

Puma Disc Inkjet Printer
ZZ 004 833 - 1 -
COMPLETE SOLUTIONS FOR ON-DEMAND CD & DVD PRODUCTION
Photo-Quality CD/DVD Inkjet Printer
OPERATING & MAINTENANCE
OPERATING & MAINTENANCE OPERATING & MAINTENANCE
OPERATING & MAINTENANCE
MANUAL
MANUALMANUAL
MANUAL

Puma Disc Inkjet Printer
ZZ 004 833 - 2 -
Thank you for purchasing the Verity Systems
Puma Disc Printer.
OPERATING & MAINTENANCE MANUAL
Document Reference No. TP 004 833 (Rev 1.01)
Production Standard
ZZ 004 833
VERITY SYSTEMS LTD VERITY SYSTEMS, INC.
2 Eastern Road 5441 Merchant Circle, Unit A
Aldershot Placerville
Hampshire California
GU12 4TD 95667
United Kingdom United States
Tel: +44 (0) 1252 317000 Tel: (530) 626-9363
Fax: +44 (0) 1252 316555 Fax: (530) 626-9395
Email: sales@veritysystems.com Email: ussales@veritysystems.us
www.veritysystems.com

Puma Disc Inkjet Printer
ZZ 004 833 - 3 -
WARNING
To avoid electrical shock hazards, unit covers should only be removed by
authorized personnel.
©
COPYRIGHT
This document is the property of Verity Systems and it may not be
reproduced, copied or exhibited to a third party without the written
permission of Verity Systems.
ENVIRONMENTAL PROTECTION
Waste electrical products should not be thrown away with household waste.
Please recycle where facilities exist.
Check with your local authority r retailer for recycling advice.
Verity Systems reserves the right to amend or modify the specifications and design criteria
applying to these products.

Puma Disc Inkjet Printer
ZZ 004 833 - 4 -
SOFTWARE WARRANTY (LIMITED)
If you discover physical defects in the media on which the software is
distributed or in the User’s Manual, Verity Systems will replace the media or
manual for a period of ninety (90) days after the purchase by the retail
customer. You must return the disk or manual to Verity Systems or an
authorized Verity Systems dealer within the warranty period accompanied by
proof of purchase.
VERITY SYSTEMS DISCLAIMS ALL IMPLIED WARRANTIES ON THE
PRODUCT, INCLUDING WITHOUT LIMITATION WARRANTIES OF
MERCHANTABILITY, PERFORMANCE AND FITNESS FOR A
PARTICULAR PURPOSE. Verity Systems WILL NOT BE LIABLE FOR ANY
BUG, ERROR, OMISSION, DEFECT, DEFICIENCY, OR NONCONFORMITY
IN ANY SOFTWARE. AS A RESULT, THE SOFTWARE IS SOLD “AS IS”,
AND THE PURCHASER ASSUMES THE ENTIRE RISK AS TO ITS
QUALITY AND PERFORMANCE.
VERITY SYSTEMS SHALL IN NO EVENT BE LIABLE FOR DIRECT,
INDIRECT, SPECIAL, INCIDENTAL, CONTINGENT OR CONSEQUENTIAL
DAMAGES RESULTING FROM ANY DEFECT IN THE SOFTWARE OR ITS
DOCUMENTATION INCLUDING DAMAGES FROM LOSS OF DATA, EVEN
IF VERITY SYSTEMS OR AN AUTHORIZED VERITY SYSTEMS DEALER
HAS BEEN ADVISED OF THE POSSIBILITY OF SUCH DAMAGES. YOU
AGREE THAT VERITY SYSTEMS’ LIABILITY, ARISING OUT OF
CONTRACT, NEGLIGENCE, STRICT LIABILITY IN TORT OR WARRANTY
SHALL NOT EXCEED ANY AMOUNTS PAID BY YOU FOR THIS
PRODUCT.
Any written or oral information or advice given by Verity Systems
dealers, distributors, agents or employees will in no way increase the
scope of this warranty. Nor may you rely on such oral or written
communication. Some states do not allow the exclusion or limitation of
implied warranties or liability for incidental or consequential damages,
so the above limitation or exclusion may not apply to you. This warranty
gives you specific legal rights, and you may also have other rights that
vary from state to state.

Puma Disc Inkjet Printer
ZZ 004 833 - 5 -
TABLE OF CONTENTS
Section 1 INTRODUCTION 7-8
1.1 Overview………………………………………………………………. 7
1.2 Features……………………………………………………………….. 7
1.3 Specifications………………………………………………………… 7-8
Section 2 BOX CONTENTS 8
Section 3 CONNECTING YOUR PUMA 9
Section 4 BUTTONS & LIGHTS 9-10
4.1 Cancel Button…………………………………………………………. 9
4.2 Print Cartridge Status Light………………………………………… 9
4.3 Resume Button & Light……………………………………………… 9
4.4 Power Button & light………………………………………………… 9
4.5 CD Tray Button……………………………………………………….. 10
Section 5 INSERTING A DISC INTO THE PUMA 10
5.1 Inserting a Standard CD/DVD………………………………………. 10
5.2 Inserting a CD Business Card & Mini Disc………………………. 10-11
Section 6 INSERTING/CHANGING PRINT CARTRIDGES 11
Section 7 INSTALLING PRINTER SOFTWARE 12-13
Section 8 INSTALLING CD LABEL DESIGNER (Graphics Software) 13
Section 9 USING CD LABEL DESIGNER & PRINTING A DISC 13-15
Section 10 SETTING PRINTER PREFERENCES 16-24
10.1 Paper/Quality……………………………………………………….…. 16-17
10.2 Basics.……………………………………………………………….…. 17-18
10.3 Colour…………………………………………………………………... 19
10.4 Services………………………………………………………………… 20
10.5 Mask Settings…………………………………………………………
20-21
10.6 Calibration……………………………………………………………... 22-24

Puma Disc Inkjet Printer
ZZ 004 833 - 6 -
Section 11 ERRORS 25
Section 12 TECHNICAL SUPPORT 26
Appendix A OTHER GRAPHICS SOFTWARE PACKAGES 27-34
CorelDRAW & Photoshop………………………………………….. 27
Create a Page………………………………………………………… 27
Introducing the Mask……………………………………………….. 27
Understanding the Mask Interface……………………………….. 28-30
Mask Type………………………………………………………. 28
Enable Mask……………………………………………………. 28
Standard Area Settings………………………………………. 29
Hub Area Settings…………………………………………….. 29-30
Mask Origin…………………………………………………….. 30
Parameter Unit…………………………………………………. 30
Templates……………………………………………………………... 30
Appendix B Recommendations & Maintenance 31-33
Standard Terms & Conditions 34-37

Puma Disc Inkjet Printer
ZZ 004 833 - 7 -
SECTION 1: INTRODUCTION
1.1 Overview
Verity Systems, world leading developers & manufacturers of optical disc duplication and printing
systems, has launched a brand new, drawer mechanism CD/DVD printer: the Puma.
Working in partnership with Hewlett-Packard, the Puma brings professional print quality to the inhouse production of CDs, DVDs, CD Business Cards and Mini CDs, delivering outstanding photo
quality images directly onto the surface of discs, enabling customers to choose colourful
backgrounds and images that reflect their company.
What’s more, the Puma has been specifically designed to provide maximum versatility and highspeed printing and can be used in a variety of settings. The PC-based Puma offers professional
desktop printing for the low volume/small business user, while the Puma can also be used in
conjunction with an autoloader or automated disc duplicator for fast, unattended printing of greater
quantities.
1.2 Features
• Professional, photo quality CD & DVD inkjet printer
• Desk-top printer
• Combine with autoloader
• Direct to surface colour inkjet printing
• Laser-sharp printing
• Perfect clean crisp graphics
• High speed printing
• 4800 dpi resolution with 16.7 million colours
• Hewlett-Packard inkjet Technology
• Genuine HP inks
• Ultra small ink drops (about 32 per dot)
1.3 Specifications
Minimum System
Requirements: Windows 2000: Pentium 133MHz, 64Mb RAM;
Windows XP: Pentium 233 MHz, 128 Mb RAM
Power Requirement: 100 to 240 VAC, 50/60Hz
Environment: Recommended operating temperature: 15 to 365 °C
Recommended operating humidity: 20 to 80% RH noncondensing
Dimensions: Width: 17.6” (447mm) Depth: 14” (356mm) Height: 6”
(152.4mm) Net Weight: 5.5kg/12.12lbs (approx. without
cartridges)
Media Support: Prints directly onto the surface of inkjet printable 120mm CDs
& DVDs, 86x61mm rectangular and 80mm x 61mm & 80mm x
x63mm saddle CD business cards & 80mm mini discs
Connectivity: Bi Universal Serial Bus. 2.0 Full Speed (USB), centronics
parallel IEEE-1284 compliant.
Maximum Resolution: Black: Up to 1200 dpi
Colour: 4800 x 1200 optimised dpi colour printing on premium
photo papers with 1200 x 1200 dpi input dpi resolution.
Full colour spectrum of 16.7 million colours.
HP PhotoREt III Colour Management System

Puma Disc Inkjet Printer
ZZ 004 833 - 8 -
Print Speed: 25% mono coverage @ normal, text quality approx.* 16
seconds per disc
25% mono coverage @ normal, inkjet quality approx.* 19
seconds per disc
100% full colour coverage @ normal, inkjet quality approx.*
24 seconds per disc
100% full colour coverage @ best Inkjet (PhotoRet) approx.*
52 seconds per disc
100% full colour coverage @ photo quality (PhotoRet),
approx.* 134 seconds per disc
(*Speeds given are approximations and are dependant on file
size, disc coverage and processing speed)
Cartridges: Dual Ink Cartridges:
C8856A Black Ink Cartridge
C8857A Tri-Colour Ink Cartridge
SECTION 2: BOX CONTENTS
Carefully remove your Verity Systems Puma from its shipping carton and verify that all parts are
present. If there are missing or damaged parts contact Verity Systems or an authorised distributor
immediately.
You should find the following:
Verity Systems Puma
Power Cable
USB Cable
Quick Start Guide
CD, including Printer Driver, User Manual, Test Image, Templates
2 Blank Printable CDs
One C8856A Black Ink Cartridge & One C8857A Tri-Colour Ink Cartridge
CD Label Designer Graphics Software CD
Note:
Be sure to remove all pieces of protective tape. Remove the tape holding down the printer
lid. Open the lid and remove the piece of foam holding the CD Tray in place.
Note:
If your Verity Systems Puma is damaged during shipment, please contact the freight carrier
first, then, contact your distributor or Verity Systems. You should save your shipping
materials so that if the need arises, you can return your Puma for service. This packaging
was designed specifically for shipping your Puma. Other packaging may not be suitable.

Puma Disc Inkjet Printer
ZZ 004 833 - 9 -
SECTION 3: POWER ON
1. Connect the power cable to the printer and plug into the power supply.
2. Power up the Puma by pressing the Power Button. (See Fig. 1)
3. The Power Button light will flash for a short period then remain illuminated.
SECTION 4: BUTTONS & LIGHTS
The Printer Buttons let you turn the printer on & off, cancel a print job, open & close tray or resume
printing. The lights give you visual clues about the status of the printer.
4.1 Print Cancel Button
Pressing the Print Cancel Button cancels the current print job.
3.2 Print Cartridge Status Light
This light flashes when a print cartridge is low in ink or incorrectly installed, or the printer’s
top cover is open.
4.3 Resume Button & Light
This light will flash when an action is required such as loading a CD or clearing a CD jam.
When the action is completed, press the Resume Button to continue printing.
The Puma also has a multiple print capability. If a multiple print command is sent from a
PC, the first CD is printed as normal. Then when the CD tray is ejected, the resume light
will flash. Place a new CD into the tray and press the Resume button. The CD tray will
retract and the CD will be printed and so on for the number of copies requested.
4.4 Power Button & Light
The Power Button turns the printer on and off. It may take a few seconds for the printer to
turn on after you press the Power button. The green light flashes when the printer is
processing.
Fig. 1
CD Tray Button
Print Cancel Button
Print Cartridge Status Light
Resume Button & Light
Power Button & Light

Puma Disc Inkjet Printer
ZZ 004 833 - 10 -
Caution!
Always use the Power button to turn the printer on and off. Using a power strip,
surge protector, or a wall-mounted switch to turn the printer on and off may cause
printer failure.
4.5 CD Tray Button
Pressing this button will slide the CD tray back and forth into the printer.
SECTION 5: INSERTING A CD INTO THE PRINTER
5.1 Standard (120mm) CDs & DVDs
With your Puma switched on, push the CD Tray Button on the front of the printer (see Fig.1
on the previous page) and the CD tray will slide out. Place a CD onto the tray ensuring that
the disc sits against the two pins at the front of the tray as shown below in Fig. 2
When you send your image to printer, the CD Tray will tray slide back into the printer and
printing will commence.
5.2 CD Business Cards & Mini Discs (option)
The Puma will also print directly onto inkjet printable CD Business Cards (rectangular and
saddle/hockey rink) and Mini Discs, via the special adaptors (Fig. 3), which can be
purchased separately (see your dealer for details). The adaptors come in two parts.
1. Open the CD tray by pressing the CD tray button on the front of the printer.
2. Place Part 1 of the adaptor onto the CD tray making sure that the 2 pins on the tray
fit snugly into the corresponding holes on the adaptor part (Fig. 4).
Position the CD so that the
edge of the CD sits against the
edge of the two pins.
Fig. 2
Fig. 3
Part 1
Part 2
Fig. 4
Fit Part 1
onto the 2
locating
pins on
the CD
tray
Puma Disc Inkjet Printer
ZZ 004 833 - 11 -
3. Open the printer cover
4. Using your hand, slowly slide the CD tray back into the printer until approximately 1
inch of the CD tray remains protruding from the front of the printer.
5. Fit Part 2 of the adaptor matching the pin on the adaptor to the hole on the CD tray
(Fig 5 & Fig. 6).
6. Close the printer cover and press the CD tray button so that the CD tray slides out.
7. Place the inkjet printable CD Business Card or Mini Disc into the adaptor, ensuring
that it sits completely flat (Fig. 6).
8. As the tray slides back into the printer, Part 2 of the adaptor closes against the discs
and holds it securely in place for printing.
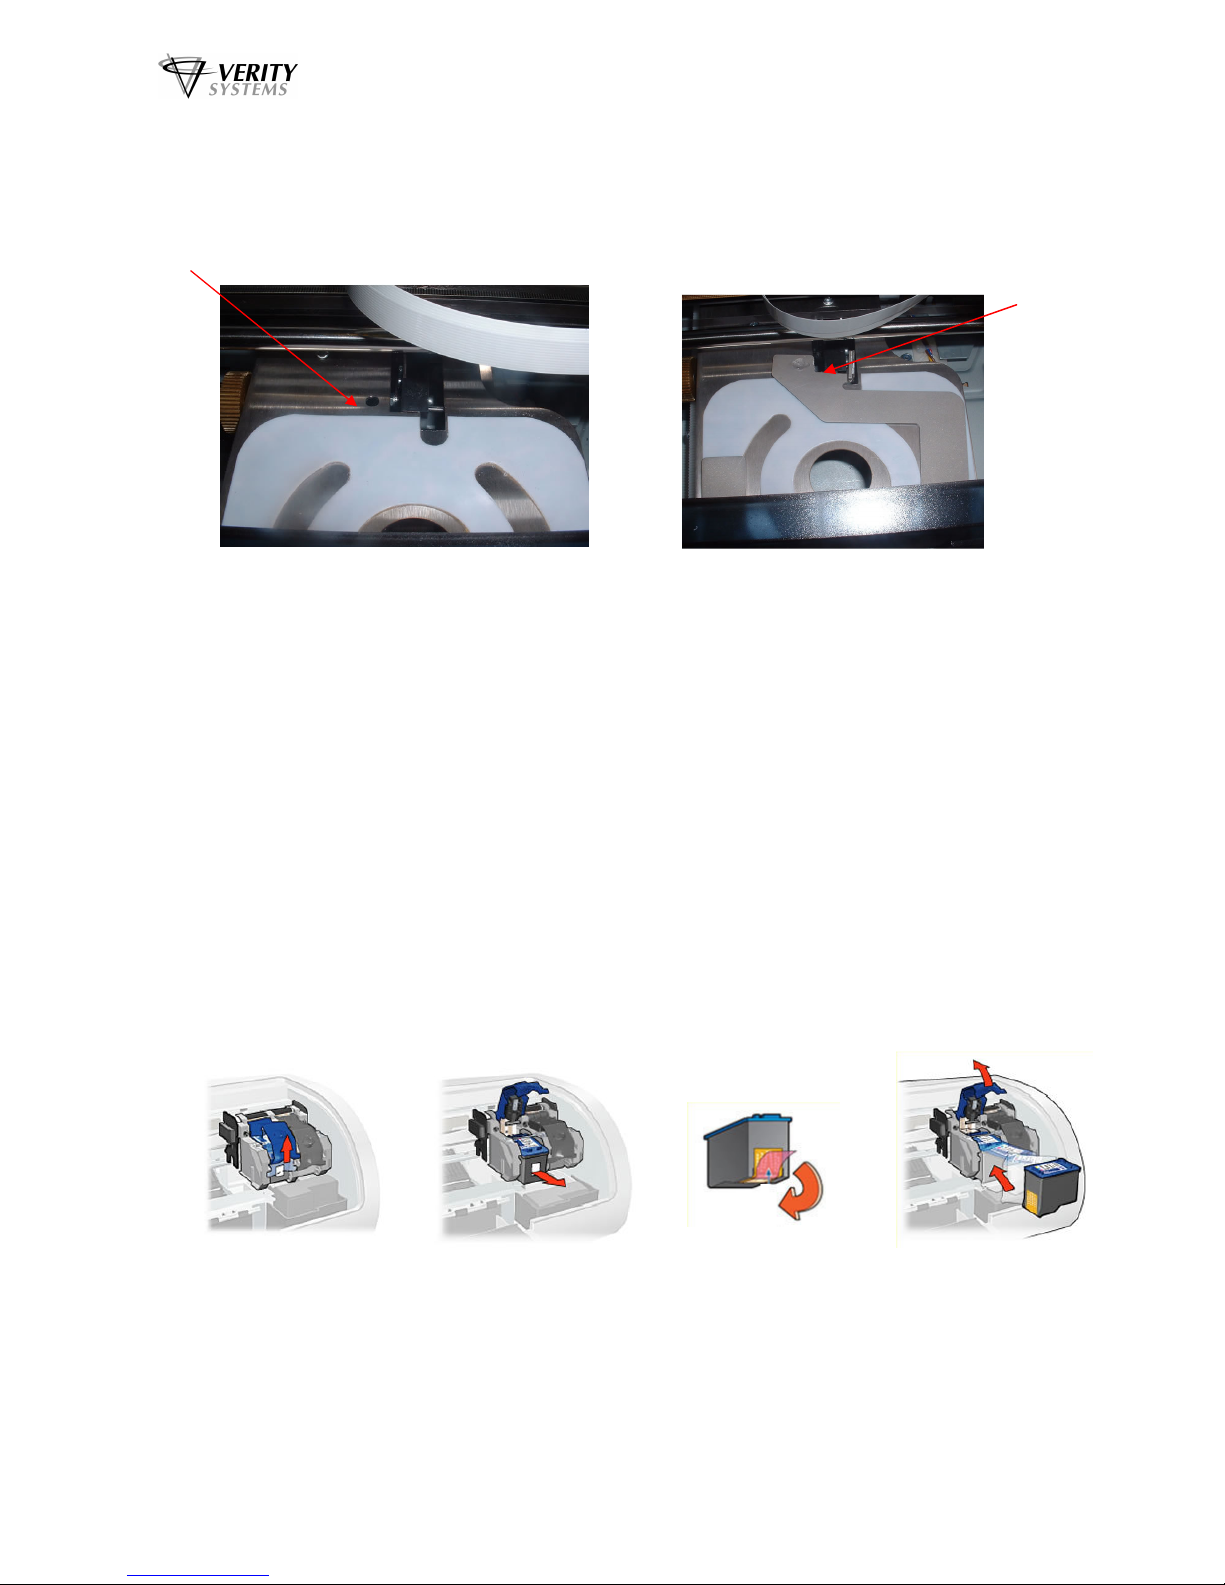
SECTION 6: INSERTING/CHANGING THE PRINT CARTRIDGES
1. Press the Power Button to turn on the printer
2. Open the top cover
3. Lift the print cartridge latch to the open position (Fig. 7)
4. Slide the print cartridge out of the cradle (Fig. 8)
5. Remove the plastic tape from the print cartridge (Fig. 9)
6. Hold the cartridge so that the copper strip is on the bottom and rear
7. Slide the cartridge firmly into the cradle, colour on the left, black on the right. (Fig. 10)
8. Push down the print cartridge latch until it snaps closed. Close the top cover.
Fig. 8 Fig. 7
Fig. 9
Fig. 10
Fig. 6 Fig. 5
Locator
hole on
CD tray
Fit
adaptor
part into
locator
hole
Puma Disc Inkjet Printer
ZZ 004 833 - 12 -
SECTION 7: INSTALLING THE PRINTER SOFTWARE
Note:
Your Puma should not be connected to your PC during the initial software installation. If
connected, remove the USB and power cables from the printer. There may be
variations in the following instructions depending on operating system (2000 or XP) and
configuration.
1. Place the Printer Driver CD into the CD-ROM drive of your PC. The Verity_Puma
installation wizard should automatically start.
2. Follow the on-screen instructions, clicking Next when prompted. When prompted, click
Install to begin installation.
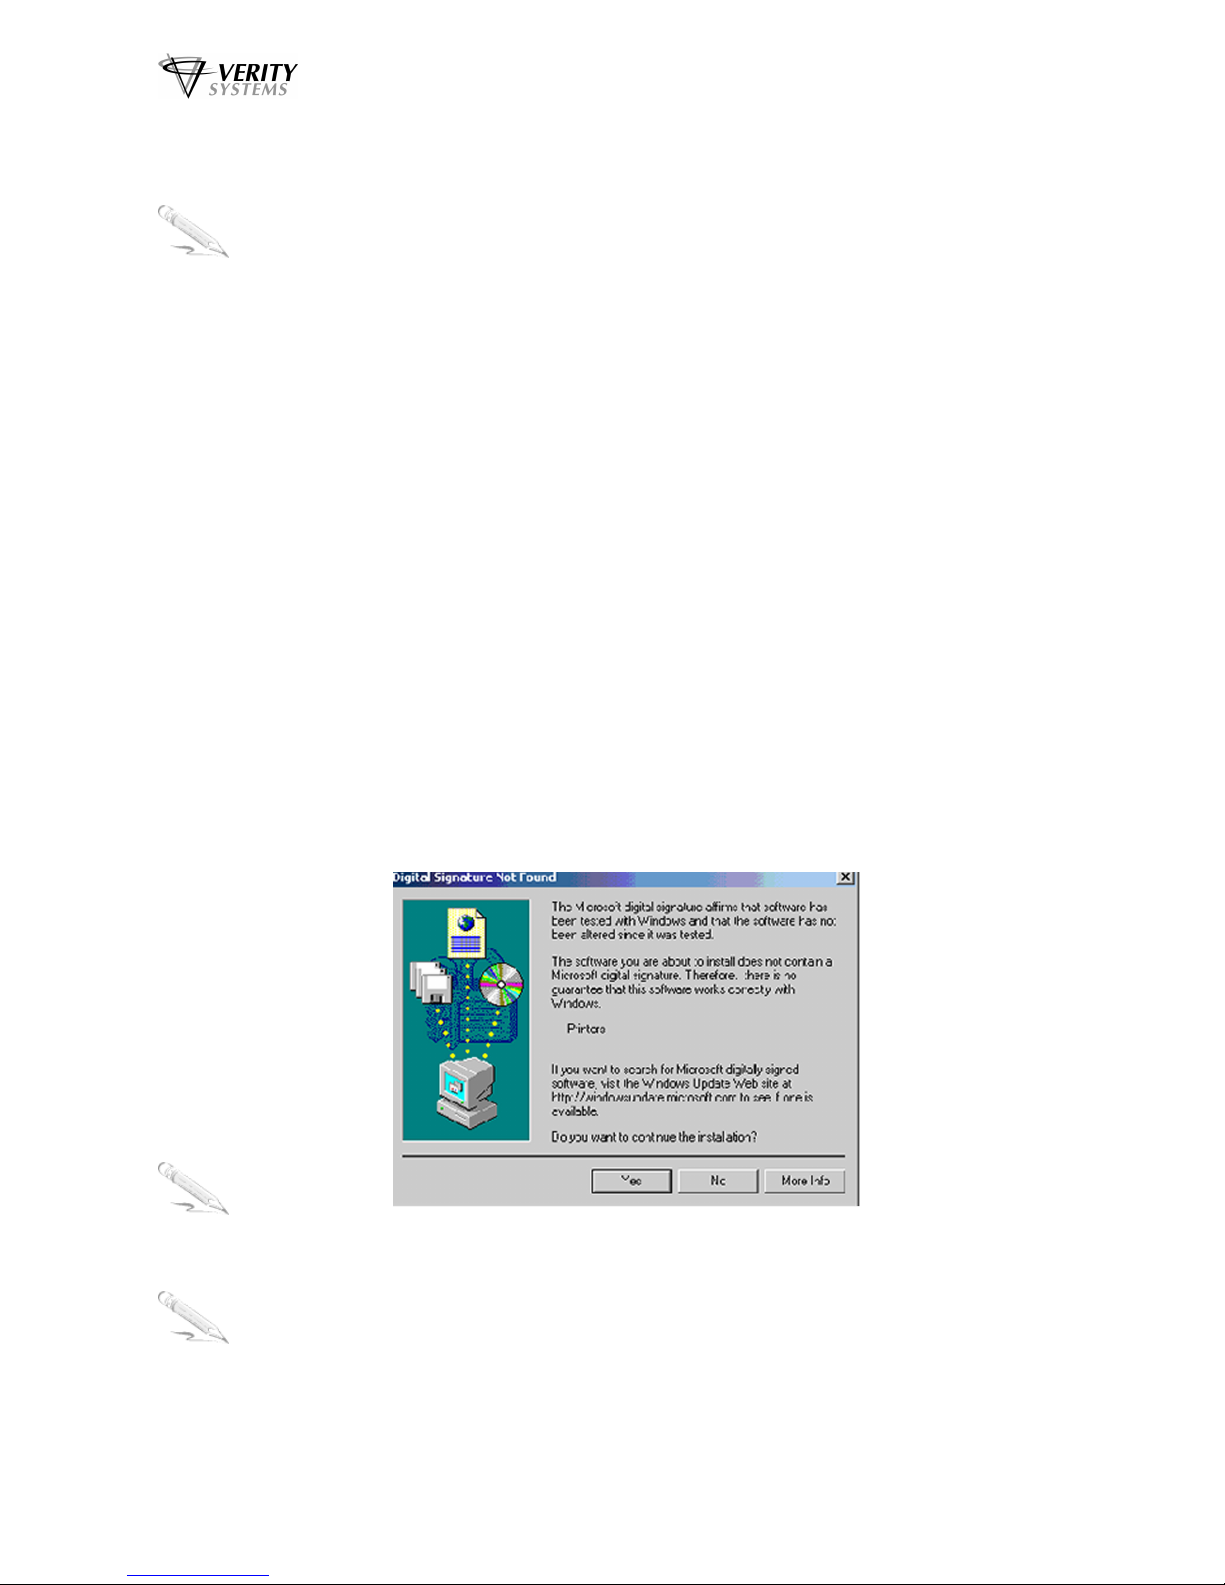
3. The Digital Signature Not Found message box will appear (see Fig.11). You will be asked if
you wish to continue installation, select Yes. In Windows XP, select Continue Anyway.
4. On the final screen click Finish.
5. Connect the Puma to your PC via the USB cable.
6. Connect the power cable to the back of the Puma and plug into the power supply. Switch on
the printer.
7. If the Digital Signature Not Found message box appears again, select Yes to continue
installation. In Windows XP, select Continue Anyway.
8. The Found New Hardware box will appear on screen, which will search for the driver. In
Windows XP select No, not at this time and click Next.
9. At the next box, select Install the software automatically (Recommended) and click Next.
10. If the Digital Signature Not Found message box appears again, select Yes to continue
installation. In Windows XP, select Continue Anyway.
11. When prompted, click Finish.
Note:
The message, which appears above, is merely precautionary from Windows and it is not
necessary to stop the installation.
Note:
If your PC does not recognize the new Puma hardware when you first connect it to your
PC, you should load the print driver via the Add Printer icon on your Printer settings:
a. Place the Print Drive CD into your PC’s CD-ROM drive
b. On you PC’s desktop, select Start, Settings and Printers
c. Double click the Add Printer icon and follow the on screen instructions
Fig. 11
 Loading...