

Verity Medical NeuroTrac Sports Operator's Manual
NeuroTrac™ Sports Operation Manual
1
NeuroTrac
™
Sports
Operators Manual
Visit our website: www .VerityMedical.co.uk for
detailed application protocols
DUAL CHANNEL STIM UNIT

NeuroTrac™ Sports Operation Manual
2
* This unit must be used with the guidance of a Physiotherapist or
Doctor
* Type BF equipment
* Do not insert lead wires into a mains power supply
* Do not immerse unit into water or any other substance
* Do not use the NeuroTrac™ Sports unit in the presence of a
flammable anaesthetic gas mixture and air or with Oxygen or Nitrous
Oxide
* If using rechargeable 9 volt PP3 Nickel Metal Hydride or Ni-Cad
batteries be sure to use a CE approved battery charger
* Never connect the NeuroTrac™ Sports unit directly to a battery
charger or any other mains powered equipment
* Patient Electrodes are for single patient use only
* Keep out of reach of children
* Do not use this stimulator on your facial area unless you are under
strict guidance from a qualified Clinician
Warnings
Revised Issue Date: 01/07/2002 Document Number ECS401-OM002-5

NeuroTrac™ Sports Operation Manual
3
Contents Page
Warnings 2
What is STIM 4
Contra Indications & Precautions 5
Description of STIM Unit & Functions 6
Quick Start Instructions 7
Sports Treatment Programmes 9
Electrode Types & Tips 17
Care & Maintenance 18
Applications 19
Specifications 20
Warranty 21
Clinical References 22
Contents

NeuroTrac™ Sports Operation Manual
4
Neuromuscular Stimulation has been used for many years to stimulate muscle
and nerve fibres to treat a number of muscle and nerve related conditions.
Over the last 30 years numerous clinical trials and papers have been written.
The NeuroTrac™ Sports is one of a new breed of modern Neuromuscular
Stimulators which Verity Medical have developed with the Therapist and
Patient in mind. Our principle aim is to design products that have high levels of
functional use, are sensibly priced, compact and user friendly.
The NeuroTrac™ Sports is a dual channel device combining several treatment
programmes into one unit. Neuromuscular Stimulation is increasingly
understood by Therapists and Doctors. There is a better understanding of the
mechanisms which exist between nerves and muscles that makes it possible to
stimulate the neuromuscular system with precise electrical signals. The
NeuroTrac™ Sports offers precision giving full control of Pulse Widths, Rates,
Ramp up times, Work / Rest cycles as well as alternating or synchronous
application if two channels are being applied.
Customer Care
W e welcome constructive comments regarding our equipment particularly those
that might help us to improve existing features, add new ones or develop new
products for the future.
What is STIM?

NeuroTrac™ Sports Operation Manual
5
Before using this equipment you must first seek the advice of your
Physiotherapist or Doctor .
Read this operating manual before using the STIM unit
STIM should not be used:
* By patients fitted with a demand style cardiac pacemakers unless so
advised by their Doctor
* During pregnancy [unless medically advised]
* By patients with undiagnosed pain conditions
* With patients who have diminished mental capacity or physical
competence who cannot handle the device properly
* On anaesthetised or desensitised skin
* When driving a vehicle or operating potentially dangerous
equipment
* Do not place electrodes:
* Over carotid sinus nerves
* Over larynx or trachea
* Inside mouth
* Over the area of the heart unless so advised by your Doctor
* On your facial area unless under strict guidance from a
qualified Clinician
* The patient should use the unit only as prescribed
* Do not immerse the unit in water or any other liquid
* Keep unit out of reach of children
Contra Indications & Precautions
NeuroTrac™ Sports Operation Manual
6
* PRG button Selects the desired set programme from P01 - P15 or
customised programme PC1 - PC3.
* SET button Displays the menu and changes the parameters for
Pulse Rate, Pulse Width, Time, Work, Rest, Ramp up
time, ChA / ChB Synchronous or Alternating and delay
for custom programmes.
* ESC button Stores customised programme and returns to the
home position.
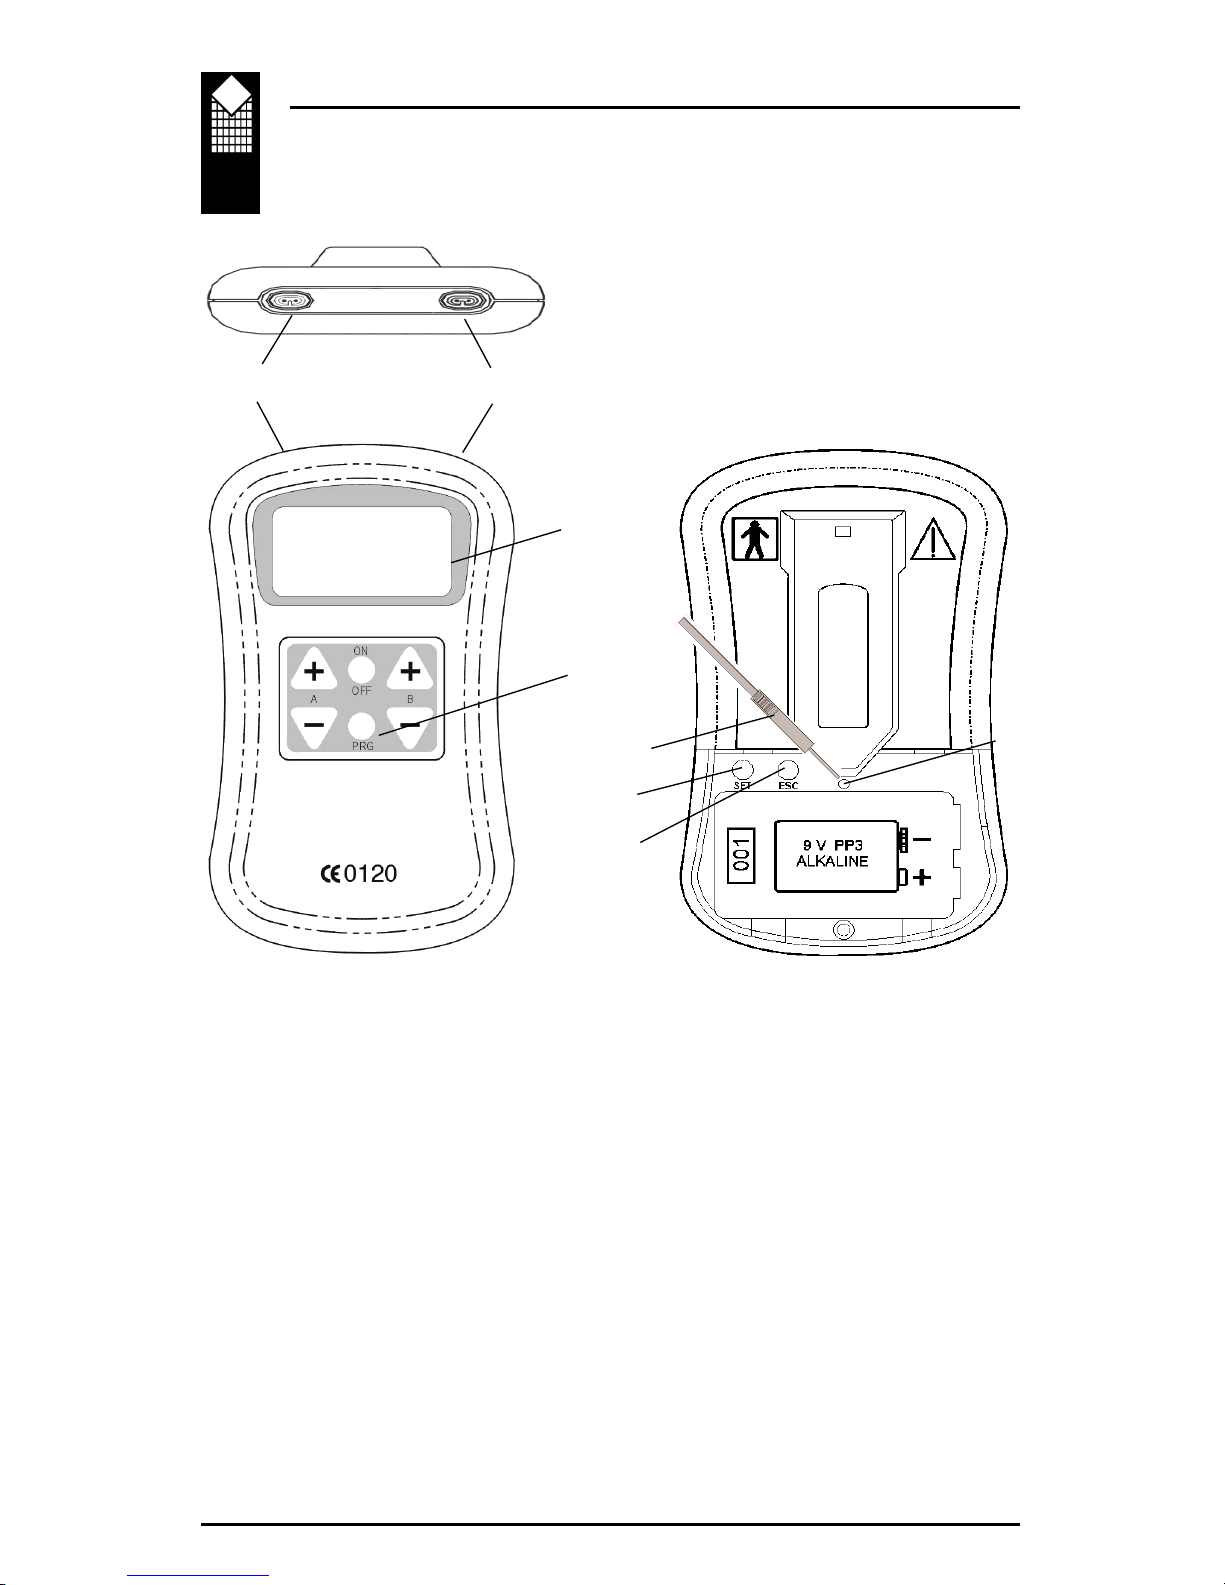
Description of STIM Unit &
Functions
NeuroTrac™
Sports
Front Rear
LCD
Display
Select
Programme
Lock
Channel A Channel B
Ch.B
Ch.A
Lead Wire
and Pin
SET
ESC

NeuroTrac™ Sports Operation Manual
7
1. Insert a 9 volt PP3 Alkaline battery. Alternatively insert a
rechargeable Nickel Metal Hydride battery {which has a much
longer life than the Ni-Cad rechargeable batteries} into the battery
compartment.
2. Insert lead wire/s to Channel A and B if you are using two channels.
3. Switch on the unit by pressing the on/off button on the front of the
unit.
4. Press the PRG button to select one of the pre-set programmes P01 -
P15 or PC1 - PC3 for the customised programmes (see page 8 for
customised programmes).
5. When you have selected one of the programmes, (P01 - P15, PC1 -
PC3) press the + button/s to start the programme and to increase the
mA intensity.
6. To stop the programme press the on/off button which will
turn the unit off.
Lock Button
A "concealed" Lock button is included in the NeuroTrac™ Sports which
allows the clinician to accurately monitor "Home Compliance" of the patent
between appointments. It also locks the customised or built in programmes.
To Lock the Unit
1. Select the built in or customised programme required. In the case of
a customised programme, make sure that the pulse width, frequency,
time etc. are set-up correctly.
2. Remove the battery cover and, using a thin rod gently press on the
lock button as shown in the diagram on page 6 until you hear a
double beep. The unit is now "locked" and cannot be altered until
"unlocked"
To Unlock the Unit
Remove the battery cover and press the concealed switch with a thin rod until a
single beep is heard. Now the LCD will display the average mA used on each
channel and the total hours the unit has been in use as shown in the diagram.
To return to normal "unlocked" operation, simply press the ESC button.
Hours Used 45
20mA 20mA
Ch.A Ch.B
Quick Start Instructions

NeuroTrac™ Sports Operation Manual
8
Setting up the Customised Programme PC1, PC2 or PC3
Remove the battery cover where you will see two buttons SET and ESC, these
buttons are used to set up a customised programme.
First press the ESC button to return to the home screen
1. Press the SET button and the Hz symbol will flash on/off, then press
the + or – button on the front panel to adjust the Pulse Rate.
2. Press the SET button again and the µS symbol will flash on/off, then
press the + or – button to adjust the Pulse Duration from 50 to 450 µS
3. Press the SET button again and the Clock [Time] symbol will flash on/
off, then press the+ or – button to adjust the time Channel A +/- button
to alter the hours and Channel B +/- button to adjust minutes.
[Maximum time 1 hour 30 minutes].
4. Press the SET button again and the WRK [Work] symbol will flash on/
off, then press the + or – button to adjust the work period from 2 –99
seconds.
5. Press the SET button again and the RST [Rest] symbol will flash on/
off, then press the + or – button to adjust the rest period 2 – 99 seconds.
6. Press the SET button again and the RMP [Ramp up] symbol will flash
on/off, then press the + or - button to adjust the ramp up period from
0.1 - 9.9 seconds.
7. Press the SET button again and ALT [Alternating] or SYN
[Synchronous] symbol will flash on/off, then press the + or – button to
select ALT or SYN.
8. If SYN [Synchronous] has been selected, press the SET button again to
set the required delay time of Ch. B stimulation after Ch. A one. DLY
will flash on the LCD display. Select the delay by pressing the Ch. B +/
- buttons to read the appropriate delay value (between 0.1 sec. and 4
sec)
After setting up the programme, press the ESC button to install and store the
customised programme. Repeat the above procedure to re-programme.
Note: You must press the ESC button before locking the unit.
 Loading...