

Page 1

VERITAS NetBackup™ 6.0
for DB2
System Administrator’s Guide
for Windows
N152668
September 2005
Page 2

Disclaimer
The information contained in this publication is subject to change without notice. VERITAS Software
Corporation makes no warranty of any kind with regard to this manual, including, but not limited to,
the implied warranties of merchantability and fitness for a particular purpose. VERITAS Software
Corporation shall not be liable for errors contained herein or for incidental or consequential damages
in connection with the furnishing, performance, or use of this manual.
VERITAS Legal Notice
Copyright © 2005 VERITAS Software Corporation. All rights reserved. VERITAS, the VERITAS Logo,
and NetBackup are trademarks or registered trademarks of VERITAS Software Corporation or its
affiliates in the U.S. and other countries. Other names may be trademarks of their respective owners.
Portions of this software are derived from the RSA Data Security, Inc. MD5 Message-Digest
Algorithm. Copyright 1991-92, RSA Data Security, Inc. Created 1991. All rights reserved.
VERITAS Software Corporation
350 Ellis Street
Mountain View, CA 94043
USA
Phone 650-527-8000
Fax 650-527-2908
www.veritas.com
Third-Party Copyrights
For a list of third-party copyrights, see the NetBackup Release Notes appendix.
ii NetBackup for DB2 System Administrator’s Guide for Windows
Page 3

Contents
Preface . . . . . . . . . . . . . . . . . . . . . . . . . . . . . . . . . . . . . . . . . . . . . . . . . . . . . . . . . . . . . . ix
Getting Help . . . . . . . . . . . . . . . . . . . . . . . . . . . . . . . . . . . . . . . . . . . . . . . . . . . . . . . . . . . . . . ix
Accessibility Features . . . . . . . . . . . . . . . . . . . . . . . . . . . . . . . . . . . . . . . . . . . . . . . . . . . . . . xi
Comment on the Documentation . . . . . . . . . . . . . . . . . . . . . . . . . . . . . . . . . . . . . . . . . . . .xii
Chapter 1. Introduction . . . . . . . . . . . . . . . . . . . . . . . . . . . . . . . . . . . . . . . . . . . . . . . . . . 1
NetBackup for DB2 Features . . . . . . . . . . . . . . . . . . . . . . . . . . . . . . . . . . . . . . . . . . . . . . . . .2
NetBackup for DB2 Overview . . . . . . . . . . . . . . . . . . . . . . . . . . . . . . . . . . . . . . . . . . . . . . . .4
Finding NetBackup Documentation . . . . . . . . . . . . . . . . . . . . . . . . . . . . . . . . . . . . . . . ix
Accessing the VERITAS Technical Support Web Site . . . . . . . . . . . . . . . . . . . . . . . . . .x
Contacting VERITAS Licensing . . . . . . . . . . . . . . . . . . . . . . . . . . . . . . . . . . . . . . . . . . . xi
NetBackup for DB2 Components . . . . . . . . . . . . . . . . . . . . . . . . . . . . . . . . . . . . . . . . . . .4
NBDB2 Vendor I/O Library . . . . . . . . . . . . . . . . . . . . . . . . . . . . . . . . . . . . . . . . . . . .4
User Exit Program . . . . . . . . . . . . . . . . . . . . . . . . . . . . . . . . . . . . . . . . . . . . . . . . . . . .5
Backup and Recovery Wizards . . . . . . . . . . . . . . . . . . . . . . . . . . . . . . . . . . . . . . . . . .5
Sample Configuration File (db2.conf) and Script Files . . . . . . . . . . . . . . . . . . . . . .5
NetBackup for DB2 Terminology Notes . . . . . . . . . . . . . . . . . . . . . . . . . . . . . . . . . . . . .7
Chapter 2. Verifying Prerequisites and Registering the License Key . . . . . . . . . . . . 9
Verifying the Installation Prerequisites . . . . . . . . . . . . . . . . . . . . . . . . . . . . . . . . . . . . . . . .9
Operating System and Platform Compatibility . . . . . . . . . . . . . . . . . . . . . . . . . . . . . . .9
NetBackup Software . . . . . . . . . . . . . . . . . . . . . . . . . . . . . . . . . . . . . . . . . . . . . . . . . . . .10
Database Software . . . . . . . . . . . . . . . . . . . . . . . . . . . . . . . . . . . . . . . . . . . . . . . . . . . . . .10
Cluster Software . . . . . . . . . . . . . . . . . . . . . . . . . . . . . . . . . . . . . . . . . . . . . . . . . . . . . . . .11
iii
Page 4

Registering the License Key . . . . . . . . . . . . . . . . . . . . . . . . . . . . . . . . . . . . . . . . . . . . . . . . . 12
Specifying Log Archiving . . . . . . . . . . . . . . . . . . . . . . . . . . . . . . . . . . . . . . . . . . . . . . . . . . 13
Adding New DB2 Instances . . . . . . . . . . . . . . . . . . . . . . . . . . . . . . . . . . . . . . . . . . . . . . . . 14
Chapter 3. Configuration . . . . . . . . . . . . . . . . . . . . . . . . . . . . . . . . . . . . . . . . . . . . . . . 17
User Interface Terminology Notes . . . . . . . . . . . . . . . . . . . . . . . . . . . . . . . . . . . . . . . . . . . 17
Configuring the Maximum Jobs Per Client . . . . . . . . . . . . . . . . . . . . . . . . . . . . . . . . . . . . 18
Configuring Backup Policies . . . . . . . . . . . . . . . . . . . . . . . . . . . . . . . . . . . . . . . . . . . . . . . . 19
Planning NetBackup for DB2 Policies and Schedules . . . . . . . . . . . . . . . . . . . . . . . . 19
Adding a New Policy . . . . . . . . . . . . . . . . . . . . . . . . . . . . . . . . . . . . . . . . . . . . . . . . . . . 20
Description of Attributes . . . . . . . . . . . . . . . . . . . . . . . . . . . . . . . . . . . . . . . . . . . . . 21
Adding Schedules . . . . . . . . . . . . . . . . . . . . . . . . . . . . . . . . . . . . . . . . . . . . . . . . . . . . . . 22
Types of Backup Schedules . . . . . . . . . . . . . . . . . . . . . . . . . . . . . . . . . . . . . . . . . . . 25
Schedule Properties . . . . . . . . . . . . . . . . . . . . . . . . . . . . . . . . . . . . . . . . . . . . . . . . . . 26
Adding Clients . . . . . . . . . . . . . . . . . . . . . . . . . . . . . . . . . . . . . . . . . . . . . . . . . . . . . . . . . 28
Adding Backup Selections . . . . . . . . . . . . . . . . . . . . . . . . . . . . . . . . . . . . . . . . . . . . . . . 29
Configuring Policies for Archive Logs and Configuration Files . . . . . . . . . . . . . . . . . . 31
Backing up the Archive Logs . . . . . . . . . . . . . . . . . . . . . . . . . . . . . . . . . . . . . . . . . . . . . 31
Backing up the Configuration Files . . . . . . . . . . . . . . . . . . . . . . . . . . . . . . . . . . . . . . . 33
Specifying the Master Server for a NetBackup for DB2 Client . . . . . . . . . . . . . . . . . 36
Configuring the Runtime Environment . . . . . . . . . . . . . . . . . . . . . . . . . . . . . . . . . . . . . . . 37
Creating a db2.conf File . . . . . . . . . . . . . . . . . . . . . . . . . . . . . . . . . . . . . . . . . . . . . . . . . 37
Example db2.conf File . . . . . . . . . . . . . . . . . . . . . . . . . . . . . . . . . . . . . . . . . . . . . . . . 39
Archiving Log Files with the User Exit Program . . . . . . . . . . . . . . . . . . . . . . . . . . . . 40
Using ARCFUNC SAVE . . . . . . . . . . . . . . . . . . . . . . . . . . . . . . . . . . . . . . . . . . . . . . 41
Using ARCFUNC COPY . . . . . . . . . . . . . . . . . . . . . . . . . . . . . . . . . . . . . . . . . . . . . 42
Using ROLLFORWARD DATABASE With ARCFUNC SAVE or ARCFUNC
COPY . . . . . . . . . . . . . . . . . . . . . . . . . . . . . . . . . . . . . . . . . . . . . . . . . . . . . . . . . . . . . . 42
Keyword Summary . . . . . . . . . . . . . . . . . . . . . . . . . . . . . . . . . . . . . . . . . . . . . . . . . . 43
Environment Variables . . . . . . . . . . . . . . . . . . . . . . . . . . . . . . . . . . . . . . . . . . . . . . . . . . 45
Enabling Database User Authentication . . . . . . . . . . . . . . . . . . . . . . . . . . . . . . . . . . . . . . 47
iv NetBackup for DB2 System Administrator’s Guide for Windows
Page 5

Creating Templates and Shell Scripts . . . . . . . . . . . . . . . . . . . . . . . . . . . . . . . . . . . . . . . . .48
Understanding Templates and Shell Scripts . . . . . . . . . . . . . . . . . . . . . . . . . . . . . . . .48
Templates . . . . . . . . . . . . . . . . . . . . . . . . . . . . . . . . . . . . . . . . . . . . . . . . . . . . . . . . . . .48
Shell Scripts . . . . . . . . . . . . . . . . . . . . . . . . . . . . . . . . . . . . . . . . . . . . . . . . . . . . . . . . .48
Specifying the NetBackup Master Server from the Client . . . . . . . . . . . . . . . . . . . . .48
Creating a Backup Template Using the NetBackup for DB2 Backup Wizard . . . . 49
Browsing for the DB2 Instance to Back Up . . . . . . . . . . . . . . . . . . . . . . . . . . . . . . .49
Using the NetBackup for DB2 Backup Wizard . . . . . . . . . . . . . . . . . . . . . . . . . . .51
Creating Shell Scripts Using bpdbsbdb2 . . . . . . . . . . . . . . . . . . . . . . . . . . . . . . . . . . .52
Creating DB2 Scripts Manually . . . . . . . . . . . . . . . . . . . . . . . . . . . . . . . . . . . . . . . . . . .54
Instructions for Modifying Scripts . . . . . . . . . . . . . . . . . . . . . . . . . . . . . . . . . . . . . .54
Script Parameters . . . . . . . . . . . . . . . . . . . . . . . . . . . . . . . . . . . . . . . . . . . . . . . . . . . .55
Storing Templates and Scripts . . . . . . . . . . . . . . . . . . . . . . . . . . . . . . . . . . . . . . . . . . . .55
Templates . . . . . . . . . . . . . . . . . . . . . . . . . . . . . . . . . . . . . . . . . . . . . . . . . . . . . . . . . . .55
Shell Scripts . . . . . . . . . . . . . . . . . . . . . . . . . . . . . . . . . . . . . . . . . . . . . . . . . . . . . . . . .56
Storing Templates and Scripts in a NetBackup Cluster . . . . . . . . . . . . . . . . . . . .56
Testing Configuration Settings . . . . . . . . . . . . . . . . . . . . . . . . . . . . . . . . . . . . . . . . . . . . . .57
Backing up the Database and Archive Logs . . . . . . . . . . . . . . . . . . . . . . . . . . . . . . . . . . .57
Chapter 4. Using NetBackup for DB2 . . . . . . . . . . . . . . . . . . . . . . . . . . . . . . . . . . . . . 59
Performing a Backup . . . . . . . . . . . . . . . . . . . . . . . . . . . . . . . . . . . . . . . . . . . . . . . . . . . . . . .60
Overview . . . . . . . . . . . . . . . . . . . . . . . . . . . . . . . . . . . . . . . . . . . . . . . . . . . . . . . . . . . . . .60
Performing a Backup from the NetBackup Master Server . . . . . . . . . . . . . . . . . . . . .61
Automatic Backup of a DB2 Policy . . . . . . . . . . . . . . . . . . . . . . . . . . . . . . . . . . . . .61
Manual Backup of a DB2 Policy . . . . . . . . . . . . . . . . . . . . . . . . . . . . . . . . . . . . . . . .61
Performing a User-directed Backup from the NetBackup for DB2 Client . . . . . . . . 62
Running a NetBackup for DB2 Backup Template . . . . . . . . . . . . . . . . . . . . . . . . .62
Using DB2 Template Administration . . . . . . . . . . . . . . . . . . . . . . . . . . . . . . . . . . .62
Using bpdbsbdb2 . . . . . . . . . . . . . . . . . . . . . . . . . . . . . . . . . . . . . . . . . . . . . . . . . . . .64
Using DB2 to Perform a Backup . . . . . . . . . . . . . . . . . . . . . . . . . . . . . . . . . . . . . . . .64
v
Page 6

Browsing Backups . . . . . . . . . . . . . . . . . . . . . . . . . . . . . . . . . . . . . . . . . . . . . . . . . . . . . . . . . 66
Using the Backup, Archive, and Restore Interface to Browse . . . . . . . . . . . . . . . . . 66
Using bplist to Browse . . . . . . . . . . . . . . . . . . . . . . . . . . . . . . . . . . . . . . . . . . . . . . . . . . 67
Example 1 . . . . . . . . . . . . . . . . . . . . . . . . . . . . . . . . . . . . . . . . . . . . . . . . . . . . . . . . . . 67
Example 2 . . . . . . . . . . . . . . . . . . . . . . . . . . . . . . . . . . . . . . . . . . . . . . . . . . . . . . . . . . 69
Example 3 . . . . . . . . . . . . . . . . . . . . . . . . . . . . . . . . . . . . . . . . . . . . . . . . . . . . . . . . . . 69
Performing a Restore . . . . . . . . . . . . . . . . . . . . . . . . . . . . . . . . . . . . . . . . . . . . . . . . . . . . . . 70
Using the NetBackup for DB2 Template on the Client . . . . . . . . . . . . . . . . . . . . . . . 70
Using the NetBackup for DB2 Recovery Wizard . . . . . . . . . . . . . . . . . . . . . . . . . 70
Using bpdbsbdb2 . . . . . . . . . . . . . . . . . . . . . . . . . . . . . . . . . . . . . . . . . . . . . . . . . . . . 72
Using DB2 to Perform a Restore . . . . . . . . . . . . . . . . . . . . . . . . . . . . . . . . . . . . . . . . . . 73
Recovering a DB2 Database - Simplest Case . . . . . . . . . . . . . . . . . . . . . . . . . . . . . 73
Recovering a DB2 Database - Restoring Archive Logs . . . . . . . . . . . . . . . . . . . . 74
RESTORE DATABASE Command Options . . . . . . . . . . . . . . . . . . . . . . . . . . . . . 76
Performing an Alternate Restore . . . . . . . . . . . . . . . . . . . . . . . . . . . . . . . . . . . . . . . . . 77
When to Use an Alternate Restore . . . . . . . . . . . . . . . . . . . . . . . . . . . . . . . . . . . . . 77
Preparing the Master Server for an Alternate Restore . . . . . . . . . . . . . . . . . . . . . 79
Performing the Alternate Restore on the Clients . . . . . . . . . . . . . . . . . . . . . . . . . 80
Chapter 5. NetBackup for DB2 with Advanced Client . . . . . . . . . . . . . . . . . . . . . . . 85
Installation and Licensing Requirements . . . . . . . . . . . . . . . . . . . . . . . . . . . . . . . . . . . . . 86
NetBackup for DB2 with Advanced Client Overview . . . . . . . . . . . . . . . . . . . . . . . . . . . 87
Snapshot Backup . . . . . . . . . . . . . . . . . . . . . . . . . . . . . . . . . . . . . . . . . . . . . . . . . . . . . . . 87
Instant Recovery . . . . . . . . . . . . . . . . . . . . . . . . . . . . . . . . . . . . . . . . . . . . . . . . . . . . . . . 87
Offhost Backup . . . . . . . . . . . . . . . . . . . . . . . . . . . . . . . . . . . . . . . . . . . . . . . . . . . . . . . . 87
Proxy Copy . . . . . . . . . . . . . . . . . . . . . . . . . . . . . . . . . . . . . . . . . . . . . . . . . . . . . . . . . . . . 87
File-based Operations . . . . . . . . . . . . . . . . . . . . . . . . . . . . . . . . . . . . . . . . . . . . . . . . . . . 88
Stream-based Operations . . . . . . . . . . . . . . . . . . . . . . . . . . . . . . . . . . . . . . . . . . . . . 89
File-based Operations . . . . . . . . . . . . . . . . . . . . . . . . . . . . . . . . . . . . . . . . . . . . . . . . 90
How Does NetBackup for DB2 with Advanced Client Work? . . . . . . . . . . . . . . . . . . . . 91
vi NetBackup for DB2 System Administrator’s Guide for Windows
Page 7

Sequence of O peration: Backup . . . . . . . . . . . . . . . . . . . . . . . . . . . . . . . . . . . . . . . . . . . 91
Sequence of Operation: Restore . . . . . . . . . . . . . . . . . . . . . . . . . . . . . . . . . . . . . . . . . . .91
Database Objects Supported by Advanced Backup Methods . . . . . . . . . . . . . . . . . . 92
Multistreaming . . . . . . . . . . . . . . . . . . . . . . . . . . . . . . . . . . . . . . . . . . . . . . . . . . . . . . . . .92
Example: Using Multiple Channels for a DB2 Command with Proxy Method . . . 93
Configuring Snapshot Backups . . . . . . . . . . . . . . . . . . . . . . . . . . . . . . . . . . . . . . . . . . . . . .94
Configuration Requirements . . . . . . . . . . . . . . . . . . . . . . . . . . . . . . . . . . . . . . . . . . . . .94
Configuring a DB2 Policy with Advanced Client Backup Methods . . . . . . . . . . . . 95
Configuring a Snapshot Policy . . . . . . . . . . . . . . . . . . . . . . . . . . . . . . . . . . . . . . . . . 95
Restoring Data from a Snapshot Backup . . . . . . . . . . . . . . . . . . . . . . . . . . . . . . . . . . . . . .99
Restoring Individual Files . . . . . . . . . . . . . . . . . . . . . . . . . . . . . . . . . . . . . . . . . . . . . . . .99
Restoring Volumes and File Systems Using Snapshot Rollback . . . . . . . . . . . . . . . . 99
Troubleshooting . . . . . . . . . . . . . . . . . . . . . . . . . . . . . . . . . . . . . . . . . . . . . . . . . . . .101
Advanced Client Effects . . . . . . . . . . . . . . . . . . . . . . . . . . . . . . . . . . . . . . . . . . . . . . . . . . .102
Types of Backups . . . . . . . . . . . . . . . . . . . . . . . . . . . . . . . . . . . . . . . . . . . . . . . . . . . . . .102
Schedule Properties . . . . . . . . . . . . . . . . . . . . . . . . . . . . . . . . . . . . . . . . . . . . . . . . . . . .103
Templates and Scripts . . . . . . . . . . . . . . . . . . . . . . . . . . . . . . . . . . . . . . . . . . . . . . . . . .103
Using NetBackup for DB2 with Advanced Client . . . . . . . . . . . . . . . . . . . . . . . . . . . . .104
Performing Backups . . . . . . . . . . . . . . . . . . . . . . . . . . . . . . . . . . . . . . . . . . . . . . . . . . . .104
Server-Directed Backups . . . . . . . . . . . . . . . . . . . . . . . . . . . . . . . . . . . . . . . . . . . . .104
User-Directed Backups Using Templates . . . . . . . . . . . . . . . . . . . . . . . . . . . . . . .104
User-Directed Backups Using bpdb2proxy . . . . . . . . . . . . . . . . . . . . . . . . . . . . .104
Performing Restores . . . . . . . . . . . . . . . . . . . . . . . . . . . . . . . . . . . . . . . . . . . . . . . . . . . .105
User-Directed Restores Using Templates . . . . . . . . . . . . . . . . . . . . . . . . . . . . . . .105
User-Directed Restores Using bpdb2proxy . . . . . . . . . . . . . . . . . . . . . . . . . . . . .105
Restoring from a Snapshot Backup . . . . . . . . . . . . . . . . . . . . . . . . . . . . . . . . . . . .105
Chapter 6. Troubleshooting . . . . . . . . . . . . . . . . . . . . . . . . . . . . . . . . . . . . . . . . . . . . 107
NetBackup Reports . . . . . . . . . . . . . . . . . . . . . . . . . . . . . . . . . . . . . . . . . . . . . . . . . . . . . . .108
Enabling Logging . . . . . . . . . . . . . . . . . . . . . . . . . . . . . . . . . . . . . . . . . . . . . . . . . . . . . .108
vii
Page 8

Accessing the Log Files . . . . . . . . . . . . . . . . . . . . . . . . . . . . . . . . . . . . . . . . . . . . . . . . . 109
bphdb Folder on the Client . . . . . . . . . . . . . . . . . . . . . . . . . . . . . . . . . . . . . . . . . . 109
bpdb2 Folder on the Client . . . . . . . . . . . . . . . . . . . . . . . . . . . . . . . . . . . . . . . . . . 109
bpdbsbdb2 Folder on the Client . . . . . . . . . . . . . . . . . . . . . . . . . . . . . . . . . . . . . . 109
NetBackup Server Reports . . . . . . . . . . . . . . . . . . . . . . . . . . . . . . . . . . . . . . . . . . . . . . 110
Setting the Debug Level . . . . . . . . . . . . . . . . . . . . . . . . . . . . . . . . . . . . . . . . . . . . . . . . . . . 1 10
Minimizing Timeout Failures on Large Database Restores . . . . . . . . . . . . . . . . . . . . . 111
Using NET_BUFFER_SZ to Speed Up a Slow Restore . . . . . . . . . . . . . . . . . . . . . . . . . 111
False Restore Failures Reported in the Activity Monitor . . . . . . . . . . . . . . . . . . . . . . . 112
Reason Codes . . . . . . . . . . . . . . . . . . . . . . . . . . . . . . . . . . . . . . . . . . . . . . . . . . . . . . . . . . . . 112
Appendix A. Configuration for a DB2 EEE (DPF) Environment . . . . . . . . . . . . . . . 123
Installing NetBackup for DB2 . . . . . . . . . . . . . . . . . . . . . . . . . . . . . . . . . . . . . . . . . . . . . . 123
Configuring NetBackup for DB2 . . . . . . . . . . . . . . . . . . . . . . . . . . . . . . . . . . . . . . . . . . . . 123
Creating DB2 Scripts or Templates for a DB2 EEE Environment . . . . . . . . . . . . . . . . 123
Appendix B. Using NetBackup for DB2 with SAP® . . . . . . . . . . . . . . . . . . . . . . . . 125
Installation of the DB2 User Exit Program . . . . . . . . . . . . . . . . . . . . . . . . . . . . . . . . . . . 126
Backup and Restore of DB2 Databases . . . . . . . . . . . . . . . . . . . . . . . . . . . . . . . . . . . . . . 126
Archive and Restore of DB2 Log Files . . . . . . . . . . . . . . . . . . . . . . . . . . . . . . . . . . . . . . . 126
Backup of SAP Files . . . . . . . . . . . . . . . . . . . . . . . . . . . . . . . . . . . . . . . . . . . . . . . . . . . . . . 127
Index . . . . . . . . . . . . . . . . . . . . . . . . . . . . . . . . . . . . . . . . . . . . . . . . . . . . . . . . . . . . . . 129
viii NetBackup for DB2 System Administrator’s Guide for Windows
Page 9

Preface
This guide d escribes how to install, configure, a nd u s e N etBackup for D B 2 o n a Windows
platform. For information about the NetBackup server software, see one of the following
platform-specific manuals:
◆ NetBackup System Administrator’s Guide for UNIX and Linux, Volumes I and II
◆ NetBackup Syste m Administrator’s Guide for Windows, Volumes I and II
Getting Help
You can find answers to questions and get help from the NetBackup documentation and
from the VERITAS technical support web site.
Finding NetBackup Documentation
A list of the entir e Ne tBackup do cumenta tion s et appea rs as an appendix in the NetBackup
Release Notes. All NetBackup documents are included in PDF format on the NetBackup
Documentation CD.
For definitions of NetBackup terms, consult the online glossary.
▼ To access the NetBackup online glossary
1. In the NetBackup Administration Console, click Help > Help Topics.
2. Click the Contents tab.
3. Click Glossary of NetBackup Terms.
Use the scroll function to navigate through the glossary.
ix
Page 10

Getting Help
Accessing the VERITAS Technical Support Web Site
The address for the VERITAS Technical Support Web site is http://support.veritas.com.
The VERITAS Support Web site lets you do an y of the following:
◆ Obtain updated information about NetBackup for DB2, including system
requirements, supported platforms, and supported peripherals
◆ Contact the VERITAS Technical Support staff and post questions to them
◆ Get the latest patches, upgrades, and utilities
◆ View the NetBackup for DB2 Frequently Asked Questions (FAQ) page
◆ Search the knowledge base for answers to technical support questions
◆ Receive automatic notice of product updates
◆ Find out about NetBackup for DB2 training
◆ Read current white papers related to NetBackup for DB2
From http://support.veritas.com, you can complete various tasks to obtain specific types
of support for NetBackup for DB2:
1. Subscribe to the VERITAS Email notification service to be informed of software alerts,
newly published documentation, Beta programs, and other services.
a. From the main http://support.veritas.com page, select a product family and a
product.
b. Under Support Resources, click Email Notifications.
Your customer profile ensures you receive the latest VERITAS technical
information pertaining to your s p ecific interests.
2. Locate the telephone support directory at http://support.veritas.com by clicking the
Phone Support icon. A page appears that contains VERITAS support numbers from
around the world.
Note Telephone support for NetBackup for DB2 is only available with a valid support
contract. To contact VERITAS for technical support, dial the appropriate phone
number listed on the Technical Support Guide included in the product box and
have your product license information ready for quick navigation to the proper
support group.
3. Contact technical support using e-mail.
x NetBackup for DB2 System Administrator’s Guide for Windows
Page 11

a. From the main http://support.veritas.com page, click the E-mail Support icon.
A wizard guides you to do the following:
◆ Select a language of your preference
◆ Select a produ ct and a platform
◆ Provide additional contact and product information, and your message
◆ Associate your message with an existing technical support case
b. After providing the required information, click Send Message.
Contacting VERITAS Licensing
For license information, you can conta c t us as follows:
◆ Call 1-800-634-4747 and select option 3
◆ Fax questions to 1-650-527-0952
◆ In the Americas, send e-mail to amercustomercare@veritas.com.
In the Asia and Pacific areas, send email to apaccustomercare@veritas.com.
In all other areas, send email to internationallicense@veritas.com.
Accessibility Features
Accessibility Features
NetBackup contains features that make the user interface easier to use by people who are
visually impaired and by people who have limited dexterity. A ccessibility features
include:
◆ Support for assistive technolog ie s such as screen readers and voice input (Windows
servers only)
◆ Support for keyboard (mouseless) navigation using accelerator keys and mnemonic
keys
For more information, see the NetBackup Installation Guide.
xi
Page 12

Comment on the Documentation
Comment on the Documentation
Let us know what you like and dislike about the documentation. Wer e you able to find the
information you needed quickly? Was the information clearly presented? You can report
errors and omissions or tell us what you would find useful in future versions of our
manuals and online help.
Please include the following information with your comment:
◆ The title and product version of the manual on which you are commenting
◆ The topic (if relevant) on which you are commenting
◆ Your comment
◆ Your name
Email your comment to NBDocs@veritas.com.
Please only use this address to comment on product documentation. See “Getting Help”
in this preface for information on how to contact Technical Support about our software.
We appreciate your feedback.
xii NetBackup for DB2 System Administrator’s Guide for Windows
Page 13

Introduction
NetBackup for DB2 integrates the database backup and recovery capabilities of DB2 with
the backup and recovery management capabilities of NetBackup.
This chapter introduces NetBackup for DB2 and how it relates to both DB2 and
NetBackup. This chapter includes the following sections:
◆ NetBackup for DB2 Features
◆ NetBackup for DB2 Overview
◆ NetBackup for DB2 Terminology Notes
1
1
Page 14

NetBackup for DB 2 Fea tu r e s
NetBackup for DB2 Features
The following list shows NetBackup f or DB2’s main features and introduces some terms
used in the NetBackup for DB2 documentation. Fo r more information on general
NetBackup terminology , see the NetBackup System Administration Guide, Volume I.
Feature Description
Media and device All devices supported by Media Manager are av a ila ble to Ne tBa c ku p
management for DB2.
Scheduling facilities NetBackup scheduling facilities on the master server can be used to
schedule automatic and unattended DB2 backups.
This also lets you choose the times when these operations can occur.
For example, to prevent interfer ence with normal day time operations,
you can schedule your database backups to occur only at night.
Multiplexed backups and NetBackup for DB2 lets you take advantage of NetBackup’s
restores multiplexing capabilities. Multiplexing directs multiple data streams
to one backup device, thereby reducing the time necessary to
complete the operation.
Transparent execution of All backups and restores run simultaneously and transparently
both DB2 and regular file without any action from the NetBackup administrator.
system backup and restore
operations
Sharing the same Media It is possible to share the same devices and media used for other
Manager and disk storage backups or to give DB2 exclusive use of certain devices and media.
units used for other file
backups
Centralized and networked From the NetBackup master server, you can schedule database
backup operations backups or start them manually for any client. The DB2 databases can
2 NetBackup for DB2 System Administrator’s Guide for Windows
The database administrator can run database backup and restore
operations through NetBackup. Alternatively, you can use DB2
commands as if Ne tBackup were not present.
An administrator or any other authorized user can use NetBackup to
run database backup s and restores.
also reside on hosts that are different from the devices on which
NetBackup stores the backups.
Page 15

NetBackup for DB2 Fe atures
Feature Description
Graphical user interface s NetBackup provides the following graphical u ser i nt erfa c es for client
users and administrators:
◆ Backup, Archive, and Restore user interface
◆ NetBackup Administration Console for Java
◆ NetBackup Administration Console for Windows
A database administrator or NetBackup administrator can start
backup operations for DB2 from the NetBackup graphical user
interface on the master server.
A database ad minis trat or ca n also u se the I BM DB2 Cont r ol Cen ter or
Command Line Processor to start user-directed backup and restore
operations.
Parallel backup and restore NetBackup for DB2 supports the parallel backup and restore
operations capabilities of the DB2 commands. For example, this permits the user
to run more than on e tape de vic e at a time fo r a single DB2 bac kup or
restore, thereby reducing the t ime necessary to comple te the
operation.
Templates The NetBackup for DB2 database wizards can create backup and
recovery templates. You can launch the Backup Wizard and the
Recovery Wizard from the NetBackup Backup, Archive, and Restore
interface. The wizards gen era te pl atform-in depen dent t emplates t ha t
contain configuration information that the software u ses whe n
performing backups and restores. Because the wizard-generated
templates do not support all the features native to DB2, you might
want to write a customized backup or restore script in an
operating-system defined scri ptin g la ngu a ge. You can use a template
as the base for a script.
Chapter 1, Introduction 3
Page 16
NetBackup for D B2 O ve r v ie w
NetBackup for DB2 Overview
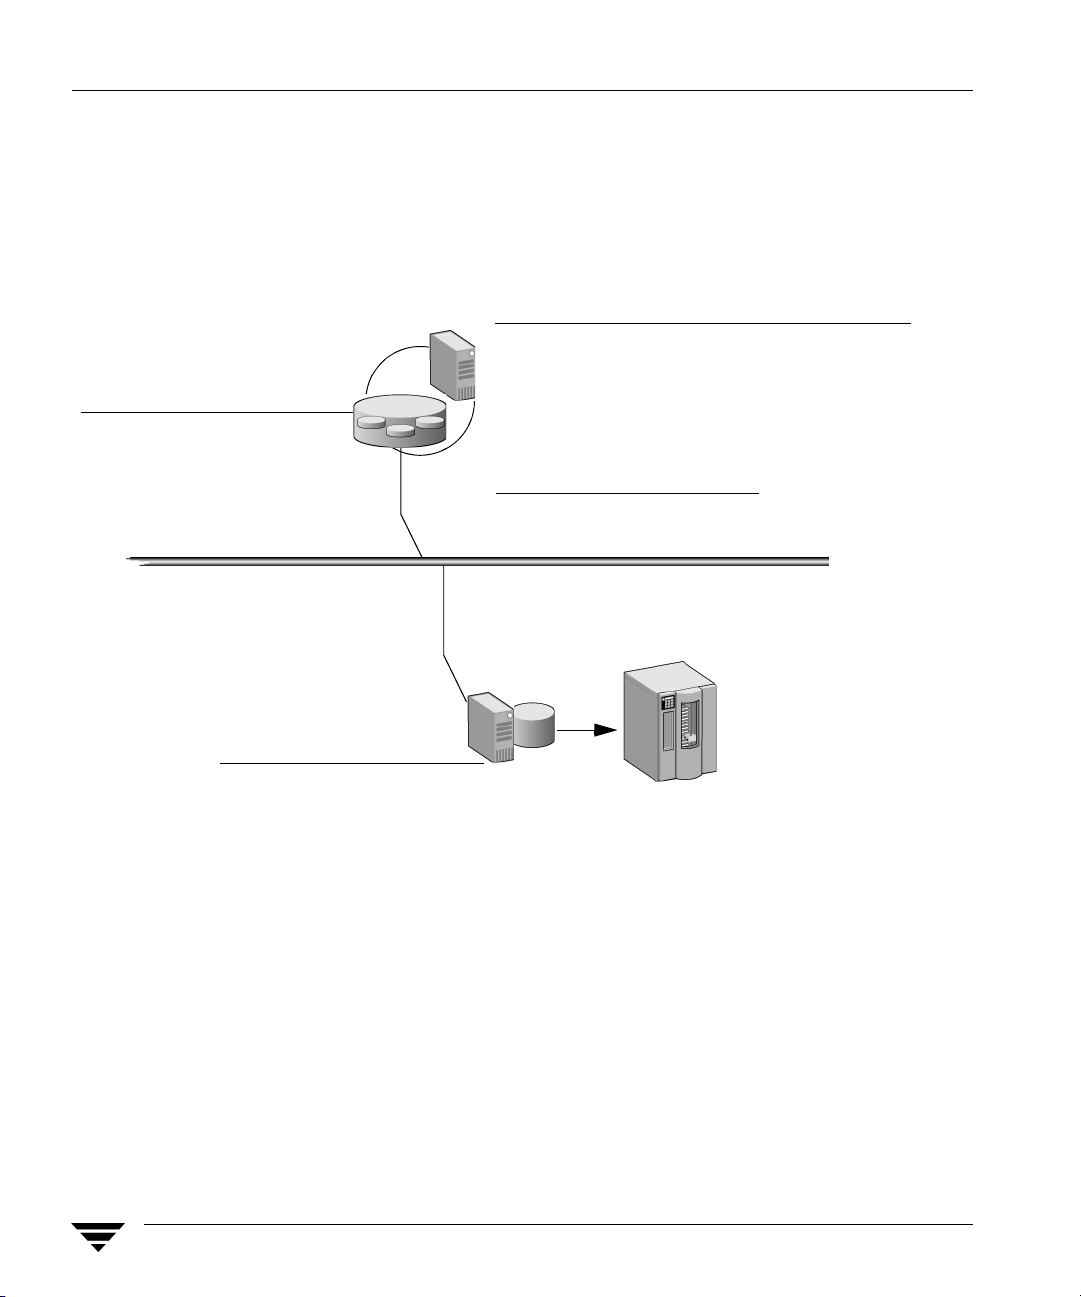
The following example network shows the major components in a NetBackup for DB2
configuration. The server that is hosting the DB2 database must be a NetBackup client,
and it must have NetBackup for DB2 licensed .
System hosting the DB2 database
NetBackup for DB2 supplies:
DB2 database
DB2 database software supplies:
– Commands:
BACKUP DATABASE,
RECOVER DATABASE (DB2 8.2 and later)
RESTORE DATABASE
ROLLFORWARD DATABASE
Network (TCP/IP)
Additional required NetBackup software:
– NBDB2 Vendor I/O Library
– GUI for browsing databases and creating
backup and restore templates
– Sample configuration file (db2.conf)
– Sample script files
– User exit program (db2uext2.exe)
– NetBackup Client
NetBackup master server Media Manager or
or remote media server disk storage unit
NetBackup software:
– NetBackup Master Server
– NetBackup Media Server
(if system is a media server)
NetBackup for DB2 Components
The following sections describe the main NetBackup components in a NetBackup for DB2
environment.
NBDB2 Vendor I/O Library
The DB2 BACKUP and RESTORE commands use the NBDB2 vendor I/O library to send
data buffers between a DB2 database and NetBackup.
The vendor library is install_path\NetBackup\bin\nbdb2.dll. For example:
4 NetBackup for DB2 System Administrator’s Guide for Windows
Page 17

NetBackup for DB 2 Overview
C:\Program Files\Veritas\NetBackup\bin\nbdb2.dll.
You specify the library as the argument to the LOAD parameter of the DB2 BACKUP and
RESTORE commands.
User Exit Program
The NetBackup for DB2 user exit program, db2uext2.exe, provides one method for
backing up and restoring the DB2 archive log f iles. This occurs at the following times:
◆ When the DB2 BACKUP or ROLLFORWARD commands are used to back up or restore
databases.
◆ When the user exits the database by using the DB2 TERMINATE or DISCONNECT
command.
◆ When the log file fills and DB2 starts writing transactions to another log file.
◆ The DB2 ARCHIVE LOG co mmand is issued.
The user exit program backs up and restores the archive logs as files. The user exit
program resides in %DB2_INSTANCE%\bin\db2uext2.exe . If you are using 64 -bit
DB2, the file is called db2uext2.64. NetBackup for DB2 supports this m ethod for
protecting the archive logs in all supported DB2 releases.
There are other methods for backing up archive log files. For more information on these
methods, see “Specifying Log Archiving” on page 13.
Backup and Recovery Wizards
NetBackup for DB2 provides wizards that enable you to create backup and recovery
templates. You invoke the wizards by browsing for and selecting a DB2 database object in
the Backup, Archive, and Restore interface. After you supply the appropriate information
about the operation, the wizard creates a template that you can run immediately or store
on the server (for backup templates). You can use the stored backup templates in
scheduled backups through a NetBackup policy, or you can use them to perform manual
backups on the NetBackup for DB2 client.
Sample Configuration File (db2.conf) and Script Files
The installation software installs the following sample files:
◆ A sample configuration file (db2.conf file)
The db2.conf file includes specifications for backups and restores, and it provides
information on policies and schedules. The NetBackup for DB2 library and user exit
program use the information in this file.
Chapter 1, Introduction 5
Page 18

NetBackup for D B2 O ve r v ie w
◆ Sample backup and restore scripts
NetBackup can invoke a script to perform a scheduled ba ckup or restore of a DB2
database. The scripts contain DB 2 BACKUP or RESTORE commands for use with
NetBackup.
Alternatively, users can use the NetBackup for DB2 wizards to create backup and
restore templates. You ca n use the templates in place of scripts, and you can convert
templates into scripts.
The installation software writes these sample files to the f ollowing location:
install_path\NetBackup\dbext\db2\samples
To use the sample files, copy the sample files to working directories and modify them f or
your own use.
6 NetBackup for DB2 System Administrator’s Guide for Windows
Page 19

NetBackup for DB 2 Overview
NetBackup for DB2 Terminology Notes
DB2 supports two methods for archiving its log files: through a user exit program and
through a vendor library . DB2 supports backing up the archive log files by using a vendor
library in its 8.2 and later releases. NetBackup for DB2 supplies a user exit program and a
library to support both of these methods.
The DB2 syntax for specifying these archive log methods differs from release to release.
This manual uses the terms user exit and VENDOR to differentiate the methods. The
following table shows the DB2 syntax you can use to specify these methods within DB2
and indicates the term this manual uses to describe each method:
DB2 Syntax for Log Archiving and NetBackup for DB2 Terminology
NetBackup for DB2 uses the term user exit
to describe these DB2 settings:
LOGARCHMETH1=LOGRETAIN
LOGARCHMETH1=USEREXIT
USEREXIT=ON
USEREXIT=YES
LOGRETAIN=ON
LOGRETAIN=RECOVERY
NetBackup for DB2 uses the term
VENDOR to describe this DB2 setting:
LOGARCHMETH1=VENDOR:...\library
When VENDOR is used, archive logs are backed up by means of the NetBackup for DB2
vendor library. The full specification for this archive log method i s as f ollows:
LOGARCHMETH1=VENDOR:install_path\NetBackup\bin\nbdb2.dll.
When a user exit program is used, archive logs are backed up by means of the NetBackup
for DB2 user exit program. The DB2 syntax for specifying the user exit program includes
the USEREXIT and LOGRETAIN keywords specified in a configurati on parameter.
Chapter 1, Introduction 7
Page 20

NetBackup for D B2 O ve r v ie w
8 NetBackup for DB2 System Administrator’s Guide for Windows
Page 21

Verifying Prerequisites and Registering the License Key
This chapter describes how to perform the following ta sks:
◆ Verifying the installation prerequisites for NetBackup for DB2. Perform this task
before enabling this agent.
The NetBackup for DB2 software is installed when you insta ll NetBackup, so verify
these prerequisites before enabling NetBackup for DB2.
◆ Registering the license key for NetBackup for DB2.
◆ Enabling functions specific to NetBackup for DB2.
Verifying the Installation Prerequisites
Before enabling NetBackup for DB2, verify that you are installing the agent on a
supported operating system or platform and that requirements are met for the NetBackup
software, the database agent, and, if applicable, the cluster software. These requirements
apply for remote and local installations.
Operating System and Platform Compatibility
2
Verify that NetBackup for DB2 will be installed on an operating system or platform
supported by NetBackup. A compatibility list for database agents is available on the
Technical Support web site.
▼ To verify compatibility
1. Go to the Technical Support web page: http://support.veritas.com.
2. From the Select Product Family list, click NetBackup Products.
3. From the Select Product list in the right pane, click NetBackup Enterprise Server.
4. Under Support Resources, click Compatibility and Reference.
9
Page 22

Verifying the Installation Prerequisites
5. In the list of documents, click NetBackup Enterprise Server (tm)/ Server x.x Database
Agent Compatibility (updated date).
For x.x, look for the current release. For date, look for the most recent date.
For information on supported cluster environments for NetBackup for DB2, see
NetBackup (tm) x.x Cluster Compatibility (updated date).
6. Click on the link for the PDF document, which is a downloadable file that enables you
to view the supported database spreadsheet for this release.
7. Read the document and verify that the software in your environment is compatible
with the NetBackup and NetBackup for DB2 software.
NetBackup Software
Veri fy that the following requirements are met for the NetBackup server and client
software:
❏ The NetBackup server software is installed and operational on the NetBackup server.
The NetBackup server platform can be any of those that NetBackup supports. For
installation information, see the NetBackup Installation Guide.
❏ The NetBackup client software is installed on the client where you will be backing up
the databases. This step also installs NetBackup for DB2.
In addition, the install_path\NetBackup directory must exist on the client. On
Windows platforms, the NetBackup for DB2 software is installed along with the
server and client software. For installation inform ation, see the NetBackup Installation
Guide.
❏ Make sure that you have configured backup media in a Media Manager or disk
storage unit. The amount of backup media required depends on the devices used, the
sizes of the databases that you are backing up, the amount of data that you are
archiving, the size of your backups, and the frequency of backups or archives. For
information on using Media Ma nager, see the NetBackup Media Manager System
Administrator’s Guide.
Database Software
Verify the following regarding the database software on the NetBackup client:
❏ DB2 vendor software must be installed and operational.
❏ One or more DB2 instances must exist.
10 NetBackup for DB2 System Administrator’s Guide for Windows
Page 23

Verifying the Installation Prerequisites
Caution In a DB2 EEE environment, install the NetBackup client software on every node
and client that DB2 uses.
For information on installing DB2 and creating instances, see your DB2 documentation.
Cluster Software
Verify t he following requirements if you are enabling the NetBackup for DB2 software on
a NetBackup server configured in a NetBackup cluster:
❏ The DB2 vendor software is installed and o perational on each node to which
NetBackup can failover.
❏ The NetBackup server software is installed and configured to work in a NetBackup
cluster. Follow the instructions in the NetBackup Installation Guide.
The NetBackup server installation procedure installs the NetBackup for DB2 software
along with the server and client software. After all other prerequisites are met, you
only need to register the license key for the agent on each NetBackup server in order
to enable the agent.
Chapter 2, Verifying Prerequisites and Registering the License Key 11
Page 24

Registering the License Key
Registering the License Key
NetBackup for DB2 is installed with the server and client software. To use this agent,
register a valid license key for it on the master or media server. In a NetBackup cluster,
register the key on each node on which the NetBackup server is ins talled.
▼ To register a license key
1. On the master or media server, open the NetBackup Administration Console.
2. Choose Help > License Keys.
3. Click the New button.
4. Type in the license key and click Add.
For information on adding license keys, see the NetBackup System Administrator’s
Guide, Volume I.
12 NetBackup for DB2 System Administrator’s Guide for Windows
Page 25

Specifying Log Archiving
DB2 can write database archive logs in several different ways. For a rollforward recovery,
you need both the database itself and the archive logs from the backup media. The
procedure in this section explains how to specify a method for DB2 to use when backing
up the DB2 archive logs.
You can use the procedure in this section to specify an archive method in DB2, or you can
use the information in the procedure to determine how your established archive method
will interact with NetBackup for DB2.
Note This manual u ses the terms user exit and VENDOR to describe the methods that DB2
supports for log archiving. Read “NetBackup for DB2 Terminology Notes” on
page 7 to ensure that you understand how the terms are used in this manual.
▼ To specify an archive method
1. Quiesce the DB2 database.
This procedure, and the configuration procedur es in the next chapter, should be done
in sequence at a time when minimal changes are being made to the DB2 database.
2. Decide on a method for specifying the archive logs.
Specifying Log Archiving
DB2 provides several methods for backing up its archive log files. The DB2
parameters that specify an archive log method include the LOGRETAIN, USEREXIT,
and LOGARCHMETH1 keywords. Depending on the DB2 release you are using, there
are different methods for specifying these parameters. DB2 supports different syntax
for these parameters in different relea ses. For mor e information on the ef fe cts of these
parameters within DB2, or on the specific syntax for specifying these parameters, see
your IBM DB2 documentation.
Chapter 2, Verifying Prerequisites and Registering the License Key 13
Page 26

Adding New DB2 Instances
The following list explains the effects of the different log archiving methods on
NetBackup for DB2 operations:
Method Notes and Effects
VENDOR Only the DB2 8.2 release allows you to specify this log archive method. The
User exit Any DB2 release allows you to specify this archive method. The syntax for
syntax is as follows:
LOGARCHMETH1=VENDOR:install_path\NetBackup\bin\nbdb2.dll
If you use this method, note the following:
◆ The ar chiv e log s ar e b acke d up as part of the da tabase, s o you do n ot n eed a
separate NetBackup policy for them.
◆ NetBackup for DB2 backs up and restores the archive log files as a byte
stream. This me t ho d uses the DB2 Backup an d Restore (BAR) API .
specifying the user exit method differs across DB2 releases.
NetBackup for DB2 includes a user exit program that you can use to back up the
archive logs. If your DB2 configuration uses the USEREXIT or LOGRETAIN
keywords in its configuration parameters, note the following:
◆ You will need to configure one of the following: (1) a separate NetBackup
MS-Window s-NT policy f or back ing up the ar chive l ogs or (2) dir ect ories for
the user exit program to use when copying the archive logs and a separate
Netbackup MS-Windows-NT policy for backing up these directories.
Another alternative to (1) and (2) would be to modify an existing Netbackup
MS-Window s-N T polic y wi th a user b acku p sc hed ule to inc lude t he a rchive
log directories. The configuration procedures in the next chapter explain
how to perform these tasks.
◆ NetBackup for DB2 backs up and restores the archive log files as individual
files.
◆ Supported only for backward compatibility.
3. V er ify your DB2 configuration to ensure that the appropriate log archiving method for
your site is enabled.
If necessary, edit your DB2 configuration specificat ions to specify the log archiving
method.
Adding New DB2 Instances
At installation, the NetBackup for DB2 in stallation software writes the user exit program
to the following location:
install_path\NetBackup\dbext\DB2\db2uext2.exe
14 NetBackup for DB2 System Administrator’s Guide for Windows
Page 27

Adding New DB2 Instances
For example:
C:\Program Files\IBM\SQLLIB\bin\db2uext2.exe
DB2 expects the db2uext2 executable to reside in the DB2 installation location .
If you reinstall or move the DB2 installa tion, manually copy db2uext2.exe from the
NetBackup location into the DB2 location.
Chapter 2, Verifying Prerequisites and Registering the License Key 15
Page 28

Adding New DB2 Instances
16 NetBackup for DB2 System Administrator’s Guide for Windows
Page 29

Configuration
Before attempting to configure NetBackup for DB2, complete the installation procedure as
described in the Installation chapter.
The following is the configuration procedure.
1. Configuring the Maximum Jobs Per Client
2. Configuring Backup Policies
3. Configuring Policies for Archive Logs and Configuratio n Files
4. Configuring the Ru nt i me Env i ronment
5. Enabling Database User Authentication
6. Creating Te mplates and Shell Scripts
7. Testing Configuration Settings
The following subsections describe these steps.
3
User Interface Terminology Notes
You can perform many of the configuration steps in this chapter from the NetBackup
Administration Console on the master server. Depending on your master server’s
platform, the console is available in one or t wo forms. NetBackup supports a Java
interface for both Windows and UNIX master servers. In addition, NetBackup supports a
Windows interface for Windows master servers.
The Java and Windows interfaces are nearly identical, but when there are interface
differences in the configuration procedures, this manual uses the following headings to
identify the interface being described:
From the Windows interface:
From the Java interface:
17
Page 30

Configuring the Maximum Jobs Per Client
Configuring the Maximum Jobs Per Client
▼ To configure the Maximum jobs per client
1. In the left pane of the NetBackup Administration Console, expand Host Properties.
2. Select Master Server.
3. In the right pane, double-click on the server icon.
The Master Server Properties dialog box displays.
4. In the Master Server Properties dialog box, click Global Attributes.
5. Change the Maximum jobs per client value to 99.
The Maximum jobs per client specifies the maximum number of concurr ent backups
allowed per client. The default is 1. You can use the following formula to calculate a
smaller value:
Maximum jobs per client = number_of_sessions X number_of_policies
number_of_sessions The number of backup sessions between the backup
server and Ne tBack up on the clie nt. Eac h sepa rate sessi on
starts a new backup job on t he client.
number_of_policies The number of policies of any type that can back up this
client at the same time. This number can be greater than
one. For example, a client can be in two policies in order
to back up two different databases. These backup
windows can overlap.
Tip Enter a large enough value for the Maximum jobs per client attribute to meet the
number of jobs executed by DB2. You might need to experiment with different
values at your site.
18 NetBackup for DB2 System Administrator’s Guide for Windows
Page 31

Configuring Backup Policies
A NetBackup policy defines the backup criteria for a specific group of one or more clients.
These cr iteria include:
◆ Storage unit and media to use
◆ Policy attributes
◆ Backup schedules
◆ Clients to be backed up
◆ Backup templates or script files to be run on the clients
To use NetBackup for DB2, you need to define at least one DB2 policy with the
appropriate schedules. A configuration can have a single policy that includes all clients, or
there can be many policies, some of which include only one client.
Most requirements for DB 2 policies are the same as for file system backups. In addition to
the attributes described here, there are other attributes for a policy to consider. For
configuration instructions and information on all the attributes available, see the
NetBackup System Administrator’s Guide, Volume I.
Configuring Backup Policies
Planning NetBackup for DB2 Policies and Schedules
The following table summarizes the types of NetBackup policies and schedules to create:
For this type of data: Specify this type Specify this type of schedule:
of policy:
DB2 database
DB2 transaction logs
DB2
DB2
(if using VENDOR)
Chapter 3, Configuration 19
Required schedule:
◆ Application Backup (Default-Application-Backup)
Optional schedules
(Note: the following schedules are required if you are
using the Advanced Client or if you want to perform
scheduled backups):
◆ Automatic Full Backup
◆ Automatic Differential Incremental Backup
◆ Automatic Cumulative Incrementa l B ackup
Required schedule:
◆ Application Backup (Default-Application-Backup)
Page 32

Configuring Backup Policies
For this type of data: Specify this type Specify this type of schedule:
DB2 transaction logs MS-Windows-NT Required Schedule:
(if using user exit)
DB2 configuration files MS-Windows-NT Optional schedules:
At a minimum, specify one DB2 policy w ith an Application Backup schedule.
If you are using DB2 EEE, see “Configuration for a DB2 EEE (DPF) Environment” on
page 123 for information on creating po licies for the catalog nodes and the noncatalog
nodes.
of policy:
◆ User Backup
◆ Full Backup
◆ User Backup
These schedules are reco mmen ded for ba cking u p
your configuration files in case of a disaster. For
information on files to include in this policy, see your
database documentation.
Adding a New Policy
▼ To add a new policy
1. Log on to the master server as administrator (Windows) or root (UNIX).
2. Start the NetBackup Administration Console.
3. If your site has more than one master server, choose the one on which you want to
add the policy.
4. From the Windows interface: In the left pane, right-click Policies and choose New
Policy.
From the Java interface: In the left pane, click Policies. In the All Policies pane,
right-click the master server, and click New.
The Add a New Policy dialog box displays.
5. In the Policy name field, type a unique name for the new policy.
6. Click OK
20 NetBackup for DB2 System Administrator’s Guide for Windows
.
Page 33

Configuring Backup Policies
A dialog box displays in which you can specify the general attributes for the policy.
7. From the Policy Ty pe box, select the DB2 policy type.
Note The DB2 policy type does not appear in the drop-down list unless your master
server has a license key for NetBackup for DB2.
8. Complete the entries on the Attributes tab. For more information, see “Description of
Attributes”, which follows this procedure.
9. Add other policy information.
◆ To add schedules, see “Adding Schedules” on page 22.
◆ To add clients, see “Adding Clients” on page 28.
◆ To add templates or scripts to the Backup Selections list, see “Adding Backup
Selections” on page 29.
10. When you have added all the schedules, clients, and Backup Selections you need,
click OK. The new policy is created.
Description of Attributes
With a few exceptions, NetBackup manages a database backup like a file system backup.
The following table shows the policy attributes that are different for DB2 backups. This
information is used when you are adding a new policy.
Other policy attributes vary according to your specific backup strategy and system
configuration. For more information on policy attri butes, see the NetBackup System
Administrator’s Guide, Volume I.
Description of Policy Attributes
Attribute Description
Policy type Determines the types of clients th at ca n b e in t he poli cy and, in some cases,
the types of backups that Ne tBackup can perform on those cli ents. To use
NetBackup for DB2, you must define at least one policy o f type DB2.
Keyword phras e For NetBackup for DB2, the Keyword phrase entry is ignored.
Advanced Client See “Using NetBackup for DB2 with Advanced Client
configuring policies for advanc ed back up meth ods.
Chapter 3, Configuration 21
” for information on
Page 34

Configuring Backup Policies
Adding Schedules
Each policy has its own set of sch edules. These schedules initiate automatic backups and
specify when a user can initate operations.
A DB2 backup requires an Application Backup schedule, which is created automatica lly
when you create a DB2 policy. The Application Backup schedule manages the backup
operation. You also need one or more automatic backup schedules if you plan to have
NetBackup perform automatic scheduled backups or if you are using Advanced Client
features.
▼ To configure an Application Backup schedule
1. In the Policy dialog, click the Schedules tab.
To access the Policy dialog, double-click the policy name in the Policies list in the
NetBackup Administration Console.
2. Double-click on the schedule named Default-Application-Backup.
A dialog box displays. The title bar shows the na me of the policy to which you are
adding the schedule.
All DB2 backup operations are performed through NetBackup for DB2 using an
Application Backup schedule. This includes backups that start automatically.
Configure an Application Backup schedule for each DB2 policy you create. If you do
not do this, you cannot perform a backup. To help satisfy this requirement, an
Application Backup schedule named Default-Application-Backup is automatically
created when you configure a new DB2 policy.
3. Specify the other properties for the schedule as explained in “Schedule Properties” on
page 26.
The backup window for an Application Backup schedule must encompass the time
period during which all NetBackup for DB2 jobs, scheduled and unscheduled, can
occur . This is necessary because the Application Backup schedule starts processes that
are required for all NetBackup for DB2 backups, including those started
automatically.
For example, assume the following:
◆ Users perform DB2 backup operations during business hours, 0800 to 1300.
◆ Automatic backups that use this policy commence between 1800 and 2200.
22 NetBackup for DB2 System Administrator’s Guide for Windows
Page 35

Configuring Backup Policies
The Application Backup schedule must have a start time of 0800 and a duration of 14
hours.
Example Settings for an Application Backup schedule
Type of Backup Schedule settings Description Settings
Application
Backup
▼ To configure an automatic backup schedule
Retention The length of time the backup
images are retained in the
NetBackup catalo g fo r r e s tore.
Backup Window The time during which a NetB ackup
operation can be initiated.
2 weeks
Sunday through Sa turday
00:00:00 - 24:00:00
Note Specify the Application Backup schedule name in the
install_path\NetBackup\dbext\db2\db2.conf file on the client.
Tip Set the time period for the Application Backup schedule for 24 hours per day, seven
days per week. This ensures that your NetBackup for DB2 operations are never
locked out due to the Application Backup schedule.
1. On the Policy dialog, click the Schedules tab.
2. Click New.
A dialog box displays. The title bar shows the na me of the policy to which you are
adding the schedules.
3. Specify a unique name for the schedule.
4. Select the Type of backup.
For information on the types of backups available for this policy , see “ Types of Backup
Schedules” on page 25.
Chapter 3, Configuration 23
Page 36

Configuring Backup Policies
5. Specify the other properties for the schedule as explained in Schedule Properties,
which follows this procedure.
The following table shows exampl e settings for an automatic backup schedule:
Type of Backup Schedule settings Description Settings
Automatic Full
Backup
Retention The length of time to store the
record of a backup, which
NetBackup uses to de termine if
the schedule needs to be run.
2 months
Automatic
Differential
Incremental Backup
Automatic
Cumulative
Incremental Backup
Frequency Frequency determines how often
a backup should be performed.
Backup Window The time during which a
NetBackup operation can be
initiated.
Retention The length of time to store the
record of a backup, which
NetBackup uses to de termine if
the schedule needs to be run.
Frequency Frequency determines how often
a backup should be performed.
Backup Window The time during which a
NetBackup operation can be
initiated.
Retention The length of time to store the
record of a backup, which
NetBackup uses to de termine if
the schedule needs to be run.
Frequency Frequency determines how often
a backup should be performed.
Backup Window The time during which a
NetBackup operation can be
initiated.
every month
Sunday, 18:00:00 - 22:00:00
1 week
every day
Monday through Saturday
18:00:00 - 22:00:00
1 month
every week
Sunday
18:00:00 - 22:00:00
6. If this is the last schedule, click OK. To add other schedules, repeat step 1 through
step 6.
24 NetBackup for DB2 System Administrator’s Guide for Windows
Page 37

Configuring Backup Policies
Types of Backup Schedules
You can perform backups with the following types of schedules:
DB2 Backup Types
Application Backup The Application Backup schedule enables user-controlled NetBackup
operations from the client, both those initiated from the client and those
initiated by an a utoma tic s chedule on the master server. NetBackup uses the
Application Backup schedule when the DB2 user starts a backup manually.
Configure at least on e Applicatio n Backup sc hedule for ea ch DB2 policy. The
Default-Application-Backup schedule is configured automatically as an
Application Backup schedule.
Automatic Full
Backup
Automatic
Differential
Incremental Backup
Automatic An Automatic Cumulative Incremental backup is an incremental backup
Cumulative that is cumulative. The backup contains a copy of the database data that has
Incremental Backup changed since the most recent successful full backup. This corresponds to
An Automatic Full Backup contains a copy of all the data. Note that a full
backup is not the same as a whole database backup; full is an indicator that
the backup is not one of the incremental backup types.
If you are performing a stream-based Automatic Full Backup, also specify
an Automatic Full Backup schedule for scheduled NetBackup operations.
If you are using the Advanced Client, other than the Block-Level
Incremental (BLI) backup, this is the only type of backup supported.
An Automatic Differential Incremental backup is an incremental backup
that is not cumulative. The backup contains a copy of the database data that
has changed since the most r e cent s ucc essf ul b a ckup, f ul l or otherwise. This
corresponds to the INCREMENTAL DELTA option of the DB2 BACKUP
command.
This type of backup takes less space and time than a cumu lative incr emental
backup because the backup includes only the data changed since the last
successful backup operation of any type.
This type of backup is supported only for stream-based backups and for
Block-Level Incremental (BLI) backups.
the INCREMENTAL option of the DB2 BACKUP command.
This type of backup is supported only for stream-based backups and
Block-Level Incremental (BLI) backups.
This type of backup takes less time and space than a full backup because the
backup contains only the data that changed since the last full backup.
Chapter 3, Configuration 25
Page 38

Configuring Backup Policies
Using Backup Schedules, Templates, and Scripts
Later in this chapter you configure templates or scripts to use when performing backups
and restores. Be aware that when an automatic schedule invokes a script authored by a
user, NetBackup does not provide safeguards to prevent unusual behavior, such as an
automatic backup schedule running a restore or recovery script.
To help guar d ag ainst such mist akes, use a te mpla te ins tead of a scri pt when ever possi ble.
When a template runs, it detects the backup type on the schedule. You are responsible for
specifying a template with the correct operation type (backup or restore) in the policy.
Backup Schedules and Advanced Client Features
The information in “Types of Backup Schedules ” on page 25 pertains to stream-based
backups. If you are using the NetBackup Advanced Client, be aware that some of the
information in that table might differ depending on the Advanced Client features that you
are using. For more information about backup schedules and A d vanced Client features,
see “NetBackup for DB2 with Advanced Client” on page 85.
Schedule Properties
Some of the schedule properties have a different meaning for database backups than for a
regular file system backup. The following table explains the schedule properties:
Description of Schedule Properties
Property Description
Type of backup Specifies the type of backup that this schedule controls. The selection list
shows only the backup types that apply to the policy you are configuring.
For more information, see “Types of Backup Schedules” on page 25.
Frequency This setting is used only for scheduled backups and not for user-directed
backups. Frequency specifies the period of time that can elapse until the
next backup or archive operation begins on this schedule. For example, if
the frequency is seven days and a successful backup occurs on Wednesday,
the next full backup does not occur until the following Wednesday.
Typically, incremental backups have a shorter frequency than full backups.
Calendar This setting is used only for scheduled backups. It is not used for
user-directed backups. The Calendar option allows you to schedule backup
operations based on specific dates, r ecurring week day s, or recurring da ys of
the month.
26 NetBackup for DB2 System Administrator’s Guide for Windows
Page 39

Description of Schedule Properties(Continued)
Property Description
Retention Frequency-based scheduling
The retention period for an Applicat ion Backup schedule r efers to t he length
of time that NetBackup keeps backup images.
The retention period for an Automatic Full Backup, Automatic Differential
Incremental Backup, or Automatic Cumulative Incremental Backup
schedule controls how long NetBackup keeps records of when scheduled
backups have occurred.
Set a retention period that is longer than the frequency setting for the
schedule. For example, if the frequency setting is set to one week, set the
retention period to be more than one week. The NetBackup scheduler
compares the latest record of the Automatic Backup schedule to the
frequency of that Auto matic Backup schedule to determine whether a
backup is due. This means that if you set the retention period to expire the
record too early, the scheduled backup frequency is unpredictable.
However, if you set the retention period to be longer than necessary, the
NetBackup catalog accumulates unnecessary records.
Calendar-based scheduling
The retention period for an Applicat ion Backup schedule r efers to t he length
of time that NetBackup keeps backup images.
The retention period for an Automatic Full Backup, Automatic Differential
Incremental Backup, or Automatic Cumulative Incremental Backup
schedule controls how long NetBackup keeps records of when scheduled
backups have occurred. However, this setting is not significant for
calendar-based scheduling.
Configuring Backup Policies
Multiple copies If you want to specify multiple copies for your DB2 policy, configure
Multiple copies on the Application Backup schedule.
Other schedule properties vary according to your specific backup strategy and system
configuration. For more information on schedule properties, consult the NetBackup System
Administrator’s Guide, Volume I.
Chapter 3, Configuration 27
Page 40

Configuring Backup Policies
Adding Clients
The client list is the list of clients on which your DB2 scripts are run during an automatic
backup. A NetBackup client must be in at least one policy but can be in more than one.
The following software must be install ed on the client:
◆ DB2
◆ NetBackup client or server
◆ The backup or restore script(s) (unless you are using temp lates)
▼ To add clients to a policy
1. In the Policy dialog, click the Clients tab.
To access the Policy dialog, double-click the policy name in the Policies list in the
NetBackup Administration Console.
2. Click New.
3. Enter the name of the client you want to add.
If DB2 is installed in a NetBackup cluster, specify the virtual DB2 name as the client
name.
From the Windows interface:
◆ Type the name into the client list and press Enter.
If NetBackup cannot detect the hardware and operating system, a dialog box
displays so you can specify this inform ation.
OR
◆ Click the Browse for Computer button to choose the client from the network.
From the Java interface:
a. The Add Client dialog box displays. In the Client name field, type the name of
the client you are adding.
b. Choose the Hardware and operating system type and click Add.
4. To add another client, repeat step 2 and step 3.
5. If this is the last client, click OK.
28 NetBackup for DB2 System Administrator’s Guide for Windows
Page 41

Configuring Backup Policies
Adding Backup Selections
The backup selections list in a database policy has a different meaning than for
non-database policies. For example, in an MS-Windows-NT policy, the list contains files
and folders to be backed up. In a NetBackup for DB2 database policy, you specify
templates or scripts to be run.
Observe the following when using templa tes or scripts:
◆ Make sure the scripts reside on each client in the client list. Scripts can reside in any
location. Make sure that NetBackup can access the location you choose an d that
NetBackup can run the scripts.
Note that templates do not reside on the clients. Templates reside on the NetBackup
master server.
◆ NetBackup installs sample scripts when you install the software, and you can modify
these scripts for your own use. As part of the modification process, write the scripts to
a location outside of the original installation location so future NetBackup
installations do not overwrite your site’s scripts.
◆ If you are using NetBackup for DB2 in a NetBackup server cluster, make sure that the
scripts reside in a location that is available after a failover.
Add templates or scripts only if you are setting up a policy for automatic scheduling. All
templates or scripts listed in the backup selections list ar e r un fo r man ual back ups an d for
Automatic Full Backup, Automatic Differential Incremental Backup, or Automatic
Cumulative Incremental Backup schedules as specified under the Schedules tab.
NetBackup runs the templates or scripts in the order that the templates or scripts appear
in the Backup Selections list.
For more information on backup templates and scripts, see “Creating T emplates and Shell
Scripts” on page 48.
▼ To add templates or scripts to the backup selections list
The following steps show how to perform this procedure from both the Java interface and
from the Windows interface.
Caution Be sure to specify the correct template and script names in the Backup
Selections list to prevent an error or possibly a wrong operation. Make sure that
the template or script resides on the client before you try to add it to the Backup
Selections list.
From the Java interface:
Chapter 3, Configuration 29
Page 42

Configuring Backup Policies
1. Open the Policy dialog.
To access the Policy dialog, double-click the policy name in the Policies list in the
NetBackup Administration Console.
2. Click the Backup Selections tab.
3. Click New.
A dialog box displays.
4. Specify the names of templates that you want NetBackup to use.
a. Specify a specific template by choosing the template from the drop-down Script
or Template list or by typing the correct template file name.
Include the .tpl extension. Do not include the full path.
For example:
weekly_full_backup.tpl
b. Click Add to add the template to the list.
c. Repeat step a and step b until all templates are added.
5. Specify the names of the scripts that you want NetBackup to use.
a. In the Script: box, type the full path name of a script on the client.
For example:
C:\backup_scripts\db\cold_backup.cmd
b. Click Add to add the script to the list.
c. Repeat step a and step b until all scripts are added.
6. Click OK.
From the Windows interface:
1. In the Policy dialog, click the Backup Selections tab.
To access the Policy dialog, double-click the policy name in the Policies list in the
NetBackup Administration Console.
2. Click New.
30 NetBackup for DB2 System Administrator’s Guide for Windows
Page 43

Configuring Policies for Archive Logs and Configuration Files
3. Specify the names of the templates you want NetBackup to use.
Use one of the following methods:
◆ Type the name of the template with the .tpl extension. Do not include the full
path.
For example:
weekly_full_backup.tpl
◆ Click the Template button. The Select Template dialog displays. From the
Template list, choose the correct template. Click OK.
4. Specify the names of the scripts you want NetBackup to use.
Use one of the following methods:
◆ Type the full path name of the script on the client.
For example:
C:\backup_scripts\db\cold_backup.cmd
◆ Click the Remote Folder button.
The Browse window displays the hosts in the client list. Navigate to and select the
script file. Click OK.
5. Click OK.
Configuring Policies for Archive Logs and Configuration
Files
The procedures in this section show you how to configure one or more MS-Windows-NT
policies for backing up archive log files and configuration files
If you are using the VENDOR m e thod for backing up your archive log files, perform only
the procedure for backing up your configuration files.
Backing up the Archive Logs
Use the procedure in this section to create a policy to back up your archive log files if you
are using the user exit program. You do not need to perform this procedure if you are
using the VENDOR method to back up your archive log files.
Chapter 3, Configuration 31
Page 44

Configuring Policies for Archive Logs and Configuration Files
▼ To configure a policy to back up the archive logs
1. Create an MS-Windows-NT policy, as specified in “Configuring Backup Policies” on
page 19.
Alternatively, you can select an existing MS-Windows-NT policy and follow this
procedure for adding a schedule to back up the configuration files. If you want to use
an existing policy, double click the policy name in the All Policies pane and proceed
to step 3.
2. Specify the general attributes for the policy.
a. Select MS-Windows-NT for the policy type.
b. Specify other attributes as desired.
3. Click the Schedules tab.
4. Click New.
5. Add a User Backup or User Archive schedule.
a. Type the name of your schedule.
b. In the Type of Backup box, select User Backup or User Archive.
You will specify either ARCFUNC SAVE or ARCFUNC COPY in the NetBackup for
DB2 configuration file, db2.conf, later on in this configuration procedure in
“Creating a db2.conf File” on page 37.
◆ If you plan to specify ARCFUNC SAVE, select a User Backup schedule for the
archive log files.
◆ If you plan to specify ARCFUNC COPY and you plan to archive these files,
select a User Archive schedule for archiving the archive log files.
c. In the Retention box, set the time period needed to retain two full backups of
your database.
For example, if your database is backed up once every Sunday mornin g, select a
retention period of at least two weeks.
d. Click the Start Window tab.
e. In the Start Window section of the Schedules dialog, set the time of day when
you want backups to occur.
32 NetBackup for DB2 System Administrator’s Guide for Windows
Page 45

Configuring Policies for Archive Logs and Configuration Files
This schedule must encompass all of the time periods during which DB2 can call
the user exit program.
f. Click OK.
Note No Backup Selections list is necessary for this policy because it has a User Backup or
User Archive schedule. It is not an automatic schedule.
6. Specify the clients to be backed up.
The clients must have the following installed:
◆ DB2
◆ NetBackup for DB2
a. Click the Clients tab.
b. Click New.
c. Type the name of the client.
If the client is installed in a NetBackup cluster, add the virtual host name to the
policy.
d. Click OK.
7. Click Close.
The Add New Policy dialog box closes. The policy you just configured appears in the
policy list.
8. Note the name of the policy you just configured.
Later in the configuration process, you configure the
install_path\NetBackup\dbext\db2\db2.conf file. If you specify ARCFUNC
SAVE or ARCFUNC COPY in the db2.conf file, you also need to specify the name of
the policy you created in this procedure in the db2.conf file. For more information
about the db2.conf file, see “Creating a db2.conf File” on page 37.
Backing up the Configuration Files
The following procedure shows how to cr eate two schedules, a User Backup s chedule and
a Full Backup schedule, for backing up the con fi guration files.
Chapter 3, Configuration 33
Page 46

Configuring Policies for Archive Logs and Configuration Files
1. Create an MS-Windows-NT policy, as specified in “Configuring Backup Policies” on
page 19.
Alternatively, you can select an existing MS-Windows-NT policy and follow this
procedure for adding a schedule to back up the configuration files. If you want to use
an existing policy, double click the policy name in the All Policies pane and proceed
to step 3.
2. Specify the general attributes for the policy.
a. Select MS-Windows-NT for the policy type.
b. (Optional) Specify other attributes.
3. Add a User Backup schedule.
a. Click the Schedules tab.
b. Click New.
c. Type the name of your schedule.
d. In the Type of Backup box, select User Backup.
e. In the Retention box, set the time period needed to retain two full backups of
your database.
For example, if your database is backed up once every Sunday mornin g, select a
retention period of at least two weeks.
f. In the Start Window section of the Schedules dialog, set the time of day when
you want backups to occur.
This schedule must encompass all of the time periods during which DB2 can call
the user exit program.
g. Click Add.
Note No Backup Selections list is necessary for this policy because it is a User Backup
type schedule.
4. Add a Full Backup schedule.
a. Type the name of your schedule.
b. In the Type of Backup box, select Full Backup.
34 NetBackup for DB2 System Administrator’s Guide for Windows
Page 47

Configuring Policies for Archive Logs and Configuration Files
c. In the Retention box, set the time period needed to retain two full backups of
your database.
For example, if your database is backed up once every Sunday mornin g, select a
retention period of at least two weeks.
d. In the Start Window section of the Schedules dialog, set the time of day when
you want backups to occur.
e. Click OK.
5. Specify a backup selections list for this policy.
a. Click the Backup Selections tab.
b. Click New.
c. Type the full path name of the directory that contains the configuration files.
d. Click Add.
e. Click OK.
6. Specify the clients to be backed up.
The clients must have the following installed:
◆ DB2
◆ NetBackup for DB2
a. Click the Clients tab.
b. Click New.
c. Type the name of the client.
If the client is installed in a NetBackup cluster, add the virtual host name to the
policy.
d. Click OK.
7. Click Close.
The Add New Policy dialog box closes. The policy you just configured appears in the
policy list.
Chapter 3, Configuration 35
Page 48

Configuring Policies for Archive Logs and Configuration Files
Specifying the Master Server for a NetBackup for DB2 Client
After you add your NetBackup for DB2 client to a policy, specify the master server for the
client in the NetBackup Administration Console.
▼ To specify the master server in the NetBackup Administration Console
1. In the left pane, expand Host Properties.
2. Click Clients.
3. Double click the NetBackup for DB2 client name in the Clients list.
4. The Client Properties dialog opens.
5. In the Properties pane, click Servers.
6. Verify tha t the correct server is displayed in the Master Server field.
If the correct server is not displayed, click the server name in the Additional Se rvers
list, and click Make Master. Alternatively, click Add to a dd a new server name to th e
list.
7. Click OK to save your change.
Note Do not specify the master server in the Backup, Archive, and Restore interface for
the DB2 client. This can cause backups and restores to fail. To specify the master
server for your NetBackup for DB2 client, you must set this value in the Client
Properties for the DB2 client on the master server.
36 NetBackup for DB2 System Administrator’s Guide for Windows
Page 49

Configuring the Runtime Environment
Creating a db2.conf File
The NetBackup for DB2 configuration file, db2.conf, consists of a series of keywords
and values that define how to back up the database and the archive logs. This file defines
the database, the policy, and the schedule to use.
Create a db2.conf file on each NetBackup for DB2 client. The installation package
installed a db2.conf file that you can custo mize. The procedure that follows shows you
how to customize this file using the sample as a template.
▼ To create a db2.conf file
1. Log into a client machine.
2. Copy the sample db2.conf file from its location in the sample folder to its active
location.
Its location in the sample folder is as follows:
install_path\NetBackup\dbext\db2\samples
Configuring the Runtime Environment
The active location for the db2.conf file is as follows:
install_path\NetBackup\dbext\db2\db2.conf
3. Edit the db2.conf file.
The db2.conf file consists of keyword lines that form object identifiers. The lines in
each object identifier specify the database, the policy, and other information.
a. Create an object identifier for backing up the database. In the sample file, this
object identifier starts with the foll owing keyword lines:
DATABASE SAMPLE
OBJECTTYPE DATABASE
. . .
b. Create an object identifier for backing up the archive logs.
The form to use depends on how the archive logs are being backed up. Use one of
the following forms for the object identifier:
◆ If you are using the user exit program and ARCFUNC SAVE, use the following
form:
Chapter 3, Configuration 37
Page 50

Configuring the Runtime Environment
DATABASE SAMPLE
OBJECTTYPE ARCHIVE
POLICY WIN_TYPE_POL_LOGPOL (an MS-Windows-NT type policy)
SCHEDULE USER_BACKUP_SCHED_LOGSCHED
In the POLICY line, specify the name of the MS-Windows-NT policy for
backing up the archive logs.
In the SCHEDULE line, specify the User Backup schedule that you created
earlier for backing up the archive logs.
◆ If you are using the user exit program and ARCFUNC COPY, use the following
form:
DATABASE SAMPLE
OBJECTTYPE ARCHIVE
POLICY WIN_TYPE_POL_LOGPOL (an MS-Windows-NT type policy)
SCHEDULE USER_ARCHIVE_SCHED_LOGSCHED
In the POLICY line, specify the name of the MS-Windows-NT policy for
backing up the archive logs.
In the SCHEDULE line, specify the User Archive schedule that you created
earlier to archive the entire ARCDIR directory to NetBackup storage.
◆ If you are using the user exit program and the logs reside on a raw partition
(PARTITIONTYPE RAW,) use the following form:
DATABASE SAMPLE
OBJECTTYPE ARCHIVE
POLICY DB2_TYPE_POL_LOGPOL (a DB2 type policy)
SCHEDULE DEFAULT-APPLICATION-BACKUP
In the POLICY line, specify the name of a DB2 policy. This can be the same
policy that you use to back up the database.
In the SCHEDULE line, specify a Default-Application-Backup schedule.
◆ If you are using VENDOR, use the following form:
DATABASE SAMPLE
OBJECTTYPE ARCHIVE
POLICY DB2_TYPE_POL_LOGPOL (a DB2 type policy)
SCHEDULE DEFAULT-APPLICATION-BACKUP
In the POLICY line, specify the name of a DB2 policy. This can be the same
policy that you use to back up the database.
In the SCHEDULE line, specify a Default-Application-Backup schedule.
For information about creating an MS-Windows-NT policy, see “Configuring
Policies for Archive Logs and Configuration Files” on page 31.
38 NetBackup for DB2 System Administrator’s Guide for Windows
Page 51

Configuring the Runtime Environment
The subsections that follow show an example file and contain information on how to
edit this file.
4. Save and close the db2.conf file.
5. Repeat this procedure on each client machine.
Example db2.conf File
Assume that you need to back up a database named SAMPLE and its archive logs.
USEREXIT is enabled for database SAMPLE. The policies for database SAMPLE specify the
required schedules for the backups. The policies are as follows:
◆ The DB2_DB_Policy backs up the database. This policy has an application backup
schedule and an automatic backup schedule. The first definition in the example
db2.conf file specifi e s t h is p olicy and its app l ic a tion backup sch e d u l e , w hi c h is
named Default-Application-Backup. The automatic backup schedule is n ot
specified in db2.conf.
◆ The DB2_Log_Policy backs up the archive logs. This policy has a user backup
schedule named User. The second entry in t he exam ple file specifies this policy and
its User backup schedule.
The sample db2.conf file is as follows:
#
# The following settings are used by NetBackup to backup/restore a DB2 database.
#
# Reminders:
# 1) The specified policy must have a type of "DB2".
# 2) The specified schedule must be defined for this policy.
# 3) The DB2 database host must be entered as a client for this policy.
#
DATABASE SAMPLE
OBJECTTYPE DATABASE
POLICY DB2_DB_Policy
SCHEDULE Default-Application-Backup
ENDOPER
#
# The following settings are used by NetBackup to backup/restore DB2 log files.
#
Reminders:
# 1) DB2 transcation logs can be backed up/restored using either
# (a) DB2 User Exit Program
# The specified policy must have a type of "Standard" (for UNIX DB2
# host) or "MS-Windows-NT" (for Windows DB2 host).
#
# (b) LOGARCHMETH1 can be configured to use NetBackup.
# (When LOGARCHMETH1 = "VENDOR:NetBackup for DB2 agent")
Chapter 3, Configuration 39
Page 52

Configuring the Runtime Environment
# This option is possible only for versions 8.2 and above.
# The specified policy must have a type of DB2.
#
# 2) The specified schedule must be defined for this policy.
# 3) The DB2 database host must be entered as a client for this policy.
#
# --------------------# DB2 User Exit Program
# --------------------# If DB2 log file archiving is enabled (DB2 USEREXIT ON), DB2 will invoke
# the NetBackup user-exit program to backup & restore DB2 archive log files.
# Using ARCFUNC SAVE causes log files to be archived to NetBackup storage,
# as specified by the policy storage-unit setting.
# Using ARCFUNC COPY causes log files to be archived to a disk directory.
# Use ARCDIR to specify the destination directory for log file backup.
# Use RETDIR to specify the source directory for log file restore.
#
DATABASE SAMPLE
OBJECTTYPE ARCHIVE
POLICY DB2_Log_Policy
SCHEDULE User
ARCFUNC SAVE
#ARCFUNC COPY
#ARCDIR /home/db2inst1/arcdir
#RETDIR /home/db2inst1/arcdir
ENDOPER
# -------------------------------------------------------------# LOGARCHMETH1 = "VENDOR.." parameter for versions 8.2 and above
# Policy is of type DB2.
# -------------------------------------------------------------#
# Comment the above DB2 User Exit section when using LOGARCHMETH1 = "VENDOR.."
#
DATABASE SAMPLE
OBJECTTYPE ARCHIVE
POLICY DB2_ARCH_Policy
SCHEDULE Default-Application-Backup
ENDOPER
Archiving Log Files with the User Exit Program
You can configure the NetBackup for DB2 user exit program to back up the archive logs in
one of the following ways:
◆ By saving archived log files directly to NetBackup. You do this by specifying the
ARCFUNC SAVE keywords in the NetBackup for DB2 configuration file, db2.conf.
You must also configure an MS-Windows-NT policy with a User Backup schedule.
40 NetBackup for DB2 System Administrator’s Guide for Windows
Page 53

Configuring the Runtime Environment
◆ Copying archived log files to another directory for later backup by NetBackup. You
do this by specifying the ARCFUNC COPY keywords in the db2.conf file. You must
also configure an MS-Windows-NT policy with a User Archive schedule.
Copying the log files to a directory is used in conjunction with a scheduled backup. In
this case, the NetBackup user exit program copies the file to an ar chive directory. Later
(for example, nightly), a scheduled NetBackup task runs to back up all files in the
archive directory. After backup, the task can optionally delete these files to free disk
space.
Note Do not specify ARCFUNC SAVE or ARCFUNC COPY if the VENDOR DB2 configuration
parameter is in effect. In environments with VENDOR in effect, NetBackup ignores
information per t aining to ARCFUNC SAVE or ARCFUNC COPY.
Whether to specify ARCFUNC SAVE or ARCFUNC COPY depends on the amount of user
intervention you intend to provide, as follows:
◆ If you specify ARCFUNC SAVE, NetBackup backs up the archive logs according to the
policy and schedule you specified earlier in the configuration process.
If DB2 later issues a ROLLFORWARD request, the user exit program (db2uext2.exe)
looks for the archive logs on a backup volume. At restoration time, no user
intervention is required.
◆ If you specify ARCFUNC COPY, NetBackup copies the archive logs to the location
specified on the ARCDIR statement.
If DB2 later issues a ROLLFORWARD request and the archive logs no longer reside on
the system, you might have to manually restore the archive logs to the RETDIR
directory.
Using ARCFUNC SAVE
If you specify ARCFUNC SAVE, use the POLICY and SCHEDULE keywords to specifiy the
name of the MS-Windows-NT policy configured earlier. For more information on
configuring a MS-Windows-NT policy, see “Configuring Policies for Archive Logs and
Configuration Files” on page 19.
The following example object identifier backs up the archive log files for database SAMPLE
using policy db2_archive and schedule db2_archive_sched:
DATABASE SAMPLE
OBJECTTYPE ARCHIVE
POLICY db2_archive
SCHEDULE db2_archive_sched
ARCFUNC SAVE
ENDOPER
Chapter 3, Configuration 41
Page 54

Configuring the Runtime Environment
Using ARCFUNC COPY
If you specify ARCFUNC COPY, the disk to which the archive logs are copied eventually
fills with archived log files. To manage this, configure an additional MS-Windows-NT
policy that archives the entire ARCDIR directory to NetBackup volumes. Sp ecify a User
Archive schedule for this policy . Such a schedule instructs NetBackup to delete the online
files after they have been successfully backed up. For more information on user archive
schedules, see the NetBackup System Adminstrator's Guide, Volume 1.
If ARCFUNC COPY is specified, also specify the ARCDIR and RETDIR keywords. Typically,
db2.conf files specify the same location for these files. The syntax for these keywords is
as follows:
◆ For ARCDIR, specify the folder to which the archive logs are written. DB2 calls the
user exit program (db2uext2.exe) to copy the archive logs to this folder.
◆ For RETDIR, specify the folder from which the user exit program can obtain the log
files needed for a DB2 database restore. Typically, the RETDIR location is th e sam e as
the ARCDIR location.
The following example object identifier specifies archive log file locations for database
SAMPLE:
DATABASE SAMPLE
OBJECTTYPE ARCHIVE
ARCFUNC COPY
ARCDIR C:\MyLogs\arcdir\
RETDIR C:\MyLogs\arcdir\
ENDOPER
Using ROLLFORWARD DATABASE With ARCFUNC SAVE or ARCFUNC COPY
When your DB2 database is in a rollforward pending state and you issue the
ROLLFORWARD DATABASE command, DB2 requests the archive log files it needs to do the
rollforward and performs the rollforward. Depending on whether ARCFUNC SAVE or
ARCFUNC COPY are in effect, user intervention might be needed, as follows:
◆ If you specified ARCFUNC SAVE, the user exit program looks for the archive logs on
the NetBackup backup media. No user intervention is needed, but their sequential
recovery can be slow when dealing with numerous, large log files.
◆ If you specified ARCFUNC COPY, the user exit program looks for the archive logs in
the RETDIR you specified in the db2.conf file. If some or all of the files ha ve been
archived to NetBackup storage, use NetBackup to restore them to the RETDIR
directory before executing the ROLLFORWARD DATABASE command. The user exit
program then copies the files to the DB2 primary log folder.
42 NetBackup for DB2 System Administrator’s Guide for Windows
Page 55

Configuring the Runtime Environment
This method requires some user intervention during the recovery. Specifically, you
must restore these files prior to the rollforward. Advanced users prefer this approach
because of performance and flexibility benefits.
For information about restoring files to disk, see the the NetBackup System
Adminstrator's Guide.
Keyword Summary
The following list summarizes t he rules regarding how to specify keywords in the
db2.conf file:
◆ A db2.conf file consists of a series of entries that define a policy and a schedule
based upon an OBJECTTYPE.
◆ Specify a different POLICY name for DATABASE and ARCHIVE objects.
◆ Within a definition, OBJECTTYPE and POLICY are required keywords. Terminate
each entry with an ENDOPER keyword. All other keywords are optional.
◆ Within a definition, the keyword value pairs can appear in any order.
◆ The keywords are not case sensitive, but their values are.
◆ Entries are not nested.
◆ Lines with a pound character (#) in the first column are treated as comment lines.
The db2.conf file accepts the keywords described in this section. If VENDOR is
configured in your DB2 environment, NetBackup for DB2 ignores the following keywords
and keyword phrases:
◆ ARCDIR
◆ ARCFUNC SAVE
◆ ARCFUNC COPY
◆ PARTITIONTYPE RAW
◆ RETDIR
The following table describes the keywords and values used in db2.conf file.
Keyword value Pairs for the db2.conf File
Keyword value Description
ARCDIR dir Full path to the location of the archive logs. No default.
Required if ARCFUNC COPY is also specified.
Chapter 3, Configuration 43
Page 56

Configuring the Runtime Environment
Keyword value Pairs for the db2.conf File (Continued)
Keyword value Description
ARCFUNC SAVE
ARCFUNC COPY
DATABASE db_name DB2 database name. No default. Required only for alternate
DESTALIAS src_db_name DESTALIAS specifies the database alias name of the destination
DESTINST src_inst_name
ENDOPER Signals the end of a defnition. Required at the end of each
NODE number Specifies the DB2 node num ber. Do not specify this keyword unless
OBJECTTYPE ALTERNATE Specify OBJECTTYPE ALTERNATE to note that the succeeding lin es
OBJECTTYPE ARCHIVE
OBJECTTYPE DATABASE
OBJECTTYPE TABLESPACE
ARCFUNC SAVE saves archive logs to/from NetBackup.
ARCFUNC COPY copies archive logs to/from ARCDIR/RETDIR
directories.
You must specify either ARCFUNC SAVE or ARCFUNC COPY if
OBJECTTYPE ARCHIVE is also specified.
restores.
database for an alternate restore.
DESTINST specifies the instance name of the destination instance
for an alternate restore.
No default. Required only for alternate restores.
definition.
you are operating within a DB2 Enterprise Extended Edition (EEE)
environment. Not required. No default.
pertain to a perf orming an alternate restore.
Specify OBJECTTYPE DATABASE or OBJECTTYPE TABLESPACE
for DB2 policies. Specify OBJECTTYPE ARCHIVE for
MS-Windows-NT policies.
One of OBJECTTYPE ALTERNATE, OBJECTTYPE ARCHIVE,
OBJECTTYPE DATABASE, or OBJECTTYPE TABLESPACE is
required in all db2.conf files. OBJECTTYPE ALTERNATE is
required if you are performing an alternare restore.
PARTITIONTYPE RAW Specifies that NetBackup sear ch for archi ve log files backed up fr om
a raw partition during a restore. Not Required.
44 NetBackup for DB2 System Administrator’s Guide for Windows
Page 57

Configuring the Runtime Environment
Keyword value Pairs for the db2.conf File (Continued)
Keyword value Description
POLICY pol_name Name of a NetBackup policy. If not specified, NetBackup uses the
first DB2 policy found in the configuration on the NetBackup
master server.
If OBJECTTYPE ARCHIVE is specified, speci fy an MS-Windows-NT
policy.
If OBJECTTYPE DATABASE or OBJECTTYPE TABLESPACE is
specified, then a DB2 policy must be specified.
RETDIR dir Full path to the location from whi c h the archive logs are retri eved.
No default.
Required if ARCFUNC COPY is also specified.
SCHEDULE sched_name NetBackup schedule name in polic y. The default is the first
application backup in the policy.
SRCALIAS src_db_name SRCALIAS specifies the database alias name of the source database
SRCINST src_inst_name
for an alternate restore.
SRCINST specifies the instance name of the source instance for an
alternate restore.
No defaults. Required only for alternate restores.
Environment Variables
The NetBackup automatic scheduler creates the environment variables in the following
table when it executes a NetBackup for DB2 backup/restore template or script. You can
use the DB2_FULL, DB2_INCR, and DB2_CINC variables within a script to determine the
type of backup requested.
Note Only Netbackup’s backup and restore templates and scripts use the environment
variables in the following table. These variables are unknown to the DB2 backup
and restore commands. For example, the backup and restore commands do not
Chapter 3, Configuration 45
Page 58

Configuring the Runtime Environment
process the DB2_POLICY variable. Instead, the templates and scripts use the
POLICY name defined in the
install_path\NetBackup\dbext\db2\db2.conf file.
DB2 Environment Variables
Enviroment Variable Purpose
DB2_POLICY Name of the NetBackup for DB2 po licy from which the Automatic
DB2_SERVER Name of the NetBackup server.
DB2_SCHED Name of the NetBackup schedule. Enabled only if the backup is
DB2_SCHEDULED Set to 1 if this is a scheduled backup type (Automatic Backup).
DB2_USER_INITIATED Set to 1 if this is a user-initiated backup type (Application Backup
Backup backup type was started. This policy name is not nece ssarily the
same policy name that is in the db2.conf file. This variable is set only
if the backup is initiated from the server, either automatically by the
NetBackup scheduler or manually through the administrator interface.
initiated from the server, either automatically by the NetBackup
scheduler or manually through the administrator inter face.
backup).
DB2_FULL Set to 1 for an Automatic Full Backup.
DB2_INCR Set to 1 for an Automatic Differential Incremental Backup.
DB2_CINC Set to 1 for an Automatic Cum u lative Incremental Backup.
46 NetBackup for DB2 System Administrator’s Guide for Windows
Page 59

Enabling Database User Authentication
Enabling Database User Authentication
Because the NetBackup client service is, by default, started under the SYSTEM account,
special attention must also be given to database user authentication. The SYSTEM account
does not have permission to connect to the target database. run the NetBackup client
service under an account that has SYSADM, SYSCTRL, or SYSMAINT privileges for DB2,
and the account name must comply with the D B2 naming rules. Use the following
procedure to change the user account.
▼ To change the user account for the NetBackup client services
1. Choose Start > Settings > Control Panel.
2. From the Control Panel, open Services.
3. Highlight NetBackup Client Service, and click Stop.
4. Click Startup.
5. From the Log ON As: pane, select This Account.
6. Type in the account name with SYSADM, SYSCTRL, or SYSMAINT privileges.
7. Type in the password.
8. Click OK.
9. Click START to restart the service.
For more information on naming rules and authentication, see your DB2 documentation.
Chapter 3, Configuration 47
Page 60

Creating Templates and Shell Scripts
Creating Templates and Shell Scripts
To perform a scheduled NetBackup for DB2 backup, you must create a template or shell
script. The template or shell script controls the backup job on the NetBackup for DB2
client. You add this template or shell script to the Backup Selections list in the NetBackup
for DB2 policy on the master server. You can also use the template or shell script to
manually start a backup on the client.
Understanding Templates and Shell Scripts
Templates
The NetBackup for DB2 Backup Wizard crea tes backup templates. This wizard is initiated
from the NetBackup Backup, Archive, and Restore interface. For more information, see
“Creating a Backup Template Using the NetBackup for DB2 Backup Wizard” on page 49.
The NetBackup for DB2 Backup Wizard does not support all of the commands and
options provided by DB2. If a template does not provide all of the required functionality,
you must write a script.
Shell Scripts
Shell scripts are written by the user and must conform to DB2 shell syntax. Sample backup
and recovery shell scripts are installed on the client with the NetBackup for DB2 a gent.
Modify these scripts to meet your individual requirements. For more information on the
sample scripts, see “Creating DB2 Scripts Manually” on page 54.
NetBackup for DB2 also provides a utility, bpdbsbdb2, that can generate a shell script
from a backup wizard template. This allows you to create a template with the wizard and
then generate a shell script from it. You can then run the shell script or modify the shell
script further. For more information, see “Creating Shell Scripts Using bpdbsbdb2” on
page 52.
Specifying the NetBackup Master Server from the Client
Use the Backup, Archive, and Restore interface to specify the NetBackup master server
from the client. Setting the master server in the client interface ensures that the templates
you create are saved to the master server upon which you created the NetBackup for DB2
policies.
48 NetBackup for DB2 System Administrator’s Guide for Windows
Page 61

Creating Templates and Shell Scripts
▼ To specify the master server
1. In the Backup, Archive, and Restore interface, click File > Specify NetBackup
Machines and Policy Type.
2. In the dialog, click the Servers tab.
3. If the master server is not in the Server List, enter the server name in the New Server
Name field. Click Add.
4. Select the master server in the Server List, and click Make Current.
5. Click OK.
Creating a Backup Template Using the NetBackup for DB2 Backup Wizard
Create the backup template using the DB2 backup wizard. You can access this wizard
from the Backup, Archive, and Restore interface.
Browsing for the DB2 Instance to Back Up
Y ou can br owse the DB2 environment in the Backup, Archive, and Res tore interface on the
NetBackup for DB2 client.
▼ To browse for a DB2 instance
❖ To start the Backup, Archive, and Restore interface from the Start menu, click
Programs > VERITAS NetBackup > Backup, Archive, and Restore
If DB2 is installed, the Backup, Arch ive, and Restore interface for your DB2 client displays
a DB2 resource node in the left pane. Click the Select for Backup tab and expand the DB2
resource in the left pane to view a DB2 instance hierarchy. Select a node in the left pane to
view details in the right pane.
Chapter 3, Configuration 49
Page 62

Creating Templates and Shell Scripts
DB2 Resource
Instance
Database
Partition
Tablespace
Selecting any parent database object automatically selects all the child objects beneath it.
The following table explains the DB2 object types displayed:
DB2 Database Objects in the Backup Window
DB2 resource If NetBackup for DB2 is detected on the client, the browser window
displays the DB2 resource. This is the top level DB2 object in the browser.
Instance The second level object is a DB2 i nstance. An instance represents a
collection of DB2 databases.
Database You cannot select a database for backup directly, but by selecting all
partitions below it, you can effectively select the whole database. If you
select the database for backup, you cannot select other databases. If you
select objects within the database, you cannot select objects within other
databases at the same time.
50 NetBackup for DB2 System Administrator’s Guide for Windows
Page 63

Creating Templates and Shell Scripts
DB2 Database Objects in the Backup Window
Partition The partition is the highest selectable DB2 obj ec t. A parti tion represents a
collection of storage within a database in which tablespaces are stored.
Partitions contain tablespaces and log folders. Within a database, you can
select one or more partitions.
DB2 EEE/DPF environments generally consist of multiple partitions.
Other DB2 UDB environments consist of a single partition, which is
usually represented as partition zero (0).
The display includes only partitions that reside on the same NetBackup
client. It does not display other partitions on remote hosts. For more
information, see the Caution that follows this table.
T a blespace A tablespace is a logical entity repr es enting a collection o f physica l storage
containers. Tablespaces are comprised of containers, which represent
database storage units. A tablespace is the lowest-level DB2 object that
you can select in the browser.
Caution Because the Backup, Archive, and Restore interface only displays local or
resident partitions, templates created on the local client do not back up
partitions on remote hosts. Create additional templates for the other remote
partitions by running the wizard on those clients. To back up the entire
EEE/DPF configuration, specify multiple templates i n the policy Backup
Selections list.
Using the NetBackup for DB2 Backup Wizard
After you select the DB2 objects that you want to back up, you can use the NetBackup for
DB2 Backup Wizard to create a backup template for that DB2 element. The following
procedure uses the Backup, Archive, and Restore interface on the NetBackup for DB2
client.
▼ To create a backup template using the NetBackup for DB2 Backup Wizard
1. In the Backup, Archive and Restore interface, select the DB2 object(s) you want to
back up.
2. Click Backup.
The NetBackup for DB2 Backup Wizard displays the following screens for you to
enter information about the backup operation you want to perform:
◆ Welcome
◆ Database Login
Chapter 3, Configuration 51
Page 64

Creating Templates and Shell Scripts
◆ Initial Settings
◆ Backup Options
◆ Template Summary
If you need an explanation of any of the fields on the wizard panels, or more details,
click Help on the wizard panel.
3. When you have completed the wizard, the Template Complete screen displays. You
can choose to save the template for later use, run the template immediately, or both.
Click Help for details about saving and running the template you created.
When you are satisfied with the template, click Finish to save, run, or sa ve and run the
template you created.
When a backup template is run from the wizard, a full backup is performed.
Creating Shell Scripts Using bpdbsbdb2
bpdbsbdb2 is a NetBackup for DB2 command that i nitiates templat e-based, user -dir ected
backup and recovery. It also generates DB2 shell scripts from templates created by the
backup wizard.
To create a shell script, issue this command with the fo llowing options:
52 NetBackup for DB2 System Administrator’s Guide for Windows
Page 65

Creating Templates and Shell Scripts
bpdbsbdb2 -backup -g script_file_name -t template_name
script_file_name Generates a shell script from a template.
Enclose script_file_name in quotation marks (““) if it contains
space charac ters. Do not us e t his option with this comman d’s -r (for
“run”) option. For more information, s ee “Using bpdbsbdb2” on
page 72.
template_name Identifies the template.
bpdbsbdb2 retrieves backup templates from a known location on
the master server. Specify only the file name.
Caution It is the user's responsibility to review and customi ze any a nd all scripts
generated from templates. Generated scripts are intended to be modified for the
user's environment and preferences. For example, settings such as passwords or
catalog partition numbers are not generated in the template-to-script
conversion, so they require manual editing. In addition, generated scripts do
not handle all possible error and failure cases a nd should be used at your own
risk.
Scripts generated for Windows are intended to be executed using the DB2CMD command
processor provided with DB2, DB2CMD C:\TEMP\SCRIPT.CMD. For more information,
see the DB2 Commands User’s Guide.
Script execution permissions should be reviewed and modified as desired by the user.
For security purposes, usernames and passwords are not included in generated scripts.
They must be added if needed.
The DB2 QUIESCE command is generated when the Disconnect users and prohibit
access template option is specified. However, this command fails if your version is prior
to DB2 V8.1.
When attempting a point-in-time restore, customize the time value. The command DB2
RESTORE ... TAKEN AT strictly interprets the specified time and succeeds only if a
backup image with the same time exists. For mo re information, see your IBM DB2
documentation. This limitation d oes not exist for templates, which search for an
appropriate ima g e.
If a template enables rollforward recovery, then rollforward commands are generated for
all partitions specified in the templa te, wheth e r or not that partition is configured for
rollforward recovery.
If a script performs a rollforward recovery, customize the DB2NODE variable. In single
partition environments, this variable can typically be empty, for example, “DB2NODE=”. In
a multiple partition environment, set this variable to the catalog partition number.
Chapter 3, Configuration 53
Page 66

Creating Templates and Shell Scripts
Creating DB2 Scripts Manually
The NetBackup for DB2 installation sof tware includes the following scripts:
db2_backup_db_offline.cmd
db2_backup_db_online.cmd
db2_restore_db.cmd
db2_mpp_backup_offline.cmd
db2_mpp_restore_db.cmd
They are installed in the following location:
install_path\NetBackup\dbext\db2\samples\
By default, install_path is C:\Program Files\VERITAS.
Note Be sure to modify these scripts for your environment. Do not store your scripts in
the sample directory because they are lost if you upgrade or reinstall. Always
relocate your scripts to a safe location. For clustered environments, this location
must be available after a failover.
Although each script can have multiple DB2 commands operations, a separate script is
required for each type of operation. For example, you need separate scripts for backups
and restores.
Caution Always specify the correct script when configuring automatic backups or when
starting operations through NetBackup. NetBackup for DB2 does not generate
an error if a restore script is used for a backup operation or a backup script is
used for a restore operation.
Instructions for Modifying Scripts
Note If you are using DB2 EEE, see “Configuration for a DB2 EEE (DPF) Environment”
on page 123.
▼ To modify the backup and install scripts
1. Copy the example scripts to a different folder on your client. This should be a safe
location. In clustered environments, this location should be available after a failover.
2. Modify the script
54 NetBackup for DB2 System Administrator’s Guide for Windows
Page 67

Creating Templates and Shell Scripts
a. Use a text editor, such as Notepad, to open the script.
b. Follow the instructions in the script.
3. Test the scripts you just created by starting a manual backup of this policy as
explained in “Testing Configuration Settings” on page 57.
Script Parameters
The NetBackup for DB2 templates and scripts read parameters from the environment
when performing backup and restore operations. The parameters can come from the
following sources:
◆ Environment Variables
◆ NetBackup db2.conf
Parameters from these sources can be evaluated within the scripts. For example, the
DB2_POLICY value is the name of the policy used to perform the backup.
For more information, see “Configuring the Runtime Environment” on page 37.
Storing Templates and Scripts
Templates
The Backup Wizard saves a backup template to a NetBackup specific location on the
current NetBackup master server . NetBackup r etrieves a backup template from the master
server as part of a backup (server-directed, scheduled, or user-directed) and ru ns i t on th e
client. A backup template is associated with a policy by specifying its name in the policy
file or script list. Because backup templates are stored on the server in a known location,
server-directed and scheduled backups use the same copy of the template for each client
in the policy client list.
The Recovery Wizard saves a restore template to a user-specified location on the client.
The location specified should include a fully qualified path to a directory where the user
has write access. For information about the recovery wizard, see “Using the NetBackup
for DB2 Recovery Wizard” on page 70.
Templates store encrypted passwords that are decrypted at runtime.
Chapter 3, Configuration 55
Page 68

Creating Templates and Shell Scripts
Shell Scripts
DB2 scripts must reside on the NetBackup client. Backup scripts are associated with a
policy by specifying the file name (including path) in the policy file or script list. This
means that for server-directed or scheduled backups, each client in the policy's client list
must have a copy of the script with the same name in the same location. For more
information, see “Adding Backup Selections” on page 29.
The backup and recovery processes sometimes require passwords for DB2 database access
and/or system user accounts.
Storing Templates and Scripts in a NetBackup Cluster
“Templates” o n page 55 and “Shell Scripts” on page 56 pertain to NetBackup for DB2
environments that are not installed in a NetBackup Cluster. If you are operating within a
NetBackup Cluster, make sure that the restore templates and shell scripts reside in a file
system that is shared between all nodes in the cluster.
56 NetBackup for DB2 System Administrator’s Guide for Windows
Page 69

Testing Configuration Settings
After configuring the master server for NetBackup for DB2, test the configuration settings
by performing a manual backup (or backups) using the automatic backup schedules y ou
have created.
▼ To test the configuration settings
1. Log onto the master server as administrator (Windows) or root (UNIX).
2. Start the NetBackup Administration Console.
3. In the left pane, click Policies.
From the Windows interface: The policy list appears in the right pane.
From the Java interface: The right pane splits into an All Policies pane and a details
pane.
4. Click the policy you want to test.
5. Choose Actions > Manual Backup.
The Manual Backup dialog box appears.
Testing Configuration Settings
The Schedules pane contains the name of an automatic schedule (or schedules)
configured for the policy that you are going to test. The Clients pane contains the
name of the client(s) listed in the policy that you are going to test.
6. Follow the directions in the Manual Backup dialog box.
7. Click Activity Monitor on the NetBackup Administration Console.
If the manual backup does not exit with a successful status, see “Troubleshooting” on
page 107.
For a description of status codes and other troubleshooting information, see the NetBackup
Troubleshooting Guide.
Backing up the Database and Archive Logs
Back up the database and archive logs as soon as possible after NetBackup for DB2 is
configured and tested.
Chapter 3, Configuration 57
Page 70

Backing up the Database and Archive Logs
▼ To back up your configuration
❖ Use the templates or scripts you have created in this chapter to back up your DB2
database, archive logs, and configuration files.
For information on how to perform a backup, see “Using NetBackup for DB2” on page 59.
58 NetBackup for DB2 System Administrator’s Guide for Windows
Page 71

Using NetBackup for DB2
When all installation and configuration is complete, you can start DB2 backups and
restores through NetBackup or you can execute DB2 commands directly.
This chapter contains the following sections:
◆ Performing a Backup
◆ Browsing Backups
◆ Performing a Restore
Caution Always specify the correct DB2 script or template wh en configuring automatic
backups or when starting operations through NetBackup. NetBackup for DB2
does not generate an error if a restore DB2 script file is used for a backup
operation or a backup DB2 template or script is used for a restore operation.
4
59
Page 72

Performing a Backup
Performing a Backup
Overview
This section describes the different ways you can perform a backup and explains the
relationships between settings.
NetBackup for DB2 provides the following ways to perform ba ckups:
◆ By issuing a DB2 command from the DB 2 control center or command line processor.
The DB2 BACKUP and RESTORE commands use the policies, schedules, and sett ings
specified in the following sources:
◆ The NetBackup for DB2 vendor I/O library. This library is named nbdb2.dll.
◆ The NetBackup for DB2 configuration file. This file is named db2.conf.
◆ By running a script from the operating system command line. You can create scripts
from scratch, or you can base a script on a template that you created earlier.
◆ Through templates initiated from the template wizards or Template Administration
interface.
◆ Through templates and scripts specified in policies. When you back up a NetBackup
policy, it uses the templates and scripts specified in the policy.
There are three main types of DB2 backups: database backups, archive log backups, and
configuration file backups.
◆ A database backup is a copy of the entire DB2 database or tablespace. This backup is
accomplished by issuing a DB2 BACKUP DATABASE command. A database backup
can be initiated th rough N etBackup by an automatic ba ckup of a DB2 policy, a manual
backup of a DB2 policy, or a user-directed backup.
◆ An archive log backup is a backup of an archive log file for DB2. If VENDOR is enabled
in the DB2 configuration files, NetBackup for DB2 backs up the archive logs along
with the database files. If the user exit program is enabled in the DB2 configuration
file, you need a separate policy and schedule to back up the archive logs.
◆ A configuration file backup is a backup of the DB2 configuration files that you need in
order to recover the database in the case of a disaster. You can use an
MS-Windows-NT policy with a User Backup schedule to back up the files. For
information on which files to back up, see your IBM DB2 documentation.
60 NetBackup for DB2 System Administrator’s Guide for Windows
Page 73

Performing a Backup
Performing a Backup from the NetBackup Master Server
Automatic Backup of a DB2 Policy
The most convenient way to back up your database is to set up schedules for automatic
backups. When the NetBackup scheduler invokes a schedule for an automatic backup, the
DB2 scripts run as follows:
◆ In the same order as they appear in the file list
◆ On all clients listed in the client list
The DB2 scripts initiate the database backup.
To add a new schedule or change an existing schedule for automatic backups, follow the
guidelines in “Configuration” on page 17.
When a backup template is run from a NetBackup schedule, the schedule determines the
backup type (automatic full, automatic cumulative incremental, or automatic differential
incremental).
The following information applies only if you are using the user exit program to back up
the archive logs:
◆ If an online backup of a partition is requested, the user exit program must be enabled.
If not, an offline partition backup is attempted. An offline backup is also attempted if
the database is in backup-pending mode.
◆ If a tablespace backup is requested, the user exit program must be enabled. If not,
template execution fails because DB2 does not support offline tablespace backups.
For more information about templates, see “Running a NetBackup for DB2 Backup
Template” on page 62.
Manual Backup of a DB2 Policy
The administrator on the master server can use the NetBackup administrator’s interface to
manually execute an Automatic Backup schedule for a DB2 policy. The instructions for
doing this are the same as those in“Testing Configuration Settings” on page 57.
For instructions on initiating a backup of a DB2 policy, see “Testing Configuration
Settings” on page 57.
Chapter 4, Using NetBackup for DB2 61
Page 74

Performing a Backup
Performing a User-directed Backup from the NetBackup for DB2 Client
Running a NetBackup for DB2 Backup Template
When executing a template, database partitions a re processed sequentially, in the order
listed in the template summary. All tablespaces residing with the same partition are
processed together. For example, if tablespace T1 resides in partition P1, and tablespaces
T2 and T3 reside in partition P2, the processing order is a s follows:
1. Process tablespace T1 in partition P1.
2. Process tablespaces T2 and T3 in partition P2.
A failure in processing a request immediately stops template execution. The error
condition must be resolved before the template can be re-run.
Except where noted, all DB2 warnings are treated as DB2 errors; they cause template
execution to fail.
If the Disconnect users and prohibit access template option is selected, the system issues
the DB2 QUIESCE command before performing the backup or restore. In versions prior to
DB2 V8.1, this feature is not available; instead, the Abort if user s are connected op t i on i s
enforced.
Users must have sufficient DB2 permi ssions to browse DB2 databases and perform
backup, restore, and rollforward operations. Refer to the following DB2 database manager
configuration settings: SYSADM, SYSCTRL, and SYSMAINT.
Using DB2 Template Administration
The DB2 Template Administration interface is available in the NetBackup Backup,
Archive, and Restore interface. The DB2 Template Administration window provides the
following functions:
Function Purpose
Run Run processes the selected template.
Edit Edit changes the contents of an existing template. The selected
template is loaded into the NetBackup for DB2 Template Generation
Wizard.
62 NetBackup for DB2 System Administrator’s Guide for Windows
Page 75

Performing a Backup
Delete
Delete removes the selected template. You must be the root
user or the template creator to delete a template.
Rename
Rename changes the name of the selected template. You must
be the root user or the template creator to rename a template.
View
View displays a summary of the se lected template.
The templates created by the NetBackup for DB2 template generation wizard are stored in
a predetermined location on the master server. For more information, see “Creating a
Backup Template Using the NetBackup for DB2 Backup Wizard” on page 49.
▼ To use the DB2 Template Administration interface
1. Start the NetBackup Backup, Archive, and Restore interface.
Click Backup, Archive, an d Restore in the left pane of the NetBackup Administration
Console.
2. In the Backup, Archive, and Restore interface, choose Actions > Administer
Templates > DB2.
The DB2 Template Administration window appears:
The Select Template list shows the names and descriptions of the DB2 backup
templates stored on the current master server.
3. Select the name of the backup template you want to run.
4. Click Run.
The Run dialog displays.
Chapter 4, Using NetBackup for DB2 63
Page 76

Performing a Backup
5. Type your User Name and Password.
6. Click OK.
A Template Summary window displays.
7. Click Run.
The template runs a full backup. Incremental backups are only available through th e
NetBackup scheduler.
You can use the View Status tool to see the status of the backup. Click File > Vie w
Status.
Using bpdbsbdb2
The bpdbsbdb2 command runs a backup template created by the NetBackup for DB2
Backup Wizard. At the command prompt, issue the bpdbsbdb2 in the following format:
bpdbsbdb2 -backup -r -t template_name
In the preceding command, -r runs a template and -t identifies the template.
For example:
bpdbsbdb2 -backup -r -t DB2_Mon_full.tpl
bpdbsbdb2 retrieves backup templates from a predetermined location on the master
server, so you only need to specify the template file name.
Using DB2 to Perform a Backup
You can start a backup by executing the DB2 BACKUP DATABASE command fr om th e D B2
command window on the client.
Depending on the release of DB2 that you are using, issue the BACKUP DATABASE
command in one of the following formats to perf orm a backup.
Format 1 - Supported in all DB2 Releases
Issue the command in the following format:
db2 backup db sample load install_path\NetBackup\bin\nbdb2.dll
For example:
db2 backup db sample load C:\Program Files\Veritas\NetBackup\bin\nbdb2.dll.
64 NetBackup for DB2 System Administrator’s Guide for Windows
Page 77

Performing a Backup
Format 2 - Supported in DB2 8.2 and Later Releases
If you are using a DB2 8.2 or later release and if VENDOR is enabled, you can use the
command in the following forma t:
db2 backup db sample online load install_path\NetBackup\bin\nbdb2.dll include logs
For more in formation on the DB 2 BACKUP DATABASE command, see your IBM DB2
documentation.
BACKUP DATABASE Command Options
You can back up a DB2 database with either the DB2 BACKUP DATABASE command or
with its alternative syntax, BACKUP DB. This command backs up a database to
NetBackup. The following list provides reference information for the DB2 BACKUP
command options when used in a NetBackup for DB2 environment.
Option Purpose
LOAD NBDB2_library_path Instructs DB2 to use the NBDB2 vendor library when performing
the backup.
OPEN number SESSIONS Specifies the number of concurrent data streams used for writing
data. Use this option if you have multiple backup devices
available, or you have multiplexing enabled in NetBackup.
Use this option only if you are using the user exit program to back
up the archive logs. This option does not apply if you specified a
VENDOR library.
WITH number BUFFERS Use this option when opening multiple sessions. See
OPEN number SESSIONS. The number of buffers must be twice
the number of sessions.
Use this option only if you are using the user exit program to back
up the archive logs. This option does not apply if you specified a
VENDOR library.
BUFFER size Use this option to increase or decrease the buffer size, if necessary.
Increased size can benefit performance, but decreased size might
be necessary if using numerous buffers. DB2 recommends the size
be a multip le of the exten t size. The DB2 DFT_EXTENT_SZ setting
defines the default extent size.
WITHOUT PROMPTING This option is required for unattended backups. It must be
specified in backup scripts executed by NetBackup.
INCREMENTAL Use this option to perform a cumulative backup.
Chapter 4, Using NetBackup for DB2 65
Page 78

Browsing Backups
Option Purpose
INCREMENTAL DELTA Use this option to perform a differential backup.
ONLINE Use this option to b ack up hot, or active, databases. The DB2
Browsing Backups
This section describes how to browse backup images. You can also use the DB2 LIST
HISTORY command.
Using the Backup, Archive, and Restore Interface to Browse
USEREXIT setting must be enabled for online backups.
Use this option only if you are using the user exit program to back
up the archive logs. This option does not apply if you specified a
VENDOR library.
The Backup, Archive, and Restor e interface displays the DB2 r esour ce. You can browse the
DB2 resource through four levels: instance, database, partition, and tablespace. You can
view the containers in a tablespace, but you can only select for restore at the tablespace
level or the partition level.
This interface does not allow you to browse previous backups. Instead, it browses the
existing DB2 instances and databases. You can select these DB2 objects and use the
NetBackup for DB2 recovery wizard to prepare recovery templates for the objects. For
more information, see “Using the NetBackup for DB2 Recovery Wizard” on page 70.
66 NetBackup for DB2 System Administrator’s Guide for Windows
Page 79

Browsin g Backups
The following shows a sample restore window in the Backup, Archive, and Restore
interface. In this example, the DB2 resource is expanded down to the tablespace level. You
can select a tablespace or tablespaces, a partition or partitions, or one entire database (by
selecting all of its partitions) for the restore.
Using bplist to Browse
You can use the bplist command to search DB2 backup images.
The examples in this section use bplist to search all DB2 backup images for a client
named camel, which is also the master server. The information comes from the
NetBackup catalog on the master server. For more information on the bplist command,
see the NetBackup online help.
The output from bplist differs depending on how you are managing your archive log
files. Examples 1 and 2 assume that the user exit program is used to back up the archive
logs. Example 3 assumes that VENDOR is set and that the user exit program is not used to
back up the archive logs.
Example 1
The -t 18 option on this command specifies the DB2 backup type. The bplist output
shows the DB2 database backup images that are stored in the NetBackup database.
install_path\NetBackup\bin\bplist -C camel -S camel -t 18 -R /
Chapter 4, Using NetBackup for DB2 67
Page 80

Browsing Backups
DB2:\SAMPLE\node0000\19991202105152\SAMPLE.0.DB2.node0000.0.19991202105152.1
DB2:\SAMPLE\node0000\19991202104734\SAMPLE.0.DB2.node0000.0.19991202104734.1
DB2:\SAMPLE\node0000\19991201171209\SAMPLE.0.DB2.node0000.0.19991201171209.1
DB2:\SAMPLE\node0000\19991129154117\SAMPLE.3.DB2.node0000.4.19991129154117.1
DB2:\SAMPLE\node0000\19991129142046\SAMPLE.0.DB2.node0000.0.19991129142046.1
The following diagram explains how to interpret one of the lines from the listing.
Output from bplist
/DB2/SAMPLE/node0000/19991202105152/SAMPLE.0.DB2.node0000.0.19991202105152.1
File name. See below.
Time that the backup occurred.
Node name.
Database name.
Directory name. DB2 is the directory name for all DB2 backups.
SAMPLE.0.DB2.node0000.0.19991202105152.1
Session number.
This file extension identifies the session
number that was specified on the DB2
BACKUP command.
Timestamp.
Includes the date (year, month, day) and time (hour,
minute, second).
Last archive log number.
Node number.
In nonpartitioned database systems, this is always zero (node0000). In
partitioned database systems, this is nodexxxx, where xxxx is the
number assigned to the node in the db2nodes.cfg file.
Database instance name.
1- to 8-characters in length.
Type of backup taken.
0 indicates a full database backup. 3 indicates a tablespace backup.
Database name.
68 NetBackup for DB2 System Administrator’s Guide for Windows
Page 81

Example 2
This example uses bplist to search for all DB2 archive log file backups. The
-k DB2_Log_Policy option specifies files backed up using this policy. The policy name
originates from the settings in the db2.conf file for archive log files. The bplist output
shows the list of DB2 archive log files stored in NetB ackup.
install_path\NetBackup\bin\bplist -k DB2_Log_Policy -C camel -S camel -R /
C:\DB2\NODE0000\SQL00001\SQLOGDIR\S0000026.LOG
C:\DB2\NODE0000\SQL00001\SQLOGDIR\S0000025.LOG
C:\DB2\NODE0000\SQL00001\SQLOGDIR\S0000024.LOG
Example 3
This example uses bplist to search for DB2 archive log files. The -k log_policy
option specifies files backed up using this policy. The output format in the following
example differs from the previous examples because for this database, the VENDOR
archive log method is enabled in DB2:
install_path\NetBackup\bin\bplist -C camel -S camel -k log_policy -R /
C:\DB2\SAMPLE\LOGFILE\node0000\db2v864d\C00000_S00000.LOG
The following list explains the informati on i n this example’s bplist output.
Browsin g Backups
Output Component Meaning
DB2 DB2 is the folder name for all DB2 backups.
SAMPLE Name of the database.
LOGFILE Identifies this as a logfile.
node0000 Name of the node.
db2v864d Name of the DB2 instance.
C0000_S00000.LOG Name of the log file. Provided by DB2.
Chapter 4, Using NetBackup for DB2 69
Page 82

Performing a Restore
Performing a Restore
Using the NetBackup for DB2 Template on the Client
Using the NetBackup for DB2 Recovery Wizard
NetBackup for DB2 includes a Recovery Wizard that solicits information from the user
about the desired DB2 restor e an d r ecover o perations. The wizard uses the information to
create a template that can be used immediately or saved for later use.
The NetBackup for DB2 Recovery Wizard saves a recovery template locally in a
user-specified location on the NetBackup client. Recovery templates are not stored on the
server because recovery is always user directed, not scheduled. Under typical
circumstances, a recovery template is run immediately and then dele ted.
The recovery process sometimes requires passwords for DB2 database access and system
user accounts. Templates store encrypted passwords that are decrypted at runtime.
Because recovery can be a complex process, it might be necessary to perf orm manual steps
as part of the operation. For more information, see your IBM DB2 documentation.
▼ To start the Backup, Archive, and Restore interface from the NetBackup
Administration Console
You can launch the NetBackup for DB2 Recovery Wizard from the Backup, Archive, and
Restore interface. You can access the interface through the NetBackup Administration
Console or from the command line.
❖ Click Backup, Archive, and Rest ore in the left pane of the NetBackup Administration
console.
▼ To select for restore
1. Click Select for Resto re
2. Expand the DB2 resource in the left pane to view a DB2 instance hierarchy.
3. Select a node in the left pane to view details in the right pane.
▼ To change the client policy type
If the DB2 node is not visible, it is possible th at your NetBackup for DB2 client does not
have the appropriate policy type specified. Complete the following steps to change the
policy type:
70 NetBackup for DB2 System Administrator’s Guide for Windows
Page 83

Performing a Restore
1. On the Actions menu, select Specify NetBackup Machines and Policy Type.
2. On the Specify NetBackup Machines dialog, click the Source client/Policy type ta b .
3. In the Policy type drop down list, select DB2.
4. Click OK.
▼ To use the Recovery Wizard
When you are ready to perform a recovery, complete the following steps to create and run
a template with the Recovery Wizard:
1. In the Backup, Archive, and Restore interface, expand a DB2 instance and select the
database object(s) you want to restore.
2. Click Actions > Start Restore of Marked Files.
The NetBackup for DB2 Recovery Wizard displays the following screens for you to
enter information about the restore operation you want to perform:
◆ Welcome
◆ Database Login
◆ Ti me Pe riod s
◆ Restore Options
Chapter 4, Using NetBackup for DB2 71
Page 84

Performing a Restore
◆ Recovery Option s
If you need an explanation of any of the fields on the wizard screens, or more details,
click Help on the wizard screen.
3. When you have completed the wizard, the Template Complete screen displays.
You can choose to run the template immediately after the wizard finishes, save the
template locally, or both. For explanations of your choices, click Help.
When running a template, all restore operations are performed before any and all
rollforward operations.
Note When performing a DB2 restore, false alarms are reported in the NetBackup
Caution The DB2 warning SQL2539W indicates that the requested restore operation will
Activity Monitor. DB2 accesses the NetBackup image twice when performing a
restore. The first access reads a partial image, which is reported as "The restore
failed to recover the requested files" (status 5) in the Activity Monitor. The next
access reads the entire image, which should result in a successful restore (status 0).
The template execution status, not the activity monitor, is the best indication of
overall success.
replace the existing database. That is, the existing database files will be deleted.
When running a template to perform a restore, this warning is logged and the
restore proceeds without interruption.
The DB2 warning SQL2523W indicates that the backup image originates from a
different database of the same name. This is handled as an error to prevent DB2
from deleting log files.
The DB2 error SQL1260N indicates that the restored partition is not configured
for rollforward recovery. If the template is configured to perform a rollforward,
this step is skipped.
T emplate execution does not support the use of local time when performing a rollforward.
The rollforward time specified in the template is passed to DB2, and it is interpreted as
GMT by DB2. For more information, see the ROLLFORWARD command in your DB2
documentation.
Using bpdbsbdb2
The bpdbsbdb2 command allows you to run a recovery template created by the
NetBackup Recovery Wizard.
At the command line, type the following:
72 NetBackup for DB2 System Administrator’s Guide for Windows
Page 85

Performing a Restore
install_path\netbackup\bin\bpdbsbdb2 -restore -r -t templ_name
The -r option runs the template, and the -t option identifies the template
For example:
bpdbsbdb2 -restore -r -t \db2\restore_templates\full_restore.tpl
Restore templates do not reside in a pr edetermined location on the master server. They are
considered to be temporary in nature and should reside on the client. If the full path is not
specified as part of the restore template name, the file might not be found.
For details about creating a script from a template using bpdbsbdb2, see “Creating Shell
Scripts Using bpdbsbdb2” on page 52.
Using DB2 to Perform a Restore
The exact process for re coverin g a DB2 dat abase differs from site to site depending on the
methods used for backing up the archive logs, the settings used in the NetBackup for DB2
configuration file, db2.conf, and the location of the archive logs.
The procedures in the following sections show how to restore the example database,
SAMPLE, to the level of a recent database backup plus archive logs:
◆ “Recovering a DB2 Database - Simplest Case” on page 73. You can use this procedure
if the archive logs are in an accessible location and they were all created using the
same parameters in db2.conf.
◆ “Recovering a DB2 Database - Rest oring Archive Logs” on page 74. This is the more
complex case. Use this procedure if you have to browse for archive logs and restore
them from secondar y storage.
For more information on how to recover a DB2 database, see the DB2 UDB Administration
Guide Data Recovery and High Availability Guide.
Recovering a DB2 Database - Simplest Case
The DB2 commands for recovering a database differ from release to release. You can use
the procedure in this section to restore a database if the archive logs are in a location that is
known and accessible to DB2 a nd NetBackup.
For example, you can probably use the procedure in this section if the following are true:
◆ If ARCFUNC SAVE was in effect in the db2.conf file when all archive logs were
backed up.
◆ If ARCFUNC COPY was in effect in the db2.conf file when all archive logs were
backed up and the logs were not moved from the ARCDIR and RETDIR dir ecto ries.
Chapter 4, Using NetBackup for DB2 73
Page 86

Performing a Restore
◆ If VENDOR was in effect in DB2 at the time all the archive logs were created.
The commands in the following procedure restore a DB2 database and its archive logs.
These commands assume that the archive log files reside in a loca tion that is known and
accessible to DB2 and Netbackup.
▼ To restore a DB2 database when the archive logs are accessible to DB2 and
NetBackup
❖ Depending on the release level of DB2, enter one of the following comman d s:
◆ For DB2 8.2 and later releases, enter the following command :
db2 recover db db_name
◆ For DB2 releases prior to 8.2, enter the following two-command se quence:
db2 restore db db_name load install_path\NetBackup\bin\nbdb2.dll
db2 rollforward db
db_name to end of logs and stop
For db_name, specify the name of the DB2 database yo u are restoring.
Recovering a DB2 Database - Restoring Archive Logs
You can use the procedure in this section if you need to restore the archive logs before you
perform the rollforward. Use the procedure in this section to restore the archive logs
manually if the follow ing situations exist:
◆ If the archive logs are not in standard locations, which prevents NetBackup from
performing a seamless restore of DB2. This might be the case if you moved one or
more of the needed archive logs to secondary storage such as tape, network storage,
or some other location. For example, if ARCFUNC COPY is in effect and the old ar chive
logs were moved to tape, perform procedure in this section.
◆ If ARCFUNC COPY was in effect in t he db2.conf file at the time the archive logs were
backed up and the ARCDIR and RETDIR parameters specify two different locations.
◆ If PARTITIONTYPE RAW was in effect in the db2.conf file for some, but not all, of
the archive log backups.
▼ To restore a DB2 database when the archive logs are in a nonstandard location
1. Restore the database.
Issue the DB2 RESTORE DATABASE command to restore the database itself. For
example:
db2 restore db db_name load install_path\NetBackup\bin\nbdb2.dll
where db_name is the name of the DB2 database you are restoring.
74 NetBackup for DB2 System Administrator’s Guide for Windows
Page 87

Performing a Restore
2. Use NetBackup to browse the archive logs.
If a restore requires log files backed up from a file system and log files backed up from
a raw device, retrieve the logs from the file system manually.
You can use either the Backup, Archive, and Restore interface or the bplist
command to browse the archive logs and find those missing from the restore
directories.
If PARTITIONTYPE RAW is specified in the db2.conf file, the user exit program
looks for only those logs when performing the restore. The missing logs are those that
were written when PARTITIONTYPE RAW was not in effect.
For more information, see “Browsing Backups” on page 66.
3. Use operating system commands to copy the missing archive logs to the correct
locations in your operating system.
For example, use your mouse to copy the files from one location to another.
If ARCFUNC COPY is in effect and the ARCDIR and RETDIR parameters specify
different locations, copy the logs in the ARCDIR directory to the RETDIR directory. If
ARCDIR and RETDIR specify the same location, you do not have to take any action. If
some of the log files have been moved to secondary storage, restore these files to the
RETDIR directory.
4. Use NetBackup to restore the archive logs.
Use either the NetBackup Backup, Archive, and Restore interface or the bprestore
command. For example:
bprestore C:\vedb2\db2\v8\db2V832d\NODE0000\SQL0001\SQLOGDIR\S0000009.LOG
5. Bring the database online.
When the rollforward is initiated, DB2 sends a request to NetBackup to restore the log
files it needs. DB2 then reapplies the transaction information in the archive logs since
the last full backup was performed a nd brin gs the database back online.
For example, you can use the following command options if PARTITIONTYPE RAW
was not specified when any of the log files were backed up:
db2 rollforward db sample to end of logs and stop
The ROLLFORWARD DATABASE command issues messages if it cannot locate all the
archive log files it needs. If you receive these messages, browse and restore the
missing archive log files, and issue the ROLLFORWARD DATABASE command again.
Chapter 4, Using NetBackup for DB2 75
Page 88

Performing a Restore
After the database is successfully restored, the ROLLFORWARD DATABASE command
restores and reapplies the transactions recorded in the archive log files since the last
backup was performed. For example, if the backup image was created 10 days ago
and restored today, the log files are used to restore transactions that occurred after the
backup.
For more in formation on the DB 2 command s, refer to the IBM DB2 Universal Database
Command Reference manual.
RESTORE DATABASE Command Options
You can restore a DB2 database with either the DB2 RESTORE DATABASE command or
with its alternative syntax, RESTORE DB. The DB2 RESTORE DATABASE command
restores a database from NetBackup. The following list provides reference information for
the DB2 RESTORE command options when used in a NetBackup for DB2 environment.
Option Purpose
LOAD NBDB2_Library_Path Instructs DB2 to use the NBDB2 vendor library when performing
the restore.
OPEN number SESSIONS Specifies the number of concurrent data streams used for writing
data. Use this option if you have multiple backup devices
available or if you have multiplexing enabled in NetBackup.
Typically, you should specify the same number of sessions used
during the backup. Using fewer sessions is allowed, but it might
degrade overall restore performance. Specifying more sessions
has no benefit.
Use this option only if USEREXIT or LOGRETAIN are in effect.
This option does not apply if VENDOR is in effect.
WITH number BUFFERS Use this option when opening multiple sessions. See
OPEN number SESSIONS.
The number of buffers must be twice the number of sessions.
Using fewer buffers can degrade performance or can cause the
restore to fail when reading multiplexed images.
Use this option only if USEREXIT or LOGRETAIN are in effect.
This option does not apply if VENDOR is in effect.
BUFFER size Use this option to increase or decrease the buffer size if necessary.
Increased size can benefit performance, while decreased size
might be necessary if using numerous buffers. DB2 alters the
actual size to be a multiple of the size used during the backup.
76 NetBackup for DB2 System Administrator’s Guide for Windows
Page 89

Performing a Restore
WITHOUT PROMPTING This option is required for unattended restores, and it must be
specified in backup scripts executed by NetBack up.
INCREMENTAL When using this option, DB2 might not read the entire image
from NetBackup media. Consequently, NetBackup logs an error
in the Activity Monitor, which can safely be ignored .
AUTOMATIC Use this option to restore a series of full and incremental images.
An automated restore coordinates the restorati on of a full ba ckup
and all associated incremental backups. A single automated
restore restores a full backup, an optional cumulative incremental
backup, and one or more differential incremental backups.
HISTORY FILE When using this option, DB2 might not read the entire image
from NetBackup media. Consequently, NetBackup logs an error
in the Activity Monitor, which can safely be ignored .
Performing an Alternate Restore
An alternate restore allows you to restore a DB2 database to a different client or to a
different instance. You can also change the name of the database during the restore.
When to Use an Alternate Restore
Alternate restores differ from regular restores, as follows:
◆ Use the regular restor e procedur es described earlier in this chapter if you are r estoring
a database into the same instance on the same NetBackup client that hosted it
previously. In this case, the database also retains its original name.
◆ Use use alternate restore procedures described in this section if you are restoring a
database to a different instance or to a different client or if you must rename the
database during the restore.
Databases within an instance must have unique names. If you restore a database into
an instance that already has a database by that name, the alternate restore process
overwrites the existing database.
Chapter 4, Using NetBackup for DB2 77
Page 90

Performing a Restore
The following table summarizes the types of restores you can perform and whether you
need to use regular or alternate restore procedures:
Types of Restores Permitted
Regular
Object
Database
name
Instance Same Same Different Same Different Different Same Different
Client Same Different Same Same Different Same Different Different
Restore
Same Same Same Different Same Different Different Different
Alternate
Restore
Alternate
Restore
Alternate
Restore
Alternate
Restore
Alternate
Restore
Alternate
Restore
Alternate
Restore
For example, assume that you have two NetBackup clients, grade7 and grade8.
Instances class1 and class2 are on grade7. Instance class1 is on grade8. The
following figure shows this:
Alternate Restore Example
Client: grade7
Instance: class1
Databases: math1, art1
Instance: class2
Databases: eng1, art1
Instance: class1
Databases: math1, art10
Client: grade8
The following list shows some of the types of restores you can perform using alternate
restore procedures:
◆ You can restore database eng1 from instance class2 on client grade7 into instance
class1 on client grade8. Database eng1 can retain its name because it is unique to
instance class1.
◆ Y ou can restore database math1 from instance class1 on cl ient grade7 into instance
class1 on client grade8. During the restore, you need to rename math1 to math2
because class1 on grade8 already has a database named math1. Without
renaming, the existing database math1 would be overwritten.
78 NetBackup for DB2 System Administrator’s Guide for Windows
Page 91

Performing a Restore
◆ You can restore database art1 from instance class2 on client grade7 into instance
class1 on client grade7. During the restore, you need to rename art1 to art2
because instance class1 already has a database named art1. Without renaming, the
existing database art1 would be overwritten.
Preparing the Master Server for an Alternate Restore
The examples in the following procedure assume that da tabase SAMPLE was backed up by
client2, and you want to restore SAMPLE to client1.
▼ To prepare the NetBackup master server for alternate restores
1. Log onto the NetBackup master server that hosts the policy that backed up databa se
SAMPLE.
2. Create one of the following files on the NetBackup master server:
install_path\NetBackup\db\altnames\No.Restrictions
Or
install_path\NetBackup\db\altnames\dest_client_name
where dest_client_name is the name of a client that is allowed to be a destination
client for alternate restores. For example, client1.
3. (Conditional) Add the name of the NetBackup for DB2 source client to the
dest_client_name file.
Perform this step if you created a dest_client_name file. For example, add the
following line to this file:
client2
4. Start the Backup, Archive, and Restore interface.
5. Click File > Specify NetBackup Machines and Policy Type.
6. Specify the source and destination clients.
a. For the NetBackup server, specify the name of the master server that contains the
policy that backed up the database.
b. Specify the source client. For example: client2.
c. Specify the destination client. For example: client1.
Chapter 4, Using NetBackup for DB2 79
Page 92

Performing a Restore
For more information on managing client restores, see the the NetBackup System
Administration Guide, Volume 1.
Performing the Alternate Restore on the Clients
The following procedures explain how to restore a DB2 database and its transaction logs.
▼ To perform an alternate restore of a DB2 database
This procedure builds a request to DB2 to find the backup images that correspond to the
database you are trying to restore. Type the commands in this procedure from the client
that is receiving the restored database.
1. Modify the db2.conf file on the destination client by adding the following new
object identifiers:
◆ One to specify the alternate restore
◆ One to define the new database
◆ One to define the old database
◆ One to define the new log files
◆ One to define the old log files
The following example shows the keyword lines needed to specify the alternate
restore:
OBJECTTYPE ALTERNATE # Specifies an alternate restore
SRCINST db2v832d # Names the source instance that was backed up
SRCALIAS SAMPLE # Names the source database that was backed up
DESTINST db2v832t # Names the destination instance name
DESTALIAS NEWSAMPL # Names the destination database alias name
ENDOPER # Ends the object identifier
The following example shows the keyword lines needed to define the new database:
DATABASE NEWSAMPL
OBJECTTYPE DATABASE
POLICY db2-bkup
SCHEDULE Default-Application-Backup
ENDOPER
The following example shows the keywords lines needed to define the old database:
DATABASE SAMPLE
OBJECTTYPE DATABASE
POLICY db2-bkup
SCHEDULE Default-Application-Backup
ENDOPER
80 NetBackup for DB2 System Administrator’s Guide for Windows
Page 93

Performing a Restore
The following example shows the keyword lines needed to define the new data
archive log files:
DATABASE NEWSAMPLE
OBJECTTYPE ARCHIVE
POLICY db_a_db2
SCHEDULE Default-Application-Backup
#SCHEDULE User
ARCFUNC SAVE
#ARCFUNC COPY
#ARCDIR C:/home/db2inst1/arcdir
#RETDIR C:/home/db2inst1/arcdir
ENDOPER
The following example shows the keyword lines needed to define the old data archive
log files:
DATABASE SAMPLE
OBJECTTYPE ARCHIVE
POLICY db_a_db2
SCHEDULE Default-Application-Backup
#SCHEDULE User
ARCFUNC SAVE
#ARCFUNC COPY
#ARCDIR C:/home/db2inst1/arcdir
#RETDIR C:/home/db2inst1/arcdir
ENDOPER
2. On the destination client, type the DB2 RESTORE command.
Type this command in the following format:
db2 restore db db_being_restored load lib_path into new_db_name redirect
where:
db_being_restored Specify the name of the database that was backed up.
lib_path Specify the full path to the NetBackup library.
new_db_name Specify the name for the new database. If the name of the new
database matches the name of a database presently included in the
new instance, the new database overwrites the existing database.
For example:
db2 restore db sample load install_path\NetBackup\bin\nbdb2.dll into newsampl redirect
Chapter 4, Using NetBackup for DB2 81
Page 94

Performing a Restore
3. Set the location of the data files for the tablespace.
Type this command in the following format:
db2 set tablespace containers for 0 using "(path path)"
where path specif ies the DB2 install path.
For example, type one or more commands similar to the following:
db2 set tablespace containers for 0 using "(path
DB2_install_path\db2v832t\NODE0000\SQL00001\SQLT0000.0)"
4. Restore the database.
Type the RESTORE comm and in the following format:
db2 restore db
db_bring_restored continue
For example:
db2 restore db sample continue
5. (Optional) Restore the transaction logs.
Perform this step if one of the following is true:
◆ The archive logs did not originally reside on a raw device.
◆ The user exit program was used to back up the archive logs.
a. On the destination client, create a directory for the restored transaction log files.
For example:
mkdir C:\db\db2_v5\home\db2inst1\NODE0000\SQL00001\SQLOGDIR
b. Use the bprestore command to restore the logs.
For example:
bprestore install_path\db\db2_v5\home\db2inst1\NODE0000\SQL00001\SQLOGDIR\S00001.LOG
c. (Optional) Move the logs to the correct directory for the destination database.
If the directory into which you restored the log files is not the correct directory for
the destination database, move the logs to the proper location.
d. Verify that the correct owner and group permissions are enabled on the log
directory.
6. Use the DB2 ROLLFORWARD command to restore the logs.
Type this command in the following format:
82 NetBackup for DB2 System Administrator’s Guide for Windows
Page 95

Performing a Restore
db2 rollforward db new_db_name to end of logs and stop
For example:
db2 rollforward db newsampl to end of logs and stop
Chapter 4, Using NetBackup for DB2 83
Page 96

Performing a Restore
84 NetBackup for DB2 System Administrator’s Guide for Windows
Page 97

NetBackup for DB2 with Advanced Client
This chapter explains how to use NetBackup for DB2 with NetBackup Advanced Client to
perform snapshot backups of your DB2 dat abase .
To use NetBackup for DB2 with Advanced Client, you must have both NetB ackup
Advanced Client and NetBackup for DB2 licensed and installed.
The chapter provides information on the following topics:
◆ Installation and Licensing Requirements
◆ NetBackup for DB2 with Advanced Client Overview
◆ How Does NetBackup for DB2 with Advanced Client Work?
◆ Configuring Snapshot Backups
◆ Restoring Data from a Snapshot Backup
◆ Advanced Client Effects
◆ Using NetBackup for DB2 with Advanced Client
5
85
Page 98

Installation and Licensing Requirements
Installation and Licensing Requirements
To use NetBackup for DB2 with Advanced Client, you must have the f ollowing licensed
and installed:
◆ NetBackup for DB2 6.0
◆ NetBackup Advanced Client 6.0
No additional VERITAS NetBackup software is required. You might need to modify other
hardware and software configurations. For more information about the following, see the
NetBackup Advanced Client Syst em Administrator’s Guide:
◆ How to install and configure the NetBackup Advanced Client
◆ Configuration requirements for specific advanced backup methods
86 NetBackup for DB2 System Administrator’s Guide for Windows
Page 99

NetBackup for DB2 with Advanced Client Overview
NetBackup for DB2 with Advanced Client Overview
The following sections describe the NetBackup Advanced Client features that are
available for use with NetBackup for DB2.
Snapshot Backup
A snapshot is a disk image of the client's data made almost instantaneously. When used in
conjunction with NetBackup Advanced Client, NetBackup for DB2 can back up DB2
objects by taking snapshot images of the component fil es. Later, it backs up the snapshot
version, either to a Media Manager or disk storage unit.
Snapshot backup captures the data at a particular insta nt without causing significant
client downtime. Client operations and user access continue without interruption during
the backup. The resulting capture or snapshot can be backed up without affecting the
performance or availability of the database.
Instant Recovery
This feature makes backups available for instant recovery from disk. Instant recover y
combines snapshot technology with the ability to do rapid disk-based restores.
NetBackup creates the image without interrupting user access to data. Optionally, the
image is retained on disk as well as backed up to storage. Instant recovery makes it
possible to perform block-level restores.
Offhost Backup
An offhost backup shifts the burden of backup processing onto a separate backup agent,
such as an alternate client. This reduces the effect on the client's computing resources
ordinarily caused by a local backup. The backup agent reads the data from the client disk
and writes it to storage.
Proxy Copy
A proxy copy is a special type of backup in which NetBackup for DB2 turns over cont rol
of the data transfer to the NetBackup for DB2 agent. During NetBackup for DB2 backup
and restore operations, proxy copy enables NetBackup for DB2 to manage the entire data
movement between the disks containing DB2 data files and the storage devices managed
by NetBackup.
Backups and restores remain tightly integrated with NetBackup for DB2 and its catalog,
greatly simplifying administration tasks.
Chapter 5, NetBackup for DB2 with Advanced Client 87
Page 100

NetBackup for DB2 with Advanced Client Overview
File-based Operations
Standard NetBackup for DB2 b ackups and restores are stream-based. NetBackup for DB2
with Advanced Client operations are file-based. The follow ing sections illustrate the
differences between these operation types.
88 NetBackup for DB2 System Administrator’s Guide for Windows
 Loading...