

Page 1

VERITAS NetBackup
System Administrator’s Guide,
Volume II
for UNIX and Linux
TM
6.0
N15258B
September 2005
Page 2

Disclaimer
The information contained in this publication is subject to change without notice. VERITAS Software
Corporation makes no warranty of any kind with regard to this manual, including, but not limited to,
the implied warranties of merchantability and fitness for a particular purpose. VERITAS Software
Corporation shall not be liable for errors contained herein or for incidental or consequential damages
in connection with the furnishing, performance, or use of this manual.
VERITAS Legal Notice
Copyright © 1993-2005 VERITAS Software Corporation. All rights reserved. VERITAS, the VERITAS
Logo, and NetBackup are trademarks or registered trademarks of VERITAS Software Corporation or
its affiliates in the U.S. and other countries. Other names may be trademarks of their respective
owners.
Portions of this software are derived from the RSA Data Security, Inc. MD5 Message-Digest
Algorithm. Copyright 1991-92, RSA Data Security, Inc. Created 1991. All rights reserved.
VERITAS Software Corporation
350 Ellis Street
Mountain View, CA 94043
USA
Phone 650-527-8000
Fax 650-527-2908
www.veritas.com
Third-Party Copyrights
For a list of third-party copyrights, see the NetBackup Release Notes appendix.
ii NetBackup System Administrator’s Guide for UNIX and Linux, Volume II
Page 3

Contents
Preface . . . . . . . . . . . . . . . . . . . . . . . . . . . . . . . . . . . . . . . . . . . . . . . . . . . . . . . . . . . . . xix
Getting Help . . . . . . . . . . . . . . . . . . . . . . . . . . . . . . . . . . . . . . . . . . . . . . . . . . . . . . . . . . . . . xix
Accessibility Features . . . . . . . . . . . . . . . . . . . . . . . . . . . . . . . . . . . . . . . . . . . . . . . . . . . . . xxi
Comment on the Documentation . . . . . . . . . . . . . . . . . . . . . . . . . . . . . . . . . . . . . . . . . . .xxii
Chapter 1. Access Management . . . . . . . . . . . . . . . . . . . . . . . . . . . . . . . . . . . . . . . . . .1
NetBackup Access Management Components . . . . . . . . . . . . . . . . . . . . . . . . . . . . . . . . . .2
Finding NetBackup Documentation . . . . . . . . . . . . . . . . . . . . . . . . . . . . . . . . . . . . . . xix
▼ To access the NetBackup online glossary . . . . . . . . . . . . . . . . . . . . . . . . . . . . . . . xix
Accessing the VERITAS Technical Support Web Site . . . . . . . . . . . . . . . . . . . . . . . . .xx
Contacting VERITAS Licensing . . . . . . . . . . . . . . . . . . . . . . . . . . . . . . . . . . . . . . . . . . xxi
VxSS Components . . . . . . . . . . . . . . . . . . . . . . . . . . . . . . . . . . . . . . . . . . . . . . . . . . . . . . . 2
Root Broker . . . . . . . . . . . . . . . . . . . . . . . . . . . . . . . . . . . . . . . . . . . . . . . . . . . . . . . . . . . . . 3
Authentication Brokers . . . . . . . . . . . . . . . . . . . . . . . . . . . . . . . . . . . . . . . . . . . . . . . . . . . 3
Security Administrator . . . . . . . . . . . . . . . . . . . . . . . . . . . . . . . . . . . . . . . . . . . . . . . . . . .3
Installation Overview . . . . . . . . . . . . . . . . . . . . . . . . . . . . . . . . . . . . . . . . . . . . . . . . . . . . . . .5
Order for Installation . . . . . . . . . . . . . . . . . . . . . . . . . . . . . . . . . . . . . . . . . . . . . . . . . . . . .5
Order for Upgrade . . . . . . . . . . . . . . . . . . . . . . . . . . . . . . . . . . . . . . . . . . . . . . . . . . . . . . . 5
Including VxSS Databases in the NetBackup Catalog Backup . . . . . . . . . . . . . . . . . . 6
VxSS Component Distribution . . . . . . . . . . . . . . . . . . . . . . . . . . . . . . . . . . . . . . . . . . . . . 6
Installing and Configuring Access Control for Master Servers . . . . . . . . . . . . . . . . . . . . 8
Installing and Configuring Access Control for Media Servers . . . . . . . . . . . . . . . . . . . . 12
Installing and Configuring Access Control for Clients . . . . . . . . . . . . . . . . . . . . . . . . . .15
Establishing a Trust Relationship Between the Broker and the Windows Remote
iii
Page 4

Console . . . . . . . . . . . . . . . . . . . . . . . . . . . . . . . . . . . . . . . . . . . . . . . . . . . . . . . . . . . . . . . 17
Installing the Authentication Service Root Broker (Root + AB) . . . . . . . . . . . . . . . . . . . 18
Configuring Authentication on the Root Broker for Use with NetBackup . . . . . . 19
Installing the Authorization Server . . . . . . . . . . . . . . . . . . . . . . . . . . . . . . . . . . . . . . . . . . 21
Configuring the Authorization Server . . . . . . . . . . . . . . . . . . . . . . . . . . . . . . . . . . . . . 21
Configuring Access Control Host Properties . . . . . . . . . . . . . . . . . . . . . . . . . . . . . . . . . . 23
Master Server and Media Server Host Properties . . . . . . . . . . . . . . . . . . . . . . . . . . . 23
Access Control Host Properties Dialog . . . . . . . . . . . . . . . . . . . . . . . . . . . . . . . . . 23
VxSS Tab . . . . . . . . . . . . . . . . . . . . . . . . . . . . . . . . . . . . . . . . . . . . . . . . . . . . . . . . . . . 24
Authentication Domain Tab . . . . . . . . . . . . . . . . . . . . . . . . . . . . . . . . . . . . . . . . . . 24
Authorization Service Tab . . . . . . . . . . . . . . . . . . . . . . . . . . . . . . . . . . . . . . . . . . . 26
Verifying Master Server Settings . . . . . . . . . . . . . . . . . . . . . . . . . . . . . . . . . . . . . . . 26
Client Host Properties . . . . . . . . . . . . . . . . . . . . . . . . . . . . . . . . . . . . . . . . . . . . . . . . . . . 27
Access Control Host Properties Dialog . . . . . . . . . . . . . . . . . . . . . . . . . . . . . . . . . 27
VxSS Tab . . . . . . . . . . . . . . . . . . . . . . . . . . . . . . . . . . . . . . . . . . . . . . . . . . . . . . . . . . 27
Authentication Domain Tab . . . . . . . . . . . . . . . . . . . . . . . . . . . . . . . . . . . . . . . . . . 27
Access Management Troubleshooting Guidelines . . . . . . . . . . . . . . . . . . . . . . . . . . . . . . 28
Windows Verification Points . . . . . . . . . . . . . . . . . . . . . . . . . . . . . . . . . . . . . . . . . . . . . 28
Master Server Verification Points . . . . . . . . . . . . . . . . . . . . . . . . . . . . . . . . . . . . . . 30
Media Server Verification Points . . . . . . . . . . . . . . . . . . . . . . . . . . . . . . . . . . . . . . 32
Client Verification Points . . . . . . . . . . . . . . . . . . . . . . . . . . . . . . . . . . . . . . . . . . . . . 33
UNIX Verification Points . . . . . . . . . . . . . . . . . . . . . . . . . . . . . . . . . . . . . . . . . . . . . . . . 35
Master Server Verification Points . . . . . . . . . . . . . . . . . . . . . . . . . . . . . . . . . . . . . . 36
Media Server Verification Points . . . . . . . . . . . . . . . . . . . . . . . . . . . . . . . . . . . . . . 38
Client Verification Points . . . . . . . . . . . . . . . . . . . . . . . . . . . . . . . . . . . . . . . . . . . . . 39
Verification Points in a Mixed Environment with a UNIX Master Server . . . . . . . 41
Master Server Verification Points . . . . . . . . . . . . . . . . . . . . . . . . . . . . . . . . . . . . . . 43
Media Server Verification Points . . . . . . . . . . . . . . . . . . . . . . . . . . . . . . . . . . . . . . 43
Client Verification Points . . . . . . . . . . . . . . . . . . . . . . . . . . . . . . . . . . . . . . . . . . . . . 44
Verification Points in a Mixed Environment with a Windows Master Server . . . . 46
iv NetBackup System Administrator’s Guide for UNIX and Linux, Volume II
Page 5

Master Server Verification Points . . . . . . . . . . . . . . . . . . . . . . . . . . . . . . . . . . . . . . 48
Media Server Verification Points . . . . . . . . . . . . . . . . . . . . . . . . . . . . . . . . . . . . . . 48
Client Verification Points . . . . . . . . . . . . . . . . . . . . . . . . . . . . . . . . . . . . . . . . . . . . .49
Other Troubleshooting Topics . . . . . . . . . . . . . . . . . . . . . . . . . . . . . . . . . . . . . . . . . . . .51
Expired Credentials Message . . . . . . . . . . . . . . . . . . . . . . . . . . . . . . . . . . . . . . . . . . 51
Useful Debug Logs . . . . . . . . . . . . . . . . . . . . . . . . . . . . . . . . . . . . . . . . . . . . . . . . . . . 51
If Uninstalling VxSS . . . . . . . . . . . . . . . . . . . . . . . . . . . . . . . . . . . . . . . . . . . . . . . . . .51
Where Credentials Are Stored . . . . . . . . . . . . . . . . . . . . . . . . . . . . . . . . . . . . . . . . .51
How System Time Affects Access Control . . . . . . . . . . . . . . . . . . . . . . . . . . . . . . .52
VxSS Ports . . . . . . . . . . . . . . . . . . . . . . . . . . . . . . . . . . . . . . . . . . . . . . . . . . . . . . . . . . 52
Stopping VxSS Daemons . . . . . . . . . . . . . . . . . . . . . . . . . . . . . . . . . . . . . . . . . . . . . . 52
If You Lock Yourself Out of NetBackup . . . . . . . . . . . . . . . . . . . . . . . . . . . . . . . . .52
nbac_cron Utility . . . . . . . . . . . . . . . . . . . . . . . . . . . . . . . . . . . . . . . . . . . . . . . . . . . . 53
Using the Access Management Utility . . . . . . . . . . . . . . . . . . . . . . . . . . . . . . . . . . . . . . . .54
Access Management Menus . . . . . . . . . . . . . . . . . . . . . . . . . . . . . . . . . . . . . . . . . . . . . .54
Determining Who Can Access NetBackup . . . . . . . . . . . . . . . . . . . . . . . . . . . . . . . . . . . . . 56
Individual Users . . . . . . . . . . . . . . . . . . . . . . . . . . . . . . . . . . . . . . . . . . . . . . . . . . . . . . . .56
User Groups . . . . . . . . . . . . . . . . . . . . . . . . . . . . . . . . . . . . . . . . . . . . . . . . . . . . . . . . . . . 58
Default User Groups . . . . . . . . . . . . . . . . . . . . . . . . . . . . . . . . . . . . . . . . . . . . . . . . .58
Additional User Groups . . . . . . . . . . . . . . . . . . . . . . . . . . . . . . . . . . . . . . . . . . . . . . 60
User Group Configuration . . . . . . . . . . . . . . . . . . . . . . . . . . . . . . . . . . . . . . . . . . . . . . . 60
▼ To create a new user group . . . . . . . . . . . . . . . . . . . . . . . . . . . . . . . . . . . . . . . . . . . 60
▼ To create a new user group by copying an existing user group . . . . . . . . . . . . . . . 60
Renaming User Groups . . . . . . . . . . . . . . . . . . . . . . . . . . . . . . . . . . . . . . . . . . . . . . . 61
General Tab . . . . . . . . . . . . . . . . . . . . . . . . . . . . . . . . . . . . . . . . . . . . . . . . . . . . . . . . 61
Users Tab . . . . . . . . . . . . . . . . . . . . . . . . . . . . . . . . . . . . . . . . . . . . . . . . . . . . . . . . . . 61
Defining User Groups and Users . . . . . . . . . . . . . . . . . . . . . . . . . . . . . . . . . . . . . . . . . . 62
Defining a User Group . . . . . . . . . . . . . . . . . . . . . . . . . . . . . . . . . . . . . . . . . . . . . . . 63
▼ To add a new user to a user group . . . . . . . . . . . . . . . . . . . . . . . . . . . . . . . . . . . . . . 63
Permissions Tab . . . . . . . . . . . . . . . . . . . . . . . . . . . . . . . . . . . . . . . . . . . . . . . . . . . . .64
Contents v
Page 6

Authorization Objects and Permissions List . . . . . . . . . . . . . . . . . . . . . . . . . . . . . 64
Permissions for Default NetBackup User Groups . . . . . . . . . . . . . . . . . . . . . . . . . . . 65
Backup, Archive, and Restore (BAR) Client Interface . . . . . . . . . . . . . . . . . . . . . 65
License Permissions . . . . . . . . . . . . . . . . . . . . . . . . . . . . . . . . . . . . . . . . . . . . . . . . . . 66
Jobs Tab in the Activity Monitor Permissions . . . . . . . . . . . . . . . . . . . . . . . . . . . . 66
Permissions in the Device Monitor . . . . . . . . . . . . . . . . . . . . . . . . . . . . . . . . . . . . . 67
Daemons Tab Permissions in the Activity Monitor . . . . . . . . . . . . . . . . . . . . . . . 68
Reports Permissions . . . . . . . . . . . . . . . . . . . . . . . . . . . . . . . . . . . . . . . . . . . . . . . . . 69
Policy Permissions . . . . . . . . . . . . . . . . . . . . . . . . . . . . . . . . . . . . . . . . . . . . . . . . . . . 69
Storage Units Permissions . . . . . . . . . . . . . . . . . . . . . . . . . . . . . . . . . . . . . . . . . . . . 70
Storage Unit Groups Permissions . . . . . . . . . . . . . . . . . . . . . . . . . . . . . . . . . . . . . . 70
Catalog Permissions . . . . . . . . . . . . . . . . . . . . . . . . . . . . . . . . . . . . . . . . . . . . . . . . . 71
Host Properties Permissions . . . . . . . . . . . . . . . . . . . . . . . . . . . . . . . . . . . . . . . . . . 72
Media Permissions . . . . . . . . . . . . . . . . . . . . . . . . . . . . . . . . . . . . . . . . . . . . . . . . . . . 72
Volume Group Permissions . . . . . . . . . . . . . . . . . . . . . . . . . . . . . . . . . . . . . . . . . . . 73
Volume Pools Permissions . . . . . . . . . . . . . . . . . . . . . . . . . . . . . . . . . . . . . . . . . . . . 73
Robots Permissions . . . . . . . . . . . . . . . . . . . . . . . . . . . . . . . . . . . . . . . . . . . . . . . . . . 74
Device Host Permissions . . . . . . . . . . . . . . . . . . . . . . . . . . . . . . . . . . . . . . . . . . . . . 74
Chapter 2. Enhanced Authentication and Authorization . . . . . . . . . . . . . . . . . . . . . 75
Common Configuration Elements . . . . . . . . . . . . . . . . . . . . . . . . . . . . . . . . . . . . . . . . . . . 76
Configuration Files . . . . . . . . . . . . . . . . . . . . . . . . . . . . . . . . . . . . . . . . . . . . . . . . . . . . . 76
methods.txt . . . . . . . . . . . . . . . . . . . . . . . . . . . . . . . . . . . . . . . . . . . . . . . . . . . . . . . . . 76
methods_allow.txt . . . . . . . . . . . . . . . . . . . . . . . . . . . . . . . . . . . . . . . . . . . . . . . . . . . 77
methods_deny.txt . . . . . . . . . . . . . . . . . . . . . . . . . . . . . . . . . . . . . . . . . . . . . . . . . . . 78
names_allow.txt . . . . . . . . . . . . . . . . . . . . . . . . . . . . . . . . . . . . . . . . . . . . . . . . . . . . . 79
names_deny.txt . . . . . . . . . . . . . . . . . . . . . . . . . . . . . . . . . . . . . . . . . . . . . . . . . . . . . 80
authorize.txt . . . . . . . . . . . . . . . . . . . . . . . . . . . . . . . . . . . . . . . . . . . . . . . . . . . . . . . . 80
Library Files . . . . . . . . . . . . . . . . . . . . . . . . . . . . . . . . . . . . . . . . . . . . . . . . . . . . . . . . . . . 82
Commands . . . . . . . . . . . . . . . . . . . . . . . . . . . . . . . . . . . . . . . . . . . . . . . . . . . . . . . . . . . . 82
vi NetBackup System Administrator’s Guide for UNIX and Linux, Volume II
Page 7

bpauthorize . . . . . . . . . . . . . . . . . . . . . . . . . . . . . . . . . . . . . . . . . . . . . . . . . . . . . . . . . 82
bpauthsync . . . . . . . . . . . . . . . . . . . . . . . . . . . . . . . . . . . . . . . . . . . . . . . . . . . . . . . . .82
vopie_util . . . . . . . . . . . . . . . . . . . . . . . . . . . . . . . . . . . . . . . . . . . . . . . . . . . . . . . . . . .83
Processes: vopied Daemon . . . . . . . . . . . . . . . . . . . . . . . . . . . . . . . . . . . . . . . . . . . . . . . 83
Files . . . . . . . . . . . . . . . . . . . . . . . . . . . . . . . . . . . . . . . . . . . . . . . . . . . . . . . . . . . . . . . . . . . 83
vopie Files . . . . . . . . . . . . . . . . . . . . . . . . . . . . . . . . . . . . . . . . . . . . . . . . . . . . . . . . . .84
temp File . . . . . . . . . . . . . . . . . . . . . . . . . . . . . . . . . . . . . . . . . . . . . . . . . . . . . . . . . . .85
Enhanced Authentication . . . . . . . . . . . . . . . . . . . . . . . . . . . . . . . . . . . . . . . . . . . . . . . . . . . 86
Using vopie Enhanced Authentication . . . . . . . . . . . . . . . . . . . . . . . . . . . . . . . . . . . . . 86
▼ To use the vopie enhanced authentication method . . . . . . . . . . . . . . . . . . . . . . . . . 86
vopie Enhanced Authentication Examples . . . . . . . . . . . . . . . . . . . . . . . . . . . . . . . 87
Using noauth Rather than vopie Authentication . . . . . . . . . . . . . . . . . . . . . . . . . . . .91
Troubleshooting Authentication . . . . . . . . . . . . . . . . . . . . . . . . . . . . . . . . . . . . . . . . . .95
Enhanced Authorization . . . . . . . . . . . . . . . . . . . . . . . . . . . . . . . . . . . . . . . . . . . . . . . . . . . . 95
Enhanced Authorization Process . . . . . . . . . . . . . . . . . . . . . . . . . . . . . . . . . . . . . . . . . . 96
Gaining Access to a Server . . . . . . . . . . . . . . . . . . . . . . . . . . . . . . . . . . . . . . . . . . . . 96
Gaining Access to a Client . . . . . . . . . . . . . . . . . . . . . . . . . . . . . . . . . . . . . . . . . . . . . 97
Configuring NetBackup Enhanced Authorization . . . . . . . . . . . . . . . . . . . . . . . . . . . 98
Enabling NetBackup Enhanced Authentication . . . . . . . . . . . . . . . . . . . . . . . . . . 98
Adding an Authorized User . . . . . . . . . . . . . . . . . . . . . . . . . . . . . . . . . . . . . . . . . . . 99
▼ To create a list of authorized users . . . . . . . . . . . . . . . . . . . . . . . . . . . . . . . . . . . . . 99
Using the Administration Console to Specify Preferred Groups (Optional) . . . 99
▼ To specify a preferred group . . . . . . . . . . . . . . . . . . . . . . . . . . . . . . . . . . . . . . . . . 100
Example Configuration . . . . . . . . . . . . . . . . . . . . . . . . . . . . . . . . . . . . . . . . . . . . . . . . .101
Chapter 3. Additional Configuration . . . . . . . . . . . . . . . . . . . . . . . . . . . . . . . . . . . . . 103
Multiplexing . . . . . . . . . . . . . . . . . . . . . . . . . . . . . . . . . . . . . . . . . . . . . . . . . . . . . . . . . . . . . 104
When to Use Multiplexing . . . . . . . . . . . . . . . . . . . . . . . . . . . . . . . . . . . . . . . . . . . . . . 104
How to Configure Multiplexing . . . . . . . . . . . . . . . . . . . . . . . . . . . . . . . . . . . . . . . . . 105
Maximum Multiplexing Per Drive for Storage Unit . . . . . . . . . . . . . . . . . . . . . . 105
Contents vii
Page 8

Media Multiplexing for a Schedule . . . . . . . . . . . . . . . . . . . . . . . . . . . . . . . . . . . 105
Other Configuration Settings to Consider Using Multiplexing . . . . . . . . . . . . 108
Demultiplexing . . . . . . . . . . . . . . . . . . . . . . . . . . . . . . . . . . . . . . . . . . . . . . . . . . . . . . . 109
Using Multiple NetBackup Servers . . . . . . . . . . . . . . . . . . . . . . . . . . . . . . . . . . . . . . . . . 110
Configuring a Master and Media Server Grouping . . . . . . . . . . . . . . . . . . . . . . . . . . . . 111
Software on Each Server . . . . . . . . . . . . . . . . . . . . . . . . . . . . . . . . . . . . . . . . . . . . . . . . 112
NetBackup Catalogs . . . . . . . . . . . . . . . . . . . . . . . . . . . . . . . . . . . . . . . . . . . . . . . . . . . 113
Adding a Media Server . . . . . . . . . . . . . . . . . . . . . . . . . . . . . . . . . . . . . . . . . . . . . . . . . . . 114
▼ To add a media server . . . . . . . . . . . . . . . . . . . . . . . . . . . . . . . . . . . . . . . . . . . . . . 114
NetBackup Configuration Options . . . . . . . . . . . . . . . . . . . . . . . . . . . . . . . . . . . . . . . . . . 117
Syntax Rules for bp.conf Options . . . . . . . . . . . . . . . . . . . . . . . . . . . . . . . . . . . . . . . . 117
bp.conf Options for Servers . . . . . . . . . . . . . . . . . . . . . . . . . . . . . . . . . . . . . . . . . . . . . 118
ALLOW_MEDIA_OVERWRITE . . . . . . . . . . . . . . . . . . . . . . . . . . . . . . . . . . . . . . 118
ALLOW_MULTIPLE_RETENTIONS_PER_MEDIA . . . . . . . . . . . . . . . . . . . . . 118
ALLOW_NON_RESERVED_PORTS . . . . . . . . . . . . . . . . . . . . . . . . . . . . . . . . . . 119
AUTHENTICATION_DOMAIN . . . . . . . . . . . . . . . . . . . . . . . . . . . . . . . . . . . . . 119
AUTHORIZATION_SERVICE . . . . . . . . . . . . . . . . . . . . . . . . . . . . . . . . . . . . . . . 120
BPBRM_VERBOSE . . . . . . . . . . . . . . . . . . . . . . . . . . . . . . . . . . . . . . . . . . . . . . . . . 121
BPDBJOBS_COLDEFS . . . . . . . . . . . . . . . . . . . . . . . . . . . . . . . . . . . . . . . . . . . . . . 121
BPDBM_VERBOSE . . . . . . . . . . . . . . . . . . . . . . . . . . . . . . . . . . . . . . . . . . . . . . . . . 124
BPRD_VERBOSE . . . . . . . . . . . . . . . . . . . . . . . . . . . . . . . . . . . . . . . . . . . . . . . . . . . 125
BPTM_VERBOSE . . . . . . . . . . . . . . . . . . . . . . . . . . . . . . . . . . . . . . . . . . . . . . . . . . . 126
BPEND_TIMEOUT . . . . . . . . . . . . . . . . . . . . . . . . . . . . . . . . . . . . . . . . . . . . . . . . . 126
BPSTART_TIMEOUT . . . . . . . . . . . . . . . . . . . . . . . . . . . . . . . . . . . . . . . . . . . . . . . 127
CHECK_RESTORE_CLIENT . . . . . . . . . . . . . . . . . . . . . . . . . . . . . . . . . . . . . . . . . 127
CLIENT_CONNECT_TIMEOUT . . . . . . . . . . . . . . . . . . . . . . . . . . . . . . . . . . . . . 127
CLIENT_PORT_WINDOW . . . . . . . . . . . . . . . . . . . . . . . . . . . . . . . . . . . . . . . . . . 127
CLIENT_READ_TIMEOUT . . . . . . . . . . . . . . . . . . . . . . . . . . . . . . . . . . . . . . . . . . 128
CLIENT_RESERVED_PORT_WINDOW . . . . . . . . . . . . . . . . . . . . . . . . . . . . . . . 129
CONNECT_OPTIONS . . . . . . . . . . . . . . . . . . . . . . . . . . . . . . . . . . . . . . . . . . . . . . 129
viii NetBackup System Administrator’s Guide for UNIX and Linux, Volume II
Page 9

DEFAULT_CONNECT_OPTIONS . . . . . . . . . . . . . . . . . . . . . . . . . . . . . . . . . . . . 131
DISABLE_JOB_LOGGING . . . . . . . . . . . . . . . . . . . . . . . . . . . . . . . . . . . . . . . . . . . 132
DISABLE_STANDALONE_DRIVE_EXTENSIONS . . . . . . . . . . . . . . . . . . . . . . 132
DISABLE_SCSI_RESERVE . . . . . . . . . . . . . . . . . . . . . . . . . . . . . . . . . . . . . . . . . . . 132
DISALLOW_BACKUPS_SPANNING_MEDIA . . . . . . . . . . . . . . . . . . . . . . . . . . 133
DISALLOW_CLIENT_LIST_RESTORE . . . . . . . . . . . . . . . . . . . . . . . . . . . . . . . .133
DISALLOW_CLIENT_RESTORE . . . . . . . . . . . . . . . . . . . . . . . . . . . . . . . . . . . . . . 133
EMMSERVER . . . . . . . . . . . . . . . . . . . . . . . . . . . . . . . . . . . . . . . . . . . . . . . . . . . . . . 133
ENABLE_ROBUST_LOGGING . . . . . . . . . . . . . . . . . . . . . . . . . . . . . . . . . . . . . . . 134
FAILOVER_RESTORE_MEDIA_SERVERS . . . . . . . . . . . . . . . . . . . . . . . . . . . . .134
FORCE_RESTORE_MEDIA_SERVER . . . . . . . . . . . . . . . . . . . . . . . . . . . . . . . . . .135
GENERATE_ENGLISH_LOGS . . . . . . . . . . . . . . . . . . . . . . . . . . . . . . . . . . . . . . . 135
INCOMPLETE_JOB_CLEAN_INTERVAL . . . . . . . . . . . . . . . . . . . . . . . . . . . . . .135
INITIAL_BROWSE_SEARCH_LIMIT . . . . . . . . . . . . . . . . . . . . . . . . . . . . . . . . . .136
LIMIT_BANDWIDTH . . . . . . . . . . . . . . . . . . . . . . . . . . . . . . . . . . . . . . . . . . . . . . . 136
MEDIA_ID_PREFIX . . . . . . . . . . . . . . . . . . . . . . . . . . . . . . . . . . . . . . . . . . . . . . . . .139
MEDIA_UNMOUNT_DELAY . . . . . . . . . . . . . . . . . . . . . . . . . . . . . . . . . . . . . . . .139
MEDIA_REQUEST_DELAY . . . . . . . . . . . . . . . . . . . . . . . . . . . . . . . . . . . . . . . . . . 140
MEDIA_SERVER . . . . . . . . . . . . . . . . . . . . . . . . . . . . . . . . . . . . . . . . . . . . . . . . . . .140
MPX_RESTORE_DELAY . . . . . . . . . . . . . . . . . . . . . . . . . . . . . . . . . . . . . . . . . . . .140
MUST_USE_LOCAL_DRIVE . . . . . . . . . . . . . . . . . . . . . . . . . . . . . . . . . . . . . . . . . 140
NBRB_CLEANUP_OBSOLETE_DBINFO . . . . . . . . . . . . . . . . . . . . . . . . . . . . . . 141
NBRB_ENABLE_OPTIMIZATIONS . . . . . . . . . . . . . . . . . . . . . . . . . . . . . . . . . . . 141
NBRB_FORCE_FULL_EVAL . . . . . . . . . . . . . . . . . . . . . . . . . . . . . . . . . . . . . . . . . 141
NBRB_REEVAL_PENDING . . . . . . . . . . . . . . . . . . . . . . . . . . . . . . . . . . . . . . . . . . 141
NBRB_REEVAL_PERIOD . . . . . . . . . . . . . . . . . . . . . . . . . . . . . . . . . . . . . . . . . . . . 142
NBRB_RETRY_DELAY_AFTER_EMM_ERR . . . . . . . . . . . . . . . . . . . . . . . . . . . . 142
NBRB_MPX_GROUP_UNLOAD_DELAY . . . . . . . . . . . . . . . . . . . . . . . . . . . . . . 142
RANDOM_PORTS . . . . . . . . . . . . . . . . . . . . . . . . . . . . . . . . . . . . . . . . . . . . . . . . . . 142
RE_READ_INTERVAL . . . . . . . . . . . . . . . . . . . . . . . . . . . . . . . . . . . . . . . . . . . . . .143
Contents ix
Page 10

REQUIRED_INTERFACE . . . . . . . . . . . . . . . . . . . . . . . . . . . . . . . . . . . . . . . . . . . 143
REQUIRED_NETWORK . . . . . . . . . . . . . . . . . . . . . . . . . . . . . . . . . . . . . . . . . . . . 145
SERVER . . . . . . . . . . . . . . . . . . . . . . . . . . . . . . . . . . . . . . . . . . . . . . . . . . . . . . . . . . . 145
SERVER_PORT_WINDOW . . . . . . . . . . . . . . . . . . . . . . . . . . . . . . . . . . . . . . . . . . 146
SERVER_RESERVED_PORT_WINDOW . . . . . . . . . . . . . . . . . . . . . . . . . . . . . . . 146
SKIP_RESTORE_TO_SYMLINK_DIR . . . . . . . . . . . . . . . . . . . . . . . . . . . . . . . . . 147
SERVER_CONNECT_TIMEOUT . . . . . . . . . . . . . . . . . . . . . . . . . . . . . . . . . . . . . 148
UNLINK_ON_OVERWRITE . . . . . . . . . . . . . . . . . . . . . . . . . . . . . . . . . . . . . . . . . 148
USE_VXSS . . . . . . . . . . . . . . . . . . . . . . . . . . . . . . . . . . . . . . . . . . . . . . . . . . . . . . . . 149
VERBOSE . . . . . . . . . . . . . . . . . . . . . . . . . . . . . . . . . . . . . . . . . . . . . . . . . . . . . . . . . 149
VXSS_NETWORK . . . . . . . . . . . . . . . . . . . . . . . . . . . . . . . . . . . . . . . . . . . . . . . . . . 150
bp.conf Options for UNIX Clients . . . . . . . . . . . . . . . . . . . . . . . . . . . . . . . . . . . . . . . . 151
ALLOW_NON_RESERVED_PORTS . . . . . . . . . . . . . . . . . . . . . . . . . . . . . . . . . . 152
AUTHENTICATION_DOMAIN . . . . . . . . . . . . . . . . . . . . . . . . . . . . . . . . . . . . . 152
BPARCHIVE_POLICY . . . . . . . . . . . . . . . . . . . . . . . . . . . . . . . . . . . . . . . . . . . . . . 153
BPARCHIVE_SCHED . . . . . . . . . . . . . . . . . . . . . . . . . . . . . . . . . . . . . . . . . . . . . . . 153
BPBACKUP_POLICY . . . . . . . . . . . . . . . . . . . . . . . . . . . . . . . . . . . . . . . . . . . . . . . 153
BPBACKUP_SCHED . . . . . . . . . . . . . . . . . . . . . . . . . . . . . . . . . . . . . . . . . . . . . . . . 153
BUSY_FILE_ACTION . . . . . . . . . . . . . . . . . . . . . . . . . . . . . . . . . . . . . . . . . . . . . . . 154
BUSY_FILE_DIRECTORY . . . . . . . . . . . . . . . . . . . . . . . . . . . . . . . . . . . . . . . . . . . 154
BUSY_FILE_NOTIFY_USER . . . . . . . . . . . . . . . . . . . . . . . . . . . . . . . . . . . . . . . . . 155
BUSY_FILE_PROCESSING . . . . . . . . . . . . . . . . . . . . . . . . . . . . . . . . . . . . . . . . . . 155
CLIENT_NAME . . . . . . . . . . . . . . . . . . . . . . . . . . . . . . . . . . . . . . . . . . . . . . . . . . . . 155
CLIENT_PORT_WINDOW . . . . . . . . . . . . . . . . . . . . . . . . . . . . . . . . . . . . . . . . . . 156
CLIENT_READ_TIMEOUT . . . . . . . . . . . . . . . . . . . . . . . . . . . . . . . . . . . . . . . . . . 156
CLIENT_RESERVED_PORT_WINDOW . . . . . . . . . . . . . . . . . . . . . . . . . . . . . . . 156
COMPRESS_SUFFIX . . . . . . . . . . . . . . . . . . . . . . . . . . . . . . . . . . . . . . . . . . . . . . . . 156
CRYPT_CIPHER . . . . . . . . . . . . . . . . . . . . . . . . . . . . . . . . . . . . . . . . . . . . . . . . . . . 156
CRYPT_KIND . . . . . . . . . . . . . . . . . . . . . . . . . . . . . . . . . . . . . . . . . . . . . . . . . . . . . 157
CRYPT_OPTION . . . . . . . . . . . . . . . . . . . . . . . . . . . . . . . . . . . . . . . . . . . . . . . . . . . 157
x NetBackup System Administrator’s Guide for UNIX and Linux, Volume II
Page 11

CRYPT_STRENGTH . . . . . . . . . . . . . . . . . . . . . . . . . . . . . . . . . . . . . . . . . . . . . . . .158
CRYPT_LIBPATH . . . . . . . . . . . . . . . . . . . . . . . . . . . . . . . . . . . . . . . . . . . . . . . . . . 158
CRYPT_KEYFILE . . . . . . . . . . . . . . . . . . . . . . . . . . . . . . . . . . . . . . . . . . . . . . . . . . . 159
DISALLOW_SERVER_FILE_WRITES . . . . . . . . . . . . . . . . . . . . . . . . . . . . . . . . . . 159
DO_NOT_RESET_FILE_ACCESS_TIME . . . . . . . . . . . . . . . . . . . . . . . . . . . . . . . 160
GENERATE_ENGLISH_LOGS . . . . . . . . . . . . . . . . . . . . . . . . . . . . . . . . . . . . . . . 160
IGNORE_XATTR . . . . . . . . . . . . . . . . . . . . . . . . . . . . . . . . . . . . . . . . . . . . . . . . . . .160
INFORMIX_HOME . . . . . . . . . . . . . . . . . . . . . . . . . . . . . . . . . . . . . . . . . . . . . . . . . 160
INITIAL_BROWSE_SEARCH_LIMIT . . . . . . . . . . . . . . . . . . . . . . . . . . . . . . . . . .161
KEEP_DATABASE_COMM_FILE . . . . . . . . . . . . . . . . . . . . . . . . . . . . . . . . . . . . . 161
KEEP_LOGS_DAYS . . . . . . . . . . . . . . . . . . . . . . . . . . . . . . . . . . . . . . . . . . . . . . . . . 161
LIST_FILES_TIMEOUT . . . . . . . . . . . . . . . . . . . . . . . . . . . . . . . . . . . . . . . . . . . . . .161
LOCKED_FILE_ACTION . . . . . . . . . . . . . . . . . . . . . . . . . . . . . . . . . . . . . . . . . . . . 162
MEDIA_SERVER . . . . . . . . . . . . . . . . . . . . . . . . . . . . . . . . . . . . . . . . . . . . . . . . . . .162
MEGABYTES_OF_MEMORY . . . . . . . . . . . . . . . . . . . . . . . . . . . . . . . . . . . . . . . . . 162
NFS_ACCESS_TIMEOUT . . . . . . . . . . . . . . . . . . . . . . . . . . . . . . . . . . . . . . . . . . . . 162
RANDOM_PORTS . . . . . . . . . . . . . . . . . . . . . . . . . . . . . . . . . . . . . . . . . . . . . . . . . . 162
RESTORE_RETRIES . . . . . . . . . . . . . . . . . . . . . . . . . . . . . . . . . . . . . . . . . . . . . . . . .163
REQUIRED_INTERFACE . . . . . . . . . . . . . . . . . . . . . . . . . . . . . . . . . . . . . . . . . . . .163
SERVER_PORT_WINDOW . . . . . . . . . . . . . . . . . . . . . . . . . . . . . . . . . . . . . . . . . . 163
SERVER . . . . . . . . . . . . . . . . . . . . . . . . . . . . . . . . . . . . . . . . . . . . . . . . . . . . . . . . . . . 163
SYBASE_HOME . . . . . . . . . . . . . . . . . . . . . . . . . . . . . . . . . . . . . . . . . . . . . . . . . . . .164
USE_CTIME_FOR_INCREMENTALS . . . . . . . . . . . . . . . . . . . . . . . . . . . . . . . . . 164
USE_FILE_CHG_LOG . . . . . . . . . . . . . . . . . . . . . . . . . . . . . . . . . . . . . . . . . . . . . .164
USE_VXSS . . . . . . . . . . . . . . . . . . . . . . . . . . . . . . . . . . . . . . . . . . . . . . . . . . . . . . . . . 165
USEMAIL . . . . . . . . . . . . . . . . . . . . . . . . . . . . . . . . . . . . . . . . . . . . . . . . . . . . . . . . . . 165
VERBOSE . . . . . . . . . . . . . . . . . . . . . . . . . . . . . . . . . . . . . . . . . . . . . . . . . . . . . . . . . . 165
VXSS_NETWORK . . . . . . . . . . . . . . . . . . . . . . . . . . . . . . . . . . . . . . . . . . . . . . . . . . 165
UNIX Client Examples . . . . . . . . . . . . . . . . . . . . . . . . . . . . . . . . . . . . . . . . . . . . . . . . . 166
Example /usr/openv/netbackup/bp.conf File . . . . . . . . . . . . . . . . . . . . . . . . . . 166
Contents xi
Page 12

Example $HOME/bp.conf File . . . . . . . . . . . . . . . . . . . . . . . . . . . . . . . . . . . . . . . 166
Dynamic Host Name and IP Addressing . . . . . . . . . . . . . . . . . . . . . . . . . . . . . . . . . . . . 167
Setting up Dynamic IP Addresses and Host Names . . . . . . . . . . . . . . . . . . . . . . . . 168
Configuring the NetBackup Master Server . . . . . . . . . . . . . . . . . . . . . . . . . . . . . . . . 169
Configuring a Dynamic Microsoft Windows Client . . . . . . . . . . . . . . . . . . . . . . . . 171
Configuring a Dynamic UNIX NetBackup Client . . . . . . . . . . . . . . . . . . . . . . . . . . 171
Busy-File Processing (UNIX Clients Only) . . . . . . . . . . . . . . . . . . . . . . . . . . . . . . . . . . . 173
Getting Started . . . . . . . . . . . . . . . . . . . . . . . . . . . . . . . . . . . . . . . . . . . . . . . . . . . . . . . . 173
Modifying bp.conf to Configure Busy-File Processing . . . . . . . . . . . . . . . . . . . . . . 174
BUSY_FILE_PROCESSING . . . . . . . . . . . . . . . . . . . . . . . . . . . . . . . . . . . . . . . . . . 174
BUSY_FILE_DIRECTORY . . . . . . . . . . . . . . . . . . . . . . . . . . . . . . . . . . . . . . . . . . . 174
BUSY_FILE_ACTION . . . . . . . . . . . . . . . . . . . . . . . . . . . . . . . . . . . . . . . . . . . . . . . 174
Creating Action Files . . . . . . . . . . . . . . . . . . . . . . . . . . . . . . . . . . . . . . . . . . . . . . . . . . . 176
Logs Directory . . . . . . . . . . . . . . . . . . . . . . . . . . . . . . . . . . . . . . . . . . . . . . . . . . . . . . . . 177
Modifying bpend_notify_busy . . . . . . . . . . . . . . . . . . . . . . . . . . . . . . . . . . . . . . . . . . 178
Configuring E-mail Notifications . . . . . . . . . . . . . . . . . . . . . . . . . . . . . . . . . . . . . . . . . . . 179
Specifying the Locale of the NetBackup Installation . . . . . . . . . . . . . . . . . . . . . . . . . . . 180
Adjusting Time Zones in the NetBackup-Java Console . . . . . . . . . . . . . . . . . . . . . . . . 181
▼ To set the time zone and Daylight Savings Time . . . . . . . . . . . . . . . . . . . . . . . . . 182
Chapter 4. Using bpadm . . . . . . . . . . . . . . . . . . . . . . . . . . . . . . . . . . . . . . . . . . . . . . 185
Starting bpadm . . . . . . . . . . . . . . . . . . . . . . . . . . . . . . . . . . . . . . . . . . . . . . . . . . . . . . . . . . 186
Defining and Managing Storage Units . . . . . . . . . . . . . . . . . . . . . . . . . . . . . . . . . . . . . . 187
Adding a Removable or Robotic Storage Unit . . . . . . . . . . . . . . . . . . . . . . . . . . . . . 187
▼ To add a removable or robotic storage unit . . . . . . . . . . . . . . . . . . . . . . . . . . . . . . 189
Adding a Disk Type Storage Unit . . . . . . . . . . . . . . . . . . . . . . . . . . . . . . . . . . . . . . . . 191
▼ To add a disk type storage unit . . . . . . . . . . . . . . . . . . . . . . . . . . . . . . . . . . . . . . . 193
Displaying and Changing Storage Unit Configurations . . . . . . . . . . . . . . . . . . . . . 194
▼ To use the Storage Unit Management menu . . . . . . . . . . . . . . . . . . . . . . . . . . . . 194
Defining and Managing Storage Unit Groups . . . . . . . . . . . . . . . . . . . . . . . . . . . . . . . . 195
xii NetBackup System Administrator’s Guide for UNIX and Linux, Volume II
Page 13

Adding a Storage Unit Group . . . . . . . . . . . . . . . . . . . . . . . . . . . . . . . . . . . . . . . . . . . 195
▼ To add a storage unit group . . . . . . . . . . . . . . . . . . . . . . . . . . . . . . . . . . . . . . . . . 196
Displaying and Changing Storage Unit Group Configurations . . . . . . . . . . . . . . . 197
▼ To view or change storage unit group configurations . . . . . . . . . . . . . . . . . . . . . . 197
Defining and Managing Policies . . . . . . . . . . . . . . . . . . . . . . . . . . . . . . . . . . . . . . . . . . . . 198
Adding a Policy . . . . . . . . . . . . . . . . . . . . . . . . . . . . . . . . . . . . . . . . . . . . . . . . . . . . . . . 199
▼ To add a policy . . . . . . . . . . . . . . . . . . . . . . . . . . . . . . . . . . . . . . . . . . . . . . . . . . . .199
Displaying and Changing Policy Configurations . . . . . . . . . . . . . . . . . . . . . . . . . . . 203
▼ To view or change policy configurations . . . . . . . . . . . . . . . . . . . . . . . . . . . . . . . . 203
Defining and Managing the Client List for a Policy . . . . . . . . . . . . . . . . . . . . . . . . .204
Adding Clients to a Policy . . . . . . . . . . . . . . . . . . . . . . . . . . . . . . . . . . . . . . . . . . . 204
▼ To add clients to a policy . . . . . . . . . . . . . . . . . . . . . . . . . . . . . . . . . . . . . . . . . . . .204
Displaying Client Lists and Deleting Clients from a Policy . . . . . . . . . . . . . . . . 206
▼ To view client lists or delete clients from a policy . . . . . . . . . . . . . . . . . . . . . . . . .206
Defining and Managing the Selections List for a Policy . . . . . . . . . . . . . . . . . . . . . . 207
Adding to a Selections List . . . . . . . . . . . . . . . . . . . . . . . . . . . . . . . . . . . . . . . . . . . 207
▼ To add entries to a selections list . . . . . . . . . . . . . . . . . . . . . . . . . . . . . . . . . . . . . . 207
Displaying and Changing a File List . . . . . . . . . . . . . . . . . . . . . . . . . . . . . . . . . . . 209
▼ To view file lists or delete files from a policy . . . . . . . . . . . . . . . . . . . . . . . . . . . . .209
Defining and Managing Schedules for a Policy . . . . . . . . . . . . . . . . . . . . . . . . . . . . .209
Adding a Schedule . . . . . . . . . . . . . . . . . . . . . . . . . . . . . . . . . . . . . . . . . . . . . . . . . . 209
▼ To add either an automatic or user-directed schedule . . . . . . . . . . . . . . . . . . . . . . 209
Displaying and Modifying a Schedule . . . . . . . . . . . . . . . . . . . . . . . . . . . . . . . . . 214
▼ To view or modify schedules . . . . . . . . . . . . . . . . . . . . . . . . . . . . . . . . . . . . . . . . . 214
Defining NetBackup Global Attributes . . . . . . . . . . . . . . . . . . . . . . . . . . . . . . . . . . . . . . 216
▼ To list or modify Global attributes . . . . . . . . . . . . . . . . . . . . . . . . . . . . . . . . . . . . 217
Installing NetBackup Software on All Trusting Client Hosts . . . . . . . . . . . . . . . . . . . . 220
Displaying Reports . . . . . . . . . . . . . . . . . . . . . . . . . . . . . . . . . . . . . . . . . . . . . . . . . . . . . . .221
▼ To view reports or change report parameters . . . . . . . . . . . . . . . . . . . . . . . . . . . . 221
▼ To view media reports or change report parameters . . . . . . . . . . . . . . . . . . . . . . . 223
Contents xiii
Page 14

Managing bprd (NetBackup Request Daemon) . . . . . . . . . . . . . . . . . . . . . . . . . . . . . . . 224
▼ To manage the request daemon . . . . . . . . . . . . . . . . . . . . . . . . . . . . . . . . . . . . . . . 224
Redefining Retention Levels . . . . . . . . . . . . . . . . . . . . . . . . . . . . . . . . . . . . . . . . . . . . . . . 225
▼ To redefine retention levels . . . . . . . . . . . . . . . . . . . . . . . . . . . . . . . . . . . . . . . . . . 225
Performing Manual Backups . . . . . . . . . . . . . . . . . . . . . . . . . . . . . . . . . . . . . . . . . . . . . . . 227
▼ To perform manual backups . . . . . . . . . . . . . . . . . . . . . . . . . . . . . . . . . . . . . . . . . 227
Backing Up the NetBackup Catalog Files . . . . . . . . . . . . . . . . . . . . . . . . . . . . . . . . . . . . 228
Listing Catalog Backup Settings . . . . . . . . . . . . . . . . . . . . . . . . . . . . . . . . . . . . . . . . . 229
Modifying Offline Catalog Backup Settings . . . . . . . . . . . . . . . . . . . . . . . . . . . . . . . 232
Deleting Offline Catalog Backup Media ID . . . . . . . . . . . . . . . . . . . . . . . . . . . . . . . . 235
Performing Manual Offline Catalog Backups . . . . . . . . . . . . . . . . . . . . . . . . . . . . . . 235
Adding Backup File Paths to an Offline Catalog Backup . . . . . . . . . . . . . . . . . . . . 235
▼ To add an offline catalog backup path . . . . . . . . . . . . . . . . . . . . . . . . . . . . . . . . . . 236
Removing Offline Catalog Backup File Paths . . . . . . . . . . . . . . . . . . . . . . . . . . . . . . 237
Configuring an Online Catalog Backup . . . . . . . . . . . . . . . . . . . . . . . . . . . . . . . . . . . 238
▼ To create an online catalog backup . . . . . . . . . . . . . . . . . . . . . . . . . . . . . . . . . . . . 238
Chapter 5. Reference Topics . . . . . . . . . . . . . . . . . . . . . . . . . . . . . . . . . . . . . . . . . . . 241
Rules for Using Host Names in NetBackup . . . . . . . . . . . . . . . . . . . . . . . . . . . . . . . . . . 242
Qualifying Host Names . . . . . . . . . . . . . . . . . . . . . . . . . . . . . . . . . . . . . . . . . . . . . . . . 242
How NetBackup Uses Host Names . . . . . . . . . . . . . . . . . . . . . . . . . . . . . . . . . . . . . . 242
Server and Client Name on UNIX Servers and Clients . . . . . . . . . . . . . . . . . . . 242
Host Names on Windows Servers and PC Clients . . . . . . . . . . . . . . . . . . . . . . . 243
Policy Configuration . . . . . . . . . . . . . . . . . . . . . . . . . . . . . . . . . . . . . . . . . . . . . . . . 243
Image Catalog . . . . . . . . . . . . . . . . . . . . . . . . . . . . . . . . . . . . . . . . . . . . . . . . . . . . . 243
Error Catalog . . . . . . . . . . . . . . . . . . . . . . . . . . . . . . . . . . . . . . . . . . . . . . . . . . . . . . 244
Catalog Backup Information . . . . . . . . . . . . . . . . . . . . . . . . . . . . . . . . . . . . . . . . . 244
How to Update NetBackup After a Host Name Changes . . . . . . . . . . . . . . . . . . . . 244
Special Considerations For Domain Name Service (DNS) . . . . . . . . . . . . . . . . . . . 245
Reading Backup Images with tar . . . . . . . . . . . . . . . . . . . . . . . . . . . . . . . . . . . . . . . . . . . 247
xiv NetBackup System Administrator’s Guide for UNIX and Linux, Volume II
Page 15

Effects of Using a Non-NetBackup tar . . . . . . . . . . . . . . . . . . . . . . . . . . . . . . . . . 247
▼ To restore files using a non-NetBackup tar . . . . . . . . . . . . . . . . . . . . . . . . . . . . . . 248
Possible Files Generated By tar . . . . . . . . . . . . . . . . . . . . . . . . . . . . . . . . . . . . . . . 250
Factors Affecting Backup Time . . . . . . . . . . . . . . . . . . . . . . . . . . . . . . . . . . . . . . . . . . . . . 250
Total Data . . . . . . . . . . . . . . . . . . . . . . . . . . . . . . . . . . . . . . . . . . . . . . . . . . . . . . . . . . . . 251
Transfer Rate . . . . . . . . . . . . . . . . . . . . . . . . . . . . . . . . . . . . . . . . . . . . . . . . . . . . . . . . . .251
Compression . . . . . . . . . . . . . . . . . . . . . . . . . . . . . . . . . . . . . . . . . . . . . . . . . . . . . . . . . . 252
Device Delays . . . . . . . . . . . . . . . . . . . . . . . . . . . . . . . . . . . . . . . . . . . . . . . . . . . . . . . . .252
Determining NetBackup Transfer Rate . . . . . . . . . . . . . . . . . . . . . . . . . . . . . . . . . . . . . . 252
Network Transfer Rate . . . . . . . . . . . . . . . . . . . . . . . . . . . . . . . . . . . . . . . . . . . . . . . . .252
Network Transfer Plus End-of-Backup-Processing Rate . . . . . . . . . . . . . . . . . . . . . 253
Total Transfer Rate . . . . . . . . . . . . . . . . . . . . . . . . . . . . . . . . . . . . . . . . . . . . . . . . . . . . . 253
Examples . . . . . . . . . . . . . . . . . . . . . . . . . . . . . . . . . . . . . . . . . . . . . . . . . . . . . . . . . . . . .253
How NetBackup Builds a Worklist . . . . . . . . . . . . . . . . . . . . . . . . . . . . . . . . . . . . . . . . . . 255
Building the Worklist (Queue) . . . . . . . . . . . . . . . . . . . . . . . . . . . . . . . . . . . . . . . . . . . 255
Prioritizing Queued Jobs . . . . . . . . . . . . . . . . . . . . . . . . . . . . . . . . . . . . . . . . . . . . . . . 256
Determining Backup Media Requirements . . . . . . . . . . . . . . . . . . . . . . . . . . . . . . . . . . . 257
NetBackup Notify Scripts . . . . . . . . . . . . . . . . . . . . . . . . . . . . . . . . . . . . . . . . . . . . . . . . . . 258
backup_notify . . . . . . . . . . . . . . . . . . . . . . . . . . . . . . . . . . . . . . . . . . . . . . . . . . . . . .259
backup_exit_notify . . . . . . . . . . . . . . . . . . . . . . . . . . . . . . . . . . . . . . . . . . . . . . . . . . 259
bpstart_notify (UNIX clients only) . . . . . . . . . . . . . . . . . . . . . . . . . . . . . . . . . . . . . 260
bpstart_notify.bat (Microsoft Windows clients only) . . . . . . . . . . . . . . . . . . . . . 262
bpend_notify (UNIX clients only) . . . . . . . . . . . . . . . . . . . . . . . . . . . . . . . . . . . . . 265
bpend_notify.bat (Microsoft Windows clients only) . . . . . . . . . . . . . . . . . . . . . . 267
dbbackup_notify . . . . . . . . . . . . . . . . . . . . . . . . . . . . . . . . . . . . . . . . . . . . . . . . . . . . 269
diskfull_notify . . . . . . . . . . . . . . . . . . . . . . . . . . . . . . . . . . . . . . . . . . . . . . . . . . . . . . 270
mail_dr_info.sh . . . . . . . . . . . . . . . . . . . . . . . . . . . . . . . . . . . . . . . . . . . . . . . . . . . . 270
parent_end_notify . . . . . . . . . . . . . . . . . . . . . . . . . . . . . . . . . . . . . . . . . . . . . . . . . . 271
parent_start_notify . . . . . . . . . . . . . . . . . . . . . . . . . . . . . . . . . . . . . . . . . . . . . . . . . . 272
restore_notify . . . . . . . . . . . . . . . . . . . . . . . . . . . . . . . . . . . . . . . . . . . . . . . . . . . . . . 272
Contents xv
Page 16

session_notify . . . . . . . . . . . . . . . . . . . . . . . . . . . . . . . . . . . . . . . . . . . . . . . . . . . . . . 273
session_start_notify . . . . . . . . . . . . . . . . . . . . . . . . . . . . . . . . . . . . . . . . . . . . . . . . . 273
userreq_notify . . . . . . . . . . . . . . . . . . . . . . . . . . . . . . . . . . . . . . . . . . . . . . . . . . . . . 273
Chapter 6. Using NetBackup With AFS . . . . . . . . . . . . . . . . . . . . . . . . . . . . . . . . . . 275
Installation . . . . . . . . . . . . . . . . . . . . . . . . . . . . . . . . . . . . . . . . . . . . . . . . . . . . . . . . . . . . . . 275
System Requirements . . . . . . . . . . . . . . . . . . . . . . . . . . . . . . . . . . . . . . . . . . . . . . . . . . 275
Server and Client Installation . . . . . . . . . . . . . . . . . . . . . . . . . . . . . . . . . . . . . . . . . . . 275
Configuration . . . . . . . . . . . . . . . . . . . . . . . . . . . . . . . . . . . . . . . . . . . . . . . . . . . . . . . . . . . . 275
General Policy Attributes . . . . . . . . . . . . . . . . . . . . . . . . . . . . . . . . . . . . . . . . . . . . . . . 276
Client List . . . . . . . . . . . . . . . . . . . . . . . . . . . . . . . . . . . . . . . . . . . . . . . . . . . . . . . . . . . . 276
Backup Selections . . . . . . . . . . . . . . . . . . . . . . . . . . . . . . . . . . . . . . . . . . . . . . . . . . . . . 276
Backup Selection List Directives . . . . . . . . . . . . . . . . . . . . . . . . . . . . . . . . . . . . . . . . . 276
Regular Expressions . . . . . . . . . . . . . . . . . . . . . . . . . . . . . . . . . . . . . . . . . . . . . . . . . . . 277
Exclude and Include Lists . . . . . . . . . . . . . . . . . . . . . . . . . . . . . . . . . . . . . . . . . . . . . . 278
Backups and Restores . . . . . . . . . . . . . . . . . . . . . . . . . . . . . . . . . . . . . . . . . . . . . . . . . . . . . 278
Backups . . . . . . . . . . . . . . . . . . . . . . . . . . . . . . . . . . . . . . . . . . . . . . . . . . . . . . . . . . . . . . 278
Automatic Backup . . . . . . . . . . . . . . . . . . . . . . . . . . . . . . . . . . . . . . . . . . . . . . . . . . 278
Manual Backup . . . . . . . . . . . . . . . . . . . . . . . . . . . . . . . . . . . . . . . . . . . . . . . . . . . . 278
Restores . . . . . . . . . . . . . . . . . . . . . . . . . . . . . . . . . . . . . . . . . . . . . . . . . . . . . . . . . . . . . . 278
Restore From the NetBackup for AFS Client . . . . . . . . . . . . . . . . . . . . . . . . . . . . 279
Restore From the NetBackup Master Server . . . . . . . . . . . . . . . . . . . . . . . . . . . . 279
Notes About Restores . . . . . . . . . . . . . . . . . . . . . . . . . . . . . . . . . . . . . . . . . . . . . . . 279
Troubleshooting . . . . . . . . . . . . . . . . . . . . . . . . . . . . . . . . . . . . . . . . . . . . . . . . . . . . . . . . . 280
Troubleshooting Backups . . . . . . . . . . . . . . . . . . . . . . . . . . . . . . . . . . . . . . . . . . . . . . . 280
Troubleshooting Restores . . . . . . . . . . . . . . . . . . . . . . . . . . . . . . . . . . . . . . . . . . . . . . . 281
Chapter 7. Intelligent Disaster Recovery . . . . . . . . . . . . . . . . . . . . . . . . . . . . . . . . . 283
Changes for NetBackup 6.0 . . . . . . . . . . . . . . . . . . . . . . . . . . . . . . . . . . . . . . . . . . . . . . . . 284
Supported Windows Editions . . . . . . . . . . . . . . . . . . . . . . . . . . . . . . . . . . . . . . . . . . . . . . 284
Requirements for IDR . . . . . . . . . . . . . . . . . . . . . . . . . . . . . . . . . . . . . . . . . . . . . . . . . . . . . 284
xvi NetBackup System Administrator’s Guide for UNIX and Linux, Volume II
Page 17

Overview of IDR Use . . . . . . . . . . . . . . . . . . . . . . . . . . . . . . . . . . . . . . . . . . . . . . . . . . . . . . 285
About the DR Files . . . . . . . . . . . . . . . . . . . . . . . . . . . . . . . . . . . . . . . . . . . . . . . . . . . . . . . . 286
Configuring NetBackup Policies for IDR . . . . . . . . . . . . . . . . . . . . . . . . . . . . . . . . . . . . . 287
Backing Up the System to be Protected . . . . . . . . . . . . . . . . . . . . . . . . . . . . . . . . . . . . . . 288
Creating IDR Media . . . . . . . . . . . . . . . . . . . . . . . . . . . . . . . . . . . . . . . . . . . . . . . . . . . . . . .288
Choosing the Bootable Media . . . . . . . . . . . . . . . . . . . . . . . . . . . . . . . . . . . . . . . . . . . . 289
Creating Bootable Diskettes . . . . . . . . . . . . . . . . . . . . . . . . . . . . . . . . . . . . . . . . . . . . . 290
▼ To create bootable diskettes . . . . . . . . . . . . . . . . . . . . . . . . . . . . . . . . . . . . . . . . . . 290
Modifying Diskette Sets for Use with Multiple Windows 2000 Computers . . 291
Creating a Bootable CD Image . . . . . . . . . . . . . . . . . . . . . . . . . . . . . . . . . . . . . . . . . . . 292
▼ To create a bootable CD image . . . . . . . . . . . . . . . . . . . . . . . . . . . . . . . . . . . . . . . 292
Creating IDR Diskettes . . . . . . . . . . . . . . . . . . . . . . . . . . . . . . . . . . . . . . . . . . . . . . . . . 293
▼ To create IDR diskettes . . . . . . . . . . . . . . . . . . . . . . . . . . . . . . . . . . . . . . . . . . . . . 294
Updating IDR Media . . . . . . . . . . . . . . . . . . . . . . . . . . . . . . . . . . . . . . . . . . . . . . . . . . . . . . 294
Updating a Bootable CD . . . . . . . . . . . . . . . . . . . . . . . . . . . . . . . . . . . . . . . . . . . . . . . .295
Updating Bootable Diskettes . . . . . . . . . . . . . . . . . . . . . . . . . . . . . . . . . . . . . . . . . . . .295
▼ To update IDR bootable diskettes . . . . . . . . . . . . . . . . . . . . . . . . . . . . . . . . . . . . . 295
Updating IDR Diskettes Only . . . . . . . . . . . . . . . . . . . . . . . . . . . . . . . . . . . . . . . . . . .296
▼ To update IDR diskettes using IDR Preparation Wizard . . . . . . . . . . . . . . . . . . . 296
Using drfile.exe to Create or Update a DR File . . . . . . . . . . . . . . . . . . . . . . . . . . . . . 297
Recovering Your Computer . . . . . . . . . . . . . . . . . . . . . . . . . . . . . . . . . . . . . . . . . . . . . . . . 297
Step 1: Boot Your Computer . . . . . . . . . . . . . . . . . . . . . . . . . . . . . . . . . . . . . . . . . . . . . 298
▼ To boot a computer using a bootable diskette . . . . . . . . . . . . . . . . . . . . . . . . . . . . 298
▼ To boot from a bootable CD . . . . . . . . . . . . . . . . . . . . . . . . . . . . . . . . . . . . . . . . . . 299
Step 2: Windows Setup in IDR Recovery . . . . . . . . . . . . . . . . . . . . . . . . . . . . . . . . . . 299
▼ To use Windows setup in IDR recovery . . . . . . . . . . . . . . . . . . . . . . . . . . . . . . . . 299
Step 3: Disaster Recovery Wizard . . . . . . . . . . . . . . . . . . . . . . . . . . . . . . . . . . . . . . . .300
▼ To use the Disaster Recovery Wizard . . . . . . . . . . . . . . . . . . . . . . . . . . . . . . . . . . 300
Notes on Altering Hard Drive Partition Sizes . . . . . . . . . . . . . . . . . . . . . . . . . . . . . .304
Notes on Recovering Specific Platforms . . . . . . . . . . . . . . . . . . . . . . . . . . . . . . . . . . . . . .304
Contents xvii
Page 18

Recovering the Dell PowerEdge 6100/200 with RAID . . . . . . . . . . . . . . . . . . . . . . 304
▼ Use the following steps with your IDR recovery diskette set . . . . . . . . . . . . . . . . 304
Recovering IBM Computers . . . . . . . . . . . . . . . . . . . . . . . . . . . . . . . . . . . . . . . . . . . . 305
Recovering Compaq Computers . . . . . . . . . . . . . . . . . . . . . . . . . . . . . . . . . . . . . . . . . 305
IDR Frequently Asked Questions . . . . . . . . . . . . . . . . . . . . . . . . . . . . . . . . . . . . . . . . . . . 305
Index . . . . . . . . . . . . . . . . . . . . . . . . . . . . . . . . . . . . . . . . . . . . . . . . . . . . . . . . . . . . . . 309
xviii NetBackup System Administrator’s Guide for UNIX and Linux, Volume II
Page 19

Preface
This guide describes how to configure and manage the operation of VERITAS
NetBackup™ Server and VERITAS NetBackup Enterprise Server for UNIX and Linux
platforms. See the NetBackup Release Notes for a list of the hardware and operating system
levels that NetBackup supports.
To determine the version and release date of installed software, see the version file
located here in /usr/openv/netbackup
Getting Help
You can find answers to questions and get help from the NetBackup documentation and
from the VERITAS technical support web site.
Finding NetBackup Documentation
A list of the entire NetBackup documentation set appears as an appendix in the NetBackup
Release Notes. All NetBackup documents are included in PDF format on the NetBackup
Documentation CD.
For definitions of NetBackup terms, consult the online glossary.
▼ To access the NetBackup online glossary
1. In the NetBackup Administration Console, click Help > Help Topics.
2. Click the Contents tab.
3. Click Glossary of NetBackup Terms.
Use the scroll function to navigate through the glossary.
xix
Page 20

Getting Help
Accessing the VERITAS Technical Support Web Site
The address for the VERITAS Technical Support Web site is http://support.veritas.com.
The VERITAS Support Web site lets you do any of the following:
◆ Obtain updated information about NetBackup, including system requirements,
supported platforms, and supported peripherals
◆ Contact the VERITAS Technical Support staff and post questions to them
◆ Get the latest patches, upgrades, and utilities
◆ View the NetBackup Frequently Asked Questions (FAQ) page
◆ Search the knowledge base for answers to technical support questions
◆ Receive automatic notice of product updates
◆ Find out about NetBackup training
◆ Read current white papers related to NetBackup
From http://support.veritas.com, you can complete various tasks to obtain specific types
of support for NetBackup:
1. Subscribe to the VERITAS Email notification service to be informed of software alerts,
newly published documentation, Beta programs, and other services.
a. From the main http://support.veritas.com page, select a product family and a
product.
b. Under Support Resources, click Email Notifications.
Your customer profile ensures you receive the latest VERITAS technical
information pertaining to your specific interests.
2. Locate the telephone support directory at http://support.veritas.com by clicking the
Phone Support icon. A page appears that contains VERITAS support numbers from
around the world.
Note Telephone support for NetBackup is only available with a valid support
contract. To contact VERITAS for technical support, dial the appropriate phone
number listed on the Technical Support Guide included in the product box and
have your product license information ready for quick navigation to the proper
support group.
3. Contact technical support using e-mail.
xx NetBackup System Administrator’s Guide for UNIX and Linux, Volume II
Page 21

a. From the main http://support.veritas.com page, click the E-mail Support icon.
A wizard guides you to do the following:
◆ Select a language of your preference
◆ Select a product and a platform
◆ Provide additional contact and product information, and your message
◆ Associate your message with an existing technical support case
b. After providing the required information, click Send Message.
Contacting VERITAS Licensing
For license information, you can contact us as follows:
◆ Call 1-800-634-4747 and select option 3
◆ Fax questions to 1-650-527-0952
◆ In the Americas, send e-mail to amercustomercare@veritas.com.
In the Asia and Pacific areas, send email to apaccustomercare@veritas.com.
In all other areas, send email to internationallicense@veritas.com.
Accessibility Features
Accessibility Features
NetBackup contains features that make the user interface easier to use by people who are
visually impaired and by people who have limited dexterity. Accessibility features
include:
◆ Support for assistive technologies such as screen readers and voice input (Windows
servers only)
◆ Support for keyboard (mouseless) navigation using accelerator keys and mnemonic
keys
For more information, see the NetBackup Installation Guide.
Preface xxi
Page 22

Comment on the Documentation
Comment on the Documentation
Let us know what you like and dislike about the documentation. Were you able to find the
information you needed quickly? Was the information clearly presented? You can report
errors and omissions or tell us what you would find useful in future versions of our
manuals and online help.
Please include the following information with your comment:
◆ The title and product version of the manual on which you are commenting
◆ The topic (if relevant) on which you are commenting
◆ Your c omme nt
◆ Your n ame
Email your comment to NBDocs@veritas.com.
Please only use this address to comment on product documentation. See “Getting Help”
in this preface for information on how to contact Technical Support about our software.
We appreciate your feedback.
xxii NetBackup System Administrator’s Guide for UNIX and Linux, Volume II
Page 23

Access Management
Access to NetBackup can be controlled by defining user groups and granting explicit
permissions to these groups. Configuring user groups and assigning permissions is done
using Access Management in the NetBackup Administration Console.
This chapter discusses how to set up and manage access to NetBackup. It contains the
following sections:
◆ “NetBackup Access Management Components” on page 2
◆ “Installation Overview” on page 5
◆ “Installing and Configuring Access Control for Master Servers” on page 8
◆ “Installing and Configuring Access Control for Media Servers” on page 12
◆ “Installing and Configuring Access Control for Clients” on page 15
◆ “Installing the Authentication Service Root Broker (Root + AB)” on page 18
◆ “Installing the Authorization Server” on page 21
◆ “Configuring Access Control Host Properties” on page 23
◆ “Access Management Troubleshooting Guidelines” on page 28
◆ “Using the Access Management Utility” on page 54
◆ “Determining Who Can Access NetBackup” on page 56
1
Note Access Management and Enhanced Authorization and Authentication (see Chapter 2) are
independent methods of Access Control. Access Management is the newest and will
be the preferred method in future NetBackup releases. If both Access Management
and Enhanced Authorization and Authentication are configured, Access
Management takes precedence.
Note If some media servers are not configured with access control,
non-root/non-administrator users will not be able to manage those servers.
1
Page 24

NetBackup Access Management Components
NetBackup Access Management Components
NetBackup uses the VERITAS Security Services (VxSS) to help implement core security.
VxSS is a set of shared VERITAS infrastructure services, installed from one of the
infrastructure common services CDs containing VxSS for your platform. The CDs are
packaged as part of NetBackup.
Note NetBackup Access Management relies on the use of home directories. Please see the
documentation for your operating system for more information on home
directories.
Note In order for members of the NBU_Operator user group to continue viewing media
and device information, run the following command:
bpnbaz -UpGrade60
Running this command brings the NetBackup 5.x permissions for the
NBU_Operator user group up to the expected configuration for 6.0.
VxSS Components
When you install VxSS, you’re installing and configuring the following services and client
software:
◆ Authentication (At Server, At Client)
Authentication is the process of proving your identity to the VxSS system.
Authentication is accomplished by communicating with the daemon which, in turn,
validates your identity with the operating system.
For more information on authentication or the authentication daemon (vxatd), see
the VERITAS Security Services Administrator’s Guide found on one of the infrastructure
common services CDs containing VxSS for your platform.
◆ Authorization (Az Server, Az Client)
Authorization is the process of verifying that an identity has permission to perform
the desired action. NetBackup verifies permissions with the authorization daemon for
most actions. In many cases, NetBackup alters what information is accessible from the
command line and Administration Console.
For more information on authorization or the authorization daemon (vxazd), see the
VERITAS Security Services Administrator’s Guide found on one of the infrastructure
common services CDs containing VxSS for your platform.
2 NetBackup System Administrator’s Guide for UNIX and Linux, Volume II
Page 25

NetBackup Access Management Components
Root Broker
A Root Broker is a NetBackup server that has VxSS Authentication Server installed and is
configured to be a Root Broker. There is always one Root Broker in every NetBackup
Access Management configuration.
The Root Broker acts as the most trusted certificate authority, implementing a registration
authority for Authentication Brokers, as well as itself.
While a Root Broker can authenticate an Authentication Broker, an Authentication Broker
cannot authenticate a Root Broker.
In many cases, the Root Broker will also be an Authentication Broker. This chapter
describes installing VxSS services, then it describes configuring the NetBackup server to
be a Root Broker and an Authentication Broker (Root Broker + AB). For more information
on the authentication Root Broker, see the VERITAS Security Services Administrator’s Guide
found on one of the infrastructure common services CDs containing VxSS for your
platform.
Authentication Brokers
An Authentication Broker is a server that has VxSS Authentication Server installed. This
machine is part of the Root Broker’s private Access Management domain. An
Authentication Broker can authenticate clients, but not other brokers.
The member of the NetBackup Security Administrator user group can choose which
Authentication Broker a client should contact for authentication. (See “Example
Configuration Containing Windows Systems Only” on page 29 or “Example
Configuration Containing UNIX Systems Only” on page 35 for a depiction of this
configuration.)
For example:
◆ A Windows 2000 client uses a Windows Authentication Broker for authentication.
◆ A UNIX client uses a UNIX Authentication Broker for authentication.
◆ For more information on authentication brokers, see the VERITAS Security Services
Administrator’s Guide found on one of the infrastructure common services CDs
containing VxSS for your platform.
Security Administrator
The user who installs and configures VxSS software for use with NetBackup Access
Management is, by default, a member of the NBU_Security Admin user group. This
chapter will refer to a member of the NBU_Security Admin group as a Security
Administrator. Users can be added to the group, but there are usually few members.
Chapter 1, Access Management 3
Page 26

NetBackup Access Management Components
Members of the NBU_Security Admin user group are the only users who can view the
contents of Access Management > Users and Access Management > NBU User Groups
in the NetBackup Administration Console. Security Administrators are the only users
allowed to create user groups, assign users to the groups, and define permissions for the
groups. However, Security Administrators, by default, do not have permission to perform
any other NetBackup administration activities. (See “Security Administrator
(NBU_Security Admin)” on page 58.)
4 NetBackup System Administrator’s Guide for UNIX and Linux, Volume II
Page 27

Installation Overview
For a detailed installation description, see “Installing and Configuring Access Control
for Master Servers” on page 8.
Order for Installation
1. Complete all NetBackup master server installations:
a. Complete Root + AB installation of VxSS Authentication server.
b. Complete VxSS Authorization server installation.
c. Configure master servers for NetBackup Access Control. See “Installing and
Configuring Access Control for Master Servers” on page 8.
2. Complete all NetBackup media server installations, then configure media servers for
NetBackup Access Control. See “Installing and Configuring Access Control
for Media Servers” on page 12.
3. Complete all NetBackup client installations, then configure clients for NetBackup
Access Control. See “Installing and Configuring Access Control for Clients” on
page 15.
Installation Overview
Order for Upgrade
Use the following order for upgrading any NetBackup machine that uses NetBackup
Access Control.
1. Stop NetBackup.
2. Upgrade VxSS.
3. Configure Access Control on the NetBackup machines. See:
◆ “Installing and Configuring Access Control for Master Servers” on page 8.
◆ “Installing and Configuring Access Control for Media Servers” on page 12.
◆ “Installing and Configuring Access Control for Clients” on page 15.
Chapter 1, Access Management 5
Page 28
Installation Overview
Including VxSS Databases in the NetBackup Catalog Backup
In NetBackup environments which use the online, hot catalog backup method, no
additional configuration is needed in order to include the VxSS Authorization and
Authentication databases in the catalog backup.
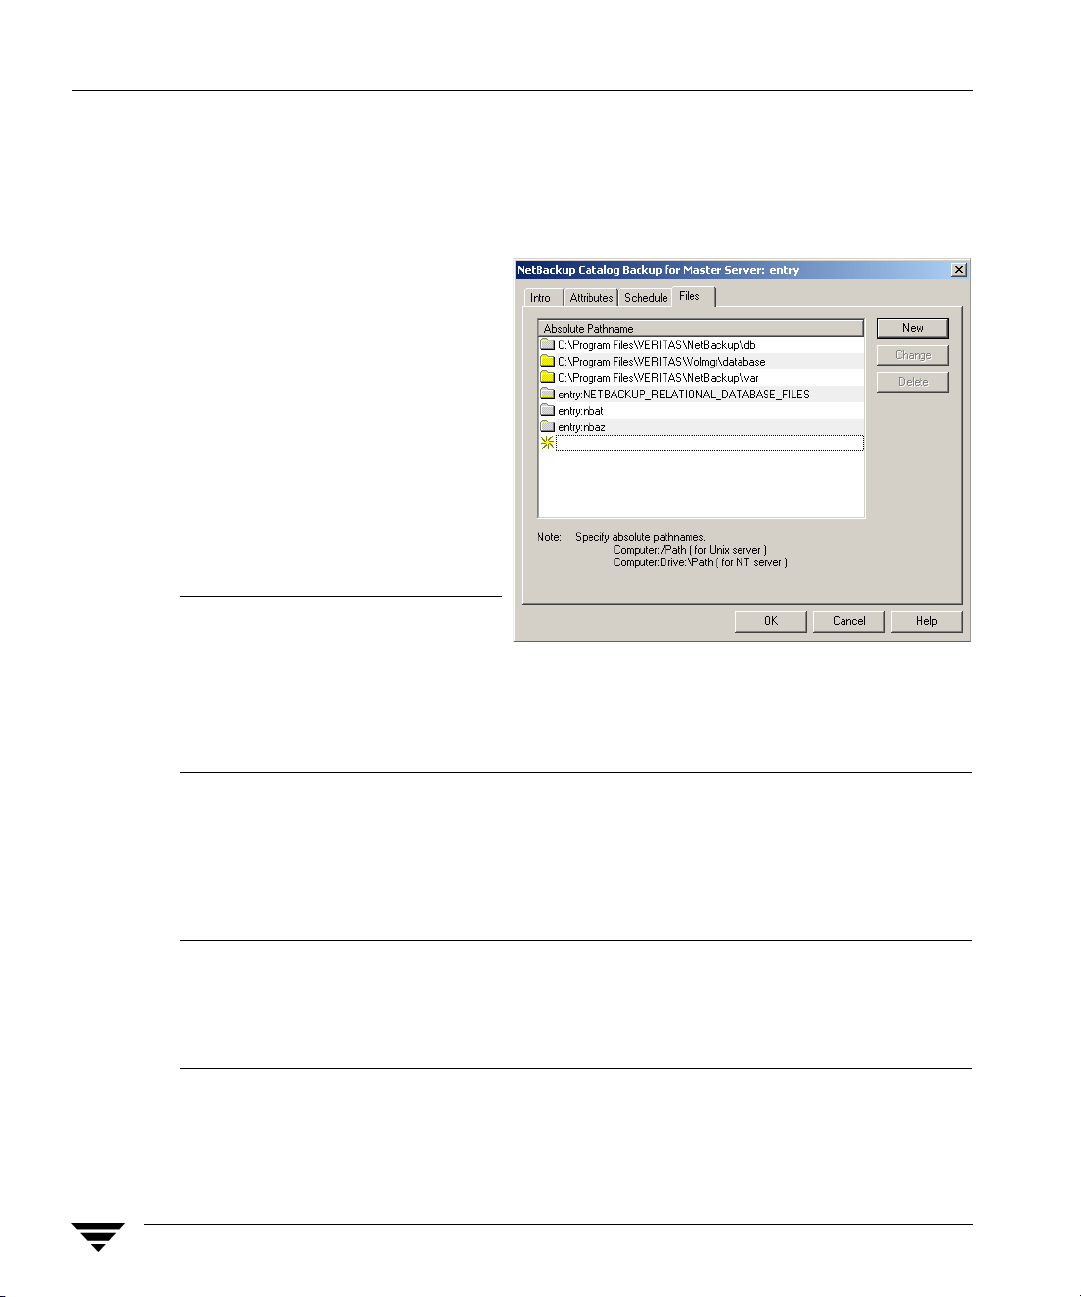
In environments which use the
offline, cold catalog backup
method, one additional step is
required:
Within the NetBackup Catalog
Wizard or on the Files tab of the
offline catalog configuration
dialog, add the following
directives for each host in the
NBAC domain:
Note If the master server using
[
host
:]nbat
[
host
:]nbaz
NBAC is a UNIX machine,
VERITAS recommends that
you do not include the NetBackup master server configuration file
(/usr/openv/netbackup/bp.conf) in the offline catalog backup file list. If
bp.conf is included in the list, it must not be recovered until all other catalog
recovery is completed.
VxSS Component Distribution
The VxSS components can be distributed throughout a configuration, just as NetBackup
can distribute master servers, media servers and clients.
Note Although the Authentication broker and Authorization broker can technically be
placed on any machine, VERITAS currently recommends that the root
Authentication broker and Authorization broker be placed on the NetBackup
master server. At a minimum, the root Authentication broker must reside on the
master server.
6 NetBackup System Administrator’s Guide for UNIX and Linux, Volume II
Page 29

Installation Overview
For specific VxSS installation information, refer to the VERITAS Security Services
Installation Guide, found on the VxSS installation CD.
NetBackup Installation Required Authentication Required Authorization
Component Component
Master server At server Az server
Media server At client Az client
Client At client None
Windows Remote Administration At client Az client
Console (only)
Java Windows Display Console (only)* At client None
Java Display Console At client None
*The At client is required for all Java consoles. Concerning the Java Windows Display Console, the
At client must be installed on the Windows host before installing the Java Windows Display
Console. This ensures that the Windows Display Console is configured correctly to use the VxSS
component successfully.
Note While it is possible to share the Enterprise Media Manager server between multiple
master servers, this configuration is not supported when using Access Control. The
EMM server must be bound to one master server.
The following sections describe some actions you can take to verify that the components
are correctly installed in a mixed environment:
◆ “Windows Verification Points” on page 28
◆ “UNIX Verification Points” on page 35
◆ “Verification Points in a Mixed Environment with a UNIX Master Server” on page 41
◆ “Verification Points in a Mixed Environment with a Windows Master Server” on
page 46
◆ “UNIX Verification Points” on page 35
Chapter 1, Access Management 7
Page 30

Installing and Configuring Access Control for Master Servers
Installing and Configuring Access Control
for Master Servers
The following steps describe configuring NetBackup Access Control for the master server
in a NetBackup configuration. A master server requires Authentication Server and Client
software and Authorization Server and Client software.
Throughout this chapter, in the configuration examples we’ll refer to the following host
names:
Windows UNIX
Master Servers win_master unix_master
Media Servers win_media unix_media
Clients win_client unix_client
1. If this is an upgrade installation, stop NetBackup.
2. Using one of the infrastructure common services CDs containing VxSS for your
platform, install both the VxSS Authentication Server and Client software on the
master server. This master server will be a Root + AB (Authentication Broker).
See “Installing the Authentication Service Root Broker (Root + AB)” on page 18 and
the VERITAS Security Services Installation Guide on the VxSS installation CD.
3. Using one of the infrastructure common services CDs containing VxSS for your
platform, install the VxSS Authorization Server and Client software on the master
server. To do this, you must perform a custom installation.
See “Installing the Authorization Server” on page 21 and the VERITAS Security
Services Installation Guide on one of the infrastructure common services CDs
containing VxSS for your platform.
4. Complete all NetBackup master server installations or upgrades.
5. Create a machine account for the master server. Make sure that the Authentication
and the Authorization services are running. See “UNIX Verification Points” on
page 35 or “Windows Verification Points” on page 28.
The command in this step must be run as either root (UNIX) or as a member of the
local Administrator group (Windows) on the Root+AB Authentication broker. For
more information about this step, see “Configuring Authentication on the Root Broker
for Use with NetBackup” on page 19.
8 NetBackup System Administrator’s Guide for UNIX and Linux, Volume II
Page 31

Installing and Configuring Access Control for Master Servers
To add the master server locally to the private domain, run the following command
on the master server:
bpnbat is located in directory /usr/openv/netbackup/bin/
bpnbat -addmachine
Does this machine use Dynamic Host Configuration Protocol (DHCP)?
(y/n) n
Authentication Broker:
Authentication port[ Enter = default]:
Machine Name: win_master
Password: *******
Password: *******
Operation completed successfully.
win_master
Note The default Authentication port is 2821.
6. Log in to the machine account for the master server.
To create a credential for the master server, run the following command on the master
server:
bpnbat -LoginMachine
Does this machine use Dynamic Host Configuration Protocol (DHCP)?
(y/n) n
Authentication Broker:
Authentication port[ Enter = default]:
Machine Name:
Password: *******
Operation completed successfully.
win_master
win_master
Note Repeat this step for each alias used by NetBackup.
For more information about this step, see “Configuring Authentication on the Root
Broker for Use with NetBackup” on page 19.
7. Create the first Security Administrator (bootstrapping security).
bpnbaz is located in directory /usr/openv/netbackup/bin/admincmd
bpnbaz -setupsecurity win_master
Please enter the login information for the first Security
Administrator other than root/Administrator. This identity
will be added to the security administrators group
(NBU_Security Admin), and to the netbackup administrators
group (NBU_Admin). It will also be used to build the initial
security information.
Authentication Broker:
Chapter 1, Access Management 9
win_master
Page 32

Installing and Configuring Access Control for Master Servers
Authentication port[ Enter = default]:
Authentication type (NIS, NIS+, WINDOWS, vx, unixpwd: WINDOWS
Domain: domain1
Login Name: admin1
Password: ******
Processing - please be patient
Operation completed successfully.
For more information about this step, see “Configuring the Authorization Server” on
page 21.
8. Add the master server as a host that is authorized to perform Authorization checks.
bpnbaz -AllowAuthorization win_master
Operation completed successfully.
For more information about this step, see “Configuring the Authorization Server” on
page 21.
9. Configure the Access Control host properties of the master server.
◆ Set VERITAS Security Services to Automatic or Required. (If some clients or
media servers will not use NetBackup Access Control, set to Automatic.)
◆ On the Authentication Domain tab, add authentication domain(s) and the host
that will act as the broker for the domain (domain1).
The broker is a machine using an operating system supporting the domain type
and the specific domain that has the VxSS Authentication service installed on it.
10 NetBackup System Administrator’s Guide for UNIX and Linux, Volume II
Page 33

Installing and Configuring Access Control for Master Servers
On the Authorization Service tab, specify the master server on which you
◆
installed the VxSS Authorization service (win_master).
For more information about this step, see “Configuring Access Control Host
Properties” on page 23.
10. After changing the host properties, recycle the server daemons for the changes to take
effect.
Chapter 1, Access Management 11
Page 34

Installing and Configuring Access Control for Media Servers
Installing and Configuring Access Control
for Media Servers
The following steps describe configuring NetBackup Access Control for a media server in
a NetBackup configuration. A media server requires Authentication Client software and
Authorization Client software.
1. If this is an upgrade installation, stop NetBackup.
2. Using one of the infrastructure common services CDs containing VxSS for your
platform, install Authentication Client software on the system.
3. Using one of the infrastructure common services CDs containing VxSS for your
platform,install the Authorization Client software on the media server.
4. Complete all NetBackup media server installations or upgrades.
5. On the master server, create a machine account for the media server. Make sure that
the Authentication and the Authorization services are running. See “UNIX
Verification Points” on page 35 or “Windows Verification Points” on page 28.
The command in this step must be run as either root (UNIX) or as a member of the
local Administrator group (Windows) on the Root+AB Authentication broker.
To add the media server locally to the private domain, run the following command on
the master server:
bpnbat is located in directory /usr/openv/netbackup/bin
bpnbat -addmachine
Does this machine use Dynamic Host Configuration Protocol (DHCP)?
(y/n) n
Authentication Broker:
Authentication port[ Enter = default]:
Machine Name: win_media
Password: *******
Password: *******
Operation completed successfully.
For more information about this step, see “Configuring Authentication on the Root
Broker for Use with NetBackup” on page 19.
6. Log in to the machine account for the media server.
To create a credential for the media server, run the following command on the media
server:
bpnbat -LoginMachine
12 NetBackup System Administrator’s Guide for UNIX and Linux, Volume II
win_master
Page 35

Installing and Configuring Access Control for Media Servers
Does this machine use Dynamic Host Configuration Protocol (DHCP)?
(y/n) n
Authentication Broker:
Authentication port[ Enter = default]:
Machine Name: win_media
Password: *******
Operation completed successfully.
win_master
Note Repeat this step for each alias used by NetBackup.
For more information about this step, see “Configuring Authentication on the Root
Broker for Use with NetBackup” on page 19.
7. Add the media server as a host authorized to perform Authorization checks.
bpnbaz is located in directory /usr/openv/netbackup/bin/admincmd
On the master server, run:
bpnbaz -AllowAuthorization win_media
Operation completed successfully.
For more information about this step, see “Configuring the Authorization Server” on
page 21.
8. Set up the proper Access Control host properties for the media server. The properties
are described in “Configuring Access Control Host Properties” on page 23.
Open Access Control host properties for the media server (win_media) through the
master server. In the NetBackup Administration Console, select NetBackup
Management > Host Properties > Media Server > Select media server win_media >
Access Control.
◆ Set VxSS mode to Required. If some clients or media servers will not use
NetBackup Access Control, set to Automatic.
◆ Add authentication domains based on the systems where you have installed
Authentication servers and the Authentication methods supported.
For example, given a Windows system configured for Authentication using
domain WINUSER, and a UNIX system configured for Authentication using the
NIS domain my.company, the tab would look like the following:
Chapter 1, Access Management 13
Page 36

Installing and Configuring Access Control for Media Servers
◆ On the Authorization Services tab, indicate the host that will perform
authorization for this media server.
9. After changing the host properties, recycle the server daemons for the changes to take
effect.
14 NetBackup System Administrator’s Guide for UNIX and Linux, Volume II
Page 37

Installing and Configuring Access Control for Clients
Installing and Configuring Access Control for Clients
The following steps describe configuring NetBackup Access Control for a client in a
NetBackup configuration. A client requires Authentication Client software.
1. If this is an upgrade installation, stop NetBackup.
2. Using one of the infrastructure common services CDs containing VxSS for your
platform, install Authentication Client software on the system.
3. Using one of the infrastructure common services CDs containing VxSS for your
platform, install Authentication client software on the system.
4. Using bpnbat, register the client with the Authentication Broker, as described in
step 2 on page 19.
For example, if registering a machine (win_client) with the Authentication Broker
(win_master), run the following command on the At server (win_master).
To add the client locally to the private domain, run the following command on the
master server:
bpnbat -AddMachine
Does the machine use Dynamic Host Configuration Protocol (DHCP)?
(y/n) n
Authentication Broker:
Authentication Port: [Enter = Default]:
Name: win_client.min.com
Password:
Password:
Operation completed successfully.
[any password]
[enter password again]
win_master.min.com
5. To create a credential for the client, run the following command on the client
(win_client):
bpnbat -loginmachine
Does this machine use Dynamic Host Configuration Protocol (DHCP)?
(y/n) n
Authentication Broker:
Authentication port[ Enter = default]:
Name: win_client.min.com
Password:
Operation completed successfully.
[same password as in step a]
win_master.min.com
6. Set up the proper Access Control host properties for the client. The properties are
described in “Configuring Access Control Host Properties” on page 23.
Chapter 1, Access Management 15
Page 38

Installing and Configuring Access Control for Clients
a. Open Access Control host properties for the client (win_client) through the master
server. In the NetBackup Administration Console, select NetBackup
Management > Host Properties > Clients > Select client win_master > Access
Control.
◆ Set VxSS mode to Required.
◆ Add authentication domains based on the systems where you have installed
Authentication servers and the Authentication methods supported.
For example, given a Windows system configured for Authentication using
domain WINUSER, and a UNIX system configured for Authentication using
the NIS domain my.company, the tab would look like the following:
b. Set up Access Control on the master server (win_master) for the client:
On the VxSS tab, add win_client.min.com to the VxSS Network list as Required.
16 NetBackup System Administrator’s Guide for UNIX and Linux, Volume II
Page 39

Installing and Configuring Access Control for Clients
Establishing a Trust Relationship Between the Broker and the Windows Remote Console
To establish a trust relationship between the master server (broker) and the administration
client:
1. From the master server, run the following command:
Install_path
admincmd>bpgetconfig USE_VXSS AUTHENTICATION_DOMAIN
>VXSS_SETTINGS.txt
Sample output of VXSS_SETTINGS.txt:
USE_VXSS = AUTOMATIC
AUTHENTICATION_DOMAIN =
Note The actual output identifies the specific domain name and broker host name.
2. Copy VXSS_SETTINGS.txt to the Administration Client.
3. Run the following command from the Administration Client:
C:\Program Files\VERITAS\NetBackup\bin\
admincmd>bpsetconfig "
Running this command matches the VXSS settings on the administration client with
those on the broker and sets the administration client to log in automatically to the
broker.
4. Launch the Administration Console from the administration client, a request to
establish a trust with the broker should be requested. Once the trust is agreed to, the
administration console should be available.
\VERITAS\NetBackup\bin\
<domain_name>
<absolute_path>
"" WINDOWS
\VXSS_SETTINGS.txt"
<broker_host>
0
Chapter 1, Access Management 17
Page 40

Installing the Authentication Service Root Broker (Root + AB)
Installing the Authentication Service Root Broker
(Root + AB)
Before installing the VxSS services which will create a Root Broker that is also an
Authentication Broker, check that the following conditions are true:
◆ Make sure that you are root on the system where you plan to install the VxSS Root
Broker software. To become root, enter the following command:
su -
◆ After becoming root, verify that root’s home directory is correctly specified.
Use the following command:
echo $HOME
◆ If NetBackup is currently installed, shut down all NetBackup services before
installing VxSS software.
Install the VxSS Root Broker software using one of the infrastructure common services
CDs containing VxSS for your platform, according to the instructions in the VERITAS
Security Services Installation Guide. The manual is found on the installation CD.
NetBackup recommends placing the Root + AB broker on the NetBackup master server.
This allows for more centralized administration of the NetBackup server and can facilitate
upgrading to NetBackup Access Management.
After installing the Authentication Server software, configure the VxSS Root Broker as
described in “Configuring Authentication on the Root Broker for Use with NetBackup”
on page 19.
18 NetBackup System Administrator’s Guide for UNIX and Linux, Volume II
Page 41

Installing the Authentication Service Root Broker (Root + AB)
Configuring Authentication on the Root Broker for Use with NetBackup
Configure the Root Broker using the NetBackup command, bpnbat located in directory
/usr/openv/netbackup/bin/
1. Shut down NetBackup on the master server and start the At daemon, then the Az
daemon:
To shut down NetBackup daemons, use
NetBackup stop
located in the goodies directory.
To start the At daemon, enter /opt/VRTSat/bin/vxatd
To start the Az daemon, enter /opt/VRTSaz/bin/vrtsaz
2. Allow the machines to communicate with one another:
Note The steps below require a password that should not be a user or root password.
The password must be at least five characters long, and match one another in both
steps. However, it is not necessary to use the same password each time the two
steps are run for a new machine in the domain.
a. To add a machine locally to the private domain:
In order for the NetBackup master servers, media servers, and clients to
communicate, this machine needs to be added to the private database of the
Authentication Broker by running the following command on the At server:
bpnbat -AddMachine
Does this machine use Dynamic Host Configuration Protocol (DHCP)?
(y/n) n
Authentication Broker:
Authentication port[ Enter = default]:
Name:
Password:
Password:
Operation completed successfully.
Where:
broker is the name of the machine that will act as the Authentication Broker for this
machine. In this case, since this machine is Root Broker + AB, enter the name of this
machine.
broker_port is a specified port number. To use the default Authentication port number
(2821), press Enter.
Chapter 1, Access Management 19
machine_name
any_password
Re-enter password
broker
broker_port
Page 42

Installing the Authentication Service Root Broker (Root + AB)
machine_name is the name of this machine.
any_password may be a unique password (at least five characters long) used only for
the purpose of registering this machine. However, the same password must be used in
both this step, when registering the machine locally in the private domain, and the
next step, when registering the machine, but not in the private domain.
b. To create a credential for a machine:
In order to log the machine into the specified Authentication Broker, enter the
following command on the machine that needs to be logged in:
bpnbat -loginmachine
Does this machine use Dynamic Host Configuration Protocol (DHCP)?
(y/n) n
Authentication Broker:
Authentication port[ Enter = default]:
Name:
Password:
You do not currently trust the server:
Do you wish to trust it? (y/n) y
Operation completed successfully.
machine_name
same password as in step a
broker
Continue to the next section for instructions on configuring authorization on the Root
Broker.
broker_port
broker
20 NetBackup System Administrator’s Guide for UNIX and Linux, Volume II
Page 43

Installing the Authorization Server
Install the VxSS Authorization software from one of the infrastructure common services
CDs containing VxSS for your platform, according to the instructions in the VERITAS
Security Services Installation Guide. The manual is found on the installation CD.
NetBackup recommends installing the Authorization server on the master server. This
ensures that the master and media servers are able to communicate with the
Authentication server at all times.
Configuring the Authorization Server
The bpnbaz command is used during Authorization setup to perform two functions
necessary for Access Management:
◆ Create the object hierarchy that appears in the NetBackup Administration Console
under Access Management.
◆ Set up user groups and add the first identity to the security administration group
(NBU_Security Admin).
bpnbaz is located in the directory /usr/openv/netbackup/bin/admincmd
Before running bpnbaz commands, check that both the Authentication daemon (vxatd)
and the Authorization daemon (vxazd) are running. If necessary, start the At daemon
first, then the Az daemon.
Installing the Authorization Server
Note The user named in the following command will be set up as the first NetBackup
security administrator.
1. On the machine where the VxSS Authorization server software is installed and
contains the Authorization server, run:
bpnbaz -SetupSecurity
Where:
master_server
AZ_server
software is installed.
Note bpnbaz -SetupSecurity must be run by root (UNIX) or Administrator
(Windows).
This process may take a number of minutes.
See step 7 on page 9 for an example of this command.
Chapter 1, Access Management 21
is the fully qualified name of the NetBackup master server.
is the fully qualified name of the machine where Authorization server
master_server
[-server
AZ_server
]
Page 44

Installing the Authorization Server
2. Allow authorization:
Run the following command on the Authorization server:
bpnbaz -AllowAuthorization
server
This command must be run on the Az server for each master or media server that will
utilize NetBackup Access Control.
Note bpnbaz -AllowAuthorization
server
must be run by root (UNIX) or
Administrator (Windows).
Where:
server is the fully qualified name of the machine where the Authorization client
software is installed. (Typically a media or master server.)
3. Start NetBackup daemons on the machine(s).
4. Continue with “Configuring Access Control Host Properties” on page 23 for
instructions on configuring NetBackup Access Control host properties for the master
server (Root Broker).
22 NetBackup System Administrator’s Guide for UNIX and Linux, Volume II
Page 45

Configuring Access Control Host Properties
Configuring Access Control Host Properties
Until host properties configuration on the master server is complete, NetBackup Access
Control is not enforced. As such, UNIX users must temporarily load the Java NetBackup
Administration Console (jnbSA) as root and Windows users must load the NetBackup
Administration Console as Administrator.
Note VERITAS recommends setting master server VxSS property to Automatic until the
clients are configured for Access Control. Then, if desired, change the VxSS
property on the master server to Required.
Master Server and Media Server Host Properties
The Access Control host properties are described fully in Chapter 7 of the NetBackup
System Administrator’s Guide, Volume I, but the following sections describe some points to
double-check.
To get to the master and media server host properties in the NetBackup Administration
Console, open NetBackup Management > Host Properties > Master Server or Media
Server > Select server > Access Control.
Access Control Host Properties Dialog
Set the VERITAS Security Services to
either Required or Automatic. A
setting of Automatic takes into
account that there may be hosts within
the configuration that are not
upgraded to NetBackup version 5.0 or
higher. The server will attempt to
negotiate the most secure connection
possible when talking to other
NetBackup systems.
Note VERITAS recommends setting the master server VxSS property to Automatic until
the clients are configured for Access Control. Then, if desired, change the VxSS on
the master server to Required.
When using Automatic, you may specify machines or domains requiring VxSS or
Prohibited from using VxSS.
Chapter 1, Access Management 23
Page 46

Configuring Access Control Host Properties
VxSS Tab
Within the Access Control host
properties, on the VxSS tab, add the
master server to the VxSS Network
list and set VERITAS Security
Services to Required.
Each new NetBackup client or media
server (version 5.0 or higher), added
to the NetBackup master, needs to
have the Access Control properties
configured on both itself and the
master. This can be done through the host properties on the master server.
Note VERITAS recommends setting the master server VxSS property to Automatic until
the clients are configured for Access Control. Then, if desired, change the VxSS on
the master server to Required.
Authentication Domain Tab
The Authentication Domain tab is used to define the following:
◆ which Authentication servers support which authentication mechanisms, and
◆ what domains each supports.
Add the domain you wish users to authenticate against. Be sure to select the proper
authentication mechanism.
The following examples contain three authentication domains and three authentication
types, two hosted on the authentication server UNIXBOX, and a Windows AD/PDC
(Active Directory/Primary Domain Controller) hosted on WINMACHINE.
24 NetBackup System Administrator’s Guide for UNIX and Linux, Volume II
Page 47

A UNIX domain
UNIXBOX.MYCOMPANY.COM on the
Authentication server UNIXBOX.
Notice that the authentication
mechanism for this domain is
PASSWD.
Note If using a UNIX authentication
domain, enter the fully qualified
domain name of the host
performing the authentication.
A NIS domain NIS.MYCOMPANY.COM
on the Authentication server
NISMACHINE.
Notice that the authentication
mechanism for this domain is NIS.
Configuring Access Control Host Properties
A Windows AD/PDC domain
WINDOWS.MYCOMPANY.COM on the
Authentication server WINMACHINE:
Notice that the authentication
mechanism for this domain is
WINDOWS.
Chapter 1, Access Management 25
Page 48

Configuring Access Control Host Properties
Authorization Service Tab
Within the Access Control host
properties, on the Authorization
Service tab, complete the properties
for the Authorization server. Specify
the fully qualified domain name for
the system running the Authorization
daemon (typically the master). If
needed, specify the alternate port for
which this daemon has been
configured. The default listening port
for the Authorization daemon is 4032.
After making any changes to the host
properties, restart the daemons.
Note If configuring this tab for a media server using Access Control, you must define the
host that will perform authorization.
Verifying Master Server Settings
Running bpnbat -whoami tells in what domain a host is registered and the name of the
machine the certificate represents (master.min.com).
bpnbat -whoami -cf
"c:\program
Files\veritas\netbackup\var\vxss\credentials\
Name: master.min.com
Domain: NBU_Machines@master.min.com
Issued by: /CN=broker/OU=root@master.min.com/O=vx
Expiry Date: Nov 5 20:17:51 2004 GMT
Authentication method: VERITAS Private Security
Operation completed successfully.
master.min.com"
If the domain listed is not NBU_Machines@master.min.com, consider running bpnbat
-addmachine for the name in question (master) on the machine that is serving the
NBU_Machines domain (master).
Then, on the machine where we want to place the certificate, run:
bpnbat -loginmachine
26 NetBackup System Administrator’s Guide for UNIX and Linux, Volume II
Page 49

Configuring Access Control Host Properties
Client Host Properties
To get to the client host properties in the NetBackup Administration Console, open
NetBackup Management > Host Properties > Master Server or Media Server > Select
client(s) > Access Control.
Access Control Host Properties Dialog
Select the NetBackup client in the host
properties. (On the master server, in the
NetBackup Administration Console, open
NetBackup Management > Host Properties >
Clients > Selected clients > Access Control.)
Set the VERITAS Security Services to
Required or Automatic.
VxSS Tab
Select the NetBackup client in the
host properties. This tab is only
enabled in Automatic mode and can
be used to control which systems
require or prohibit the use of VxSS on
a per-machine basis. Note that both
systems must have matching settings
in order to have communicate.
Authentication Domain Tab
Within the Access Control host
properties, on the Authentication
Domain tab, add the domain in which
the NetBackup client resides and
select the proper authentication
mechanism.
Chapter 1, Access Management 27
Page 50

Access Management Troubleshooting Guidelines
Access Management Troubleshooting Guidelines
In the configuration examples we’ll refer to the following host names:
Windows UNIX
Master Servers win_master unix_master
Media Servers win_media unix_media
Clients
Note While it is possible to share the Enterprise Media Manager server between multiple
master servers, this configuration is not supported when using Access Control. The
EMM server must be bound to one master server.
win_client
unix_client
Windows Verification Points
There are procedures that help you verify that the master server, media server and client
are configured correctly for Access Control.
28 NetBackup System Administrator’s Guide for UNIX and Linux, Volume II
Page 51

At server
Az server
Access Management Troubleshooting Guidelines
Example Configuration Containing Windows Systems Only
NBU master server (Windows) win_server.min.com
Root Broker
Authentication Broker
Authorization Service
Private VxSS domain called:
NBU_Machines@win_server.min.com
contains the following credentials:
win_server.min.com@NBU_Machines
win_media.min.com@NBU_Machines
win_client.min.com@NBU_Machines
Media server (Windows) win_media.min.com
At Client, Az Client
Windows User accounts
authenticate via Windows
Authentication Broker
Note:
Each machine has a private domain account created for it. Using these accounts allows NetBackup to
more reliably identify machines as they communicate with each other.
win_media.min.com@NBU_Machines
Client (Windows) win_client.min.com
At Client
win_client.min.com@NBU_Machines
Chapter 1, Access Management 29
Page 52

Access Management Troubleshooting Guidelines
Master Server Verification Points
The following sections describe procedures for Windows master server verification.
Verify Windows Master Server Settings
To determine in what domain a host is registered (where the primary Authentication
broker resides), and the name of the machine the certificate represents, run bpnbat with
-whoami. For example:
bpnbat -whoami -cf
"c:\program
Files\veritas\netbackup\var\vxss\credentials\
Name: win_master.min.com
Domain: NBU_Machines@win_master.min.com
Issued by: /CN=broker/OU=root@win_master.min.com/O=vx
Expiry Date: Nov 5 20:17:51 2004 GMT
Authentication method: VERITAS Private Security
Operation completed successfully.
If the domain listed is not NBU_Machines@win_master.min.com, consider running
bpnbat -addmachine for the name in question (win_master) on the machine that is
serving the NBU_Machines domain (win_master).
Then, on the machine where we want to place the certificate, run:
bpnbat -loginmachine
win_master"
Note When determining if a user’s credentials have expired, keep in mind that the output
displays the expiration time in GMT, not local time.
Note For the remaining procedures in this verification section, we assume that the
commands are performed from an operating system window in which the user
identity in question has run bpnbat -login using an identity that is a member of
NBU_Security Admin. This is usually the first identity with which the security was
set up.
Verify which Machines are Permitted to Perform Authorization Lookups
Logged in as a member of the Administrators group run the following command:
bpnbaz -ShowAuthorizers
This command shows that win_master and win_media (media server) are permitted to
perform Authorization lookups. Note that both servers are authenticated against the same
vx (VERITAS Private Domain) Domain, NBU_Machines@win_master.min.com.
30 NetBackup System Administrator’s Guide for UNIX and Linux, Volume II
Page 53

Access Management Troubleshooting Guidelines
Note This command must be run by a local administrator or by root. The local
administrator must be a member of the NBU_Security Admin user group.
bpnbaz -ShowAuthorizers
==========
Type: User
Domain Type: vx
Domain:NBU_Machines@win_master.min.com
Name: win_master.min.com
==========
Type: User
Domain Type: vx
Domain:NBU_Machines@win_master.min.com
Name: win_media.min.com
Operation completed successfully.
If a master or media server is missing from the list of Authorized machines, run
bpnbaz -allowauthorization to add the missing machine.
Verify that the Database is Configured Correctly
To make sure that the database is configured correctly, run bpnbaz -listgroups:
bpnbaz -listgroups
NBU_User
NBU_Operator
NBU_Security Admin
Vault_Operator
NBU_Admin
Operation completed successfully.
If the groups do not appear, or if bpnbaz -listmainobjects does not return data, run
bpnbaz -SetupSecurity.
Verify that the vxatd and vxazd Processes are Running
Use the Windows Task Manager to make sure that vxatd.exe and vxazd.exe are running
on the designated host. If necessary, start them.
Verify that the Host Properties are Configured Correctly
In the Access Control host properties, verify that the VERITAS Security Services
property is set correctly. (The setting should be either Automatic or Required, depending
on whether all machines are using VxSS or not. If all machines are not using VxSS, set it to
Automatic.
This can also be verified by viewing USE_VXSS in the registry at:
Chapter 1, Access Management 31
Page 54

Access Management Troubleshooting Guidelines
HKEY_LOCAL_MACHINE\Software\VERITAS\NetBackup\CurrentVersion\config
In the Access Control host properties, verify that the authentication domains listed are
spelled correctly and point to the proper servers (valid Authentication brokers). If all
domains are Windows-based, they should point to a Windows machine running the At
broker.
Media Server Verification Points
The following sections describe procedures for Windows media server verification.
Verify the Media Server
To determine which Authentication broker the media server is authenticated against, run
bpnbat -whoami. For example:
bpnbat -whoami -cf "c:\program
files\veritas\netbackup\var\vxss\credentials\win_media.min.com"
Name: win_media.min.com
Domain: NBU_Machines@win_master.min.com
Issued by: /CN=broker/OU=root@win_master.min.com/O=vx
Expiry Date: Nov 5 20:11:40 2004 GMT
Authentication method: VERITAS Private Security
Operation completed successfully.
Verify that the Server has Access to the Authorization Database
To make sure that the media server is able to access the Authorization database as it
needs, run bpnbaz -ListGroups -CredFile
"
directory_containing_credential_file
”
For example:
32 NetBackup System Administrator’s Guide for UNIX and Linux, Volume II
Page 55

Access Management Troubleshooting Guidelines
bpnbaz -ListGroups -CredFile "C:\Program
Files\VERITAS\NetBackup\var\vxss\credentials\win_media.min.com"
NBU_User
NBU_Operator
NBU_Security Admin
Vault_Operator
NBU_Admin
Operation completed successfully.
If this command fails, run bpnbaz -AllowAuthorization on the master server that is
the Authorization broker (win_master.min.com).
Unable to Load Library Message
Verifying the media server and verifying that the media server has access to the proper
database indirectly informs us that the VxSS client libraries for both At and Az are
properly installed. If either of these procedures fail with messages pertaining to “unable to
load libraries,” check to make certain the Authentication and Authorization client
libraries are installed. See the VERITAS Security Services Installation Guide on the VxSS
installation CD for proper installation procedures.
You may also verify that the Authentication domains are correct by viewing the Access
Control host properties for this media server, or by using regedit directly on the media
server.
Client Verification Points
The following sections describe procedures for Windows client verification.
Verify the Credential for the Client
To check that the credential for the client is indeed for the correct client and comes from
the correct domain, run bpnbat -whoami. For example:
bpnbat -whoami -cf "c:\program
files\veritas\netbackup\var\vxss\credentials\win_client.min.com"
Name: win_client.min.com
Domain: NBU_Machines@win_master.min.com
Issued by: /CN=broker/OU=root@win_master.min.com/O=vx
Expiry Date: Nov 5 20:11:45 2004 GMT
Authentication method: VERITAS Private Security
Operation completed successfully.
Chapter 1, Access Management 33
Page 56

Access Management Troubleshooting Guidelines
Verify that the VxSS Authentication Client Libraries are Installed
Run bpnbat -login on the client to verify that the VxSS authentication client libraries
are installed.
bpnbat -login
Authentication Broker:
Authentication port[ Enter = default]:
Authentication type (NIS, NIS+, WINDOWS, vx, unixpwd): WINDOWS
Domain: ENTERPRISE
Name: Smith
Password:
Operation completed successfully.
This can also be done by looking at the Windows Add/Remove Programs.
Verify Correct Authentication Domains
In the Access Control host properties or by using regedit, check that any defined
authentication domains for the client are correct. Make certain the domains are spelled
correctly, and that the authentication brokers listed for each of the domains is valid for
that domain type.
win_master
34 NetBackup System Administrator’s Guide for UNIX and Linux, Volume II
Page 57

UNIX Verification Points
These are the procedures that help you verify that the UNIX master server, media server
and client are configured correctly for Access Control.
Example Configuration Containing UNIX Systems Only
NBU master server (UNIX) unix_master.min.com
At server
Az server
Root Broker
Authentication Broker
Authorization Service
Private VxSS domain called:
NBU_Machines@unix_master.min.com
contains the following credentials:
unix_master.min.com@NBU_Machines
unix_media.min.com@NBU_Machines
unix_client.min.com@NBU_Machines
Access Management Troubleshooting Guidelines
Media server (UNIX) unix_media.min.com
At Client, Az Client
UNIX User accounts
authenticate via UNIX
Authentication Broker
Note:
Each machine has a private domain account created for it. Using these accounts allows NetBackup to
more reliably identify machines as they communicate with each other.
Chapter 1, Access Management 35
unix_media.min.com@NBU_Machines
Client (UNIX) unix_client.min.com
At Client
unix_client.min.com@NBU_Machines
Page 58

Access Management Troubleshooting Guidelines
Master Server Verification Points
The following sections describe procedures for UNIX master server verification.
Verify UNIX Master Server Settings
To determine in what domain a host is registered (where the primary Authentication
broker resides), and the name of the machine the certificate represents, run bpnbat with
-whoami. For example:
bpnbat -whoami -cf
/usr/openv/var/vxss/credentials/unix_master.min.com
Name: unix_master.min.com
Domain: NBU_Machines@win_master
Issued by: /CN=broker/OU=root@win_master/O=vx
Expiry Date: Nov 13 15:44:30 2004 GMT
Authentication method: VERITAS Private Security
Operation completed successfully.
If the domain listed is not NBU_Machines@unix_master.min.com, consider running
bpnbat -addmachine for the name in question (unix_master) on the machine that is
serving the NBU_Machines domain (unix_master).
Then, on the machine where we want to place the certificate, run:
bpnbat -loginmachine
Note When determining if a user’s credentials have expired, keep in mind that the output
displays the expiration time in GMT, not local time.
Note For the remaining procedures in this verification section, we assume that the
commands are performed from an operating system window in which the user
identity in question has run bpnbat -login using an identity that is a member of
NBU_Security Admin. This is usually the first identity with which the security was
set up.
Verify which Machines are Permitted to Perform Authorization Lookups
Logged in as root on the Authorization broker, run the following command:
bpnbaz -ShowAuthorizers
This command shows that unix_master and unix_media are permitted to perform
Authorization lookups. Note that both servers are authenticated against the same vx
(VERITAS Private Domain) Domain, NBU_Machines@unix_master.min.com.
bpnbaz -ShowAuthorizers
==========
36 NetBackup System Administrator’s Guide for UNIX and Linux, Volume II
Page 59

Access Management Troubleshooting Guidelines
Type: User
Domain Type: vx
Domain:NBU_Machines@unix_master.min.com
Name: unix_master.min.com
==========
Type: User
Domain Type: vx
Domain:NBU_Machines@unix_master.min.com
Name: unix_media.min.com
Operation completed successfully.
If a master or media server is missing from the list of Authorized machines, run
bpnbaz -allowauthorization to add the missing machine.
Verify that the Database is Configured Correctly
To make sure that the database is configured correctly, run bpnbaz -listgroups:
bpnbaz -listgroups
NBU_User
NBU_Operator
NBU_Admin
NBU_Security Admin
Vault_Operator
Operation completed successfully.
If the groups do not appear, or if bpnbaz -listmainobjects does not return data, run
bpnbaz -SetupSecurity.
Verify that the vxatd and vxazd Processes are Running
Run the ps command to ensure that vxatd and vxazd are running on the designated
host. If necessary, start them. For example:
ps -fed |grep vx
root 10716 1 0 Nov 11 ? 0:02 /opt/VRTSat/bin/vxatd
root 10721 1 0 Nov 11 ? 4:17 /opt/VRTSaz/bin/vxazd
See the VERITAS Security Services Administrator’s Guide for more details on how to start
vxatd and vxazd.
Chapter 1, Access Management 37
Page 60

Access Management Troubleshooting Guidelines
Verify that the Host Properties are Configured Correctly
In the Access Control host properties, verify that the VERITAS Security Services
property is set correctly. (The setting should be either Automatic or Required, depending
on whether all machines are using VxSS or not. If all machines are not using VxSS, set it to
Automatic.
In the Access Control host properties, verify that the authentication domains listed are
spelled correctly and point to the proper servers (valid Authentication brokers). If all
domains are UNIX-based, they should point to a UNIX machine running the At broker.
This can also be verified in bp.conf using vi.
cat bp.conf
SERVER = unix_master
SERVER = unix_media
CLIENT_NAME = unix_master
AUTHENTICATION_DOMAIN = min.com "default company NIS namespace" NIS
unix_master 0
AUTHENTICATION_DOMAIN = unix_master "unix_master password file"
PASSWD unix_master 0
AUTHORIZATION_SERVICE = unix_master.min.com 0
USE_VXSS = REQUIRED
#
Media Server Verification Points
The following sections describe procedures for UNIX media server verification.
Verify the Media Server
To determine which Authentication broker the media server is authenticated against, run
bpnbat -whoami. For example:
bpnbat -whoami -cf
/usr/openv/var/vxss/credentials/unix_media.min.com
Name: unix_media.min.com
Domain: NBU_Machines@unix_master.min.com
Issued by: /CN=broker/OU=root@unix_master.min.com/O=vx
Expiry Date: Nov 9 14:48:08 2004 GMT
Authentication method: VERITAS Private Security
Operation completed successfully.
Verify that the Server has Access to the Authorization Database
To make sure that the media server is able to access the Authorization database as it
needs, run bpnbaz -ListGroups -CredFile "
38 NetBackup System Administrator’s Guide for UNIX and Linux, Volume II
directory_containing_AZ_db
”
Page 61

Access Management Troubleshooting Guidelines
For example:
bpnbaz -ListGroups -CredFile
/usr/openv/var/vxss/credentials/unix_media.min.com
NBU_User
NBU_Operator
NBU_Admin
NBU_Security Admin
Vault_Operator
Operation completed successfully.
If this command fails, run bpnbaz -AllowAuthorization on the master server that is
the Authorization broker (unix_master).
Unable to Load Library Message
Verifying the media server and verifying that the media server has access to the proper
database indirectly informs us that the VxSS client libraries for both At and Az are
properly installed. If either of these procedures fail with messages pertaining to “unable to
load libraries,” check to make certain the Authentication and Authorization client
libraries are installed. See the VERITAS Security Services Installation Guide on the VxSS
installation CD.
You may also verify that the Authentication domains are correct by viewing the Access
Control host properties for this media server, or by using cat(1)ing the bp.conf file.
Client Verification Points
The following sections describe procedures for UNIX client verification.
Verify the Credential for the Client
To check that the credential for the client is indeed for the correct client and comes from
the correct domain, run bpnbat -whoami. For example:
bpnbat -whoami -cf
/usr/openv/var/vxss/credentials/unix_client.min.com
Name: unix_client.min.com
Domain: NBU_Machines@unix_master.min.com
Issued by: /CN=broker/OU=root@unix_master.min.com/O=vx
Expiry Date: Nov 9 14:49:00 2004 GMT
Authentication method: VERITAS Private Security
Operation completed successfully.
Chapter 1, Access Management 39
Page 62

Access Management Troubleshooting Guidelines
Verify that the VxSS Authentication Client Libraries are Installed
Run bpnbat -login on the client to verify that the VxSS authentication client libraries
are installed.
bpnbat -login
Authentication Broker: unix_master.min.com
Authentication port[ Enter = default]:
Authentication type (NIS, NIS+, WINDOWS, vx, unixpwd): NIS
Domain: min.com
Name: Smith
Password:
Operation completed successfully.
This can also be done by looking at /etc/vx/vss/*.loc to see where the libraries are
installed, and verify they are in the location indicated:
cat /etc/vx/vss/*.loc
ProductInstallDir=/opt/VRTSat
ProductInstallDir=/opt/VRTSaz
ls -l /opt/VRTSat/*/opt/VRTSaz/*
Verify Correct Authentication Domains
In the Access Control host properties or by using vi, check that any defined
authentication domains for the client are correct. Make certain the domains are spelled
correctly, and that the authentication brokers listed for each of the domains is valid for
that domain type.
This can also be verified in bp.conf using vi.
cat bp.conf
SERVER = unix_master
SERVER = unix_media
CLIENT_NAME = unix_master
AUTHENTICATION_DOMAIN = min.com "default company NIS namespace" NIS
unix_master 0
AUTHENTICATION_DOMAIN = unix_master "unix_master password file"
PASSWD unix_master 0
AUTHORIZATION_SERVICE = unix_master.min.com 0
USE_VXSS = REQUIRED
40 NetBackup System Administrator’s Guide for UNIX and Linux, Volume II
Page 63

Access Management Troubleshooting Guidelines
Verification Points in a Mixed Environment with a UNIX Master Server
The following procedures can help you verify that the master server, media server and
client are configured correctly for a heterogeneous NetBackup Access Control
environment, where the master server is a UNIX machine.
Chapter 1, Access Management 41
Page 64

Access Management Troubleshooting Guidelines
Example Mixed Configuration Containing a UNIX Master
NBU master server (UNIX) unix_master.min.com
At server
Az server
Root Broker
Authentication Broker
Authorization Service
Private VxSS domain called
NBU_Machines@unix_master.min.com
contains the following credentials:
unix_master.min.com@NBU_Machines
win_server.min.com@NBU_Machines
win_media.min.com@NBU_Machines
win_client.min.com@NBU_Machines
unix_media.min.com@NBU_Machines
unix_client.min.com@NBU_Machines
Host (Windows)
At server
win_server.min.com@NBU_Machines
Media server (Windows)
win_media.min.com
win_server.min.com
Authentication Broker
Windows hosts
authenticate via
Windows
Authentication
Broker
See note
win_media.min.com@NBU_Machines
below.
Client (Windows) win_client.min.com
At Client
win_client.min.com@NBU_Machines
Media server (UNIX) unix_media.min.com
At Client, Az Client
UNIX hosts
authenticate via UNIX
Authentication Broker
Note:
Each machine has a private domain account created for it. Using these accounts allows
NetBackup to more reliably identify machines as they communicate with each other.
unix_media.min.com@NBU_Machines
Client (UNIX) unix_client.min.com
At Client
unix_client.min.com@NBU_Machines
42 NetBackup System Administrator’s Guide for UNIX and Linux, Volume II
Page 65

Access Management Troubleshooting Guidelines
Master Server Verification Points
Follow the same procedures as those listed in “Master Server Verification Points” on
page 36.
Media Server Verification Points
Verify the UNIX Media Server
For UNIX media servers, follow the same procedures as those listed in “Media Server
Verification Points” on page 38.
Verify the Windows Media Server
Check the machine certificate comes from the root Authentication broker, which is found
on the UNIX master server (unix_master).
If the certificate is missing, run the following commands to correct the problem:
◆ bpnbat -addmachine on the root Authentication broker (in this example,
unix_master)
◆ bpnbat -loginmachine (in this example, win_media)
For example:
bpnbat -whoami -cf "C:\program
files\veritas\netbackup\var\vxss\credentials\win_media.min.com"
Name: win_media.min.com
Domain: NBU_Machines@unix_master.min.com
Issued by: /CN=broker/OU=root@unix_master.min.com/O=vx
Expiry Date: Nov 13 20:11:04 2004 GMT
Authentication method: VERITAS Private Security
Operation completed successfully.
Verify that a Media Server is Permitted to Perform Authorization Lookups
Make sure the media server is allowed to perform authorization checks by running
bpnbaz -listgroups -CredFile. For example:
bpnbaz -listgroups -CredFile "C:\program
files\veritas\netbackup\var\vxss\credentials\win_media.min.com"
NBU_User
NBU_Operator
NBU_Admin
NBU_Security Admin
Vault_Operator
Operation completed successfully.
Chapter 1, Access Management 43
Page 66

Access Management Troubleshooting Guidelines
If the media server is not allowed to perform authorization checks, run bpnbaz
-allowauthorization on the master server for the media server name in question.
Unable to Load Library Message
Verifying the Windows media server and verifying that the media server is permitted to
perform authorization checks indirectly informs us that the VxSS client libraries for both
At and Az are properly installed. If either of these procedures fail with messages
pertaining to “unable to load libraries,” check to make certain the Authentication and
Authorization client libraries are installed. See the VERITAS Security Services Installation
Guide on the VxSS installation CD.
Verify Authentication Domains
You may also verify that the Authentication domains are correct by viewing the Access
Control host properties for this media server, or by using regedit directly on the media
server in the following location:
HKEY_LOCAL_MACHINE\Software\VERITAS\NetBackup\CurrentVersion\config\
AUTHENTICATION_DOMAIN
Cross Platform Authentication Domains
Take extra care in mixed environments to ensure that the appropriate domain types point
to the correct authentication brokers. In the example below, note that the WINDOWS
domains point to win_media.min.com.
Client Verification Points
For UNIX client machines, follow the same procedures as those listed in “Client
Verification Points” on page 39.
For Windows clients:
44 NetBackup System Administrator’s Guide for UNIX and Linux, Volume II
Page 67

Access Management Troubleshooting Guidelines
Verify the Credential for the Windows Client
To check that the credential for the client is indeed for the correct client and comes from
the correct domain, run bpnbat -whoami. For example:
bpnbat -whoami -cf "c:\program
files\veritas\netbackup\var\vxss\credentials\
Name: win_master.min.com
Domain: NBU_Machines@unix_master.min.com
Issued by: /CN=broker/OU=root@unix_master.min.com/O=vx
Expiry Date: Nov 13 19:50:50 2004 GMT
Authentication method: VERITAS Private Security
Operation completed successfully.
win_master.min.com"
Verify that the VxSS Authentication Client Libraries are Installed
Run bpnbat -login on the client to verify that the VxSS authentication client libraries
are installed. For example:
bpnbat -login
Authentication Broker: unix_master.min.com
Authentication port[ Enter = default]:
Authentication type (NIS, NIS+, WINDOWS, vx, unixpwd): NIS
Domain: min.com
Name: Smith
Password:
Operation completed successfully.
Verifying the Windows Authentication Broker
Make sure that the Windows Authentication broker either has mutual trust with the main
UNIX Authentication broker, or is using the UNIX broker as its root broker. See the
VERITAS Security Services Installation Guide on the VxSS installation CD for more
information regarding these scenarios.
Chapter 1, Access Management 45
Page 68

Access Management Troubleshooting Guidelines
Verification Points in a Mixed Environment with a Windows Master Server
The following procedures can help you verify that the master server, media server and
client are configured correctly for a heterogeneous NetBackup Access Control
environment, where the master server is a Windows machine.
46 NetBackup System Administrator’s Guide for UNIX and Linux, Volume II
Page 69

Example Mixed Configuration Containing a Windows Master
NBU master server (Windows) win_server.min.com
At server
Az server
Root Broker
Authentication Broker
Authorization Service
Private VxSS domain called
NBU_Machines@win_server.min.com
contains the following credentials:
win_server.min.com@NBU_Machines
unix_master.min.com@NBU_Machines
unix_media.min.com@NBU_Machines
unix_client.min.com@NBU_Machines
win_media.min.com@NBU_Machines
win_client.min.com@NBU_Machines
Access Management Troubleshooting Guidelines
Host (UNIX) unix_master.min.com
At server
unix_master.min.com@NBU_Machines
Media server (UNIX) unix_media.min.com
At Client, Az Client
Authentication Broker
UNIX user accounts
authenticate via
UNIX Authentication
Broker
See note
unix_media.min.com@NBU_Machines
below.
Client (UNIX) unix_client.min.com
At Client
unix_client.min.com@NBU_Machines
Media server (Windows) win_media.min.com
At Client, Az Client
Windows user accounts
authenticate via Windows
Authentication Broker
Note:
Each machine has a private domain account created for it. Using these accounts allows
NetBackup to more reliably identify machines as they communicate with each other.
win_media.min.com@NBU_Machines
Client (Windows) win_client.min.com
At Client
win_client.min.com@NBU_Machines
Chapter 1, Access Management 47
Page 70

Access Management Troubleshooting Guidelines
Master Server Verification Points
Follow the same procedures as those listed in “Master Server and Media Server Host
Properties” on page 23.
Media Server Verification Points
Verify the Windows Media Server
For Windows media servers, follow the same procedures as those listed in “Media Server
Verification Points” on page 32.
Verify the UNIX Media Server
Check that the machine certificate is issued from the root Authentication broker, found on
the Windows master server (win_master). To determine which Authentication broker the
media server is authenticated against, run bpnbat -whoami. For example:
bpnbat -whoami -cf
/usr/openv/var/vxss/credentials/unix_media.min.com
Name: unix_media.min.com
Domain: NBU_Machines@win_master.min.com
Issued by: /CN=broker/OU=root@win_master.min.com/O=vx
Expiry Date: Nov 9 14:48:08 2004 GMT
Authentication method: VERITAS Private Security
Operation completed successfully.
Verify that the Server has Access to the Authorization Database
To make sure that the media server is able to access the Authorization database as it needs
to perform authorization checks, run bpnbaz -ListGroups -CredFile
"
/usr/openv/var/vxss/credentials/<hostname>
”
For example:
bpnbaz -ListGroups -CredFile\
/usr/openv/var/vxss/credentials/unix_media.min.com
NBU_User
NBU_Operator
NBU_Admin
NBU_Security Admin
Vault_Operator
Operation completed successfully.
If the media server is not allowed to perform authorization checks, run bpnbaz
-allowauthorization on the master server for the media server name in question.
48 NetBackup System Administrator’s Guide for UNIX and Linux, Volume II
Page 71

Access Management Troubleshooting Guidelines
Unable to Load Library Message
Verifying the media server and verifying that the media server has access to the proper
database indirectly informs us that the VxSS client libraries for both At and Az are
properly installed. If either of these procedures fail with messages pertaining to “unable to
load libraries,” check to make certain the Authentication and Authorization client
libraries are installed. See the VERITAS Security Services Installation Guide on the VxSS
installation CD.
Cross Platform Authentication Domains
You may also verify that the Authentication domains are correct by viewing the Access
Control host properties for this media server, or by using cat(1)ing the bp.conf file.
Take extra care in mixed environments to ensure that the appropriate domain types point
to the correct authentication brokers. In the example below, note that the PASSWD and
NIS domains point to unix_media.min.com, which, in this example, is the UNIX
Authentication broker:
cat bp.conf
SERVER = win_master.min.com
MEDIA_SERVER = unix_media.min.com
CLIENT_NAME = unix_media
AUTHENTICATION_DOMAIN = win_master "win_master domain" WINDOWS
win_master.min.com
0
AUTHENTICATION_DOMAIN = enterprise "enterprise domain" WINDOWS
win_master.min.com 0
AUTHENTICATION_DOMAIN = unix_media.min.com "local unix_media
domain" PASSWD unix_media.min.com 0
AUTHENTICATION_DOMAIN = min.com "NIS domain" NIS
unix_media.min.com 0
AUTHORIZATION_SERVICE = win_master.min.com 0
USE_VXSS = REQUIRED
Client Verification Points
Verify the Credential for the Windows Client
For Windows clients, follow the same procedures as those listed in “Client Verification
Points” on page 33.
Verify the Credential for the UNIX Client
To check that the credential for the client is indeed for the correct client and comes from
the correct domain, run bpnbat -whoami. For example:
Chapter 1, Access Management 49
Page 72

Access Management Troubleshooting Guidelines
bpnbat -whoami -cf \
"/usr/openv/var/vxss/credentials/unix_client.min.com"
Name: unix_client.min.com
Domain: NBU_Machines@win_master.min.com
Issued by: /CN=broker/OU=root@win_master.min.com/O=vx
Expiry Date: Nov 6 21:16:01 2004 GMT
Authentication method: VERITAS Private Security
Operation completed successfully.
Verify that the VxSS Authentication Client Libraries are Installed
Run bpnbat -login on the client to verify that the VxSS authentication client libraries
are installed.
bpnbat -login
Authentication Broker: unix_media.min.com
Authentication port[ Enter = default]:
Authentication type (NIS, NIS+, WINDOWS, vx, unixpwd): NIS
Domain: min.com
Name: Smith
Password:
You do not currently trust the server: unix_media.min.com, do you
wish to tr
ust it? (y/n):
y
Operation completed successfully.
Verify the UNIX Authentication Broker
Make sure that the UNIX Authentication broker either has mutual trust with the main
Windows Authentication broker, or is using the Windows broker as its root broker. See the
VERITAS Security Services Installation Guide on the VxSS installation CD for more
information regarding this scenario.
50 NetBackup System Administrator’s Guide for UNIX and Linux, Volume II
Page 73

Access Management Troubleshooting Guidelines
Other Troubleshooting Topics
The following sections describe topics that may be helpful when configuring VxSS with
NetBackup.
Expired Credentials Message
If your credential has expired or is incorrect, you may receive the following message while
running a bpnbaz or bpnbat command:
Supplied credential is expired or incorrect. Please reauthenticate and
try again.
Run bpnbat -Login to update an expired credential.
Useful Debug Logs
The following logs are useful when debugging NetBackup Access Control:
On the master: admin, bpcd, bprd, bpdbm, bpjobd
On the client: admin, bpcd, bprd, bpdbjobs
See the NetBackup Troubleshooting Guide for instructions on implementing proper logging.
If Uninstalling VxSS
On UNIX:
Using installvss, select the option for uninstalling Authentication and Authorization.
The following directories should be empty after uninstalling:
/opt
/etc/vx/vss
/var/
On Windows:
Use the Windows Add/Remove Programs panel from the Control Menu to uninstall
Authentication and Authorization. The \Veritas\Security directory should be empty
after uninstalling.
Where Credentials Are Stored
NetBackup VxSS credentials are stored in the following UNIX directories:
User credentials: $HOME/.vxss
Machine credentials: /usr/openv/var/vxss/credentials/
Chapter 1, Access Management 51
Page 74

Access Management Troubleshooting Guidelines
How System Time Affects Access Control
Credentials have a birth and death time. Machines with large discrepancies in time may
see credentials as being created in the future or may prematurely consider a credential to
be expired. Consider synchronizing system time if you have trouble communicating
between systems.
VxSS Ports
VxSS daemons listen at the following ports:
Authentication:
netstat -an | grep 2821
Authorization:
netstat -an | grep 4032
Stopping VxSS Daemons
When stopping the VxSS daemons, stop Az first, then stop At.
When stopping the VxSS services, stop Authorization first, then stop Authentication.
UNIX: Use the following commands.
To stop Az: /opt/VRTSaz/bin/vrtsaz -stop
To stop At: Use the term signal as shown in the example below:
# ps -fed |grep vxatd
root 16018 1 4 08:47:35 ? 0:01 ./vxatd
root 16019 16011 0 08:47:39 pts/2 0:00 grep vxatd
# kill 16018
# ps -fed |grep vxard
root 16021 16011 0 08:47:48 pts/2 0:00 grep vxard
Windows:
Use the Services utility that Windows provides, since these services do not appear in
the NetBackup Activity Monitor.
If You Lock Yourself Out of NetBackup
It is possible to lock yourself out of the NetBackup Administration Console if Access
Control is incorrectly configured.
If this occurs, use vi to read the bp.conf entries (UNIX) or regedit (Windows) to view
the Windows registry in the following location:
52 NetBackup System Administrator’s Guide for UNIX and Linux, Volume II
Page 75

Access Management Troubleshooting Guidelines
HKEY_LOCAL_MACHINE\Software\VERITAS\NetBackup\CurrentVersion\config
You’ll look to see if he following entries are set correctly: AUTHORIZATION_SERVICE,
AUTHENTICATION_DOMAIN, and USE_VXSS.
If the administrator does not wish to use NetBackup Access Control or does not have the
VxSS libraries installed, make certain that the USE_VXSS entry is set to Prohibited, or is
deleted entirely.
nbac_cron Utility
Use the nbac_cron utility to create identities under which to run cron or at jobs.
nbac_cron is found in the following location:
UNIX: /opt/openv/netbackup/bin/goodies/nbac_cron
Windows:
Install_path
\netbackup\bin\goodies\nbac_cron.exe
nbac_cron options:
◆ -SetupAt [-Port #]
-SetupCron [-Port #]
Either option sets up an Authentication account. Optionally, specify a port number to
use for authentication.
◆ -AddAt
Create an at account for a user.
◆ -AddCron
Create a cron account for a user.
Chapter 1, Access Management 53
Page 76

Using the Access Management Utility
Using the Access Management Utility
Users assigned to the NetBackup Security Administrator user group have access to Access
Management. Users assigned to any other user group, including NetBackup
Administrator, can see the Access Management node in the NetBackup Administration
Console, but cannot expand it.
If a user other than a Security Administrator tries to select Access Management, an error
message displays. Toolbar buttons and menu items specific to Access Management are
not displayed.
Upon successful completion, the default NetBackup user groups should display in the
NetBackup Administration Console under Access Management > NBU User Groups.
To list the groups on the command line, run
bpnbaz -ListGroups on the machine where
the VxSS Authorization server software is installed.
bpnbaz is located in directory /usr/openv/netbackup/bin/admincmd
(You must be logged in as the Security Administrator by using bpnbat -login)
bpnbaz -ListGroups
NBU_User
NBU_Operator
NBU_Admin
NBU_Security Admin
Vault_Operator
Operation completed successfully.
The NetBackup user groups are listed. This verifies that the Security Administrator can
access the user groups.
Access Management Menus
The Menu bar consists of the following menu items:
Option Description
File Options Change Server, New Window from Here, Adjust Application Time Zone,
Export, Page Setup, Print Preview, Print, Close Window, and Exit are described in
Chapter 1 of the NetBackup System Administrator’s Guide for UNIX, Volume I.
Edit Options New, Change, Delete, and Find are described in Chapter 1 of the
NetBackup System Administrator’s Guide for UNIX, Volume I.
The Change option is available when a NBU user group is selected in the details
pane.
54 NetBackup System Administrator’s Guide for UNIX and Linux, Volume II
Page 77

Using the Access Management Utility
Option Description
View Options Show Toolbar, Show Tree, Back, Forward, Up One Level, Options,
Refresh, Column Layout, Sort, and Filter are described in Chapter 1 of the
NetBackup System Administrator’s Guide for UNIX, Volume I.
Actions The Actions menu contains the following options when Access Management is
selected:
◆ New User Group: Click to create a new NetBackup user group.
◆ Copy to New User Group: Use to create a new user group based on an existing
user group. Users and permissions can be changed as needed for the new user
group.
Help Options Help Topics, Troubleshooter, License Keys, Current NBAC User, and
About NetBackup Administration Console are described in Chapter 1 of the
NetBackup System Administrator’s Guide for UNIX, Volume I.
Chapter 1, Access Management 55
Page 78

Determining Who Can Access NetBackup
Determining Who Can Access NetBackup
Access Management allows only one user group, by default, the NBU_Security Admin user
group, to define the following aspects of NetBackup Access Management:
◆ The permissions of individual users.
◆ The creation of user groups.
First, determine which NetBackup resources your users will need to access. (See
“Permissions for Default NetBackup User Groups” on page 65 for resources and
associated permissions.)
The Security Administrator may want to first consider what different users have in
common, then create user groups with the permissions that these users require. User
groups generally correspond to a role, such as administrators, operators, or end-users.
Consider basing user groups on one or more of the following criteria:
◆ Functional units in your organization (UNIX administration, for example)
◆ NetBackup resources (drives, policies, for example)
◆ Location (East Coast or West coast, for example)
◆ Individual responsibilities (tape operator, for example)
Note Permissions are granted to individuals in user groups, not to individuals on a
per-host basis. If a machine is authenticated within the configuration, any
individual in the user group can operate NetBackup to the extent that they are
authorized to do so. There are no restrictions based on a machine name.
Individual Users
NetBackup Access Management uses your existing OS-defined users, groups, and
domains. As such, Access Management maintains no list of users and passwords. When
defining members of groups, the Security Administrator is specifying existing OS level
users as members of user groups.
56 NetBackup System Administrator’s Guide for UNIX and Linux, Volume II
Page 79

Determining Who Can Access NetBackup
Every authenticated user belongs to at least one authorization user group. By default,
every user belongs to the user group NBU_Users, which contains all authenticated users.
Only users and OS groups display
in the console, not domains.
Note: Contents of Access Management
visible only to members of the
NBU_Security Admin
user group.
There are two types of users that are implicit members of groups:
◆ On the server hosting the Authorization daemons, root is an implicit member of the
NBU_Security Admin user group
◆ All authenticated users are implicit members of the NBU_Users user group
All other groups must have members defined explicitly. The NetBackup Security
Administrator can delete members added manually to other groups; however, the
Security Administrator may not delete the predefined implicit members of the NBU_Users
and NBU_Security Admin groups. OS groups and OS users may be added to an
authorization group.
Note Although root (UNIX) or administrator (Windows) on the master server are added to
the NetBackup Administrators user group and get NetBackup Administrator
permissions, root and administrator are not predefined users.)
Chapter 1, Access Management 57
Page 80

Determining Who Can Access NetBackup
User Groups
Rather than assigning permissions directly to
individual users, NetBackup Access Management
is configured by assigning permissions to user
groups, then assigning users to the user groups.
Upon successful installation, NetBackup provides
five default user groups that complement how
sites often manage the duties of NetBackup
operation. The user groups are listed under Access
Management > NBU User Groups. Keep in mind
that the contents of Access Management are
visible to members of the NBU_Security Admin
group only.
The Security Administrator may choose to use the
default NetBackup user groups, or may choose to
create custom user groups.
Default User Groups
The permissions granted to users in each of the five default user groups correlate to the
group name. Essentially, an authorization object correlates to a node in the NetBackup
Administration Console tree.
Note: Contents of Access
Management visible only to members of
the
NBU_Security Admin
user group.
The following sections describe each NetBackup default user group:
Security Administrator (NBU_Security Admin)
There are usually very few members in the NBU_Security Admin user group. The only
permission that the Security Administrator possesses by default is that of configuring
Access Control within Access Management. Configuring Access Control includes the
following permissions:
◆ Ability to see the contents of Access Management in the NetBackup Administration
Console
◆ Ability to create, modify and delete users and user groups
◆ Ability to assign users to user groups
◆ Ability to assign permissions to user groups
58 NetBackup System Administrator’s Guide for UNIX and Linux, Volume II
Page 81

Determining Who Can Access NetBackup
Administrator (NBU_Admin)
By default, members of the NBU_Admin user group have full permission to access,
configure, and operate any NetBackup authorization object. In other words, members
have all the capabilities that are currently available to administrators without Access
Management in place. However, as members of this group, it is not necessary to log on as
root or administrator at the OS level.
Note Members of the NBU_Admin user group cannot see the contents of Access
Management, and therefore, cannot ascribe permissions to other user groups.
Operator (NBU_Operator)
The main task of the NBU_Operator user group is to monitor jobs. For example, members
of the NBU_Operator user group might monitor jobs and notify a NetBackup
administrator if there is a problem so the problem can be addressed by the administrator.
Using the default permissions, a member of the NBU_Operator user group would
probably not have enough access to be address larger problems.
Members of the NBU_Operator user group have permissions that allow them to perform
some tasks such as moving tapes, operating drives, and inventorying robots.
Note In order for members of the NBU_Operator user group to continue viewing media
and device information, run the command bpnbaz -UpGrade60.
Running this command brings the NetBackup 5.x permissions for the
NBU_Operator user group up to the expected configuration for 6.0.
Default User (NBU_User)
The NBU_User user group is the default NetBackup user group with the fewest
permissions. Members of the NBU_User user group can only backup, restore, and archive
files. NBU_User user group members have access to the functionality of the NetBackup
client interface (BAR).
Vault Operator (Vault_Operator)
The Vault_Operator user group is the default user group that contains permissions to
perform the operator actions necessary for the Vault process.
Chapter 1, Access Management 59
Page 82

Determining Who Can Access NetBackup
Additional User Groups
The Security Administrator (member of NBU_Security Admin or equivalent) can create
user groups as needed. Although the default user groups can be selected, changed and
saved, NetBackup recommends that the groups be copied, renamed, then saved in order
to retain the default settings for future reference.
User Group Configuration
The Security Administrator can create a new user groups by clicking Actions > New
Group or by selecting an existing user group and selecting Actions > Copy to New
Group.
▼ To create a new user group
1. As a member of the NBU_Security Admin user group (or equivalent), expand Access
Management > User Groups.
2. Select Actions > New User Group. The Add New User Group dialog displays,
opened to the General tab.
3. Type the name of the new group in the Name field, then click the Users tab. For more
information on users, see “Users Tab” on page 61.
4. Select the defined users that you wish to assign to this new user group, then click
Assign. Or, to include all the defined users in the group, click Assign All. To remove
users from the assigned users list, select the user name, then click Remove.
5. Click the Permissions tab. For more information on permissions, see “Permissions
Ta b” on page 64.
6. Select a resource from the Resources list, then select the permissions for the object.
7. Click OK to save the user group and the group permissions.
▼ To create a new user group by copying an existing user group
1. As a member of the NBU_Security Admin user group (or equivalent), expand Access
Management > User Groups.
2. Select an existing user group in the Details pane. (The pane on the left side of the
NetBackup Administration Console.)
60 NetBackup System Administrator’s Guide for UNIX and Linux, Volume II
Page 83

Determining Who Can Access NetBackup
3. Select Actions > Copy to New User Group. A dialog based on the selected user group
displays, opened to the General tab.
4. Type the name of the new group in the Name field, then click the Users tab.
5. Select the defined users that you wish to assign to this new user group, then click
Assign. Or, to include all the defined users in the group, click Assign All. To remove
users from the assigned users list, select the user name, then click Remove.
6. Click the Permissions tab.
7. Select a resource from the Resources list, then select the permissions for the object.
8. Click OK to save the user group and the group permissions. The new name for the
user group appears in the Details pane.
Renaming User Groups
Once a NetBackup user group has been created, the user group cannot be renamed. The
alternative to directly renaming a user group is to copy the user group, give the copy a
new name, ensure the same membership as the original, then delete the original
NetBackup user group.
General Tab
The General tab contains the name of
the user group. If creating a new user
group, the Name field can be edited.
Users Tab
The Users tab contains controls to
assign and remove users from user groups.
Chapter 1, Access Management 61
Page 84

Determining Who Can Access NetBackup
Defined Users
The Defined Users list is a list of all
users defined manually within other
groups.
◆ Assign button: Select a user in the
Defined User list and click Assign
to assign that user to a user group.
◆ Assign All button: Click Assign
All to add all defined users to the
user group.
Assigned Users
The Assigned Users list contains
defined users who have been added to
the user group.
◆ Remove button: Select a user in the
Assigned Users list and click Remove to remove that user from the user group.
◆ Remove All button: Click Remove All to remove all assigned users from the
Assigned User list.
New User
Click New User to add a user to the Defined Users list. After adding a user, the name
appears in the Defined Users list and the Security Administrator can assign the user to
the user group. (See “To add a new user to a user group” on page 63.)
Defining User Groups and Users
NetBackup authenticates existing users of the operating system rather than requiring that
NetBackup users be created with a NetBackup password and profile.
62 NetBackup System Administrator’s Guide for UNIX and Linux, Volume II
Page 85

Defining a User Group
Determining Who Can Access NetBackup
Users can belong to more than one
user group and have the combined
access of both groups.
While users can be members of
multiple user groups simultaneously,
NetBackup does not allow user
groups to be nested.
For example, while members of a
user group can belong to more than
one user group, a user group cannot
belong to another user group.
▼ To add a new user to a user group
1. As a member of the NBU_Security Admin
user group (or equivalent), expand Access
Management > NBU User Groups.
Users can
belong in more
than one user
group
Nested user
groups are not
allowed
User_Group_1
Users
User_Group_2
Users
User_Group_1
Users
User_Group_2
Users
2. Double-click on the user group to which
you wish to add a user.
3. Select the Users tab and click New User.
4. Enter the user name and the
authentication domain. Select the domain
type of the user: NIS, NIS+, PASSWD,
Windows or Vx. See the VERITAS Security
Services Administrator’s Guide for more information on domain types.
For the User Type, select whether the user is an individual user or an OS domain.
5. Click OK. The name is added to the Assigned Users list.
Chapter 1, Access Management 63
Page 86

Determining Who Can Access NetBackup
Permissions Tab
The Permissions tab contains a list of NetBackup authorization objects and configurable
permissions associated with each object.
Authorization Objects and Permissions List
Select an authorization object, then
place a check in front of a permission
that you want to grant the members of
the user group currently selected.
When a user group is copied to create a
new user group, the permission
settings are copied as well.
64 NetBackup System Administrator’s Guide for UNIX and Linux, Volume II
Page 87

Determining Who Can Access NetBackup
Permissions for Default NetBackup User Groups
The permissions granted to users in each of the five default user groups correlate to the
name of the user group.
In the following tables:
◆ X indicates that the specified user group has permission to perform the activity.
◆ --- indicates that the user group does not have permission to perform the activity.
Backup, Archive, and Restore (BAR) Client Interface
The table below shows the permissions associated with the BAR authorization object for
the five default NetBackup user groups. BAR includes only Access and Operate
permission sets, and does not include a Configure permission set.
In the NetBackup Administration Console, BAR is accessed by selecting File > Backup,
Archive, and Restore.
Backup, Archive, and Restore Permission Defaults
Set Activity Sec Admin NBU_Admin NBU_Operator NBU_User Vault_Operator
Access Read
Browse
Operate Backup
Restore
Alternate client
List
DB Agent
Admin Access
Chapter 1, Access Management 65
---
---
---
---
---
---
---
---
X
X
X
X
X
X
X
X
X
X
X
X
X
X
---
---
X
X
X
X
---
X
---
---
X
X
X
---
---
X
---
---
Page 88

Determining Who Can Access NetBackup
License Permissions
The table below shows the permissions associated with the License authorization object
for the five default NetBackup user groups.
In the NetBackup Administration Console, the license dialog is accessed by selecting Help
> License Keys.
License Permission Defaults
Set Activity Sec Admin NBU_Admin NBU_Operator NBU_User Vault_Operator
Access Read license
Browse license
Configure New
Delete
Operate Assign license --- X --- --- ---
---
---
---
---
X
X
X
X
---
---
---
---
---
---
---
---
---
---
---
---
Jobs Tab in the Activity Monitor Permissions
The table below shows the permissions associated with the Jobs tab authorization object
for the five default NetBackup user groups.
The Jobs tab is found in the NetBackup Administration Console under NetBackup
Management > Activity Monitor > Jobs tab.
Jobs Tab Permission Defaults
Set Activity Sec Admin NBU_Admin NBU_Operator NBU_User Vault_Operator
Access Read job
Browse job
Configure Delete job
New job
---
---
---
---
X
X
X
X
X
X
X
X
---
---
---
---
---
---
---
---
Operate Suspend job
Resume job
Restart job
Cancel job
66 NetBackup System Administrator’s Guide for UNIX and Linux, Volume II
---
---
---
---
X
X
X
X
X
X
X
X
---
---
---
---
---
---
---
---
Page 89

Determining Who Can Access NetBackup
Permissions in the Device Monitor
The table below shows the permissions associated with the Device Monitor authorization
object for the five default NetBackup user groups.
The Device Monitor is found in the NetBackup Administration Console under Media and
Device Management.
Device Monitor Permission Default
Set Activity Sec Admin NBU_Admin NBU_Operator NBU_User Vault_Operator
Access Read device host
Browse device host
Configure New
Delete
Operate Up drive
Down drive
Reset drive
---
---
---
---
---
---
---
X
X
X
X
X
X
X
X
X
---
---
X
X
X
---
---
---
---
---
---
---
---
---
---
---
---
---
---
Chapter 1, Access Management 67
Page 90

Determining Who Can Access NetBackup
Daemons Tab Permissions in the Activity Monitor
The table below shows the permissions associated with the Daemons tab authorization
object for the five default NetBackup user groups. The Daemons tab includes only Access
and Operate permission sets, and does not include a Configure permission set.
The Daemons tab is found in the NetBackup Administration Console under NetBackup
Management > Activity Monitor > Daemons tab.
Daemons Tab Permission Defaults
Set Activity Sec Admin NBU_Admin NBU_Operator NBU_User Vault_Operator
Access Read
Browse
Operate Stop daemon --- X** X --- ---
---
---
X*
X*
X
X
---
---
---
---
* The Read and Browse permissions do not have an affect on the Daemons tab. This
information is harvested from the server using user level calls to access the process list
and is displayed to all users for informational purposes.
** If a user is not a member of the NBU_Admin user group, but is logged on as an OS
administrator (root), the user will be able to restart a daemon from the command line
only:
/etc/init.d/netbackup start
If a user is a member of the NBU_Admin user group, but is not logged on as an OS
administrator (root), the user will not be able to restart a daemon from the NetBackup
Administration Console or from the command line.
68 NetBackup System Administrator’s Guide for UNIX and Linux, Volume II
Page 91

Determining Who Can Access NetBackup
Reports Permissions
The table below shows the permissions associated with the Reports authorization object
for the five default NetBackup user groups. Reports includes only the Access permission
set, and does not include a Configure or Operate permission set.
Reports is found in the NetBackup Administration Console under NetBackup
Management > Reports.
Reports Permission Defaults
Set Activity Sec Admin NBU_Admin NBU_Operator NBU_User Vault_Operator
Access Read report --- X --- --- X
Browse report --- X --- --- X
Policy Permissions
The table below shows the permissions associated with the Policy authorization object for
the five default NetBackup user groups.
Policy is found in the NetBackup Administration Console under NetBackup
Management > Policies.
Policy Permissi on Defaults
Set Activity Sec Admin NBU_Admin NBU_Operator NBU_User Vault_Operator
Access Read policy --- X X --- ---
Browse policy --- X X --- ---
Configure New policy --- X --- --- ---
Delete policy --- X --- --- ---
Operate Activate policy --- X --- --- ---
Deactivate policy --- X --- --- ---
Backup (manually) --- X X --- ---
Chapter 1, Access Management 69
Page 92

Determining Who Can Access NetBackup
Storage Units Permissions
The table below shows the permissions associated with the Storage Unit authorization
object for the five default NetBackup user groups.
Storage Units is found in the NetBackup Administration Console under NetBackup
Management > Storage Units.
Storage Unit Permission Set Defaults
Set Activity Sec Admin NBU_Admin NBU_Operator NBU_User Vault_Operator
Access Read storage unit
Browse storage unit
Configure New
Operate Assign storage unit
storage unit
Delete storage unit
---
---
---
---
X
X
X
X
X ---
---
---
---
---
--- --- ---
---
---
---
---
---
---
---
---
Storage Unit Groups Permissions
The table below shows the permissions associated with the Storage Unit Groups
authorization object for the five default NetBackup user groups.
Storage Unit Groups is found in the NetBackup Administration Console under
NetBackup Management > Storage Unit Groups.
Storage Unit Groups Permission Set Defaults
Set Activity Sec Admin NBU_Admin NBU_Operator NBU_User Vault_Operator
Access Read
group
Browse storage unit
group
storage unit
---
---
X
X
---
---
---
---
---
---
Configure New storage unit
group
Delete storage unit
group
Operate Assign
storage unit
group
70 NetBackup System Administrator’s Guide for UNIX and Linux, Volume II
---
---
--- X --- --- ---
X
X
---
---
---
---
---
---
Page 93

Determining Who Can Access NetBackup
Catalog Permissions
The table below shows the permissions associated with the Catalog authorization object
for the five default NetBackup user groups.
Catalog is found in the NetBackup Administration Console under NetBackup
Management > Catalog.
Catalog Permission Set Defaults
Set Activity Sec Admin NBU_Admin NBU_Operator NBU_User Vault_Operator
Access Read catalog
Browse catalog
Configure Online, hot
catalog backup
Offline, cold
catalog backup
Delete --- X --- --- ---
Expire --- X --- --- ---
Operate Verify catalog
Duplicate catalog
Import catalog
Set Primary Copy
Backup (online,
hot method)
Backup (offline,
cold method)
Recover online, hot
catalog backup
Recover offline, cold
catalog backup
Read configuration --- X --- --- ---
Set configuration --- X --- --- ---
---
---
--- X --- --- ---
--- X --- --- ---
--- X --- --- ---
--- X --- --- ---
--- X --- --- ---
--- X --- --- ---
--- X --- --- ---
--- X --- --- ---
--- X --- --- ---
--- X --- --- ---
X
X
---
---
---
---
---
---
Chapter 1, Access Management 71
Page 94

Determining Who Can Access NetBackup
Host Properties Permissions
The table below shows the permissions associated with the Host Properties authorization
object for the five default NetBackup user groups.
Host Properties is found in the NetBackup Administration Console under NetBackup
Management > Host Properties.
Host Properties Permission Set Defaults
Set Activity Sec Admin NBU_Admin NBU_Operator NBU_User Vault_Operator
Access Read host properties --- X X --- ---
Browse host properties --- X X --- ---
Configure New host properties --- X --- --- ---
Delete host properties --- X --- --- ---
Media Permissions
The table below shows the permissions associated with the Media authorization object for
the five default NetBackup user groups.
Media is found in the NetBackup Administration Console under Media and Device
Management > Media.
Media Permission Set Defaults
Set Activity Sec Admin NBU_Admin NBU_Operator NBU_User Vault_Operator
Access Read media
Browse media
Configure New media
Delete media
Expire media
Operate Update barcode
Inject media
Eject media
Move media
Assign media
Deassign media
Update database
72 NetBackup System Administrator’s Guide for UNIX and Linux, Volume II
---
---
---
---
---
---
---
---
---
---
---
---
X
X
X
X
X
X
X
X
X
X
X
X
X
X
---
---
---
X
X
X
X
X
X
X
---
---
---
---
---
---
---
---
---
---
---
---
X
X
---
---
---
X
X
X
X
X
X
X
Page 95

Determining Who Can Access NetBackup
Volume Group Permissions
The table below shows the permissions associated with the Volume Group authorization
object for the five default NetBackup user groups.
Volume Group is found in the NetBackup Administration Console under Media and
Device Management > Media > Vo l u m e Gr ou ps .
Volume Group Permission Set Defaults
Set Activity Sec Admin NBU_Admin NBU_Operator NBU_User Vault_Operator
Access Read volume group
Browse volume group
Configure New
volume group
Delete volume group
---
---
---
---
X
X
X
X
X
X
---
---
---
---
---
---
---
---
---
---
Volume Pools Permissions
The table below shows the permissions associated with the Volume Pools authorization
object for the five default NetBackup user groups.
Volume Pools is found in the NetBackup Administration Console under Media and
Device Management > Media > Vo l u m e Po ol s.
Volume Pools Permission Set Defaults
Set Activity Sec Admin NBU_Admin NBU_Operator NBU_User Vault_Operator
Access Read
Browse volume pool
Configure New
Delete volume pool
volume pool
volume pool
---
---
---
---
X
X
X
X
X
X
---
---
---
---
---
---
---
---
---
---
Operate Assign volume pool --- X --- --- ---
Chapter 1, Access Management 73
Page 96

Determining Who Can Access NetBackup
Robots Permissions
The table below shows the permissions associated with the Robots authorization object
for the five default NetBackup user groups.
Robots is found in the NetBackup Administration Console under Media and Device
Management > Media > Robots.
Volume Robots Permission Set Defaults
Set Activity Sec Admin NBU_Admin NBU_Operator NBU_User Vault_Operator
Access Read robot
Browse robot
Configure New robot
Delete robot
Operate Inventory robot --- X X --- X
---
---
---
---
X
X
X
X
X
X
---
---
---
---
---
---
X
X
---
---
Device Host Permissions
The table below shows the permissions associated with the Device Host authorization
object for the five default NetBackup user groups.
Device Host is found in the NetBackup Administration Console under Media and Device
Management > Devices > Hosts.
Device Host Permission Set Defaults
Set Activity Sec Admin NBU_Admin NBU_Operator NBU_User Vault_Operator
Access Read device host
Browse device host
Configure
New device host
Delete device host
Synchronize device host
---
---
---
---
---
X
X
X
X
X X
X
X
---
---
---
---
---
---
---
---
---
---
---
---
Operate
Stop device host
74 NetBackup System Administrator’s Guide for UNIX and Linux, Volume II
--- --- ---
X X
Page 97

Enhanced Authentication and Authorization
Enhanced authentication allows each side of a NetBackup connection to verify the host and
user on the other side of the connection. By default, NetBackup runs without enhanced
authentication.
Enhanced authorization determines if authenticated users (or groups of users) have
NetBackup administrative privileges. By default, NetBackup provides administrative
privileges to UNIX root administrators or Windows system administrators on
NetBackup servers. In order to use the enhanced authorization, you must configure and
enable it.
This chapter contains the following sections:
◆ “Common Configuration Elements” on page 76
◆ “Enhanced Authentication” on page 86
◆ “Enhanced Authorization” on page 95
Note Access Management and Enhanced Authorization and Authentication are
independent methods of access control. Access Management is the newest method
and will be the preferred method in future NetBackup releases. If both Access
Management and Enhanced Authorization and Authentication are configured,
Access Management takes precedence.
2
Note Please note that Enhanced Authorization and Authentication will be removed from
the next major release of NetBackup.
There are additional types of authorization outside of what is described in this chapter.
One of these is the appearance of MEDIA_SERVER entries in the bp.conf. The machine
listed as a MEDIA_SERVER has media server privileges only and has no administrative
privileges. For more information, see “MEDIA_SERVER” on page 140.
Another form of authorization concerns restricting administrative privileges when using
the NetBackup Java Console (jnbSA) through entries in auth.conf.
75
Page 98

Common Configuration Elements
Refer to “NetBackup-Java Administration Console Architectural Overview” on page 484
in NetBackup System Administrator’s Guide, Volume I for information relevant to
understanding this topic.
Common Configuration Elements
The following sections describe elements involved in configuring enhanced
authentication and enhanced authorization.
Configuration Files
The following configuration files are used by enhanced authentication, enhanced
authorization, or both of these files. Some may need to be modified during configuration.
Location of Configuration Files
Option
Enhanced
Authentication
and
Enhanced
Authorization
Enhanced authorize.txt UNIX /usr/openv/var/
Authorization
* If it is necessary to create a new .txt file, base the new .txt file on the template file.
File
methods.txt
template.methods.txt*
methods_allow.txt
template.methods_allow.txt*
methods_deny.txt
template.methods_deny.txt*
names_allow.txt
template.names_allow.txt*
names_deny.txt
template.names_deny.txt*
Master or Media Path to Directory
Server Platform
UNIX /usr/openv/var/auth
Windows
Windows
install_path
install_path
\NetBackup\var\auth
\NetBackup\var\
methods.txt
The methods.txt file is an essential file which defines the supported enhanced
authentication methods.
76 NetBackup System Administrator’s Guide for UNIX and Linux, Volume II
Page 99

Common Configuration Elements
By default, methods.txt lists the two supported methods:
◆ vopie: one-time password authentication. The vopie method authenticates user
name, host names, and group/domain names.
◆ noauth authentication: The noauth method exchanges user name, host names, and
group/domain names, but makes no attempt to verify that the information is correct.
Each method is listed on a separate line in the file, and shows the method number, method
name, and the path to a shared library:
Entries in methods.txt File
Platform Line in methods.txt
(except HP-UX) 128 vopie /usr/openv/lib/libvopie.so
UNIX
0 noauth /usr/openv/lib/libvnoauth.so
UNIX (HP-UX only) 128 vopie /usr/openv/lib/libvopie.sl
0 noauth /usr/openv/lib/libvnoauth.sl
Windows 128 vopie
0 noauth
install_path
install_path
\NetBackup\lib\libvopie.dll
\NetBackup\lib\libvnoauth.dll
The order in which the methods are listed in the file is important: The method listed first
indicates that it is preferred to the second method.
Syntax rules for methods.txt
◆ Empty lines are ignored
◆ The # character and all following characters on a line are ignored.
methods_allow.txt
The methods_allow.txt file defines the authentication methods that NetBackup
servers and clients can use.
When a client or server attempts a connection, it specifies the authentication method it is
using. The other server or client then checks its methods_allow.txt file to determine if
that method is allowed for the system that is attempting the connection. If an entry in this
file matches the host and method, the method is allowed. Otherwise, NetBackup checks
the methods_deny.txt file.
# All hosts in the ourcompany.com domain and host name
# bob.theircompany.com can use the vopie method.
vopie : .ourcompany.com, bob.theircompany.com
Chapter 2, Enhanced Authentication and Authorization 77
Page 100

Common Configuration Elements
#
# Hosts with IP addresses in the 12.123.56 network and IP address
# 2.123.57.23 can use all methods.
ALL : 12.123.56.
ALL : 12.123.57.23
The keyword ALL is used to specify all valid methods, as in the previous example, or all
possible hosts.
The default file is empty.
◆ Each entry must be on a separate line.
◆ Empty lines are ignored.
◆ The # character and all following characters on a line are ignored.
◆ If a domain name is preceded by a dot (.), all hosts in that domain will match.
◆ If a network number is followed by a dot (.), all IP numbers in that network will
match.
◆ A comma-separated list of domain name patterns and network number patterns can
be specified on a single line.
methods_deny.txt
The methods_deny.txt file defines the authentication methods that NetBackup servers
and clients cannot use.
NetBackup checks this file only if the methods_allow.txt file does not have a
matching entry for the host and method. If a matching entry is found in
methods_deny.txt the method is not allowed and authentication is not used.
Otherwise, the method is used and authentication proceeds.
Example methods_deny.txt File
# All hosts in the ourcompany.com domain cannot use the vopie method.
vopie : .ourcompany.com
#
# Hosts with IP addresses in the 12.123.56 network cannot use all
# methods.
ALL : 12.123.56.
The default file contains only the following entry:
ALL : ALL
This means that all methods are denied for all hosts, unless it is specified otherwise in the
methods_allow.txt file.
78 NetBackup System Administrator’s Guide for UNIX and Linux, Volume II
 Loading...