

Page 1
Instruction manual
Guia del Usario
Guide de L'utilisateur
Gebrauchsanleitung
Gebruiksaanwijzing
Manuale di Instruzioni
jsa18
Page 2

English
UK ONLY IMPORTANT PLEASE READ CAREFULLY
The wires in this mains lead are coloured in accordance with the following code:
BLUE-NEUTRAL BROWN-LIVE (OR ACTIVE)
As the colours of the mains lead of this appliance may not correspond with the coloured markings identifying the terminals in your plug
— PROCEED AS FOLLOWS: The earth plug pin is unnecessary. As the Machine is designed under double insulation structure, the
earth wire is removed from the machine. The wire coloured BROWN must be connected to the terminal marked L or A or coloured RED.
The wire coloured BLUE must be connected to the terminal marked N or coloured BLACK. Neither core is to be connected to the earth
terminal of a three-pin plug.
2
Page 3

IMPORTANT SAFETY INSTRUCTIONS
When using an electrical appliance, basic safety precautions should always be followed, including the following:
Read all instructions before using (this appliance). DANGER – To reduce the risk of electric shock:
An appliance should never be left unattended when plugged in. Always unplug this appliance from the electric outlet immediately after using and
before cleaning.
WARNING – To reduce the risk of burns, fire, electric shock, or injury to persons:
1. Do not allow to be used as a toy. Close attention is necessary when this appliance is used by or near children.
2. Use this appliance only for its intended use as described in this manual. Use only attachments recommended by the manufactur-er as contained
in this manual.
3. Never operate this appliance if it has a damaged cord or plug, if it is not working properly, if it has been dropped or damaged, or dropped into
water. Return the appliance to the nearest authorized dealer or service center for examination, repair, electrical or mechanical adjustment.
4. Never operate the appliance with any air openings blocked. Keep ventilation openings of the sewing machine and foot controller free from the
accumulation of lint, dust, and loose cloth.
5. Never drop or insert any object into any opening.
6. Do not use outdoors.
7. Do not operate where aerosol (spray) products are being used or where oxygen is being administered.
8. To disconnect, turn all controls to the off (“O”) position, then remove plug from outlet.
9. Do not unplug by pulling on cord. To unplug, grasp the plug, not the cord.
10. This appliance can be used by children aged from 8 years and above and persons with reduced physical, sensory or mental capabilities or lack of
experience and knowledge if they have been given supervision or instruction concerning use of the appliance in a safe way and understand the
hazards involved.
11. The machine must only be used with designated foot controller, in order to avoid a hazard. If the foot controller is damaged or broken, it must be
replaced by the manufacturer or its service agent or a similarly qualified person.
12. The LED lamp maximum power is 0.3W, maximum voltage is DC 5V. If the LED light is damaged, you should not use the product and send it to
the manufacture or service agent to repair or replace at once.
13. Keep the instructions at a suitable place close to the machine and hand it over if you give the machine to a third party.
14. Caution - to avoid injury:
a. Unplug the foot controller of the appliance when leaving it unattended.
b. Unplug the foot controller of the appliance before carrying out any maintenance.
DANGER
1. Do not reach for an appliance that has fallen into water. Unplug immediately.
2. Do not place or store appliance where it can fall or be pulled into a tub or sink. Do not place or drop into water or other liquid.
3
Page 4

English
WARNING
1. Keep fingers away from all moving parts. Special care is required around the sewing machine needle.
2. Always use proper needle plate. The wrong plate can cause the needle to break.
3. Do not use bent needles.
4. Do not pull or push fabric while stitching. It may deflect the needle causing it to break.
5. Switch the sewing machine off (“O”) when making any adjustments in the needle area, such as threading needle, changing needle, threading bobbin, or changing presser foot, etc.
6. Always unplug sewing machine from the electrical outlet when removing covers, lubricating, or when making any other user servicing adjustments mentioned in the instruction manual.
7. Never operate on a soft surface such as a bed or couch where the air openings may be blocked.
SAVE THESE INSTRUCTIONS
Machine Specifications:
Dimensions:
Mass of the equipment:
Rated Voltage, Rated Frequency: 230V 50Hz
Rated input:
Using ambient temperature:
Acoustic noise level:
4
41cm × 18cm × 31cm
6.4kg
60W
Normal temperature
less than 72db(A)
Page 5

English
RECOMMENDATIONS
You’re just starting off on your machine…
Do you have any problems?
Check the following sections:
— Changing or fitting the needle (page 31)
— Winding the spool (page 21)
— Fitting the spool (pages 25)
— Adjusting the bottom tension (page 101)
— Maintaining the machine (page 85)
— The graduated knob with settings 1 to 9 situated top left must be on 5
.
— The top thread and the bottom thread must be of the same thickness
; before starting to sew, pull them together towards the back.
— The needle has a flat side
, which must be facing towards the back of the machine.
— The needle must
be raised before you select your stitch.
— The top thread is threaded from right to left, taking care never to cross the threads (see diagram in the top lid).
— Put the thread through the eye of the needle from the front (i.e. from front to back).
It is recommended that you keep this packaging so that the machine can be transported safely if necessary.
5
Page 6

English
1.
NAME OF PARTS .................................................................27-28
2.
3.
4.
5.
6.
7.
CONTENTS
ACCESSORIES ....................................................................29-30
BEFORE SEWING ................................................................31-32
DETACHABLE EXTENSION TABLE ....................................33-34
CONNECTING FOOT CONTROLLER AND POWER CORD ...33-34
THREADING UPPER THREAD ............................................33-34
DRAWING UP LOWER THREAD .........................................35-36
TRIAL SEWING ....................................................................35-37
ADJUSTING THREAD TENSION .........................................37-39
STARTING TO SEW .............................................................39-44
BOBBIN WINDING ................................................................45-46
INSERTING BOBBIN ............................................................47-48
CHANGING FOOT ................................................................49-52
CHANGING NEEDLE ...........................................................52-54
FABRIC, THREAD AND NEEDLE TABLE ............................55-56
PATTERN SELECTION DIAL ...............................................57-60
TURNING A SQUARE CORNER ..........................................61-66
REVERSE SEWING .............................................................67-68
THICK FABRIC SEWING ......................................................69-72
DOUBLE PRESSER FOOT LIFTER .....................................69-72
SELECTING THE STITCH ....................................................73-74
STRAIGHT SEWING ............................................................75-76
ZIGZAG SEWING .................................................................77-80
Thread Tension For Zigzag Stitch .......................................77-80
BLIND HEM STITCH ........................................................77-80
OVERCASTING ...............................................................77-80
OVERLOCKING ...............................................................79-82
STRETCH STITCHING ....................................................83-84
MAKING BUTTONHOLES ...............................................85-86
Determine Length ..........................................................87-94
Cutting Buttonholes ........................................................95-96
ZIPPER SEWING .............................................................97-98
MENDING ........................................................................97-98
Patching .........................................................................97-98
Mending a Rip ................................................................99-102
APPLIQUE WORK .........................................................103-108
EMBROIDERY ...............................................................109-110
Darning Plate ...............................................................109-110
Removing Foot Holder .................................................111-114
MAINTENANCE .............................................................111-114
CLEANING .....................................................................111-114
OILING ...........................................................................125-126
TROUBLE CHART .........................................................127-130
LOWER TENSION ADJUSTMENT ................................131-132
CLEANING SHUTTLE CASE .........................................132-133
CHANGING LIGHT BULB ..............................................133
8.
NEEDLE THREADER (only for JSB21
model).............................................................................134
6
Page 7

INSTRUCCIONES IMPORTANTES DE SEGURIDAD
Cuando utilice un aparato eléctrico, se deben respetar siempre ciertas precanciones básicas de seguridad, incuyendo las siguientes:
Lea todas las instrucciones antes de utilizarlo (este aparato). PELIGRO – Para reducir el riesgo de descargas
eléctricas:
Nunca se debe dejar desatendido un aparato que esté enchufado a la corriente eléctrica. Desenchufe siempre este aparato de la toma eléctrica
immediatamente después de su utilización y antes de limpiarlo.
ADVERTENCIA – Para reducir el riesgo de quemaduras, incendios, descargas eléctricas, o lesiones personales:
1. No permita que sea utilizado como un jugnete. Cuando este aparato es utilizado por, o cerca de, niños, es necesario prestar especial
atención.
2. Utilice este aparato sólo para el uso al que se la destina,tal como se describe en este manual. Utilice únicamente los acceso-rios
recommendados por el fabricante que se incluyen en este manual.
3. No utilice nunca este aparato si el cable o el enchufe están dañados, si no funciona correctamente, si se ha dejado caer o ha sufrido algún
dafio, o si ha sido sumergido en agua. devuelva el aparato al concesionario antorizado más cercano para que sea examinado, reparado o
ajustado mecánica o eléctricamente.
4. No utilice nunca el aparato si los orificios de ventilación están bloqueados. Mantenga los orifcios de ventilación de la máquina de coser y del
pedal control sin acumulaciones de hilo, polyo y fragmentos de tela.
5. Nunca deje caer o introduzca ningún objecto en ninguna abertura.
6. No lo utilice al aire libre.
7. No utilice nunca este aparato en lugares donde se estén utilizando productos en aerosol (spray) o donde se esté administrado oxígeno.
8. Para disconectarlo, apague todos los controles (posición “O”) y después desconecte el enchufe de la toma de corriente.
9. No desenchufe el aparato tirando del cable. Para desenchufar, tire del enchufe, no del cable.
10. Pueden utilizar el aparato niños a partir de 8 años y personas con capacidades físicas, sensoriales o mentales reducidas o sin experiencia ni
conocimientos si han recibido una supervisión o instrucciones sobre cómo utilizar el aparato de forma segura y comprenden los peligros que
implica.
11. La máquina debe ser usada solo con el pedal diseñado al efecto, para evitar un peligro. Si el pedal está dañado o roto, debe ser reemplazado
por el Fabricante o por su Servicio Técnico autorizado.
12. La potencia máxima de la lámpara LED es de 0,3W, el voltaje máximo es de 5V DC. Si la luz LED está dañada, no debe usar el producto y
enviarlo al agente de fabricación o de servicio para que lo repare o lo reemplace de inmediato.
13. Guarde las instrucciones en un lugar adecuado, cerca de la máquina, y entréguelas junto con la máquina si se la da a un tercero.
14. Precaución - para evitar lesiones:
- Desconecte el pedal de control del aparato cuando lo deje desatendido.
- Desconecte el pedal de control del aparato antes de realizar cualquier mantenimiento.
PELIGRO
1. No intente coger un aparato que haya caído al agua. Desenchúfelo immediatamente.
2. No coloque o guarde el aparato en un lugar donde pueda caerse o ser empujado dentro de una bañera o lavabo. No ponga o deje gotear
agua u otro líquido sobre el aparato.
7
Page 8

Español
ADVERTENCIA
1. Mantenga los dedos alejados de las piezas en movimiento. Se debe prestar especial atención en las proximidades de la aguja.
2. Utilice siempre una placa de aguja adecuada. Una placa incorrecta puede causer la ruptura de la aguja.
3. No utilice agujas dobladas.
4. No tire de la tela o la emuje mientras cosa a máquina. Puede desviar la aguja y romperla.
5. Apague (“O”) la máquina de coser cuando haga ajustes en el área de la aguja, por ejemplo, cuando enhebre le aguja, cuando
cambie la aguja, cuando coloque la bobina o cuando cambie el pedal, etc.
6. Desenchufe siempre la máquina de coser de la toma eléctrica cuando retire las cubiertas, lubrique el aparato, o cuando realice
cualquier otro ajuste mencionado en el manual de intrucciones
7. No utilice nunca el aparato sobre una superficie blanda, tal como o un sofá, donde los orificios de ventilación puen quedar bloqueados.
Guarda estas instrucciones
Especificaciones de la máquina:
Dimensiones:
Masa del equipo:
Tensión nominal, frecuencia nominal:
Entrada clasificada:
Usando la temperatura ambiente:
Nivel de ruido acústico:
8
41cm × 18cm × 31cm
6,4 kg.
230V 50Hz
60W
Temperatura normal
menos de 72db(A)
Page 9

Español
RECOMENDACIONES
Es la primera vez que utiliza su máquina…
Tiene algún problema
Consulte las rúbricas:
— Cambio o colocación de la aguja (página 31)
— Bobina de la canilla (página 21)
— Colocación de la canilla (páginas 25)
— Ajuste de la tensión inferior (página 101)
— Mantenimiento de la máquina (página 85)
— La rueda graduada entre 1 y 9 arriba a la izquierda debe estar en la posición 5
— El hilo superior y el hilo inferior deben tener el mismo espresor y antes de coser tirar de ellos al mismo tiempo hacia atrás
— La aguja tiene un lado plano que debe dirigirse hacia la parte de atrás de la máquina
— Antes de seleccionar el punto de costura, la aguja debe estar obligatoriamente
levantada
— El enhebrado del hilo superior se hace de derecha a izquierda procurando no cruzar nunca los hilos (ver esquema en la tapadera)
— Colocar el hilo en el ojo de la aguja de frente (es decir de delante hacia atrás)
Le aconsejamos que conserve el embalaje para poder transportar la máquina de coser con toda seguridad
9
Page 10

Español
1.
NOMBRE DE LAS PARTES .............................................27-28
2.
3.
4.
5.
6.
7.
INDICE
ACCESORIOS ..................................................................29-30
ANTES DE EMPEZAR A COSER .....................................31-32
TABLERO DE EXTENSIÓN RETIRABLE .........................33-34
CONECCIÓN DEL PEDAL Y CABLE DE CORRIENTE ...33-34
ENHEBRAMIENTO DEL HILO SUPERIOR ......................33-34
CÓMO LEVANTAR EL HILO INFERIOR ..........................35-36
COSTURA DE PRUEBA ...................................................35-37
AJUSTE DE LA TENSIÓN DEL HILO ...............................37-39
COMENZAR A COSER ....................................................39-44
BOBINADO .......................................................................45-46
COLOCACIÓN DEL CARRETE EN LA BOBINA ..............47-48
CAMBIO DEL PIE PRENSATELA ...................................49-52
CAMBIO DE LA AGUJA ....................................................52-54
TABLA DE TELAS, HILOS Y AGUJAS .............................55-56
CONTROL PARA SELECCIONAR LA PUNTADA ...........57-60
COSTURA EN REVERSA ................................................61-66
COSTURA EN TELAS GRUESAS ....................................67-68
DOBLE ACCIÓN DEL ELEVADOR DEL PIE PRENSATELA 69-72
ESCOGER LA PUNTADA .................................................69-72
COSTURA RECTA ...........................................................73-74
COSTURA EN ZIG-ZAG ...................................................75-76
Tensión del Hilo para Costura Zig-Zag ...........................77-80
COSTURA INVISIBLE Y DOBLADILLO ...........................77-80
SOBRE COSTURA .........................................................77-80
COSTURA “OVERLOCK” ...............................................77-80
COSTURA ELÁSTICA DE DISEÑOS AUTOMÁTICOS ..79-82
CONFECCIÓN DE OJALES ...........................................83-84
Determinación del Largo ...............................................85-86
Corte del Ojal ................................................................87-94
COSTURA DE CIERRES ................................................95-96
COSTURA PARA REMENDAR ......................................97-98
Parchado .......................................................................97-98
Remiendo de una Rasgadura .......................................97-98
COSTURA DE APLICACIÓN (PARCHES DE ADORNO) ....99-102
COSTURA PARA BORDAR .......................................103-108
La Placa de la Aguja para Bordado ..........................109-110
Para Quitar el Soporte del Pie Prensatela ................109-110
MANTENIMIENTO ......................................................111-114
Limpieza ....................................................................111-114
Aceitado ....................................................................111-114
TABLA DE PROBLEMAS ...........................................115-126
AJUSTE DE TENSIÓN DE LA BOBINA .....................127-130
LIMPIEZA DE LA CAJA DEL CANGREJO .................131-132
CAMBIO DEL FOCO ...................................................133
8.
Enhebrador de agujas (sólo para el modelo
JSB21)............................................................................134
10
Page 11

IMPORTANT: PRESCRIPTIONS DE SECURITE
Lors de l’utilisation d’un appareil électrique, des mesures élémentaires de sécurité doivent toujours étre respectées.
Lire toutes les prescriptions avant utilisation (de cet appareil). DANGER – Afin de réduire le risqué d’électrocution:
Il ne faut jamais laisser un appareil sans surveillance lorsqual est branché. Toujours déconnecter cet appareil de la prise électrique immédiatement
aprés l’avoir utilisé et avant de le nettoyer.
ATTENTION – Afin de réduire le risque de brûlures, d’incendie, d’électrocution ou de blessures:
1. Ne pas utiliser comme jouet. Il est nécessaire d’être très attentif lorsque cet appareil est utilisé par ou près d’enfants.
2. Utiliser cet appareil uniquement pour l’application décrite dans ce manuel. Utiliser uniquement les accessoires recommendés par le fabricant
et décrits dans ce manuel.
3. Ne jamais utiliser cet appareil si le cordon ou la prise est endommagé, s’il ne fonctionne pas convenablement, s’il est tombé, s’il a été
endommagé ou immergé. Rapporter l’appareil au distributeur ou au centre de maintenance agréé le plus proche pour exa-men, réparation,
réglage électrique ou mécanique.
4. Ne jamais utiliser l’appareil si les ouvertures de ventilation sont bloquées. Veiller à éviter toute accumulation de peluches, de poussière et de
morceaux de tissu devant les ouvertures de ventilation de la machine à coudre et du rhéostat.
5. Ne jamais laisser tomber ni insérer aucun object dans les overtures.
6. Ne pas utiliser à l’extérieur.
7. Ne pas utiliser dans des endroits où l’on emploie des produits aérosols (sprays) et où l’on administre de l’oxygène.
8. Pour débrancher, mettre tous les réglages en position off (“O”) et ensuite, enlever la fiche de la prise.
9. Ne pas débrancher en tirant sur le cordon. Pour débrancher, tenir la fiche, pas le cordon.
10. Cette machine peut être utilisée par un enfant à partir de l’âge de 8 ans ou par une personne déficiente mentalement, physiquement et
sensoriellement uniquement si une explication complète sur l’utilisation de la machine et les consignes de sécurité, leur ont été transmise par une
personne qui s’est assurée de la bonne compréhension des instructions fournies.
11. La machine doit être utilisée avec une pédale spécifique. Si le câble ou le pédale de votre machine sont endommagés ils doivent être remplacés
par le fabricant ou son agent ou par toute personne qualifiée, pour éviter tout problème.
12. La puissance maximale de la lampe LED est de 0,3W, la tension maximale est de 5V DC. Si la lampe LED est endommagée, vous ne devez pas
utiliser le produit et l'envoyer au fabricant ou à l'agent de service pour qu'il le répare ou le remplace immédiatement.
13. Gardez toujours votre livret d’instructions à proximité de votre machine ainsi qu’en cas de prêt de votre machine.
14. Attention - pour éviter les blessures :
- Débranchez la commande au pied de l'appareil lorsque vous le laissez sans surveillance.
- Débranchez la pédale de commande de l'appareil avant d'effectuer toute opération de maintenance.
DANGER
1. Ne pas essayer rattraper un appareil tombé dans l’eau. Débrancher immédiatement.
2. Ne pas placer ni ranger l’appareil à un endroit où il peut tomber par terre, dans l’eau ou couler. Ne pas placer ni laisser tomber dans l’eau ou
dans tout auter liquide.
11
Page 12

Francais
ATTENTION
1. Eloigner les doigts de toutes les parties en mouvement. Il faut faire particuliérement attemtion an nivean de l’aiguille de
la machine à coudre.
2. Toujours utiliser la plaque à aiguille appropriée. Si vuos n’uitlisez pas la plaque appropriée, l’aiguille pent casser.
3. Ne pas utiliser d’aiguilles tordues.
4. Ne pas tirer ni pousser le tissu pendant que vous cousez. Cette manouvre peut faire dévier l’aiguille et la casser.
5. Eteindre la machine à coudre (position “O”) lors de tout réglage, comme enfiler l’aiguille, enfiler une bobine ou changer le
pied presseur, etc., dans la zone de l’aiguille.
6. Toujours déconnecter la machine à coudre de la prise électrique lorsque vous enlevez les couvercles, que vous lubrifiez on
que vous effectuez tout autre réglage mentionné dans le manuel d’utilisation.
7. Ne jamais utiliser sur une surface molle telle qu’un lit ou un canapé où les ouvertures de ventilation pourraient être bloquées.
CONSERVER CES PRESCRIPTIONS
Spécifications des machines :
Dimensions:
Masse de l'équipement:
Tension nominale, fréquence nominale:
Entrée nominale:
En utilisant la température ambiante:
Niveau de bruit acoustique:
12
41cm × 18cm × 31cm
6,4 kg
230V 50Hz
60W
Température normale
moins de 72db(A)
Page 13

Francais
RECOMMANDATIONS
Vous débutez sur votre machine......
Vous avez quelques problèmes?
Consultez les rubriques
— Changement ou mise en place de l’aiguille
— Bobinage de la canette
— Mise en place de la canette
— Réglage de la tension inférieure
— Entretien de la machine
— Le bouton gradué de 1 à 9 en haut à gauche doit être sur 5.
— Le fil supérieur ainsi que le fil inférieur doivent être de même grosseur et avant de coudre les tirer ensemble vers l’arrière.
— L’aiguille possède un côté plat qui doit être dirigé vers l’arrière de la machine.
— Avant de sélectionner votre point l’aiguille doit se trouver obligatoirement en haut.
— L’enfilage du fil supérieur se fait de la droite vers la gauche en prenant garde de ne jamais croiser les fils (voir schéma dans le cou-
vercle supérieur).
— Mettre le fil dans le chas de l’aiguille de face (soit de l’avant vers l’arrière).
La conservation de cet emballage est conseillée pour l’eventuel transport de cette machine en toute sécurité.
13
Page 14

Francais
1.
NOM DES PIECES ..........................................................27-28
2.
3.
4.
5.
6.
7.
SOMMAIRE
ACCESSOIRES ...............................................................29-30
AVANT DE COMMENCER A COUDRE .........................31-32
TABLE D’EXTENSION ESCAMOTABLE ........................33-34
CONNEXION DE LA PEDALE ET DU FIL ELECTRIQUE ..33-34
ENFILAGE DU FIL SUPERIEUR ....................................33-34
POUR FAIRE REMONTER LE FIL INFERIEUR .............35-36
COUTURE D’UN ECHANTILLON ...................................35-37
REGLAGE DE LA TENSION DES FILS .........................37-39
COMMENCER A COUDRE ............................................39-44
BOBINAGE DE LA CANETTE ........................................45-46
MISE EN PLACE DE LA CANETTE ...............................47-48
CHANGEMENT DU PIED DE BICHE .............................49-52
CHANGEMENT DE L’AIGUILLE .....................................52-54
TABLE DES TISSUS, FILS ET AIGUILLES ....................55-56
SELECTION DES PROGRAMMES DE POINTS POSSIBLES 57-60
CHANGEMENT DE DIRECTION DE PIQURE ...............61-66
COUTURE EN MARCHE ARRIERE ...............................67-68
COUTURE DES TISSUS EPAIS (en particuler le JEAN) 69-72
DOUBLE LEVIER DE PIED DE BICHE ..........................69-72
SELECTING THE STITCH ..............................................73-74
COUTURE EN POINT DROIT ........................................75-76
COUTURE AU POINT ZIGZAG ......................................77-80
Tension Du Fil Pour Point Zig Zag ................................77-80
COUTURE D’OURLET INVISIBLE .................................77-80
SURFILAGE ....................................................................77-80
SURJET ..........................................................................79-82
COUTURE DE POINTS ELASTIQUES ..........................83-84
COUTURE DES BOUTONNIERES ................................85-86
Longueur De La Boutonnière ........................................87-94
Couture De La Boutonnière ...........................................95-96
Ouverture Des Boutonnières ........................................97-98
POSE DE FERMETURE ECLAIR ...................................97-98
RACOMMODAGE ...........................................................97-98
Rapiéçage .....................................................................99-102
Raccommodage D’une Déchirure ...............................103-108
APPLICATIONS ............................................................109-110
BRODERIE ...................................................................109-110
PLAQUE DE GRIFFE D’ENTRAINEMENT ...................111-114
POUR ENLEVER LE SUPPORT DE PIED DE BICHE 111-114
ENTRETIEN DE LA MACHINE .....................................111-114
NETTOYAGE ................................................................115-126
HUILAGE ......................................................................127-130
TABLEAU DES DERANGEMENTS ..............................131-132
REGLAGE DE LA TENSION INFERIEURE ..................133-134
Nettoyage Du Logement De La Coursière ..................133-134
REMPLACEMENT DE L’AMPOULE .............................133
8.
Enfilage automatique (uniquement pour le modèle
JSB21)........................................................................... 134
14
Page 15

WICHTIGE SICHERHEITSANWEISUNGEN
Sei der Verwendung eines elektrischen Gerätes sollten immer für die Sicherheit grundsätzliche Vorsichtswaßuahwen getroffen werden, einschließlich:
Lesen Sie vor der Verwendung (dieses Gerätes) alle Gebrauchshinweise.
GEFAHRENHINWEIS – zur Verminderung des Risikos eines elektrischen Schlages:
Ein Apparat, der an das elektrische Netz durch den Stacker angeschlossen ist, sollte nie unbeobachtet bleiben. Sofort nach der Ver-wendung und vor
der Reinigung dieses Apparates soll sein Stecker immer aus der Steckdose gezogen werden.
WARNHINWEISE – zur Verminderung des Risikos von Verbrennungen, Feuer, elektrischen Schlägen
oder Verletzungen von Personen:
1. Erlauben Sie nicht, dass dieses Gerät als Spielzeug verwendet wird. Hohe Wachsamkeit ist notwendig, wenn dieses Geràt von oder in der Nähe
von Kindern verwendet wird.
2. Benützen Sie dieses Gerät ausschließlich für den im Handbuch beschriebenen Gebrauch. Verwenden Sie nur vom Hersteller empfohlene
Zubehörteile, die im Handbuch angegeben sind.
3. Arbeiten Sie nie mit diesem Gerät, wenn es ein beschädigtes Kabel oder einen beschädigten Stecker hat, wenn es nicht richtig funktioniert, wenn es fallen
gelassen oder beschädigt wurde oder wenn es ins Wasser gefallen ist. Bringen Sie dieses Gerät zu dem nächstgelegenen zuständigen Händler oder zu einer
Service Werkstett, um es Überprüfen, reparien oder mechanisch einstellen zu lassen.
4. Arbeiten Sie nie mit diesem Gerät, wenn eine der Lüftungsöffnungen verstopft ist. Halten Sie die Lüftungsöffnungen der Nähma-chine und des
Fußanlassers frei von Stoffstreifen, Staub und losen Kleidungsstücken.
5. Lassen Sie nie irgendwelche Gegenstände in irgendeine Öffnung fallen oder stecken Sie sie nie hinein.
6. Verwenden Sie das Gerät nicht im Freien.
7. Arbeiten Sie nicht an einem Ort, wo Sprayprodukte oder Sauerstoff verwendet werden.
8. Bevor Sie den Stecker aus der Steckdose ziehen, drehen Sie alle Kontrollknöpfe auf "Aus" (“O”).
9. Ziehen Sie den Stecker nicht durch Zeihen am Kabel heraus. Halten Sie den Stecker selbst, wenn Sie ihn herausziehen wollen.
10. Dieses Gerät kann von Kindern ab 8 Jahren und darüber sowie von Personen mit verringerten physischen, sensorischen oder mentalen Fähigkeiten
oder Mangel an Erfahrung und Wissen benutzt werden, wenn sie beaufsichtigt oder bezüglich des sicheren Gebrauchs des Gerätes unterwiesen
wurden und die daraus resultierenden Gefahren verstehen.
11. Die Maschine darf nur mit einem bestimmten Fußpedal verwendet werden, um Gefährdungen zu vermeiden. Wenn das Fußpedal beschädigt oder
defekt ist, muss es durch den Hersteller, seinen Kundendienst oder einer gleichermaßen qualifizierten Person ersetzt werden.
12. Die maximale Leistung der LED-Lampe beträgt 0,3W, die maximale Spannung beträgt DC 5V. Wenn die LED-Lampe beschädigt ist, sollten Sie das
Produkt nicht mehr verwenden und es sofort zur Reparatur oder zum Austausch an den Hersteller oder Servicevertreter schicken.
13. Bewahren Sie die Gebrauchsanweisung an einem geeigneten Ort in der Nähe des Gerätes auf. Händigen Sie die Gebrauchsanleitung bei der
Weitergabe des Gerätes an Dritte ebenfalls mit aus.
14. Vorsicht - um Verletzungen zu vermeiden:
- Ziehen Sie den Stecker des Fußanlassers des Geräts ab, wenn Sie es unbeaufsichtigt lassen.
- Ziehen Sie den Stecker des Fußanlassers aus dem Gerät, bevor Sie Wartungsarbeiten durchführen.
GEFAHRENHINWEIS
1. Langen Sie nicht nach einem Gerät, das ins Wasser gefallen ist. Ziehen Sie sofort den Stecker heraus.
2. Lagern Sie das Gerät nicht an einem Ort oder stellen Sie es nicht dort auf, wo es herunterfallen kann oder in ein Becken gezogen werden oder
versinken kann. Stellen oder tauchen Sie es nicht in Wasser oder in eine andere Flüssigkeit.
15
Page 16

Deutsch
WARNHINWEISE
1. Halten Sie Ihre Finger weg von allen sich bewegenden Teilen. Sesondere Vorsicht ist rund um die Nadel der Nähmaschine
geboten.
2. Verwenden Sie immer eine saubere Stichplatte. Eine unpassende Stichplatte kann verursachen, daß die Nadel bricht.
3. Verwenden Sie keine verbogenen Nadeln.
4. Während des Nähens sollen Sie den Stoff weder ziehen moch schieben. Dies kann dazu führen, daß die Nadel verschoben wird
und bricht.
5. Schalten Sie die Nähmaschine ans, wenn Sie irgendetwas im Bereich der Nadel zu regeln haben, z.3. den Faden in die Nadel
einfädeln, die Nadel auswechsein, die Spule auffädeln oder das Sciffchen wechseln, u.s.w.
6. Beim Abnehmen von Deckvorrichtungen, beim Ölen oder bei irgendeiner der im Handbuch angeführten Wartungshandlongen
durch den Benutzer muß der Stecker der Nähmaschine aus der Steckdose gezogen werden.
7. Benutzen Sie das Gerät nie auf einer weichen Oberfläche wie einem Bett oder einem Sofa, wo die Lüftungsöffnungen verstopft
werden können.
HEBEN SIE DIESE ANWEISUNG AUF
Maschinenspezifikationen:
Abmessungen:
Gewicht:
Nennspannung, Nennfrequenz:
Nennleistung:
Verwendung der Umgebungstemperatur: Normale Temperatur
Akustischer Lärmpegel: weniger als 72db(A)
16
41cm × 18cm × 31cm
6,4 kg
230V 50Hz
60W
Page 17

Deutsch
BESONDERE TIPPS
Sie arbeiten die ersten Male mit Ihrer
Maschine…Sie haben irgendwelche Probleme ?
Lesen Sie in folgenden Kapiteln nach
— Auswechseln oder Einsetzen der Nadel
— Aufspulen der Spule für den Unterfaden
— Einlegen der Spule für den Unterfaden
— Einstellen der unteren Spannung
— Wartung der Maschine
— Der mit einer Graduierung von 1 bis 9 versehene Knopf oben links muss auf 5 eingestellt sein.
— Der Oberfaden sowie der Unterfaden müssen dieselbe Stärke haben und müssen vor dem Nähen zusammen nach hinten gezogen
werden.
— Die Nadel hat eine flache Seite, die zur hinteren Seite der Maschine ausgerichtet sein muss.
— Bevor Sie die Stichart wählen, muss die Nadel unbedingt in der Höhe sein.
— Das Einlegen des Oberfadens wird von rechts nach links vorgenommen, achten Sie darauf, dass die Fäden sich nicht kreuzen
(siehe Zeichnung im oberen Deckel).
— Fädeln Sie den Faden von vorne nach hinten in die Nadel ein.
Es wird empfohlen, diese Verpackung für einen eventuellen, gefahrlosen Transport dieser Maschine aufzuheben.
17
Page 18

Deutsch
1.
HAUPTTEILE DER MASCHINE .....................................27 - 28
2.
3.
4.
5.
6.
INHALTSVERZEICHNIS
DAS ZUBEHÖR ..............................................................29 - 30
VOR DEM NÄHEN..........................................................31 - 32
ENTFERNEN DES ANSCHIEBETISCHES ....................33 - 34
Anschluß des Fußanlassers .........................................33 - 34
HAUPTSCHALTER EINGEBAUTE NÄHLEUCHTE .......33 - 34
DER FUSSANLASSER...................................................35 - 36
EINFÄDELN DES OBERFADENS..................................35 - 37
HERAUFHOLEN DES UNTERFADENS.........................37 - 39
DER NÄHBEGINN ......................................................... 39 - 44
REGULIERUNG DER OBERFADENSPANNUNG ........45 - 46
VORBEREITUNG DES UNTERFADENS .......................47 - 48
SPULEN..........................................................................49 - 52
EINSETZEN DER SPULE...............................................52 - 54
AUSWECHSELN DER NÄHFÜSSE ...............................55 - 56
AUSWECHSELN DER NADEL.......................................57 - 60
STOFF, FADEN, NADELTEBELLE ..............................61 - 66
Musterwählknopf...........................................................67 - 68
ÄNDERUNG DER NÄHRICHTUNG ...............................69 - 72
RÜCKWÄRTSNÄHEN ....................................................69 - 72
Vernähen von dicken Stoffen........................................73 - 74
Dicke Stoffe...................................................................75 - 76
PROGRAMMWAHL ........................................................77 - 80
DER GERADSTICH ........................................................77 - 80
DER ZICKZACK-STICH..................................................77 - 80
Fadenspannung für Zickzack-Stich.............................. 77 - 80
DER BLINDSTICH ..........................................................79 - 82
ABKANTELN...................................................................83 - 84
KAPPEN..........................................................................85 - 86
SUPER-NUTZSTICHE....................................................85 - 86
NÄHEN VON KNOPFLÖCHERN....................................87 - 94
Knopflänge festlegen ....................................................87 - 94
AUFSCHEIDEN VON KNOPFLÖCHERN.......................87 - 94
REISSVERSCHLUSS EINNÄHEN .................................95 - 96
AUSBESSERN................................................................97 - 98
Ausbessern eines Risses..............................................97 - 98
Flicken...........................................................................97 - 98
APPLIZIEREN...............................................................99 - 102
STICKEN.....................................................................103 - 108
STOPFPLATTE...........................................................109 - 110
ENTFERNEN DES NÄHFUSSHALTERS ...................109 - 110
WARTUNG DER MASCHINE .....................................111 - 114
REINIGEN...................................................................111 - 114
ÖLEN ..........................................................................111 - 114
7. STÖRUNGSTABELLE ................................................115 - 126
REGULIERUNG DER UNTERFADENSPANNUNG ...127 - 130
Entfernen der Spulenkapsel......................................131 - 132
AUSWECHSELN DER GLÜHBIRNE..........................133 - 134
8.
Einfädelhilfe (nur bei JSB21
Modell)....................................................................... 134
18
Page 19

BELANGRIJK: VEILIGHEIDSINSTRUCTIES
Wanneer u een elektrisch toestel gebruikt, dient u steeds een aantal belangrijke veiligheidsmaatregelen in acht te nemen, waaron-der de volgende:
LEES ALLE INSTRUCTIES VOOR HET GEBRUIK (VAN DIT TOESTEL). GEVAAR – Voorkom elektrische schokken:
Laat een toestel nooit onbewaakt in het stopcontact steken. Trek de stekker altijd uit onmiddellijk na het gebruik en voor het schoonmaken.
OPGELET – – Voorkom brand, brandwonden, elektrische schokken of verwondingen:
1. Een naaimachine is geen speelgoed. Indien het toestel wordt gebruikt door kinderen of met kinderen in de buurt dient u goed op te letten.
2. Gebruik de naaimachine uitsluitend waarvoor ze bedoeld is, zoals beschreven in de handleiding. Gebruik enkel door de fabrikant aanbevolen
hulpstukken of zoals vermeld in de handleiding.
3. Gebruik geen toestellen met een beschadigde stekker of snoer, toestellen die niet naar behoren werken, die zijn gevallen of wer-den beschadigd
of toestellen die in het water zijn gevallen. Breng dergelijke toestellen ter inspectie, reparatie van elektrische of mechanische afstelling binnen
bij een erkend dealer of onderhoudscentrum.
4. Gebruik de naaimachine niet indien één van de ventilatie–openingen versperd is. Hou de ventilatie–openingen van de naaima-chine en het
voetpedaal vrij van stof, pluisjes en losse stukken stof.
5. Steek geen voorwerpen in de openingen en zorg dat er geen voorwerpen kunnen invallen.
6. Gebruik de naaimachine nooit buiten.
7. Gebruik het toestel niet op een plaats waar aérosolprodukten (spuitbussen) worden gebruikt of waar zuurstof wordt toegediend.
8. Om het toestel uit te schakelen zet U alle bedieningstoetsen uit (positie “O”); vervolgens trekt u de stekker uit het stopcontact.
9. Trek de stekker niet uit door aan het snoer te trekken, maar neem de stekker zelf vast.
10. Deze machine kan gebruikt worden door kinderen van 8 jaar en ouder, mensen met verminderderde fysieke, sensorische of geestelijke
capaciteiten of gebrek aan kennis en ervaring, mits dat onder toezicht gebeurt of instructie gegeven is hoe ze de machine veilig kunnen
gebruiken en zij de gevaren begrijpen die ermee samenhangen. Kinderen mogen niet spelen met de machine.
11. Om gevaar te voorkomen mag de machine alleen worden gebruikt met het daarvoor bedoelde voetpedaal. Als het voetpedaal defect of
beschadigd is, moet het worden vervangen door de producent, een dealer of een erkende onderhoudstechnicus.
12. The LED lamp maximum power is 0.3W, maximum voltage is DC 5V. If the LED light is damaged, you should not use the product and send it to
the manufacture or service agent to repair or replace at once.
13. Bewaar de instructies waar u ze gemakkelijk terug kunt vinden, bijvoorbeeld dicht bij de machine. Geeft u de machine door aan iemand anders,
geef de gebruiksaanwijzing er dan bij.
14. Caution - to avoid injury:
a. Unplug the foot controller of the appliance when leaving it unattended.
b. Unplug the foot controller of the appliance before carrying out any maintenance.
GEVAAR
1. Als het toestel in het water valt, probeer het dan niet beet te pakken. Trek in dat geval onmiddellijk de stekker uit.
2. Zet het toestel niet op een plaats waar het in een bad, wastafel zou kunnen vallen of zou kunnen worden getrokken en berg het steeds veilig
op. Plaats het toestel nooit in water of in een andere vloeistof en zorg dat het hier ook niet in kan vallen.
19
Page 20

Dutch
OPGELET
1. Hou uw vingers uit de buurt van alle bewegende onderdelen. Pas vooral goed op voor de naald van de machine.
2. Gebruik steeds de juiste steekplaat. Door het gebruik van een verkeerde plaat kan de naald breken.
3. Gebruik geen kromme naalden.
4. Duw of trek niet aan de stof terwijl u stikt. Hierdoor kan de naald immers buigen, zodat ze uiteindelijk breekt.
5. Schakel de naaimachine uit (“O”) wanneer u handelingen verricht in de buurt van de naald zoals het bedraden van de naald, het
vervangen van de naald, het bedraden van het klosje, het vervangen van de persvoet, enz.
6. Trek steeds de stekker uit de naaimachine wanneer u een beschermplaat verwijdert, evenals om het toestel te smeren, een
onderhoudsbeurt te geven of een aanpassing door te voeren zoals beschreven in de handleiding.
7. Bedien de naaimachine nooit op een zachte ondergrond zoals een bed of zetel, want dan kunnen de ventilatie–openingen
versperd worden.
BEWAAR DEZE INSTRUCTIES
Machinespecificaties:
Afmetingen:
Massa van de uitrusting:
Nominale spanning, Nominale frequentie: 230V 50Hz
Nominale invoer:
Gebruik van de omgevingstemperatuur:
Akoestisch geluidsniveau:
20
41cm × 18cm × 31cm
6,4 kg
60W
Normale temperatuur
minder dan 72db(A)
Page 21

Dutch
AANBEVELINGEN
Kleine moeilijkheden?
Raadpleeg volgende rubrieken:
— De naald vervangen
— Het opwinden van de spoel
— Het inzetten van het spoelklosje
— Het regelen van de benedendraad spanning
— Het onderhoud van de machine
— De regelknop voor de bovendraadspanning (Gegradueerd van 1 to 9)moet steeds op 5 staan.
— De boven-en onderdraad moeten dezelfde dikte hebben.
— Alvorens te naaien, beide draden samen naar achter trekken.
— Het inrijgen van de bovendraad moet van rechts naar links gebeuren, de draden mogen nooit elkaar kruisen (zie schema op de
machine)
— De draad steeds van voor naar achter door het naaldoog steken.
Wij raden U aan om de originele verpakking van uw naaimachine te bewaren zodat deze bij een eventueel transport voldoende
beschermd wordt.
Bewaar de verpakking om deze in geval mogelijke reparatie van uw machine in terug te kunnen zenden.
21
Page 22

Dutch
1.
VOORNAAMSTE ONDERDELEN ....................................27-28
3.
4.
5.
7.
INHOUD
2. TOEBEHOREN .................................................................29-30
VOOR U MET NAAIEN BEGINT.......................................31-32
AFNEMEN VAN DE VERLENGTAFEL.............................33-34
AANSLUITING VAN HET PEDAAL EN STROOMSNOER..33-34
INRIJGEN VAN DE BOVENDRAAD....................................33-34
OPHALEN VAN DE SPOELDRAAD ................................35-36
PROEFNAAIEN ...............................................................35-37
REGELEN VAN DE DRAADSPANNING .........................37-39
U BEGINT OP UW MACHINE .........................................39-44
OPWINDEN VAN DE SPOEL ..........................................45-46
INZETTEN VAN DE SPOEL ............................................47-48
VERANDEREN VAN DE PERSVOET .............................49-52
VERANDEREN VAN DE NAALD.....................................52-54
STOF, GAREN-EN NAALDTABEL ..................................55-56
STEEKKEUZEKNOP .......................................................57-60
EEN RECHTE HOEK MAKEN .........................................61-66
ACHTERUITNAAIEN .......................................................67-68
HET NAAIEN VAN STOFFEN VAN VERSCHILLENDE DIKTE 69-72
DUBBELE FUNCTIE PERSVOETHEFBOOM ......................69-72
KIEZEN VAN DE STEEK ......................................................73-74
RECHTUIT NAAIEN..............................................................75-76
ZIGZAG NAAIEN ..................................................................77-80
Draadspanning Voor Zigzag Naaien...................................77-80
BLINDZOMEN...................................................................77-80
FESTONNEREN ...............................................................77-80
OVERLOCKEN .................................................................79-82
ELASTISCHE STEKEN ....................................................83-84
KNOOPSGATEN ..............................................................85-86
Lengte Van Het Knoopgsgat...........................................87-94
Opensnijden Van Het Knoopsgat....................................95-96
INZETTEN VAN RITSSLUITINGEN .................................97-98
REPARATIE VAN KLEDINGSTUKKEN............................97-98
Verstellen........................................................................97-98
Reparatie Van Een Scheur of Winkelhaak......................99-102
APPLIQUEREN...............................................................103-108
BORDUURWERK ...........................................................109-110
Stopwerkplaatje ............................................................109-110
Verwijderen Van De Voethouder ..................................111-114
6. ONDERHOUD.................................................................111-114
SCHOONMAKEN............................................................111-114
SMEREN.........................................................................115-126
CONTROLETABEL ........................................................127-130
REGELEN VAN DE SPOELDRAADSPANNING ............131-132
SCHOONMAKEN VAN DE GRIJPER.............................133-134
VERVANGEN VAN HET LAMPJE ..................................133-134
8.
Naaldinrijger (alleen voor model
JSB21)........................................................................... 134
22
Page 23

IMPORTANTI ISTRUZIONI DI SICUREZZA
Quando si utilizzano apparecchiature elettriche, occure osservare sempre le elementari norme in materia di sicurezza, compresso quanto segne:
Leggere tutte le istruzioni prima di utilizzare questa apparecchiatura. PERICOLO – Onde ridurre il rischio di scosse elettriche:
Mai lasciare incustodita un'apparecchiatura se essa è collegata alla rete. Sempre disinserire l'apparecchiatura dalla presa di cor-rente subito dopo
l'utilizzo e prima della pulitura.
ATTENZIONE – Onde ridure il rischio di bruciature, incendi, scosse elettriche, o lesioni a persone:
1. Non consentire che venga utilizzata come giocattolo. E necessario prestare perticolare attenzione allorquando questa apparec-chiatura viene
utilizzata da, o vicino ad, un bambino.
2. Utilizzare quest'apparecchiatura solo per lo scopo cui è destina, coma da manuale. Utilizzate soltanto accessori raccomandti dal fabbricante o
contencti in questo manuale.
3. Mai far funzionare quest'apparecchiatura se il cordone o la spina sono danneggiati. Se non funziona adeguatamente, se è cadnto/a per terra o se è
danneggiato/a oppure se è finito/a nell'acqua. Ritornare l'apparecchiatura al rivenditore autorizzato più vicino od al centro riparazioni perché
vengano eseguiti i controlli del caso od eventuali riparazioni e regolazioni elettriche e/o meccaniche.
4. Mai far funzionare l'apparecchiatura con qualsiasi presa d'aria bloccata. Mantenere le aperture di ventilazione della macchina per cucire e
curate che il comando a pedale non sia attorniato da filacci, polvere o panni sporchi.
5. Non lasciare cadere né inserire mai oggetti nelle aperture.
6. Non utilizzare in esterni.
7. Non far funzionare quando vengono utilizzati prodotti spray o quando viene amministrato ossigeno.
8. Per scollegare, posizionate tutti i commandi so "Off" (“O”), e poi togliete la spina dalla presa.
9. Non scollegare tirando sul cordone. Per scollegare, afferrare la spina e non il cordone.
10. La macchina può essere utilizzata da bambini con più di 8 anni, persone con ridotte capacità fisiche, sensorie o mentali solamente se ben a
conoscenza delle istruzioni per l'utilizzo e dei rischi o se controllati da un supervisore.
11. La macchina deve essere utilizzata solo con il piedino di controllo appositamente progettato, per evitare pericoli. Se il piedino di controllo è
danneggiato o rotto deve essere sostituito dal produttore o dal suo agente di servizio o persona di pari qualifica.
12. La potenza massima della lampada a LED è di 0,3W, la tensione massima è di 5V DC. Se la lampada a LED è danneggiata, non si deve
utilizzare il prodotto e inviarlo al produttore o all'agente di servizio per la riparazione o la sostituzione in una sola volta.
13. Tenere le istruzioni a porta di mano, vicino alla macchina e se date la macchina ad altre persone consegnate anche le istruzioni.
14. Attenzione - per evitare lesioni:
- Scollegare il comando a pedale dell'apparecchio quando lo si lascia incustodito.
- Scollegare il comando a pedale dell'apparecchio prima di effettuare qualsiasi manutenzione.
AVVISO DI PERICOLO
1. Non toccate un'apparecchiatura finita nell'acqua. Scollegate subito.
2. Non collocate né immagazzinate apparecchiatura se esse possono cadere od essere spinte in una vasca oppure in un lavandino. Non collocate
né lasciate cadere nell'acqua o in altri liquidi.
23
Page 24

Italiano
AVVERTENZA
1. Mantenere le dita lontane da ogni parte mobile. Particolare attenzione va prestata all'ago della macchina da cucire.
2. Utilizzare sempre le guiste piastre per l'ago. La piastra sbagliata può causare la rottura dell'ago
3. Non utilizzare aghi curvi.
4. Non tirare o spingere il tessuto mentre cucite. Potrebbe far incurvare l'ago fino a romperlo.
5. Spegnere la macchina da cucire (su “O”) se volete apportare aggiustamenti alla zona dove c'è l'ago, ad es infilare l'ago, cambiarlo, infilare la spola, cambiare il premistoffa a pedale, ecc.
6. Scollegare sempre la macchina per cucire dalla presa elettrica quando aprite la macchina, quando lubrificate, o quando effettuate aggiustamenti e riparazioni menzionati nel manuale d'istruzioni per l'uso.
7. Mai far funzionare su di una superficie morbida come un letto od un divano, laddove le prese d'aria possano resultare bloccate.
CONSERVATE QUESTE ISTRUZIONI
Specifiche della macchina:
Dimensioni:
Massa dell'attrezzatura:
Tensione nominale, frequenza nominale: 230V 50Hz
Ingresso nominale:
Utilizzando la temperatura ambiente:
Livello di rumore acustico:
24
41cm × 18cm × 31cm
6,4 kg
60W
Temperatura normale
meno di 72db(A)
Page 25

Italiano
RACCOMANDAZIONI
Usate la macchina da cucire per la prima volta...
In caso di problemi, consultate i seguenti paragrafi:
– Sostituzione o inserimento dell’ago
– Riempimento dela spoline
– Sistemazione della spolina
– Regolazione della tensione inferiore
– Manutenzione della macchina
– Il selettore graduato da 1 a 9 in alto a sinistra deve essere su 5.
– Il filo superiore ed il filo inferiore devono avere la stessa grossezza; prima di cucire vanno tirati insieme all’indietro.
– L’ago possiede un lato piatto che deve essere rivolto verso la parte posteriore della macchina.
– Prima di selezionare il punto l’ago deve trovarsi sempre in alto.
– Il filo superiore deve essere infilato da destra verso sinistra facendo attenzione a non incrociare i fili (vedi schema sul coperchio supe-
riore della macchina).
– Introdurre il filo nella cruna dell’ago dal di fronte (ossia dal davanti verso il retro della macchina).
Si consiglia di conservare l’imballaggio originale per un eventuale transporto successivo della macchina.
25
Page 26

Italiano
1.
ELENCO DEI COMPONENTI ...........................................27-28
3.
COLLEGAMENTO DELLA MACCHINA E DEL PEDALE
4.
PRIMA DI SELEZIONARE IL PUNTO TABELLA TESSUTI,
LEVA PER DOPPIO SOLLEVAMENTO DEL PIENDINO
5.
6.
7.
INDICE
2. ACCESSORI .....................................................................29-30
PRIMA DI INIZIARE A CUCIRE........................................31-32
TAVOLETTA DI PROLUNGA ...........................................33-34
ALLA LINEA ELETTRICA .................................................33-34
INFILATURA DEL FILO SUPERIORE ..............................35-36
PER FAR RISALIRE IL FILO INFERIORE........................35-37
CUCITURA DI UN CAMPIONE.........................................37-39
REGOLAZIONE DELLA TESIONE DEI FILI.....................39-44
RIEMPIMENTO DELLA SPOLINA....................................45-46
SISTEMAZIONE DELLA SPOLINA ..................................47-48
SOSTITUZIONE DEL PIEDINO PREMISTOFFA .............49-52
SOSTITUZIONE DELL’AGO.............................................52-54
FILI ED AGHI ....................................................................55-56
PER INIZIARE A CUCIRE SELEZIONE DEI PUNTI ........57-60
CAMBIO DI DIREZIONE DI CUCITURA...........................61-66
CUCITURA IN MARCIA INDIETRO..................................67-68
CUCITURA DI TESSUTI DI GROSSO SPESSORE.........69-72
PREMISTOFFA.................................................................73-74
SELEZIONE DEL PUNTO ...............................................75-76
CICITURA DIRITTA .........................................................77-80
CUCITURA A ZIG-ZAG....................................................77-80
Tension del filo per il punto zig-zag ...............................77-80
CUCITURA D’ORLO INVISIBLE......................................77-80
I PUNTI ............................................................................79-82
SOPRAGGITTO...............................................................83-84
PUNTO ELASTICO..........................................................85-86
ASOLE .............................................................................87-94
Lunghezza dell’asola .....................................................95-96
Apertura delle asole.......................................................97-98
APPLICAZIONE DI CERNIERE LAMPO .........................97-98
RAMMENDO....................................................................97-98
Rattoppo ........................................................................99-102
Rammendo di uno strappo ..........................................103-108
APPLICAZIONE DI BOTTONI .......................................109-110
RICCAMI ........................................................................109-110
Piastra da rammendo...................................................111-114
Rimozione della staffa di supporto del piendo .............111-114
MANUTENZIONE DELLA MACCHINA..........................111-114
PULIZIA..........................................................................115-126
LIBRIFICAZIONE ..........................................................127-130
PICCOLI INCONVENIENTI............................................131-132
REGOLAZIONE DELLA TENSIONE INFERIORE.........131-132
Pulizia del supporto della crochet ................................133-134
SOSTITUZIONE DELLA LAMPADINA ..........................133-134
8.
Filettatrice ad ago (solo per il modello
JSB21)........................................................................... 134
26
Page 27
Section
1
2 1
16
17
14
15
18
22
19
20
21
3
4
5
6
8
9
10
11
12
13
23
7
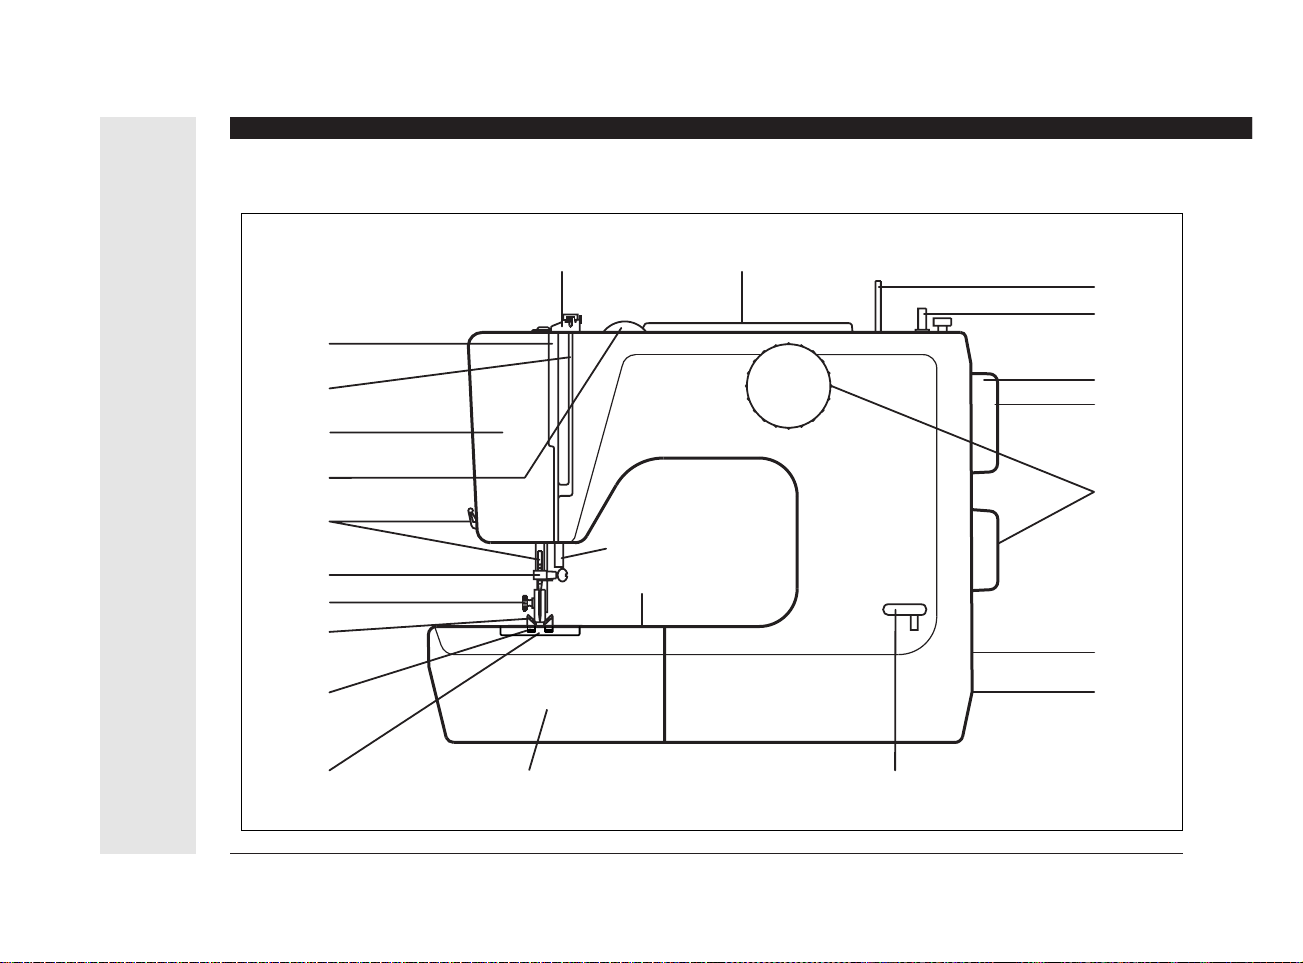
1. NAMES OF PARTS / NOMBR DE LAS PARTES / NOM DES PIECES / HAUPTTEILE DER
MASCHINE / VOORNAAMSTE ONDERDELEN / ELENCO DEI COMPONENTI
27
Page 28

English
Handle
Thread guide for bobbin
winding
Take-up lever
Upper tension plate
Face cover
Upper thread tension dial
Thread cutter
Thread guide for upper
threading
Presser foot thumb screw
Presser foot
Feed dog
Needle plate
Extension table. (Accessory
box)
Spool pin
Bobbin winding spindle
Handwheel
Declutch knob
Presser foot lifter
Pattern selection dial*
Socket
Switch
Free arm
Reverse sewing lever
* 7 & 19 differs from country
to country.
Español
Manija
Guía para enhebrar el hilo
Tira hilo
Guía del hilo superior
Tapa frontal
Control de la tensión del hilo
superior
Cuchilla para cortar el hilo
Guía del hilo superior
Tornillo del pie prensatela
Pie prensatela
Dientes
Placa de la aguja
Tablero de extensión (Caja
de accesorios)
Porta carretel
Devanador
Volante
Seguro del volante
Elevador del pie prensatela
Control para seleccionar la
puntada*
Enchufe
Interruptor
Brazo libre
Palanca para coser en reversa
* 7 & 19 son diferentes de un
pais a otro.
Francais
Poignée
Guide-fil pour le bobinage de
la canette
Tendeur de fil
Couvercle de la tension
supérieure
Couvercle latéral
Bouton de tension du fil
supérieur
Coupe-fil
Guide du fil supérieur
Vis de fixation du pied-debiche
Pied-de-biche
Griffe d’entraînement
Plaque-aiguille
Table d’extension (Boîte
accessoires)
Porte-bobine (escamotable)
Axe de bobinage de la
canette
Volant
Bouton de débrayage
Releveur de pied de biche
Cadran de sélection du point*
Prise de courant
Interrupteur de moteur
Bras libre
Levier de marche arrière
* Les pièces 7 et 19 peuvent
être différentes selon les
pays.
Deutsch
Tragegriff
Fadenführung zum Spulen
Gelenkfadenhebel
Oberfadenspannung
Frontklappe
Rad zur Regulierung der
Oberfadenspannung
Fadenabschneider
Fadenführung
Feststellschraube des
Nähfußhalters
Nähfuß
Transporteur
Stichplatte
Anschiebetisch und
Zubehörkästchen
Garnrollenhalter
Spulerspindel
Handrad
Umschalt-Knopf (Nähen-
Spulen)
Füßchenheber
Musterwählknopf (Programm-
Selector)*
Steckergehäuse
Schalter für Licht und Mas-
chine
Freiarm
Taste zum Rückwärtsnähen
* Nr. 7 u. 19 können von Land
zu Land unterschiedlich
sein.
Dutch
Handvat
Draadgeleider voor opwinden
van spoel
Aantrekhefboom
Bovenspanningsplaatjes
Lampkap
Regelknop voor boven-
draadspanning
Draadsnijmesje
Bovendraadgeleider
Klemschroef van persvoet
Persvoet
Transporteur
Steekplaat
Verlengtafel
Klospennen
As voor opwinden van spoel
Handwiel
Ontkoppelingsknop
Persvoethefboom
Patroonkeuzeknop*
Stopcontact
Motorschakelaar
Vrije arm
Achteruitnaaiknop
* 7 & 19 kunnen van land tot
land verschillen.
Italiano
Maniglia
Guidafilo per il riempimento
della spolina
Tendifilo
Piatto di tensione superione
Coperchio laterale
Manopola di tensione del filo
superiore
Tagliafilo
Guidafilo superiore
Vite di fissaggio del piedino
premistoffa
Piedino premistoffa
Trasportatore
Placca ago
Tavoletta di prolunga (casset-
to accessori)
Portarocchetto
Alberino avvolgitore della
spolina
Volantino
Bottone di disinnesto
Leva alza piedino premistoffa
Manopola di selezione dei
punti*
Presa di corrente
Interruttore motore
Braccio libero
Leva marcia indietro
* 7 & 19 possono variare da
un paese all’artro.
1.
2.
3.
4.
5.
6.
7.
8.
9.
10.
11.
12.
13.
14.
15.
16.
17.
18.
19.
20.
21.
22.
23.
1.
2.
3.
4.
5.
6.
7.
8.
9.
10.
11.
12.
13.
14.
15.
16.
17.
18.
19.
20.
21.
22.
23.
1.
2.
3.
4.
5.
6.
7.
8.
9.
10.
11.
12.
13.
14.
15.
16.
17.
18.
19.
20.
21.
22.
23.
1.
2.
3.
4.
5.
6.
7.
8.
9.
10.
11.
12.
13.
14.
15.
16.
17.
18.
19.
20.
21.
22.
23.
1.
2.
3.
4.
5.
6.
7.
8.
9.
10.
11.
12.
13.
14.
15.
16.
17.
18.
19.
20.
21.
22.
23.
1.
2.
3.
4.
5.
6.
7.
8.
9.
10.
11.
12.
13.
14.
15.
16.
17.
18.
19.
20.
21.
22.
23.
28
Page 29
Section
2
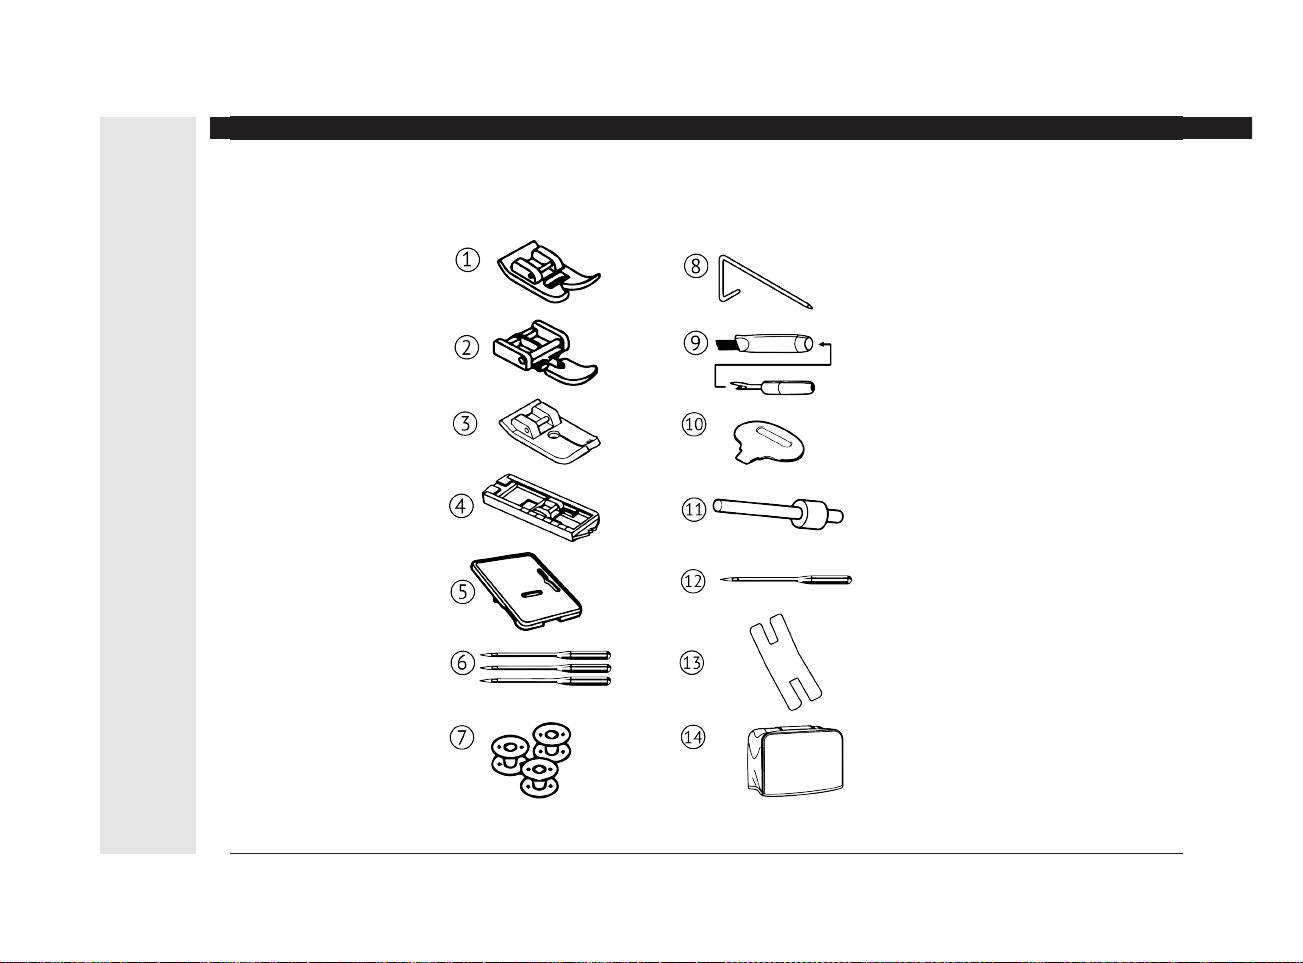
2. ACCESSORIES / ACCESORIOS / ACCESSOIRES / ZUBEHÖR / TOEBEHOREN / ACCESSORI
29
Page 30

2. ACCESSORIES / ACCESORIOS / ACCESSOIRES / ZUBEHÖR / TOEBEHOREN / ACCESSORI
Deutsch
1. Zickzack-Nähfuß (an der
Maschine)
2. Reißverschlußfuß
3. Geradstichfuß
4. Knopflochfuß
5. Stick- und Stopfplatte
6. Organ Nadeln
7. Spulen (3 Stück)
8. Kantenlineal
9. Pinsel und Nahttrenner
10. Schraubenzieher
11. Garnrollenstift
12. 2x Denim Nadeln
13. Jeans Support
14. Staubschutzhülle
Español
1. Pie de costura zig-zag (en la
máquina)
2. Pie para coser cierres
3. Pie de punto recto
4. Pie para ojales
5. Placa de zurcir
6. Juego de agujas Organ
7. Canillas 3x
8. Guía para coser bordes/
acolchados
9. Cepillo/abreojales
10. Destornillador
11. El pin de la bobina
12. Agujas denim 2x
13. Jeans Support
14. Cubierta de protección
English
1. Zigzag sewing foot (on
machine)
2. Zipper foot
3. Straight Stitch foot
4. Buttonhole foot
5. Darning Plate
6. Organ Needles
7. Bobbins (3 pcs.)
8. Edge Guide
9. Brush and Seam Ripper
10. Screwdriver
11. Spool pin
12. 2x Denim Needles
13. Jeans Support
14. Dust Cover
Dutch
1. Zigzagvoet (op de machine
gemonteerd)
2. Ritssluitingvoet
3. Rechte steekvoet
4. Knoopsgatenvoet
5. Stopplaat
6. Set naalden Organ
7. Spoelen 3x
8. Geleider voor doorstikken/
quilten
9. Tornmesje/borsteltje
10. Schroevendraaier
11. Spoelpin
12. Denim Naalden 2x
13. Jeans Support
14. Beschermhoes
Francais
1. Pied Zigzag (monté sur la
machine)
2. Pied de biche fermeture
glissière
3. Pied à point droit
4. Pied pour boutonnières
5. Plaque à broder et à repriser
6. Aiguilles Organ
7. Canettes 3x
8. Guide couture
9. Brosse et Couteau à
boutonnière
10. Tournevis
11. Broche de la bobine
12. Aiguilles Denim 2x
13. Passe épaisseur
14. Housse de protection
Italiano
1. Piendino zig-zag (montato
sulla macchina)
2. Piedino per cerniere lampo
3. Piedino punto dritto
4. Piedino per asola
5. Piastra da rammendo
6. Aghi Organ
7. Spoline 3x
8. Bordo diritto
9. Taglia asole
10. Cacciaviti
11. Spilla da bobina
12. Aghi Denim 2x
13. Jeans support
14. Copertura di protezione
30
Page 31

English Español
Section
3
3. BEFORE SEWING
The machine is stored in flatbed style which makes your
work easier for ordinary
sewing.
3. ANTES DE
EMPEZAR A
COSER
La máquina se presenta en
forma plana para hacer más
fácil su labor en la costura
normal.
DETACHABLE EXTENSION
TABLE
Remove the table (accessory
box) and the machine is used
as a free-arm machine.
TABLERO DE EXTENSIÓN
RETIRABLE
Quitar esta parte (conteniendo accesorios) y la máquina
se puede usar con el brazo
libre.
The free-arm is more convenient to sew or embroider;
trousers, sleeves, cuffs of Tshirts, blouses, etc.
Reverse the above steps to
attach the extension table.
El brazo libre es recomendable para coser o bordar pantalones, mangas, puños de
camisas, blusas, etc.
Colocar nuevamente la caja
de accesorios.
31
Page 32

Francais Deutsch Dutch Italiano
3. AVANT DE
COMMENCER A
COUDRE
La machine est rangée sur un
support plat, ce qui facilite le
travail usuel de couture.
3. VOR DEM NÄHEN
Für einfache Näharbeiten
sollte der flache Anschiebetisch verwendet werden.
Dadurch wird die Arbeitsfläche vergrößert und somit
das Nähen erleichtert.
3. VOOR U MET
NAAIEN BEGINT
De machine op een vlakke
ondergrond opstellen wat het
gewone naaiwerk vergemakkelijkt.
3. PRIMA DI INIZIARE
A CUCIRE
La macchina è installata su
un supporto piatto che facilita
il normale lavoro di cucitura.
TABLE D’EXTENSION
ESCAMOTABLE
Enlevez la tablette pour utiliser la machine en bras libre.
ENTFERNEN DES
ANSCHIEBETISCHES
Ziehen Sie den Anschiebetisch in Pfeilrichtung nach
vorne weg und Sie können im
Nu den Freiarm benutzen.
AFNEMEN VAN DE
VERLENGTAFEL
Na het afschuiven van de verlengtafel kan men de machine
met vrije arm gebruiken.
TAVOLETTA DI PROLUNGA
Sfilate la tavoletta per utilizzare la macchina a braccio
libero.
Le bras libre est commode
pour coudre ou pour broder,
des pantalons, manches,
manchettes de T-shirts,
blouses, etc.
Procèdez selon la méthode
inverse pour remettre la table
d’extension.
Schwer zugängliche Stellen
wie Manschetten, Ärmel,
Hosenbeine usw. können mit
dem Freiarm mühelos genäht
werden. Taschen aufnähen,
Steppnähte an Kleidern,
Mänteln......, alles kein Prob-
lem mehr.
Door de machine met vrije
arm te gebruiken, kan men
broeken, mouwen en opslagen van T-shirts, bloezen
enz. gemakkelijk naaien of
borduren. Om de verlengtafel
weer te monteren, de bovenstaande instructies in omgekeerde volgorde uitvoeren.
L’uso della macchina a braccio libero permette di cucire o
di ricamare con grande facilità
pantaloni, maniche e polsini
di camicia, camicette, ecc.
Per riposizionare la tavoletta,
eseguite la stessa operazione
indicata al punto precedente
ma in senso inverso.
32
Page 33

❈
➀
➁
❈
English Español
Section
3
To open the lid of the accessory box, pull it open, as illustrated.
Para abrir la tapa de la caja
de accesorios, jalarla como
se indica.
CONNECTING FOOT
CONTROLLER AND
POWER CORD
Connect foot controller and
power cord
1 2 .
Before plugging in your
machine, be sure that the
voltage is the same as that of
your machine (written on a
plate at back of machine).
CONECCIÓN DEL PEDAL Y
CABLE DE CORRIENTE
Conectar el pedal y el cable
de corriente siguiendo los
pasos
1 y 2 .
Antes de conectar la clavija
de la máquina, asegurarse de
que el voltaje de la máquina
sea igual que el de su toma
de corriente.
Switch on power to the
machine and turn on the
sewing light.
Switch off power to the
machine and turn off the
sewing light.
(* el voltaje está escrito sobre
una placa en la parte posterior de la máquina.)
Accione el botón de la
máquina, para el funcionamiento del pedal y del
foco.
OFF - Apagado
ON - Encendido
OFF
ON
33
Page 34

Francais Deutsch Dutch Italiano
Pour ouvrir le couvercle de la
boîte d’accessoires, tirez-le
comme illustré.
Das Zubehör ist im Anschiebetisch integriert. Zum Öffnen der Box heben Sie nur
die Klappe in Pfeilrichtung an.
Om het vakje met accessoires te openen gaat men
tewerk zoals wordt afgebeeld.
Tirate nella direzione della
freccia il coperchio del cassetto degli accessori per
aprirlo.
CONNEXION DE LA
PÉDALE ET DU FIL
ELECTRIQUE
Connectez la pédale et le fil
électrique
1 , 2 .
Avant de brancher votre
machine, assurez-vous que la
tension est la même que celle
de votre machine (voyez l’inscription au dos de la machine).
La tension varie d’un pays à
l’autre.
Poussez sur l’interrupteur du
moteur et allumez la lumière.
Lorsque vous n’utilisez pas
votre machine, veillez à
l’éteindre ou à la débrancher.
Anschluß des Fußanlassers
Verbinden Sie Fußanlasser und
Kabel wie abgebildet
1 , 2
.
Bevor Sie die Maschine
anschließen, beachten Sie
bitte, daß die Netzspannung mit
der Angabe auf der Rückseite
der Maschine übereinstimmt.
* Die Angaben sind von Land
zu Land unterschiedlich.
HAUPTSCHALTER
EINGEBAUTE NÄHLEUCHTE
Das Nählicht ist in der Frontplatte eingebaut und
beleuchtet nur das Arbeitsfeld. Das Nählicht und die
Maschine werden mittels des
auf der Handradseite befindlichen Kippschalters aus- und
eingeschaltet. Wechseln der
Glühbirne Seite 100.
AANSLUITING VAN HET
PEDAAL EN STROOMSNOER
Pedaal en stroomsnoer
aansluiten
1 , 2 .
Voor u de stekker in de
machine steekt, goed opletten
of de spanning dezelfde is als
vermeld staat op het plaatje
achteraan op de machine.
* De netspanning verschilt
van land tot land.
De schakelaar indrukken
zodat het lampje brandt.
Wanneer u de machine niet
gebruikt, vergeet ze dan niet
uit te schakelen of de stekker
uit te trekken.
COLLEGAMENTO DELLA
MACCHINA E DEL PEDALE
ALLA LINEA ELETTRICA
Collegate pedale e filo di alimentazione della macchina
1 , 2 .
Prima di collegare la macchina da cucire, assicuratevi che
la tensione della linea elettrica sia quella indicata sulla
macchina (vedere la targhetta
sul retro).
La tensione varia da un
paese all’altro.
Premete l’interruttore del
motore ed accendate la luce.
Quando non utilizzate la
macchina, ricordate sempre
di spegnerla o scollegarla.
34
Page 35

English Español
Section
3
The more you press the foot
controller, the faster the
machine runs.
A major presión del pedal,
mayor será la velocidad con
que la máquina coserá.
1
2
3
4
5
6
THREADING UPPER
THREAD
Raise the presser foot lifter.
Raise the take-up lever to the
highest position by turning the
handwheel towards you.
Thread following numbers 1 - 6 .
Pass the thread through
guide 1 .
ENHEBRAMIENTO DEL
HILO SUPERIOR
Levantar el elevador del pie
prensatela.
Levantar el tira hilo a su posición más alta girando el
volante hacia Ud.
Para enhebrar seguir los
pasos del
1 al 6 .
Pasar el hilo a través de la
guía 1 .
2
3
1
Lead thread through either
side of tension disc
2 .
Hook the thread under the
guide
3 as shown.
Jalar el hilo hacia el frente y
pasarlo por cualquier unidad
de la guía
2 .
Enhebrar el hilo en la guía
3 y
jalar el hilo hacia arriba para
insertarlo en el resorte.
35
Page 36

Francais Deutsch Dutch Italiano
Plus vous appuyez sur la
pédale, plus la machine fonctionne vite.
DER FUSSANLASSER
Mittels des Fußanlassers wird
die Nähgeschwindigkeit reguliert. Stellen Sie ihn so auf,
daß Sie den Anlasser
bequem erreichen können.
Langsam nähen - leichter
Fußdruck. Schnell nähen Pedal stärker, nötigenfalls bis
zum Anschlag drücken.
Hoe dieper u het pedaal
indrukt, des te sneller werkt
de machine.
Più si spinge sul pedale, più
si aumenta la velcosità di funzionamento della macchina.
ENFILAGE DU FIL
SUPERIEUR
Relevez le pied-de-biche.
Placez le tendeur de fil à sa
position la plus haute en tournant le volant vers vous.
Enfilez en suivant les
numéros
1 ~ 6 .
Faites passer le fil par le
guide-fil
1 .
EINFADELN DES
OBERFADENS
Nähfußheber nach oben und
Gelenkfadenhebel in höchste
Stellung bringen, indem Sie
das Handrad auf sich zu
drehen.
Einfädeln in der Reihenfolge
1
- 6 . Führen Sie den Faden
durch die Fadenführung
1 .
INRIJGEN VAN DE
BOVENDRAAD
Zet de persvoethefboom
omhoog. De aantrekhefboom
in de hoogste stand zetten
door het handwiel naar u toe
to draaien.
Inrijgen volgens nummer
1 ~
6 . De draad door geleider
leiden
1 .
INFILATURA DEL FILO
SUPERIORE
Alzate il piedino premistoffa.
Ruotate il volantino verso di
voi fino a quando il tendifilo
sarà nella sua posizione più
alta.
Infilate seguendo i numeri da
1 a 6 .
Fate passare il filo attraverso
il guidafilo 1 .
Puis entre les deux disques
du tendeur
2 .
Accrochez-le au guide
3 , de
bas en haut et droit à gauche.
Faden senkrecht durch die
Spannungsscheiben hindurchführen 2 .
Von unten nach oben in die
Fadenanzugsfeder einhaken
3 .
Vervolgens tussen de twee
spanschijfjes leiden
2 .
De draad onder de geleider
haken, zoals op de tekening
3 .
Quindi tra i due dischi della
tensione
2 .
Agganciatelo alla guida
3 ,dal
basso in alto e da destra verso sinistra.
36
Page 37

English Español
Thread take-up lever 4 .
Pass thread through needle
guide
5 (use left one) then
through the needle eye
from front to back.
Enhebrar el hilo en la guía
Jalar el hilo a través de la
guía
5 (usar izquierda).
Enhebrar en la aguja de ade-
6
lante hacia atrás.
4 .
4
6
Section
3
Allow about 15 cm (6”) of
thread extra.
DRAWING UP LOWER
THREAD
Hold the end of the upper
thread with the left hand as
illustrated.
Turn the handwheel slowly
towards you until the needle
moves down and up again to
its highest position.
Pull the upper thread slowly
and the lower thread will be
brought up in a loop.
Dejar aproximadamente 15
cm de hilo extra.
CÓMO LEVANTAR EL HILO
INFERIOR
Sostener el extremo del hilo
superior con la mano izquierda.
Girar el volante lentamente
hacia Ud. hasta que la aguja
baje y suba otra vez.
Jalar el hilo supeior lentamente y el hilo inferior se
alzará en forma de presilla.
5
6
37
Page 38

Francais Deutsch Dutch Italiano
Enfilez-le ensuite par le tendeur
4 .
Faites passer le fil par le
guide
5 , (situé à gauche) et
par le chas de l’aiguille
6 , de
l’avant vers l’arrière.
Laissez pendre environ 15
cm de fil.
Durch den Gelenkfadenhebel
führen
4 .
Fädeln Sie den Faden durch
die Fadenführungen
5 und
dann von vorne nach hinten
durch das Nadelöhr
6 ein.
Etwa 10 cm Faden nach
hinten herausziehen.
De draad van rechts naar
links door de aantrekhefboom
leiden
4 .
Daarna door geleider
5
(links) en door het naaldoog
leiden
6 .
Een eind draad van circa 15
cm overlaten.
Infilatelo quindi nel tendifilo
4 .
Fate passare il filo attraverso
la guida
5 (situata a sinistra)
ed infine nella cruna dell’ago
6 da davanti verso il restro
della macchina.
Lasciate pendere all’incirca
15 cm di filo.
POUR FAIRE REMONTER
LE FIL INFÉRIEUR
Saisissez l’extrémité du fil
supérieur de la main gauche.
Tournez lentement le volant
vers vous jusqu’à ce que
l’aiguille descende puis
remonte à sa position la plus
haute.
HERAUFHOLEN DES
UNTERFADENS
Fadenende des Oberfadens
mit der linken Hand wie auf
Abb. halten.
Drehen Sie nun das Handrad
langsam in Ihre Richtung, bis
der Gelenkfadenhebel sich
wieder in der höchsten Stellung befindet.
OPHALEN VAN DE
SPOELDRAAD
Het uiteinde van de bovendraad met de linkerhand
vasthouden.
Het handwiel langzaam naar
u toe draaien zodat de naald
éénmaal op en neer gaat.
PER FAR RISALIRE IL FILO
INFERIORE
Afferrate l’estremità del filo
superiore con la mano sinistra.
Girate lentamente il volantino
verso di voi facendo scendere
e quindi risalire l’ago.
Tirez lentement sur le fil
supérieur de telle sorte que le
fil inférieur fasse une boucle.
Ziehen Sie den Oberfaden
leicht an, und der Unterfaden
wird in Form einer kleinen
Schlinge heraufgeholt.
De bovendraad voorzichtig
aantrekken zodat de spoeldraad met een lus naar boven
komt.
Tirate lentamente il filo superiore in modo che il filo inferiore formi un cappio.
38
Page 39

English Español
Section
3
Pull out both threads to about
15 cm (6") and place them
together at the left under the
presser foot.
Jalar ambos hilos 15 cm
aproximadamente y ponerlos
juntos debajo del pie prensatela hacia el lado izquierdo.
TRIAL SEWING
Now that you have finished
the first steps (page 1-13),
you are familiar with the controls on your machine and
with the accessories provided
for the machine you are ready
to start to sew with your new
sewing machine.
COSTURA DE PRUEBA
Ahora Ud. ha terminado los
primeros pasos (de la página
1 a la 13). El manejo de su
máquina y accesorios le son
familiares a Ud.. Esta todo
en orden para comenzar a
coser con su nueva máquina.
5
Lets try to sew straight stitch.
1. Make sure your machine
is set completely as illustrated here.
2. Pattern selection dial to ( ).
3. Upper thread tension dial
to 5.
4. Place fabric under the
presser foot.
Comenzaremos a probar la
costura recta.
1. Asegurase que su máquina esté completamente
como aparece indicado.
2. Control para seleccionar
la puntada a ( ).
3. Control de la tensión del
hilo superior al No. 5.
4. Colocar la tela debajo del
pie prensatela.
39
Page 40

Francais Deutsch Dutch Italiano
Tirez les deux fils à 15 cm
environ du pied et placez-les
tous les deux à gauche et
sous le pied-de-biche.
Beide Fäden bis etwa 15 cm
herausziehen und nach links
unter den Nähfuß legen.
De twee uiteinden circa 15
cm van de persvoet uittrekken
en ze beide links onder de
persvoet leggen.
Tirate le due estremità dei fili
a 15 cm circa dal piedino e
sistematele entrambe a sinistra e sotto il premistoffa.
COUTURE D’UN
ECHANTILLON
Maintenant que vous avez
effectué les préparatifs
nécessaires et que vous êtes
familiarisés avec les commandes et les accessoires de
votre machine, vous êtes
prêtes à commencer à
coudre.
DER NÄHBEGINN
Nachdem Sie nun die ersten
Schritte (Seite 1 - 14) beendet
haben, sind Sie jetzt mit der
Bedienung der Maschine und
der Anwendung des Zubehörs vertraut. Nun können
Sie auch mit dem Nähen mit
Ihrer neuen Nähmaschine
beginnen.
PROEFNAAIEN
Nadat U de eerste handelingen (pag. 1-14) doorgewerkt
hebt bent u vertrouwd met de
bedieningsorganen van uw
machine en met de bijgeleverde accessoires. Nu bent
u gereed om met uw nieuwe
naaimachine te gaan naaien.
CUCITURA DI UN
CAMPIONE
Ora che avete portato a termine i preparativi necessari e
avete una maggiore familiarità con i comandi della vostra
macchina ed i suoi accessori,
siete pronti per iniziare a
cucire.
Essayons la couture du
point droit.
1. Assurez vous que votre
machine se trouve complètement comme illustré.
2. Mettez le cadran de sélection du point sur 5 ( ).
3. Le bouton de tension du fil
supérieur sur 5.
4. Placez le tissu sous le
pied-de-biche.
Versuchen Sie zuerst im
Geradstich zu nähen:
1. Stellen Sie die Maschine
entsprechend der Abbildung ein.
2. Drehen Sie den Programm-Selektor auf ( ).
3. Stellen Sie die Oberfadenspannung auf (5) ein.
4. Legen Sie nun den Stoff
unter den Nähfuß.
Laten we nu een rechte
steek naaien-
1. Verzeker er U van dat uw
machine volledig is
afgesteld zoals hier afgebeeld.
2. Draai de steekkeuzeknop
op 5 ( ).
3. Bovendraarspanning op 5
zetten.
4. Leg de stof onder de
persvoet.
Provate per prima la
cucitura diritta:
1. Assicuratevi che la macchina e completamente
come ilustrato.
2. Ruotate la manopola di
selezione dei punti su 5 ( ).
3. Regolate la tensione del
filo superiore su 5.
4. Posizionate il tessuto sotto il piendino premistoffa.
40
Page 41

English Español
Section
3
5. Take-up lever in its highest position.
* Fabric should be placed
under the presser foot with
the bulk of the material to
the left of the needle and the
right edge of the material
placed on the appropriate
seam allowance.
5. Colocar la palanca en la
posición más alta.
* La tela debe quedar coloca-
da debajo del pie prensatela
con la mayor parte sobre la
izquierda de la aguja. Y
colocar el borde del lado
derecho de al tela con el
apropiado espacio para la
costura.
6. Lower press foot lifter.
7. Press foot controller lightly
and commence forward
sewing guiding the fabric
by hand as it is fed. Never
push or pull the material.
* The more you press the foot
controller, the faster the
machine runs.
8. Draw out fabric to left
when sewing is finished.
6. Bajar el elevador del pie
prensatela.
7. Presionar el pedal ligeramente y comenzar a coser
guiando la tela con la
mano mientras avanza
ésta. Nunca se debe
tironear o empujar la tela.
* A mayor presión del pedal,
mayo será la velocida con
que la máquina coserá.
* Always finish sewing each
seam with the needle at its
highest position.
* Leave at least 15 cm (6”) of
thread behind the needle so
that it will not be drawn out
of the eye of the needle
when next sewing.
9.
AA
Cut threads with thread
cutter.
BB
Cut threads with thread
cutter behind presser
bar.
8. Jalar la tela hacia el lado
izquierdo cuando se haya
terminado de coser.
* Siempre terminar cada costura
con la aguja en su posición
más alta.
* Dejar aproximadamente 15
cm del hilo extra hacia atrás
para que no se desprenda el
hilo de la aguja.
9.
AA
Cortar los hilos con la
cuchilla.
BB
Cortelos hilos con el corta
cadcneta que está detras
de la barrapata.
AA
BB
41
Page 42

Francais Deutsch Dutch Italiano
5. Déplacer le levier à sa
position la plus haute.
5. Bringen Sie den Gelenkfadenhebel in die höchste
Position.
5. Breng de aantrekhefboom
in zijn hoogste positie.
* De stof moet onder de
persvoet gelegd worden zodat
het grootste deel aan de linkerkant van de naald ligt. De
rechterkant van de stof moet
altijd breed genoeg zijn om er
de door u gekozen steekbreedte ruimschoots op kwijt
te kunnen. Té kort op de rand
stikken hecht n.l. niet goed.
5. Alzare completamente la
leva di rientro del
trasportatore
* Colloate il tessuto sotto il
premistoffa in modo che la
messa principale si trovi a
sinistra dell’ago e il bordo
destro sulla tacca della
placca ago corrispondente
alla larghezza della cucitura che si vuole ottenere.
6. Descendez le levier du
pied-de-biche.
7. Appuyez légèrement sur
la pédale et commencez
la couture en guidant le
tissu d’une main.
* Pour coudre plus vite,
appuyer plus fort sur la
pédale.
6. Senken Sie den Nähfuß.
7. Fangen Sie jetzt an, langsam
und gleichmäßig zu nähen.
Führen Sie das Nähgut leicht
mit der Hand vor der Nadel.
Niemals am Nähgut ziehen
oder den Stoff festhalten,
weil dadurch der Materialtransport verändert wird. Je
mehr Sie den Fußanlasser
herunterdrücken, desto
schneller läuft die Maschine.
6. Laat de persvoethendel
zakken.
7. Druk voorzichtig op de
voetpedaal en begin te
naaien terwiji u de stof
geleidt als deze getransporteerd wordt.
Trek of duw nooit aan de
stof.
* Hoe verder u het voetpedaal
indrukt des te sneller gaat
de machine lopen.
6. Abbassate il piedino
premistoffa.
7. Premete leggermente sul
pendale e cominciate
cucire guidando il tessuto
con la mano.
* Per cucire più velocemente,
premete più forte sul pedale.
8. Quand la couture est terminée, enlever le tissu en
le tirant vers la gauche.
* Toujours terminer la couture
avec l’aiguille en position
haute.
* Laissez un bout de fil d’envi-
ron 15 cm de long, pour
éviter que le fil ne sorte du
chas de l’aiguille.
9.
AA
Coupez le fil à l’aide du
coupefil.
BB
Couper les fils à l’aide du
coupe-fil situé derrière la
barre pied-presseur.
8. Nehmen Sie das Nähgut
nach links aus der Maschine.
Wenn Sie aufhören zu nähen,
sollte die Nadel in der
höchsten Position sein. Legen Sie Ober- und Unterfaden
nach hinten unter den Nähfuß
und ziehen Sie etwa 15 cm
heraus.
9.
AA
Schneiden Sie die Fäden mit
dem Fadenabschneider ab.
BB
Schneiden Sie den Faden
mit dem Fadenabschneider
hinter der Drückerstange ab.
8. Haal de stof naar de linkerkant weg als het naaiwerk
gereed is.
* Stop altijd met draadaan-
trekhefboom in de hoogste
stand.
* Laat ten minste 15 cm van de
draad door de naald steken
zodat deze niet uit het oog van
de naald wordt getrokken als u
verder gaat naaien.
9.
AA
Knip draad met draadsnijder.
BB
Snij de draden af met behulp
van de draadafsnijder aan de
achterkant van de naaldstang.
8. Una volta terminata la
cucitura, togliete il tessuto
tirandolo verso sinistra.
* Terminate sempre la cucitu-
ra con l’ago in alto.
* Lasciate pendere all’incirca
15 cm di filo per evitare che
si sfili dall’ago.
9.
AA
Tagliare il filo con l’ap-
posito taglierino.
BB
Tagliare il filo con il
tagliafilo dietro la barra
dell’ago.
38
Page 43

Section
3
English Español
5. SELECTING THE
STITCH
The desired stitch will be
obtained by turning the Pattern Selection Dial.
* When operating the selec-
tor, make sure the needle is
in the highest position.
STRAIGHT SEWING
Set machine as shown, 4
kinds of straight stitch lengths
can be selected as shown
below.
Stitch
Selector
No.5
No.6
No.7
No.8
ZIGZAG SEWING
Set the machine as shown.
To prevent seam ends unravelling, set machine for straight
stitch and sew in reverse at
beginning and ending of
seam.
3 kinds of zigzag patterns can
be selected as shown.
Stitch
Length
2 mm
2 mm
3.2 mm
5 mm
Needle
Position
Left
Centre
Centre
Centre
5. ESCOGER LA
PUNTADA
Girar el selector para escoger
la puntada que se requiere.
* Asegurarse que la aguja
esté siempre en su posición
más alta al operar el selector.
COSTURA RECTA
Preparar la máquina como se
indica. 3 diferentes longitudes
en la costura recta y se pueden
escoger come se indica.
LA SELECCIÓN
DE LA PUNTADA
No.5
No.6
No.7
No.8
COSTURA EN ZIG-ZAG
Preparar la máquina como se
indica.
Para evitar que en la terminación de la costura se
deshile, preparar la máquina
para la puntada recta y coser
en reversa al principio y al
final de la costura.
3 diferentes modelos de la
costura en zig-zag se pueden
escoger como se indica.
EL LARGO DE
LA PUNTADA
2 mm
2 mm
3.2 mm
5 mm
6578
9 1110
43
Page 44

Francais Deutsch Dutch Italiano
5. SÉLECTION DE
POINTS
On sélectionne le point
souhaité en tournant le cadran de sélection du point.
En tournant ce cadran
assurez-vous que l’aiguille se
trouve dans sa position la
plus haute.
COUTURE EN POINT DROIT
Réglez la machine comme
indiqué ci-contre. Il est possible de sélectionner trois
sortes de points droits comme
montré ci-dessous.
Sélecteur
Programme
n°5
n°6
n°7
n°8
COUTURE AU POINT ZIGZAG
Réglez la machine comme
indiqué ci-contre.
Pour éviter que les extrémités
de couture soient inégales,
réglez la machine sur “couture au point droit” et piquez
en marche arrière aux deux
extrémités de la couture.
Il est possible de sélectionner
3 types de zigzag comme
montrés.
44
Longueur
de point
2 mm
2 mm
3.2 mm
5 mm
5. PROGRAMMWAHL
Den gewünschten Stich erhalten Sie durch Drehen des
Programm-Selektors. Achten
Sie unbedingt darauf, daß
sich beim Drehen des Selektors die Nadel immer in der
höchsten Stellung befindet.
DER GERADSTICH
Stellen Sie die Maschine
entsprechend der Abbildung ein.
Es stehen 3 Geradstiche in verschiedenen Längen zur Verfügung,
wie die nachfolgende Tabelle zeigt.
Programm-
Selektor
Nr. 5
Nr. 6
Nr. 7
Nr. 8
DER ZICKZACK-STICH
Stellen Sie die Maschine lt.
Abbildung ein.
Um zu vermeiden, daß die Naht
aufgeht, nähen Sie zuerst einige
Rückwärtsstiche im Geradstich
an Nahtanfang und -ende.
Sie können zwischen 3 Zickzackstichen in verschiedenen
Breiten wählen, wie die
Tabelle zeigt.
Stichlänge
2 mm
2 mm
3.2 mm
5 mm
5.
KIEZEN VAN DE STEEK
Het kiezen van de steek.
De gewenste steek zal
verkregen worden door aan
de steekkeuzeknop te
draaien.
* Zorg er voor dat alvorens u
hieraan gaat draaien de
draadaantrekhefboom zich
in de hoogste stand bevindt.
RECHT NAAIEN
De machine instellen zoals op
de afbeelding.
U kunt kiezen uit 3 rechte
steeklengtes.
Steekkeuzeknop
Nr. 5
Nr. 6
Nr. 7
Nr. 8
Steeklengte
2 mm
2 mm
3.2 mm
5 mm
ZIGZAG NAAIEN
De machine instellen zoals op
de afbeelding.
Om te vermijden dat de uitenden van de naad uitrafelen,
de machine instellen voor
“recht naaien” en achteruitnaaien aan de beide uiteinden van de naad.
U kunt kiezen uit 3 soorten
zigzag steken.
5. SELEZIONE DEL
PUNTO
Selezionare il punto desiderato avvalendosi della manopola di selezione modello.
* Prima di intervenire sulla
manopola di selezione,
accertarsi che l’ago sia in
posizione completamente
sollevata.
CUCITURA DIRITTA
Impostare la macchina come
illustrato. Come qui oltre
mostrato, si possono
selezionare tre diversi tipi di
punto dritto.
Selettore punto
No. 5
No. 6
No. 7
No. 8
CUCITURA A ZIG-ZAG
Impostare la macchina come
mostrato in figura. Per
evitare che le cuciture si sfilaccino, impostare la macchina sul punto dritto e cucire in
senso inverso all’inizio ed alla
fine della cucitura. Si potranno selezionare i tre tipi di punto a zig-zag illustrati.
Lunghezza pun-
to
2 mm
2 mm
3.2 mm
5 mm
Page 45

English Español
Section
3
ADJUSTING THREAD
TENSION
After you finish sewing the
above stitches, check if upper
and lower threads tension is
equal and strong enough to
lock both thread in centre as
in figure a .
If upper tension is too tight
(loose), upper (lower) thread
lies straight along upper (lower) surface of fabric b ( c ).
Correct by turning tension dial
in the direction of arrow.
* Always check the balance of
upper and lower tensions by
test sewing using fabric,
needle, thread and stitch
pattern you plan to use.
(Correct combinations are
described on page 35.)
AJUSTE DE LA TENSIÓN
DEL HILO
a Para la costura correcta,
la tensión de ambos hilos
es igual y tendrá que juntar ambos hilos en el centro.
b Si la tensión del hilo supe-
rior está muy ajustada, el
hilo superior quedará recto a lo largo de la superficie superior de la tela.
c Si la tensión del hilo supe-
rior está muy suelta, el
hilo inferior quedará recto
a lo largo de la superficie
inferior de la tela.
* Es recomendable ensayar
antes en un pedazo de la
tela; el molde de la costura,
la tensión de los hilos (superior ó inferior), la aguja, y el
hilo. (Consultar la Table de
Telas, Hilos y Agujas en la
página 36.)
5
4
6
a
4
3
5
b
6
5
7
c
45
Page 46

Francais Deutsch Dutch Italiano
REGLAGE DE LA TENSION
DES FILS
Avant de passer à la couture
définitive, faites un essai sur
une chute de la même étoffe.
Si la tension est correcte, la
tension des fils inférieur et
supérieur doit être égale et
assez forte pour que les deux
fils s’entrecroisent au centre
de l’ouvrage a .
Si la tension du fil supérieur
est trop forte (faible), le fil
supérieur (inférieur) se trouve
à plat sur (sous) le tissu b
c .
Pour obtenir la tension correcte, tournez le bouton
régulateur de tension.
Ceci est la couture du point
zig-zag.
* Vérifiez toujours l’équilibre
entre la tension supérieure
et la tension inférieure en
cousant un échantillon avec
le tissu, l’aiguille, le fil et le
point que vous souhaitez
utiliser. (Les combinaisons
correctes sont indiquées à
la page 37).
REGULIERUNG DER
OBERFADENSPANNUNG
Testen Sie die Stichqualität
an einem Stückchen des
Stoffes, den Sie vernähen
möchten. Bei richtiger
Fadenspannung a ist das
Stichbild des Ober- wie des
Unterfadens gleich.
Ist die Oberfadenspannung
zu stark (zu lose), so liegt der
Ober (Unter)-faden ganz fest
an der oberen (unteren) Seite
des Stoffes an b , c . Regulieren Sie dies durch Drehen
des Rades.
Es empfiehlt sich, die richtige
Fadenspannung für den
gewünschten Stoff, Nadel,
Faden und den betreffenden
Stich vorher auszuprobieren
(siehe hierzu die Stoff-,
Nadel- und Garntabelle auf
Seite 38).
REGELEN VAN DE
DRAADSPANNING
Voor u begint te naaien, moet
u een proef uitvoeren op een
lapje van dezelfde stof. Indien de spanning goed is a ,
is de spannning van de spoeldraad en de bovendraad
gelijk en strek genoeg om de
twee draden in het midden in
elkaar te doen grijpen. Indien
de spannning van de bovendraad te sterk (zwak) is, ligt
de bovendraad (spoeldraad),
bovenop (onder) de stof b ,
c .
Om de correcte spannning te
krijgen, de spannningsregelknop verdraaien.
* Controleer altijd eerst de
verhouding tussen de
boven- en onderspanning
door vooraf een proeflapje
te maken met de stof, naald
en steek die u wilt gaan
gebruiken. (de juiste combi-
naties staan vermeld op
pag. 39).
REGOLAZIONE DELLA
TENSIONE DEI FILI
Prima di passare alla cucitura
definitifva , fate una prova su
uno scarto della stessa stoffa.
Se la tensione è corretta, la
tensione dei fili inferiore e
superiore deve essere uguale
ed abbastanza forte per far si
che i due fili si incrocino al
centro del lavoro a .
Se la tensione del filo superiore è troppo forte (insufficiente) il filo superiore (inferiore) si trova appiattito sopra
(sotto) il tessuto b , c .
Per ottenere la tensione corretta, ruotate la manopola di
tensione.
* Verificate sempre l’esatto
equilibrio tra tensione superiore e inferiore cucendo un
campione con la stessa stoffa, ago, filo e punto della
cucitura definitiva (le combinazioni corrette sono indicate a pagina 40).
46
Page 47

English
Español
Section
4
4. STARTING TO SEW
BOBBIN WINDING
Set the needle in the highest
position by turning the handwheel towards you.
Open shuttle cover.
4. COMENZAR A
COSER
BOBINADO
Colocar la aguja en su posición más alta g i r a n d o e l
volante hacia Ud.
Abrir la cubierta del lansadera.
Open latch of bobbin c a s e
and pull it out.
Abrir el seguro de la bobina y
sacarla.
Cl o s e latch of bo b b in case
and bobbin comes out easily.
Soltar el seguro de la bobina
y el carrete saldrá fácilmente.
47
Page 48

Francais Deutsch Dutch Italiano
4. COMMENCER A
COUDRE
BOBINAGE DE LA CANETTE
Tournez le volant vers vous
pour amener la barre-aiguille
à sa position la plus haute.
Ouvrez le couvercle de la
navette.
4. VORBEREITUNG
DES UNTERFADENS
SPULEN
Nadel in die höchste Position
bringen, indem Sie das Handrad wie bereits beschrieben
drehen.
Öffnen Sie die Freiarmklappe.
4. U BEGINT OP UW
MACHINE
OPWINDEN VAN DE SPOEL
Het handwiel naar u toe
draaien om de naald in de
hoogste stand te plaatsen.
Het klepje openmaken.
4. RIEMPIMENTO
DELLA SPOLINA
Fate ruotare il volantino verso
di voi per portare la barra ago
nel punto piu alto.
Aprite il coperchio della capsula.
Ouvrez le loquet de la navette
contenant la canette et
retirez-la.
Öffnen Sie die Klappe der
Spulenkapsel und nehmen
Sie sie heraus.
Het klepje van de spoelhouder openmaken en deze uitnemen.
Aprite la levetta di chiusura
della capsula che contiene la
spolina ed estraetela.
Refermez le loquet de la
navette pour détacher ensuite
la canette.
Lassen Sie nun die Klappe
wieder los und die Spule gleitet leicht heraus.
Het klepje van de spoelhouder weer sluiten en de spoel
uitnemen.
Richiudete la levetta e quindi
staccate la spolina.
48
Page 49

English Español
Section
4
Pull out and stand spool pin. Levantar el porta carretel
hacía arriba.
1
2
Put a spool on spool pin.
Draw thread from spool pin
through thread guide and pretension device; following
numbers
1 and 2 .
Colocar un hilo en el porta
carretel.
Pasar el hilo del porta carretel
como se muestra en el dibujo.
(pasos 1 y 2 )
Wind thread clockwise around
bobbin several times.
Push bobbin on to spindle.
Move the declutch knob in the
handwheel into the ( ) direction.
Note: Never touch declutch
knob while sewing or it
may cause trouble.
Enredar el hilo varias veces
alrededor del carrete en dirección a las manecillas del reloj.
Colocar el carrete sobre el eje.
Mover el botón que se encuentra en el volante hacia el dibujo
( ). (indicando el carrete).
Nota: Nunca toca el botón de
desembrague
automático al coser.
¡Puede ser peligroso!
49
Page 50

Francais Deutsch Dutch Italiano
Tirer uerticalement le porte
bobine.
Zum Aufspulen Tragegriff
umlegen und Garnrollenstift
ganz herausziehen,umdrehen
und hineinstecken.
De klospen uittrekken en
recht op zetten.
Tirare alla uertieale il perno
portaroochetto.
Mettez une bobine sur le
porte-bobine.
Tirez le fil de la bobine en le
passant par le guide fil et la
poulie de pré-tension, en
suivant les numéros
1 et 2 .
Setzen Sie die Garnrolle auf
den Garnrollenstift und ziehen
Sie den Faden von der Spule
durch die Vorspannung Abb.
1 und 2 .
Steek een klop op de
klospen. De draad van de
klos door de draadgeleider en
het voorspanschijfje trekken,
volgens de nummers 1 en 2 .
Inserire una spoletta sul perno portarocchetto
Estrarre il filo dalla spoletta,
farlo correre attraverso la guida ed il pretensionatore,
eseguir lóperazione seguendo ì numeri di riferimento
1 e
2 .
Enroulez le fil dans le sens des
aiguilles d’une montre plusieurs
fois autour de la canette.
Placez la canette sur l’axe.
Poussez le bouton de
débrayage - qui se trouve dans
le volant - dans la direction ( ).
* Ne jamais toucher le bouton
de bobinage automatique
pendant que la machine coud:
cela peut être très dangereux.
Wickeln Sie den Faden einige
Male im Uhrzeigersinn um die
Spule. Stecken Sie die Spule
auf die Achse.
Verschieben Sie den
Umschalt-Knopf am Handrad
in die ( ) Position.
Betätigen Sie niemals den
Umschalt-Knopf während die
Maschine in Betrieb ist.
De draad enkele malen rechtsom op de spoel winden. De
spoel op de as drukken.
Zet de ontkoppelingsknop in
het handwiel in de ( ) stand.
* Raak nooit aan de ontkop-
pelingsknop tijdens het
naaien, dit zou problemem
kunnen geven.
Avvolgete il filo a mano per
alcuni giri intorno alla spolina
in senso orario.
Posizionate la spolina sull’asse del filarello.
Spingete il tasto di disinnesto
che si trova sul volantino nella
direzione ( ).
* Onde evitare inconvenienti
non toccare mai il pomell di
sgancio della frizione mentre si sta cucendo.
50
Page 51

English Español
Section
4
b
a
c
Push bobbin in the direction of
arrow a .
Press down foot controller for
bobbin winding. When the
bobbin is wound as shown b ,
stop the machine and push
the bobbin to left as shown c
for disengaging from wheel.
Mover el carrete se indica en
la flecha a .
Presionar el pedal para devanar. Cuando el carrete está
como se indica en la figura
b , pare la máquina y mueva el carrete hacia la izquierda como se indica en la figura
c para desprenderlo.
Note: Watch the bobbin care-
fully to wind the correct
volume of thread.
Take bobbin off the spindle
and cut the thread.
Move the declutch knob in the
handwheel into the ( ) direction.
Nota: Al devanar cuide que el
volumen del hilo no
exceda la capacidad
del carrete.
Quitar el carrete del eje y cortar el hilo.
Mover el botón del volante en
dirección a la aguja. ( )
INSERTING BOBBIN
Place the bobbin in its case
with the thread running in
direction of arrow (clockwise).
COLOCACIÓN DEL CARRETE EN LA BOBINA
Colocar el carrete dentro de
al bobina con el hilo en dirección a la flecha.
51
Page 52

Francais Deutsch Dutch Italiano
Poussez la bobine dans la
direction de la flèche a et
appuyez sur la pédale pour
bobiner.
Quand le bobinage est terminé (voir b ), poussez la
bobine vers la gauche (voir
c ) pour la déconnecter du
volant.
SPULEN
Spule nach rechts bis zum
Anschlag drücken und
Fußanlasser betätigen.
Es kann so lange gespult
werden, bis die Spule voll
gefüllt ist. Falls die Spule nur
zum Teil gefüllt werden soll,
kann die Spulerwelle jederzeit
von Hand abgeschaltet werden.
Duw het spoeltje in de richting
van pijl a .
Druk nu op het voetpedaal
om te gaan spoelwinden.
Wanneer het spoeltje is opgewonden zoals in afbeelding
b , stop dan met spoelen en
druk het spoeltje terug naar
links zoals in afbeelding c
om het spoelmechanisme
weer te ontkoppelen.
Premere il rocchetto nel senso indicato dalla freccia a .
Mantenere premuto il regolatore a pedale per il riavvolgimento del rocchetto.
Una volta riavvolta il rocchetto
come indicato al punto b ,
arrestare la macchina e premere il punto c per disimpegnarlo dalla relativa ruota.
Surveillez que la quantité
souhaitée de fil soit bobinée.
Retirez la canette de l’axe et
coupez le fil.
Poussez le bouton de
débrayage dans la direction
( ).
Spule herausnehmen und
Faden abschneiden.
Handrad festhalten und
Umschalt-Knopf auf Position
Nähen schalten.
LET OP: U dient er goed op te
letten dat er niet meer
dan de aangegeven
hoeveelheid garen
(zie afbeelding b )
opgespoeld wordt.
De spoel van de as nemen en
de draad doorknippen.
Zet de ontkoppelingsknop in
het handwiel in de ( )stand.
Nota: Assicurarsi di riavvol-
gere sul rocchetto solamente il corretto quanti-
tativo di filo.
Togliete la spolina dall’asse
del filarello e tagliate il filo.
Spostate il tasto di disinnesto
nella direzione ( ).
MISE EN PLACE DE LA
CANETTE
Mettez la canette dans la
navette.
Assurez-vous que le fil soit
bobiné dans le sens de la
flèche.
EINSETZEN DER SPULE
Setzen Sie die Spule in die
Spulenkapsel, so daß der
Faden in Pfeilrichtung abläuft.
INZETTEN VAN DE SPOEL
De spoel in de spoelhouder
leggen, met de draad in de
richting van het pijltje (rechtsom)
SISTEMAZIONE DELLA
SPOLINA
Inserite la spolina nella capsula. Assicuratevi che il filo
sia avvolto nella direzione
della freccia.
52
Page 53

English
Español
Section
4
a
Guide thre ad in to sl ot a of
bobbin case.
Guiar el hilo por la ranura a
de la caja porta bobina.
b
Pulling thread to left, bring it
under tension spring then to
delivery eye b .
Extraer el h i l o ha c i a la
iz quierda , conduci rlo h acia
abajo del resorte de tensión y
luego pasarlo por la ranura
b .
Raise the needle to the highest position.
Leave end of thread of about
10 cm (4") from bobbin case.
Take hold of latch and push
bobb in case into shuttl e, as
illustrated.
Re lease latch when bo bbin
case is fully inserted.
Levantar la aguja a su posición más alta.
Dejar en el extremo del hilo
unos 10 cm fuera de la bobina.
Tomar el seguro de la bobina
y empujarla hacia adentro del
cangrejo, como se indica.
Solta r el se g u r o cu a n d o l a
bobina esté completamente
adentro del cangrejo.
53
Page 54

Francais Deutsch Dutch Italiano
Faites passez le fil dans la
fente a de la navette.
Faden in den Schlitz a der
Spulenkapsel ziehen.
De draad door gleuf a in de
spoelhouder trekken.
Fate passare il filo nell’apertura a della capsula.
En tirant le fil vers la gauche,
faites-le passer sous le
ressort de tension, puis par
l’orifice b .
Faden nach links, unter die
Spannungsfeder hindurch bis
zur Öffnung ziehen b .
De draad naar links trekken
en eerst onder de spanveer
en daarna door de opening
b leiden.
Tirando il filo verso sinistra,
fatelo passare sotto la molla
di tensionamento e quindi
attraverso il foro b .
Amenez l’aiguille à sa position la plus haute.
Laissez pendre environ 10 cm
de fil de la navette. Tenez le
loquet et poussez la navette
dans la coursière. Assurezvous que la canette est bien à
sa place avant de lâcher le
loquet.
Nadel ganz nach oben bringen.
Ca. 10 cm vom Fadenende aus
der Spulenkapsel heraushängen
lassen. Halten Sie nun die Spule
an der Spulenkapselklappe und
setzen Sie sie auf den Stift.
Klappe loslassen, wenn Spulenkapsel eingesetzt ist.
Breng de naald in de hoogste
stand.
Circa 10 cm draad overlaten.
Het klepje vasthouden en de
spoelhouder in de grijper
steken. Nagaan of de spoelhouder goed op zijn plaats zit
voor u het klepje loslaat.
Portate l’ago al punto più alto.
Lasciate pendere circa 10 cm
di filo. Tenete la levetta e
spingete la capsula nel crochet. Assicuratevi che la
spolina sia bene in posizione
prima di lasciare la levetta.
54
Page 55

English Español
Section
4
1
2
CHANGING FOOT
Raise presser foot lifter
1 .
Set needle in the highest
position by turning the handwheel towards you
2 .
CAMBIO DEL PIE
PRENSATELA
Levantar el elevador del pie
prensatela.
1
Colocar la aguja en la posición más alta, girando el
volante hacia Ud.
2 .
a
a Push button of holder
towards you and foot will
come off.
a Oprimir la palanca del
soporte del pie prensatela
hacia Ud. y el pie se sor
tará.
b
b Position a new foot by
aligning holding groove of
shank with pin of foot.
Lower presser foot lifter so
that holder catches presser
foot.
b Poner un pie prensatela
con el poste justamente
debajo de la hendidura
del soporte.
Bajar el elevador del pie prensatela y el soporte detendrá
el pie inmediatament.
55
Page 56

Francais Deutsch Dutch Italiano
CHANGEMENT DU PIED DE
BICHE
Levez le levier remonteur du
pied-de-biche
1 .
Veillez à ce que la barre-aiguille soit à sa position la plus
haute en tournant le volant
vers vous
2 .
AUSWECHSELN DER
NÄHFÜSSE
Die einzelnen Zubehörfüße
werden an dem Nähfußhalter
2 befestigt. Um den Fuß
richtig einzusetzen, muß man
den Lüfterhebel
1 nach oben
stellen.
VERANDEREN VAN DE
PERSVOET
De persvoethefboom omhoog
zetten
1 .
De naald in de hoogste stand
plaatsen door het handwiel
naar u toe te draaien
2 .
SOSTITUZEIONE DEL
PIEDINO PREMISTOFFA
Sollevate la leva alza-piendino premistoffa
1 .
Portate la barra ago nella sua
posizione più alta facendo
girare il volantino verso di voi
2 .
Pour enlever le pied-de-biche:
Poussez le levier a dans la
direction de la flèche afin de
libérer le pied-de-biche.
Drücken Sie den Hebel in
Pfeilrichtung, damit sich das
Füßchen löst.
Om de naaivoet te verwisselen moet hendel a in de
richting van de pijl worden
geduwd waardoor REMOVE
de naaivoet vrij komt van de
houder.
Plaats een nieuwe naaivoet
met de stift recht onder de
inkeping van de houder.
Per togliere il piedino premistoffa:
Spingete la leva a nella
direzione della freccia per liberare il piedino.
Pour fixer le nouveau piedde-biche: Placer l’axe b du
nouveau pied-de-biche sous
la rainure.
Abaisser le levier remonteur
du pied-de-biche de telle
sorte que l’axe s’emboîte
automatiquement dans la
rainure.
Legen Sie ein neues Füßchen
unter die Aussparung des
Füßchenhalters.
Senken Sie die Stoffdrückerstange, bis der Nähfuß einrastet.
Laat de Persvoethendel
zakken waardoor de naaivoet
automatisch wordt vastgeklikt.
Per fissare il nuovo piedino
premistoffa:
Psizionate lo stelo b del nuovo piendino sotto la
scanalatura dell’attacco.
Abbassare la leva alza-piedino premistoffa in modo che il
piedino si agganci automaticamente nella scanalatura.
56
Page 57

English Español
Section
4
CHANGING NEEDLE
Set the needle in the highest
position by turning the handwheel towards you.
Loosen needle clamp screw
and take out needle.
CAMBIO DE LA AGUJA
Colocar la aguja en la posición más alta girando el
volance hacia Ud.
Aflojar el tornillo de presión
de la aguja y quitarla.
a
With the flat side away from
you, insert a new needle into
groove of needle bar.
Push needle into clamp until it
reaches stopper a and tighten needle clamp screw firmly.
Con la parte plana hacia
atrás, inserte la nueva aguja
dentro de la cavidad.
Empujar la aguja hacia arriba
hasta el tope figuro a y apriete el tornillo de presión
firmemente.
57
Page 58

Francais Deutsch Dutch Italiano
CHANGEMENT DE
L’AIGUILLE
Mettez la barre-aiguille à sa
position la plus haute en tournant le volant vers vous.
Desserrez la vis de fixation de
l’aiguille et retirez l’aiguille.
AUSWECHSELN DER
NADEL
Handrad in Ihre Richtung
drehen, bis die Nadel ganz
oben steht.
Lösen Sie die Nadelbefestigungsschraube und nehmen
Sie die Nadel heraus.
VERANDEREN VAN DE
NAALD
De naald in de hoogste stand
plaatsen door het handwiel
naar u toe te draaien.
De klemschroef van de naald
losdraaien en de naald wegnemen.
SOSTITUZIONE DELL’AGO
Portate la barra ago nella sua
posizione più alta facendo
girare il volantino verso di voi.
Allentate la vite del morsetto
dell’ago e togliete l’ago.
Placez l’aiguille avec le côté
plat vers l’arrière dans la
gorge de la barre-aiguille.
Poussez l’aiguille jusqu’à ce
qu’elle atteigne le butoir a et
resserrez la vis de fixation de
l’aiguille.
Die flache Seite des
Nadelkolbens muß nach hinten, von Ihnen weg zeigen
und so setzen Sie nun die
neue Nadel in die Nadelstange ein. Schieben Sie die
Nadel bis zum Anschlag a
nach oben, und ziehen dann
die Nadelbefestigungsschraube wieder gut an.
De nieuwe naald met de platte kant naar achteren in de
gleuf van de naaldhouder
steken.
De naald omhoog schuiven
tot ze tegen de aanslag a
komt en de klemschroef van
de naald weer aandraaien.
Posizionate l’ago nel morsetto
in modo che la superficie piatta sia rivolta verso il retro della macchina.
Spingete l’ago verso l’alto fino
a fine corsa a e serrate a
fondo la vite.
58
Page 59

English Español
Section
4
xy
Always use a straight needle
with a sharp point.
Using defective or worn needles not only causes stitch
skipping, breakage of needles
or snapping of thread; it also
can damage shuttle and needle plate.
Note: Always use needle type
15x1/705
Legend:
x Straight shaft
y Sharp point
Usar siempre agujas bien
derechas, con buena punta.
Usar agujas defectuosas o
gastadas no solaments causa
que se omitan puntadas, rotura de agujas o que se corra el
hilo; también pueden dañarse
el cangrejo y la placa de la
aguja.
Nota: Usar siempre agujas
tipo 15 x 1.
Leyenda:
x Aguja derecha
y Punta aguda
59
Page 60

Francais Deutsch Dutch Italiano
Utilisez toujours une aiguille
bien droite à la pointe effilée.
Une aiguille défectueuse ou
usée peut provoquer non
seulement des sauts dans les
points, le bris de l’aiguille ou
l’entortillement des fils ; elle
peut egalement endommager
la coursière et la plaque-aiguille.
Légende:
x Aiguille droite
y Effilée
Verwenden Sie stets gerade
Nadeln mit einer einwandfreien Spitze. Beschädigte
oder abgenutzte Nadeln
verursachen nicht nur Stichfehler, Abbrechen von Nadeln
oder Einklemmen von
Nähgarn, sondern können
auch die Stichplatte beschädigen.
Achtung:
Verwenden Sie immer nur
Nadeln der Stärke 15 x
1/705.
Legencle:
x Gerade
y Scharfe spitze
Steeds een rechte naald met
een scherpe punt gebruiken.
Een beschadigde of versleten
naald veroorzaakt niet alleen
het overslaan van steken,
naaldbreuk of draadbreuk,
maar kan ook de grijper en de
steekplaat beschadigen.
Beschrijving:
x Rechte schacht
y Scherpe punt
Utilizzate sempre un ago perfettamente diritto e con la
punta ben affilata.
L’uso di un ago difettoso o
smussato può portare non
soltanto a salti di punti, rottura
dell’ago o attorcigliamento dei
fili, ma può anche danneggiare la placca ago.
Leggenda:
x Ago diritto
y Ago affiliato
60
Page 61

English
Section
4
FABRIC, THREAD AND NEEDLE TABLE
FABRIC
EXTRA HEAVY: Upholstery,
Canvas, Awning
FAKE-FURS, VELOURS
HEAVY LEATHER
MACHINE EMBROIDERY
VERY SHEER: Lace,
Voile, Chiffon, Net
SHEER: Blouse, Crepe
Lawn, Organdy, Taffeta
LIGHT-WEIGHT: Crepe,
Wool, Brocada, Velvet
MEDIUM: Wool, Silk, Linen,
Velveteen, Cotton, Faille,
Terrycloth
HEAVY: Denim, Duck, Sailcloth
[KNITS]
LIGHT-WEIGHT: Tricot
MEDIUM-WEIGHT: Jersey,
Double knit
HEAVY-WEIGHT: Double knit
[LEATHER]
VINYLS FILMS
LIGHT-TO-MEDIUM-WEIGHT
[DECORATIVE TOUCHES]
TOP STITCHING
THREAD NEEDLE
European
Cotton
70
50-70
30
30
30
30
65-70
65-70
100
80-90
75-80
120
50-70
30
30
30
70
90-100
100-110
65-80
80-90
70-80
30
30
30
90
90-100
100-110
Silk twist
Size 50-70
Mercerized
Cotton
European
705
9
9
16
11-14
11
19
9
14-16
16-18
9-11
11-14
9-10
14
14-16
16-18
U.S. Size
15x1
Regular
Regular
Regular
Regular
Regular
Regular
Ball
Point
Ball
Point
Regular
Regular
Ball
Point
Ball
Point
Wedge
Wedge
Wedge
Point
Style
50
50
60
60
Heavy Duty
Heavy Duty
Heavy Duty
60
50
50
50
50
Heavy Duty
Cotton Covered
Polyester, Silk,
Nylon
Silk, Nylon
Silk, Nylon
Silk, Nylon
Silk, Nylon
C.C.Poly
Silk, Nylon
C.C.Poly
C.C.Poly
C.C.Poly
C.C.Poly
C.C.Poly
Silk
Silk
C.C.Poly
C.C.Poly
REMARKS
Loosen upper tension
one or two
points
61
Page 62

Español
TELAS
SUPER PESADAS: Tapiceria,
cáñamo, todos
IMITACIÓN PIEL, VELOUR
CUERO GRUESO
BORDADO Y MÁQUINA
MUY LIGERAS: Encaje,
gasa chifón, tul.
LIGERAS: Crepé, lino,
organdi, tafetán
LIVIANAS: Crepé, lana,
brocado, terciopelo
MEDIANAS: Lana, seda,
pana, lino, Faya,
tela de tolla
PESADAS: Drill, loneta, lona
[TEJIDOS]
LIVIANAS: Tricot
MEDIANAS: Jersey,
Calado doble
PESADAS: Calado doble
[CUERO]
TELAS VINÍLICAS
TELAS VINÍLICAS
LIVIANAS O MEDIANAS
[DECORADOS MATELASSE]
HILOS AGUJAS
Algodón
70
50-70
30
30
30
30
50-70
30
30
30
30
30
30
Seda retorcida
Medida 50 - 70
Algodón
mercerizad
9
9
16
11-14
11
19
9
14-16
16-18
9-11
11-14
9-10
14
14-16
16-18
Medida
americana
15x1
Normal
Normal
Normal
Normal
Normal
Normal
Red
Red
Normal
Normal
Red
Red
Cuña
Cuña
Cuña
Tipo de
Puntada
50
50
60
60
Extrafuerte
Extrafuerte
Extrafuerte
60
50
50
50
50
Extrafuerte
Algodón
Poliester
Seda, Nylon
Seda, Nylon
Seda, Nylon
Seda, Nylon
Seda, Nylon
Poliester
Seda, Nylon
Poliester
Poliester
Poliester
Poliester
Poliester
Seda
Seda
Poliester
Poliester
OBSERVA-
CIONES
Aflojar la
tensión
superior
uno o dos
puntos
TABLA DE TELAS. HILOS AGUJAS
62
Page 63

Francais
Section
4
TISSU
TRES LOURD: tissu d’ameublement, toile de tente, canevas
FOURRURES ARTIFICIELLES,
VELOURS ET FEUTRES
CUIR EPAIS
BRODERIE MACHINE
TRES DELICAT: dentelle,
voile, filet
DELICAT: crêpe, batiste,
organdi, taffetas
LEGER: crêpe, laine,
brocard, velours
MOYEN: laine, soie, lin,
velours, piqué, faille,
velours bouclé
LOURD: coton croisé, coutil, toile
TRICOTS
LEGER: tricots
MOYEN: jersey, double-face
LOURD: double-face
CUIR
FILMS VINYLIQUES
LEGER OU MOYEN
DECORATION
PIQURE DE TETE
(x) Q.I. Qualité Industrielle
FIL AIGUILLE
Coton
Eur
70
50-70
30
30
30
30
65-70
65-70
100
80-90
75-80
120
50-70
30
30
30
70
90-100
100-110
65-80
80-90
70-80
30
30
30
90
90-100
100-110
sorie retorse
50-70
Coton
Mercerisé
Eur.
705
9
9
16
11-14
11
19
9
14-16
16-18
9-11
11-14
9-10
14
14-16
16-18
Amer.
15x1
normale
normale
normale
normale
normale
normale
légèrement
arrondie
arrondie ou
effilée
normale
normale
moyennement
oufortement
arrondie
légèrement ou
moyennement
arrondie
triangulaire
triangulaire
triangulaire
Forme de
la pointe
50
50
60
60
Q.I.
Q.I. (x)
Q.I.
60
50
50
50
50
Q.I.
Polyester/
Coton;
soie; nylon
soie, nylon
soie, nylon
soie
soie, nylon,
poly/coton
soie, nylon,
poly/coton
poly/coton
poly/coton
poly/coton
poly/coton
soie
soie
poly/coton
poly/coton
REMARQUES
Relâchez la
tension
supérieure
d’un ou deux
points
TABLE DES TISSUS, FILS ET AIGUILLES
63
Page 64

Deutsch
STOFF, FADEN, NADELTABELLE
STOFF
EXTRASCHWER: Bezugsstoff,
Baumwollestramin, Markise
TAUSCHPELZ, VELOURS
SCHWERES LEDER
STICKEN MIT DER MASCHINE
SEHR DÜNN: klöppelspitze,Voil,
Chiffon, Netzartiges Gewebe
DÜNN: Bluse aus krepp, Leinen,
Organdie, Taft
LEICHT: Krepp, Wolle,
Nadelstuhigewebe, velvet
MITTELMÄBIG: Wolle, Seide,
Leinen, Samt, Baumwolle,
Faille, Terrygewebe
SCHWER: Denim, Segeltuch
STRCKWAREN
LEICHT: Trikot Stretchstoffe
MITTELMÄBIG:
jersey, Doppelstrickware,
Stretchstoffe
SCHWER: Doppelstrickware,
stretchstoffe
LEDER
KUNSTSTOFF-FOLIE
LEICHT BIS
MITTELMÄBIG
DEKORATIVES GEFUHL
SPITZENSTICH
FADEN NADEL
Europäische
Baumwolle
70
50-70
30
30
30
30
65-70
65-70
100
80-90
75-80
120
50-70
30
30
30
70
90-100
100-110
65-80
80-90
70-80
30
30
30
90
90-100
100-110
Seide geflochten
Größe 50-70
Merzerierte
Baumwolle
Europäische
705
9
9
16
11-14
11
19
9
14-16
16-18
9-11
11-14
9-10
14
14-16
16-18
U. S. A.
Größe
Regulär
Regulär
Regulär
Regulär
Regulär
Regulär
Leichter
Ball
Ball oder Schart
Regulär
Regulär
Mittelmäßiger
bis schwerer
Ball
Leichter bis
Mittelmäßiger
Ball
Keil
Keil
Keil
Punkt,
Art
50
50
60
60
Schwer
Schwer
Schwer
60
50
50
50
50
Schwer
Baumwolle
abgedeckt mit
Polyester,
Seide, Nylon
Seide, Nylon
Seide, Nylon
Seide, Nylon
Seide, Nylon
C. C. Poly.
Seide, Nylon
C. C. Poly.
C. C. Poly.
C. C. Poly.
C. C. Poly.
C. C. Poly.
Seide
Seide
C. C. Poly.
C. C. Poly.
REMARK-
UNGEN
Lockern Sie
die Oberfadenspannung bei
einem oder 2
Stellen auf.
64
Page 65

Dutch
Section
4
STOF, GAREN-EN NAALDTABLE
STOF
EXTRA ZWAAR:
Bekledingsstoffen,
canvas, Zwaar Zeildoek
KUNSTBONT, FLUWEEL EN VILT
ZWAAR
MACHINEBORDUURWERK
ZEER FIJN: Kant, Voile,
Gaas, Tule
FIJN: Crépe, Batist, Organdie,
Taf
LICHT: Crépe, Wol, Brokaat,
Fluweel
MIDDELZWAAR: Wol, Zijde,
Linnen, Fluweel, Pique, Faille,
Badstof
ZWAAR: Denim, Linnen, Zeildoek
GEBREIDE STOFFEN LICHT: Tricot
MIDDELZWAAR: Jersey,
Dubbeigebreide Stof
ZWAAR: Dubbel Gebreide stof
LEDER VINYLFILM
LICHT TOT MIDDEL ZWAAR
SIERSTIKSELS
OPLIGGENDE STIKSELS
GAREN NAALD
Europees
katoen
70
50-70
30
30
30
30
65-70
65-70
100
80-90
75-80
120
50-70
30
30
30
70
90-100
100-110
65-80
80-90
70-80
30
30
30
90
90-100
100-110
Zijde twijndraad
Maat 50-70
Gemerceriseerd
katoen
Europese maat
705
9
9
16
11-14
11
19
9
14-16
16-18
9-11
11-14
9-10
14
14-16
16-18
Amerikaanse
maat 15x1
Normaal
Normaal
Normaal
Normaal
Normaal
Normaal
Lichte bal
Bal of scherp
Normaal
Normaal
Middelzwaar
tot zware bal
Lichte tot
middelzwaar bal
Wig
Wig
Wig
Punttype
50
50
60
60
Zwaar werk (*)
Zwaar werk (*)
60
50
50
50
50
Zwaar werk (*)
Met katoen
overtrokken
polyester,
zijde, nylon
Zijde Nylon
Zijde Nylon
Zijde Nylon
Zijde Nylon
Poly/katoen
Zijde Nylon
Poly/katoen
Poly/katoen
Poly/katoen
Poly/katoen
Poly/katoen
Zijde
Zijde
Poly/katoen
Poly/katoen
OPMERKINGEN
Bovendraadspanning één
of twee punten
verlagen
65
Page 66

Italiano
PRIMA DI SELEZIONARE IL PUNTO, TABELLA TESSUTI, FILI ED AGHI
TESSUTO
MOLTO PESANTE: tessuto da arredamento, tende da sole, tela grossa
PELLICCE ARTIFICIALI,
VELLUTI E PANNI
LEGGERO O MEDIO PELLAME
GROSSO
RICAMI A MACCHINA
(x) Q. I. Qualità industriale
MOLTO DELICATO: merletto,
voile, rete
DELICATO; crêpe, batista,
organza, taffettâ
LEGGERO: crêpe, lana,
broccato, velluto
MEDIO: lana, seta, lino velluto,
piqué, faille, bouclé
PESANTE: cotone batavia,
tessuti a trama fitta, tela
MANGLIERIA
LEGGERA: maglie in lana
MEDIA: jersey, double face
PESANTE: duble face
PELLAME MATERIALI VINILICT
LICHT TOT MIDDEL ZWAAR
DECORAZIONI
IMPUNTITURA DI TESTA
FILO AGO
Cotone Eur
70
50-70
30
30
30
30
65-70
65-70
100
80-90
75-80
120
50-70
30
30
30
70
90-100
100-110
65-80
80-90
70-80
30
30
30
90
90-100
100-110
seta ritorta
50-70
Cotone
mercerizzato
Eur. 705
9
9
16
11-14
11
19
9
14-16
16-18
9-11
11-14
9-10
14
14-16
16-18
Ame. 15 x 1
normale
normale
normale
normale
normale
normale
leggermente
arrotondata
arrotondata o
affusolata
normale
normale
mediamente o
molto arrotondata
legermente o
mediamente
arrotondata
triangolare
triangolare
triangolare
Forma della
punta
50
50
60
60
Q. I.
Q. I. (x)
Q. I.
60
50
50
50
50
Q. I.
Poliestere/
Cotone; seta;
nylon seta, nylon
seta, nylon
seta, nylon
seta
seta, nylon,
poli/cotone
seta, nylon,
poli/cotone
poli/cotone
poli/cotone
poli/cotone
poli/cotone
seta
seta
Poli/cotone
Poli/cotone
NOTE
Diminuire la
tensione
superiore di
uno o due
punti
66
Page 67

English Español
PATTERN SELECTION
DIAL
The desired stitch will be
obtained by turning the stitch
selector, it can be turned
either to the right or to the left.
Note: When operating selec-
tor, make sure the needle is in the highest
position.
Section
JSA18
JSB21
CONTROL PARA
SELECCIONAR LA
PUNTADA
Girar el control de izquierda a
derecha para seleccionar la
puntada que Ud. desee.
Nota: Siempre asegúrese de
que la aguja se encuentre en su posición más
ata cuando se maniobre este control.
Francais Deutsch Dutch Italiano
SÉLECTION DES
PROGRAMMES DE POINTS
POSSIBLES
Pour obtenir le point désiré,
tournez le sélecteur de point
soit vers la gauche, soit vers
la droite.
Attention: Avant d’actionner le
sélecteur, assurez-vous que
l’aiguille est en position haute.
Musterwählknopf
(Programm-Selector)
Dieser Knopf wird entsprechend dem gewünschten
Muster gedreht, entweder nach
links oder nach rechts.
* Bitte beachten Sie, daß
beim Drehen des Musterknopfes die Nadel immer in
höchster Position steht.
STEEKKEUZEKNOP
De steek kiezen door de
keuzeknop te verdraaien.
De knop zal zowel rechtsom
als linksom worden gedraaid.
N.B.: Bij het instellen van de
keuzeknop, steeds nagaan of
de naald in de hoogste stand
staat.
PER INIZIARE A CUCIRE
SELEZIONE DEI PUNTI
Ruotate la manopola di
selezione dei punti sul punto
desiderato. La manopola può
girare verso destra o verso
sinistra.
Attenzione: assicuratevi che
l’ago sia in alto prima di
scegliere i punti.
67
Page 68

Francais Deutsch Dutch Italiano
SÉLECTION DES
PROGRAMMES DE POINTS
POSSIBLES
Pour obtenir le point désiré,
tournez le sélecteur de point
soit vers la gauche, soit vers
la droite.
Attention: Avant d’actionner le
sélecteur, assurez-vous que
l’aiguille est en position haute.
Musterwählknopf
(Programm-Selector)
Dieser Knopf wird entsprechend dem gewünschten
Muster gedreht, entweder nach
links oder nach rechts.
* Bitte beachten Sie, daß
beim Drehen des Musterknopfes die Nadel immer in
höchster Position steht.
STEEKKEUZEKNOP
De steek kiezen door de
keuzeknop te verdraaien.
De knop zal zowel rechtsom
als linksom worden gedraaid.
N.B.: Bij het instellen van de
keuzeknop, steeds nagaan of
de naald in de hoogste stand
staat.
PER INIZIARE A CUCIRE
SELEZIONE DEI PUNTI
Ruotate la manopola di
selezione dei punti sul punto
desiderato. La manopola può
girare verso destra o verso
sinistra.
Attenzione: assicuratevi che
l’ago sia in alto prima di
scegliere i punti.
Point boutonnière
Couture en point droit
droit
Point droit et zigzag
Couture invisible
Zigzag piqué
Point double
Couture invisible
élastique
Couture invisible
Point droit triple
extensible
Point tricot double
Point bordeur
Point tricot double
Point surjet
Point droit et zigzag
1
2
3
4
5
Alle Stiche sind mit der
entsprechenden Nummer des
Programm-Selektors hier
nochmals einzeln abgebildet.
Knopfloch
Geradstiche in drei ver-
schiedenen Stichlängen
Zickzack-Stiche in
drei verschiedenen
Stichbreiten
Blindstich
Elasticstich
Schrittstich
Elastic-Blindstich
Dessousstich
Dreifach-Stretch-Gerad-Stich
Overlockstich
Federstich
Rauten-Stich
Übernendlingstich
Stretch-Zickzackstich
1
2
3
4
5
De steken zijn aangegeven
alsvolgt:
Knoopsgatsteek
Rechte steek
(4 steeklengtes)
Zigzag-steek
(3 zigzag-breedtes)
Blindzomen
Meervoudige zigzag
Laddersteek
Elastische blindsteek
Schelpsteek
Elastisch rechte steek
Overlocksteek
Vedersteek
Ruitsteek
Overlocken
Elastic zigzag-steek
1
2
3
4
5
Vengono qui oltre mostrati i
punti eseguibili
Punto per asole
Punto dritto (4 selezioni
di lunghezza punto)
Punto a zig-zag (3
selezioni di larghezza
punto a zig-zag
Punto invisibile
Punto da rammendo
Punto ribattuto
Punto imboccolato a
conchiglia
Punto diritto elastico
triplo
Punto elastico in
sopraggitto
Punto chiuso
Punto a nido d’ape
Punto sopraggitto
Punto elastica zigzag
Punto elestico dritto
1
2
3
4
5
68
Page 69

1cm
English Español
Section
4
TURNING A SQUARE
CORNER
To turn a square corner 5/8”
from the fabric edge, stop
stitching with the needle tip
piercing the fabric, when
reaching the cornering guide
as shown. Raise the presser
foot, turn fabric. New stitching
line will align with 5/8” seam
guide on side of needle plate.
Lower the presser foot and
begin stitching in new direction.
CAMBIO DE DIRECCIÓN DE
PESTUNTE
Parar la máquina en el punto
de rotación con la aguja en el
tejido. Subir la palanca del
pie prensatelas y girar el tejido en el sentido deseado.
Bajar la palanca del pie prensatelas y volver a coser en la
nueva dirección.
REVERSE SEWING
(Starting to sew)
Place fabric under foot about
1 cm (0.4”) inside the edge.
Lower presser foot lifter.
(Reverse sewing)
To reinforce seam, sew backwards to the edge of fabric by
pushing reverse sewing button.
COSTURA EN REVERSA
(Empezar a coser)
Colocar la tela debajo del pie
prensatela aproximadamente
a 1 cm de la orilla.
Bajar el elevador del pie prensatela.
(Costura en reversa)
Para reforzar la costura coser
en sentido contrario de la orilla
de la tela accionando la palanca para coser en reversa.
69
Page 70

Francais Deutsch Dutch Italiano
CHANGEMENT DE
DIRECTION DE PIQURE
Arréter la machine au point
de rotation. L’aiguille étant
piquée dans le tissu. Remonter le pied de biche et tourner
le tissu dans le sens voulu.
Redescendre le pied de biche
et continuer de coudre dans
la nouvelle direction.
ÄNDERUNG DER
NÄHRICHTUNG
Die Maschine im Drehpunkt
anhalten, während die Nadel
im Stoff steckt. Den Nähfuß
hochstellen und den Stoff in
die gewünschte Richtung
drehen. Den Nähfuß senken
und in der neuen Richtung
weiternähen.
EEN RECHTE HOEK
MAKEN
OM een rechte hoek te maken op 1.5 cm van de rand van
de stof, stopt u met naaien
met de naaldpunt door de stof
wanneer de geleider is bereikt
zoals op de tekening.
Breng de persvoet omhoog
en draai de stof. De volgende
naad zal zich opnieuw op 1.5
cm van de stofgeleider bevinden. Breng de persvoet
omhoog en begin opnieuw te
naaien.
CAMBIO DI DIREZIONE DI
CUTITURA
Fermale la macchina nel punto in cui è necessario cambiare direzione con l’ago infilato nel tessuto. Alzate quindi
il piedino premistoffa e girate
il tessuto nella direzione
desiderata. Riabbassate il
premistoffa e continuate a
cucire nella nuova direzione.
COUTURE EN MARCHE
ARRIERE
Placez le tissu sous le pied à
environ 1 cm du bord.
Pour renforcer la couture,
recoudre en marche arrière
au bord du tissu.
Pour ce faire, poussez sur le
bouton de marche arrière.
RÜCKWÄRTSNÄHEN
Legen Sie das Nähgut so unter
den Nähfuß, daß sich dieser ca.
1 cm innerhalb des Stoffes
befindet (siehe Abbildung).
Um die Naht zu verstärken,
nähen Sie bis zur Stoffkante
im Rückwärtsstich. Hierzu
drücken Sie lediglich die
entsprechende Taste.
ACHTERUITNAAIEN
Tijdens het naaien
De stof onder de persvoet
schuiven op circa 1 cm van de
rand. De persvoet laten zakken.
Achteruitnaaien
Om het naaiwerk bij het begin
te versterken, werkt u achteruit
tot de rand van de stof. Hiervoor duwt u de achteruitnaaihendel naar beneden.
CUCITURA IN MARCIA
INDIETRO
Posizionate il tessuto sotto il
piedino a circa 1 cm dal bordo.
Per rinforzare la cucitura,
passate in marcia indietro sul
bordo del tessuto. A tal
scopo, abbassate la leva di
marcia indietro.
70
Page 71

English Español
Section
4
Release button and commence forward sewing guiding fabric by hand as it is fed.
Never pull material.
Soltar la palanca e inicial la
costura hacia adelante girando la tela con la mano según
se vaya avanzando. Nunca
se debe tironear la tela.
Sew reverse stitches for reinforcement at end of seam.
Coser con puntadas en reversa para reforzar el final de
una costura.
Draw fabric to left when
sewing is finished.
Jalar la tela hacia el lado
izquierdo cuando se haya
teminado de coser.
71
Page 72

Francais Deutsch Dutch Italiano
Relâchez le bouton de
marche arrière et commencez
à coudre en guidant le tissu à
la main.
Ne tirez jamais trop fort votre
tissu.
Solange Sie diese gedrückt
halten, näht die Maschine
rückwärts. Wenn Sie den
Nähvorgang beenden wollen,
lassen Sie die Taste einfach
wieder los.
Taste für Rückwärtsnähen
loslassen und weiternähen,
indem Sie den Stoff leicht mit
der Hand führen.
Niemals den Stoff ziehen
oder zerren!
De achteruitnaaihendel loslaten en U begint te naaien terwijl u de stof met de hand
geleidt.
Nooit aan de stof trekken.
Rilasciate la leva di marcia
indietro e cominciate a cucire
guidando il tessuto con la
mano. Non tirate mai il tessuto.
Pour renforcer la fin de la
couture, piquez quelques
points en marche arrière.
Einige Stiche Rückwärtsnähen
am Ende des Saumes zur
Nahtverstärkung.
Naai enkele steken achteruit
voor extra versteviging aan
het einde van een naad.
Per rinforzare anche la fine
della cucitura, eseguite alcuni
punti in marcia indietro.
Tirez le tissu vers la gauche
lorsque vous avez terminé.
Stoff nach Beendigung des
Nähens nach links aus der
Maschine nehmen.
Haal het naaiwerk naar de
linkerkant weg als dit gereed
is.
Tirate il tessuto verso sinistra
una volta ultimato il lavoro.
72
Page 73

English Español
Section
4
1
x
y
THICK FABRIC SEWING
(Particularly denim)
For thick fabric sewing, it is
important to follow the instructions carefully.
Make sure that the sewing is
set flat. Needle must be perpendicular to the seam so
that it penetrates the cloth
properly.
Legend:
x Direction of needle
y Direction of cloth
COSTURA EN TELAS
GRUESAS
(Dril de algodón en particular)
Para coser las telas gruesas,
lo que importa es que se siga
las instrucciones cuidadosamente.
Asegurarse de colocar la tela
verticalment. La aguja debe
estar perpendicular a la costura para que la aguja penetre la tela apropiadamente.
(ver figura No.
1 )
Leyenda:
x Dirección aguja
y Dirección tela
2
x
y
Improper setting causes
deflection and possible breaking of the needle.
For sewing of very thick cloth,
sew gently, maintaining the
cloth perfectly by hand.
Breaking a needle is not a
mechanical problem, but simply misuse.
Legend:
x Direction of needle
y Direction of cloth
La mala colocación causará
que se doble y posiblemente
se rompa la aguja. Para
coser las telas muy gruesas,
coser suavemente manteniendo la tela en la mano.
La rotura de la aguja no es
problema mecanico, sino mal
uso.
Leyenda:
x Dirección aguja
y Dirección tela
73
Page 74

Francais Deutsch Dutch Italiano
COUTURE DES TISSUS
EPAIS
(en particulier le JEAN)
Pour passer la couture d’un
jean, il est important de
respecter le schéma ci-contre
1 .
Vous remarquerez que la
couture est posée bien à plat.
L’aiguille étant bien perpendiculaire à la couture, elle
pénètrera correctement dans
le tissu.
Légende:
x Direction de l’aiguille
y Direction du tissu
Vernähen von dicken
Stoffen (speziell Denim)
Beim Vernähen von dicken
Stoffen, ist es wichtig, diese
Hinweise zu beachten.
Das Nähgut muß unbedingt
flach auf der Maschine, bzw.
der Stichplatte aufliegen. Die
Nadel muß senkrecht über
der Naht stehen und den Stoff
sauber durchstechen.
Legencle:
x Richtung der Nadel
y Richtung des Stoffes
HET NAAIEN VAN
STOFFEN VAN
VERSCHILLENDE DIKTE
(in het bijzonder JEANS-stof)
Om jeansstof te kunnen
naaien is het belangrijk het
onderstaande schema
1 aan
te houden.
U ziet dat de stof goed platgelegd is. Als de naald precies loodrecht op de stof staat
dan kunt U beginnen met
naaien.
Beschrijving:
x Stand van de naald
y Richting van de stof
CUCITURA DI TESSUTI DI
GROSSO SPESSORE
(ad esempio is Jeans)
Per ripassare la cucitura di un
jeans, è importante rispettare
lo schema riportato qui a fianco
1 .
Noterete che la cucitura deve
essere perfettamente piatta.
In questo modo, l’ago che è
perpendicolare alla cucitura
potrà penetrare correttamente
nel tessuto.
Leggenda:
x Direzione dell'ago
y Direzione del tessuto
2 Le schéma 2 montre que
si la couture n’est pas posée
correctement, l’aiguille glisse
et risque de se casser.
Pour coudre une épaisseur de
tissu importante, le passage
sous l’aiguille doit se faire
doucement en maintenant parfaitement le tissu.
Dans le cas ou l’aiguille casse,
ce n’est pas un problème
mécanique, mais tout simplement une mauvaise utilisation.
Légende:
x Direction de l’aiguille
y Direction du tissu
Andernfalls kann die Nadel
abgleiten, sich verbiegen oder
auch brechen. Beim Nähen
von dicken Stoffen, achten
Sie darauf, daß Sie unbedingt
vorsichtig nähen, dann erhalten Sie auch eine einwandfreie Naht.
Nadelbruch ist kein technischer Defekt, sondern eindeutig
ein Bedienungsfehler.
Legencle:
x Richtung der Nadel
y Richtung des Stoffes
Het schema 2 laat zien dat
als de stof niet goed ligt, de
naald kan gaan glijden en
misschien zelfs breken.
Om zeer dikke stoffen te
naaien, moet u de stof heel
goed vasthouden en langzaam onder de naald door laten
glijden.
Wanneer de naald breekt, is
dat geen constructiefout,
maar komt dat door verkeerd
gebruik.
Beschrijving:
x Stand van de naald
y Richting van de stof
Come si vede nello shcema 2,
se la cucitura non è posizionata correttamente l’ago scivola
e rischia di rompersi.
Per cucire un grosso spessore di tessuto, il passaggio
sotto l’ago deve avvenire
lentamente ed il tessuto deve
essere tenuto perfettamente
in posizione.
Nel caso in cui l’ago si rompa,
non si tratta di un problema
meccanico ma semplicemente di un utilizzo errato.
Leggenda:
x Direzione dell'ago
y Direzione del tessuto
74
Page 75

English Español
Section
4
DOUBLE PRESSER FOOT
LIFTER
In order to obtain a larger
opening when using very
thick materials, firmly push
presser lifter up as far as it
will go.
DOBLE ACCIÓN DEL
ELEVADOR DEL PIE
PRENSATELA
Para tener mayor espacio
entre el pie y la tela, cuando
se usan materiales muy gruesos llevar hacia arriba el elevador del pie tanto como se
pueda.
75
Page 76

Francais Deutsch Dutch Italiano
DOUBLE LEVIER DE PIED
DE BICHE
Pour obtenir un relèvement
plus important du pied-debiche lorsque vous piquez
des matières épaisses,
relevez fortement le levier du
pied-de-biche aussi loin qu’il
peut aller.
Dicke Stoffe
Um bei dicken Stoffen mehr
Raum zwischen Drückerfuß
und Stichplatte zu erhalten,
drücken Sie den Lüfterhebel
so weit wie möglich nach
oben.
Legen Sie den Stoff unter das
Füßchen und senken Sie den
Lüfterhebel wieder.
DUBBELE FUNCTIE
PERSVOETHEFBOOM
Om de persvoet hoger te
zetten wanneer dikke stoffen
genaaid moeten worden, trekt
u de persvoethefboom zo ver
mogelijk omhoog.
LEVA PER DOPPIO
SOLLEVAMENTO DEL
PIEDINO PREMISTOFFA
Per ottenere il sollevamento
massimo del piedino quando
cucite tessuti grossi, spingete
verso l’alto la leve del piedino
premistoffa fino a fine corsa.
76
Page 77

COSTURA EN ZIG-ZAG
Preparar la máquina como se
indica.
Para evitar que en la terminación de la costura se
deshile, preparar la máquina
para la puntada recta y coser
en reversa al principio y al
final de la costura.
3 diferentes modelos de la
costura en zig-zag se pueden
escoger como se indica.
English Español
Section
5
5. SELECTING THE
STITCH
The desired stitch will be
obtained by turning the Pattern Selection Dial.
* When operating the selec-
tor, make sure the needle is
in the highest position.
5. ESCOGER LA
PUNTADA
Girar el selector para escoger
la puntada que se requiere.
* Asegurarse que la aguja
esté siempre en su posición
más alta al operar el selector.
6578
STRAIGHT SEWING
Set machine as shown, 4
kinds of straight stitch lengths
can be selected as shown
below.
COSTURA RECTA
Preparar la máquina como se
indica. 3 diferentes longitudes
en la costura recta y se pueden
escoger come se indica.
Stitch
Selector
No.5
No.6
No.7
No.8
Stitch
Length
2 mm
2 mm
3.2 mm
5 mm
Needle
Position
Left
Centre
Centre
Centre
LA SELECCIÓN
DE LA PUNTADA
No.5
No.6
No.7
No.8
EL LARGO DE
LA PUNTADA
2 mm
2 mm
3.2 mm
5 mm
9 1110
ZIGZAG SEWING
Set the machine as shown.
To prevent seam ends unravelling, set machine for straight
stitch and sew in reverse at
beginning and ending of
seam.
3 kinds of zigzag patterns can
be selected as shown.
77
Page 78

Francais Deutsch Dutch Italiano
5. SÉLECTION DE
POINTS
On sélectionne le point
souhaité en tournant le cadran de sélection du point.
En tournant ce cadran
assurez-vous que l’aiguille se
trouve dans sa position la
plus haute.
5. PROGRAMMWAHL
Den gewünschten Stich erhalten Sie durch Drehen des
Programm-Selektors. Achten
Sie unbedingt darauf, daß
sich beim Drehen des Selektors die Nadel immer in der
höchsten Stellung befindet.
5.
KIEZEN VAN DE STEEK
Het kiezen van de steek.
De gewenste steek zal
verkregen worden door aan
de steekkeuzeknop te
draaien.
* Zorg er voor dat alvorens u
hieraan gaat draaien de
draadaantrekhefboom zich
in de hoogste stand bevindt.
5. SELEZIONE DEL
PUNTO
Selezionare il punto desiderato avvalendosi della manopola di selezione modello.
* Prima di intervenire sulla
manopola di selezione,
accertarsi che l’ago sia in
posizione completamente
sollevata.
COUTURE EN POINT DROIT
Réglez la machine comme
indiqué ci-contre. Il est possible de sélectionner trois
sortes de points droits comme
montré ci-dessous.
DER GERADSTICH
Stellen Sie die Maschine
entsprechend der Abbildung ein.
Es stehen 3 Geradstiche in verschiedenen Längen zur Verfügung,
wie die nachfolgende Tabelle zeigt.
RECHT NAAIEN
De machine instellen zoals op
de afbeelding.
U kunt kiezen uit 3 rechte
steeklengtes.
CUCITURA DIRITTA
Impostare la macchina come
illustrato. Come qui oltre
mostrato, si possono
selezionare tre diversi tipi di
punto dritto.
Sélecteur
Programme
n°5
n°6
n°7
n°8
Longueur
de point
2 mm
2 mm
3.2 mm
5 mm
COUTURE AU POINT ZIGZAG
Réglez la machine comme
indiqué ci-contre.
Pour éviter que les extrémités
de couture soient inégales,
réglez la machine sur “couture au point droit” et piquez
en marche arrière aux deux
extrémités de la couture.
Il est possible de sélectionner
3 types de zigzag comme
montrés.
DER ZICKZACK-STICH
Stellen Sie die Maschine lt.
Abbildung ein.
Um zu vermeiden, daß die Naht
aufgeht, nähen Sie zuerst einige
Rückwärtsstiche im Geradstich
an Nahtanfang und -ende.
Sie können zwischen 3 Zickzackstichen in verschiedenen
Breiten wählen, wie die
Tabelle zeigt.
ZIGZAG NAAIEN
De machine instellen zoals op
de afbeelding.
Om te vermijden dat de uitenden van de naad uitrafelen,
de machine instellen voor
“recht naaien” en achteruitnaaien aan de beide uiteinden van de naad.
U kunt kiezen uit 3 soorten
zigzag steken.
CUCITURA A ZIG-ZAG
Impostare la macchina come
mostrato in figura. Per
evitare che le cuciture si sfilaccino, impostare la macchina sul punto dritto e cucire in
senso inverso all’inizio ed alla
fine della cucitura. Si potranno selezionare i tre tipi di punto a zig-zag illustrati.
Programm-
Selektor
Nr. 5
Nr. 6
Nr. 7
Nr. 8
Stichlänge
2 mm
2 mm
3.2 mm
5 mm
Steekkeuzeknop
Nr. 5
Nr. 6
Nr. 7
Nr. 8
Steeklengte
2 mm
2 mm
3.2 mm
5 mm
Selettore punto
No. 5
No. 6
No. 7
No. 8
Lunghezza pun-
to
2 mm
2 mm
3.2 mm
5 mm
78
Page 79

English Español
Section
5
Thread Tension For Zigzag
Stitch
Better-looking zigzag stitching
requires less upper tension
than straight stitching.
Loosen upper tension slightly.
Legend:
x Wrong side
y Right side
Tensión del Hilo para
Costura Zig-Zag
Para una mejor apariencia de
la puntada en zig-zag se
requiere demenor tensión
superior que la que se usa en
la puntada recta. Aflojar la
tensión superior ligeramente.
Leyenda:
x Revés
y Derecho
Stitch
Selector
No. 9
No.10
No.11
Zigzag
Width
2 mm
3.5 mm
5 mm
Stitch
Length
1 mm
2 mm
2.5 mm
LA SELEC-
CIÓN DE LA
PUNTADA
No. 9
No.10
No.11
EL ANCHO
DEL ZIG-ZAG
2 mm
3 mm
5 mm
EL LARGO
DE LA
PUNTADA
1 mm
2 mm
4 mm
12
BLIND HEM STITCH
Set machine as shown.
COSTURA INVISIBLE Y
DOBLADILLO
Preparar la máquina como se
indica.
x
y
79
Page 80

Francais Deutsch Dutch Italiano
Tension Du Fil Pour Point
Zig Zag
Pour une meilleure présentation du point zigzag, la tension du fil supérieur doit être
moins forte que pour le point
droit.
Relâchez légèrement la tension du fil supérieur.
Légende:
x Envers
y Endroit
Fadenspannung für
Zickzack-Stich
Damit der Zickzackstich besser aussieht, stellen Sie die
Oberfadenspannung loser ein
als beim Geradstichnähen.
Legencle:
x linke Seite
y rechte Seite
Draadspanning Voor Zigzag
Naaien
Om de mooiste zigzag-steek
te krijgen, moet de bovendraadspanning iets zwakker
zijn dan voor een rechte
steek.
Daarom de bovendraadspanning iets losser maken.
Beschrijving:
x Onderkant
y Bovenkant
Tension del filo per il punto
zig-zag.
Per eseguire punti a zig-zag
più perfetti, allentare leggermente il tendifilo superiore
rispetto all’esecuzione dei
punti dritti. Allentare leggermente il tendifilo superiore.
Leggenda:
x Rovescio
y Diritto
Sélecteur
programme
n° 9
n°10
n°11
Largeur
de point
2 mm
3 mm
5 mm
Longueur
de point
1 mm
2 mm
4 mm
Programm-
Selektor
Nr. 9
Nr. 10
Nr. 11
Stichbreite
2 mm
3 mm
5 mm
Stichlänge
1 mm
2 mm
4 mm
Steekkeuze
knop
Nr. 9
Nr. 10
Nr. 11
Zigzagbreedte
2 mm
3.5 mm
5 mm
Steeklengte
1 mm
2.5 mm
4 mm
Selettore
punto
No. 9
No. 10
No. 11
Larghezza del
punto a zig-zag
2 mm
3 mm
5 mm
Lunghezza
punto
1 mm
2 mm
4 mm
COUTURE D’OURLET
INVISIBLE
Réglez la machine comme
indiqué ci-contre.
DER BLINDSTICH
Maschine wie auf Abb. einstellen.
BLINDZOMEN
De machine instellen zoals op
de tekening hiernaast.
CUCITURA D’ORLO
INVISIBLE
Regolate la macchina come
indicato qui fianco.
80
Page 81

English Español
Section
5
Fold material as shown and
place it under foot.
For a neater finish, it is preferable to baste or iron hem
beforehand.
Legend:
x Wrong side
y Right side
Plegar la tela como se indica
y colocar debajo del pie prensatela.
Para un mejor acabado es
preferible hilvanar o planchar
el doblez previamente.
Leyenda:
x Revés
y Derecho
Sew carefully, so that straight
stitches are made on hem
edge, and slanting stitches
pierce only one or two
threads of fold.
Coser cuidadosamente para
que las puntadas estén
hechas sobre la orilla del
pliegue, y las puntadas
desplazadas tomen solamente uno o dos hilos del
doblez.
a Correct seam.
b Needle is catching edge
of fold too much.
c Needle is not catching
edge of fold at all.
Legend:
x Wrong side
y Right side
a Costura correcta
b La aguja está tomando
demasiado la orilla del
doblez.
c La aguja no está tomando
la orilla del doblez.
Leyenda:
x Revés
y Derecho
3 ~ 5mm (0.2”)
x
y
a
b
c
x
y
81
Page 82

Francais Deutsch Dutch Italiano
Pliez l’ouvrage comme
indiqué ci-contre et placez le
sous le pied-de-biche.
Pour obtenir un travail net, il
est préférable de faufiler ou
d’aplatir d’abord au fer.
Légende:
x Envers
y Endroit
Stoff wie auf Abb. falten und
unter das Nähfüßchen legen.
Um sauber nähen zu können,
empfiehlt es sich, den Stoff
bzw. Saum vorher zu bügeln
oder zu heften.
Legencle:
x linke Seite
y rechte Seite
De stof vouwen zoals op de
tekening hiernaast en onder
de persvoet leggen.
Voor een keurige afwerking is
het aanbevolen de zoom
vooraf te rijgen of te strijken.
Beschrijving:
x Onderkant
y Bovenkant
Piegate il lavoro come indicato qui a fianco e collocatelo
sotto il piedino premistoffa.
Per ottenere un lavoro pulito,
è preferibile imbastire o appiattire prima con il ferro.
Leggenda:
x Rovescio
y Diritto
Commencez à piquer et
assurez-vous que les points
droits sont piqués au bord de
l’ourlet et que les points
biaisés n’accrochent qu’un ou
deux fils du pli.
Nähen Sie sorgfältig. Beginnen met naaien en
ervoor zorgen dat de rechte
steken op de zoomrand
gemaakt worden, en de
schuine steken slechts door
éen of twee draden van de
zachte vouw gaan.
Cominciate a cucire ed assicuratevi che i punti diritti
vengano eseguiti sul bordo
dell’orlo e che i punti di sbieco
prendano soltanto uno o due
fili della tela libera.
a Couture correcte.
b L’aiguille accroche trop le
bord du pli.
c L’aiguille n’accroche pas
du tout le bord du pli.
Légende:
x Envers
y Endroit
a Richtig.
b Falsch, Nadel faßt zuviel.
c Falsch, Nadel faßt nicht.
Legencle:
x innen
y außen
a Goede naad.
b De naald steekt te ver in
de vouwrand.
c De naald steekt helemaal
niet in de vouwrand.
Beschrijving:
x Onderkant
y Bovenkant
a Cucitura corretta.
b L’ago prende troppo il
bordo della tela.
c L’ago non prende affatto il
bordo della tela.
Leggenda:
x Rovescio
y Diritto
82
Page 83

English Español
Section
5
11
OVERCASTING
For light-weight material:
Set machine as shown.
Overcasting prevents edge of
fabric from fraying and produces neat finish.
SOBRE COSTURA
Para materiales ligeros:
Preparar la máquina como se
indica.
Evita que las orillas de la tela
se deshilen y crea una mejor
apariencia en el acabado.
Place the seam allowance
under the presser foot with
the edge of the seam in line
with the side of the presser
foot as illustrated.
Trim the fabric to the stitch
line.
Coser cuidadosamente para
que todas las puntadas estén
niveladas con la orilla de la
tela.
13
For thick and elastic, and
also very fine material:
Set machine as shown.
Sew in the same way as
above.
Para telas gruesas y
elásticas:
Preparar la máquina como se
indica.
Coser de la misma forma,
como en las indicaciones
anteriores.
83
Page 84

Francais Deutsch Dutch Italiano
SURFILAGE
Pour des tissus légers:
Réglez la machine comme
indiqué ci-contre.
ABKANTELN
Für leichte Stoffe:
Maschine wie auf Abb. einstellen.
FESTONNEREN
Festonneren van lichte
stoffen:
De machine instellen zoals op
de tekening hiernaast.
I PUNTI
SOPRAFFILO
*Accessori opzionali
Sopraffilo dei tessuti leggeri:
Regolate la macchina come
illustrato qui a fianco. Usate
un ago a punta sferica “ball
point”.
Cousez soigneusement de
façon à ce que tous les points
piqués sur le bord droit soient
alignés le long du bord du tissu.
Nähen Sie sorgfältig, so daß
alle Stiche auf der rechten
Seite genau mit dem Rand
abschließen.
Voorzichtig naaien zodat alle
steken aan de voorzijde gelijk
komen met de rand van de
stof.
Cucite con attenzione in
modo che tutti i punti eseguiti
sul bordo destro siano
allineati lungo il bordo del tessuto
Surfilage de tissus épais ou
élastiques:
Réglez la machine comme
indiqué ci-contre.
Procédez comme décrit cidessus.
Für dicke und elastische
Stoffe:
Maschine wie auf Abb. einstellen.
Nun genau so nähen wie o.a.
Festonneren van dikke of
elastische stoffen:
De machine instellen zoals op
de tekening hiernaast.
Tewerk gaan zoals hierboven
vermeld.
Sopraffilo di tessuti spessi
o elastici:
Regolate la macchina come
illustrato qui a fianco. Procedete come descritto sopra.
84
Page 85

English Español
Section
5
19
16
SD/LU
SD/U
OVERLOCKING
Overlocking stitches make it
possible to sew and overcast
seams at the same time.
Set machine as shown.
COSTURA “OVERLOCK”
Las puntadas en overlock
hacen posible coser y
reforzar la costura al mismo
tiempo.
Preparar la máquina como se
indica.
Put two pieces of cloth
together with the right sides
facing and sew.
To prevent edges from fraying, sew so that right side
stitches drop outside the edge
of material.
In some cases overlocking
stitches can be used for overcasting.
Poner dos telas juntas, con el
derecho de las mismas cara a
cara y coser.
Para evitar que se deshilen
las orillas, coser de modo que
el lado derecho de las puntadas caiga fuera del borde
de las telas.
En algunos casos la puntada
en overlock puede usarse
para reforzar la costura.
STRETCH STITCHING
The stitches shown are all
used with stretch and knit fabrics. These are special stitches built in the machine for
your quick selection.
COSTURA ELÁSTICA DE
DISEÑOS AUTOMÁTICOS
Estas puntadas especiales
son de uso práctico en telas
elásticas y tejidos, y vienen
integradas en la máquina.
85
Page 86

Francais Deutsch Dutch Italiano
SURJET
Le point de surjet permet de
piqûer et de surfiler en une
seule opération.
Réglez la machine comme
indiqué ci-contre.
KAPPEN
Diese Stichart macht es
möglich, Säume zu nähen
und gleichzeitig zu versäubern.
Maschine wie auf Abb. einstellen.
OVERLOCKEN
Met overlocken kan men
tegelijk naaien en festonneren.
De machine instellen zoals op
de tekening hiernaast.
SOPRAGGITTO
Il sopraggitto permette di
cucire e sopraffilare in una
sola operazione.
Regolate la macchina come
indicato qui a lato.
Placez les deux pièces de l’ouvrage ensemble, les endroits
se faisant face et piquez.
Pour empêcher les bords de
s’effilocher, veillez à ce que les
points extérieurs débordent du
tissu.
Dans certains cas, le point de
surjet peut être utilisé pour surfiler.
Legen Sie zwei Stoffteile mit
den rechten Seiten aufeinander und nähen Sie (Abb.).
De twee stukken stof met de
voorzijde tegen elkaar leggen
en naaien.
Om uitrafelen te vermijden,
erop letten dat de buitenste
steek niet buiten de stof gaat.
In sommige gevallen kan men
overlocksteken gebruiken om
te festonneren.
Unite i due pezzi del lavoro
con i due diritti uno contro l’al-
tro e cucite.
Per impedire che i bordi si sfilaccino, fate in modo che i
punti esterni oltrepassino il
tessuto.
In certi casi, il punto di
sopraggitto può essere utilizzato per sopraffilare.
COUTURE DE POINTS
ELASTIQUES
Les points montrés ci-contre
sont tous utilisés sur des tissus extensibles ou tricot. La
machine est équipée pour
réaliser ces points en
automatique; leurs multiples
utilisations sont décrites cidessous.
SUPER-NUTZSTICHE
Die Super-Nutz- oder auch
Dreifach-Stiche ergeben eine
besonders feste Naht. Während
normale Nähte beim Dehnen
reißen würden, sind diese Stiche
elastisch. Sie eignen sich
deshalb vor allem für alle elastischen Stoffe, zur Verstärkung
von Nähten bei Sportbekleidung
und im allgemeinen für alle
besonders strapazierten Nähte.
ELASTISCHE STEKEN
Deze steken worden gebruikt
voor stretch-stoffen of gebreide stoffen. U hoeft dus maar
de steek te kiezen, die u het
best past.
PUNTO ELASTICO
I puti illustrati nella figura a
fianco sono utilizzati per tessuti sintetici e maglieria. La
macchina è concepita per
eseguire i sei punti seguenti
automaticamente. Qui di
seguito sono descritti i vari usi
di questi punti.
86
Page 87

English Español
Section
5
x
y
z
z
SD/LU SD/U
x Overcast stretch
y Straight stretch
(SD/LU)
z Zigzag stretch stitch
(SD/U)
z Overlock stitch
x Elástica sobre las orillas
y Elástica recta
(SD/LU)
z Zigzag elástica costura
(SD/U)
z Puntada overlock elástica
4 132
MAKING BUTTONHOLES
Set machine as shown.
CONFECCIÓN DE OJALES
Preparar la máquina como se
indica.
Determine Length
Measure the diameter and
thickness of the button and
add 0.3 cm (1/8")
for bar tacks.
Mark buttonhole size on
material.
* For stretch fabrics, lay a
piece of paper where the
buttonhole will be placed.
Determinación del Largo
Marcar el largo del ojal en la
tela agregandole 0.3 cm para
los remates.
* Para tejidos elásticos, pon
una pieza de papel donde
viene el ojal.
87
Page 88

Francais Deutsch Dutch Italiano
x Point tricot double
y Point droit extensible triple
(SD/LU)
Z Point droit et zigzag exten-
sible
(SD/U)
z Point surjet
x Overlockstich
y Dreifach-Geradstich
(SD/LU)
z Stretch-zickzackstich
(SD/U)
z Übernendlingstich
x Elastische geslotensteek
y Elastische rechte steek
(SD/LU)
z Elastic zigzag-steek
(SD/U)
z Overlock steek
x Punto zig zag elastico trip-
lo
y Punto diritto elastico triplo
(SD/LU)
z Punto elastica zigzag
(SD/U)
z Punto sopraggitto
COUTURE DES
BOUTONNIERES
Réglez la machine comme
indiqué ci-contre.
NÄHEN VON
KNOPFLÖCHERN
Stellen Sie die Maschine so
ein.
KNOOPSGATEN
De machine instellen zoals op
de afbeelding.
ASOLE
Regolate la macchina come
illustrato qui a fianco.
Longueur De La
Boutonnière
Mesurez le diamètre et l’épais-
seur du bouton et ajoutez 0.3
cm pour les points d’arrêt.
Tracez la dimension de la
boutonnière sur le tissu.
* Pour les tissus stretch,
veuillez placer un morceau
de papier à l’endroit de la
boutonnière.
Knopflänge festlegen
Messen Sie Durchmesser
und Dicke des Knopfes und
rechnen Sie noch 0.3 cm
hinzu. Markieren Sie die
Knopflochlänge auf dem
Stoff.
* Bei elastischem Material,
legen Sie ein Stück Papier
auf den Stoff wo Sie das
Knopfloch plazieren wollen.
Lengte Van Het Knoopsgat
De diameter en de dikte van
de knoop meten en 0.3 cm
bijtellen voor de trenzen. De
afmetingen van het knoopsgat op de stof markeren.
* Het is aan te raden bij
gebruik van elastishe materialen een papier te leggen
onder het materiaal op de
plaats waar het knoopsgat
zal gemaakt worden.
Lunghezza dell’asola
Misurate il diametro e lo spessore del bottone aggiungendo
0.3 cm per i punti di chiusura.
Tracciate la dimensione dell’asola sul tessuto.
88
Page 89

English Español
Section
5
0.3cm (1/8”)
L
d
t
m
Legend:
L Length of a buttonhole
d Diameter
t Thickness
m Marking
Leyenda:
L Longitud del ojal
d Diametro
t Espessor
m Marca
a
b
Attach buttonhole foot.
Completely push back sliding
part a of buttonhole foot.
Place material under foot so
that marking of buttonhole
passes through centre of foot.
Directions line b of foot indicates beginning line of marking.
Extra thread is placed under
foot and then to left or back.
Colocar el pie presatela para
ojales.
Desplazar completamente
hacia atrás la parte deslizable
del pie a . Poner el material
debajo del pie de modo que
la marca del ojal quede al
centro del pie. La línea b
indica el inicio de la marca.
El Hilo sobrante colocarlo
debajo del pie, hacia la
izquierda o hacia atrás.
3
1
Bar tacking: Set pattern
selection dial to 1 ( ) and
sew 5-6 stitches.
Remate inferior: Colocar el
selector de diseños en 1 ( )
y coser de 5 a 6 puntadas.
89
Page 90

Francais Deutsch Dutch Italiano
Légende:
L Longueur de la
boutonnière
d Diamètre
t Épaisseur
m Marque
Legencle:
L Knopflochlänge
d Durchmesser
t Dicke
m Markierung
Beschrijving:
L Lengte van he knoopsgat
d Diameter
t Dikte
m Richtlijn
Leggenda:
L Lunghezza dell'asola
d Diametro
t Spessore
m Riferimento
Mettre en place le pied-debiche boutonnière. Tirez
complètement vers l’arrière la
glissière a du pied pour boutonnière.
Placez le tissu sous le pied
afin que la marque de la boutonnière soit placée au centre
du pied et que la flèche b du
pied indique le commencement de la boutonnière.
Knopflochfüßchen einsetzen.
Gleitplättchen ganz
zurückschieben a .
Stoff nun so unter das
Füßchen legen, daß das
markierte Knopfloch genau in
Mitte des Füßchens liegt. Der
Pfeil b kennzeichnet den
Anfang des Knopflochs.
Den Faden legen Sie unter
den Fuß und dann nach
links oder nach hinten.
De knoopsgatvoet monteren.
Schuifje a van de knoopsgatvoet volledig naar
achteren trekken. De stof
onder de voet schuiven zodat
de richtlijn voor het knoopsgat
in het midden van de voet
staat en pijltje b van de voet
op de aanvangslijn van het
knoopsgat staat.
Inserite il piedino per asole.
Spingete completamente
all’indietro la slitta a del
piedino per asole.
Posizionate il tessuto sotto il
piedino in mode che il riferimento dell’asola si trovi al
centro del piedino stesso e la
freccia b indichi l’inizio dell’asola.
Couture De La Boutonnière
Point d’arrêt:
réglez le bouton de sélection du modèle
sur 1 ( ) et piquez 5 à 6
points.
Riegel: Stellen Sie den
Musterwählknopf auf 1 ( )
und nähen Sie 5 - 6 Stiche.
Trens: De patroonkeuzeknop
instellen op 1 ( ) en 5 á 6
steken naaien.
Cucitura dell’asola
Punti di chiusura:
regolate il
selettore dei punti su 1 ( )
ed eseguite 5 o 6 punti.
90
Page 91

English Español
Section
5
2
Left side: Change pattern to
2 ( ). Sew left side from
front to back until it reaches
the end line.
Note at which line the centre
marker points so that it is not
necessary to mark the end
lines for all buttonholes.
Lado izquierdo: Cambiar el
selector a 2 ( ). Coser el
lado izquierdo del ojal de adelante hacia atrás hasta llegar
a la marca del final.
3
1
Bar tacking: Change the pat-
tern to 3 ( ) and sew 5-6
stitches.
Remate superior: Cambiar el
selector a 3 ( ) y coser de 5
a 6 puntadas.
4
Right side: Change pattern
to 4 ( ) and sew right side
until it catches first bar tack.
Lado derecho: Cambiar el
selector a 4 ( ) y coser el
lado derecho del ojal hasta
que alcance el remate inferior.
91
Page 92

Francais Deutsch Dutch Italiano
Chenille gauche: changez le
bouton de sélection et placezle sur 2 ( ), Piquez la chenille gauche de la ligne de
début jusqu’à la ligne finale.
Repérez le point où s’arrête la
flèche, de manière à ce qu’il
ne soit plus nécessaire de
marquer des lignes d’arrêt
pour toutes les autres boutonnières.
Linke Seite: Musterknopf auf
2 stellen ( ). Nähen Sie die
linke Seite von vorn nach hinten bis zum Ende.
Denken Sie daran, daß der
Pfeil den Endpunkt angibt.
Sie müssen die Endpunkte
bei Knopflöchern also nie
extra markieren.
Linkerkant: De keuzeknop
instellen op 2 ( ). De linkerkant naaien van de aanvangsstreep tot de eindstreep.
Het punt waarop het pijltje nu
staat, geeft aan zodat u voor
de volgende knoopsgaten de
eindstreep niet meer hoeft te
trekken.
Cordoncino di sinistra:
spostate il selettore e regolatelo su 2 ( ). Cucite il cordoncino di sinistra dalla riga
d’inizio fino alla riga finale.
Segnate il punto in cui si
arresta la freccia, in modo
che non sia più necessario
contrassegnare le ringhe di
arresto per tutte le altre asole.
Point d’arrêt: placez le bouton de sélection sur 3 ( ) et
piquez 5 à 6 points.
Riegel: Musterknopf auf 3
stellen ( ) und 5 - 6 Stiche
nähen.
Trens: De keuzeknop
instellen op 3 ( ) en 5 á 6
steken naaien.
Punto di arresto: regolate il
selettore su 3 ( ) ed eseguite 5 o 6 punti.
Chenille droite: placez le
bouton de sélection sur 4 ( )
et piquez la chenille droite
jusqu’au premier point.
Rechte Seite: Muster auf 4
( ) stellen und nun die rechte
Raupe nähen, bis Sie den
Riegel erreicht.
Rechterkant: De keuzeknop
instellen op 4 ( ) en de
rechterkant naaien tot aan het
aanvangspunt.
Cordoncino di destra: regolate il selettore su 4 ( ) e
cucite il cordoncino di destra
fino al primo punto.
92
Page 93

English Español
Section
5
Cutting Buttonholes
Place a pin through the bar
tacks to prevent over-cutting.
Cut the buttonhole along centre with the buttonhole cutter.
Corte del ojal
Poner un alfiler en uno de los
extremos del ojal para evitar
un corte de más.
Equilibro de los lados
derechio y izquierdo del
ojal
Los puntos de los lados derecho y izquierdo no se pueden
equilibrar sobre tejidos diferentes. En este caso, ajustar
el equilibro girando el control
de ajuste para ojales.
If the right side of buttonhole
is too dense , turn dial to left
as shown.
If the left side of the buttonhole is too dense , turn dial to
right as shown.
Si el lado derecho del ojal
esta demasiao cerca del lado
izquierdo, girar el cintrol hasta
la izquierda como esta sefialado.
Si el lado izquierdo del ojl
esta demasiado cerca del
lado derecho, girar el control
hasta la derecha como esta
sefialado.
Balance of Left and Right
Side Buttonhole
Occasionally the left and right
buttonhole columns may need
to be balanced on specialty
fabric.
In this case adjust stitch balance by turning adjusting dial
located on the back of the
machine.
93
Page 94

Francais Deutsch Dutch Italiano
Ouverture Des
Boutonnières
A l’aide d’une épingle, marquez le point d’arrêt afin de
ne pas couper trop loin.
Percez la boutonnière au
milieu à l’aide d’un découvite.
AUFSCHNEIDEN VON
KNOPFLÖCHERN
Stecken Sie jeweils 1 Nadel
in den oberen und unteren
Riegel, damit Sie nicht zu weit
einschneiden.
Mit dem Knopflochschneider
dann in der Mitte aufschneiden (Abb.).
Opensnijden Van Het
Knoopsgat
Met een speld de trens markeren om niet te ver te snijden.
Het knoopsgat in het midden
met het knoopsgatmesje
insnijden.
Apertura delle asole
Con l’aiuto di uno spillo, segnate il punto di arresto per
evitare di tagliare troppo.
Tagliate l’asola al centro servendovi dell’apposito taglia
asole.
Equilibrage du côté droit et
du côté gauche d’une boutonnière
En fonction du tissu, il arrive
que les points du côté droit et
du côté gauche ne soient pas
équilibrés.
Dans ce cas, adaptez l’equilibrage du point en tournant el
sélecteur de mise au point.
Einjustieren der linken und
rechten Knopflochseite
Bei manchen Stoffen kann die
Stichdichte der rechten und
linken Knopflochraupe ungleich sein, sie muß dann einjustiert werden, dies wird
durch Drehen des Stichausgleichswählers gemacht.
Uitbalanceren van de linkeren rechterzijde van het
knoopsgat
Bij verschillende stoffen kan
het gebeuren dat de steken
op de linker-en rechterzijde
niet uitgebalanceerd zijn, In
dat geval moet u de steekbalancering bijregelen met
behulp van de regelknop.
Bilanciamento dei lati sinistro e destro dell’occhiello
Su tessuti diversi, i punti
destro e sinistro possono
risultare non bilanciati.
In tal caso regloare il bilanciamento dei punti ruotando il
relativo controllo.
Si le côté droit de la boutonnière est trop près du côt é
gauche, tournez le sélecteur
vers la gauche comme illustré.
Si le côté gauche de la boutonnière est trop près du côté
droit, tournez le sélecteur
vers la droite comme illustré.
Wenn die rechte Knopflochseite dichter als die linke
Seite ist, drehen Sie den
Stichausgleichwähler nach
links, wie abgebildet.
Wenn die linke Knopflochseite dichter als die rechte
Seite ist, drehen Sie den
Stichausgleichwähler nach
rechts, wie abgebildet.
Als de rechterizijde van
knoopsgat te dicht tegen de
linkerzijde zit, draait u de
knop nar links zoals
weergegeven.
Als de linkerzijde van het
knoopsgat te dicht tegen de
rechterzijde zit, draait u de
knop naar rechts zoals
weergegeven.
Si il lato destro dell’occhiello è
troppo vicino al lato sinistro,
ruotare il controllo a sinistra
come indicato.
Si il lato sinistro dell’occhiello
è troppo vicino al lato destro,
ruotare il controllo a destra
come indicato.
94
Page 95

English Español
Section
5
8
7
ZIPPER SEWING
Set machine as shown.
By using a special zipper foot,
zipper sewing can be easily
done without turning the fabric.
COSTURA DE CIERRES
Preparar la máquina como se
indica.
Al usar el pie prensatela
especial para cierres la costura puede resultar más fácil sin
dar vuelta a la tela.
Set the zipper foot on the
right of the needle.
Sew right side of zipper guiding fabric carefully so that
right side teeth of zipper are
parallel with left edge of foot.
Poner el pie para la costura
de cierres a la derecha de la
aguja.
Coser el lado derecho del
cierre y cuidar que los dientes
del cierre queden paralelos al
borde izquierdo del pie.
Re-set zipper foot to the left
of the needle.
Sew left side of zipper in the
same way.
Pasar el pie para cierres al
lado izquierdo de la aguja.
Coser el lado izquierdo del
cierre de la misma forma.
95
Page 96

Francais Deutsch Dutch Italiano
POSE DE FERMETURE
ECLAIR
Réglez la machine comme
indiqué.
En utilisant un pied-de-biche
spécial fermeture éclair, la
pose d’une fermeture peut
être réalisée facilement sans
tourner le tissu.
REIßVERSCHLUSS
EINNÄHEN
Stellen Sie die Maschine wie
auf Abb. ein.
Wenn Sie den speziellen
Reißverschlußfuß verwenden, können Sie Reißver-
schlüsse einnähen, ohne das
Material zu wenden.
INZETTEN VAN
RITSSLUITINGEN
De machine instellen zoals op
de tekening hiernaast.
Door de speciale ritssluitingvoet te gebruiken in combinatie met een geleider, kan
een ritssluiting ingezet worden zonder dat de stof moet
worden omgedraaid.
APPLICAZIONE DI
CERNIERE LAMPO
Regolate la macchina come
indicato nella figura qui la
fianco.
Usando il piedino speciale, la
cucitura di una cerniera lampo può essere esequita senza
che sia necessario girare il
tessuto.
Installez le pied fermeture
éclair sur la droite de l’aiguille.
Piquez le côté droit de la fermeture en guidant le tissu de
façon à ce que les dents de
droite de la fermeture soient
parallèles avec le bord
gauche du pied.
Befestigen Sie die
Nähfußsohle so an dem
Füßchenhalter, daß sie rechts
von der Nadel liegt.
Nähen Sie nun die rechte
Seite des Reißverschlusses
an und achten Sie darauf,
daß die Zähne des Reißverschlusses genau parallel zum
linken Rand des Füßchens
liegen.
Plaats de ritsvoet aan de
rechtkant van de naald. Naai
nu de rechertkant van de rits
terwijl u het naaiwerk
voorzichtig geleidt zodat de
rechterkant van de tandenrij
van de rits parallel loopt met
de linkerkant van de ristvoet.
Posizionate il piedino per
cerniera lampo a destra dell’ago. Cucite il bordo destro
della cerniera guidando il tessuto in modo che i denti di
destra della cerniera siano
paralleli con il bordo sinistro
del piedino.
Replacez le pied fermeture
éclair à gauche de l’aiguille.
Piquez le côté gauche de la
fermeture de la même façon.
Füßchen nun neu plazieren,
so daß es links von der Nadel
steht.
Nähen Sie nun die linke Seite
des Reißverschlusses in derselben Weise ein.
Plaats nu de ritsvoet aan de
linkerkant van de naald. Herhaal dezelfde handelingen.
Riposizionate il piedino a sinistra dell’ago.
Cucite il bordo sinistro della
cerniera procedendo nello
stesso modo.
96
Page 97

English Español
Section
5
13
MENDING
Patching
Set machine as shown.
COSTURA PARA
REMENDAR
Parchado
Preparar la máquina como se
indica.
Place the patch over the worn
part.
Pull the thread ends toward
back or left when starting
sewing.
Sew along the edge of the
patch on the right side. Trim
away the worn part close to
the seam on the wrong side.
Poner un parche sobre la
parte rota. Jalar los extremos
de los hilos hacia atrás o a la
izquierda cuando se va a
empezar a coser.
Coser por el derecho toda la
orilla del parche. Despúes
recortar la parte rota de atrás.
97
Page 98

Francais Deutsch Dutch Italiano
RACOMMODAGE
Rapiéçage
Réglez la machine comme
indiqué ci-contre.
AUSBESSERN
Ausbessern eines Risses
Maschine wie auf Abb. einstellen.
REPARATIE VAN
KLEDINGSTUKKEN
De machine instellen zoals op
de tekening hiernaast.
RAMMENDO
Rattoppo
Regolate la macchina come
indicato qui a fianco.
Recouvrir complètement la
partie usée au moyen d’un
morceau de tissu identique.
Réaliser une couture le long
du bord de la pièce de tissu
ajoutée à l’endroit du tissu.
Découper la partie usée, à
l’envers du tissu, jusqu’à environ 0.5 à 1 cm du bord cousu.
Nähen Sie zuerst die Mitte
des Risses. Dann noch einmal entlang jeder Seite.
Ein untergelegtes Stück Gaze
(Bügelfolie) oder Stoff
verstärkt die Naht.
Verstellen
Leg het verstellapje over het
versleten gedeelte. Naai aan
de rechterkant van de stof het
verstellapje op het versleten
gedeelte. Knip de rafels aan
de achterkant weg.
Bij het verstellen van rekbare
stoffen, de persvoetdruk
lichter zetten om te
voorkomen dat de stof
samentrekt. Speld een lap op
de versleten plek en naai
deze vast. Dun papier onder
de stof leggen is aan te bevelen.
Ricoprite completamente la
parte lisa con un pezzo di
stoffa identica. Eseguite una
cucitura lungo il bordo della
pezza di tessuto aggiunta sul
diritto del tessuto.
Ritagliare la parte lisa, sul
rovescio del tessuto vicino al
bordo cucito.
98
Page 99

English Español
Section
5
Mending a Rip
Set the machine in the same
way as for patching.
Sew the edges of tear together first. Then sew two more
seams on either side.
A piece of gauze can be
placed underneath to reinforce the rip.
Remiendo de una Rasgadura
Preparar la máquina de la
misma forma como en el parchado.
Primero coser las orillas de la
rasgadura abarcando ambos
lados. Después coser más
de dos veces en cada lodo,
cerca de la costura anterior.
Un pedazo de tela puede ser
colocada debajo, para
reforzar la costura en la rasgadura.
109 11
APPLIQUE WORK
Set machine as shown.
COSTURA DE APLICACIÓN
(PARCHES DE ADORNO)
Preparar la máquina como se
indica.
99
Page 100

Francais Deutsch Dutch Italiano
Raccommodage D’une
Déchirure
Régler la machine de la
même façon que le raccommodage.
Commencer par coudre le
milieu de la déchirure en
guidant le tissu, puis coudre
de chaque côté.
Si nécessaire, renforcer la
couture au moyen d’un petit
morceau de gaze placé à
l’envers du tissu déchiré.
Flicken
Legen Sie einen passenden
Flicken über das beschädigte
Teil.
Nähen Sie auf der Stoffvorderseite entlang der
Kante des Flickens. Schneiden Sie auf der Rückseite das
beschädigte Stück entlang
dem Saum ab.
Wenn Sie elastische Stoffe
flicken, erzielen Sie ein
besseres Ergebnis, wenn Sie
ein Stück Papier unter den
Stoff legen und nach dem
Nähen wieder entfernen.
Reparatie Van Een Scheur
Of Winkelhaak
Naai de zijkanten van de
scheur eerst bij elkaar. Naai
dan aan elke stofkant een
extra stiksel als versterking.
Een stukje gaas of i.d. onder
de scheur, kan het gerepareerde stiksel extra versterken.
Rammendo di uno strappo
Regolate la macchina come
per il rattoppo.
Cominciate cucendo il centro
dello strappo guidando il tessuto, quindi cucite su ogni
lato. Se necessario, rinforzate la cucitura per mezzo
di un pezzetto di garza
posizionato sul revescio del
tessuto strappato.
APPLICATIONS
Réglez la machine comme
indiqué ci-contre.
Tracez le motif sur le tissu qui
servira à être appliqué et
découpez-le.
Posez la pièce sur le
vêtement et faufilez-la.
APPLIZIEREN
Maschine wie auf Abb. einstellen.
APPLIQUEREN
De machine instellen zoals op
de tekening hiernaast.
Het motief op de als applique
te gebruiken stof tekenen en
uitknippen.
De figuur op de stof leggen
en vastrijgen.
APPLICAZIONI
Regolate la macchina come
indicato nella figura qui a fianco.
100
 Loading...