

Verismo V·585 Operation Manual
Operating Manual
Manuel d’utilisation
EN
FR

2
EN
3
FR
Contents Table des matières
Introduction ����������������������������������������������������������������������������������������������������������������������������������������������������������������� 2
Important safeguards �������������������������������������������������������������������������������������������������������������������������������������������������� 4
Special safety ins tructions ������������������������������������������������������������������������������������������������������������������������������������������� 5
Verismo
™
System V∙585 overview�������������������������������������������������������������������������������������������������������������������������������� 6
Overview of LED sy mbols ��������������������������������������������������������������������������������������������������������������������������������������������� 7
Getting star ted ������������������������������������������������������������������������������������������������������������������������������������������������������������� 8
Preparing beverages ���������������������������������������������������������������������������������������������������������������������������������������������������� 9
Daily cleaning ������������������������������������������������������������������������������������������������������������������������������������������������������������� 10
Cleaning the machine (when prompted) ��������������������������������������������������������������������������������������������������������������11–12
Descaling the machine (when prompted) ������������������������������������������������������������������������������������������������������������ 13–14
Changing the filter (when prompted) �������������������������������������������������������������������������������������������������������������������15–16
Manually enabling the cleaning, descaling or filter change funct ions ��������������������������������������������������������������������� 17
Parameter setting: Water hardnes s ���������������������������������������������������������������������������������������������������������������������������18
Parameter setting: Water filter ���������������������������������������������������������������������������������������������������������������������������������� 18
Parameter setting: Auto -Off �������������������������������������������������������������������������������������������������������������������������������������� 19
Parameter setting: Cleaning inter val �������������������������������������������������������������������������������������������������������������������������20
Parameter setting: Temperature reduc tion ���������������������������������������������������������������������������������������������������������������21
Parameter setting: Long (lungo) espresso shot ��������������������������������������������������������������������������������������������������������� 22
Evaporation of residual water ������������������������������������������������������������������������������������������������������������������������������������ 23
Frequently asked questions ��������������������������������������������������������������������������������������������������������������������������������������� 24
Specifications and ser vicing �������������������������������������������������������������������������������������������������������������������������������������� 25
Disposal instruc tions��������������������������������������������������������������������������������������������������������������������������������������������������26
Notes �������������������������������������������������������������������������������������������������������������������������������������������������������������������������� 27
Introduction ����������������������������������������������������������������������������������������������������������������������������������������������������������������� 3
Consignes de sécurité import antes ��������������������������������������������������������������������������������������������������������������������������28
Instructions de sé curité particulières ������������������������������������������������������������������������������������������������������������������������ 29
Aperçu du système Verismo
MC
V∙585 ������������������������������������������������������������������������������������������������������������������������30
Aperçu des symboles DEL ����������������������������������������������������������������������������������������������������������������������������������������� 31
Pour commencer �������������������������������������������������������������������������������������������������������������������������������������������������������32
Préparation des boissons ������������������������������������������������������������������������������������������������������������������������������������������ 33
Nettoyage quotidien ������������������������������������������������������������������������������������������������������������������������������������������������� 34
Nettoyage de l’appareil (sur invitation) ���������������������������������������������������������������������������������������������������������������35–36
Détartrage de l ’appareil (sur invitation) �������������������������������������������������������������������������������������������������������������� 37–38
Changement du filtre (sur invitation) ������������������������������������������������������������������������������������������������������������������39–40
Activation manuelle des fonc tions de nettoyage, de détar trage ou de changement du filtre ��������������������������������� 41
Réglage des paramètres : Dureté de l ’eau ����������������������������������������������������������������������������������������������������������������42
Réglage des paramètres : Filtre à e au �����������������������������������������������������������������������������������������������������������������������42
Réglage des paramètres : Arr êt automatique �����������������������������������������������������������������������������������������������������������4 3
Réglage des paramètres : Inter valles de nettoyage �������������������������������������������������������������������������������������������������4 4
Réglage des paramètres : Réduc tion de la température ������������������������������������������������������������������������������������������45
Réglage des paramètres : Espre sso long (lungo) �����������������������������������������������������������������������������������������������������46
Évaporation de l’eau résiduelle ���������������������������������������������������������������������������������������������������������������������������������47
Foire aux questions ��������������������������������������������������������������������������������������������������������������������������������������������������� 48
Caractéris tiques techniques et entretien ������������������������������������������������������������������������������������������������������������������49
Instructions pour le s mises au rebut particulières ���������������������������������������������������������������������������������������������������� 50
Remarques ����������������������������������������������������������������������������������������������������������������������������������������������������������������� 51
Verismo™ System V·585 Operating Manual – Introducti on
WARNING
Read ALL instruc tions before use to avoid injury�
Pay attention to warnings
in this Operating Manual�
Keep this Operating Manual in a safe place for fu ture reference�
For use by adults only�
Be diligent about emptying, cleaning and desc aling as described in this Operating Manual�
Designed for beverage pods that b ear the Verismo
™ System logo� Also compatible with o ther K-fee® System pods�
Manuel d’utilisation du système VerismoMC V·585 – Introduction
AVERTISSEMENT
Lisez TOUTES les ins tructions avant l’utilisation pour évit er les blessures�
Portez attention aux aver tissements
contenus dans ce manuel d’utilisation�
Conservez ce manuel d’utilisation dans un endroit sûr po ur vous y référer ultérieurement�
Pour une utilisation par des adultes seulement�
Ne tardez pas à procéder à la vidange, au net toyage et au détartrage comme dé crit dans ce manuel d’utilisation�
Conçu pour les capsules de boisson s qui portent le logo du système Verismo�
MC
Également compatible avec les
autres capsules du sys tème K-fee�®
4
EN
5
EN
Special safety
instructions
IMPORTANT
SAFEGUARDS
WARNING
When using elec trical appliance s, basic
saf et y prec aut ion s mus t alw ays b e
followed, including the f ollowing:
1. Read all instructions and use only in
accordance with the se instruction s.
2. The app lia nce i s des ign ed a nd
manufacture d for household use.
3. Never pl ace your fin gers under
the spout while the appli ance
is oper ating — this may res ult
in scaldin g. Ne ver insert your
fingers in the pod opening — this
may result in injury.
4. Neve r open the le ver on t he
appliance during the brewing,
rinsin g, c leaning or desca ling
processes. Always keep the lever
in the clos ed / do wn positi on
while machine is operating.
5. Do no t tou ch ho t sur face s. Us e
handles or knobs when ava ilable.
6. Never use a damaged or de formed
pod . O nly us e bev era ge po ds
suitable for this app liance.
7. Never lift the ap pliance by its lever.
Never open or close the lever forcibly.
8. Never open the appliance or insert
objects into the appliance openings.
9. Never operate the appliance without
its drip tray or dri p grating.
10. Do not overfill t he water tank wit h
water.
11. Use only fresh and cold drinking
water in this appliance! D o not put
any other liq uids or foods in the
water tank except as dire cted in the
cleaning and descaling instruc tions
in this manual.
12. The use of acce ssory atta chments
not recommended by the appliance
manuf actu rer may re sult in f ire,
electric shoc k or injury to persons.
13. Do not place on or near a h ot gas or
electric burner, or in a heated oven.
Do not place near water, e.g., kitchen
sink.
14. Do not use outdoors .
15. To pr otec t ag ains t fir e, el ect ric
shock and in jury, d o not immerse
appliance, cord or p lug in wat er or
any other liquid.
16. This a pplian ce is equ ipped w ith
a po wer c ord ha ving a grou nding
wire with a gro unding plug. Only
plug the appliance into a gr ounded
3-pin wall socket. In t he event of an
elect rical short circu it, gr ounding
reduces the r isk of electr ical shock.
Check if mains volta ge matches the
speci ficat ions on the name plate.
The warranty becomes null and void
if the appliance is plugged i nto an
incorrect mains v oltage.
17. Do no t, un der any circ umstan ces,
cut or remov e th e t hird (groun d)
prong from t he power cord or use
an ad apte r. Con sult a qual ifie d
el ec tr ici an if th e g ro und in g
ins truc tion s are n ot co mplet ely
understood , or if doubt exi sts as to
whether the appliance is pr operly
grounded.
18. Turn of f and u nplug the appliance
from the outlet when not in use and
before cleaning and mainten ance.
Allow to cool before putting on or
taking off parts, and before cleaning
the appliance.
19. Do not ope rate app liance wit h a
damaged cord or plug or after the
appliance malfunctions or is damaged
in a ny mann er. Cont act Starbuck s
customer serv ice (1-800-334-5553)
to report any malfunctions or damage
to the appliance. Repair should be
done by authorized customer service
company only.
20. Do not let cord hang over the edge
of the table or the c ounter, or touch
hot surfaces.
21. To di scon nec t, al way s tur n any
contro l to “off” first , the n remov e
plug from wall outlet .
22. Close supervision is necessary when
this appli ance is used by or near
childre n. St ore t he ap pliance and
all its acces sories outside the reach
of children.
23. Refer to the ins truction s for us e of
all c leaning and d escaling agent s
befo re use and c omply wi th the
saf ety r egul ation s. D o not t urn
off appl ianc e dur ing r insin g or
descaling proces s.
24. Apar t fro m nor mal u se, c leaning,
desc aling and ext ernal cle aning,
all othe r wo rk such as rep airs or
replacing the power cor d may only
be car ried ou t by an aut horiz ed
customer se rvice company in order
to avoid hazards.
25. In case of long peri ods of abse nce,
vacati on, etc ., the applian ce mus t
be emptied, cleaned and the power
plug mus t be remove d from the
socket.
26. Do not use appliance f or other than
intended use.
SAVE THESE
INSTRUCTIONS
WARNING TO USERS
ANDPARENTS
DO NOT permit children to use
the ap plian ce unle ss the re is
adu lt sup erv isio n. Ap plia nce
dispenses very hot water.
Important
safeguards
SPECIAL SAFETY
INSTRUCTIONS
Warning symbols and words
The w arning t riangle a ppears in thes e
instructions where failure to comply with
the safety instructions may result in risks
to the user or the applianc e.
WARNING: Extremely hot water
Don’ts: Do not reach inside
WARNING:
Electric shock
WARNING
Avoid risk of electric shock
• Keep the appliance away from moisture
and splashing water.
• Do not clean appliance under running
water or with a water jet.
• Never pour any type of liquid on top of
the appliance.
• Never unplug the appliance by pulling the
power cord.
• No user serviceable parts inside.
WARNING
WARNING: Make sure the lever is closed
completely during use. Extremely hot
water runs thr ough the a ppliance
when operating (brewing, descaling,
cleaning, rinsing). To avoid the risk of
scalding or other injury, always keep
the lever in the closed / down position
while machine is operat ing. Do not
reach under the spout or remove the
drip tray.
• Take care when emptying the drip tray.
The water can be very hot.
• T here i s a danger of scalding when
evapor ating t he re sidual w ater (t he
steam temperature can be as high as
248°F / 120°C).
WARNING
Hygiene and cleaning
• Only use pods with a best-by date that
has not yet expired.
• Store pods in a suitable location.
• For health reasons it is recommended
to ri nse th e applia nce fiv e times
befo re firs t use and onc e after
each beverage is poured. Read the
instructions under “Daily Cleaning“ on
page10.
• Clean the appliance periodically and in
accordance with the Operating Manual
to prevent hygiene risks.
• Only use cleaning / descaling agents that
are suitable for the appliance.
• Carefully read the user instructions about
the cleaning and descaling agents and
comply with the safety instructions.
Short cord instructions
A short power-supply cord is provided to
reduce risks of entanglement or tripping
over a longer cord.
Information o n Eco (Energy–Savin g)
mode (Auto-Off)
The applianc e ret urns to Ec o (Ener gy–
Saving) mode if it is unused for more than
30 minutes (factory setting). The appliance
uses considerably less energy in this mode.
For example, it uses less than 0.5 W/h (the
stand ard op erating amount of energy
used).
CAUTION
CAUTION: There are four sharp needles
that puncture the Verismo™ System
pods inside the pod opening. To avoid
risk of injury, do not put your fingers
in the pod opening.
WARNING: TO REDUCE THE R ISK OF FIRE
OR ELECTRIC SHO CK, DO NOT REMOVE THE
BOTTOM COVER. N O USER SERVICEABLE
PARTS ARE INSIDE. REPAI R SHOULD BE DONE
BY AUTHORIZED SERVI CE PERSONNEL ONLY.
WARNING
RISK OF FIRE OR
ELECTRIC SHOC K
DO NOT OPEN
6
EN
7
EN
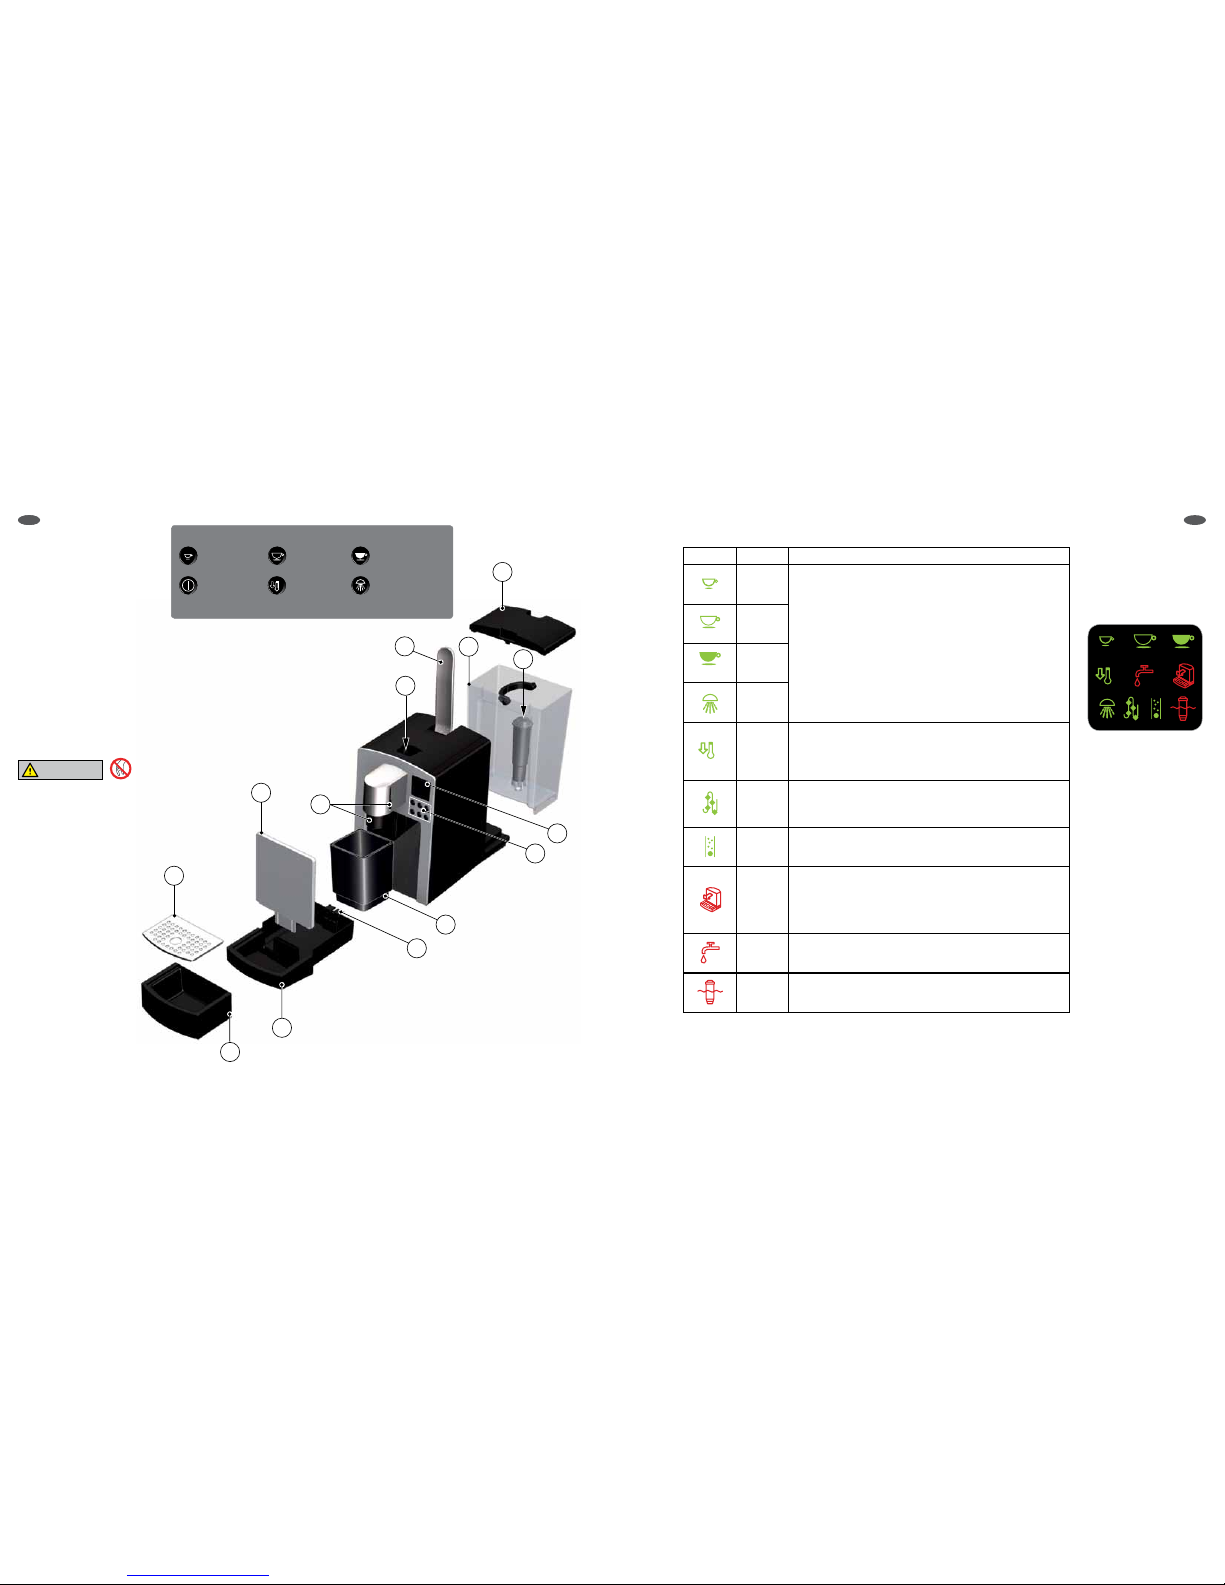
Overview of
LEDsymbols
1
2
7
3
9
10
4
8
6
11
12
13
14
5
EN
Verismo™ System V∙585
overview
1 Drip tray grat e
2 Drip tray wall
3 Height-adjus table spout
4 Pod opening
5 Lever
6 Water tank
7 Water tank cover
8 Water filter (optiona l)
9 LED display
10 Contr ols
11 Used po d container
12 Connec tor
13 Lower dr ip tray
14 Upper dr ip tray
CAUTION
CAUTIO N: There a re four sh arp need les that
punctur e the Veris mo™ System pods ins ide
the pod opening . To avoi d risk of injur y, do
not put your finger s in the pod open ing.
Symbol
Espresso
• The cup s ymbols flash green while applianc e heats up.
• The cup s ymbols and the Rinse symb ol light up green if appliance is read y.
• The respe ctive cup symbol o r the Rinse symbol flashes g reen as the desired
action isper formed.
Brewed
Milk
Rinse
°C
Temperature
Reduction
• Lights u p green when temperature re duction is select ed.
• Flashes gre en as beverage prepara tion is prepared with
temperatureredu ction.
• Brewing temp erature can be reduced f or products to appr oximately
158°F / 70°C.
Clean
Machine
• Lights u p green if appliance needs to be c leaned. Set to every 100 be verage
preparations (fa ctory sett ing).
• Flashes gre en as desired action is p erformed.
Descale
Machine
• Lights u p green if appliance needs to be de scaled.
• Flashes gre en as desired action is p erformed.
Empty
Used Pod
Container
• Symbol for us ed pods lights up red if us ed pod container and lower drip tr ay
need to be emptied.
• Approxima tely 30 pods fit in the used po d container.
• The upper dri p tray has a capacit y of approximately 10.14 fl oz / 300ml;
thelower drip tray has a c apacity of approx imately 16.91 fl oz / 500ml.
Fill
WaterTank
• Lights u p red if water tank is empt y.
• The water tank has a capacity of approximately 0.92 gallons / 3.5L.
Replace
Water FIlter
• Lights u p red when water filter needs t o be replaced
(after 13.2 gallons / 50 L water).
• Symbol st ays lit until filter has been re placed.
Display of sy mbols:
°C
Espresso
On / Off
Button symbols:
Brewed
Temperature
Reduction
Milk
Rinse
°C
8
EN
9
EN
NOTE: Wh en in sert ing p ods, pleas e cl ose
hand le wi th on e smo oth moti on. A void
back a nd fo rth m ovemen t of the ha ndle o r
hesitatio n when closing the leve r, as this can
cause the pod to drop straigh t into the u sed
pod containe r without bein g punctured .
Do no t rem ove t he to p foil lid or pu nctu re
the pod.
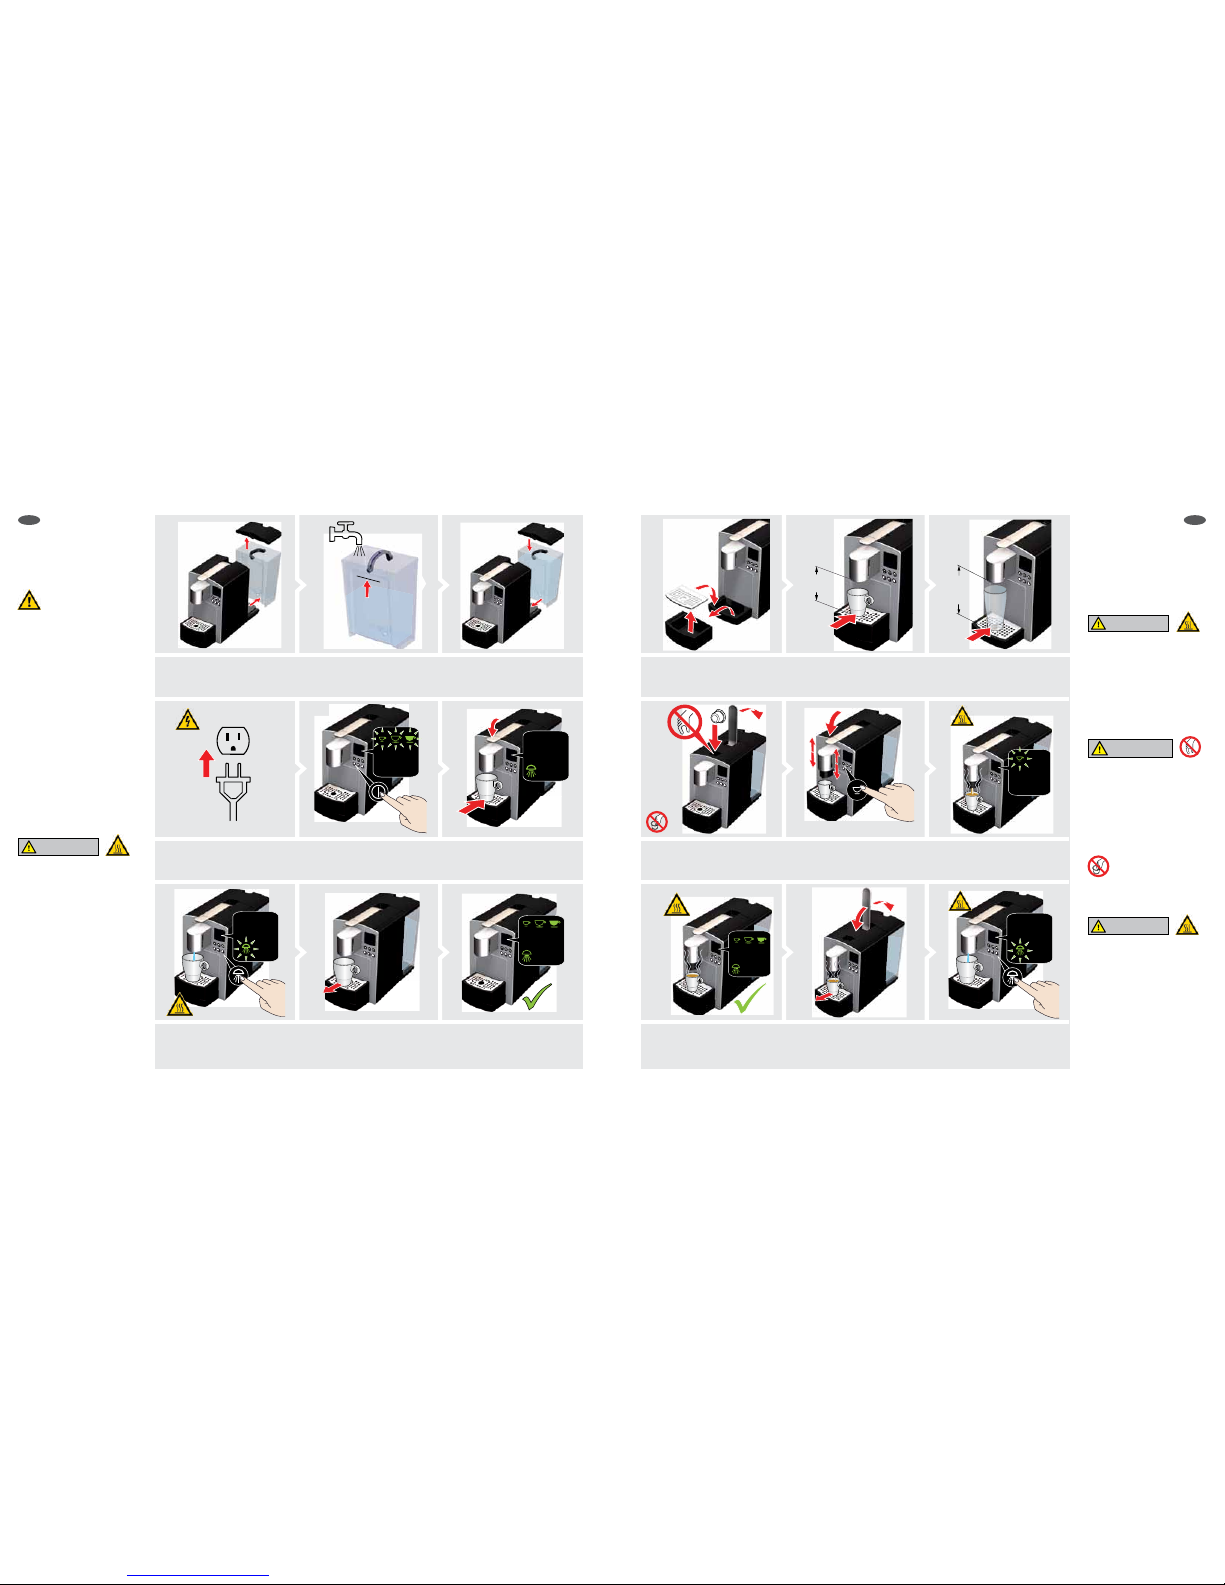
Preparing
beverages
If a p pl i an c e ha s be en ex po s ed t o
tempera tures be low free zing, all ow at lea st
three hou rs for t he applia nce to re ach room
temp era tur e b efo re st art up. A fro zen or
extre mely cold a pplia nce ma y not oper ate
properly.
WARNING
WARN ING: Mak e s ure the le ver is clo sed
completel y during use . Extre mely hot wa ter
runs thro ugh the app liance whe n operat ing
(brewi ng, d escal ing, c leani ng, ri nsing) . To
avoid the ri sk o f sc aldi ng o r o ther inju ry,
always keep the l ever i n the close d / do wn
position w hile machin e is opera ting. Do no t
reach under the spout and do not remo ve the
drip tray.
°C
°C
with upper drip tray, or with lower drip tray.Adjust drip tray to desired cup size—
Lift lever and insert pod. Brewing in progress. To stop the
brewingprocess, press anybutton.
Wait until beverage stops pouring.
Beverage is ready.
Lift and close lever to eject pod. After preparing a beverage, press the
Rinse button once to dispense water to
thoroughly rinse out the machine.
°C
max
4.3 in / 110 mm
max
6.3 in /
160 mm
°C
Adjust height of spout. Close lever
and choose beverage type (espresso,
brewed or milk).
1 A B
2 3 4
5 6 7
°C
°C
°C
°C
Fill water tank with fresh and cold
drinking water.
Remove water tank. Insert water tank.
Press On / Off button briefl y
(1second).
Check operating voltage on rating
plate. Please read important
safeguards on page 4.
Close lever completely. Place a
heat-safe cup under spout.
Press the Rinse button to star t rinsing
process.
Wait until rinsing process is finished.
Then empty cup. For first use: Repeat
steps 6–8 four more times to rinse the
machine thoroughly.
Appliance is ready for operation.
On
max
118 fl oz / 3.5 L
°C
°C
1 2 3
4 5 6
7 8 9
Please rea d th e saf ety inst ruct ions befor e
the first use .
If you decide to u se a water filter, sc rew filter
in water tank and rinse appliance with at least
6.76 fl oz / 20 0 ml wate r. Enable th e sett ing
“Filter available.” Refer to “Parameter setting:
Water filter” o n page 18.
Getting started
The spout can be moved eithe r downward or
upward with the help of the sliding device (on
both sides of th e spout).
WARNING
Danger of scaldi ng: D o not open the lever
during the bre wing proce ss. Do n ot r each
under the spout .
See Quick Star t Guide for mor e recipes.
CAUTION
CAUTIO N: There a re four sh arp need les that
punctur e the Veris mo™ System pods ins ide
the pod opening . To avoi d risk of injur y, do
not put your finger s in the pod open ing.
WARNING
WARNI NG: Make s ure the le ver is cl osed
completel y during use . Extre mely hot wa ter
runs thro ugh the app liance whe n operat ing
(brewin g, de scali ng, c leanin g, ri nsing). To
avoid the ri sk of s cald ing or other inj ury,
always keep the le ver in the closed / do wn
position w hile machin e is opera ting. Do no t
reach under the spout and do not remo ve the
drip tray.

10
EN
11
EN
Cleaning
themachine
(whenprompted)
Daily cleaning
Only use liquid detergents that are suitable
for the Verismo
™
System. Visit our website for
moreinformation.
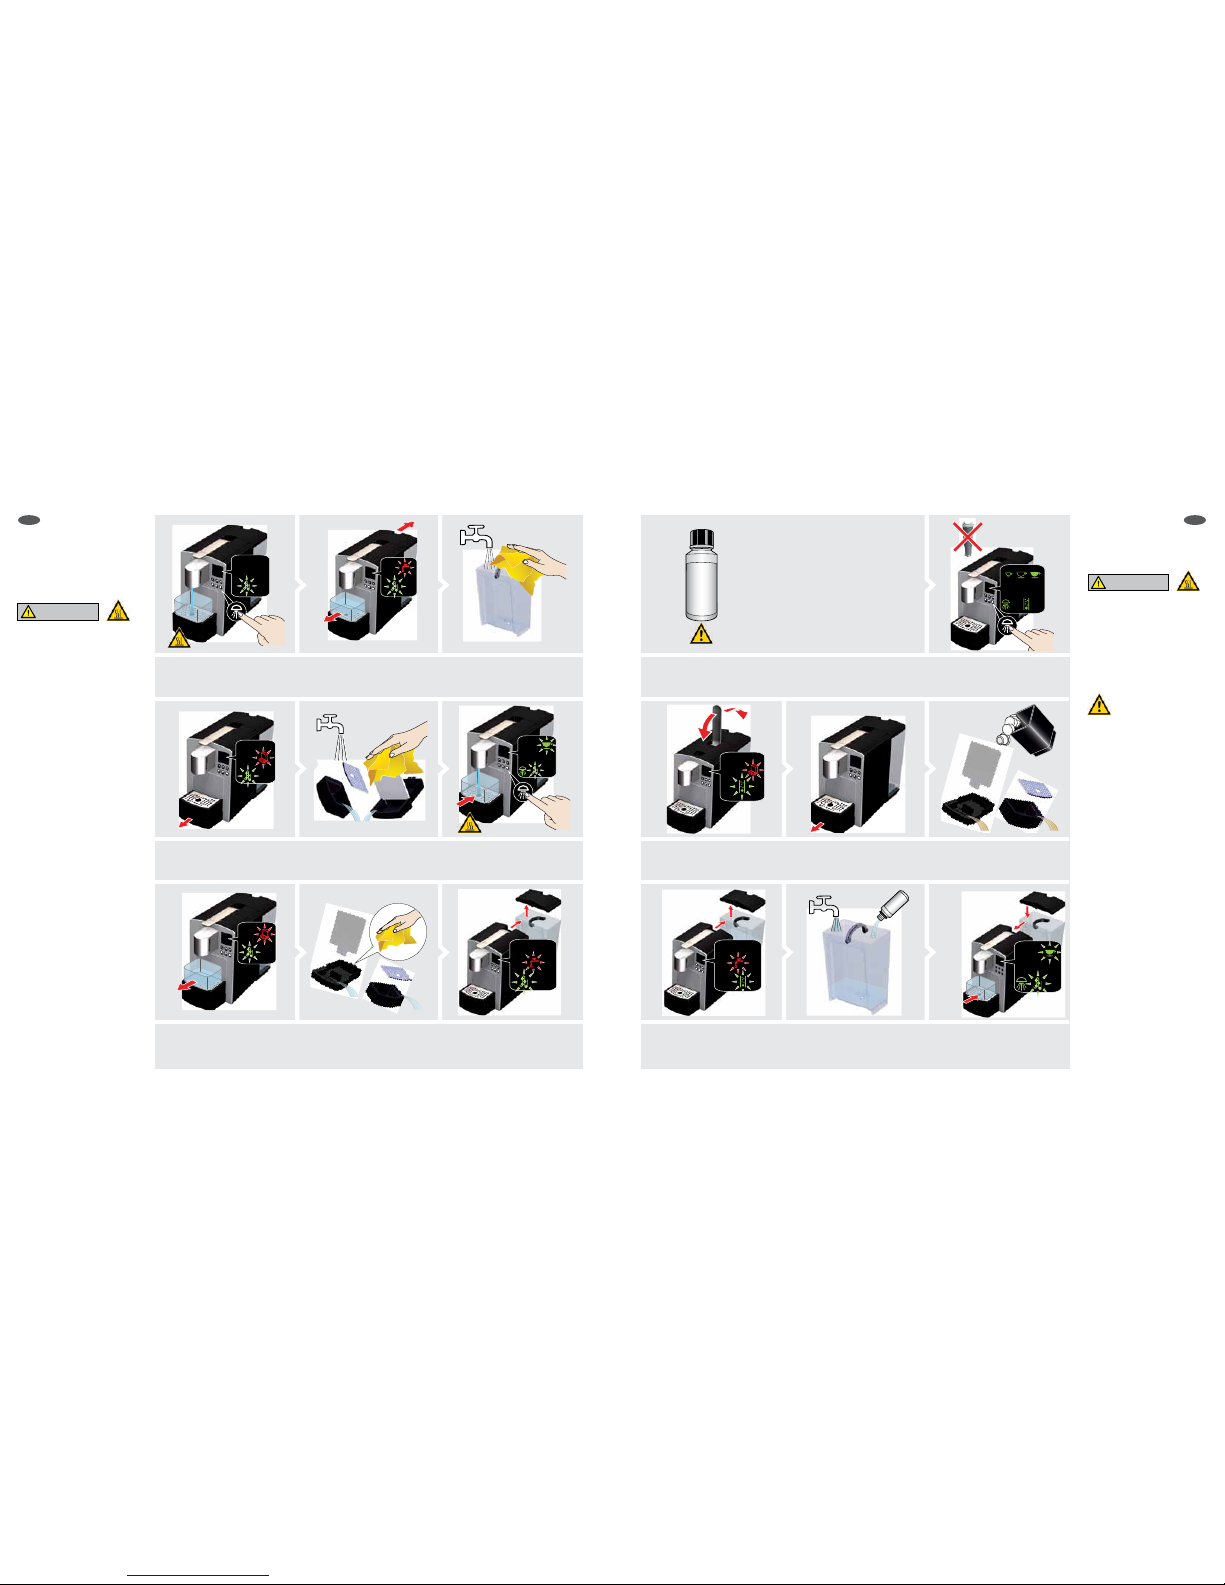
Lift and close lever. Remove drip trays with used pod
container.
(Before removing th e drip trays, make sure
thatthe spoutis in its upp ermost positio n.)
Remove and empty water tank.
The filter has to be removed
beforecleaning.
Fill water tank with detergent and
water according to cleaning chemical
manufacturer�s directions .
°C
Empty containers and then reinsert
into the appliance.
Insert water tank. Place a container
under spout.
After 100 beverage preparations, the appliance aut omatically prompts for
cleaning (factory set ting).
Press the Rinse button for at least
3seconds. Remove the water filter.
min
20.29 floz /
0.6 L
1 2
3 4 5
6 7 8
Carefully r ead the inst ructions f or using the det ergent
and comply wit h all safety i nstruct ions.
Place a cup under spout. Push Rinse button briefly to rinse
theappliance.
Switch off appliance (or machine
will automatically shut off after
30minutes).
Empty cup.
Lift and close lever.
Press Off
min 3 sec
Take drip trays apart. Empty all containers. Clean and reassemble all parts.
°C
°
C
°C
Remove drip trays, used pod container
and water tank.
(Before removing th e drip trays, make sure
thatthe spoutis in its upp ermost positio n.)
1 2 3
4 5 6
7 8 9
°C
Risk of damage: O nly use a mois t cloth and
if nece ssar y a mild det erge nt (neve r u se
abrasive detergents). Do not wash parts of the
appliance in the dishwasher. Before insertin g
the lower drip tr ay, dry the conn ector.
WARNING
WARNI NG: Make s ure the le ver is cl osed
completel y during use . Extre mely hot wa ter
runs thro ugh the app liance whe n operat ing
(brewin g, de scali ng, c leanin g, ri nsing). To
avoid the ri sk of s cald ing or other inj ury,
always keep the le ver in the closed / do wn
position w hile machin e is opera ting. Do no t
reach under the spout and do not remo ve the
drip tray. Take care when empt ying th e drip
trays an d pod con tainer. Res idual wat er can
be very hot.
If t he c leanin g pr ocess is inter rupte d, t he
appliance automati cally re turns t o cleanin g
mode when swi tched on again.
For heal th reas ons it is re comme nded to
maintain the fac tory sett ing of the automatic
prompt for cle aning.
WARNING
WARNI NG: Make s ure the le ver is cl osed
completel y during use . Extre mely hot wa ter
runs thro ugh the app liance whe n operat ing
(brewin g, de scali ng, c leanin g, ri nsing). To
avoid the ri sk of s cald ing or other inj ury,
always keep the le ver in the closed / do wn
position w hile machin e is opera ting. Do no t
reach under the spout and do not remo ve the
drip tray.
Carefully r ead the inst ructions f or using
the detergen t and comply wit h all safet y
instruc tions.
12
EN
13
EN
Descaling
themachine
(whenprompted)
Cleaning
themachine
(whenprompted)
continued
The water hardness setting deter mines when the symbol for descaling lights up
in the display. (See page 18.)
Empty containers and then reinsert
into the appliance.
Fill water tank with descaling agent
and water according to descaling
chemical manufacturer�s direc tions.
Insert water tank. Place a container
under spout.
Remove and empty water tank. Filter
has to be removed before descaling.
Remove drip trays with used pod
container.
(Before removing th e drip trays, make sure
thatthe spoutis in its upp ermost positio n.)
Lift and close lever.
°C
Press the Rinse button for at least
3seconds.
1 2
3 4 5
6 7 8
Remove water filter.
min
20.29 fl oz/
0.6 L
Press the Rinse button. Rinses in
intervals until empty.
Remove drip trays with used pod
container.
(Before removing th e drip trays, make sure
thatthe spoutis in its upp ermost positio n.)
Remove water tank. Fill tank with fresh
drinking water and reinsert it.
Place a container under spout. Press
the Rinse button. Rinses until water
tank is empty.
Wait until rinsing process is finished,
then empty container.
Remove and empty drip trays, drying
connector on lower tray with a dry cloth.
Reinsert trays with pod container.
Clean water tank. Refill water tank
(min. 10.14 fl oz / 0.3 L) and reinsert it.
Wait until rinsing process is finished,
then empty container.
Empty and clean drip trays, drying
connector on lower tray with a dry cloth.
Reinsert trays with pod container.
9 10 11
12 13 14
15 16 17
WARNING
WARNI NG: Make s ure the le ver is cl osed
completel y during use . Extre mely hot wa ter
runs thro ugh the app liance whe n operat ing
(brewin g, de scali ng, c leanin g, ri nsing). To
avoid the ri sk of s cald ing or other inj ury,
always keep the le ver in the closed / do wn
position w hile machin e is opera ting. Do no t
reach under the spout and do not remo ve the
drip tray.
If the desc aling p roces s is i nterru pted, the
appliance autom atically ret urns to descal ing
mode when swi tched on again.
WARNING
WARNI NG: Make s ure the le ver is cl osed
completel y during use . Extre mely hot wa ter
runs thro ugh the app liance whe n operat ing
(brewin g, de scali ng, c leanin g, ri nsing). To
avoid the ri sk of s cald ing or other inj ury,
always keep the le ver in the closed / do wn
position w hile machin e is opera ting. Do no t
reach under the spout and do not remo ve the
drip tray.
Only use descaling agents that are suitable
for the Verismo
™
System. Visit our website for
moreinformation.
Carefully r ead the inst ructions f or using the des caler
and comply wit h all safety i nstruct ions.
Carefully r ead the inst ructions f or using
the descale r and comply with a ll safety
instruc tions.
14
EN
15
EN
Changing the filter
(whenprompted)
Descaling
themachine
(whenprompted)
continued
°C
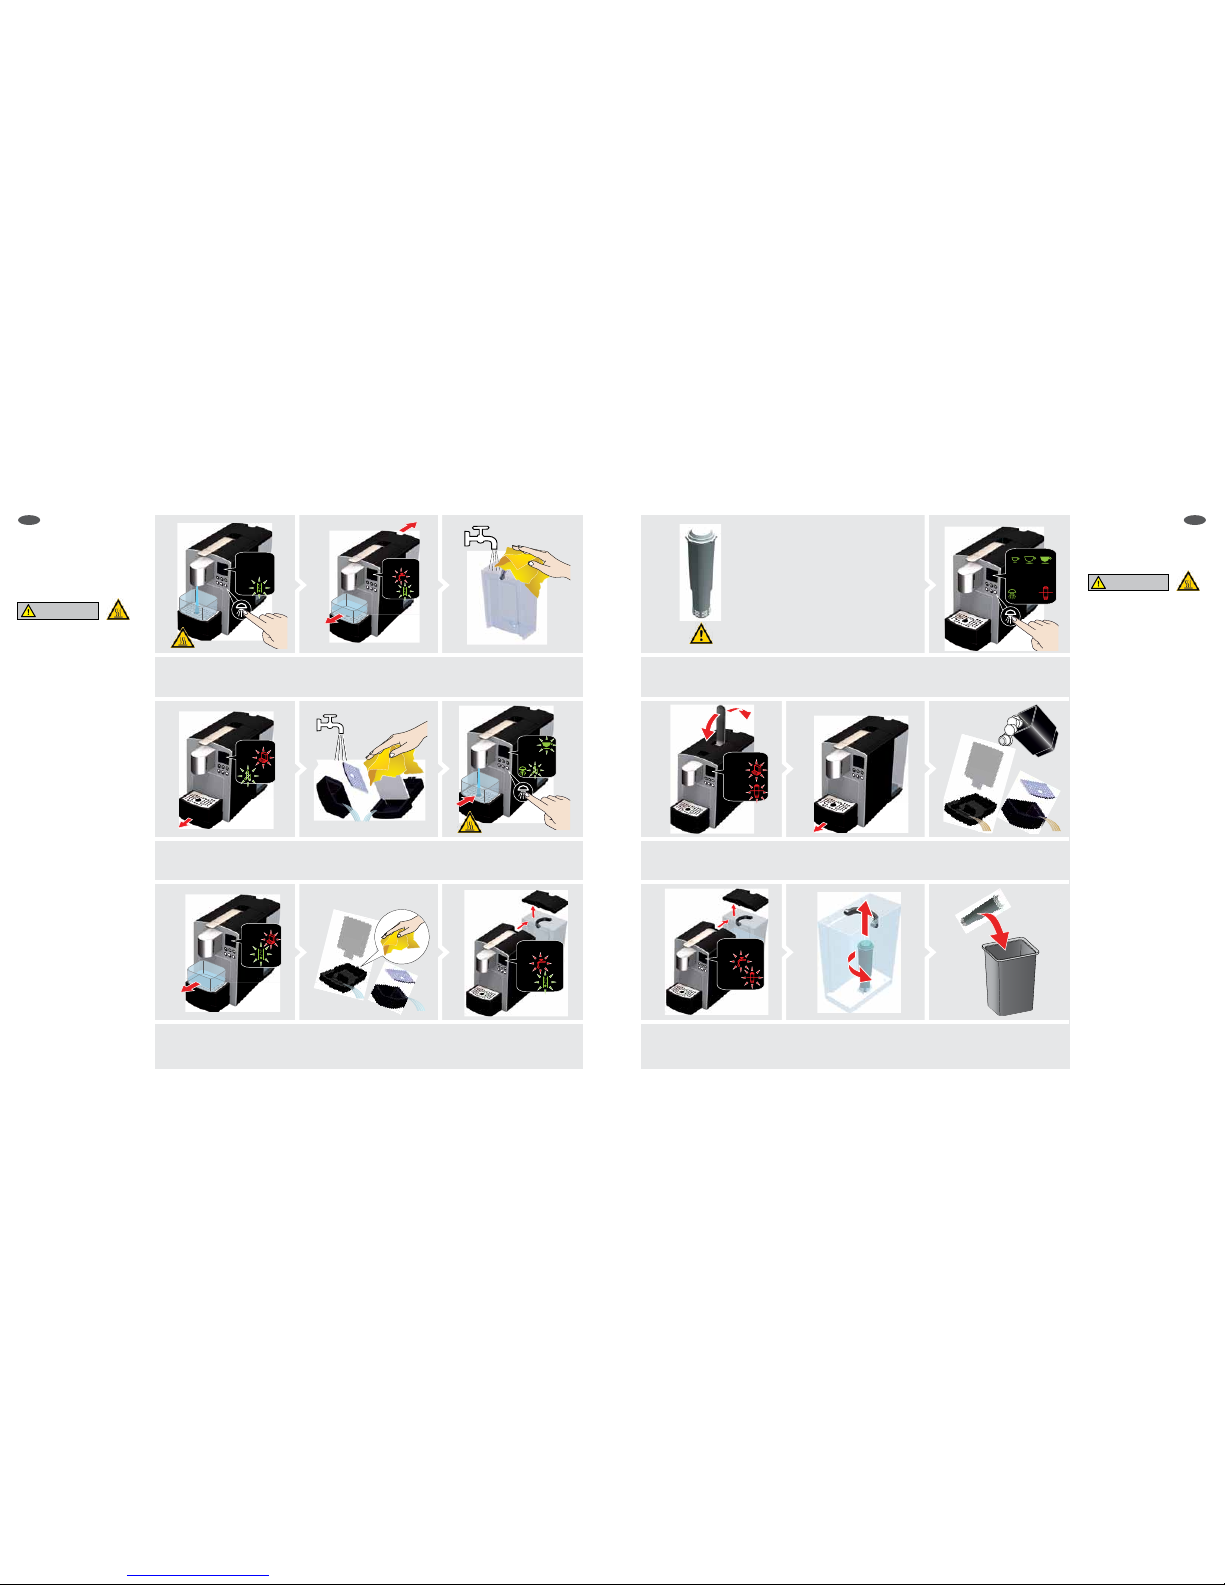
Unscrew used water filter. Discard used water filter.
If setting “Filter available” has been act ivated, the appliance automatically
prompts for water filter replacement after 13.2 gallons / 50 L water.
Empty all containers and then reinsert.Remove drip trays with used pod
container.
(Before removing th e drip trays, make sure
thatthe spoutis in its upp ermost positio n.)
Lift and close lever.
Remove and empty water tank.
Press the Rinse button for at least
3seconds.
1 2
3 4 5
6 7 8
Press the Rinse button. Rinses in
intervals until empty.
Remove drip trays with used pod
container.
(Before removing th e drip trays, make sure
thatthe spoutis in its upp ermost positio n.)
Remove water tank. Fill tank with fresh
drinking water and reinsert it.
Wait until rinsing process is finished,
then empty container.
Remove and empty drip trays, drying
connector on lower tray with a dry cloth.
Reinsert trays with pod container.
Wait until rinsing process is finished,
then empty container.
Clean water tank. Refill water tank
(min. 10.14 fl oz / 0.3 L) and reinsert it.
Empty and clean drip trays, drying
connector on lower tray with a dry cloth.
Reinsert trays with pod container.
9 10 11
12 13 14
15 16 17
WARNING
WARNI NG: Make s ure the le ver is cl osed
completel y during use . Extre mely hot wa ter
runs thro ugh the app liance whe n operat ing
(brewin g, de scali ng, c leanin g, ri nsing). To
avoid the ri sk of s cald ing or other inj ury,
always keep the le ver in the closed / do wn
position w hile machin e is opera ting. Do no t
reach under the spout and do not remo ve the
drip tray.
The w ater filter symbo l will conti nue t o be
displ ayed in red unt il the fil ter has bee n
replaced.
If the water filter rep lacement is inter rupted,
the appliance au tomatical ly returns to “ filter
replacement“ mode when switc hed on again.
To prevent hygie ne risks, it i s recommende d
to change the wa ter filter ever y two month s.
Place a container under spout. Press
the Rinse button. Rinses until water
tank is empty.
Carefully r ead the inst ructions f or using the wat er
filter and compl y with all safe ty instr uctions.
Only use a water filter that is suitable for
the Verismo™ System. Visit our website
for more information.

16
EN
17
EN
The w ater fi lter symbol appe ars o nly if the
sett ing "F Ilte r avai labl e" was p revi ousl y
activat ed.
Manually enabling
the cleaning,
descaling or filter
changefunctions
Changing the filter
(when prompted)
continued
°C
°C
°C
Press the Rinse button for at least
3seconds.
Cleaning symbol blinks. For the
cleaning process, please follow the
operating steps on pages 11–12.
Filter symbol blinks. For filter
replacement, please follow the
operating steps on pages 15–16.
To return to descaling function, press
the Rinse button briefly.
Descaling symbol blinks again
(program loop).
Switch off appliance to exit
programloop.
Descaling symbol blinks. For the
descaling process, please follow the
operating steps on pages 13–14.
°C
For next function, press the Rinse
button briefly.
For next function, press the Rinse
button briefly.
1 2 3
4 5 6
7 8 9
Screw in new water filter. Place a container under spout.Refill water tank completely and
reinsert it.
Press the Rinse button. Remove drip trays with used pod
container.
(Before removing th e drip trays, make sure
thatthe spoutis in its upp ermost positio n.)
Appliance is ready for operation. Empty and clean drip trays. Wipe
connector on lower drip tray with
adrycloth.
Reinsert drip trays with pod container.
Appliance heats up.
°C
max
118 fl oz / 3.5 L
min
8.45 fl oz
/ 0.25 L
Wait until rinsing process is finished,
then empty container.
9 10 11
12 13 14
15 16 17
WARNING
WARNI NG: Make s ure the le ver is cl osed
completel y during use . Extre mely hot wa ter
runs thro ugh the app liance whe n operat ing
(brewin g, de scali ng, c leanin g, ri nsing). To
avoid the ri sk of s cald ing or other inj ury,
always keep the le ver in the closed / do wn
position w hile machin e is opera ting. Do no t
reach under the spout and do not remo ve the
drip tray.
Afte r i nser ting the f ilter, ch eck if set ting
“Fi lte r e xis tin g“ is a cti vat ed . Re fe r t o
instruction s under “Parameter setting: Water
filter “ (s ee p age 18). A n alr eady act ivate d
setting re mains activ e.
 Loading...