Page 1
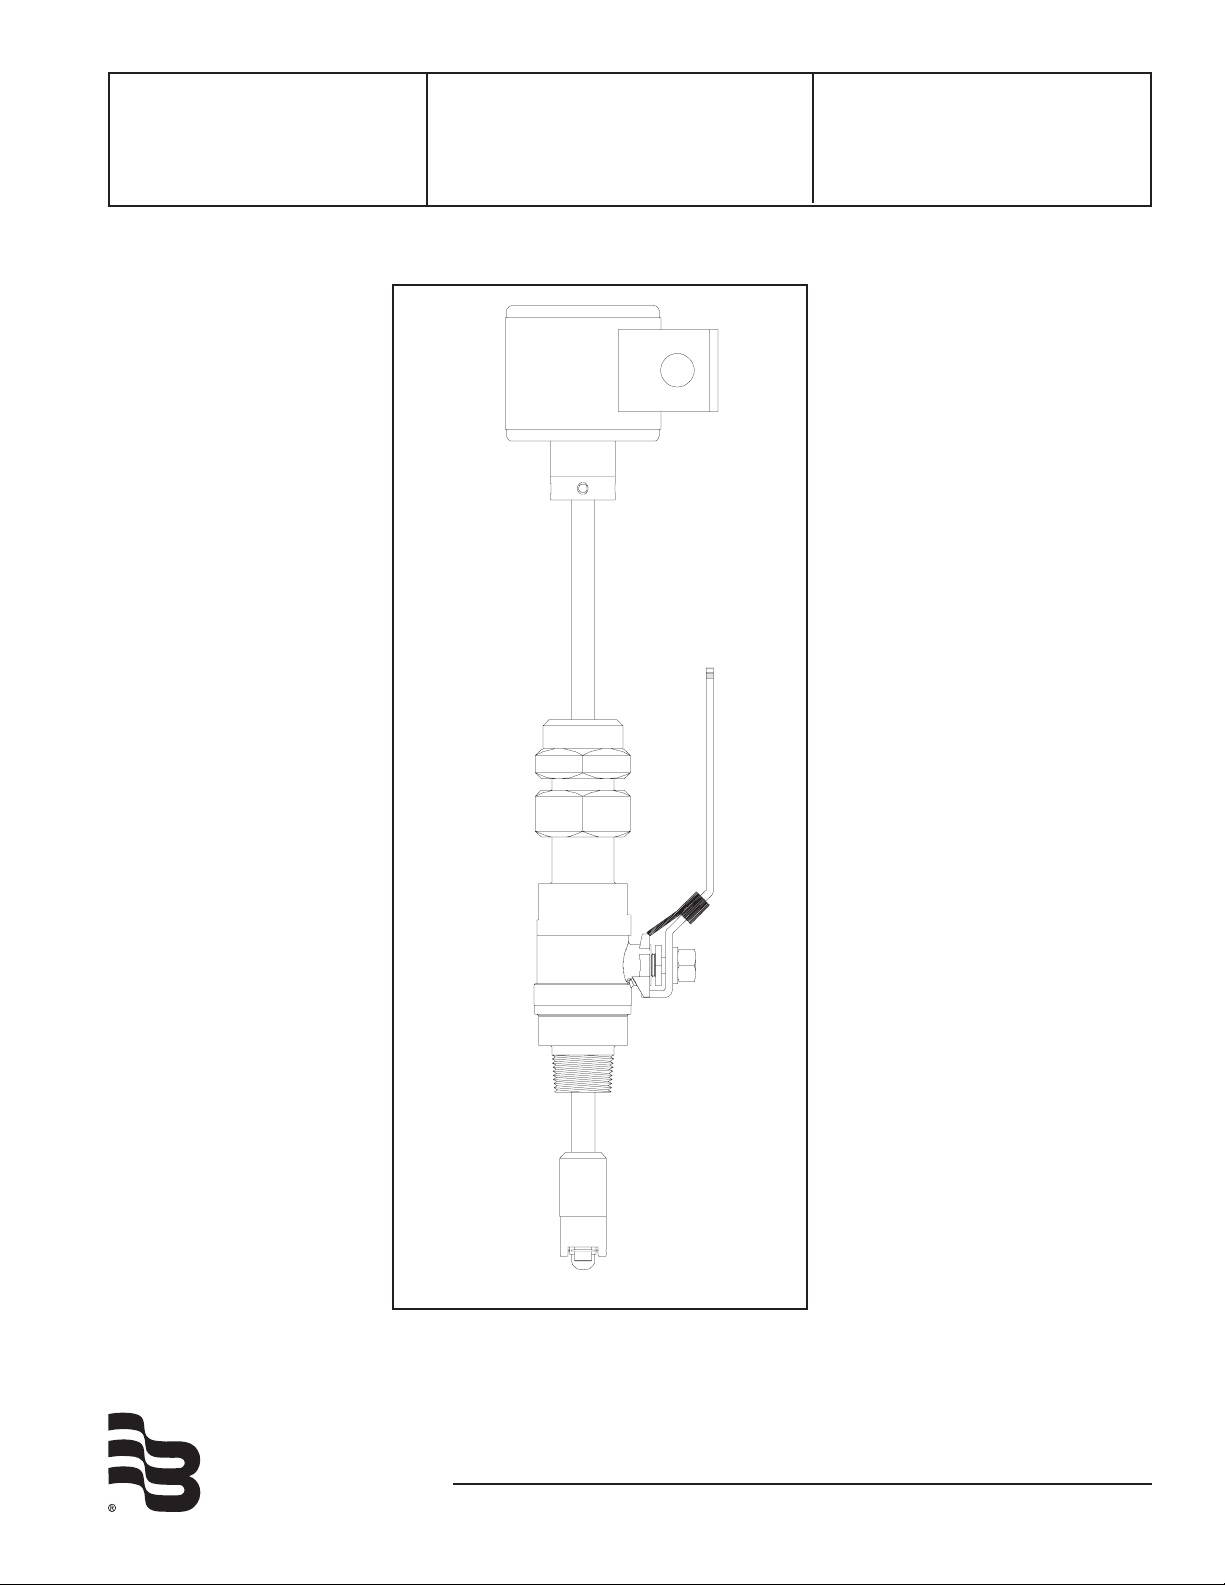
SDI Series
Insert Style Flow Sensors
Installation &
Operation Manual
BadgerMeter, Inc.
PN# 72034
1-09 Rev B8
Page 2

(This page intentionally left blank.)
2
Page 3
Introduction
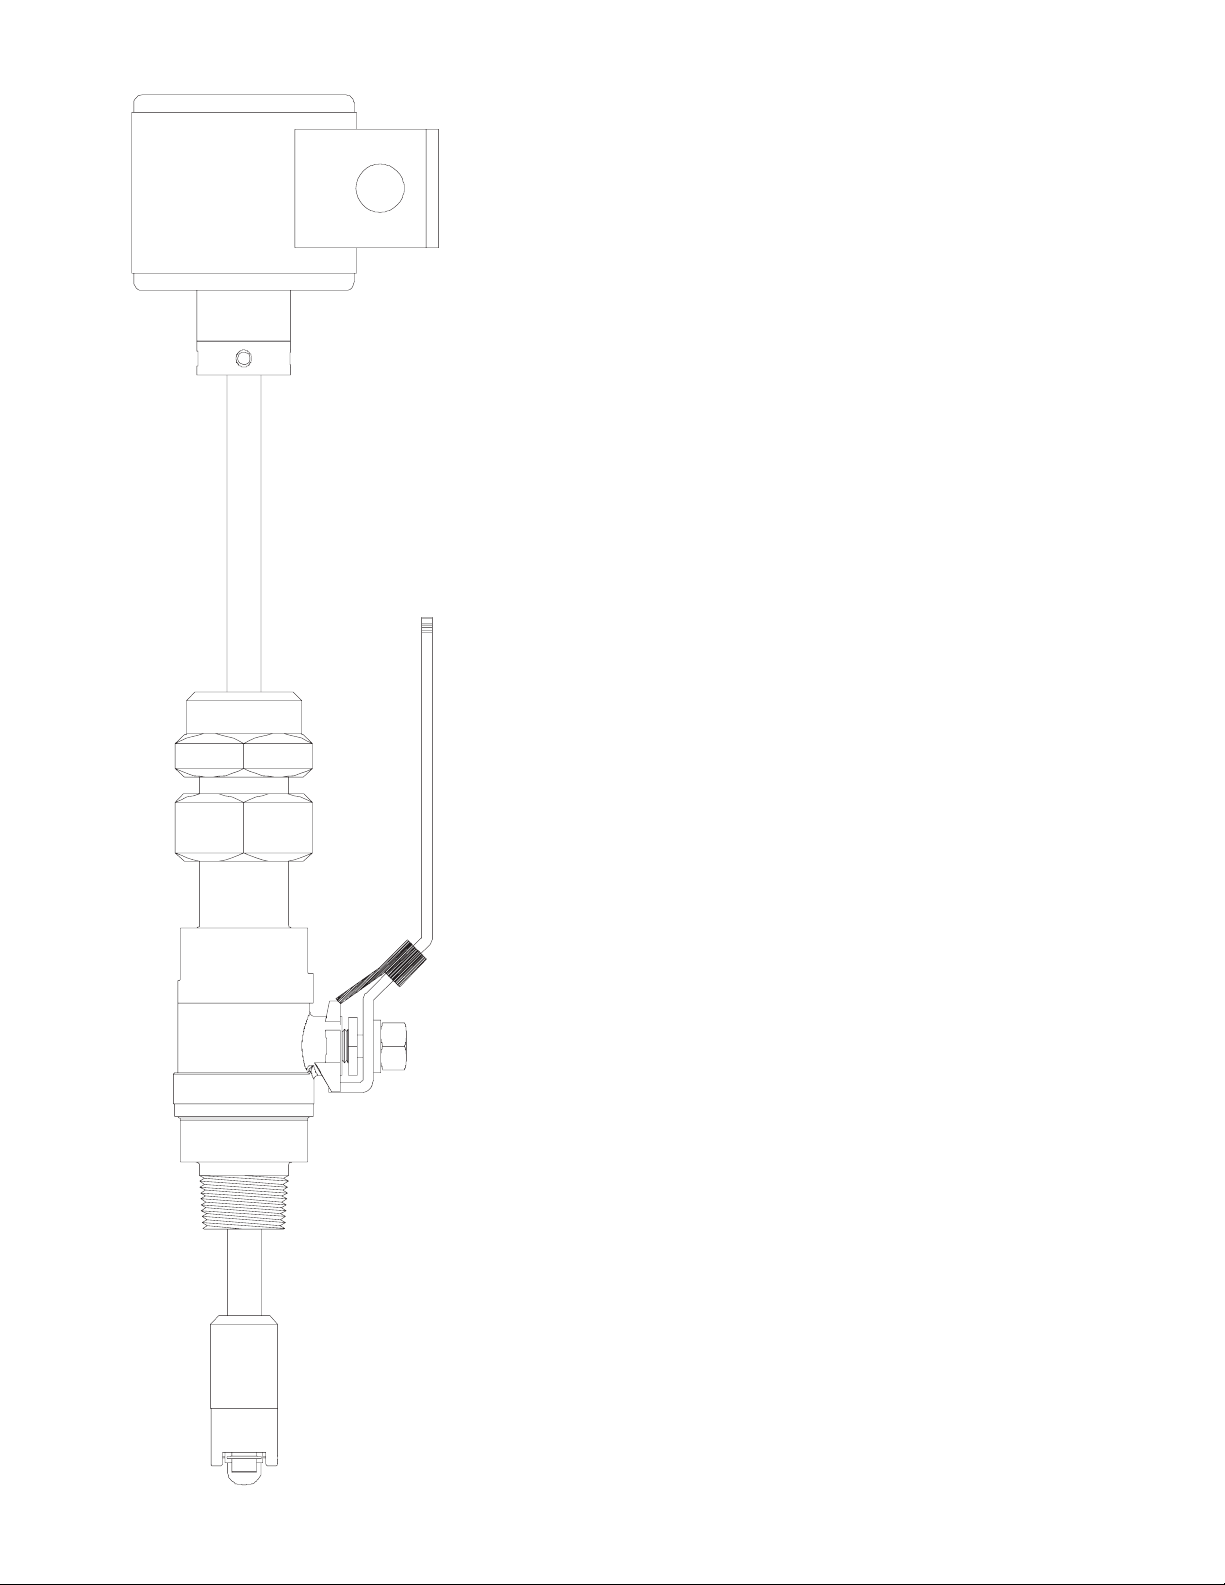
The Data Industrial SDI Series impeller ow sensor offers unparalleled performance for liquid ow measurement in closed pipe
systems in an easy to install economical package. Impeller sensors
offer a quick response to changes in ow rate and are well suited to
ow control and batch type applications in addition to ow monitoring. The new four-bladed impeller design is rugged, non-fouling and
does not require custom calibration.
Coupled with the proprietary patented digital detection circuit, the
sensor measures ows from under 0.3 feet per second to over
20 fps regardless of the conductivity or turbidity of the liquid. The
standard frequency output produces a low impedance square wave
signal proportional to ow rate that may be transmitted up to 2000
feet without amplication. Models are available to measure ow in
one or both directions.
All SDI insert sensors are mounted on the pipe using a 1” tap. As
with any insert sensor, a pipe saddle or weld-on tting is preferred
over a service tee because it causes fewer disturbances to the ow.
Models Available
Direct insert sensor models are installed in piping congurations
that are not in service or under pressure.
Hot tap insert sensor models feature isolation valves and mounting hardware to install or remove the sensor from a pipeline that
would be difcult to shut down or drain. In a true “hot tap” installation the sensor is mounted in the pipe under pressure by attaching
a service saddle or weld-on tting to the pipe and mounting the
isolating valve and nipple to the threaded connection. A hole is then
cut in the wall of the pipe through the valve using a commercial tapping machine with a 1” size cutter. Once the hole is cut, the tapping
machine is removed and the valve is shut. Then the sensor assembly is mounted to the isolation valve and extended into the pipeline
to measure ow.
Even in new construction a hot tap sensor may be appropriate for
service considerations.
The small stem diameter allows the sensor to be inserted into the
pressurized pipeline by hand without the need for an installation
tool. The mounting hardware holds the sensor rmly in place at the
3
Page 4

correct depth and alignment.
SDI Series Hot Tap Ordering Matrix
SDI 0 H1 N 0 0 - 0 2 0 0
Material
Stainless Steel/PPS Tip 0
Stainless Steel/PEEK Tip 2
Type
Hot Tap for Pipe 1-1/2" thru 10" * H1
Hot Tap for Pipe 12" thru 36" * H2
Hot Tap for Pipe 36" and UP* H3
Electronic Housing
NEMA 4X N
Output
Standard Frequency Pulse 0
Analog 4-20mA 1
Scaled Pulse 2
Bi-Directional, 4-20mA + Direction [PPS tip Only] 5
Bi-Directional, Scaled Pulse [PPS tip Only] 6
Display
No Display 0
LCD Option [not available with output option 0] 1
O-Ring
Viton
®
0
Shaft
Tungsten Carbide [Standard] 2
Hastelloy
®
C-276 [optional - consult factory] 1
Zirconia Ceramic [optional - consult factory] 0
Impeller
Stainless Steel 0
Bearing
Torlon
®
0
*Pipe size for reference only-Depending on pipe material, tapping saddle, or existing
hardware, longer sensor length may be required. Consult Factory
SDI Series Direct Insert Ordering Matrix
SDI 0 D1 N 0 0 - 0 2 0 0
Material
Stainless Steel/PPS Tip 0
Brass/PPS Tip 1
Stainless Steel/PEEK Tip 2
Type
Direct Insert for Pipe 1-1/2" thru 10" * D1
Direct Insert for Pipe 12" thru 36" * D2
Direct Insert 36" and UP* D3
Electronic Housing
NEMA 4X N
Output
Standard Frequency Pulse 0
Analog 4-20mA 1
Scaled Pulse 2
Display
No Display 0
LCD Option [not available with output option 0] 1
O-Ring
Viton
®
0
Shaft
Tungsten Carbide [Standard] 2
Hastelloy
®
C-276 [optional - consult factory] 1
Zirconia Ceramic [optional - consult factory] 0
Impeller
Stainless Steel 0
Bearing
Torlon
®
0
*Pipe size for reference only-Depending on pipe material, tapping saddle, or existing
hardware, longer sensor length may be required. Consult Factory
Electronic Outputs
Standard Frequency
Sensor output is a pulse proportional to ow. The
signal is similar to all 200 Series Data Industrial
ow sensors and will interface with all existing
Data Industrial transmitters and monitors. The
power supply to the sensor and the output signal
from the sensor is carried on the same two wires.
Wire connections are made at screw terminals on
removable headers inside the NEMA 4X housing.
Analog Output
The Sensor is also available with a two-wire loop
powered 4-20 mA output. The analog output is
produced by an on-board micro-controller for
precise, drift-free signals. The unit is programmed
from a computer using Windows based software
and a Data Industrial A-301 connection cable.
Units may be pre-programmed at the factory or
eld programmed. All information is stored in
non-volatile memory in the ow sensor.
Scaled Pulse Output
The scaled pulse is produced by an on-board
micro-controller for precise, accurate outputs.
This option may be programmed to produce
an isolated dry contact closure scaled to any
number of engineering units of measure.
Sensors may be pre-programmed at the factory
or eld programmed using a Data Industrial
A-301 connection cable and a Windows based
software program. All information is stored in
non-volatile memory in the ow sensor. This is a
four-wire option.
Bi-directional Flow- Analog Output
This option provides a programmable 4-20 mA
signal proportional to ow rate and a contact
closure to indicate the direction of ow. All
programming is accomplished as previously
mentioned. The user can program the unit for
pipe size, ow scale and the direction of ow.
This is a six-wire option.
Bi-directional Flow- Scaled Pulse Output
This option provides the user with a choice
of outputs. In one case the sensor provides
an output scaled to the required number of
engineering units on one set of terminals and a
contact closure to indicate the direction of ow on
another. The other choice provides two isolated
scaled pulse outputs, one for each direction.
Programming the output choice, pipe size, output
scale and direction of ow by the user are also
accomplished by using a PC with Data Industrial
software and A-301 connection cable. This option
4
Page 5
Display Options-
5 x Pipe Dia
DATA INDUSTRIAL
SDI Series Sensor
10 x Pipe Dia
FLOW
All models except the standard frequency output version may also be equipped with a display. Integrated into the
NEMA 4 housing, the 8 digit LCD may be programmed to show rate of ow, ow total or toggle between the two. Bidirectional models also show ow direction.
Mechanical Installation
The accuracy of ow measurement for all insert type ow measuring devices is highly dependent on proper location
of the sensor in the piping system. Irregular ow velocity proles caused by valves, ttings, pipe bends, etc. can lead
to inaccurate overall ow rate indications even though local ow velocity measurement may be accurate. A sensor
located in the pipe that is partially full or where it can be affected by air bubbles, oating debris, or sediment may not
achieve full accuracy and could be damaged.
Data Industrial ow sensors are designed to operate reliably under adverse conditions, but the following
recommendations should be followed to ensure maximum system accuracy:
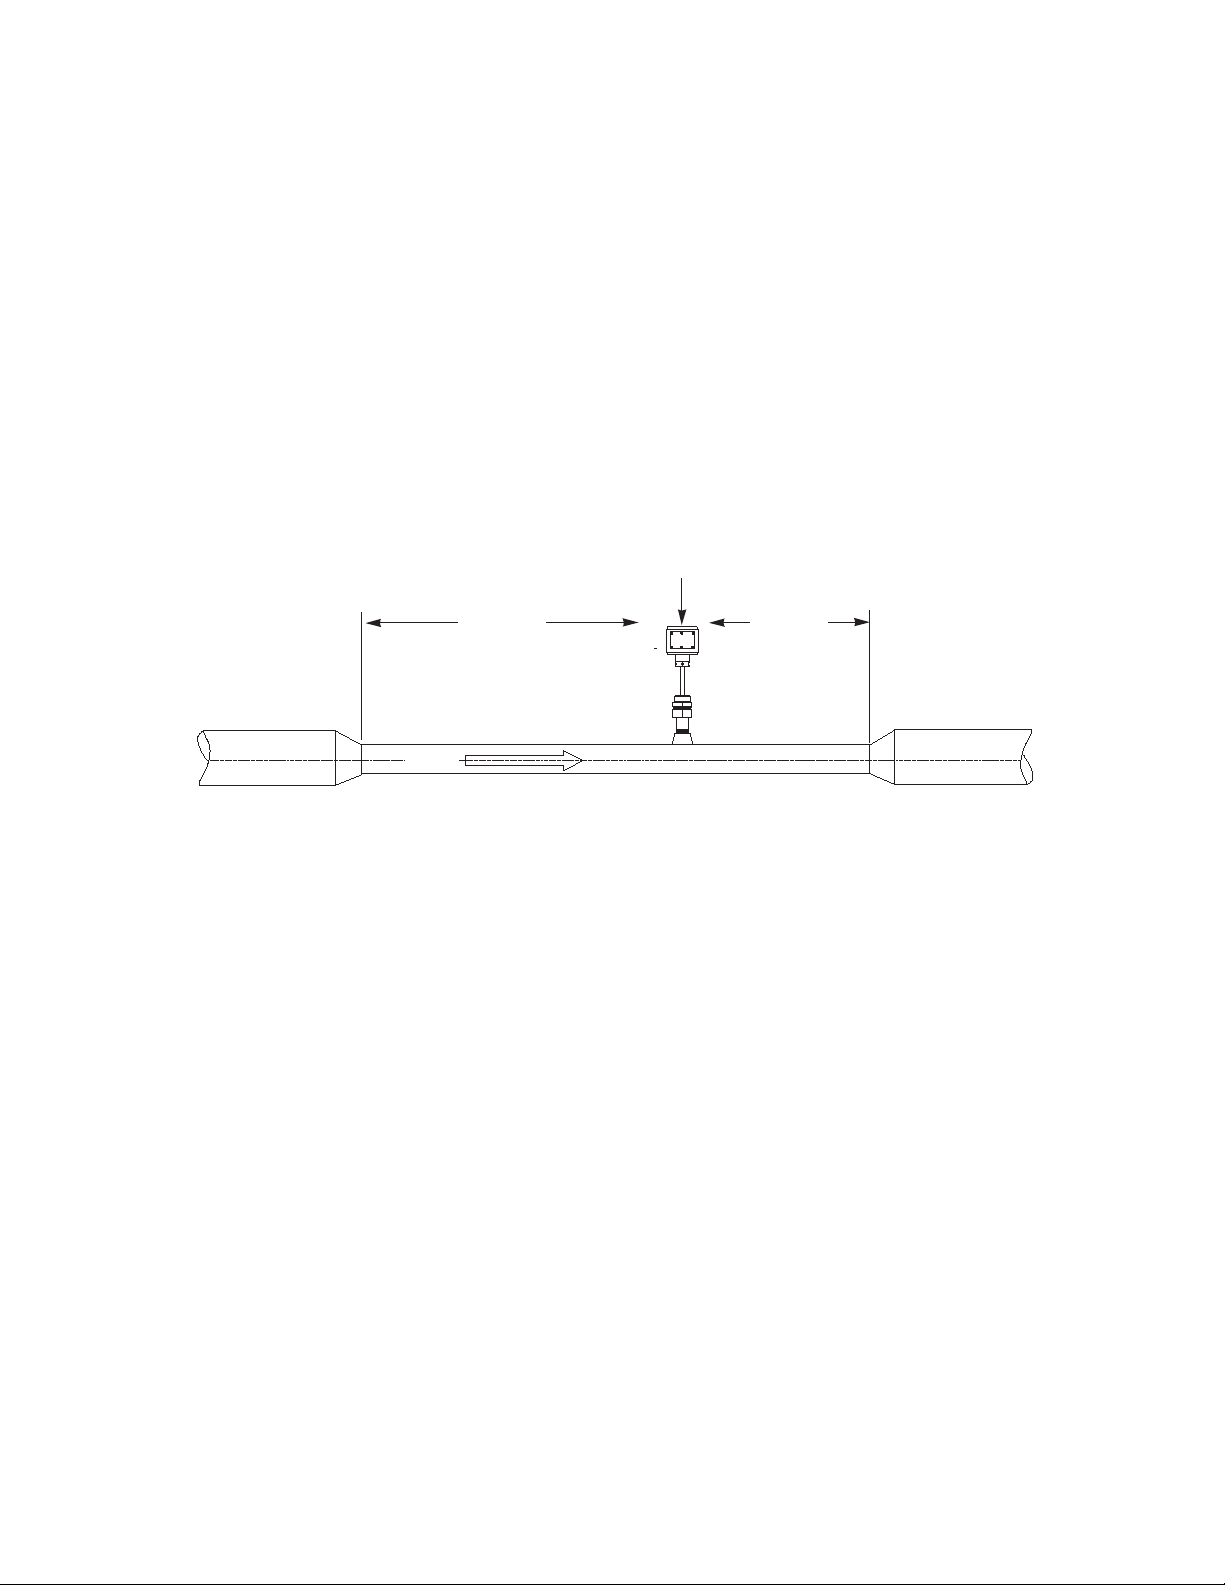
1) Choose a location along the pipe where there is straight pipe for a distance of 10 pipe diameters upstream and 5
pipe diameters downstream of the sensor. Pipe bends, valves, other ttings, pipe enlargements and reductions or
anything else that would cause a ow disturbance should not be present in this length of pipe.
2) The recommended tap location around the circumference of a horizontal pipe is on top. If trapped air or debris will
interfere, then the sensor should be located around the pipe from the top preferably not more than 45 degrees
from top dead center. The sensor should never be located at the bottom of the pipe, as sediment may collect
there. Locations off top dead center cause the impeller friction to increase, which may affect performance at low
ow rates. Any circumferential location is correct for installation in vertical pipes.
5
Page 6
Pipe Saddle
(ref.)
Mounting
Adapter
Gasket
(ref)
15 3/4” *
4.23”
0.660”
Handtight Engagement + Wrench Makeup
Per ANSI/ASME B1.20.1-1993, R1992
* Pipe Sizes for reference only - Depending on pipe material, tapping
saddle, or existing hardware longer sensor length may be required Contact Factory.
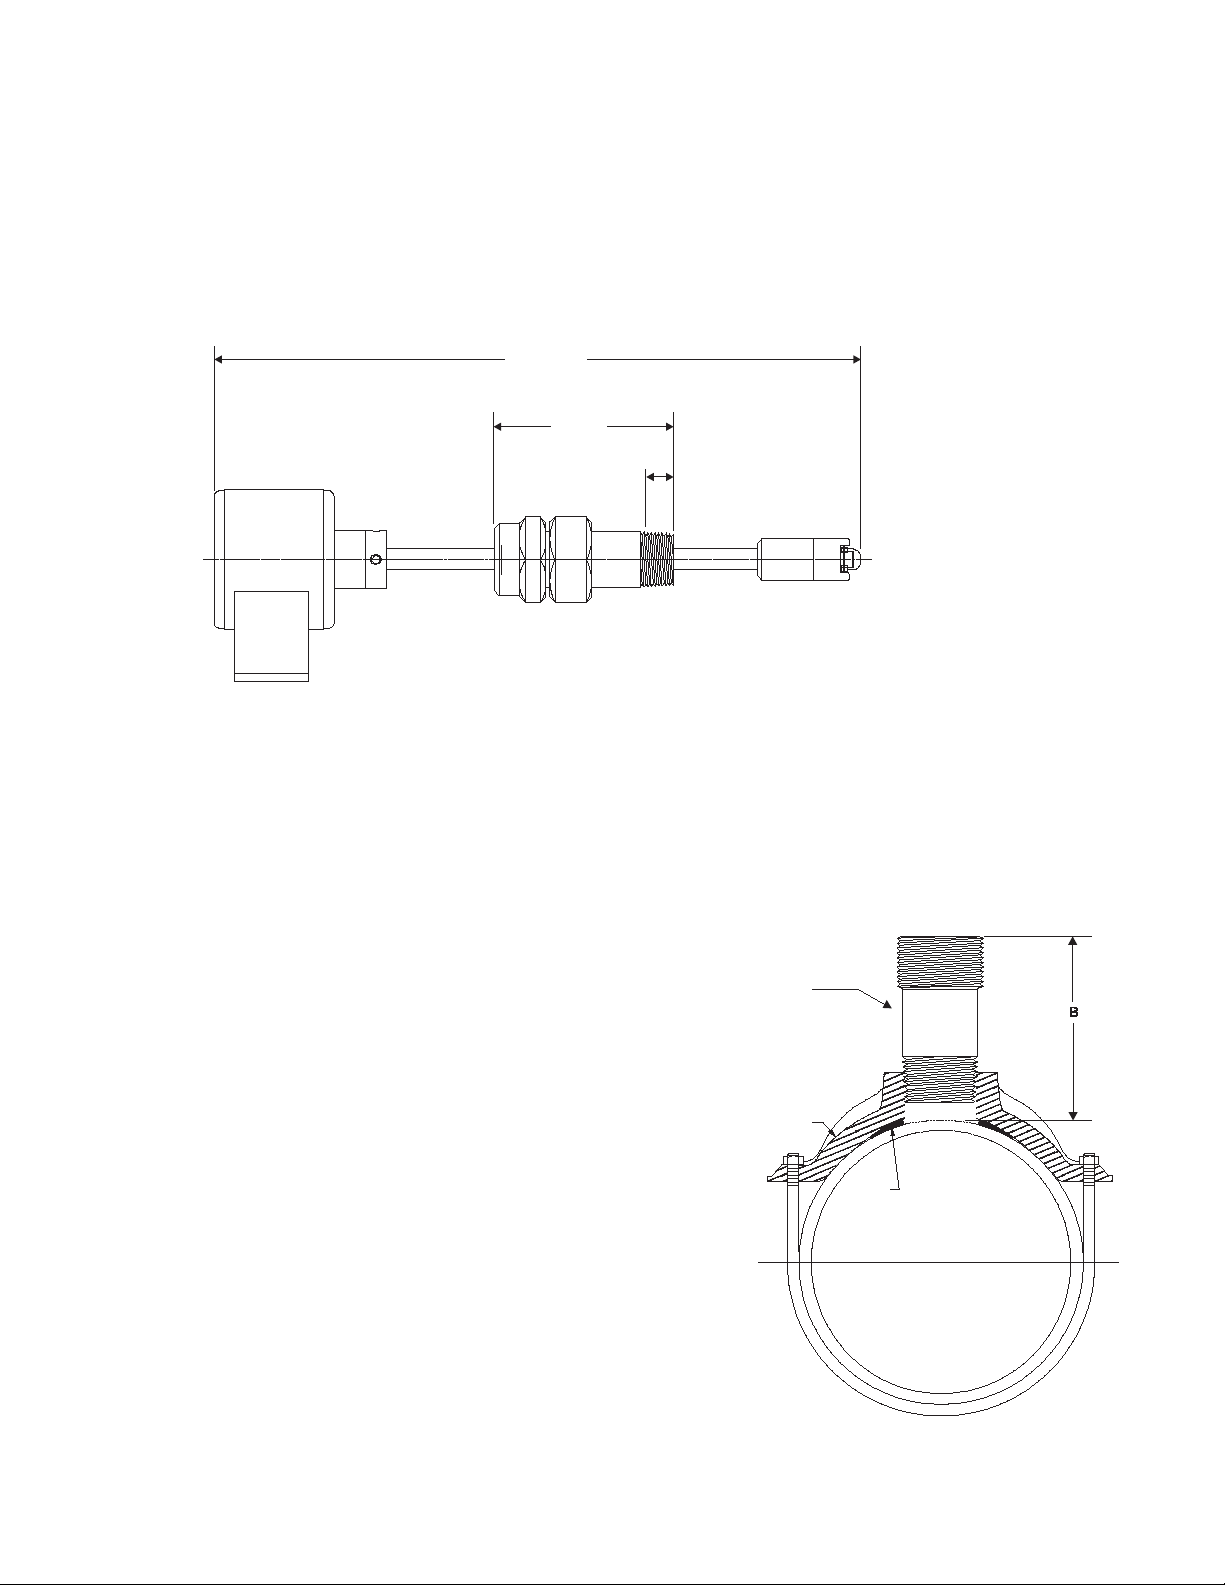
3) Insertion depth is critical to accuracy. The algorithm used to convert impeller motion into ow was developed
through ow tests in an independent calibration laboratory. The impeller must be located in the same position in
the pipe as it was in the calibration test for the impeller frequency to accurately describe the same liquid velocity.
Detailed installation instructions on the following pages include methods for ensuring correct insertion depth.
4) Alignment of the sensor is also important. The impeller shaft must be perpendicular to the ow for accuracy.
Alignment instructions are also included on the following pages.
also requires six wires.
Installation for Direct insert models
These instructions are for the installation of ow sensors
into piping systems that are not under pressure at the time
of installation. If the line must be tapped under pressure, a
hot tap style sensor must be used. See following section
for hot tap installation instructions.
The insertion depth and alignment of the sensor are critical to the
accuracy of the ow measurement. The impeller must be at the
same location in the pipe as it was during calibration. Data Industrial
provides sensors with different stem lengths. Longer stems are
intended for use in larger diameter pipes and shorter stems for use in
smaller pipelines. However stem length has no affect on the operation
of the sensor provided that the impeller is positioned correctly in the
pipe.
Direct insert models are available in one stem length designated
D1. They are intended for nominal pipe diameters from 1 1/2” to 10”.
However, pipe with extra thick walls, existing linings, or unusual tapping hardware may require longer length sensors - Consult factory.
For larger pipe sizes hot tap style sensors equipped with an isolation
valves are recommended.
The preferred method of installation is by means of a saddle with 1”
NPT outlet. On steel pipelines a weld-on type tting may be substituted.
6
Page 7
Pipe Saddle
(ref.)
Mounting
Adapter
Gasket
(ref)
Stem
Stem Collar
Hex Cap
Cover
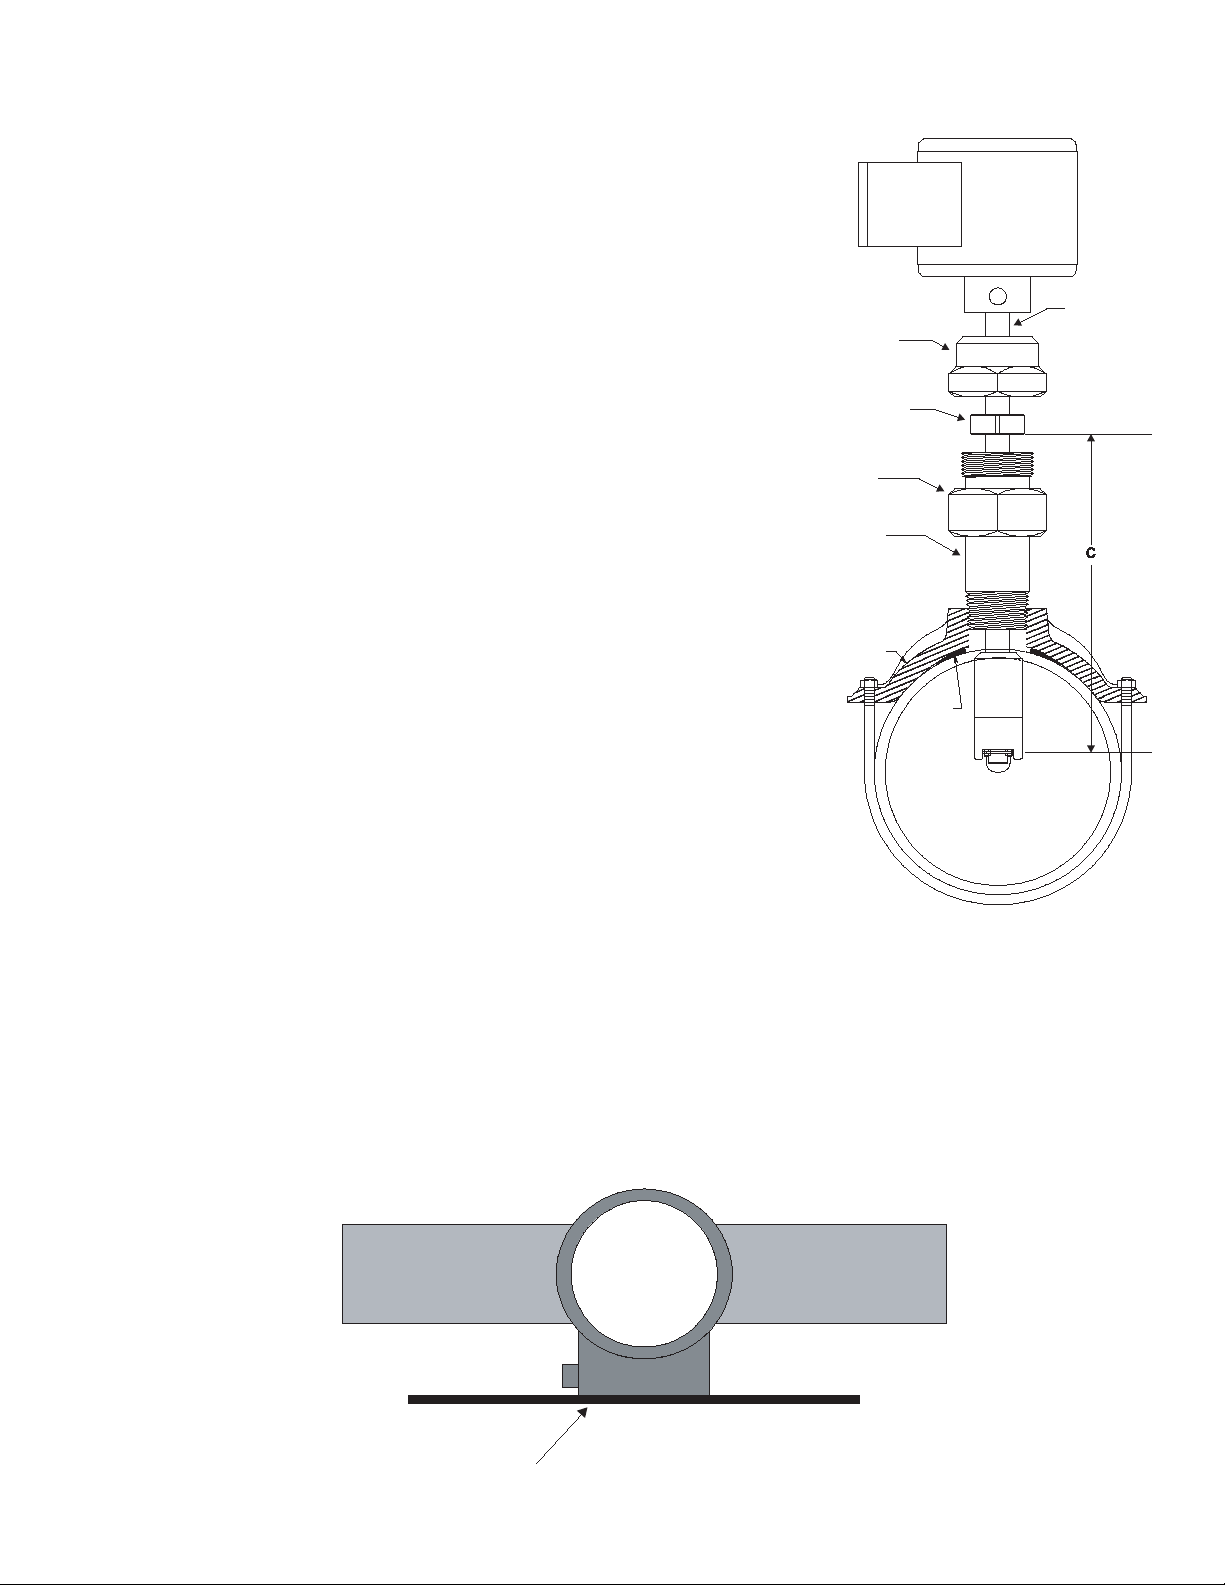
1. Attach the saddle to a section of pipe that has at least 10 diameters
Straight Edge Parallel to Pipe
Pipe Pipe
SDI
Flow Sensor
of straight pipe ahead and ve diameters of straight pipe behind the
saddle. Drill a minimum 1 1/8” diameter hole in the pipe.
2. Remove the sensor assembly from the mounting hardware by loosening
the hex cap over the stem collar and the cover to the mounting adapter
and detaching the assembly. Set aside taking care not to damage impeller/shaft assembly.
3. Attach the pipe thread end of the mounting adapter to the saddle/weld-
o-let using a pipe joint compound and tighten the joint. Do not apply
sealing compound to the top thread of the mounting adapter. It is sealed
with an o-ring.
4. The sensor rotor assembly is to be located a xed distance from the
center of the pipe. To position the impeller at this depth, a reference
measurement for the pipe size and schedule is used. Look up the pipe
size and schedule number in Table A and note the reference number.
Next, measure from the outside wall of the pipe to the top of the installed
mounting adapter “B” in Figure 3. Add this number to the reference measurement.
The resulting number, “C” in Figure 4 is the distance from the recess of
the sensor tip to the bottom of the stem collar. Insert the metal tab of
a tape measure into the recess of the ow sensor tip. Extend the tape
up the stem and mark the shaft with a pencil. Slide the collar along the
shaft until its bottom surface is at the mark on the stem. Tighten the cap
screw on the collar. When the sensor is reassembled, this will set the
insertion depth of the sensor.
5. Attach the sensor to the mounting adapter by gently pushing the ow
sensor into the mounting adapter until the cover touches the mounting
adapter. Tighten the cover against the o-ring seal. This will seal the
sensor assembly.
6. Continue to insert the ow sensor stem until the stem collar meets the cover. Thread the hex cap onto the mount-
ing adapter but don’t tighten. Align the ow sensor with the pipe by using the at cover on the electronics housing as a guide. Place a straightedge along the cover and rotate the sensor until the straightedge is parallel with
the pipe. Tighten the hex cap over the collar approximately 10 foot pounds. The hex cap holds the sensor alignment but performs no sealing functions. DO NOT OVERTIGHTEN.
7. Pressurize pipeline and check for leaks.
7
Page 8
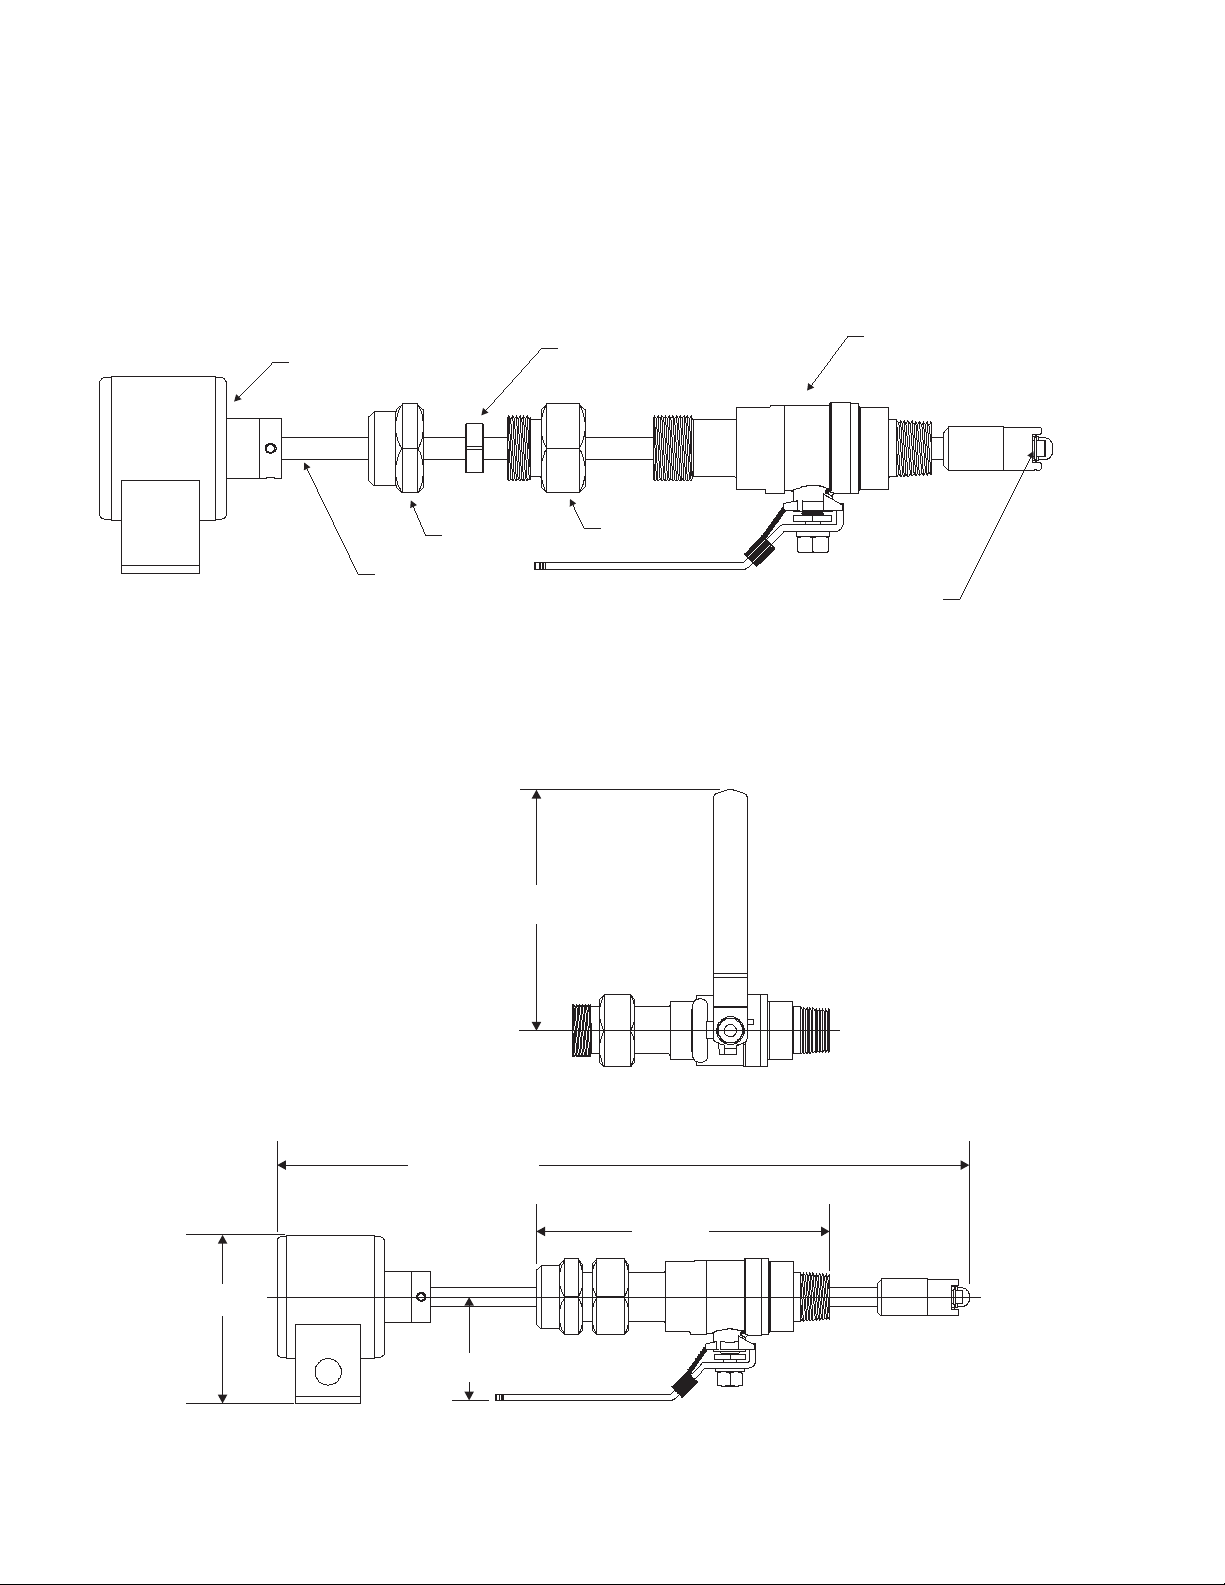
H1=19” *
H2=21½” *
H3=27½” *
7.85”
7 ¾”
2 27/32”
4 11/32”
* Pipe Sizes for reference only - Depending on pipe material, tapping
saddle, or existing hardware longer sensor length may be required Contact Factory.
Installation for Hot tap models
Ball Valve
Stem Collar
Bottom of Housing
Stem
Hex Cap
Cover
Measure Insertion
Depth From Here
The insertion depth and alignment of the sensor are critical to the accuracy of the ow measurement. The impeller
must be at the same location in the pipe as it was during calibration. Data Industrial provides sensors with three different stem lengths. Longer stems are intended for use in larger diameter pipes and shorter stems for use in smaller
pipelines. However stem length has no affect on the operation of the sensor provided that the impeller is positioned
correctly in the center of the pipe.
Stem length H1 is intended for use in nominal pipe diameters from 1 1/2” to 10”, H2 is for nominal pipe diameters from
12” to 36”, and stem length H3 is for nominal pipe diameters from 36” and up. However, pipe with extra thick walls,
existing linings, or unusual tapping hardware may require longer length sensors - Consult factory.
8
Page 9
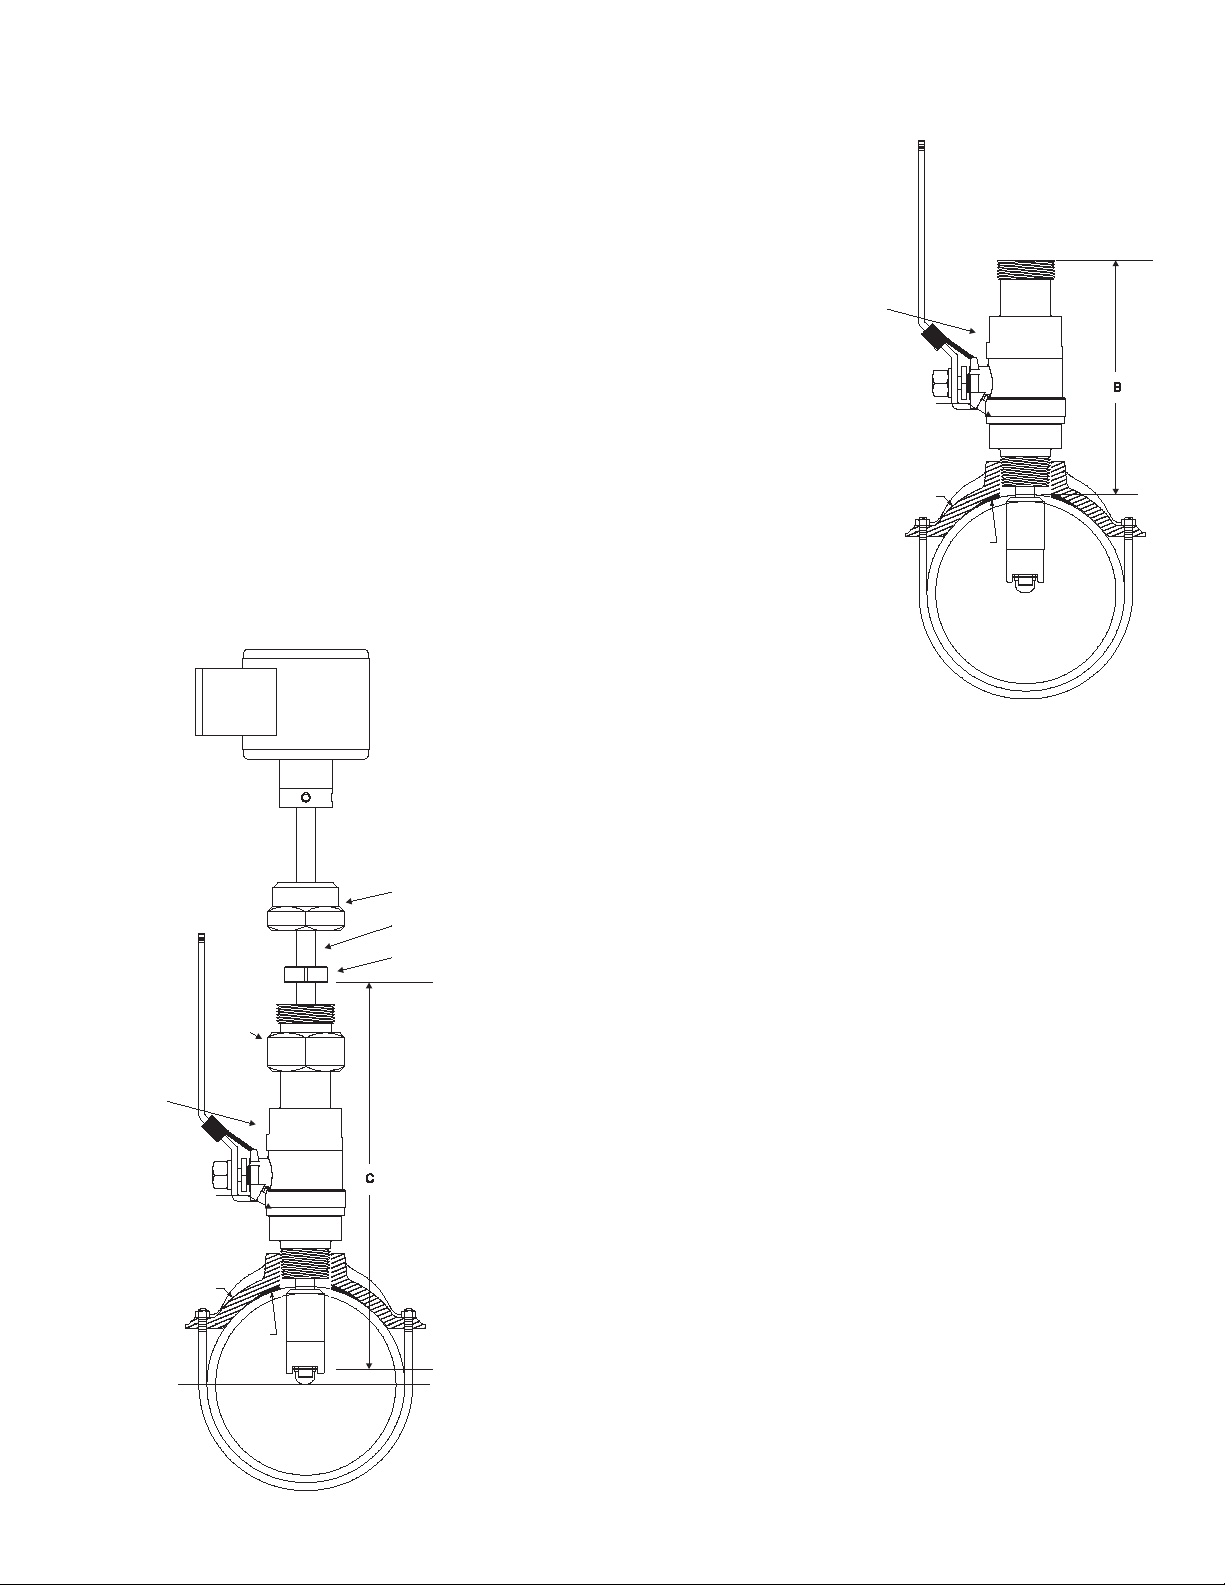
The preferred method of installation is by means of a saddle with 1” NPT out-
Pipe Saddle
(ref.)
Gasket
(ref)
Ball Valve
Stem Colla
r
Stem
Hex Cap
Cover
Pipe Saddle
(ref.)
Gasket
(ref)
Ball Valve
let. On steel pipelines a weld-on type tting may be substituted.
1. Attach the saddle to a section of pipe that has at least 10 diameters of
straight pipe ahead and ve diameters of straight pipe behind the saddle.
2. Remove the sensor assembly from the mounting/isolation valve by
loosening the hex cap over the stem collar and the cover to the mounting/
isolation valve and detaching the assembly. Set aside taking care not to
damage impeller/shaft assembly.
3. Attach the pipe thread end of the valve to the saddle using a pipe joint
compound and tighten the joint. Do not apply sealing compound to the top
thread of the valve. It is sealed with an o-ring.
4. Attach the tapping adapter, Data Industrial part number A-1027 to the top
of the valve.
5. Any pipe tapping machine with a 1” pipe thread connection may be used.
Use a cutter appropriate for the pipe material being tapped.
6. Attach the tapping machine to
the tapping adapter. Ensure
that all connections and seals
are tight.
7. Slowly open the valve by
rotating the handle 90° and lower the cutter past the valve ball to
the pipe. Drill the 1” nominal hole according to the manufacturer’s
instructions. Withdraw the cutter past the valve ball, close the valve
and remove the tapping tool.
8. Remove the Data Industrial tapping adapter from the top of the
valve.
9. The sensor rotor assembly is to be located a xed distance from the
center of the pipe. To position the impeller at this depth, a reference
measurement for the pipe size and schedule is used. Look up the
pipe size and schedule number in Table A and note the reference
number. Next, measure from the outside wall of the pipe to the top
of the ball valve “B” in Figure 8. Add this number to the reference
measurement.
The resulting number is the distance from the recess of the sensor
tip to the bottom of the stem collar “C” in Figure 9. Insert the metal
tab of a tape measure into the recess of the ow sensor tip. Extend
the tape up the stem and mark the shaft with a pencil. Slide the
collar along the shaft until its bottom surface is at the mark on the
stem. Tighten the cap screw on the collar. When the sensor is
reassembled, this will set the insertion depth of the sensor.
9
Page 10

Straight Edge Parallel to Pipe
Pipe Pipe
SDI
Flow Sensor
10. Slide the cover down the stem until it stops. Attach the sensor to the valve by inserting the impeller end of the
stem into the valve until the cover touches the top of the valve. The sensor tip and impeller will be in the section
of the valve above the ball. Tighten the cover against the o-ring in the top of the valve. This will seal the sensor
assembly. Open the ball valve again by slowly rotating the handle 90° If the cover was not at the bottom of the
sensor stem, water pressure from the pipe would now push it out until it stops. However, the sensor cannot be
ejected from the pipe if the cover is secured to the valve. Check to make sure all joints are tight.
11. Insert the ow sensor stem into the pipe by pushing against the top of the electronics housing with a slight
twisting motion until the stem collar meets the cover. The force required to push the sensor into the pipeline is
approximately 20% of the line pressure. Be aware of the close spacing between the diameter of the ow sensor,
the bore of the ball valve and the hole in the pipe. If the sensor stops or “catches” before the stem collar meets
the cover, apply a gentle rocking/twisting motion to the sensor to continue its travel. While holding the ow sensor
collar against the cover, thread the hex cap onto the cover to hold the ow sensor in place but do not tighten.
Align the ow sensor with the pipe by using the at side cover of the electronics housing as a guide. Place a
straightedge along the cover and rotate the sensor until the straightedge is parallel to the pipe. Tighten the
hex cap to the cover to approximately 10 foot pounds. The hex cap holds the sensor alignment and depth but
performs no sealing functions. DO NOT OVERTIGHTEN.
12. Pressurize pipeline and check for leaks.
10
Page 11

Electrical Installation
1. Shield
2. Power -
3. Power +
4. Pulse -
5. Pulse +
1 2 3 4 5
1 2 3
1. Shield
2. Loop -
3. Loop +
1 2 3
1. Shield
2. Sensor Common
3. Sensor Signal
Access wiring terminals by removing side cover. A wiring diagram is on the side cover, under the gasket. Use care
when replacing side cover to insure that the gasket is in place.
DO NOT REMOVE CIRCULAR COVER from top of sensor. You may disturb seal and label alignment.
A moisture absorbing silica pack has been placed inside the electronics housing during assembly. Leave in place after
making wire connections.
Standard frequency (Pulse) output - Option “0” in the
ordering matrix
This two wire sensor is intended for connection to Data Industrial
monitors and transmitters or other devices that supply 10-24 DC
excitation voltage and accept frequencies from 0 to 1000Hz.
Attach the sensor shield terminal 1 to the shield terminal on the
transmitter (used for maximum protection from interference).
Attach the sensor common terminal 2 to the common (-) terminal
on the transmitter.
Attach the sensor signal terminal 3 to the signal (+) terminal on the
transmitter.
Analog 4-20mA Output - Option “1” in the ordering matrix
This option provides a programmable 4-20 mA signal proportional to ow
rate. All programming is accomplished as previously mentioned. The user
can program the unit for pipe size, ow scale. This is a two-wire option.
Attach SDI #1 (Shield) to Earth Ground or Power Supply Common. (This
provides maximum power and signal EMI protection).
ANALOG OUTPUT – WIRED AS CURRENT SINKING
Attach SDI#2 (Loop -) to the Analog input terminal of device receiving this
4-20mA signal.
Attach SDI#3 (Loop +) to +24VDC terminal of device receiving the 4-20mA
Signal.
ANALOG OUTPUT – WIRED AS CURRENT SOURCING – (WITH SEPARATE 24VDC POWER SUPPLY)
Attach SDI#2 (Loop -) to Analog input terminal of device receiving this
4-20mA signal. (Sometimes labeled Loop +).
Attach SDI#3 (Loop +) to +24VDC Supply terminal.
Attach -24VDC Supply terminal to the Analog Input Common. (Sometimes labeled Loop -).
Scaled Pulse output - Option “2” in the ordering matrix
This option provides a programmable opto-isolated solid state switch closure
with internal solid state fuse protection. All programming is accomplished as
previously mentioned. The user can program the unit for pipe size, ow scale
and the direction of ow. This is a six-wire option.
Attach SDI #1 (Shield) to Earth Ground or Power Supply Common. (This
provides maximum power and signal EMI protection).
Attach SDI #2 (Power -) to the negative terminal of a nominal
12-24VAC/VDC Power Supply. (See data sheet for current draw and voltage
limits).
Attach SDI#3 (Power +) to positive terminal of power supply.
Attach SDI #4 (Pulse -) to the Input pulse (-) of the receiving device.
Attach SDI #5 (Pulse +) to the Input pulse (+) of the receiving device.
11
Page 12

Bi-Directional Analog Output - Option “5” in the ordering matrix
1. Shield
2. Power -
3. Power +
4. Direction
5. Direction
6. Loop -
7. Loop +
1 2 3 4 5 6 7
1. Shield
2. Power -
3. Power +
4. Pulse B -
5. Pulse B +
6. Pulse A -
7. Pulse A +
1 2 3 4 5 6 7
This option provides a programmable 4-20 mA signal proportional to ow rate and a contact closure to indicate the
direction of ow. All programming is accomplished as previously mentioned. The user can program the unit for pipe
size, ow scale and the direction of ow. This is a six-wire option.
Attach SDI #1 (Shield) to Earth Ground or Power Supply Common. (This provides maximum power and signal EMI
protection).
Attach SDI #2 (Power -) to the negative terminal of a nominal
12-24VAC/VDC Power Supply. (See data sheet for current draw and voltage
limits).
Attach SDI#3 (Power +) to positive terminal of power supply.
Attach SDI #4 and SDI#5 (Direction +/-) to the device receiving the directional signal. (This connection is not polarity sensitive; and, when active,
provides a solid state switch closure for a maximum load of 100mA @30VAC
or +/-40VDC).
ANALOG OUTPUT – WIRED AS CURRENT SINKING
Attach SDI#6 (Loop -) to the Analog input terminal of device receiving this
4-20mA signal.
Attach SDI#7 (Loop +) to +24VDC terminal of device receiving the 4-20mA
Signal.
ANALOG OUTPUT – WIRED AS CURRENT SOURCING – SHARING SDI’s 24VDC POWER SUPPLY
Attach SDI#6 (Loop -) to Analog input terminal of device receiving this 4-20mA signal.
Attach SDI#7 (Loop +) to SDI#3. (Sharing terminal with +24VDC Supply).
Attach SDI#2 (Loop -) to Analog Input Common. (Sometimes labeled Loop -).
ANALOG OUTPUT – WIRED AS CURRENT SOURCING – (WITH SEPARATE 24VDC POWER SUPPLY)
Attach SDI#6 (Loop -) to Analog input terminal of device receiving this 4-20mA signal. (Sometimes labeled Loop +).
Attach SDI#7 (Loop +) to +24VDC Supply terminal.
Attach -24VDC Supply terminal to the Analog Input Common. (Sometimes labeled Loop -).
Bi-Directional Scaled Pulse Output - Option “6” in the ordering matrix
This option provides a programmable scaled pulse output signal proportional to ow rate and a contact closure to
indicate the direction of ow. All programming is accomplished as previously mentioned. The user can program
the unit for pipe size, ow scale and the direction of ow. This is a six-wire
option.
Attach SDI #1 (Shield) to Earth Ground or Power Supply Common. (This
provides maximum power and signal EMI protection).
Attach SDI #2 (Power -) to the negative terminal of a nominal
12-24VAC/VDC Power Supply. (See data sheet for current draw and voltage
limits).
Attach SDI#3 (Power +) to positive terminal of power supply.
Attach SDI #4 (Pulse B -) to the Input pulse (-) of the receiving device.
Attach SDI #5 (Pulse B +) to the Input pulse (+) of the receiving device.
Attach SDI #6 (Pulse A -) to the Input pulse (-) of the receiving device.
Attach SDI #7 (Pulse A +) to the Input pulse (+) of the receiving device.
12
Page 13

Programming
To go to the calibration settings
screen select “parameters” from
either place shown.
To go to the calibration settings
screen select “parameters” from
either place shown.
Programming the Series SDI is accomplished by installing the Data Industrial programming software on a computer
and entering data on templates of the Windows® based program.
1. Load the interface software into the computer.
2. Connect the computer to the SDI with the Data Industrial A-301 communications cable to the socket labeled “D.I.C
Comm Port”, taking care to properly align the tab on the plug and socket to maintain polarity. Connect the DB9
connector of the Data Industrial A-301 communications cable to the PC com port of a PC that has the SDI software installed.
3. Connect the Series SDI Flow Sensor to a power supply.
4. Open the interface software and select the appropriate COM PORT as shown in the dialog box below.
5. Open the Parameters Screen as shown below.
OR
13
Page 14

6. Program using diagram below as a reference.
Step #1
Select rate units from the pull down
values.
Step #2
Select total units from the
pull down values.
Step #3
Select the pipe size from the pull
down menu, if the pipe size is not
present then custom must be
selected, or check for an updated
pipe.dat table on the Data Industrial
web site.
See Note #1
Step #4
Note #2.
If custom was selected in step 3
then click the custom button
and see
Step #5
Enter 4mA flow rate. This is
normally zero.
Step#6
Enter 20mA flow rate.
Step #7
Step #8.
For models with LCD Display Option
select the desired LCD Configuration
from the pull down menu. If Model
has no display then skip to
Step #8
Press Send to transmit calibration
data to the SDI Sensor.
Press to retrieve calibration
data from SDI.
Press to reset all parameters
back to factory defaults. Send
must be pressed to send this
data to the SDI.
Step #9
Press to exit parameters
screen and to go back to the
main screen.
Single Direction Analog Output Models
Note #1
Press “details” to see “K” and “offset” numbers for the selected pipe. The “K” and “offset” are
factors used to convert the sensor frequency to ow rate. They are unique to each pipe size/
material.
Note #2
Press “custom” button to enter “K” and “offset” numbers for pipe material not listed in pull down
menu. The numbers may be obtained by contacting Data Industrial.
14
Page 15

Single Direction Scaled Pulse Output Models
Step #1
Select rate units from the pull down
values.
Step #2
Select total units from the
pull down values.
Step #3
Select the pipe size from the pull
down menu, if the pipe size is not
present then select custom or check
for an updated pipe.dat table on the
Data Industrial web site.
See Note #1.
Step #4
Note #2.
If custom was selected in step 3
then click the custom button
and see
Step#5
Enter the number of units per
pulse and select the pulse
width required.
Step #7
Press Send to transmit calibration
data to the SDI Sensor.
Press to retrieve calibration
data from SDI.
Press to reset all parameters
back to factory defaults. Send
must be pressed to send this
data to the SDI.
Step #8
Press to exit parameters
screen and to go back to the
main screen.
Step #6
Step #7.
For models with LCD Display Option
select the desired LCD Configuration
from the pull down menu. If Model
has no display then skip to
Note #1
Press “details” to see “K” and “offset” numbers for the selected pipe. The “K” and “offset” are
factors used to convert the sensor frequency to ow rate. They are unique to each pipe size/
material.
Note #2
Press “custom” button to enter “K” and “offset” numbers for pipe material not listed in pull down
menu. The numbers may be obtained by contacting Data Industrial.
15
Page 16

Bi-Directional Analog Output Models
Step #1
Select rate units from the pull down
values.
Step #2
Select total units from the
pull down values..
Step #3
Select the pipe size from the pull
down menu, if the pipe size is not
present then select custom or check
for an updated pipe.dat table on the
Data Industrial web site.
See Note #1.
Step #4
Note #2.
If custom was selected in step 3
then click the custom button
and see
Step #5
Enter 4mA flow rate. This is
normally zero.
Step#6
Enter 20mA flow rate.
Step #8
Select Active Direction.
Step #9
If the Flow direction label
requires changing see Note #3.
Step #10
Press Send to transmit calibration
data to the SDI Sensor.
Press to retrieve calibration
data from SDI.
Press to reset all parameters
back to factory defaults. Send
must be pressed to send this
data to the SDI.
Step #11
Press to exit parameters
screen and to go back to the
main screen.
Step #7
Step #10.
For models with LCD Display Option
select the desired LCD Configuration
from the pull down menu. If Model
has no display then skip to
Note #1
Press “details” to see “K” and “offset” numbers for the selected pipe. The “K” and “offset” are
factors used to convert the sensor frequency to ow rate. They are unique to each pipe size/
material.
Note #2
Press “custom” button to enter “K” and “offset” numbers for pipe material not listed in pull down
menu. The numbers may be obtained by contacting Data Industrial.
Note #3
Press “Change Label” button to change ow direction label. Enter up to 20 characters such as
“From Pump”
16
Page 17

Bi-Directional Scaled Pulse Output Models
Step #1
Select rate units from the pull down
values.
Step #2
Select total units from the
pull down values.
Step #3
Select the pipe size from the pull
down menu, if the pipe size is not
present then select custom or check
for an updated pipe.dat table on the
Data Industrial web site.
See Note #1.
Step #4
Note #2.
If custom was selected in step 3
then click the custom button
and see
Step #5
Step #6
Select the pulse output type
that is required. If raw pulse is
selected skip .
Step #8
Select Active Direction.
Step #9
If the Flow direction label
requires changing see Note #3.
Step #10
Press Send to transmit calibration
data to the SDI Sensor.
Press to retrieve calibration
data from SDI.
Press to reset all parameters
back to factory defaults. Send
must be pressed to send this
data to the SDI.
Step #11
Press to exit parameters
screen and to go back to the
main screen.
Step #7
Step #10.
For models with LCD Display Option
select the desired LCD Configuration
from the pull down menu. If Model
has no display then skip to
Step#6
Enter the number of units per
pulse and select the pulse
width required.
Note #1
Press “details” to see “K” and “offset” numbers for the selected pipe. The “K” and “offset” are
factors used to convert the sensor frequency to ow rate. They are unique to each pipe size/
material.
Note #2
Press “custom” button to enter “K” and “offset” numbers for pipe material not listed in pull down
menu. The numbers may be obtained by contacting Data Industrial.
Note #3
Press “Change Label” button to change ow direction label. Enter up to 20 characters such as
“From Pump”
17
Page 18

Battery Powered SDI Programming
To calibrate select
“parameters” from
either place shown.
Programming the Series SDI is accomplished by installing the Data Industrial programming software on a
computer and entering data on templates of the Windows® based program.
1. Load the interface software into the computer.
2. Connect the PC to the SDI with the Data Industrial A-303 communications cable. Plug in the the RJ11
plug on the A-303 cable to the RJ11 socket on Battry Powered SDI. Connect the DB9 connector of the
A-303 cable to the PC com port to a PC that has the SDI software installed.
3. Open the interface software and select the appropriate COM PORT as shown in the dialog box below.
4. Open the Parameters Screen as shown below.
18
Page 19

5. Program parameters using diagram below as a reference.
Step #1
Table B.
Enter in a “K” number
found in
Step #2
Table B.
Enter in a “offset” number
found in
Step #3
Table A.
Enter in a Reference
number found in
Step #4
Select the desired
flow rate and total
units.
Step #5
Select the desired
display readout mode.
Step #6
Optional setting, Enter in
the gallons/pulse and
select pulse width. Skip
this step if not using the
Scaled pulse output
Step #7
Press Send to transmit
calibration data to the SDI
Sensor. See Note #1
Press to retrieve
calibration data
from SDI.
Press to reset all parameters
back to factory defaults. Send
must be pressed to send this
data to the SDI.
Step #8
See Note #2
Press to exit parameters
screen and to go back to the
main screen.
Programming
Process Bar
Status Bar
Note #1
After the “send” button is pressed the unit could take up to one and a half minutes to program
the Battery Powered SDI. The illustration below shows the programming process bar. When the
programming process bar disappears and the status bar says “updated” the Battery Powered SDI
is programmed.
Note #2
After the “exit” button is pressed it takes about 10 seconds to go back to the operating display and
refresh ow rate and ow total.
19
Page 20

Table A
Customer Reference Number
Pi
p
e Pipe Schedules
Size O.D. 10 10s 40 40s/Std 80
SDR21
(
200
)
1 1/2 1.900
Wall
Insertion Depth
Customer Ref #
.109
.58
1 9/16
.109
.58
1 9/16
.145
.54
1 9/16
.145
.54
1 9/16
.200
.49
1 9/16
2 2.375
Wall
Insertion Depth
Customer Ref #
.109
.81
1 13/16
.109
.81
1 13/16
.154
.77
1 13/16
.154
.77
1 13/16
.218
.71
1 13/16
.113
.81
1 13/16
2 1/2 2.875
Wall
Insertion Depth
Customer Ref #
.120
1.05
2 1/16
.120
1.05
2 1/16
.203
.97
2 1/16
.203
.97
2 1/16
.276
.90
2 1/16
.137
1.04
2 1/16
3 3.500
Wall
Insertion Depth
Customer Ref #
.120
1.37
2 3/8
.120
1.37
2 3/8
.216
1.27
2 3/8
.216
1.27
2 3/8
.300
1.19
2 3/8
.167
1.32
2 3/8
4 4.500
Wall
Insertion Depth
Customer Ref #
.120
1.70
2 11/16
.120
1.70
2 11/16
.237
1.61
2 23/32
.237
1.61
2 23/32
.337
1.53
2 3/4
.214
1.63
3 1/8
5 5.563
Wall
Insertion Depth
Customer Ref #
.134
1.59
2 5/8
.134
1.59
2 5/8
.258
1.63
2 21/32
.258
1.63
2 21/32
.375
1.44
2 11/16
6 6.625
Wall
Insertion Depth
Customer Ref #
.134
1.91
2 29/32
.134
1.91
2 29/32
.280
1.82
2 31/32
.280
1.82
2 31/32
.432
1.73
3 1/32
.316
1.83
3 1/32
8 8.625
Wall
Insertion Depth
Customer Ref #
.148
2.50
3 17/32
.148
2.50
3 17/32
.322
2.39
3
19/32
.322
2.39
3 19/32
.500
2.29
3 21/32
.410
2.40
3 11/16
10 10.750
Wall
Insertion Depth
Customer Ref #
.165
3.13
4 5/32
.165
3.13
4 5/32
.365
3.01
4 1/4
.365
3.01
4 1/4
.594
2.87
4 11/3
2
.511
2.98
4 3/8
12 12.750
Wall
Insertion Depth
Customer Ref #
.180
3.72
4 25/32
.180
3.72
4 25/32
.406
3.58
4 7/8
.375
3.60
4 27/32
.688
3.41
5
.606
3.52
5
14 14.000
Wall
Insertion Depth
Customer Ref #
.250
2.03
3 5/32
.188
2.04
3 3/32
.438
1.97
3 9/32
.375
1.99
3 1/4
.750
1.88
3 1/2
16 16.000
Wall
Insertion Depth
Customer Ref #
.250
2.33
3 7/16
.188
2.34
3 13/32
.500
2.25
3 5/8
.375
2.29
3 17/32
.844
2.15
3 7/8
18 18.000
Wall
Insertion Depth
Customer Ref #
.250
2.63
3 3/4
.188
2.64
3 23/32
.562
2.53
3 31/32
.375
2.59
3 27/32
.938
2.42
4 1/4
20
Page 21

Table A (cont.)
Customer Reference Number
Pipe Pipe Schedules
SizeO.D.10 10s 40 40s/Std80
20 20.000
Wall
Insertion Depth
Customer Ref #
.250
2.93
4 1/16
.218
2.94
4 1/32
.594
2.82
4 9/32
.375
2.89
4 1/8
1.031
2.69
4 19/32
22 22.000
Wall
Insertion Depth
Customer Ref #
.250
3.23
4 11/32
.375
3.19
4 7/16
1.125
2.96
4 31/32
24 24.000
Wall
Insertion Depth
Customer Ref #
.250
3.53
4 21/32
.250
3.53
4 21/32
.688
3.39
4 31/32
.375
3.49
4 3/4
1.219
3.23
5 5/16
26 26.000
Wall
Insertion Depth
Customer Ref #
.312
3.81
5
.375
3.79
5 1/32
28 28.000
Wall
Insertion Depth
Customer Ref #
.312
4.11
5 9/32
.375
4.09
5 11/32
30 30.000
Wall
Insertion Depth
Customer Ref #
.312
4.41
5 19/32
.312
4.41
5 19/32
.375
4.39
5 5/8
For sizes above 30", consult factory. Pipe O.D. & Schedule, or pipe O.D. & I.D., or
pipe O.D. & wall thickness is required.
Copper Tube Type
SizeO.D.KLMDWV
1 1/2 1.625
Wall
Insertion Depth
Customer Ref #
.072
.48
1 7/16
.060
.49
1 7/16
.049
.50
1 7/16
.042
.51
1 7/16
2 2.125
Wall
Insertion Depth
Customer Ref #
.083
.72
1 11/16
.070
.73
1 11/16
.058
.74
1 11/16
.042
.76
1 11/16
2 1/2 2.625
Wall
Insertion Depth
Customer Ref #
.095
.95
1 29/32
.080
.97
1 29/32
.065
.98
1 29/32
3 3.125
Wall
Insertion Depth
Customer Ref #
.109
1.19
2 3/16
.090
1.21
2 3/16
.072
1.23
2 3/16
.045
1.25
2 3/16
4 4.125
Wall
Insertion Depth
Customer Ref #
.134
1.54
2 9/16
.110
1.56
2 9/16
.095
1.57
2 17/32
.058
1.60
2 17/32
6 6.125
Wall
Insertion Depth
Customer Ref #
.192
1.72
2 25/32
.140
1.75
2 3/4
.122
1.76
2 3/4
.083
1.79
2 3/4
21
Page 22

Table A (cont.)
Customer Reference Number
Ductile Iron
Because of the variety of iron pipe classes, sizes, and wall thicknesses,
consult factory for customer reference number. Pipe O.D. & Schedule, or
pipe O.D. & I.D., or pipe O.D. & wall thickness is required.
PVC AWWA C900
SizeO.D.
CL100
44.800
Wall
Insertion Depth
Customer Ref #
.192
1.77
2 27/32
66.900
Wall
Insertion Depth
Customer Ref #
.276
1.90
3 1/16
89.050
Wall
Insertion Depth
Customer Ref #
.362
2.50
3 23/32
10 11.100
Wall
Insertion Depth
Customer Ref #
.444
3.06
4 3/8
12 13.200
Wall
Insertion Depth
Customer Ref #
.528
3.64
5 1/16
For other types of pipe not listed above, consult factory. Pipe O.D. & Schedule, or pipe O.D. & I.D., or
pipe O.D. & wall thickness is required.
22
Page 23

Table B
k & Offset
Pi
p
e Pipe Schedules
Size O.D. 10 10s 40 40s/Std 80
SDR21
(
200
)
1 1/2 1.900
K
Offset
0.297315
0.859353
0.297315
0.859353
0.244927
0.859353
2 2.375
K
Offset
0.801632
1.813024
0.801632
1.813024
0.498124
1.523850
0.498124
1.523850
2 1/2 2.875
K
Offset
0.801632
1.813024
0.801632
1.813024
0.699870
1.111784
0.699870
1.111784
0.654225
1.307587
3 3.500
K
Offset
1.317775
1.756472
1.317775
1.756472
1.169137
1.609184
1.169137
1.609184
1.070953
1.307587
1.212446
1.056965
3½ 3.500
K
Offset
1.612333
1.609184
1.612333
1.609184
4 4.500
K
Offset
2.110168
4.142096
2.110168
4.142096
1.872713
4.142096
1.872713
4.142096
1.964629
1.307587
5 5.563
K
Offset
3.251260
2.093849
3.251260
2.093849
6 6.625
K
Offset
5.144059
3.295640
5.144059
3.295640
4.642584
3.295640
4.642584
3.295640
4.237085
2.093849
8 8.625
K
Offset
8.730561
2.793790
8.730561
2.793790
10 10.750
K
Offset
13.737621
2.937799
13.737621
2.937799
12.476283
2.937799
12 12.750
K
Offset
19.830912
2.768877
20.041272
2.768877
17.796906
2.937799
14 14.000
K
Offset
24.238528
2.768877
24.702144
2.768877
16 16.000
K
Offset
31.728175
2.768877
32.804463
2.768877
28.663241
2.768877
18 18.000
K
Offset
41.579656
3.715358
43.462537
3.715358
37.706693
3.715358
20 20.000
K
Offset
51.751173
3.715358
46.771847
3.715358
22 22.000
K
Offset
24 24.000
K
Offset
74.0284944
3.155189
78.201801
3.155189
67.789784
3.715358
26 26.000
K
Offset
28 28.000
K
Offset
123.735118
3.155189
30 30.000
K
Offset
123.735118
3.155189
For sizes above 30", consult factory. Pipe O.D. & Schedule, or pipe O.D. & I.D., or
pipe O.D. & wall thickness is required.
23
Page 24

Table B (cont.)
Copper Tube Type
SizeO.D.KLMDWV
1 1/2 1.625
K
Offset
0.277993
0.063685
2 2.125
K
Offset
0.509285
-0.043054
2 1/2 2.625
K
Offset
0.784450
-0.126200
3 3.125
K
Offset
1.177171
0.198965
4 4.125
K
Offset
1.750507
4.142096
5 5.125
K
Offset
3.587835
0.198965
6 6.125
K
Offset
5.041780
0.198965
4.298570
3.295640
Ductile Iron
Because of the variety of iron pipe classes, sizes, and wall thicknesses,
consult factory for customer reference number. Pipe O.D. & Schedule, or
pipe O.D. & I.D., or pipe O.D. & wall thickness is required.
PVC Municipal C900 Schedules
SizeO.D. 100
4 4.800
K
Offset
6 6.900
K
Offset
8 9.050
K
Offset
10 11.100
K
Offset
12 13.200
K
Offset
For other types of pipe not listed above, consult factory. Pipe O.D. & Schedule, or pipe O.D. & I.D., or
pipe O.D. & wall thickness is required.
Blank boxes indicate no data at time of printing.
24
Page 25

SPECIFICATIONS
raw pulse
option 0
Number of wi re connections2
Pulse Units
Operating Voltage8-35 VDC
Overvo ltage protec tion
Short Circuit Current
Output Frequency
Output Pulse Width
Output Isolation
Analog Units
Operating VoltageN/A
Output Response Time N/A
Opto-Isolated
Quiescent Current Draw
@12VDC or 24VAC
330uA
TY P
50mA
TY P
5 mS
below 100
Hz
adjustable 50mS to
5.0 second in 50 mS
increments
> 100 mA
< 5.0 mA
N/A
N/A
30 VAC
±40 VDC
800 Hz
max
scaled pulseanalog loop
option 1option 2
30 VAC ±40 VDC
4
±40 VDC
6
option 6
scaled pulseanalog loop
option 5
6
N/A
N/A
8-35 VDC
va ries with
programmable filter
N/A
N/A
va ries with
programmable filter
Software controlled
current of 3.5-20.5mA
< 2mA
> 100 mA
N/AOpto-Is olated
8-35 VDC
adjustable 50mS to
5.0 second in 50 mS
increments
Opto-Isolated
> 100 mA
for direction
N/A
uni-directionalbi-directional
12-30 VAC
12-35 VDC
12-30 VAC
12-35 VDC
12-30 VAC
12-35 VDC
2
N/A
30 VAC ±40 VDC
N/A
N/AN/Ascaled by customer scaled by customer
30 VAC ±40 VDC
< 5.0 mA
Wetted Materials
Sensor stem, mounting adapter, isolation valve, and
nipple:
- 316 Stainless steel
Sensor Tip:
- polyphenylene sulde (PPS)
O-rings,bearings,shaft:
- see ordering matrix
Maximum Temperature Ratings:
Fluid measured
- 300° F (135°C) continuous service
Operating temperature: Electronics:
- 150°F (65°C)
Operating Temperature: LCD:
- 150°F (65°C)
Maximum Pressure Rating:
- 1000 psi @ 100°F
- 900 psi @ 200°F
- 750 psi @ 300°F
Recommended Design Flow Range:
- 0.33 to 20 ft/sec
- Initial ow detection below .25 ft/sec
Pressure Drop:
- 0.5 psi or less @ 10 ft/sec for all pipe sizes 1.5” dia and
up.
Accuracy:
- Standard calibration NIST traceable to +/- 1% of rate
- Custom wet calibration NIST traceable
to +/- 0.5% of rate
Straight Pipe Requirement:
- install sensor in straight pipe section with a minimum
distance of 10 diameters upstream and 5 diameters
downstream to any bend, transition, or obstruction.
Repeatability:
+/- 0.5%
Enclosure:
- Polypropylene with Viton® sealed acrylic cover. Meets
NEMA 4X specications
Wire Connections:
- all wire connections are made to removable headers
with screw type terminals within the electronics
housing, ½” conduit thread provided
Programming:
- all programmable models utilize Data Industrial A-301
connector cable and SDI Series software
Display: (optional)
- 8 character, 3/8” LCD
- STN (Super twisted Nematic) display
- annunciators for:
rate, total, input, output ow direction for Bi-directional
models
Accessories
- ASDI Programming Kit
- A1027 Hot Tap Adapter Nipple
25
Page 26

(This page intentionally left blank.)
26
Page 27

(This page intentionally left blank.)
27
Page 28

Viton® is a registered trademark of DuPont-Dow Elastomers.
Torlon® is a registered trademark of Amoco Performance Products.
Windows® is a registered trademark of Microsoft Corporation.
Hastelloy® is a registered trademark of Haynes Corporation.
Due to continuous research, product improvements and enhancements, Badger
Meter reserves the right to change product or system specications without notice,
except to the extent an outstanding contractual obligation exists.
Please see our website at www.badgermeter.com
for specific contacts.
Copyright © Badger Meter, Inc. 2009. All rights reserved.
BadgerMeter, Inc.
P.O. Box 581390, Tulsa, Oklahoma 74158
(918) 836-8411 / Fax: (918) 832-9962
www.badgermeter.com
 Loading...