

Page 1
Installation Guide
Pressure
available
• This product is not intended for life or safety applications.
• Do not install this product in hazardous or classied locations.
• Read and understand the instructions before installing
this product.
• Turn off all power supplying equipment before working on it.
• The installer is responsible for conformance to all applicable codes.
No responsibility is assumed by Veris Industries for any consequences arising out of the
use of this material.
NOTICE
TM
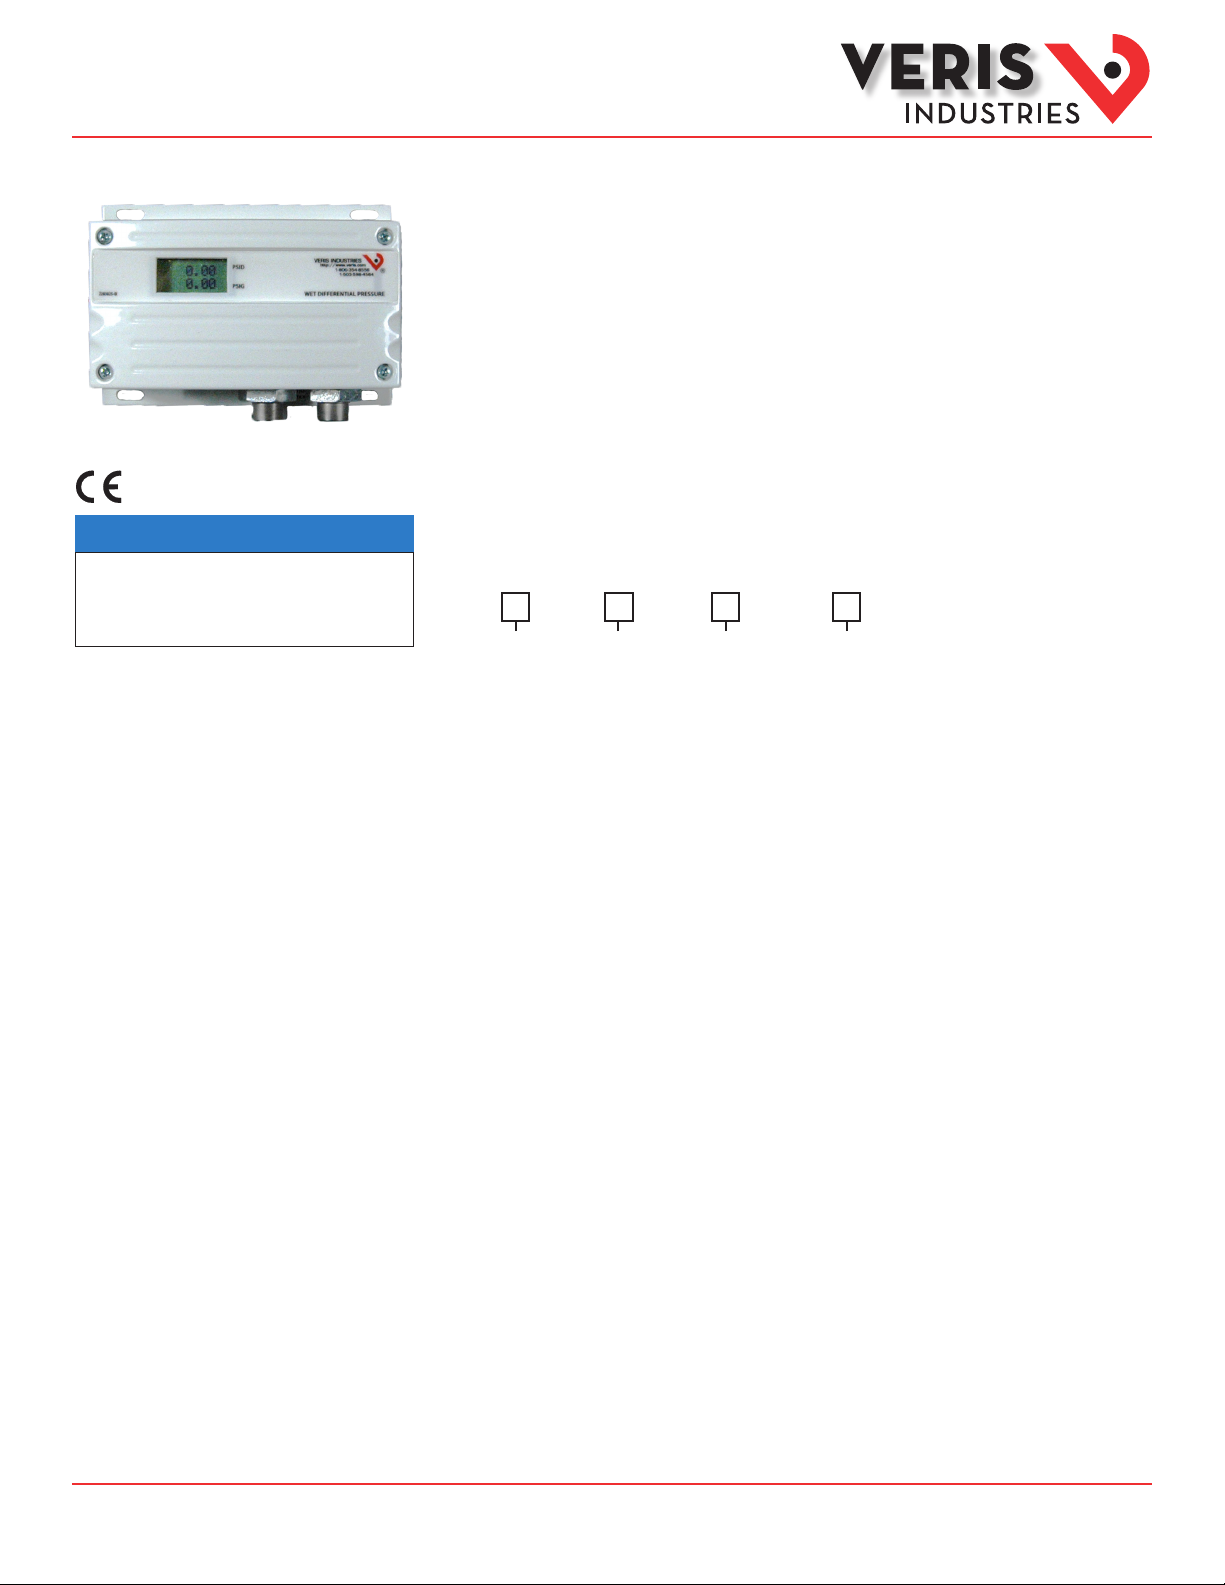
PW Series
Wet Media Differential Pressure Transducer
Product Overview
The PW Series pressure transducer measures the dierential pressure across pumps, lters, heat exchangers, and
other non-corrosive wet media. Several operational pressure ranges are available, and the analog output is user
selectable (4-20 mA, 0-5 V, or 0-10 V). PW Series devices are warranted to meet accuracy specications for a period
of ve years.
Product Identification
2
2
2
1
US or EU
S = Standard
C = CE
3
Local Display
PW
L = LCD Display
X = No Display
NIST
Operational Range
N = NIST
X = None
03 = 0-50 psig
04 = 0-100 psig
05 = 0-250 psig
06 = 0-3.5 barg
07 = 0-7.0 barg
08 = 0-17 barg
1
Select ope rational range according to maximu m gauge pressure, NOT dierential p ressure.
Example: Hig h gauge pressure=90 psig, Selec t 100 psig model (04).
2
barg models use BSPT threads o n sensor ttings.
3
Not available w ith barg units.
Z202882-0U Page 1 of 4 ©2013 Veris Industries USA 800.354.8556 or +1.503.598.4564 / support@veris.com 06131
Alta Labs, E nercept, Ensp ector, Hawkeye, Trus tat, Aerospo nd, Veris, and th e Veris ‘V’ log o are tradema rks or registe red tradema rks of Veris Ind ustries, L. L.C. in the USA and /or other countri es.
Other companies’ trademarks are hereby acknowledged to belong to their respective owners.
Page 2
Installation Guide
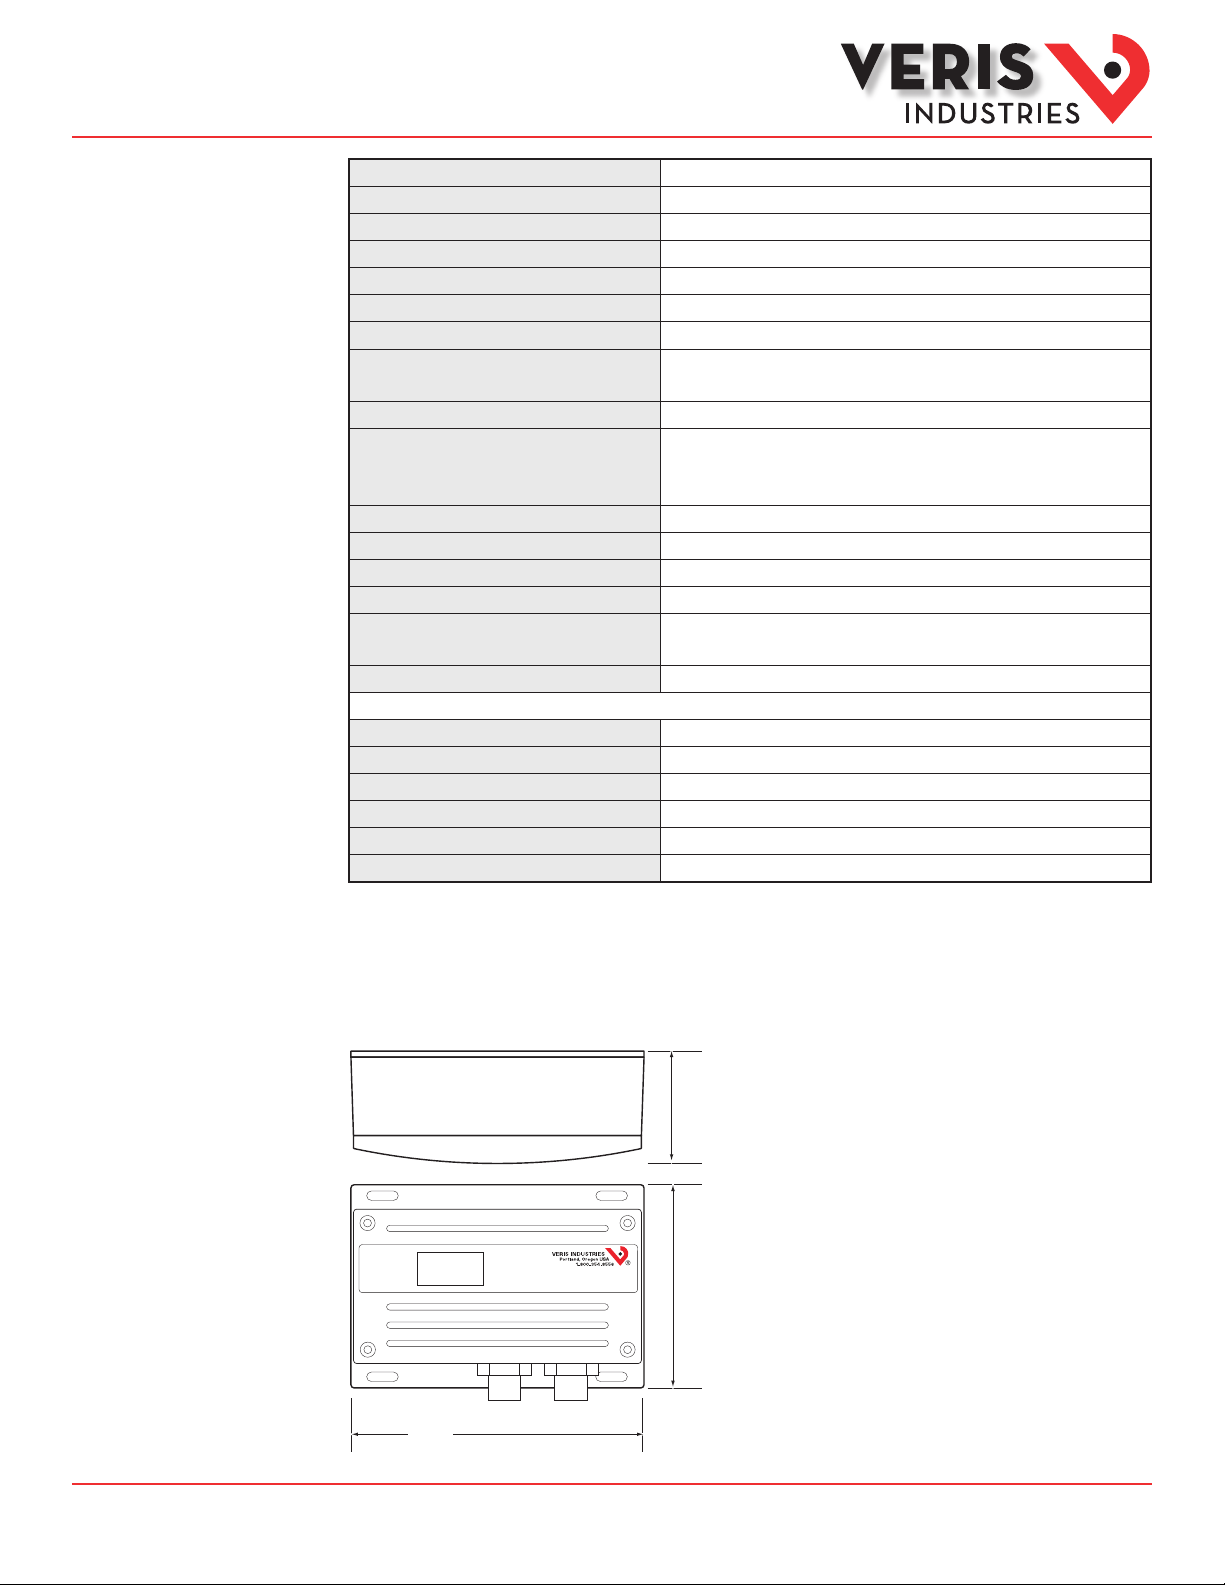
2.2"
(57 mm)
4"
(102 mm)
5.8"
(147 mm)
LOW HIGH
WET DIFFERENTIAL PRESSURE
Pressure
PWSeries
TM
Specifications
Media Compatibility
Input Power
Maximum Current Draw
Output
Status Indication
Proof Pressure
Burst Pressure
Accuracy at 2 5°C
Surge Damping
Temperature Compensated Range
Sensor Operating Range
Operating Environment
Long Term Stabil ity
Zero Adjust
Fittings
Physical
0-50 psig
0-1 00 ps ig
0-250 psig
0-3.5 barg
0-7.0 bar g
0-17 ba rg
To conform to EMC Standards, use shielded cabling. Technical information is available from the factory on request or on our
website (www.veris.com/ce)
1
Minimum input voltage for 4-20 mA operation: 250 Ω loop (1-5V) = 12 VDC; 500 Ω loop (2-10V) = 15 VDC
Minimum input voltage for volt operation: 0-5 VDC output = 12 VDC; 0-10 VDC output = 15 VDC
2
Accuracy combines linearity, hysteresis, and repeatability.
3
F.S. is defined as full span of selected range in bidirectional mode.
17-4 PH stainless steel
12 to 30VDC, 24VAC nom.
DC: 125mA; AC: 280mA
3-wire transmitter; user-selectable 4-20mA/ 0- 5V/ 0-10V
Dual color LED
2x max. F.S. range
5x max. F.S. range
2
Ranges A , B, C: ±1% F.S.3
Range D : ±2% F.S.3
Electronic; 5-second averaging
0° to 50 °C (32° to 122° F);
TC Zero <1.5% of product F.S. per sensor;
TC Span <1.5% of product F.S. per sensor
-20° to 8 5°C ( -4° to 185°F)
-10° to 55°C (14° to 131°F); 10-90% RH noncondensing
±0.25%
Pushbutton auto-zero and digital input (2-position terminal block)
psig models: 1/ 8” NPT female thread, stainless steel 17-4 PH
barg models: 1/ 8” BSP T female thread, stainless steel 17-4 PH
White powder-coated aluminum
PRESSURE RANGES
5/10/ 25/ 50 psid
10/20/50/100 psid
25/50/125/ 250 psid
0.3 5/ 0.7/1.75 /3.5 bard
0.7/1.4/3.5 /7.0 bard
1.7/3.4/8.5/17.0 bard
1
Dimensions
Z202882-0U Page 2 of 4 ©2013 Veris Industries USA 800.354.8556 or +1.503.598.4564 / support@veris.com 06131
Alta Labs, E nercept, Ensp ector, Hawkeye, Trus tat, Aerospo nd, Veris, and th e Veris ‘V’ log o are tradema rks or registe red tradema rks of Veris Ind ustries, L. L.C. in the USA and /or other countri es.
Other companies’ trademarks are hereby acknowledged to belong to their respective owners.
Page 3

Installation Guide
JP8
JP7
JP6
JP3
JP2
JP1
ZERO
Analog Reverse/Normal
Port Swap/Normal
Bidirectional/Normal
Fast/Slow Surge Damping
5V/10V Output
mA/Volts Output
POWER
REMOTE ZERO
(Dry Contact)
DIGITAL CONTROL
Analog Input
0-5V/0-10V
or 4-20mA
Optional
Digital Output
POWER SOURCE
12 to 30 VDC/24 VAC
SIGNAL
COM
PW SERIES
/
Range
A
B
C
D
HI PORT
100 psi
100 psi
50 psi
50 psi
0 psi
LO PORT
0 psi
50 psi
50 psi
100 psi
100 psi
4-20mA 0-10V
+100 psi
+50 psi
0 psi
-50 psi
-100 psi
Bidirectional Operation
Input Conditions Result Outputs Read
DP
20mA
16mA
12mA
8mA
4mA
10V
7.5V
5V
2.5V
0V
17.0 bar
17.0 bar
8.5 bar
8.5 bar
0 bar
0 bar
8.5 bar
8.5 bar
17.0 bar
17.0 bar
+17.0 bar
+8.5 bar
0 bar
-8.5 bar
-17.0 bar
20mA
16mA
12mA
8mA
4mA
10V
7.5V
5V
2.5V
0V
Output is either
mA or V
e.g. PW-04
e.g. PW-08
Range (psi)
Model
PW-03
PW-04
PW-05
A
50
100
250
B
25
50
125
C
10
20
50
D
5
10
25
Range (bar)
A
3.5
7.0
17.0
B
1.75
3.5
8.5
C
0.7
1.4
3.4
D
0.35
0.7
1.7
e.g. PW-04
e.g. PW-08
Use the Range switch to
select F.S. differeintial
pressure.
Model
PW-06
PW-07
PW-08
Pressure
PWSeries
TM
Installation
Observe precautions for handling static sensitive
devices to avoid damage to the circuitry that
is not covered under the factory warranty.
1. Find a suitable mounting position near the location to be measured. Mount the PW housing using the self-tapping screws
provided.
2. Remove the lid from the housing to reveal the board. Wire the PW terminals to the power source and to the digital control
system as shown. Congure the jumpers for desired operating parameters. Replace the cover.
Jumper Options Notes
JP1 Voltage (V) or Current (mA)
JP2 0-10V or 0-5V output span Use only if JP1 is set to V mode.
JP3 Slow or Fast Slow mode provides 5 second averaging for
surge damping.
JP6 Normal or Bidirectional Normal: 0 to F.S. pressure
Bidirectional: -F.S. pressure to +F.S. pressure;
output reads 1/2 when pressure is zero.
JP7 Normal or Port Swap Reverses polarity of the pressure ports (i.e.
makes the LO port operate as the HI port and
vice versa); used when the sensor is incorrectly
plumbed.
JP8 Normal or Analog Reverse Normal: output increases as pressure increases;
Reverse: output is maximum when pressure
dierential is zero and decreases as pressure
increases.
Z202882-0U Page 3 of 4 ©2013 Veris Industries USA 800.354.8556 or +1.503.598.4564 / support@veris.com 06131
Alta Labs, E nercept, Ensp ector, Hawkeye, Trus tat, Aerospo nd, Veris, and th e Veris ‘V’ log o are tradema rks or registe red tradema rks of Veris Ind ustries, L. L.C. in the USA and /or other countri es.
Other companies’ trademarks are hereby acknowledged to belong to their respective owners.
Page 4

Installation Guide
Pressure
PWSeries
TM
Installation
(cont.)
3. Connect tubing to the high and low ports on the PW.
PSID
PSIG
WET DIFFERENTIAL PRESSURE
Low
High
Port
Port
4. Connect the other ends of the tubing to a pipe or duct, across the pump, lter, or other pressure dierential.
Notes
During operation, the LCD shows two pressure values. The value adjacent to the PSID label shows the dierential pressure, while
the value adjacent to the PSIG label shows the high port gauge pressure. The gauge pressure value is read from the high port if
JP7 is in the Normal position. If this jumper is in the Port Swap position, the PSIG value is read from the low por t, and the value is
usually a negative number.
This product uses a half-wave rectier power supply. If the installer is using a transformer to power the device, do not use the
same transformer to power other devices utilizing non-isolated full-wave power supplies.
Optional: Connect the Zero terminals to the digital output (contact closure) of the control system. The Zero input is for dry-contact
only. Do not apply voltage to the Zero terminals.
To use the auto zero function, press and hold the Zero button for 2 seconds or provide contact closure on the auxiliary ‘Remote
Zero’ terminal to reset the output to zero pressure. To protect the device from accidental zeroing, this feature is only enabled when
the detected pressure is within 5% of factory calibration.
LEDBlink Codes
LED Color Status
Solid Green Normal operation.
Flashing Green Low > High; use port swap jumper or bidirectional mode.
Solid Red Dierential pressure is too high; select a higher pressure range.
Flashing Red Gauge pressure over sensor range; reduce line pressure or replace with a higher range device.
Z202882-0U Page 4 of 4 ©2013 Veris Industries USA 800.354.8556 or +1.503.598.4564 / support@veris.com 06131
Alta Labs, E nercept, Ensp ector, Hawkeye, Trus tat, Aerospo nd, Veris, and th e Veris ‘V’ log o are tradema rks or registe red tradema rks of Veris Ind ustries, L. L.C. in the USA and /or other countri es.
Other companies’ trademarks are hereby acknowledged to belong to their respective owners.
 Loading...