

Page 1

Multimedia Station Premier
Installation Guide
Installation CD
CD d’installation
Installations-CD
CD di installazione
CD de instalación
インストレーションCD
安装光碟
Installation Guide
Guide d’installation
Installationsanleitung
Guida di installazione
Guía de instalación
インストレーションガイド
安装指南
Mounting Screws
Vis de montage
Montageschrauben
Viti di montaggio
Tornillos de montaje
マウンティングスクリュー
托架螺丝
Internal USB cable
Câble USB interne
Internes USB-Kabel
Cavo USB interno
Cable USB interno
内蔵USBケーブル
内接USB线
RM200 Remote Control
and Battery
Pile et RM200 télécommande
RM200 Fernbedienung
und Batterie
Telecomando e batteria
di RM200
Mando a distancia RM200
y batería
RM200リモートコントローラー及
びバッテリー
RM200 遥控器和电池
Receiver
Récepteur
Empfänger
Ricevitore
Receptor
レシーバー
接收器
24-pin Power Adapter
Adaptateur d’alimentation à
24 broches
24-poliger Netzadapter
Adattatore di alimentazione a
24 pin
Adaptador de suministro de
24 clavijas
24ピンパワーアダプター
24-pin电源转接器
(2) AAA
RM200
Page 2

• English ----------------------------- 1
• Français --------------------------- 6
• Deutsch ------------------------- 11
• Italiano --------------------------- 16
• Español -------------------------- 21
• --------------------------- 26
• --------------------------- 31
Table of Contents
Table des matières / Inhaltsverzeichnis
Indice / Índice / /
目录
中文
Page 3

1
Multimedia Station Premier
1. The Multimedia Station Premier consists of two parts, the remote
control and an internal receiver. Install the internal receiver into
two adjoining 5.25” drive bays.
1. Turn OFF your PC and disconnect the AC power cable before
installing any hardware
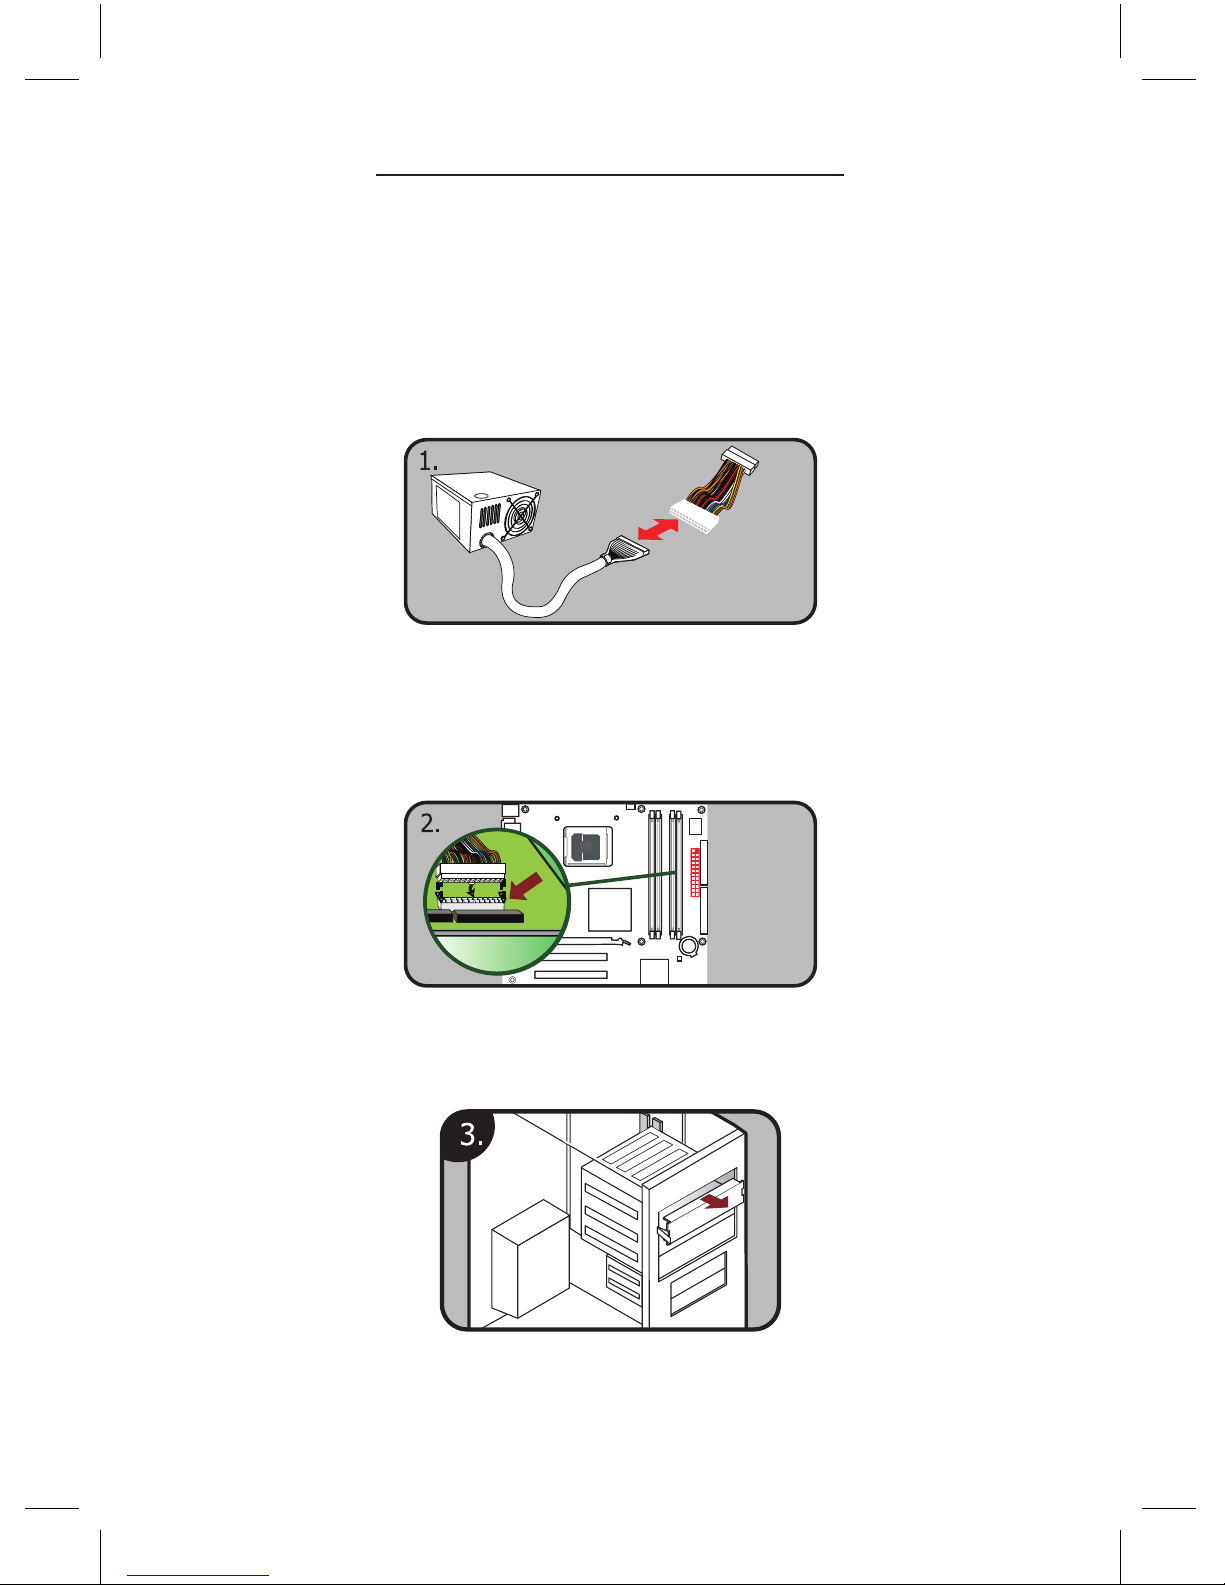
2. A 24-pin power adapter comes with the Premier. Connect the
adapter to the power supply 24-pin ATX power connector
and connect the other end of the adapter to the motherboard.
3. Remove the front cover from two 5.25” external drive bays.
Page 4

2
4. Connect the 3pin standby power cable from the 24-pin
power adapter to CN1 of the internal receiver. This connector is
shaped so that it only fits one direction.
5. Connect the wires from CN2 to the power switch (usually
labeled PWR SW) connector on the motherboard. You may
need to refer to the motherboard manual to determine the
correct location. Polarity (positive and negative) does not
matter for switches.
6. Connect the cable from the PC power switch (usually labeled
POWER SW) to CN3 of the internal receiver.
Page 5

3
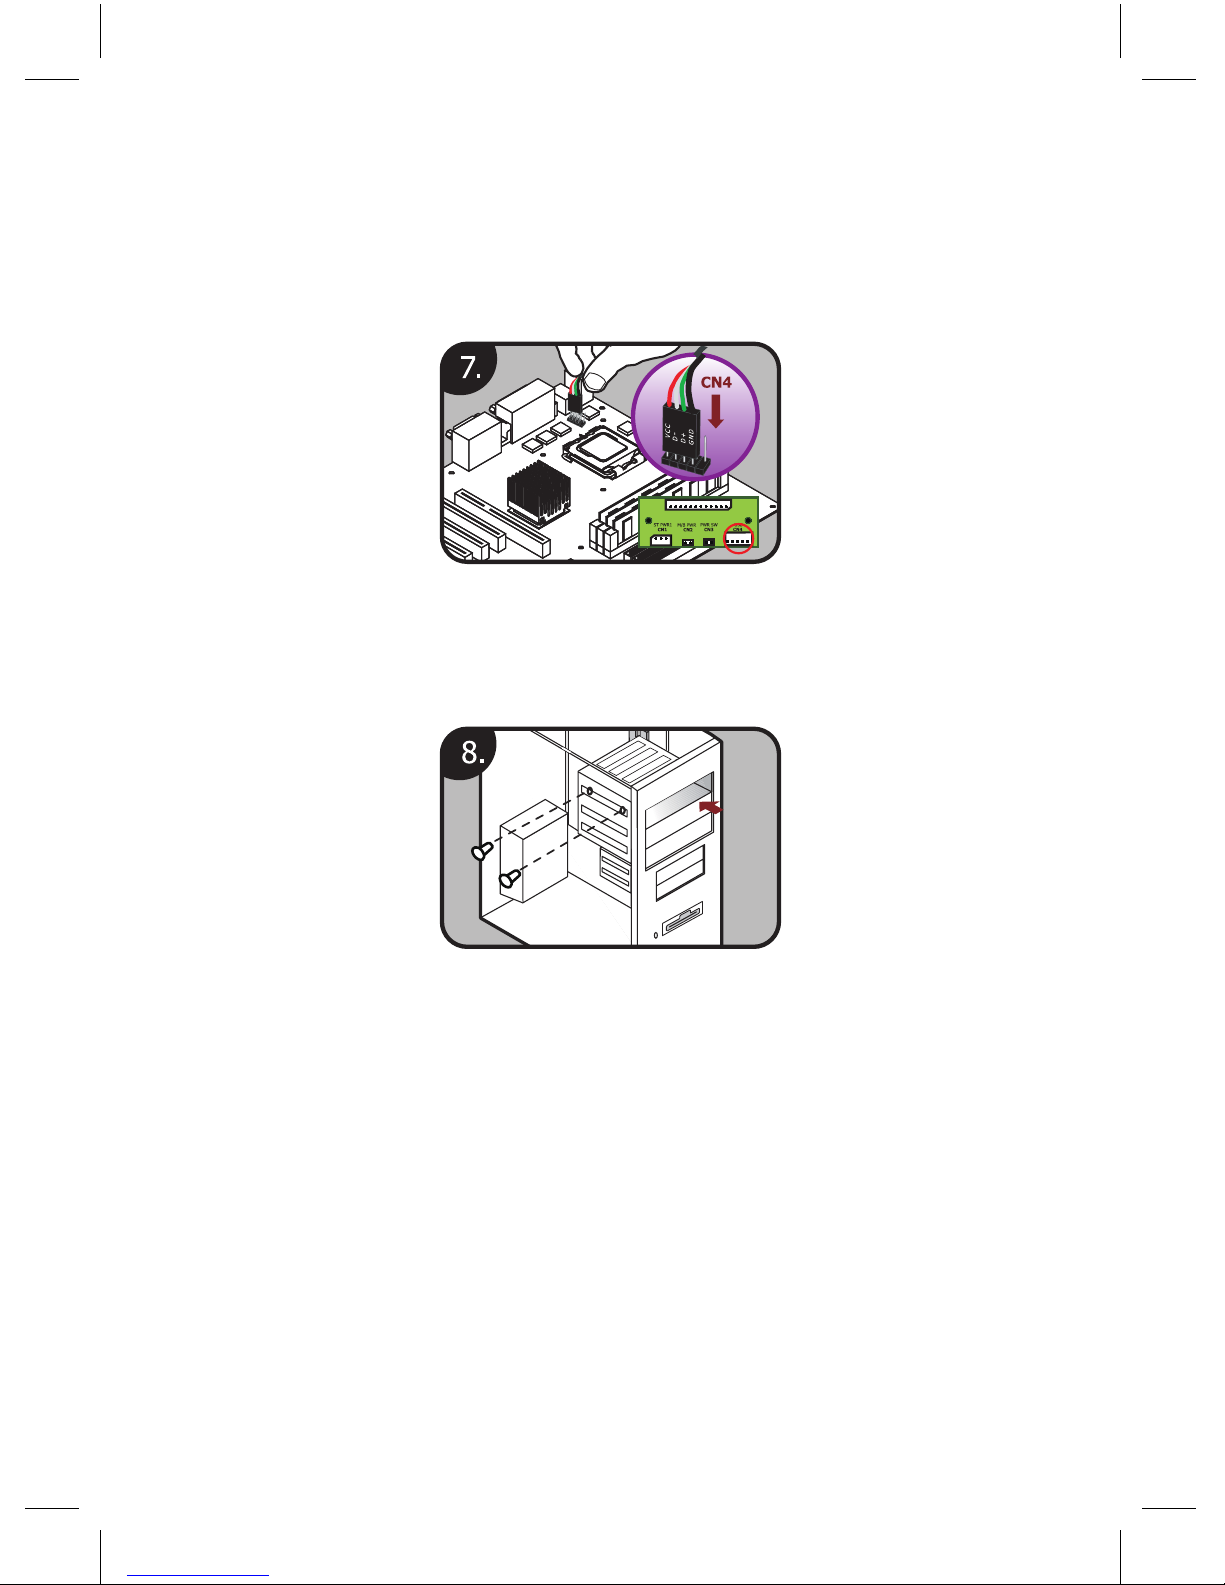
7. Connect the USB cable of CN4 to either a USB pin header on
the motherboard or an external USB port. If you use a motherboard header, check the motherboard manual to make sure
you have the pinout correct. On the USB adapter cable, the
black wire is ground (–) and the red wire is power (+5V).
8. Insert the Multimedia Station Premier receiver into the external
5.25” drive bays and secure it with the supplied
mounting screws.
2. Software Installation
Please insert the installation CD and then install the iMEDIAN HD
software. If you see the “Auto Update” message after your installation,
please update to the newest version. After the installation, you may
need to tune the settings of your system for optimal performance.
Please visit www.soundgraph.com for more information on how to
install.
Page 6
4
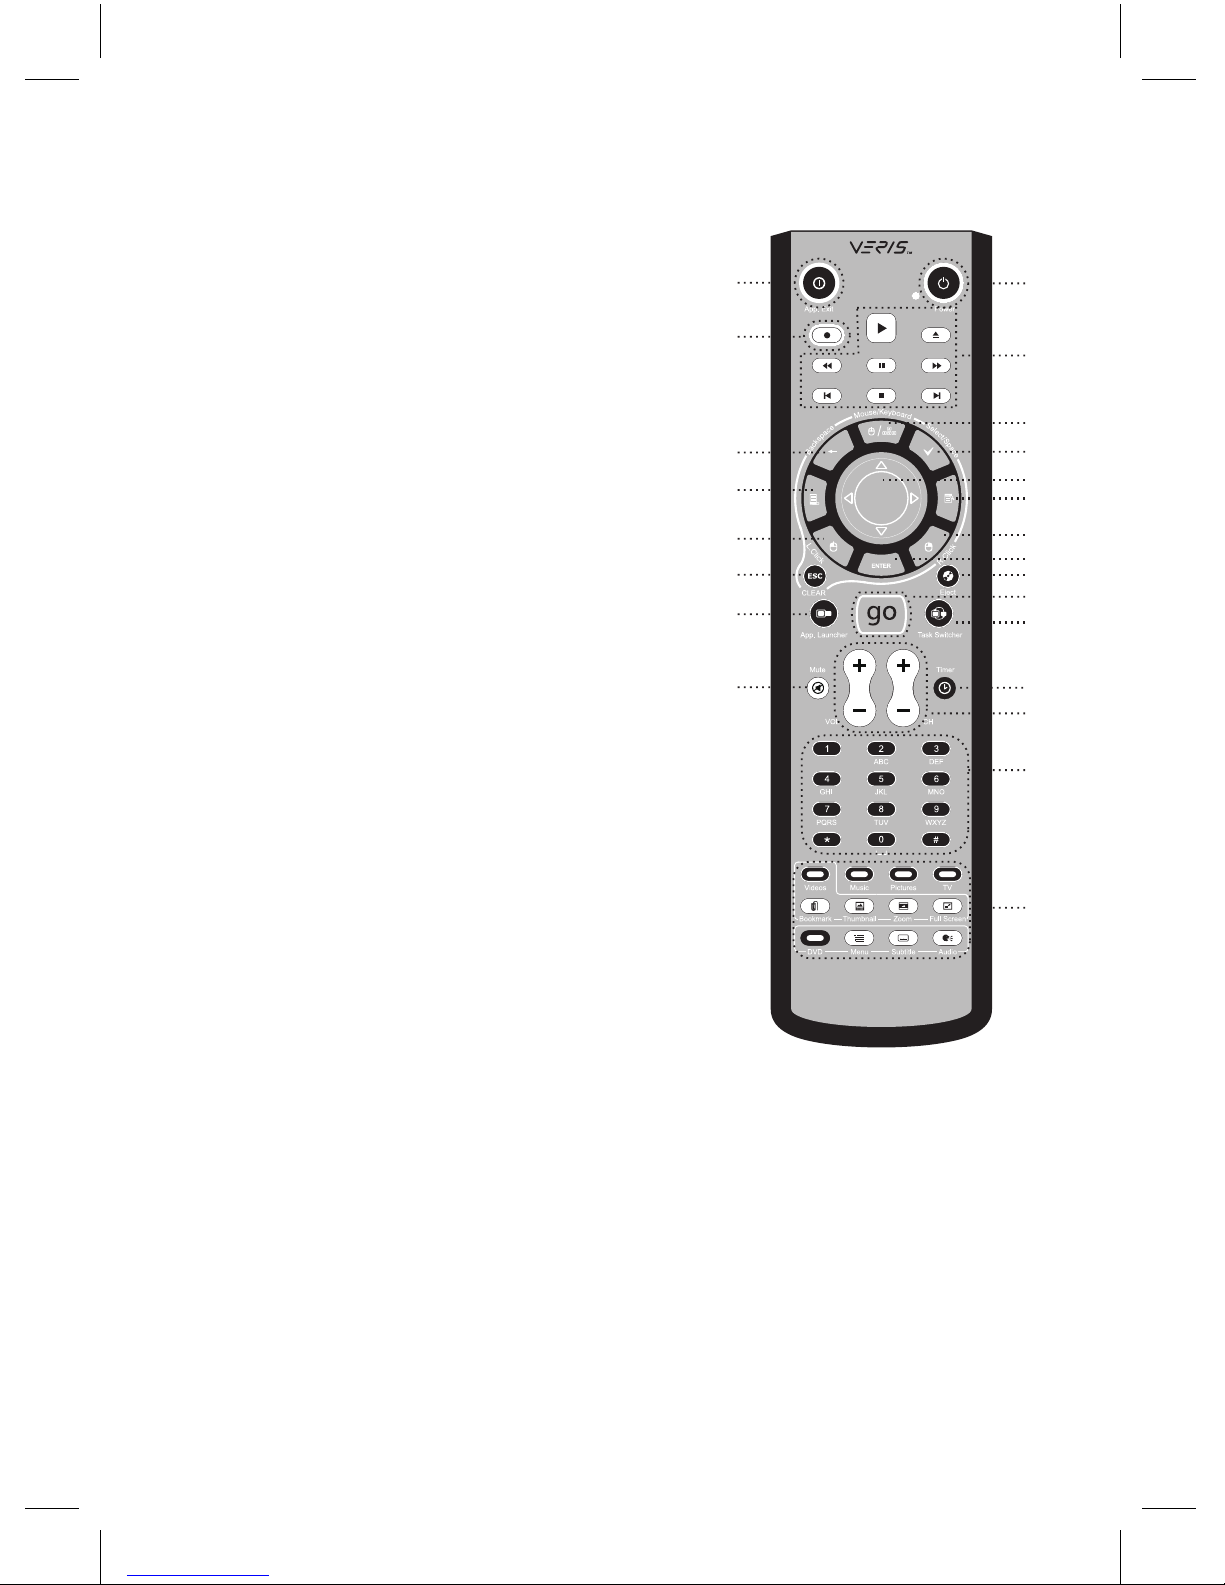
3. RM200 (IR Remote Control for PC)
1. Application Exit: Close the active window or close iMEDIAN
HD [ALT + F4]
2. Power: Turn the PC on/off
3. Record
4. Media Control Group 1: Play/
Pause/Stop/Open/Prev/Next/
Rew/F.Fwd
5. Mouse/Keyboard: Switch the
use of a PAD controller between
a mouse and a keyboard
6. Backspace: View previous
menu
7. Select/Space
8. PAD Controller: Mouse cursor
control & 4-way arrow keys
9. Windows Start
10. Windows Menu
11. Mouse left click
12. Mouse right click
13. ENTER
14. Esc
15. Open/Close: Open or close
DVD or CD-ROM tray
16. “go”: Starts iMEDIAN HD
application
17. Application Launcher: Run an
application
18. Task Switch: Switch between
running applications [ALT-TAB]
19. Mute
20. Timer: Use a timer to manage on/off and alarm schedule
21. VOL/CH: Change the volume and TV channel
22. Custom button group for user-customized commands
23. Media Control Button Group 2
12
4
5
7
8
10
12
13
15
16
18
20
21
22
23
3
6
9
11
14
17
19
Page 7

5
4. iMEDIAN HD
1. Running iMEDIAN HD
Press the “go” button to launch iMEDIAN HD
2. Navigating iMEDIAN HD
Use the 4-way buttons to navigate iMEDIAN HD. Holding
the left and right buttons will take you to the “Home” and
“Menu” screens
3. Local Media
Users can easily enjoy music, videos, and pictures on their
PC with simple remote control. IMEDIAN HAD supports
every essential internal codec.
4. Network Media
Users can easily enjoy media files on other local PCs as well
as Internet radio.
5. CD/DVD
Users can easily listen to CDs or watch DVDs
6. TV
Users can watch and record digital/analog TV channels by
TV card on the PC.
7. Tasks
Users can check RSS news feeds, world city time and
weather, manage their files, set an alarm, and shut down
their system
8. Settings
Users can change and adjust settings such as GUI,
Media Playback features, and more
Page 8

6
Multimedia Station Premier
1. Multimedia Station Premier se compose de deux éléments :
la télécommande et un récepteur interne. Installez le récepteur
interne dans deux baies de disque adjacentes de 5,25 pouces.
1. Mettez votre PC hors tension et débranchez le câble
d’alimentation secteur avant d’installer un composant
matériel quelconque.
2. Un adaptateur secteur à 24 broches est fourni avec Premier.
Branchez l’adaptateur sur le connecteur d’alimentation
ATX à 24 broches du bloc et branchez l’autre extrémité de
l’adaptateur sur la carte mère.
3. Enlevez le couvercle de façade des deux baies de disque
externes de 5,25 pouces.
Page 9

7
4. Branchez le câble d’alimentation de réserve à 3 broches de
l’adaptateur à 24 broches sur CN1 sur le récepteur interne.
La forme de ce connecteur ne permet de le brancher que
dans un sens.
5. Branchez les fils de CN2 sur le connecteur de l’interrupteur
d’alimentation (en général libellé PWR SW) de la carte mère.
Vous devrez peut-être consulter le manuel de la carte-mère
pour trouver l’emplacement exact. La polarité (pôles positif
et négatif) est sans importance pour les interrupteurs.
6. Branchez le câble de l’interrupteur d’alimentation du PC (en
général libellé POWER SW) sur CN3 du récepteur interne.
Page 10

8
7. Branchez le câble USB de CN4 sur une barrette USB de
carte-mère ou à un port USB externe. Si vous utilisez une
barrette de contact de carte mère, consultez le manuel de
la carte mère pour vérifier que le brochage est juste. Sur le
câble de l’adaptateur USB, le fil noir correspond à la mise à
la terre (–) et le fil rouge à l’alimentation (+5V).
8. Insérez le récepteur Multimedia Station Premier dans les
baies de disque externes de 5,25 pouces et fixez-le avec les
vis de montage fournies.
2. Installation du logiciel
Insérez le CD d’installation, puis installer le logiciel iMEDIAN HD. Si
le message “Auto Update (Mise à jour automatique)” s’affiche après
l’installation, veuillez effectuer une mise à jour vers la version de
logiciel la plus récente. Après l’installation, vous devrez peut-être
effectuer le réglage des paramètres de votre système pour en
optimiser les performances.
Rendez-vous sur www.soundgraph.com pour plus d’informations sur
l’installation.
Page 11
9
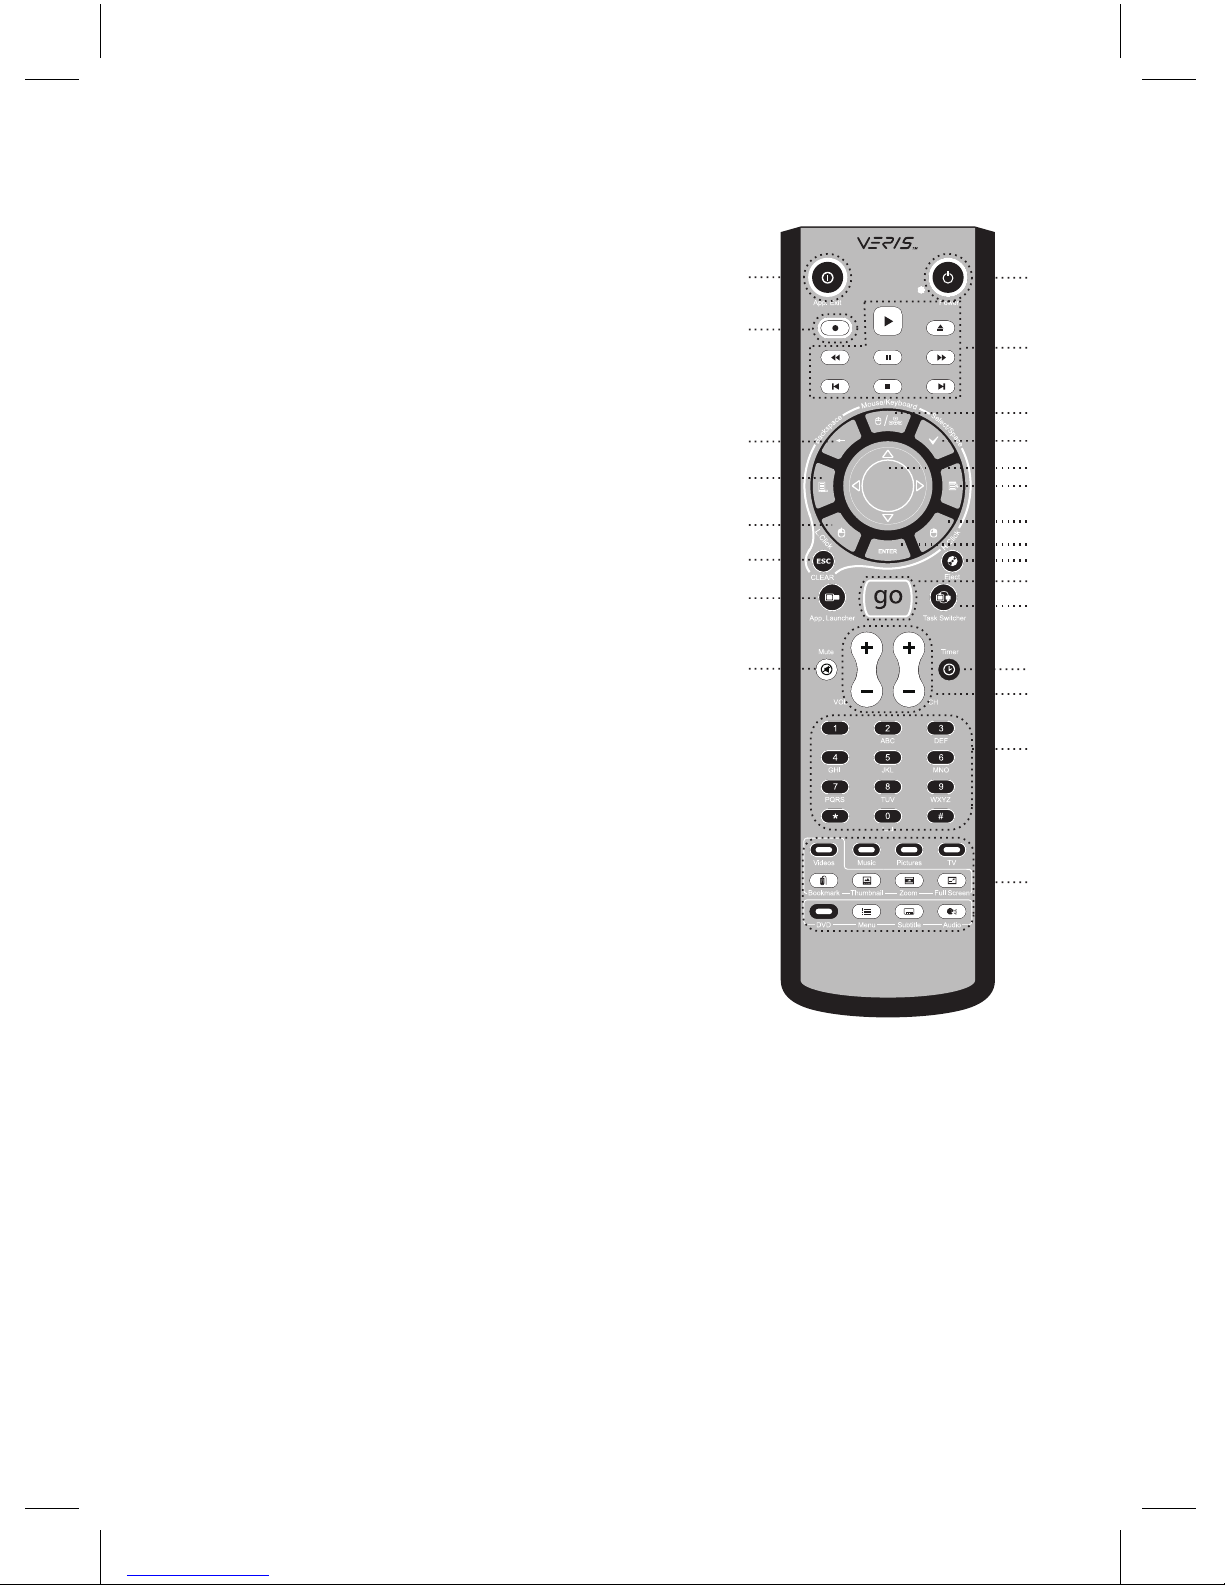
3. RM200 (télécommande à infrarouge pour PC)
1. Pour quitter l’application : fermez la fenêtre active ou le
logiciel iMEDIAN HD. [ALT+F4]
2. Marche/arrêt : met le PC sous/
hors tension
3. Enregistrement
4. Groupe de commandes multimédia 1 : Lecture/Pause/Arrêt/
Ouverture/Précédent/Suivant/
Rembobinage/Avance rapide
5. Souris/Clavier : alternez
l’utilisation d’un contrôle du
pavé entre une souris et un clavier
6. Retour arrière : affiche le menu
précédent
7. Sélection/Espace
8. Contrôle du pavé : commande
du curseur de la souris et
touches fléchées à 4 directions
9. Menu Démarrer de Windows
10. Menu de Windows
11. Clic gauche de la souris
12. Clic droit de la souris
13. ENTRÉE
14. Échap
15. Ouvrir/Fermer : ouvrez ou
fermez le plateau de DVD ou de CD-ROM
16. “go” : lance l’application iMEDIAN HD
17. Lanceur d’application : exécutez une application
18. Basculement entre plusieurs tâches : passez d’application à
l’autre en cours d’exécution [ALT+TAB]
19. Coupure du son
20. Minuterie : permet de gérer la programmation des marches/
arrêts et de l’alarme
21. VOL/CANAL : règle le volume et la chaîne de télévision
22. Groupe de touches personnalisées réservées à des commandes
définies par l’utilisateur
23. Groupe de commandes multimédia 2
12
4
5
7
8
10
12
13
15
16
18
20
21
22
23
3
6
9
11
14
17
19
Page 12

10
4. iMEDIAN HD
1. Exécution de iMEDIAN HD
Cliquez sur le bouton de lancement (go) pour lancer le
logiciel iMEDIAN HD
2. Navigation dans iMEDIAN HD
Utilisez les touches à quatre directions pour naviguer dans
iMEDIAN HD. Si vous maintenez les touches gauche et droite
enfoncées, les écrans d’accueil (Home) et Menu s’affichent
3. Fonctions multimédia locales
Possibilité d’écouter de la musique et de visualiser des
vidéos et des photos stockées sur un PC en se servant de la
télécommande. Le logiciel IMEDIAN HD prend en charge les
principaux codecs internes.
4. Fichiers multimédia disponibles via un réseau
Possibilité de consulter des fichiers multimédia stockés sur
d’autres PC locaux et d’écouter la radio sur Internet.
5. CD/DVD
Possibilité d’écouter des CD ou de regarder des DVD
6. TV
Possibilité de regarder et d’enregistrer des chaînes de
télévision analogiques et numériques en utilisant une carte
TV sur un PC.
7. Tâches
Possibilité de consulter les chaînes d’information RSS, de
vérifier l’heure et la météo à travers le monde, de gérer les
fichiers, de régler une alarme et d’arrêter le système.
8. Paramètres
Possibilité de modifier et de configurer des paramètres tels
que l’interface utilisateur et les fonctions de lecture multimédia.
Page 13

11
Multimedia Station Premier
1. Die Multimedia Station Premier besteht aus Fernbedienung und
internem Empfänger. Installieren Sie den internen Empfänger in
zwei benachbarte 5,25”-Laufwerkeinschübe.
1. Bevor Sie neue Hardware installieren, schalten Sie den PC
AUS und trennen das Netzkabel von der Stromversorgung.
2. Die Station wird mit einem 24-poligen Netzadapter geliefert.
Verbinden Sie das eine Ende des Adapters mit dem
24-poligen ATX-Netzanschluss des Netzteils und das
andere mit dem Mainboard.
3. Entfernen Sie die vordere Abdeckungen von zwei externen
5,25”-Laufwerkeinschüben.
Page 14
12
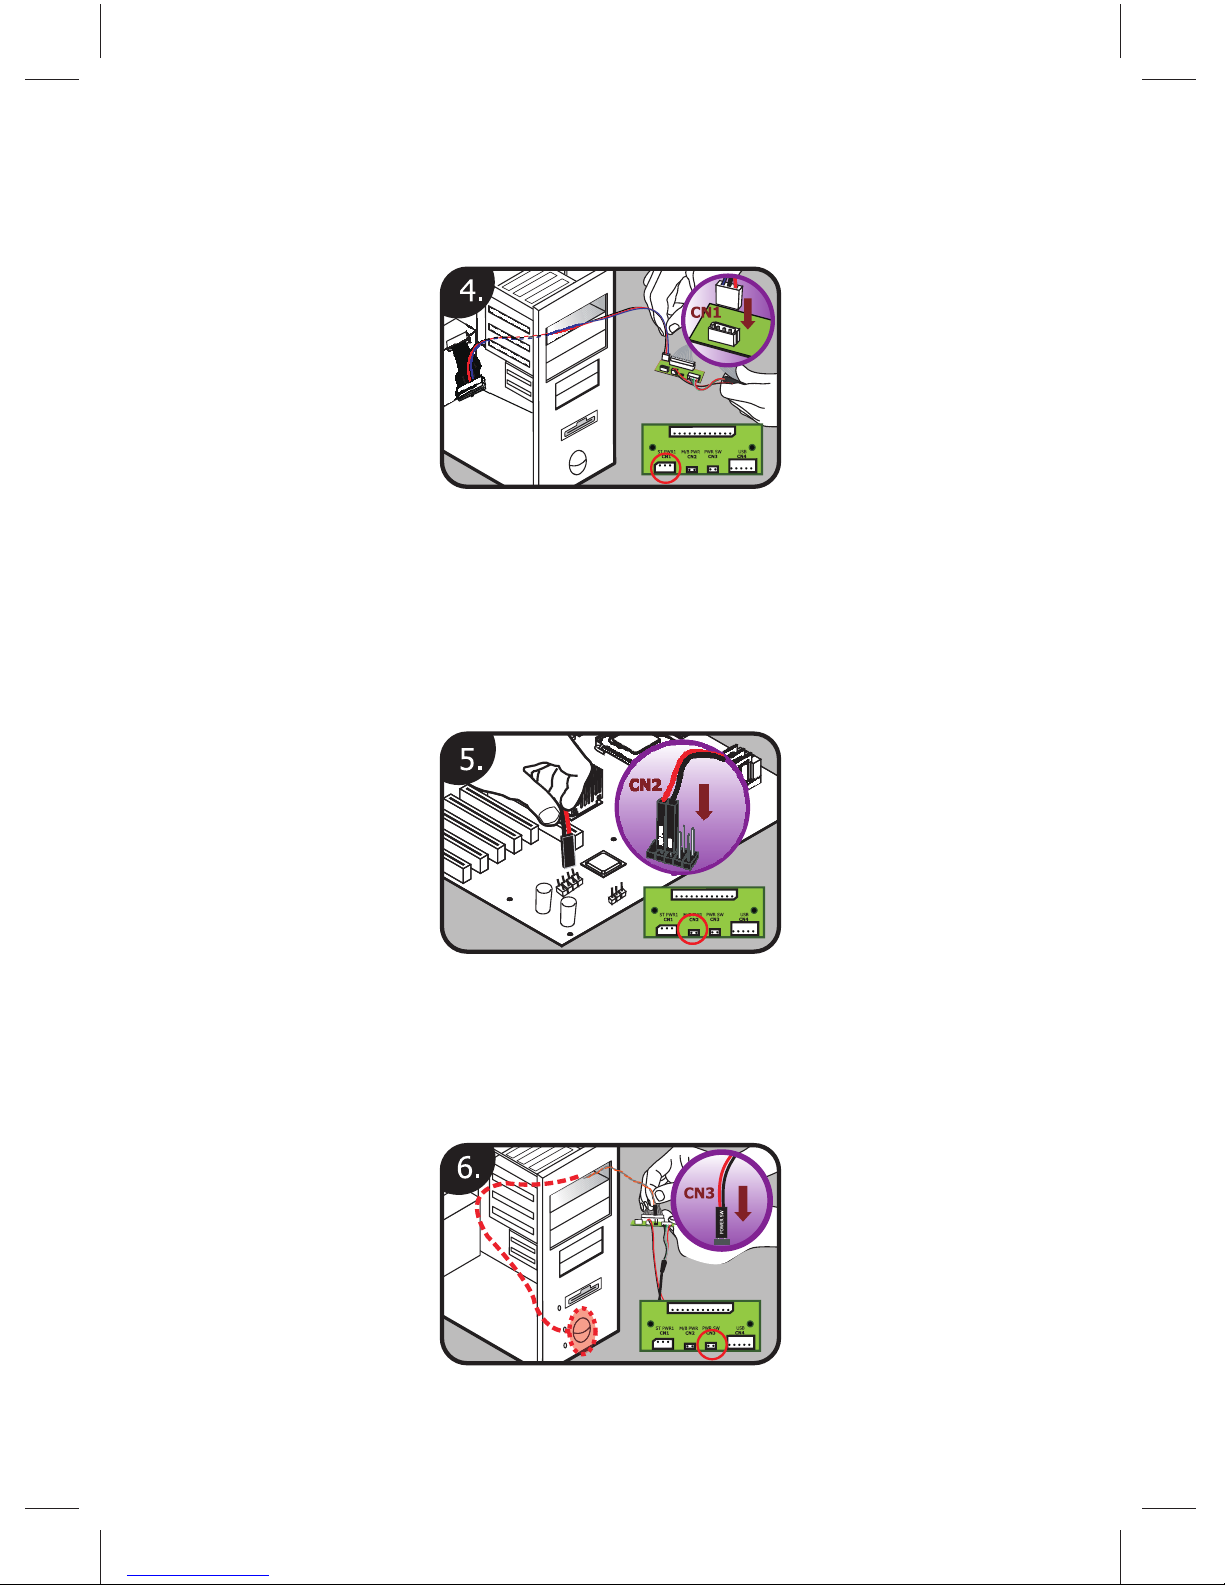
4. Verbinden Sie das 3-polige Standby-Netzkabel vom 24-poligen
Adapter mit CN1 des internen Empfängers. Der Stecker ist
so ausgelegt, dass er nur in einer Richtung passt.
5. Verbinden Sie die Kabel von CN2 mit dem Stecker für den
Netzschalter (üblicherweise mit PWR SW gekennzeichnet)
auf dem Mainboard. Konsultieren Sie dafür ggf. das
entsprechende Handbuch. Die Polarität (negativ oder
positiv) spielt hier keine Rolle.
6. Verbinden Sie das Kabel des PC-Netzschalters
(üblicherweise mit POWER SW gekennzeichnet) mit CN3
des internen Empfängers.
Page 15

13
7. Verbinden Sie das USB-Kabel von CN4 mit einem USB-PinHeader auf dem Mainboard oder einem externen USBAnschluss. Wenn Sie sich für die erste Variante entscheiden,
prüfen Sie anhand des Mainboard-Handbuchs, ob Sie den
richtigen Pin gewählt haben. Der schwarze Draht am USBAdapterkabel führt Masse (–), der rote Strom (+5 V).
8. Schieben Sie den Empfänger der Multimedia Station Premier
in die externen 5,25”-Laufwerkeinschübe und befestigen Sie
ihn mit den mitgelieferten Schrauben.
2. Software-Installation
Legen Sie die Installations-CD ein und installieren Sie die iMEDIAN HD
Software. Wenn nach abgeschlossener Installation die Meldung “Auto
Update” angezeigt wird, aktualisieren Sie die Software auf die neueste
Version. Konfigurieren Sie nach der Installation ggf. Ihre Systemeinstellungen, um eine optimale Performance
zu gewährleisten.
Unter www.soundgraph.com finden Sie weitere Infos zur Installation.
Page 16

14
3. RM200 (IR-Fernbedienung für PC)
1. Anwendung beenden: aktives Fenster oder iMEDIAN HD
[ALT + F4] schließen
2. Netztaste: PC ein/aus
3. Aufzeichnen
4. Mediensteuerung Gruppe 1:
Wiedergabe/Pause/Stopp/
Öffnen/Zurück/Weiter/Rückl./
Schn.Vorl.
5. Maus/Tastatur: Umschalten
des PAD-Controllers zwischen
Maus und Tastatur
6. Rücktaste: vorheriges Menü
anzeigen
7. Auswahl/Leertaste
8. PAD-Controller: Mauscursorsteuerung und 4-Wege-Pfeiltasten
9. Windows Start
10. Windows-Menü
11. Linksklick Maus
12. Rechtsklick Maus
13. EINGABE
14. Esc
15. Öffnen/Schließen: DVD/CDSchublade öffnen bzw. schließen
16. “go”: iMEDIAN HD
Anwendung starten
17. Application Launcher: Anwendung ausführen
18. Task-Umschaltung: zwischen ausgeführten Anwendungen
umschalten [ALT-TAB]
19. Stummtaste
20. Timer: Ein- und Ausschalten sowie Alarme einstellen
21. VOL/KN: Lautstärke regeln und TV-Kanal wechseln
22. Tastengruppe zur Definition durch den Benutzer
23. Mediensteuerung Gruppe 2
12
4
5
7
8
10
12
13
15
16
18
20
21
22
23
3
6
9
11
14
17
19
Page 17

15
4. iMEDIAN HD
1. Ausführen von iMEDIAN HD
Drücken Sie die go-Taste, um iMEDIAN HD zu starten
2. Navigieren in iMEDIAN HD
Verwenden Sie dazu die 4-Wege-Taste. Halten Sie die rechte
und linke Taste gedrückt, um zu den Bildschirmen “Home”
und “Menu” zu gelangen.
3. Lokale Medien
Wiedergabe/Anzeige von Musik und Videos bzw. Bildern auf
dem PC per Fernbedienung. IMEDIAN HD unterstützt alle
benötigten internen Codecs.
4. Netzwerkmedien
Wiedergabe von Mediendateien auf anderen lokalen PCs und
Internetradio.
5. CD/DVD
Wiedergabe von CDs und DVDs
6. TV
Empfang von digitalen/analogen TV-Programmen auf dem PC
per TV-Karte
7. Andere Vorgänge
Empfang von RSS News Feeds, Abrufen von Weltzeiten oder
Wetterbericht, Verwalten von Dateien, Alarmfunktion und
Ausschalten des Systems
8. Einstellungen
Konfiguration von GUI, Funktionen zur Medienwiedergabe
und vielem mehr
Page 18

16
Multimedia Station Premier
1. Multimedia Station Premier consiste di due parti: il telecomando e
un ricevitore interno. Installare il ricevitore interno in due guide di
fissaggio da 5,25” adiacenti.
1. Spegnere il PC e scollegare il cavo di alimentazione CA prima
di installare componenti hardware.
2. Premier viene fornito con un adattatore a 24 pin. Collegare
un’estremità dell’adattatore al connettore di alimentazione ATX
a 24 pin dell’alimentatore e l’altra estremità all’adattatore
della scheda madre.
3. Rimuovere la copertura delle due guide di fissaggio per unità
a disco esterna da 5,25”.
Page 19

17
4. Collegare il cavo di alimentazione a 3 pin dall’adattatore di
alimentazione a 24 pin a CN1 nel ricevitore interno. La forma
di questo connettore ne consente il collegamento soltanto in
una direzione.
5. Collegare i fili da CN2 al connettore dell’interruttore di
alimentazione (contrassegnato in genere con PWR SW) nella
scheda madre. Può essere necessario consultare il manuale
della scheda madre per determinare la posizione corretta. La
polarità (positiva e negativa) non è importante per gli interruttori.
6. Collegare il cavo dall’interruttore di alimentazione del PC
(contrassegnato in genere con POWER SW) a CN3 nel
ricevitore interno.
Page 20

18
7. Collegare il cavo USB di CN4 al connettore a pin USB nella
scheda madre o a una porta USB esterna. Se viene utilizzato
un collegamento interno della scheda madre, consultare il
manuale della scheda madre per accertarsi che la
disposizione dei pin sia corretta. Sul cavo dell’adattatore
USB, il filo nero corrisponde alla messa a terra (–) e il filo
rosso all’alimentazione (+5 V).
8. Inserire il ricevitore di Multimedia Station Premier nelle guide
di fissaggio per unità a disco esterna da 5,25” e fissarlo con
le viti di montaggio fornite in dotazione.
2. Installazione del software
Inserire il CD di installazione, quindi procedere all’installazione del
software iMEDIAN HD. Se viene visualizzato il messaggio
“Aggiornamento automatico” dopo l’installazione, eseguire
l’aggiornamento alla versione più recente del software. Al termine
dell’installazione, può essere necessario regolare le impostazioni del
sistema in modo da ottenere prestazioni ottimali.
Per maggiori informazioni sull’installazione, visitare
www.soundgraph.com
Page 21

19
3. RM200 (telecomando a raggi infrarossi per PC)
1. Uscita dall’applicazione: chiude la finestra attiva o iMEDIAN
HD [ALT + F4]
2. Alimentazione: accende/spegne
il PC
3. Registrazione
4. Comando multimediale gruppo
1: riproduzione/pausa/
interruzione/apertura/preceden-
te/successivo/riavvolgimento/
avanzamento rapido
5. Mouse/Tastiera: alterna l’uso di
un comando PAD tra un mouse
e una tastiera
6. Spazio indietro: visualizza il
menu precedente
7. Selezione/Spazio
8. Comando PAD: comando per il
cursore del mouse e tasti
freccia a quattro direzioni
9. Avvio finestra
10. Menu finestre
11. Clic sinistro con il mouse
12. Clic destro con il mouse
13. INVIO
14. Esc
15. Apertura/Chiusura: apre o chiude il vassoio per DVD o CD-ROM
16. “go”: avvia l’applicazione iMEDIAN HD
17. Lancio dell’applicazione: esegue un’applicazione
18. Commutatore task: commuta tra applicazioni in esecuzione
[ALT-TAB]
19. Silenziamento
20. Timer: utilizza un timer per gestire l’accensione e lo
spegnimento e per programmare una sveglia
21. VOL/CAN: cambia il volume e il canale TV
22. Gruppo di pulsanti personalizzati per comandi personalizzati
dell’utente
23. Pulsante comando multimediale gruppo 2
12
4
5
7
8
10
12
13
15
16
18
20
21
22
23
3
6
9
11
14
17
19
Page 22

20
4. iMEDIAN HD
1. Esecuzione di iMEDIAN HD
Premere il pulsante “go” per avviare iMEDIAN HD
2. Esplorazione di iMEDIAN HD
Utilizzare i pulsanti a quattro direzioni per esplorare iMEDIAN
HD. Tenendo premuti i pulsanti destro e sinistro si
raggiungono le schermate “Home” e “Menu”
3. Multimedialità locale
È possibile riprodurre con facilità musica, video e immagini
su PC, utilizzando semplicemente il telecomando. IMEDIAN
HD supporta ogni codec interno essenziale.
4. Multimedialità in rete
È possibile riprodurre con facilità file multimediali su altri PC
locali e ascoltare la radio tramite Internet.
5. CD/DVD
È possibile ascoltare CD o guardare DVD.
6. TV
È possibile guardare e registrare su PC i canali TV digitali/
analogici trasmessi da scheda TV
7. Task
È possibile ricevere feed di notiziari RSS, verificare l’ora e il
meteo di tutto il mondo, gestire file, impostare una sveglia e
spegnere il sistema
8. Impostazioni
È possibile modificare e regolare le impostazioni di GUI,
le funzioni di Media Playback e altro ancora.
Page 23

21
Multimedia Station Premier
1. Multimedia Station Premier consta de dos partes: el mando a
distancia y un receptor interno. Instale el receptor interno en dos
compartimientos para unidades de 5,25” anejos.
1. Apague el sistema y desconecte el cable de suministro antes
de instalar cualquier hardware.
2. Hay un adaptador de suministro de 24 clavijas incluido con
Premier. Enchufe el adaptador al conector de suministro ATX
de 24 clavijas de la fuente de suministro y conecte el otro
extremo del adaptador a la placa base.
3. Quite la cubierta frontal de dos compartimientos para
unidades externas de 5,25”.
Page 24

22
4. Enchufe el cable de suministro de standby de 3 clavijas del
adaptador de suministro de 24 clavijas al conector CN1 del
receptor interno.
5. Enchufe los cables de CN2 al conector del interruptor de
suministro (normalmente etiquetado PWR SW) de la placa
base. Quizá deba consultar el manual de la placa base para
saber su ubicación exacta. La polaridad (positiva y negativa)
no es importante para los interruptores.
6. Conecte el cable del interruptor de suministro del PC
(normalmente etiquetado POWER SW) al conector CN3 del
receptor interno.
Page 25
23
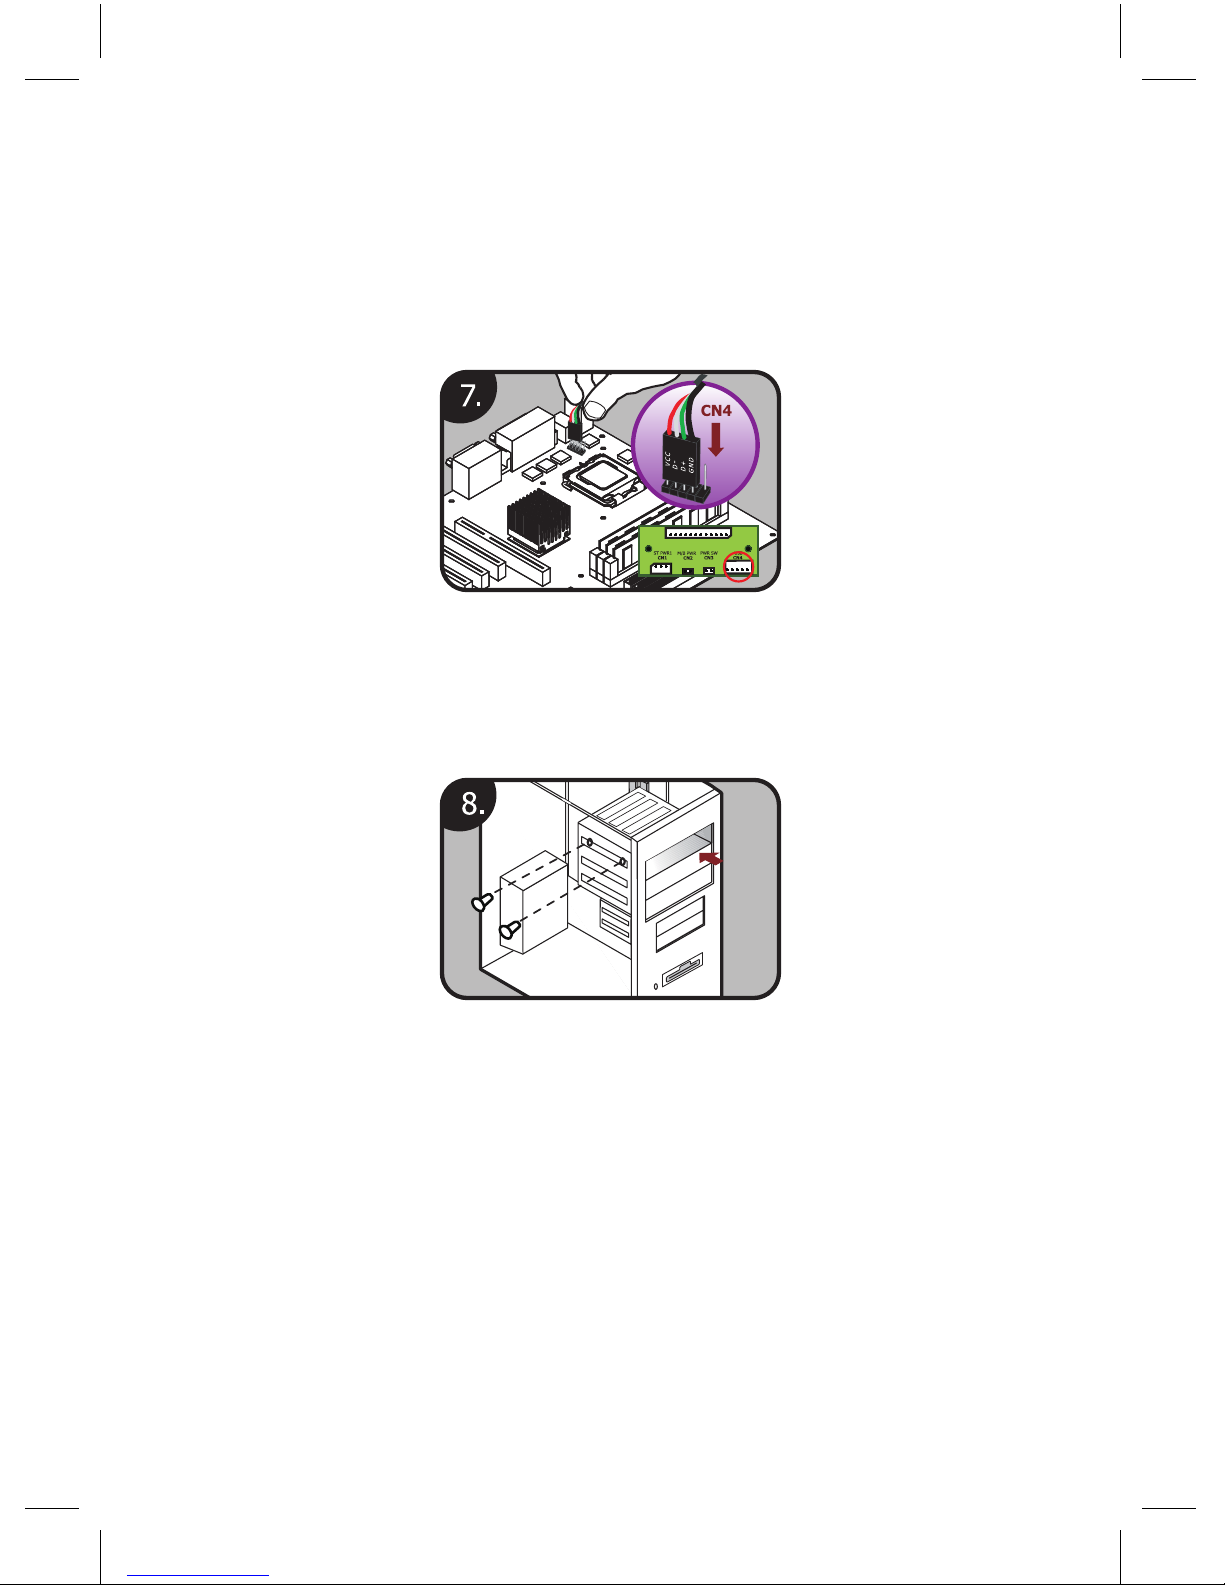
7. Conecte el cable USB de CN4 a una toma USB de la placa
base o a un puerto USB externo. Si utiliza una toma de la
placa base, consulte el manual de ésta para asegurarse de
que usa la disposición de clavijas correcta. En el cable
adaptador USB, el hilo de color negro es de tierra (–) y el
tricolor es de suministro (+5V).
8. Inserte el receptor Multimedia Station Premier en los compartimientos para unidades externas de 5,25” y fíjelo con
los tornillos de montaje suministrados.
2. Instalación del software
Inserte el CD de instalación e instale el software iMEDIAN HD.
Si aparece un mensaje de actualización automática tras la instalación,
actualice a la versión más reciente. Después de la instalación, quizá
deba ajustar la configuración del sistema para un rendimiento óptimo.
Para más información sobre la instalación, visite www.soundgraph.com.
Page 26

24
3. RM200 (mando a distancia IR para PC)
1. Salir de la aplicación: Cerrar la ventana activa o cerrar iMEDIAN
HD [ALT + F4]
2. Suministro: Encendido/apagado
del PC
3. Grabar
4. Grupo de control de medios 1:
Reproducir/Pausa/Parar/Abrir/
Anterior/Siguiente/Rebobinar/
Avance rápido
5. Ratón/teclado: Cambiar el uso
de controlador PAD entre ratón
y teclado
6. Retroceso: Ver menú anterior
7. Seleccionar/espacio
8. Controlador PAD: Control del
cursor del ratón y teclas de
flecha
9. Inicio de Windows
10. Menú Windows
11. Clic izquierdo del ratón
12. Clic derecho del ratón
13. INTRO
14. Esc
15. Abrir/cerrar: Abrir o cerrar DVD
o bandeja de CD-ROM
16. “go”: Inicia la aplicación
iMEDIAN HD
17. Ejecutar aplicación: Ejecutar una aplicación
18. Cambio de tarea: Cambiar entre aplicaciones en ejecución
[ALT-TAB]
19. Silenciar
20. Temporizador: Temporizador para cambiar horarios de
encendido/apagado y alarma
21. VOL/CH: Cambiar el volumen y canal de TV
22. Grupo de botones para comandos personalizados por el usuario
23. Grupo de control de medios 2
12
4
5
7
8
10
12
13
15
16
18
20
21
22
23
3
6
9
11
14
17
19
Page 27

25
4. iMEDIAN HD
1. Ejecución de iMEDIAN HD
Pulse el botón “go” para ejecutar iMEDIAN HD
2. Navegación por iMEDIAN HD
Utilice los botones de cuatro vías para navegar por iMEDIAN
HD. Mantenga pulsados los botones derecho e izquierdo para
ir a las pantallas “Home” y “Menu”.
3. Medios locales
Los usuarios pueden disfrutar de la música, vídeos e
imágenes en su PC utilizando un sencillo mando a distancia.
IMEDIAN HAD admite todos los códec internos esenciales.
4. Medios en la red
Los usuarios pueden disfrutar fácilmente de archivos de
medios en otros PC locales además de radio por Internet.
5. CD/DVD
Los usuarios pueden escuchar CDs o ver DVDs fácilmente.
6. TV
Los usuarios pueden ver y grabar canales de TV digitales/
analógicos con la tarjeta de TV del PC.
7. Tareas
Los usuarios pueden consultar información de noticias RSS,
la hora y el tiempo de todo el mundo, gestionar sus archivos,
programar una alarma y cerrar el sistema.
8. Configuración
Los usuarios pueden cambiar y ajustar la configuración de
interfaz de usuario, reproducción de medios, etc.
Page 28
26
Multimedia Station Premier
1. マルチメディアステーションPremierはリモコンと内蔵のレシーバ
ーの2つで構成されています。内蔵のレシーバーを2つの隣接した
5.25ドライブベイにインストールして下さい。
1. パソコンの電源を切り、ハードウェアをインストールする前に
コンセントから電源ケーブルを抜いて下さい。
2. Premierには24ピンパワーアダプターが同梱されています。
24ピンパワーアダプターの一方をATX電源コネクターに、もう
一方をマザーボードに接続して下さい。
3. 2つの5.25インチ外付けドライブベイのカバーをはずして下さい。
Page 29

27
4. 24ピンアダプターから出ている3ピンスタンバイパワーケーブ
ルを内蔵レシーバーのCN1に接続して下さい。このコネクター
は、正しい方向のみに接続できるようになっています。
5. CN2からワイヤーをマザーボードの電源スイッチコネクター(
PWR SW)へ接続して下さい。正しい位置をお持ちのマザーボー
ドのマニュアルで確認して下さい。スイッチの接続には極性は
関係ありません。
6. PC電源スイッチ(POWER SW)からケーブルを内蔵レシーバーの
CN3へ接続して下さい。
Page 30
28
7. CN4のUSBケーブルをマザーボードのUSBピンヘッダー、もしく
は外付けのUSBポートに接続して下さい。マザーボードヘッダ
ーを使用する場合は、お持ちのマザーボードのマニュアルで確
認して下さい。USBアダプターケーブル上で、黒の線はグラウ
ンド、赤の線は+5V電源です。
8. マルチメディアステーションPremierレシーバーを外付けの
3.5インチドライブベイに挿入し、付属のネジで固定して下さい。
2. ソフトウェアのインストール
インストール用CDを挿入し、そしてiMEDIAN HD softwareをインストール
して下さい。インストール後に”Auto Update”という画面が表示された
場合は、最新のバージョンにアップデートして下さい。備考:インストー
ル後、システムを最適化する必要があることがあります。この他のインス
トールについての情報は www.soundgraph.com をご覧下さい。
Page 31

29
12
4
5
7
8
10
12
13
15
16
18
20
21
22
23
3
6
9
11
14
17
19
3. RM200 (PC用赤外線リモコン)
1. Application Exitボタン:起動中のウィンドウを閉じ、iMEDIAN
HDを閉じます。[ALT+F4]
2. Powerボタン:PCの電源のオ
ン/オフ
3. Recordボタン:録音録画
4. Media Control Group1ボタン:
再生/一時停止/停止/開く/戻
る/進む/巻き戻し/早送り
5. Mouse/Keyboard: PADコントロ
ーラーのマウスとキーボードの
切り替え
6. Backボタン:以前のメニューに戻
ります
7. Select/Spaceボタン:選択/スペース
8. PAD Controller:マウスカーソ
ルのコントロール及び4方向キー
9. Windowsの開始
10. Windowsメニュー
11. L.Clickボタン:マウス左クリック
12. R.Clickボタン:マウス右クリック
13. ENTERボタン
14. ESCボタン
15. Open/Closeボタン:DVD、
CD-ROMトレイの開閉
16. goボタン: iMEDIAN HD
applicationの開始
17. Application Launcherボタン:アプリケーションの起動
18. Taskスイッチ:実行中のアプリケーションの切り替え
[ALT-TAB]
19. Muteボタン
20. Timerボタン:Timerのオン/オフとアラームの設定
21. VOL/CHボタン:ボリュームとTVチャンネルの変更
22. Customボタン:カスタムコマンドの設定
23. Media Control ボタングループ2
Page 32

30
4. iMEDIAN HD
1. iMedian HDの開始
goボタンを押し、iMedian HDを開きます
2. iMEDIAN HDの操作
4方向ボタンでiMEDIAN HDを操作します。左ボタンでホーム画
面へ、右ボタンでメニュー画面へ行き、ENTERボタンで選択し
ます
3. ローカルメディア
リモコンで簡単に音楽、ビデオ、写真をパソコンで楽しめま
す。iMEDIAN HDソフトウェアはほぼ全ての内蔵コーデックをサ
ポートしています
4. ネットワークメディア
簡単にメディアファイルをインターネットラジオと同様に、ネ
ットワーク上のパソコンでも楽しめます
5. CD/DVD
簡単にCD、DVDを鑑賞するこおができます
6. テレビ
パソコンにテレビチューナーカードを取り付けると、デジタ
ル/アナログテレビを見たり、録画することが可能です
7. タスク
RSS news feeds、世界の都市の時間、天気の確認、ファイルの
管理、アラームの設定、そしてシステムのシャットダウンがで
きます
8. セッティング
GUI,メディアプレイバックなどのセッティングを変更/調整等
ができます
Page 33

31
Multimedia Station Premier
1. 多媒体休闲小站Premier包含两个部分,遥控器和接收器。将接收器
装入相邻的两个5.25” 磁碟快置槽。
1. 安装任何硬体前,请先关闭主机电源并拆下AC电源线。
2. Premier版内附一个24-pin 电源转接器。将转接器接上电源供应
器的24-pin ATX 电源接头,并将转接器另一端接上主机板。
3. 拆下两片5.25” 磁碟快置槽的前面挡板。
Page 34

32
4. 将24-pin 电源转接器上的3-pin电源待命线,接到接收器的
CN1接头。接头附有防呆功能,只能从一个方向插入。
5. 将CN2接头上的电源开关线连接到主机板上的电源开关接头(通
常会标有PWR SW字样)。正确位置请您参阅主机板说明书。开关
接头无正负之分。
6. 将机壳上的电源开关的接线(通常会标有PWR SW字样)连接到接
收器的CN3接头。
Page 35

33
7. 将CN4接头上的USB线(此USB线附有转接头)连接到主机板上的
USB接头或是外接式USB插孔(需拔除转接头)。假如您是使用主
机板上的USB接头,请您参阅主机板说明书,确保针脚的正确位
置。USB转接线的黑线是地线(-)而红线是电源(+5V)。
8. 将多媒体休闲小站Premier的接收器装入5.25” 磁碟快置槽,
并以所附的托架螺丝固定。
2. 安装软体
请将安装光碟放入光碟机,然后安装 iMEDIAN HD 软体。如果您看到“Auto
Update”的信息,请于安装完成后更新至最新版本。此外,安装完成后,为
求系统的最佳表现,您或许会需要调整系统的设定。详细的安装资讯请参照
www.soundgraph.com。
Page 36

34
12
4
5
7
8
10
12
13
15
16
18
20
21
22
23
3
6
9
11
14
17
19
3. RM200 (PC用红外线遥控器)
1. Application Exit: 关闭使用中的视窗,或是关闭iMEDIAN HD
[ALT + F4]
2. Power: 开启或关闭PC电源
3. Record:录影键
4. Media Control Group 1:放
映/暂停/停止/开启/返回/跳
过/回转/快转
5. Mouse/Keyboard: 切换PAD控制模
式于键盘模式/滑鼠模式
6. Backspace: 返回上一页选单
7. 选择键/空白键
8. PAD Controller:控制滑鼠游标和
4向导航键
9. 开启 Windows
10. Windows 选单
11. L.Click:滑鼠左键
12. R.Click:滑鼠右键
13. Enter键
14. Esc键
15. Open/Close: 开启或关闭光碟机
16. “go”: 启动 iMEDIAN HD 应用
程式
17. Application Launcher: 执行应
用程式
18. Task Switch:切换执行中的应用
程式 [ALT-TAB]
19. 静音
20. Timer: 计时器/闹铃功能
21. VOL/CH: 音量调整/频道切换
22. Custom 群组键:由使用者自行设定
23. 多媒体控制群组键 2
Page 37

35
4. iMEDIAN HD
1. 执行 iMEDIAN HD
按下“go“键启动 iMEDIAN HD
2. iMEDIAN HD 操作方法
使用4向导航键来操作iMEDIAN HD。长押左键和右键可以回到首
页和选单画面。按下ENTER键,确认所选
3. 本机多媒体
使用者可以经由遥控器轻松享受自己个人电脑里的音乐,影片和
照片。IMEDIAN HD 支援绝大多数的媒体格式
4. 网络多媒体
使用者可以轻松享受网络上的媒体档案,就像享受自己个人电脑
里的媒体档案一样
5. CD/DVD
使用者可以轻松享受CDs或是DVDs
6. 电视
使用者可以经由个人电脑里的电视卡观赏或是录下数位/类比电
视频道的内容
7. 应用程式
借由iMEDIAN HD,使用者可以阅读RSS news feeds,读取世界各
都市的时间,天气,管理档案,设定闹铃以及关机
8. 设定
设定及调整iMEDIAN HD的各项功能
Page 38

Antec, Inc.
47900 Fremont Blvd.
Fremont, CA 94538
USA
tel: 510-770-1200
fax: 510-770-1288
Antec Europe B.V.
Stuttgartstraat 12
3047 AS Rotterdam
The Netherlands
tel: +31 (0) 10 462-2060
fax: +31 (0) 10 437-1752
Customer Support:
US & Canada
1-800-22ANTEC
Europe
+31 (0) 10 462-2060
www.antec.com
© Copyright 2008 Antec, Inc. All rights reserved.
All trademarks are the property of their respective owners.
Reproduction in whole or in part without written permission is prohibited.
Printed in China.
 Loading...