

Page 1

VERIS INDUSTRIES
™
POWER MONITORING
HAZARD OF ELECTRIC SHOCK, EXPLOSION, OR ARC FLASH
• Follow safe electrical work practices. See NFPA 70E in the USA, or applicable local codes.
• This equipment must only be installed and serviced by qualified electrical personnel.
• Read, understand and follow the instructions before installing this product.
• Turn off all power supplying equipment before working on or inside the equipment.
• Use a properly rated voltage sensing device to confirm power is off.
DO NOT DEPEND ON THIS PRODUCT FOR VOLTAGE INDICATION
• Only install this product on insulated conductors.
Failure to follow these instructions will result in death or serious injury.
DANGER
8.2 in
(209 mm)
2.0 in
(51 mm)
9.3 in
(77 mm)
INSTALLATION GUIDE
H8822
H8822
AcquiSuite DR™ Data Acquisition System
Installer’s Specifications
Processo rs:
Main Process or ARM 9
I/O Co-Processor ARM 7
Operating Sys tem Linux
Flash ROM 16 MB NOR Flash (expandable with USB memory device)
Memory 32 MB RAM
LEDs 8x pulse input, 4 modem activity, Modbus TX/R X, power status
LCD 2 x 16 LCD Character, two but tons
LAN 10/100, Auto crossover detection
Modem:
Modem (phone) V.34 bis, 33,600 bps (Part number H8822)
Modem (cellular) GSM/GPRS Class 10, 85 kbps (Par t number H8822GSM)
Protocols Modbus/RTU, Modbus/TCP, TCP/IP, PPP, HTTP/HTML, FTP, SNMP, SMTP, XML
Power Supply 24VDC, included
Serial Port RS-485 Modbus
Power Requirement 120-240VAC
Interval Re cording User selec table 1-60 minutes. Def ault 15 minute inter val
Inputs 8x, user selectable: 0-10V - Min/Max/Ave/Instantaneous;
4-20mA- Min/Max/Ave/Instantaneous; Pulse - Consumption, Rate;
Resistance - Min/Max/Ave/Inst antaneous; Runtime - Runtime, Status
Approvals CE; FCC Par t 15, Class A
USB Port USB memory ex pansion port
Outputs 2x, Dry contact 30VDC, 150mA max.
table of contents
Quick Install 1
Configuration 2
Overview 2
Wiring 2
Installation Checklist 3
Hardware Overview 3
Hardware Installation 4
Basic Network Configuration 5
AcquiSuite Administration Overview 7
Security 7
Modbus 8
Networking 12
System Options 16
Diagnostics 17
LCD Console 18
Log File Data 19
Retrieving Data from the AcquiSuite 22
ZL0056-0C PAGE 1 ©2010 Veris Industries USA 800.354.8556 or +1.503.598.4564 / support@veris.com 06101
Alta Labs, Enercep t, Enspector, Hawkeye, Trustat, Veris, and the Veris ‘ V’ logo are trademark s or registered tradema rks of Veris Industries, L.L .C. in the USA and/or othe r countries.
quick install
1. Mount the AcquiSuite DR on the wall or other appropriate location.
2. Apply power.
3. Configure the IP address for the device.
4. Connect the device to a laptop or other computer.
5. Connect the AcquiSuite to a Modbus device (optional).
6. Configure the AcquiSuite to the local area netowrk (LAN).
overview
The AcquiSuite DR™ data acquisition system is designed to allow owners and
managers of commercial and industrial facilities with a cost-effective means of
gathering crucial information in a timely manner. To meet these requirements, the
AcquiSuite DR™ system provides the installer with all the tools necessary to install
and configure the hardware and software with a minimum of time and investment.
dimensions
Page 2
VERIS INDUSTRIES
™
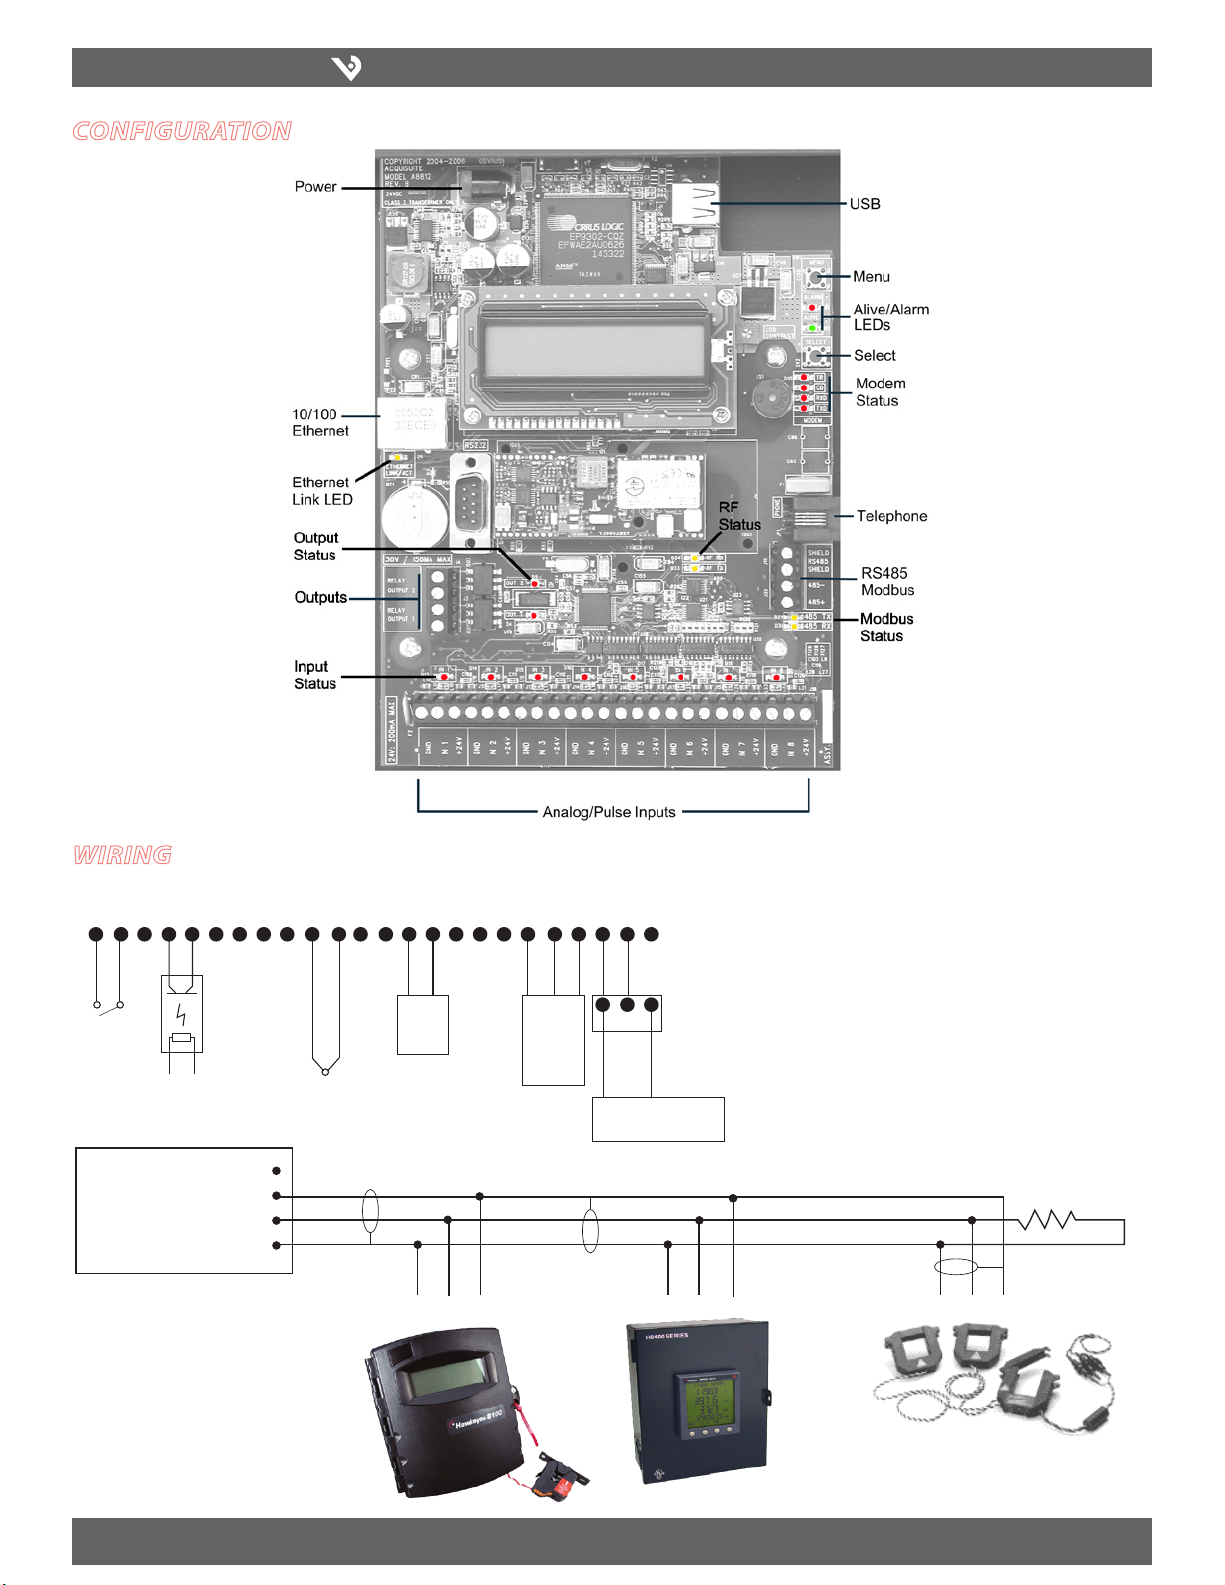
confiGuration
GND
Input 1
+ 24V
GND
Input 2
+ 24V
GND
Input 3
+ 24V
GND
Input 4
+ 24V
GND
Input 5
+ 24V
GND
Input 6
+ 24V
GND
Input 7
+ 24V
GND
Input 8
+ 24V
Dry Contacts
Opto-isolator
2-Wire
4-20mA
3-Wire
0-10V
4-20mA
-
OUT +
-
OUT +
- +
External Power Supply
- +
External Power Required
for high-current (>200mA)
Analog Devices
3-Wire, 0-10V, 4-20mA
Thermistor
+ - s + - s + - s
Shield
Shield
RS-485 –
RS-485 +
AcquiSuite
H8822
Shield
Black
Red
Twisted Pair
Termination Resistor
150 Ohm
H8822
INSTALLATION GUIDE
wirinG
ZL0056-0C PAGE 2 ©2010 Veris Industries USA 800.354.8556 or +1.503.598.4564 / support@veris.com 06101
Alta Labs, Enercep t, Enspector, Hawkeye, Trustat, Veris, and the Veris ‘ V’ logo are trademark s or registered tradema rks of Veris Industries, L.L .C. in the USA and/or othe r countries.
Page 3
VERIS INDUSTRIES
™
H8822
INSTALLATION GUIDE
installation checklist
1. Inspect components
Required hardware
AcquiSuite DR™ H8822-1 server (required) •
Data connection (ethernet or phone line). •
Ethernet Cat 5 standard or crossover cable (required for LAN or direct •
laptop-to-AcquiSuite DR connection); or
Phone line and cord (required for modem connection) •
Optional hardware
Analog sensors for temperature, humidity, etc. •
Pulse output transducers for measuring gas, electricity, water, etc. from •
existing meters and sensors.
Additional Modbus RTU devices power meters (e.g., Veris Enercept, PML •
Ion, etc)
2. Choose a connection method
For LAN installations only:
hardware overview
Processor Arm9 embedded CPU
Operating system Linux
Flash memory 16 MB flash
Memory 32 MB RAM
LED 8x input, 4 modem activity, Modbus TX/RX, ppower,
system, io status
Console 2 x 16 LCD (passive), two pushbuttons
LAN RJ45 10/100 Ethernet, full half duplex
Modem V.34 bis, 33,600 bps
Protocols Modbus/RTU, Modbus/TCP, TCP/IP, PPP, HTTP/HTML, FTP,
NTP, XML
Power requirements 120-240 VAC
Power supply Included, 24 VDC, Class 2 transformer
Interval recording User selectable 1-60 minutes; default 15 minute interval
Serial port RS-485 Modbus, supports up to 32 external devices
(expandable)
Inputs 8x inputs with multiple modes: 0-10V/4-20mA (min/
max/average/instantaneous data); pulse/dry contact
(consumption/rate/runtime/status)
Size 8" x 9.25" x 2.5"
Ethernet 10/100Mbit connection point (hub or switch) •
IP address and Netmask (check with system administrator) •
Gateway address (check with system administrator) •
DNS server address (check with system administrator) •
HTTP Proxy address (optional), may be required if the AcquiSuite DR is •
behind a firewall (check with system administrator)
For dialout installations only (AcquiSuite DR initiates a phone call to your ISP or
modem server):
Phone line with dialtone. May be shared with other devices such as a fax •
machine
Phone cord for connection to phone system •
Dial out access prefixes, and long distance access code if required. (ie, dial •
9 for local line)
ISP account or Modem Server phone number (check with ISP) •
DNS server address. (check with ISP) •
Time to dial. If phone line is shared, choose a time of day when other •
devices are not in use
A regular telephone for line testing and diagnostics•
For dialin installations only (AcquiSuite DR receives/answers a phone call from your
computer):
Phone line with dialtone. Must be NOT shared with other devices. (or use •
appropriate line sharing device)
Phone cord for connection to phone system•
Telephone number for the phone line that the AcquiSuite DR will be •
attached to (so you can call the AcquiSuite DR)
Make note of the AcquiSuite DR dialin IP/Netmask for future use.•
A regular telephone for line testing and diagnostics•
ZL0056-0C PAGE 3 ©2010 Veris Industries USA 800.354.8556 or +1.503.598.4564 / support@veris.com 06101
Alta Labs, Enercep t, Enspector, Hawkeye, Trustat, Veris, and the Veris ‘ V’ logo are trademark s or registered tradema rks of Veris Industries, L.L .C. in the USA and/or othe r countries.
Page 4

VERIS INDUSTRIES
™
hardware installation
- +
2-Wire
4-20mA
GND
Input 1
+24V
GND
Input 2
+24V
GND
Input 3
+24V
GND
Input 4
+24V
GND
Input 5
+24V
GND
Input 6
+24V
GND
Input 7
+24V
GND
Input 8
+24V
Dry
Contacts
Thermistor
Opto-isolator
- out +
3-Wire
0-10V
4-20mA
- out +
- +
External
Power Supply
1. Unpack materials and verify all required components are available.
2. Mount the AcquiSuite DR on the wall or other appropriate location.
3. (optional) Connect any analog or pulse output sensors you may have. For analog
sensors, 0-10V or 4-20mA sensor types are allowed. The combined power
consumption of all the analog sensors attached to the AcquiSuite DR must not
exceed 200mA. If more current is required, use an external power supply as shown
in the wiring diagram shown below.
H8822
INSTALLATION GUIDE
Modbus TX/RX: The Modbus TX and RX LEDs blink to indicate data on the •
RS485/Modbus loop. The RX LED blinks only when data is received by the
AcquiSuite
Modem RTS: the modem is being monitored or operated by the •
AcquiSuite DR, off when the modem is idle. This LED will be on when a
dialout call is in progress, or when dialin is enabled and waiting for an
inbound call.
Modem CD: the modem has a carrier connection to a remote system.•
Modem TX/RX: data is being sent or received on the modem.•
Alive: blinks once per second while the system is operating correctly. •
Inputs 1-8: in pulse mode, the LED is on when contacts are closed. In •
analog 4-20mA and 0-10V mode, the LED blinks quickly (2hz) to indicate
an input error alarm.
6. Verify connected devices: To verify that the Modbus devices are installed and
reporting correctly, use the Modbus status utility on the AcquiSuite DR™ server. To
do this test, follow these steps:
A. Press and release the menu (top) button on the AcquiSuite DR. The
following will appear on the LCD display:
4. (optional) Connect the Modbus network loop as shown in the wiring diagram.
Follow the manufacturer’s instructions for installing and powering the Modbus
devices. Verify that the Modbus address set tings are unique for each device (i.e.,
no two devices with the same address) and power up the device. Connect each
device in the chain by “daisy-chaining” the devices together. Observe + and polarity on the Modbus devices.
Note: Low Voltage analog, pulse, and RS485 wiring that enters electrical
panels must have a minimum insulation rating that exceeds the voltage
inside the panel. In addition, other regulations may apply; consult the
building codes in your area prior to installation.
Note: Some Modbus devices do not use the same label notation as the
AcquiSuite DR.
Note: The AcquiSuite DR H8822 internal IO module (analog and pulse inputs)
uses Modbus address 250, and will show up in the Modbus device count as a
single Modbus device. Additional H8923-4 IO modules may be added to the
Modbus loop as needed.
5. Power-up and diagnostics: Attach the power supply to the power input jack on
the AcquiSuite DR, and plug the power brick into a wall outlet. The power brick
should be in a location that is accessible for connection and disconnection. After
power is applied, the green alive light in the upper right of the AcquiSuite DR
should come on and the LCD display will display a series of diagnostic screens
ending with the following message on the LCD display (this boot sequence may
require up to 20 seconds to complete):
This indicates that the AcquiSuite DR has loaded properly and is ready for
configuration and connection to the network and sensors. If the “power” light does
not come on or the LCD display does not cycle to the above screen, verify that the
power cord is plugged in. If after cycling the power the unit still does not power up
(or if an error message appears in the LCD display) contact technical support. After
the H8822 has been powered up for a minute, the yellow RS485 LED should blink
slowly once per second during normal operation. Contac t closure on pulse inputs will
cause the red pulse LED to blink. Verify each pulse input is functioning properly by
observing the pulse status LEDs.
ZL0056-0C PAGE 4 ©2010 Veris Industries USA 800.354.8556 or +1.503.598.4564 / support@veris.com 06101
Alta Labs, Enercep t, Enspector, Hawkeye, Trustat, Veris, and the Veris ‘ V’ logo are trademark s or registered tradema rks of Veris Industries, L.L .C. in the USA and/or othe r countries.
AcquiSuite Ready
Main Menu
TCP/IP Config
B. Press the menu (top) button several more times until the LCD display shows
the following message:
Main Menu
Modbus Status
C. Press the select (bottom) button on the server and the unit will begin the
diagnosis of the Modbus loop. After the check is completed, the unit will
display the following message:
X devices OK
X fail, X new
D. Verify that the number of devices located by the server (the total of OK, fail
and new) matches the number of devices actually installed and connected.
For a first time installation, all devices should appear as “new." The AcquiSuite
DR H8822 Internal IO (pulse and analog inputs) appear as one device in this
list. (Note: A “device” is the Modbus connected device, not necessarily the
sensor. For example, an H8923-4 I/O module with 4 sensors connected is only
one modbus device, not four) For further information on the LCD console,
please review the console section of this manual.
E. The AcquiSuite DR completes a background scan for new Modbus devices
every 2-5 minutes. Increasing the RS485 Modbus timeout may increase the
time required to detec t new devices. If the Modbus devices are connected
after the server is booted up, the devices may not appear on the screen for
several minutes. In the worst case, allow up to 5 minutes for the AcquiSuite
DR to locate all the connected devices.
F. If all devices are reporting properly, it is now time to connec t the server to
the network or phone line for remote reporting and configuration.
Page 5
VERIS INDUSTRIES
™
H8822
basic network confiGuration
1. Determine the IP addressing needs: The IP address of the AcquiSuite DR™ server
can be implemented using one of three methods. Check with the network
administrator to determine which method applies. For phone installations, use
“direct connection to laptop” to allow initial configuration.
Static IP address - this is a fixed IP address which is assigned by a network •
administrator and “hard-coded” into the AcquiSuite DR; or
Dynamic Host Configuration Protocol (DHCP) address - this process •
assigns an IP address dynamically to the AcquiSuite DR when it is
connected to the network from a host DHCP server; or
Direct connec tion between the AcquiSuite DR and a single temporary •
computer such as a laptop. (primary connection will be dialin or dialout
by modem)
You will need the following information from your network •
administrator: The addresses will be in the form of “###.###.###.###”),
where “#” refers to the numbers 0 to 9. See the Network Address
Worksheet below for more information.
2. Configure the IP address as selected from the table above. For Direct Connection to
Laptop, the address settings above are set as the factory default, and you may be
able to skip to the “Laptop/Computer Setup” section if the factory default settings
are present.
To begin configuration, make sure that the server displays the start screen:
AcquiSuite Ready
If this screen does not appear on the LCD display, press and hold the menu (top)
button on the ser ver for several seconds and the message should appear. To
change the IP address to the static address assigned by the network administrator,
do the following:
A. Press the menu (top) button once to get the TCP/IP configuration menu.
Main Menu
TCP/IP Config
INSTALLATION GUIDE
C. Press the select button again to see the IP address menu.
IP Address
192.168.40.50
D. At this point, the cursor on the display will be blinking on the first number
in the IP address on the second line.
E. To change the number, press the menu (top) button and the display will
cycle through the digits 0-9 as well as “.”. Once the correct digit is displayed,
press the select (lower) button to advance to the nex t digit and repeat the
process until all the digits are correct.
F. Once the IP address on the server matches the assigned IP address, press
the select (bottom) button once more to return to the main TCP/IP menu.
3. Set the Netmask, gateway, and DNS server(s) addresses as noted in the chart
“Network Address Worksheet” using the same technique as shown above. The
only change is that after Step B, press the menu (top) button multiple times to see
the netmask, gateway, and dns setup menu, then push the select but ton to set
the option.
Note: If DHCP configuration is selec ted, the IP, netmask, gateway, and dns
server addresses will be obtained automatically. Simply select the “Enable
DHCP” from the first TCP/IP configuration manu.
4. After the address information has been set, you must reboot the AcquiSuite DR.
Select the “(Previous Menu)” option after step B above. The menu will then state
that the AcquiSuite DR must be rebooted to take effect. Press ‘select’ to allow the
AcquiSuite DR to reboot. Once the AcquiSuite DR has rebooted, the new IP address
will be displayed on the console. If DHCP addressing was specified, the server
assigned address will be displayed.
Note: if DHCP is unable to obtain an ip address, the AcquiSuite DR will use the
fallback address of 192.168.0.100.
B. Press the select (bottom) button twice to get the IP config menu.
TCP/IP Config
IP Address
Network Address Worksheet:
Static IP Address DHCP Direct Connection to Laptop
IP address: ___.___.___.___ proxy server port: ______ IP Address: 192.168.40.50
Netmask: ___.___.___.___ IP address: (dhcp assigned) Netmask: 255.255.255.0
Gateway: ___.___.___.___ Netmask: (dhcp assigned) Gatway: 192.168.40.1
DNS server: ___.___.___.___ Gateway: (dhcp assigned) DNS: 198.107.56.37
DNS server: ___.___.___.___ DNS server: (dhcp assigned) HTTP Proxy: [blank]
HTTP Proxy _____________ HTTP Proxy __________ (factory default settings)
proxy server port: _________ proxy server port: ______ Network Address Worksheet
ZL0056-0C PAGE 5 ©2010 Veris Industries USA 800.354.8556 or +1.503.598.4564 / support@veris.com 06101
Alta Labs, Enercep t, Enspector, Hawkeye, Trustat, Veris, and the Veris ‘ V’ logo are trademark s or registered tradema rks of Veris Industries, L.L .C. in the USA and/or othe r countries.
Page 6
VERIS INDUSTRIES
™
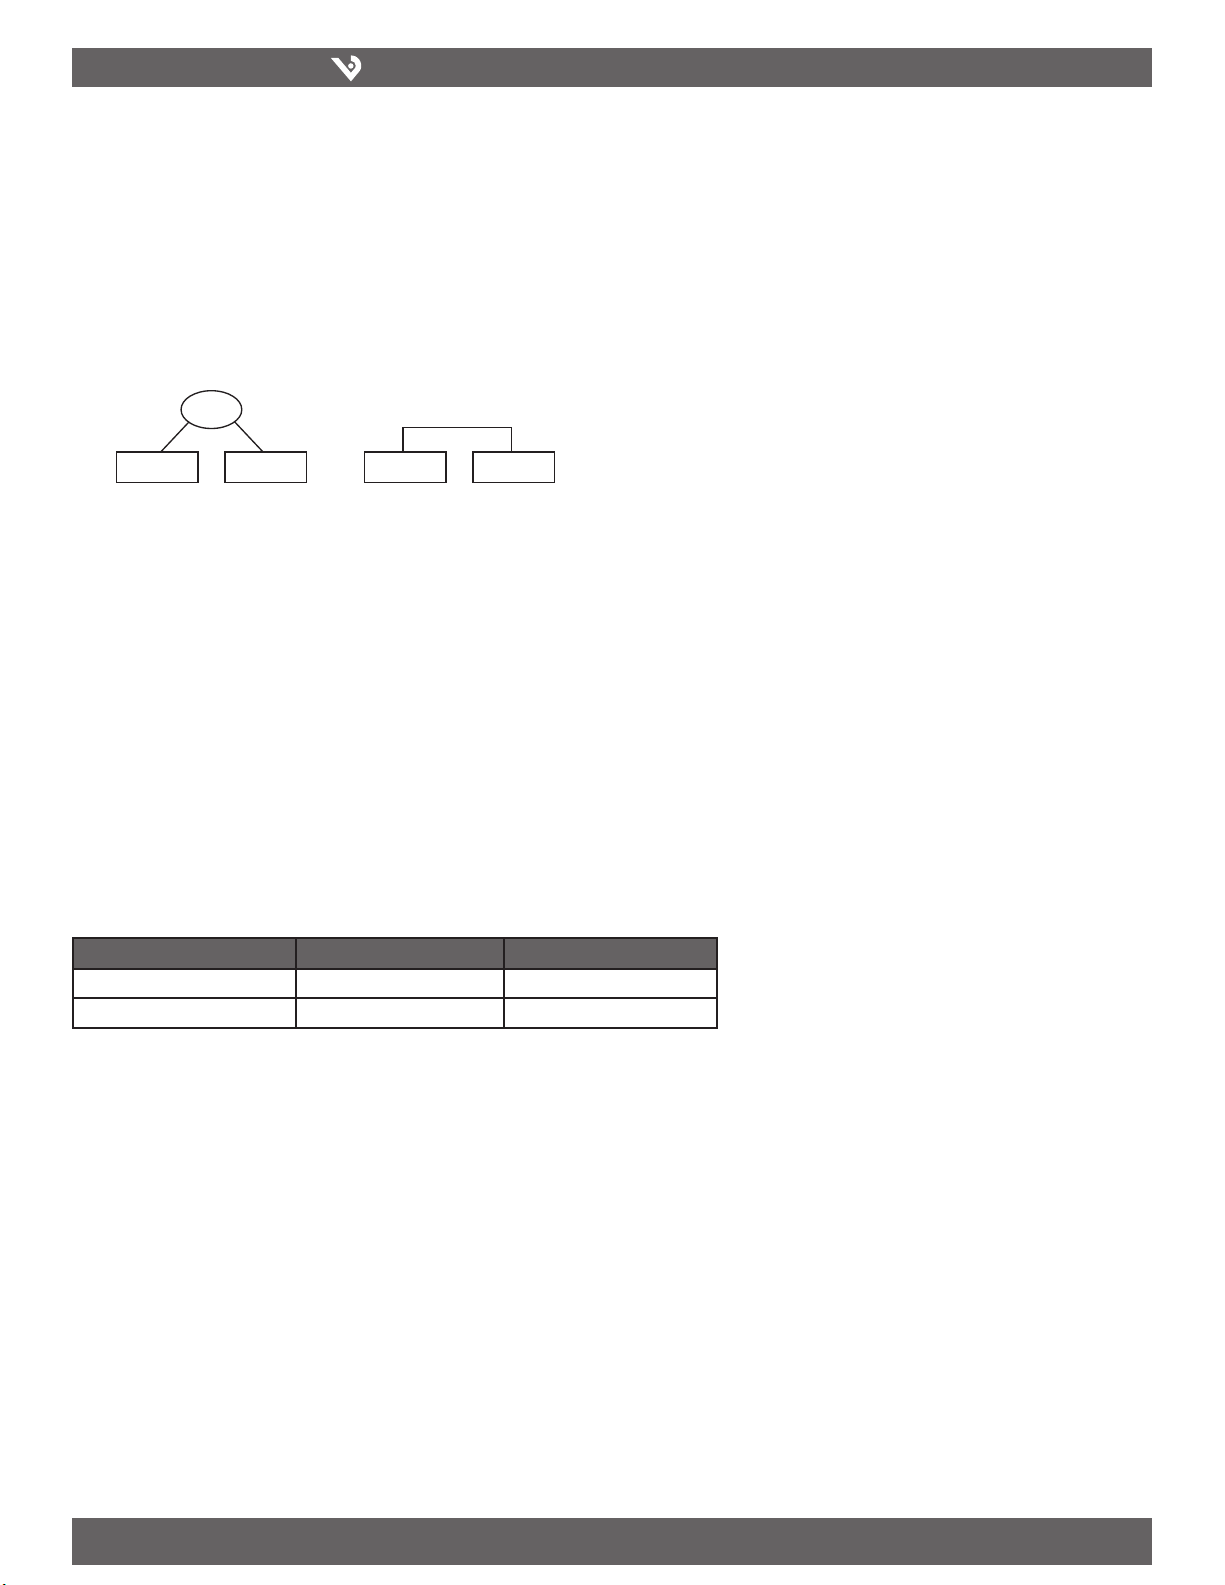
Laptop/Computer Setup
Laptop AcquiSuite
LAN
LAN connected AcquiSuite
ethernet ethernet
ethernet crossover cable
Direct connected AcquiSuite
Laptop
AcquiSsuite
H8822
INSTALLATION GUIDE
1. You must have a computer to access and configure the AcquiSuite DR. This
computer must have an ethernet connection (on the LAN or by direct connection)
and must have a web browser installed such as Internet Explorer or Netscape.
Note: If your building already has an existing LAN that the AcquiSuite DR
is attached to, you can use an existing computer on that LAN. Check with
your network administrator for details. If this option is available, use a LAN
connected computer and skip to the “AcquiSuite DR administration overview”
section below.
The remainder of this section will assume the installer has brought a laptop to the
site, and will connect the laptop to the building LAN, or directly to the AcquiSuite DR.
Attach the laptop to the AcquiSuite DR or LAN as shown.
2. Attach the laptop to the AcquiSuite DR or to the LAN. If the laptop is to be
attached to an existing LAN, use a standard (direct) ethernet patch cable. If the
laptop is to be attached directly to the AcquiSuite DR use an ethernet “Crossover”
cable. If the laptop is to be attached to an existing LAN, obtain a static IP address
(or use DHCP addressing) from the network administrator.
3. Configure the laptop IP address using the following steps.
Note: Only MS Windows is detailed below, however you can use any OS/
Browser you wish such as MacOS or Linux. Details on network setup fornonwindows operating systems is beyond the scope of this document however.
A. From the Windows start menu, select the “Settings”, “Control Panel”
option. Double click the network icon in the displayed window.
Note: If you are using Windows 2000 or Windows XP, select the ‘Local Area’
connection icon in the network folder, then click the “Properties” button.
B. In the network setup dialog, there should be a list of items including
adapters, clients and protocols. Locate the protocol labeled “TCP/IP”.
Note: If you have multiple ethernet cards, you may have multiple lines labeled
“TCP/IP --> ethernet card”. Locate the ethernet card that corresponds to the
physical connection to the AcquiSuite DR and then select the TCP/IP option
that is linked with that ethernet card.
C. Double click the TCP/IP option you selected in step B above. An example
screen is shown. Set the IP and Netmask from the laptop Address Worksheet
above. It would be helpful to make note of your previous settings in this
dialog so you may set them back af ter you are done with the AcquiSuite DR
Configuration.
D. Close the TCP/IP settings dialog, and Network dialog. If you are using
Windows 95, 98, or ME, you will be required to reboot your computer.
E. Close the TCP/IP Settings dialog and Network dialog.
Laptop Address Worksheet:
Static IP Address DHCP Direct Connection to Laptop
IP address: ___.___.___.___ Obtain IP address automatically IP Address: 192.168.40.1
Netmask: ___.___.___.___ IP address: (dhcp assigned) Netmask: 255.255.255.0
ZL0056-0C PAGE 6 ©2010 Veris Industries USA 800.354.8556 or +1.503.598.4564 / support@veris.com 06101
Alta Labs, Enercep t, Enspector, Hawkeye, Trustat, Veris, and the Veris ‘ V’ logo are trademark s or registered tradema rks of Veris Industries, L.L .C. in the USA and/or othe r countries.
Page 7

VERIS INDUSTRIES
™
H8822
INSTALLATION GUIDE
acquisuite administration
overview
The AcquiSuite DR should now be available on the local area network for you to access
using a web browser such as Internet Explorer or Netscape.
1. Use your web browser to connect to the AcquiSuite DR by entering
http://192.168.40.50/setup/ where 192.168.40.50 is the IP address displayed on
the on the AcquiSuite DR LCD display.
2. When prompted, use the following default login information
Login: admin
Password: admin
3. Your web browser should now display the AcquiSuite DR configuration menu.
To the left, a list of configuration options are available. On the right, a specific
configuration page will be shown. The first page is a welcome message with some
system status information. Proceed with the configuration of the AcquiSuite DR
using your web browser.
4. Click on the + mark next to the Accounts menu. Select the Admin account, and
click ‘Change Password’. All units are shipped with the same factor y default
password, and it should be changed to prevent unwanted access.
5. Expand the Networking option, and selec t setup. Verify the addresses are
consistent with those in the “Network Address Worksheet.”
6. Expand the Modbus option, and select “Device List.” You should see a list of each
Modbus device attached to the AcquiSuite DR. Before the AcquiSuite DR can begin
logging data, each Modbus device must be assigned a unique name.
A. Click the device number to the left of the unconfigured Modbus device.
B. A page with the current device status and readings will be displayed. Click
on the ‘configure’ button at the bottom of the page.
C. Enter a name for the device in the supplied field.
D. Change any low and high range alarm settings you may need. (optional)
E. Click the ‘Save’ button at the bottom of the page to save your changes.
F. Repeat these steps for each Modbus device.
Some devices may require additional information. The H8238 Multi circuit power
meter allows the CT size to be specified. The H8923-4 IO Module and the H8822
AcquiSuite DR internal IO module have additional configuration options on each
data point line to specif y the details of the analog or pulse input. These include the
4-20mA device scale, multipliers and engineering units. Each 4-20mA or 0-10V sensor
should be supplied with technical information including the low and high range
values that can be used to configure the AcquiSuite DR. Also, the AcquiSuite DR has
many common sensor types pre-programmed that can be selec ted from a drop down
list. Review the Modbus Advanced Configuration Options section of this manual for
further configuration details.
7. Select the Modbus/Setup menu option. Specify the Modbus Loop Name. This will
become the name of the AcquiSuite DR. This is the name that will appear on the
BMO website service (if subscribed). Specify the data logging period. The default
is 15 minutes.
8. Decide upon a method of data transfer. (see section later in this document) If you
select the HTTP/Post method to send data to the BMO website, you can configure
this by selecting the “LogFileData, Setup/Upload” page.
A. Make note of the AcquiSuite DR serial number.
B. Select upload options as needed for time of day to upload the data and
retry control.
C. Check the checkbox to allow remote configuration. This will allow you
to reconfigure the AcquiSuite DR from the BMO web site without having to
connect direc tly to the AcquiSuite DR.
D. Specify the “Target address to upload data.” This is the website address
where the AcquiSuite DR will send the collected data. If you have an in-house
data collection service, you should enter the address of your data server in
this field. If you are using BMO service, the target address to upload data
should be set to http://www.buildingmanageronline.com/upload.php
E. When configuring the AcquiSuite DR to send data to the BMO site or your
own data collection server, the AcquiSuite DR will authenticate itself with
the server by using the serial number and a password. This password must be
supplied here, and can be obtained when you subscribe for the BMO service,
or by your database administrator.
F. Click “Apply” to save your changes.
If you select a manual transfer method, remove (blank out) the target address in the
Modbus/Upload Data page.
security
The AcquiSuite DR has three levels of security. These are "operator," "user," and
"admin." When using a browser to access the AcquiSuite DR, basic http authentication
is used to prompt your browser for a username and password. The admin account
uses "admin" as the default password. To change the password, select the Accounts
menu from the left side tree display. Next, select the account name. Click the "Change
Password" button to set a new password for the selected account.
admin: This account has full access to modif y any of the system settings. The
default password is "admin."
operator: This account may view settings, however may only change modbus
alarm ranges and device names.
user: This account can view some system settings including the modbus
device status pages and can change nothing.
When using FTP to access the AcquiSuite DR, you may use the admin account
username/password for read-only access. Log information is stored in /var/log/
Modbus. For read-write-delete access, use the login name “root” and the admin
password.
The three usernames specified are not able to be changed or renamed, nor can
arbitrary usernames be added to the AcquiSuite DR. Access is only controlled by
setting the password for the three existing usernames noted above.
The “operator” and “user” accounts are disabled by default. These accounts are
activated when you first set a password for each.
ZL0056-0C PAGE 7 ©2010 Veris Industries USA 800.354.8556 or +1.503.598.4564 / support@veris.com 06101
Alta Labs, Enercep t, Enspector, Hawkeye, Trustat, Veris, and the Veris ‘ V’ logo are trademark s or registered tradema rks of Veris Industries, L.L .C. in the USA and/or othe r countries.
Page 8

VERIS INDUSTRIES
™
H8822
modbus
Modbus Device List
The AcquiSuite DR automatically searches for Modbus devices on the RS-485 serial
loop. The Modbus Device List page will show a listing of all the currently detected or
configured devices the AcquiSuite DR has found. The device list will show the Modbus
address number, status (OK, Error, Alarm, Unconfigured), the device name (user
specified), and the device identification string.
Click on the Modbus address number for any of the devices for specific device details.
INSTALLATION GUIDE
Device Name: This field allows you to specif y a name for the device such
as “main building power” or other useful name to indicate the location or
function of the device. A name must be assigned to a device before the
AcquiSuite DR will log data for it.
Low Alarm, High Alarm: Specify a threshold for the alarm. If the data point is
recorded below the Low Alarm, or above the High Alarm levels at the time a
log entry is taken, the point will be considered in an alarm state.
Console: Checking this checkbox will cause the AcquiSuite DR to display this
data point on the LCD console. Multiple data points are rotated about every
10 seconds. The values on the LCD console are updated when the next log
interval occurs.
Point Config: Some devices have configurable point features. The H8923-4 IO
module has 4 pulse and 4 analog inputs that require additional configuration
as detailed in the nex t section. The H663/704 BCM product only requires
the circuit breaker name in this menu. Most device points are automatically
configured, and this option may not be displayed.
Advanced: At the lower right corner of the page, an advanced configuration
button may be present depending on the Modbus device features.
Note: not all Modbus devices are supported by the AcquiSuite DR. If a device
appears in the list with “Unsupported” in the status column, you may
need to upgrade the firmware on the AcquiSuite DR to access the device.
At the bottom right corner of the device list page, a link is shown that will
enumerate all the supported Modbus devices in the installed version of the
firmware. Use the System/Firmware update page to check for newer versions
of the firmware. The Veris.com website faq also has a list of supported
Modbus devices.
Device Details
The Device Detail page will show a list of all the meter data points, alarm settings and
console options. The data point names for most devices are automatically entered.
Some devices such as the H8923-4 IO module have generic inputs, and will be labeled
as “pulse input #1”. At the top of the page, the status of the device is shown. This
usually reports “ok” however it can include error information if the device is not
responding properly. A list of device errors is available in the log file details section of
this manual. At the bottom of the page, several buttons are present.
Done: returns you to the device list page.
Log File: will display a tabular view of the most recent data in the current log
file. Use the log file export page for complete log data access.
Advanced Configuration Options
The advanced configuration page contains special options specific to the device you
are configuring. For the H8923-4 IO module, you may specify the pulse rate speed
that the pulse inputs will work at, as well as review the 4-20mA/0-10V input status.
On power meters, the CT size and orientation options may be present. The device
serial number and other specific parameters will be displayed if available.
Internal IO Configuration
The H8822 AcquiSuite DR provides 8 multipurpose inputs on board. The onboard IO
inputs will always be device 250 in the device list.
Click on the device number 250 in the device list. A page showing the device 1.
inputs will be presented. Each input has 5 lines on this page. Analog inputs
have one line each for an instantaneous, min, max and average value. Pulse
inputs have a line for the accumulated value, rate, runtime and status.
Configure: This button will allow you to change the device parameters such as
the name, alarm and console settings.
Device Configuration
Clicking the “Configure” button from the Device Details page will refresh the screen
with the same information, however the device name, alarm settings and console
checkbox will be available.
ZL0056-0C PAGE 8 ©2010 Veris Industries USA 800.354.8556 or +1.503.598.4564 / support@veris.com 06101
Alta Labs, Enercep t, Enspector, Hawkeye, Trustat, Veris, and the Veris ‘ V’ logo are trademark s or registered tradema rks of Veris Industries, L.L .C. in the USA and/or othe r countries.
Page 9

VERIS INDUSTRIES
™
H8822
INSTALLATION GUIDE
Click the Configure button at the bottom of the page. The page will be displayed 2.
again, however the device name and alarm level fields will allow editing. Type in a
name for the device in the space provided at the top of the page. The name should
describe the purpose or location of the IO module. For device 250, you may want
to use the name “internal IO”
For each input that you wish to use, click the “Config Point” button to the right of 3.
the input.
The analog input configuration requires several options. The input mode will 4.
control how the input functions. This includes measuring voltage, current,
resistance, pulse, or runtime. Use the dropdown menu to select the mode that is
appropriate for your sensor. The input configuration must be completed for each
input that is in use.
Sensor Name: Change this to describe the input. This can be anything you
wish, such as “Indoor Temperature.”
Input Mode: Select from one of the following: Voltage 0-10V, Current 4-20
mA, Resistance, Pulse, or Unconfigured.
Sensor Make and Model: This entry is a space for the model number of the
sensor. It is only used for reference.
Sensor Minimum Range: All analog sensors have min/max range values. For
example, a temperature sensor may have a range of 50 to 95 degrees F. Enter
the low range number here.
Sensor Maximum Range: Enter the high range value of the analog sensor
here.
Pulse Multiplier: For pulse mode inputs, this option specifies the multiplier
for the input.
Pulse Rate: For most units, this feature is an automatic rate field. For KWH
points, the rate is KW.
Engineering Units: Enter the units of measure, i.e., degrees F, %RH, etc.
After saving the sensor profile, the device configuration page will appear again. 5.
The input values should now be scaled correctly and the names will be updated
to your new configuration. You may wish to set any alarm thresholds required or
check the “Console” checkbox for any data points that should be displayed on the
LCD console.
Click the “Advanced” button in the lower right corner of the page. For the H8822 6.
onboard IO, there are several options.
After returning to the device configuration page, click “Save” at the bottom of the 7.
page to return to the device display.
Troubleshooting Modbus Devices
If the device you have attached does not appear in the Modbus device list, check the
following:
Verify the + (red), - (black), and Shield connections are correct on all •
connections. Look for any connection in the middle of the loop that may
have the wires reversed, or shorted together.
Verify the address settings of every Modbus device. No two devices may •
have the same address. Note: the AcquiSuite DR H8822 uses the address
250 for the internal IO module. Do not assign this address to any other
Modbus device.
If only one device is not working, try disconnecting all the other devices •
on the Modbus loop to isolate the problem. If possible, bring the failed
device adjacent to the AcquiSuite DR and attach it with a short stub of
wire to eliminate possible wiring problems. If the AcquiSuite DR can find
a device on the short stub, the problem is probably a wiring related issue
on the RS-485 loop.
Check to verify the Modbus device is supported by the AcquiSuite DR. •
Usually, the AcquiSuite DR will locate the device and print “Unsupported”
in the device status column if the device is not recognized by the
AcquiSuite DR firmware drivers. In the lower right corner of this screen,
there is a link that will show a list of supported devices. Use this to
verify the Modbus device in question is supported by the AcquiSuite DR
firmware version. If not, check for firmware upgrades online with the
Firmware Update configuration page.
ZL0056-0C PAGE 9 ©2010 Veris Industries USA 800.354.8556 or +1.503.598.4564 / support@veris.com 06101
Alta Labs, Enercep t, Enspector, Hawkeye, Trustat, Veris, and the Veris ‘ V’ logo are trademark s or registered tradema rks of Veris Industries, L.L .C. in the USA and/or othe r countries.
Page 10

VERIS INDUSTRIES
™
H8822
INSTALLATION GUIDE
Remember, the AcquiSuite DR may take between 2 and 5 minutes to •
detect a new device that has been attached to the Modbus RS-485 loop.
Rebooting the AcquiSuite DR, refreshing the device list page, or using the
console ‘Modbus status’ menu will not speed up the recognition process.
Click the “Troubleshooting” link at the bottom of the Modbus device list •
page for further diagnostics.
Modbus Setup
The Modbus setup page provides several options related to the Modbus RS-485 serial
port.
Loop name: This is the name of the AcquiSuite DR. This name will be present
on all log file descriptors when uploaded to a central database website such
as BMO. It is helpful to name the AcquiSuite DR based on the physical location
of the system, or building.
Data logging period: This option sets the log inter val for the AcquiSuite DR.
Options range from once per minute to once per hour. All of the selections are
evenly divisible by one hour. The AcquiSuite DR calculates the next log time
by finding the next multiple of the log period past the start of the hour. For
example, if the log period is 15 minutes, log readings will be taken at 0, 15, 30
and 45 minutes past the hour. The log period is not calculated based on “15
minutes after the last reading.” When the AcquiSuite DR is first started, it will
take an initial reading immediately. The next log reading will be calculated
as a multiple of the log period after the hour. The initial reading is taken
to allow the AcquiSuite DR to gather information for meters that require
demand calculations, as well as provide accurate information starting when
the AcquiSuite DR is booted.
Modbus/TCP access: The AcquiSuite DR has a Modbus TCP gateway feature
that allows other systems to send queries to all attached Modbus RS-485
devices. This feature allows control of what systems may quer y the Modbus
TCP gateway. The settings include “no access”, “local subnet only” and “allow
any”. This basic security feature only allows control based on the IP address
of the system making the request. The Modbus TCP protocol does not have
provisions for any authentication password or other methods of security. By
default, the gateway feature is disabled, and set to “No Access.”
with that specific device at the detected speed. This feature will allow you
to mix multiple devices on the same RS-485 loop with different baud rates.
Modbus devices must be configured at baud rates of 9600 or 19200, other
baud rates are not supported. Note: Modbus device manufacturers usually
do not ‘officially’ support this configuration, however we have not seen any
problems with this in any of the modbus devices we provide drivers for. If you
are experiencing Modbus communications problems, set the baud rate to a
fixed 9600 before troubleshooting.
Modbus Parity: This feature allows alternate parity options to be set. Default
is no parity.
Modbus Stopbit: This feature allows alternate stop bit options to be set.
Default is one stop bit.
Search for Acromag Devices: This feature allows Mcromag brand devices to be
detected with alternate serial port settings of 8 data bits, even parity and one
stop bit. Leave this feature disabled unless you have Acromag brand modbus
devices attached to the 485 chain.
Modbus Debug: This feature records Modbus transaction data in the system
debug log file. Click the “start log” button on the system/log files page to
record this information.
Modbus RS-485 timeout: This feature sets the period of time the AcquiSuite
DR will wait for a response from any device on the Modbus RS-485 serial
loop. The default of 200ms is long enough for most Modbus devices.
Longer timeouts may be required if you have a very slow device, or if you
have a Modbus repeater device in the serial loop. Devices such as the Veris
H8936 Local Display, and RS-485 wireless link repeaters provide access to
downstream Modbus devices with a substantial delay. Setting the delay
longer than the default will increase the time required to auto-detect new
Modbus devices when attached to the AcquiSuite DR. The allowed range is
100 ms to 5 seconds.
The Modbus TCP gateway is a feature that allows the AcquiSuite DR to share
the attached Modbus RS-485 devices with other systems such as PCs with
software and building control systems. The gateway receives incoming TCP
requests, verifies the length of the packet does not exceed 255 bytes, and
forwards the packet to the Modbus RS485 loop. The gateway does not verif y
the contents of the packet, nor the target address specified in the request.
If the Modbus RS-485 device sends a valid response back, the gateway will
return this information to the the system requesting it via TCP. If no response
is received, a timeout failure will be sent to the requester. Because the
gateway does not process the contents of the request or reply, it is possible to
query devices on the Modbus RS-485 loop that are not specifically supported
by the AcquiSuite DR.
Modbus RS-485 baud rate: This feature allows the configuration of the
RS485 serial port speed which the AcquiSuite DR uses to communicate with
Modbus devices. Options include 9600, 19200, and Opportunistic/Multispeed. The default is 9600, most Modbus devices communicate at this speed
as well. In Opportunistic mode, the AcquiSuite DR will automatically detect
the baud rate of each Modbus device, and will continue to communicate
ZL0056-0C PAGE 10 ©2010 Veris Industries USA 800.354.8556 or +1.503.598.4564 / support@veris.com 06101
Alta Labs, Enercep t, Enspector, Hawkeye, Trustat, Veris, and the Veris ‘ V’ logo are trademark s or registered tradema rks of Veris Industries, L.L .C. in the USA and/or othe r countries.
Page 11

VERIS INDUSTRIES
™
H8822
Alarm Setup
The Modbus Alarms sec tion provides the ability to send messages when alarm levels
are exceeded. Messages can be sent by email, snmp, or displayed on the LCD console.
Alarms are processed at the end of the data logging period. For more frequent
alarms, shorten the data log interval. Log readings and alarm processing can be set to
as often as once per minute.
Display all alarms on LCD console: When checked, all alarm messages are
shown on the LCD display of the AcquiSuite.
SNMP Trap Send Enabled: When checked, SNMP Trap messages are sent after
every log period for each data point that is in an alarm state. The trap includes
information about the AcquiSuite system data point and alarm state. A full
MIB is located on the AcquiSuite, click the MIB link to the right of this option.
SNMP Trap Host 1 (2,3): When SNMP traps are enabled, a trap message is sent
to each of the trap host addresses. Specif y the trap host by IP address, not
DNS name.
Direct email on alarm: When checked, the AcquiSuite will send an email
message when any data point changes its alarm state.
INSTALLATION GUIDE
SMTP Mail Server Address: The IP address of the email server on the LAN that
will process and forward the email message to the recipient.
Sender address: The address that will be used in the “From:” line of the
email. This is helpful in identifying the source of the alarm email message. If
your SMTP mail server has junk filtering, you may be required to use a sender
address that matches a mailbox address on the SMTP mail server; check with
your mail server administrator for specific details on this issue.
Recipient address 1 (2,3): The AcquiSuite can send a copy of the alarm notice
to multiple email addresses. Specify one, two, or three email addresses in the
fields provided for the recipient addresses.
ZL0056-0C PAGE 11 ©2010 Veris Industries USA 800.354.8556 or +1.503.598.4564 / support@veris.com 06101
Alta Labs, Enercep t, Enspector, Hawkeye, Trustat, Veris, and the Veris ‘ V’ logo are trademark s or registered tradema rks of Veris Industries, L.L .C. in the USA and/or othe r countries.
Page 12

VERIS INDUSTRIES
™
H8822
INSTALLATION GUIDE
networkinG
Network Status
This page displays the current status of the AcquiSuite DR net work connections.
Several interfaces may be shown if both Ethernet and PPP dialin/dialout are active at
the same time. Each interface will report the IP address, number of packets sent and
received, and other details specific to the interface. For the ethernet inter face, the
MAC address (HWaddr) will be shown as well as a network collision count.
Ethernet network:
eth0 Link encap:Ethernet HWaddr
00:99:99:0E:C1:CA
inet addr:192.168.10.50 Bcast:192.168.10.255
M a sk:255.255.255.0
UP BROADCAST RUNNING MULTICAST MTU:1500
M e t r i c:1
RX packets:2624171 errors:6 dropped:0 overruns:0 frame:0
TX packets:220342 errors:0 dropped:0 overruns:0 carrier:0
collisions:1 txqueuelen:100
RX bytes:174674347 (166.5 Mb) TX
bytes:50607122 (48.2 Mb)
Interrupt:5 Base address:0x320
Note: the “lo” or Loopback interface is the internal network and is always
present, “eth0” is the Ethernet segment, and “ppp0” is the dialout or dialin
connection.
Ethernet setup
The ethernet setup page has the following options:
Troubleshooting Ethernet Problems
If, after reconfiguring the ethernet settings, you experience problems accessing the
AcquiSuite DR with your web browser, check the following items.
Verify that you rebooted the AcquiSuite DR after making the changes to •
the network settings.
Use the AcquiSuite DR LCD console. Check the IP address and Netmask. •
Verify these are correct.
Verify the network connection in your computer has the proper IP •
address, on the same subnet, to access the AcquiSuite DR. Note: One
common mistake is configuring the laptop IP to the same address as
the IP address of the AcquiSuite. In order for the laptop and AcquiSuite
to communicate, the IP addresses should not be identical. See the basic
network config for suggested IP addresses.
Use the LCD console to run the Network Status test. This will attempt •
a number of things including a ping query to the gateway address. If
the AcquiSuite DR can ping an external machine such as a gateway, the
ethernet port is most likely connected properly. If the AcquiSuite DR does
not use a gateway, try adding a gateway address, and make it the address
of your computer.
Modem Status
The modem status page will show the connection status of a dialin/dialout session if
any is currently active. Also included are two buttons:
Dialout now: This button will cause the AcquiSuite DR to initiate a dialout
connection if dialout networking is enabled. This will not initiate a data
upload to a webserver database such as BMO. If you manually start a
connection with this button, you will need to manually disconnect when you
are finished.
IP Address: The IP address of the ethernet interface. Default 192.168.40.50
Netmask: The netmask of the ethernet network. Default 255.255.255.0
Gateway Address: The gateway is the routing device that moves traffic from
the LAN to the internet. The default is 192.168.40.1. If you do not have an
internet connection for your LAN, or if you are using a crossover ethernet
cable, leave this field blank.
DNS1, DNS2: These are the primary and secondary DNS servers. If you are
using a dialout connection, these must be set to the DNS server provided by
your dialup ISP. If you only use the AcquiSuite DR on a crossover cable and/or
dialin mode, you should leave these blank.
DHCP (enable/disable): If you LAN has a DHCP server, you may enable this
option and remove the previous options for IP, netmask, gateway, and DNS.
Check with your LAN administrator first.
HTTP Proxy: If your LAN is connected to the internet using a sophisticated
firewall, you may need to use the HTTP proxy feature. Check with your LAN
administrator first, however; if you don’t have a proxy set on your computer
(MSIE/Tools/Connections-tab/LAN-Settings), then you most likely don’t need
to configure the AcquiSuite DR to use a proxy. If in doubt, leave this blank
first, and try the connection test. If it fails, ask your LAN administrator about
proxy servers, if any.
After changing any of the settings on this page, you will be required to reboot the
AcquiSuite DR Use the system/status web configuration page, or the LCD console to
reboot the AcquiSuite DR.
ZL0056-0C PAGE 12 ©2010 Veris Industries USA 800.354.8556 or +1.503.598.4564 / support@veris.com 06101
Alta Labs, Enercep t, Enspector, Hawkeye, Trustat, Veris, and the Veris ‘ V’ logo are trademark s or registered tradema rks of Veris Industries, L.L .C. in the USA and/or othe r countries.
Hangup now: This button will cause the modem dialout or dialin connection
to be disconnected immediately.
Modem Setup
This configuration option will allow you to configure specific features in the modem if
needed. For most applications, the default settings are appropriate. The options are
as follows:
Modem type: multitech: A MultiTech modem was detected (default on all
H8822 AcquiSuite DR devices).
Max serial port speed: This feature allows you to specify the maximum speed
at which the modem can communicate. The default is 57.6 kbps. You may
be able to get a more reliable connection by slowing down the rate of data
transfer.
Modem setup string: This option allows the use of specialized modem setup
strings. The default “AT” is sufficient for most applications
Modem speaker enabled: This option sets whether the speaker is on or off
when dialing out or answering a call.
Debug PPP messages: Checking this option will allow the system debug log
to show a complete report of the PPP connection status. You must click the
“start log” button on the system/log files page to record this information.
Modem Diagnostics: This button will run a diagnostic test on the modem to
verify that it is working and report the modem firmware version number.
Page 13

VERIS INDUSTRIES
™
H8822
INSTALLATION GUIDE
Modem PPP Dialout
The AcquiSuite DR has a dialout feature that will allow the AcquiSuite DR to place
an outbound call and upload data to a central database server. If the dialout feature
is enabled, the dialout connection will be initiated before the data upload process
is started. Dialout connections allow the AcquiSuite DR to connect to a generic PPP
server such as a RAS system, or an internet service provider (ATT Worldnet, Earthlink,
Netcom, etc.). Internet services that require custom software such as AOL, Juno,
and ATT Global are not supported. To test if a dialup service is supported, simply
use the MS Windows built in dialup-networking feature and attempt to establish
a connection. If successful, the AcquiSuite DR should work with the service. You
may wish to test the dialup account phone number, username and password with
windows first to verify that the account works correctly.
Enable/Disable: Turn on or off the ability to place an outbound call to an
ISP. Note: when enabling this feature, the default ethernet gateway in
the network setup webpage is removed. You must reboot af ter enabling or
disabling dialout support to make the change take effect.
Phone number to dial: This is the phone number to call. A comma can be used
to pause for 1 second, useful after dialing 9 for an outside line.
Username: The login or username of the dialup account at your ISP.
Password: The password for the ISP account.
Example Dialout to an ISP or RAS
The AcquiSuite DR has the ability to place phone calls to a Remote Access Server
(RAS) or ISP in order to upload data that has been collected from the Modbus
devices. This feature is useful when using the AcquiSuite DR on a phone line with the
Building Manager Online service, or with your own data collection server. Dialout
configuration is not useful if you do not have a central database server to send the
data to.
Collect the necessary information. You will need some details about the ISP or RAS 1.
you will be calling:
Dialout prefix and long distance code, if needed (i.e. dial 9 for an outside •
line)
ISP or RAS telephone number•
ISP or RAS login name•
ISP or RAS password•
Plug a regular telephone into the phone line that the AcquiSuite DR is to use. Verify 2.
the line has dialtone. Attempt dialing the ISP or RAS phone number, and confirm a
modem answers the phone. If so, hangup, attach the AcquiSuite DR to the phone
line, and proceed to the next step.
Select the Network/PPP0/ModemSetup option from the AcquiSuite DR 3.
configuration webpage. Set the “setup string” by clicking on the “use default”
button. The default is simply “AT.” Click apply changes to save the setting.
Enter the login name and password to the ISP dialup account in the space •
provided.
Click Apply Changes to save the settings. •
Reboot the AcquiSuite using the system/status page or the console push button 5.
menu.
Use the Connection Test page in the Testing/Diags menu on the AcquiSuite DR 6.
for a full report of the dialout connection progress. Even if you are not using the
BMO service, you can still test dialout with this feature. You may however receive
an error that the AcquiSuite DR is not allowed to transfer data to the BMO server.
Further information on the connection test is provided in the connection test
section of this manual.
GSM/GPRS Cellular modem (H8822-GSM only)
The AcquiSuite DR model number H8822-GSM includes a GSM/GPRS cellular modem.
GPRS can provide the AcquiSuite DR a connection to the internet without using a land
base phone line or LAN connection. This is of ten helpful in providing communications
in remote areas or in customer sites that will not allow LAN connections for security
purposes.
The GSM/GPRS cellular option is very similar to the standard modem configuration.
Both provide the AcquiSuite DR a way to place a call and get an internet connection.
For the GPRS services, the cellular provider handles the internet connectivity part, so
all you need to do is set up the cellular service account.
To enable your GSM/GPRS modem, you must sign up for a data-only account with
your cellular provider. You may need to supply the MEI number for the cellular
modem which is located on the modem section of the AcquiSuite DR. Alternatively ,
the modem/diagnostics section will print the modem’s IMEI number as well. When
requesting ser vice, it is often easiest to explain that you need data only service for
internet access. You should receive a SIM card from your service provider. Install
the SIM card in the slot provided on the right side of the cellular modem inside the
AcquiSuite DR.
Run the modem diagnostics test to confirm the SIM card is installed and working
correctly. Also note the diagnostics page prints the current cellular provider’s name,
as well as the strength and quality of the cellular tower signal.
Enable/Disable: Turn on or off the ability to place an outbound call to an
ISP. Note: when enabling this feature, the default ethernet gateway in
the network setup webpage is removed. You must reboot af ter enabling or
disabling dialout support to make the change take effect.
APN: This is the access point name for the GPRS service provider. For Cingular,
this is “CINGULAR”
Login name: The login or username of the dialup account at your cellular
provider. For Cingular, this is “CINGULAR@CINGULARISP.COM”
Password: The password for the ISP account. For Cingular, this is “CINGULAR”
Select the Network/PPP0/DialoutSetup option from the AcquiSuite DR 4.
configuration webpage. Verify the basic configuration page is shown (the default).
If the “show basic” button is present in the lower right, click it to reduce the
number of choices to the following.
Check the box to enable dialout.•
Enter the phone number in the space provided.•
ZL0056-0C PAGE 13 ©2010 Veris Industries USA 800.354.8556 or +1.503.598.4564 / support@veris.com 06101
Alta Labs, Enercep t, Enspector, Hawkeye, Trustat, Veris, and the Veris ‘ V’ logo are trademark s or registered tradema rks of Veris Industries, L.L .C. in the USA and/or othe r countries.
Once GPRS dialout is configured, use the Diagnostics / Connection Test to confirm the
cellular service porviders connec tion is working properly.
Page 14

VERIS INDUSTRIES
™
H8822
INSTALLATION GUIDE
Modem PPP Dialin
The AcquiSuite DR is designed to allow incoming connections from any generic
PPP system including MacOS, Linux, Windows 9x, XP and 2000. The dialin feature
is disabled by default, and must be enabled from LCD console or the dialin options
menu in order to receive calls. Dialin options include the following:
Enabled: Check this checkbox to enable dialin support. When checked, the
AcquiSuite DR will answer any ring on the phone line, after the first ring. If
not checked, the AcquiSuite DR will never answer a ring on the phone line.
Local IP address: This is the IP address assigned to the AcquiSuite DR side
of the dialin connection. This address is the one which you must use on the
computer in the web browser address line when remotely accessing the
AcquiSuite DR with a dialin connection. The default is 192.168.238.1
Remote IP address: This is the IP address assigned to the calling computer.
The default is 192.168.238.2
Netmask: The netmask that defines the subnet for both the local and remote
IP addresses. The default is 255.255.255.0
Unless you have specific requirements, the default IP, remote IP and Netmask should
be sufficient. Note: GSM/GPRS products do not allow dialin communications.
Dialin from a computer to the AcquiSuite DR
The AcquiSuite DR has the ability to receive and answer phone calls from a Windows
computer in order to allow remote configuration, or to collect data that has been
logged from the modbus devices. This feature is useful when using the AcquiSuite DR
on a phone line and a central database server is not present. The dialin feature will
support the Windows built-in dialup networking features, and can be used as easily
as a dialup ISP service.
Collect the necessary information. You will need some details about the ISP or RAS 1.
you will be calling.
A dedicated phone line is required, and can not be shared with a fax •
machine or other device.
Telephone number (the phone line the AcquiSuite DR is attached to)•
Static IP address: 192.168.238.1 (the AcquiSuite DR PPP IP address)•
Static Netmask: 255.255.255.0 •
Remote Address: 192.168.238.2 (the IP address assigned to the calling •
computer)
Admin password•
Plug a regular telephone into the phone line that the AcquiSuite DR is to use. Verify 2.
the line has dialtone. Use a second telephone and dial the AcquiSuite DR phone
number to verify the first telephone rings and that it can be answered. If it does
not ring, verify the telephone number dialed is actually associated with physical
phone line. If the line tests succeed, hangup, attach the AcquiSuite DR to the
phone line, and proceed to the next step.
Select the Network/PPP0/ModemSetup option from the AcquiSuite DR 3.
configuration webpage. Set the “setup string” by clicking on the “use default”
button. Click apply changes to save the setting.
Select the Network/PPP0/DialinSetup option from the AcquiSuite DR configuration 4.
webpage.
A. Check the “dialin enabled” option
B. Set the IP, Netmask, and Remote Address as shown in Dialin Address
Worksheet. The IP addresses shown (factor y default) will work for most
dialup connections. If you make changes to the IP address, make note of it for
future use.
C. Click “Apply” to save your changes.
Example Dialin from a WinXP computer
The AcquiSuite DR is designed to allow connections from any generic PPP system
including MacOS, Linux, Windows 9x, XP and 2000. We have found that windows
XP/2000 has a timeout issue that affects some computers but not others. When
calling the AcquiSuite DR with windows XP/2000 you may receive an error message
stating that a loopback error was detected, preceded by windows hanging up
promptly after connecting to the AcquiSuite DR. If that is the case, a slight delay in
the dial process for windows will correct the problem. Adding this delay in a dial
script is detailed below.
Using notepad, create a text file called “c:\windows\system32\ras\AcquiSuite 1.
DR.scp.” In that text file, add the following script
proc main
delay 2
endproc
Save and close the file
Create a windows networking connection.2.
A. From the control panel, select Network Connections. Click “Create a new
connection”
B. The “Connection Wizard” will appear with a welcome screen and no
options. Click next.
C. Select “Connect to the internet” and click next.
D. Select “Set up my connection manually” and click next.
E. Select “Connect using a dialup modem” and click next.
F. Enter “My AcquiSuite DR” for the ISP name (you may want to name each
AcquiSuite DR connection by the name of the building where it resides). Click
next.
G. Enter the phone number of the phone line attached to the AcquiSuite DR.
Click next.
H. Enter “admin” for the username, and the admin password in the
password field. Uncheck the option “Make this the default internet
connection.” Click next.
I. The connection wizard will show you that the setup is complete. Click
Finish.
ZL0056-0C PAGE 14 ©2010 Veris Industries USA 800.354.8556 or +1.503.598.4564 / support@veris.com 06101
Alta Labs, Enercep t, Enspector, Hawkeye, Trustat, Veris, and the Veris ‘ V’ logo are trademark s or registered tradema rks of Veris Industries, L.L .C. in the USA and/or othe r countries.
Page 15

VERIS INDUSTRIES
™
Configure connection details.3.
A. Right click on the “My AcquiSuite DR” connection icon you created in step
2 above (you may also click the properties button in the dialout dialog box).
B. General Tab: defaults are ok.
C. Options Tab: Verify the option “include windows login domain” is not
checked. Set any timeout values if desired.
D. Security Tab: Security: Use “Typical”, allow unsecured password. At the
bottom of the dialog box, in the section “Interactive Login and Scripting”.
Check the “Run Script” checkbox. Click the browse button below the script
name. Select the AcquiSuite DR.scp file created in step one above. Click the
open button. The script name should appear to the right of the Run Script
checkbox.
E. Networking Tab: defaults are ok.
F. Advanced Tab: defaults are ok.
G. Click Ok to save the changes.
Dial the connection.4.
H8822
INSTALLATION GUIDE
A. Double click the “My AcquiSuite DR” connection icon.
B. Complete the password field if it is blank. The password is the Admin
password of the AcquiSuite DR.
C. Click the dial button. The modem usually takes between 40 and 60
seconds to establish a connection.
Once the connection is established, use your web browser to connect to the
AcquiSuite DR by entering http://192.168.238.1/setup/
Where 192.168.238.1 is the Static IP address listed in the Dialin Address Worksheet.
Your browser will now be able to access the AcquiSuite DR the same way as you did in
the LAN/Direct Connection setup in previous sec tions of this manual.
ZL0056-0C PAGE 15 ©2010 Veris Industries USA 800.354.8556 or +1.503.598.4564 / support@veris.com 06101
Alta Labs, Enercep t, Enspector, Hawkeye, Trustat, Veris, and the Veris ‘ V’ logo are trademark s or registered tradema rks of Veris Industries, L.L .C. in the USA and/or othe r countries.
Page 16

VERIS INDUSTRIES
™
H8822
system options
Status
The system status page shows the current memory and flash disk utilization values,
system up-time, and load average. Also included on this page are two buttons for
Reboot and Shutdown. It is impor tant to use the shutdown option prior to removing
power from the AcquiSuite DR. The LCD console will report the reboot or shutdown
status.
Processes
The system process table is shown in both tree and tabular formats. The process list is
useful when contacting Veris technical support.
Date and Time
The AcquiSuite DR keeps time using UTC or Universal time. All log files are recorded
in UTC time as well. Timestamps shown on the AcquiSuite DR local configuration
pages are converted to local time for the convenience of the installer. The date/time
configuration page provides the following options:
Date/time in UTC and local time.
Date/time dropdown menus to select the current (local) time manually.
Time zone: a drop down list of the supported time zones.
Time sync protocol: Select NTP or Rdate. Most Linux/Unix systems provide
rdate, however many provide NTP as well. Windows domain servers can also
provide NTP. If possible use NTP as it is a more robust protocol.
Time Server: Specify the dns name or ip address of your time server. The
default “time.obvius.com” can be used if the AcquiSuite DR has a connection
to the Internet. You may need to verify if your firewall will allow NTP or Rdate
packets to pass through. Generally, it is better to use a local time server if
possible. The time server time.obvius.com supports both NTP and Rdate time
protocols.
Universal Time Is Your Friend
Log data is stored in UTC time. This allows data collection services such as BMO to
collect data from multiple sites in different time zones. If you are operating your own
database system to store log data from the AcquiSuite DR, it is best to store the data
in UTC time in the database as well, and only convert it to local time when generating
the final report or graph for the user.
If you store data in local time, you may encounter a number of issues:
Local time is relative. Is local the time where the AcquiSuite DR exists, or local 1.
to where the data is stored. If local to the AcquiSuite DR, you must shift each
AcquiSuite DR data set depending on its location.
There are about 11 time zones in the US. Some observe DST, others do not. These 2.
include Alaska, Aleutian, Arizona, Central, Eastern, Hawaii, Indiana, Michigan,
Mountain, Pacific, and Samoa.
INSTALLATION GUIDE
Converting Local time to any other timezone usually involves converting it to UTC 5.
first.
Using UTC time solves these problems elegantly. The best practice is to store data
in the database in UTC format and then convert the information when generating a
report for the user.
For example, if you wish to draw a graph of KW over Time, prompt the user for a date
range, say Jan 1 midnight to Jan 2 midnight. Take the user specified end points and
convert these times from Local time to UTC. Nex t, create an SQL query using the new
UTC formatted data as your select statement. i.e.:
SELECT * from TABLE where time > ‘2003-01-01 08:00:00’ and time < ‘200301-02 08:00:00’
Note the time is 8 hours ahead of local time. This example is for Pacific which is 8
hours off from UTC. This will return a list of data points between the two specified
time ranges. Next, plot the data on a graph, using the UTC times for start and end
points. Lastly, when drawing the ‘time’ legend on the graph, convert the values back
to Local time before displaying, i.e., 2003-01-01 00:00:00 to 2003-01-02 00:00:00.
Any division lines on the time axis can be handled the same way. The advantage
of using this technique is that it will properly draw a graph across DST change
boundaries. The graph axis is based on UTC time with no DST, and will not show a gap
or overlap a the time of the change. The axis labeling will be correct as well, matching
the UTC times precisely.
Another way to handle the conversion is to quer y and convert all the returned
timestamps to local time before drawing the graph. This is useful if you do not have
detailed control over the graph legend drawing process. This technique will not
properly graph across DST changes as the graph is based on local time including DST
changes.
System logs
The AcquiSuite DR can keep several log files that report the general operation of the
system, not related to the normal data logs. These include the following:
Kernel: Startup messages about the Linux operating system. This log shows
what hardware items were detec ted and initialized.
Upload: This log file contains a repor t from the last data upload attempt to
remote database/webser vers such as BMO. This log will show if any log files
are being rejected by the dabase/webserver, or if the network is not allowing
a connection.
Debug Messages: The AcquiSuite DR can run a “syslog” process to record
more detailed information about its operations, however this log consumes
vast quantities of memory quickly, and is disabled by default. Click the “start
log” button to enable the feature. Click the “end log” button to disable.
Note: when the AcquiSuite DR is rebooted, the debug log will be disabled on
star tup.
Ftp log: This log shows a list of files transferred by FTP on the AcquiSuite DR.
When converting to local time, there will be one hour of overlapping data in the 3.
fall when the time is adjusted for Daylight Savings time, i.e., log entries run 12:45,
1:00, 1:15, 1:30, 1:45, 1:00, 1:15, 1:30, 1:45, 2:00am. This will prevent you from
sorting your data by time in your database.
In the spring, you will have a gap in the data from 1:59 to 3:00am. This can cause 4.
problems if you are calculating demand values based on consumption.
ZL0056-0C PAGE 16 ©2010 Veris Industries USA 800.354.8556 or +1.503.598.4564 / support@veris.com 06101
Alta Labs, Enercep t, Enspector, Hawkeye, Trustat, Veris, and the Veris ‘ V’ logo are trademark s or registered tradema rks of Veris Industries, L.L .C. in the USA and/or othe r countries.
System boot log: This log shows when the AcquiSuite DR was started, and
lists process events such as remote logins, or logger process restar ts. This
log is most useful for detecting when the AcquiSuite DR was restarted,
and whether there was a proper shutdown event prior to rebooting (if not,
possibly a power outage).
Start/End logging: This button allows the user to start detailed logging or
Page 17

VERIS INDUSTRIES
™
H8822
disable it if it is running.
Purge Log Files: This button will clear all the system log files listed on this
page, but not the meter data log files (deletes kernel, boot, ftp, messages,
upload log files).
Firmware Update
The AcquiSuite DR can upgrade its own firmware using the firmware update page.
The AcquiSuite DR must have an Internet connec tion to communicate with the Veris.
com website for firmware updates. If a LAN connection is present and configured, it
will be used by default. If the AcquiSuite DR uses a dialout connection, you must first
enable the dialout by clicking the “dialout now” button on the Networking/Modemppp/Status page.
After clicking the “Check for updates” button, the AcquiSuite DR will contact the
Veris.com webserver and attempt to download a list of firmware files. The list
is compared to the firmware versions installed, and a listing of the files will be
displayed. If any firmware updates are available, a button to the right will be shown
labled “Upgrade.” The firmware files are as follows:
as.cramfs: The main AcquiSuite DR firmware file including the Modbus and
data logging software .
usr.cramfs: High level system support files such as FTP, and time zone
information.
ramdisk.gz: Low level system files and system libraries.
zImage: The Linux operating system.
H8822.hex: The analog/pulse IO co-processor firmware.
When clicking on the Upgrade button, the AcquiSuite DR will again contact the Veris.
com website and download the requested firmware image file. The AcquiSuite DR
will take a few seconds to verif y the file checksum and prompt you with an “Install”
button. Click the install button and the AcquiSuite DR will install the firmware update
and reboot itself to make the changes take effect.
Do not power down the AcquiSuite DR during any step of the firmware update
process. Doing so may corrupt the system and render the AcquiSuite unusable.
INSTALLATION GUIDE
diaGnostics
Host Lookup
The Host Lookup page provides the ability to do some basic network tests. These are
as follows:
Ping: send an echo request to the specified host.
Traceroute: Send an echo request to the target address and attempt to locate
every router in between the Acquisuite DR and that address.
Nslookup: convert the dns name to an IP address, useful for testing the
functionality of the DNS server configured in the Network/Setup webpage.
To run a network test, enter the IP address or DNS name in the field provided, check
the checkbox nex t to the test you wish to use, and click the OK button. Multiple tests
can be specified.
Connection Test
The connection test page will attempt to establish an HTTP session with the specified
upload server. Click the “begin test” to start this process. Information will be
printed in black. Success responses will be printed in Green, failure messages will be
printed in Red. A sample upload test follows:
Ping localhost [127.0.0.1]: Success
Ethernet IP address [192.168.10.50], mask [255.255.255.0]
Local su bnet [192.168.10.0] to [192.168.10.255]
Ping ethernet ip address [192.168.10.50]: Success
Starting system de bug logger
Dialout not enabled, using ethernet LAN con nection.
Ping ethernet gateway [192.168.10.1]: Success
Ping DNS #1 [192.168.10.1]: Success
The DNS #2 server address is not congured.
Resolving time server [time.obvius.co m] to an IP address:
Success. Got [198.107.56.37]
Ping tim e server [time.obvius.com]: Success
Testing tim e server
SyncTime: Sync system tim e with time.obvius.com.
16 Dec 19:49:36 ntp date[3165]: adjust time server
198.107.56.37 offset 0.009985 sec
new tim e: Tuesday, Decem ber 16 2003 19:49:36 PST, drift
1 seconds.
Processing upload url.
No proxy speci ed, using direct con nect method.
Upload URL looks ok: http://www.building manageronline.com/
up lo ad .ph p
Resolving web server [www.building ma nageronline.com] to an
IP address: Success. Got [198.107.56.37]
Ping web server [ww w.buildingm anageronline.com]: Success
Connecting to server at [198.107.56.37:80]: Success
Sending HTTP request: Success
Reading response:
Upload test completed. Got:
HTTP/1.1 200 OK
Date: Wed, 17 Dec 2003 03:49:38 GMT
Server: Apache/1.3.23 (Unix) PHP/4.1.2 Auth MySQL/2.20
X-Powered-By: PHP/4.1.2
Connection: close
Content-Ty pe: text/html
SUCCESS - Test Successful
Closing TCP connection
Shutting dow n system debug logger
Test complete
ZL0056-0C PAGE 17 ©2010 Veris Industries USA 800.354.8556 or +1.503.598.4564 / support@veris.com 06101
Alta Labs, Enercep t, Enspector, Hawkeye, Trustat, Veris, and the Veris ‘ V’ logo are trademark s or registered tradema rks of Veris Industries, L.L .C. in the USA and/or othe r countries.
Note in the last section where SUCCESS is indicated. A failure would be cause by an
incorrect password.
Page 18

VERIS INDUSTRIES
™
H8822
lcd console
The AcquiSuite DR has an LCD console and two push buttons labeled “Menu” and
“Select.” These can be used to configure some of the basic features. The intended
purpose of the console is to configure the AcquiSuite DR to a point where a computer
can communicate with it for further detailed configuration.
When the AcquiSuite DR is running, it will show “AcquiSuite Ready” and the current
time alternated with the ethernet IP address. If you choose to enable the console
display of data points, the LCD will also show the selected point names and current
reading values. The display will change to the next listed item about once every 10
seconds. If a data point name is longer than will fit on the 16 character wide display,
it will be scrolled. Pressing the select button will cause the display to change to the
next configured item. Pressing the selec t button quickly will skip through multiple
display points.
Pressing the Menu button will cause the main menu to appear. Once [Main Menu] is
shown on the console, the menu button will change the menu option, and the select
button will take action on the currently displayed option. Some options provide sub
menus, others allow you to edit the option value. The following is a tree display of the
main menu and sub menus.
[Main Menu]
TCP/IP Cong
[TCP/IP Cong]
IP Address
Netmask
Gateway
DNS Server #1
DNS Server #2
(previous menu)
Network Status
Dialin
Modbus Status
Upload Data Now
Shutdown
Reboot
(previous menu)
The TCP/IP sub menu will allow you to configure the ethernet settings for the
AcquiSuite DR. To edit the IP settings, use the menu button to change options, and
press the select button to edit the option. Once selected, you will see the curent value
displayed and a blinking square cursor on the first character. Press the menu button
to change the character or digit. Press the select button to use the digit and move the
cursor to the right one space. If you press the select button multiple times, the cursor
will move right a similar number of spaces, allowing you to skip over characters
that may be correct based on the previous settings. When you are finished entering
the IP address, select a blank space with the menu button, and press select. Any
characters still remaining to the right of the cursor will be eliminated (i.e., if changing
128.193.100.200 to 10.0.0.1, the new IP address will be several digits shorter than the
old one).
INSTALLATION GUIDE
Network Status: This option will test the ethernet connection by attempting to ping
the following addresses: localhost, ethernet IP address, gateway, DNS1, DNS2. The
local host ping will verify the kernel IP stack is properly initialized. The ethernet ping
will verify the ethernet card’s IP address is set and communicating with the kernel.
The ethernet ping test does not send any packets over the ethernet cable however.
The gateway ping test will verif y that the gateway address responds to queries. This
test is the first one that actually sends packets over the ethernet wire. The gateway
test does not verif y the IP address of the gateway is correct, or that the gateway is
working correctly. It only tests that the address specifed as a gateway responds to
a ping request. The DNS1 and DNS2 ping tests verify the IP addresses listed for DNS
servers respond to ping requests. This test does not verify if the DNS ser vers can
actually resolve DNS names to IP addresses.
For a more complete test, use the connection test web page in the AcquiSuite DR
diagnostics menu.
Dialin: This menu provides the ability to enable or disable dialin support. From the
console, the installer can enable dialin support and allow a remote user the ability
to call the AcquiSuite DR and configure the options without requiring a computer on
site. For more information on connecting to the AcquiSuite DR review the “Modem/
PPP Dialin” section of this manual.
Modbus Status: This option will report the number of devices currently detected by
the AcquiSuite DR. The display will show a device count for “Devices OK,” “New,” and
“Failed.” These are explained below:
Devices OK: The number of Modbus devices that are presently working, and
have been configured.
New: Devices that the AcquiSuite DR supports, and are working, but have not
yet been given a name.
Failed: The number of Modbus devices that either stopped responding, or
are not supported by the AcquiSuite DR. Note: selecting the Modbus status
option from the AcquiSuite DR console does not cause the AcquiSuite DR
to search for new devices. The AcquiSuite DR checks for new devices in the
background all the time, taking about 2.5 minutes to complete each pass
through all 255 possible addresses. The Modbus test console option simply
displays the number of devices the AcquiSuite DR presently knows about.
The AcquiSuite DR has a built in IO module with 4 analog and 4 pulse inputs. This
module shows up in the Modbus listing as device 250, and is counted in the number
of devices OK or New. Therefore, if you have one AcquiSuite DR H8811 with a single
Modbus power meter, the device count will be two, (one for the meter, and one for
the AcquiSuite DR on board IO).
Upload Data Now: If the AcquiSuite DR is configured to upload data using HTTP/
POST to a webserver/database such as BMO, this option will cause the AcquiSuite DR
to upload all stored data immediately. If the dialout option is enabled, an outbound
phone call will be initiated, and disconnected af ter the transfer is complete.
Reboot: This option will reboot the AcquiSuite DR.
ZL0056-0C PAGE 18 ©2010 Veris Industries USA 800.354.8556 or +1.503.598.4564 / support@veris.com 06101
Alta Labs, Enercep t, Enspector, Hawkeye, Trustat, Veris, and the Veris ‘ V’ logo are trademark s or registered tradema rks of Veris Industries, L.L .C. in the USA and/or othe r countries.
Page 19

VERIS INDUSTRIES
™
H8822
Shutdown: This option will stop the data logging processes and secure the flash
memory. When secured, the console will state that the power may be disconnected.
It is important to shut down the AcquiSuite DR cleanly prior to disconnecting the
power from the device.
The AcquiSuite DR has an advanced menu that can be used to perform system checks
and clear all configuration options to the default settings. To access the advanced
menu, wait until the LCD shows “AcquiSuite Ready” and press both the Menu and
Select buttons at the same time. Hold both down together for about 10 seconds.
When the advanced menu is displayed, you may release the two buttons. The
following is a tree display of the advanced menu.
[Advanced Menu]
Console on COM1 (RS485 port)
Check ash disk
Erase Log/Cong
(previous menu)
The Check Flash Disk option will force the AcquiSuite DR to check the entire flash disk
for file system integrity. This will require you to reboot the AcquiSuite DR.
The Enable Console feature will provide a shell prompt on the serial port for remote
diagnostics. This is intended to be used by Veris technical support only.
INSTALLATION GUIDE
loG file data
The AcquiSuite DR stores data from the modbus devices in text (csv) log files. One
log file is created for each modbus device on the system. On a daily basis, the log
files are “rotated,” that is the current log file is renamed and compressed with gzip
compression, and a new log file is started. This allows the AcquiSuite DR to make
efficient use of the flash memory. When the storage capacity is beyond 95% full, the
oldest log file will be removed from the system.
Log File Status
The AcquiSuite DR can display a list of log files in the “log file data/status” web
configuration page. A bar graph will show the amount of storage capacity that is
used by the existing log data. Below, a list of modbus device log file will be displayed
along with the file size and timestamp when the file was last modified.
Each modbus device may have multiple log files. The log file name starts with “mbxxx.” where xxx is the modbus device id number. One file, with the .log extension
is the file where the most recent data is being stored. Other log files have a .gz
extension. These are older log data files that have been compressed to save space.
The file name will be a link that will open up a browser window to view the contents
of the single log file. Clicking on the single log file will only show the contents of that
log file, and not all historical data for the device. Use the log export feature if all log
data is required.
The Reset Configuration option will remove all the user settings, data, and passwords
that have been configured and will return the AcquiSuite DR to the factory default
settings. This is mainly useful when reconfiguring an AcquiSuite DR that has been
used previously on a different job or project.
Log File Format
Once you have downloaded the data from the AcquiSuite DR, you will need to process
it. The file is an ASCII text file with comma delimited data. One line is recorded for
each log cycle. The file will look something like the following example from a H89234 IO Module.
‘2002-01-31 18:30:00’,0,0,0,-0.00,89.29,39.05,49.11,0,0,0,0
‘2002-01-31 18:35:00’,0,0,0x02,-0.01,104.24,39.05,49.11,0,0,0,0
‘2002-01-31 18:40:00’,0,0,0,NULL,87.82,39.05,49.11,0,0,0,0
‘2002-01-31 18:45:00’,139,NULL,NULL,NULL,NULL,NULL,NULL,NULL,NULL,NULL,NULL
In this example, the first line shows a regular log entry. The second line shows a high
range alarm for data point 2. The third column shows point 1 as invalid, and the
fourth line shows the modbus device is not responding.
Notice the following columns are shown.
Date/Time in UTC (GMT) time. This field is quoted to handle the space in the 1.
middle. The format is YYYY-MM-DD HH-MM-SS
Modbus error (if any). 0=no-error, see table below.2.
Low Range alarm bitmap (hex notation). 3.
High Range alarm bitmap (hex notation) 4.
Data point 1 5.
ZL0056-0C PAGE 19 ©2010 Veris Industries USA 800.354.8556 or +1.503.598.4564 / support@veris.com 06101
Alta Labs, Enercep t, Enspector, Hawkeye, Trustat, Veris, and the Veris ‘ V’ logo are trademark s or registered tradema rks of Veris Industries, L.L .C. in the USA and/or othe r countries.
Data point 2 6.
- - - 7.
Data point N 8.
Page 20

VERIS INDUSTRIES
™
H8822
INSTALLATION GUIDE
Comments:
Date/Time: The date/time column reports the time at which data was logged from
the modbus device. Note: this is not necessarily the time at the start of the log cycle.
Users with large number of devices may notice some of the modbus devices at higher
address numbers report 1 or 2 seconds after the first modbus devices. This is because
the 9600baud speed of the modbus loop is not fast enough to log all modbus devices
in less than 1 second. If a device does not respond during a log cycle, the AcquiSuite
DR will attempt to query the device several more times. If a subsequent query is
successful, the time of the successful query will be used in the log file but may be
several seconds after the initial log cycle.
The log date/time is in Universal time. (UTC) This means that the data is logged with
no shift for daylight savings time, and must be converted to local time for reporting
purposes. When importing into a database, data should be kept in UTC time for ease
of use. When reporting the final data, you should adjust the time to reflect the local
timezone for which you are reporting. The data export option on the BMO website
will prompt you for a timezone when you export the data, and will adjust the log
date/time accordingly. Note: UTC is sometimes referred to as GMT. (Greenwich Mean
Tim e)
Modbus Error: If the error value is not 0, the remainder of the columns for this line
will be reported as NULL.
1 Operation not permitted
2 No such file or directory
3 No such process
4 Interrupted system call
5 Input/output error
6 No such device or address
9 Bad file descriptor
11 Resource temporarily unavailable
12 Cannot allocate memory
13 Permission denied
16 Device or resource busy
19 No such device
23 Too many open files in system
24 Too many open files
26 Text file busy
28 No space left on device
32 Broken pipe
101 Network is unreachable
110 Connec tion timed out
111 Connection refused
113 No route to host
129 Illegal Function (function was not allowed by the slave device)
130 Illegal Data Address (the data address is not allowed by the slave device)
131 Illegal Data Value
132 Illegal Response Length
139 Device Failed to Respond (the modbus device may be off or disconnec ted)
160 Start log (Entry in log file af ter AcquiSuite DR starts up)
161 Stop log (Entry in log file if AcquiSuite DR is shut down properly)
Low/High Range Alarms: This number is a hex representation showing which data
points are out of range. 0x01 shows data point 1 in alarm state. 0x04 shows data
point 3 in alarm state.
Data Points: Data points are shown in the same order as the modbus device
configuration display in the modbus/device list page. Data is displayed in floating
point form. When a specific point is unavailable (4A4P-M broken wire alarm) or the
point is not supported as part of the configuration (phase B current on a single phase
H8163 meter hookup) the point will be logged as NULL. This preserves the column
structure of the file, and allows notation of invalid data. SQL databases often accept
NULL as a valid entry in a data table to represent invalid data.
For data exported from the BMO website, the columns that are invalid (NULL) are
reported as blank fields. This makes it easier to import into MS Excel as blank cells. At
some point in the future, the AcquiSuite DR will be converted to report blank fileds
rather than “NULL” to make direct import of data from the AcquiSuite DR easier, as
well as reduce the file size. Developers intending to use data files from the AcquiSuite
DR should handle both the word “NULL” as well as a blank column as indications of an
invalid data point.
Log Storage Capacity
The AcquiSuite DR uses approximately 2 Mbytes of flash disk for log file storage. As
data from the modbus meters is collected, it is appended to log files on this flash
chip. Once a day (at the first call-out period for uploading data) the log files are
“rotated”. This action renames each log file and compresses the old file using gzip.
The net result is a smaller file for storage or modem/ethernet transfer.
Because the files are compressed, the actual size of the data on the flash chip will
vary depending on the data itself. For example, if a device is reporting 25KWh, it will
use fewer bytes than a log entry that has 9,999,999KWh.
We have measured a typical installation with 2 H8036 power meters and 2 H8923-4
IO modules, and determined the system will run for approximately 80 days with a 15
minute log cycle. Changing the number of meters or the log cycle period will affect
your results accordingly.
When the AcquiSuite DR storage area on the flash starts to run out of space, the
following action is taken:
When the 2 Mbyte log file storage area is 75% full, the AcquiSuite DR will •
immediately compress the log files and attempt to upload the data to the
BMO website or user specified site. This action will not wait until the next
scheduled upload time.
When the storage area is 95% full, the AcquiSuite DR will immediately •
attempt to upload the data, and if unsuccessful, will purge the oldest
(rotated) log data file.
Log files are deleted automatically if the AcquiSuite DR has successfully uploaded the
log file to a database server using the HTTP/Post protocol. If you do not configure the
AcquiSuite DR to automatically push the log files to your server, you must manually
delete them. To delete log files, refer to the FTP method of downloading log files.
One step detailed in the FTP section is how to delete a log file from the AcquiSuite DR.
ZL0056-0C PAGE 20 ©2010 Veris Industries USA 800.354.8556 or +1.503.598.4564 / support@veris.com 0 6101
Alta Labs, Enercep t, Enspector, Hawkeye, Trustat, Veris, and the Veris ‘ V’ logo are trademark s or registered tradema rks of Veris Industries, L.L .C. in the USA and/or othe r countries.
Page 21

VERIS INDUSTRIES
™
H8822
INSTALLATION GUIDE
Uploading data to the BMO website.
After the AcquiSuite DR has been configured and has logged some data, you will want
to collect the data for analysis. There are several ways of collecting the data from
the AcquiSuite DR including the Building Manager Online service. Other methods are
noted in the data collection FAQ. This section details configuring the AcquiSuite DR
for use with the BMO ser vice.
First, use your browser to connect to the AcquiSuite DR. Select the Modbus/Setup 1.
section from the menu on the left. In the field titled “Modbus Loop Name” enter
a name for this AcquiSuite DR to uniquely identify it on the BMO website. Because
the BMO site can show multiple AcquiSuite DR devices, it is important to have a
descriptive name in this field.
Select the “Log File Data”, “Setup/Upload” menu option. The following features 2.
are available:
AcquiSuite DR Serial Number: This is the serial number that uniquely •
identifies this AcquiSuite DR. This number can not be changed. When
uploading data to the BMO website, this serial number is used to identify
the AcquiSuite DR to the BMO server.
Scheduled upload time: This option allows you to control when the •
AcquiSuite DR will initiate the upload process. You can select any hour of
the day, and the AcquiSuite DR will select some time at random within
that hour to start the upload. The random feature allows multiple
AcquiSuite DR devices to share a single dialup account or phone line by
not starting the dialout at the sam
time for all devices. If the AcquiSuite DR is on a LAN connection (DSL,
Cable
Modem, T1, etc) an upload time of “hourly” may be selected.
Upload data on alarm status change will cause the AcquiSuite DR to •
initiate the upload process if any point on any modbus device enters or
leaves an alarm state. This allows the AcquiSuite DR to send data when an
alarm is detected, and will upload that information to the BMO website
in a timely manner. The BMO website will then send email notifications if
necessary. If this option is disabled, the BMO website may not be able to
send notifications until the end of the day when the AcquiSuite DR calls in
at its specified upload time.
Upload data on low disk alarm: This feature will cause the AcquiSuite DR •
to attempt a data upload immediately if the log file storage area is more
than 75% full.
Allow remote modbus device configuration: If enabled, users may •
remotely configure alarms and other modbus device features on the BMO
website. When the AcquiSuite DR uploads data to the BMO website, it
will also download any new configuration information as needed. Note: if
configuration changes are made to the AcquiSuite DR, those changes will
be uploaded to the BMO site. If configuration changes are made at both
the AcquiSuite DR and the BMO website, the most recent changes will be
used.
Target Address to upload data: This is the website URL to upload data to. •
This should always be set to “http://www.buildingmanageronline.com/
upload.php” unless you are configuring the AcquiSuite DR to send data to
your own internal database server.
Password to upload data: This password is used by the BMO webser ver •
to verify the AcquiSuite DR device authentication before accepting the
uploaded data. You should select a password other than the default, and
make note of it for future reference.
Number of times to retry: In the event of a failure (often due to dialup •
problems, busy signals, etc) this option specifies the number of retries to
attempt the upload again. If all retries fail, the AcquiSuite DR will wait
until the next scheduled upload time before trying again.
Time to wait before retry: In the event of a failure, the AcquiSuite DR can •
be configured to wait for a specified period of time before attempting
another connection. This option specifies how long to wait before
retrying.
Contact the Veris Technical Support department. Please have the AcquiSuite 3.
DR serial number and password to upload data handy. Your tech support
representative will confirm your BMO account and will add the AcquiSuite DR to
one of your client databases.
Click the “Upload Data Now” button. Your data should be sent to the BMO 4.
webserver.
For more detailed information about the transfer process, use the Connection Test 5.
page in the Testing/Diags menu on the AcquiSuite for a full report of the data
upload progress.
ZL0056-0C PAGE 21 ©2010 Veris Industries USA 800.354.8556 or +1.503.598.4564 / support@veris.com 06101
Alta Labs, Enercep t, Enspector, Hawkeye, Trustat, Veris, and the Veris ‘ V’ logo are trademark s or registered tradema rks of Veris Industries, L.L .C. in the USA and/or othe r countries.
Page 22

VERIS INDUSTRIES
™
retrievinG data from the
acquisuite
H8822
HTTP/Post Upload To Your Database Server
INSTALLATION GUIDE
Now that you have installed your AcquiSuite DR and configured it to collect data from
your meters and sensors, you will want to retrieve the data from your AcquiSuite
DR. This section provides an overview for collecting data from the AcquiSuite DR.
Processing the data for billing reports, summaries, and other data processing are
beyond the scope of this document. There are four basic ways to collect data from the
AcquiSuite DR:
HTTP download from the AcquiSuite DR with a browser (pull)1.
FTP download from the AcquiSuite DR (pull)2.
Enertrax DL download from the AcquiSuite (pull)3.
HTTP Post: The AcquiSuite DR uploads data to a database/webserver (push)4.
HTTP Direct from the AcquiSuite DR
The AcquiSuite DR has the ability to export log file data to a web browser directly
from the setup web pages. To use this feature, access the AcquiSuite DR setup menu
with your web browser. Select the “Log File Expor t” page from the Log File Data
menu on the left side of the page.
For each device, a separate log file will be saved. Select the device from the
dropdown list provided. Specify Comma or Tab delimited data, and indicate if column
headers are required. Click the download button to download the data.
The log file format is the same as is provided by FTP and by the BMO web site. Note:
All timestamps are in UTC.
When importing log files into Microsof t Excel, be sure to specify the log data is
comma seperated, and use a single quote mark as the text delimiter.
FTP Direct from the AcquiSuite DR
The AcquiSuite will allow inbound connections for transfer of log data files using the
FTP protocol. FTP to the AcquiSuite and log in using the system admin password.
Files are located in /var/log/modbus. For further information on FTP log file transfer,
review the technote and FAQ section of the Veris website.
Enertrax Download Direct from the AcquiSuite
AcquiSuite DR uploads data direc tly to your webserver or database server. •
You must supply a script to process the incoming data. Sample script for •
Linux/PHP is available upon request.
Requires Webserver, CGI Scripting and, database (SQL) knowledge •
Alarm processing available by processing data on your server when data •
is uploaded
Designed for integration with existing energy reporting systems. •
Removing Data From the AcquiSuite DR
When using an HTTP/Post method to allow the AcquiSuite DR to push data to a
database server, the AcquiSuite DR will automatically remove log files from its’ flash
memory once the AcquiSuite DR has confirmed that the file was received by the
database server.
If you are using the AcquiSuite DR with a standalone mode, you can use FTP to delete
log files from the flash memory. This is essentially the same process as in the manual
FTP data download section.
At the Microsoft Windows command prompt ftp, use the following commands.
ftp 192.168.40.50 Use the IP address of your
AcquiSuite DR
userna me: root
password: adm in The same as the admin pass-
word
cd /var/log/modbus
dir View a list of log les.
mdel *.gz Remove the log le to free
up ash space
bye
The model command will tell the FTP software to delete all files ending in .gz in the
current directory. Some FTP clients will allow you to specify a command “prompt”
prior to using mdel that will prevent the FTP client software from asking if you are
sure you wish to delete each file.
Veris provides a free tool called Enertrax DL that can automate the process of
downloading log data from the AcquiSuite to your Windows PC hard drive. Enertrax
DL can merge new log data into existing log files on your computer as well as provide
configuration information about the AcquiSuite. Enertrax DL can also be configured
to make LAN or dialup calls to one or more AcquiSuite or AcquiLite data acquisition
servers. Enertrax DL can be obtained from the Veris.com website in the Products
section.
HTTP/Post Upload To Building Manager Online
AcquiSuite DR sends data to the BMO website •
The BMO Website stores the data in a SQL database. •
Quick reporting from our website •
Includes remote AcquiSuite DR configuration service. •
Includes alarm notification by email. •
Data available for download in CSV/Tab delimited format upon your •
request.
For pricing service, information, contact • sales@buildingmanageronline.
com
ZL0056-0C PAGE 22 ©2010 Veris Industries USA 800.354.8556 or +1.503.598.4564 / support@veris.com 0 6101
Alta Labs, Enercep t, Enspector, Hawkeye, Trustat, Veris, and the Veris ‘ V’ logo are trademark s or registered tradema rks of Veris Industries, L.L .C. in the USA and/or othe r countries.
Linking to AcquiSuite DR Device Status Pages
It may be helpful to create a shortcut or a hyperlink on another web page that will
direct the browser to bring up a specific device status page in your browser. To do
this, right click on the page and select Properties. The url for the page will be shown
on that dialog. Copy and paste this url into your link.
To format a URL that will bypass the username/password prompt, you can include
the login information in the URL itself. Note however that this will allow any one to
discover the password for the AcquiSuite DR. Consider using this only with the “user”
account. This technique is shown in the following example:
http://user:mypassword@192.168.40.50/setup loggersetup.cgi?ADDRESS=001
Note: the address=001 section specifies which modbus device to display. To allow
the user to be prompted for the login/password, remove “user:mypassword@” from
the example URL.
Note: This URL syntax is no longer supported in Internet Explorer or in Windows
Explorer after you install the MS04-004 Cumulative Security Update for Internet
Explorer.
 Loading...