


TM
veripart
VACUUM CLEANER
VPSS101
HANDLEIDING VERIPART | USER MANUAL VERIPART
MANUEL D’INSTRUCTIONS VERIPART

2

INHOUD
1. VEILIGHEIDSVOORSCHRIFTEN 5
2. PRODUCTOMSCHRIJVING 9
3. VOOR HET EERSTE GEBRUIK 10
4. MONTAGE 10
5. GEBRUIK 11
6. ONDERHOUD 12
NL
INDEX
1. SAFETY INSTRUCTIONS 15
2. PRODUCT DESCRIPTION 19
3. PRIOR TO FIRST USE 20
4. ASSEMBLY 20
5. USE 21
6. MAINTENANCE 22
INDEX
1. CONSIGNES DE SÉCURITÉ 25
2. DESCRIPTION DU PRODUIT 29
3. AVANT LA PREMIÈRE UTILISATION 30
4. MONTAGE 30
EN
FR
5. UTILISATION 31
6. ENTRETIEN 32
3
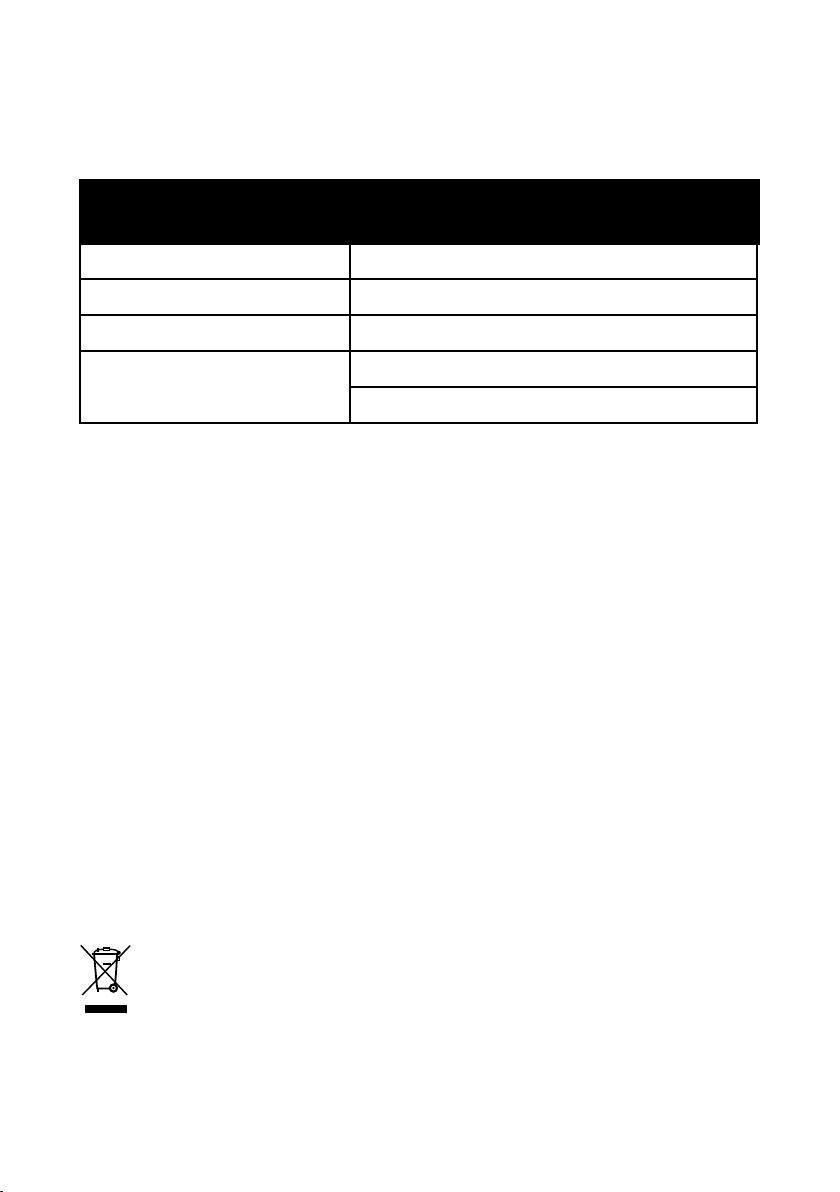
TECHNICAL DATA
TYPE NUMMER
Stofzuiger VPSS101
Voltage 25,2V
Opgenomen vermogen 100-240V~ 50-60 Hz 0,5A Max
Uitgangsvermogen 25,0V - 0,5A 12,5W
29,0V - 0,5A 14,5 W
Recycling
Dit symbool betekent dat dit product niet bij het gewone huishoudelijke afval mag
worden weggegooid (2012/19/EU). Volg de geldende regels in uw land voor de
gescheiden inzameling van elektrische en elektronische producten.
Als u het product correct afvoert, voorkomt u negatieve gevolgen voor het milieu en de
volksgezondheid.
Het verpakkingsmateriaal van dit product is 100% recyclebaar, lever het
verpakkingsmateriaal gescheiden in.
4

1. VEILIGHEIDSVOORSCHRIFTEN
1. Lees eerst de gebruiksaanwijzing aandachtig en
geheel door voordat u het apparaat gaat gebruiken
en bewaar deze zorgvuldig voor latere raadpleging.
2. Gebruik dit apparaat uitsluitend voor de in de
gebruiksaanwijzing beschreven doeleinden.
3. Dit apparaat is uitsluitend geschikt voor
huishoudelijk gebruik.
4. Het apparaat mag gebruikt worden door kinderen
vanaf 8 jaar en ouder en door personen met
beperkte fysieke, zintuiglijke of mentale vermogens
of gebrek aan ervaring of kennis, wanneer zij
het apparaat onder toezicht gebruiken of zijn
geïnstrueerd over het veilige gebruik ervan en zij de
daaruit voortkomende gevaren begrijpen.
5. Kinderen mogen niet met het apparaat spelen.
6. Het apparaat mag niet door kinderen jonger dan
8 jaar worden gereinigd of onderhouden, tenzij dit
onder toezicht gebeurt.
7. Houd het apparaat en het snoer buiten bereik van
kinderen jonger dan 8 jaar.
8. Streng toezicht is noodzakelijk wanneer het
apparaat door of in de buurt van kinderen gebruikt
wordt.
9. Houd handen, voeten, loszittende kleding, haren en
dieren buiten bereik van de ronddraaiende borstel.
Dit om letsel te voorkomen aan bijvoorbeeld de huid,
ogen of oren.
10. Gebruik het apparaat niet buiten of op een natte
ondergrond of voor het opzuigen van vocht.
5

11. Zuig geen licht ontvlambare materialen op.
12. Zuig geen brandende materialen zoals sigaretten,
lucifers of as op.
13. Zorg er altijd voor dat het apparaat op een effen,
vlakke ondergrond staat en gebruik het uitsluitend
binnenshuis.
14. Gebruik alleen de originele oplader die geleverd
is bij het apparaat om de accu op te laden. De
technische details zijn te vinden op het typeplaatje
van het apparaat.
15. Wanneer het apparaat opgeladen wordt, moet het
apparaat uit staan.
16. Laad de accu niet op bij temperaturen boven 40°C
of beneden 5°C.
17. Statische elektriciteit: sommige soorten
vloerbedekking kunnen statisch geladen zijn. Een
ontlading van statische elektriciteit is niet gevaarlijk.
18. Gebruik het apparaat niet voor het reinigen van
dieren of mensen.
19. Dit apparaat is bedoeld voor huishoudelijk en
soortgelijk gebruik, zoals:
- in personeelkeukens, in winkels, kantoren en andere
werkomgevingen;
- door gasten in hotels, motels en andere residentiële
omgevingen;
- in Bed&Breakfast type omgevingen;
- boerderijen.
20. Let op: het apparaat mag niet worden gebruikt met
een externe timer of een aparte afstandsbediening.
6

21. Sluit het apparaat alleen aan op wisselstroom,
op een randgeaarde wandcontactdoos, met een
netspanning overeenkomstig met de informatie
aangegeven op het typeplaatje van het apparaat.
22. Het netsnoer nooit scherp buigen of over hete delen
laten lopen.
23. Gebruik het apparaat niet wanneer de oplader, het
snoer of het apparaat beschadigd is, of wanneer
het apparaat niet meer naar behoren functioneert
of wanneer het gevallen of op een andere manier
beschadigd is. Raadpleeg dan de winkelier
of onze klantenservice. In geen geval de stekker
van de oplader of het snoer zelf vervangen.
24. Het gebruik van accessoires die niet worden
aanbevolen of verkocht door Veripart, kan brand,
elektrische schokken of verwondingen veroorzaken.
25. De borstel en stofzuiger zijn speciaal ontworpen
voor gebruik op tapijt en harde vloeren. In
beperkte gevallen, en afhankelijk van de soort
vloer, kan het voorkomen dat er krassen ontstaan
aan het te stofzuigen oppervlak. Veripart is niet
verantwoordelijk voor schade ontstaan aan de vloer.
26. Indien het apparaat niet gebruikt wordt of
wanneer onderdelen of accessoires gemonteerd
of gedemonteerd moeten worden of wanneer het
apparaat gereinigd wordt, zet het apparaat geheel
uit.
27. Laat het apparaat niet onbeheerd achter indien het
apparaat in werking is.
28. Plaats het apparaat nooit in de buurt van apparaten
die warmte afgeven zoals ovens, gasfornuizen,
kookplaten, etc.
7

29. Wanneer het apparaat oneigenlijk gebruikt wordt
of het opvolgen van de instructies in de handleiding,
kan er bij eventuele defecten of ongelukken geen
aanspraak op schadevergoeding worden gemaakt
en vervalt het recht op garantie.
30. Het correct installeren en onderhouden van het
motorlter en het stofreservoir volgens de instructies
in de handleiding is nodig om defecten aan het
apparaat te voorkomen. Bij defecten ontstaan
door verkeerd gebruik of het niet plaatsen van het
stofreservoir en lters vervalt het recht op garantie.
31. Dompel het apparaat, de oplader, het snoer of de
stekker nooit onder in water.
32. Zorg ervoor dat kinderen het snoer of het apparaat
niet kunnen aanraken.
33. Laat het snoer niet over scherpe randen, warme
onderdelen of andere warmtebronnen hangen.
34. Niet aan het snoer c.q. het apparaat trekken om
de stekker uit de wandcontactdoos te halen. Het
apparaat of de oplader nooit met natte of vochtige
handen aanraken.
35. Als u besluit het apparaat, vanwege een defect, niet
langer te gebruiken, adviseren wij u, nadat u de
stekker uit de wandcontactdoos heeft verwijderd,
het snoer af te knippen.
8
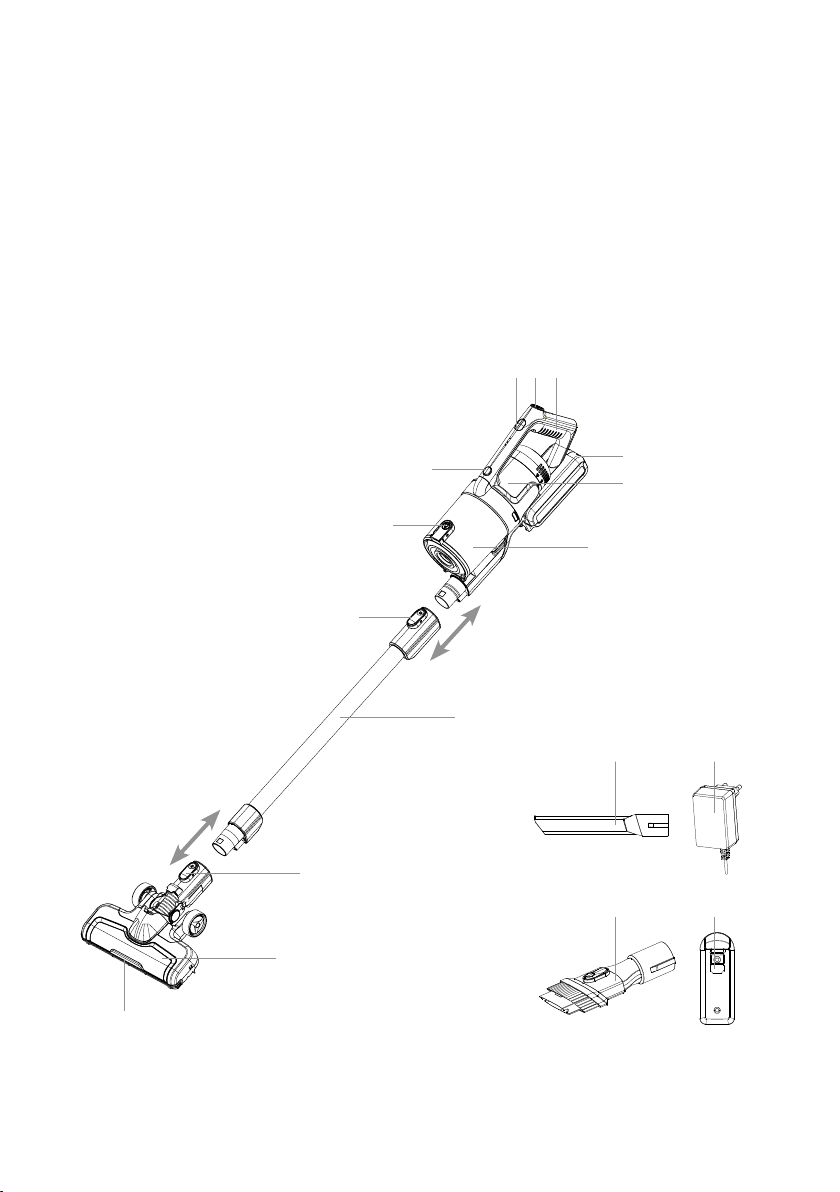
2. PRODUCTOMSCHRIJVING
1. Turboknop
2. Aan/ uit knop
3. Handgreep
4. Aansluiting voor de adapter
5. Motorbehuizing
6. Stofreservoir
7. Steel
8. Knop om de turboborstel los te koppelen
9. Turboborstel
12
11
10. LED verlichting
11. Knop om de steel los te koppelen
12. Knop om stofreservoir te openen
13. Knop om het stofreservoir los te koppelen
14. Kierenzuigmondstuk
15. Adapter
16. Combinatie-meubelzuigmondstuk
17. Ophangbeugel
1 2
3
13
7
4
5
6
1514
8
1716
9
10
9

3. VOOR HET EERSTE GEBRUIK
Voordat u de stofzuiger voor de eerste maal in gebruik neemt, dient u als volgt te
werk te gaan: pak de stofzuiger en alle accessoires voorzichtig uit en verwijder al het
verpakkingsmateriaal. De verpakking (plastic zakken en karton) buiten het bereik van
kinderen houden. Controleer na het uitpakken het apparaat zorgvuldig op uiterlijke schade,
mogelijk ontstaan tijdens transport. Plaats de stofzuiger op een stevige, droge en vlakke
ondergrond. Laad de accu van de stofzuiger voor het allereerste gebruik minimaal 5 uur op
met de adapter.
4. MONTAGE
Turboborstel monteren en demonteren
Houd de aansluiting van de turboborstel in lijn met de aansluiting van de steel en klik de twee
onderdelen aan elkaar vast.
Druk de knop in op de turboborstel om deze los te koppelen.
Steel monteren en demonteren
Houd de aansluiting van de steel in lijn met de zuigmond van de stofzuiger en klik de twee
onderdelen stevig aan elkaar vast. Druk de knop in om de stofzuiger weer los te koppelen.
Het opladen van de stofzuiger
Steek de connector van de adapter in de aansluiting op de achterkant van de accu.
Steek de adapter in het stopcontact. Zodra de adapter aangesloten is op een stopcontact zal
de stofzuiger opladen.
De indicatieverlichting gaat aan en kleurt lampje voor lampje wit.
Als de accu van de stofzuiger helemaal leeg is, zal het opladen ongeveer 4 - 6 uur duren.
Wanneer de accu volledig opgeladen is, zullen de twee acculampjes continue branden. Om
stroom te besparen, gaat de indicatieverlichting na 3 tot 5 minuten uit, nadat de stofzuiger
volledig is opgeladen.
Verwijder altijd de adapter uit het stopcontact wanneer de accu volledig opgeladen is. Het is
normaal dat de adapter warm wordt als deze in het stopcontact zit.
TIPS
• Een volledig compleet opgeladen accu zorgt voor een gebruiksduur van:
- ca. 20 minuten op de normale stand
- ca. 10 minuten op de turbo stand
- ca. 60 minuten op de lage stand
• Wij adviseren de accu minimaal een keer per maand helemaal op te gebruiken en daarna
volledig op te laden. Dit bevordert de levensduur van de accu.
Waarschuwing! Sluit het apparaat nooit met natte of vochtige handen aan de adapter.
Waarschuwing! Raak de ronddraaiende borstel van de turboborstel niet aan als de stofzuiger
aan is.
Waarschuwing! Gebruik alleen de originele bijgeleverde oplader om de stofzuiger op te
laden. Andere opladers kunnen het apparaat schade toebrengen en zelfs gevaarlijk zijn.
10

5. GEBRUIK
De stofzuiger aan en uit zetten
• Druk op de aan/ uit knop op de handgreep om de stofzuiger aan te zetten. De
stofzuiger zal op de normale stand functioneren.
• Druk op de turbo knop om de turbo stand te activeren.
• Druk nogmaals op de turbo knop om de stofzuiger te gebruiken op de laagste stand.
• Druk op de aan/uit knop om de stofzuiger uit te zetten.
De turboborstel gaat automatisch draaien zodra de stofzuiger aangezet wordt. De
turboborstel is voorzien van LED verlichting.
De stofzuiger gebruiken als kruimelzuiger
De stofzuiger kan ook gebruikt worden als kruimelzuiger om bijvoorbeeld meubels of
autostoelen te reinigen. Demonteer de steel en plaats een van de accessoires op de
zuigmond van de stofzuiger.
De kruimelzuiger kan gebruikt worden met de turboborstel, de kierenzuigmond of de
combinatie-borstelzuigmond.
• Druk op de aan/ uit knop
stofzuiger zal op de normale stand functioneren.
• Druk op de turbo knop om de turbo stand te activeren.
• Druk nogmaals op de turbo knop om de stofzuiger te gebruiken op de laagste stand.
• Druk op de aan/uit knop om de stofzuiger uit te zetten.
De combinatie-borstelzuigmond kan op twee wijzen gebruikt worden: mét borstel of zonder
borstel.
Hang de stofzuiger na elk gebruik terug op de ophangbeugel. Zodra de adapter
aangesloten is op een stopcontact en de connector in de aansluiting van de stofzuiger
gestoken is, zal de accu opladen. Wanneer de accu volledig is opgeladen, verwijder de
adapter uit het stopcontact en uit het apparaat.
op de handgreep om de stofzuiger aan te zetten. De
11

6. ONDERHOUD
Controleer de lters regelmatig om problemen te voorkomen. Leeg het stofreservoir
wanneer deze vol is en reinig of vervang de lters wanneer ze vies zijn.
Het legen van het stofreservoir
Het wordt aanbevolen het stofreservoir na elk gebruik te legen. Het
stofreservoir zit vol als de hoeveelheid vuil de max-lijn heeft bereikt.
Verwijder eerst de accessoires voordat u het stofreservoir leegt.
• Houd de stofzuiger boven een afvalbak en klik het deksel van het
stofreservoir los.
• Het deksel valt open. Schud het stofreservoir rustig leeg in de
afvalbak en sluit het deksel met een klik.
Het reinigen van het cycloonsysteem
Verwijder eerst de accessoires en leeg het stofreservoir voordat u de stofzuiger gaat
reinigen. Reinig de lters en het cycloonsysteem eens per 4 legingen van het stofreservoir.
• Druk op de knop om het stofreservoir los te maken en verwijder
het stofreservoir van de stofzuiger.
• Het hele stofreservoir komt los van de stofzuiger. Let op dat u het
stofreservoir rechtop houdt om te voorkomen dat het lter en het
cycloonsysteem er uit vallen.
• Neem het lter (a) en het cycloonsysteem (b en c) uit het
stofreservoir.
• Reinig het lter en het cycloonsysteem met lauwwarm stromend
water en laat de onderdelen aan de lucht drogen. Gebruik geen
reinigingsmiddelen of borstels. Let op dat het lter mogelijk na
het reinigen zijn oorspronkelijke kleur niet terug krijgt. Deze
verkleuring heeft echter geen invloed op de werking.
• Het cycloonsysteem bestaat uit twee delen (b en c). Om het
cycloonsysteem grondig te reinigen, kunt u het cycloonsysteem
uit elkaar nemen. Reinig de onderdelen met lauwwarm stromend
water. Gebruik geen reinigingsmiddelen of borstels. Laat de
onderdelen aan de lucht drogen.
• Zet de onderdelen weer in elkaar als alles volledig droog is en
plaats ze in de omgekeerde volgorde in het stofreservoir. Let op:
het cycloonsysteem past maar op een manier in het stofreservoir.
• Klik het stofreservoir goed vast aan de stofzuiger.
a
b
c
Het reinigen van het HEPA lter
• Klik de afdekkap (d) van de luchtuitlaat los en verwijder deze.
• Neem het HEPA van de motor en verwijder het HEPA lter.
• Reinig het HEPA lter met lauwwarm stromend water en laat
het lter gedurende 24 uur aan de lucht drogen. Gebruik geen
reinigingsmiddelen of borstels.
• Plaats het HEPA lter pas terug als deze volledig droog is of plaats
een nieuw HEPA lter.
• Plaats de afdekkap terug. Let erop dat deze goed vastgeklikt zit.
12
d

Attentie
• Gebruik de stofzuiger alleen als alle lters geplaatst zijn. Als dit niet het geval is, kan dit
de zuigkracht verminderen of schade aan de motor veroorzaken.
• Gescheurde of niet goed sluitende lters kunnen schade veroorzaken aan de motor. Als
een lter defect is, moet deze vervangen worden door een nieuw origineel exemplaar.
Het reinigen van de turboborstel
In de ronddraaiende borstel kunnen haren en/of ander vuil
achterblijven. Reinig de turboborstel daarom regelmatig voor
optimaal gebruik van de stofzuiger.
• Zorg dat de stofzuiger uit staat en koppel de turboborstel los van
de stofzuiger.
• Ontgrendel het lipje aan de onderkant van de turboborstel met
een muntje of platte schroevedraaier.
• Klap het lipje omhoog.
• Trek nu voorzichtig de borstel omhoog uit de turboborstel.
• Knip of snijd voorzichtig verstrikte draden of haren los van de
borstel.
• Reinig de borstel met lauwwarm stromend water en laat de borstel
aan de lucht drogen.
• Plaats de borstel terug in de turboborstel.
• Klap het lipje dicht en draai deze met een muntje of platte
schroevedraaier op slot.
Opbergen
Hang de stofzuiger na elk gebruik terug op de ophangbeugel. Zodra de adapter
aangesloten is op een stopcontact en de connector in de aansluiting van de stofzuiger
gestoken is, zal de accu opladen. Wanneer de accu volledig is opgeladen, verwijder de
adapter uit het stopcontact en uit het apparaat.
HET BEVESTIGEN VAN DE OPHANGBEUGEL
Bevestig de ophangbeugel met behulp van de schroeven en plugggen aan de muur op een
plek waar ook een stopcontact in de buurt zit voor de adapter.
• Houd de ophangbeugel tegen de muur op de gewenste positie.
• Teken de twee schroefgaten af met een potlood op de muur.
• Boor met een boor twee gaten op de markeringen van minstens 4 cm diep.
• Duw de pluggen in de gaten.
• Plaats de ophangbeugel op de muur en schroef deze vast met de schroeven.
13

TECHNICAL DATA
TYPE NUMBER
Vacuum cleaner VPSS101
Voltage 25,2V
Input 100-240V~ 50-60 Hz 0,5A Max
Output 25,0V - 0,5A 12,5W
29,0V - 0,5A 14,5 W
Recycling
This symbol means that this product should not be disposed of with regular household
waste (2012/19/EU). Observe the rules that apply in your country for the separated
collection of electric and electronic products. Correct disposal of the product prevents
negative consequences for the environment and for public health. The packaging
material of this product can be recycled 100%, return packaging material separately.
14

1. SAFETY INSTRUCTIONS
1. First carefully read the instruction manual in full
prior to using the appliance and store the manual in
a safe place for future reference.
2. Only use this appliance for the purposes described
in the instruction manual.
3. This appliance is only suitable for household use.
4. The appliance may be used by children of 8 years
and older and persons with a limited physical,
sensory or mental capacity or lack of experience or
knowledge, provided they use the appliance under
supervision or have been instructed about its safe use
and understand the hazards involved.
5. Children must not play with the appliance.
6. The appliance may not be cleaned or maintained by
children younger than 8 years of age, unless this is
done under supervision.
7. Keep the appliance and cable out of reach of
children younger than 8 years of age.
8. Strict supervision is required if the appliance is used
by or near children.
9. Keep hands, feet, loose-tting clothes, hair and
animals out of reach of the rotating brush. This is to
prevent injury to skin, eyes or ears, for example.
10. Do not use the appliance outdoors or on a wet
surface and do not use it for picking up moisture.
11. Do not pick up lightly ammable materials.
12. Do not pick up burning materials such as cigarettes,
matches or ash.
13. Always make sure the appliance is placed on an
even, at surface and is only used indoors.
15

14. Only use the original charger provided with the
appliance for charging the battery. The technical
details can be found on the information plate of the
appliance.
15. When the appliance is being charged, it must be in
the off position.
16. Do not charge the battery at temperatures above
40°C or below 5°C.
17. Static electricity: some types of oor covering
can be statically charged. A discharge of static
electricity is not dangerous.
18. Do not use the appliance for cleaning animals or
people.
19. This appliance is intended for household and similar
use, such as:
- in staff kitchens, shops, ofces and other work
environments;
- by guests of hotels, motels and other residential
environments;
- in Bed&Breakfast type environments;
- farms.
20. Caution: the appliance may not be used with an
external timer or a separate remote control.
21. Only connect the appliance to alternate current, to
an earthed wall socket, with a mains voltage that
corresponds with the information provided on the
information plate of the appliance.
22. Never bend the power cord sharply or allow it to run
across hot parts.
16

23. Do not use the appliance if the charger, cord or
appliance are damaged, or if the appliance no
longer functions properly or if it is damaged in any
other way. In that case, consult the shop or our
customer service. Never replace the charger’s plug
or cord yourself.
24. The use of accessories not recommended or sold by
Veripart may cause re, electrical shocks or injuries.
25. The brush and vacuum cleaner were specially
designed for use on carpets and hard oors. In
rare cases, and depending on the type of oor, it
is possible that scratches are made in the surface
to be cleaned. Veripart is not responsible for any
damage made on the oor.
26. If the appliance is not being used or if parts or
accessories must be mounted or removed or if the
appliance is being cleaned, fully switch off the
appliance and remove the plug from the socket.
27. Do not leave the appliance unsupervised if the
appliance is operational.
28. Never place the appliance near appliances that
give off heat, such as ovens, gas cookers, hotplates,
etc.
29. If the appliance is not used as intended or if the
instructions in the manual are not observed, no
compensation can be claimed in case of defects or
accidents and the warranty will be invalidated.
30. Correct installation and maintenance of the motor
lter and dust reservoir in accordance with the
instructions in the manual is necessary to prevent
defects in the appliance. In case of defects caused
by incorrect use or not placing the dust reservoir
and lters, the warranty becomes invalid.
17

31. Never submerge the appliance, charger, cord or
plug in water.
32. Make sure that children are unable to touch the
cable or appliance.
33. Do not allow the cable to run over sharp edges, hot
components or other sources of heat.
34. Do not pull the cord and/or appliance to remove the
plug from the wall socket. Never touch the charger
or the appliance with wet or damp hands.
35. If you decide to cease using the appliance due to
a defect, we recommend cutting off the cord of the
charger after removing the plug from the wall socket.
18

2. PRODUCT DESCRIPTION
1. Turbo button
2. On/ off switch
3. Handle
4. Connection for adapter
5. Motor casing
6. Dust reservoir
7. Stick
8. Knob for disconnecting the turbo brush
9. Turbo brush
12
11
10. LED lights
11. Knob for disconnecting the stick
12. Knob for opening the dust reservoir
13. Knob for disconnecting the dust reservoir
14. Crack nozzle
15. Adapter
16. Combination furniture nozzle
17. Suspension bracket
1 2
3
13
7
4
5
6
1514
19
8
1716
9
10

3. PRIOR TO FIRST USE
Follow these instructions when using the vacuum cleaner for the rst time: carefully remove
the vacuum cleaner and all accessories from the packaging and remove all packaging
material. Keep the packaging (plastic bags and cardboard) out of reach of children. After
unpacking the appliance, carefully check it for external damage that may have occurred
during transport. Place the vacuum cleaner on a sturdy, dry and at surface. Prior to using
the vacuum cleaner for the very rst time, charge the battery for at least 5 hours on the
adapter.
4. ASSEMBLY
Mounting and removing the turbo brush
Hold the connection of the turbo brush in line with the connection of the stick and connect
both parts in such a way that they snap in place.
Press the knob on the stick to disconnect the turbo brush.
Mounting and removing the stick
Hold the connection of the stick in line with the connection of the vacuum cleaner and connect
both parts in such a way that they snap in place. Press the knob to disconnect the vacuum
cleaner again.
Charging the vacuum cleaner
Insert the connector of the adapter into the connection on the back of the battery.
Insert the adapter into the socket. Once the adapter is connected to a socket, the vacuum
cleaner is being charged.
The indicator lighting switches on and the LED’s turn white one at a time.
If the battery of the vacuum cleaner is totally empty, charging takes approximately 4-6 hours.
When the battery is fully charged, all LEDs light up continuously. In order to save power, the
indicator lighting switches off after 3 to 5 minutes, once the vacuum cleaner is fully charged.
Always remove the adapter from the socket once the battery is fully charged. It is normal for
the adapter to become warm when it is connected to the socket.
TIPS
• A fully charged battery has a usage time of:
- approx. 20 minutes in normal mode
- approx. 10 minutes in turbo mode
- approx. 60 minutes in low mode.
• We recommend fully using up the battery at least once per month and then fully charging
it. This is benecial to the battery’s life span.
Warning! Never connect the appliance to the adapter with wet or damp hands.
Warning! Do not make contact with the rotating brush of the turbo brush when the vacuum
cleaner is on.
Warning! Only use the originally provided charger to charge the vacuum cleaner. Other
chargers could damage the appliance and can even be dangerous.
20

5. USE
Switching the vacuum cleaner on and o
• Press the on/off button on the handle to switch on the vacuum cleaner. The vacuum
cleaner will function in normal mode.
• Press the turbo button to activate the turbo mode.
• Press the turbo button again to set the vacuum cleaner to the lowest mode.
• Press the on/off button to switch off the vacuum cleaner.
The turbo brush starts to rotate automatically when the vacuum cleaner is switched on. The
turbo brush has been provided with LED lighting.
Using the vacuum as a handheld vacuum cleaner
The vacuum cleaner can also be used as a handheld vacuum cleaner, in order to clean
furniture or car seats for instance. Remove the stick and place one of the accessories on the
nozzle of the vacuum cleaner.
The handheld vacuum cleaner can be used with the turbo brush, crack nozzle or combination
brush nozzle.
• Press the on/off button
cleaner will function in normal mode.
• Press the turbo button to activate the turbo mode.
• Press the turbo button again to set the vacuum cleaner to the lowest mode.
• Press the on/off button to switch off the vacuum cleaner.
The combination brush nozzle can be used in two ways: with or without a brush.
After each use, place the vacuum cleaner back on the suspension bracket. Once the adapter
is connected and the connector is inserted into the connection of the vacuum cleaner, the
battery will charge. Once the battery is fully charged, remove the adapter from the socket
and the appliance.
on the handle to switch on the vacuum cleaner. The vacuum
21

6. MAINTENANCE
Regularly check the lters to prevent problems. Empty the dust reservoir when it is full and
clean or replace the lters when they are dirty.
Emptying the dust reservoir
It is recommended emptying the dust reservoir after each use. The
dust reservoir is full when the amount of dirt has reached the max
line. Remove the accessories prior to emptying the dust reservoir.
• Hold the vacuum cleaner above a waste bin and open the cover of
the dust reservoir by pressing the knob.
• The cover falls open. Gently shake the dust reservoir empty into
the waste bin and close the cover in such a way that it snaps in
place.
Cleaning the cyclone system and lters
First remove the accessories and empty the dust reservoir before cleaning the vacuum
cleaner. Clean the lters and cyclone system after each 4th time that the dust reservoir is
emptied.
• Press the knob to disconnect the dust reservoir and remove the dust
reservoir from the vacuum cleaner.
• The entire dust reservoir comes away from the vacuum cleaner.
Make sure you hold the dust reservoir upright to prevent the lter
and cyclone system from falling out.
• Remove the lter (a) and cyclone system (b and c) from the dust
reservoir.
• Clean the lter and cyclone system with lukewarm running water
and allow the components to dry in the air. Do not use cleaning
agents or brushes. It is possible that the lter does not return to its
original colour after cleaning. This discolouration does not have an
effect on its function.
• The cyclone system consists of two parts (b and c). In order to
clean the cyclone system thoroughly, you can dismantle the
cyclone system. Clean the parts with lukewarm running water. Do
not use cleaning agents or brushes. Allow the parts to dry in the
air.
• Re-assemble all parts when everything is fully dry and place them
back in the dust reservoir in reverse order.
Caution: the cyclone system ts in the dust reservoir in only one way.
• Properly connect the dust reservoir to the vacuum cleaner and make sure it snaps in place.
a
b
c
Cleaning the HEPA lter
• Unscrew the cover (d) of the air outlet and remove it.
• Remove the HEPA lter from the motor.
• Clean the HEPA lter with lukewarm owing water and allow the
lter to dry in the air for 24 hours. Do not use cleaning agents or
brushes.
• Only place the HEPA lter back once it is fully dry, or place a new
HEPA lter.
22
d

• Place back the cover. Make sure it is properly attached.
Attention
• Only use the vacuum cleaner when all lters have been placed. If not, the suction power
could be reduced or the motor could be damaged.
• Torn or not properly sealing lters could damage the motor. When a lter is defective, it
must be replaced by a new original lter.
Cleaning the turbo brush
Hair and/or other dirt can remain in the rotating brush. Therefore,
regularly clean the turbo brush for an optimum use of the vacuum
cleaner.
• Make sure the vacuum cleaner is off and disconnect the turbo
brush from the vacuum cleaner.
• Unlock the catch at the bottom of the turbo brush with a coin or
at screwdriver.
• Fold out the catch.
• Now carefully pull the brush out of the turbo brush.
• Carefully cut the entangled threads or hairs from the brush.
• Clean the brush with lukewarm running water and allow the brush
to dry in the air.
• Place the brush back in the turbo brush.
• Fold in the catch and rotate it to the locked position with a coin or
at screwdriver.
Storage
After each use, place the vacuum cleaner back on the suspension bracket. Once the adapter
is connected and the connector is inserted into the connection of the vacuum cleaner, the
battery will charge. Once the battery is fully charged, remove the adapter from the socket
and the appliance.
ATTACHING THE SUSPENSION BRACKET
Use screws and plugs to attach the suspension bracket to the wall on a location near a socket
for the adapter.
• Hold the suspension bracket against the wall at the required position.
• Demarcate the two screw holes on the wall using a pencil.
• Use a drill to make two holes of at least 4 cm deep on the marks.
• Insert the plugs in the holes.
• Place the suspension bracket on the wall and fasten it with the screws.
23

DONNÉES TECHNIQUES
TYPE NUMÉRO DE TYPE
Aspirateur VPSS101
Voltage 25,2V
Donnée d’entrée 100-240V~ 50-60 Hz 0,5A Max
Donnée de sortie 25,0V - 0,5A 12,5W
29,0V - 0,5A 14,5 W
Recyclage
Ce symbole signie que ce produit ne peut pas être jeté avec les déchets ménagers
ordinaires (2012/19/UE). Veuillez suivre les règles en vigueur dans votre pays
concernant la collecte sélective des produits électriques et électroniques. La mise
au rebut adéquate du produit permet d’éviter des conséquences négatives pour
l’environnement et la santé publique. Le matériel d’emballage de ce produit est
100 % recyclable ; veuillez donc l’éliminer séparément.
24

1. CONSIGNES DE SÉCURITÉ
1. Lisez attentivement et entièrement le mode d’emploi
avant d’utiliser l’appareil pour la première fois, et
conservez-le soigneusement pour une consultation
future.
2. Utilisez cet appareil uniquement aux ns décrites
dans ce mode d’emploi.
3. Cet appareil est uniquement destiné à un usage
domestique.
4. L’appareil peut être utilisé par les enfants à partir
de 8 ans et plus, et par les personnes ayant des
capacités physiques, sensorielles ou mentales réduites
ou un manque d’expérience et de connaissances, à
condition qu’elles utilisent l’appareil sous surveillance
ou qu’elles aient reçu des instructions concernant son
utilisation en toute sécurité et qu’elles comprennent
les dangers encourus.
5. Les enfants ne doivent pas jouer avec l’appareil.
6. L’appareil ne doit pas être nettoyé ni entretenu
par des enfants âgés de moins de 8 ans, sauf sous
surveillance.
7. Tenir l’appareil et le câble d’alimentation hors de
portée des enfants de moins de 8 ans.
8. Une surveillance accrue est requise lorsque cet
appareil est utilisé par ou à proximité des enfants.
9. Maintenez les mains, pieds, vêtements lâches,
cheveux et animaux hors de portée de la brosse
en rotation, ceci an de prévenir toute blessure au
niveau de la peau, des yeux ou des oreilles
par exemple.
25

10. N’utilisez pas l’appareil à l’extérieur ou sur une
surface humide, et n’utilisez pas l’appareil pour
aspirer du liquide.
11. N’aspirez pas de matériaux inammables.
12. N’aspirez pas de matériaux en combustion comme
des cigarettes, des allumettes ou des cendres.
13. Veillez à toujours poser l’appareil sur une surface
égale et plane, et à l’utiliser exclusivement à
l’intérieur.
14. Pour recharger la batterie, utilisez uniquement
le chargeur d’origine fourni avec l’appareil. Les
détails techniques sont indiqués sur la plaque
signalétique de l’appareil.
15. Lorsqu’il est en charge, l’appareil doit être arrête.
16. Ne rechargez pas la batterie en cas de
températures supérieures à 40°C ou inférieures à
5°C.
17. Électricité statique : certains types de revêtement de
sol peuvent être chargés d’électricité statique. Une
décharge d’électricité statique n’est pas dangereuse.
18. N’utilisez pas l’appareil pour nettoyer des animaux
ou des humains.
19. Cet appareil est destiné à un usage domestique et
analogue, par exemple :
- dans les cuisines destinées au personnel, dans les
magasins, bureaux et autres environnements de
travail ;
- par des clients dans les hôtels, motels et autres
environnements résidentiels ;
- dans les environnements de type chambre d’hôte ;
- dans les fermes.
20. Attention : l’appareil ne doit pas être utilisé avec
une minuterie externe ou une télécommande séparée.
26

21. Branchez l’appareil uniquement sur du courant
alternatif, dans une prise de courant murale mise à
la terre, avec une tension de secteur correspondant
à celle indiquée sur la plaque signalétique de
l’appareil.
22. Le câble d’alimentation ne doit jamais être plié de
manière trop serrée ou entrer en contact avec des
parties chaudes.
23. N’utilisez pas l’appareil si le chargeur, le câble
d’alimentation ou l’appareil est endommagé, ou si
l’appareil ne fonctionne plus correctement ou s’il est
tombé ou endommagé d’une autre manière. Dans
ce cas, consultez le revendeur ou notre service
clientèle. Ne remplacez en aucun cas la che du
chargeur ou le câble d’alimentation vous-même.
24. L’utilisation d’accessoires non recommandés ou non
vendus par Veripart, peut provoquer un incendie,
une électrocution ou des blessures.
25. La brosse et l’aspirateur sont spécialement conçus
pour une utilisation sur de la moquette ou des sols
durs. Dans de rares cas, et en fonction du type de
sol, il peut arriver que des rayures apparaissent sur
la surface à aspirer. Veripart n’est pas responsable
pour les dommages occasionnés au sol.
26. Si vous n’utilisez pas l’appareil ou si vous montez
ou démontez des accessoires, ou encore lorsque
vous le nettoyez, arrêtez totalement l’appareil et
retirez la che de la prise de courant.
27. Ne laissez jamais l’appareil sans surveillance
lorsqu’il fonctionne.
28. Ne placez jamais l’appareil près d’équipements
produisant de la chaleur comme les fours,
cuisinières à gaz, plaques de cuisson, etc.
27

29. L’utilisation impropre de l’appareil ou le non-respect
des instructions du mode d’emploi annule tout droit
à une indemnisation en cas d’éventuels défauts ou
accidents et annule la garantie.
30. Il est nécessaire d’installer correctement et d’entretenir
le ltre moteur et le réservoir à poussières suivant
les instructions du mode d’emploi pour éviter
d’endommager l’appareil. Lorsque des dommages
sont causés par une mauvaise utilisation ou une
installation incorrecte du réservoir à poussières pour
aspirateur, la garantie est caduque.
31. N’immergez jamais l’appareil, le chargeur, le câble
d’alimentation ou la che dans l’eau.
32. Veillez à ce que les enfants ne puissent pas toucher
le câble d’alimentation ni l’appareil.
33. Ne laissez pas pendre le câble d’alimentation sur
des arêtes vives, des éléments chauds ou d’autres
sources de chaleur.
34. Ne tirez pas sur le câble d’alimentation ou sur
l’appareil pour retirer la che de la prise de
courant murale. Ne touchez jamais l’appareil ou le
chargeur avec les mains mouillées ou humides.
35. Si vous décidez de ne plus utiliser l’appareil en
raison d’un défaut, nous vous conseillons de retirer
la che de la prise murale et de couper le câble du
chargeur d’alimentation.
28

2. DESCRIPTION DU PRODUIT
1. Bouton turbo
2. Bouton marche/ arrêt
3. Poignée
4. Raccord pour l’adapteur
5. Carter du moteur
6. Réservoir à poussières
7. Manche
8. Bouton pour désaccoupler la brosse turbo
9. Brosse turbo
10. Éclairage LED
12
11
11. Bouton pour désaccoupler le manche
12. Bouton pour vider le réservoir à
poussières
13. Bouton pour désaccoupler le réservoir à
poussières
14. Embout suceur
15. Adapteur
16. Suceur pour meubles combiné
17. Dispositif de suspension
1 2
3
13
7
4
5
6
1514
29
8
1716
9
10

3. AVANT LA PREMIERE UTILISATION
Avant d’utiliser l’aspirateur pour la première fois, vous devez procéder comme suit : déballez
l’aspirateur avec précaution et retirez tous les emballages. Conservez le matériel d’emballage
(sacs en plastique et carton) hors de portée des enfants.
Après l’avoir déballé, vériez scrupuleusement si l’appareil n’a pas été endommagé
(dommages apparents) pendant le transport. Placez l’aspirateur sur une surface plane, sèche
et solide. Chargez la batterie de l’aspirateur pendant minimum 5 heures avec l’adaptateur
avant la première utilisation.
4. MONTAGE
Monter et démonter la brosse turbo
Alignez le raccord de la brosse turbo avec celui du manche et emboîtez fermement les deux
pièces.
Appuyez sur le bouton situé sur le tube pour désaccoupler la brosse turbo.
Monter et démonter le manche
Alignez le raccord du manche avec celui suceur de l’aspirateur et emboîtez fermement les
deux pièces. Appuyez sur le bouton pour désaccoupler de nouveau l’aspirateur.
La mise en charge de l’aspirateur
Enfoncez le connecteur de l’adaptateur dans le raccord situé sur le côté de l’aspirateur.
Branchez l’adaptateur dans la prise de courant. L’aspirateur commencera à charger dès que
l’adaptateur est branché sur une prise de courant.
Le témoin lumineux s’allume en blanc, lampe par lampe.
Lorsque la batterie de l’aspirateur est complètement vide, la charge dure environ 4-6 heures.
Lorsque la batterie est complètement chargée, les quatre lampes sont allumées en blanc en
continu. An d’économiser de l’énergie, le témoin lumineux s’éteint au bout de 3 à 5 minutes,
une fois que l’aspirateur est totalement chargé.
Retirez toujours l’adaptateur de la prise de courant lorsque la batterie est complètement
chargée. Il est normal que l’adaptateur devienne chaud lorsqu’il se trouve inséré dans la
prise de courant.
CONSEILS
• Une batterie pleinement rechargée permet une durée d’utilisation :
- d’environ 20 minutes sur la position normale
- d’environ 10 minutes en mode turbo.
- d’environ 60 minutes en mode bas
• Nous vous conseillons de décharger complètement la batterie et de la faire recharger
totalement une fois par mois. Cela favorise la longévité de la batterie.
Avertissement ! Ne raccordez jamais l’appareil à l’adaptateur avec des mains mouillées ou
humides.
Avertissement ! Ne touchez pas la brosse rotative de la brosse turbo lorsque l’aspirateur est
allumé.
Avertissement ! Utilisez uniquement le chargeur d’origine fourni pour faire charger
l’aspirateur. D’autres chargeurs peuvent endommager l’appareil et même être dangereux.
30

5. UTILISATION
Mise en marche et arrêt de l’aspirateur
• Appuyez sur le bouton de marche/arrêt sur la poignée, pour mettre en marche
l’aspirateur. L’aspirateur va fonctionner sur la position normale.
• Appuyez sur le bouton turbo pour utiliser l’aspirateur au réglage le mode turbo.
• Appuyez à nouveau sur le bouton turbo pour utiliser l’aspirateur au réglage le plus bas.
• Appuyez sur le bouton de marche/arrêt pour arrêter l’aspirateur.
La brosse turbo se met automatiquement en marche dès que l’aspirateur est allumé. La brosse
turbo est pourvue d’un éclairage LED.
Utilisation de l’aspirateur comme aspire-miettes
L’aspirateur peut également être utilisé comme aspire-miettes pour nettoyer des meubles ou
des sièges de voiture, par exemple. Démontez le manche 4 et placez un des accessoires sur
l’embout de l’aspirateur.
L’aspirateur peut être utilisé avec la brosse turbo, le suceur plat ou la combinaison
suceur-brosse.
• Appuyez sur le bouton de marche/arrêt
l’aspirateur. L’aspirateur va fonctionner sur la position normale.
• Appuyez sur le bouton turbo pour utiliser l’aspirateur au réglage le mode turbo.
• Appuyez à nouveau sur le bouton turbo pour utiliser l’aspirateur au réglage le plus bas.
• Appuyez sur le bouton de marche/arrêt pour arrêter l’aspirateur.
La combinaison suceur-brosse peut être utilisée de deux façons : avec ou sans brosse.
Après chaque utilisation, suspendez de nouveau l’aspirateur au dispositif de suspension. La
batterie se met en charge dès que l’adaptateur est raccordé à une prise de courant et que
le connecteur est inséré dans le raccord de l’aspirateur. Lorsque la batterie est complètement
chargée, retirez l’adaptateur de la prise de courant et de l’appareil.
sur la poignée, pour mettre en marche
31

6. ENTRETIEN
Vériez régulièrement les ltres pour éviter les problèmes. Videz le réservoir à poussières
lorsqu’il est plein, et nettoyez ou remplacez les ltres lorsqu’ils sont sales.
Vidage du réservoir à poussières
Il est recommandé de vider le réservoir à poussières après chaque
utilisation. Le réservoir à poussières est plein lorsque la quantité de
saleté a atteint la ligne de maximum. Retirez d’abord les accessoires
avant de vider le réservoir à poussières.
• Tenez l’aspirateur au-dessus d’une poubelle et appuyez sur le
bouton pour ouvrez le couvercle du réservoir à poussières.
• Le couvercle s’ouvre. Secouez le réservoir à poussières au-dessus
de la poubelle pour le vider et refermez le couvercle en appuyant
dessus.
Le nettoyage du système cyclonique et des ltres
Retirez d’abord les accessoires et videz le réservoir à poussières avant d’entamer le
nettoyage de l’aspirateur. Nettoyez les ltres et le système cyclonique après 4 vidages du
réservoir à poussières.
• Appuyez sur le bouton pour détacher le réservoir à poussières et
retirez le réservoir à poussières de l’aspirateur.
• L’ensemble du réservoir à poussières se détache de l’aspirateur.
Veillez à tenir droit le réservoir à poussières an d’éviter que le
ltre et le système cyclonique se détachent et tombent.
• Retirez du réservoir à poussières le ltre (a) et le système
cyclonique (b et c).
• Nettoyez le ltre et le système cyclonique à l’eau courante tiède
et laissez sécher les éléments à l’air libre. N’utilisez pas de
détergents ni de brosses. Sachez qu’après le nettoyage, le ltre
peut ne pas récupérer sa couleur d’origine. Cette décoloration n’a
toutefois aucune incidence sur son fonctionnement.
• Le système cyclonique se compose de deux éléments (b et c). Pour
nettoyer à fond le système cyclonique, vous pouvez désassembler
le système. Nettoyez les éléments à l’eau courante tiède. N’utilisez
pas de détergents ni de brosses. Laissez les éléments sécher à l’air.
• Lorsque tout est complètement sec, réassemblez les éléments et
placez-les dans l’ordre inverse dans le réservoir à poussières.
Attention : le système cyclonique ne peut être installé que d’une
seule manière dans le réservoir à poussières.
• Enclenchez fermement le réservoir à poussières sur l’aspirateur.
Le nettoyage du ltre HEPA
• Cliquez sur la couverture (d) de la prise d’air et retirez-la.
• Retirez le ltre HEPA.
• Nettoyez le ltre HEPA à l’eau courante tiède et laissez sécher le
ltre à l’air pendant 24 heures. N’utilisez pas de détergents ni de
brosses.
a
b
c
d
32

• Réinstallez le ltre HEPA uniquement s’il est complètement sec ou insérer un nouveau ltre
HEPA.
• Replacez la couverture. Veillez à ce que celle-ci soit bien clipsée.
Attention
• N’utilisez l’aspirateur que lorsque tous les ltres y ont été installés. Si ce n’est pas le cas,
cela peut réduire la puissance d’aspiration ou endommager le moteur.
• Des ltres déchirés ou ne fermant pas correctement peuvent endommager le moteur. Si un
ltre est défectueux, vous devez le remplacer par un nouvel exemplaire d’origine.
Nettoyage de la brosse turbo
Des cheveux ou d’autres saletés peuvent rester coincés dans la
brosse rotative. Par conséquent, nettoyez régulièrement la brosse
turbo pour garantir un fonctionnement optimal de l’aspirateur.
• Assurez-vous que l’aspirateur est bien éteint et détachez la brosse
turbo de l’aspirateur.
• Déverrouillez la languette sur la partie inférieure de la brosse
turbo, à l’aide d’une pièce ou d’un tournevis plat.
• Relevez la languette.
• Tirez ensuite délicatement la brosse vers le haut, hors de la brosse
turbo. Coupez avec précaution les ls ou cheveux emmêlés dans
la brosse.
• Nettoyez la brosse à l’eau courante tiède et laissez-la sécher à
l’air libre.
• Replacez ensuite la brosse dans la brosse turbo.
• Refermez la languette et verrouillez-la à l’aide d’une pièce ou d’un
tournevis plat.
Rangement
Après chaque utilisation, suspendez de nouveau l’aspirateur au dispositif de suspension. La
batterie se met en charge dès que l’adaptateur est raccordé à une prise de courant et que
le connecteur est inséré dans le raccord de l’aspirateur. Lorsque la batterie est complètement
chargée, retirez l’adaptateur de la prise de courant et de l’appareil.
LA FIXATION DU DISPOSITIF DE SUSPENSION
Fixez le dispositif de suspension au mur à l’aide des vis et des chevilles à un endroit situé à
proximité d’une prise de courant pour l’adaptateur.
• Tenez le dispositif de suspension contre le mur à l’endroit souhaité.
• Marquez les deux trous de vis à l’aide d’un crayon sur le mur.
• Percez deux trous d’au moins 4 cm de profondeur à l’aide d’une perceuse, à l’endroit des
marques.
• Enfoncez les chevilles dans les trous.
• Placez le dispositif de suspension sur le mur et xez-le à l’aide des vis.
33

34

35

Veripart is a registered trademark
Weena 664
3012CN Rotterdam
The Nederlands
Wijzigingen en drukfouten voorbehouden/ Modications and printing errors reserved/ Sous réserve de modication
VPSS101/01.0720C
 Loading...