

Blood Glucose Monitoring System
Owner's
Booklet
Instructions
for Use


Verio Flex
Blood Glucose Monitoring System
Owner's Booklet
1

Thanks for choosing OneTouch®!
The OneTouchVerio Flex™ Blood Glucose Monitoring
System is one of the latest product innovations from
OneTouch®.
Your OneTouchVerio Flex™ Meter is designed to connect
(sync) with a variety of compatible wireless devices
running software applications that let you review and
graph your results, and help identify patterns. Meter
results are sent to the compatible devices either through
BLUETOOTH® Smart (wireless) or USB cable connection.
Every OneTouch® Meter is designed to help you test your
blood glucose and manage your diabetes.
This Owner's Booklet offers a complete explanation of how
to use your new meter and testing supplies. It reviews the
do's and don'ts of testing your blood glucose level. Please
keep your Owner's Booklet in a safe place; you may want
to refer to it in the future.
We hope OneTouch® products and services will continue to
be a part of your life.
2

Compatible Wireless Devices
Visit www.OneTouch.com for information on which
wireless devices are compatible with your OneTouch
Verio Flex™ Meter, and where/how to download the
OneTouch Reveal® Mobile App on your compatible
wireless device.
Meter symbols and icons
Meter Power
Low Battery
Battery Empty
Control Solution
Syncing
BLUETOOTH® Smart Feature On
History Mode (Past results)
Apply Sample
Range Indicator Arrow
Setting Mode
3

Other symbols and icons
Cautions and Warnings: Refer to the
Owner's Booklet and inserts that came with
your system for safety-related information.
Direct current
Before you begin
Before using this product to test your blood
glucose, carefully read this Owner's Booklet, and
the inserts that come with the OneTouchVerio® Test
Strips, OneTouchVerio® Control Solution and the
OneTouch®Delica® Lancing Device.
4

IMPORTANT SAFETY INSTRUCTIONS:
• This meter and lancing device are for single patient use
only. Do Not share them with anyone else, including
family members! Do Not use on multiple patients!
• After use and exposure to blood, all parts of this kit are
considered biohazardous. A used kit may potentially
transmit infectious diseases even after you have
performed cleaning and disinfection.
For more information see: FDA Public Health Notification:
"Use of Fingerstick Devices on More than One Person
Poses Risk for Transmitting Bloodborne Pathogens:
Initial Communication" (2010) http://www.fda.gov/
MedicalDevices/Safety/AlertsandNotices/ucm224025.htm.
CDC Clinical Reminder: "Use of Fingerstick Devices
on More than One Person Poses Risk for Transmitting
Bloodborne Pathogens" (2010) http://www.cdc.gov/
injectionsafety/Fingerstick-DevicesBGM.html.
5

Intended use
The OneTouchVerio Flex™ Blood Glucose Monitoring
System is intended to be used for the quantitative
measurement of glucose (sugar) in fresh capillary whole
blood samples drawn from the fingertip.
The OneTouchVerio Flex™ Blood Glucose Monitoring
System is intended for self-testing outside the body
(in vitro diagnostic use) by people with diabetes at home
as an aid to monitor effectiveness of diabetes control.
Limitations
The OneTouchVerio Flex™ Blood Glucose Monitoring
System is intended to be used by a single patient and
should not be shared. The system is not to be used for the
diagnosis of or screening of diabetes or for neonatal use.
The system is not for use on critically ill patients, patients
in shock, severely dehydrated patients or hyperosmolar
patients.
6

Test principle
Glucose in the blood sample mixes with the enzyme
FAD-GDH (see page104) in the test strip and a small
electric current is produced. The strength of this current
calculates your blood glucose level. It then displays the
blood glucose result and stores it in the meter memory.
Use only OneTouchVerio® Control Solution and Test
Strips with the OneTouchVerio Flex™ Meter.
BLUETOOTH® Smart wireless
technology
BLUETOOTH® Smart wireless technology is used by
some smartphones and many other devices. Your
OneTouchVerio Flex™ Meter uses BLUETOOTH® Smart
wireless technology to pair and to send your glucose
results to compatible wireless devices.
The OneTouchVerio Flex™ Meter is designed to work with
the OneTouchReveal® Mobile App.
Visit www.OneTouch.com for information on which
wireless devices are compatible with your OneTouch Verio
Flex™ Meter, and where/how to download the OneTouch
Reveal® Mobile App on your compatible wireless device.
7

When using the OneTouchVerio Flex™ System, we
suggest you pair your OneTouchVerio Flex™ Meter with
a compatible wireless device and track your results. See
page31 for pairing instructions.
Changes or modifications not expressly approved by the
party responsible for compliance could void the user's
authority to operate the equipment.
This device complies with Part 15 of the FCC Rules.
Operation is subject to the following two conditions:
(1) this device may not cause harmful interference and
(2) this device must accept any interference received,
including interference that may cause undesired operation.
8

NOTE: This equipment has been tested and found to
comply with the limits for a Class B digital device,
pursuant to part 15 of the FCC Rules. These limits are
designed to provide reasonable protection against harmful
interference in a residential installation. This equipment
generates, uses and can radiate radio frequency energy
and, if not installed and used in accordance with the
instructions, may cause harmful interference to radio
communications. However, there is no guarantee that
interference will not occur in a particular installation. If
this equipment does cause harmful interference to radio
or television reception, which can be determined by
turning the equipment off and on, the user is encouraged
to try to correct the interference by one or more of the
following measures:
• Reorient or relocate the receiving antenna.
• Increase the separation between the equipment and
receiver.
• Connect the equipment into an outlet on a circuit
different from that to which the receiver is connected.
• Consult the dealer or an experienced radio/ TV
technician for help.
9

If you experience meter interference problems, try moving
your meter away from the source of the interference.
You can also move the electronic device or its antenna to
another location to solve the problem.
These guidelines help ensure that your meter will not
affect the operation of other nearby electronic devices.
Additionally, other electronic devices should not affect the
use of your meter.
WARNING: The BLUETOOTH® Smart feature on your
meter sends test results to your compatible wireless device.
To prevent other people's results from being sent to your
compatible wireless device, Do Not let anyone else use your
meter to test their blood glucose. This meter is for single
patient use only.
10

WARNING: In locations where cell phone use is not
permitted, such as hospitals, some healthcare professional
oces and airplanes, you should turn the BLUETOOTH®
Smart feature o. See page29 for more information.
BLUETOOTH® Smart trademark
The BLUETOOTH® word mark and logos are owned by the
Bluetooth SIG, Inc. and any use of such marks by LifeScan
Scotland Ltd. is under license. Other trademarks and trade
names are those of their respective owners.
11

Table of Contents
1 Getting to know your system ...................................14
2 Setting up your system ............................................ 24
Setting up your meter .....................................................24
Connecting to a compatible wireless device ............... 29
Turning the meter off ......................................................35
3 Taking a test .............................................................. 36
Testing your blood glucose ............................................ 36
Testing with control solution..........................................60
4 Reviewing past results ............................................70
12
5 Editing Your Settings ............................................... 76
Editing time and date ..................................................... 76
Editing your range limits ................................................ 77
6 Caring for your system ............................................80
7 Battery .......................................................................86
8 Troubleshooting your system .................................90
9 Detailed information about your system ...........100
10 Index ......................................................................... 112
13

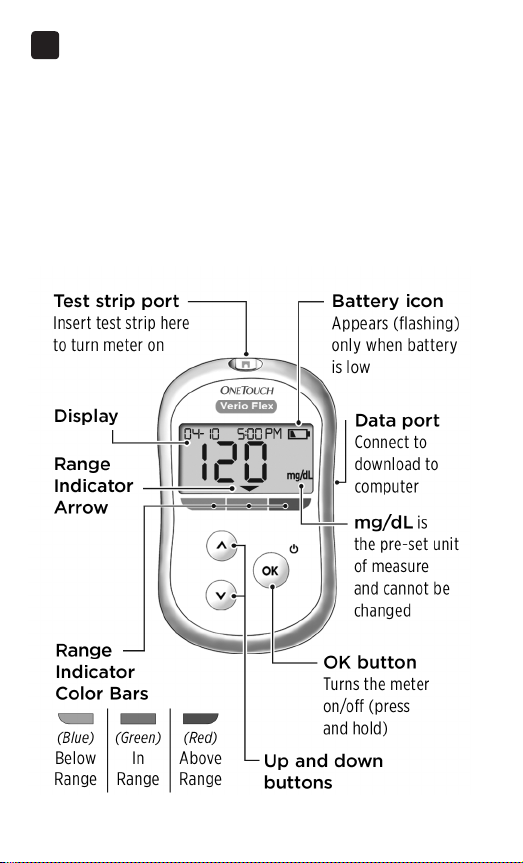
1 Getting to know your
system
Your OneTouchVerio Flex™ Blood
Glucose Monitoring System
Included with your kit:
OneTouchVerio Flex™ Meter
(CR2032 lithium coin cell
battery included)
Lancing device Lancets
14

Getting to know your system
1
NOTE: If any item is missing or defective in your kit, contact
Customer Service. As your partner in diabetes care, we
welcome you to contact us (available 7 days a week,
8 a.m. - 10 p.m. Eastern Time) at 1888567-3003 (English),
1888567-3010 (Spanish), or www.OneTouch.com.
NOTE: If another type of lancing device was included, see
the separate instructions for that lancing device.
15

Getting to know your system
1
Available separately:
Items pictured below are required, but may not be
included in your kit:
They are sold separately. Refer to your meter carton for a
list of included items.
OneTouchVerio®
Level 3 Control
Solution*
(vial with blue cap)
OneTouchVerio®
OneTouch Verio
Level 4 Control
Solution*
(vial with red cap)
Test Strips*
16
Getting to know your system
*OneTouchVerio® Control Solution and Test Strips are
available separately. For availability of test strips and
control solution, contact Customer Service or ask your
pharmacist or healthcare professional.
You can use either OneTouch Verio® Level 3 Control
Solution or OneTouch Verio® Level 4 Control Solution
with your OneTouch Verio Flex™ Meter.
WARNING: Keep the meter and testing supplies away
from young children. Small items such as the battery door,
batteries, test strips, lancets, protective covers on the
lancets, and control solution vial cap are choking hazards.
Do Not ingest or swallow any items.
1
17
Getting to know your system
1
Getting to know your
OneTouchVerio Flex™ Blood
Glucose Monitoring System
Meter
18
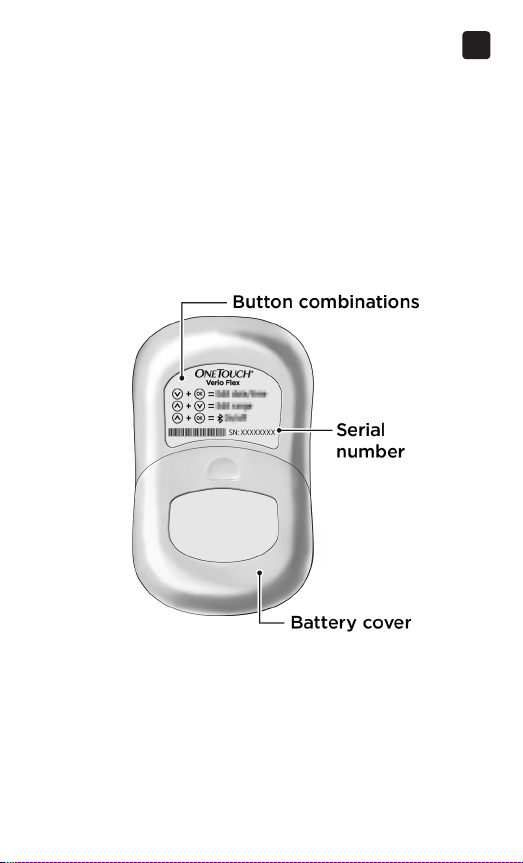
Getting to know your system
1
19
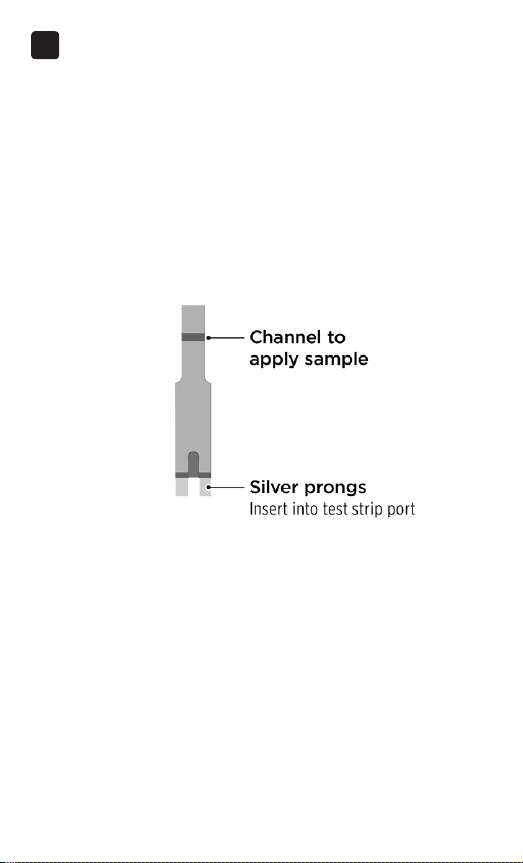
Getting to know your system
1
Getting to know your
OneTouchVerio® Test Strip
Test strip
20
Getting to know your system
1
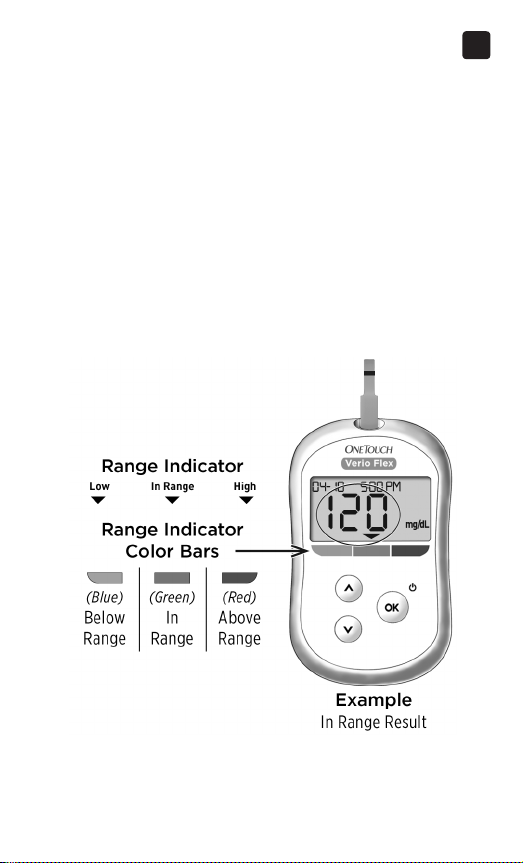
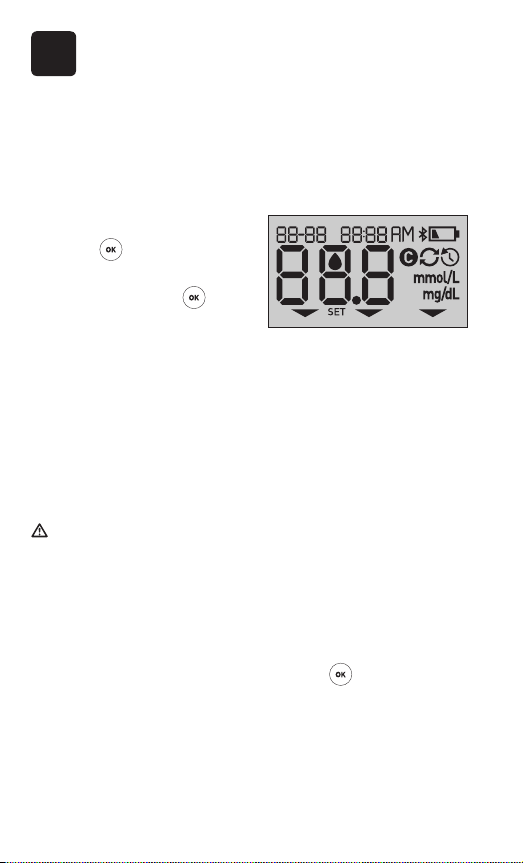
The Range Indicator feature
The OneTouchVerio Flex™ Meter automatically lets you
know if your current result is below, above or within your
range limits. It does this by displaying your current result
with a Range Indicator Arrow, pointing to a corresponding
Range Indicator Color Bar below the meter display. Use
the Range Indicator Arrow and Color Bar together to
interpret your results.
21
Getting to know your system
1
3 Possible Range Indicator Displays
A Range Indicator Arrow will
appear just below your result
after each test depending upon
how you set your low and high
range limits in the meter.
Things you should know before
using the Range Indicator feature:
Example
Below Range Result
• The meter comes with pre-set
range limits. The pre-set low
range limit is 70mg/dL and
the pre-set high range limit
is 180mg/dL. You can change
these limits as needed to meet
your needs. See page77 for
Example
In Range Result
details on the pre-set range
limits and on editing your
range limits.
• If you decide to change
your range limits, the Range
Indicator Arrows stored with
previous results in meter
memory will not change.
Example
Above Range Result
However, any new tests will
display Range Indicator Arrows
which reflect your changes.
22

Getting to know your system
This page left blank intentionally.
1
23
2 Setting up your system
Setting up your meter
Turn your meter on
To turn your meter on, press
and hold until the start-up
test screen appears. Once the
device is on, release . You
can also turn the meter on by
inserting a test strip.
Every time you turn your meter on, a start-up screen will
appear for a few seconds. All segments of the display
should appear briefly, indicating your meter is working
properly. If the meter does not power on, check the
battery.
CAUTION:
If you see any missing segments within the start-up
screen, there may be a problem with the meter. Contact
Customer Service. Contact us at 1888567-3003.
NOTE: If you turned the meter on for the first time by
inserting a test strip instead of pressing
be able to perform a glucose test until you complete the
first time setup.
24
, you will not

First time setup
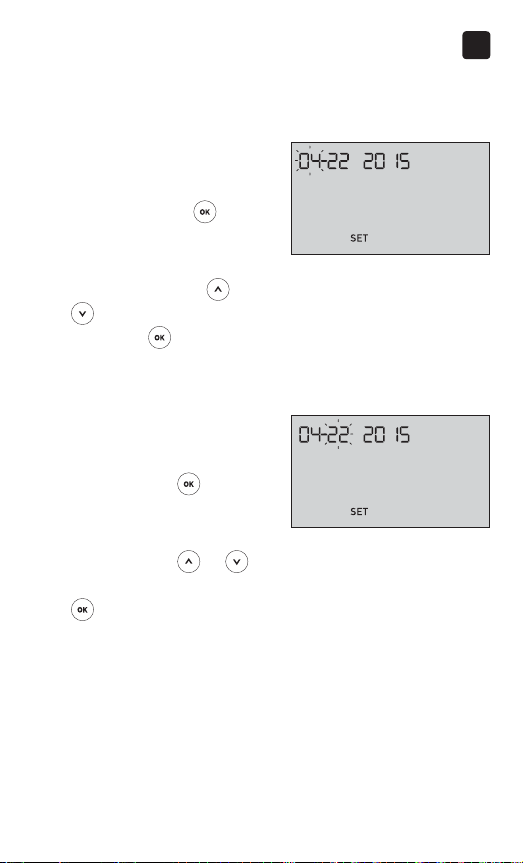
Setting up your system
2
To turn your meter on, press and hold
until the startup screen appears. Once the device is on, release .
The meter will now automatically prompt you to set the
time and date. The SET icon will appear on the screen to
indicate that the meter has entered setup mode.
Setting the time
Hour will flash
• If the hour displayed
is correct, press
to
confirm.
• If the hour displayed is not
correct, press
or to
change the hour and press
to confirm.
Minutes will flash
• If the minutes displayed
is correct, press
to
confirm.
• If the minutes displayed is
not correct, press
or
to change the minutes and
press to confirm.
25

Setting up your system
2
AM/PM will flash
• If the AM/PM displayed
is correct, press
to
confirm.
• If the AM/PM displayed is
not correct, press
or
to change AM/PM and press
to confirm.
Setting the date
After completing the time setup, the meter will
automatically move to date setup.
Year will flash
• If the year displayed
is correct, press
to
confirm.
• If the year displayed is not
correct, press
or to
change the year and press
to confirm.
26
Setting up your system
Month will flash
• If the month displayed
is correct, press
to
confirm.
• If the month displayed is
not correct, press
or
to change the month
and press to confirm.
Day will flash
• If the day displayed is
correct, press
to
confirm.
• If the day displayed is not
correct, press
or to
change the day and press
to confirm.
2
27
Setting up your system
2
You are now ready to take
a test. See the section
Testing your blood glucose in
Chapter 3.
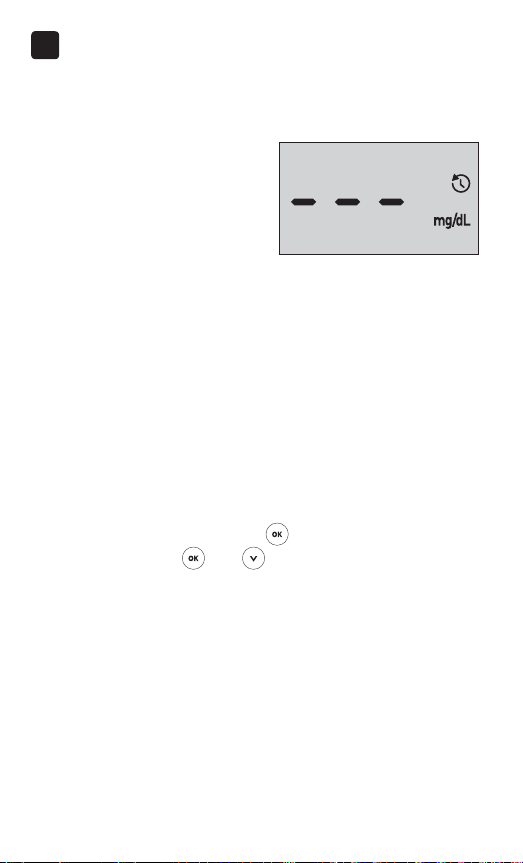
NOTE: After completing first time setup, a screen with
three dashes will appear. Once you begin testing, your last
result will appear in place of the three dashes, along with
the date and time the test was taken.
Adjusting the time and date settings after
first time setup
You can adjust the meter's time and date settings after
first time setup. Press and hold
to turn the meter on,
then press and hold and at the same time. The SET
screen will appear. See page76.
After adjusting the settings, your meter will exit settings
mode and your last result screen will appear.
28

Setting up your system
2
Connecting to a compatible wireless
device
Turning the BLUETOOTH® Smart feature on
or o
In order to connect your meter with your compatible
wireless device, the BLUETOOTH® Smart feature will
need to be turned on. The
meter screen when the BLUETOOTH® Smart feature is
on. When the symbol is not present on the screen the
BLUETOOTH® Smart feature is off.
symbol will appear on the
• To turn the BLUETOOTH® Smart feature on press
and at the same time.
• To turn the BLUETOOTH® Smart feature off press
and at the same time.
symbol indicates
The
the BLUETOOTH® Smart
feature is on
NOTE: The BLUETOOTH® Smart feature will turn OFF
during a blood glucose test.
29

Setting up your system
2
Pairing Overview
Pairing allows your OneTouchVerio Flex™ Meter to
communicate with compatible wireless devices. The
devices must be within 26feet of each other to pair and
sync. Download the OneTouchReveal® Mobile App from
the appropriate app store before pairing your meter and
compatible wireless device.
Multiple OneTouchVerio Flex™ Meters can be paired
with your compatible wireless device. For example, your
compatible wireless device can be paired with a meter at
home and another at work. To pair multiple meters, repeat
the pairing instructions for each meter. See page31 for
pairing instructions.
Your OneTouchVerio Flex™ Meter can be paired with
multiple compatible wireless devices. To pair multiple
compatible wireless devices, repeat the pairing
instructions for each compatible wireless device.
30

Setting up your system
Pairing Instructions
2
1. Start by turning your meter on using the
button
2. The BLUETOOTH® Smart feature is turned on by
pressing
The
and together
symbol will appear to
indicate that the BLUETOOTH®
Smart feature is on.
3. Open the OneTouchReveal® Mobile App and follow
instructions to pair meter with your compatible
wireless device
31

Setting up your system
2
4. Look for "OneTouch" and the last 4 characters of the
meter serial number on the compatible wireless device
display to correctly identify your meter
32

Setting up your system
2
5. When prompted by the OneTouchReveal® Mobile App,
the meter will display a six digit PIN number
Enter the PIN number into your compatible wireless device
using the keypad on your compatible wireless device.
CAUTION:
Make sure the PIN you enter on your compatible wireless
device matches the PIN on your meter display. If a PIN
number unexpectedly appears on your meter display,
cancel the PIN request by either inserting a test strip to
take a test or press the
button to enter History Mode.
Example of PIN number
display on meter
6. Wait for your compatible wireless device to indicate
that your meter and compatible wireless device are
paired
33

Setting up your system
2
Syncing to send results wirelessly to the
OneTouchReveal® Mobile App
After pairing the meter with your compatible
wireless device, you are ready to send results to the
OneTouchReveal® Mobile App.
1. Open the OneTouchReveal® Mobile App on your
compatible wireless device
2. Press and hold
to turn the meter on and make sure
the BLUETOOTH® Smart feature is ON as indicated by ( )
If needed, press
and at the same time to turn the
BLUETOOTH® Smart feature on.
The Sync symbol (
)
flashes on the meter display.
"Syncing Data" will appear
on the app to notify you that
the meter is communicating
with the app.
Syncing Data
After syncing, the Sync symbol will disappear, the
"Syncing Data" message will disappear on the app, and
the app will display a list of any new results sent from the
meter.
NOTE: Inserting a test strip during the transmission will
cancel the transfer of all results. The flashing
symbol
appears on the screen and you can proceed with testing.
34

Setting up your system
Turning the meter o
There are three ways to turn your meter off:
2
• Press and hold
for several seconds until the meter
turns off.
• Remove the test strip.
• Your meter will turn off by itself if left alone for two
minutes.
NOTE: Following a glucose test, the meter will still be
available for BLUETOOTH® Smart connection for up to
4hours. See page71 for more details.
35

3 Taking a test
Testing your blood glucose
Preparing for a blood glucose test
NOTE: Many people find it helpful to practice testing with
control solution before testing with blood for the first
time. See page60.
Have these things ready when you test:
OneTouchVerio Flex™ Meter
OneTouchVerio® Test Strips
Lancing device
Sterile lancets
NOTE:
• Use only OneTouchVerio® Test Strips.
• Unlike some blood glucose meters, no separate step to
code your OneTouchVerio Flex™ System is required.
• Testing must be done within operating temperature
range (50-104°F).
• Make sure your meter and test strips are about the
same temperature before you test.
• Keep test strips in a cool, dry place between 41°F
and 86°F.
36

Taking a test
• Do Not test if there is condensation (water build-up)
on your meter. Move your meter and test strips to a
cool, dry spot and wait for the meter surface to dry
before testing.
• Do Not open the test strip vial until you are ready to
remove a test strip and perform a test. Use the test
strip immediately after removing it from the vial.
• Tightly close the cap on the vial immediately after use
to avoid contamination and damage.
• Store unused test strips only in their original vial.
• Do Not return the used test strip to the vial after
performing a test.
• Do Not re-use a test strip that had blood, control
solution, or any contaminants applied to it. Test strips
are for single use only.
• With clean, dry hands, you may touch the test strip
anywhere on its surface. Do Not bend, cut or modify
the test strip in any way.
• When you first open a vial of test strips, record the
discard date on the label. Refer to the test strip insert
or vial label for instructions on determining the
discard date.
3
37

Taking a test
3
• Comparing your blood glucose test results taken with
this meter to your results taken from a different meter
is not recommended. Results may differ between
meters and are not a useful measure of whether your
meter is working properly.
IMPORTANT: If another person assists you with testing,
the meter should always be cleaned prior to use by that
person. See page80.
CAUTION:
• The OneTouchVerio Flex™ Blood Glucose Monitoring
System should not be used within 24 hours of receiving
a D-xylose absorption test as it may cause inaccurately
high results.
• Do Not use the OneTouchVerio® Family of Meters when
PAM (Pralidoxime) is known or suspected to be in the
whole blood sample.
• Do Not use your test strips if your vial is damaged
or left open to air. This could lead to error messages
or inaccurate results. Contact Customer Service
immediately if the test strip vial is damaged. Contact us
at 1888567-3003.
38

Taking a test
3
• If you cannot test due to a problem with your testing
supplies, contact your healthcare professional. Failure
to test could delay treatment decisions and lead to a
serious medical condition.
• The test strip vial contains drying agents that are
harmful if inhaled or swallowed and may cause skin or
eye irritation.
• Do Not use test strips after the expiration date (printed
on the vial) or the discard date, whichever comes first,
or your results may be inaccurate.
39

Taking a test
3
Getting to know your OneTouch®Delica®
Lancing Device
40

Taking a test
NOTE:
• The OneTouch®Delica® Lancing Device uses ONLY
OneTouch®Delica® Lancets.
• If another type of lancing device was included, see the
separate instructions for that lancing device.
• The OneTouchVerio Flex™ Blood Glucose Monitoring
System has not been evaluated for Alternate Site
Testing (AST). Use only fingertips when testing with
the system.
• The OneTouch®Delica® Lancing System does not
include the materials needed to perform Alternate
Site Testing (AST). The OneTouch®Delica® Lancing
System should not be used on the forearm or palm with
the OneTouchVerio Flex™ Blood Glucose Monitoring
System.
3
41

Taking a test
3
Lancing precautions
CAUTION:
To reduce the chance of infection and disease spread by
blood:
• Make sure to wash the sample site with soap and warm
water, rinse and dry before sampling.
• The lancing device is intended for a single user. Never
share a lancet or lancing device with anyone.
• Always use a new, sterile lancet each time you test.
• Always keep your meter and lancing device clean (See
page80).
• The meter and lancing device are for single patient use
only. Do Not share them with anyone, including family
members! Do Not use on multiple patients!
• After use and exposure to blood, all parts of this kit
are considered biohazardous. A used kit may transmit
infectious diseases even after you have performed
cleaning and disinfection.
42

Preparing the lancing device
1. Remove the lancing device cap
Remove the cap by turning
it counterclockwise and then
pulling it straight off of the
device.
Taking a test
3
43

Taking a test
3
2. Insert a sterile lancet into the lancing device
Align the lancet as shown
here, so that the lancet fits
into the lancet holder. Push
the lancet into the device
until it snaps into place and
is fully seated in the holder.
Twist the protective
cover one full turn until it
separates from the lancet.
Save the protective cover
for lancet removal and
disposal. See page57.
44

Taking a test
3. Replace the lancing device cap
Place the cap back onto the device; turn clockwise to
secure the cap.
Do Not overtighten.
3
45

Taking a test
3
4. Adjust the depth setting
The lancing device has seven
puncture depth settings,
numbered 1 through 7.
Smaller numbers are for a
shallower puncture and the
larger numbers are for a
deeper puncture. Shallower
punctures work for children
and most adults. Deeper
punctures work well for people with thick or callused skin.
Turn the depth wheel to choose the setting.
NOTE: A shallower fingertip puncture may be less painful.
Try a shallower setting first and increase the depth until
you find the one deep enough to get a blood sample of
the proper size.
5. Cock the lancing device
Slide the cocking control
back until it clicks. If it does
not click, it may already
have been cocked when you
inserted the lancet.
46

Taking a test
3
Preparing the meter
1. Insert a test strip to turn the meter on
Insert a test strip into the test strip port with the gold side
of the test strip and the two silver prongs facing you.
NOTE: No separate step to
code the meter is required.
The flashing blood drop icon
) appears on the display.
(
You can now apply your
blood sample to the test
strip.
47

Taking a test
3
Getting a blood sample from the fingertip
Choose a different puncture site each time you test.
Repeated punctures in the same spot may cause soreness
and calluses.
Before testing, wash your hands thoroughly with warm,
soapy water. Rinse and dry completely.
1. Puncture your finger
Hold the lancing device
firmly against the side of
your finger. Press the release
button. Remove the lancing
device from your finger.
48

2. Get a round drop of blood
Gently squeeze and/or
massage your fingertip until
a round drop of blood forms
on your fingertip.
NOTE: If the blood smears or
runs, Do Not use that sample.
Dry the area and gently squeeze
another drop of blood or
puncture a new site.
Taking a test
3
49

Taking a test
3
Applying blood and reading results
Applying the sample
1. Apply the sample to the test strip
You can apply blood to either side of the test strip.
Apply your sample to the opening of the channel.
Be sure to apply your sample immediately after you get a
drop of blood.
Holding the meter at a
slight angle, guide the
channel to the blood drop.
50

Taking a test
3
When it touches your
sample, the test strip wicks
blood into the channel.
2. Wait for the channel to fill completely
The blood drop will be drawn into the narrow channel.
The channel should fill completely.
The channel turns red and the meter will count down from
5 to 1.
Blood should not be applied on the top of the test strip or
to the top edge of the test strip.
51

Taking a test
3
NOTE:
• Do Not smear or scrape the sample with the test strip.
• Do Not press the test strip too firmly against the
puncture site or the channel may be blocked from filling
properly.
• Do Not apply more blood to the test strip after you
have moved the drop of blood away.
• Do Not move the test strip in the meter during a test or
you may get an error message or the meter may turn
off.
• Do Not remove the test strip until the result is
displayed or the meter will turn off.
52

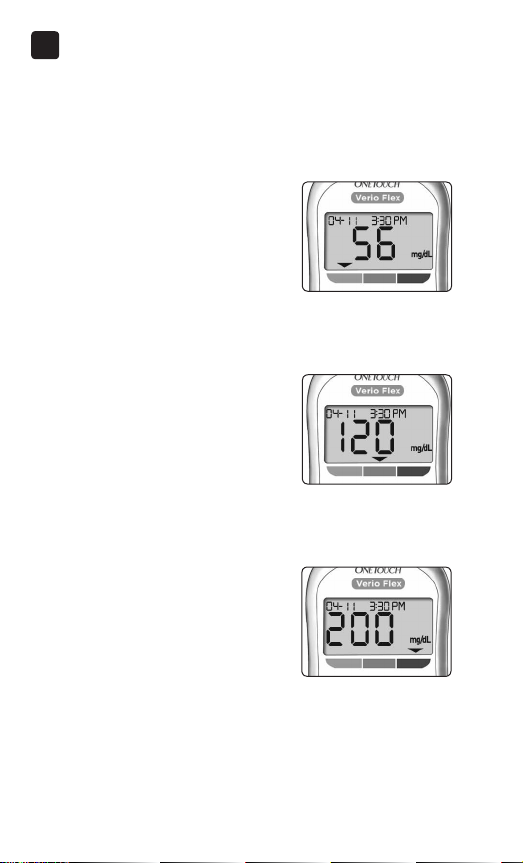
Viewing your result
Your result appears on the display,
along with the unit of measure,
and the date and time of the test.
After your glucose result appears,
the meter will also display a Range
Indicator Arrow below your glucose
result to indicate if your result is
below, above or within your range
limits (see page21). The arrow
will point to the appropriate Range
Indicator Color Bar on the meter as
a visual reminder.
CAUTION:
Do Not make immediate treatment
decisions based on the Range
Indicator feature. Treatment
decisions should be based on the
numerical result and healthcare
professional recommendation and
not solely on where your result
falls within your range limits.
Taking a test
Example
Below Range Result
Example
In Range Result
Example
Above Range Result
3
WARNING: Confirm that the unit of measure mg/dL is
displayed. If your display shows mmol/L rather than mg/dL,
stop using the meter and contact Customer Service.
53

Taking a test
3
Interpreting unexpected results
Refer to the following cautions when your results are
higher or lower than what you expect.
CAUTION:
Low results
If your result is below
70mg/dL or is shown as LO
(meaning the result is less
than 20mg/dL), it may mean
hypoglycemia (low blood
glucose). This may require
immediate treatment according to your healthcare
professional's recommendations. Although this result
could be due to a test error, it is safer to treat first, then do
another test.
NOTE: When your glucose result is below 20mg/dL, both
the LO and the Range Indicator Arrow will flash on the
meter screen.
CAUTION:
Dehydration and low results
You may get false low results if you are severely
dehydrated. If you think you are severely dehydrated,
contact your healthcare professional immediately.
54

Taking a test
3
CAUTION:
High results
• If your result is above 180mg/dL, it may mean
hyperglycemia (high blood glucose) and you should
consider re-testing. Talk to your healthcare professional
if you are concerned about hyperglycemia.
• HI is displayed when your
result is over 600mg/dL.
You may have severe
hyperglycemia (very high
blood glucose). Re-
test your blood glucose
level. If the result is HI again, this indicates a severe
problem with your blood glucose control. Obtain and
follow instructions from your healthcare professional
immediately.
NOTE: When your glucose result is above 600mg/dL, both
the HI and the Range Indicator Arrow will flash on the
meter screen.
55

Taking a test
3
CAUTION:
Repeated unexpected results
• If you continue to get unexpected results, check your
system with control solution.
• If you are experiencing symptoms that are not
consistent with your results and you have followed
all instructions in this Owner's Booklet, call your
healthcare professional. Never ignore symptoms or
make significant changes to your diabetes management
program without speaking to your healthcare
professional.
Unusual red blood cell count
A hematocrit (percentage of your blood that is red blood
cells) that is either very high (above 60%) or very low
(below 20%) can cause false results.
56

Taking a test
Removing the used lancet
NOTE: This lancing device has an ejection feature, so you
do not have to pull out the used lancet.
1. Remove the lancing device cap
Remove the cap by turning
it counterclockwise and then
pulling it straight off of the
device.
2. Cover the exposed lancet tip
Before removing the lancet, place the lancet protective
cover on a hard surface then push the lancet tip into the
cupped side of the cover.
3
57

Taking a test
3
3. Eject the lancet
Slide the ejection control
forward until the lancet
comes out of the lancing
device. Return the ejection
control to its back position.
If the lancet fails to eject
properly, cock the device
again and then slide the
ejection control forward until
the lancet comes out.
58

Taking a test
4. Replace the lancing device cap
Place the cap back onto the device; turn clockwise to
secure the cap.
Do Not overtighten.
3
It is important to use a new lancet each time you obtain a
blood sample. Do Not leave a lancet in the lancing device.
This will help prevent infection and sore fingertips.
59

Taking a test
3
Disposing of the used lancet and test strip
Discard the used lancet carefully after each use to avoid
unintended lancet stick injuries. Used lancets and test
strips may be considered biohazardous waste in your
area. Be sure to follow your healthcare professional's
recommendations or local regulations for proper disposal.
Wash hands thoroughly with soap and water after
handling the meter, test strips, lancing device and cap.
Testing with control solution
Control solution testing precautions
OneTouchVerio® Control Solution is used to check that the
meter and test strips are working together properly and
that the test is performing correctly. (Control solution is
available separately.)
NOTE:
• Use only OneTouch Verio® Level 3 Control Solution or
OneTouch Verio® Level 4 Control Solution with your
OneTouch Verio Flex™ Meter. Either level can be used to
check your system.
• When you first open a new vial of control solution,
record the discard date on the vial label. Refer to the
control solution insert or vial label for instructions on
determining the discard date.
60

Taking a test
• Tightly close the cap on the control solution vial
immediately after use to avoid contamination or
damage.
See page36 for more information on testing.
CAUTION:
• Do Not swallow or ingest control solution.
• Do Not apply control solution to the skin, eyes, ears or
nose as it may cause irritation.
• Do Not use control solution after the expiration
date (printed on the vial label) or the discard date,
whichever comes first, or your results may be
inaccurate.
3
61

Taking a test
3
When to do a control solution test
• When you open a new vial of test strips.
• If you suspect that the meter or test strips are not
working properly.
• If you have had repeated unexpected blood glucose
readings.
• If you drop or damage the meter.
Preparing your meter for a control solution
test
1. Insert a test strip to turn the meter on
62

2. Wait for the flashing blood
drop icon (
) to appear on
the display
Taking a test
3
3. Press
or until the
control solution icon ( )
appears on the display
Preparing the control solution
1. Before removing the cap, shake the vial gently
2. Remove the vial cap and place it on a flat surface with
the top of the cap pointing up
3. Squeeze the vial to discard
the first drop
63

Taking a test
3
4. Wipe both the tip of the
control solution vial and the
top of the cap with a clean,
damp tissue or cloth
5. Squeeze a drop into the
small well on the top of the
cap or onto another clean,
non-absorbent surface
64

Taking a test
Applying the control solution
1. Hold the meter so that the
side edge of the test strip is
at a slight angle to the drop
of control solution
2. Touch the channel on the side of the test strip to the
control solution
3. Wait for the channel to fill
completely
3
65

Taking a test
3
Viewing your control solution result
After the control solution
is applied, the meter will
count down until the test
is complete. Your result is
displayed along with the date,
time, unit of measure, and
(for control solution) and stored in the meter.
Control solution results can be seen when reviewing past
results on the meter.
CAUTION: Make sure you press or until the control
solution icon
appears before you begin a control solution
test. Invalid results may be logged into your history if you
applied control solution to the test strip without following the
steps beginning on page62.
66

Taking a test
Checking if the result is in range
Each vial of test strips
has both OneTouch Verio®
Level 3 Control Solution
and OneTouch Verio®
Level 4 Control Solution
ranges printed on its
label. Compare the result
displayed on the meter
to either the OneTouch
Verio® Level 3 Control
Solution or OneTouch
Verio® Level 4 Control
Solution range printed
on the test strip vial,
depending on the type of
Example range
OneTouchVerio® Level 3
Control Solution Control
Range 102-138mg/dL
OneTouch Verio® Level 4
Control Solution Control
Range 298-403 mg/dL
control solution you used.
CAUTION:
3
The range printed on the test strip vial is for control
solution tests only and is not a recommended range for
your blood glucose level.
67

Taking a test
3
Causes of out-of-range results
Out-of-range results may be due to:
• Not following the instructions for performing a control
solution test.
• Control solution is contaminated, expired, or past its
discard date.
• Test strip or test strip vial is damaged, expired, or past
its discard date.
• Meter, test strips and/or control solution were not all at
the same temperature when the control solution test
was performed.
• A problem with the meter.
• Dirt or contamination in the small well on the top of the
control solution cap.
CAUTION:
If you continue to get control solution results that fall
outside the range printed on the test strip vial, Do Not
use the meter, test strips, or control solution. Contact
Customer Service. Contact us at 1888567-3003.
68

Taking a test
Cleaning the control solution cap
Clean the top of the control solution cap with a clean,
damp tissue or cloth.
3
69

4 Reviewing past results
Reviewing past results on your meter
Your meter stores your most recent 500 blood glucose and
control solution test results and displays them in the order
the tests were taken. The ( ) symbol will appear on your
screen when in History Mode.
1. When the meter is o, press and hold to turn
History Mode on
The (
results.
The (
above or within range at the time of the test, by pointing
to the appropriate color bar.
2. Scroll through your results by pressing to move
backwards and to move forward through your results
) symbol indicates you are viewing your past
) symbol indicates if the result was below,
70

Reviewing past results
Using the meter without syncing to
an app
The meter can be used without a compatible wireless
device or the app. You can still test your blood glucose
and review up to 500 results on the meter.
Sending your results to the app
If the BLUETOOTH® Smart feature on the meter is turned
on, indicated by the BLUETOOTH® Smart symbol ( ),
the meter will automatically send the latest result to
any paired compatible wireless device. The compatible
wireless device must have the app running and have
already been paired to the meter before sending a result.
NOTE: The compatible wireless device must have the app
open and have already been paired to the meter before
sending a result. See page30.
4
NOTE: If the BLUETOOTH® Smart feature on the meter is
turned off, or the meter is out of range, the result is not
sent to the compatible wireless device. The result is saved
in the meter memory with the current date and time, and
will be sent to the app the next time you sync. The sent
results are also stored in the meter. To sync, the app must
be open and running on your compatible wireless device.
71

Reviewing past results
4
To ensure that glucose test results are successfully sent to
the app, turn on the BLUETOOTH® Smart feature and check
the following:
• The compatible wireless device and meter are both
turned on, and the app is running.
• The meter is correctly paired with your compatible
wireless device.
• The BLUETOOTH® Smart feature on both devices is
running (indicated by
) and the devices are within
26feet of each other.
• The meter will attempt to transmit results up to 4 hours
after a test, even if the meter appears to be off. This
is indicated by the BLUETOOTH® Smart symbol (
)
remaining on the meter screen.
72
Example

Reviewing past results
If you are still unable to send results to the compatible
wireless device, please call Customer Service. Contact us
at 1888567-3003.
NOTE: Inserting a test strip during the transmission will
cancel the transfer of all results. The
symbol appears on
the screen and you can proceed with testing.
4
73

Reviewing past results
4
Downloading results to a computer
Your meter can work with diabetes management software,
which provides a visual way to track key factors that
affect your blood sugar. To learn more about diabetes
management tools available to you, contact Customer
Service. As your partner in diabetes care, we welcome you
to contact us (available 7 days a week, 8 a.m. - 10 p.m.
Eastern Time) at 1888567-3003 (English), 1888567-3010
(Spanish), or www.OneTouch.com.
Connect only to a computer certified to UL 60950-1 (
To transfer meter data, follow the instructions provided
with the diabetes management software product to
download the results from the meter. You will need a
standard micro USB interface cable to connect your
OneTouchVerio Flex™ Meter to a computer to download
results (not included).
74
).

Reviewing past results
Once the command to start
the download is sent from the
computer to the meter, the
meter display will show the
flashing Sync symbol ( )
indicating that the meter is in
communication mode.
Do Not insert a test strip while the meter is connected to
a computer.
If you are unable to download your results to a computer,
please call Customer Service. Contact us at 1888567-3003.
4
75

5 Editing Your Settings
Editing time and date
You can adjust the meter's time and date settings after
first time setup. Press and hold to turn the meter on,
then press and hold and at the same time. The SET
screen will appear, and the hour will flash.
For instructions on adjusting the time and date, see
page25.
After adjusting the settings, you will exit settings mode
and your last glucose result screen will appear. The
adjusted time and date will be displayed once a new
glucose test has been completed and the result appears on
the screen.
NOTE: You will not be able to perform a blood glucose test
until you finish editing the time and date.
NOTE: The OneTouchReveal® Mobile App on your
compatible wireless device checks and updates the time
and date in your meter each time you sync. Check the time
and date often on your compatible wireless device to be
sure they are correct. See the App instructions for more
information.
76

Editing Your Settings
5
Editing your range limits
Your meter uses low and high range limits to tell you
when your result is below, above or within your set range.
The meter comes with pre-set range limits that can be
changed. The pre-set low range limit is 70mg/dL and the
pre-set high range limit is 180mg/dL. To edit the pre-set
range limits press and hold and at the same time.
The SET screen will appear with the current low range limit
displayed, and the number and range indicator arrow will
flash.
NOTE: The low and high range limits you set apply to
all glucose test results. This includes tests taken before
or after mealtimes, medications and around any other
activities that may affect your blood glucose.
CAUTION:
Be sure to talk to your healthcare professional about the
low and high range limits that are right for you. When
selecting or changing your limits, you should consider
factors such as your lifestyle and diabetes therapy. Never
make significant changes to your diabetes care plan
without consulting your healthcare professional.
77

Editing Your Settings
5
1. Review the pre-set low range limit displayed
• To accept the pre-set low
range limit, press
.
• To edit the pre-set low range
limit, press
or to
change the value between
60mg/dL-110mg/dL, and
then press .
2. Review the pre-set high range limit displayed
• To accept the pre-set high
range limit, press
.
• To edit the pre-set high
range limit, press
or
to change the value between
90mg/dL-300mg/dL, and
then press .
Your meter will exit settings mode and your last result
screen will appear.
78

Editing Your Settings
5
NOTE: If you change your range limits, this will only affect
whether future test results are displayed as below, above
or within your range limits. Changing your range limits
does not affect how past results are displayed.
NOTE: You will not be able to perform a glucose test until
you finish editing the range limits.
NOTE: You can use the OneTouchReveal® Mobile App on
your compatible wireless device to change the range limits
stored in your meter. See the instructions that came with
the app for more information.
79

6 Caring for your system
Storing your system
Once opened, store your meter, test strips, control solution
and other items in your carrying case. Keep in a cool, dry
place between 41°F and 86°F and below 65% relative
humidity. Keep all items away from direct sunlight
and heat.
Cleaning and disinfection
Cleaning and disinfection are different. Both should be
performed at least once per week. Cleaning is part of your
normal care and maintenance, but does not kill germs. You
should clean your meter, lancing device and cap before
disinfecting. After use and exposure to blood, all parts of
this kit may transmit infectious diseases. Disinfection is
the only way to reduce your exposure to disease.
For cleaning information, see page82 and for
disinfecting information, see page83.
80

Caring for your system
For cleaning and disinfecting, Clorox® Germicidal Wipes*
containing 0.55% sodium hypochlorite as the active
ingredient have been shown to be safe for use with
the OneTouchVerio Flex™ System and can be obtained
from retail websites offering disinfection products, e.g.,
www.officedepot.com or www.staples.com. For more
information on purchase options, visit
www.onetouch.com/disinfection, or contact Customer
Service. Contact us at 1888567-3003.
*Other products, such as Clorox® Disinfecting Wipes, have
not been tested and should not be used. Only Clorox®
Germicidal Wipes should be used. Follow manufacturer's
instruction for handling and storage of wipes. Clorox® is a
registered trademark of the Clorox Company.
IMPORTANT: If another person assists you with testing,
the meter, lancing device and cap should always be
cleaned and then disinfected prior to use by that person.
6
81

Caring for your system
6
Cleaning your meter, lancing device
and cap
The meter, lancing device and cap should be cleaned at
least once per week. Be sure to clean the meter, lancing
device and cap before disinfecting.
1. Use a Clorox® Germicidal
Wipe to wipe the outside of
the meter and lancing device
To clean your meter, hold
it with the test strip port
pointed down. Be sure to
squeeze out any excess liquid
before you wipe the meter.
Wipe the outside of the
lancing device cap.
2. Wipe dry with a clean,
sterile gauze
82

Caring for your system
6
Disinfecting your meter, lancing device
and cap
The meter, lancing device and cap should be disinfected
at least once per week. Be sure to clean the meter, lancing
device and cap before disinfecting.
1. First, clean your meter, lancing device and cap prior to
disinfecting
Follow step 1 of page82.
2. Use a new Clorox®
Germicidal Wipe to wipe the
outside of the meter, lancing
device and cap until the
surface is damp
Be sure to squeeze out any
excess liquid before you wipe
the meter. Hold the meter
with the test strip port pointed
down.
Allow the surface of the meter,
lancing device and cap to
remain damp for 1 minute.
83

Caring for your system
6
3. Wipe dry with a clean, sterile gauze
Wash hands thoroughly with soap and water after
handling the meter, lancing device and cap.
• Do Not use alcohol or any other solvent.
• Do Not allow liquids, dirt, dust,
blood or control solution to enter
the test strip port or the data
port.
• Do Not squeeze the germicidal
wipe into test strip port.
• Do Not spray cleaning solution
on the meter and lancing device.
• Do Not immerse the meter and lancing device in any
liquid.
The OneTouchVerio Flex™ System withstood cleaning
and disinfection cycles well in excess of LifeScan's
recommendation. See page85 for more details.
84

Caring for your system
6
Examples of damage to the meter may include fogged
display, cracked housing or lens, illegible labels, button
not working or meter malfunction (such as repeated error
messages). Examples of damage to the lancing device and
cap may include cracking, illegible depth setting numbers
and lancing device malfunction (such as failure to load,
cock or release).
Do Not use your meter or lancing device if you see
evidence of such damage. If you have questions about
cleaning or disinfecting, or if you see evidence of physical
damage, contact Customer Service. As your partner in
diabetes care, we welcome you to contact us (available
7days a week, 8 a.m. - 10 p.m. Eastern Time) at
1888567-3003 (English), 1888567-3010 (Spanish),
or www.OneTouch.com.
Cleaning and Disinfecting Cycles
The meter, lancing device and cap can be cleaned daily for
3 years and have been tested up to 2879 cleaning cycles.
The meter, lancing device and cap can be disinfected
weekly for 3 years, and have been tested up to
412 cleaning and disinfection cycles.
85

7 Battery
Replacing the battery
Your OneTouchVerio Flex™ Meter uses one CR2032 lithium
coin cell battery.
IMPORTANT: Use only one CR2032 lithium coin cell battery
with your meter. Do Not use rechargeable batteries. Use
of an incorrect battery type may result in your meter
providing fewer tests than normal.
If the meter does not turn on, you may need to replace the
battery. See below for instructions.
WARNING: Certain batteries may cause leaking which can
damage the meter or cause the battery to lose power sooner
than normal. Replace leaking battery immediately.
NOTE: After replacing the battery, you will be prompted
to set time and date, as if you are turning the meter on for
the first time.
86

1. Remove the old battery
Start with the meter turned off.
Remove the battery cover by
sliding it downward.
Pull up on the battery ribbon
to lift the battery out of the
compartment.
Do Not remove the battery while
the meter is connected to a
computer.
Battery
7
87

Battery
7
2. Insert the new battery
Insert one CR2032 lithium coin
cell battery on top of the battery
ribbon, with the plus (+) side up.
If the meter does not power on after you have replaced the
meter battery, check that the battery is correctly installed.
If the meter still does not power on, contact Customer
Service. Contact us at 1888567-3003.
3. Replace battery cover by
sliding it upwards onto the meter
88

Battery
4. Check your meter settings
Removing the meter battery will not affect your stored
results. However, you will need to check your date and
time settings.
5. Dispose of battery
Dispose of the battery according to your local
environmental regulations.
7
89

8 Troubleshooting your
system
Error and other messages
The OneTouchVerio Flex™ Meter displays messages when
there are problems with the test strip, with the meter or
when your glucose levels are above 600mg/dL or below
20mg/dL. Improper use may cause an inaccurate result
without producing an error message.
NOTE: If the meter is on but does not operate (locks-up),
contact Customer Service. Contact us at 1888567-3003.
What it means
You may have a very
low blood glucose level
(severe hypoglycemia),
below 20mg/dL.
NOTE: When your glucose result is below 20mg/dL, both
the LO and the Range Indicator Arrow will flash on the
meter screen.
What to do
This may require immediate treatment. Although this
message could be due to a test error, it is safer to treat
first and then do another test. Always treat according to
your healthcare professional’s recommendations.
90

Troubleshooting your system
8
What it means
You may have a very
high blood glucose level
(severe hyperglycemia),
over 600mg/dL.
NOTE: When your glucose result is above 600mg/dL, both
the HI and the Range Indicator Arrow will flash on the
meter screen.
What to do
Re-test your blood glucose level. If the result is HI
again, obtain and follow instructions from your healthcare
professional right away.
91

Troubleshooting your system
8
What it means
Meter is too hot (above
104°F) to perform a test.
What to do
Move the meter and test strips to a cooler area. Insert a
new test strip when the meter and test strips are within
the operating range (50-104°F). If you do not get another
HI .t message, you can proceed with testing.
If this message continues to appear, contact Customer
Service. Contact us at 1888567-3003.
92

Troubleshooting your system
What it means
Meter is too cold (below 50°F)
to perform a test.
What to do
Move the meter and test strips to a warmer area. Insert a
new test strip when the meter and test strips are within
the operating range (50-104°F). If you do not get another
LO.t message, you can proceed with testing.
If this message continues to appear, contact Customer
Service. Contact us at 1888567-3003.
8
93

Troubleshooting your system
8
Error Screens
If there is a problem with your meter, there are six possible
error screens that may appear. Along with an error
number, there is also an error code in the upper left corner
of your meter screen. If you cannot resolve the error
with your meter, contact Customer Service. Contact us at
1888567-3003. They will refer to the error number and
code to help troubleshoot the problem.
Example Error
Screen Code
94

Troubleshooting your system
What it means
There is a problem with
the meter.
What to do
Do Not use the meter. Contact Customer Service. Contact
us at 1888567-3003.
What it means
Error message could be
caused either by a used test
strip or a problem with the
meter or test strip.
What to do
8
Repeat the test with a new test strip; see page50 or
page65. If this message continues to appear, contact
Customer Service. Contact us at 1888567-3003.
95

Troubleshooting your system
8
What it means
The sample was applied
before the meter was ready.
What to do
Repeat the test with a new test strip. Apply a blood or
control solution sample only after the flashing
symbol
appears on the display. If this message continues to
appear, contact Customer Service. Contact us at
1888567-3003.
96

Troubleshooting your system
What it means
One of the following may
apply:
• Not enough blood or
control solution was
applied or more was added
after the meter began to
count down.
• The test strip may have been damaged or moved
during testing.
• The sample was improperly applied.
• There may be a problem with the meter.
What to do
Repeat the test with a new test strip; see page50 or
page65. If the error message appears again, contact
Customer Service. Contact us at 1888567-3003.
8
97

Troubleshooting your system
8
What it means
The meter has detected a
problem with the test strip.
Possible cause is test strip
damage.
What to do
Repeat the test with a new test strip; see page50 or
page65. If the error message appears again, contact
Customer Service. Contact us at 1888567-3003.
What it means
Meter battery power is low
but there is still enough
battery power to perform
a test. The flashing low
battery (
) icon will
continue to appear until the
battery is replaced.
What to do
Replace the meter battery soon.
98
 Loading...