

Page 1

=VeenA^iZB^c^
3
Hjch]^cZHjeeaZbZciA^\]iHnhiZb
0,5
VT01
VT01_MAN_Rev5v3.indd 1VT01_MAN_Rev5v3.indd 1 4/22/09 2:53 PM4/22/09 2:53 PM
Job#: 0.0612 Title: VT01 Manual
Date: 04/22/09 Version: VT01-MAN-Rev5v3
Page 2

Dear Customer,
Thank you for purchasing the Verilux
®
HappyLite®
Mini Plus Sunshine Supplement Light System. You
have received an innovative and quality manufactured
product, backed by a one-year limited warranty. As a
Verilux® customer, your satisfaction means everything
to us. We look forward to serving you now and in the
future.
This product brings healthful Natural Spectrum
®
Daylight into your home or offi ce. Many other healthy
lighting products are available through our catalog and
online. To request a free copy of our catalog, call our
toll-free number 1-888-544-4865. You may also visit us
on the web at www.Verilux.com to learn more about all
our quality Verilux® products.
Have a Bright Day!
Nicholas Harmon
President, Verilux, Inc.
2
VT01_MAN_Rev5v3.indd 2VT01_MAN_Rev5v3.indd 2 4/22/09 2:53 PM4/22/09 2:53 PM
Page 3

Contents
Warnings and Precautions . . . . . . . . . . . . . . . . . . . . . . . . . . . . .4
Features . . . . . . . . . . . . . . . . . . . . . . . . . . . . . . . . . . . . . . . . . . .5
Set-up Instructions . . . . . . . . . . . . . . . . . . . . . . . . . . . . . . . . . . .6
Package Contents . . . . . . . . . . . . . . . . . . . . . . . . . . . . . . . . . 6
Bulb Installation . . . . . . . . . . . . . . . . . . . . . . . . . . . . . . . . . . .7
Diffuser Installation . . . . . . . . . . . . . . . . . . . . . . . . . . . . . . . .8
Selecting a Location . . . . . . . . . . . . . . . . . . . . . . . . . . . . . . .9
Operation . . . . . . . . . . . . . . . . . . . . . . . . . . . . . . . . . . . . . . . . . .10
Instructions for Use . . . . . . . . . . . . . . . . . . . . . . . . . . . . . . . 10
Recommended Usage . . . . . . . . . . . . . . . . . . . . . . . . . . . . 11
Bulb Removal and Replacement . . . . . . . . . . . . . . . . . . . . . . . . 12
Troubleshooting . . . . . . . . . . . . . . . . . . . . . . . . . . . . . . . . . . . . .13
Care and Cleaning . . . . . . . . . . . . . . . . . . . . . . . . . . . . . . . . . . . 13
Disclaimer . . . . . . . . . . . . . . . . . . . . . . . . . . . . . . . . . . . . . . . . .14
Technical Specifi cations . . . . . . . . . . . . . . . . . . . . . . . . . . . . . .14
Warranty . . . . . . . . . . . . . . . . . . . . . . . . . . . . . . . . . . . . . . . . . . 15
3
VT01_MAN_Rev5v3.indd 3VT01_MAN_Rev5v3.indd 3 4/22/09 2:53 PM4/22/09 2:53 PM
Job#: 0.0612 Title: VT01 Manual
Date: 04/22/09 Version: VT01-MAN-Rev5v3
Page 4

Warnings and Precautions
• Please read these instructions before using this lamp.
• For indoor use only.
• Do not place near any heat sources such as radiators, heat registers, stoves,
or other apparatus (including amplifiers) that produce heat.
• Do not block any ventilation openings.
• Do not defeat the safety purpose of the polarized plug. A polarized plug
has two blades with one wider than the other. The wider blade is provided
for your safety. If the provided plug does not fit in your outlet, consult an
electrician for replacement of the obsolete outlet.
• Protect the power cord from being walked on or pinched, particularly at
plugs, convenience receptacles and the point where the power cord exits the
lamp.
• Unplug this lamp during lightning storms or when unused for long periods.
• If the lamp has been damaged in any way, such as the power-supply cord or
plug is damaged, liquid has been spilled or objects have fallen onto the lamp,
the lamp has been exposed to rain or moisture, does not operate normally, or
has been dropped, it should not be operated. There are no user serviceable
parts in this lamp.
• Do not use with power supply voltage other than 120V AC.
• Avoid placing the lamp in areas that are dusty, humid/moist, lack ventilation
or are subject to constant vibration.
• Not for use with light dimmers, timers, motion detectors, voltage transformers
or extension cords.
• Close supervision is recommended when this lamp is used by or near
children, or others who may not understand the need for these precautions.
• Do not leave the lamp unattended during use.
• Do not use a lubricating agent in bulb assembly.
4
VT01_MAN_Rev5v3.indd 4VT01_MAN_Rev5v3.indd 4 4/22/09 2:53 PM4/22/09 2:53 PM
Page 5

Warnings and Precautions continued
WARNING: TO REDUCE THE RISK OF FIRE, ELECTRIC
SHOCK OR PERSONAL INJURY:
• Turn off/unplug and allow to cool before replacing bulb or cleaning.
• Light bulbs get hot quickly! Do not touch the bulb while the lamp is on.
• Do not look directly at the lighted bulb without the diffuser being in place.
• Do not operate the lamp in close proximity to flammable or combustible
vapors, such as aerosol spray products, or where oxygen is being
administered.
• Use only the type of bulb and maximum wattage indicated by Verilux®.
• Never cover the lamp when it is in operation.
• To prevent risk of shock or personal injury when cleaning lamp, make sure
you have turned off and unplugged the lamp, and allow suffi cient time for the
bulb to cool.
SAVE THESE INSTRUCTIONS
Features
Your new Verilux® HappyLite® Sunlight Supplement Light System is a
remarkable product with features that include:
• Natural sunlight delivered to your home, offi ce, dorm room or apartment, with
no dangerous UV rays.
• Up to 2,500 LUX of bright Natural Spectrum® light to lift spirits, sharpen
concentration and improve energy levels.
• Activates your body’s own energy enhancers to make you more alert and
productive.
• Compact design makes it easy to place in a convenient spot.
• Energy-effi cient, cool-burning 26-Watt 10,000-hour bulb.
• Convenient on-off power switch on cord.
• Best-in-class power system with electronic ballast and Flicker Elimination
Technology™ assure no-buzz operation and instant-on, fl icker-free
illumination.
5
VT01_MAN_Rev5v3.indd 5VT01_MAN_Rev5v3.indd 5 4/22/09 2:53 PM4/22/09 2:53 PM
Job#: 0.0612 Title: VT01 Manual
Date: 04/22/09 Version: VT01-MAN-Rev5v3
Page 6

Unpacking
Package Contents
Lamp
Diffuser
Bulb
6
VT01_MAN_Rev5v3.indd 6VT01_MAN_Rev5v3.indd 6 4/22/09 2:53 PM4/22/09 2:53 PM
Page 7

Bulb Installation
Set-up Instructions
To install the bulb, insert bulb into lamp by fi rmly holding bulb base and pushing
down and rotating slightly in a clockwise direction to seat properly.
7
VT01_MAN_Rev5v3.indd 7VT01_MAN_Rev5v3.indd 7 4/22/09 2:53 PM4/22/09 2:53 PM
Job#: 0.0612 Title: VT01 Manual
Date: 04/22/09 Version: VT01-MAN-Rev5v3
Page 8

Set-up Instructions continued
Diffuser Installation
A
B
Top Track
SideTab C
HappyLite
Side Slot
1. Attach the diffuser to the lamp
body by first inserting the tab
located at the bottom of the
diffuser (A) into the opening of
the lamp base (B).
2. Insert one diffuser corner at
a time into the side track and
gently down into place into the
bottom track.
3. Snap side tab into place on
side slot. Entire side of diffuser
should be seated into the track.
Repeat for other side of diffuser.
Side Track
Diffuser
Corner
Note: Alignment of
diffuser corner into
Bottom
Track
Bottom
Track
side track
8
VT01_MAN_Rev5v3.indd 8VT01_MAN_Rev5v3.indd 8 4/22/09 2:53 PM4/22/09 2:53 PM
Page 9

Set-up Instructions continued
4. Firmly push lens down until Tab
A snaps into place. Align top of
lens in top track as necessary.
Tab A
Selecting a Location
• Place your Verilux® HappyLite® Mini Plus Sunshine Supplement Light System
on a table or other flat surface.
• For best performance, place the lamp within 18 inches of you.
Note: Avoid placing this lamp in areas that are exposed to direct sunlight or
close to heat-radiating products, such as heaters. Do not place the lamp on
the top of appliances that radiate heat.
WARNING: DO NOT BLOCK VENTS
Vents are necessary for proper function of the electronic ballast;
blocking them may cause overheating of the electronics and
increase risk of fire.
9
VT01_MAN_Rev5v3.indd 9VT01_MAN_Rev5v3.indd 9 4/22/09 2:53 PM4/22/09 2:53 PM
Job#: 0.0612 Title: VT01 Manual
Date: 04/22/09 Version: VT01-MAN-Rev5v3
Page 10

Operation
Instructions for Use
Light therapy consists of sitting close to the HappyLite
open. While staying oriented toward the light, feel free to engage in other
activities such as reading, writing, hobbies and crafts, sewing, needlepoint,
applying makeup, painting, or working at your computer or desk.
1. Turn on the lamp and allow a few
minutes for the bulb to achieve full
brightness.
®
2. The HappyLite
Mini should be
positioned 5-18 inches from your
eyes, and should be slightly offset
from center (see diagram) Note: It is
not necessary to stare directly at
the light.
The light from the HappyLite® Mini must
be directed at your eyes; therefore, your
eyes must be open to achieve the full
benefi t. Note: Tinted glasses reduce the
amount of light reaching your eyes.
When you are feeling sluggish and
lethargic, spend more time with the
light, sit closer to the light, or add more
lighting devices to increase the intensity.
If you experience edginess, or are over
stimulated, move the light further away
or reduce usage time.
®
Mini with your eyes
10
VT01_MAN_Rev5v3.indd 10VT01_MAN_Rev5v3.indd 10 4/22/09 2:53 PM4/22/09 2:53 PM
Page 11
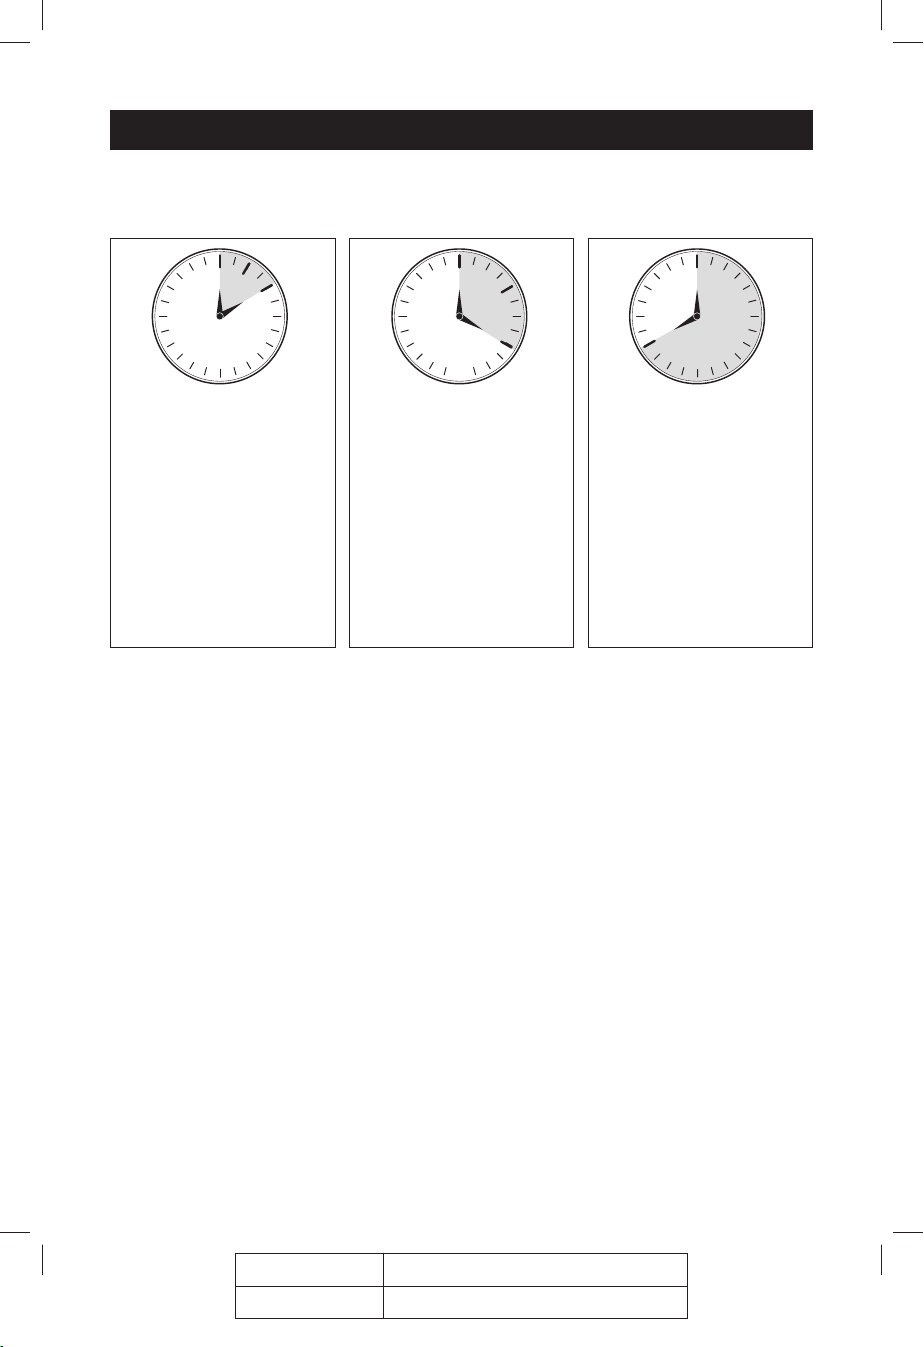
Recommended Usage
Operation continued
1-2
2-4 8
Hours Hours Hours
5-12”
From
Light
Recommended exposure time is a function of output and distance
Individual results may vary
*2,500 LUX at 5”
Optimum time depends upon how your body uniquely responds to light. Typical
recommended usage time is 1 to 6 hours per day. Ideally, the HappyLite
should be used fi rst thing in the morning. Note: We recommend limiting use
during the evening.
Different exposure strategies work best for different people. It is important to
establish a distance and schedule that is comfortable for you. We recommend
you use the light regularly and at about the same time each day. It is not
necessary to sit in front of the lamp continuously. You can divide the time into
several mini sessions. Continue to use the HappyLite® daily until you feel an
improvement in your mood and activity level.
*
12-18”
From
Light
*
18”+
From
Light
*
®
11
VT01_MAN_Rev5v3.indd 11VT01_MAN_Rev5v3.indd 11 4/22/09 2:53 PM4/22/09 2:53 PM
Job#: 0.0612 Title: VT01 Manual
Date: 04/22/09 Version: VT01-MAN-Rev5v3
Page 12

Bulb Removal and Replacement
Your HappyLite® uses a bulb manufactured only by Verilux®. To order a
replacement bulb, please call Verilux®, toll-free, at 1-800-454-4408.
To Replace the Bulb:
1. Unplug the lamp from power outlet.
2. To access the bulb, remove the plastic diffuser by pressing the tabs (D) and
lifting out the diffuser.
3. Firmly hold the bulb base (B) (do not hold the glass portion of the bulb) and
turn bulb in a slight counter-clockwise direction until it releases from the
socket.
4. To re-install bulb and plastic diffuser, see instructions on pages 6 and 7.
B
D
12
VT01_MAN_Rev5v3.indd 12VT01_MAN_Rev5v3.indd 12 4/22/09 2:53 PM4/22/09 2:53 PM
Page 13
Troubleshooting
Before requesting service on your Verilux® lamp, please read the following:
• Make sure all power connectors, cords, and plugs are inserted fully and
securely.
• Be sure the bulb is securely seated in the socket. (See pages 6 and 7)
• Make sure there is power to the wall outlet or try another outlet – one that is
not connected to a dimmer.
PROBLEM CHECK SOLUTION
Light won’t
come on
Blackening/darkening
at ends of bulb
Light Flickers
Has the plug come
loose?
Is the bulb old?
Is the bulb connected
securely into socket?
Is the bulb new?
Is the bulb old?
Has the plug come
loose?
Is the bulb connected
securely to the socket?
Is the lamp connected
to a dimmer switch?
Insert plug securely into wall outlet.
Check bulb for blackening/darkening at bottom of spiral where it joins the
base (an indicator of bulb life) and replace bulb.
Be sure the bulb is securely seated into socket, repeat the bulb
installation process.
Sometimes when a new bulb is turned on for the first time the tube will
darken, but this will fade after a few minutes.
With older bulbs darkening of the tube indicates end of bulb life. (This
doesn't affect operation except to reduce the amount of light available
since the phosphor in that area has become inactive). Bulb replacement
is recommended.
Insert plug securely into wall outlet.
Be sure the bulb is securely seated into socket, repeat the bulb
installation process.
Connect lamp plug only to wall outlet without dimmer switch.
Care and Cleaning
Your Verilux® lamp is made from high quality materials that will last for many
years with a minimum of care.
Clean only with a soft dry cloth – DO NOT USE SOLVENTS OR CLEANERS
CONTAINING ABRASIVES OR AMMONIA
WARNING: To prevent risk of shock or personal injury when
cleaning lamp, make sure you have turned off and unplugged the
lamp, and allow suffi cient time for the bulb to cool.
13
VT01_MAN_Rev5v3.indd 13VT01_MAN_Rev5v3.indd 13 4/22/09 2:53 PM4/22/09 2:53 PM
Job#: 0.0612 Title: VT01 Manual
Date: 04/22/09 Version: VT01-MAN-Rev5v3
Page 14

Disclaimer
Verilux® does not make any medical claims regarding the use of this product.
This product is solely intended for use as portable supplemental lighting;
and is not listed as a medical device. Always consult a qualifi ed health care
professional before using light therapy. It is especially advisable that you contact
a doctor if:
• You are hypersensitive to light and/or experience eye discomfort.
• You are currently taking any medication that might increase your sensitivity
to light.
• There is no improvement after using the product for two weeks, or if you feel
uncomfortable after using the product.
• You have a history of eye disease including, but not limited to, cataracts or
macular degeneration.
Each individual’s sensitivity to light is different. Each person must use his/her
own judgment when determining the length of time spent exposed to the light.
The use of this product is the sole responsibility of the consumer.
Note: The bulb used in this lamp does not emit any harmful levels of UV.
Technical Specifi cations
HAPPYLITE® MINI PLUS
Environment
Operating Temperature: 15°C to 35°C; 56°F to 95°F
Storage Temperature: 0°C to 40°C; 32°F to 104°F
Relative Humidity: 5% to 95% non-condensing
Bulb
Replacement bulb: 26-Watt 10,000-hour bulb (replace with Verilux® brand only,
Model number CFS26GU24VLX)
Power
Input Power: AC 120V~60Hz
UL Listed
14
VT01_MAN_Rev5v3.indd 14VT01_MAN_Rev5v3.indd 14 4/22/09 2:53 PM4/22/09 2:53 PM
Page 15

Warranty
One-Year Limited Warranty
ATTENTION! ONCE OPENED, PLEASE DO NOT RETURN THIS PRODUCT TO THE
STORE WHERE IT WAS PURCHASED FOR REPAIR OR REPLACEMENT!
Many questions may be answered by visiting www.Verilux.com, or you may call our
customer service department at 1-888-544-4865
This limited warranty is provided by:
Verilux, Inc., 340 Mad River Park, Waitsfi eld, VT 05673
Verilux® warrants this product to be free from defects in material and workmanship for a
period of one year from the date of the original retail purchase. During the limited warranty
period, Verilux, Inc. will, at its option, repair or replace defective parts of this product, at
no charge to the customer, subject to the following limitations. This limited warranty does
not include any postage, freight, insurance or delivery fees. This warranty does not cover
damage, defect or failure caused by or resulting from accident, external destruction,
alteration, modifi cation, abuse, misuse, or misapplication of this product.
If, during the fi rst year of ownership, this product fails to operate properly, it should be
returned as specifi ed below:
Please pack the defective product in its original protective packing and box, with a copy of
your sales receipt, name, address and telephone number, along with $9.95 (check or money
order to cover shipping and handling), and send to:
For U.S. Postal Service Only:
®
Verilux
Warranty
Service Center, c/o WTB
P.O. Box 119, West Redding, CT 06896
32 Henry Street, Bldg 17A, Bethel, CT 06801
Please allow 4-6 weeks before you receive the repaired or replaced product.
For Fed Ex & UPS Only:
®
Verilux
Warranty
Service Center, c/o WTB
ATTENTION: When returning a product, be aware that damage during shipping is the
responsibility of the purchaser and will void any warranty claim. We recommend that
you insure the shipment by shipper when returning this product or any parts. Be sure to
return product in original packaging.
Note: Verilux® recommends using a quality surge suppressor on all electronics equipment. Voltage variations
and spikes can damage electronic components in any system. A quality suppressor can eliminate the vast
majority of failures attributed to surges and may be purchased at electronics stores.
Due to ongoing improvements, actual product may have slight variations from the product described in this manual.
15
VT01_MAN_Rev5v3.indd 15VT01_MAN_Rev5v3.indd 15 4/22/09 2:53 PM4/22/09 2:53 PM
Job#: 0.0612 Title: VT01 Manual
Date: 04/22/09 Version: VT01-MAN-Rev5v3
Page 16

Please visit our web site at:
www.Verilux.com
or call our Customer Service Department at
1-888-544-4865
Representatives are available 8 a.m. – 10 p.m. M – S, 9 a.m. – 8 p.m. Sunday EST
340 Mad River Park, Waitsfi eld, VT 05673
VT01-MAN-Rev5
VT01_MAN_Rev5v3.indd 16VT01_MAN_Rev5v3.indd 16 4/22/09 2:53 PM4/22/09 2:53 PM
© Copyright 2009 Verilux, Inc. All rights reserved.
Printed in China for: Verilux, Inc.
 Loading...