

Page 1

CWST1
Page 2

GENERAL PRECAUTIONS
• Do NOT dismantle.
• Do NOT place near fl ammable or combustible items.
• Do NOT alter power cord.
• Unplug from electrical outlet during lightning storms or when unused
for long periods of time.
• Unplug from electrical outlet before cleaning or changing bulbs.
• For indoor use only.
Main Parts & Controls
A. Lens Cover
B. On/Off Switch
C. Wall Mount Bracket
D. Carrying Handle
E. Built-in Stand
F. Power Cord
2
Page 3

IMPORTANT SAFETY INSTRUCTIONS
Thank you for purchasing the Verilux® ClearWave® Deluxe Phototherapy
Skincare System. Please read the following safety information before
using.
IMPORTANT:
• Verilux
®
does not make any
medical claims. This product is
not intended to treat or prevent
any illness.
• It is recommended that you
consult a medical professional
before using the ClearWave
®
• Before plugging in the
ClearWave
®
, check to make
sure the voltage corresponds
with the main voltage of your
location (120 volts).
• Do not use the ClearWave
®
outside or in wet locations such
as bathrooms. It is rated for
indoor, dry use only.
• Children should be supervised
around the ClearWave
®
.
• Not for use with light dimmers,
timers, or motion detectors.
• This product may cause
interference with radios,
cordless telephones, or devices
that use a wireless remote
control, such as televisions. If
interference occurs, move the
product away from the device,
plug the product or device into
a different outlet, or move the
product out of the line of sight of
the remote control receiver. This
product complies with part 18
of FCC.
• The light bulbs may become
loose during transit. To reinstall
the light bulbs, see the bulb
replacement instructions.
• The Verilux
®
ClearWave® is an
electrical device.
.
DO NOT USE NEAR WATER
It is advisable that you contact
a doctor if:
• You are hypersensitive to
light and/or experience eye
discomfort.
• You are currently taking certain
light sensitive drugs such as
Tetracycline.
• There is no improvement after
using the ClearWave
for 12 weeks, or if you feel
uncomfortable.
• You have a history of eye
disease.
• Do not treat the genitalia.
• Do not use if you are pregnant.
• If your skin responds negatively,
discontinue use and consult a
dermatologist.
®
Deluxe
3
Page 4

IMPORTANT SAFETY INSTRUCTIONS
THIS PRODUCT MUST BE GROUNDED.
This product is equipped with a cord having an equipment–grounding
conductor and a grounding plug. The plug must be plugged into
anappropriate outlet that is properly installed and grounded in
accordance with all local codes and ordinances.
DANGER
Improper connection of the equipment–grounding conductor can
result in a risk of electric shock. Check with a qualifi ed electrician or
serviceman if you are in doubt as to whether the product is properly
grounded. Do not modify the plug provided with the product – if it
will not fi t the outlet, have a proper outlet installed by a qualifi ed
electrician. This product is for use in a nominal 120 volt circuit, and has
a grounding plug that looks like the plug illustrated in sketch (Fig. A). A
temporary adapter that looks like the adapter illustrated in Fig. B may
be used to connect this plug to a 2-pole receptacle as shown in Fig. B,
if a properly grounded outlet is not available. The temporary adapter
should be used only until a properly grounded outlet (Fig. A) can be
installed by a qualifi ed electrician. The green colored rigid ear, or lug
extending from the adapter must be connected to a permanent ground
such as a properly grounded outlet box cover. Whenever the adapter is
used, it must be held in place by a metal screw.
4
Page 5

INSTRUCTIONS FOR USE
To use the ClearWave® Deluxe Phototherapy Skincare System:
1. Plug into properly grounded
outlet.
2. Turn the unit on using the on/off
switch. Allow a few minutes at
the start of each session for
bulbs to achieve full illumination.
3. Gently wash the affected parts
of the skin with a neutral PH
soap and dry the skin.
4. Place the goggles (supplied)
over your eyes, position yourself
within 6 inches of the front of
the ClearWave
®
(Figure 1).
5. Turn your face occasionally to
ensure overall exposure.
6. Based on research, a 15 minute
session daily for 8–12 weeks
should produce the desired
results.
7. While using ClearWave
®
,
you may talk on the phone,
meditate, or listen to music.
8. When fi nished with the
session, turn ClearWave
®
off,
remove goggles, and unplug
ClearWave
®
from the wall.
Figure 1
Note: ClearWave® does not contain harmful UV and WILL NOT cause
sunburn or skin cancer with repeated use.
5
Page 6

INSTRUCTIONS FOR USE
Hanging the ClearWave®
Place the screw included into the wall
leaving approximately 3mm between the
screw head and the wall. Be sure to use
an the included anchor if mounting into
sheet rock or other soft material. Insert
the screw head into the hole located in
the upper part of unit. (Figure 2).
Figure 2
Standing the ClearWave®
on a Table Top
Unfold the stand on back of lamp
(Figure 3) and place the ClearWave
on a stable, fl at surface.
Transporting the Unit
The ClearWave
There is a convenient handle located on the
back (Figure 4).
Figure 4
6
®
Figure 3
®
is very light and easy to carry.
Page 7

BULB REPLACEMENT INSTRUCTIONS
Step 1: Opening the
Lens Cover
Place the ClearWave
back on a large fl at surface.
Press down gently on the
center of the lens cover. (See
Figure 5). This releases the
locking tabs located under
the grey handles. Open the
lens cover by grasping the
grey handles with your hands.
Remove the lens and gently
place it next to the unit with
the logo face up.
Step 2: Opening the
Bulb Clips
Locate the clear plastic clips
across each fl uorescent tube
(Figure 6). Put a fi nger under
the clear plastic clip on the
outer side and pull up (See
Figure 7). The clip should pop
open. Repeat on other side.
®
on its
7
Page 8
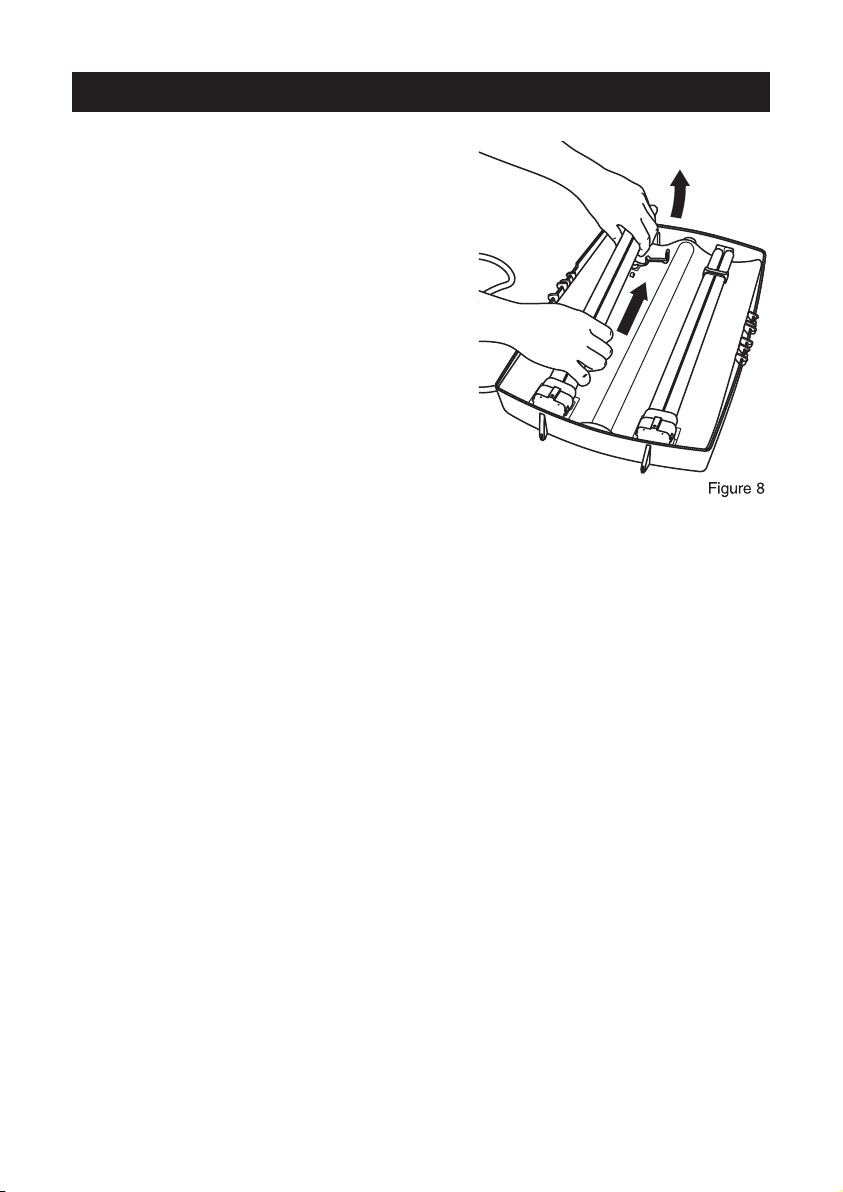
BULB REPLACEMENT INSTRUCTIONS
Step 3: Removing Bulbs
Gently lift the fl uorescent tube up
and out of the clip holder. Grasp
the tube by the white plastic base
with the Verilux
the tube from the socket by pulling
the tube towards the black cushion
pads. (See Figure 8). Repeat
removal of the second bulb.
Step 4: Installing New Bulbs
Ensure the ClearWave
back on a large fl at surface. Hold
the fl uorescent tubes by the white
plastic base, not the glass. Ensure
the Verilux
up the pins on the base of the
fl uorescent tube with the holes
in the socket. Gently push the
bulb into the socket until it snaps
securely in place. Repeat on other
side.
®
logo and remove
®
is on its
®
logo is facing up. Line
Bulb Disposal: All fl uorescents contain some amount of mercury.
Some states have special requirements regarding their disposal.
Please go online to: www.lamprecycle.org or call
1-866-300-5606 for more information.
8
Page 9

BULB REPLACEMENT INSTRUCTIONS
Step 5: Closing the Bulb Clips
Ensure the plastic bulb clips are
centered on the white protective
bands. Gently push on the upper
portion of the fl uorescent tube
until it slides snuggly into the
clear plastic clip. Close the clip
over the tube. The clip will click
when fastened. Repeat on other
side. (Figure 9).
Step 6: Replacing the Lens
Cover
Align the lens cover over the
open face of the unit with the
ClearWave
the lamp. Place your thumbs one
inch beyond the grey handles
towards the center of the unit
while your other fi ngers grasp
under the lip of the grey handles
(see Figure 10). Pull outward
with your fi ngers while pushing
down on the lens with your
thumbs. Release your fi ngers to
snap the lens into place.
Plug your ClearWave
electrical socket and turn it on to
ensure the bulbs were properly
installed into their sockets. If the
bulbs do not illuminate, ensure
the bulbs are fully seated into the
sockets.
®
logo at the bottom of
®
into an
9
Page 10

CARE & CLEANING
Your ClearWave® Deluxe Phototherapy Skincare System is made from
high quality materials that will last for many years with minimum care.
You may want to periodically clean the inside of the lens and outside
parts, using a mild non-abrasive cleaner and soft cloth. When cleaning,
make sure you have turned off and unplugged the unit, and allowed
suffi cient time for the unit to cool.
DO NOT USE SOLVENTS OR CLEANERS CONTAINING
ABRASIVES, OR AMMONIA BASED CLEANERS
Cleaning the lens is important for maintaining optimum light output.
Periodically remove the lens (refer to lens removal instructions) and
clean with soft damp cloth. All liquid should be properly wiped away
and dried prior to restoring power.
TROUBLESHOOTING
Light fl ickers.
If bulb fl ickers when turned on,
the bulb is not seated fully into the
socket. If this occurs, repeat the
bulb installation process applying
additional force to ensure that the
bulb is inserted fully into the socket.
Does not illuminate.
Make sure that the bulbs are
secured into the sockets.
Sometimes in shipping they
will come loose. Try a different
grounded outlet. In many cases,
this will correct the problem.
IMPORTANT – Grounded outlets
must be used for proper function
of the unit. If both bulbs do not
illuminate when you apply power,
this may indicate an internal
problem. Please call Verilux
®
Customer Service at
1-888-544-4865.
See Warranty section.
Only one bulb illuminates.
If only one bulb illuminates, it
is most likely a bad bulb.Try
swapping bulbs and turn on again.
If the same bulb fails to illuminate
in the swapped position, the bulb
needs to be replaced.
Bulb blackening at the ends.
This is a common phenomenon
with most fl uorescent tubes as they
age. The black areas don’t affect
operation except to slightly reduce
the amount of light available since
the phosphor in that area is dead.
Bulb replacement is recommended.
NOTICE – When returning a unit,
be aware that damage during
shipping is the responsibility of
the purchaser and will void any
warranty claim.We recommend
that you purchase insurance when
shipping this unit or any parts. Be
sure to return product in original
packaging.
10
 Loading...