

Veridian Healthcare SmartHeart 01-540 series Quick Start Manual
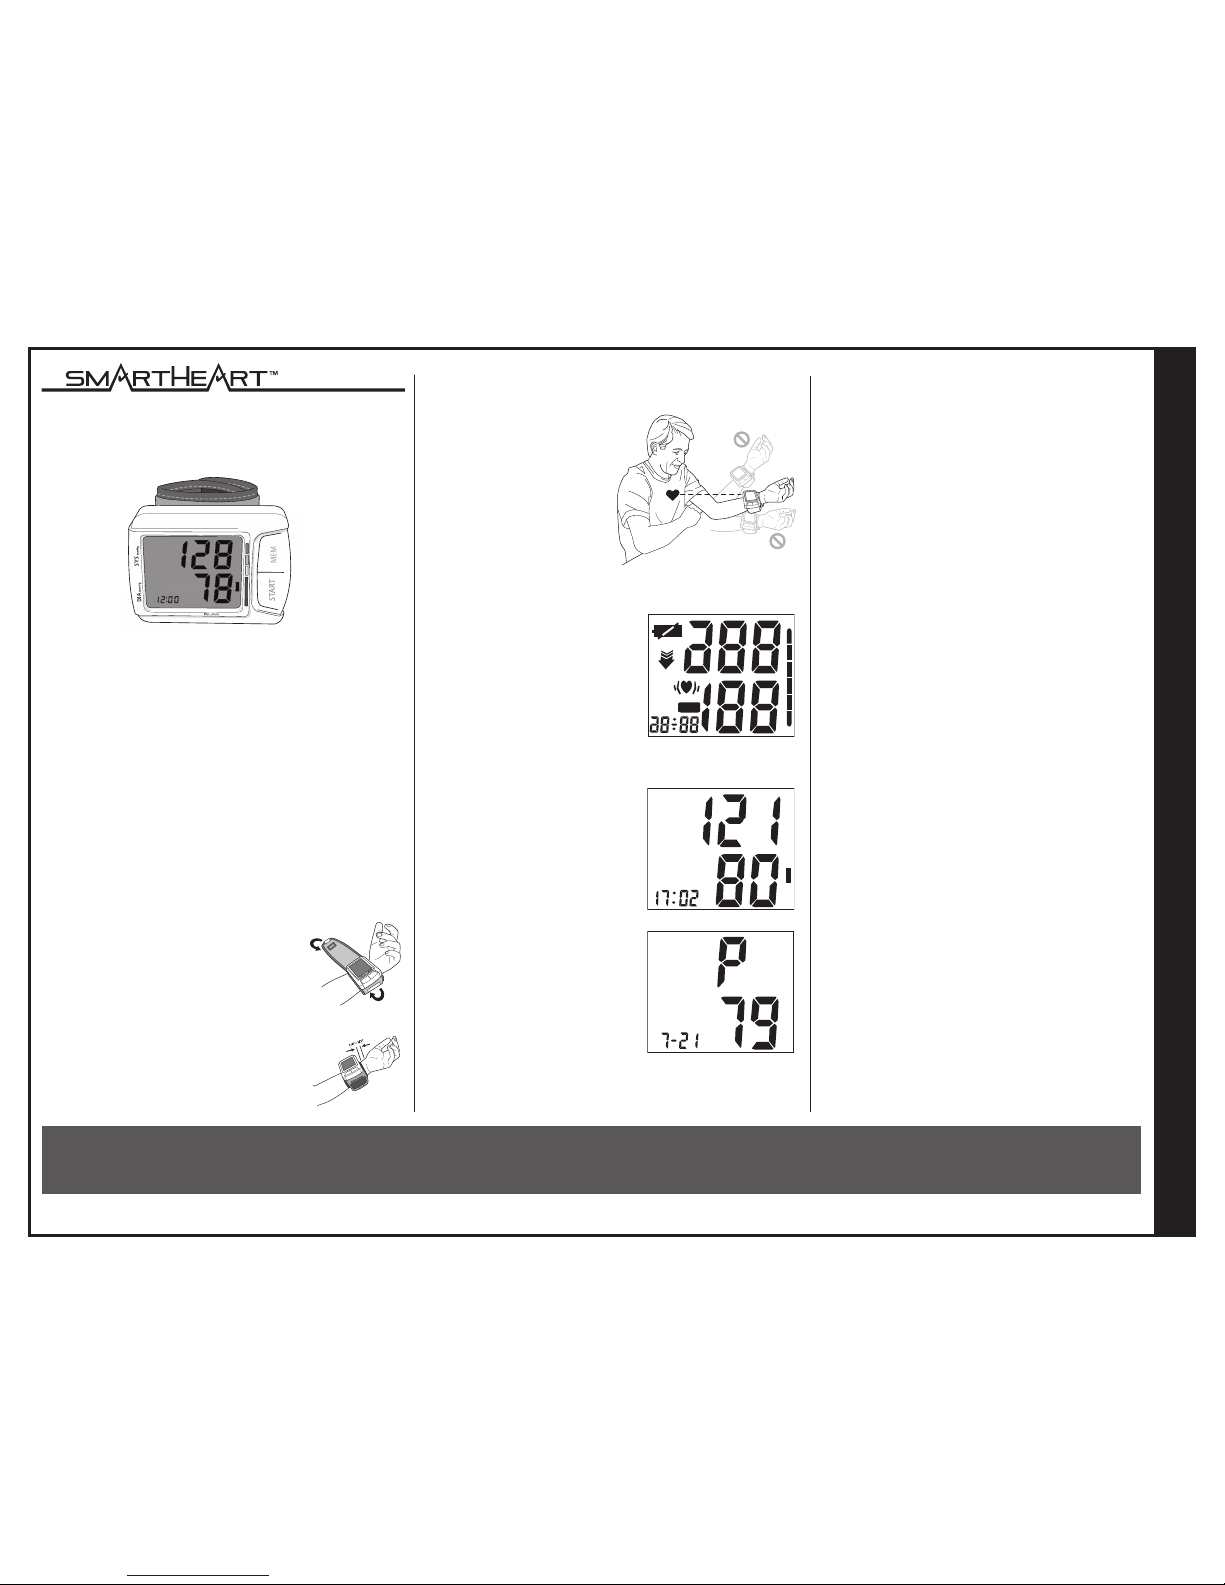
Taking the Measurement
1.Rest your elbow on a solid
surface with your palm
facing upward. Elevate
your arm so that the cuff is
at the same level as your
heart. Be certain that cuff is
elevated to the proper
level; you may choose to
support your hand with a
folded towel or book. Relax
your left hand.
2.Press the START button to turn
the unit on; the unit will run a selftest, Fig 1.
3.The cuff will automatically inate
to approximately 190mmHg or
40 mmHg higher than the last
systolic pressure reading stored in
memory.
4.When the measurement is
complete, your blood pressure
measurement and pulse will
display separately on the screen
alternating repeatedly every 2-3
seconds, Fig 2. The systolic and
diastolic readings will display at
the same time.
5.Consult the included Instruction
Manual for information on
interpreting your reading results.
6.The results will automatically be
stored in memory up to 60
readings.
7.Select START to turn the unit off
and conserve energy and battery
life. The unit will automatically
shut-off and revert to time/date
mode after approximately 1
minute.
A 15 minute resting period is needed to stabilize the
body prior to taking a reading. No eating, drinking
or smoking while resting.
Applying the Wrist Cuff
1.Be seated at a table or desk with your
feet at on the oor. Hold your left arm
in front of you with your palm facing
upward.
2.Apply the preformed cuff to your left
wrist so that the digital display face is
positioned on the inside area of your
wrist facing you.
3.Adjust the cuff 1/4” - 1/2” from the edge
of the head of the ulna bone. The cuff
should t comfortably, yet snugly around
your wrist.
QUICK START GUIDE • ENGLISH AND SPANISH
THIS QUICK START GUIDE IS INTENDED AS
A SUPPLEMENT TO THE INSTRUCTION
MANUAL. PLEASE READ THE COMPLETE
MANUAL PRIOR TO FIRST USE.
IF YOU HAVE ANY QUESTIONS OR ARE EXPERIENCING DIFFICULTIES, PLEASE CALL THE TOLL-FREE
CUSTOMER SERVICE HELP LINE FOR FURTHER ASSISTANCE AT 1-866-326-1313.
#93-2032 08/14
©2014 Veridian Healthcare
Before applying your blood pressure cuff, be sure your
wrist is within the appropriate range: wrist circumference
5-1/2” – 7-5/8” (14-19.5 cm)
Fig. 1
Pulse Results
Please Note:
• You can stop the ination or deation process of
the cuff at any time by pressing the START button.
• Many factors such as genetics, age, sex, altitude,
physical activity, anxiety, muscular development,
certain medications or even the time of day can
inuence blood pressure.
• Blood pressure varies from moment to moment;
even readings taken after proper rest periods can
vary. Home blood pressure readings may vary as
much as 10-20 points from ones taken at your
doctor’s ofce.
• Variations in your individual readings should only
be interpreted by your physician or trained health
care professional.
• We encourage you to consult with your physician
to achieve the maximum benet from your blood
pressure monitor.
MEM
Automatic Digital
Wrist Blood Pressure Monitor
Model #
01-540 series
Fig. 2
Systolic/Diastolic Results
Es necesario un período de descanso de 15 minutos
para estabilizar el cuerpo antes de tomarse la presión.
No coma, no beba ni fume mientras descansa.
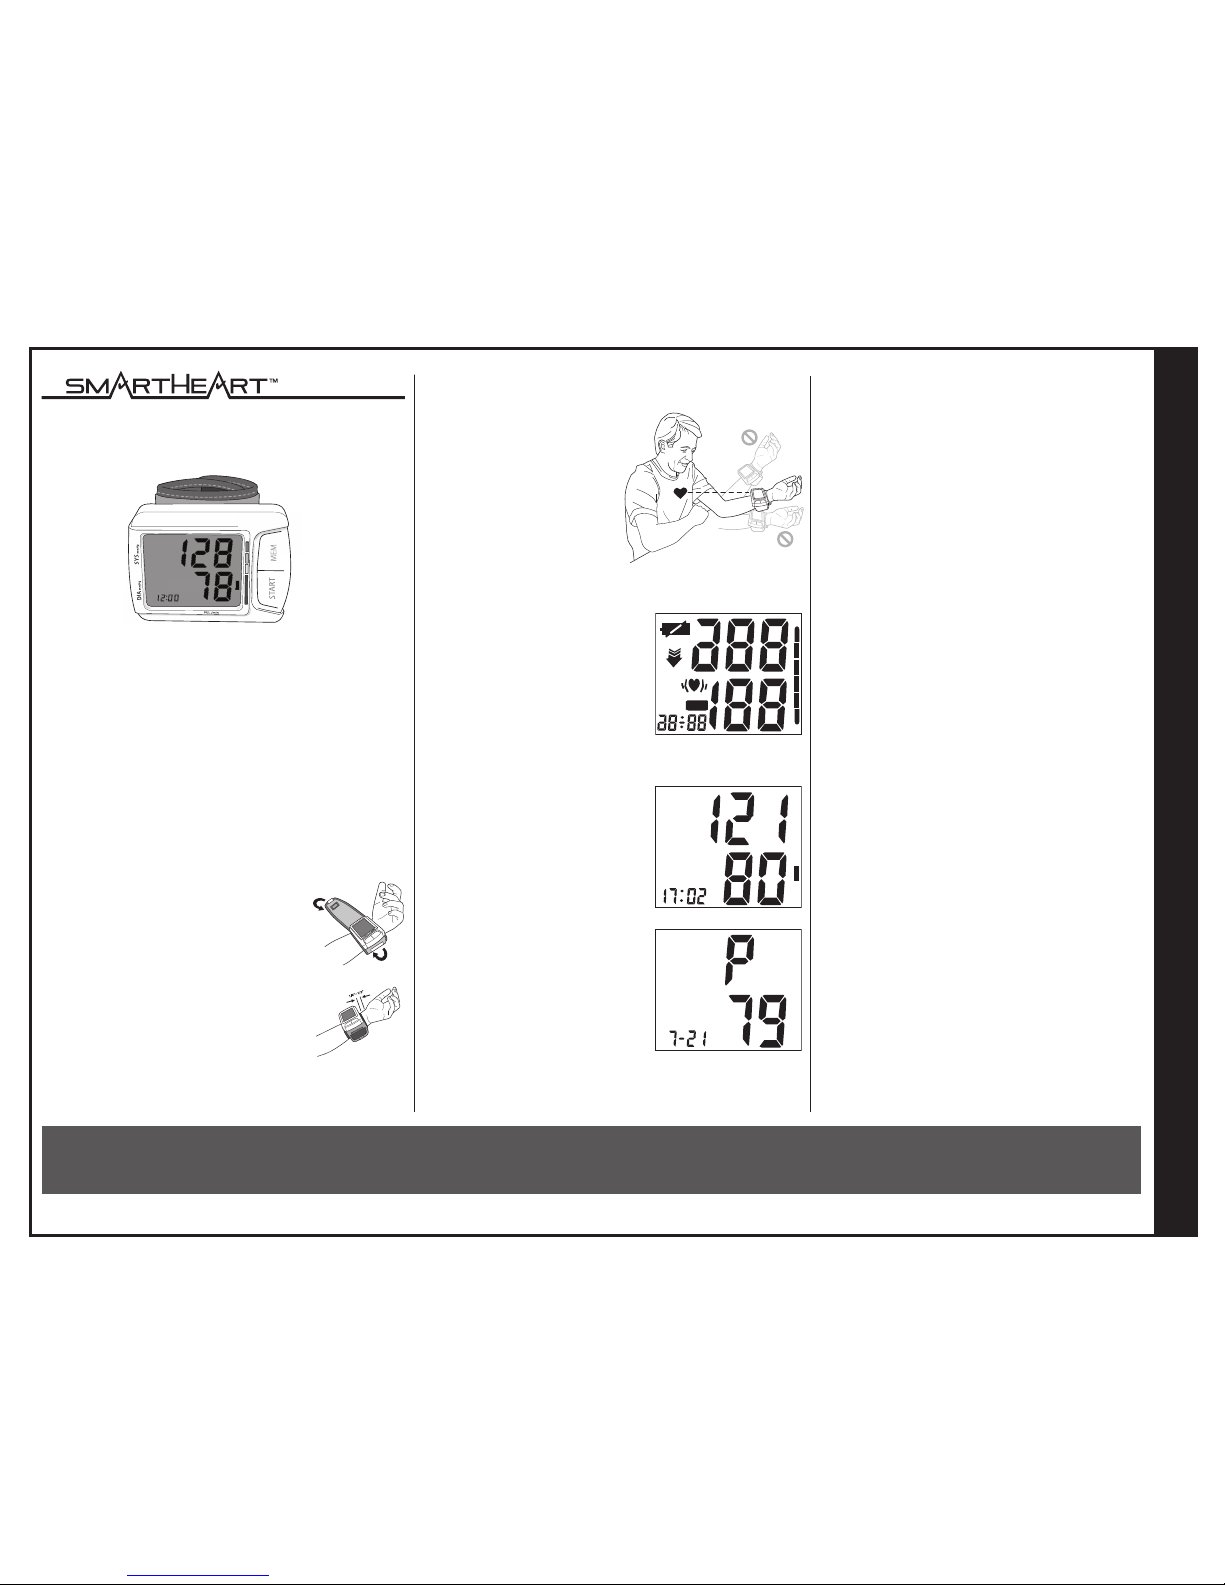
Cómo colocar el brazalete para muñeca
1. Permanezca sentado a una mesa o
escritorio, con los pies planos sobre el
suelo. Sosténgase el brazo izquierdo frente
a usted, con la palma hacia arriba.
2. Colóquese el brazalete preformado en la
muñeca izquierda de manera tal que la
cara del visor digital quede posicionada del
lado interno de la muñeca, mirando hacia
usted.
3. Ajustel el brazalete 1/4” - 1/2” desde el
borde de la cabeza del hueso ulna. El
brazalete debe sentirse cómodo, aunque
ajustado, alrededor de la muñeca.
GUÍA DE REFERENCIA RÁPIDA • ESPAÑOL
ESTA GUÍA DE REFERENCIA RÁPIDO SE PIENSA
COMO SUPLEMENTO AL MANUAL DE LA
INSTRUCCIÓN. LEA EL MANUAL COMPLETO
ANTES DEL PRIMER USO.
SI TIENE ALGUNA DUDA O EXPERIMENTA PROBLEMAS, LLAME A LA LÍNEA GRATUITA DE ASISTENCIA AL
CLIENTE PARA OBTENER ASISTENCIA ADICIONAL, 1-866-326-1313.
#93-2032 08/14
©2014 Veridian Healthcare
Antes de colocarse el brazalete de presión arterial,
asegúrese de que la muñeca esté dentro del rango de
brazalete correspondiente: circunferencia de la muñeca
5-1/2” – 7-5/8” (14-19.5 cm)
Tenga en Cuenta lo Siguiente
• Para interrumpir el proceso de inado o
desinado en cualquier momento, presione el
botón START.
• Muchos factores pueden inuir en la presión
arterial, como por ejemplo genética, edad, sexo,
altitud, actividad física, ansiedad, desarrollo
muscular, determinada medicación o, incluso, la
hora del día.
• La presión arterial varía de un momento al otro;
incluso las lecturas tomadas después de períodos
de descanso adecuados pueden variar. Las
lecturas de presión arterial en el hogar pueden
diferir en 10 a 20 puntos de las tomadas en el
consultorio del médico.
• Las variaciones en sus lecturas individuales sólo
debe interpretarlas su médico o un profesional de
cuidados médicos capacitado.
• Lo instamos a que consulte con su médico para
lograr el óptimo benecio de su monitor de
presión arterial.
Automático Digital
Monitor de Muñeca Para la Presión Arterial
Modelo #
01-540 serie
Toma de Lecturas
1.El codo debe descansar
sobre una supercie sólida,
con la palma de la mano
hacia arriba. Levante el
brazo hasta que el
brazalete quede al mismo
nivel de su corazón.
Asegúrese de que el
brazalete quede elevado al
nivel correcto; puede
apoyar la mano sobre una
toalla doblada o un libro.
Relaje su mano izquierda.
2.Oprima el botón de encendido
START para encender la unidad;
la unidad realizará una prueba
automática, Fig 1.
3.El brazalete se inará
automáticamente hasta alcanzar
aproximadamente 190mmHg ó
40 mmHg más que la última
lectura de presión sistólica
almacenada en la memoria.
4.Cuando haya terminado de
medir, la medición de su pulso y
presión arterial se exhibirán por
separado en el visor,
alternándose varias veces cada
2 a 3 segundos, Fig 2. Las
lecturas sistólica y diastólica se
exhibirán simultáneamente.
5.Para información acerca de la
interpretación de los resultados
de las lecturas, consulte el
Manual de Instrucciones que se
incluye.
6.La lectura se almacenará
automáticamente en la memoria,
hasta un máximo de 60 lecturas.
Fig. 1
Pulso Resultados
MEM
Fig. 2
Sistólica/Diastólica Resultados
7.Seleccione START para apagar la unidad y
ahorrar energía y la vida útil de las baterías. La
unidad se apagará automáticamente y volverá al
modo de fecha/hora después de
aproximadamente 1 minuto.
 Loading...