

Veridian Healthcare 01-5041, 01-5042, 01-506 Instruction Manual
m
m
H
g
M
M
D
Semi-Automatic
Digital Blood Pressure
Arm Monitor
INSTRUCTION MANUAL • ENGLISH & ESPA
Ñ
OL
Model 01-5041 (adult)
Model 01-5042 (large adult)

2 – ENGLISH
STOP!
PLEASE ENSURE YOU HAVE ALL OF THE FOLLOWING
COMPONENTS BEFORE USING YOUR DIGITAL BLOOD
PRESSURE MONITOR
IF YOU ARE MISSING ANY PARTS, INCLUDING INSERTS OR INSTRUCTION
MANUALS, DO NOT RETURN TO PLACE OF PURCHASE. CONTACT
CUSTOMER CARE AT 866-326-1313.
Digital Monitor
m
m
H
g
M
Adult Arm Cuff
4 AA Batteries
Canvas Storage Bag
Instruction Manual
Quick Start Guide
Blood Pressure Reading Tracking Log
FAQ Information Sheet
Replacement Parts Order Form

ENGLISH – 3
Care and Safety Information......................................................................4-5
Introduction ..................................................................................................6
Features of Digital Blood Pressure Monitor....................................................7
Getting Started .............................................................................................8
Battery Installation and Replacement / AC Power..........................................9
Setting Date and Time ................................................................................10
Applying Your Blood Pressure Cuff.........................................................11-12
Taking Your Blood Pressure Reading......................................................13-14
Interpreting your Results .......................................................................15-16
Memory Function........................................................................................17
Care and Maintenance................................................................................18
Description of Device & Label Symbols.......................................................19
Display Symbols .........................................................................................20
Troubleshooting & Error Codes .............................................................21-22
FCC Statement ...........................................................................................23
Electromagnetic Compatibility ...............................................................24-27
Specifications.............................................................................................28
Warranty.....................................................................................................29
Instrucciones en Español.......................................................................31-60
Toll-Free Customer Care Help Line: 1-866-326-1313
Monday – Friday 8:30 a.m. – 4:30 p.m. CST
INDEX
Manufactured for:
Veridian Healthcare
1175 Lakeside Drive
Gurnee, IL 60031
www.veridianhealthcare.com
Made in China
#93-1039 11/14
©2014 Veridian Healthcare, LLC

4 – ENGLISH
NOTE: Read all instructions and inserts included with this monitor carefully before use. The
following basic precautions are needed when using an electrical product.
CAUTION: Failure to read and observe all precautions could result in personal injury or
equipment damage.
Improper care or use of your blood pressure monitor may result in injury, damage to the unit or
ineffective treatment. Following these instructions will ensure the blood pressure monitor’s
efficacy and long life.
GENERAL CAUTIONS AND WARNINGS
• Measurement results should be discussed with your physician or healthcare
professional; never self-diagnose or attempt treatment as this may be dangerous
• Intended for adult use only; this device is not approved for infant or child use
• Keep out of reach of children
• Do not use the unit if it has any damaged parts, if it has been submersed in water or dropped
• If any abnormality occurs, discontinue use until the unit has been examined and repaired
• Only use included attachments and parts; do not use attachments from other brands or
models as these may not be properly calibrated for use with this device and may result in
measurement error
• This monitor may not be appropriate for individuals with serious arrhythmias; consult with
your physician for proper monitor use and evaluation.
• Check the blood circulation of the user before measurement
• Do not share the cuff with an infected person.
• Do not disassemble the unit or attempt to repair it; substitution of a component different from
that supplied may result in measurement error and will void manufacturer warranty
• Always follow local regulations for proper disposal of the monitor, cuff and batteries
CARE & SAFETY INFORMATION
ENGLISH – 5
OPERATING CAUTIONS AND WARNINGS
• Prolonged overinflation may cause congestion, swelling or bruising in some people
• Wait a minimum of 2 minutes between measurements (20-minutes is recommended);
excessive frequent measurements may restrict blood circulation
• Do not use this device while connected to any monitoring equipment on the same limb
• Do not apply over a wound or limb with inflammation disease
• Consult with your healthcare professional for guidance for use if you have any of the
following: intravascular shunt; mastectomy on the arm cooresponding to the measurement
side of the body
• If you experience any discomfort or an abnormality occurs, stop using the device
immediately; to stop the device during operation, press the POWER button and the cuff
will automatically deflate
• Operation outside of stated operating temperature may result in measurement error or device
malfunction; operation environment temperature is: 41°F – 104°F (5°C – 40°C);
Humidity: ≤90% RH
• Never use this unit while operating a vehicle or in the bathtub or shower
STORAGE CAUTIONS AND WARNINGS
• Storage outside of stated storage temperature may result in measurement error or device
malfunction; storage environment temperature is: -4°F – 131°F (-20°C – 55°C);
Humidity: ≤90% RH
• Keep the unit out of reach of small children
• Always keep the unit unplugged while not in use; remove the batteries if the unit will not be
used for an extended period of time
CLEANING CAUTIONS AND WARNINGS
• Never immerse the unit in water to clean as it may damage the unit
• Follow the ‘Cleaning and Maintenance’ portion of this manual for instruction on how to clean
and care for your monitor
CARE & SAFETY INFORMATION

6 – ENGLISH
It is recommended that you first seek the advice and recommendation of your physician or
healthcare professional when using home diagnostic devices, including blood pressure
monitors.
Semi-automatic digital blood pressure monitors use the oscillometric method to electronically
measure your blood pressure. The monitor detects your blood’s movement through the artery in
your arm and converts the movements into a digital reading. The oscillometric method does not
require a stethoscope, making the monitor ideal for home use.
Blood pressure readings determined with this device are equivalent to measurements obtained
by a trained healthcare professional using the cuff/stethoscope auscultation method, within the
limits prescribed by the American National Standard for Electronic or Automated
Sphygmomanometers.
Thank you for purchasing a Semi-Automatic Digital Blood Pressure Monitor. With proper
care and use, your monitor will provide you with many years of reliable readings.
PLEASE READ THIS INSTRUCTION MANUAL
COMPLETELY BEFORE OPERATING THIS UNIT.
INTRODUCTION
ENGLISH – 7
DETAILS OF THE DISPLAY AND INTERPRETATION OF THE SYMBOLS ARE
INCLUDED THROUGHOUT THIS MANUAL.
m
m
H
g
M
M
D
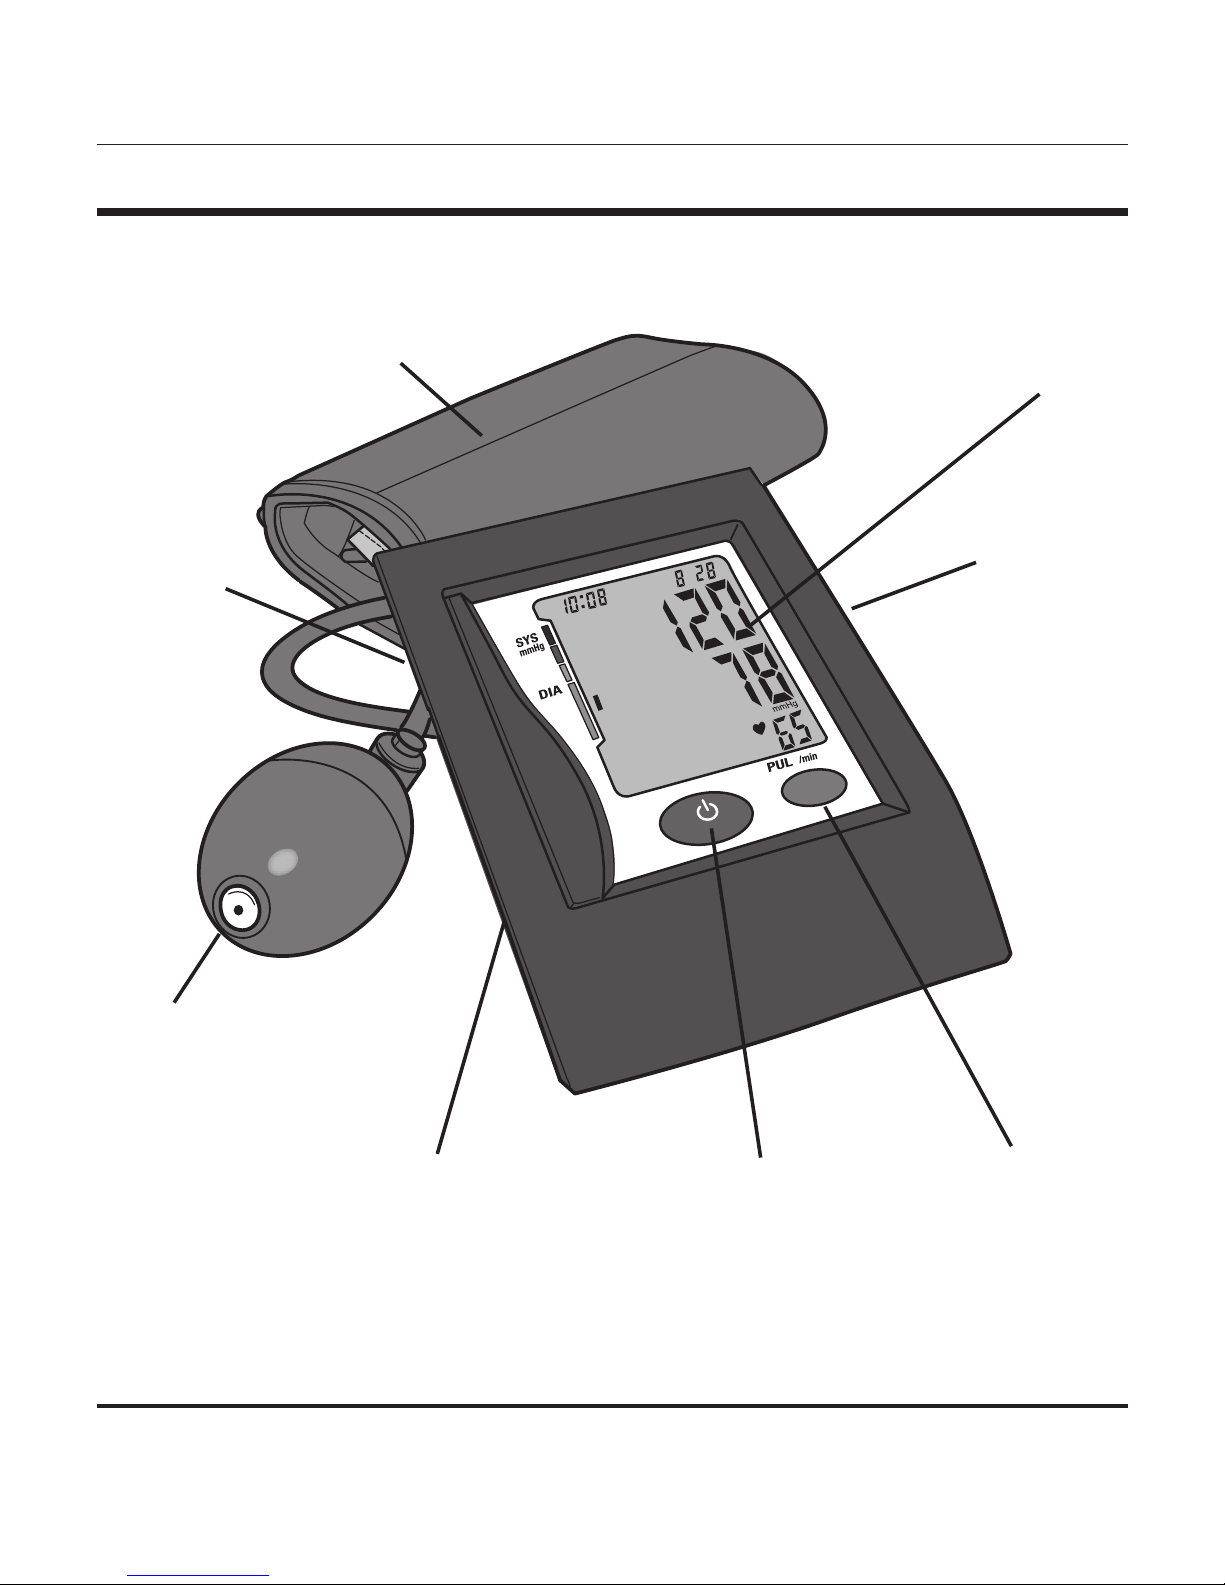
Arm Cuff
Digital Display
AC Adaptor Port
MEMORY
Recall Button
POWER
Button (on/off)
Tubing
Connector
Battery
Compartment
(underside)
Squeeze
Bulb
BLOOD PRESSURE MONITOR FEATURES

8 – ENGLISH
Before Taking a Measurement
1. Your readings should only be interpreted by your physician or healthcare professional with
access to your individual medical history. Regular use of a home blood pressure monitor will
allow you to track and record your readings for discussion with your physician.
2. Conduct your measurement in a quiet place while seated in a relaxed position. Rest for 15
minutes before taking your reading. If an error occurs or you desire to take a second reading,
allow 15 minutes between readings for your blood vessels to return to normal.
3. Avoid smoking, eating, taking medication, alcohol, physical activity or any other stressful
activity for 30 minutes prior to taking a reading.
4. Always remove any jewelry or constrictive clothing that may interfere with the cuff
placement.
5. Keep yourself and the monitor still during measuring; do not talk during the reading.
6. It is recommended that you take your readings as the same time each day to better monitor
any indications in your results.
7. Record your daily measurement on the included chart or some other written document to
share with your physician.
GETTING STARTED
ENGLISH – 9
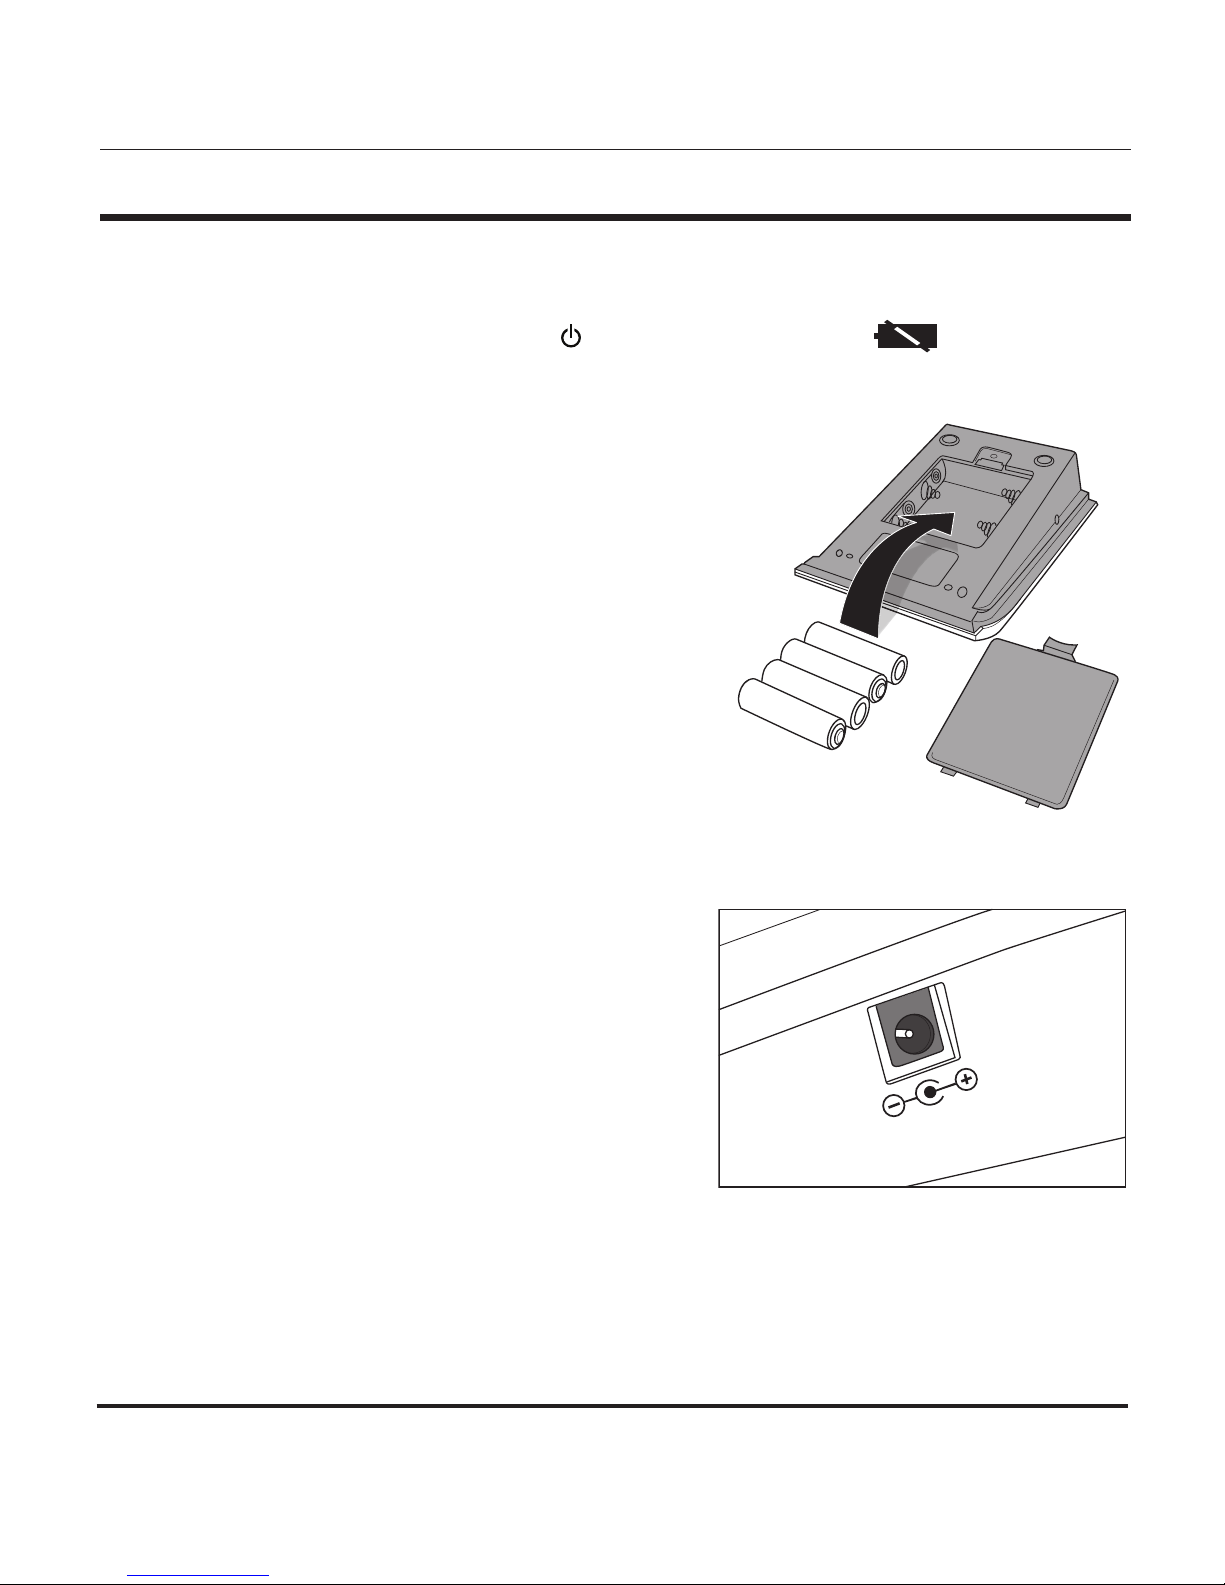
This unit comes complete with 4 AA batteries.
It is necessary to replace the batteries when the Low Battery symbol appears on the display or
when the display does not turn on after the POWER button is pressed.
Replacing Battery, Fig 1
1. Press down and lift the cover.
2. Insert or replace 4 AA batteries into the battery
compartment, ensuring to match the indicated
polarity symbols. Always use new batteries.
3. Replace the battery cover.
4. Dispose of batteries according to local disposal and
recycling regulations.
It is recommended to remove the batteries if the unit
will not be used for an extended period of time.
AC Power Adapter
An AC adapter is available separately for battery-free
operation. The AC adapter plugs into the right side of the
unit, Fig 2.
Please remember to practice common sense electrical
safety precautions while using the adapter.
To order an AC adapter, please see the enclosed
order form.
AC Adapter Output: 6V DC 600mA
Fig. 2
-
-
+
+
Fig. 1
BATTERY INSTALLATION / AC POWER
10 – ENGLISH
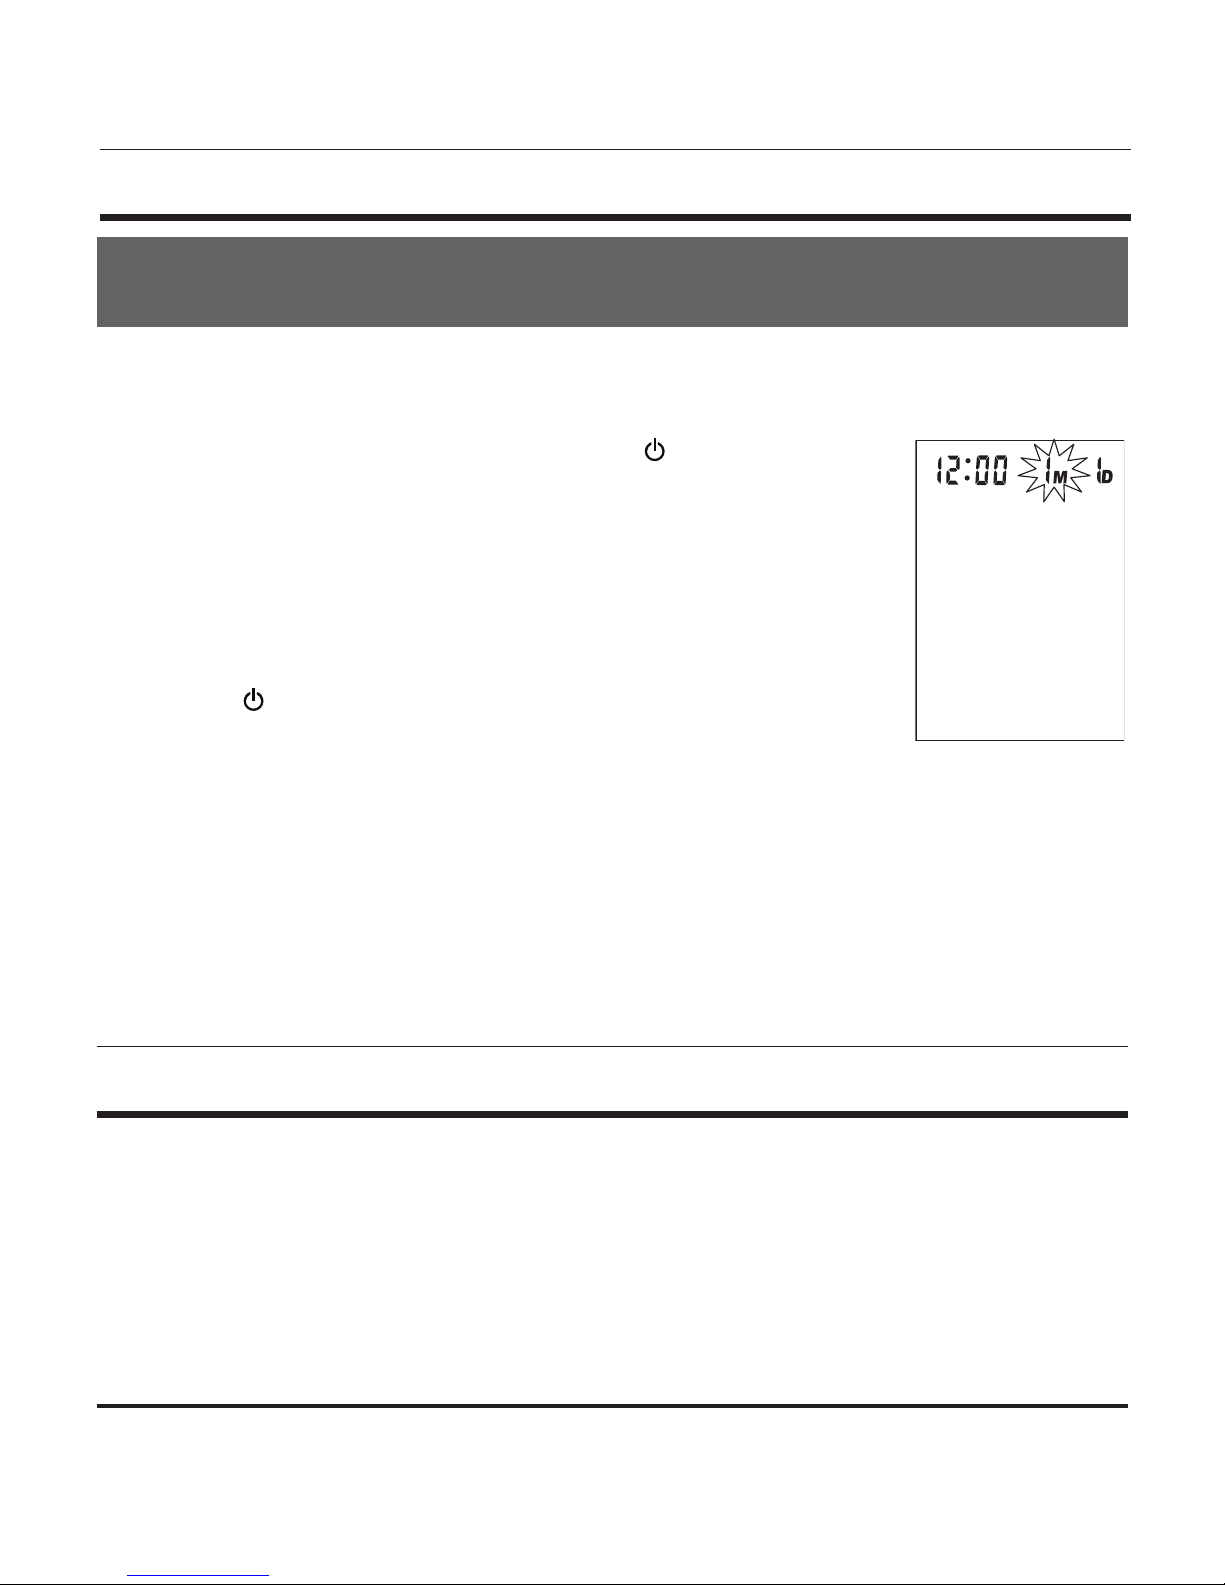
1. When the unit is off, press and release both the POWER and
M (MEMORY) button at the same time. The month will begin to flash,
Fig 1.
2. Press the M (MEMORY) button to change until the desired number
appears. To scroll through the numbers quicker, hold down the M
(MEMORY) button as the numbers advance.
3. Press the POWER button to confirm the month entry.
4. Next, the date will blink. Repeat steps 2 and 3 to set the date, then
hours, then minutes. This unit does not track the year.
5. After setting the minutes, the unit will automatically exit out of the date/time setting mode.
When the monitor is off, the date and time will still appear at the top of the screen.
T ime is displayed in 24hr Military Time. This chart explains the time conversion.
and time will default to factory settings, 12:00 a.m. 1M 1D, if you do not choose to set the
correct information.
1:00 = 1am 7:00 = 7am 13:00 = 1pm 19:00 = 7pm
2:00 = 2am 8:00 = 8am 14:00 = 2pm 20:00 = 8pm
3:00 = 3am 9:00 = 9am 15:00 = 3pm 21:00 = 9pm
4:00 = 4am 10:00 = 10am 16:00 = 4pm 22:00 = 10pm
5:00 = 5am 11:00 = 11am 17:00 = 5pm 23:00 = 11pm
6:00 = 6am 12:00 = 12pm 18:00 = 6pm 24:00 = 12am
Fig. 1
IT IS NECESSARY TO SET THE DATE AND TIME FOR THE MONITOR EVERY TIME
BATTERIES ARE INITIALLY INSTALLED OR REPLACED.
SETTING DATE/TIME
MILITARY TIME = REGULAR TIME

ENGLISH – 11
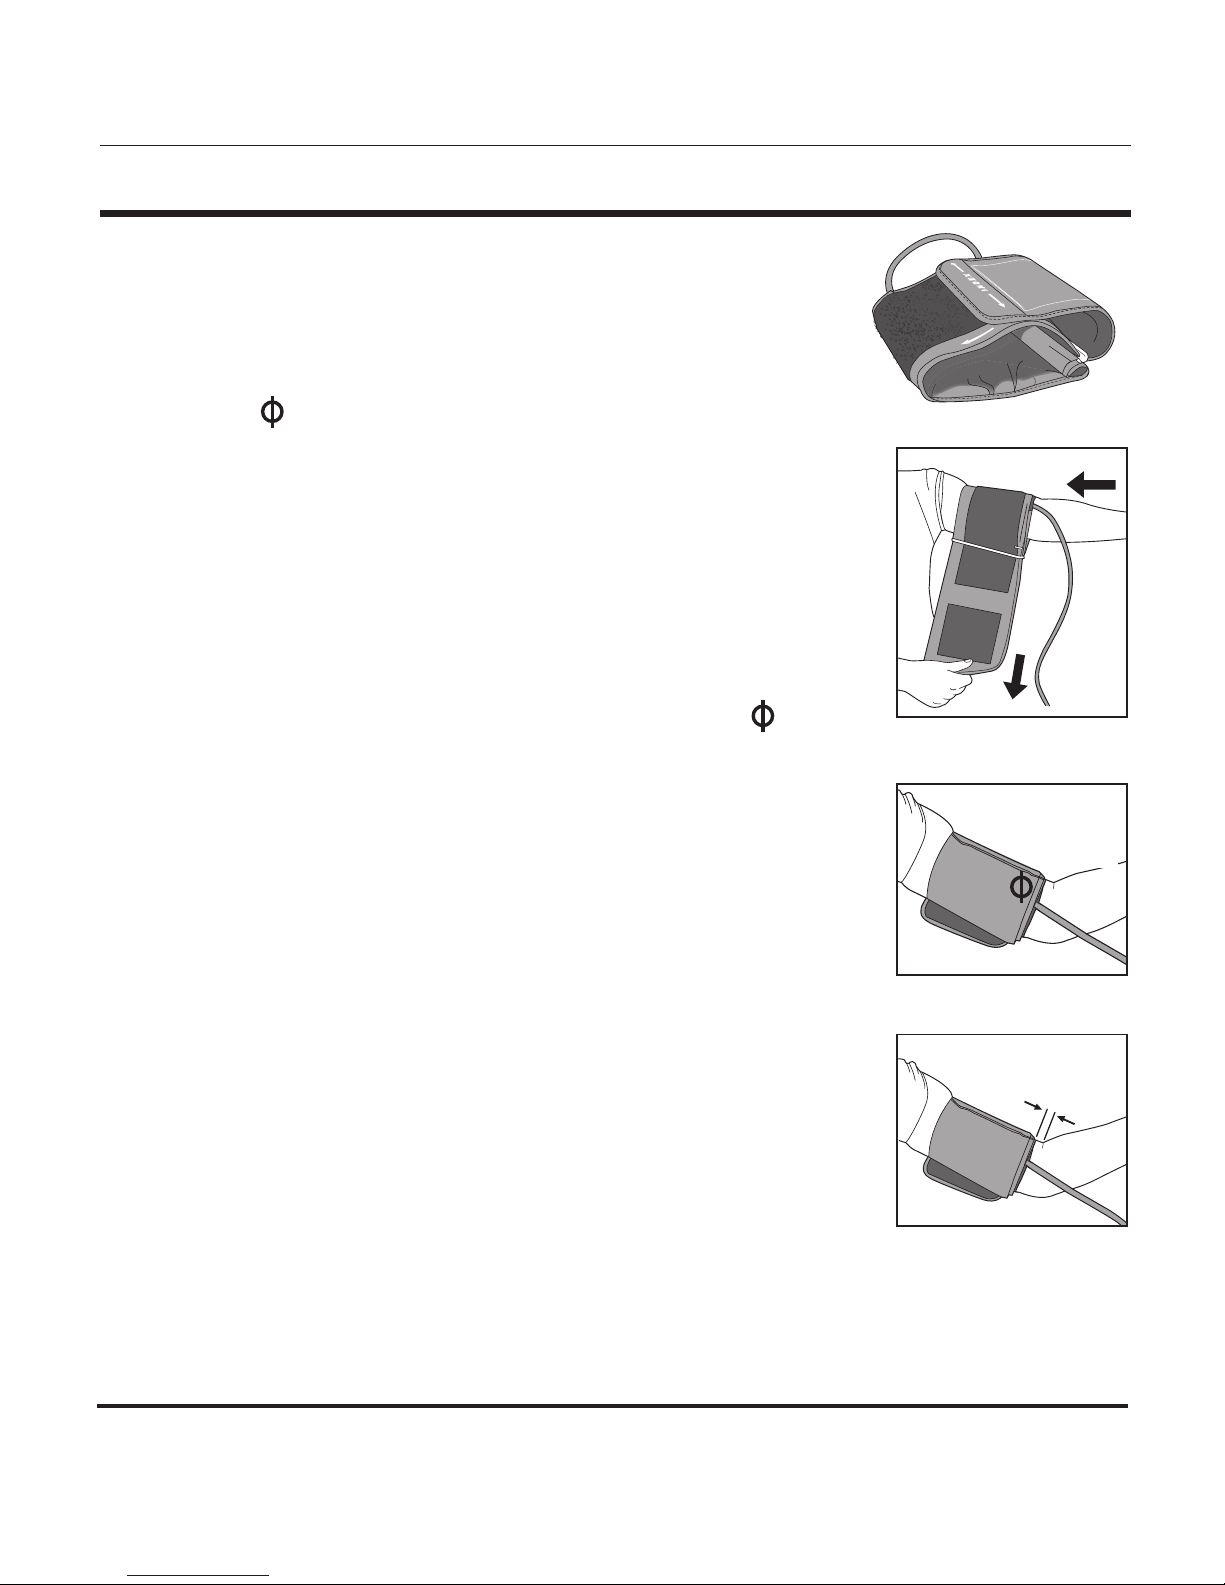
Before applying your blood pressure cuff, be sure you have selected the
appropriate size cuff.
To determine the proper cuff size, measure the circumference of your
left upper arm at the point midway between inside bend of your elbow
and your shoulder, Fig 1.
Adult Cuff fits arm circumference 11-3/4” - 16-1/2” (30-42 cm)
Additional cuff sizes are available for order on the enclosed order form.
If for any reason you are unable to or should not use your left arm,
please modify the instructions for cuff application to your right arm.
Your physician can help you identify which arm is best for you to take
measurements from.
1. The cuff should not be plugged into the monitor until after the cuff is
applied to your arm.
2. Remove any constrictive clothing or jewelry that may interfere with
cuff placement.
3. Be seated at a table or desk with your feet flat on the floor and legs
uncrossed.
4. Position the cuff on a solid surface with the tubing facing up and
away from you. The metal ring/bar on the cuff should be to the left
of the tubing.
Fig. 1
PROPER CUFF FIT AND PLACEMENT IS CRITICAL IN OBTAINING ACCURATE BLOOD
PRESSURE MEASUREMENTS. PLEASE READ THESE INSTRUCTIONS CAREFULLY AND
CONSIDER CONSULTING WITH YOUR PHYSICIAN FOR FURTHER DIRECTION.
APPLYING YOUR BLOOD PRESSURE CUFF
12 – ENGLISH
Fig. 5
Fig. 2
Fig. 3
Fig. 4
Main
Artery
0.4”-0.8”/1-2cm
APPLYING YOUR BLOOD PRESSURE CUFF
5. Open the cuff by pulling or rolling the bottom of the cuff to the
right, Fig 2. This should open the cuff without fully unrolling it,
creating a cylinder. Do not extend the cuff beyond the metal bar.
6. Insert your left arm into the created cuff cylinder. Position the
index mark over the main artery on the inside of your arm,
Fig 3, 4.
7. The bottom edge of the cuff should be positioned approximately
one inch above the elbow joint, Fig 5.
8. The cuff should fit comfortably, yet snugly around your arm. You
should be able to insert one finger easily between your arm and
the cuff.
The cuff size is suitable for use when the vertical index mark is
within the horizontal OK range. A different size cuff is needed if the
mark is outside the OK range.
If you are not comfortable with applying your cuff, please seek the
assistance of another member of your household or work with your
physician to practice the cuff application. Incorrectly applied cuffs
may result in inaccurate readings.
ENGLISH – 13
Please read the preceding portions of this manual prior to taking your
first reading.
Reminder, it is important to avoid smoking, eating, taking medication,
alcohol consumption or physical activity 30 minutes prior to taking a
reading.
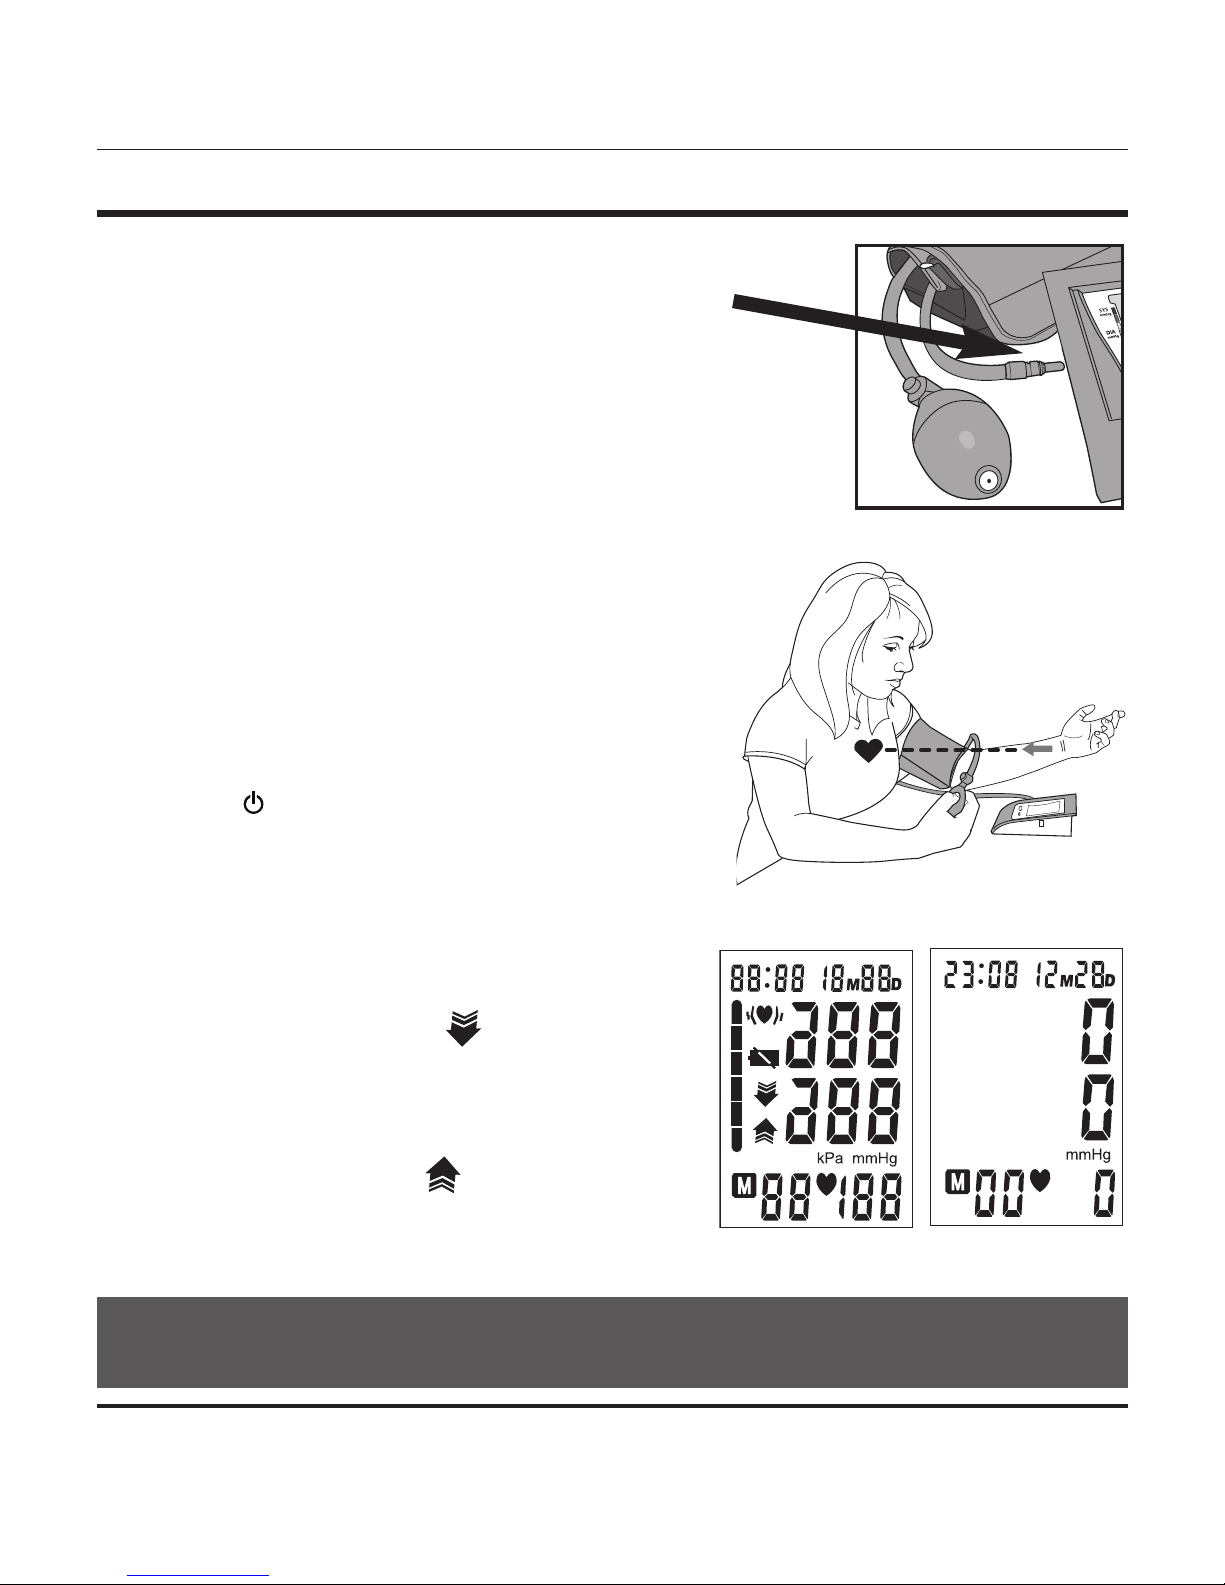
1. Position the monitor on a flat, stable surface with the digital display
in view.
2. Insert the cuff tubing connector into the port on the left
side of your monitor, Fig 1.
3. Rest your elbow on a solid surface with your palm
facing upward. Elevate your arm so that the cuff is
at the same level as your heart, Fig 2. Relax your left
hand.
4. Press the POWER button to turn the unit on; the
unit will run a self-test, Fig 3.
5. After the self-test, the unit will briefly display the last
reading values. If there is no previous measurement,
the unit will display ‘0’ for all of the reading values,
Fig 4.
If a downward arrow flashes , there is air
remaining in the cuff from a previous measurement;
press the release button on the valve to release any
remaining air. After the air is released, an up arrow
will appear on the display.
Fig. 1
Fig. 2
Fig. 4
NOTE: You can stop the inflation or deflation process at any time by pressing
the POWER button.
Fig. 3
TAKING YOUR BLOOD PRESSURE READING
14 – ENGLISH
6. Begin taking your measurement by first inflating the cuff using the
attached inflation bulb. Using your right hand, squeeze and release
the bulb at a steady pace. The inflation pressure should reach 50-60
mmHg above your normal systolic pressure; if the pressure in the
cuff is insufficient, an upward arrow will flash on the display.
Continue to steadily inflate the cuff. When the unit beeps, cease
inflating the cuff.
7. The cuff will begin to automatically deflate; the display will begin to
show the decreasing pressure while you feel the pressure of the cuff
decrease.
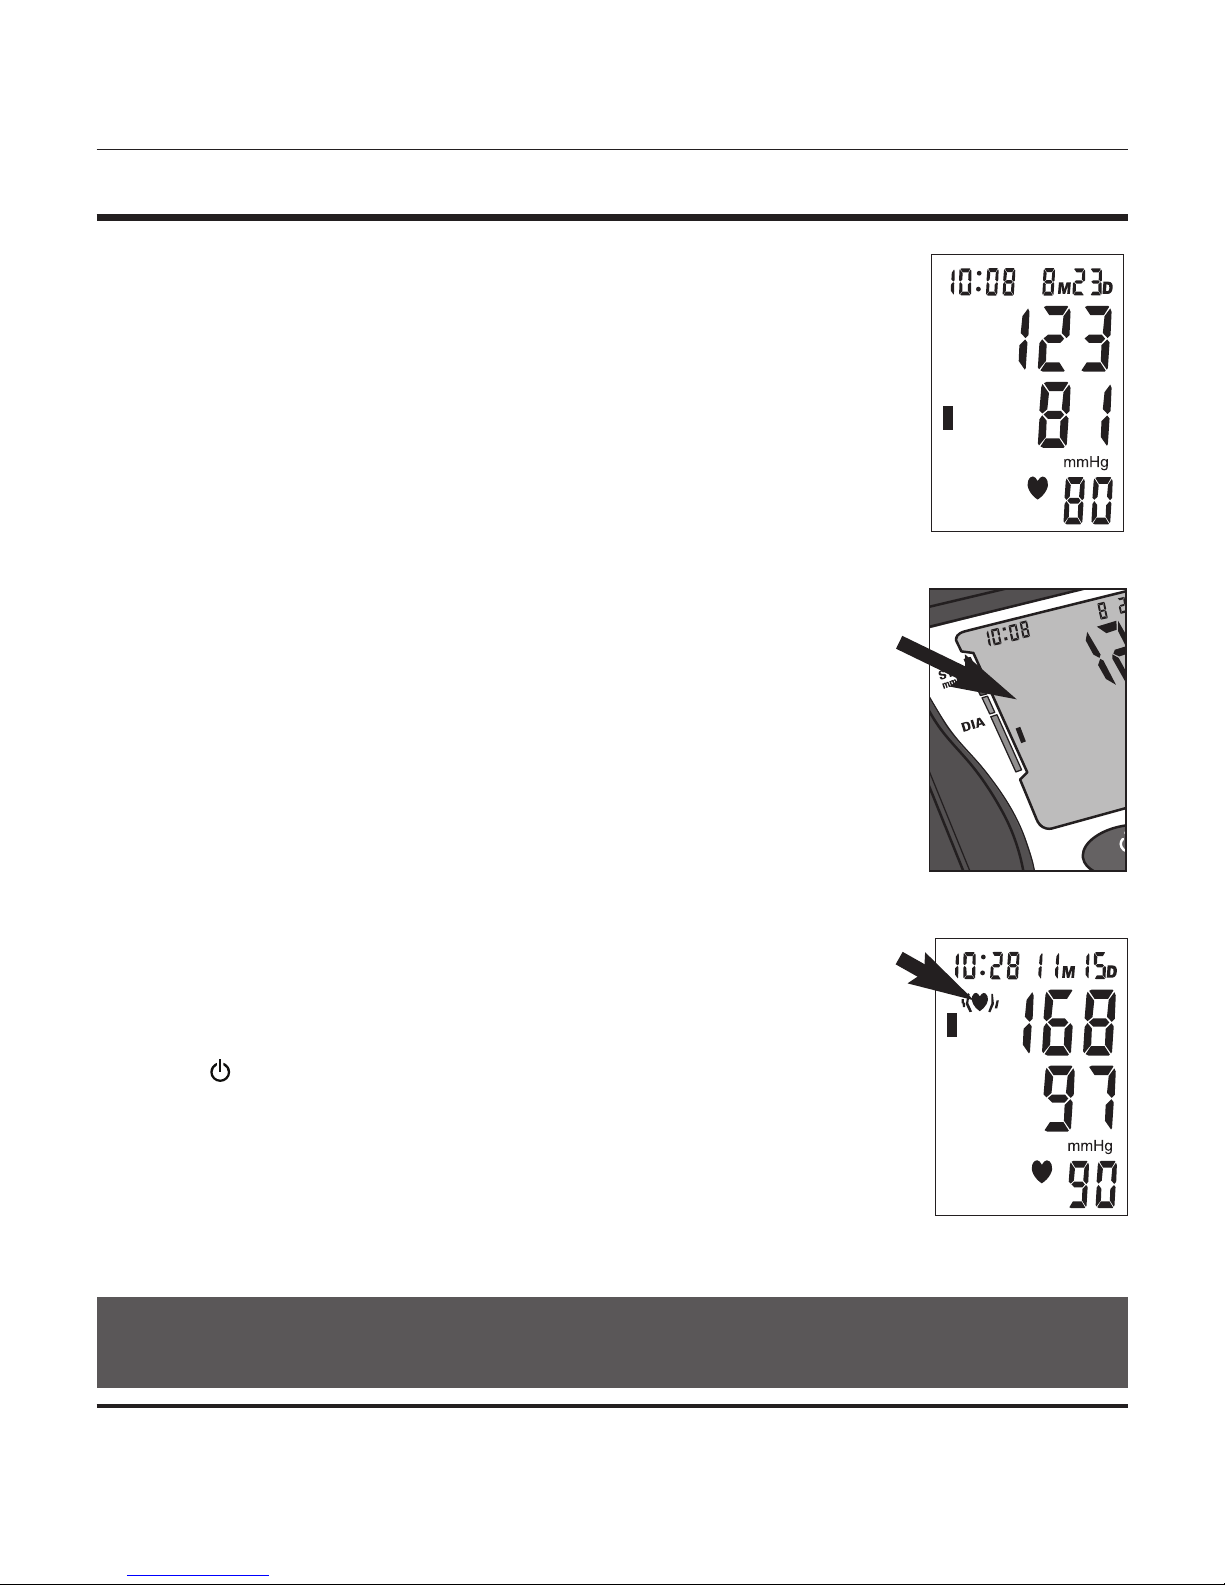
8. Your blood pressure measurement and pulse will display
simultaneously on the screen, Fig 5. Both the systolic and diastolic
readings will display at the same time.
9. The Hypertension Indicator will indicate your reading range in the
left side of the display, Fig 6. See page 16 for a chart interpreting the
Hypertension Indicator results.
10. If an irregular heartbeat was detected during the reading, the
Irregular Heartbeat Detector will appear on the display, Fig 7. See
page 15 for more information on the Irregular Heartbeat Detector
indicator feature.
11. The reading will automatically be stored in memory, up to 60
readings.
12. Select POWER button to turn the unit off and conserve energy and
battery life. The unit will automatically shut-off and revert to
time/date mode after approximately 1 minute.
13. Disconnect the cuff and tubing from the monitor prior to storing.
Fig. 5
Fig. 6
Fig. 7
m
m
H
g
M
M
D
NOTE: You can stop the inflation or deflation process at any time by pressing
the POWER button.
TAKING YOUR BLOOD PRESSURE READING
ENGLISH – 15
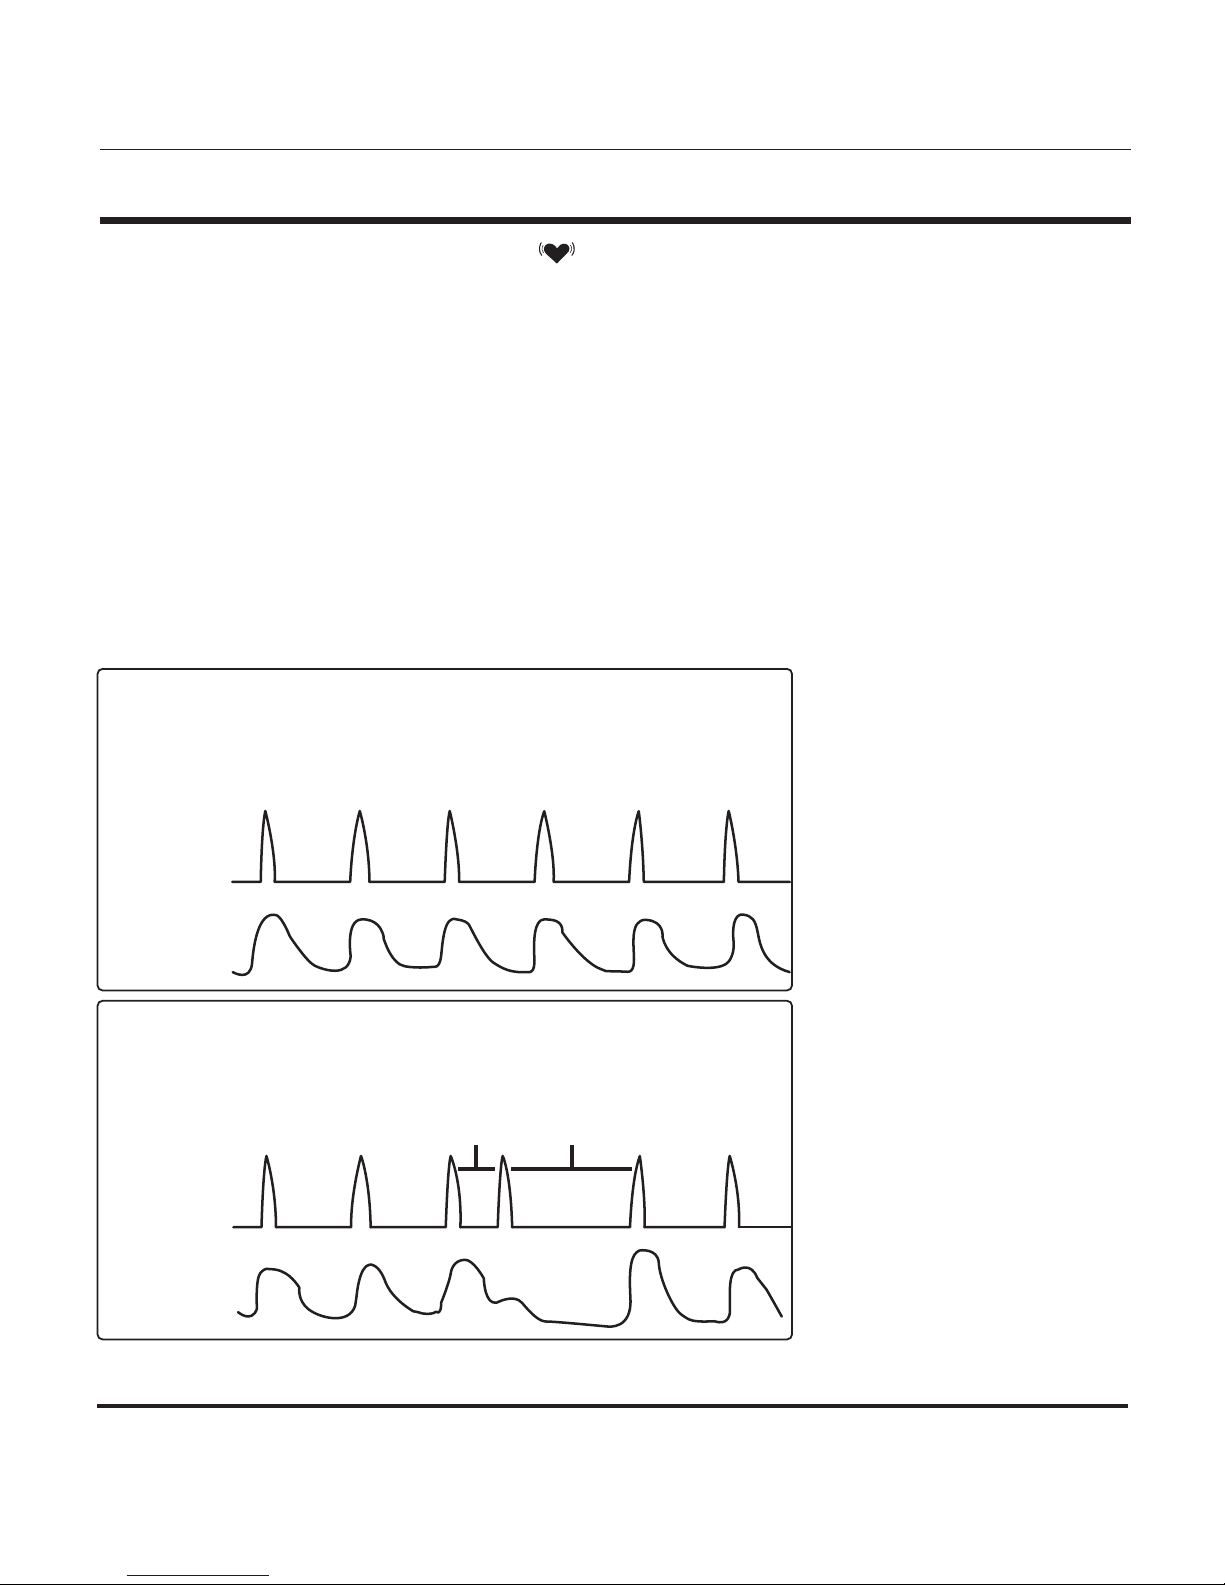
Irregular Heartbeat Detection
An irregular heartbeat is defined as a heartbeat rhythm that is more than 25% slower or 25%
faster than the average measurement detected while the monitor is conducting the
measurement. When this device detects an irregular rhythm two or more times during the
reading, the IHB symbol will appear on the display screen.
This monitor will operate if the icon appears, but the results may be compromised, especially if
this symbol appears often. Please consult with your physician or trained healthcare professional
for further information regarding an irregular heartbeat and if this symbol appears frequently.
Pulse
Pulse
Blood
Pressure
Blood
Pressure
Normal Heartbeat
Irregular Heartbeat
Short
Beat
Long
Beat
INTERPRETING YOUR RESULTS

16 – ENGLISH
Hypertension Indicator
This unit features our unique Hypertension Indicator. The World Health Organization has
established globally accepted standards for the assessment of high or low blood pressure.
This chart can help you identify where your blood pressure measurements fall according to WHO
classification standards. This chart should only be considered as a guideline; always consult with
your physician to interpret your individual results. Never adjust your medication(s) dosage, or
severely alter your diet or exercise routine without consulting with your physician.
m
m
H
g
M
M
D
The Hypertension
Indicator is
located on the left
side of the display
window
Stage 3 Hypertension
Systolic pressure: ≥ 180 mmHg
or
Diastolic pressure: ≥ 110 mmHg
Stage 2 Hypertension
Systolic pressure: ≥ 160-179 mmHg
or
Diastolic pressure: ≥ 100-109 mmHg
Stage 1 Hypertension
Systolic pressure: ≥ 140-159 mmHg
or
Diastolic pressure: ≥ 90-99 mmHg
High Normal
Systolic pressure: ≥ 130-139 mmHg
or
Diastolic pressure: ≥ 85-89 mmHg
Normal
Systolic pressure: ≥ 120-129 mmHg
or
Diastolic pressure: ≥ 80-84 mmHg
Optimal
Systolic pressure: < 120 mmHg
or
Diastolic pressure: < 80 mmHg
INTERPRETING YOUR RESULTS
ENGLISH – 17
Recalling Measurements in Memory
You can recall up to 60 total measurements in memory. These
measurements can be shared with your physician or trained
healthcare professional.
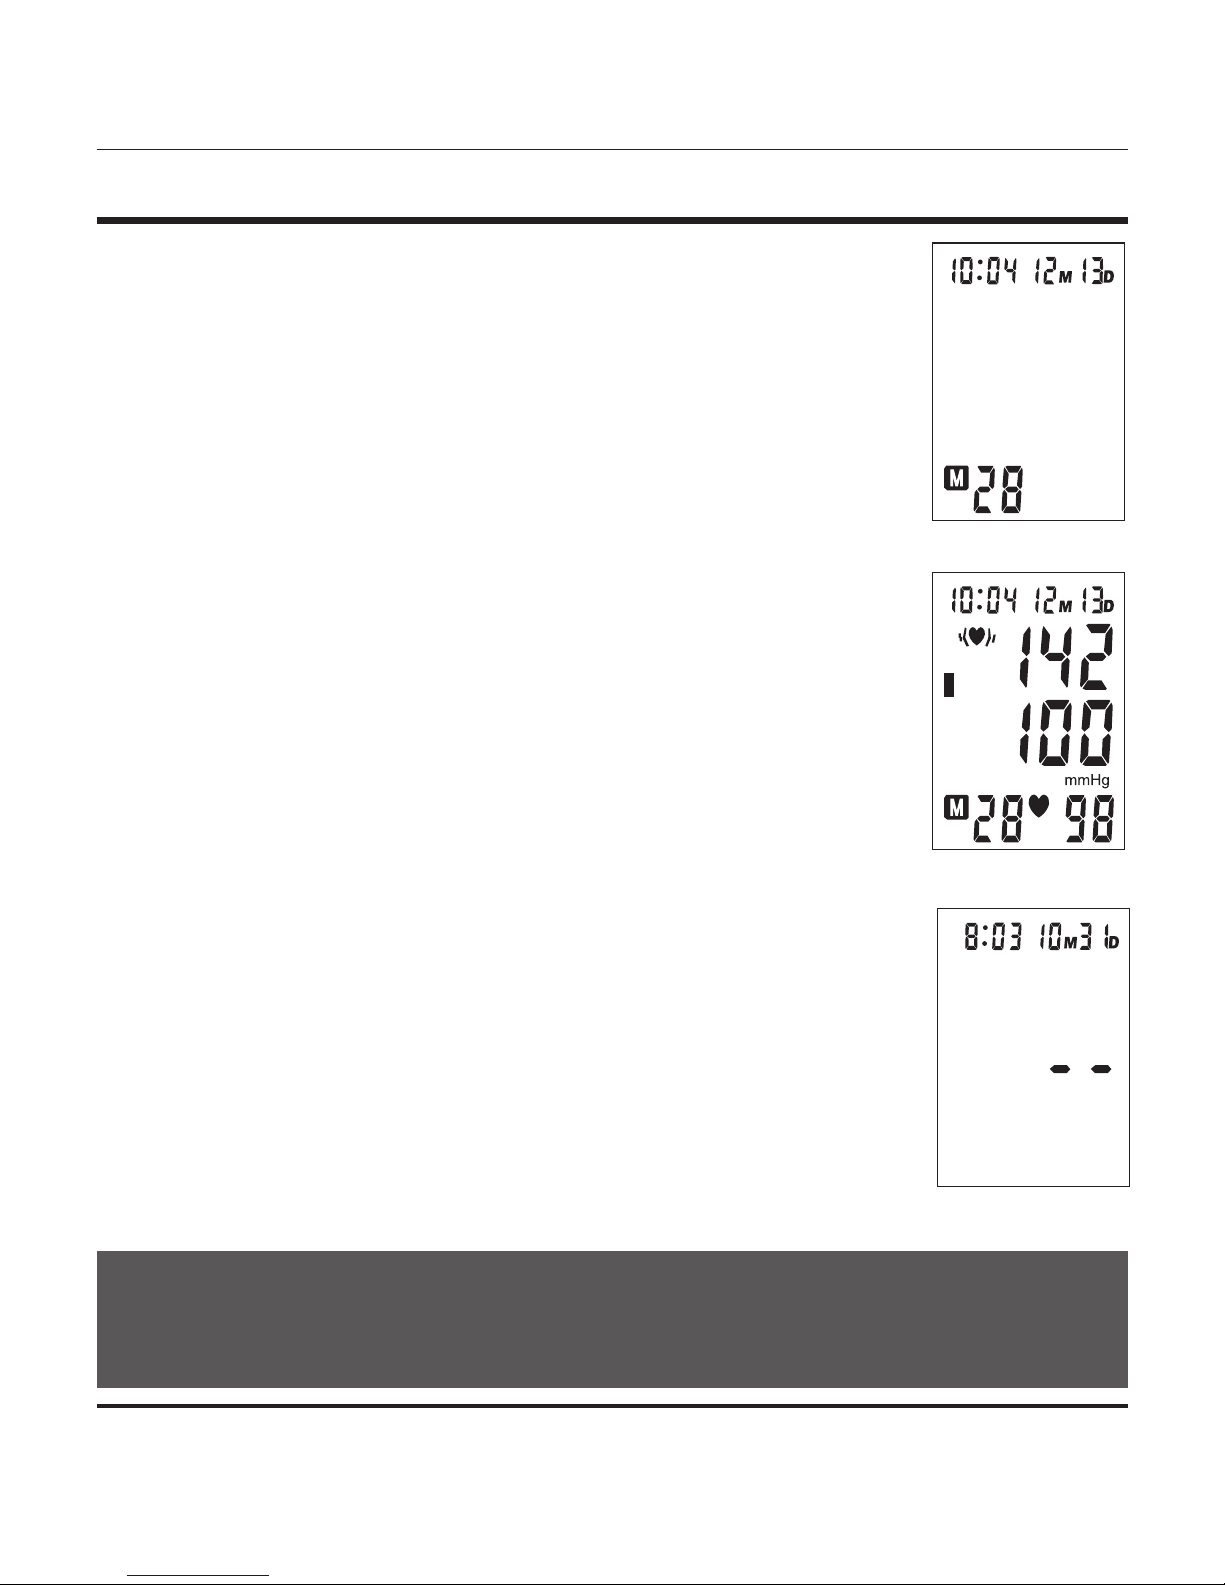
1. Press and release the M (MEMORY) button. The unit will show
how many measurements are stored within the bank, Fig 1.
2. Press the M (MEMORY) button again to scroll through the saved
measurements. Measurements will appear on the display from
oldest to most current. All results for a given measurement will
display, including measurement results, pulse rate, Hypertension
Indicator icon and Irregular Heartbeat alert (if applicable), Fig 2.
After you’ve scrolled through all the readings, the unit will
automatically turn off.
3. When the number of readings exceeds 60, the oldest data will
be replaced with the new record.
Clearing Measurements from Memory
1. Press and release the M (MEMORY) button. The unit will display
how many measurements are stored within the bank.
2. Press and hold down the M (MEMORY) button until two
horizontal lines flash, Fig. 3. This indicates that all
measurements have been erased.
Fig. 2
Fig. 1
Fig. 3
MEMORY FUNCTION–RECALL
REMINDER: When using an AC adapter, it isrecommended that batteries are
also installed in order to preserve the date and time settings when the
monitor is not plugged in to a power source.

18 – ENGLISH
Proper care and maintenance of your blood pressure monitor will help ensure long life for the
product; improper use of the monitor may void the included warranty.
Monitor Care and Maintenance
• Do not use any liquids on the monitor; use a soft, dry cloth to clean the monitor as needed
• Storage outside of stated storage temperature may result in measurement error or device
malfunction; storage environment temperature is: -
4oF – 131oF (-20oC – 55oC)
Humidity ≤90% RH
• Do not store in direct sunlight
• Always keep the unit unplugged while not in use; remove the batteries if the unit will not
be used for an extended period of time
• Do not attempt to disassemble your monitor; disassembling your monitor may void the
manufacturers warranty
• Do not subject the monitor to strong shocks; take care not to drop the monitor
• With proper care, the monitor will maintain performance for a minimum of 10,000
measurements or three years
• No component of this device can be maintained by the user; the circuit diagrams,
component part lists, descriptions, calibration instruction or other information which will
assist the user’s appropriately qualified technical personnel to repair those parts of
equipment which are designated repairable can be supplied
• It is recommended that monitor performance be reviewed every two years or after service
or repair; please contact your service provider or call Customer Care.
Cuff Care and Maintenance
• The cuff should not be submerged or washed in a washing machine, but may be spot
cleaned with a mild-detergent as needed; it is suggested that the cuff be cleaned once a
month if the deviced is used daily
• Clean the cuff thoroughly after every 200 uses or more frequently as needed
CARE & MAINTENANCE
 Loading...