

mmHg
M
M
D
AAuuttoommaattiicc
DDiiggiittaall BBlloooodd PPrreessssuurree
AArrmm MMoonniittoorr
INSTRUCTION MANUAL • ENGLISH & ESPA
ÑÑ
OL
Model 01-5021 (adult)
Model 01-5022 (large adult)
STOP!
PLEASE ENSURE YOU HAVE ALL OF THE FOLLOWING
COMPONENTS BEFORE USING YOUR DIGITAL
BLOOD PRESSURE MONITOR
IF YOU ARE MISSING ANY PARTS, INCLUDING INSERTS OR
INSTRUCTION MANUALS, DO NOT RETURN TO PLACE OF
PURCHASE. CONTACT CUSTOMER CARE AT 8663261313.
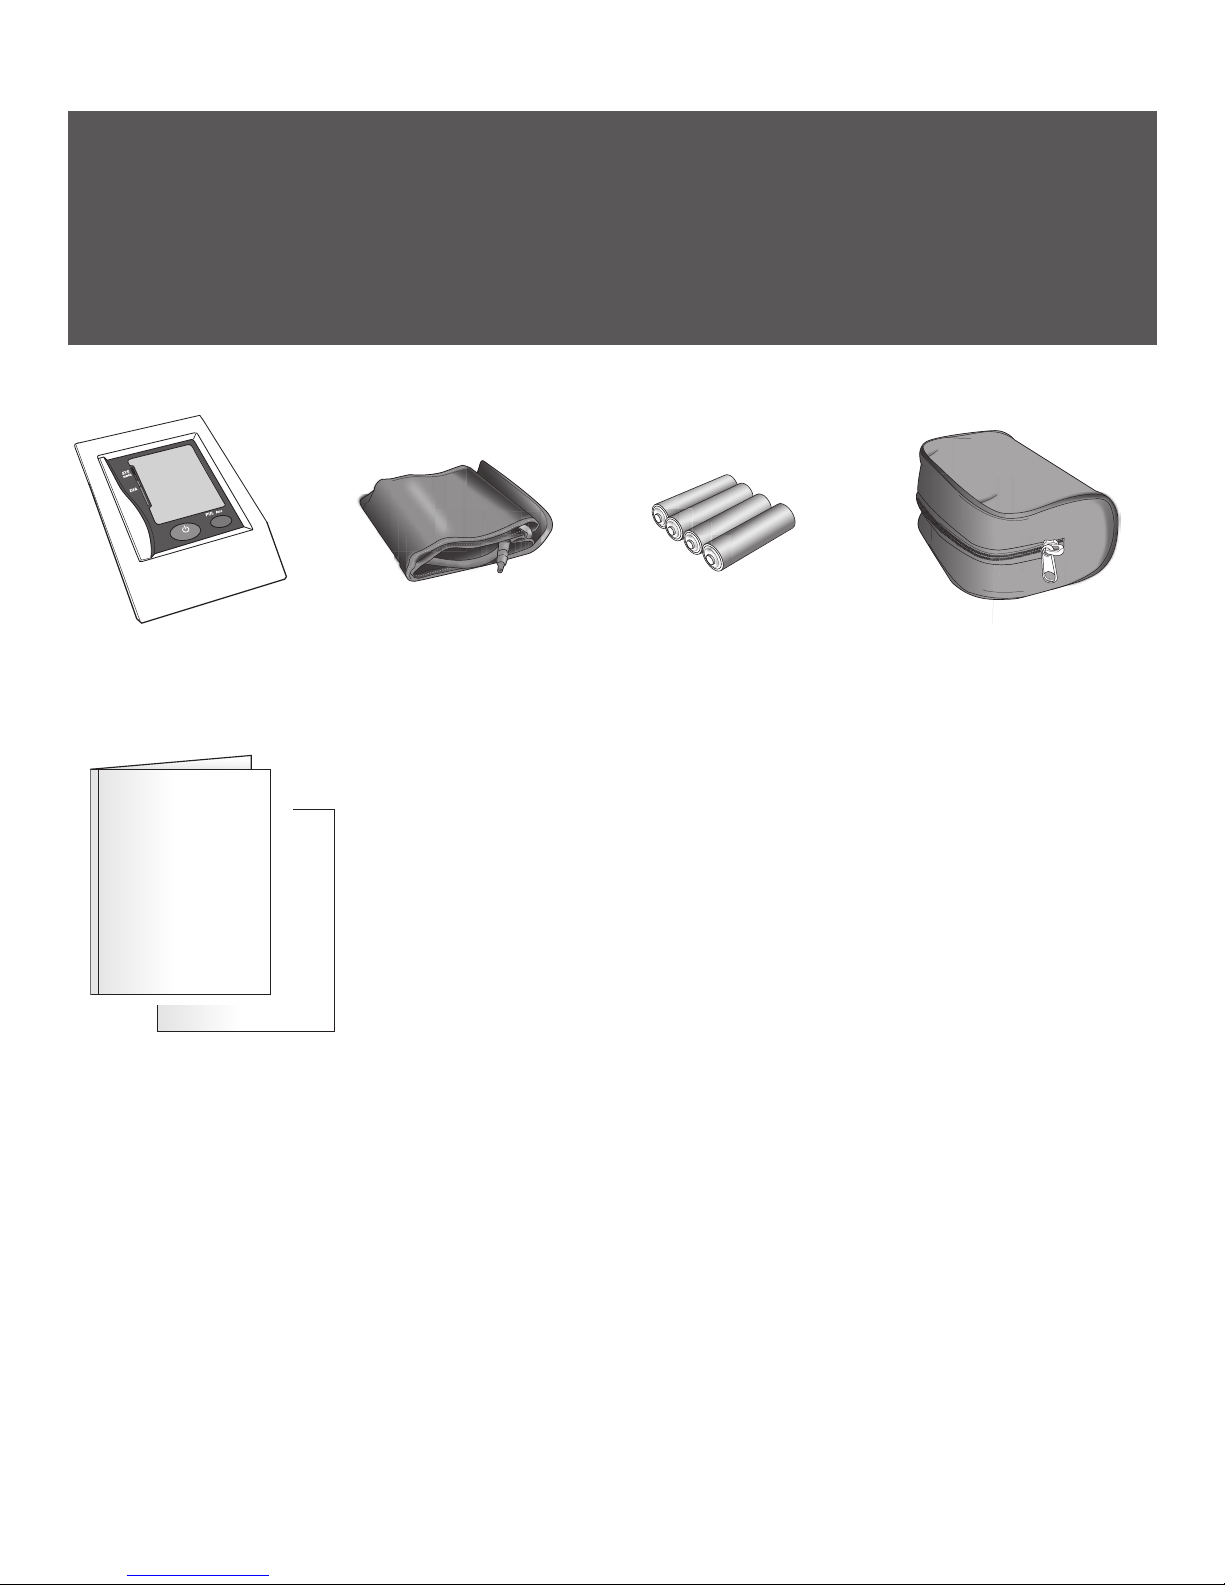
Digital Monitor
mmHg
M
Adult Arm Cuff
or Large Adult Arm
Cuff
4 AA Batteries
Canvas Storage Bag
Instruction Manual
Quick Start Guide
Blood Pressure Reading Tracking Log
FAQ Information Sheet
Replacement Parts Order Form

EENNGGLLIISSHH •• 33
INDEX
Introduction..................................................................................................................4
Digital Blood Pressure Monitor Features ...............................................................5
Getting Started.............................................................................................................6
Battery Installation / AC Power ................................................................................7
Setting Date and Time................................................................................................8
Applying Your Blood Pressure Cuff....................................................................9-10
Taking Your Blood Pressure Reading ..............................................................11-12
Interpreting your Results.........................................................................................13
Memory Functions .............................................................................................14-15
Care and Maintenance.............................................................................................15
Display Symbols.........................................................................................................16
Troubleshooting ........................................................................................................16
FCC Statement............................................................................................................17
Specications .............................................................................................................18
Warranty ......................................................................................................................19
Instrucciones en Español...................................................................................21-40
Toll-Free Customer Care Help Line: 1-866-326-1313
Monday – Friday 8:30 a.m. – 4:30 p.m. CST
Distributed by
Veridian Healthcare
1465 S. Lakeside Drive
Waukegan, IL 60085
www.veridianhealthcare.com
Made in China
#93-1045 04/10
©2010 Veridian Healthcare, LLC

44 •• EENNGGLLIISSHH
Veridian Healthcare recommends that you rst seek the advice and recommendation of
y
our physician or healthcare professional when using home diagnostic devices, including
blood pressure monitors.
Automatic digital blood pressure monitors use the oscillometric method to electronically
measure your blood pressure. The monitor detects your blood’s movement through the artery
in your arm and converts the movements into a digital reading. The oscillometric method
does not require a stethoscope, making the monitor ideal for home use.
Blood pressure readings determined with this device are equivalent to measurements
obtained by a trained healthcare professional using the cuff/stethoscope auscultation
method, within the limits prescribed by the American National Standard for Electronic or
Automated Sphygmomanometers.
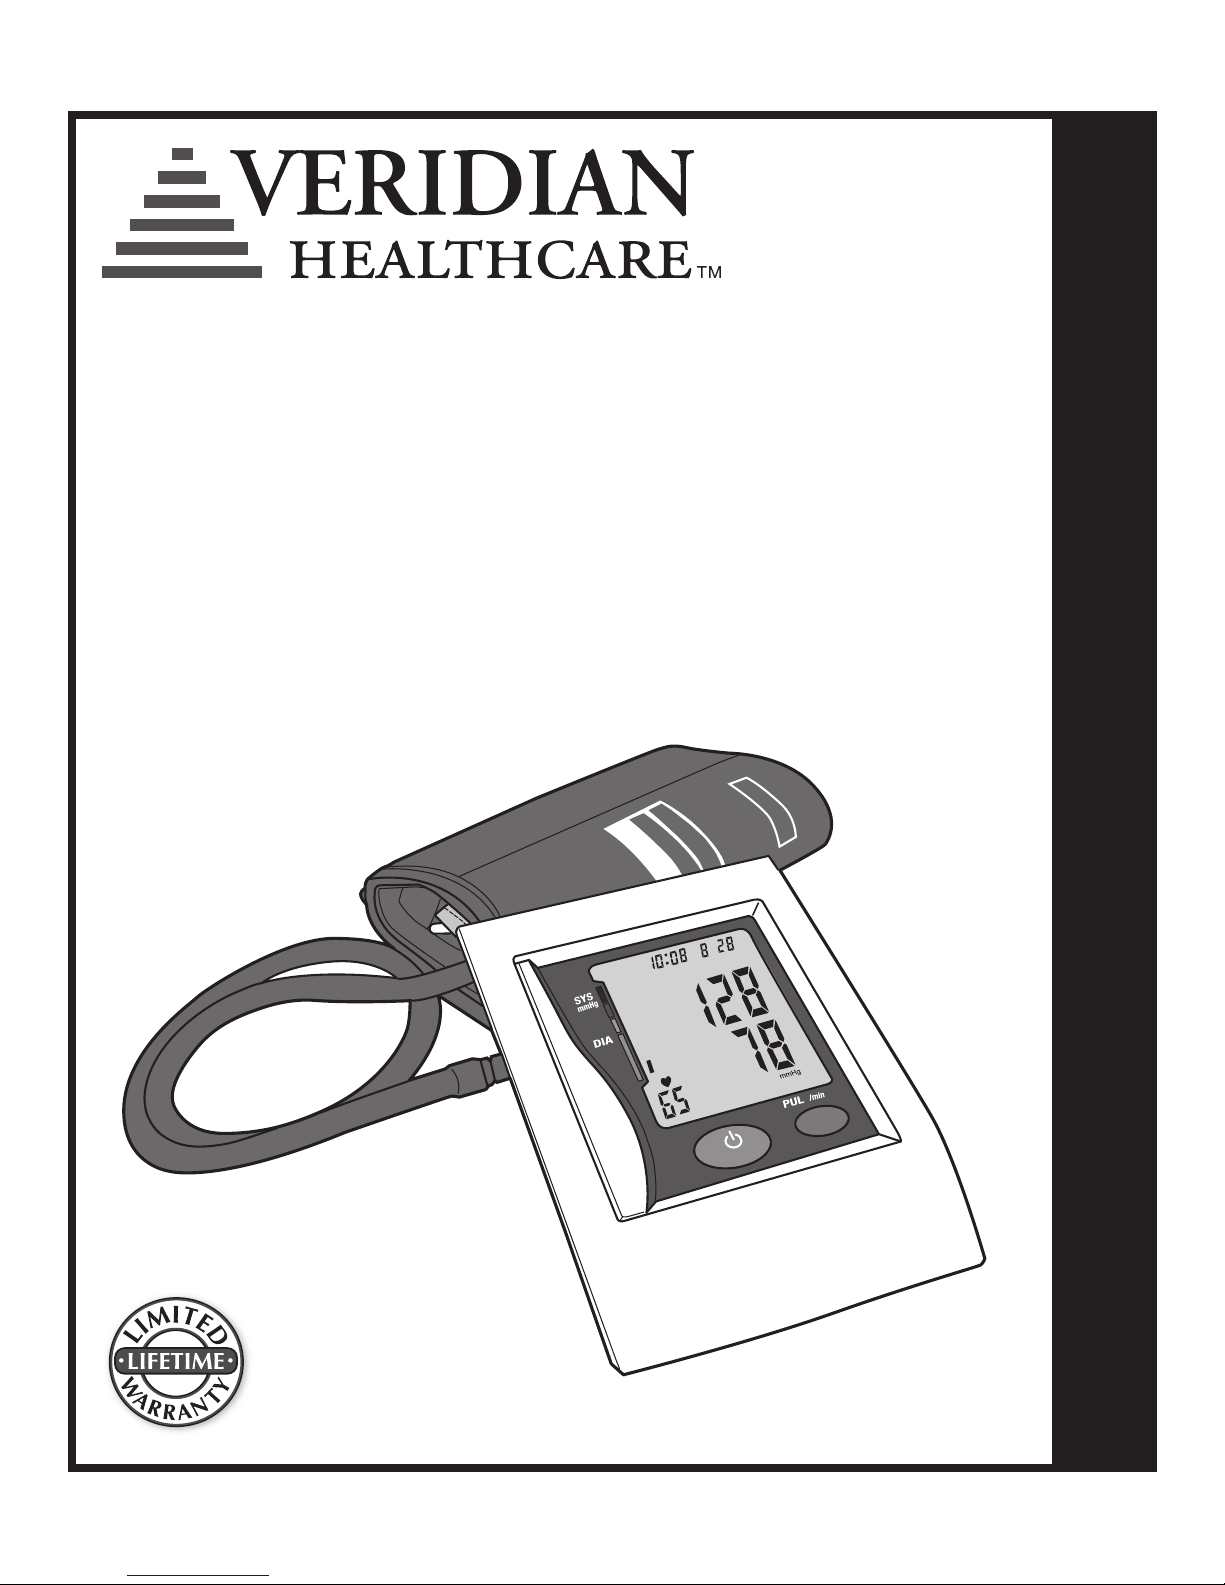
Thank you for purchasing a Veridian Healthcare Automatic Digital Blood Pressure Monitor.
With proper care and use, your monitor will provide you with many years of reliable
readings.
INTRODUCTION
PLEASE READ THIS INSTRUCTION MANUAL
COMPLETELY BEFORE OPERATING THIS UNIT.
EENNGGLLIISSHH •• 55
DDEETTAAIILLSS OOFF TTHHEE DDIISSPPLLAAYY AANNDD IINNTTEERRPPRREETTAATTIIOONN OOFF TTHHEE SSYYMMBBOOLLSS AARREE
IINNCCLLUUDDEEDD TTHHRROOUUGGHHOOUUTT TTHHIISS MMAANNUUAALL..
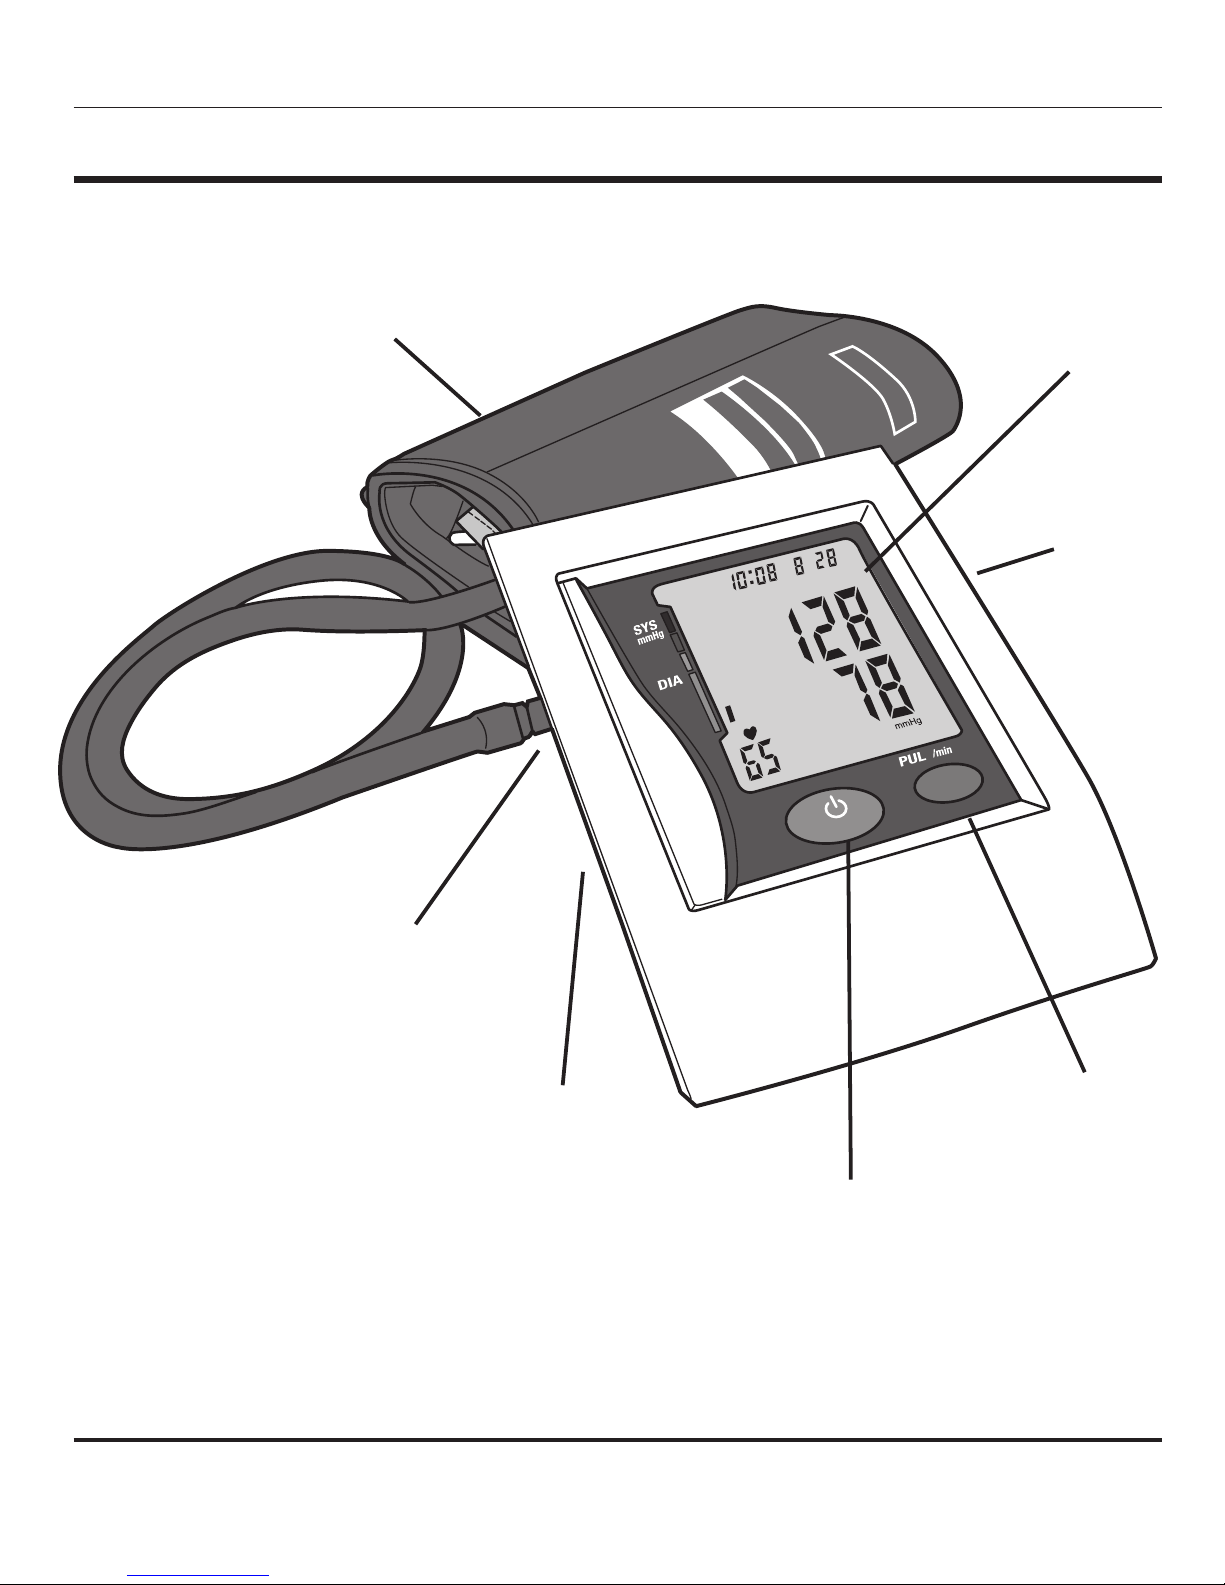
BLOOD PRESSURE MONITOR FEATURES
mmHg
M
M
D
Arm Cuff
Digital Display
AC Adaptor
Port
MEMORY
Recall
Button
POWER
Button (on/off)
Tubing
Connector
POWER
Button (on/off)

66 •• EENNGGLLIISSHH
Before Taking a Measurement
1. Your readings should only be interpreted by your physician or healthcare professional with
access to your individual medical history. Regular use of a home blood pressure monitor
will allow you to track and record your readings for discussion with your physician.
2. Conduct your measurement in a quiet place while seated in a relaxed position. Rest for 15
minutes before taking your reading. If an error occurs or you desire to take a second
reading, allow 15 minutes between readings for your blood vessels to return to normal.
3. Avoid smoking, eating, taking medication, alcohol, physical activity or any other stressful
activity for 30 minutes prior to taking a reading.
4. Always remove any jewelry or constrictive clothing that may interfere with the cuff
placement.
5. Keep yourself and the monitor still during measuring; do not talk during the reading.
6. It is recommended that you take your readings as the same time each day to better
monitor any indications in your results.
7. Record your daily measurement on the included chart or some other written document to
share with your physician.
GETTING STARTED
EENNGGLLIISSHH •• 77
This unit comes complete with 4 AA batteries.
2
It is necessary to replace the batteries when the Low Battery symbol appears on the display or
when the display does not turn on after the POWER button is pressed.
Replacing Battery, Fig. 1
1. Press down and lift the cover.
2. Insert or replace 4 AA batteries into the battery
compartment, ensuring to match the indicated
polarity symbols. Always use new batteries.
3. Replace the battery cover.
4. It is recommended to remove the batteries if the
unit will not be used for an extended period of
time.
AC Power Adapter
An AC adapter is available separately for battery-free
operation. The AC adapter plugs into the right side of
the unit, Fig. 2.
Please remember to practice common sense electrical
safety precautions while using the adapter.
To order an AC adapter, please see the enclosed order
form.
AC Adapter Output: 6V DC 600mA
BATTERY INSTALLATION / AC POWER
Fig. 2
-
-
+
+
Fig. 1
88 •• EENNGGLLIISSHH
Fig. 1
SETTING DATE/TIME
1. When the unit is off, press and release both the and M button at
the same time. The month will begin to ash, Fig. 1.
2. Press the M button to change until the desired number appears. To
scroll through the numbers quicker, hold down the M button as the
numbers advance.
3. Press the button to conrm the month entry.
4. Next, the date will blink. Repeat steps 2 and 3 to set the date, then
hours, then minutes. This unit does not track the year.
5. After setting the minutes, the unit will automatically exit out of the
date/time setting mode.
When the monitor is off, the date and time will still appear at the top of
the screen.
T ime is displayed in 24hr Military Time. This chart explains the time
conversion.
IT IS NECESSARY TO SET THE DATE AND TIME FOR THE MONITOR EVERY
TIME BATTERIES ARE INITIALLY INSTALLED OR REPLACED.
DATE AND TIME WILL DEFAULT TO FACTORY SETTINGS, 12:00 A.M. 1M
1D, IF YOU DO NOT CHOOSE TO SET THE CORRECT INFORMATION.
MILITARY TIME = REGULAR TIME
1:00 = 1am 7:00 = 7am 13:00 = 1pm 19:00 = 7pm
2:00 = 2am 8:00 = 8am 14:00 = 2pm 20:00 = 8pm
3:00 = 3am 9:00 = 9am 15:00 = 3pm 21:00 = 9pm
4:00 = 4am 10:00 = 10am 16:00 = 4pm 22:00 = 10pm
5:00 = 5am 11:00 = 11am 17:00 = 5pm 23:00 = 11pm
6:00 = 6am 12:00 = 12pm 18:00 = 6pm 24:00 = 12am

EENNGGLLIISSHH •• 99
Before applying your blood pressure cuff, be sure you have selected
t
he appropriate size cuff.
To determine the proper cuff size, measure the circumference of your
left upper arm at the point midway between inside bend of your
elbow and your shoulder, Fig 1.
Adult Cuff ts arm circumference 11-3/4” - 16-1/2” (30-42 cm)
Large Adult Cuff ts arm circumference 16-1/2” - 18-7/8” (42-48 cm)
Additional cuff sizes are available for order on the enclosed order
form.
If for any reason you are unable to or should not use your left arm,
please modify the instructions for cuff application to your right arm.
Your physician can help you identify which arm is best for you to
take measurements from.
1. The cuff should not be plugged into the monitor until after the
cuff is applied to your arm.
2. Remove any constrictive clothing or jewelry that may interfere
with cuff placement.
3. Be seated at a table or desk with your feet at on the oor.
4. Position the cuff on a solid surface with the tubing facing up and
away from you. The metal ring/bar on the cuff should be to the
left of the tubing.
APPLYING YOUR BLOOD PRESSURE CUFF
PROPER CUFF FIT AND PLACEMENT IS CRITICAL IN OBTAINING
ACCURATE BLOOD PRESSURE MEASUREMENTS. PLEASE READ THESE
INSTRUCTIONS CAREFULLY AND CONSIDER CONSULTING WITH YOUR
PHYSICIAN FOR FURTHER DIRECTION.
Fig. 1

1100 •• EENNGGLLIISSHH
Fig. 5
APPLYING YOUR BLOOD PRESSURE CUFF
5. Open the cuff by pulling or rolling the bottom of the cuff to the
right, Fig 2. This should open the cuff without fully unrolling it,
creating a cylinder. Do not extend the cuff beyond the metal bar.
6. Insert your left arm into the created cuff cylinder. Position the
index mark over the main artery on the inside of your arm, Fig
3, 4.
7. The bottom edge of the cuff should be positioned approximately
one inch above the elbow joint, Fig 5.
8. The cuff should t comfortably, yet snugly around your arm. You
should be able to insert one nger easily between your arm and
the cuff.
The cuff size is suitable for use when the vertical index mark is
within the horizontal OK range. A different size cuff is needed if the
‘index’ mark is outside the OK range.
If you are not comfortable with applying your cuff, please seek the
assistance of another member of your household or work with your
physician to practice the cuff application. Incorrectly applied cuffs
may result in inaccurate readings.
Fig. 2
Fig. 3
Fig. 4
Main
Artery
0.8-1.2”/2-3cm
EENNGGLLIISSHH •• 1111
TAKING YOUR BLOOD PRESSURE READING
Please read the preceding portions of this manual prior to taking
your rst reading.
Reminder, it is important to avoid smoking, eating, taking
medication, alcohol consumption or physical activity 30 minutes
prior to taking a reading.
1. Position the monitor on a at, stable surface with the
digital display in view.
2. Insert the cuff tubing connector into the port on the
left side of your monitor, Fig 1.
3. Rest your elbow on a solid surface with your palm
facing upward. Elevate your arm so that the cuff is at
the same level as your heart, Fig 2. Relax your left
hand.
4. Press the (POWER) button to turn the unit on; the
unit will run a self-test, Fig 3.
5. The unit will briey display the last reading value for that
memory bank. If there is no previous measurement, the unit will
display ‘0’ for all of the reading values, Fig 4.
6. The cuff will automatically inate to approximately 190mmHg or
40 mmHg higher than the last systolic pressure reading store in
memory.
mmHg
M
M
D
Fig. 3 Fig. 4
Fig. 1
Fig. 2

7. When the ination has reached optimum level, the display will begin to show the
decreasing pressure while you feel the pressure of the cuff decrease.
8. Your blood pressure measurement and pulse will display simultaneously on the screen, Fig
5. Both the systolic and diastolic readings will display at the same time.
9. The Hypertension Indicator will indicate your reading range in the left side of the display,
Fig 6. See page 14 for a chart interpreting the Hypertension Indicator results.
10. If an irregular heartbeat was detected during the reading, the Irregular Heartbeat Detector
will appear on the display, Fig 7. See page 14 for more information on the Irregular
Heartbeat Detector feature.
11. The reading will automatically be stored in memory, up to 60 readings.
12. Select (POWER) to turn the unit off and conserve energy and battery life. The unit will
automatically shut-off and revert to time/date mode after approximately 1 minute.
13. Disconnect the cuff and tubing from the monitor prior to storing.
1122 •• EENNGGLLIISSHH
Fig. 5
Fig. 6 Fig. 7
mmHg
M
M
D
YOU CAN STOP THE INFLATION OR DEFLATION PROCESS AT ANY TIME
BY PRESSING THE POWER BUTTON.
TAKING YOUR BLOOD PRESSURE READING

EENNGGLLIISSHH •• 1133
mmHg
M
M
D
INTERPRETING YOUR RESULTS
Irregular Heartbeat Detection
Your digital blood pressure monitor features an Irregular Heartbeat Detector. This feature
allows users to accurately monitor blood pressure even if an irregular heartbeat should occur.
When an irregular heartbeat is detected, the IHB icon will appear on the display.
Please consult with your physician or trained healthcare professional for further information
regarding an irregular heartbeat and if this symbol appears frequently.
Hypertension Indicator
This unit features our unique Hypertension Indicator. The World Health Organization has
established globally accepted standards for the assessment of high or low blood pressure
readings. The below chart should be considered only as a guideline, always consult with your
physician or health care professional to interpret your individual results.
The Hypertension Indicator, located on the left side of the display, will identify your reading
within a range in accordance with the guidelines set by the World Health Organization (WHO).
The Hypertension
Indicator is
located on the left
side of the display
Stage 3 Hypertension
(red bar)
Systolic pressure: ≥ 180 mmHg
or
Diastolic pressure: ≥ 110 mmHg
Stage 2 Hypertension
(orange bar)
Systolic pressure: ≥ 160-179 mmHg
or
Diastolic pressure: ≥ 100-109
mmHg
Stage 1 Hypertension
(yellow bar)
Systolic pressure: ≥ 140-159 mmHg
or
Diastolic pressure: ≥ 90-99 mmHg
High Normal
(green bar)
Systolic pressure: ≥ 130-139 mmHg
or
Diastolic pressure: ≥ 85-89 mmHg
Normal
(green bar)
Systolic pressure: ≥ 120-129 mmHg
or
Diastolic pressure: ≥ 80-84 mmHg
Optimal
(green bar)
Systolic pressure: < 120 mmHg
or
Diastolic pressure: < 80 mmHg

1144 •• EENNGGLLIISSHH
MEMORY FUNCTION
Recalling Measurements in Memory
You can recall up to 60 total measurements in memory. These
measurements can be shared with your physician or trained
healthcare professional.
1. Press and release the M (MEMORY) button. The unit will show
how many measurements are stored within the bank, Fig 1.
2. Press the M (MEMORY) button again to scroll through the
saved measurements. Measurements will appear on the
display from oldest to most current. All results for a given
measurement will display, including measurement results,
pulse rate, Hypertension Indicator icon and Irregular
Heartbeat alert (if applicable), Fig 2. After you’ve scrolled
through all the readings, the unit will automatically turn off.
3. When the number of readings exceeds 60, the oldest data will
be replaced with the new record.
Fig. 2
Fig. 1

EENNGGLLIISSHH •• 1155
CARE & MAINTENANCE OF MONITOR
• Disconnect the cuff and tubing from the monitor prior to storing.
• Do not use any liquids on the monitor or cuff.
• Use a soft, dry cloth to clean your monitor.
• Do not store in direct sunlight, dust or excessive humidity.
• Avoid extreme temperatures.
• Do not disassemble the monitor or cuff.
Fig. 3
MEMORY FUNCTION
Clearing Measurements from Memory
1. Press and release the M (MEMORY) button. The unit will
display how many measurements are stored within the bank.
2. Press and hold down the M (MEMORY) button until two
horizontal lines ash, Fig. 3. This indicates that all
measurements have been erased.

1166 •• EENNGGLLIISSHH
DISPLAY SYMBOLS
TROUBLESHOOTING
Low battery
Pulse rate per minute
An error has occured during measurement
Reading on display is a reading from a
memory bank
Symbol Meaning Symbol Meaning
An irregular heartbeat was detected
during measurement
The cuff is not properly wrapped or has
too much air left in it. The arrow will
cease flashing when the unit is ready for
measurement
A measurement error has occured and
the measurement should be attempted
again.
Display shows an
abnormal result
Display is blank when
power is on
Problem
Cuff position was not correct or was
not tight enough
Body posture was not correct during
measurement
Speaking, excessive movement, anger,
excited or nervous anxiety during
measurement
Batteries may be expired or installed
improperly
Apply the cuff properly and attempt a
new measurement
Review the ‘Taking a Measurement’
portion of this manual and attempt a
new measurement
Wait a period of time and attempt a
new measurement after calm has
returned; do not speak or move during
measurement
Check the polarity of the batteries and
reinstall if necessary; replace batteries
with new batteries
Possible Cause Solution

NOTE:
POTENTIAL FOR RADIO/TELEVISION INTERFERENCE (for U.S.A. only)
This product has been tested and found to comply with the limits for a Class B digital
device, pursuant to part 15 of the FCC rules.
These limits are designed to provide reasonable protection against harmful interference in a
residential installation. The product generates, uses, and can radiate radio frequency energy
and, if not installed and used in accordance with the instructions, may cause harmful
interference to radio communications. However, there is no guarantee that interference will
not occur in a particular installation. If the product does cause harmful interference to radio or
television reception, which can be determined by turning the product on and off, the user is
encouraged to try to correct the interference by one or more of the following measures:
• Reorient or relocate the receiving antenna
• Increase the separation between the product and the receiver.
• Connect the product into an outlet on a circuit different from that to which the receiver is
connected.
• Consult the dealer or an experienced radio/TV technician for help.
POTENTIAL FOR RADIO/TELEVISION INTERFERENCE (for Canada only)
This digital apparatus does not exceed the Class B limits for radio noise emissions from digital
apparatus as set out in the interference-causing equipment standard entitled “Digital
Apparatus”, ICES-003 of the Canadian Department of Communications.
Cet appareil numérique respecte les limites de bruits radioeléctriques applicables aux
appareils numériques de Clase B prescrites dans la norme sur le materiel brouilleur:
“Appareils Numériques”, ICES-003 édictée par le minister des communications.
Changes or modications not expressly approved by the party responsible for compliance
could void the user’s authority to operate the equipment.
FCC STATEMENT
EENNGGLLIISSHH •• 1177

NAME Automatic Premium Digital Blood Pressure Arm Monitor
MODEL NUMBER 01-5021 (adult); 01-5022 (large adult)
DISPLAY SYSTEM Digital display/LCD
MEASUREMENT METHOD Oscillometric
POWER SOURCE 4 “AA” batteries
MEASURING RANGE Pressure: 0-300 mmHg; Pulse: 30-180 beats/minute
ACCURACY Pressure: ±3 mmHg; Pulse: ±5% of reading
INFLATION Pump Drive
DEFLATION Automatic Pressure Release Valve
MEMORY Built-in memory enabling display of up to 60 measurements
AUTOMATIC SHUT-OFF Approximately 1 minute after last button operation
OPERATION ENVIRONMENT Temperature 41
o
F – 104oF (5oC – 40oC); Humidity < 80%
STORAGE ENVIRONMENT Temperature -4
o
F – 131oF (-20oC – 55oC); Humidity < 95%
MONITOR DIMENSIONS 4-1/8” x 6” x 1-3/4”
WEIGHT 12.7 oz. (without batteries)
CUFF ARM CIRCUMFERENCE Adult size cuff fits arm circumference: 11-3/4” - 16-1/2” (30-42 cm)
Large adult size cuff fits arm circumference: 16-1/4” -18-7/8” (42-48 cm)
ACCESSORIES Cuff, detailed guidebook, quick start guide, blood pressure log,
four “AA” batteries, storage case
OPTIONS Small adult size cuff fits arm circumference: 8-5/8” -11-3/4” (22-30 cm),
(AVAILABLE SEPARATELY) AC Adapter
Specifications are subject to change without notice
PRODUCT SPECIFICATIONS
1188 •• EENNGGLLIISSHH

EENNGGLLIISSHH •• 1199
Congratulations on your purchase of a Veridian Digital Blood Pressure Monitor. Your Digital Blood Pressure Monitor is covered by the
following limited warranty commencing upon the date of purchase, and subject to the following terms and conditions:
Veridian Healthcare warrants that its Digital Blood Pressure Monitor will be free from defects in materials and workmanship under
normal consumer usage for as long as the original purchaser owns the product.
Periodic maintenance, repair and replacement of parts due to normal wear and tear are excluded from coverage. Defects or damage
that result from: (a) improper operation, storage, misuse or abuse, accident or neglect, such as physical damage (cracks, scratches, etc.)
to the surface of the product resulting from misuse; (b) contact with liquid, water, rain, extreme humidity or heavy perspiration, sand,
dirt or the like, extreme heat, or food; (c) use of the Digital Blood Pressure Monitor for commercial purposes or subjecting the Digital
Blood Pressure Monitor to abnormal usage or conditions; or (d) other acts which are not the fault of Veridian, are excluded from
coverage. This warranty does not cover batteries or other power sources that may be provided with, or used with the Digital Blood
Pressure Monitor.
If the Digital Blood Pressure Monitor fails to conform to this limited warranty, return the Digital Blood Pressure Monitor postage
prepaid along with $5.00 for return shipping, handling and insurance to: Veridian Healthcare, Attn: Repair Department, 1465 S.
Lakeside Drive, Waukegan, IL, 60085. When returning a product, please also include: (i) a copy of your receipt, bill of sale or other
comparable proof of purchase; (ii) a written description of the problem; and (iii) your name, address and telephone number. Carefully
package the product to avoid any damage that may occur while in transit; shipping insurance with returned receipt is recommended.
At our option, Veridian Healthcare will repair or replace the unit found to be defective in materials or workmanship under normal
consumer usage. The purchaser will be notied of any additional repairs required prior to completing the repair, and will be responsible
for parts charges, if any, and repair charges not covered by this limited warranty.
EXCEPT AS PROVIDED FOR IN THIS LIMITED WARRANTY, ALL EXPRESS AND IMPLIED WARRANTIES AND CONDITIONS ARE DISCLAIMED,
INCLUDING WITHOUT LIMITATION THE IMPLIED WARRANTIES OF MERCHANTABILITY AND FITNESS FOR A PARTICULAR PURPOSE. THE
REPAIR OR REPLACEMENT AS PROVIDED UNDER THIS LIMITED WARRANTY IS THE EXCLUSIVE REMEDY OF THE CONSUMER, AND IS
PROVIDED IN LIEU OF ALL OTHER WARRANTIES, EXPRESS OR IMPLIED. IN NO EVENT SHALL VERIDIAN HEALTHCARE BE LIABLE, WHETHER
IN CONTRACT OR TORT (INCLUDING NEGLIGENCE) FOR DAMAGES IN EXCESS OF THE PURCHASE PRICE OF THE PRODUCT, OR FOR ANY
INDIRECT, INCIDENTAL, SPECIAL OR CONSEQUENTIAL DAMAGES OF ANY KIND, OR FOR DAMAGES TO, OR LOSS OF, OTHER PROPERTY OR
EQUIPMENT OR PERSONAL INJURIES TO THE FULL EXTENT THESE DAMAGES MAY BE DISCLAIMED BY LAW.
Some states and jurisdictions do not allow the limitation or exclusion of incidental or consequential damages, or
limitation on the length of an implied warranty, so the above limitations or exclusions may not apply to you. This
warranty gives you specic legal rights, and you may also have other rights that vary from state to state or from one
jurisdiction to another.
LIFETIME LIMITED WARRANTY

mmHg
M
M
D
AAuuttoommááttiiccoo DDiiggiittaall ddee LLuujjoo
PPaarraa llaa PPrreessiióónn AArrtteerriiaall
MMoonniittoorr
MANUAL DE INSTRUCCIONES • ESPA
ÑÑ
OL
Modelo 01-5021 (adulto)
Modelo 01-5022 (adulto grande)

ALTO!
ASEGÚRESE DE TENER LA TOTALIDAD DE LOS
SIGUIENTES COMPONENTES ANTES DE USAR SU
MONITOR DIGITAL DE PRESIÓN ARTERIAL
SI FALTA ALGUNO DE LOS ELEMENTOS, INCLUIDOS LOS INSERTOS
O LOS MANUALES DE INSTRUCCIONES, NO HAGA LA DEVOLUCIÓN
EN EL LUGAR DONDE EFECTUÓ LA COMPRA. COMUNÍQUESE CON
ATENCIÓN AL CLIENTE AL TELÉFONO 8663261313.
Monitor Digital
mmHg
M
El Brazalete para
Adultos o Adultos
Grandes
4 Baterías Tipo AA
Estuche
Manual Detallado
Guía de Referencia Rápida
Registro de Presión Arterial
Preguntas con Frecuencia Hechas
Forma de Orden

EESSPPAAÑÑOOLL •• 2233
CONTENIDO
Distributed by
Veridian Healthcare
1465 S. Lakeside Drive
Waukegan, IL 60085
www.veridianhealthcare.com
Made in China
#93-1045 04/10
©2010 Veridian Healthcare, LLC
Línea de ayuda gratuita de asistencia al cliente: 1-866-326-1313
De lunes a viernes de 8:30 a 16:30 (hora central del Este)
Introducción ...............................................................................................................24
Funciones del monitor digital de presión arterial.............................................25
Cómo comenzar.........................................................................................................26
Colocación de las baterías /alimentación de c.a................................................27
Ajuste de fecha y hora..............................................................................................28
Colocación del brazalete de medición de presión arterial........................29-30
Toma de lecturas de presión arterial..............................................................31-32
Interpretación de lecturas de presión arterial....................................................33
Función de memoria ..........................................................................................34-35
Cuidado y mantenimiento......................................................................................35
Símbolos del visor.....................................................................................................36
Solución de problemas............................................................................................36
Declaración de la FCC...............................................................................................37
Especicaciones del producto ...............................................................................38
Garantía .......................................................................................................................39

2244 •• EESSPPAAÑÑOOLL
Veridian Healthcare le recomienda procurar primero el asesoramiento y las
r
ecomendaciones de su médico o profesional de cuidados médicos cuando utilice
dispositivos de diagnóstico en el hogar, incluidos monitores de presión arterial.
Los monitores automáticos digitales de presión arterial emplean el método oscilométrico para
medir la presión arterial electrónicamente. El monitor detecta el movimiento de la sangre por
la arteria de su brazo y convierte dichos movimientos en una lectura digital. El método
oscilométrico no requiere de un estetoscopio; con lo cual, el equipo resulta ideal para uso
doméstico
Las lecturas de la presión arterial determinadas con este dispositivo son equivalentes a las
mediciones obtenidas por un profesional de cuidados médicos capacitado mediante el
método de auscultación con brazalete/estetoscopio, dentro de los límites prescritos por la
norma nacional estadounidense para esgmomanómetros electrónicos o automatizados
(American National Standard for Electronic or automated Sphygmomanometers).
Muchas gracias por adquirir un monitor automático digital de presión arterial de Veridian
Healthcare. Con el cuidado y uso adecuados, el monitor le brindará muchos años de
lecturas conables.
INTRODUCCIÓN
SÍRVASE LEER TODA ESTA GUÍA ANTES DE OPERAR
LA UNIDAD.

EESSPPAAÑÑOOLL •• 2255
LLOOSS DDEETTAALLLLEESS DDEELL VVIISSOORR YY LLAA IINNTTEERRPPRREETTAACCIIÓÓNN DDEE LLOOSS SSÍÍMMBBOOLLOOSS
EESSTTÁÁNN IINNCCLLUUIIDDOOSS EENN EESSTTEE MMAANNUUAALL..
FUNCIONES DEL MONITOR DIGITAL
mmHg
M
M
D
Brazalete para
el brazo
Visor Digital
Puerto para
adaptador
AC
POWER
Botón de encendido
(encendido/
apagado- on/off )
Conector
del tubo
Compartimiento
de las baterías
(superficie inferior)
MEMORIA
Botón para
llamar la

2266 •• EESSPPAAÑÑOOLL
CÓMO COMENZAR
Antes de tomarse la presión
1. Sus lecturas sólo deben ser interpretadas por su médico o profesional de cuidados
médicos con acceso a su historia clínica individual. El uso periódico de un monitor en el
hogar le permitirá rastrear y registrar sus lecturas para comentarlas con su médico.
2. Tómese la presión en un lugar tranquilo y sentado en una posición relajada. Descanse
durante 15 minutos antes de tomarse la presión. Si se produce un error o si desea tomar
una segunda lectura, deje transcurrir 15 minutos entre lecturas para que sus vasos
sanguíneos se normalicen.
3. Evite fumar, comer, tomar medicación, beber alcohol, hacer actividad física o cualquier otra
actividad estresante 30 minutos antes de tomarse la presión.
4. Quítese siempre las joyas o indumentaria apretada que pudiere interferir en la colocación
del brazalete.
5. Manténgase quieto usted y el monitor durante la medición; no hable durante la lectura.
6. Se recomienda tomarse la presión a la misma hora todos los días para controlar mejor las
indicaciones en sus resultados.
7. Registre su medición diaria en la planilla que se incluye o en algún otro documento escrito
para compartirla con su médico.

Esta unidad viene completa con 4 baterías tipo AA.
2
Será necesario cambiar las baterías cuando se presente el símbolo de Batería Baja en el
visor, o cuando no se encienda el visor después de haber pulsado el botón de encendido
(POWER).
Reemplazo de la Baterîa, Fig. 1
1. Presione hacia abajo para levantar la tapa
2. Inserte o cambie 4 baterías tipo AA en el
compartimento de baterías; asegúrese de que
coincidan los símbolos de polaridad indicados. Use
siempre baterías nuevas.
3. Vuelva a colocar la tapa.
4. Se recomienda quitar las baterías si la unidad no se va
a usar por un período de tiempo prolongado.
Adaptador de alimentación de c.a.
Hay un adaptador de c.a. disponible por separado, para
funcionamiento sin baterías. El adaptador de c.a. se
enchufa en el costado de la unidad, según se indica en
la Fig. 2.
Recuerde tomar precauciones de seguridad eléctrica
guiadas por el sentido común mientra use el adaptador.
Para efectuar el pedido de un adaptador de c.a., vea el
formulario de pedido que se adjunta.
Adaptador de c.a. Salida: 6V de c.a., 600mA
EESSPPAAÑÑOOLL •• 2277
-
-
+
+
COLOCACIÓN DE LA BATERÍA / ALIMENTACIÓN
DE C.A.
Fig. 1
Fig. 2

2288 •• EESSPPAAÑÑOOLL
AJUSTE DE FECHA Y HORA
1. Con la unidad apagada, pulse y libere simultáneamente los
botones de y de M. Comenzará a parpadear el mes, Fig. 1.
2. Pulse el botón de M para cambiar el número hasta que se
visualice el número deseado. Si desea que los números pasen
más rápido, mantenga pulsado el botón de M mientras
avanzan los números.
3. Pulse el botón de para conrmar el ingreso del mes.
4. A continuación, parpadeará la fecha. Repita los pasos 2 y 3
para ajustar la fecha; después las horas, luego los minutos.
5. Una vez ajustados los minutos, la unidad saldrá automáticamente del modo de
ajuste de fecha/hora.
Aunque el monitor esté apagado, seguirán visualizándose la fecha y la hora en la parte
superior de la pantalla.
La hora se presenta en formato militar de 24 horas. Esta planilla explica la conversión de la
hora.
ES NECESARIO AJUSTAR LA FECHA Y HORA DEL MONITOR CUANDO SE
COLOCAN LAS BATERÍAS POR PRIMERA VEZ O CADA VEZ QUE SE LAS
REEMPLAZA.
SI USTED NO ELIJE AJUSTAR LA INFORMACIÓN CORRECTA, LA FECHA Y
LA HORA INDICADA SERÁ LA DETERMINADA POR DEFECTO POR EL
FABRICANTE: 12:00 A.M. 1M 1D.
HORA FORMATO MILITAR = HORA FORMATO ESTÁNDAR
1:00 = 1am 7:00 = 7am 13:00 = 1pm 19:00 = 7pm
2:00 = 2am 8:00 = 8am 14:00 = 2pm 20:00 = 8pm
3:00 = 3am 9:00 = 9am 15:00 = 3pm 21:00 = 9pm
4:00 = 4am 10:00 = 10am 16:00 = 4pm 22:00 = 10pm
5:00 = 5am 11:00 = 11am 17:00 = 5pm 23:00 = 11pm
6:00 = 6am 12:00 = 12pm 18:00 = 6pm 24:00 = 12am
Fig. 1

EESSPPAAÑÑOOLL •• 2299
Antes de colocarse el brazalete de presión arterial, asegúrese de
h
aber seleccionado el tamaño de brazalete adecuado:
Para determinar el tamaño correcto, mida la circunferencia de su
brazo superior izquierdo en la curva situado a mitad del camino del
interior del punto en medio de su codo y de su hombro, Fig 1.
El brazalete para adultos se adapta a una circunferencia de brazo
de entre 11-3/4” y 16-1/2” (de 30 a 42 cm)
El brazalete para adultos grandes se adapta a una circunferencia
de brazo de entre 16-1/2” y 18-7/8” (de 42 a 48 cm)
Hay disponibles otros brazaletes para efectuar el pedido en el
formulario de pedido que se adjunta.
Si, por cualquier motivo, usted no puede o no debe usar su brazo
izquierdo, modique las instrucciones para la colocación del
brazalete en el brazo derecho. Su médico puede ayudarlo a
identicar el brazo que le resulte mejor para tomarse la presión.
1. No debe enchufar el brazalete al monitor mientras no esté
colocado en el brazo.
2. Quítese cualquier indumentaria apretada o joya que pudiere
interferir en la colocación del brazalete.
3. Permanezca sentado a una mesa o escritorio, con los pies planos
sobre el suelo.
COLOCACIÓN DEL BRAZALETE
ES MUY IMPORTANTE EL AJUSTE Y LA COLOCACIÓN ADECUADA DEL
BRAZALETE PARA OBTENER MEDICIONES PRECISAS DE LA PRESIÓN
ARTERIAL. LEA CUIDADOSAMENTE ESTAS INDICACIONES Y CONSULTE
CON SU MÉDICO PARA MÁS INSTRUCCIONES.
Fig. 1

3300 •• EESSPPAAÑÑOOLL
Fig. 5
COLOCACIÓN DEL BRAZALETE
4. Coloque el brazalete sobre una supercie sólida, con los tubos
hacia arriba y lejos de usted. El aro/barra de metal del brazalete
debe quedar a la izquierda de los tubos.
5. Abra el brazalete tirando o desenrollando la parte inferior del
brazalete hacia la derecha, Fig. 2, para que se abra el brazalete
sin tener que desenrollarlo totalmente, creando un cilindro. No
extienda el brazalete más allá de la barra de metal.
6. Inserte el brazo izquierdo en el cilindro creado por el brazalete.
Posicione la marca sobre la arteria principal, del lado interno
del brazo, Fig. 3,4.
7. El borde inferior del brazalete debe quedar posicionado
aproximadamente a una pulgada sobre la articulación del codo,
Fig. 5.
8. El brazalete debe sentirse cómodo, aunque bien ajustado,
alrededor del brazo. Se debe poder insertar fácilmente un dedo
entre el brazo y el brazalete.
El tamaño del brazalete es adecuado para uso cuando la marca
vertical de “índice” se encuentra dentro del rango horizontal
aceptable. Se necesitará un tamaño diferente de brazalete cuando la
marca de “índice” quede fuera del rango aceptable.
Si no se siente cómodo al colocarse el brazalete, procure la ayuda de
otro integrante de la familia o practique la colocación del brazalete
con su médico. La colocación incorrecta del brazalete dará como
resultado lecturas inexactas.
Fig. 2
Fig. 3
Fig. 4
Main
Artery
0.8-1.2”/2-3cm

EESSPPAAÑÑOOLL •• 3311
TOMA DE LECTURAS DE PRESIÓN ARTERIAL
Lea las partes precedentes de este manual antes de tomarse la
presión arterial por primera vez.
Recuerde: es importante evitar fumar, comer, tomar medicación,
beber alcohol o realizar actividad física 30 minutos antes de tomarse
la presión.
1. Coloque el monitor sobre una supercie plana y
estable, con el visor digital a la vista.
2. Inserte el conector de tubos del brazalete en el puerto
que se encuentra del lado izquierdo del monitor,
Fig. 1.
3. Su codo debe descansar en una supercie sólida, con
la palma de la mano hacia arriba. Eleve el brazo, de
manera tal que el brazalete y su corazón se
encuentren alineados, Fig. 2. Deje su mano izquierda
relajada.
4. Pulse el botón de encendido (POWER) para encender la unidad,
que ejecutará una prueba automática, Fig. 3.
5. La unidad visualizará brevemente el último valor de lectura de
ese banco de memoria. Si no hay una medición anterior, en el
visor se presentará ‘0’ para todos los valores de lectura.
6. El brazalete se inará automáticamente hasta alcanzar
aproximadamente 190mmHg o 40 mmHg más
que la última lectura de presión sistólica
almacenada en la memoria.
mmHg
M
M
D
Fig. 1
Fig. 2
Fig. 4Fig. 3

3322 •• EESSPPAAÑÑOOLL
TOMA DE LECTURAS DE PRESIÓN ARTERIAL
7. Cuando el proceso de inado haya alcanzado su óptimo nivel, el visor comenzará a
mostrar la presión disminuyendo y usted sentirá cómo disminuye la presión en el
brazalete.
8. La medición de presión arterial y pulso se presentarán simultáneamente en la pantalla, Fig.
5. Se visualizarán al mismo tiempo las lecturas de presión sistólica y diastólica.
9. El indicador de hipertensión mostrará el rango de lecturas en el sector izquierdo del visor,
Fig. 6. Para una planilla de interpretación de los resultados del indicador de hipertensión,
consulte la página 30.
10. Si se detectó un latido irregular durante la lectura, en el visor se presentará el detector de
latidos irregulares, Fig. 7. Para más información acerca de la función del indicador del
detector de latidos irregulares, consulte la página 30.
11. La lectura se almacenará automáticamente en la memoria, hasta un máximo de 60
lecturas.
12. Seleccione (POWER) para apagar la unidad y ahorrar energía y la vida útil de las baterías.
La unidad se apagará automáticamente y volverá al modo de fecha/hora después de
aproximadamente 1 minuto.
13. Desconecte el brazalete y los tubos del monitor antes de guardarlo.
Fig. 5
Fig. 6 Fig. 7
mmHg
M
M
D
PARA INTERRUMPIR EL PROCESO DE INFLADO O DESINFLADO EN
CUALQUIER MOMENTO, PRESIONE EL BOTÓN POWER.

EESSPPAAÑÑOOLL •• 3333
mmHg
M
M
D
COMPRENSIÓN DE LOS RESULTADOS
Detector de latidos irregulares
El monitor digital de presión arterial cuenta con detector de latidos irregulares. Esta función
permite a los usuarios controlar la presión arterial en forma precisa, aun cuando tenga lugar
un latido irregular. Cuando se detecte un latido irregular, en el visor se presentará el ícono IHB.
Consulte con su médico o con un profesional de cuidados médicos capacitado para más información acerca de los latidos irregulares y si el símbolo correspondiente se presenta con frecuencia.
Indicador de hipertensión
Esta unidad posee nuestro indicador de hipertensión único. La Organización Mundial de la
Salud ha establecido normas aceptadas mundialmente para la evaluación de lecturas de
presión arterial alta y baja. La siguiente planilla debe ser considerada sólo como una guía;
consulte siempre con su médico o profesional de cuidados médicos en relación con la
interpretación de sus resultados individuales.
El indicador de hipertensión, localizado en el sector izquierdo del visor, identicará su lectura
dentro de un rango, de conformidad con las pautas establecidas por la Organización Mundial
de la Salud (OMS).
El indicador de
hipertensión es
localizado en el
sector izquierdo
del visor
Grado 3 de Hipertensión
Presión arterial sistólica:
≥ 180 mmHg
or
Presión arterial diastólica:
≥ 110 mmHg
Grado 2 de Hipertensión
Presión arterial sistólica:
≥ 160-179 mmHg
or
Presión arterial diastólica:
≥ 100-109 mmHg
Grado 1 de Hipertensión
Presión arterial sistólica:
≥ 140-159 mmHg
or
Presión arterial diastólica:
≥ 90-99 mmHg
Alta Normal
Presión arterial sistólica:
≥ 130-139 mmHg
or
Presión arterial diastólica:
≥ 85-89 mmHg
Normal
Presión arterial sistólica:
≥ 120-129 mmHg
or
Presión arterial diastólica:
≥ 80-84 mmHg
Óptima
Presión arterial sistólica:
< 120 mmHg
or
Presión arterial diastólica:
< 80 mmHg

3344 •• EESSPPAAÑÑOOLL
FUNCIÓN DE MEMORIA
Memorización de mediciones en la memoria
Puede memorizar hasta un total de 60 mediciones en la
memoria. Estas mediciones las puede compartir con su médico o
profesional capacitado para el cuidado de la salud.
1. Pulse y libere el botón de memoria, M. La unidad demostrará
cuántas medidas se almacenan dentro del banco, seguido
por el último resultado, Fig. 1.
2. Pulse nuevamente el botón de memoria, M, para desplazarse
por las mediciones que están almacenadas. Las medidas
aparecerán en la exhibición de la más viejo a la más actual.
Todos los resultados para una medida dada exhibirán,
incluyendo los resultados de la medida, el pulso, el icono y la
alarma irregular del latido del corazón (si fuera aplicable), Fig
2. del indicador de la hipertensión. Después de que usted
haya enrollado a través de todas las lecturas, la unidad
apagará automáticamente.
3. Cuando el número de lecturas excede las 60, las más
antiguas serán reemplazadas por el nuevo registro.
Fig. 2
Fig. 1

EESSPPAAÑÑOOLL •• 3355
Fig. 3
CUIDADO Y MANTENIMIENTO DEL MONITOR
• Desconecte el brazalete y los tubos del monitor antes de guardar el equipo.
• No use líquidos para limpiar el monitor ni el brazalete.
• Utilice un paño suave y seco para la limpieza del monitor.
• No guarde el equipo en lugares que reciban la luz directa del sol, con polvo o con
humedad excesiva.
• Evite las temperaturas extremas.
• No desarme ni el monitor ni el brazalete
FUNCIÓN DE MEMORIA
Borrado de mediciones de la memoria
1. Pulse y libere el botón de memoria, M. La unidad mostrará la
cantidad de mediciones almacenadas en el banco.
2. Pulse y libere el botón de memoria, M, hasta que brillen dos
líneas horizontales, Fig 3. Esto indica que se han borrado
todas las mediciones.

3366 •• EESSPPAAÑÑOOLL
SÍMBOLOS VISUALIZADOS
Low Se presenta cuando es necesario
cambiar las baterías.
Muestra los pulsos por minuto
Tiene lugar cuando se produjo un error
durante la medición
Se presenta para recordar una medición
de la memoria
Símbolo Signicado Símbolo Signicado
Se presenta cuando se detecta un latido
irregular durante la medición
Se presenta cuando se detecta un latido
irregular durante la medición. Se presenta cuando se produjo un error en la
medición. Reinicie la medición.
Se presenta cuando el brazalete está inestable o tiene demasiado aire. Cuando
la flecha deje de parpadear, la unidad estará lista para tomar una medición
SOLUCIÓN DE PROBLEMAS
El monitor muestra
una medición anormal
El visor está en blanco
cuando se enciende el
equipo
Problema
La posición del brazalete no era
correcta o no estaba lo
sucientemente ajustado
La postura del cuerpo durante la
medición no era la correcta
Hablar, movimiento excesivo, enojo,
excitación o ansiedad nerviosa durante
la medición
Las baterías pueden estar agotadas o
colocadas de manera incorrecta
Coloque correctamente el brazalete e
intente una nueva medición
Revise la parte para ‘Tomar una
medición’ de este manual e intente
nuevamente
Espere un tiempo e intente una nueva
medición luego de recuperar la calma;
no hable ni se mueva durante la
medición
Verique la polaridad de las baterías y
si es necesario, vuélvalas a colocar;
reemplace las baterías por unas
nuevas
Causa posible Solución

EESSPPAAÑÑOOLL •• 3377
NOTA:
POTENTIAL FOR RADIO/TELEVISION INTERFERENCE (for U.S.A. only)
POTENCIAL DE INTERFERENCIA PARA RADIO/TELEVISIÓN (sólo para EE.UU.)
Este producto ha sido probado y se comprobó que cumple con los límites para un dispositivo
digital Clase B, de acuerdo con la parte 15 de las disposiciones de la FCC (Comisión Federal de
Comunicaciones).
Estos límites están diseñados para proporcionar una protección razonable contra la interferencia dañina de una instalación residencial. El producto genera, usa y puede irradiar energía de
radiofrecuencia y, si no se instala y usa de acuerdo con las instrucciones, podría ocasionar una
interferencia dañina para las comunicaciones de radio. No obstante, no hay garantía alguna
de que la interferencia no ocurrirá en una instalación en particular. Si el producto ocasiona interferencia dañina para la recepción de radio o televisión, la cual se puede determinar al encender y apagar el producto, se exhorta al usuario a que trate de corregir la interferencia
mediante una o más de las medidas siguientes:
• Reoriente o cambie de lugar la antena receptora
• Aumente la separación entre el producto y el receptor.
• Conecte el producto a un tomacorriente en un circuito diferente al que está conectado el
receptor.
• Consulte al distribuidor o a un técnico de radio/TV experimentado para obtener ayuda.
POTENCIAL DE INTERFERENCIA PARA RADIO/TELEVISIÓN (sólo para Canadá)
Este aparato digital no excede los límites de Clase B para emisiones de ruido de radio para un
aparato digital, como se estipula en la norma sobre equipos causantes de interferencia
titulada “Aparato digital”, ICES-003 del Departamento Canadiense de Comunicaciones.
Cet appareil numérique respecte les limites de bruits radioeléctriques applicables aux
appareils numériques de Clase B prescrites dans la norme sur le materiel brouilleur:
“Appareils Numériques”, ICES-003 édictée par le minister des communications.
Los cambios o modicaciones no aprobados expresamente por la parte responsable del
cumplimiento podrían anular la autoridad del usuario para operar el equipo.
DECLARACIÓN DE LA FCC

NOMBRE Monitor automático digital de lujo para la presión arterial
NÚMERO DE MODELO 01-5021 (adulto), 01-5022 (adulto grande)
SISTEMA DE VISUALIZACIÓN Visor digital/visor de cristal líquido
MÉTODO DE MEDICIÓN Oscilométrico
FUENTE DE ENERGÍA 4 baterías tipo AA
RANGO DE MEDICIÓN Presión: de 0 a 300 mmHg; Pulso: de 30 a 180 pulsos por minuto
PRECISIÓN Presión: ±3 mmHg; Pulso: ±5% de la lectura
INFLADO Accionamiento por bomba
DESINFLADO Válvula automática de alivio de presión
MEMORIA Memoria incorporada que permite la visualización de un
máximo de 60 mediciones
CIERRE AUTOMÁTICO Aproximadamente 1 minuto después de la última vez que se
accionó un botón
ENTORNO OPERATIVO Temperatura 41
o
F – 104oF (5oC – 40oC ; Humedad < 80%
ENTORNO DE ALMACENAMIENTO Temperatura -4
o
F – 131oF (-20oC – 55oC); Humedad < 95%
DIMENSIONES DEL MONITOR 4-1/8” x 6” x 1-3/4”
PESO DEL MONITOR Peso 12,7 oz. (sin baterías)
RANGO DE CIRCUNFERENCIA DE BRAZO El brazalete para adultos se adapta a una circunferencia de
brazo: 11-3/4” - 16-1/2” (30-42 cm); El brazalete para adultos
tamaño grandes se adapta a una circunferencia de brazo:
16-1/4” -18-7/8” (42-48 cm)
ACCESORIOS Brazalete, manual detallado, guía de referencia rápida, registro
de presión arterial, cuatro baterías tipo “AA”, estuche
OPCIONES (SE VENDEN POR SEPARADO) El brazalete para adultos tamaño pequeño se adapta a la
circunferencia de brazo: 8-5/8”-11-3/4” (22-30 cm),
adaptador de c.a.
Las especificaciones están conforme a cambio sin el aviso
ESPECIFICACIONES DEL PRODUCTO
3388 •• EESSPPAAÑÑOOLL

EESSPPAAÑÑOOLL •• 3399
Felicitaciones por su compra de un Monitor de Muñeca Para la Presión Arterial Automático Digital. Su Monitor de Muñeca Para la
Presión Arterial Automático Digital está cubierto por la siguiente garantía limitada a partir de la fecha de compra y está sujeto a los
siguientes términos y condiciones:
Veridian Healthcare garantiza que su Monitor de Muñeca Para la Presión Arterial Automático Digital estará libre de defectos en
materiales y mano de obra bajo el uso normal del consumidor por el tiempo que el comprador original sea propietario del producto.
Se excluyen de la cobertura el mantenimiento periódico, las reparaciones y el reemplazo de partes debidos al desgaste normal. Los
defectos o daños que resulten de: (a) la operación incorrecta, el almacenamiento incorrecto, el uso inadecuado o abuso, accidente o
negligencia, como el daño físico (grietas, raspones, etc.) en la supercie del producto resultado del uso inadecuado; (b) el contacto con
líquidos, agua, lluvia, humedad extrema o transpiración abundante, arena, polvo o suciedad en general, calor extremo, o alimentos; (c)
el uso del Monitor de Muñeca Para la Presión Arterial Automático Digital con propósitos comerciales o someter al Monitor de Muñeca
Para la Presión Arterial Automático Digital a un uso o condiciones anormales; u (d) otros actos que no son culpa de Veridian, se
excluyen de la cobertura. Esta garantía no cubre baterías ni otras fuentes de energía que se puedan suministrar o usar con el Producto.
Si el Producto no cumple con esta garantía limitada, devuelva el Monitor de Muñeca Para la Presión Arterial Automático Digital con
franqueo prepagado junto con $5.00 para su envío de regreso, manejo y seguro a: Veridian Healthcare, Attn: Repair
Department, 1465 S. Lakeside Drive, Waukegan, IL, 60085. Cuando devuelva un producto, por favor incluya
además: (i) una copia de su recibo, factura u otro comprobante de compra; (ii) una descripción por escrito del problema; y (iii) su
nombre, dirección y número telefónico. Embale cuidadosamente el producto para evitar daños mientras está en tránsito; se
recomienda contratar un seguro de envío con acuse de recibo. Según lo que elija, Veridian Healthcare reparará o reemplazará la unidad
que se considere defectuosa en materiales o mano de obra bajo el uso normal del consumidor. Al comprador se le noticará cualquier
reparación adicional requerida antes de completar la reparación, y será responsable de pagar el cargo por las piezas, si lo hubiese, y los
cargos de reparación que no estén cubiertos por esta garantía limitada.
EXCEPTO COMO LO DISPONE ESTA GARANTÍA LIMITADA, NO SE ACEPTA RESPONSABILIDAD ALGUNA POR TODAS LAS GARANTÍAS Y
CONDICIONES EXPRESAS E IMPLÍCITAS, INCLUIDAS EN FORMA NO RESTRICTIVA, LAS GARANTÍAS IMPLÍCITAS DE COMERCIABILIDAD Y
APTITUD PARA UN PROPÓSITO EN PARTICULAR. LA REPARACIÓN O REEMPLAZO, COMO SE ESTIPULA EN ESTA GARANTÍA LIMITADA, ES EL
ÚNICO RECURSO EXCLUSIVO DEL CONSUMIDOR Y SE PROPORCIONA EN LUGAR DE TODAS LAS DEMÁS GARANTÍAS, EXPRESAS O
IMPLÍCITAS. EN NINGÚN CASO VERIDIAN HEALTHCARE SERÁ RESPONSABLE, CON BASE EN OBLIGACIONES CONTRACTUALES O CULPA
EXTRACONTRACTUAL (INCLUIDA LA NEGLIGENCIA), POR DAÑOS Y PERJUICIOS QUE SUPEREN EL PRECIO DE COMPRA DEL PRODUCTO, O
POR CUALQUIER DAÑO INDIRECTO, INCIDENTAL, ESPECIAL O CONSECUENTE DE CUALQUIER TIPO, O POR DAÑOS A OTRA PROPIEDAD O
EQUIPO, O PÉRDIDA DE PROPIEDAD O EQUIPO O LESIONES PERSONALES, EN LAS MÁS AMPLIAS EXTENSIÓN EN QUE LA LEY PERMITA EL
DESCARGO DE LA RESPONSABILIDAD POR DICHOS DAÑOS.
Algunos estados y jurisdicciones no permiten la limitación o exclusión de daños incidentales o consecuentes, o la
limitación en la duración de una garantía implícita, de modo tal que las limitaciones o exclusiones podrían no aplicarse
a usted. Esta garantía le otorga derechos legales especícos y usted también puede tener otros derechos, que varían
dependiendo del estado o de una jurisdicción a otra.
GARANTÍA DE VIDA ÚTIL LIMITADA

REFERENCE PAGE / PÁGINA DE REFERENCIA
PLEASE FILLIN INFORMATION FOR FUTURE
REFERENCE AND ATTACH YOUR RECEIPT BELOW.
This information is necessary should you need to contact
Customer Care in the future.
COMPLETE TODA LA INFORMACIÓN PARA REFERENCIA
FUTURA Y ADJUNTE ABAJO SU COMPROBANTE.
Esta información es necesaria para el caso que en el futuro usted necesite
comunicarse con Atención al Cliente.
Model / Modelo: 01-5021 (adult), 01-5022 (large adult)
Name / Nombre: Automatic Digital Blood Pressure Monitor
Date Purchased / La Fecha Compró:
Store Name / Nombre del Almacén:
Lot No. (located on the bottom of the monitor)/
Lot No. (localizado en la parte inferior del monitor)
ATTACH RECEIPT HERE
ADJUNTE AQUÍ EL RECIBO
 Loading...