

Veridian Endeavor Owner's Manual
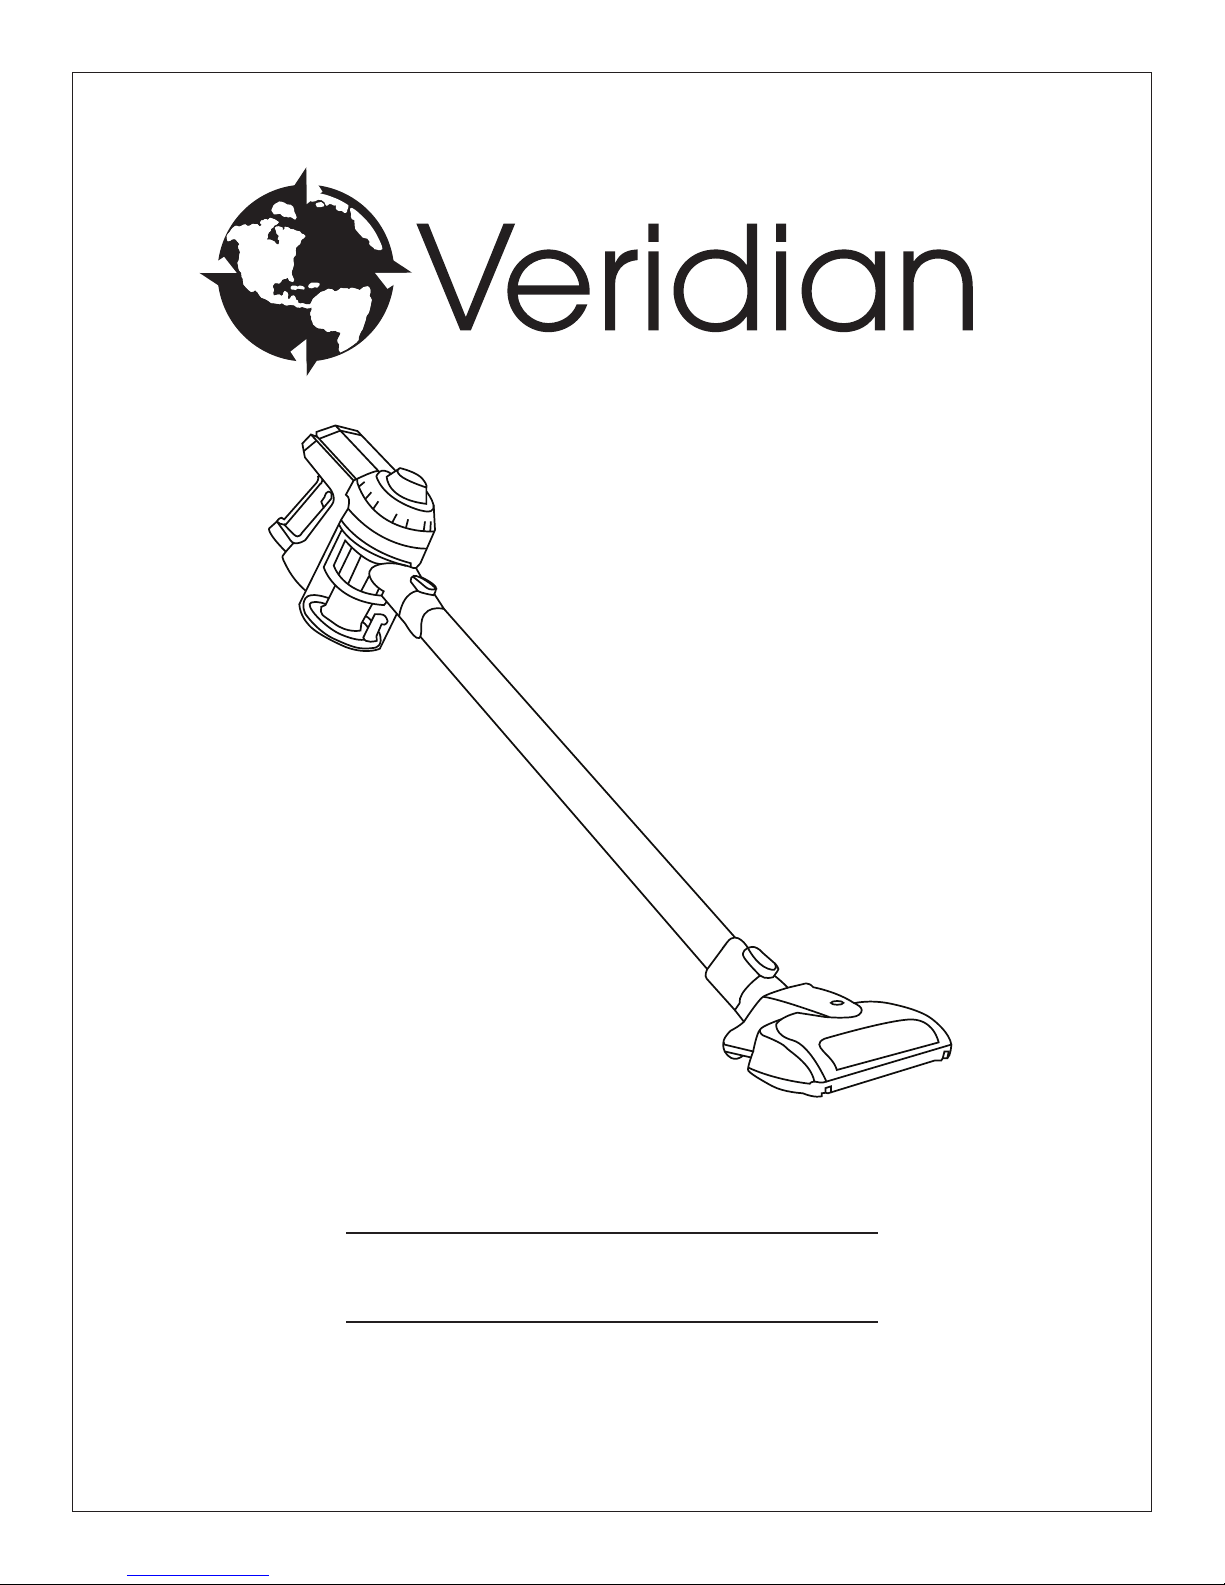
ENDEAVOR
®
CORDLESS HANDHELD STICK VACUUM
CAUTION: READ MANUAL CAREFULLY FOR PROPER USE AND OPERATION.
OWNER’S MANUAL

INTRODUCTION
Congratulations on the purchase of your new Veridian vacuum cleaner!
Lighter than full-size vacuum cleaners, easier to maneuver and less bulky for convenient storage, the Veridian Endeavor cordless handheld stick vacuum makes
quick work of everyday messes. With all the power of a high-performance stick vac and the versatility of a hand vac, the Endeavor is a top choice for cleaning
multiple oor types plus above oor surfaces.
There are many useful features built into your cleaner and we recommend that you carefully read this instruction manual so that you may take best advantage of
them.
If you have any questions concerning this product, contact Customer Service by calling toll free
1-888-764-0693 or via email at support@aerusonline.com.
TABLE OF CONTENTS
Introduction .............................................................................................................................................. 2
Specications . . . . . . . . . . . . . . . . . . . . . . . . . . . . . . . . . . . . . . . . . . . . . . . . . . . . . . . . . . . . . . . . . . . . . . . . . . . . . . . . . . . . . . . . . . . . . . . . . . . . . . . . . . . . . . . . . . . . . . . . . . . . . . . . . . . . . . . . . . . . . 2
Important Safety Instructions ............................................................................................................................. 3-4
Battery Use and Care . . . . . . . . . . . . . . . . . . . . . . . . . . . . . . . . . . . . . . . . . . . . . . . . . . . . . . . . . . . . . . . . . . . . . . . . . . . . . . . . . . . . . . . . . . . . . . . . . . . . . . . . . . . . . . . . . . . . . . . . . . . . . . . . . . . . . . 4
Features .................................................................................................................................................. 5
Assembly ................................................................................................................................................. 6-7
Operation................................................................................................................................................. 7
Maintenance .............................................................................................................................................. 8-9
Troubleshooting .......................................................................................................................................... 10
Warranty Information ..................................................................................................................................... 11
SPECIFICATIONS
Power Supply: 22.2 V Lithium Battery
Motor (Watts): 150 W
Dust Capacity: 30.5 in / 0.5 L
Noise Reduction/Decibel Range: < 80 dBA
Dimensions: 47” H X 9” W X 9” D
Eective Run Time: Up to 20 minutes
Recharging Time: 4-5 hours
Weight: 2.86 lbs.
Warranty: 1 year warranty
2

IMPORTANT SAFETY INSTRUCTIONS
READ ALL INSTRUCTIONS THOROUGHLY BEFORE USING THIS PRODUCT
CAUTION! Always switch o the appliance before cleaning, when not in use or attempting any maintenance task. The charger must only be
connected to an AC power supply at the voltage shown on the rating label. This cleaner should only be used for its intended purpose as
described in this instruction manual. Never operate the vacuum cleaner without lters.
When using your vacuum cleaner, basic precautions should always be obser ved, including the following:
• This appliance is not intended for use by persons (including children) without supervision or instruction concerning the use of the appliance by a person
responsible for their safety.
• Children should be supervised to ensure that they do not play with the appliance.
• To prevent electrical shock, do not immerse the appliance, battery or power plug into water or other liquids.
• To prevent electrical shock, do not use the vacuum cleaner outdoors or on wet surfaces.
• Do not operate vacuum cleaner too close to heaters, radiators, and other hot surfaces.
• Before inserting the charger plug into the wall, make sure your hands are dry.
• Before turning on the vacuum cleaner, remove any large or sharp objects from the oor or cleaning surface in order to prevent damage to the lter.
• Do not unplug the charger by pulling on the cord. To unplug the charger, gently pull the plug from the outlet.
• If the air inlet, Power Head or aluminum wand are blocked, you should switch o the unit immediately and remove the battery. First clear the blocked
substance before attempting to start the vacuum cleaner again.
• The appliance and charging base are intended for domestic indoors use only.
• Do not use the charger with a damaged cord or plug. If the charger is not working as it should, has been dropped, damaged, left outdoors or dropped in
water, return it to an authorized service center for inspection.
• Do not handle or operate the appliance with wet hands.
• Extreme caution should be exercised when using the appliance on stairs.
• Do not attempt to change the attachments while the appliance is switched on. Use only manufacturer’s recommended accessories.
• Do not use the appliance to pick up ammable items or combustiblie liquids (i.e. gasoline, hot ashes, cigarettes, matches, explosive materials or anything
burning) or use in areas where such substances and items may be present.
• Do not use the appliance to pick up toxic materials (i.e. chlorine bleach, ammonia).
• Never operate or use the appliance without the lters in place.
• Before carrying out any maintenance service or cleaning the lters, always switch o the vacuum cleaner and remove the battery.
• Keep openings away from your face and body.
• Do not use the vacuum cleaner if it is damaged or broken. Check the electrical regularly for defects. If the connection cables are damaged, have them
replaced immediately.
• Never clean the vacuum cleaner or any of the electrical parts, especially the electrical connections, with water or liquid cleaners.
SAVE THESE INSTRUCTIONS
3

IMPORTANT SAFETY INSTRUCTIONS (continued)
• Never attempt to make any modications electrically to the vacuum cleaner and charging base.
• Always store the appliance and charger indoors in a cool and dry place.
• Do not pick up water, for dry household use only.
• Use the electric power head only for vacuuming dust and dry substances in the home.
• Never run over a power cable with the power head as the cable could get damaged.
• Never touch the roller brush while the vacuum is switched on.
• To prevent unnecessary wear on the power head cleaning nozzle, keep it moving while in operation.
• Damage caused by improper use or by not observing the instructions in this manual will void warranty.
Battery Use and Care
CAUTION! Under abusive conditions, liquid may be ejected from the battery; avoid contact. If contact accidentally occurs, ush with water. If liquid
contacts eyes, additionally seek medical help. Liquid ejected from the battery may cause irritation or burns.
• The appliance is only to be used with the charger uniquely provided with the appliance.
• Only charge the battery inside the product and only use the specically designated charger to charge the unit.
• When handvac is not in use, keep it away from other metal objects (i.e. paper clips, coins, keys, nails, screws, or other small metal objects) that can make a
connection from one terminal to another. Shorting the handvac terminals together may cause burns or a re.
• Do not charge or store the cleaner outdoors or inside the car. Only charge or store the battery in a dry indoor area where the temperature is more than
41°F (5°C) but less than 113°F (45°C). The charger is for indoor use only.
• Never attempt to open the battery for any reason. If the plastic housing of the cleaner breaks or cracks, immediately discontinue use and do not recharge.
• The charger is not a servicable part.
• Before disposal of your battery, fully discharge your battery by running the product until it stops.
• The cleaner contains a Li-Ion battery. Do not dispose the cleaner with your local garbage. Contact your local authority for the instructions on proper
disposal of the battery.
• Do not use the charger to charge a non-chargable battery.
• After each use of your product, please ensure that the continuous mode lock is in the “unlocked” position. Failure to do so may cause poor performance or
battery failure. It is recommended to charge your product after each use to ensure the maximum performance.
4
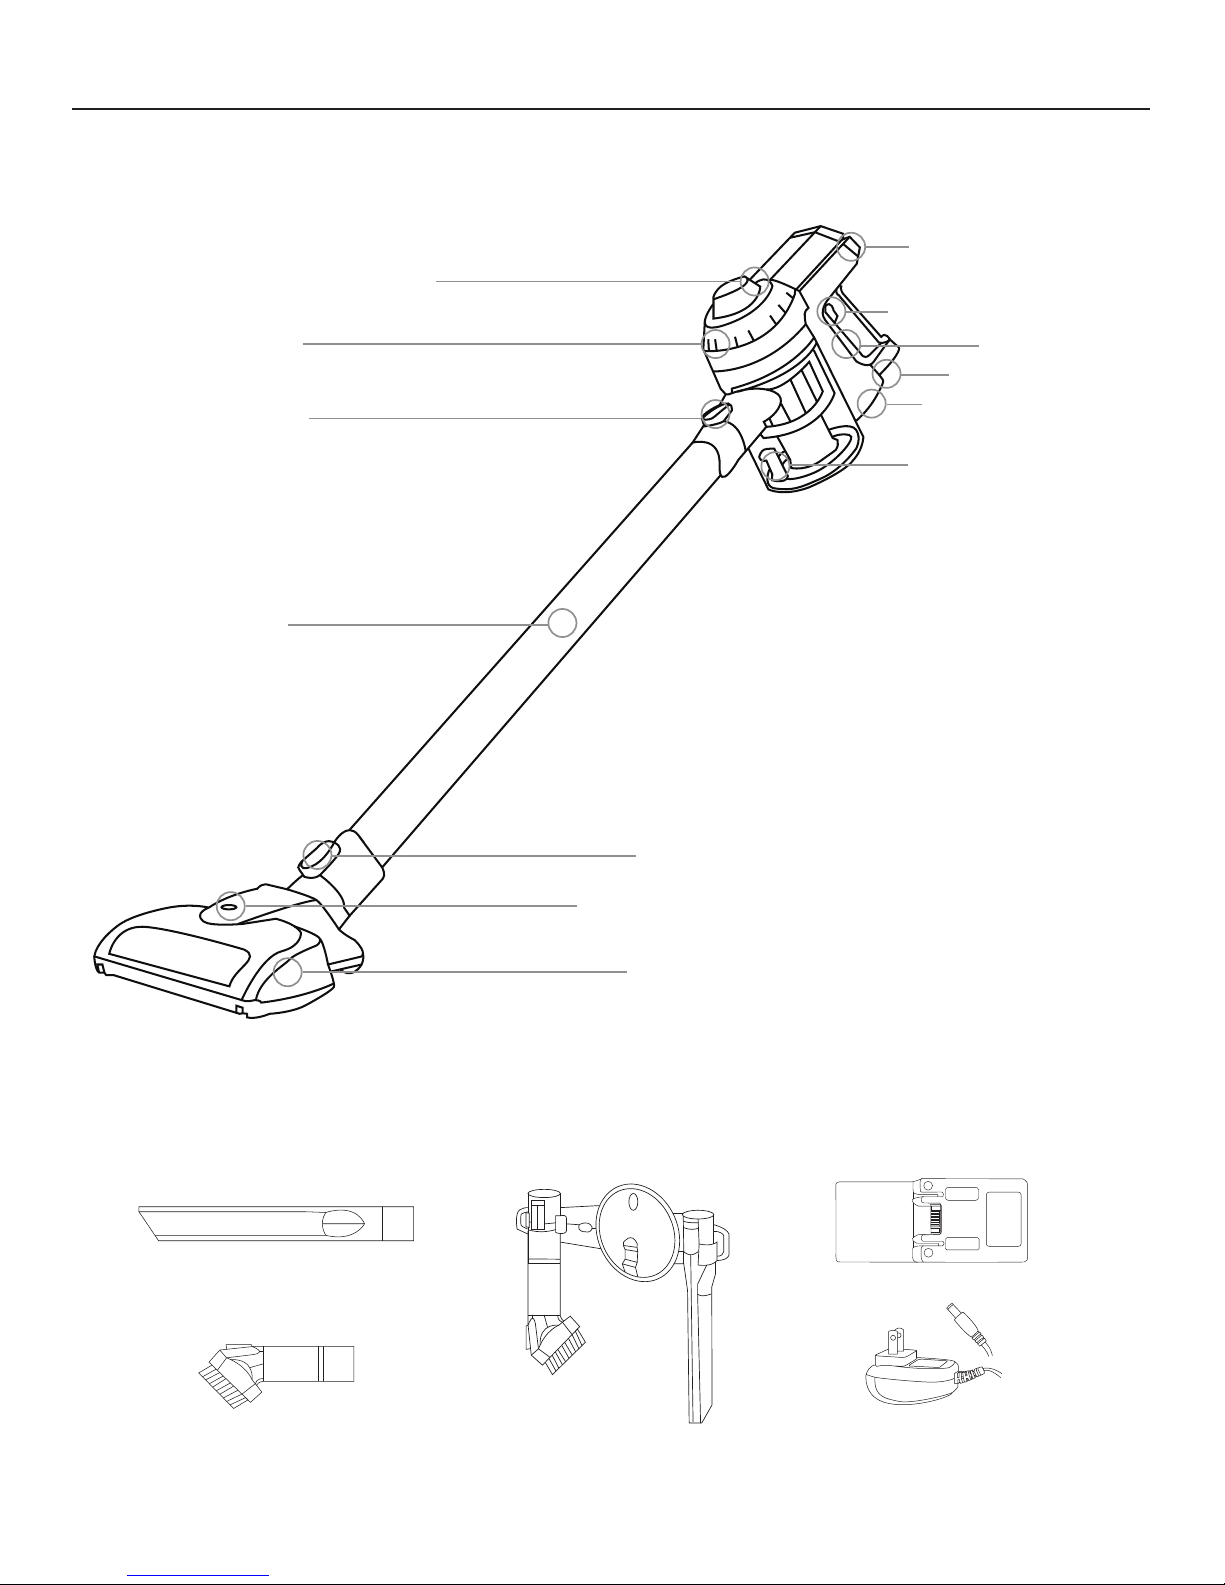
FEATURES
Continuous Mode Lock
Wand Release Button
Exhaust Filter Release Button
Charging Indicator
On/O Button
Battery
Battery Release Button
Dust Bin Release Button
Dust Release Button
Wand
ACCESSORIES:
Crevice Tool
Power Head Release Button
Power Indicator
Power Head
Battery Pack
2-in-1 Dusting Brush Wall Mount Storage Holder
Power Adapter
5
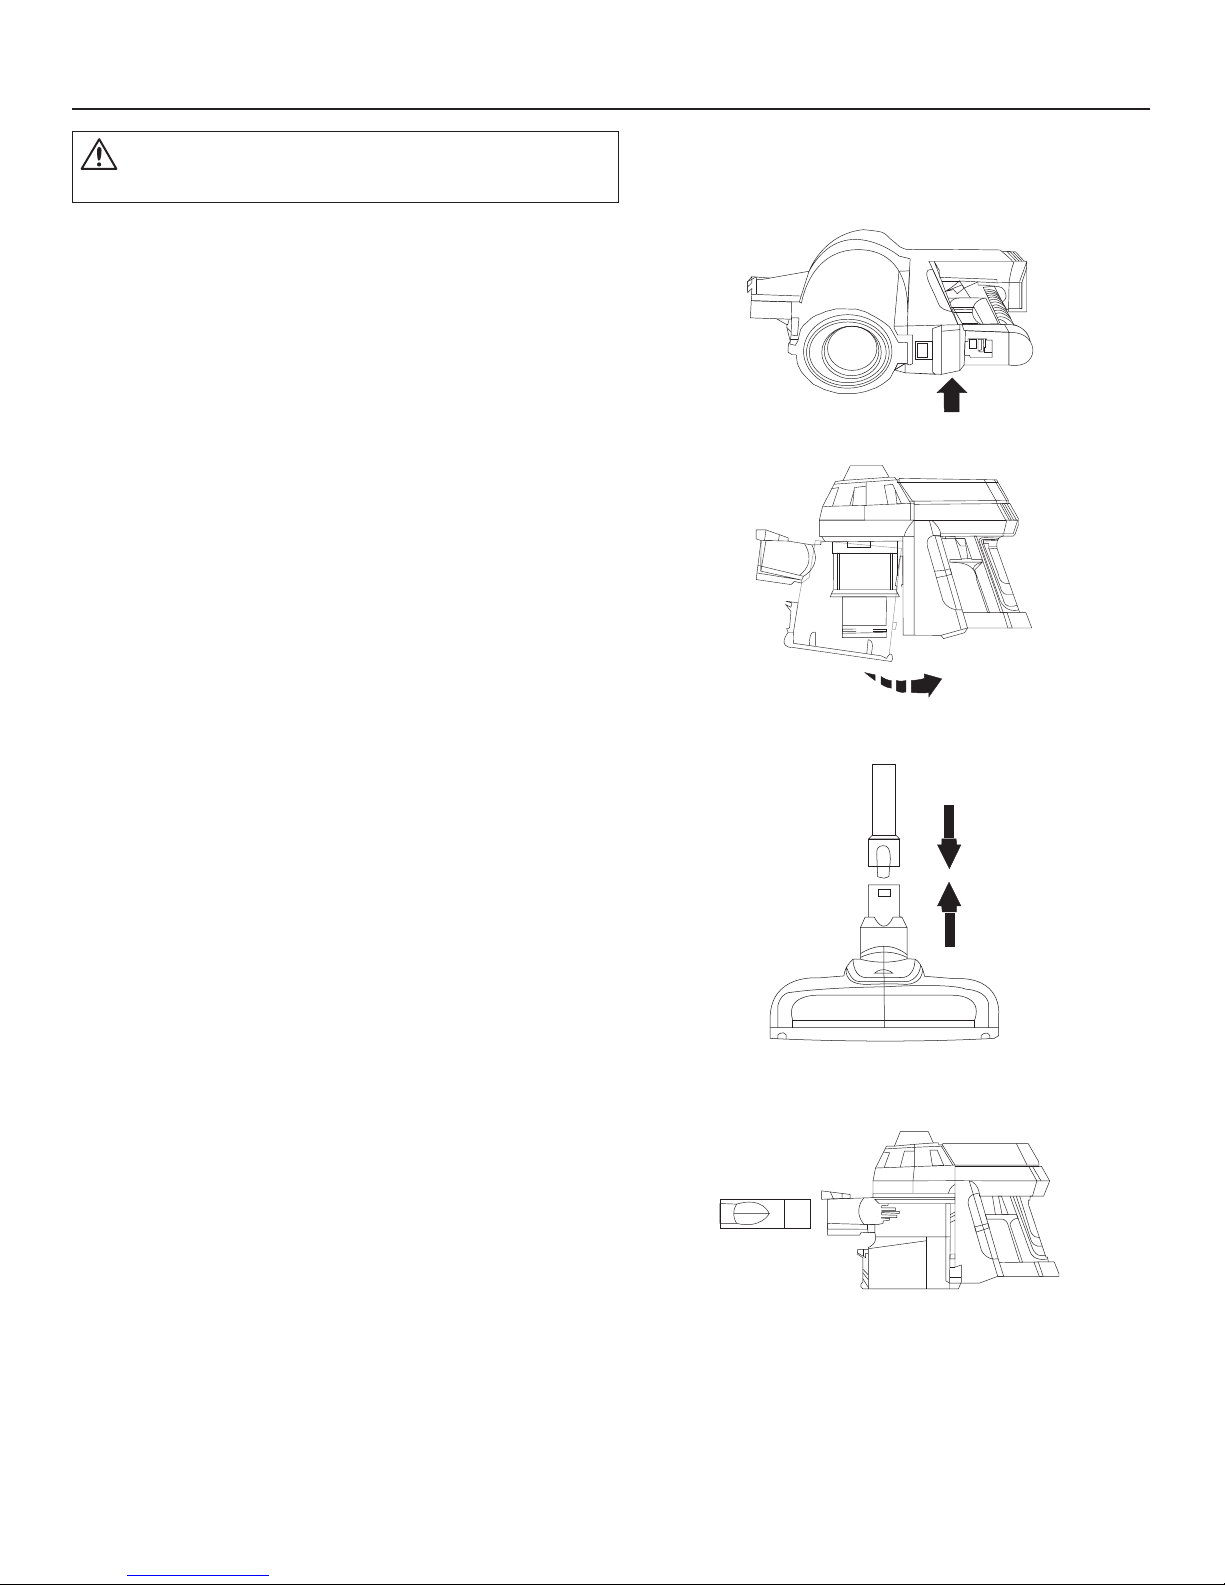
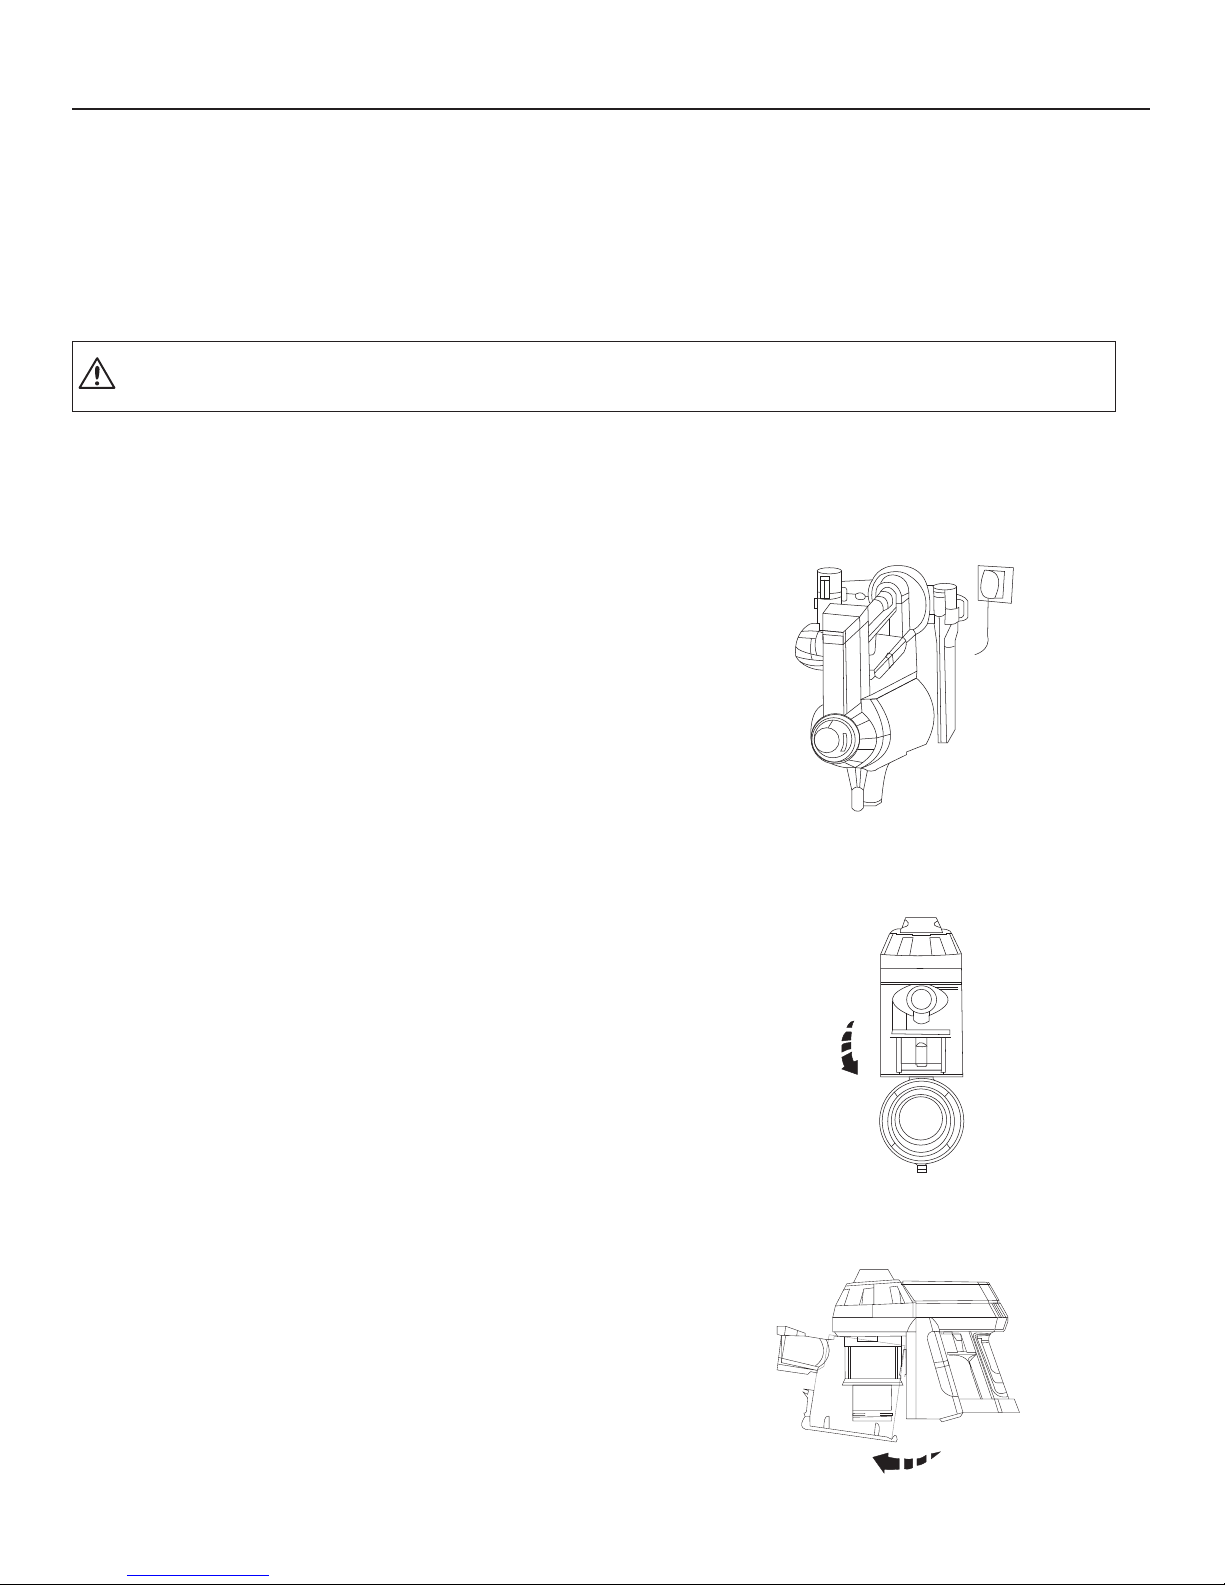
ASSEMBLY
CAUTION! Always remove the battery from the appliance before
tting or removing accessories.
INSTALLING THE BATTERY
1.
Align the sliding slot of the battery with the guide rail on the machine
body component.
2. Insert the battery into the machine case component in the direction
shown, until a “click” sound is heard.
INSTALLING THE DUST CANISTER
1.
Align the dust bin to the cleaner and push upward as the direction
shown, until a “click” sound is heard.
CONNECTING THE POWER HEAD
Insert the Power Head into the wand. You will hear a “click” sound when it is
securely in place.
CONNECTING THE WAND TO THE UNIT
During installation of the wand, insert the plug end into the air inlet of the
cleaner. Once securely in place, you will hear a “click” sound.
6
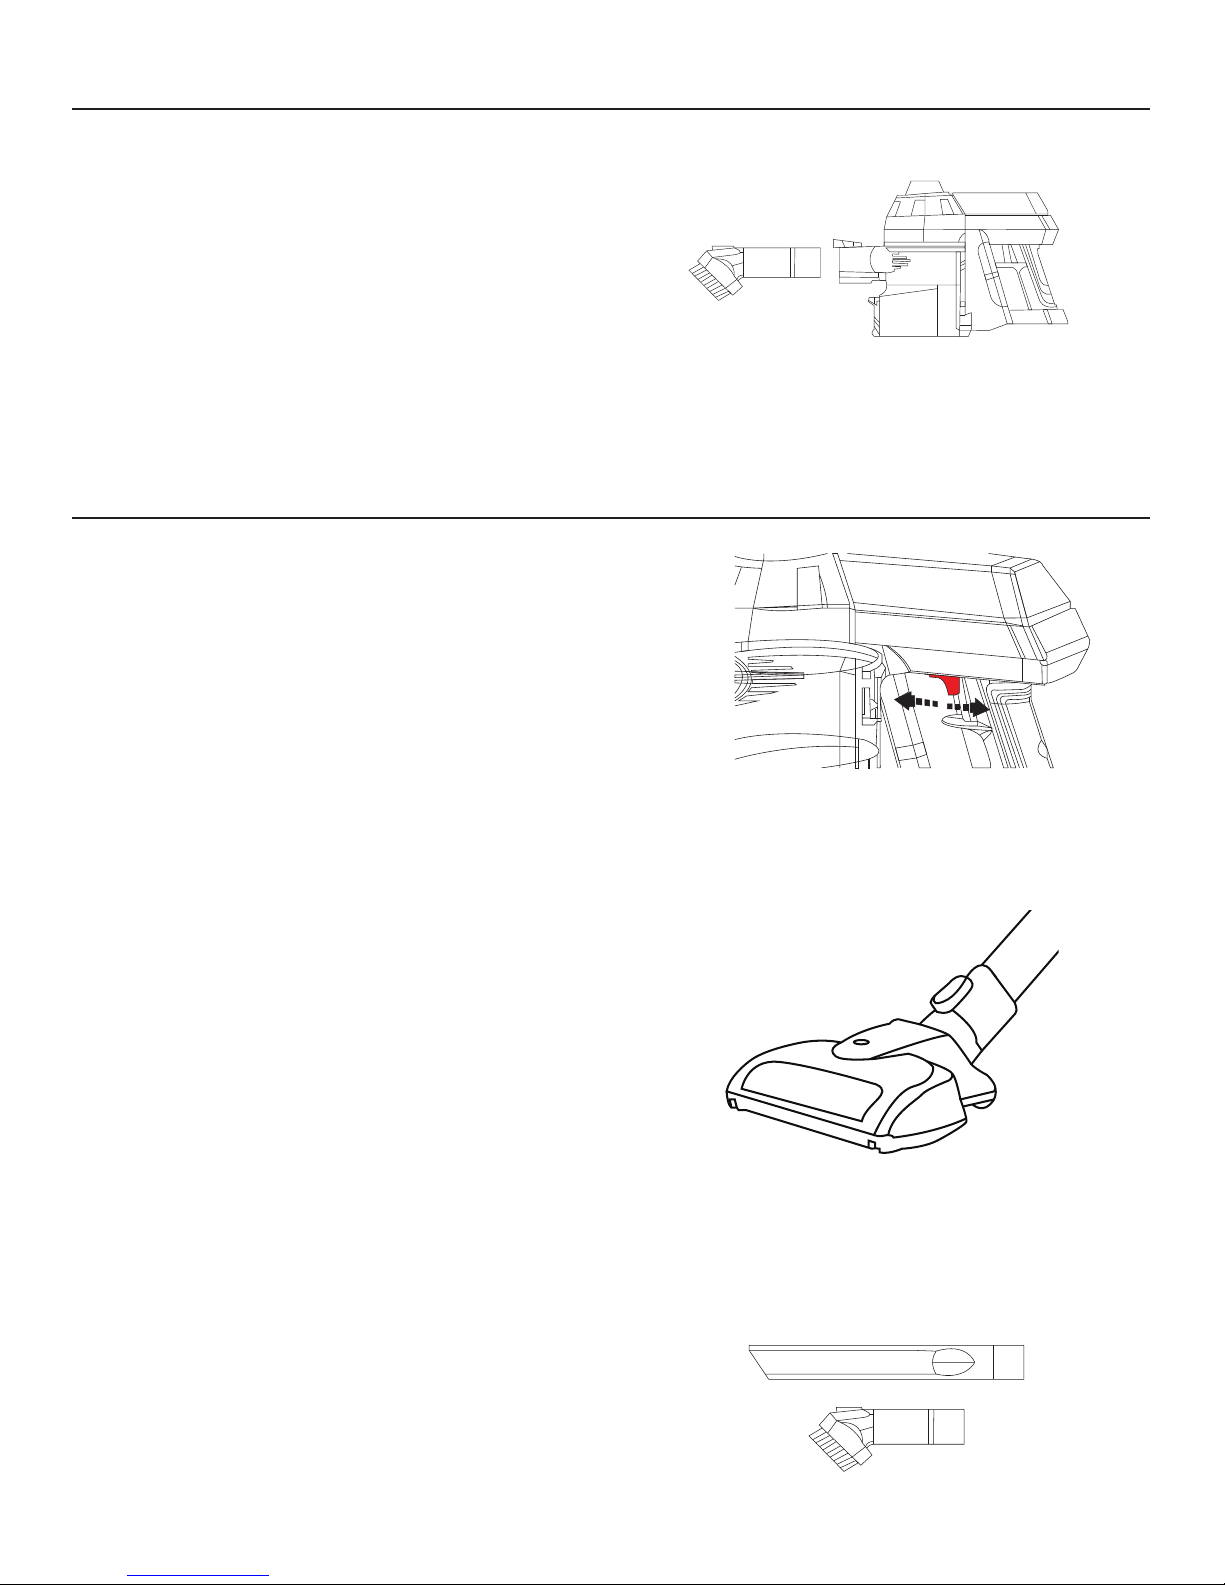
ASSEMBLY (continued)
CONNECTING ACCESSORIES TO THE UNIT
When inserting accessories into the cleaner you will hear a “click” sound when it is
securely in place.
To disassemble, press the wand release button on the cleaner and then pull the
accessory out from the air inlet.
OPERATION
CONTINUOUS MODE
1.
To enable continuous mode, pull the lever back, it will click into place.
2. To disable continuous mode, push the lever forward.
POWER HEAD
Ideal for cleaning on carpets and hard oors.
NOTE: If the Power Head is blocked, the motor switches o automatically. If this
occurs, switch o the vacuum cleaner and remove the battery. Remove
any object that has blocked the Power Head, and switch on again. If the
Power Head does not start again after cleaning, do not try to dismantle the
Power Head. Please contact your nearest location or call Customer Service
at (888) 764-0693.
2IN1 DUSTING BRUSH
The 2-in-1 Dusting Brush and Crevice Tool can be attached to the unit for
cleaning hard to reach places.
7
MAINTENANCE
CHARGING THE VACUUM CLEANER:
Insert the charger into the vacuum cleaner. When the charging indicator light is ashing red, the vacuum cleaner is being charged. When the charging indicator
light turns from red to green, the vacuum cleaner battery is fully charged.
NOTE: When the charging indicator light is ashing red during use, it means the battery is running low on power.
CAUTION! Do not try to open the battery and repair it yourself.
NOTE: This vacuum cleaner is specically provided with the function of halt in charging. When the vacuum cleaner is being charged and the charging
indicator light is red, the vacuum cleaner cannot be enabled even though the switch button is pressed down.
STORAGE
1.
Place the cleaner into the Wall Mount Holder with the wand and Power Head attached.
2. Place all accessories on the corresponding hook.
NOTE: If you are not going to use the machine for a long period of time, please remove the
battery from the machine to maintain the battery life.
IMPORTANT! Turn o the cleaner and remove the battery before conducting any
maintenance tasks. It is recommended to clean the dust canister after
each use or when dust is up to the max ll line.
EMPTYING THE DUST CANISTER
1.
Press the dust release button to open the bottom cover to empty the dust canister.
CLEANING THE DUST CANISTER AND FILTERS
1.
Press the canister release button, while also pulling the canister away in a downwards and
outward direction.
8
 Loading...