

Veridian 01-516 Instruction Manual

JJuummbboo SSccrreeeenn PPrreemmiiuumm
DDiiggiittaall BBlloooodd PPrreessssuurree
WWrriisstt MMoonniittoorr
Model 01-516
INSTRUCTION MANUAL • ENGLISH & ESPA
ÑÑ
OL

22 •• EENNGGLLIISSHH
STOP!
PLEASE ENSURE YOU HAVE ALL OF THE FOLLOWING
COMPONENTS BEFORE USING YOUR DIGITAL BLOOD
PRESSURE MONITOR
Digital Monitor
with Attached Cuff
Instruction Manual
Quick Start Guide
Blood Pressure Reading Tracking Log
FAQ Information Sheet
IF YOU ARE MISSING ANY PARTS, INCLUDING INSERTS OR
INSTRUCTION MANUALS, DO NOT RETURN TO PLACE OF
PURCHASE. CONTACT CUSTOMER CARE AT 8663261313.
2 AAA Batteries
Canvas Storage
Case

INDEX
Introduction .........................................................................................................................4
Getting Started....................................................................................................................5
Features of Digital Blood Pressure Monitor..................................................................6
Battery Installation and Replacement ..........................................................................7
Setting Date and Time ...................................................................................................8-9
Applying Your Blood Pressure Cuff.........................................................................10-11
Taking Your Blood Pressure Reading .....................................................................12-14
Interpreting your Blood Pressure Reading...........................................................15-17
Memory Function.......................................................................................................18-19
Care and Maintenance ....................................................................................................20
Display Symbols................................................................................................................21
Troubleshooting ...............................................................................................................22
Specications.....................................................................................................................23
FCC Statement ............................................................................................................24-25
Warranty .......................................................................................................................26-27
Instrucciones en Español..........................................................................................28-55
EENNGGLLIISSHH •• 33
Toll-Free Customer Care Help Line: 1-866-326-1313
Monday – Friday 8:30 a.m. – 4:30 p.m. CST
Manufactured for:
Veridian Healthcare
1465 S. Lakeside Drive
Waukegan, IL 60085
www.veridianhealthcare.com
Made in China
#93-1059 04/10
©2010 Veridian Healthcare, LLC

44 •• EENNGGLLIISSHH
Veridian Healthcare recommends that you rst seek the advice and
recommendation of your physician or healthcare professional when
using home diagnostic devices, including blood pressure monitors.
Automatic Digital Blood Pressure Monitors use the oscillometric method
to electronically measure your blood pressure. The monitor detects your
blood’s movement through the artery in your arm and converts the
movements into a digital reading. The oscillometric method does not
require a stethoscope, making the monitor ideal for home use.
Blood pressure readings determined with this device are equivalent to
measurements obtained by a trained healthcare professional using the
cuff/stethoscope auscultation method, within the limits prescribed by
the American National Standard for Electronic or Automated
Sphygmomanometers.
Thank you for purchasing a Veridian Healthcare Automatic Digital
Blood Pressure Monitor. With proper care and use, your monitor will
provide you with many years of reliable readings.
INTRODUCTION

Before Taking a Measurement
1. Your readings should only be interpreted by your physician or healthcare
professional with access to your individual medical history. Regular use of
a home blood pressure monitor will allow you to track and record your
readings for discussion with your physician.
2. Conduct your measurement in a quiet place while seated in a relaxed
position. Rest for 15 minutes before taking your reading. If an error occurs
or you desire to take a second reading, allow 15 minutes between
readings for your blood vessels to return to normal.
3. Avoid smoking, eating, taking medication, alcohol, physical activity or any
other stressful activity for 30 minutes prior to taking a reading.
4. Always remove any jewelry or constrictive clothing that may interfere
with the cuff placement.
5. Keep yourself and the monitor still during measuring; do not talk during
the reading.
6. It is recommended that you take your readings as the same time each day
to better monitor any indications in your results.
7. Record your daily measurement on the included chart or some other
written document to share with your physician.
EENNGGLLIISSHH •• 55
GETTING STARTED
66 •• EENNGGLLIISSHH
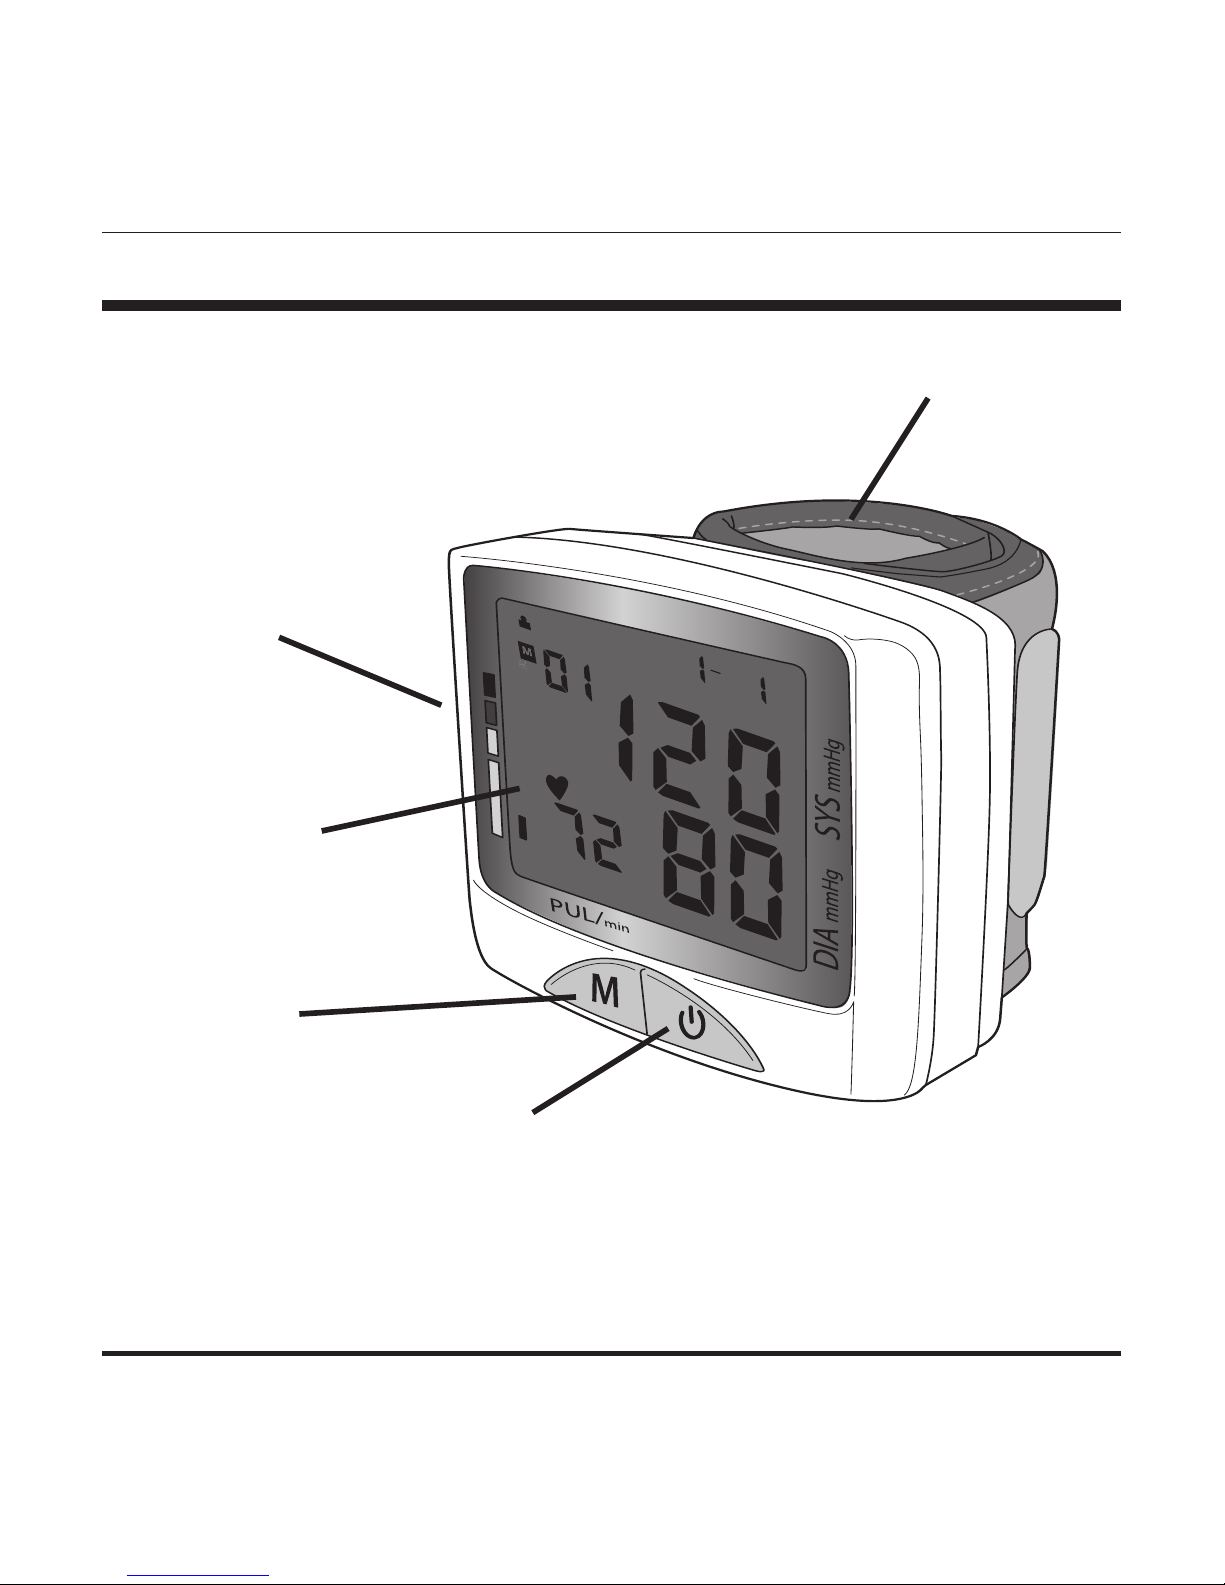
FEATURES OF YOUR MONITOR
Wrist Cuff
Digital LCD
Display
MEMORY
Recall Button
Battery
Compartment
(behind unit)
POWER
Button
DDEETTAAIILLSS OOFF TTHHEE DDIISSPPLLAAYY AANNDD IINNTTEERRPPRREETTAATTIIOONN OOFF TTHHEE SSYYMMBBOOLLSS
AARREE IINNCCLLUUDDEEDD TTHHRROOUUGGHHOOUUTT TTHHIISS MMAANNUUAALL..
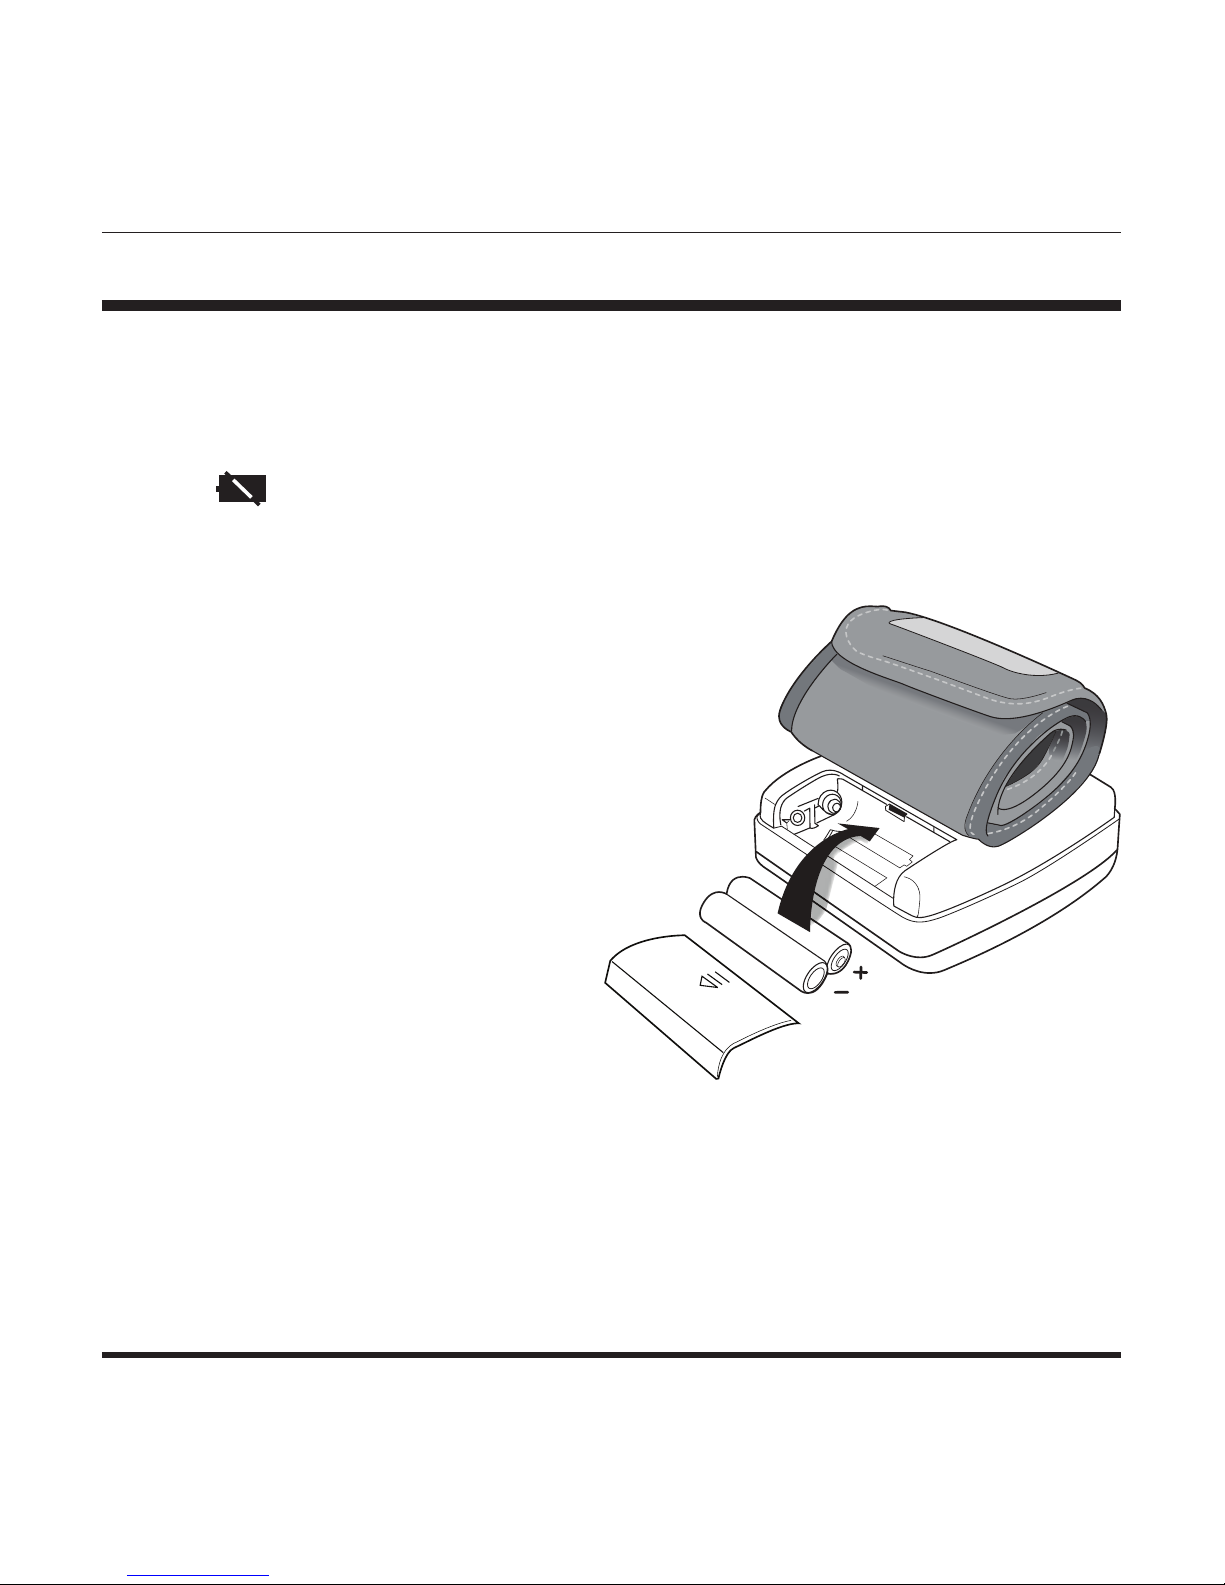
This unit comes complete with 2 AAA batteries.
It is necessary to replace the batteries when the low battery symbol appears
on the display, or when the display does not turn on after the POWER button is
pressed.
Replacing Battery
1. Open the battery compartment
cover.
2. Insert or replace 2 AAA batteries
into the battery compartment,
ensuring to match the indicated
polarity symbols. Always use new
batteries. Do not mix new and old
batteries; do not use
rechargeable batteries.
3. Replace the battery cover.
4. Dispose of batteries according to local disposal and recycling regulations.
It is recommended to remove the batteries if the unit will not be used for an
extended period of time.
EENNGGLLIISSHH •• 77
BATTERY INSTALLATION
88 •• EENNGGLLIISSHH
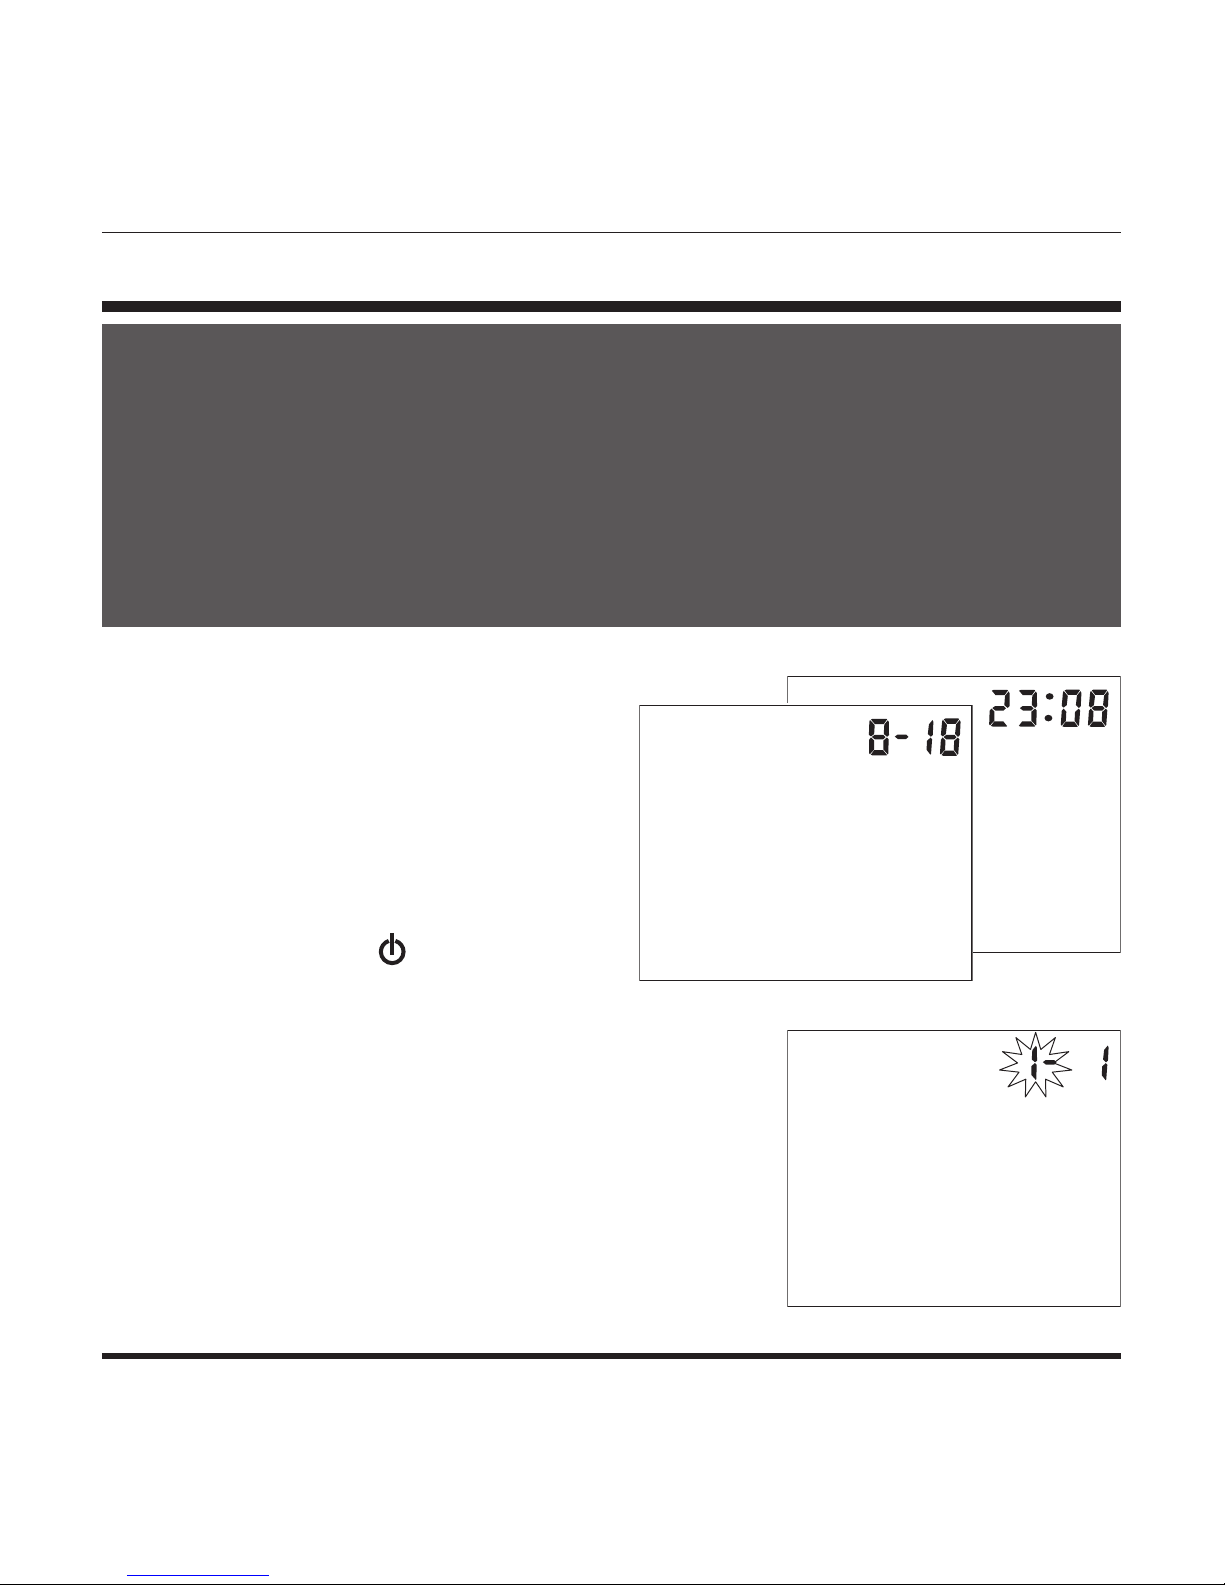
The
date/time feature is on the top right
of the display screen, Fig 1. The date and
time will alternate every four seconds
regardless of the operating mode.
1. When the unit is off, press and
release both the (POWER) and M
button at the same time. The month
will begin to ash, Fig. 2.
2. Press the M button to change until the desired
number appears. To scroll through the
numbers quicker, hold down the M button as
the numbers advance.
IT IS NECESSARY TO SET THE DATE AND TIME FOR THE UNIT
EVERY TIME BATTERIES ARE INITIALLY INSTALLED OR
REPLACED.
DATE AND TIME WILL DEFAULT TO FACTORY SETTINGS, 12:00
A.M. / 1M1D, IF YOU DO NOT CHOOSE TO SET THE
CORRECT INFORMATION.
Fig. 2
SETTING DATE/TIME
1
2
Fig. 1

3. Press the button to conrm the month entry.
4. Next, the date will blink. Repeat steps 2 and 3 to set the date, then hours,
then minutes. This unit does not track the year.
5. After setting the minutes, the unit will automatically exit out of the
date/time setting mode.
T ime is displayed in 24hr Military Time. This chart explains the time
conversion.
EENNGGLLIISSHH •• 99
SETTING DATE/TIME
MILITARY TIME = REGULAR TIME
1:00 = 1am 7:00 = 7am 13:00 = 1pm 19:00 = 7pm
2:00 = 2am 8:00 = 8am 14:00 = 2pm 20:00 = 8pm
3:00 = 3am 9:00 = 9am 15:00 = 3pm 21:00 = 9pm
4:00 = 4am 10:00 = 10am 16:00 = 4pm 22:00 = 10pm
5:00 = 5am 11:00 = 11am 17:00 = 5pm 23:00 = 11pm
6:00 = 6am 12:00 = 12pm 18:00 = 6pm 24:00 = 12am

Before applying your blood pressure cuff, be sure your wrist is within the
appropriate cuff range:
Wrist Circumference Range Suitable for 5-1/2” – 7-5/8” (14 – 19.5 cm)
Reminder, it is important to avoid smoking, eating, taking medication, alcohol
consumption or physical activity 30 minutes prior to taking a reading.
If for any reason you are unable to or should not use your left wrist, please
modify the instructions for cuff application to your right wrist. Your physician
can help you identify which wrist is best for you to take measurements from.
1. Remove any constrictive clothing or jewelry that may interfere with cuff
placement.
2. Be seated at a table or desk with your feet at on the oor.
1100 •• EENNGGLLIISSHH
APPLYING THE CUFF
PROPER CUFF FIT AND PLACEMENT
IS CRITICAL IN OBTAINING
ACCURATE BLOOD PRESSURE
MEASUREMENTS. PLEASE READ
THESE INSTRUCTIONS CAREFULLY
AND CONSIDER CONSULTING WITH
YOUR PHYSICIAN FOR FURTHER
DIRECTION.

EENNGGLLIISSHH •• 1111
APPLYING THE CUFF
3. Hold your left arm in front of you with
your palm facing upward.
4. Apply the preformed cuff to your left wrist
so that the digital display face is
positioned on the inside area of your wrist
facing you, Fig. 1.
5. Adjust the cuff 1/4” - 1/2” from the edge of
the head of the ulna bone, Fig. 2.
6. The cuff should t comfortably, yet snugly
around your wrist.
If you are not comfortable with applying your cuff,
please seek the assistance of another member of
your household or work with your physician to
practice the cuff application. Incorrectly applied
cuffs may result in inaccurate readings.
Fig. 1
Fig. 2
Please read the preceeding portions of this manual
prior to taking your rst reading.
Reminder, it is important to avoid smoking, eating,
taking medication, alcohol consumption or
physical activity 30 minutes prior to taking a
reading.
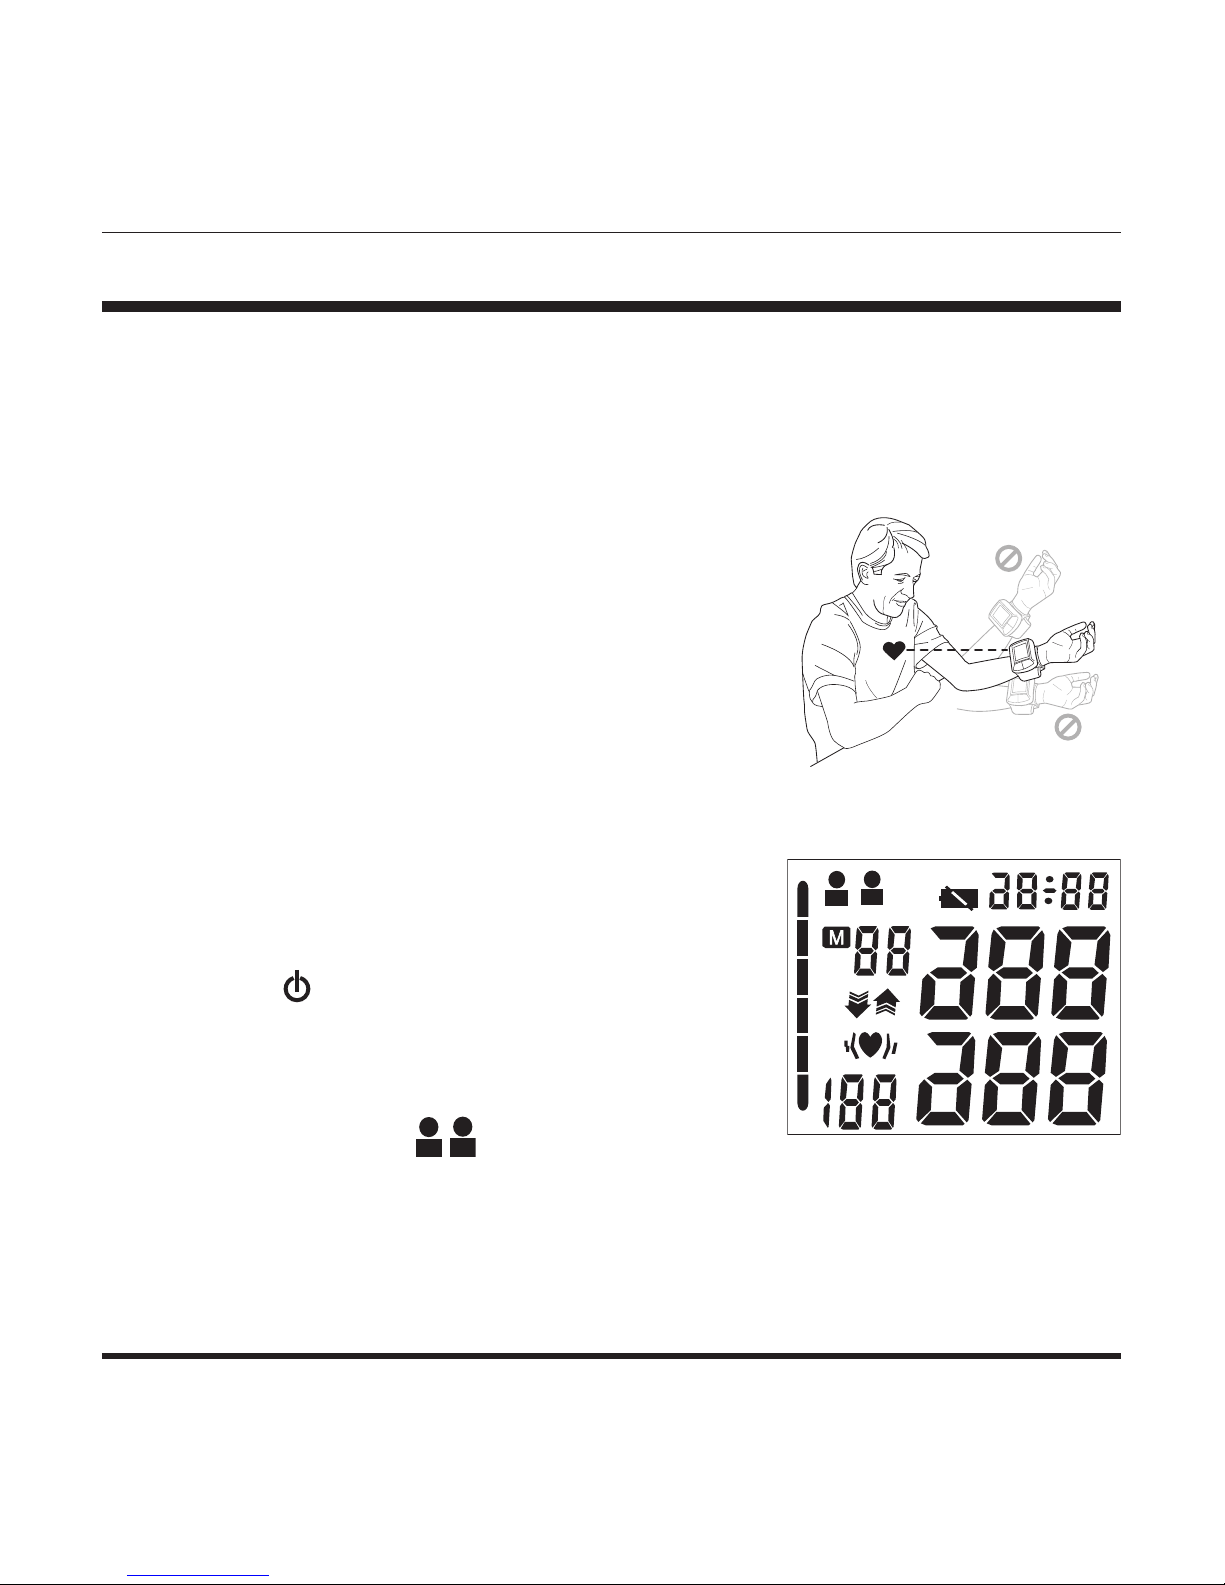
1. Rest your elbow on a solid surface with your
palm facing upward. Elevate your arm so that
the cuff is at the same level as your heart, Fig
1. Be certain that cuff is elevated to the proper
level; you may choose to support your hand
with a folded towel or book. Relax your left
hand.
2. Press the (POWER) button to turn the unit
on; the unit will run a self-test, Fig 2.
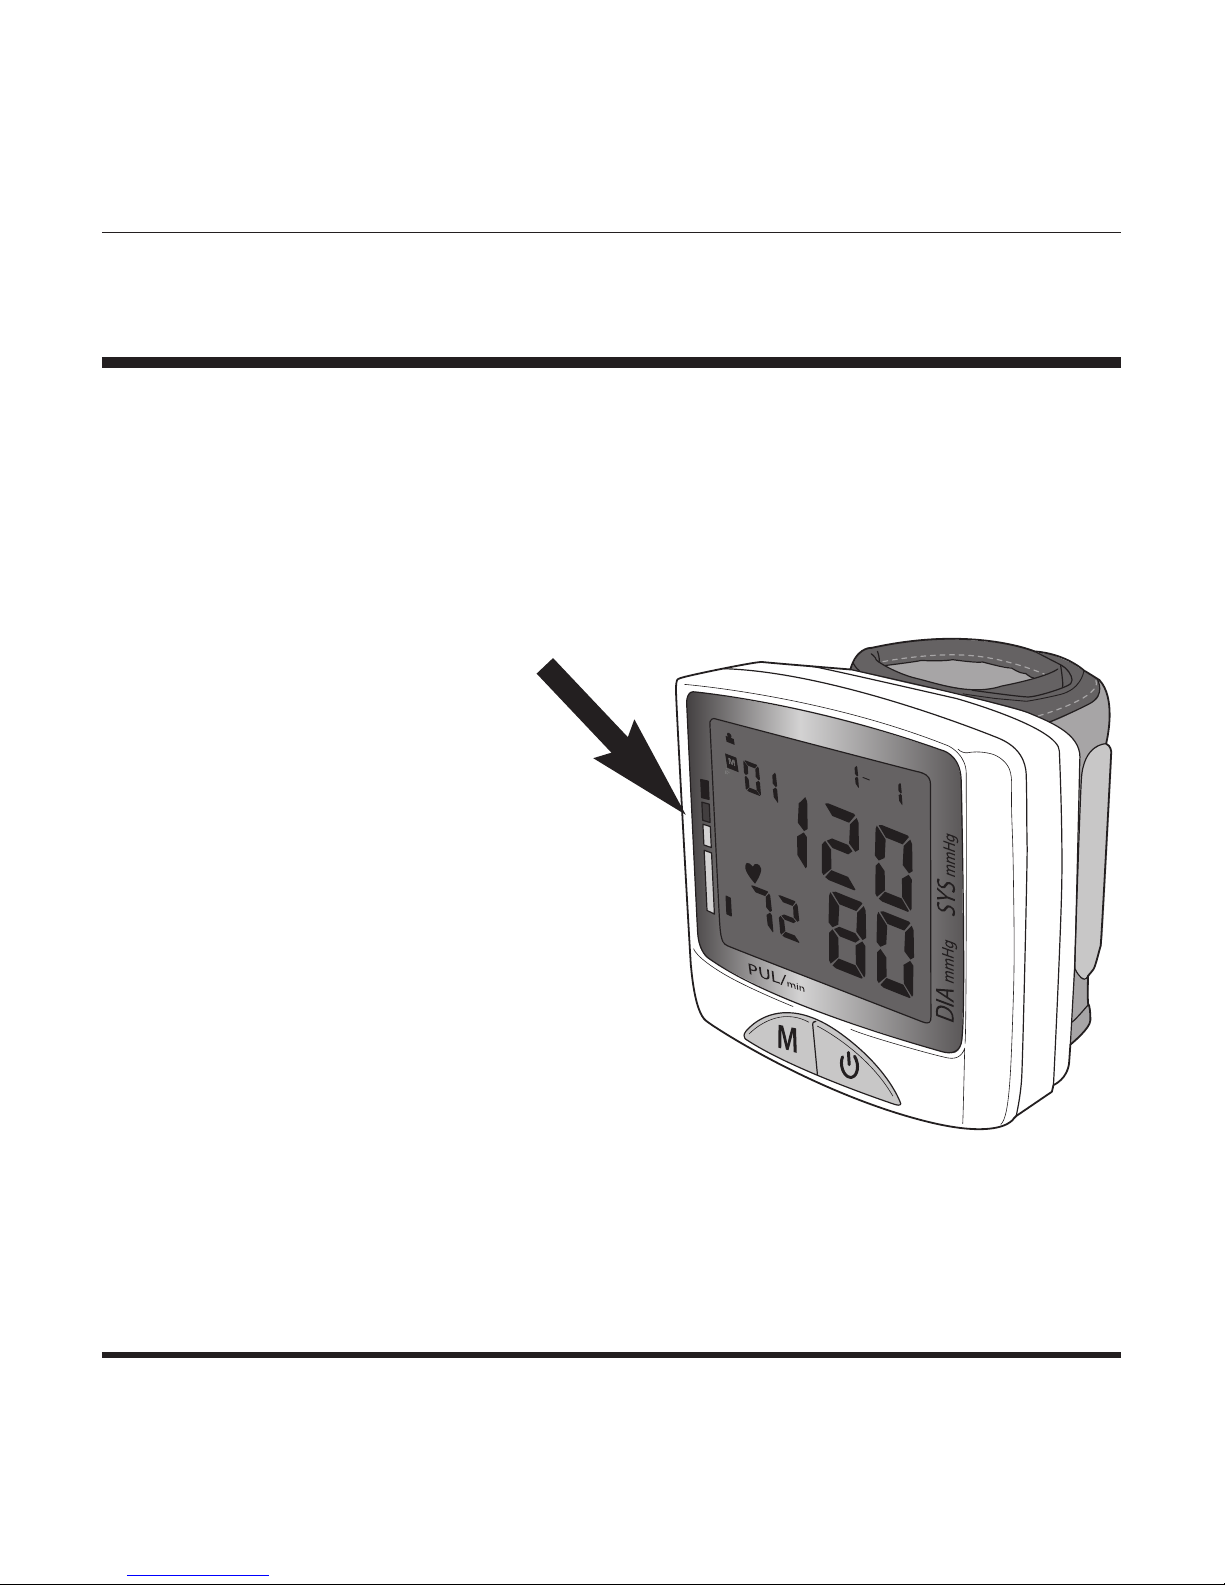
3. The display will show the current memory
bank in use, 1 or 2, at the top left of the
display. Press the M button to select a
different memory bank if desired.
1122 •• EENNGGLLIISSHH
TAKING YOUR READING
Fig. 2
Fig. 1
1
2
1
2

4. The unit will briey display the last reading
value for that memory bank. If there is no
previous measurement, the unit will display ‘0’
for all of the reading values, Fig 3.
5. The cuff will automatically inate to
approximately 190mmHg or 40 mmHg higher
than the last systolic pressure reading stored
in memory.
6. When the ination has reached optimum
level, the display will begin to show the
decreasing pressure while you feel the
pressure of the cuff decrease.
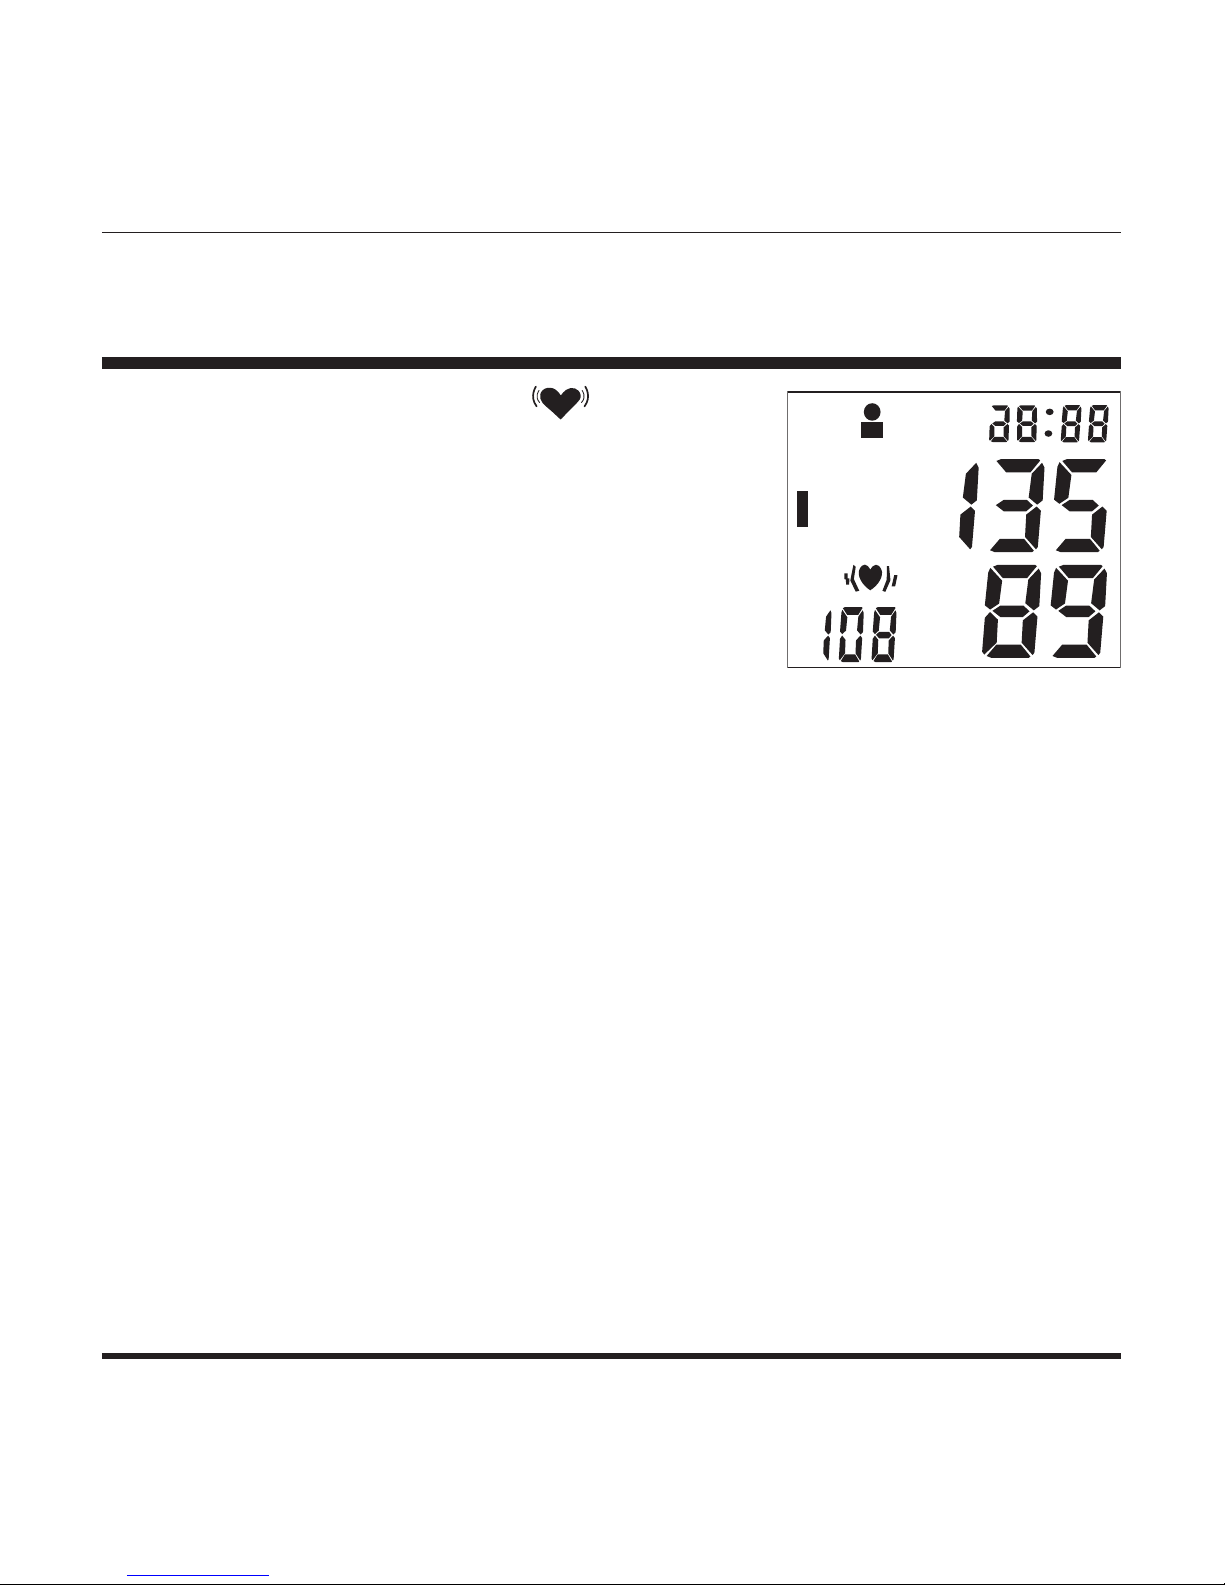
7. Your blood pressure measurement and pulse
will display simultaneously on the screen, Fig
4. Both the systolic and diastolic readings will
display at the same time.
EENNGGLLIISSHH •• 1133
TAKING YOUR READING
Fig. 4
Fig. 3
1
1

8. The Hypertension Indicator will indicate your
reading range in the left side of the display,
Fig 5. See page 17 for a chart interpreting the
Hypertension Indicator results.
9. If an irregular heartbeat was detected during
the reading, the Irregular Heartbeat Detector
indicator will appear on the display, Fig 6. See
page 15 for more information on the Irregular
Heartbeat Detector feature.
10. The reading will automatically be stored in
the memory bank selected prior to the
measurement, up to 60 readings.
11. Select (POWER) to turn the unit off and
conserve energy and battery life. The unit will
automatically shut-off and revert to time/date
mode after approximately 1 minute.
1144 •• EENNGGLLIISSHH
TAKING YOUR READING
Fig. 6
Fig. 5
2
YOU CAN STOP THE INFLATION OR DEFLATION PROCESS AT
ANY TIME BY PRESSING THE START/POWER BUTTON.
EENNGGLLIISSHH •• 1155
2
INTERPRETING YOUR RESULTS
IHB
Irregular Heartbeat Detector
Your digital blood pressure monitor features an
Irregular Heartbeat Detector. This feature allows
users to accurately monitor blood pressure even if
an irregular heartbeat should occur. When an
irregular heartbeat is detected, the IHB icon will
appear on the display.
Please consult with your physician or trained
healthcare professional for further information
regarding an irregular heartbeat and if this symbol
appears frequently.
1166 •• EENNGGLLIISSHH
INTERPRETING YOUR RESULTS
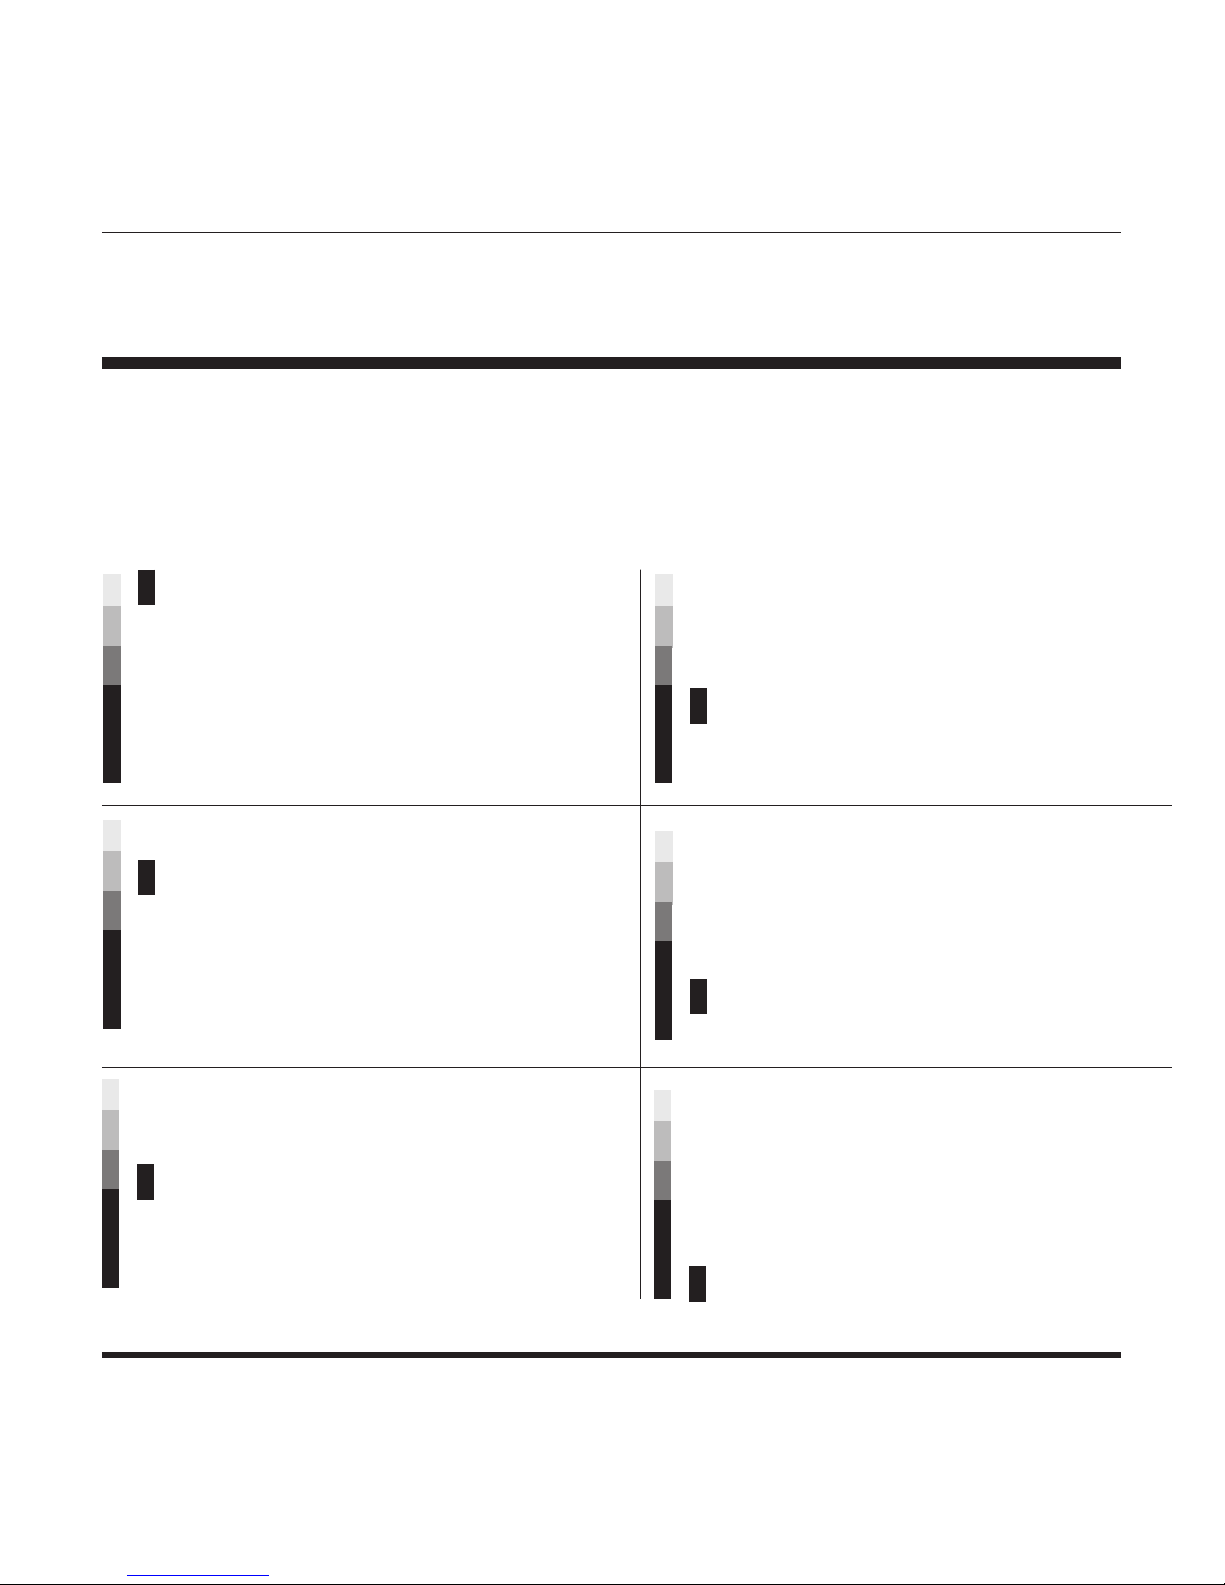
HYPERTENSION INDICATOR
The Hypertension Indicator is
located on the left side of the
display
Hypertension Indicator
This unit features our unique Hypertension Indicator. The World Health
Organization has established globally accepted standards for the assessment
of high or low blood pressure readings.
EENNGGLLIISSHH •• 1177
INTERPRETING YOUR RESULTS
HYPERTENSION INDICATOR
Stage 3 Hypertension
Systolic pressure: ≥ 180 mmHg
or
Diastolic pressure: ≥ 110 mmHg
Stage 2 Hypertension
Systolic pressure: ≥ 160-179 mmHg
or
Diastolic pressure: ≥ 100-109 mmHg
Stage 1 Hypertension
Systolic pressure: ≥ 140-159 mmHg
or
Diastolic pressure: ≥ 90-99 mmHg
High Normal
Systolic pressure: ≥ 130-139 mmHg
or
Diastolic pressure: ≥ 85-89 mmHg
Normal
Systolic pressure: ≥ 120-129 mmHg
or
Diastolic pressure: ≥ 80-84 mmHg
Optimal
Systolic pressure: < 120 mmHg
or
Diastolic pressure: < 80 mmHg
This chart should be considered only as a guideline, always consult with your
physician or health care professional to interpret your individual results.
 Loading...