


NÒÎKY NA ÎIV¯ PLOT S BATERIÍ 20V
20V BATTERY HEDGE TRIMMER
Cod. 4342
Pfieklad pÛvodních pokynÛ
Návod k obsluze
Operating manual
CS
1
11
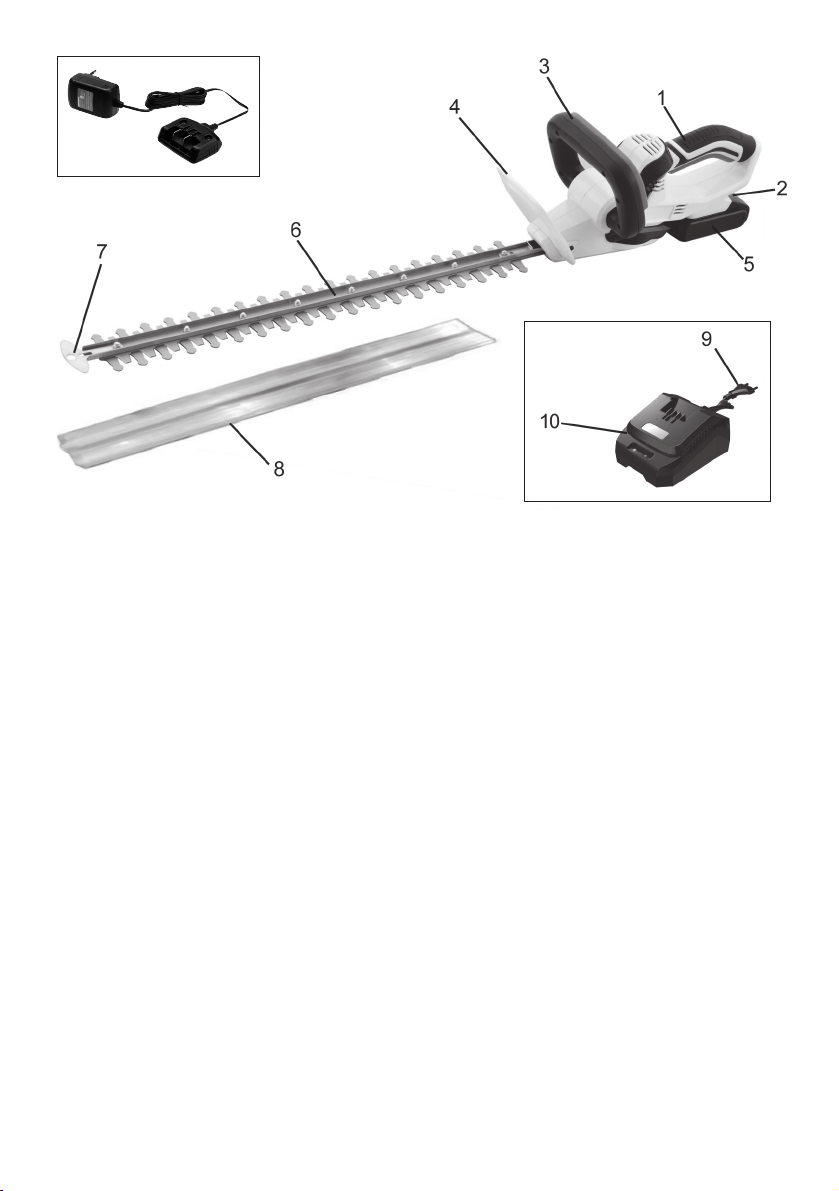
Popis ãástí
1 Zadní klika se spínaãem
ON/OFF
2 Blokování baterie
3 Omotejte rukojeÈ pomocí spínaãe
ON/OFF
4 Ochrana rukou
5Baterie
6 Bezpeãnostní li‰ta ãepele
7 Ochrana proti nárazu
8 Ochrann˘ kryt ãepele
9 Napájecí kabel (NENÍ SOUâÁSTæ)
10 Nabíjecí stanice (NENÍ SOUâÁSTæ)
11 Standardní nabíjeãka baterií (SOUâÁSTæ)
Pfieklad pÛvodních pokynÛ
Description of the parts
1 Rear handle with ON/OFF switch
2 Battery interlock
3Wrap-around handle with ON/OFF switch
4 Hand guard
5 Battery
6 Blade safety rail
7 Impact protector
8 Protective blade cover
9 Power supply cable (NOT INCLUDED)
10 Charging station (NOT INCLUDED)
11 Standard battery charger
2
3
Pfieklad pÛvodních pokynÛ

Pfieklad pÛvodních pokynÛ
4

Návod k obsluze
OBSAH Strana
1. Úvod do návodu k obsluze ..................................................................... 2
2. Technické specifikace .............................................................................2
3. Zam˘‰lené pouÏití ...................................................................................3
4. Vysvûtlení v˘straÏn˘ch pokynÛ na stroji ...............................................8
5. Obecné bezpeãnostní pokyny ................................................................9
6. Aplikace....................................................................................................9
7. Obecné bezpeãnostní pokyny ................................................................9
1) Pracovní plocha
2) Elektrická bezpeãnost
3) Osobní bezpeãnost
4) Peãlivá manipulace a pouÏívání elektrick˘ch spotfiebiãÛ
5) Správná manipulace a pouÏívání elektrick˘ch spotfiebiãÛ baterií
6) Pomoc
7) Problémy
8) Bezpeãnostní pokyny pro vyÏínaãe
8. Pokyny k pouÏívání spotfiebiãe .............................................................. 11
• Pokyny k pouÏívání baterie
• Likvidace akumulátorÛ
9. Nabíjení baterií .........................................................................................12
10. Zapnutí a vypnutí ...................................................................................13
11. UÏívání sekaãky na Ïivé ploty pfii pouÏívání ........................................13
1) Profiezávání Ïiv˘ch plotÛ
2) Chcete-li získat v˘‰ku v˘‰ky
12. ÚdrÏba ....................................................................................................13
1) Ostfiení noÏe
2) V˘mûna noÏÛ
13. Maximální bezpeãnost...........................................................................14
1) Oboustrann˘ bezpeãnostní spínaã
2) Rychlé zastavení kotouãe
3) Blade safety track
4) Ochrana proti nárazÛm
5) Ochrana zafiízení
14. Po pouÏití nÛÏky na Ïiv˘ plot uloÏte .....................................................10
15. Náhradní díly ..........................................................................................14
16. Opravy ....................................................................................................14
17. Likvidace odpadu a ochrana Ïivotního prostfiedí................................14
5
Pfieklad pÛvodních pokynÛ

Bezdrátov˘ plotostfiih
1. VáÏen˘ zákazníku
Úãelem tohoto návodu k obsluze je usnadnit vám seznámení se strojem a jeho pouÏívání v
souladu s pfiedpisy. Návod k obsluze obsahuje dÛleÏité informace o bezpeãném, správném
a hospodárném pouÏívání stroje. DodrÏování tûchto informací pomÛÏe zv˘‰it spolehlivost
a Ïivotnost stroje. Pfii pouÏívání stroje musí b˘t vÏdy po ruce návod k pouÏití.
Musí je pfieãíst a respektovat kdokoli, kdo stroj pouÏívá, aÈ uÏ jde o provoz, pomoc nebo
pfiepravu.
Kromû pokynÛ k pouÏití a pfiíslu‰n˘ch pfiedpisÛ o prevenci úrazÛ platn˘ch v zemi pouÏití a
na místû musí b˘t dodrÏovány obecnû uznávané normy pro bezpeãnou a správnou práci a
pravidla pro prevenci úrazÛ pfiíslu‰n˘ch profesních sdruÏení.
2. Technické údaje
Model HTB20
Jmenovité napûtí 20 V DC
Délka tyãe 560 mm
Tlou‰Èka fiez 18 mm
¤ezná délka 510 mm
Rychlost otáãení n
0
1300±130 min
Typ baterie Li-Ion 20 V / 2,0 Ah / 40 Wh
Hmotnost 2,1 kg
Hladina akustického tlaku L
* 92 dB(A) K 3,0 dB
pA
Vibrace * 2,5 m/s
SíÈová nabíjeãka
SíÈové napûtí 200-240 V ~
Nabíjecí napû 21 V DC
Nabíjecí proud 2 A
Doba nabíjení
asi 1 hodinu / pÛl hodiny pomocí
rychlonabíjeãka n není souãástí dodávky
* podle EN 60745-2-15
-1
2
K 1,5 m/s
/ 50-60 Hz
2
Technické zmûny jsou vyhrazeny.
Pfieklad pÛvodních pokynÛ
6

3. Zam˘‰lené pouÏití
PouÏití tohoto sekaãky na trávu je urãeno pouze pro profiezávání kefiÛ, kefiÛ, okrasn˘ch
rostlin a Ïiv˘ch plotÛ. Je urãen k fiezání vûtví o prÛmûru nejv˘‰e 18 mm. NoÏnice na Ïivé
ploty není urãena pro komerãní pouÏití. UÏivatel sekaãky na Ïivé ploty musí zajistit, aby
ochranné zafiízení uvedené v tûchto pokynech a v˘straÏné ‰títky pfiipevnûné k sekaãce na
Ïivé ploty byly pfiipojeny, kdyÏ je sekaãka na trávu v provozu. Pfied pouÏitím nebo za chodu
zkontrolujte, zda se nÛÏky na Ïivé ploty nevyskytují elektrické nebo mechanické po‰kození.
Pokud zjistíte po‰kození, zastavte práci a kontaktujte odborn˘ servis.
Nesprávné pouÏití
Jakékoli pouÏití, které není popsáno v kapitole „Zam˘‰lené pouÏití“, je nesprávn˘m pouÏitím.
UÏivatel sekaãky na Ïivé ploty je zodpovûdn˘ pouze za ‰kody na majetku nebo zranûní
osob zpÛsobené nesprávn˘m pouÏitím sekaãky na Ïivé ploty.
Povinnost v˘robce dodrÏovat záruku zaniká, pokud se nÛÏky na Ïivé ploty pouÏívají s
neoriginálními náhradními díly.
Zbytková nebezpeãí
VÏdy existují urãitá zbytková rizika, i kdyÏ je nÛÏky na Ïivé ploty pouÏívány správnû.
Konstrukce plotostfiihu mÛÏe pfiedstavovat následující nebezpeãí:
• Kontakt s odkrytou ãepelí (s následn˘mi fiezn˘mi lézemi)
• KdyÏ je stroj v chodu, drÏte ho za ruce nebo ho uchopte ofiezávaãi Ïivin (coÏ má za
následek poranûní pfii fiezání)
• Neoãekávan˘ a náhl˘ pohyb fiezané rostliny (s následn˘mi fiezn˘mi lézemi)
• Vyhození nebo vyfiazení po‰kozen˘ch fiezn˘ch zubÛ
• Vyhození nebo odmítnutí fiezané rostliny
• Po‰kození sluchu, pokud se nenosí uvedená ochrana sluchu
• Vdechnutí fiezan˘ch materiálÛ
7
Pfieklad pÛvodních pokynÛ
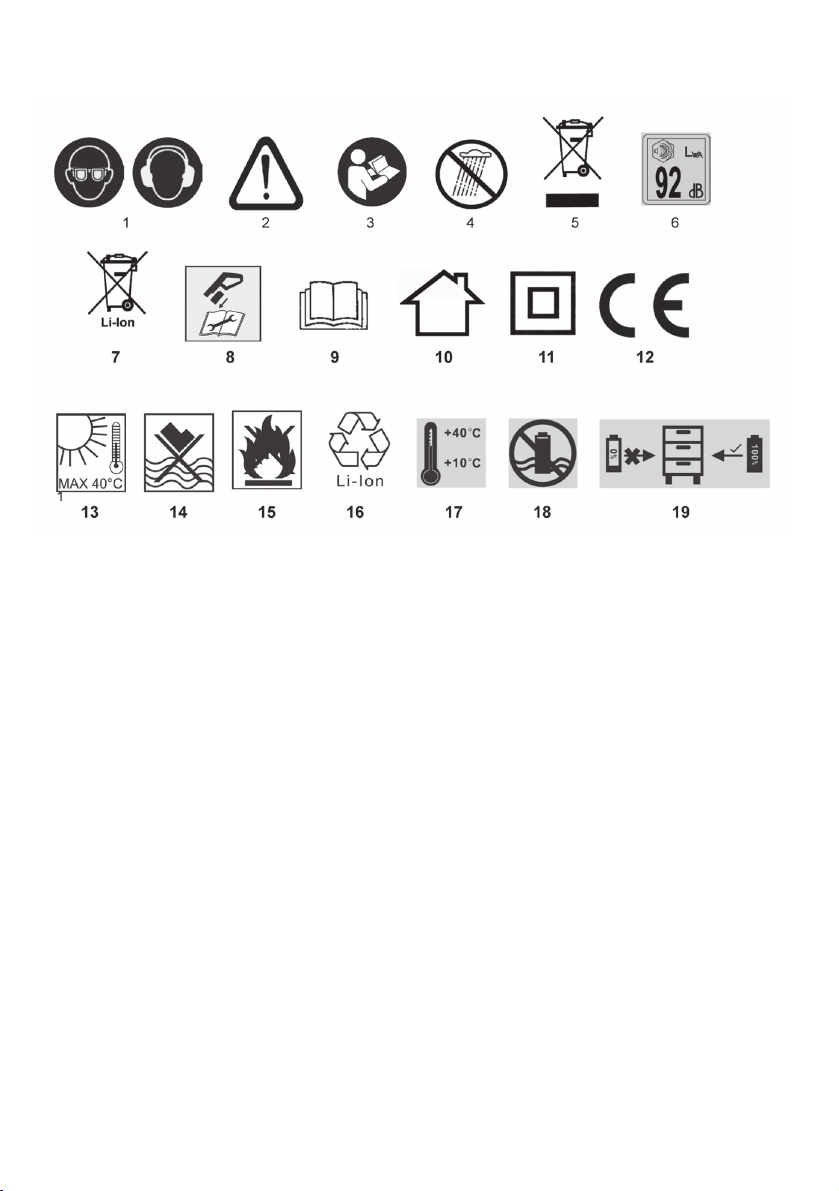
4. Vysvûtlení v˘straÏn˘ch pokynÛ na stroji
1 PouÏívejte prostfiedky na ochranu oãí a sluchu!
2 Pozor!
3 Pfieãtûte si návod k pouÏití!
4 Tento elektrick˘ spotfiebiã nesmí b˘t vystaven de‰ti.
5 Pozor: Ochrana Ïivotního prostfiedí! Toto zafiízení nelze likvidovat s bûÏn˘m / domácím
odpadem.
Likvidujte pouze na urãen˘ch sbûrn˘ch místech.
6 Zaruãená úroveÀ akustické kapacity LWA 92 dB(A)
7 Baterie obsahuje lithium! Nevyhazujte je do domácího odpadu.
8 Pfied opravami a údrÏbou vyjmûte dobíjecí baterii!
9 Pfieãtûte si pozornû v‰echny bezpeãnostní a provozní pokyny!
10 Nabíjecí zafiízení se smí pouÏívat pouze v uzavfien˘ch místnostech.
11 Dvojitá izolace.
12 DodrÏování pfiíslu‰n˘ch bezpeãnostních pfiedpisÛ.
13 Nevystavujte teplotám nad 40 ° C.
14 Nevhazujte baterie do vodních tokÛ ani je neponofiujte do vody.
15 Nebezpeãí v˘buchu! Nikdy nevhazujte baterie do ohnû.
16 Dobíjecí baterie obsahuje lithium! Recyklujte vadné dobíjecí baterie!
17 Nabíjení pfii teplotû mezi + 10 ° C a 40 ° C.
18 Nevhazujte baterie do vodních tokÛ ani je neponofiujte do vody.
19 Pfied uloÏením nabijte dobíjecí baterii.
Pfieklad pÛvodních pokynÛ
8

5. Bezpeãnostní pokyny
Informace o emisích hluku v souladu s nûmeck˘m
zákonem o bezpeãnosti v˘robkÛ (ProdSG) a
smûrnicí ES o strojních zafiízeních: hladina
akustického tlaku na pracovi‰ti mÛÏe pfiekroãit 80
dB (A). V takov˘ch pfiípadech bude operátor
potfiebovat ochranu proti hluku (napfi. Nosit chrániãe
sluchu / sluchátka).
Pozor: Ochrana proti hluku! Pfii obsluze zafiízení
respektujte místní pfiedpisy.
Ru‰ení potlaãeno podle EN 55014, EN 61000-3-2,
EN 61000-3-3.
Vyhrazujeme si právo na zmûnu technick˘ch
specifikací.
Zafiízení jsou vyrábûna v souladu s ustanoveními
EN 60745-1 a EN 60745-2-15 a jsou plnû v souladu
s ustanoveními nûmeckého zákona o bezpeãnosti
v˘robkÛ.
Obecné bezpeãnostní pokyny
PouÏívání sekaãky na Ïivé ploty vÏdy
pfiedstavuje riziko nehody, proto prosím
dodrÏujte pfiíslu‰né pokyny k prevenci nehod.
Stroj byl vyroben podle nejnovûj‰ích technologií a v
souladu s uznávan˘mi bezpeãnostnû technick˘mi
pfiedpisy. PouÏívání stroje v‰ak mÛÏe pfiedstavovat
rizika pro uÏivatele nebo tfietí osoby a mÛÏe zpÛsobit
po‰kození stroje nebo jin˘ch pfiedmûtÛ.
Varování: Pfii pouÏívání elektrick˘ch spotfiebiãÛ se
fiiìte tûmito základními bezpeãnostními pokyny,
abyste se ochránili pfied úrazem elektrick˘m
proudem, nebezpeãím zranûní a nebezpeãím
poÏáru. Pfied pouÏitím sekaãky na Ïivé ploty si
pfieãtûte cel˘ návod a dodrÏujte je. Bezpeãnostní
pokyny uschovejte na bezpeãném místû.
PouÏívejte stroj bezpeãnû a vûdomû pro vhodné
aplikace pouze v technicky dokonal˘ch podmínkách
as náleÏit˘m ohledem na provozní návod! Vyfie‰te
nebo nechte okamÏitû odstranit závady, které by
mohly nepfiíznivû ovlivnit bezpeãnost!
Tento stroj mÛÏe zpÛsobit váÏné zranûní. Pfieãtûte
si pozornû návod k pouÏití t˘kající se správné
manipulace, pfiípravy, údrÏby a správného pouÏívání
sekaãky na Ïivé ploty.
Pfied prvním pouÏitím se seznamte se strojem a
seznamte se s praktick˘m pouÏíváním stroje.
Spotfiebiã není urãen k pouÏití osobami (vãetnû dûtí)
se sníÏen˘mi fyzick˘mi, smyslov˘mi nebo
mentálními schopnostmi nebo osobami, které nemají
Ïádné zku‰enosti ani znalosti, pokud nejsou pod
dohledem nebo nebyly pouãeny o pouÏívání pfiístroje
spotfiebiã osobou odpovûdnou za jejich bezpeãnost.
DohlíÏejte na dûti, aby si se zafiízením nehrály.
6. Aplikace
Stroj je urãen pouze pro profiezávání Ïiv˘ch plotÛ.
PouÏití k jinému úãelu je povaÏováno za nesprávné
pouÏití. V˘robce / dodavatel neodpovídá za zranûní
a / nebo po‰kození zpÛsobené nesprávn˘m
pouÏitím. Toto riziko je v˘luãnou odpovûdností
uÏivatele. Správné pouÏívání rovnûÏ zahrnuje
dodrÏování uÏivatelské pfiíruãky a dodrÏování
pokynÛ pro servis a údrÏbu.
Bûhem provozu mûjte návod vÏdy po ruce!
7. Obecné bezpeãnostní pokyny
Varování! Pfieãtûte si tyto pokyny úplnû. NedodrÏení
níÏe uveden˘ch pokynÛ mÛÏe vést k úrazu
elektrick˘m proudem, popálení nebo váÏnému
zranûní. Pojem „elektrick˘ spotfiebiã“ pouÏívan˘ níÏe
zahrnuje jak spotfiebiãe napájené ze sítû (s
napájením ze sítû), tak i spotfiebiãe napájené z baterií
(bez napájení ze sítû).
DODRÎUJTE POKYNY POZORNù!
1) Pracovní plocha
a) UdrÏujte pracovní prostor ãist˘ a uklizen˘.
Pracovní oblasti, které jsou mimo provoz a
‰patnû osvûtlené, mohou zpÛsobit zranûní.
b) NepouÏívejte spotfiebiã v potenciálnû
v˘bu‰ném prostfiedí obsahujícím hofilavé
kapaliny, plyny nebo prach. Elektrické
spotfiebiãe vytváfiejí jiskry, které mohou zapálit
prach nebo v˘pary.
c) Pfii pouÏívání spotfiebiãe drÏte dûti a jiné osoby
mimo dosah. Obsluha mÛÏe ztratit kontrolu nad
strojem v dÛsledku rozptylování.
2) Elektrická bezpeãnost
a) SíÈová zástrãka elektrického spotfiebiãe musí
b˘t vhodná pro síÈovou zásuvku. Zástrãka
nesmí b˘t Ïádn˘m zpÛsobem upravována.
NepouÏívejte adaptéry / konektory
kombinované se zafiízeními s ochrann˘m
uzemnûním. Nemodifikované zástrãky a zásuvky
sniÏují riziko úrazu elektrick˘m proudem.
b) Vyvarujte se fyzického kontaktu s
uzemnûn˘mi povrchy, jako jsou potrubí,
radiátory, trouby a chladniãky. Pokud va‰e tûlo
pÛsobí jako vodiã k zemi, zvy‰uje se riziko úrazu
elektrick˘m proudem.
c) UdrÏujte zafiízení mimo dosah de‰tû. PrÛnik
vody do elektrického spotfiebiãe zvy‰uje riziko
úrazu elektrick˘m proudem.
d) NepouÏívejte kabel k pfiepravû nebo zavû‰ení
spotfiebiãe ani k vyjmutí zástrãky ze zásuvky.
Kabel udrÏujte mimo dosah tepla, olejÛ a
ostr˘ch hran nebo pohybliv˘ch ãástí
spotfiebiãe. Po‰kozené nebo zamotané kabely
zvy‰ují riziko úrazu elektrick˘m proudem.
9
Pfieklad pÛvodních pokynÛ

e) PouÏíváte-li elektrick˘ spotfiebiã venku,
pouÏívejte pouze prodluÏovací kabely
schválené pro venkovní pouÏití. PouÏití
prodluÏovacího kabelu vhodného pro venkovní
pouÏití sniÏuje riziko úrazu elektrick˘m proudem.
3) Osobní bezpeãnost
a) Pfii pouÏívání elektrického spotfiebiãe vÏdy
vûnujte pozornost postupÛm, které provádíte,
a buìte pfiimûfienû opatrní. NepouÏívejte
spotfiebiã, pokud jste unavení nebo jste pod
vlivem drog, drog nebo alkoholu. Pfii práci s
elektrick˘mi spotfiebiãi mÛÏe i okamÏik rozpt˘lení
zpÛsobit váÏné zranûní.
b) PouÏívejte osobní ochranné pomÛcky a vÏdy
noste ochranu oãí (ochranné br˘le). PouÏívání
osobních ochrann˘ch prostfiedkÛ, jako je
protiprachová maska, protiskluzová bezpeãnostní
obuv, ochranná pfiilba nebo ochrana sluchu (v
závislosti na typu a pouÏití spotfiebiãe), sniÏuje
riziko zranûní.
c) Vyvarujte se neúmyslného spu‰tûní. Pfied
vyjmutím zástrãky ze zásuvky se ujistûte, Ïe
je pfiepínaã v poloze „VYPNUTO“. Pfieprava
spotfiebiãe prstem na vypínaãi nebo pfiipojení
spotfiebiãe k síÈovému napájení pomocí spínaãe
v poloze „ON“ mÛÏe vést k nehodám.
d) Pfied zapnutím spotfiebiãe vyjmûte sefiizovací
nástroje nebo klíãe a podobnû. Klíã nebo jin˘
nástroj vloÏen˘ nebo umístûn˘ na rotující ãásti
spotfiebiãe mÛÏe zpÛsobit zranûní.
e) NepfieceÀujte své dovednosti. Ujistûte se, Ïe
máte bezpeãnou podporu a udrÏujte
rovnováhu po celou dobu. To vám umoÏní mít
lep‰í kontrolu nad zafiízením v neoãekávan˘ch
situacích.
f) PouÏívejte vhodn˘ odûv. Nenoste volné
obleãení nebo ‰perky. UdrÏujte vlasy, obleãení
a rukavice mimo dosah v‰ech pohybliv˘ch
ãástí. Uvolnûné odûvy, ‰perky nebo dlouhé vlasy
se mohou zachytit v pohybliv˘ch ãástech.
g) Jsou-li k dispozici zafiízení pro odsávání / sbûr
prachu, ujistûte se, Ïe jsou správnû pfiipojena
a pouÏívána. PouÏívání tûchto zafiízení sniÏuje
nebezpeãí zpÛsobená prachem.
4) Peãlivá manipulace a pouÏívání elektrick˘ch
spotfiebiãÛ
a) NepfietûÏujte elektrick˘ spotfiebiã. VÏdy
pouÏívejte elektrick˘ spotfiebiã urãen˘ pro vá‰
typ práce. PouÏitím vhodného elektrického
spotfiebiãe, kter˘ spadá do definovan˘ch v˘konÛ,
je práce efektivnûj‰í a bezpeãnûj‰í.
b) NepouÏívejte elektrick˘ spotfiebiã, kter˘ má
po‰kozen˘ spínaã. Elektrické zafiízení, které jiÏ
nelze zapnout nebo vypnout, je nebezpeãné a
musí b˘t opraveno.
c) Pfied sefiízením spotfiebiãe, v˘mûnou
pfiíslu‰enství nebo uskladnûním spotfiebiãe
odpojte síÈovou zástrãku ze zásuvky. Toto
opatfiení zabraÀuje neúmyslnému spu‰tûní
spotfiebiãe.
d) Elektrické spotfiebiãe skladujte mimo dosah
dûtí. Nedovolte, aby zafiízení pouÏíval nûkdo,
kdo není se zafiízením nebo tûmito pokyny
seznámen. Elektrické spotfiebiãe jsou
nebezpeãné, pokud je pouÏívají nezku‰ení lidé.
e) Proveìte dÛkladnou údrÏbu elektrického
spotfiebiãe. Zkontrolujte, zda pohyblivé ãásti
správnû fungují a nejsou blokovány /
zablokovány a zda nejsou po‰kozené nebo
jinak po‰kozené souãásti, které by mohly
ovlivnit ãinnost spotfiebiãe. Pfied pouÏitím
spotfiebiãe nechte po‰kozené díly opravit.
Mnoho nehod je dÛsledkem ‰patnû udrÏovan˘ch
elektrick˘ch spotfiebiãÛ.
f) ¤ezné nástroje udrÏujte ostré a ãisté. Peãlivû
udrÏované fiezné nástroje s ostr˘mi bfiity se
zasekávají ménû ãasto a snadnûji se pouÏívají.
g) PouÏívejte elektrické spotfiebiãe, pfiíslu‰enství,
dal‰í nástroje atd. v souladu s tûmito pokyny
a zpÛsobem pfiedepsan˘m pro pfiíslu‰n˘ typ
zafiízení. Zohlednûte také pracovní podmínky
a zásah, kter˘ má b˘t proveden. PouÏívání
elektrick˘ch spotfiebiãÛ pro jiné úãely, neÏ pro
které se pfiedpokládá pro pfiíslu‰n˘ spotfiebiã,
mÛÏe vést k nebezpeãn˘m situacím.
5) Správná manipulace a pouÏívání elektrick˘ch
spotfiebiãÛ baterií
a) Pfied vloÏením baterie se ujistûte, Ïe je zafiízení
vypnuté. VloÏení baterie do zapnutého
elektrického spotfiebiãe mÛÏe vést k nehodám!
b) Pro dobití baterií pouÏívejte pouze nabíjeãku
doporuãenou v˘robcem. Nabíjecí jednotky jsou
obvykle urãeny pro urãité typy baterií; nebezpeãí
poÏáru pfii pouÏití s jin˘mi typy.
c) PouÏívejte pouze baterie urãené pro vá‰
elektrick˘ spotfiebiã. PouÏívání jin˘ch baterií
mÛÏe vést k nehodám a riziku poÏáru.
d) NepouÏité baterie udrÏujte mimo papír, svorky,
mince, klíãe, hfiebíky, ‰rouby nebo jiné malé
kovové pfiedmûty, které mohou zpÛsobit
mÛstkov˘ efekt mezi kontakty. Zkrat mezi
kontakty baterie mÛÏe zpÛsobit popálení nebo
poÏár!
e) Nesprávné pouÏití mÛÏe vést k úniku kapaliny
z baterie. Vyvarujte se kontaktu s kapalinou z
baterie. V pfiípadû kontaktu opláchnûte. Pokud
se vám tekutina z baterie dostane do oãí,
poraìte se také s lékafiem. Kapalina vytékající
z baterie mÛÏe zpÛsobit podráÏdûní kÛÏe nebo
popálení!
Pfieklad pÛvodních pokynÛ
10

6) Pomoc
a) ÚdrÏbu elektrického zafiízení provádûjte pouze
kvalifikovan˘mi techniky; k opravám
pouÏívejte pouze originální náhradní díly. Tím
se zajistí bezpeãn˘ provoz elektrického
spotfiebiãe.
7) Problémy
- Zadaná hodnota vibraãního v˘stupu byla zmûfiena
standardizovan˘mi zku‰ebními metodami a lze ji
porovnat s jin˘mi pouÏívan˘mi elektrick˘mi spotfiebiãi.
- Zadaná hodnota vyzafiovan˘ch vibrací mÛÏe b˘t také
nezbytná pro vyhodnocení pracovních pfiestávek.
- Zadaná hodnota vibraãního v˘stupu se mÛÏe bûhem
skuteãného pouÏívání elektrického spotfiebiãe li‰it
stanovením jeho hodnoty v závislosti na zpÛsobu
pouÏití elektrického spotfiebiãe.
- Poznámka: Pfiestávkami se vyhnûte cévním pulzacím
rukou.
8) Bezpeãnostní pokyny pro vyÏínaãe
- UdrÏujte v‰echny ãásti tûla mimo fiezné listy.
Nepokou‰ejte se vyjmout fiezan˘ materiál, kdyÏ
je spotfiebiã v provozu. NesnaÏte se drÏet
materiál, kter˘ má b˘t fiezán, rukou. OdstraÀte
jak˘koli fiezn˘ materiál uvíznut˘ mezi lopatkami,
pouze kdyÏ je spotfiebiã vypnut˘! Pfii práci s
nÛÏkami na Ïiv˘ plot mÛÏe i okamÏik nepozornosti
zpÛsobit váÏné zranûní.
- NoÏnice na Ïiv˘ plot nesete za rukojeÈ a sekací
noÏe stojí. VÏdy noste ochrann˘ plá‰È, abyste
mohli nosit nebo skladat nÛÏky na Ïivé ploty.
Obezfietné zacházení sniÏuje riziko poranûní fiezn˘mi
listy.
• Pfied zahájením fiezání zkontrolujte, zda v Ïivém plotu
nejsou Ïádné skryté pfiedmûty, napfiíklad drátûné
pletivo.
• NoÏnice na Ïivé ploty nemohou pouÏívat dûti mlad‰í
16 let ani lidé, ktefií nejsou v pouÏívání vy‰koleni.
• VyÏínaãka by mûla b˘t mimo dosah dûtí, jin˘ch osob
a domácích zvífiat.
• PouÏívejte vhodn˘ odûv. Nenoste volné obleãení
nebo ‰perky. Mohli by se zachytit v pohybliv˘ch
ãástech. Doporuãují se gumové rukavice a odolná
obuv. Pro dlouhé vlasy pouÏívejte síÈ na vlasy.
• Pokud je prostfiedí, ve kterém pracujete, zaprá‰ené,
pouÏívejte protiprachovou masku.
• NepouÏívejte nÛÏky na Ïivé ploty, pokud není nÛÏ
správnû upevnûn nebo pokud je po‰kozen.
• Pfied zapnutím sekaãky na Ïiv˘ plot se ujistûte, Ïe
se noÏe nedot˘kají kamenÛ nebo úlomkÛ.
• Pfii práci drÏte ãepel od tûla a konãetin.
11
• NefieÏte tvrdé pfiedmûty. To mÛÏe zpÛsobit zranûní
a po‰kození sekaãky na Ïivé ploty.
• PouÏívejte pouze bûhem dne nebo pfii dostateãném
umûlém osvûtlení.
• Pokud se nÛÏky na Ïivé ploty nepouÏívají, skladujte
je na suchém místû, aby nebyla ãepel odkrytá a
nÛÏky na Ïivé ploty byly mimo dosah dûtí.
• Nikdy nepouÏívejte plotostfiih za de‰tivého poãasí.
ChraÀte jej pfied vlhkostí. Nenechávejte to pfies noc.
NereÏte mokrou ani mokrou trávu.
• Ujistûte se, Ïe se nÛÏky na Ïiv˘ plot náhodnû
nespustí. Pokud je sefiizovaã plotu pfiipojen k
zásuvce, nenoste sekaãku na Ïivé ploty pfiidrÏováním
prstÛ na obou spínaãích. Pfied pfiipojením zástrãky
do zásuvky se ujistûte, Ïe je pfiepínaã v poloze
Vypnuto.
• Nepokou‰ejte se vyjmout fiezan˘ materiál ani se
nepokou‰ejte udrÏovat fiezan˘ materiál, kdyÏ se noÏe
pohybují. Pfied odstranûním zaseknutého materiálu
se ujistûte, Ïe je plotostfiih vypnut˘ a zcela zastaven˘.
Zastfiihovaã nezvedejte ani nedrÏte za noÏe.
• Pokud do fiezacího noÏe zaseknou pevné pfiedmûty
a zaseknou motor, okamÏitû stroj vypnûte, vyjmûte
baterii, vyjmûte pfiedmût a pokraãujte v práci.
• NepfieceÀujte sekaãku. Funguje lépe a pfii pouÏití v
souladu s urãením pfiedstavuje men‰í riziko zranûní.
• Buìte opatrní a vûnujte pozornost operacím, které
provádíte. PouÏijte zdrav˘ rozum. Pokud jste
unavení, nepouÏívejte nÛÏky na Ïivé ploty.
• UdrÏovací nÛÏky na Ïivé ploty peãlivû udrÏujte, ostfií
ostfií a ãisté; Tímto zpÛsobem ãepele zajistí optimální
v˘kon a pfiedstavují men‰í riziko zranûní. DrÏte
rukojeti v suchu, ãistotû a bez oleje a mastnoty.
- Pocit brnûní nebo necitlivosti v rukou je známkou
nadmûrn˘ch vibrací. Pfii dlouhodobém pouÏívání
spotfiebiãe omezte pracovní dobu, dûlejte dostateãnû
dlouhé pfiestávky, rozdûlte práci mezi nûkolik osob
nebo noste antivibraãní rukavice.
- Je nevyhnutelné, Ïe zafiízení vydává urãitou úroveÀ
hluku. Provádûjte velmi hluãné zásahy v dobû, kdy
je to povoleno a v dobû naplánované pro tento typ
práce. V pfiípadû potfieby respektujte období ticha a
sniÏte pracovní dobu na absolutní minimum. Pro vás
a dal‰í osoby v oblasti, kde se nÛÏky na Ïivé ploty
pouÏívají, doporuãujeme pouÏívat vhodnou ochranu
sluchu.
8. Pokyny k pouÏívání spotfiebiãe
NepouÏívejte nÛÏky na Ïivé ploty za de‰tû nebo na
stfiíhání mokr˘ch Ïiv˘ch plotÛ!
Pfied kaÏd˘m pouÏitím zkontrolujte kabel a
zastfiihovaã plotu a zkontrolujte pfiíznaky po‰kození
(odpojte síÈovou zástrãku)! NepouÏívejte vadn˘
kabel.
Pfieklad pÛvodních pokynÛ

Rukavice:
Pfii pouÏívání sekaãky na Ïivé ploty pouÏívejte
ochranné rukavice.
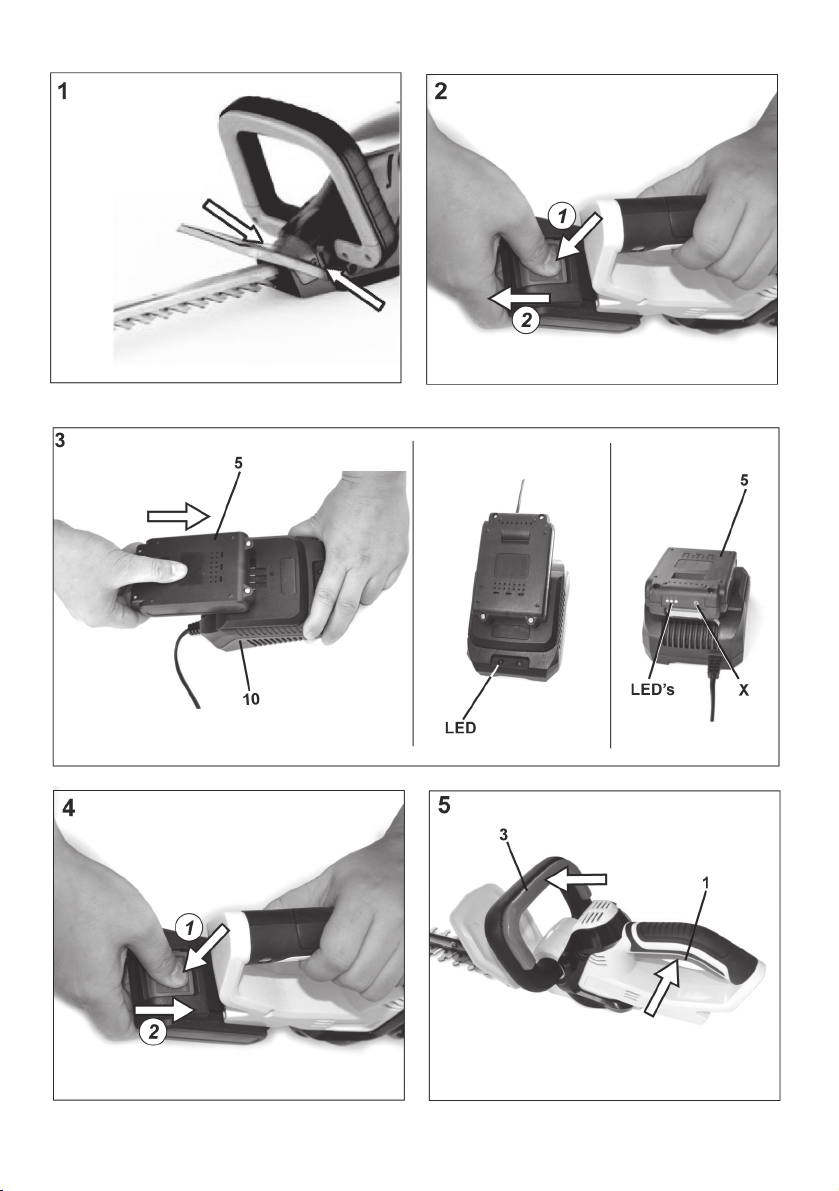
MontáÏ ochranného ‰títu (obr. 1)
Ochrann˘ ‰tít (4) nasuÀte pfies li‰tu noÏe a zajistûte
ji z obou stran na krytu pomocí 1 ‰roubu na kaÏdé
stranû, jak je znázornûno na obr. 1.
Pokyny k pouÏívání baterie
1. Po dodání plotostfiihu se vymûnitelná baterie
nenabíjí. Pfied prvním zapnutím pfiístroje nabijte
baterii.
7. Nikdy neotevírejte baterii.
8. Nikdy nevyhazujte vybité baterie do ohnû NEBEZPEâÍ V¯BUCHU!
9. Pfiipojte nabíjeãku pouze k síti, jejíÏ napûtí
odpovídá tomu, co je uvedeno na ‰títku.
10. PouÏívejte pouze originální baterii.
11. Nikdy nenabíjejte baterii pomocí nabíjeãky od
jiného v˘robce. Mohlo by dojít k po‰kození
baterie nebo k pfiehfiátí.
12. Pfii del‰ím zásahu se mÛÏe baterie zahfiát. Pfied
naãtením jej nechte vychladnout.
13. Neuchovávejte nabíjeãku a baterie v dosahu
dûtí.
14. NepouÏívejte nabíjeãku v prostfiedí s hofilav˘mi
v˘pary nebo kapalinami.
15. Baterie nabíjejte pouze pfii teplotû mezi 10 ° C
a 40 ° C.
16. Baterii skladujte pouze pfii teplotách vy‰‰ích neÏ
30 ° C. Vy‰‰í teploty skladování mohou baterii
po‰kodit. Ideální skladovací teplota je 10 ~ 15 °
C.
17. ChraÀte baterii pfied teplem, intenzivním
záfiením a ohnûm. Riziko v˘buchu!
18. V pfiípadû po‰kození baterie mohou unikat
nebezpeãné páry nebo kapaliny. V pfiípadû
náhodného kontaktu opláchnûte a okamÏitû
vyhledejte lékafie. Kapalina mÛÏe mít dráÏdivé
nebo leptavé úãinky na kÛÏi.
19. Nikdy nezkratujte kontakty baterie a nikdy je
nepfiipojujte kovov˘mi pfiedmûty.
20. Pfii pfiepravû baterie se ujistûte, Ïe kontakty
nejsou vzájemnû propojeny, nepouÏívejte
kovové pfiepravní nádoby.
21. Zkrat baterie mÛÏe zpÛsobit v˘buch. Zkratové
pfiipojení v‰ak baterii po‰kodí.
22. Pravidelnû kontrolujte kabel, zda není
po‰kozen˘. Pokud je kabel po‰kozen, nechte
jej vymûnit.
23.
Baterie je vybavena úplnou ochranou proti vybití:
zafiízení se automaticky vypne, pokud je vybitá. V
takovém pfiípadû baterii okamÏitû dobijte.
24. Pfied uskladnûním baterií na zimu je znovu
nabijte.
Likvidace akumulátorÛ
Pfii likvidaci akumulátoru / baterie
dodrÏujte následující pokyny. Baterie by
nemûly b˘t hozeny do odpadu. Jako
spotfiebitel jste ze zákona povinni vrátit
baterie a akumulátory. Na konci Ïivotnosti
spotfiebiãe musí b˘t baterie nebo
akumulátory ze zafiízení vyjmuty a
zlikvidovány oddûlenû. Máte moÏnost
doruãit své staré baterie a akumulátory do
místního sbûrného místa místní obce nebo
k prodejci nebo distribuãním stfiediskÛm.
9. Nabíjení baterií pomocí rychlé nabíjeãky
(NENÍ SOUâÁSTæ)
(obr. 2 a 3)
•Chcete-li vyjmout dobíjecí baterii ze zafiízení,
stisknûte pojistné tlaãítko (2) a vyjmûte baterii
(obr. 2).
• Pfiipojte napájecí kabel (9) k elektrické zásuvce.
Ujistûte se, Ïe síÈové napûtí uvedené na rychlé
nabíjeãce (10) odpovídá napûtí dodávanému
va‰í zásuvkou. Zelené svûtlo na pravé stranû
rychlé nabíjeãky bude blikat.
• VloÏte nabíjecí baterii (5) do rychlé nabíjeãky
(10). MÛÏe b˘t vloÏen pouze v jedné poloze (obr.
3).
• Tím se zahájí proces nabíjení baterie, kter˘ je
na rychlé nabíjeãce (10) oznaãen ãerven˘m
svûtlem. 3 zelené LED diody na baterii (5) se
postupnû rozsvítí.
• KdyÏ je dobíjecí baterie plnû nabitá, kontrolka
na pravé stranû rychlé nabíjeãky (10) se rozsvítí
zelenû. Nabíjení se ukonãí automaticky. Rozsvítí
se 3 zelené LED diody na baterii (5).
• Proces nabíjení trvá asi hodinu / hodinu a pÛl.
Baterie se bûhem nabíjení zahfiívá. Je to normální
a není to známka selhání. Vyjmûte dobíjecí baterii
nejpozdûji do 5 hodin.
Poznámka: âas od ãasu je moÏné, Ïe bûhem cyklu
nakládání je pfiekroãena pfiípustná teplota. V tomto
pfiípadû elektronická regulace nabíjení pfieru‰í
nabíjecí cyklus, aby nedo‰lo k po‰kození baterie.
Kontrolky nabíjeãky baterií zÛstanou svítit. Pokud k
tomu dojde, odpojte baterii od rychlé nabíjeãky a
nechte ji asi 30 minut vychladnout. Poté restartujte
nabíjecí cyklus opûtovn˘m vloÏením baterie do
nabíjecí stanice.
• Není nutné kontrolovat dobu nabíjení.
• Pokud se nepouÏíváte, odpojte zástrãku nabíjecí
jednotky.
• Pokud není baterie zapnutá, zkontrolujte, zda je
zásuvka napájena elektfiinou. Pokud nemÛÏete
baterie nabít, odneste nabíjeãku a baterie do
servisu.
Pfieklad pÛvodních pokynÛ
12

Stisknutím tlaãítka X zkontrolujte stav nabití (obr. 3).
Mohou nastat následující pfiípady:
• V‰echny 3 kontrolky svítí: baterie je plnû nabitá.
•2 kontrolky svítí: stav nabíjení je stále pfiijateln˘.
•1 svítí: vybitá baterie. Baterii ihned dobijte!
Poznámka: Pfii prvním nabití baterie (5) nedosáhne
plné kapacity. âervené svûtlo svítí, dokud není
napájecí kabel (9) odpojen od sítû. DosaÏení
maximálního nabití mÛÏe trvat nûkolik nabíjecích
cyklÛ.
Poznámka: Baterie je vybavena úplnou ochranou
proti vybití: pfiístroj se automaticky vypne, pokud je
vybitá. V takovém pfiípadû baterii okamÏitû dobijte.
Poznámka:
• Pokud je nabíjeãka pfiipojena do zásuvky, ale bez
nabíjení baterie, zelená LED na pravé stranû
rychlé nabíjeãky bude blikat a ãervená LED na
levé stranû zhasne.
• Bûhem nabíjení baterie se rozsvítí ãervená LED
na levé stranû rychlé nabíjeãky (zelená LED
zhasne) a 3 zelené LED na baterii se postupnû
rozsvítí.
• KdyÏ je baterie plnû nabitá, rozsvítí se zelená
LED na pravé stranû rychlé nabíjeãky (ãervená
LED zhasne) a 3 zelené LED na baterii se
rozsvítí.
• Pokud je teplota pfiíli‰ vysoká, zÛstanou ãervené
a zelené LED na rychlé nabíjeãce svítit.
•V pfiípadû neobvyklé situace a nemoÏnosti
nabíjení ãervená a zelená LED na rychlé
nabíjeãce stále blikají.
Tepelná a napûÈová ochrana
Pokud je zafiízení vystaveno nadmûrnû intenzivní
práci po del‰í dobu, mÛÏe se dobíjecí baterie
vypnout. Pokud k tomu dojde, nechte baterii asi 30
minut vychladnout.
10. Zapnutí a vypnutí plotostfiihu (obr. 4 a 5) VloÏte
nabitou baterii (5) do plotostfiihu. Blokovací systém
baterie (2) musí zapadnout na místo.
Pfii zapínání sekaãky na Ïiv˘ plot zaujmûte stabilní
polohu.
Chcete-li zapnout nÛÏky na Ïivé ploty, stisknûte
tyãov˘ pfiepínaã na rukojeti (3) a také stisknûte
knoflík na rukojeti oblouku (1). Chcete-li zafiízení
vypnout, uvolnûte oba spínaãe. Jakmile se uvolní
jeden ze dvou spínaãÛ, motor se zastaví.
11. Pfii pouÏívání sekaãky na Ïivé ploty pfii pouÏití
(obr. 6)
Toto zafiízení vám umoÏní snadno a pohodlnû stfiíhat
nebo stfiíhat kefie a Ïivé ploty.
1) Profiezávání Ïiv˘ch plotÛ
-Mladé v˘honky se nejlépe stfiíhají rotaãním
pohybem.
- Star‰í a robustnûj‰í Ïivé ploty jsou lépe fiezány
pohybem, jako by pouÏívaly pilu.
- Vûtve pfiíli‰ silné na zastfiihovaã plotu musí b˘t
fiezány pilou.
- Hrany Ïiv˘ch plotÛ by mûly b˘t vyfiíznuty smûrem
nahoru.
2) Chcete-li získat v˘‰ku v˘‰ky
- Vytvofite vodítko v poÏadované v˘‰ce.
- ¤ezejte rovnomûrnû podél této smûrnice.
Pfii práci se zastfiihovaãem Ïiv˘ch plotÛ buìte opatrní
a zajistûte stabilní a bezpeãnou polohu, aby nedo‰lo
ke sklouznutí a zranûní. ¤ezací noÏe udrÏujte vÏdy
mimo tûlo.
12. ÚdrÏba
Pfied zahájením jak˘chkoli prací na stroji vÏdy
odpojte zástrãku ze zásuvky.
DÛleÏité: Po del‰ím pouÏívání sekaãky na Ïivé ploty
vÏdy ãepele vyãistûte a namaÏte. To v˘raznû ovlivní
Ïivotnost spotfiebiãe. Po‰kozené Ïací jednotky musí
b˘t okamÏitû fiádnû opraveny. ¤ezací noÏe oãistûte
such˘m hadfiíkem nebo - v pfiípadû velk˘ch neãistot
- ‰tûtcem. Varování: Nebezpeãí zranûní! Teorie
mazání lopatek musí b˘t provedena ekologick˘m
mazivem (obr. 7).
1) Ostfiení noÏe
âepele obecnû nepotfiebují pomoc a pfii správném
pouÏití nesmí b˘t znovu naostfieny.
Aby se pfiede‰lo zranûní zpÛsobenému noÏi, kdyÏ
se nepouÏívají, musí b˘t ostr˘ fiezn˘ kotouã zakryt
plá‰tûm noÏe. NoÏe nemohou b˘t uÏivatelem
naostfieny bez otevfiení pfiístroje a bezpeãnostního
mechanismu. Chcete-li proto ostfií znovu ostfiit,
kontaktujte pouze odborn˘ servis.
2) V˘mûna noÏÛ
Pouze správná instalace noÏÛ zaruãí bezporuchov˘
provoz a fungování v˘‰e uvedené bezpeãnosti noÏÛ.
V˘mûna noÏÛ proto musí b˘t provádûna pouze v
odborném servisu.
13. Maximální zabezpeãení
5 speciálních funkcí: dvouruãní bezpeãnostní
spínaã, rychlé zastavení noÏe, ochrann˘ plá‰È,
bezpeãnostní li‰ta noÏe a ochrana proti nárazu
jsou navrÏeny tak, aby zaji‰Èovací nÛÏky
zaji‰Èovaly maximální bezpeãnost.
Varování!
Pokud zjistíte, Ïe bezpeãnostní funkce,
jako je 2-spínací mechanismus nebo
13
Pfieklad pÛvodních pokynÛ

bezpeãnostní zaráÏka, nefungují pfii
pouÏívání sekaãky na Ïivé ploty, okamÏitû
zastavte práci a dejte stroj do
specializovaného stfiediska k opravû.
1) Oboustrann˘ bezpeãnostní spínaã (obr. 5)
Chcete-li zapnout nÛÏky na Ïivé ploty, stisknûte
tyãov˘ pfiepínaã na rukojeti (1) a knoflík na rukojeti
oblouku (3). Chcete-li zafiízení vypnout, uvolnûte oba
spínaãe. Pokud se uvolní jeden ze dvou spínaãÛ,
motor se zastaví.
2) Rychlé zastavení kotouãe
Aby nedo‰lo k poranûní fiezem, ãepel se zastaví do
max. 1 sec. kdyÏ je uvolnûn jeden ze dvou
pfiepínaãÛ.
3) Bezpeãnostní pás ãepele (obr. 8)
¤ezací nÛÏ, umístûn˘ zpût od krytu noÏe, sniÏuje
riziko zranûní v dÛsledku nedobrovolného kontaktu
s tûlem. Jakmile je vyÏínaã plotu vypnut˘, ostré noÏe
se z bezpeãnostních dÛvodÛ zastaví pfiímo pod krycí
li‰tou, aby se sníÏilo riziko zranûní bûhem pfiepravy.
4) Ochrana proti nárazÛm
ProdlouÏená vodicí kolejnice zabraÀuje
nepfiíjemn˘m nárazÛm (ãepel, která se odráÏí zpût),
která by byla pfiená‰ena na obsluhu v dÛsledku
nárazu pevn˘mi pfiedmûty (zeì, zemû atd.).
5) Ochrana zafiízení
Pokud se do fiezacího noÏe zaseknou pevné
pfiedmûty a zasekne se motor, okamÏitû stroj
vypnûte, odpojte napájecí zástrãku ze zásuvky,
vyjmûte pfiedmût a pokraãujte v práci. Zafiízení je
také vybaveno ochranou proti pfietíÏení, která chrání
ozubená kola pfied mechanick˘m po‰kozením v
pfiípadû zaseknutí kotouãe.
14) Po pouÏití ofiezávátko zajistûte
NoÏnice na Ïivé ploty musí b˘t skladována tak,
aby nehrozilo nebezpeãí poranûní fiezn˘mi noÏi!
DÛleÏitá poznámka: ¤ezné listy musí b˘t po
kaÏdém pouÏití vyãi‰tûny (viz také ãást ÚdrÏba). Tím
se v˘raznû prodlouÏí Ïivotnost zafiízení. PouÏijte
ekologicky ‰etrné mazivo, napfi. nበspecifick˘ sprej
pro údrÏbu. Poté vloÏte nÛÏ na Ïivé ploty zpût do
pouzdra vloÏením noÏÛ.
15. Náhradní díly
Pfii objednávce náhradních dílÛ uveìte následující
informace:
• Typ stroje
• Strojov˘ kód
16. Opravárenská sluÏba
Opravy elektrick˘ch spotfiebiãÛ by mûl provádût
pouze kvalifikovan˘ elektrikáfi.
V pfiípadû moÏné pfiepravy spotfiebiãe vÏdy
uschovejte originální obal.
17. Informace o ochranû / odstraÀování Ïivotního
prostfiedí
PouÏit˘ stroj fiádnû zlikvidujte. Abyste zabránili
zneuÏití, odpojte síÈov˘ kabel. Nevyhazujte stroj do
domácího odpadu. V zájmu ochrany Ïivotního
prostfiedí je odneste na sbûrné místo pro elektrické
stroje. Vበmístní pfiíslu‰n˘ orgán vám mÛÏe
poskytnout adresu a otevírací dobu. Obalové
materiály a opotfiebované pfiíslu‰enství vezmûte také
na pfiíslu‰ná sbûrná místa.
Pouze pro zemû EU
Nevyhazujte elektrické spotfiebiãe do
domácího odpadu!
V souladu s evropskou smûrnicí 2012/19 / ES o
odpadních elektrick˘ch a elektronick˘ch zafiízeních
a jejím provádûním ve vnitrostátních právních
pfiedpisech musí b˘t odpadní elektrická zafiízení
sbírána oddûlenû, aby bylo moÏné ekologické pouÏití
znovu pouÏít.
Recyklace jako alternativa k návratu:
Místo vrácení elektrického spotfiebiãe je majitel
povinen se v pfiípadû vzdání se vlastnictví
alternativnû podílet na vhodné recyklaci. Odpadní
zafiízení mÛÏe b˘t také pfievezeno do sbûrného místa
pro likvidaci v souladu s právními pfiedpisy o národní
recyklaci a nakládání s odpady. To se nevztahuje
na souãásti pfiíslu‰enství a pomocná zafiízení bez
elektrick˘ch souãástí obsaÏen˘ch v odpadním
zafiízení.
Pfieklad pÛvodních pokynÛ
14

Operating instruction
Contents Page
1. Introduction to the Operating Instructions
2. Technical specifications ............................................................................ 16
3. Intended use ........................................................................................... 17
4. Explanation of the Warning Instructions on the Machine ........................... 18
5. General safety instructions ...................................................................... 19
6. Applications ............................................................................................ 19
7. General safety instructions ...................................................................... 19
1) Working area
2) Electrical safety
3) Personal safety
4) Careful handling and use of power tools
5) Appropriate handling and use of battery-operated power tools
6) Service
7) Emissions
8) Safety instructions for hedge trimmers
8. Instructions for use of the equipment ........................................................ 21
• Instructions for using the battery
• Disposal of accumulators
9. Charging the batteries ............................................................................ 22
10. Switching on and off ............................................................................. 23
11. Holding the hedge trimmer when in use ............................................... 23
1) Trimming of hedges
2) In order to achieve an even height
12. Maintenance ......................................................................................... 23
1) Sharpening of the blades
2) Changing the blades
13. Optimum safety .................................................................................... 23
1) Two-hand safety switch
2) Quick blade stop
3) Blade safety rail
4) Impact protector
5) Gear protection feature
14. Storing the trimmer after use ................................................................. 24
15. Spare parts ........................................................................................... 24
16. Repair service ....................................................................................... 24
17. Waste disposal and environmental protection......................................... 24
.................................................
16
15

Cordless Hedge Trimmer
1. Dear Customer
These Operating Instructions are intended to facilitate your becoming acquainted with the machine
and using it in accordance with the regulations. The Operating Instructions contain important
information on how to use the machine safely, correctly and economically. Observing this information
will help increase the reliability and working life of the machine. The Operating Instructions must
always be at hand when the machine is being used.
They must be read and observed by every person dealing with the machine, whether operating,
servicing or transporting it.
In addition to the Operating Instructions and the applicable rules of the prevention of accidents
valid in the country of use and on site, the generally recognised rules on working safely and
correctly must be observed as well as the accident prevention rules of the relevant professional
associations.
2. Technical Data
Model HTB20
Rated voltage 20 V DC
Bar length 560 mm
Cutting thickness 18 mm
Cutting length 510 mm
Speed of rotation n
0
1300±130 min
Battery type Li-Ion 20 V / 2,0 Ah / 40 Wh
Weight 2,1 kg
Noise pressure level L
* 92 dB(A) K 3,0 dB
pA
Vibration * 2,5 m/s
Mains battery charger
Mains voltage 200-240 V ~
Charging voltage 21 V DC
Charging current 2 A
Charging time approx 1 to 1,2 hours with
fast battery charger (NOT INCLUDED)
* nach EN 60745-2-15
-1
2
K 1,5 m/s
/ 50-60 Hz
2
Technical changes are reserved.
16

3. Intended use
This hedge trimmer is only intended to be used to trim shrubs, bushes, ornamental plants and
hedges. It is designed to cut branches with a diameter of no more than 18 mm. The hedge trimmer
is not intended for commercial use. The user of the edge trimmer must make sure that the protective
equipment specified in the operating instructions and by the warning label on the trimmer is
attached whenever the trimmer is in use. The hedge trimmer must be checked for electrical or
mechanical damage before it is used or while it is being used.
Improper use
Any use not identified in the chapter “Intended use” is an improper use.
The user of the hedge trimmer is solely liable for any property damage or personal injury arising
from improper use of the hedge trimmer.
The manufacturer‘s obligation to honour the warranty is voided if the hedge trimmer is used with
non-original parts
Residual dangers
Residual risks always remain even if the hedge trimmer is used properly. The hedge trimmer‘s
design can entail the following hazards:
• Contact can be made with the unprotected blade (resulting in cutting injuries)
• Reaching into or grabbing the hedge trimmer while it is in operation (resulting in cutting injuries)
• Unanticipated, sudden movement of the plant material being cut (resulting in cutting injuries)
• Ejection or catapulting of damaged cutting teeth
• Ejection or catapulting of the plant material being cut
• Hearing damage if the specified hearing protection is not worn
• Inhalation of cut materials
17

4. Explanation of the Warning Instructions on the Machine
1 Use protective means for eyes and ears!
2 Caution!
3 Read instructions for use!
4 This electric machine must not be exposed to rain.
5 Attention: Environmental Protection! This device may not be disposed of with general/
household waste. Disposeof only at a designated collection point.
6 Guaranteed acoustic capacity level L
92 dB(A)
WA
7 Battery contains lithium! Do not dispose of as household refuse
8 Remove rechargeable battery before repair and maintenance work!
9 Carefully read all safety instructions and operating instructions!
10 The charging device is only intended for indoor use.
11 Double-insulated
12 Complies with the relevant safety standards
13 Do not expose battery to temperatures above 40 ºC.
14 Do not dispose of batteries in bodies of water or immerse them in water.
15 Risk of explosion! Never throw batteries onto a fire.
16 Rechargeable battery contains lithium! Recycle defective rechargeable batteries!
17 Charge between +10°C and 40°C
18 Do not dispose of batteries in bodies of water or immerse them in water.
19 Charge rechargeable battery before storing
18

5. Safety instructions
Noise emission information in accordance with the
German Product Safety Act (ProdSG) and the EC
Machine Directive: the noise pressure level at the place
of work can exceed 80 dB(A). In such cases the
operator will require noise protection (e.g. wearing
of ear protectors).
Attention: Noise protection! Please observe the local
regulations when operating your device.
Interference suppressed in accordance with EN
55014, EN 61000-3-2, EN 61000-3-3.
We reserve the right to make changes to the technical
specifications.
The devices are manufactured in accordance with the
provisions of EN 60745-1and EN 60745-2-15 and
fully comply with the provisions of the German Product
Safety Act.
General safety instruction
Usage of hedge trimmer always involves a risk
of accidents, therefore please observe the
relevant accident prevention instructions.
The machine has been constructed according to the
latest technology and in accordance with the recognised technical safety regulations. Nevertheless, use of
the machine can involve risks to the user or third
persons, and can cause damage to the machine or
other objects.
Attention: Using electric power tools, you must observe
following fundamental safety instructions to protect
yourself against electric shock, against danger of
injuries and danger of fire. Read all these instructions
before using the hedge trimmer and observe them.
Keep these safety instructions at a safe place.
Use the machine in a safety conscious manner for
suitable applications in a technically perfect condition
only and with due regard to the operating instructions!
Immediately rectify or have rectified any faults which
could adversely affect safety!
This machine may cause serious injuries. Please read
the instruction manual carefully as to the correct
handling, the preparations, the maintenance and the
proper use of the hedgetrimmer. Familiarize yourself
with the machine before the first use and also have
yourself introduced to practical use of the machine.
This appliance is not intended for use by persons
(including children) with reduced physical, sensory
or mental capabilities, or lack of experience and
knowledge, unless they have been given supervision
or instruction concerning use of the appliance by a
person responsible for their safety. Children should
be supervised to ensure that they do not play with the
appliance.
6. Application
The machine is only intended for trimming hedges.
Use for any other purpose constitutes inappropriate
use. The manufacturer / supplier is not liable for any
injury and/or damage arising from inappropriate use.
This risk is the sole responsibility of the user. Appropriate use of the machine also includes adherence
to the operating instructions and compliance with the
servicing and maintenance instructions.
Always keep the instruction manual close at hand during operation!
7. General safety instructions
Attention! Read all instructions contained herein.
Failure to observe the following instructions may result
in electric shock, burns and/or severe injury. The term
“power tool” used in the following includes both
mains-operated tools (with mains supply) and batteryoperated tools (without mains supply).
KEEP THESE INSTRUCTIONS CAREFULLY!
1) Working area
a) Keep your working area clean and tidy. Untidy
and poorly lit working areas may lead to
accidents.
b) Do not operate the tool in potentially explosive
environments containing combustible fluids,
gases or dusts. Power tools generate sparks that
may ignite dusts or fumes.
c) Keep children and other persons away when you
are operating the power tool. Distractions may
result in the operator loosing control over the tool.
2) Electrical safety
a) The mains plug of the power tool must fit into
the mains socket. The plug must not be modified
in any way. Do not use adapter plugs/connectors
in combination with tools with protective earthing.
Unmodified plugs and fitting sockets reduce the
risk of electric shock.
b) Avoid physical contact with earthed surfaces as
pipes, heaters, ovens and refrigerators. There is
an increased risk of electric shock if your body
earthed.
c) Keep the tool out of the rain. The penetration of
water into a power tool increases the risk of electric
shock.
d) Do not use the cable to carry or hang up the tool
or to pull the plug out of the socket. Keep the
cable away from heat, oil and sharp edges or
moving parts of the tool. Damaged or tangled
cables increase the risk of electric shock.
19

e) When operating a power tool outdoors, use
exclusively extension cables that are approved
for outdoor-use. The use of an extension cable
that is suitable for outdoor use reduces the risk of
electric shock.
3) Personal safety
a) Always pay attention to what you do and apply
reasonable care when working with a power tool.
Do not use the tool when you are tired or under
the influence of medication, drugs or alcohol.
When working with power tools even a short
moment of inattentiveness may result in severe
injury.
b) Wear personal protection equipment and always
wear eye protection (safety goggles). Wearing
personal protection equipment as a dust mask,
nonslip safety shoes, safety helmet or ear protectors (depending on the type and use of the tool)
reduces the risk of injury.
c) Avoid unintentional operation. Make sure that
the switch is in “OFF” position before pulling the
plug from the main socket. When carrying the
tool with your finger on the on/off switch or connecting the tool to the mains supply with the switch
in “ON” position, this may result in accidents.
d) Remove adjustment tools or wrenches and the
like before you switch the tool on. A wrench or
another tool that is inside or on a turning part of
the tool may cause injury.
e) Do not overestimate your abilities. Take care of a
safe footing and keep your balance at all times.
This will allow you to better control the tool in unexpected situations.
f) Wear suitable clothes. Do not wear wide clothing
or jewellery. Keep your hair, clothes and gloves
clear of all moving parts. Loose clothing, jewellery
or long hair may get caught in moving parts.
g) If dust extraction/collection devices are provided
make sure that they are connected and used
properly. The use of these devices reduces hazards
caused by dust.
4) Careful handling and use of power tools
a) Do not overtax the power tool. Use the
tool intended for your type of
The use of the suitable power tool within the stated
ran-ge of performance makes working more
effective and safer.
b) Do not use a power tool with a damaged switch.
A power tool that cannot be switched on or off
any more is dangerous and must be repaired.
c) Pull the mains plug out of the socket before you
adjust a tool, change accessories or put the tool
aside. This precaution avoids the unintentional start
of the tool.
work in each case.
power
d) Store power tools out of the reach of children.
Do not allow persons to use the tool if they are
not familiar with the tool or these instructions.
Power tools are dangerous if used by inexperienced persons.
e) Thoroughly maintain your power tool. Check
whether moving parts are working properly and
are not jamming/sticking, and whether parts are
broken or otherwise damaged in a way that
affects the function of the tool.
parts repaired before using the tool. Many accidents
are the result of poorly maintained power tools.
f) Keep cutting tools sharp and clean. Thoroughly
looked-after cutting tools with sharp cutting edges
are jamming less often and are easier to guide.
g) Use power tools, accessories, add-on tools, etc.
in accordance with these instructions and in the
way prescribed for the respective type of tool.
You should also consider the working conditions
and the work to be carried out. The use of power
tools for purposes other than those intended for
the respective tool may result in dangerous
situations.
5) Appropriate handling and use of battery-operated
power tools
a) Make sure that the device has been switched off
before inserting the battery. Inserting a battery
into a switched-on power tool may lead to
accidents!
b) Only use charging devices recommended by the
manufacturer to charge the batteries. Charging
units are usually designed for certain types of
batteries; if used with other types there is a risk of
fire!
c) Only use batteries designed for your power tool.
The use of other batteries may lead to injury and
risk of fire!
d) Keep unused batteries clear of paper clips, coins,
keys, nails, screws or other small metal objects
that may bridge the contacts. A short circuit
between the battery contacts may lead to burns or
fire!
e) Improper use may result in fluid leaking out of
the battery. Avoid any contact with battery fluid.
Flush with water in case of contact. If battery fluid
should get into your eyes seek medical advice
additionally. Leaking battery fluid may lead to
irritations of the skin or burns!
6) Service
a) Have the power tool serviced by qualified
technical personnel only; repairs should be
carried out using exclusively original spare parts.
This will ensure the safe operation of the power
tool.
20
Have damaged

7) Emissions
- The specified vibration emission value was measu-
red by a standardized test methods and can
compare with other power tools are used.
- The specified vibration emission value can also be
necessary for the assessment of work breaks are
used.
- The specified vibration emission value can vary
during the actual use of the electric tool by
specifying the value, depending on the way how
to use the power tool.
- Note: You create the privilege against vascular
pulsations of the hands in time breaks.
8) Safety instructions for hedge trimmers
- Keep all parts of your body away from the cutting
blades. Do not try to remove cut-off matter with
the tool running. Do not try to hold material to
be cut off with your hand. Remove cut-off matter
that is stuck between the blades only with the
tool be- ing switched off! When working with
hedge trimmers even a short moment of
inattentiveness may result in severe injury.
- Carry the hedge trimmer at the handle with the
cutting blades standing still. Always put on the
protection cover when transporting or storing the
hedge trimmer. Careful handling reduces the risk
of injury through the cutting blades.
• Check the hedge for hidden objects such as wire
fencing before beginning to cut.
• The hedge trimmer may not be used by persons
who are younger than 16 years of age or by
persons who have not been trained to use it.
• Keep the hedge trimmer away from children, other
persons and pets.
•
Wear suitable clothing. Do not wear loose clothing
or jewellery. This could become caught in moving
parts. Wearing rubber gloves and sturdy footwear is
recommended. Wear a hair net if you have long hair.
•Wear a dust mask if it is dusty where you are
working.
• Do not use the hedge trimmer if the cutter is not
properly secured or if it is damaged.
• Make sure before switching on the hedge trimmer
that the blades do not come into contact with stones
or rubble.
• When working, keep the cutter away from your
body and extremities.
• Do not cut hard objects. This can cause injuries
and damage the hedge trimmer.
• Use only in daylight or if there is sufficient artificial
lighting.
• When the hedge trimmer is not being used, store
it in a dry location in such a way that the blade is
not exposed and the hedge trimmer is out of the
reach of children.
• Never use the hedge trimmer in the rain. Keep
away from the wet and the damp. Do not leave
outdoors overnight. Do not cut damp or wet grass.
• Make sure the hedge trimmer does not start
accidentaly. Do not carry the hedge trimmer with
fingers on both switches if the hedge trimmer is
plugged in. Make sure the switch is set to off before
plugging the plug into the socket.
• Do not attempt to remove cut materials or attempt
to hold on to materials being cut while the blades
are in motion. Make sure that the hedge trimmer
has been switched off and has come to a complete
stop before attempting to remove jammed material.
Do not lift or hold the hedge trimmer by the blades.
• If solid objecst are caught in the cutting blade and
jam the motor, switch off the machine at once,
remove the battery, remove the object and continue
with the work.
• Do not overload the hedge trimmer. The trimmer
works better and poses less risk of injury if it is
operated as intended.
• Be careful, pay attention to what you are doing.
Use common sense. Do not use the hedge trimmer
if you are tired.
•Take care of the hedge trimmer, keep the blades
sharp and clean; the blades then provide the best
performance and pose less risk of injury. Keep the
grips dry, clean and free of oil and grease.
-A tingling feeling or numbness in the hands is sign
of excessive vibration. Limit the operating time, take
sufficiently long work breaks. Distribute the work
between several people or wear anti-vibration
gloves when using the tool for extended periods.
-A certain degree of noise from this device is
unavoidable. Perform noise-intensive work at times
when this is permitted and at times intended for
this type of work. Where applicable, observe quiet
times and limit working time to the absolute
minimum. You and other persons in the area where
the trimmer is being used should wear suitable
hearing protection.
8. Instructions for use of the equipment
Do not use the trimmer in rain or for cutting wet
hedges!
Check the hedge trimmer flex and its connections
before each and every use for visible signs of damage
(disconnect the power plug)! Do not use a faulty flex.
Gloves:
Protective gloves must be worn when using the hedge
trimmer.
Assembly of the protection shield (Fig. 1)
Slide the included protection shield (4) over the blade
rail and fix it from both sides at the housing using 1
screw on each side as shown in Fig. 1.
21

Instructions for using the battery
1. When the hedge shears are delivered, the replaceable battery is not charge. Before starting the
machine for the first time, the battery must be
charged.
7. You must never open the battery.
8. Never throw the used batteries in fire - RISK OF
EXPLOSION!
9. Connect the battery charger only to mains with
such a voltage as stated on the type-bearing plate.
10. Use only the original battery.
11. Never charge the battery with a battery charger
from other producer. This can result in the battery
being damaged or it can result in an injury due
to over-heating.
12. During a long-term operation, the battery may
heat up. Let it cool down before charging it.
13. Do not store the battery charger and the batteries
within children‘s reach.
14. Do not use the battery charger in an environment
with vapors or inflammable fluids.
15. Charge the batteries only at a temperature within
the range of 10°C to 40°C.
16. Store the battery at temperatures up to 30°C only.
Higher storage temperatures may result in
damage to the battery. The ideal storage
temperature range is 10~15°C.
17. Protect the battery from heat, intense insolation
and fire. Explosion hazard!
18. In case of damage to the battery, hazardous
vapours or fluids may escape. In case of incidental
contatc flush with water and seek medical advice
immediately. The fluid may have irritating or
caustic effects on the skin.
19. Never short-circuit the contacts of the batteries
and never interconnect them with metal objects.
20. When transporting the battery, take care that the
contacts are not interconnected, do not use metal
transportation containers.
21. Short-circuit of the battery can lead to explosion.
In any case, the short-circuit connection will
damage the battery.
22. Check the cable regularly on whether it is
damaged. If the cable is damaged, have it
replaced.
23. The battery is equipped with a deep-discharge
protection feature: the tool is automatically
switched off if the battery is discharged. Recharge
the battery immediately if this should be the case.
24. Before storing the batteries for the wintertime,
charge them fully once more.
Disposal of accumulators
Please observe the following directions
for the disposal of your accumulator/
battery. Batteries are not to be put into the
rubbish. As a consumer you are legally
obliged to return used batteries and
accumulators. At the end of the duration of
your apparatus, the batteries or accumulators have to be taken from the apparatus,
disposing of them separately. You have the
possibility of delivering your old batteries
and accumulators to the local collecting
points of your municipality or to your dealer
or to the distribution centers.
9. Charging the batteries (Fig. 2 and 3)
• In order to remove the rechargeable battery from
the device, press the interlock button (2) and slide
the battery out (Fig. 2).
• Plug the power cable (9) into the mains socket.
Make sure that the mains voltage cited on the charging station (10) complies with the voltage supplied
by your socket. The green light on the right side of
the changing station would blink.
• Slide the rechargeable battery (5) into the charging
station (10). It can only be inserted in one position
(Fig. 3).
• The battery charging process now begins and is
signalledby the red indicator light on left side of
charging station (10). The 3 green LEDs on battery
(5) light up in turn.
• Once the rechargeable battery has been fully
charged, the indicator light on right side of
charging station (10) turn to green. The charging
process ends automatically. The 3 green LEDs on
battery (5) light up.
• Charging takes approx. 1-1.2 hours. The battery
heats up during the charging process. This is
normal and does not signal a fault. Remove the
rechargeable battery after no more than 5 hours.
Note: Occasionally, the permissible temperature
range may be exceeded during the charging cycle.
In this case, the electronic charging control interrupts
the charging cycle to avoid any damage to the battery.
The read control light will then glow continuously. If
you should witness this, pull the battery from the
charging station and let it cool down for about 30
minutes. Then, restart the charging cycle by sliding
the battery back onto the charging station.
• It is not required to monitor the charging time.
• Pull the plug of the charging unit if it is not in use.
• If the battery is not lit up, check if there is electric
current in the socket. If the charging of the batteries
is not possible, give the battery charger and the
batteries to a service shop.
22

Push the button X to check the charging level (Fig. 3)
The following indications may occur:
• All 3 control lights are glowing: the battery is fully
charged.
•2 control lights are glowing: the charging level is
still acceptable.
•1 control light is glowing: the battery is discharged.
Recharge the battery immediately!
Note! The battery (5) will not reach its full capacity
when charged for the first time. The red light illuminates untill the power cable (9) is disconnected from
the mains. Multiple charging cycles may be required
in order to reach the maximum charge.
Note: The battery is equipped with a deep-discharge
protection feature: the tool is automatically switched
off if the battery is discharged. Recharge the battery
immediately if this should be the case.
Note:
• When charger is connected to mains socket, but
without battery charing, the right side green LED
of the charging station would blink and the left
side red LED extinguish.
• When charging the battery, the left side red LED
of the charger station illuminates (green LED
extinguishs) and the 3 green LED on the battery
light up in turn.
• When the battery is fulled charged, the right side
green LED of the charger station illuminates (red
LED extinguishs) and the 3 green LED on the battery
light up.
• When too high temperature warming, the red and
green LED on the charge station keep illuminates.
• When abnormal situation and charing process is
prohibit, the red and green LED on the charge
station keep blink.
Thermal and voltage protection
If the tool is subject to excessively high loads for an
extended period, the rechargeable battery may switch
off. If this occurs leave the battery to cool down for
approx. 30 minutes.
10. Switching the hedge shears on/off
Insert the charged battery (5) into the hedge trimmer.
The locking latch (2) at the battery must properly lock
in place.
When switching the hedge shears on take a safe stand.
To switch on the hedge shears, press the bar switch
in the handle (3) and the grip switch of the bow-type
handle (1) must be pushed down. To switch off the
device, let go of both switches. The motor already
stops if one of the two switches is released.
(Fig. 4 and 5)
11. Holding the hedge trimmer when in use (Fig. 6)
This equipment will enable you to cut or trim bushes
and hedges easily and comfortably.
1) Trimming of hedges
-Young shoots are best cut in a scythe movement.
- Older and stronger hedges are best cut in a sawing
movement.
- Branches, which are too thick for the hedge
trimmer, should be cut with a saw.
- Sides of hedges should be cut upwards in a taper.
2) In order to achieve an even height
- Fix a guide line at the required height.
- Cut evenly over this guide line.
Take care to have a secure and safe standing position
when working with your hedge shears in order to
avoid slipping and injury. Always keep the shearing
blades away from your body.
12. Maintenance
Always disconnect the plug from the power socket
before commencing any work on the machine.
Important: Always clean and oil the blades after prolonged use of the hedge trimmer. This will greatly affect
the life of the equipment. Damaged cutting units must
be properly repaired immediately. Clean the shearing
blades with a dry cloth or - in case of heavier dirt with a brush. Attention: Danger of injury! Oiling of
the blades should ideally be carried out using an
environmentally friendly lubricant (Fig. 7).
1) Sharpening of the blades
The blades generally do not need servicing and do
not require resharpening if used correctly. In order to
pre- vent injuries caused by the blades when not in
use, the sharpened cutting blade should be covered
by the blade cover. The blades cannot be sharpened
by the user without opening the equipment and the
safety mechanism. Resharpening of the blades can
therefore only be carried out at a specialist workshop.
2) Changing the blades
Only correct installation of the blades will guarantee
problem-free operation and function of the above
mentioned safety feature of the blades. Changing of
the blades should therefore only be carried out at a
specialist workshop.
13. Optimum safety
The 5 special features two-hand safety switch, quick
blade stop, protective cover, blade safety rail and
impact protector are fitted to provide the hedge
trimmer with optimum safety features.
23

Attention!
If you find out that safety functions, such as
the 2-switch mechanism or the safety stop,
are not functioning while working with the
hedge shears, immediately cease working
and take the machine to a specialised shop
for repairing.
1) Two-hand safety switch (Fig. 5)
To switch the hedge shears on the bar switch in the
handle (1) and the grip switch of the bow-type handle
(3) must be pushed down. To switch the device off let
go of both switches. The motor already stops if one of
the two switches is released.
2) Quick blade stop
In order to avoid injuries through cuts, the blade will
stop in max. 1 sec. when one of the two switches is
released.
3) Blade safety rail (Fig. 8)
The cutting blade set back from the blade housing
reduc- es the risk of injuries due to unintentional body
contact. As soon as the hedge trimmer is switched
off, the sharp cutting blades will stop - due to safety
reasons - exactly under the cover rail in order to
reduce the risk of injuries during transport.
4) Impact protector
The extended guide rail prevents unpleasant shocks
(blade recoil) being transmitted to the operator due
to impact with solid objects (wall, ground etc.).
5) Gear protection feature
If solid objecst are caught in the cutting blade and
jam the motor, switch off the machine at once,
disconnect the power plug from the power socket,
remove the object and continue with the work.
The equipment is also fitted with an overload cutout
which protects the gears against mechanical damage
in the event of blade jams.
14. Storing the trimmer after use
The hedge shears must be stored such that there is
no danger of injuries being caused to persons by
the cutting blades!
Important note: The shearing blades should be
cleaned after each use (see also Section
Maintenance).
This will considerably increase the service life of the
device. Please use a lubricator that is not harmful to
the environment, e. g. our service spray. Then put the
shears in their case with the cutting blades first.
15. Spare parts
The following information should be provided when
ordering spare parts:
•Type of machine
• Item number of the machine
16. Repair Service
Repairs to electric power tools should only be carried
out by specialist electrical personnel.
Always keep the original packaging for a possibly
required shipping of the tool.
17. Information for environmental protection/
disposal
Dispose of the machine properly after it is worn out.
Disconnect the mains cable in order to prevent misuse.
Do not dispose of the machine with the household
waste. In the interest of environmental protection, take
it to a collection point for electric machines. Your
responsible local authority can provide you with
addresses and operating times. Also take the
packaging materials and worn out accessories to the
appropriate collection points.
Only for EU countries
Do not discard electric tools in the
household waste!
In accordance with European Directive 2012/19/EC
on waste electrical and electronic equipment and its
implementation in national law, waste electric tools
must be collected separately for environmentallycompatible re-use.
Recycling alternative to the return invitation:
Instead of returning the electric equipment, the owner is
alternatively obligated to take part in the proper recycling
in the case of relinquishment of ownership. The waste
equipment can also be taken to a collection facility which
disposes of it in the sense of the national recycling management and waste acts. This does not pertain to the accessory parts and auxiliary equipment without electrical
components accompanying the waste equipment.
www.verdemax.it
Via Agnoletti, 8 - 42124 Reggio Emilia - Italy
Rama Motori SpA
Made in P.R.C.
24
 Loading...