

Page 1
095209 Wireless Optical Mouse User Manual
Welcome
Thank you for selecting this product! Your RF wireless optical mouse uses a newly developed RF wireless
technology 27MHz that replaces the traditional wired mouse. You can use your wireless optical mouse freely and
improve your efficiency and enjoy your beautiful life from the high technology. The receiver of this mouse can be put
into its transmitter, and it is an outstanding design.
Product Features
1,Radio frequency 27MHz, enjoy your freely wireless space
2, It has 256 ID code, there is no interference even many mice being used at the same time.
3,Automatically save power sleeping functions, battery life be prolonged.
4,5 buttons and free definition functions .
Systems Compatibility
IBM PC and Win 95/98/Me/2000/XP, No need driver
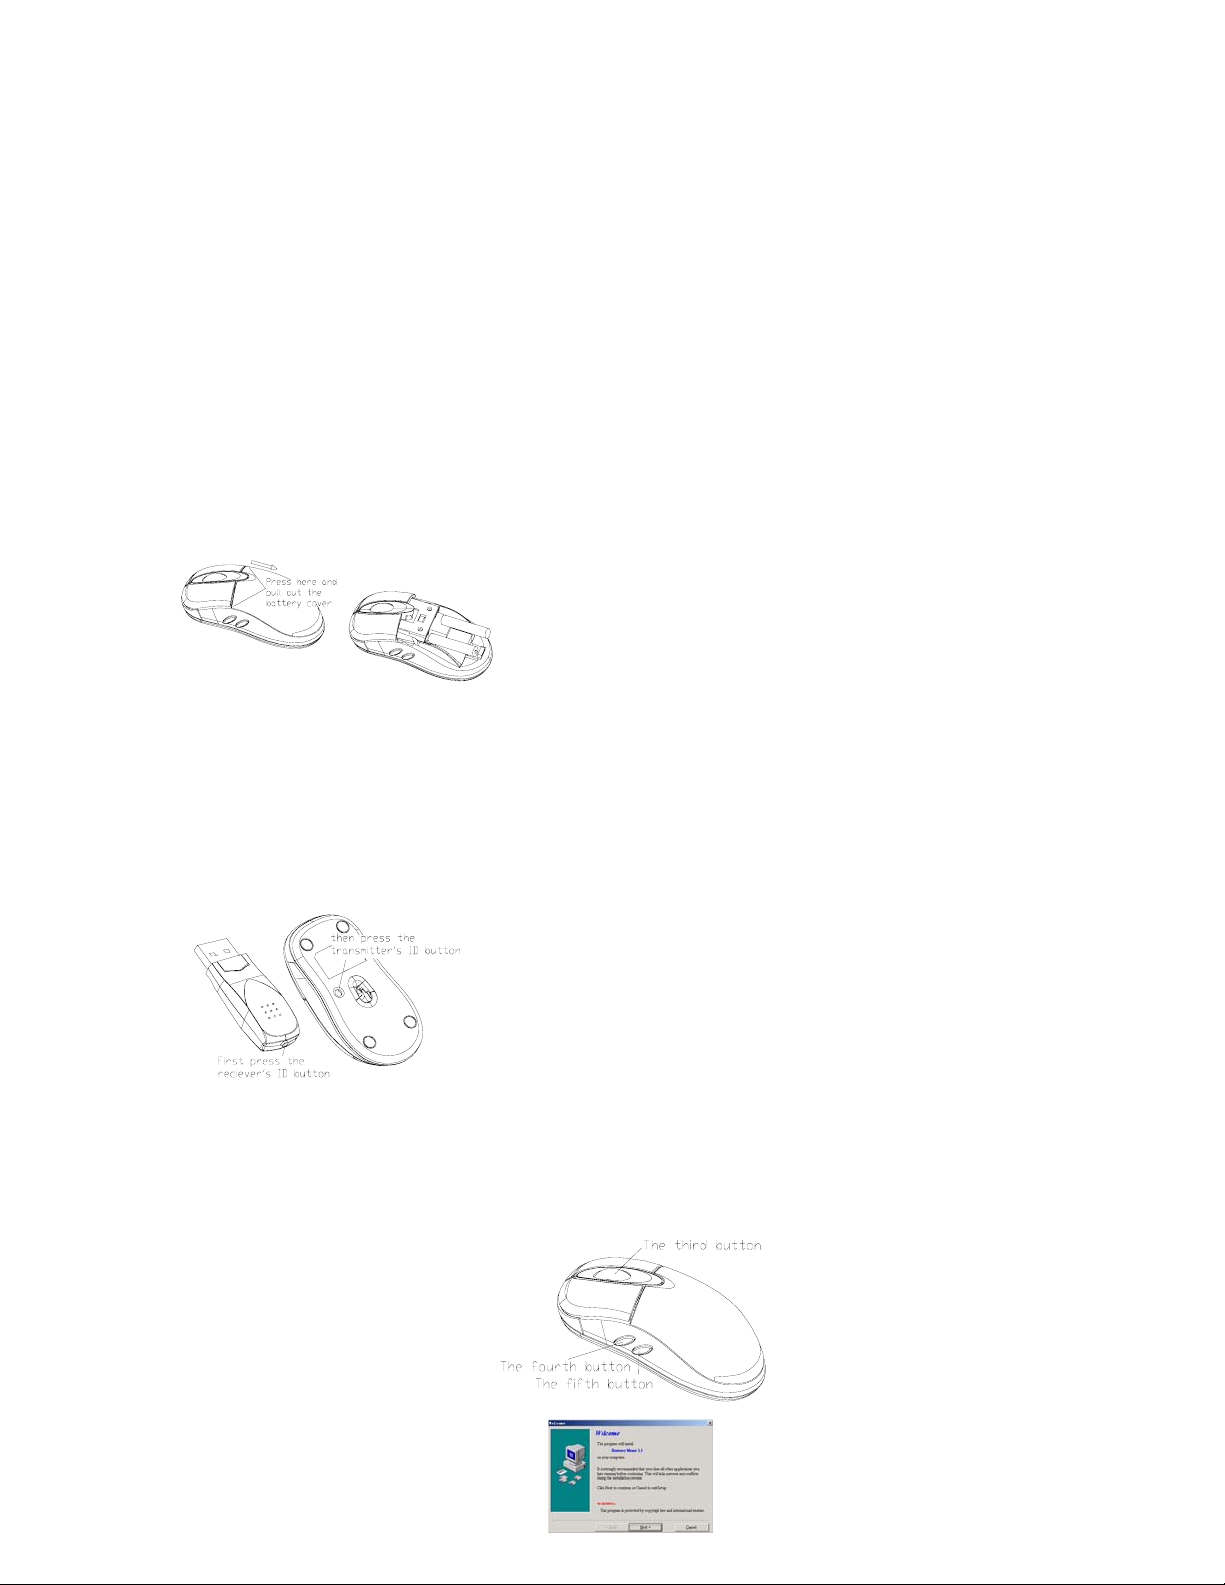
The Steps of Install Battery
1,Please prepare for two PCS new AA alkaline batteries
2,Press the two sides of the mouse transmitter and pull the battery cover rearward (Please see the reference
picture)
3,Please insert the batteries correctly according to the polarity marks of the battery grooves.
4,Pull the battery covers forward, when you hear “crack” sound which shows the battery cover is locked
successfully.。
Receiver Installation
1,please use extended cable, and put the receiver and transmitter on one desktop, in this way, you may have
higher working efficiency.
2, If you use PS/2 connector, please use the USB to PS/2 adaptor and connect with the connector before your
computer start-up For laptop, you may connect the receiver directly with the USB connector.
ID Setup
1,Please move the mouse near to the receiver
2,press the ID button I the front of the receiver,the light of the receiver begains to flicker.
3,Press the ID button of the mouse bottom with some hard and acuate object within 10 seconds, the receiver
light will flash very fast, a few seconds later it will be on which shows it is successfully to finish the digital
transmission between the mouse and the receiver. You may start to use it.
4,Working distance: within 1-2 m.
user-defined buttons
after the installation of drive program,users can self define the buttons freely, as long as to press the button
predefined, we can turn on the preseted function。before use self defined buttons, please install drive program first,
so that we can use software to define functions
Installation of drive program
put the drive program disk into the CD-room,unfold the disk and run the file named setup.exe.The system will run
3 4
files automatically and appear the picture below
Page 2

click “next” button
choose “5 Button Mouse” and click the “next” button
5 6
the system requires the address of installation,we can choose windows default and then click “next” button
system requires the catalog of installation,click “next” to use the windows default
information of copy files appears,click “next” to copy files
when copy finished,system requires to restart PC.choose “finish” and PC begines to restart
settings of self-defined buttons
after PC restarted,there is a
icon appeared in taskbar,double click this icon and enter the picture of
self-definition for scroll wheel and buttons
7 8
as this picture show,the upside is for setting mode of scroll wheel,the underside is for setting speed of scroll
wheel
System default(Intelli-Mouse) mode
Enhanced scroll mode
Scroll ** lines per scroll unit
Scroll one page scroll unit
Click “button setting”and enter the picture below
in this setting,the third,forth,fifth buttons can be defined freely,click the little triangle at the right side can select
functions below
Auto scroll
Back space
Close Application
Connect To Internet
Control Lock
Page 3

Control Panel
Copy
Cut
Delete
Double click
Down
Drag Lock
End
Enter
Esc
Explorer
F1~F10
Find computer
Find File
Home
Horizontal wheel
Internet Explorer Backward
Internet Explorer forward
Launch Default Browser
Launch Default E-mail
Left
Maximize Window
Middle Button
Minimize All Windows
Minimize windows
Page Down
Page Up
10
Paste
Redo
Right
Run
9
Shift Lock
Space
Start Menu
System Default
System Help
System Property
Tab
Undo
Undo Minimize All Windows
Universal Scroll
Universal Zoom
Up
Attention Please
1, Please don’t make the mouse far away from the receiver in order to work more smoothly.
2, You’d better use the mouse on the white desk, in this way the batteries can be used longer time. Please
remove the batteries if the mouse will not be used for a long time.
3, This mouse with save power sleeping functions, please press any key or scroll the wheel to wake up the
mouse when it is sleeping.
4, you want to take off the mouse power, please continue to press the ID switch of the mouse bottom over 3
seconds. If you want to take on the power, please click the ID switch once again.
5,The optical mouse will not work freely on a smooth desk ,glass, any reflecting surface, 3D mouse pad.
6,No need to check the digital connection within 10 seconds when change the batteries, if more than that please
according to the above way to re-operate.
Caution
Any changes or modifications not expressly approved by the party responsible for compliance could void the
user's authority to operate the equipment.
Note
This equipment has been tested and found to comply with the limits for a Class B digital device, pursuant to part
15 of the FCC Rules. These limits are designed to provide reasonable protection against harmful interference in
a residential installation. This equipment generates, uses and can radiate radio frequency energy and, if not
installed and used in accordance with the instructions, may cause harmful interfer- ence to radio communications. However, there is no guarantee that interference will not occur in a particular installation. If this
equipment does cause harmful interference to radio or television reception, which can be determined by turning
the equipment off and on, the user is encouraged to try to correct the interference by one or more of the following
measures:
--Reorient or relocate the receiving antenna.
--Increase the separation between the equipment and receiver.
--Connect the equipment into an outlet on a circuit different from that to which the receiver is connected.
--Consult the dealer or an experienced radio/TV technician for help.
This device complies with Part 15 of the FCC Rules. Operation is subject to the following two conditions: (1)
this device may not cause harmful interference, and (2) this device must accept any interference received, including
interference that may cause undesired operation.
 Loading...