

Inclusion and Exclusion
Your VeraEdge Controller can work with all
Z-Wave devices, such as sensors, alarms,
door locks, thermostats, etc. Over a thousand Z-Wave devices are available from
many brands. (Z-Wave is a wireless communications system; check the package or
specs to see if a device uses Z-Wave.) Before
VeraEdge can control a device, it must be
included into the Vera system.
Vera Custom Device Wizards are available
for select devices that pass stringent Vera
Labs testing for compatibility and quality.
The Custom Device Wizards make Inclusion/
Exclusion easiest, with specific details for
each device.
A list of these devices is available and
updated at http://getvera.com/compatibility/
For all other Z-Wave devices, a
Generic Device Wizard is used for Inclusion/Exclusion. A Generic Device Wizard is
available for each device category (thermostats, sensors, alarms, etc.)
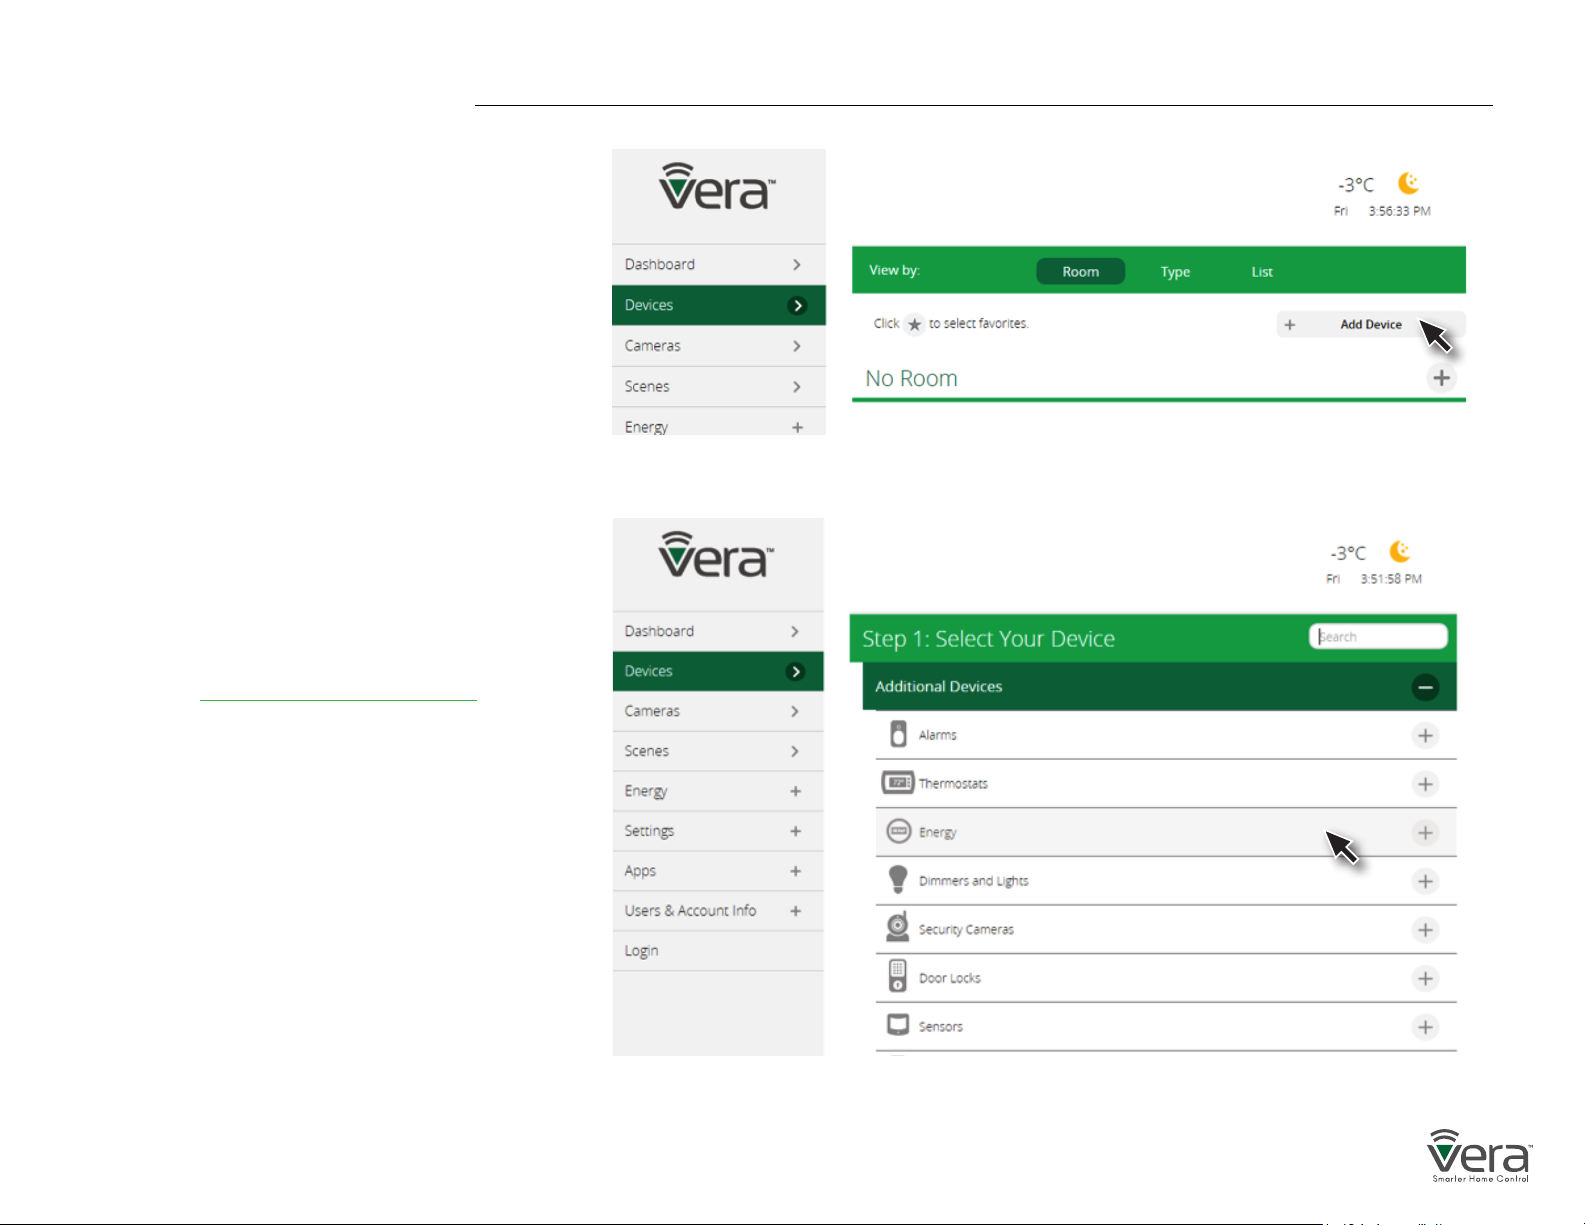
To get started, after setting up your
VeraEdge Controller, use the Vera UI to
select Devices and then Add Device
(Figures 1-1 & 1-2).
Figure 1-1: Add Device
Figure 1-2: Device Paring menu
Inclusion/Exclusion for Devices with Vera Custom
Step 1
Select Devices and click on the
Add Device option.
After adding a new device, the VeraEdge Controller will ask you to name it and choose the room it is (or will be) located in.
Note: If the device was previously included with a different Z-Wave system, you’ll need to it exclude it before adding with your VeraEdge.
(You may also need to do this if you have problems Inclusion/Exclusion the first time.) Press the Retry button to start the exclusion process. Once the device is excluded, add it by following the inclusion steps.
Step 2
Click on the “+” sign for the device’s category.
A list of Vera Custom Device Wizards is
displayed. Select a device to include.
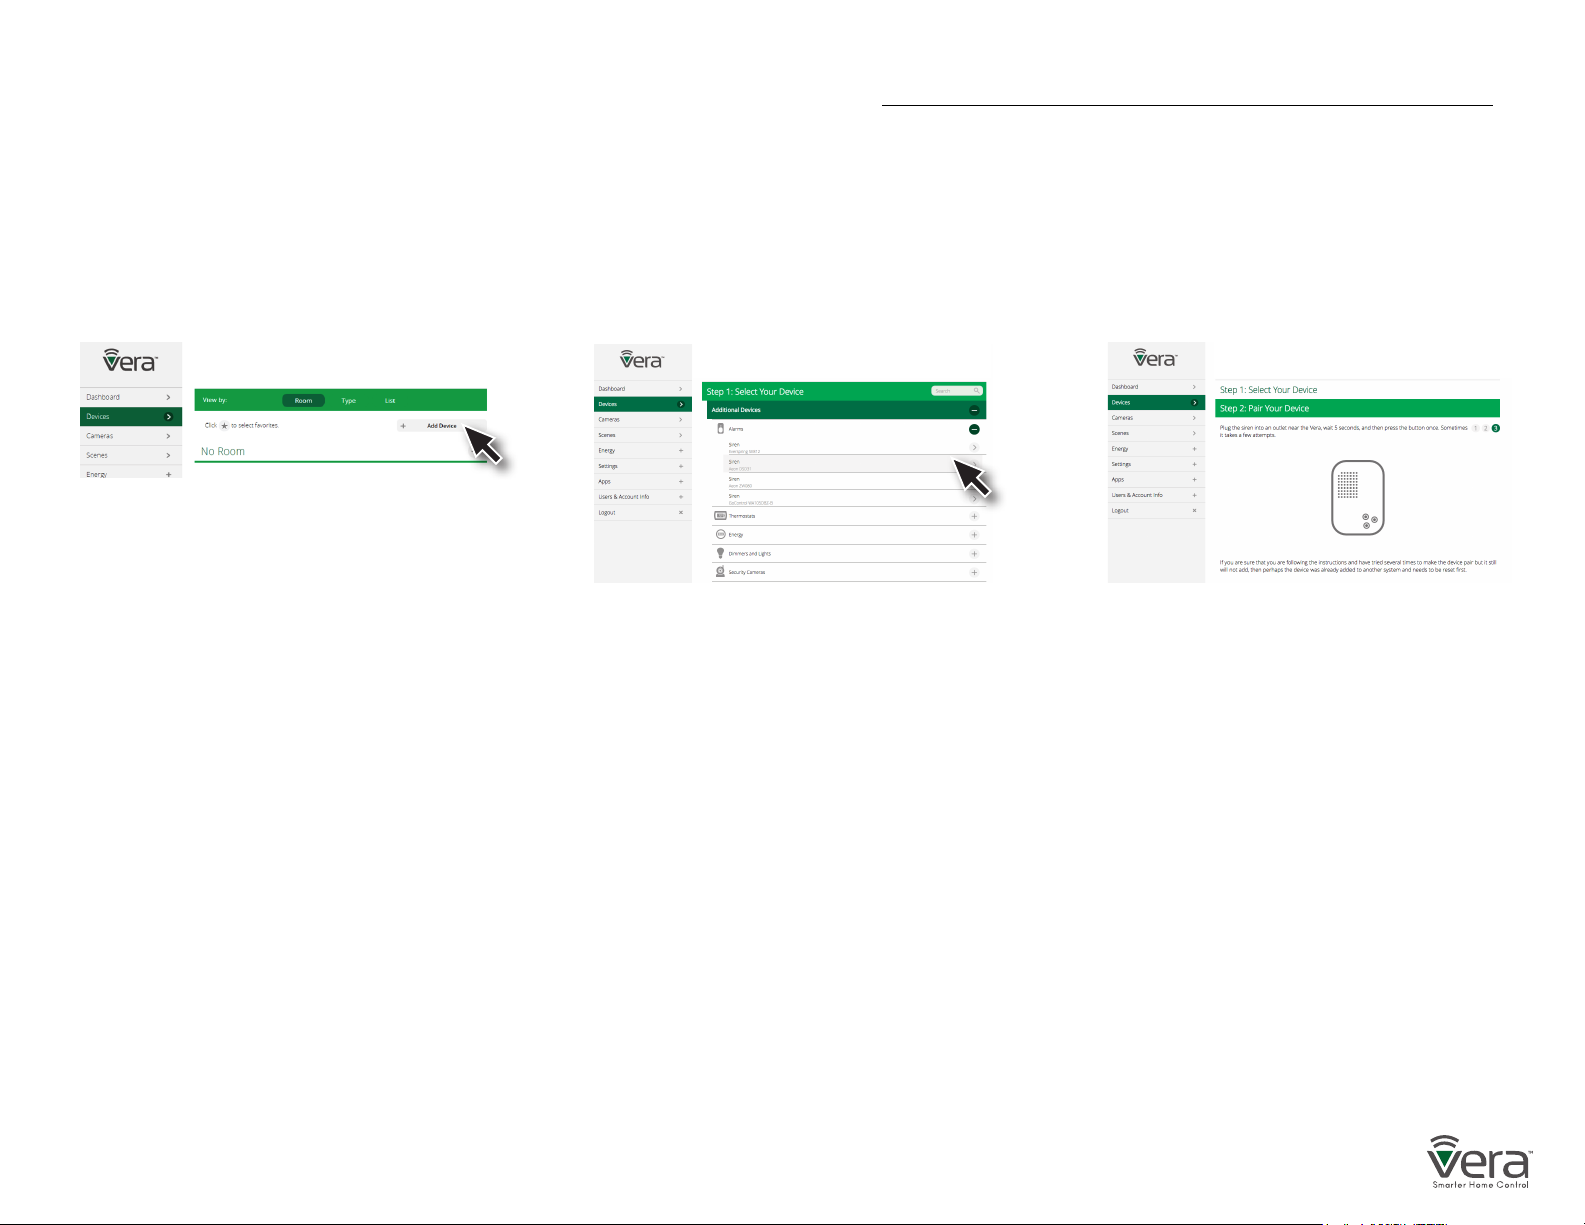
Step 3
Follow the steps in the Device Wizard
to add the device.

Inclusion/Exclusion for Devices using a Generic Device Wizard
Step 1
Select Devices and click on the
Add Device option.
After adding a new device, the VeraEdge Controller will ask you to name it and choose the room it is (or will be) located in.
Note: If the device was previously included with a different Z-Wave system, you’ll need to it exclude it before adding with your VeraEdge.
(You may also need to do this if you have problems Inclusion/Exclusion the first time.) Press the Retry button to start the exclusion process. Once the device is excluded, add it by following the inclusion steps.
Step 2
Click on the “+” sign for the device’s category.
A list of Vera Custom Device Wizards is displayed. If your specific device is not shown,
select the “Generic Device” option.
Step 3
Follow the steps in the Device Wizard
to add the device.

VeraEdge Buttons
A
Sync Button
To carry out a manual setup of devices, tap the Sync button on the
controller. To exit the inclusion mode on the controller, tap the
Sync button again. To exclude a Z-Wave product from the network,
hold the Sync button down for 3 seconds. (Figure 2-1)
B
WPS Button
Easy push button inclusion for Wi-Fi devices. (Figure 2-1)
C
Reset Button
The Vera Edge controllers can be reset to factory defaults by
holding the reset button for 20 seconds and releasing it. This will
reset the Z-Wave network and change it’s House ID, and clear your
account and user configuration data from your controller.
The account will only be removed from the controller, but it will
continue to be in the database.
Holding the reset button for 10 seconds will reset the network
configuration settings to defaults, while keeping your other
settings intact. (Figure 2-1)
A B C
Figure 2-1: VeraEdge Left Side
Note: Please use this procedure only in the event that the system
primary controller is missing or otherwise inoperable.

Advanced Z-Wave Functions
These Advanced Z-Wave Functions are usually needed only for
specific (and rare) technical situations, or for professional installers
creating very large systems, or for developers creating new hardware
or software.
You may need to access these advanced functions if there’s a problem with your system and you need to reset the Z-Wave network, if
you want to upgrade to a different model of Vera Controller, to enable
another controller to operate your VeraEdge, or for other technical
situations as described below.
To access Advanced Z-Wave Functions select Settings and then
Z-Wave Settings. Select the Advanced tab (Figure 3-1).
From there you’ll be able to access these Advanced Z-Wave options:
A
Reset Z-Wave network
Will clear all the user configuration data and assign a new
Z-Wave HouseID.
A
B
C
Figure 3-1: Advanced Tab
B
Copy Z-Wave network from a primary controller
Will allow the unit to copy all Z-Wave related information from
a Primary Z-Wave Controller and is used with Replication.
C
Controller shift
Tells Vera to transfer the role of primary controller to another
Z-Wave controller. The other Z-Wave controller will become the
‘Master controller’, and Vera will be a secondary controller. This
means the other Z-Wave controller will then be responsible for
healing the networking and being the SIS/SUC (a technical
Z-Wave term). Normally, by default, Vera is the master
controller and is SIS/SUC.

Advanced Z-Wave Functions
D
Reset the Z-Wave chip
This option will re-initialize the Z-Wave chip.
E
Get network update from SUC/SIS
This option will update the slave controller network from the
primary controller to which it’s currently added. This option is
used when Vera is a secondary controller.
F
Backup Z-Wave Network
VeraEdge has the ability to back up its Z-Wave network and its
configuration settings to be restored on another gateway.
This procedure is explained on the page below:
http://support.getvera.com/customer/portal/articles/2345058
Learn Mode
Include your controller into an existing Z-Wave network.
Steps for VeraEdge controller using the web interface.
D
E
F
Figure 3-1: Advanced Tab
Click on Settings > Z-Wave Settings > Advanced > Select
‘Copy Z-Wave network from a primary controller’
This will put the controller into learn mode and shift it to a secondary role. The controller can now receive data from a primary
device in the network and associate with other devices in the
Z-Wave network via the primary controller.
Replication
Include another controller and transfer the Z-Wave network
data to it. Steps for VeraEdge controller using the web interface.
Click on Settings > Z-Wave Settings > Advanced > Select ‘Controller Shift’
All the Z-Wave devices will be replicated into the new controller.
This is used to transfer data from one controller to another.
With replication the new controller becomes primary.

Advanced Z-Wave Functions
Basic Command Class Handling
The basic command class is controlled by Vera and it is not mapped
to any other Z-Wave Command Class.
More details can be found on our wiki page.
http://wiki.mios.com/index.php/ZWave_Basic_Command_Class_Mapping
Support for Association Command Class
VeraEdge has support for the Lifeline association command class.
group id: 1 - lifeline
number of nodes in group: 1
More details can be found on our wiki page.
http://wiki.mios.com/index.php/Association
Support for Multiple Manufacturers in The Same Network
The controller can be included and operated in any Z-Wave network
with other certified Z-Wave devices from other manufacturers and/or
other applications. All non-battery operated nodes within the network
will act as repeaters regardless of the vendor to increase the reliability
of the network.
Support for sending Z-Wave Commands
Z-Wave commands can be sent using the Vera API which will allow
you to send HTTP requests with the specified command class to the
specified node.
More details can be found on our wiki page.
http://wiki.mios.com/index.php/Luup_UPnP_Variables_and_Actions#
ZWaveNetwork1
To send a Z-Wave command you’ll need to add the node id of the
controlled Z-Wave device and the command class used.
For example to control node 3 and send a BASIC_SET with a value
of 00, the command will be :
http://GATEWAY_IP/port_3480/data_request?id=
action&DeviceNum=1&serviceId=urn:
micasaverde-com:serviceId:ZWaveNetwork1&action=
SendData&Node=3&Data=0x20-0x01-0x00
GATEWAY_IP is the actual local IP address of the unit.
Node is the Z-Wave node the command is sent to.
Data will contain the Z-Wave Command Class sent to the device.

VeraEdge
Congratulations!
Welcome to Vera Smarter Home Control.
The VeraEdge Controller provides entry to
a world of convenience & peace of mind.
In this package you'll find:
Detail Views
Home Controller
VeraEdge Controller AC Power Adapter Ethernet Cable
Back Side
Power Ethernet USB
Sync WPS

Installation
For Additional Help, Visit
support.getvera.com
+1 (866)-966-2272
support@getvera.com
QSG-VERAEDGEV1
Firmly connect the provided Ethernet Cable from your
1
VeraEdge to your Wi-Fi router (or other Internet source).
Firmly connect the AC Power Adapter to VeraEdge
2
and plug in to an AC outlet. VeraEdge has no on/off switch,
it will power up as soon as you plug in the AC adapter.
2
1
To setup your controller, go to home.getvera.com
3
If you are a new Vera user, click
“I have a new gateway to setup!”
at the bottom of the screen.
Then select your Controller from
the pull-down menu.
If you already have an account,
please login. Then click
“Add another controller”
on the next screen. Select your
Controller from the pull-down menu.
Follow the Setup Instructions.
 Loading...