

Page 1

VeraSecure
Advanced Smart Home Security Controller
Page 2
Congratulations!
Welcome to Vera Smarter Home Control. The VeraSecure
Advanced Smart Home Security Controller provides security you can
count on, plus safety and convenience.
Page 3
What’s In The Box
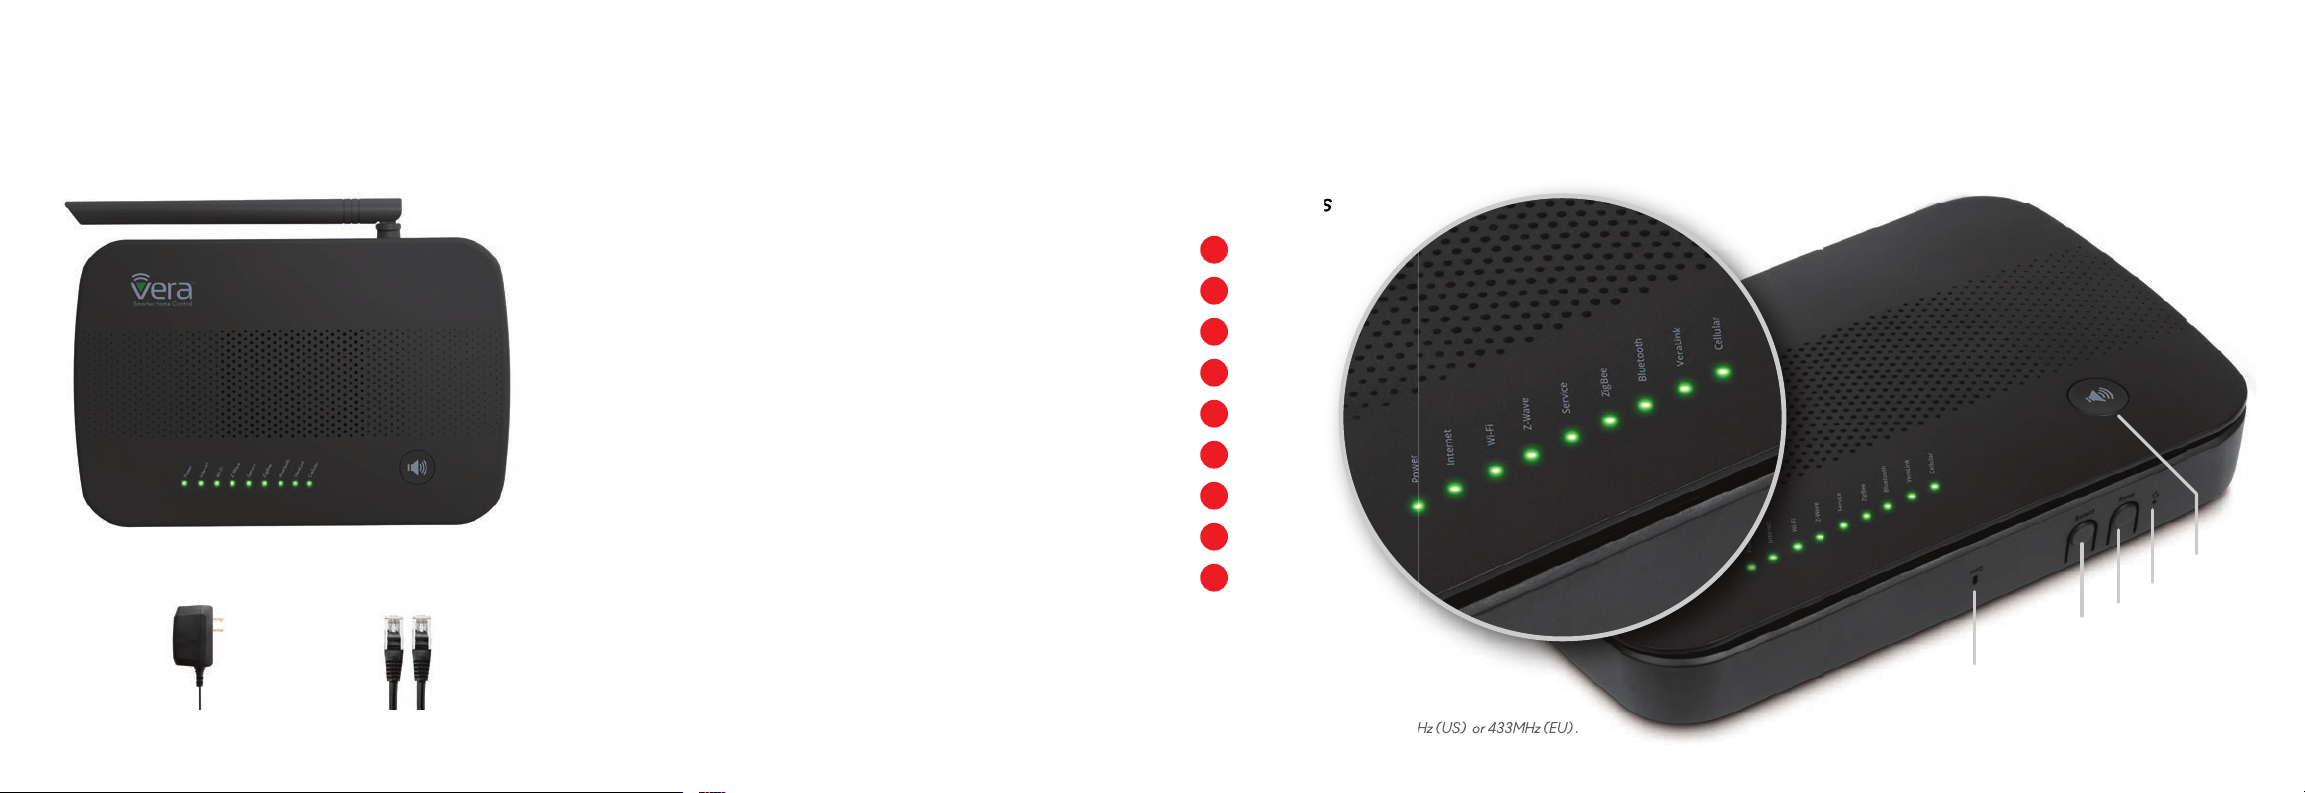
VeraSecure Controller
AC Power Adapter Ethernet Cable
Controller Features
2-Way Audio Button
Press to activate 2-way audio intercom to speak with emergency
dispatch (requires optional monitoring service.)
Siren
Automatically emits a piercing alarm if there’s a security breach.
Microphone
Enables hearing what’s going on in your home from anywhere,
via the Vera app.
Battery Backup
If AC power goes out, this built-in Backup Battery will continue to
power VeraSecure for up to 8 hours to keep your home protected.
3G Cellular
If Internet goes out, the cellular data backup connection enables
VeraSecure to continue sending emergency alerts, notifications,
and also change home modes.
Antenna
External antenna extends the range of 345 (US)
or 433 (EU) MHz protocol.
For more information on these controller features go to:
www.getvera.com/controllers/verasecure
LED Names
1
Power
2
Internet
3
Wi-Fi
4
Z-Wave
5
Service
6
ZigBee
7
Bluetooth
8
VeraLink*
Cellular
9
* VeraLink Protocol is either 345MHz (US) or 433MHz (EU) .
2-Way Audio
Reset
Sync
Select
Mic
Page 4
Installation
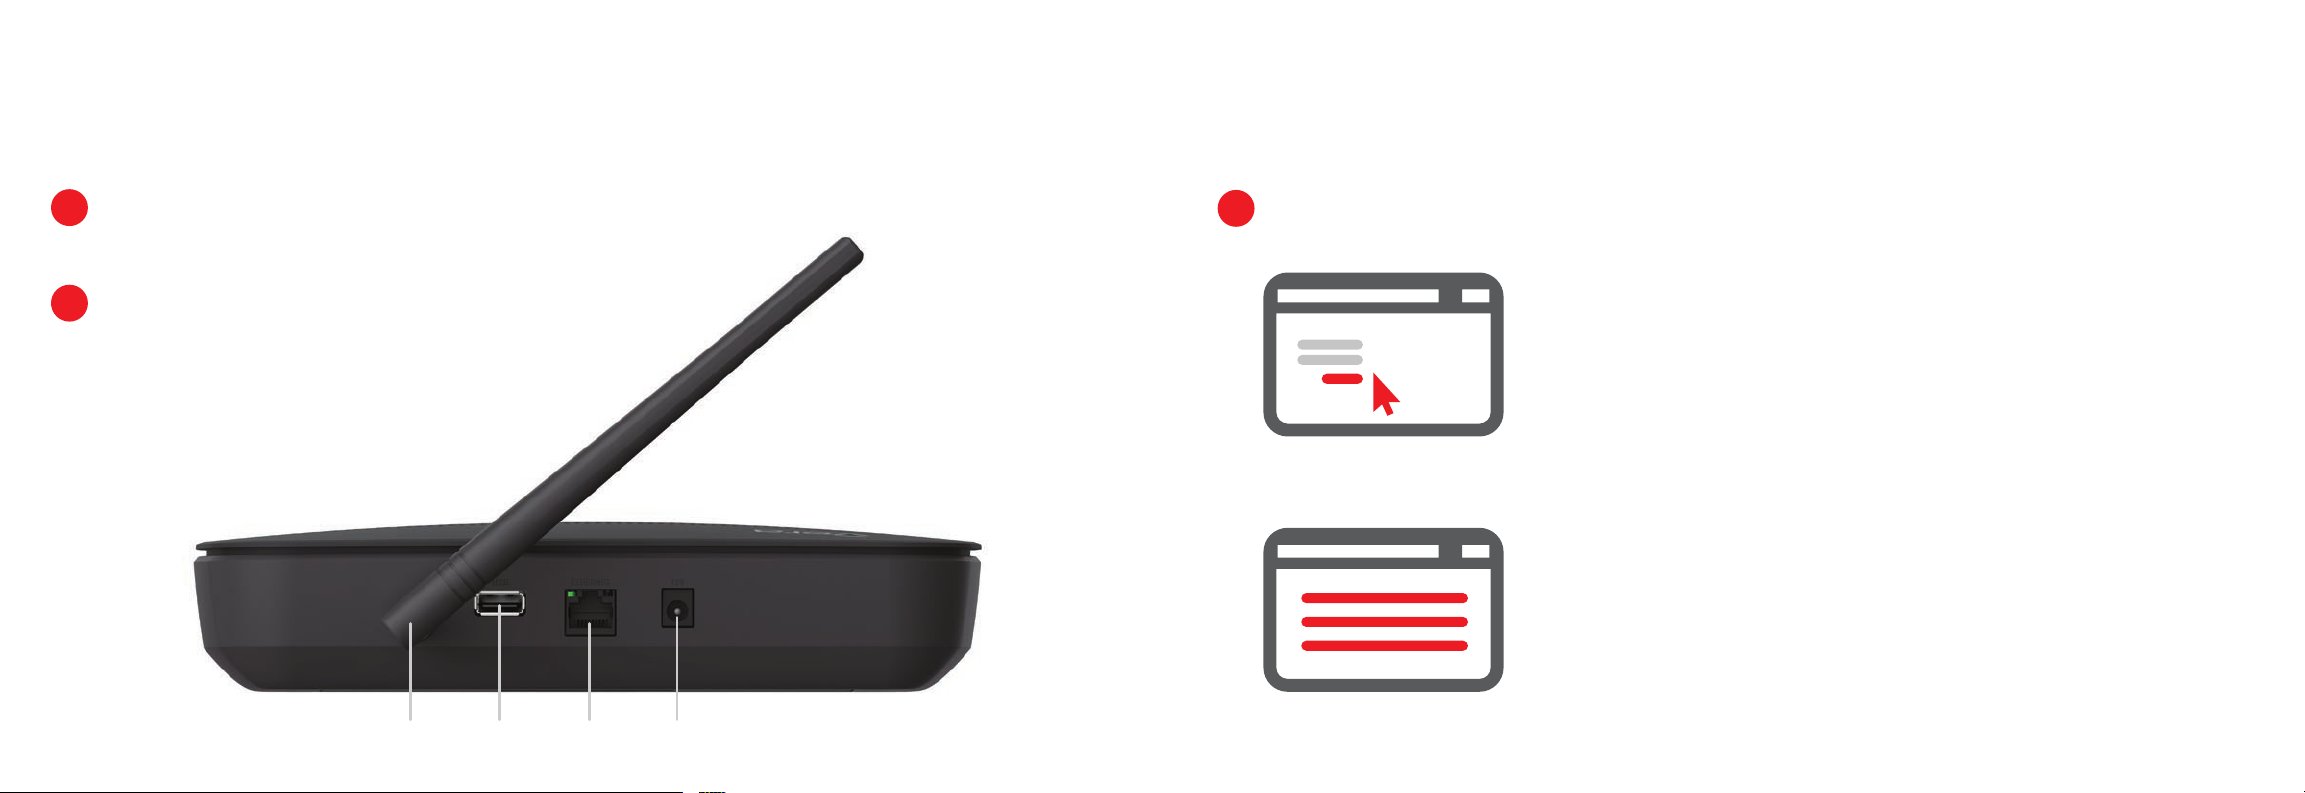
1
Firmly connect the provided Ethernet Cable from your
VeraSecure to your Wi-Fi router (or other Internet source).
2
Firmly connect the AC Power Adapter to VeraSecure
and plug it into an AC outlet. VeraSecure has no on/off
switch. It will power up as soon as you plug in
the AC adapter.
3
To setup your controller, go to http://home.getvera.com
If you are a new user, click the “I have a new controller”
button on the screen. Agree to the terms and conditions.
Then select your Controller.
If you already have an account, please login.
Click the “Add another controller” button.
Then select your Controller.
Follow the Setup Instructions.
USBAntenna Ethernet Power
Page 5

Overview
There are over two thousand devices that can work with VeraSecure.
VeraSecure Home Controller is the central hub for creating security or
smart home scenes. Scenes give you the power to simply and easily customize
your Vera controller to work with devices exactly the way you want.
Combine devices such as cameras, lighting and sensors
to personalize your system’s scenes.
Page 6
| Device Types
SECURITY DEVICES
They are always on and monitoring your home. However, your VeraSecure
system will only report a breach if the sensor is in the “Armed” status. Normally,
these sensors are “Armed” in Night, Away and Vacation modes as default
settings. (You may change these defaults in the Settings section of the
Vera dashboard app.)
Wi-Fi Cameras (Indoor & Outdoor)
Door / Window Sensors
Motion Detectors
Glass Break Sensors
Outdoor Alarm
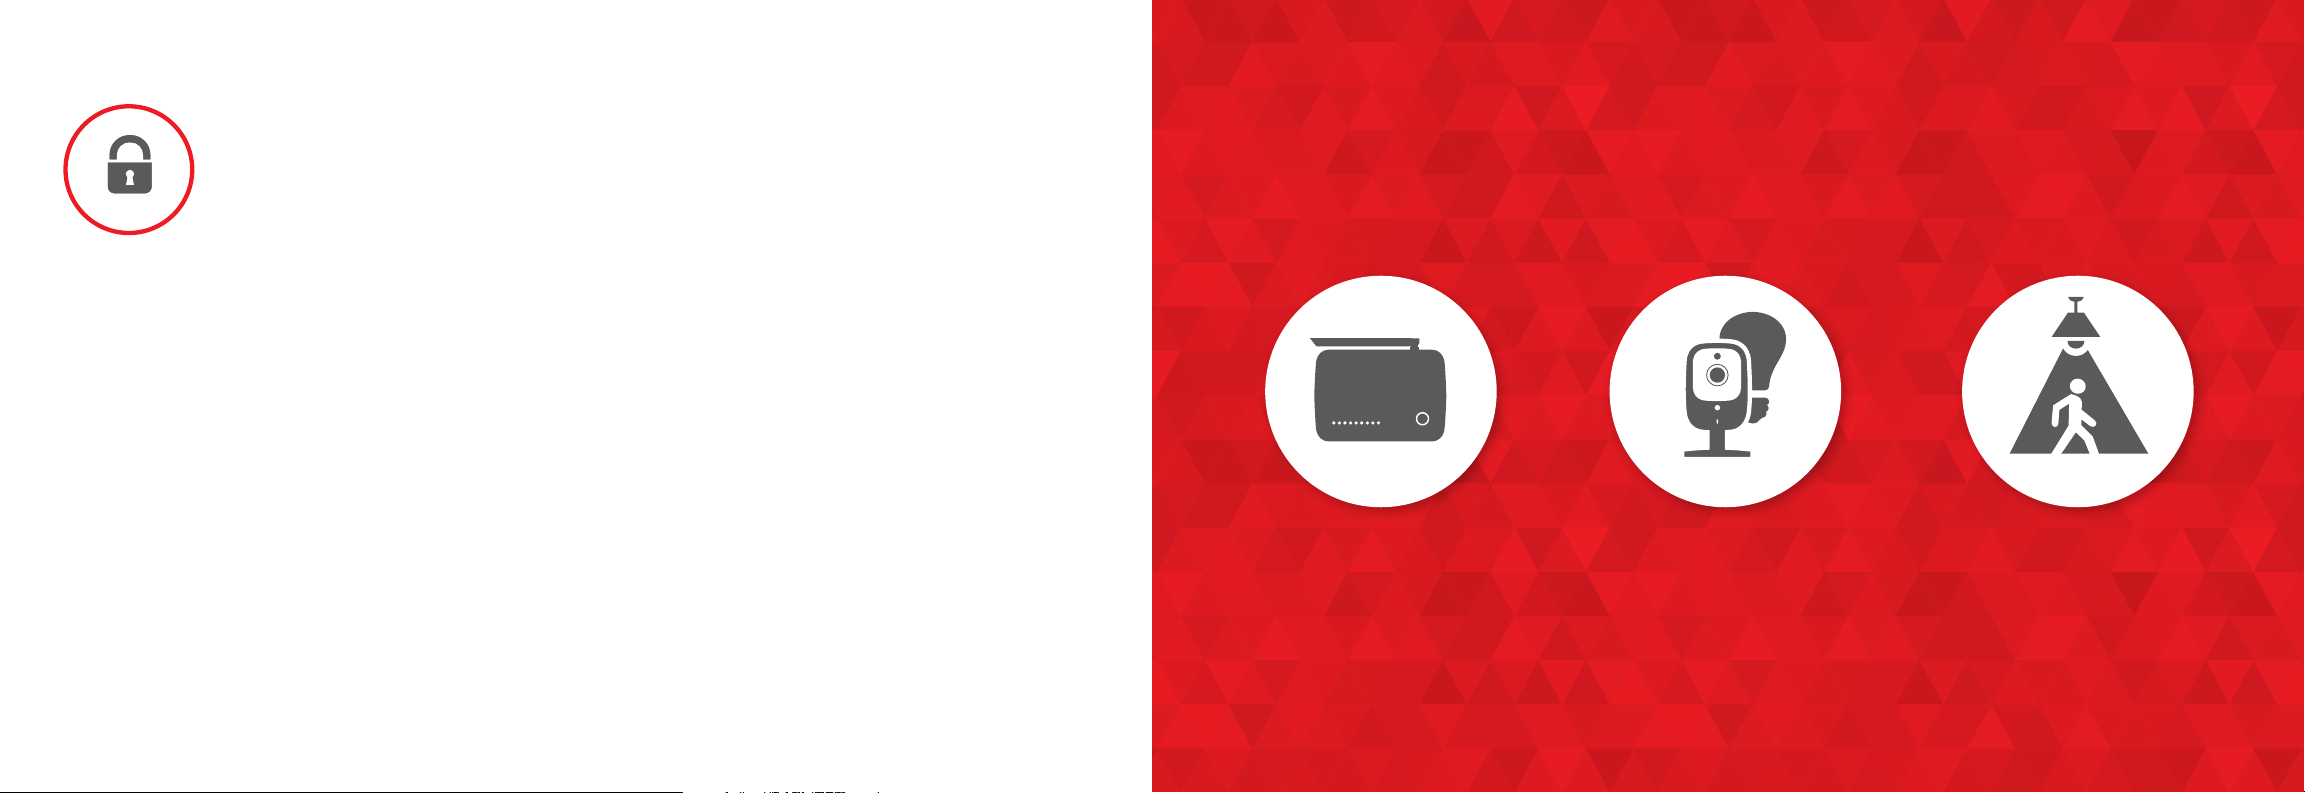
Help Scare Away Intruders
=+
Vera Controller
Wi-Fi Camera with
Motion Detection
Automatic light and alarm
sounds with recording
Go to www.getvera.com/scenes for more ideas
Page 7
SAFETY DEVICES
Find Out Instantly When
Use these for home protection and peace of mind even when away from home.
Safety devices are always active and “Armed” regardless of which mode your
VeraSecure system is in. If a problem arises, you need to know about it,
regardless of whether you’re home, away, asleep or on vacation.
Smoke Detectors
Carbon Monoxide Detectors
Flood Sensor
Temperature & Humidity Sensors
Problems Occur
=+
Vera Controller Flood Sensor You’re notified when a
water leak is detected
Go to www.getvera.com/scenes for more ideas
Page 8
CONVENIENCE & LIFESTYLE DEVICES
Warm Or Cool Your House
Use these devices to save energy and money. Eliminate the repetitive tasks in
your life like turning lights off, adjusting the thermostat, double checking to make
sure the garage door is closed or the daily adjustments of window coverings.
Thermostats
Door Locks
Light Dimmers & Switches
Garage Door Openers
Temperature & Humidity Sensors
Light Sensors
Lawn Sprinklers
Window Curtains
HVAC Vents
Room Air Conditioners
While You’re Driving Home
=+
Vera Controller
Z-Wave Thermostat
Go to www.getvera.com/scenes for more ideas
Always the perfect
temperature when
you arrive!
72°
Page 9
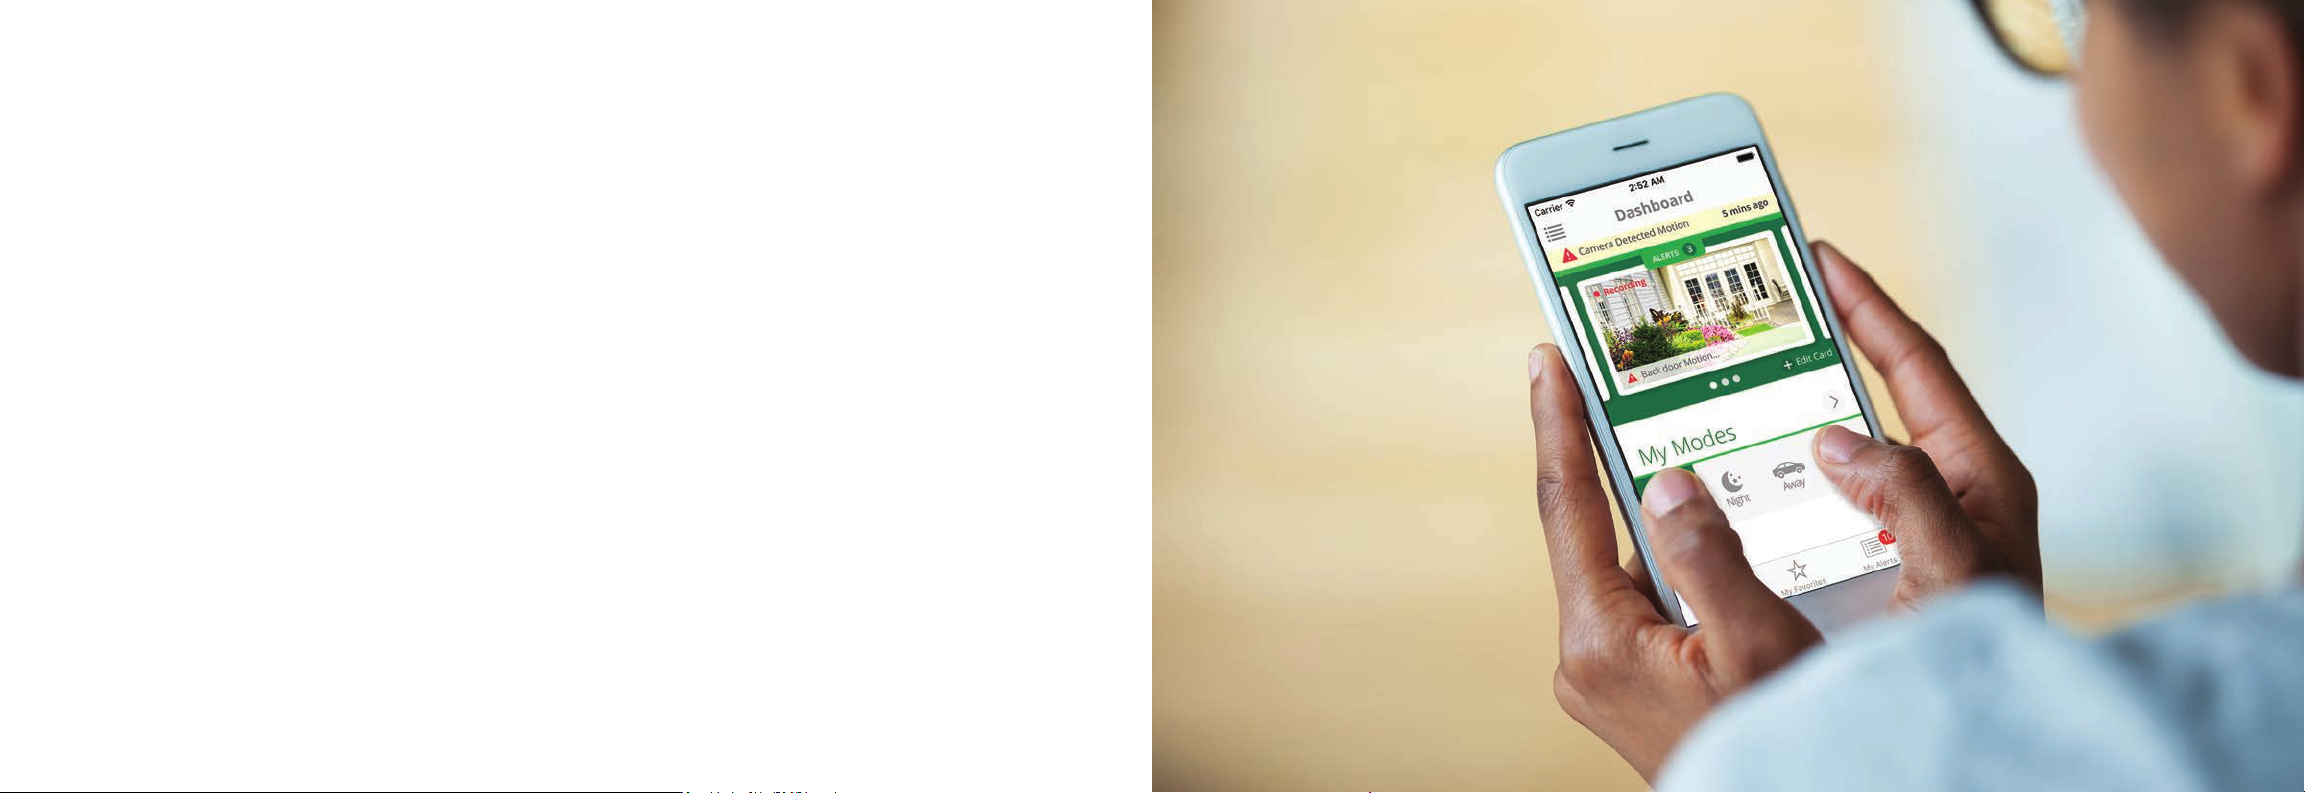
Vera App
The Vera App controls your entire VeraSecure system, including
all the devices working individually or together. Even if a device has its own app,
you won’t need it—use the Vera app instead.
The free Vera app runs on smartphones (iOS and Android), tablets, or in
a browser on any Windows, Mac, Chromebook or Linux computer. You don’t
have to choose between them—use your computer when home and your
smartphone when away. VeraSecure will continue running 24/7 to monitor
your home, regardless of whether you have the app open.
Page 10
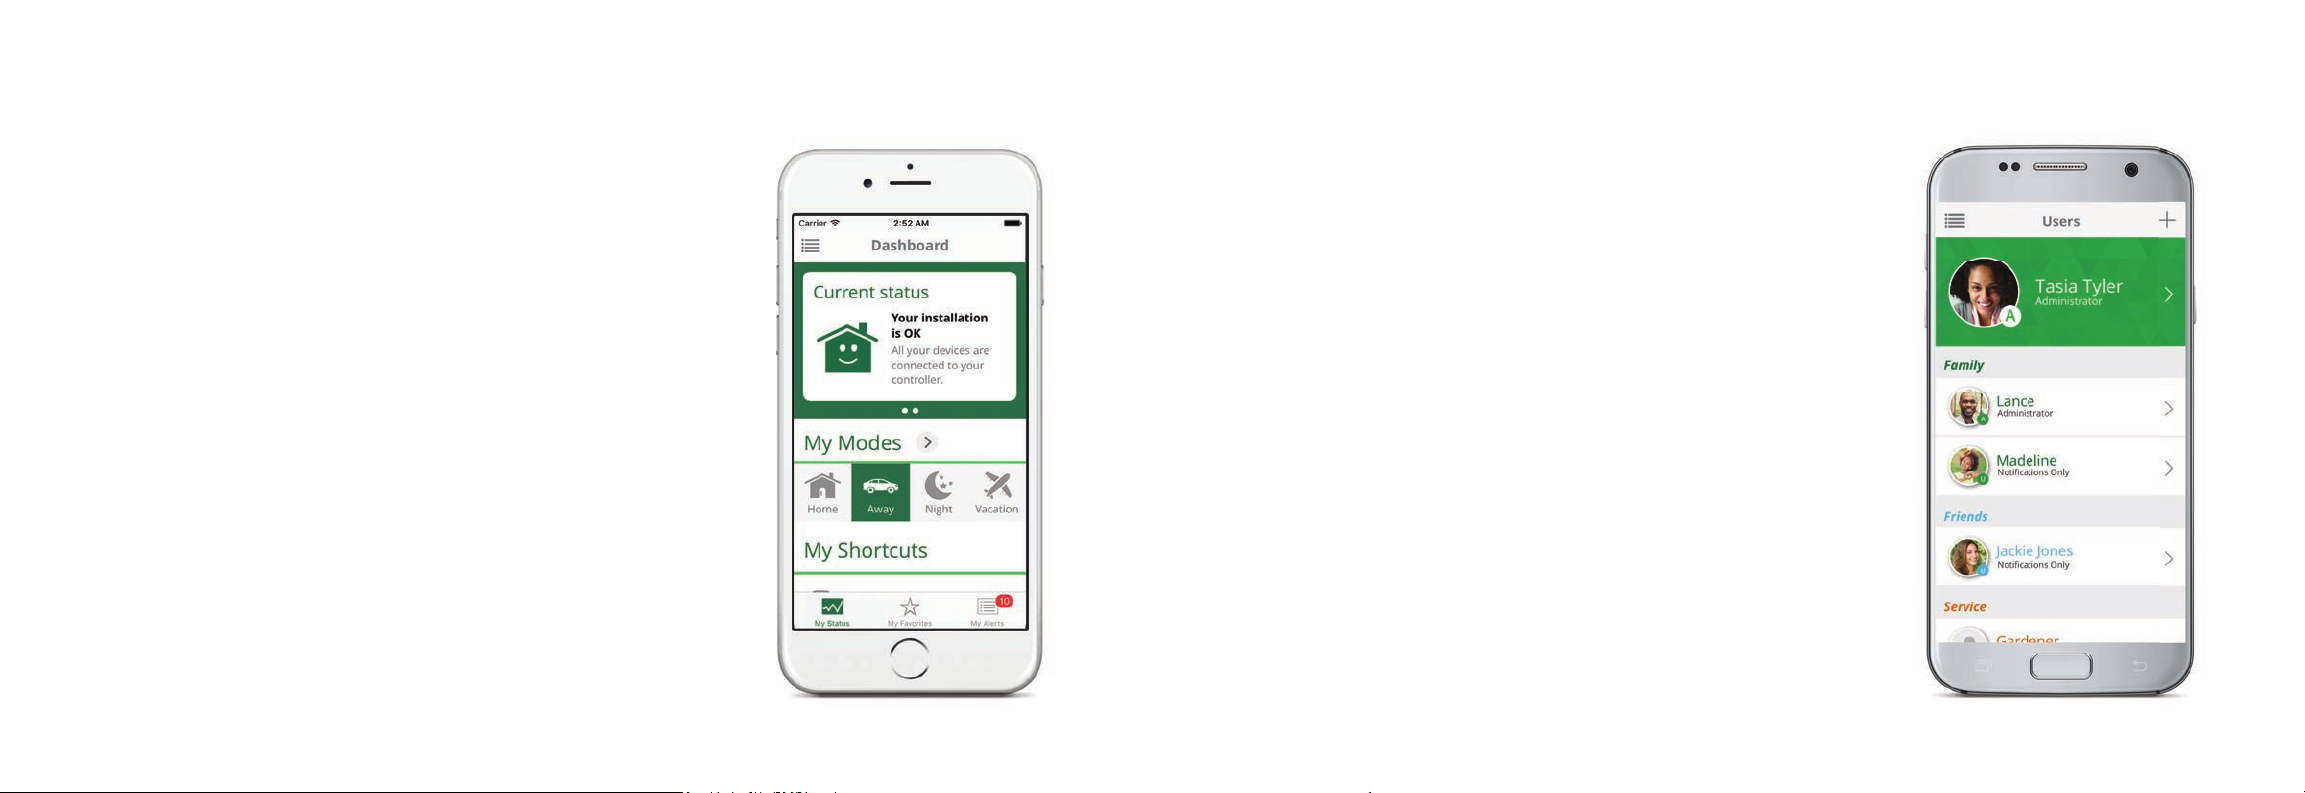
KEY FEATURES OF VERA APP
| Modes | Users
Modes are a powerful feature that lets you control all
your devices at once. There are 4 Modes—Home, Away,
Night and Vacation. You can customize how
each Mode works.
Your Vera system can have as many users as you like.
Everyone in your family, or everyone who works in your
small business can have a different username and
password. The Vera app lets you set permissions
and notifications for each user.
| Cards | Notifications
The Current Status Card displays at the top of the
Dashboard and offers a quick check of overall
Vera system status. You don’t have to check each
window sensor to know that all windows are closed
and the alarm system is “Armed”, for example.
Your Vera system can send you a text or email alert to
notify you (and other users) of just about anything that
happens in the system, such as when a door or window
opens, a motion detector trips, someone unlocks the
door, a smoke detector trips, and much more!
For more information on setting up notifications, go to:
http://support.getvera.com
Page 11
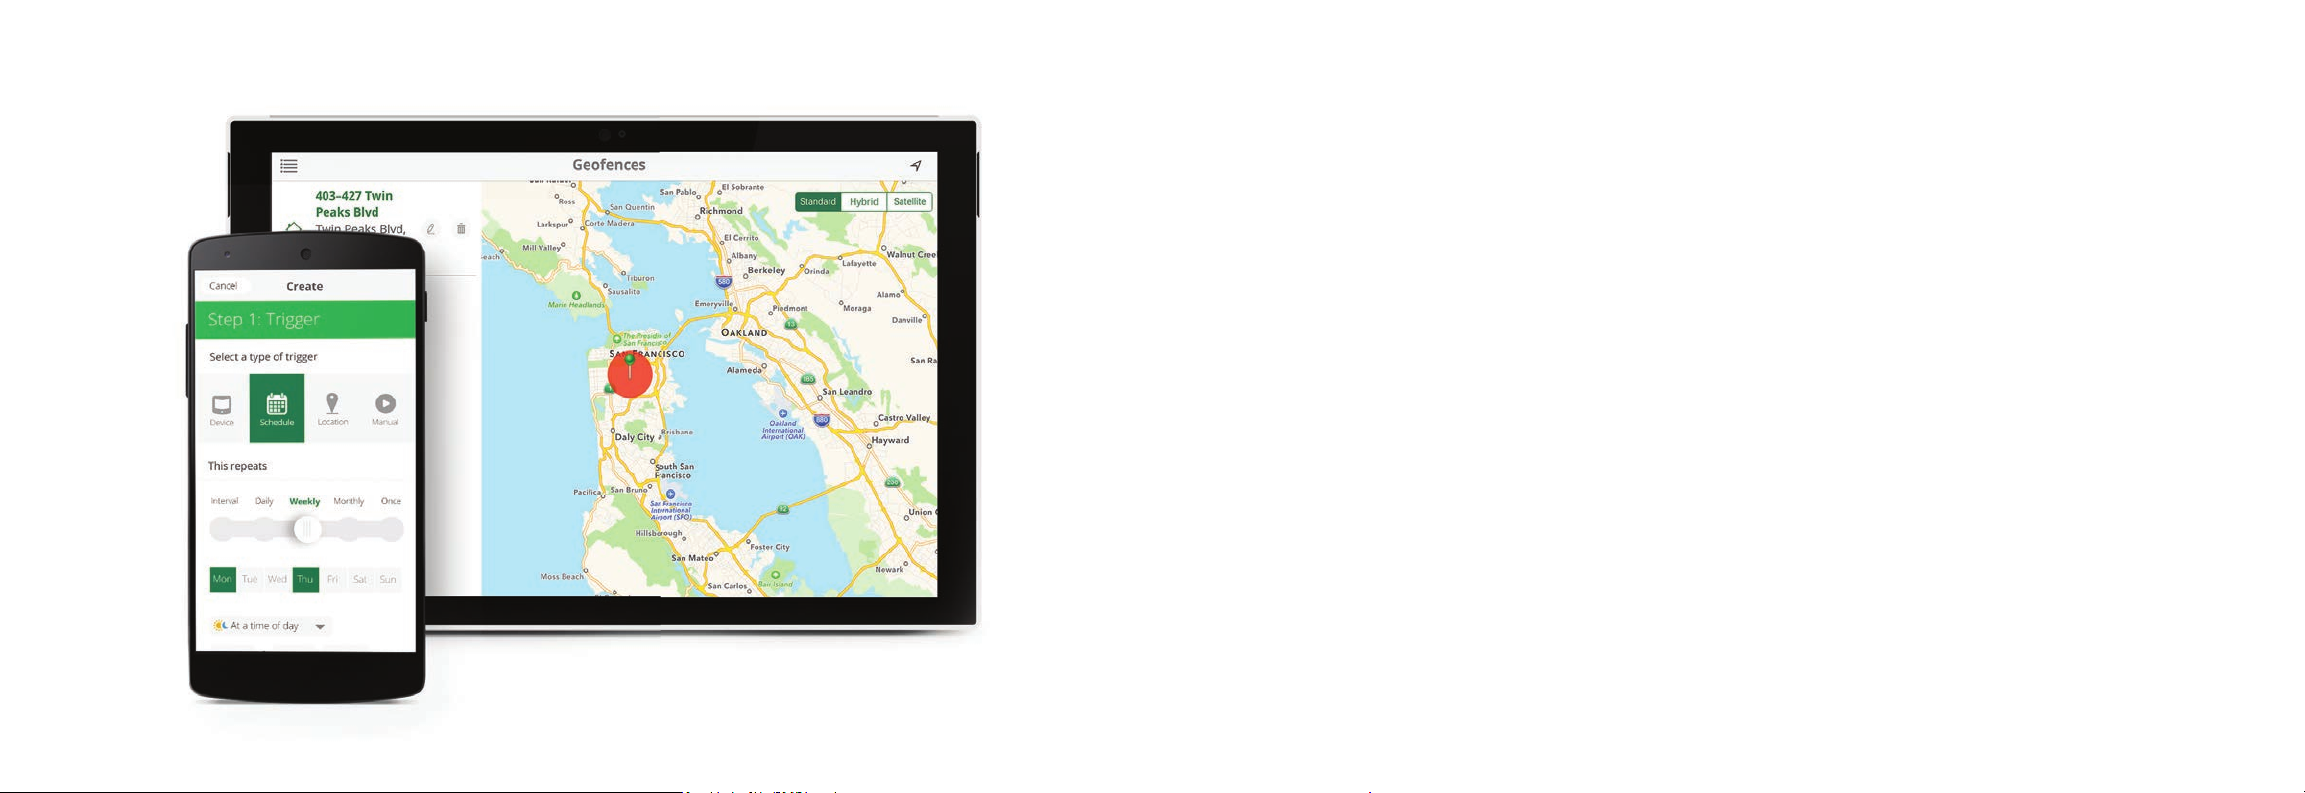
| Scenes
Control any device based on another device. Turn on an outdoor light when a sensor
detects motion. Or set an alert, to get a text whenever a door is opened. Timer scenes use
the Controller’s built-in clock to turn devices such as lights and lawn sprinklers on or off.
Or use your phone’s location to Geofence.
| Geofencing
Use your cell phone location to automatically control your system. As you arrive home your
garage door will automatically open. Or leave the house and lights will turn off, doors will
lock, and your thermostat will set to reduce energy use. Just be sure to carry your phone!
For more information on Geofencing go to: www.getvera.com/geofencing
Page 12
Range Extenders Help Options
If a device doesn’t seem to work in its proper location, but you find that your device works when you bring
it closer to your VeraSecure controller, you will need to add a repeater or range extender. Repeaters or
extenders are used to expand the coverage area of your network. They work by receiving your existing
signal, amplifying it and then transmitting the boosted signal.
For most devices, you don’t need to pay any attention to which protocol (Z-Wave, ZigBee, Wi-Fi, Bluetooth
& VeraLink) a device uses, as your VeraSecure controller automatically connects wirelessly to any of these.
However, repeaters & range extenders are protocol specific. Be sure it matches your device’s protocol.
=+
Vera Controller Repeater Extended Range
For more information on repeaters go to: https://shop.getvera.com
We strive to make VeraSecure and the Vera App easy. If you experience any diculty,
Vera is here to help. We provide free customer support with real experts who quickly
identify and resolve any issues.
support.getvera.com
Vera Knowledge Base: http://support.getvera.com
Articles with instructions, downloadable manufacturer sheets and extensive FAQs.
Videos demonstrating system setup and features.
Forums where knowledgeable users and experts respond to posts.
Warranty—We Stand Behind Our Products!
Vera strives to build the very best products possible. Should
your Vera Smart Home Controller fail within the first 12 months from
purchase, we will repair or replace your unit, free of charge.
+1 (866) 966-2272
Page 13

GSG-VERASECURE100-V1
Page 14
Ve raSecure
Z-Wave Overview
Page 15
Inclusion and Exclusion
Your VeraSecure Controller can work with all
Z-Wave devices, such as sensors, alarms, door
locks, thermostats, etc. Over a thousand Z-Wave
devices are available from many brands. (Z-Wave
is a wireless communications system; check the
package or specs to see if a device uses Z-Wave.)
Before VeraSecure can control a device, it must
be included into the Vera system.
Vera Custom Device Wizards are available for
select devices that pass stringent Vera Labs
testing for compatibility and quality. The Custom
Device Wizards make Inclusion/Exclusion easiest,
with specic details for each device.
A list of these devices is available and
updated at http://getvera.com/compatibility/
For all other Z-Wave devices, a
Generic Device Wizard is used for Inclusion/
Exclusion. A Generic Device Wizard is available
for each device category (thermostats, sensors,
alarms, etc.)
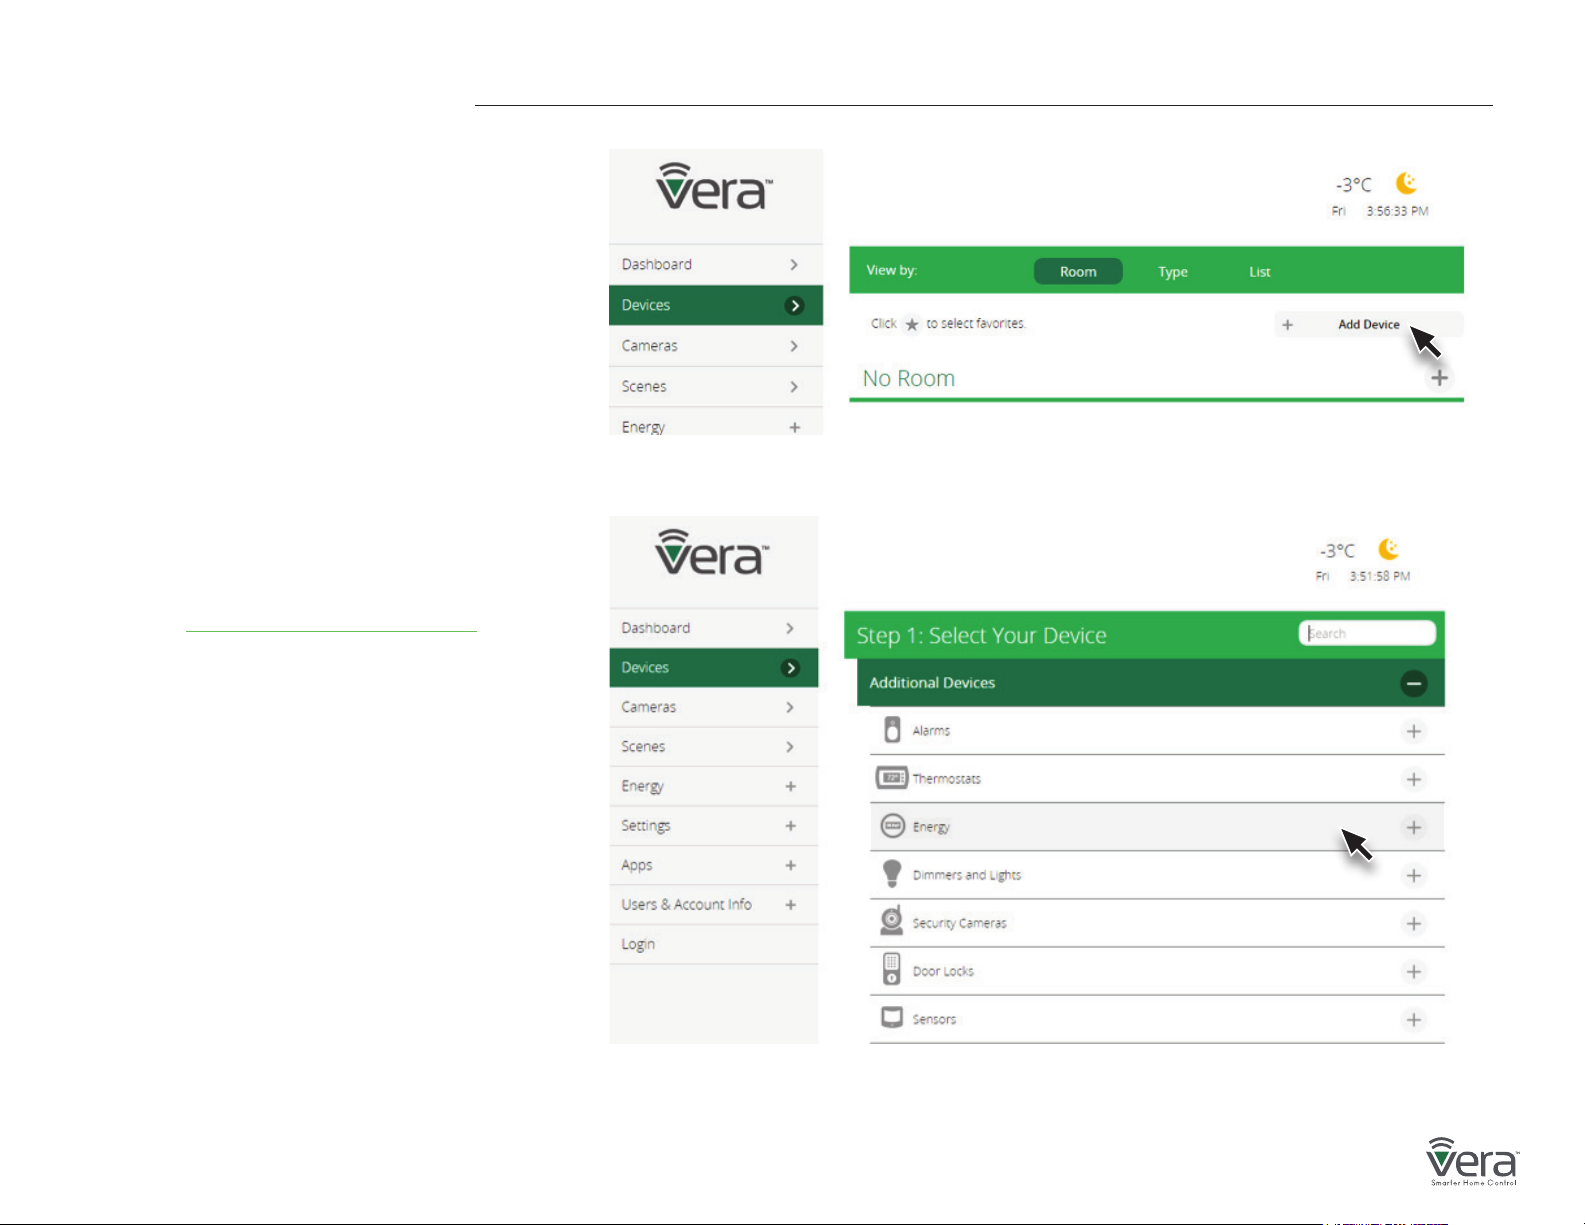
Figure 1-1: Add Device
To get started, after setting up your
VeraSecure Controller, use the Vera UI to
select Devices and then Add Device
(Figures 1-1 & 1-2).
Figure 1-2: Device Paring menu
Page 16
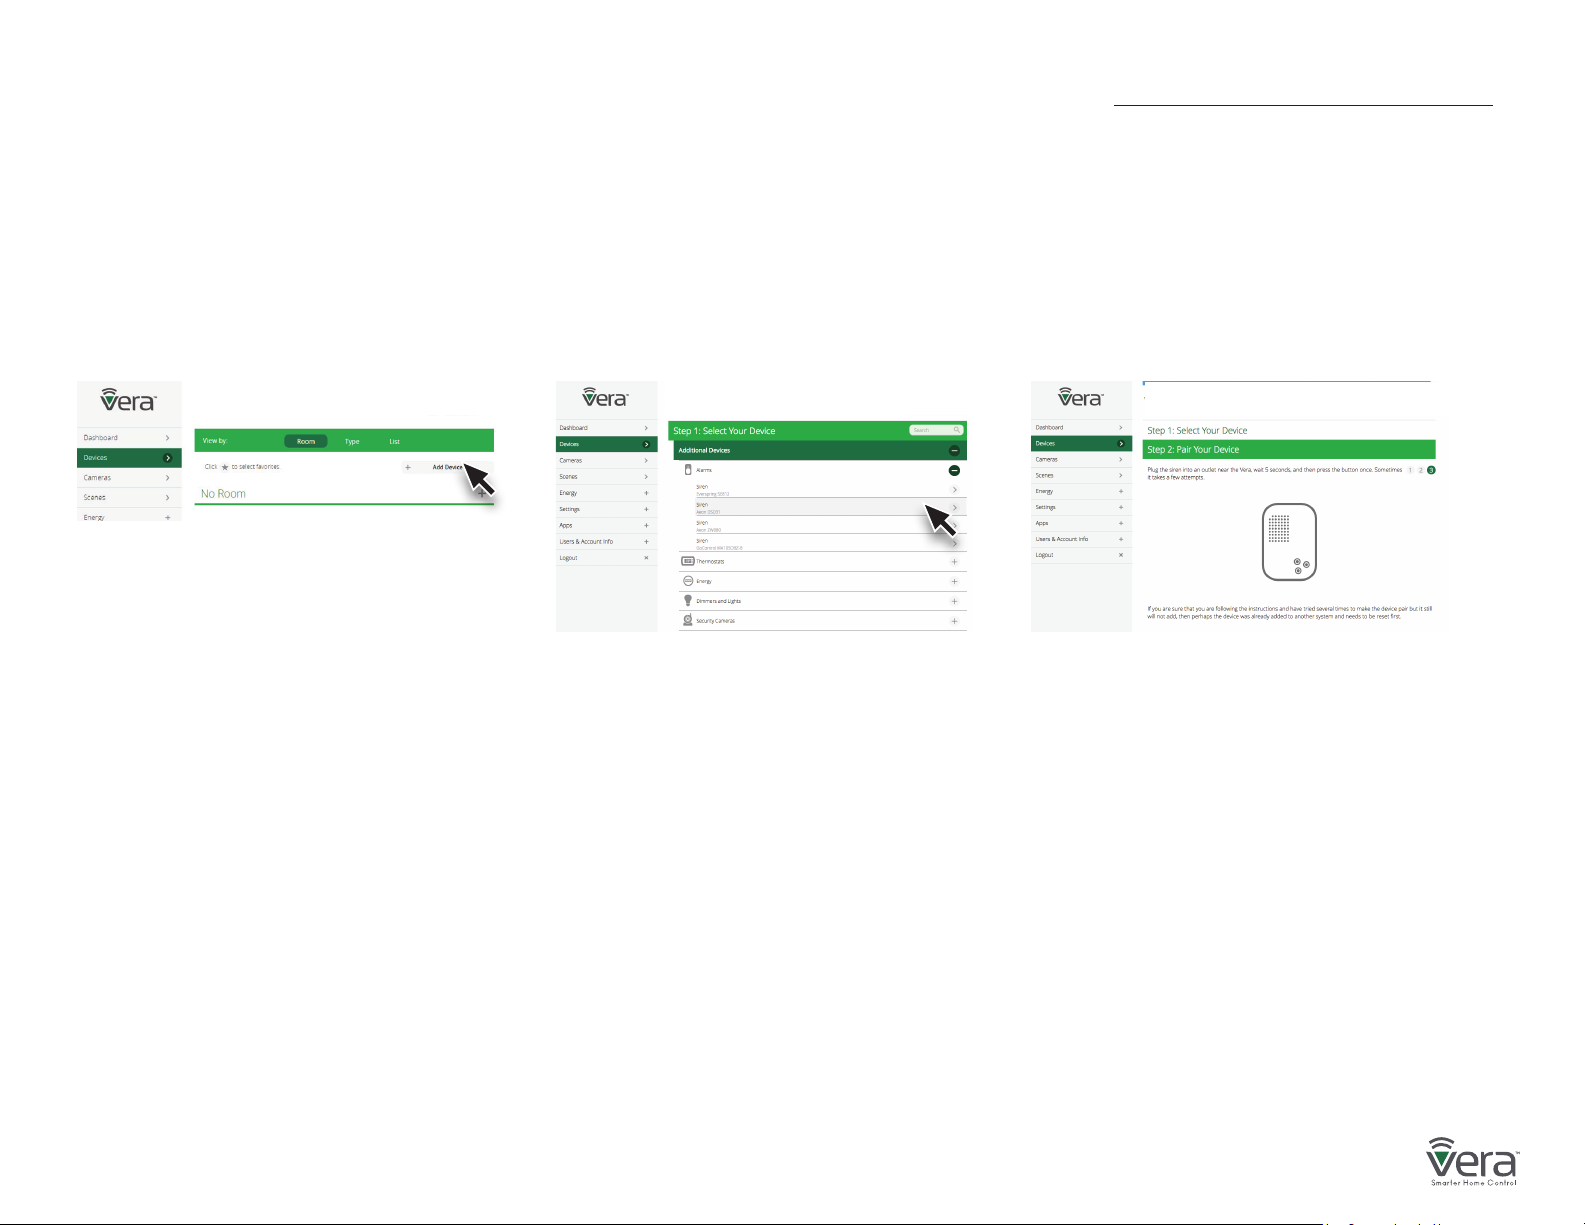
Inclusion/Exclusion for Devices with Vera Custom Device Wizard
Step 1 Step 2 Step 3
Select Devices and click on the
Add Device option.
After adding a new device, the VeraSecure Controller will ask you to name it and choose the room it is (or will be) located in.
Note: If the device was previously included with a dierent Z-Wave system, you’ll need to it exclude it before adding with your VeraSecure.(You may also
need to do this if you have problems Inclusion/Exclusion the rst time.) Press the Retry button to start the exclusion process. Once the device is exclud-
ed, add it by following the inclusion steps.
Click on the “+” sign for the device’s
category. A list of Vera Custom Device
Wizards is displayed. Select a device
to include.
Follow the steps in the Device Wizard
to add the device.
Page 17
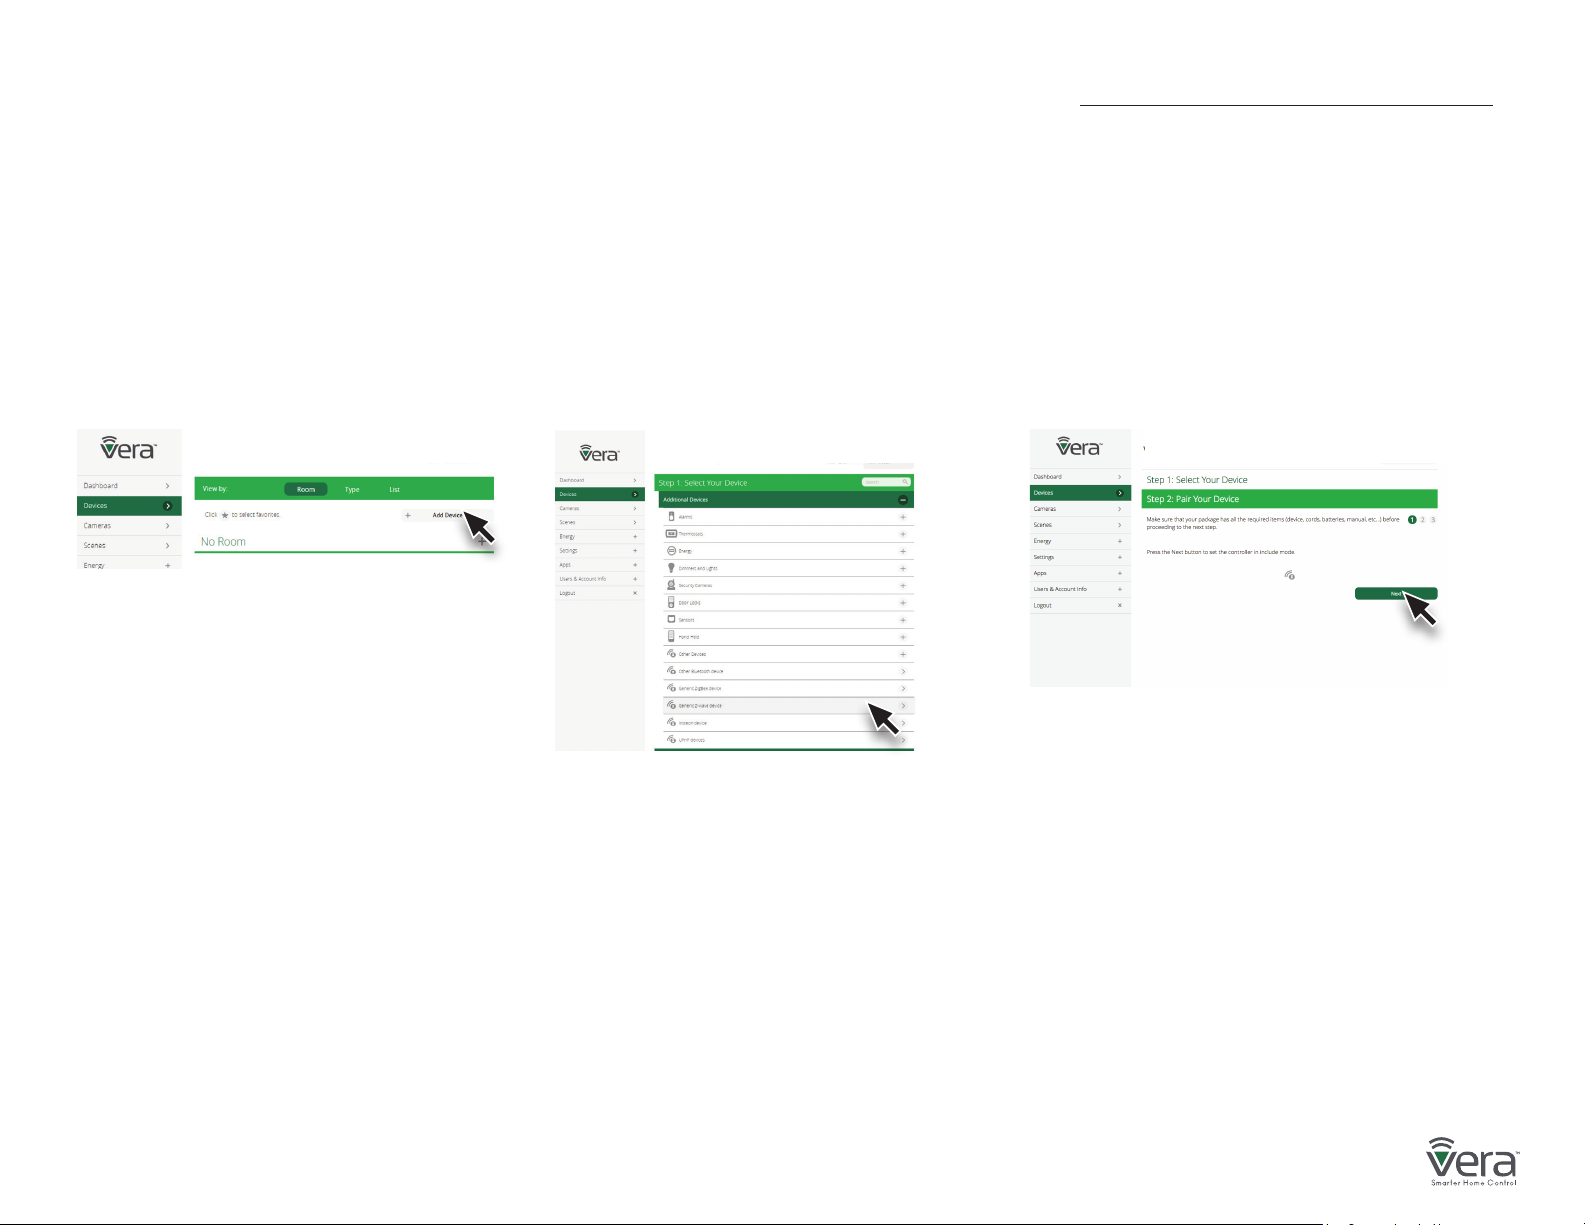
Inclusion/Exclusion for Devices using a Generic Device Wizard
Step 1 Step 2 Step 3
Select Devices and click on the
Add Device option.
Click on the “+” sign for the Other
Device’s category. A list of Vera Custom
Device Wizards is displayed. If your specic
device is not shown, select the “Generic
Z-Wave Device” option.
Follow the steps in the Device Wizard
to add the device.
After adding a new device, the VeraSecure Controller will ask you to name it and choose the room it is (or will be) located in.
Note: If the device was previously included with a dierent Z-Wave system, you’ll need to it exclude it before adding with your VeraSecure.(You may also
need to do this if you have problems Inclusion/Exclusion the rst time.) Press the Retry button to start the exclusion
process. Once the device is excluded, add it by following the inclusion steps.
Page 18
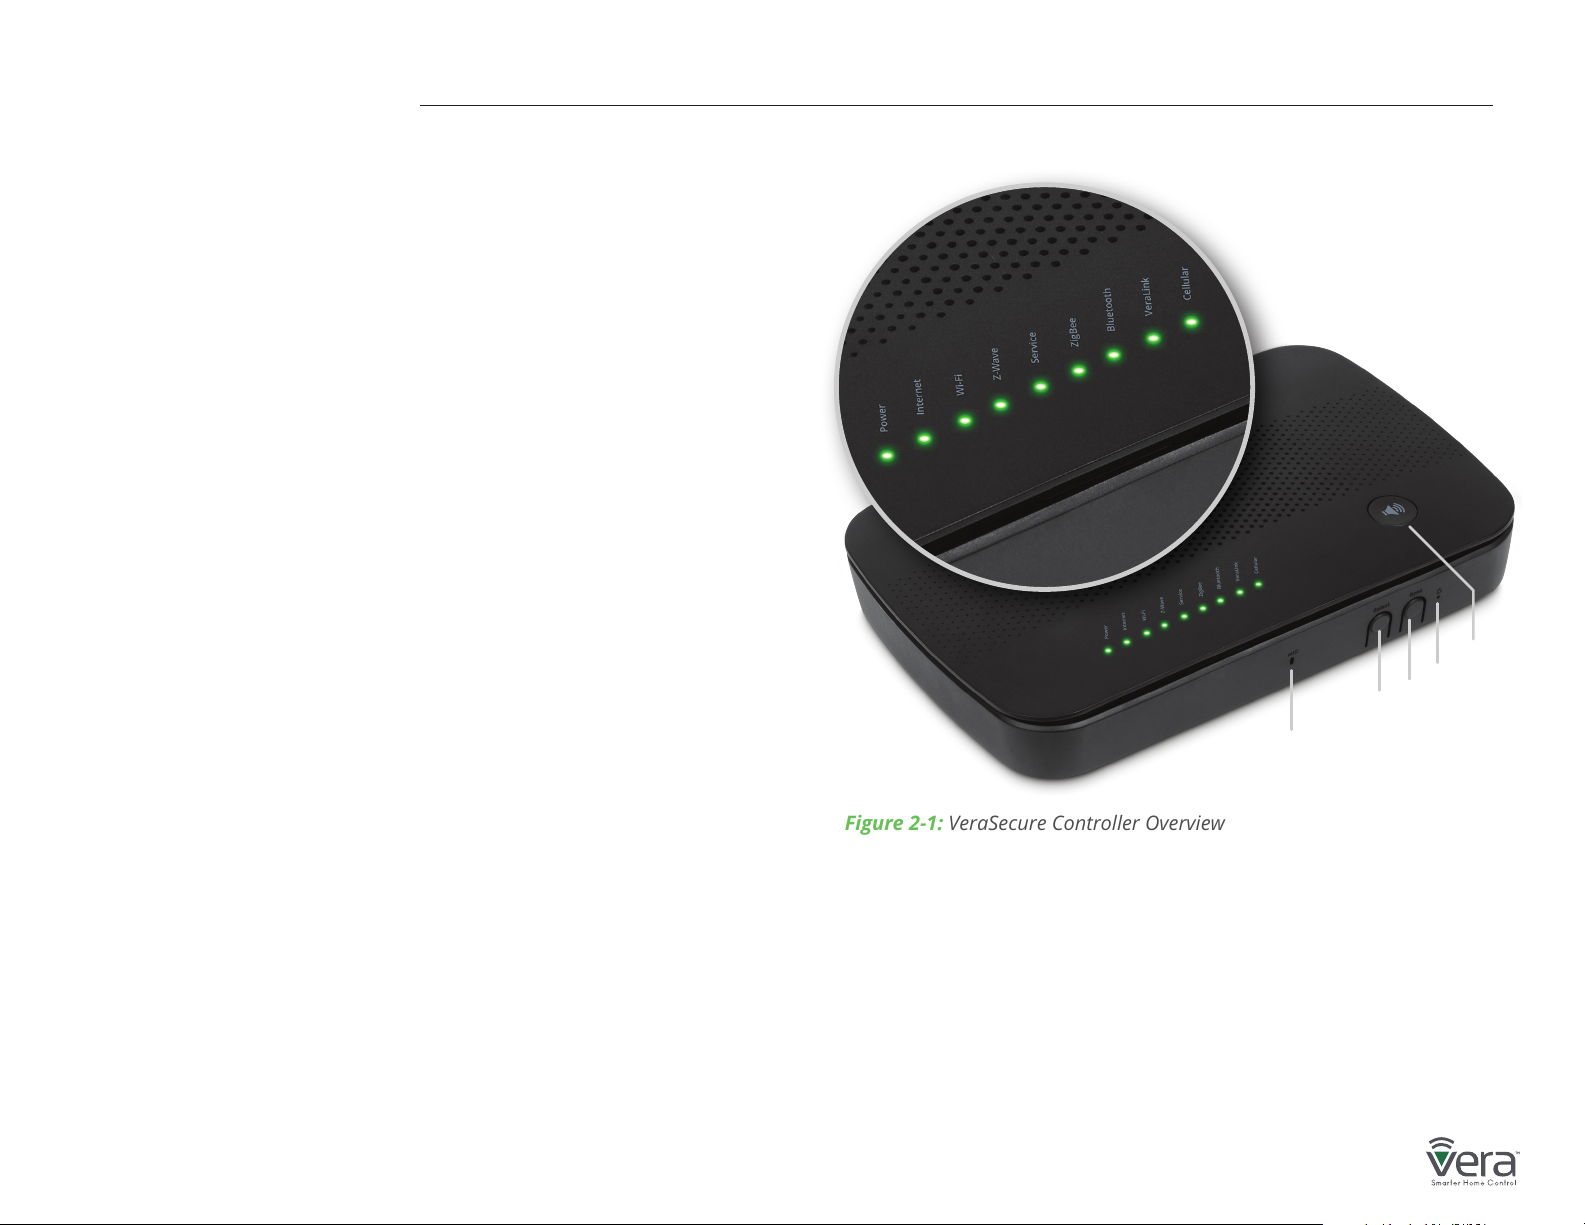
VeraSecure Buttons
Z-Wave Include/Exclude Mode
During normal installation of Z-Wave devices you do NOT need to use these
buttons. These instructions are for manually starting Z-Wave
Include and Exclude Modes (Figure 2-1).
• Press the Select button.
• Press the Select button again. The Z-Wave light will begin blinking.
• For Include Mode, press the Sync button briey (less than 1 second).
• For Exclude Mode, press and hold the Sync button for at least
2 seconds, then release.
Controller Reset
Reset to Network defaults - Press the Reset button 3 times in 6 seconds.
Factory Reset - Press the Reset button 6 times in 6 seconds.
The Controller will reboot.
Note: If this controller is the primary controller for your network, resetting it
will result in the nodes in your network being orphaned and it will be necessary
after the reset to exclude and re-include all of the nodes in the network. If this
controller is being used as a secondary controller in the network, use this proce-
dure to reset this controller only in the event that the network primary control-
ler is missing or otherwise inoperable (Figure 2-1).
Figure 2-1: VeraSecure Controller Overview
Mic
Select
2-Way Audio
Reset
Sync
Page 19
Advanced Z-Wave Functions
These Advanced Z-Wave Functions are usually needed only for
specic (and rare) technical situations, or for professional installers
creating very large systems, or for developers creating new hardware
or software.
You may need to access these advanced functions if there’s a problem
with your system and you need to reset the Z-Wave network, if you
want to upgrade to a dierent model of Vera Controller, to enable
another controller to operate your VeraSecure, or for other technical
situations as described below.
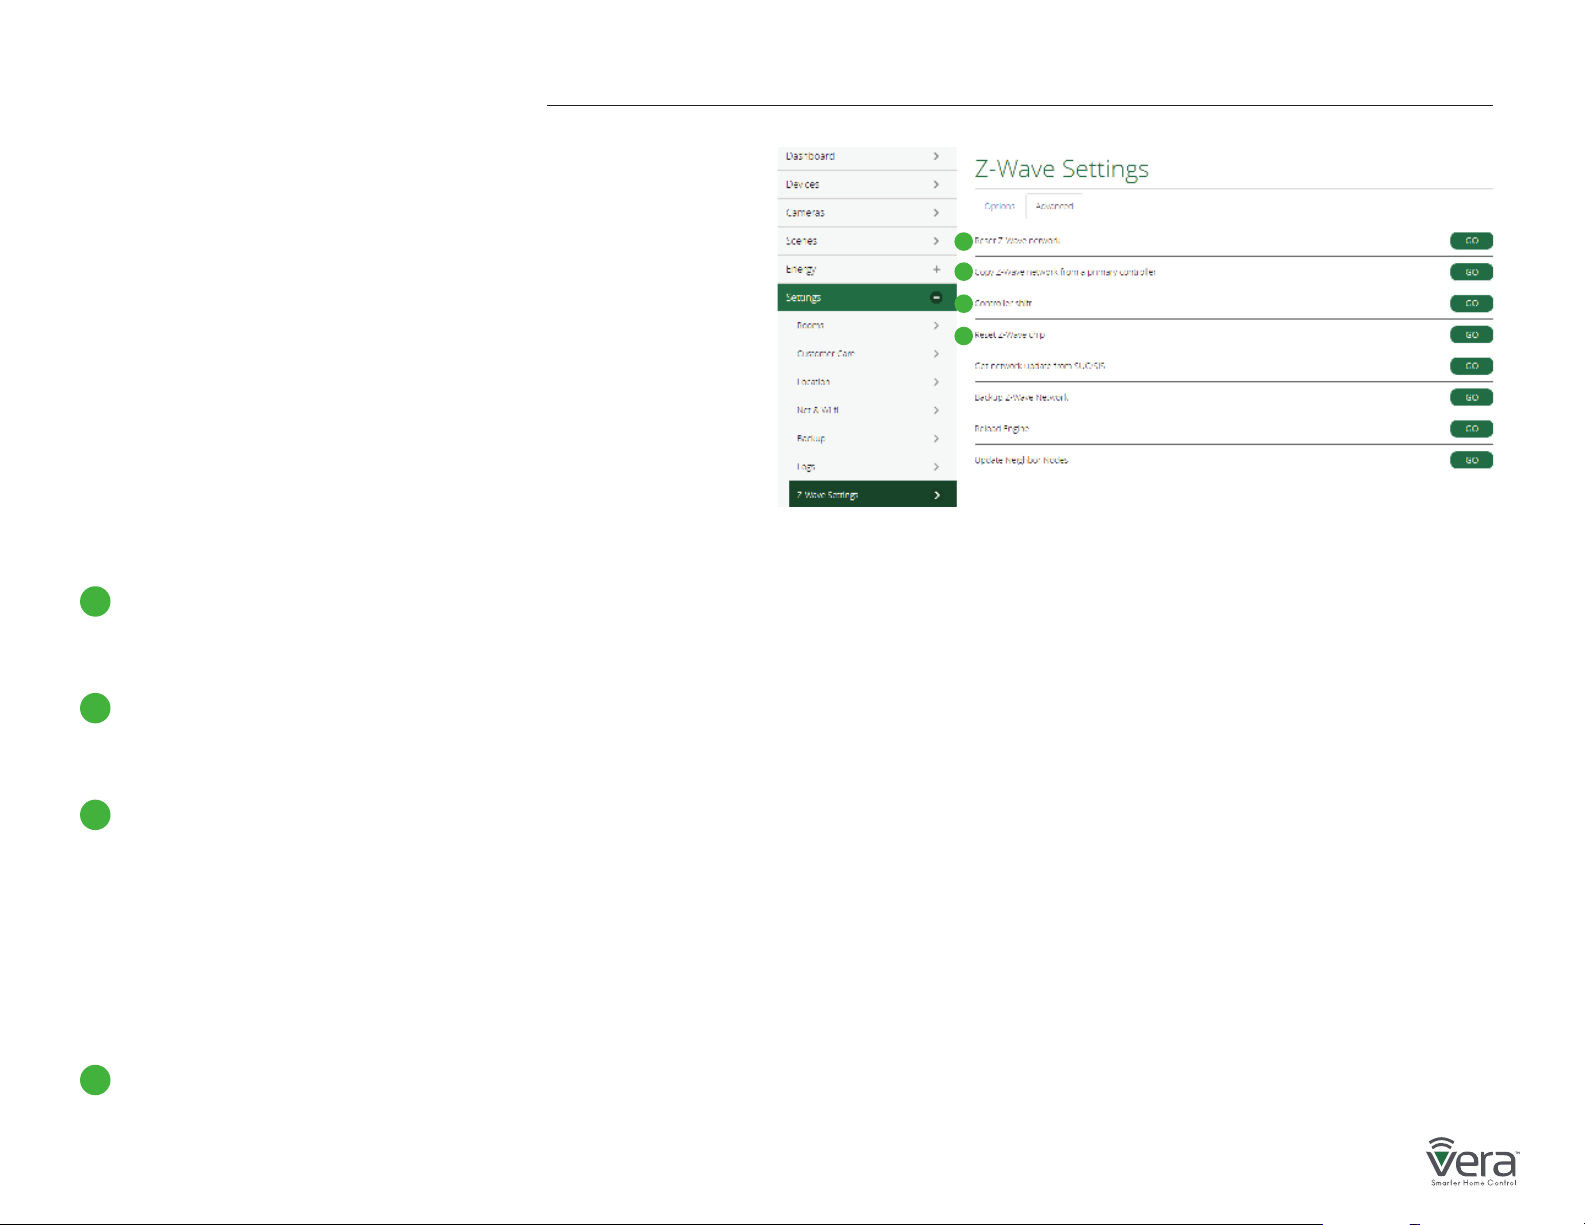
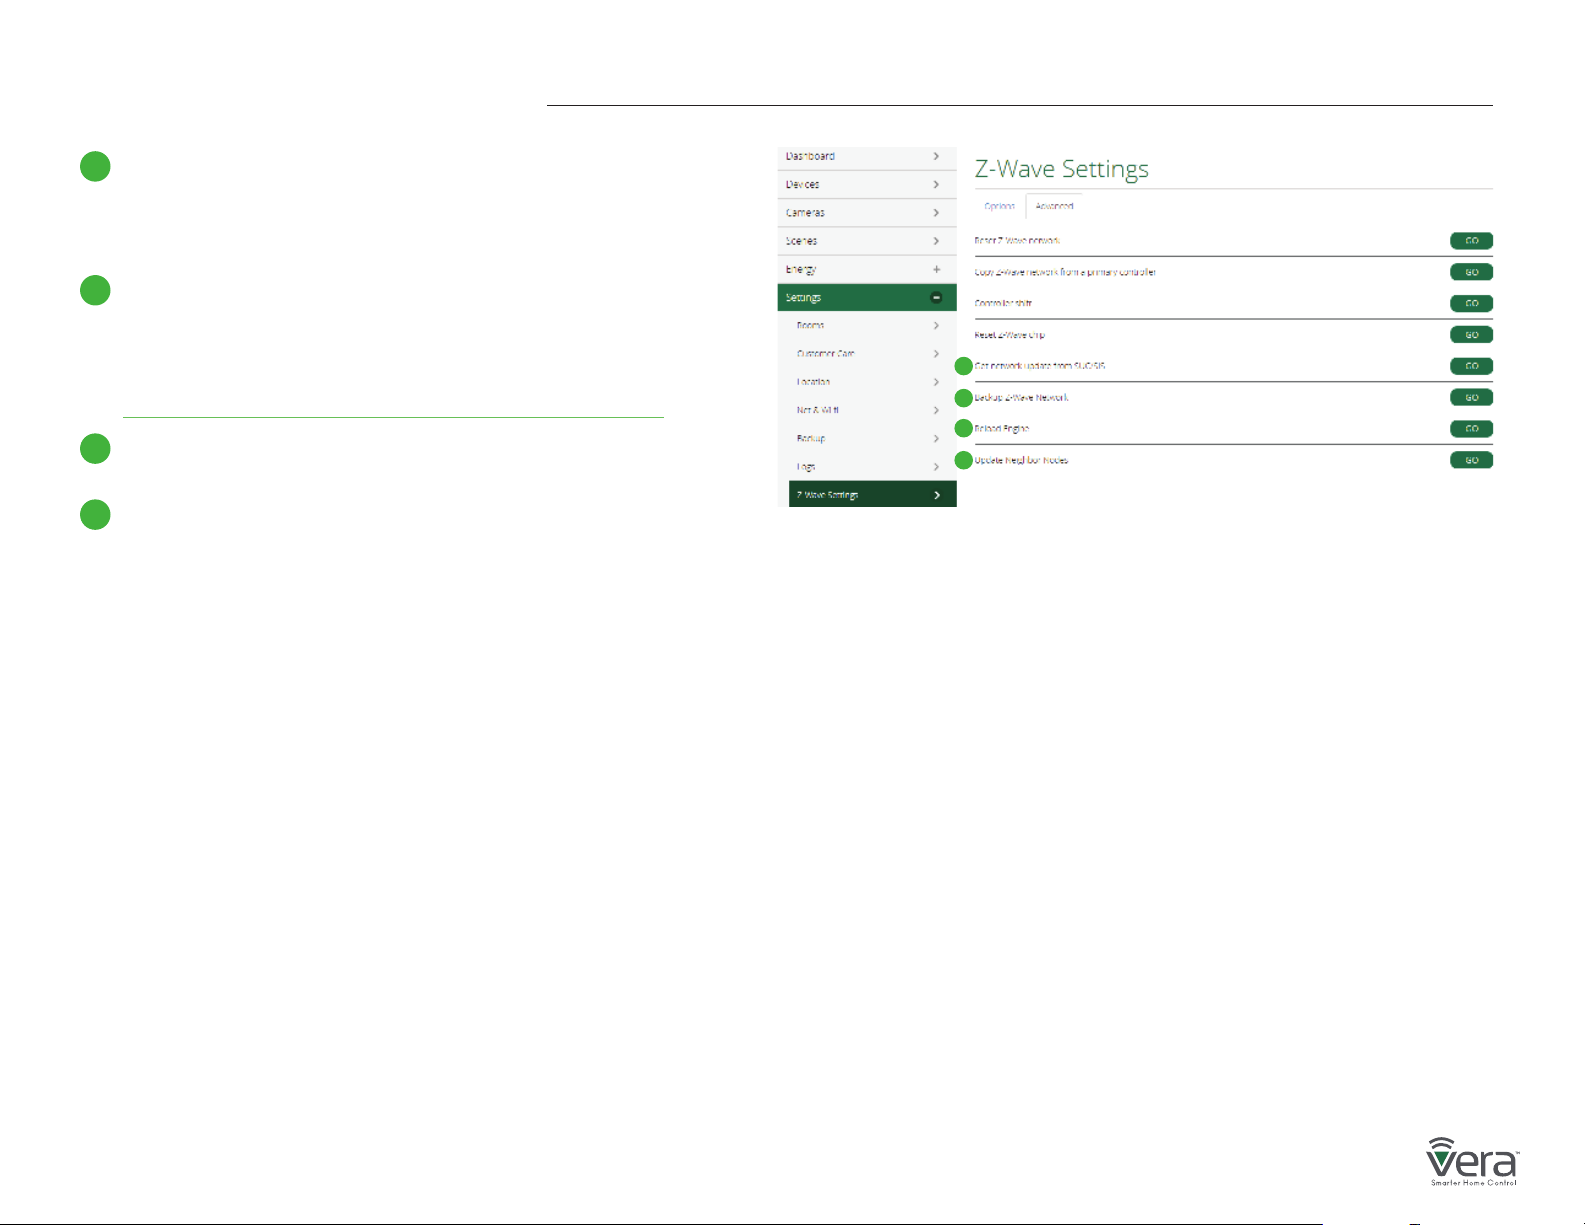
To access Advanced Z-Wave Functions select Settings and then
Z-Wave Settings. Select the Advanced tab (Figure 3-1).
From there you’ll be able to access these Advanced Z-Wave options:
A
Reset Z-Wave network
Will clear all the user conguration data and assign a new
Z-Wave HouseID.
A
B
C
D
Figure 3-1: Advanced Tab
B
Copy Z-Wave network from a primary controller
Will allow the unit to copy all Z-Wave related information from
a Primary Z-Wave Controller and is used with Replication.
C
Controller shift
Tells Vera to transfer the role of primary controller to another
Z-Wave controller. The other Z-Wave controller will become the
‘Master controller’, and Vera will be a secondary controller. This
means the other Z-Wave controller will then be responsible
for healing the networking and being the SIS/SUC (a technical
Z-Wave term). Normally, by default, Vera is the master controller
and is SIS/SUC.
Reset the Z-Wave chip
D
This option will re-initialize the Z-Wave chip.
Page 20
Advanced Z-Wave Functions
Get network update from SUC/SIS
E
This option will update the slave controller network from the
primary controller to which it’s currently added. This option is
used when Vera is a secondary controller.
Backup Z-Wave Network
F
VeraSecure has the ability to back up its Z-Wave network and its
conguration settings to be restored on another gateway.
This procedure is explained on the page below:
http://support.getvera.com/customer/portal/articles/2345058
G
Reload Engine
Reloads the Lua engine.
H
Update Neighbor Nodes
This forces the controller to do a node neighbor update over
Z-Wave for all the nodes in the network.
Learn Mode
Include your controller into an existing Z-Wave network.
Steps for VeraSecure controller using the web interface.
E
F
G
H
Figure 3-1: Advanced Tab
Click on Settings > Z-Wave Settings > Advanced > Select
‘Copy Z-Wave network from a primary controller’
This will put the controller into learn mode and shift it to
a secondary role. The controller can now receive data from a
primary device in the network and associate with other devices
in the Z-Wave network via the primary controller.
Replication
Include another controller and transfer the Z-Wave network
data to it. Steps for VeraSecure controller using the web
interface.
Click on Settings > Z-Wave Settings > Advanced > Select ‘Controller Shift’
All the Z-Wave devices will be replicated into the new controller.
This is used to transfer data from one controller to another.
With replication the new controller becomes primary.
Page 21
Advanced Z-Wave Functions
Basic Command Class Handling
The basic command class is controlled by Vera and it is not mapped
to any other Z-Wave Command Class.
More details can be found on our wiki page.
http://wiki.mios.com/index.php/ZWave_Basic_Command_Class_Mapping
Support for Association Command Class
VeraSecure has support for the Lifeline association command class.
group id: 1 - lifeline
number of nodes in group: 1
More details can be found on our wiki page.
http://wiki.mios.com/index.php/Association
Support for Multiple Manufacturers in The Same Network
The controller can be included and operated in any Z-Wave network with
other certied Z-Wave devices from other manufacturers and/or other
applications. All non-battery operated nodes within the network will act
as repeaters regardless of the vendor to increase the reliability
of the network.
Support for sending Z-Wave Commands
Z-Wave commands can be sent using the Vera API which will allow you
to send HTTP requests with the specied command class to the specied
node.
More details can be found on our wiki page.
http://wiki.mios.com/index.php/Luup_UPnP_Variables_and_Actions#
ZWaveNetwork1
To send a Z-Wave command you’ll need to add the node id of the con-
trolled Z-Wave device and the command class used.
For example to control node 3 and send a BASIC_SET with a value
of 00, the command will be :
http://GATEWAY_IP/port_3480/data_request?id=
action&DeviceNum=1&serviceId=urn:
micasaverde-com:serviceId:ZWaveNetwork1&action=
SendData&Node=3&Data=0x20-0x01-0x00
GATEWAY_IP is the actual local IP address of the unit.
Node is the Z-Wave node the command is sent to.
Data will contain the Z-Wave Command Class sent to the device.
Page 22

 Loading...