

Veon VN4019LEDDVD Instruction Manual
Instruction Manual
VN4019LEDDVD
MODEL:
40”
FHD LE D LCD TELEVISION wi th BUILT IN DVD
8

Table of Contents
1
Freeview: EPG- Electronic programme guide......................................... 28
Safety Information..................................................................................2
Important Safety Precautions................................................................. 3
TV Base Assembly
.............................................................................
4
Front Back panel diagrams..................................................................... 5
Remote Control...................................................................................... 6-8
Basic TV Setup and Installation ............................................................. 9
System Connections .............................................................................10-12
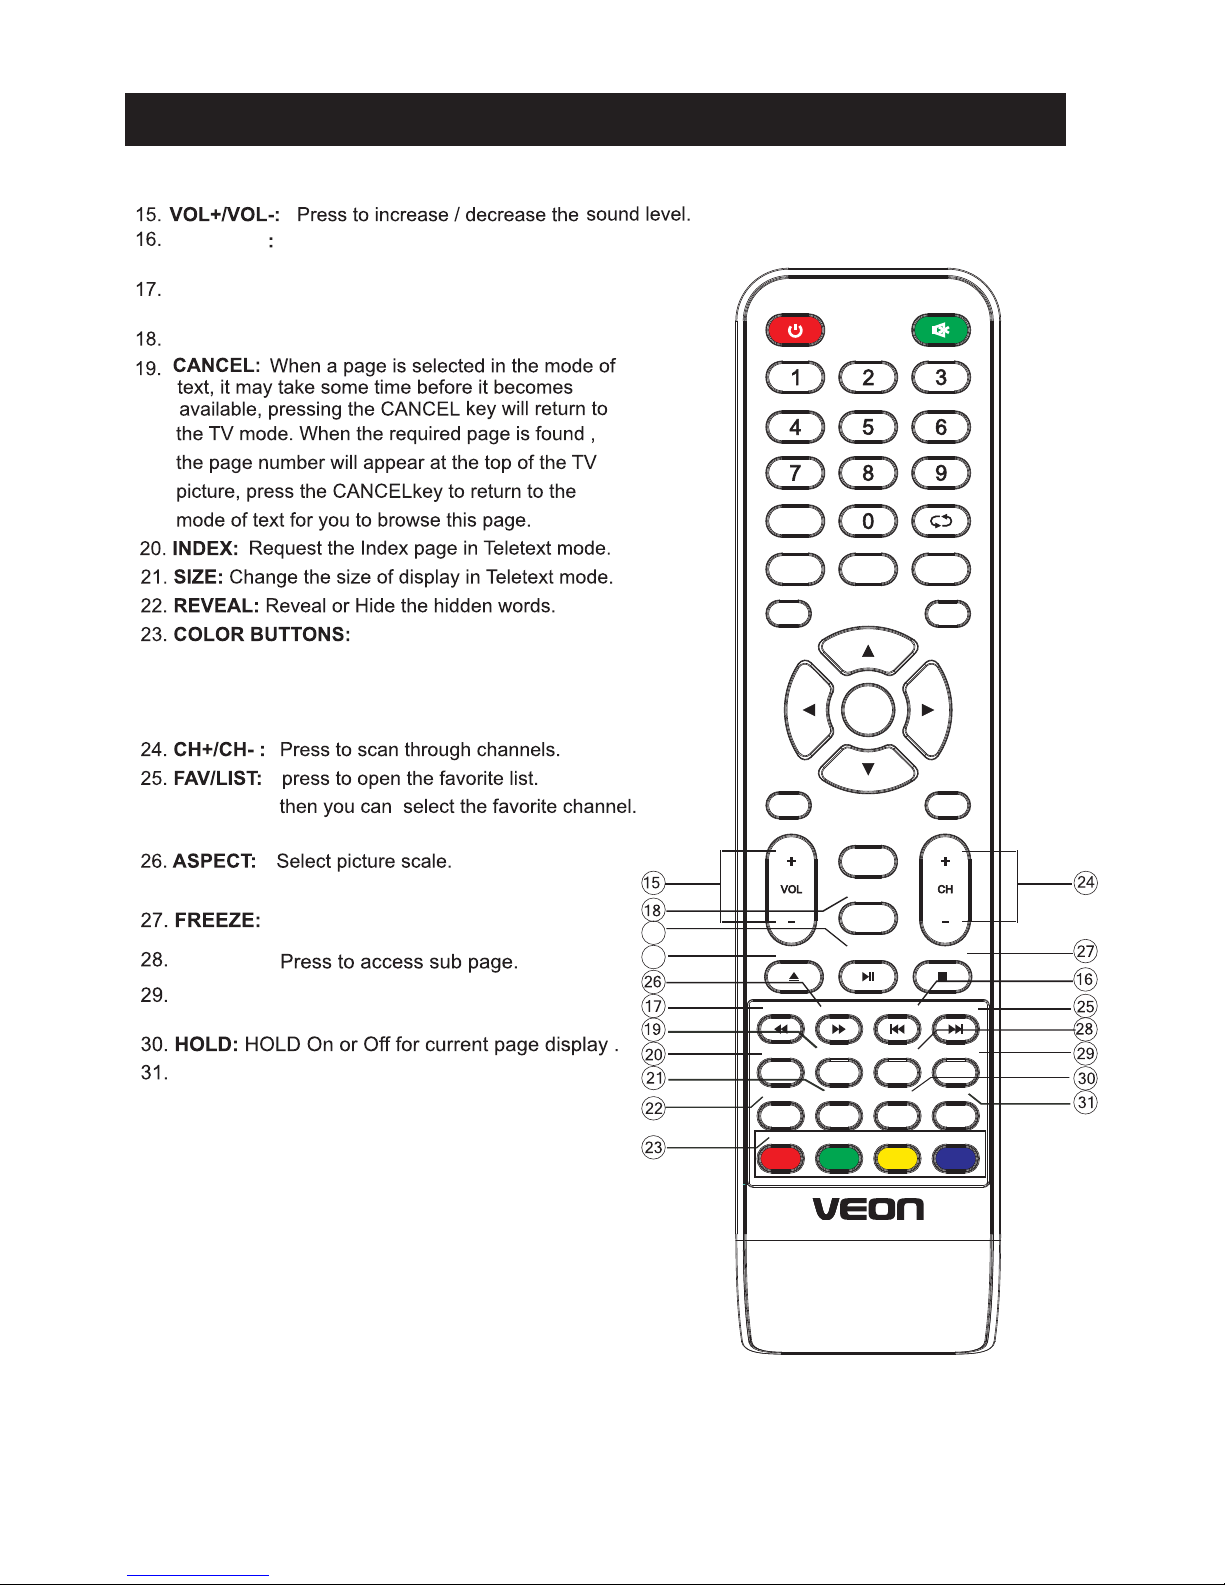
Select Input Source ............................................................................... 13
Channel Menu Setup.............................................................................. 13 -15
Picture Menu..........................................................................................16
Sound Menu ..........................................................................................17
Time Menu............................................................................................. 18
Lock Menu............................................................................................. 19
Setup Menu ........................................................................................... 21-22
Screen Menu..........................................................................................23
Media Operation.....................................................................................24
Media: Photo Menu.................................................................................24
Media: Music Menu ................................................................................25-26
Media: Movie Menu.................................................................................27
Media: Text Menu................................................................................... 28
Freeview: Timeshift and Record Function.............................................. 29-33
USB Functions.......................................................................................34
Resolution............................................................................................. 35
Using Built-In DVD player...................................................................... 36-37
HELP......................................................................................................38
Specifications........................................................................................39
General Instructions.............................................................................. 40
Hotel mode ........................................................................................... 20
Important Safety Instructions
When using any electrical apparatus always observe safety
regulations and use basic safety precautions to reduce the
risk of fire, electric shock and personal injury, including the
following.
1. Read, Keep and Follow these instructions, heeding all Warnings.
2. Keep out of reach of young children. This apparatus is not suitable for use by
young children or infirm persons without supervision. Young children must be
supervised to ensure that they do not play with the apparatus.
3. WARNING. Do not insert any objects into any openings of an electrical
apparatus.
4. WARNING. Do not touch any moving parts of any electrical apparatus.
5. WARNING! Where the mains plug or an appliance coupler is used as the
disconnect device, the disconnect device shall remain readily operable
6. WARNING. Do not use this apparatus near water. To avoid the risk of fire or
electric shock, do not expose this apparatus to rain or moisture.
The apparatus shall not be exposed to dripping or splashes.
7. WARNING. No objects filled with liquid, such as vases, shall be placed on any
electrical apparatus.
Safety Information

8. Do not immerse in any liquid whilst in use or in cleaning. Clean only with a damp
cloth, dry with a dry towel. Do not use harsh abrasives as these may damage
plastic parts.
9. DO NOT block any ventilation openings. Keep away from curtains, newspapers and
restricted areas. Install in accordance with any specific manufacturer's instructions.
Always allow a sufficient gap around the apparatus to avoid overheating.
10.DO NOT install near any heat sources such as radiators, gas heaters, stoves or
other apparatus (including amplifiers) that produce heat. Do not leave in direct
sunlight.
11.WARNING. Do not place any naked flame source, such as lighted candles on any
electrical apparatus.
12.WARNING! Connect to a suitable 230-240V~ 50Hz power supply only. If a class 1
product it must be connected to a suitably earthed mains socket.
13.Always unplug from the power source when any electrical apparatus is not in use.
14.Do not abuse or damage a power cord. If any power cord is damaged, it must be
replaced by the manufacturer, its service agent or a similarly qualified person in
order to avoid a hazard. A replaceable cord must be replaced with an authorised
replacement from an authorised service agent only.
15.Only use attachments/accessories specified by the manufacturer.
16.Unplug this apparatus during lightening storms or when unused for long periods
of time.
17.Attention is drawn to the environmental aspects of disposing of any battery.
18.Refer all servicing to qualified personnel. Servicing is required when the
apparatus has been damaged in any way, such as when the power supply cord or
plug is damaged, liquid has been spilled or objects have fallen into the apparatus,
the apparatus has been exposed to rain or moisture, does not operate normally,
or has been dropped.
19.Do not attempt to service any double insulated apparatus. Double insulated
apparatus requires specialist servicing and knowledge to retain the safety of
the apparatus.
20.WARNING. Do not use any electrical apparatus outdoors. If any electrical
apparatus is to be used outdoors, use a suitable Isolating transformer or Electrical
Safety Switch (RCD).
21.For household use only, this apparatus is not intended for commercial use.
22.If this apparatus is to be used by a third party, please supply these instructions
with it.
23.No liability will be accepted for any personal injury or damage caused by failure
to follow these instructions.
IMPORTANT INFORMATION – TELEVISION DISPLAY EQUIPMENT
If a television is not positioned in a sufficiently stable location, it can be
potentially hazardous due to falling. Many injuries, particularly to children,
can be avoided by taking simple precautions such as:
Using cabinets or stands recommended by the manufacturer of the television.
Only using furniture that can safely support the television.
Ensuring the television is not overhanging the edge of the supporting furniture.
Not placing the television on tall furniture (for example, cupboards or book cases)
without anchoring both the furniture and the television to a suitable support.
Not standing the television on a cloth or other materials placed between the
television and supporting furniture.
Educating children about the dangers of climbing on furniture to reach the
television or its controls.
Important Safety Precautions
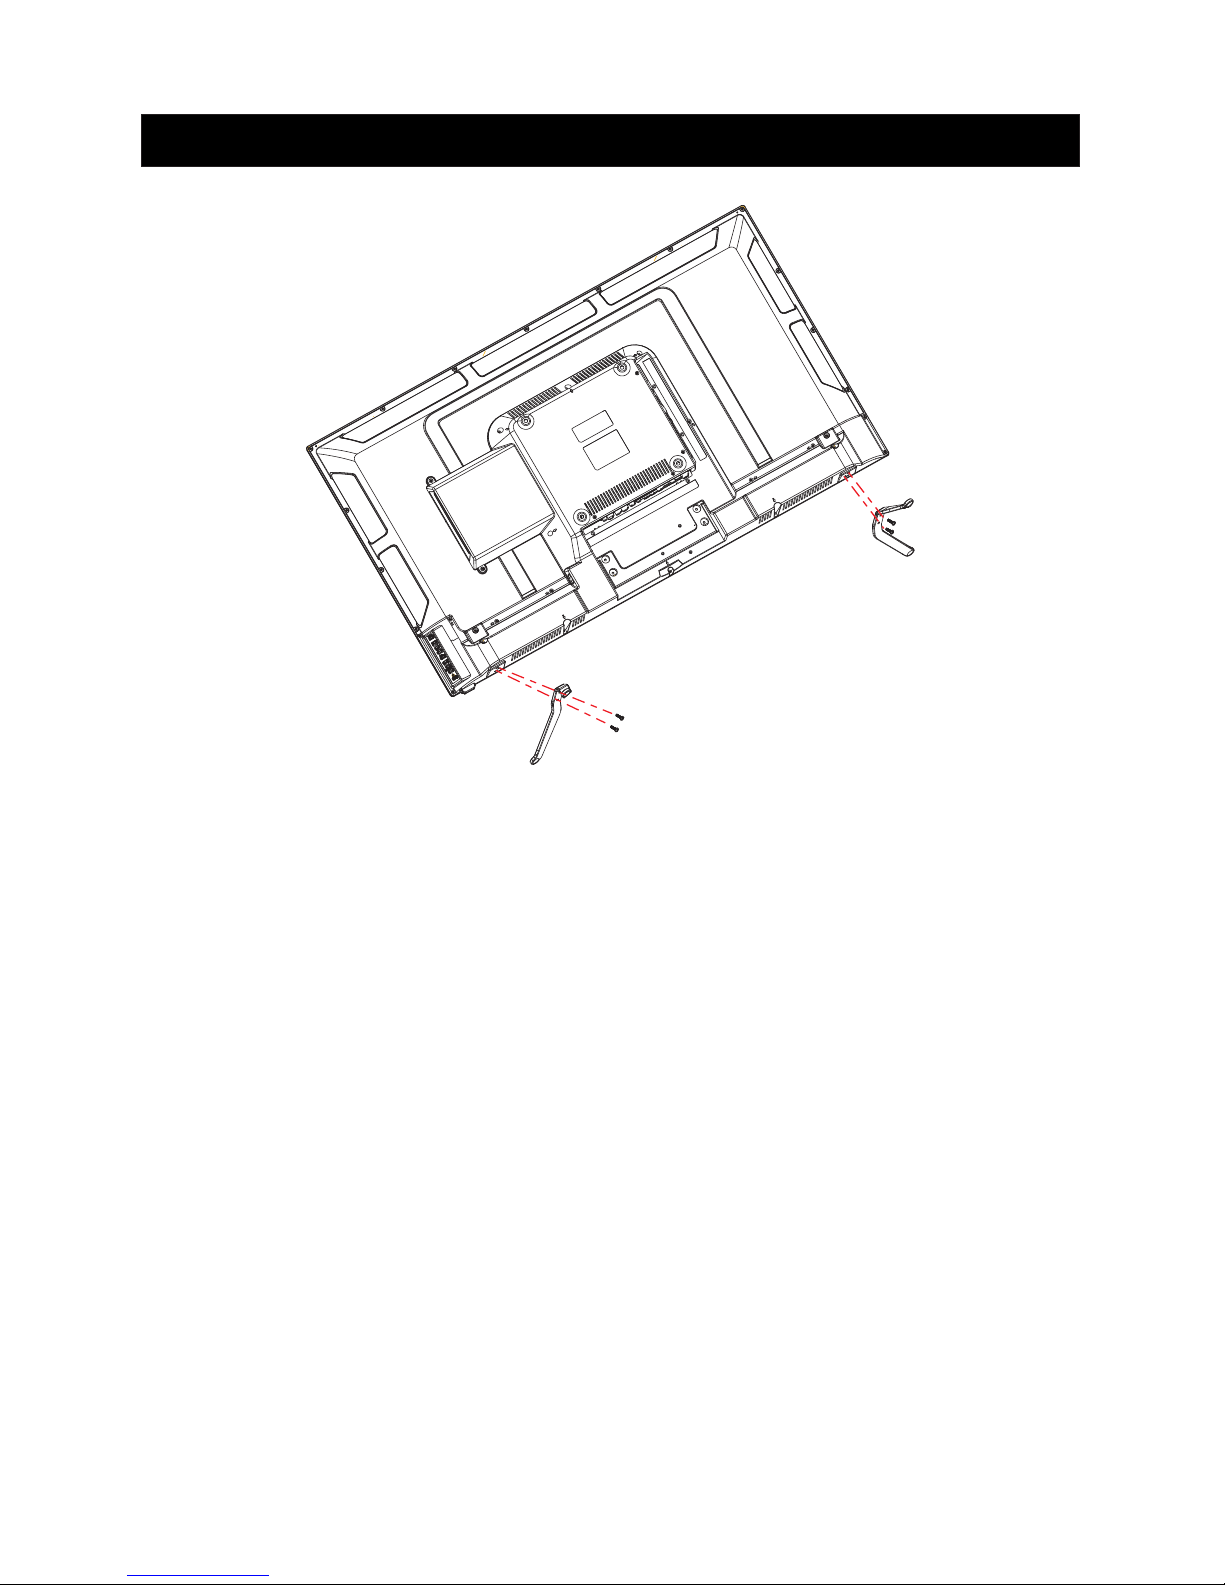
4
TV Base Assembly
Before beginning TV base assembly please check you have the following;
-1 X Set of Stand Feet ( 1 X Left + 1 X RIGHT)
-4 X Screw (BM4*12)
IMPORTANT: There is a LEFT and RIGHT foot for the stand, the left foot
must only align with the left hand side and the right foot must only align
with the right hand side. The feet for the TV are not left and right
reversible.
To begin set up; lay the TV on a soft and clean flat surface with the TV panel
facing upwards.
Take the left hand foot and align with the left hand side of the TV.
Using the appropriate size screw driver please fix the foot with the screws
provided. Repeat the same process with right hand side using the right foot.
IMPORTANT: DO NOT OVER TIGHTEN SCREWS.
IMPORTANT: ENSURE THE PINS ON THE FEET PROVIDED ALIGN
WITH THE BASE OF THE TV.

5
Front Back panel diagrams
1.SOURCE Source select
2.MENU Into or exit from menu
Use CH+/- button select item,
VOL+/- button adjust item
3.CH+/- Select channel
4.VOL+/- Adjust Volume
5. Turn on/off TV .
6. .
7.HDMI 2 (ARC) :HDMI and ARC
9 .VGA Input.
11.Y Pb/Cb Pr/Cr:Color difference
components input and relevant
video input .
12.AV Input:External AV signal input and
relevant right/left sound channel inputs.
13.PC AUDIO INPUT
15.USB Input.
14.COAXIAL Output.
8.HDMI 1 Input.
1
234
5
10.HDMI 3 Input.
Earphone output
16.
HDM I3
HDM I1
HDM I 2 (ARC)
Y Pb Pr
COA XIAL
AC 10 0-240 V~
50/ 60Hz
1610 15
11 7 8 13 9 6
14
12
COM PONEN T INPUT
AV INP UT
connection port.

Remote Control
6
previous
ENTER:
DTV/ATV: Switch between Analog and Digital TV
LANG/AUDIO
Press to search NICAM mode or
language option.
MENU
SOURCE
ENTER
EXIT
SLEEP
P.MODE S.MODE
INDEX
REVEAL SIZE
CANCEL
HOLD
SUB .PG
RED GREEN
YELLOW
CYAN
D.Menu D.Title
Goto
D.Disp
PROG
STEP
REPEAT
A-B
Zoom
Angle
Subtitle
Audio
D.setup
DTV/ATV
DISPLAY
RECLIST
REC TIMESHIFT
FREEZE
ASPECT
TV/RADIO
FAV/LIST
SUBTITLE
TEXT
EPG
LANG/AUDIO
+/-
VN 401 9LE DDV D
33
32
MENU
SOURCE
ENTER
EXIT
SLEEP
P.MODE S.MODE
INDEX
REVEAL SIZE
CANCEL
HOLD
SUB .PG
RED GREEN
YELLOW
CYAN
D.Menu D.Title
Goto
D.Disp
PROG
STEP
REPEAT
A-B
Zoom
Angle
Subtitle
Audio
D.setup
DTV/ATV
DISPLAY
RECLIST
REC
TIMESHIFT
FREEZE
ASPECT
TV/RADIO
FAV/LIST
SUBTITLE
TEXT
EPG
LANG/AUDIO
Remote Control
7
TV/RADIO
1.When watching channel,allows you to switch between TV and Radio modes.
EPG: 1. Launches the EPG (Electronic Program Guide)
2. Fast reverse in PVR or Media Player mode.
2.Previous chapter in PVR or Media Player mode
1.
2.fast forward in PVR or Media Player mode.
2.Next chapter in PVR or Media Player mode.
REC LIST: .list of PVR recordings
In the on-screen menus, these
buttons have different functions as specified by the
colours shown on-screen. See next page for their
DVD-playback functionality.
1.
:
SUB.PG
SUBTITLE:To show subtitles when watching
DTV (broadcast-dependent)
Switch the teletext on and off.
TEXT:
32.
REC: Begin recording current program to connected
USB memory device, in PVR mode
33.
press to ‘
cast continues in background)
pause' the picture (actual broad
TIMESHIFT: 1、DTV channel time shift Function.
2.play on PVR or Media Player mode.
VN 401 9LE DDV D
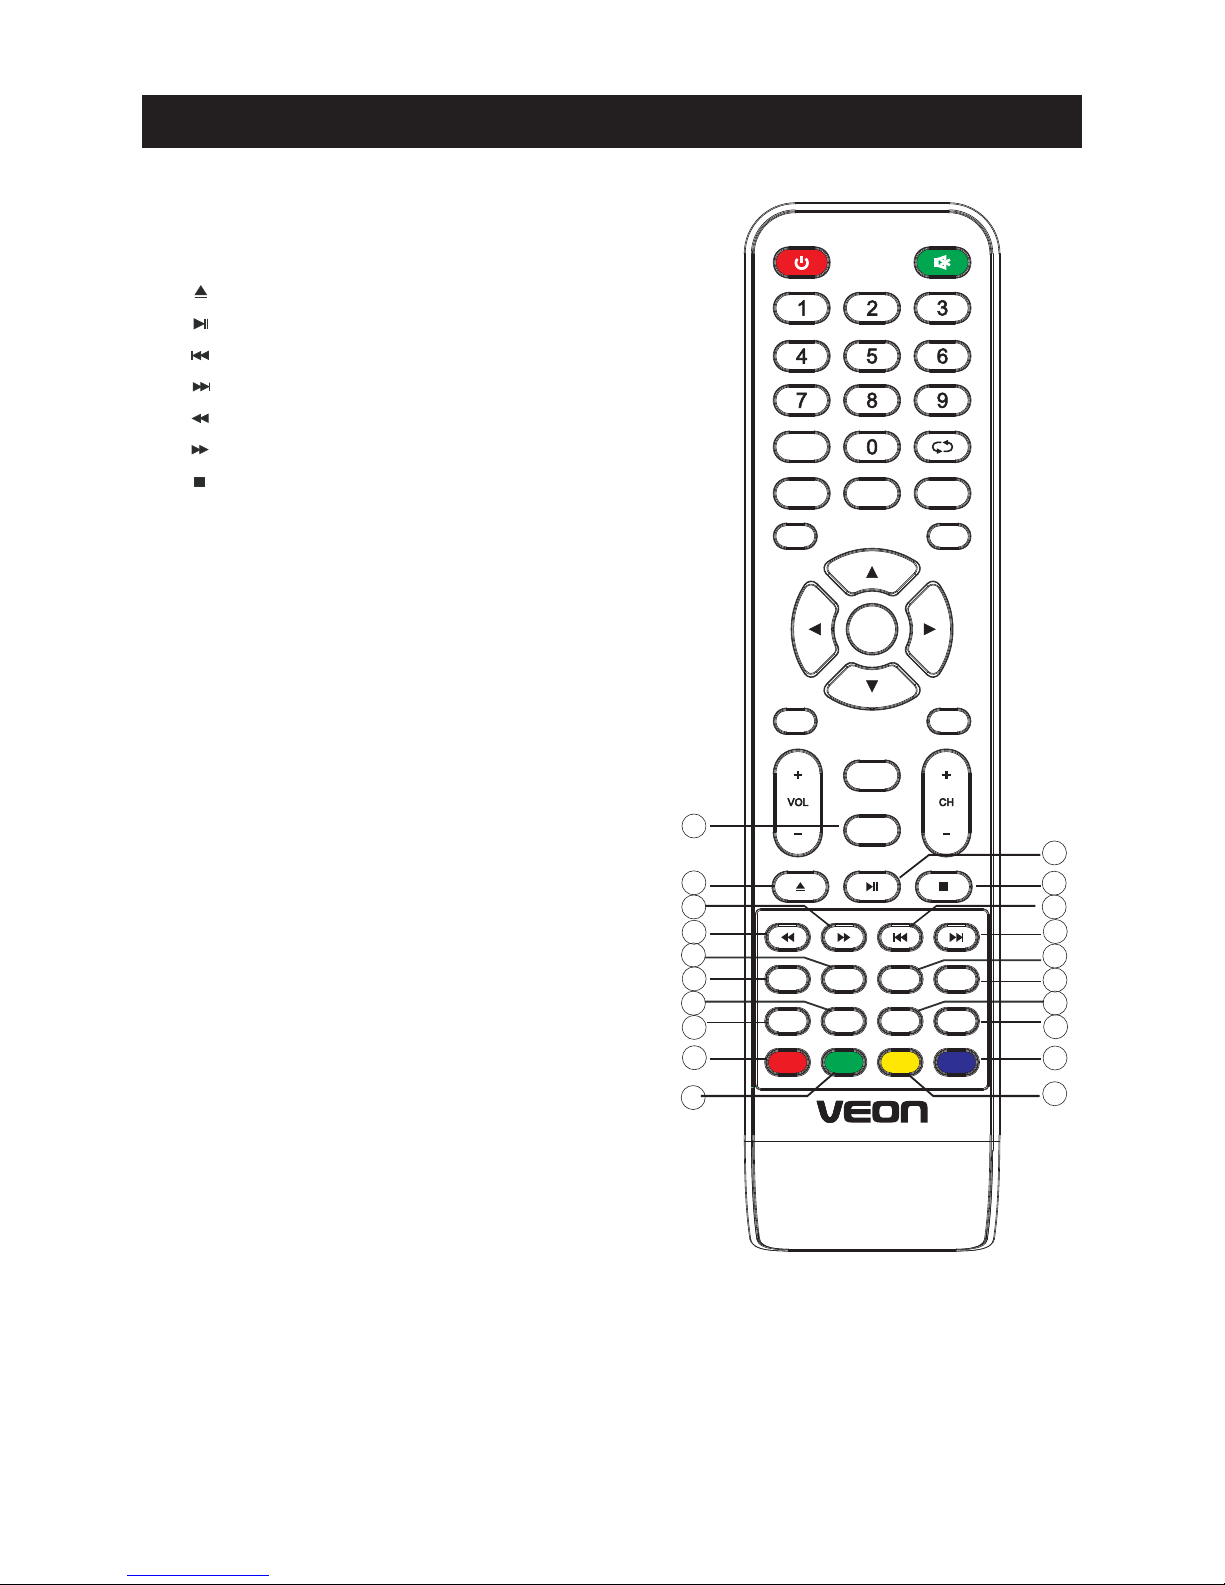
34. :DVD EJECT。
35. :play /pause DVD program.
36. :DVD previous chapter.
37. :DVD next chapter.
38. :DVD fast reverse.
39. :DVD fast forward.
40. :stop DVD program.
41. D.setup:DVD system setup.
42. ZOOM: in DVD source adjust
DVD picture size.
43.Angle:select DVD picture angle.
44.Audio:select DVD disc language.
45.Subtitle:select DVD disc subtitle.
46.D.MENU: DVD disc menu .press this to access
the menu.
47.D.Title:Press to select the dvd title.
48.GOTO:play your favorite title/chapter/track.
49.D.DISP:press to display the source and channel's info.
50.PROG:Press this button to change the playback
order .It varies according to the different discs.
51.STEP: Entrance of DVD OSD features.
52.REPEAT:Repeat playing the title or chapter.
53.A-B:Whilst watching a DVD, press this button
8
Button functionality when watching DVD
(Note that some features are disc-dependent):
the start and again at the end of a desired section
to watch it repeatedly.
47
37
35
40
34
39
38
42
46
50
43
53
49
48
44
45
36
52
51
41
Remote Control
MENU
SOURCE
ENTER
EXIT
SLEEP
P.MODE S.MODE
INDEX
REVEAL SIZE
CANCEL
HOLD
SUB .PG
RED GREEN
YELLOW
CYAN
D.Menu D.Title
Goto
D.Disp
PROG
STEP
REPEAT
A-B
Zoom
Angle
Subtitle
Audio
D.setup
DTV/ATV
DISPLAY
RECLIST
REC
TIMESHIFT
FREEZE
ASPECT
TV/RADIO
FAV/LIST
SUBTITLE
TEXT
EPG
LANG/AUDIO
VN 401 9LE DDV D
9
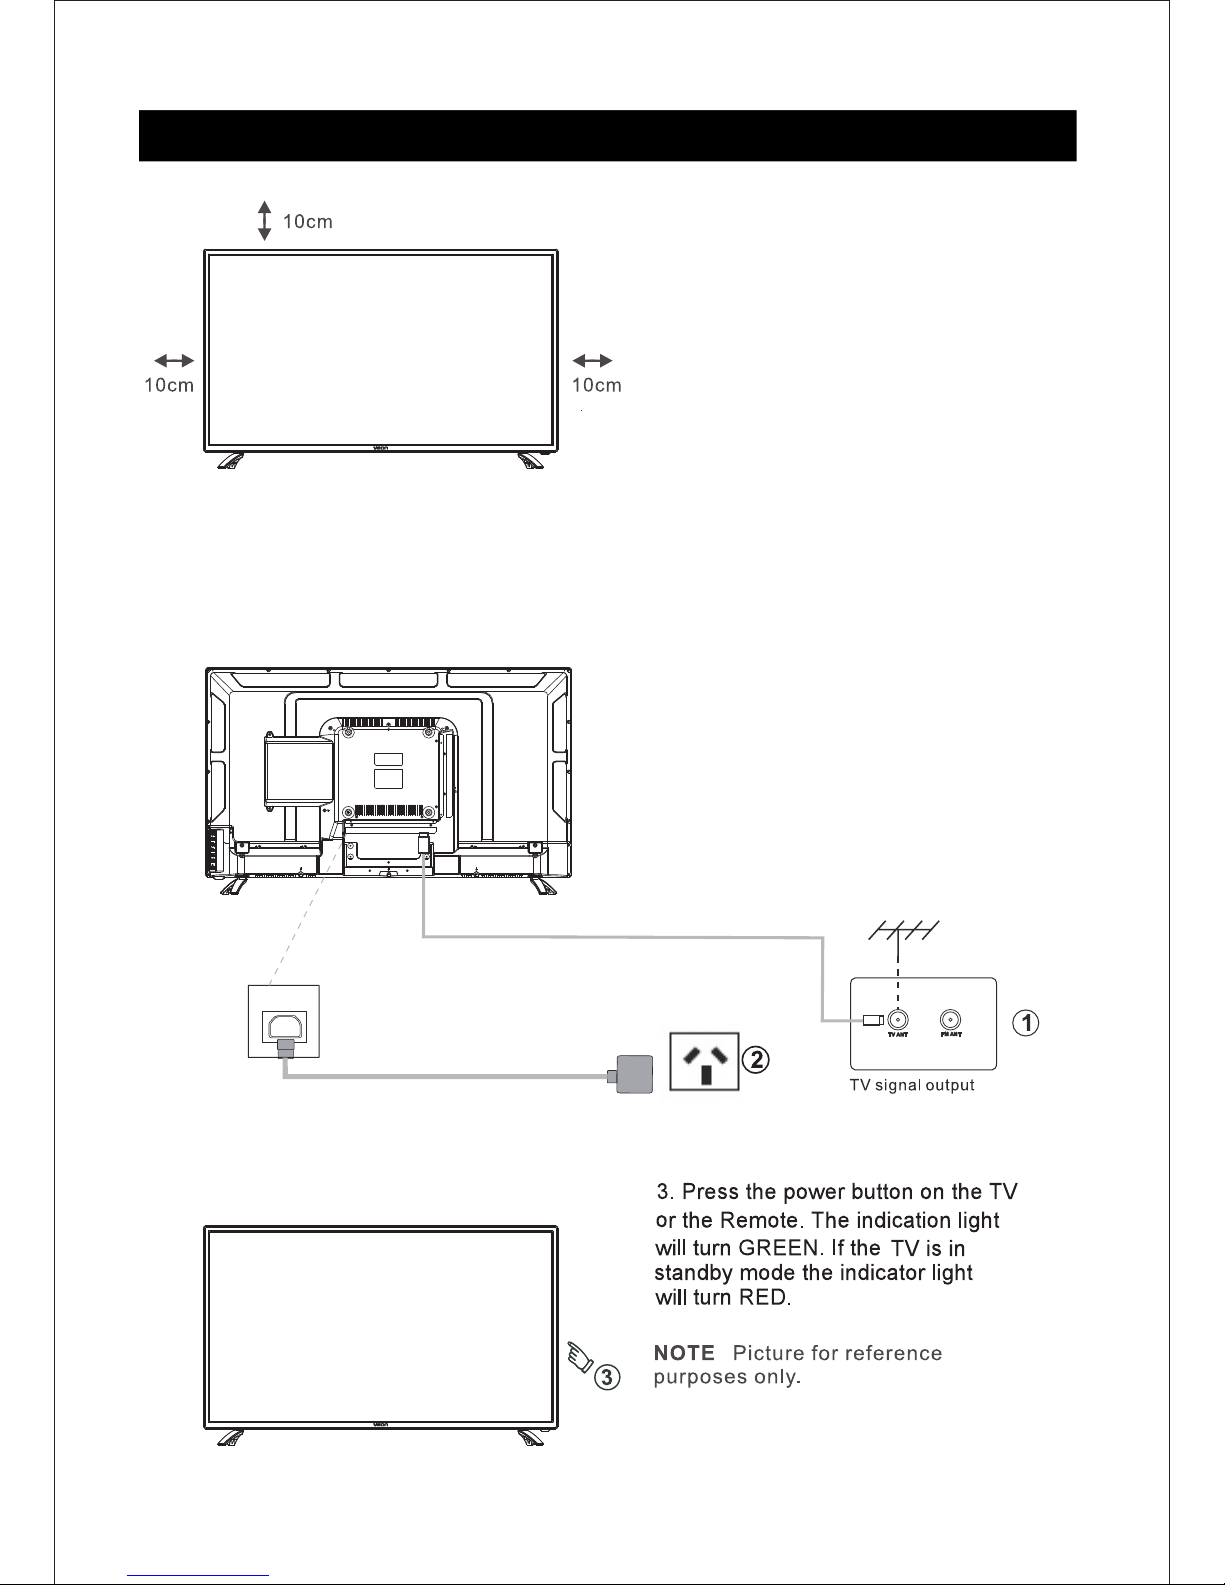
Setting up your TV
Ensure to put your TV in a firm place which
can bear the weight of the TV.
To avoid any danger, please do not expose
or place the TV near water, fire place
And / or heating apparatuses.
(such as heaters, candles, strong lights)
Do not block the ventilation at the back
Of the TV.
Connect Antenna and Power
1.Connect one end of the antenna
cable to the ANT 75 (Antenna socket)
in the rear of your television set. Plug
the other end of the Antenna Cable into
a desired antenna wall socket. (Note
Antenna cable not included)
2.Your TV is equipped with an external
power supply. Please connect the
provided power supply to the Television
set and into the desired AC power outlet.
Basic TV Setup and Installation
Turn on TV
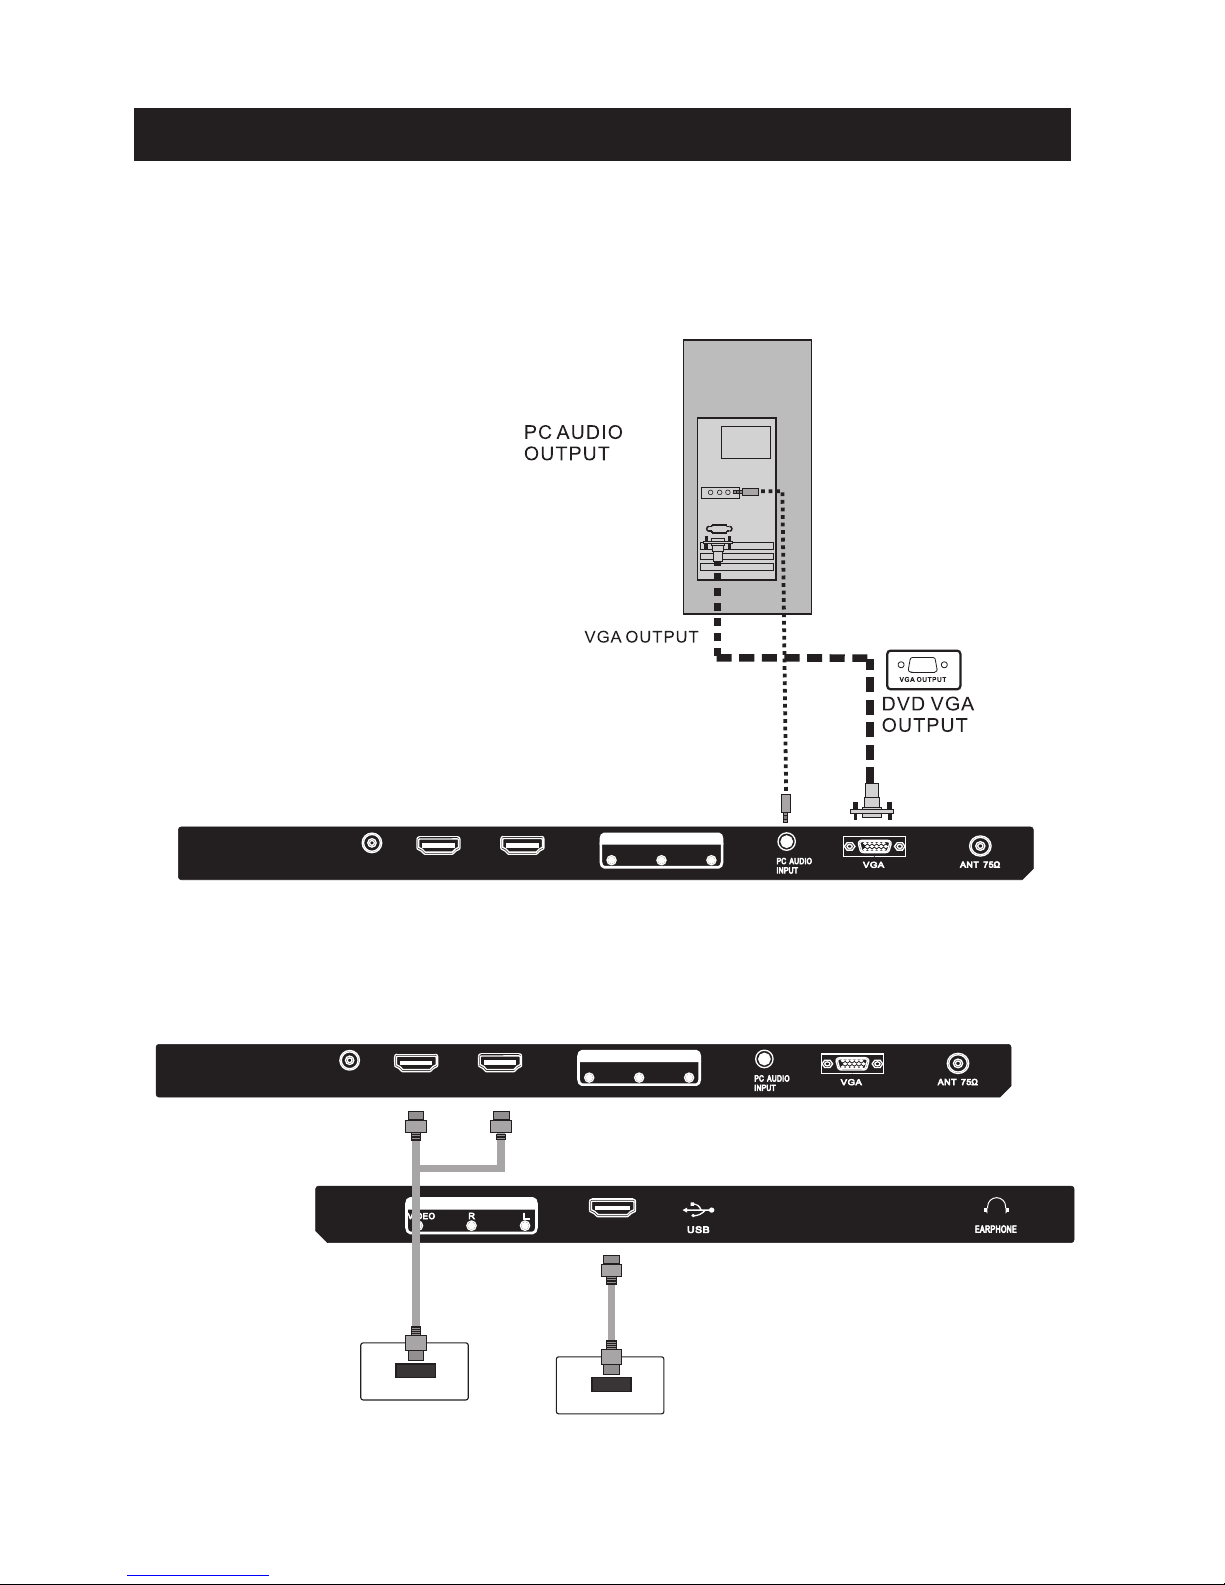
Systems Connections
10
2
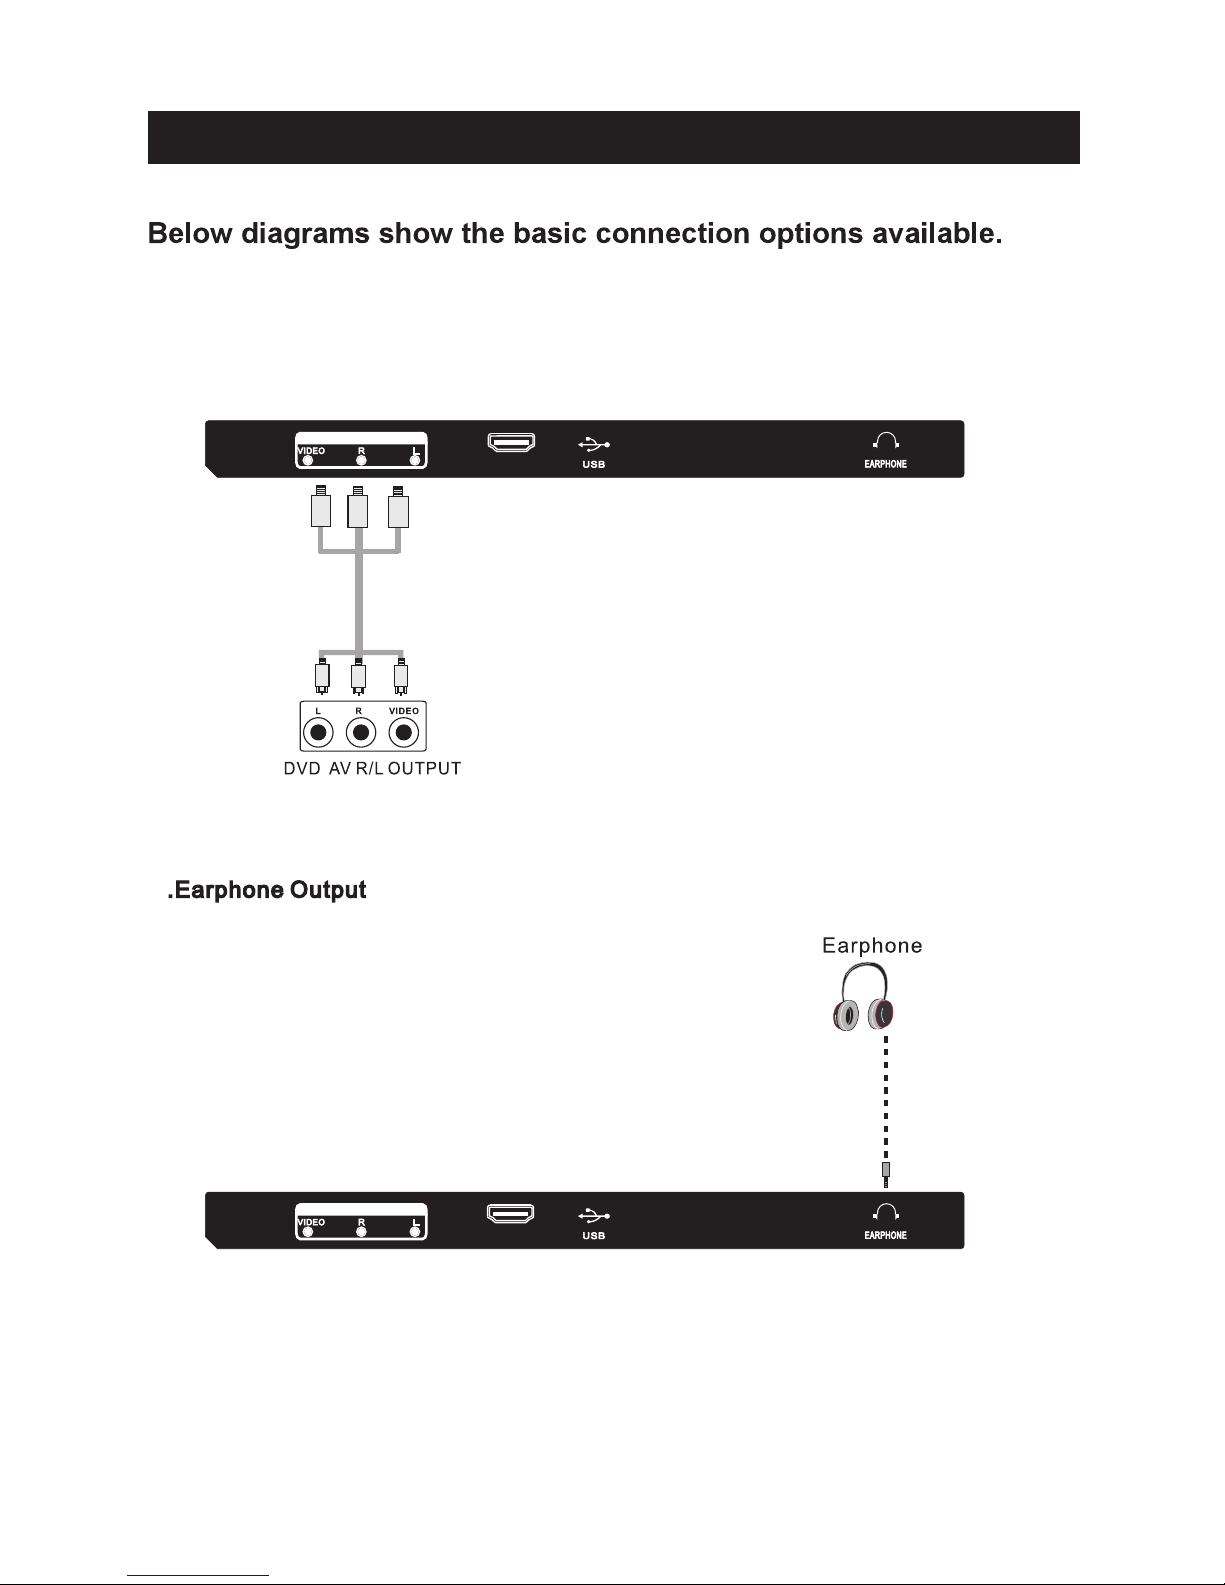
1. AV INPUT
Video/Audio input, press the SOURCE button using either the remote control or the button
Located on the side of the TV set and select the AV option.
HDM I3
HDM I3
AV INP UT
AV INP UT
11
HDMI 3 OUTPUT
3.PC INPUT
PC(VGA)Input, press the SOURCE button on either the remote control or the button
located
on the side of the TV set and select the PC option.
4.HDMI INPUT
HDMI Input, press the SOURCE button on either the remote control or the button located
on the side of the TV set and select the appropriate HDMI option.
Systems Connections
HDM I1
HDM I 2 (ARC)
Y Pb Pr
COA XIAL
AC 100- 240V ~
50/60 Hz
HDM I1
HDM I 2 (ARC)
Y Pb Pr
COA XIAL
AC 100- 240V ~
50/60 Hz
HDM I3
HDMI 1/2 OUTPUT
COM PONEN T INPUT
COM PONEN T INPUT
AV INP UT
 Loading...