

Page 1
Page 2

2
Table of Contents
Chapter 1: Welcome to the Veo Mini Capture 3
1.1 Veo Mini Capture Digital Camera Package Contents 3
1.2 Minimum System Requirements 4
1.3 A Quick Look at the Veo Mini Capture 5
Chapter 2: Getting Started 6
2.1 Battery Installation 6
2.2 Turning the Power On/Off 7
2.3 Taking a Picture 7
2.4 Recording a Video 8
2.5 Inserting & Removing an SD Memory Card (Not included) 8
2.6 SD Memory Card Storage Capacity 9
Chapter 3: Camera Settings & Features 10
3.1 Status Display 10
3.2 Camera Settings 10
3.3 Deleting Images 12
3.4 Low Light Warning 12
3.5 Memory Full Warning 12
Chapter 4: Software Installation & Bundled Software 13
4.1 Software Installation 13
4.2 Bundled Software 14
Chapter 5: Connecting the Camera & Downloading Images 16
5.1 Connecting the Mini Capture 16
5.2 Downloading pictures & videos to your computer 16
Chapter 6: Web Camera Mode 18
6.1 Taking a Snapshot 19
6.2 Recording a Video 19
6.3 Web Camera Settings 20
6.4 Viewing Pictures & Videos in the Album 21
Chapter 7: Sending Pictures & Videos 24
7.1 Selecting your E-mail Program 24
7.2 Sending Pictures & Video From the Web Camera Mode 24
7.3 Sending Pictures & Video Downloaded From the Camera 25
Chapter 8: Video Instant Messaging 26
Technical Specifications 28
Troubleshooting 29
Additional Help & Resources 30
Warranty 31
Page 3
3
Chapter 1
Welcome to the Veo Mini Capture
Thank you for purchasing the Veo Mini Capture digital camera. The Veo Mini Capture takes high quality
digital images in a convenient, easy-to-carry size to ensure that you'll alway s be ready to take pictures at
any moment. We hope you'll enjoy using the camera with family and friends everywhere. Before you start
to use your camera, please refer to this User's Guide to become familiar with the features and functions of
the Veo Mini Capture digital camera.
1.1 Veo Mini Capture Digital Camera Package Contents
Before using the camera, please check to ensure that all the items have been included in your package:
• 1 - Veo Mini Capture Camera
• 1 - 6’ USB 1.1 Cable
• 1 - AAA Alkaline Battery
• 1 - Quick Start Guide
• 1 - Veo Mini Capture CD-ROM (containing Camera Driver & Bundled Software)
Important! If any of the package contents listed above are missing, please contact the
retailer where you purchased the product to exchange the package.
Page 4

4
1.2 Minimum System Requirements
PC Requirements
• 300 MHz Intel® Pentium II®, AMD® K-6 or higher
• 200 MB free hard disk space
• 32 MB RAM or better
• Available USB Port
• Display adapter with screen resolution at least 800x600 in 24-bit color
• 4x CD -ROM drive or better
• Microsoft® Windows® 98SE/Me/2000/XP
• Email program (i.e. Microsoft Outlook, Outlook Express, Yahoo! E-mail, AOL, etc.)
• Optional: SD™ Card Reader
Mac Requirements
• Power Macintosh® 266 MHz or later
• 6MB free hard disk space
• 8MB RAM or better
• Available USB port
• 256-color display adaptor
• 4x CD -ROM drive or better
• SD™ Memory Card
• SD™ Card Reader
• Macintosh
• QuickTime™ 4.0 or later
• CarbonLib 1.3.1 (free download from the Apple website)
®
OS 8.6 or later
Page 5
5
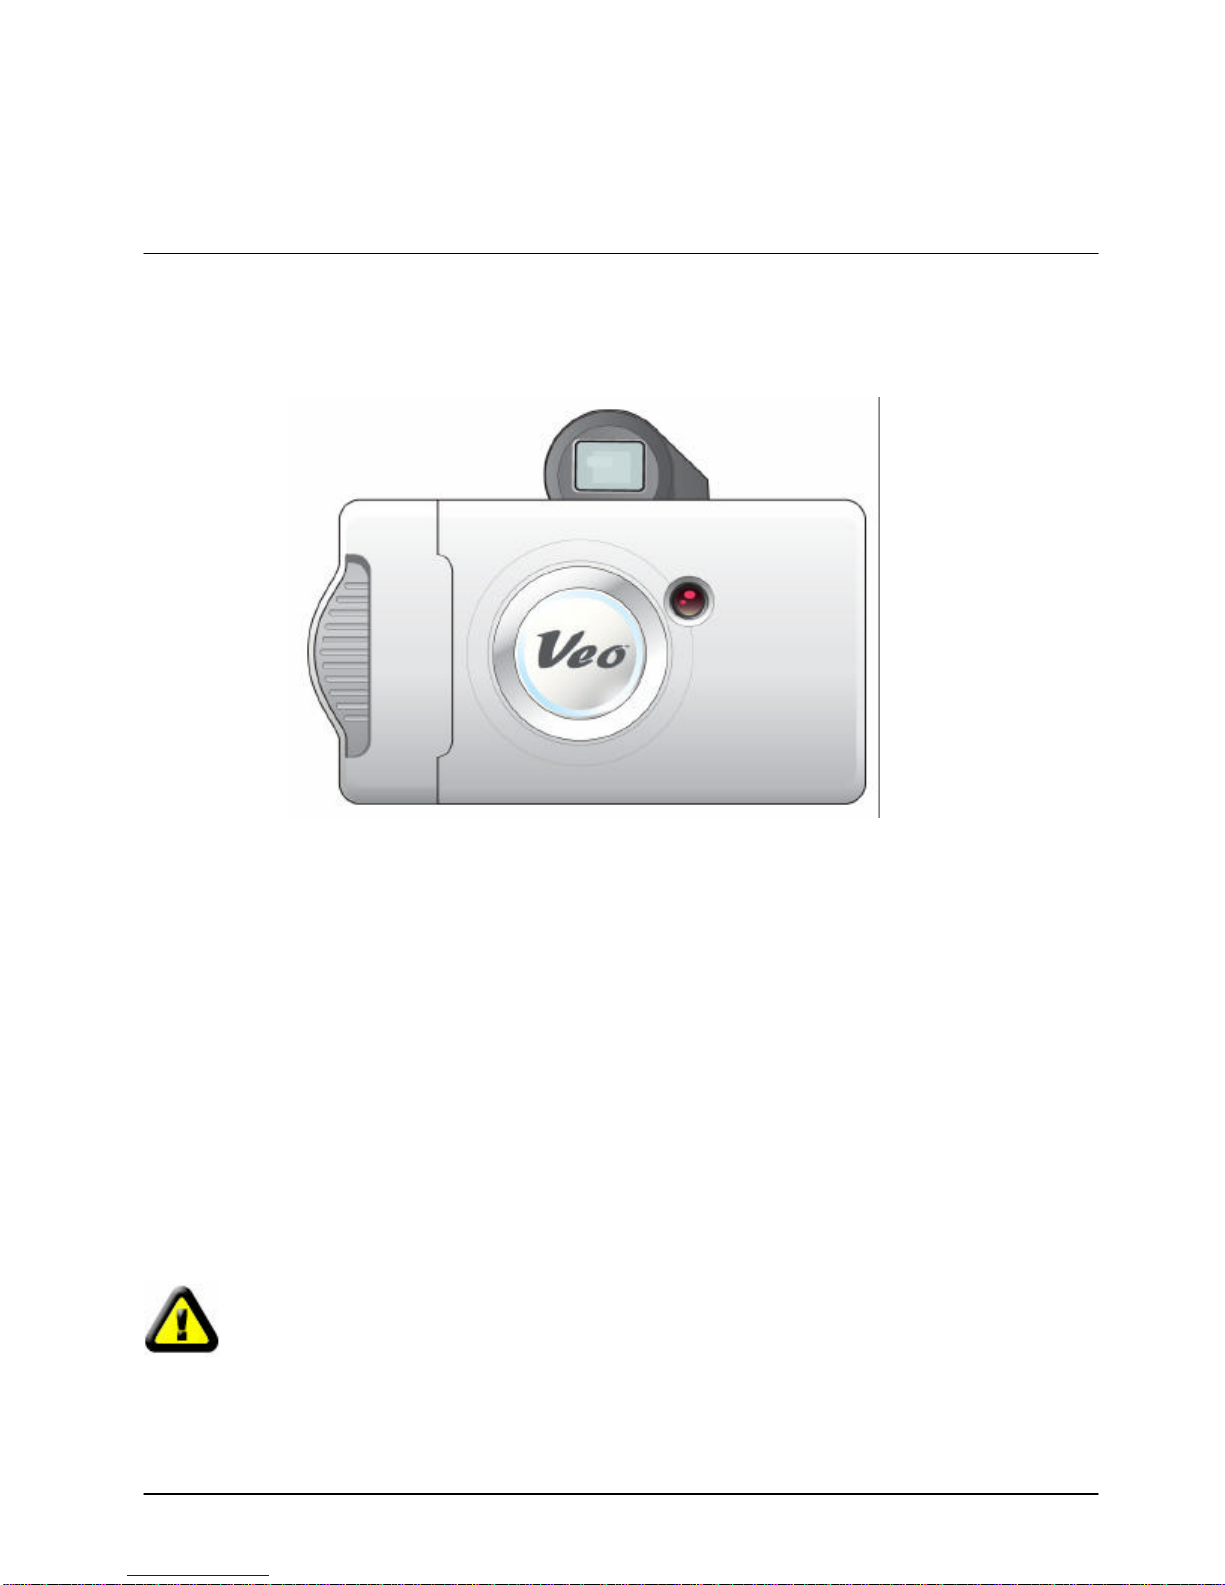
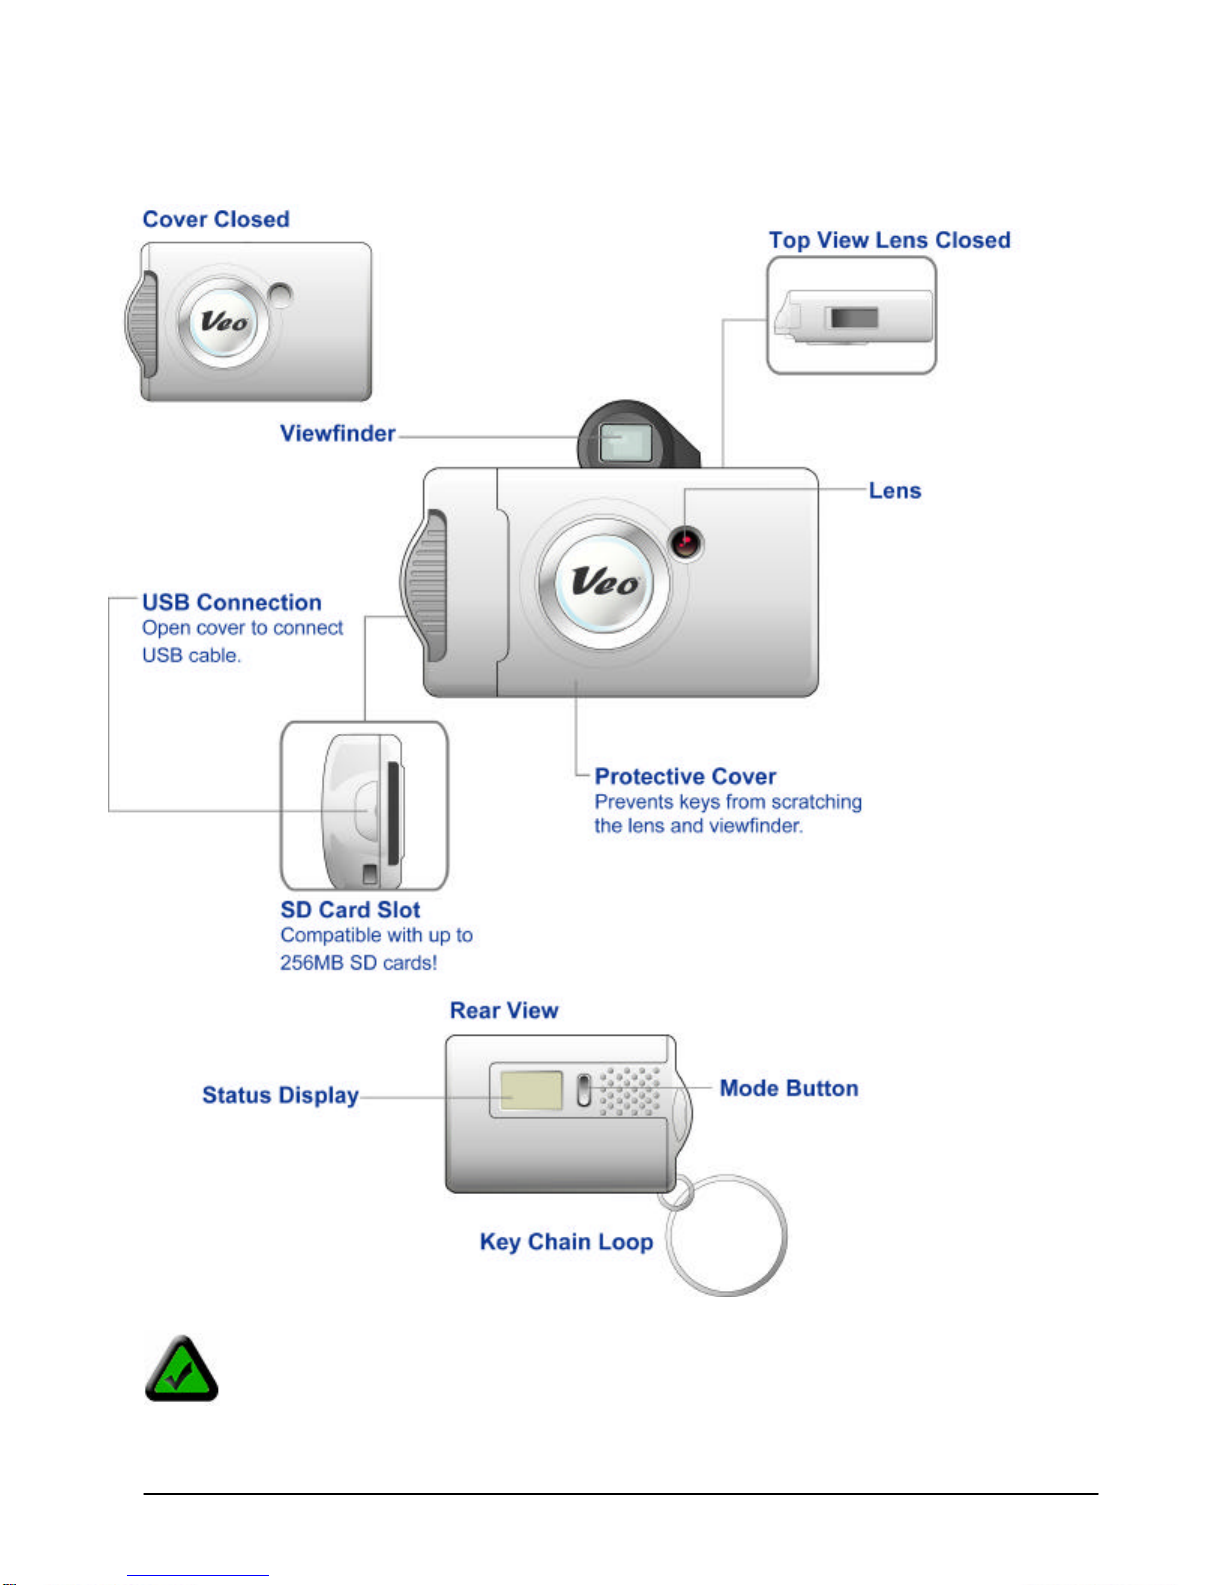
1.3 A Quick Look at the Veo Mini Capture
The camera has a Macro/Landscape mode switch on the side of the camera which can be
used to adjust the focus. Macro: Used for subjects about 2’-6’ away. Landscape: Used for
subjects greater than 6’ away.
Page 6
6
2.1 Battery Installation
Chapter 2
Getting Started
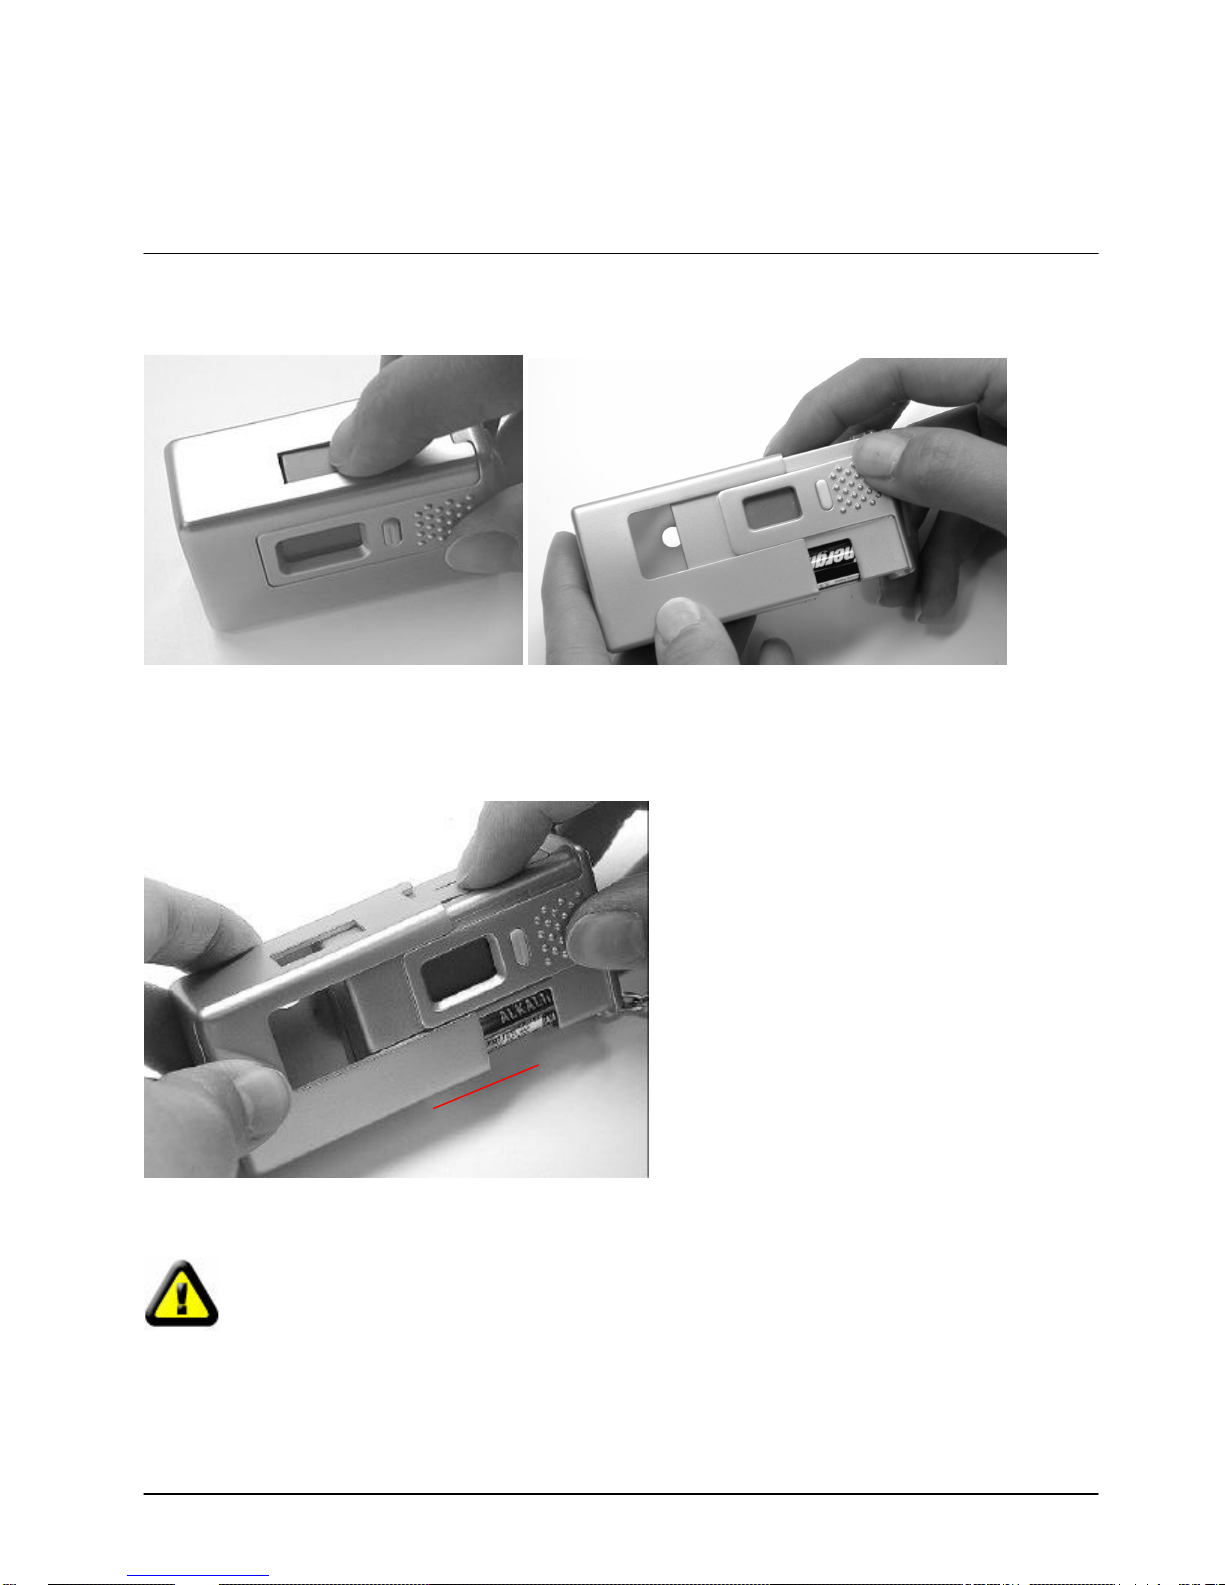
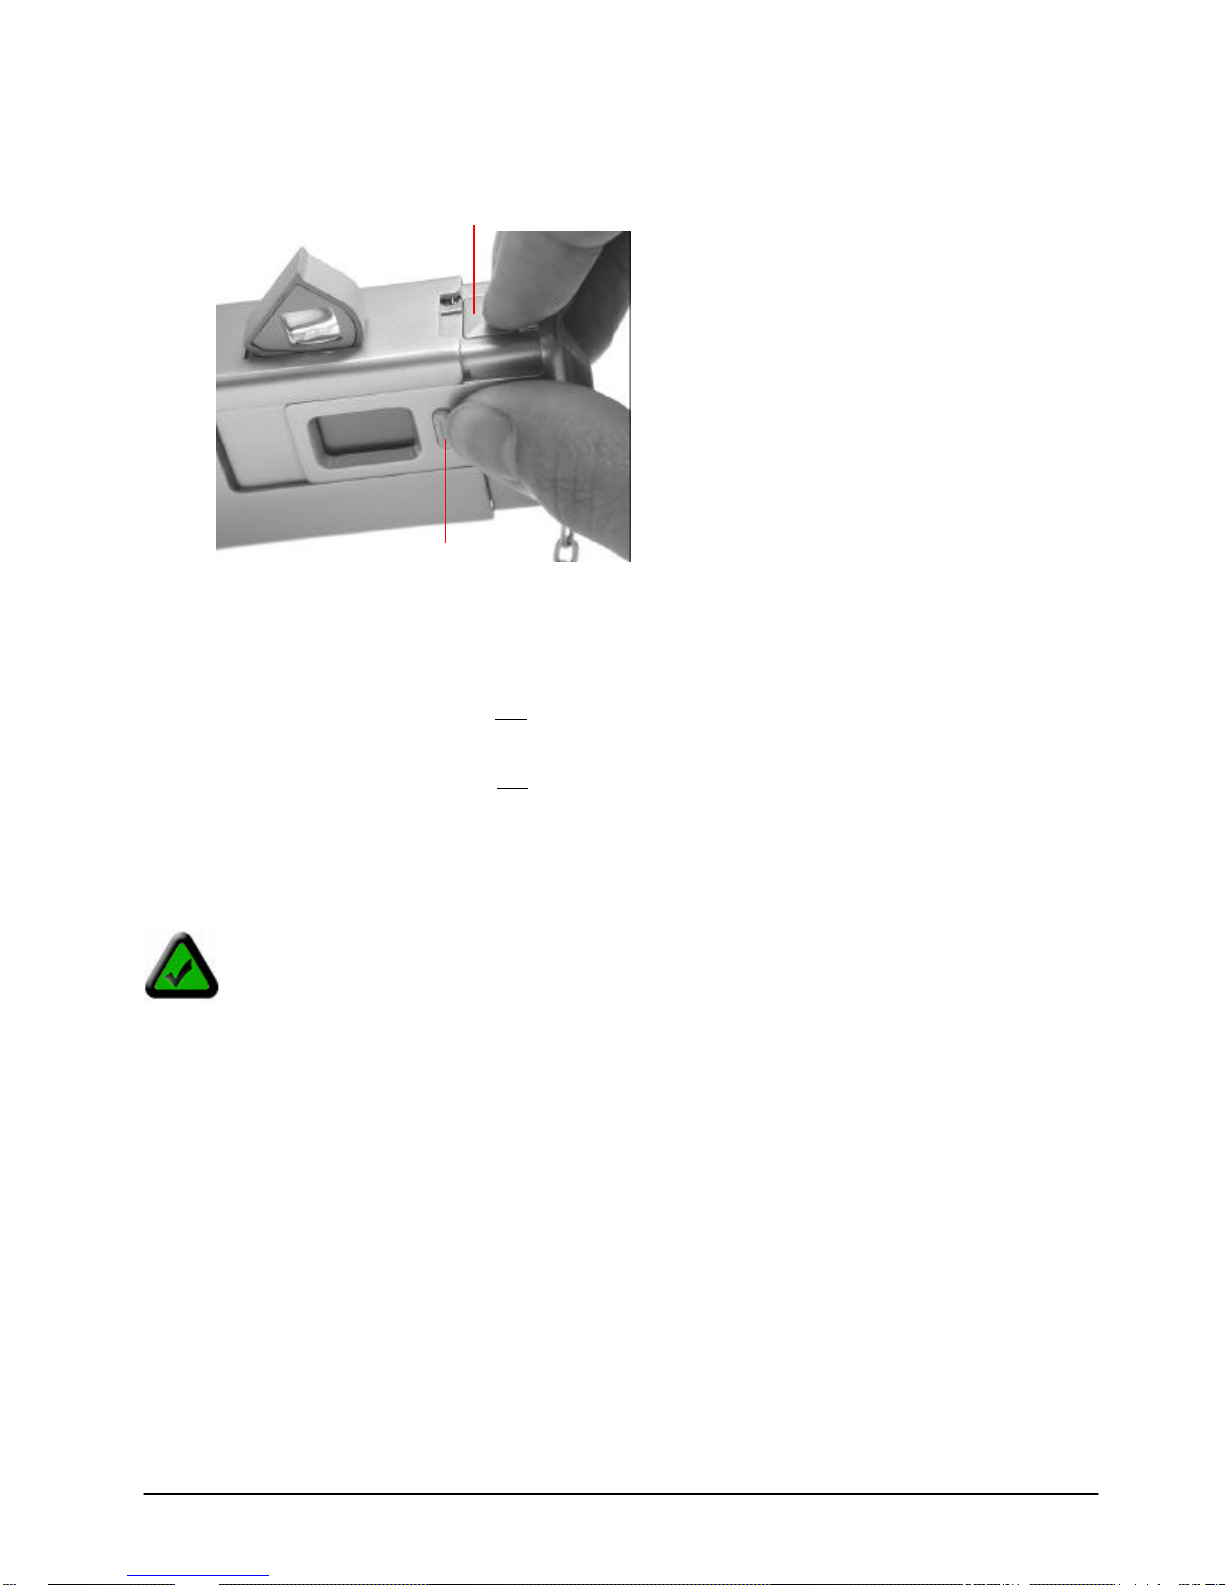
1. Hold down the viewfinder on the top of the camera and slide the camera cover off.
2. Insert a single AAA battery inside the battery compartment. Make sure that you insert the battery with
the correct orientation as indicated by the markings inside the battery compartment.
3. Hold down the viewfinder and slide the camera cover back to insert the camera into its cover.
IMPORTANT! When using only the camera’s internal memory, make sure to always have
enough battery power since the camera utilizes SDRAM, which is volatile memory. If there is
not enough power or the battery is removed for longer than 3 minutes , the pictures will be lost
from the camera. Make sure to always download your pictures as soon as possible or replace
the battery with a new one after you have downloaded the pictures if the batteries are low.
Page 7
7
2.2 Turning the Power On/Off
Shutter button
Mode button
1. Slide the camera cover open.
2. The viewfinder will pop up from the top of the camera.
3. To turn the camera on: Press and hold the Mode button for three seconds. The LCD status
display will turn on.
4. To turn the camera off: Press and hold the Mode button for three seconds. The LCD status
display will turn off.
2.3 Taking a Picture
Before you take a picture or record a video, make sure that the camera cover is extended and
there are no obstructions covering the front of the camera lens.
To take pictures with your camera, make sure t he camera is powered on and the camera is in the correct
mode (i.e. picture taking mode if you want to take pictures, video mode if you want to record a video).
Frame your subject through the viewfinder and press the Shutter button to take a picture.
When you snap a picture, your camera takes about one second to process and will beep once when the
process is completed. The picture counter on the LCD status will increase by 1. (If taking pictures in Burst
mode, the picture counter on the LCD status will increase by 3. )
When saving a picture or a video clip with an SD memory card installed, the LCD will indicate the camera
is saving the picture or video by displaying a bar rotating clockwise in a circular pattern.
Page 8
8
2.4 Recording a Video
Make sure the video clip mode is visible on the LCD screen before you record a video. To switch
to Video Clip mode, please refer to the Camera Settings section.
Press and hold the Shutter button to record a video and release the Shutter button to stop recording.
While recording a video clip, the resolution mode symbol will rotate clockwise in a circle. The Mini Capture
can record individual video clips up to a maximum of 4MBs in size.
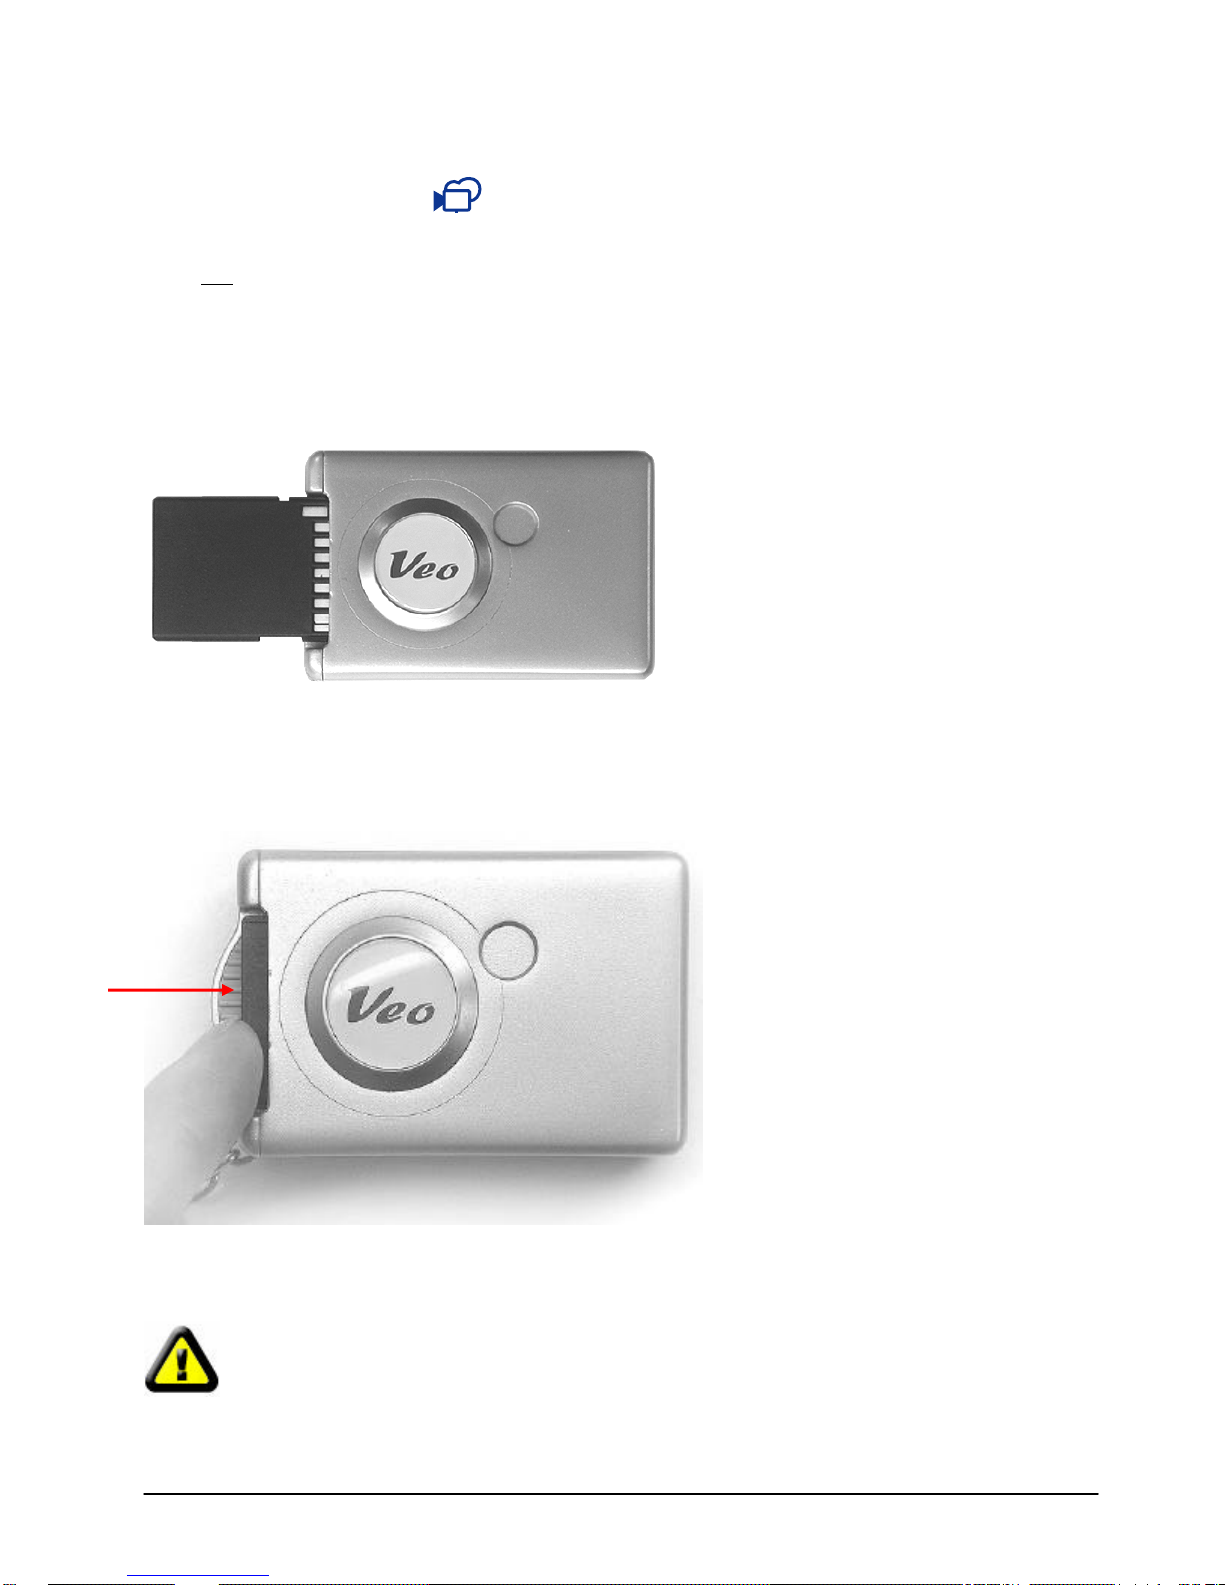
2.5 Insert ing & Removing an SD Memory Card (Not included)
To insert: Slide the SD memory card into the SD slot until the memory card clicks into position. The SD
memory card can only fit in one way. Do not force the memory card into the SD slot. If you cannot insert
the SD memory card, make sure you have the SD memory card properly oriented and then try inserting it
again.
To remove: Push the SD memory card into the camera until you hear a click and then pull the SD card
out from the slot.
CAUTION! When the SD card is saving or transferring data, never perform the following actions:
• Removing the SD memory card
• Turning off the camera power
• Subjecting the camera to strong vibration or shock
Page 9

9
2.6 SD Memory Card Storage Capacity
Secure Digital
Mode
The Mini Capture can utilize removable Secure Digital (SD) memory cards (not included) up to 256MB in
capacity. The use of a higher capacity SD memory card allows you to take more pictures.
An SD memory card is not included with this camera. You can purchase an SD memory card
at a local computer or electronics store or from our webpage at www.veo.com
Picture Capacity
Table of Approximate Picture Capacity (# of JPEG)*
High Resolution
Card Capacity (MB)
On-Board Memory (8MB) 22 35 130
16 67 74 391
32 111 174 651
64 200 313 1172
128 378 590 2214
256 733 1146 4297
*Picture capacities are approximate and are scene dependent. Less complex scenes will allow more pictures to be taken with the
camera.
Mode
(1600x1200)
Video Capacity
The Mini Capture can record individual video clips (MPEG) up to a maximum of 4MBs in size. For
example, if you have inserted a 32 MB SD memory card, you will be able to record up to eight 4MB video
clips.
Normal Resolution
(1280x960)
Low Resolution
Mode
(640x480)
Page 10

10
è
è
è
3.1 Status Display
Chapter 3
Camera Settings & Features
3.2 Camera Settings
To change the camera modes, press the Mode button. Each press of the Mode button will cycle to a
different mode, indicated by a blinking icon. To confirm the m ode change and save the setting, press the
Shutter button. Each press of the Mode button changes the mode according to this cycle:
è
Normal Low High Video Self-Timer Burst Delete Format
1. Resolutions
Low Resolution – (640x480)
Good for e-mailing or posting pictures on a webpage
High Resolution - (1600x1200)
Good for printing pictures up to 5”x7”
Normal - (1280x960)
[Default setting] Good for printing pictures up to 4”x6”
Video Clip Mode
Can record short videos clips at 320x240 resolution
è
è
è
dEL
F
Page 11

11
2. Self-Timer
Self-Timer Mode
If the Self-Timer mode is selected, a 10-second countdown will be gin when you press the Shutter button
to take a picture. You will hear the camera beep continuously until the picture is taken.
Takes pictures after a 10 second delay
3. Burst Mode
Burst Mode
Shoots three continuous pictures while the shutter button is pressed down
Burst mode only works in Normal and Low resolutions. If you attempt to set the Burst mode with the High
resolution setting, it will automatically take the picture in Normal resolution.
4. Delete Mode
dEL
Delete the last captured picture or video
Deletes the last captured picture or video taken with the camera
To delete the last captured picture or recorded video, change the mode on the camera until you see “dEL”
appear on the LCD status display. Press the Shutter button while “dEL” is blinking to delete the last
picture or vid eo that was captured.
5. Format Mode
F
SD Card inserted
Appears when an SD memory card is in the camera
Format SD Card
Appears when an SD memory card is in the camera and in the format SD card mode
Format On-Board Memory
Appears when using the On-Board memory and in the format mode
If an SD Card is inserted in the camera, appears in the setting mode and all your pictures and videos
will be saved to the SD Card. If no SD card is inserted in the camera, pictures and videos will be saved to
the camera’s internal On-Board Memory.
Note: If the current selected mode blinks for three seconds and you do not press any buttons,
the camera will automatically revert back to the previous mode/settings .
6. Battery indicator
Battery Full
The battery is full and the camera can be used
Battery Low
The battery is low and needs to be replaced soon
Page 12

12
3.3 Deleting Images
You can delete the last picture or video taken with the camera or format the memory to delete all the
images from the camera at once.
To delete the last picture or video
1. Keep pressing the Mode button until it cycles to the “Delete mode” indicated by: dEL
2. Press the Shutter button to delete the last image or video taken with the camera. The last picture will
be deleted from the camera’s memory or SD memory card (if an SD memory card is inserted in the
camera).
3. If you do not want to delete the last picture or video, press the Mode button again which will cancel this
operation.
To format the On-Board Memory
1. Keep pressing the Mode button until it cycles to the “Format mode” indicated by: F
2. Press the Shutter button. You will be prompted with a blinking “YES.” If you are certain that you want to
format the On-Board memory and delete all the pictures from the camera, press the Shutter button.
3. If you do not want to format and delete all the pictures from the camera, press the Mode button again
which will cancel this operation.
To format the SD memory card
1. Ensure that your SD memory card is fully inserted in the camera.
2. Keep pressing the Mode button until it cycles to the “Format mode” indicated by:
3. Press the Shutter button. You will be prompted with a blinking “YES.” If you are certain that you want to
format the SD memory card and delete all the pictures from the SD memory card, press the Shutter
button.
4. If you do not want to format and delete all the pictures from the SD memory card, press the Mode
button again which will cancel this operation.
Note: The camera does not allow you to choose specific images to delete. You can only delete
the last image taken or all of the images.
3.4 Low Light Warning
If you take a picture in a low light ing condition, your camera will give you a low light warning by displaying
L-L to prompt you that the lighting condition may be too dark. Try taking the picture where there is more
light, otherwise your pictures may come out dark or blurry.
3.5 Memory Full Warning
If there is not enough remaining memory to store another picture or video, your camera will give you a
memory full warning by beeping and displaying FUL to prompt that the memory is full and the picture or
video cannot be saved. Download your pictures to the computer first and then erase the camera memory
to take more pictures or videos.
Page 13

13
Chapter 4
Install the software
Software Installation & Bundled Software
4.1 Software Installation
Make sure you install the software before connecting your Veo Mini Capture camera to your
computer. If you have already plugged the camera into the computer, please unplug it before
installing the software.
1. Insert the Veo Mini Capture installation CD into the CD-ROM drive in your computer. Autorun
displays the installation screen. *
View the User’s Guide
Exit the software installation
2. Click [Install] to start the installation. You may deselect (uncheck) any additional software you do
not wish to install. For more information regarding the Bundled Software, refer to the Bundled
Software section.
3. Follow the prompts to finish the installation. Make sure you restart your computer after you
complete the installation.
*Note: If Autorun does not automatically start, click on the Windows Start button and then select Run. Assuming your
CD-ROM drive is the D drive, type “d: \Autorun” in the Run dialog box. If Autorun still does not run, consult your
computer manual or manufacturer to locate the CD-ROM drive.
Page 14

14
4.2 Bundled Software
ACDSee 5.0
The most useful and complete way to find, view,
manage, organize, and share your pictures.
ACD FotoSlate 2.0
Allows you to easily print your photos in over 450
templates with text, color, and other photo
enhancements.
ACD FotoAngelo 2.0
Lets you quickly combine images, audio, text and color
to creat e custom photo screensavers and slideshows.
ACD software titles are third-party software that have been bundled with the camera as a creative
resource to manage your pictures. For more information or to obtain technical support for these three
ACD applications, please refer to the ACD Systems website at: http://www.acdsystems.com
DirectX 8.0 or above:
Enables your PC to use advanced video and graphics.
Microsoft DirectX 8.0 or higher is required to use many of the software programs bundled with this
camera. Microsoft DirectX 8.0 or higher is already installed on your computer if you are using Windows
XP. For other operat ing systems, the installer will determine if your computer is using a version of DirectX
that is 8.0 or higher. If you are using an older version of DirectX, the installer will update your version of
DirectX. More information regarding DirectX can be found on the Microsoft website at:
http://www.microsoft.com/directx
Page 15

15
Capture Applications - Main Screen
Starts ACD FotoSlate 2.0
Exit the software
Starts the Veo Web Camera
software
When you double-click on the Veo Capture icon, the following screen will appear:
Veo Capture
Starts the Veo Capture Camera Download
Starts ACDSee 5.0
Starts ACD FotoAngelo 2.0
Click on one of the options to start the corresponding software:
Download your Pictures – Starts the Veo Capture Camera Download program. This program allows you
to transfer your pictures from the camera to the My Documents\My Pictures\VeoCapture folder (default)
on your computer or any other folder that you specify.
Manage your Photos – Starts ACDSee 5.0. This program allows you to organize, edit, and manage your
pictures.
Print your Photos – Starts ACD FotoSlate 2.0. This program allows you to print your photos using
various templates with text, color, and other photo enhancements.
Create a Screen Saver – Starts ACD FotoAngelo 2.0. This program allows you to combine images,
audio, text and color to creat e custom photo screensavers and slideshows.
Start Web Camera Mode – Starts the Veo Web Camera software. This program allows you to take
snapshots and record videos which you can e-mail to friends and family.
Exit – Exits the Veo Capture software.
Page 16

16
Chapter 5
Starts the Veo Capture Camera Download
2) Plug the other end of the USB cable to the computer’s USB port.
Connecting the Camera & Downloading Images
5.1 Connecting the Mini Capture
Plug the USB cable into the camera and any available USB port on your computer. Your computer should
recognize a new device being installed. If the camera is properly detected, the camera will display “USb”
on the LCD status display.
1) Open the cover on the side of the camera to plug in the USB cable.
If your computer does not recognize a new device when the camera is connected, please refer to the
Troubleshooting section of this manual.
5.2 Downloading pictures & videos to your computer
There are two ways to download pictures and videos from your camera to your computer:
1. Download pictures & videos with the USB cable (PC only)
A) Make sure your camera is connected and powered on.
B) Double click on the Veo Capture icon on your desktop.
C) Click on [Download your Pictures].
Veo Captu re
Page 17

17
D) The Veo Capture Camera Download window will open. Click [Download] to download your photos
to the My Documents\My Pictures\VeoCapture folder on your computer. If you would like to specify a
different folder, click [Browse ] to specify the folder first.
E) Once the pictures are downloaded to your computer, you will be prompted to delete the pictures
from the camera. If you are ready to delete all the pictures and movies from the camera after
downloading, click “Yes” to delete all the pictures, otherwise click “No.” Deleting all the pictures and
movies from the camera will erase the camera memory and allow you to take more pictures again.
Note: You do not need to turn the camera or computer off when connecting the USB cable,
however, when you disconnect the USB cable from the camera when it is connected to the
USB port, the camera will automatically turn off.
2. Download pictures & videos using an SD Card reader (Optional on PC, Required on Mac)
An alternat e way to download images is to transfer your pictures directly from the SD card using an SD
card reader (not included) to the computer.
Eject the SD card from the camera and insert it into an SD card reader connected to the computer.
Windows:
A) Double -click on the My Computer icon on your desktop and locate the drive that contains the
SD memory card.
B) Copy the images from the SD memory card to a folder on your computer, such as My Pictures
or the Desktop.
Mac:
A) Double -click on the SD memory card icon on your desktop.
B) Drag the pictures from the folder on the SD memory card to your desktop or any other folder.
Page 18

18
Chapter 6
Web Camera Mode
The Veo Web Camera software allows you to take snapshots and record videos with the Mini Capture
when it is connected to the PC. You can then e-mail or print the snapshots or e-mail videos to your
friends and family. To use the camera as a web camera for instant messaging, please refer to Chapter 8:
Video Instant Messaging.
1. Start the Veo Web Camera software by double-clicking on the Veo Capture icon on your desktop.
Veo Capture
2. From the main Capture Applications menu, click on Start Web Camera Mode to start the Veo Web
Camera software.
3. The Veo Web Camera software will start. You can then use the software to take snapshots with your
camera or record video clips.
Starts the Veo Web Camera software
Page 19

19
Snapshot Take a still image (JPEG)
Capture Record a video clip (AVI)
Save Save the video clip you have recorded
Settings Advanced configuration settings
Album
Stores and displays pictures and videos
taken with the Veo Web Camera software
6.1 Taking a Snapshot
1. Make sure your camera is connected to the computer and pointed at your subject.
2. Select the desired resolution at the bottom right of the screen.
3. Click the Snapshot button. The snapshot button will automatically save the photos to the Album in
the JPEG format. The pictures are saved in the My Documents\VeoCapture folder (Windows 2000/XP) or
C:\Program Files \Veo Capture\Album (Windows 98/Me).
6.2 Recording a Video
1. Make sure your camera is connected to the computer and pointed at your subject.
2. When you are ready to record, click the Capture button to begin recording.
3. The Capture button automatically changes to the Stop button.
4. To stop recording, click the Stop button.
5. If you would like to preview the video before saving the video, click the Preview button
to playback the recorded video.
Page 20

20
6. Once you click the Preview button, playback controls will appear. You can click on Pause at any
time to pause playing or click on Play to continue playing. If you want to stop playing the video, click Stop.
7. To save the recorded video to the Album, click the Save button. The video will be saved in the AVI
format.
6.3 Web Camera Settings
You can adjust the web camera settings by clicking the Settings button.
The Settings dialog box consists of three tabs (Capture, Video, Mail Agent) and one button (Advanced) to
adjust picture and video options. Click [OK] button save any settings you have made or click [Cancel] to
leave the settings unchanged.
1. Capture
Maximum video size
This setting specifies the maximum video file size that will be recorded. Please note that most e-mail
providers have a maximum file size limitation for sending attachments. You can uncheck the Maximum
video size checkbox to record longer videos. The default maximum video size is 2 MBs.
Snapshot delay
This setting specifies whether there should be a delay when taking a snapshot. You can enable snapshot
delay by checking the “Snapshot delay” checkbox and then specifying a time delay in seconds. When this
feature is enabled, select the number of seconds to delay the snapshot. You can set the delay up to 99
seconds. This option is disabled by default.
Enable audio
If you have an external microphone connected to your computer, check the “Enable audio” checkbox to
allow you to record videos with audio. Adjust the volume by moving the slider. This option is enabled by
default.
2. Video
You can adjust the Brightness, Contrast, and Auto white balance to get the best possible picture quality.
To manually adjust the color quality, uncheck “Auto white balance” to adjust the color settings by moving
the sliders for Red, Green, and Blue. The default settings are optimized for overall image quality.
Page 21

21
For further video adjustments, click [ Advanced] to display the following screen:
Brightness Adjust if the image is too
dark or bright
Contrast Adjust for better image
Sharpness Adjust if the picture is
Saturation Adjust to improve image
Auto white balance Uncheck to manually
Light frequency 60 Hz/50Hz – Adjust if the
Defaults Resets settings back to
contrast
fuzzy or blurred
color saturation
adjust color settings
image flickers
default
3. Mail Agent
Simple MAPI clients is the default setting which allows you to send snapshots and videos directly from the
web camera mode by pressing the Send button. You may need to adjust the settings or options in your email program, if you have not configured your e-mail program yet . Please refer to Chapter 7: Sending
Pictures & Videos for more information.
6.4 Viewing Pictures & Videos in the Album
Press the Album button to view all the saved pictures and videos in the Album. The Album window
slides out from the main web camera screen to the right of the Application window. It displays the
thumbnails of all your saved files along with additional options.
Page 22

22
To View Files
1. Select the file that you want to view by clicking once on the thumbnail to select it.
2. Click the Open button from the toolbar or double-click on the thumbnail to open the selected
file. Your default graphics program/JPEG viewer will display the picture.
Note: If you open a video clip, your default Media Player program (i.e. Windows Media Player) will
playback the file.
To Send Pictures & Videos
1. Select the file that you want to send by clicking on it once to select it.
2. Click the Send button from the toolbar to open your default e-mail program. You can then send
the picture or video directly from the application if your e-mail program has been correctly configured.
To Print Snapshots
1. Select the snapshot that you want to print it by clicking on it once to select it.
2. Click the Print button from the toolbar to bring up the print window.
3. Your printer’s print window will appear and you can print the picture.
Page 23

23
To Save Files to Another Folder
1. Select the file that you want to save to another folder by clicking on it once to select it.
2. Click the Save button from the toolbar to save the selected file to another folder.
To Delete Files
1. Select the file that you want to delete by clicking on it once to select it.
2. Click the Delete button from the toolbar to delete an unwanted picture or video from the Album.
Note: You can also right -click on the picture or video and then select Delete to delete the picture or video.
To Change the Viewing Format
If you need to view the file details for a particular picture or video, click the Detail button for more
information. The file name, file size, format, resolution, and date and time are listed.
Additional Options for Pictures Only
There are some options are available for pictures only. The options are rotate, mirror, and color. Please
note that these options are not available for videos.
To Rotate Pictures
1. Select a snapshot that you want to rotate by clicking on it once to select it.
2. Click the L Rotate button from the toolbar to rotate the picture counter-clockwise. You can click
the R Rotate button to rotate the picture clockwise.
Mirror
Click the Mirror button if you want to flip the selected picture horizontally, as if looking in a mirror.
Color
Click the Color button to adjust the image color manually.
Page 24

24
Chapter 7
Select your E
-
mail program from the list
Sending Pictures & Videos
7.1 Selecting your E-mail program
In order to send your pictures and videos, you must select your default e-mail program in Windows .
1. Click on Start ->Settings->Control Panel.
2. In the Control Panel, double -click on the Internet Options icon.
3. In the Int ernet Options Properties window, select the Programs tab.
4. Under E-mail, select your e-mail program from the drop-down list.
5. Click [OK] to save your settings.
6. This setting lets Windows know which e-mail program you would like to use to send pictures and
videos with.
Note: Your e-mail program must also be configured to send and receive e-mail. Contact your
Internet Service or E-mail provider for assistance with configuring your e-mail program to send
and receive e-mail.
7.2 Sending Pictures & Videos From the Web Camera Mode
1. Start the Web Camera Mode and click the Album button.
2. Select the file that you want to send by clicking on it once to select it.
3. Click the Send button from the toolbar to open your default e-mail program. You can then send
the picture or video directly from the application if your e-mail program has been configured correctly.
Page 25

25
7.3 Sending Pictures & Videos Downloaded From the Camera
The pictures and videos that you have downloaded from the camera are saved in the My Documents\My
Pictures\VeoCapture folder on your computer.
1. To send these pictures and videos, go to the My Documents\My Pictures\VeoCapture folder where the
pictures are stored.
2. Right -click on the picture or video and select Send To->Mail Recipient .
3. This will automatically start your default e-mail program that you specified in 7.1 Configuring your Email program. You can then type your e-mail message and send the file. The file should be attached to
the e-mail.
Some e-mail providers may not support sending files directly. If you click the Send
button in the Veo Capture application or right-click on a file and select Send To->Mail
Recipient and there is no response, this means that you will need to manually attach the
snapshots or videos to your e-mail. Contact your Internet Service Provider or E-mail
provider for further assistance with sending/attaching files.
Here are some general directions you can use to send a picture or video:
1. Log -in to your e-mail.
2. Compose a new e-mail message.
3. Depending on your e-mail service, look for the Attach, Attachments, or Insert option to attach a
snapshot or video. You will be prompted to browse for the desired file you want to attach. Follow the
directions provided by your web-based e-mail service to attach a file from C:\Program Files\Veo Mini
Capture\Album or My Documents\My Pictures\VeoCapture.
4. Once the file has been attached to your e-mail, the file should appear in the Attachments window.
5. Click the appropriate button to send off your e-mail with the snapshot or video attached to it.
Page 26

26
Chapter 8
Video Instant Messaging
Video Instant Messaging allows you to keep in touch with family, friends and business associates in realtime. Using your Veo web camera with the latest version of MSN Messenger 6.0 is easy and fun. MSN
Messenger 6.0 is a great way to keep in contact with friends and family, whether they’re across town or
across the globe.
MSN Messenger is a Microsoft product and we cannot offer any technical support for this
product beyond what is outlined in this guide. To obtain additional assistance with MSN
Messenger, directly from Microsoft, please refer to the MSN Messenger webpage at:
http://messenger.msn.com or in MSN Messenger, click on Help->Help Topics.
1. Start MSN Messenger and sign-on. In the main MSN Messenger window, double-click on the person’s
name who you’d like to have a Webcam chat with.
2. This will open a conversation window so you can chat with the other person. To invite the other person
to view your webcam, click Webcam to turn your webcam on. This will send an invitation to the other
person, inviting him/her to start a webcam conversation.
Page 27

27
3. If the other person accepts your webcam invitation, you will see your own image in the lower right
corner of the conversation window. You can also use a microphone to talk instead of typing, by clicking
on Audio to turn on your microphone. This will send an audio conversation invitation to the other person.
If the other person accepts the invitation, you can start using your microphone.
4. To view the other person’s webcam, the other person must invite you to view his/her webcam. If the
other person invites you to view their webcam, you will get an invitation in the chat window. Click Accept
to accept the Webcam conversation when you are invited.
You can also use other third-party videoconferencing and web cam software with your camera.
We do not provide support for these third-party software, however, you can obtain support
directly from the third-party videoconferencing/web camera software manufacturer if you
encounter any difficulties.
Page 28

28
Technical Specifications
Sensor Sensor Resolution
Sensor Type:
Shutter:
Lens Aperture:
Focus:
Focus Distance:
View Angle:
Physical Dimensions and Weight Dimensions:
Weight:
Still Image Capture Color Depth:
White Balance:
File Format:
Resolutions:
Compression Ratio:
Exposure Control:
PC Video Capture
Environmental (Ambient) Operating Temperature:
Storage Temperature:
Operating Humidity:
Color Depth:
Exposure Control:
White Balance:
Resolutions:
Video Frame Rate:
Storage Humidity:
1.3 Megapixel (1280 x 1024)
CMOS, 1/3” Optical format
Electronic
F/2.8
Fixed
2 feet to infinity
58º Diagonal
38mm (H) x 60mm (W) x 20mm (D)
1.5” (H) x 2.4” (W) x .79” (D)
85 g (3 oz.) - Including Battery
24 bit true color
Auto
JPEG (EXIF 2.1)
1600x1200, 1280x960, 640x 480
16:1
Auto
24 bit true color
Auto
Auto
320x240, 176x144, 160x 120
6fps@320x240, 12 fps@176x144,
12fps@160x120
-5° to 40° C (23° to 104° F)
-5° to 40° C (23° to 104° F)
15-90% RH
15-90% RH
Page 29

29
Troubleshooting
Problem: Windows does not detect the camera when it is connected to the PC
Solution: Follow the steps below, depending on your operating system:
Windows 98/Me: Click on Start ->Settings->Control Panel->System->Device Manager
Windows 2000: Click on Start->Settings->Control Panel->System->Hardware ->Device Manager
Windows XP: Click on Start->Control Panel->Switch to Classic View->System->Hardware->Device
Manager
1) Look for the Imaging Device category. Is there one present?
2) If you see the Imaging Device category click the [+] next to it and look for the Veo Capture Camera.
Double-click on the Veo Capture Camera and check the Device Status. The Device Status will indicate
what may be wrong with the camera and any suggestions to correct the problem.
3) If you do not have the Imaging Device, make sure that your USB ports are working properly. There
should be a Universal Serial Bus Controller category. Is this category there? If not, contact your computer
manufacturer to enable the USB ports on your computer.
4) Try reinstalling the Veo software and then plug the camera back in.
Alternative suggestion: Try the camera on another computer to verify that the camera is working properly.
Mac: Note that the Veo Mini Capture will not work directly via the USB cable on a Mac. You’ll need to use
an SD memory card (not included) and SD card reader (not included) to transfer pictures from the camera
to the Mac.
Problem: The picture s are dark or blurry.
Solution: The camera does not have a built-in flash. Make sure to take pictures where there is adequate
lighting. Hold the camera steady to prevent the camera from moving when taking a picture. Ensure that
the macro/landscape switch on the side of the camera is in the correct position.
Problem: The pictures are lost from the camera when the battery is discharged or low.
Solution: When using only the camera’s internal memory, make sure to always have enough battery
power since the camera utilizes SDRAM, which is volatile memory. If there is not enough power or the
battery is removed for longer than 3 minutes, the pictures will be lost from the camera. Make sure to
always download your pictures as soon as possible or replace the battery with a new one after you have
downloaded the pictures if the batteries are low.
Problem: The camera doesn ’t turn on or the battery drains too quickly.
Solution: Make sure that you press and hold the Mode button down for 3 seconds to turn the camera on.
Also, make sure that the AAA battery being used is new. The camera utilizes SDRAM, which requires
constant power to store the pictures in the camera’s internal On -Board memory. When not taking pictures,
remove the AAA battery from the camera to prevent the battery from draining. Note that if you remove the
battery for more than 3 minutes, the pictures in the camera will be lost.
Problem: The SD memory card is not detected by the camera.
Solution: The SD memory card brand may not be compatible or the SD memory card may be damaged.
Make sure that you have inserted the SD memory card completely into the camera and in the proper
direction. If this doesn’t help, try using a different SD memory card.
Page 30

30
Additional Help & Resources
While we hope your experience with the Veo Mini Capture camera is enjoyable, you may experience
some issues or have some questions that this User’s Guide has not answered.
Go directly to the Technical Support section on our webpage at www.veo.com for the latest information
regarding your camera.
When obtaining technical support, please make sure to have the following information handy:
• Camera Model
• Camera Serial Number
• Operating System
• Computer Brand/Model
• Detailed Description of the Problem
For detailed Technical Support, Frequently Asked Questions, and resources about the Veo Mini Capture,
the website is accessible directly by clicking the ? (Online help) button on the top right hand corner of the
Album or by selecting the Veo logo at the bottom of the application. The website is also accessible at the
following URL address: http://www.veo.com
Page 31

31
Warranty
Veo Statement of Limited Warranty
Veo warrants that for a period of 1 (one) year from the date of purchase that this product 1) is free from
manufacturer defects in materials and workmanship and 2) conforms to its specifications. If this product
does not function due to manufacturer defects during the warranty period, Veo, at its option, will either
replace this product with one that is functionally equivalent or will refund your purchase price. These are
your exclusive remedies under this warranty. Please visit our webpage for warranty service. This product
is distributed and sold by Veo. Veo Mini Capture camera is a registered trademark of Veo. All other
products and company names mentioned herein are the trademarks or registered trademarks of their
respective owners.
Who the warranty protects:
This warranty is valid for the original consumer purchaser only.
What the warranty does not cover:
Any Veo product, on which the serial number has been defaced, modified or removed.
• Damage, deterioration or malfunction resulting from:
§ Accident, misuse, neglect, fire, water, lightning, or other acts of nature, unauthorized
product modification, or failure to follow instructions supplied with the product.
§ Repair or attempted repair by anyone not authorized by Veo.
§ Any damage of the product due to shipment.
§ Removal or installation of the product.
§ Causes external to the product, such as electric power fluctuations or failure.
§ Use of supplies or parts not meeting Veo's specifications.
§ Normal wear and tear.
§ Any other cause which does not relate to a product defect.
• Removal, installation and set -up service charges by any third party.
• Costs associated with shipping and/or transporting the product for repair, replacement, or
exchange.
How to get service :
For information on obtaining warranty service, fill out a technical support form on the Veo web site,
located on our webpage at: http://www.veo.com/support.asp.
To obtain warranty service, you will be required to provide:
• A copy of the original dated sales slip or sales invoice
• Your name
• Your address
• The serial numbe r of the product
• A description of the problem
A Technical Support Representative will determine if your problem is covered under this warranty
agreement. If the problem is covered, you will be issued a Return Merchandise Authorization number
(RMA) with specific instructions regarding how the product must be returned to Veo for repair or
replacement.
At this time, replacement or repaired products can only be sent to U.S. addresses. Products cannot be
sent to P.O. boxes.
Limitation of implied warranties:
Page 32

32
THERE ARE NO WARRANTIES, EXPRESS OR IMPLIED, WHICH EXTEND BEYOND THE
DESCRIPTION CONTAINED HEREIN INCLUDING THE IMPLIED WARRANTY OF MERCHANTABILITY
AND FITNESS FOR A PARTICULAR PURPOSE.
Exclusion of damages:
VEO'S LIABILITY IS LIMITED TO THE COST OF REPAIR OR REPLACEMENT OF THE PRODUCT.
VEO SHALL NOT BE LIABLE FOR:
• DAMAGE TO OTHER PROPERTY CAUSED BY ANY DEFECTS IN THE PRODUCT,
DAMAGES BASED UPON INCONVENIENCE, LOSS OF USE OF THE PRODUCT, LOSS OF
TIME, LOSS OF PROFITS, LOSS OF BUSINESS OPPORTUNITY, LOSS OF GOODWILL,
INTERFERENCE WITH BUSINESS RELATIONSHIPS, OR OTHER COMMERCIAL LOSS,
EVEN IF ADVISED OF THEIR POSSIBILITY OF SUCH DAMAGES.
• ANY OTHER DAMAGES, WHETHER INCIDENTAL, CONSEQUENTIAL OR OTHERWISE.
• ANY CLAIM AGAINST THE CUSTOMER BY ANY OTHER PARTY.
Effect of local law:
This warranty gives you specific legal rights, and you may also have other rights which vary from locality
to locality. Some localities do not allow limitations on implied warranties and/or do not allow the exclusion
of incidental or consequential damages, so the above limitations and exclusions may not apply to you.
Copyright
© 2003 Veo, Inc. All rights reserved. Veo and all Veo product names are trademarks of Veo. The Veo
logo is a registered trademark of Veo. All other brands are trademarks or registered trademarks of their
respective owners.
 Loading...