

Page 1

Getting Started
Thank you for purchasing the Veo Capture 1300 Digital Camera. Your
new camera is designed to be extremely easy and fun to use.
Please take a few minutes to read this User’s Guide. It covers basic
operations of your camera and offers helpful tips for enjoying your
camera for years to come.
The Veo Capture 1300 Digital Camera can be used as a digital still
camera or a Personal Computer based Internet web camera.
Here are a few examples of the things you can do with your camera:
• Take digital pictures.
• Transfer digital pictures to your computer for editing and
enhancing.
• Email digital pictures to family and friends.
• Videoconference with friends and family over the Internet.
Veo Capture 1300 Digital Camera 1
Page 2

Veo Capture 1300 Digital Camera
Kit Contents
Your Veo Capture 1300 Digital Camera Kit includes the following
items:
• Veo Capture 1300 Digital Camera
• Wrist Strap
• User’s Guide
• Camera Software Suite CD-ROM
• USB Cable
• 4 Energizer Alkaline AA batteries
• Back-Up Battery
2
Page 3
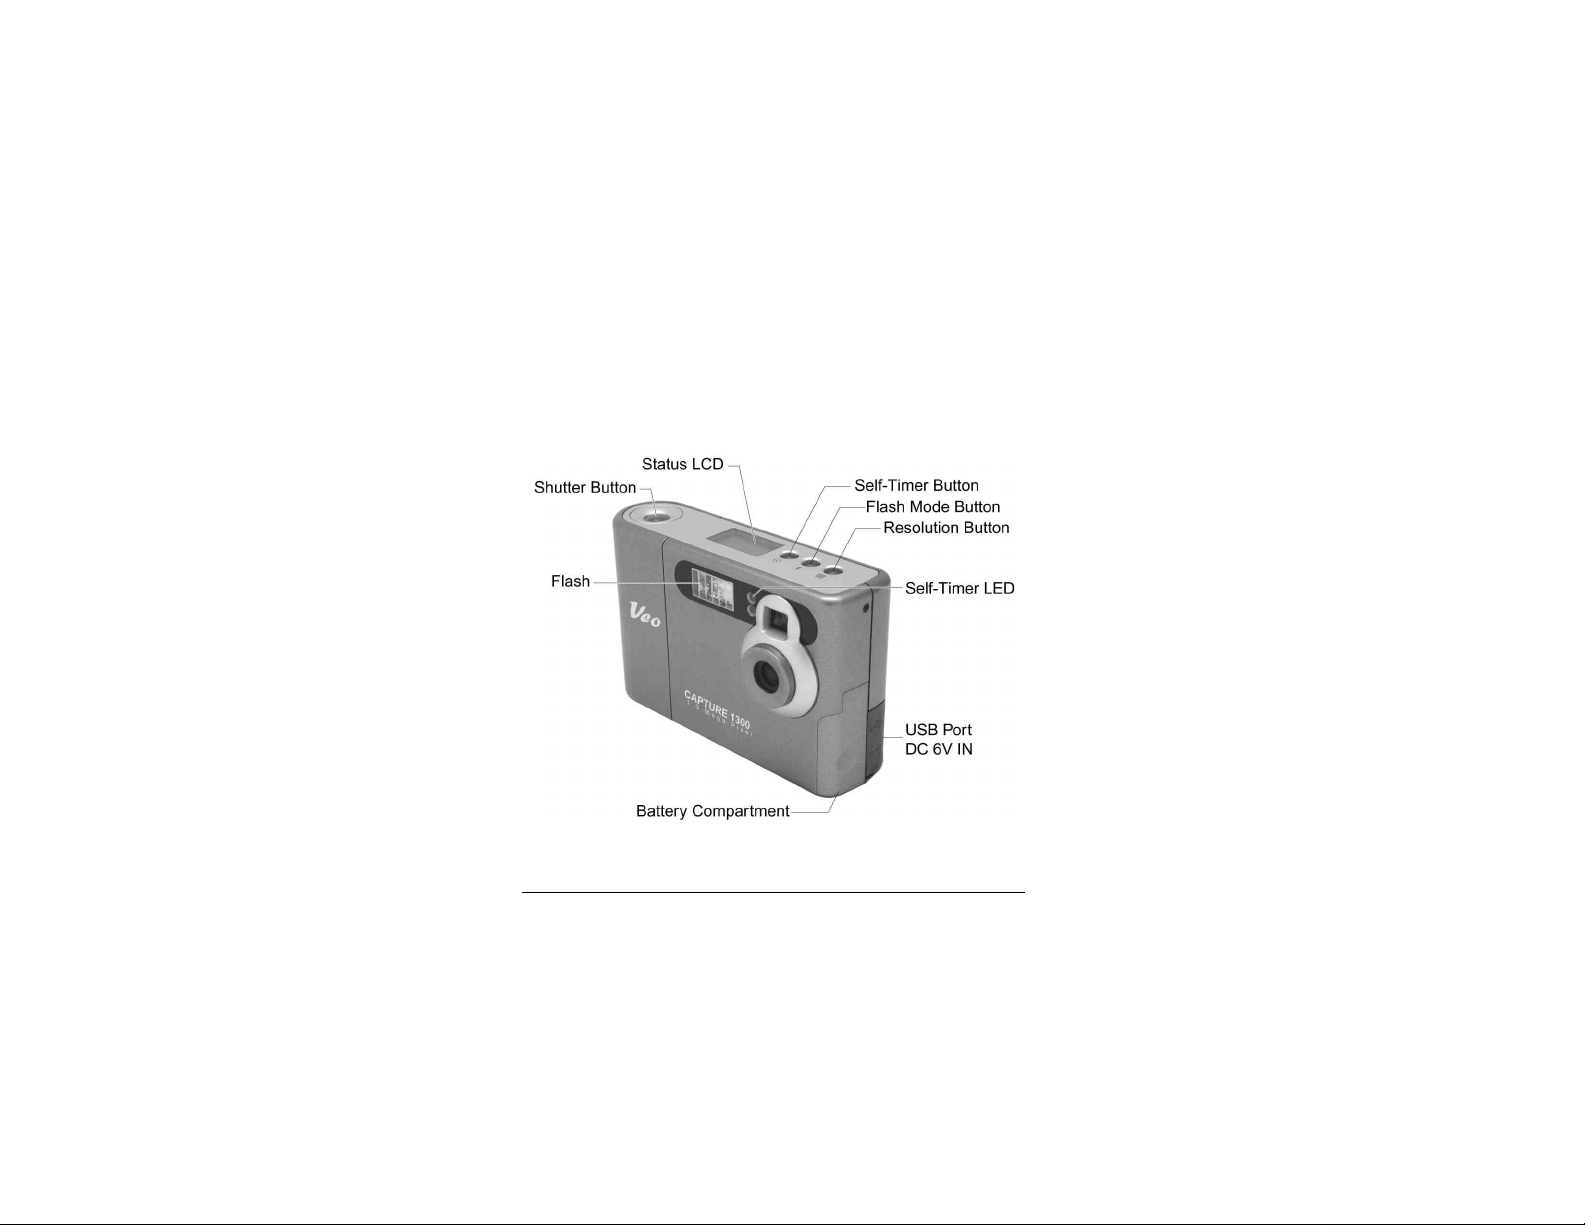
Camera Features and Functions
Front of the camera
Veo Capture 1300 Digital Camera 3
Page 4

Back of the camera
4
Page 5

Minimum System Requirements
- Intel Pentium or AMD K6 with 300 MHz or better
- Microsoft Windows 98/98SE/Me/2000/XP
- 32 MB RAM or better
- 280 MB available hard drive space
- CD-ROM drive
- Available USB port
- Display adapter capable of 800x600 in 16 bit color
- Standard microphone for sending video mail and videoconferencing
messages. (Microphone not included)
- Internet connection (required for sending email)
- Internet browser application (Microsoft Internet Explorer/AOL
- Email program
Veo Capture 1300 Digital Camera 5
Page 6
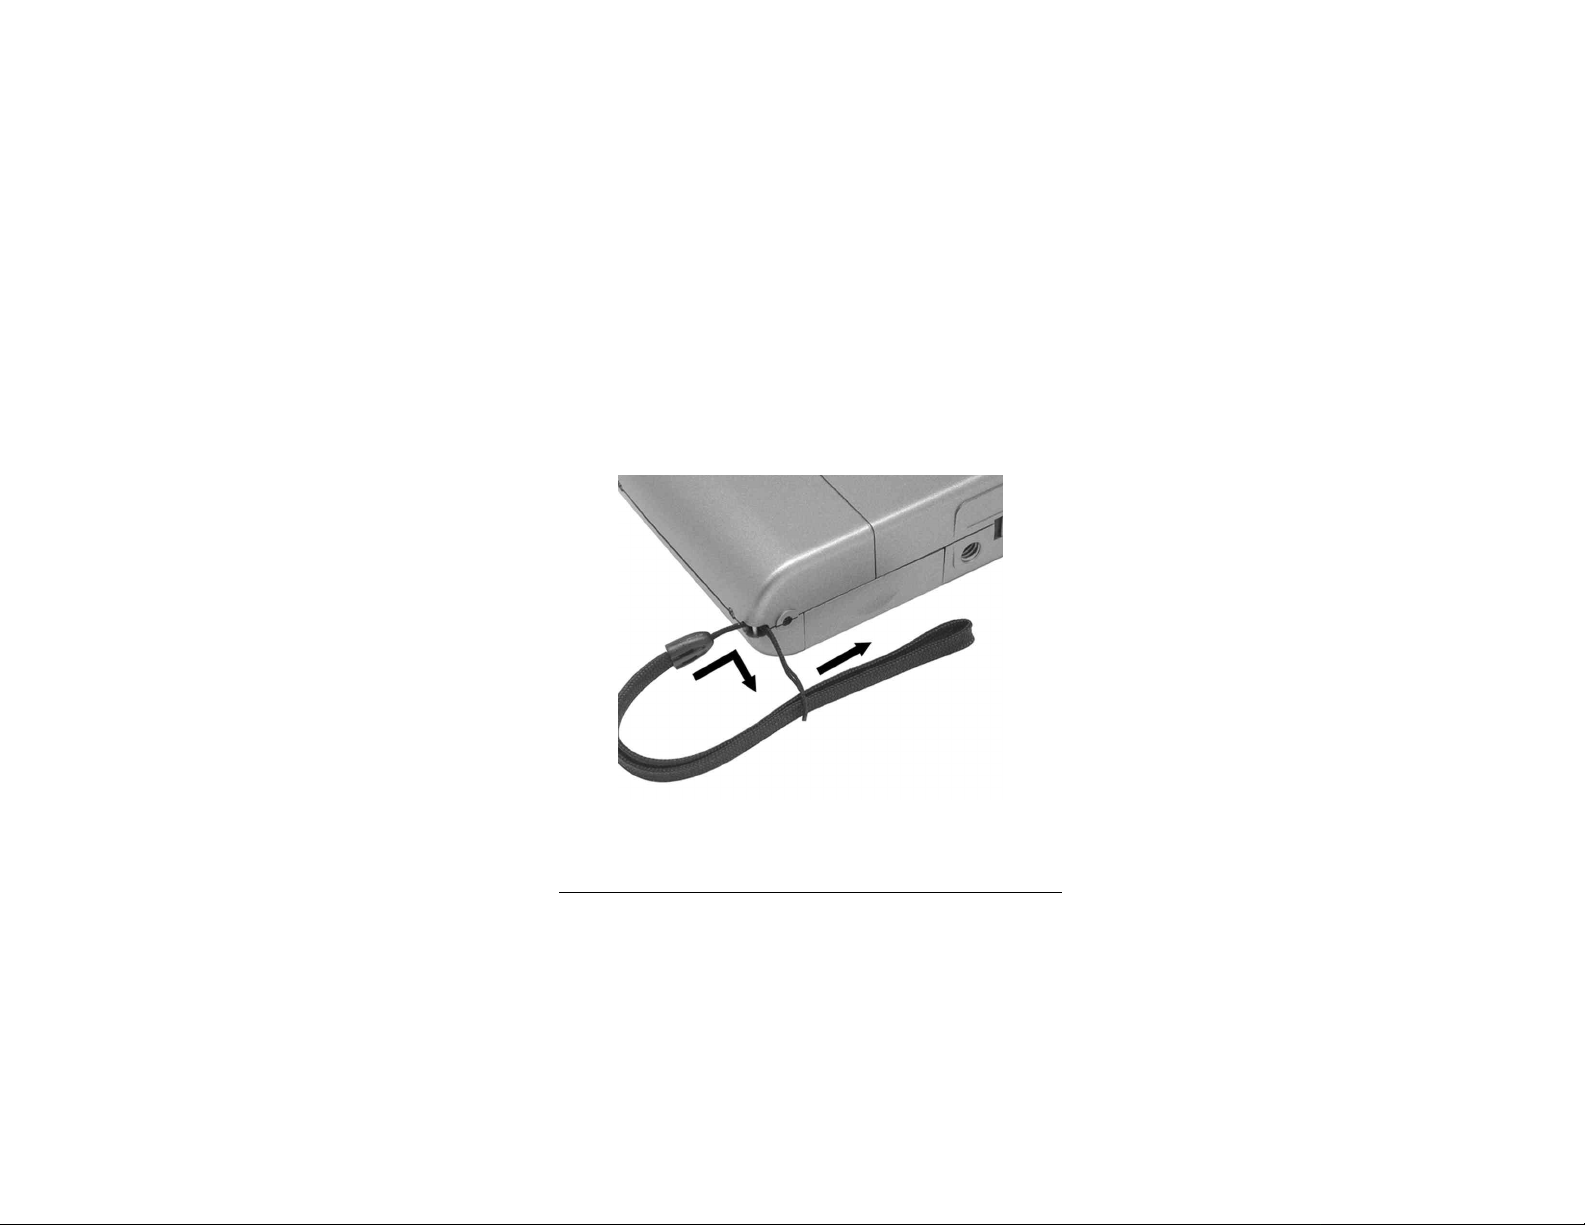
Attaching the Wrist Strap
Attach the wrist strap as shown below.
6
Page 7
Batteries
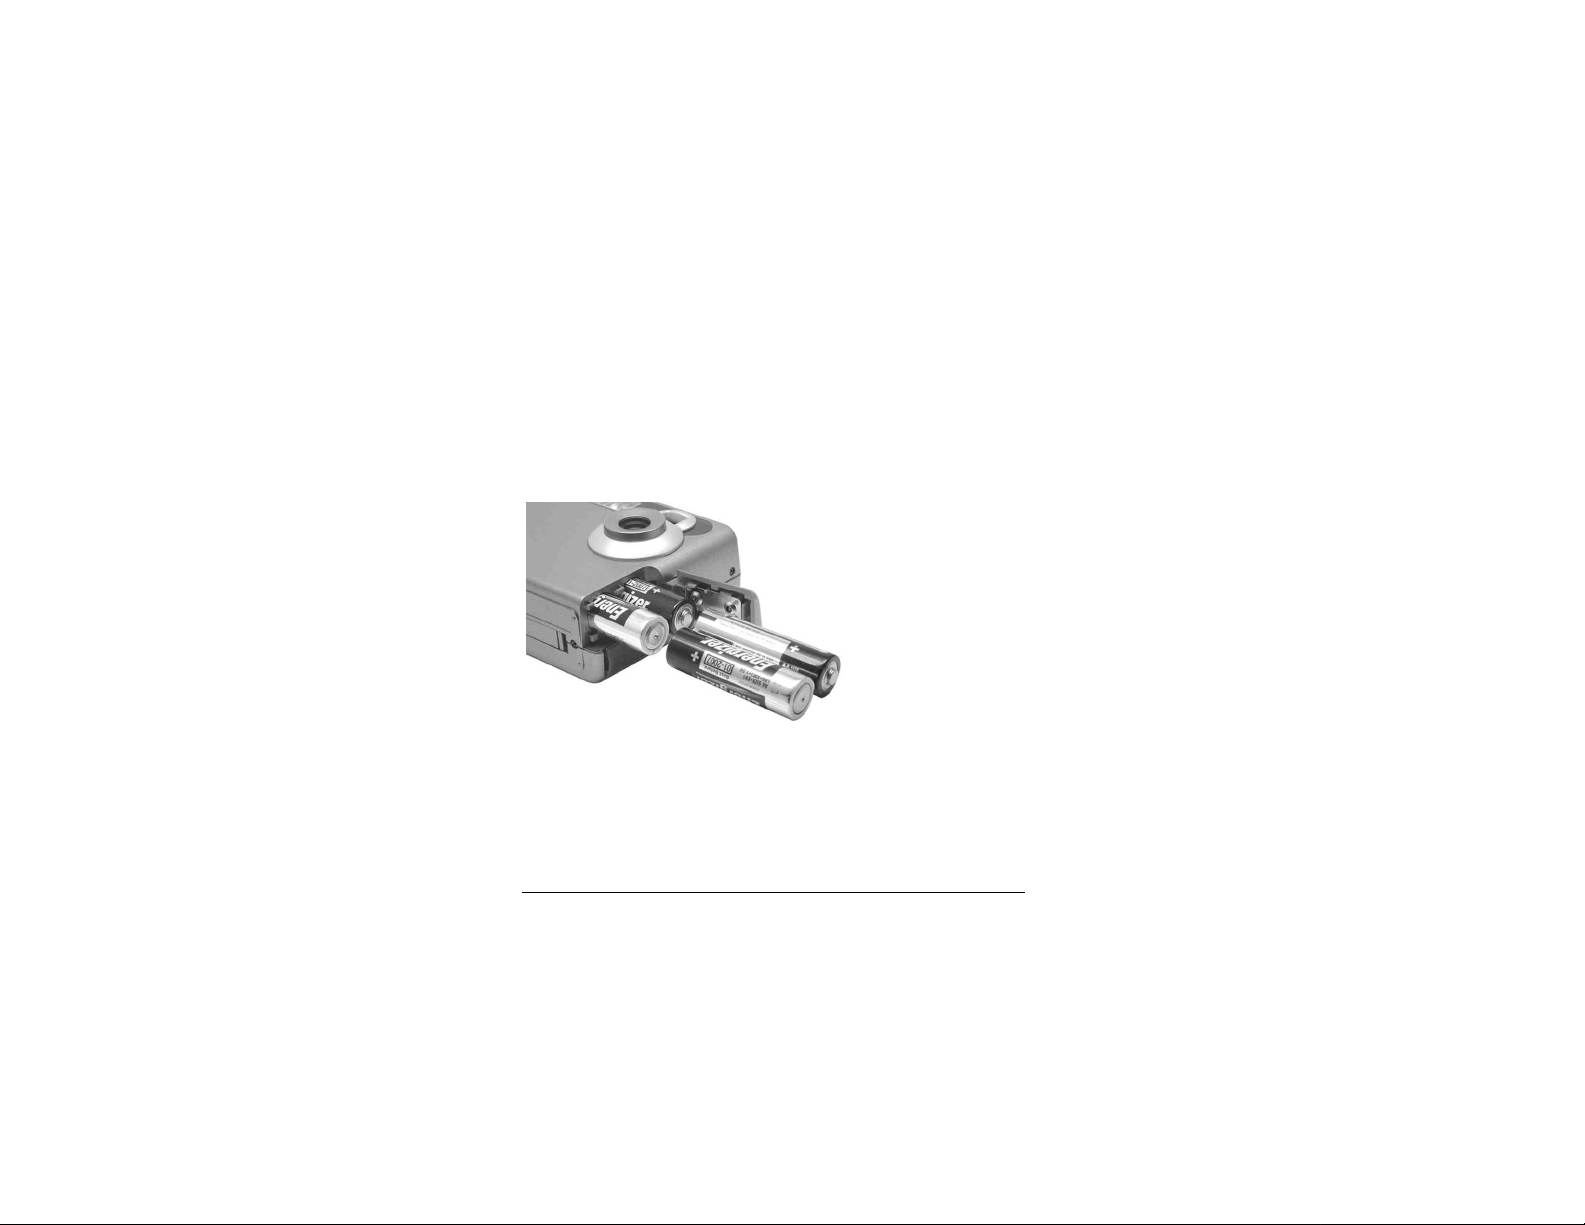
AA Battery Installation
Insert 4 AA Batteries as shown below. Make sure the POWER is
TURNED OFF before inserting the batteries if you are replacing the
old batteries with new batteries.
1. Slide and open the
battery door located on
the side of the camera.
2. Insert the batteries as
indicated in the illustration.
Close the battery door by sliding it in until it locks.
Note: Replace all four batteries at the same time. Do not mix old and
new batteries or batteries of different type. We strongly recommend
the use of Energizer Rechargeable NiMH AA batteries.
Veo Capture 1300 Digital Camera 7
Page 8

Back-Up Battery
Your camera comes with one 3 volt back-up battery (model 3V
CR2032). If the main AA batteries lose power or are removed from
the camera, the back-up battery maintains any images that are stored
in the camera’s internal memory.
Note: Always replace the camera’s AA batteries when the LCD Status
indicator indicates low batteries. Doing so will ensure that you are not
draining power from the back-up battery.
The internal memory will be cleared if both the back-up and main AA
batteries are removed.
8
Page 9
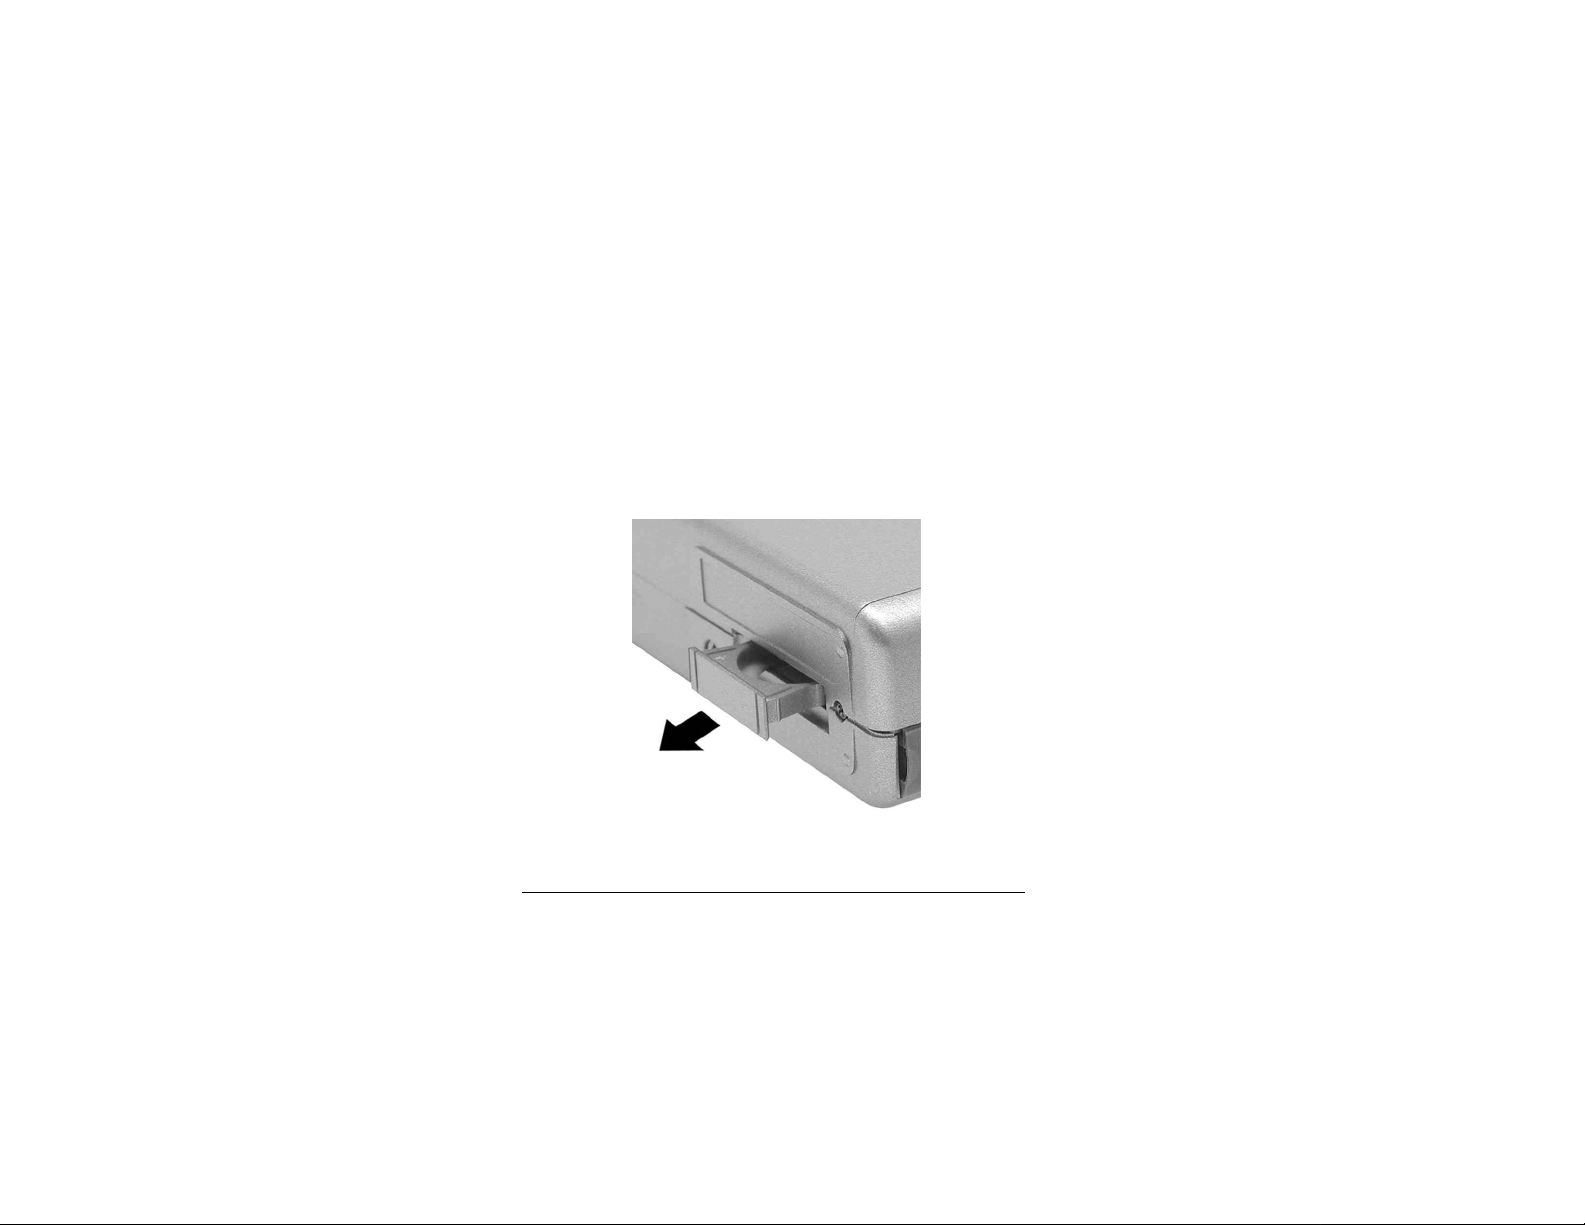
Back-Up Battery Installation and Removal
The back-up battery compartment is located on the bottom of the
camera. To gain access to the compartment, squeeze the spring tabs on
both sides of the cradle and pull the cradle out of the compartment.
Veo Capture 1300 Digital Camera 9
Page 10
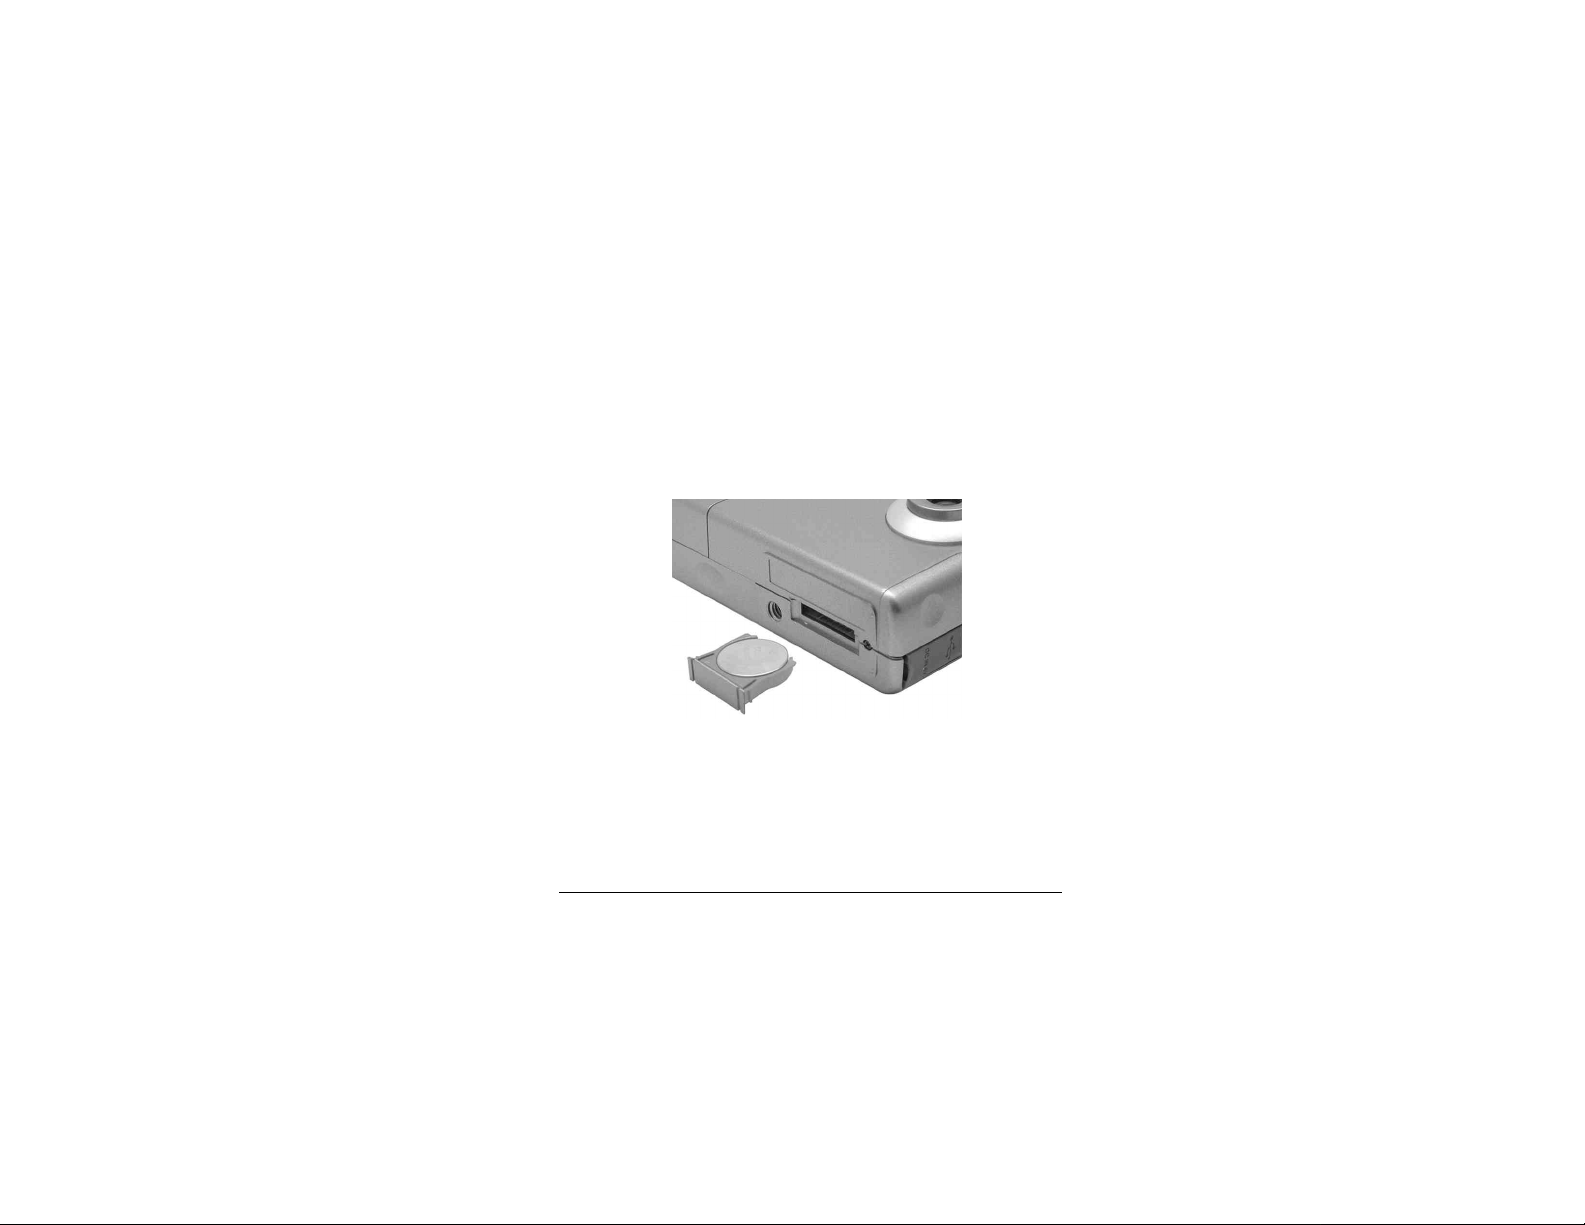
Back-Up Battery Installation and Removal continued
Position the back-up battery in the cradle per the illustration below,
taking care to make sure the (+) mark on the battery is facing up,
toward the lens of the camera. Gently push the cradle back into the
camera until end tabs snap into place.
Note: If the back-up battery charge is low or no back-up battery is in
the camera , the bbL symbol will appear in the LCD screen for a few
seconds when the camera is first turned on. The camera will not allow
you to take pictures without a CompactFlash card installed if the
back-up battery is low. Pictures must be taken on a CompactFlash
card if the back-up battery is low or not installed.
10
Page 11

CompactFlash Card
Inserting a CompactFlash Card in your Camera
Your camera includes 8 MB of internal memory for picture storage.
For additional memory, insert either a CompactFlash Type I or
CompactFlash Type II memory card (not included) in the
CompactFlash compartment as shown in the illustration below.
Insert the
CompactFlash
card with the
front facing up.
Note: Make sure your camera is turned OFF before inserting a
CompactFlash card. Your camera can accept either
CompactFlash Type I or CompactFlash Type II memory cards.
Veo Capture 1300 Digital Camera 11
Page 12
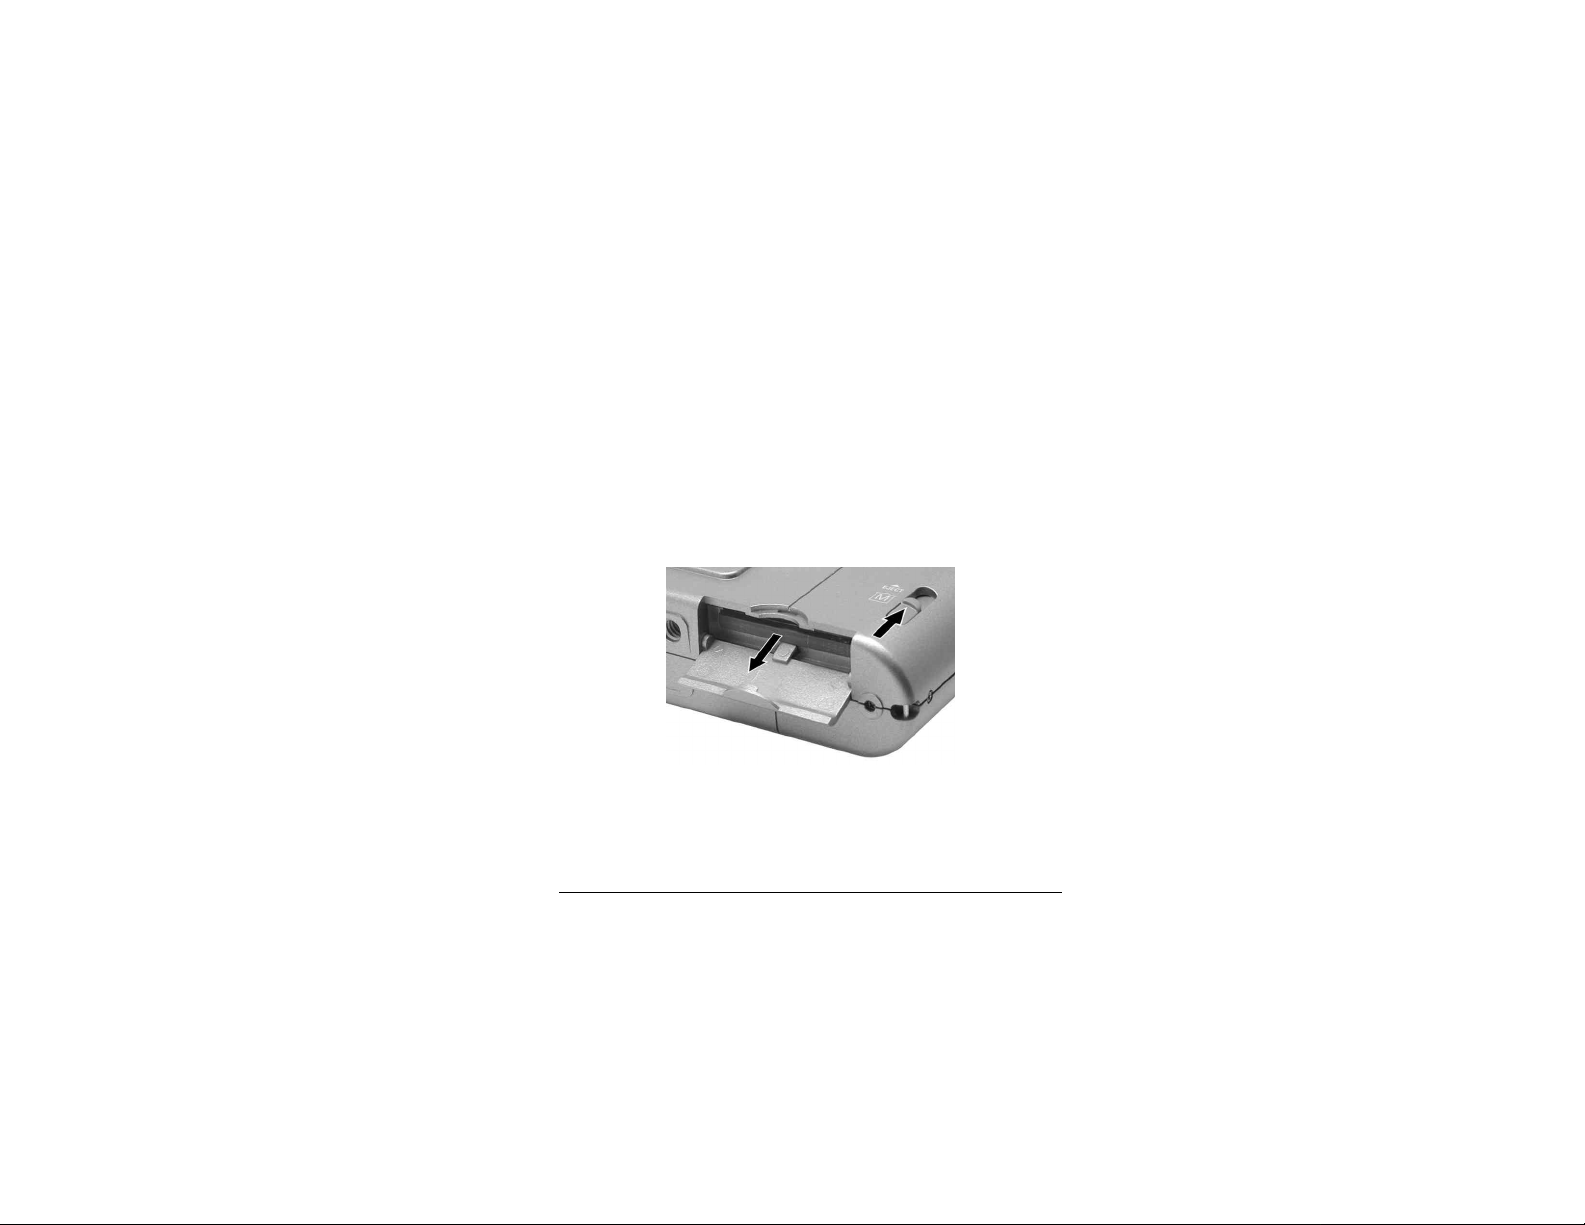
Ejecting a CompactFlash Card from your
Camera
1. Turn camera power off.
2. Open the card compartment cover.
3. Gently push the EJECT slider.
4. Remove the card from the compartment and close the cover.
Note: Make sure the camera’s power is turned off before removing a
CompactFlash card. Your camera or pictures inside your camera may
be damaged if you do not follow these instructions.
12
Page 13

Camera Internal Memory vs.
CompactFlash Card
The Veo Capture 1300 Digital Camera automatically stores pictures in
internal memory when no CompactFlash card is inserted into the
camera. Pictures will be stored on the card if a CompactFlash card is
inserted. If there are pictures stored in the internal memory of the
camera and a CompactFlash card is inserted in the camera, the camera
checks to see if there is enough memory space available on the card to
accept all the pictures in the internal memory. If there is space
available on the card, a message appears on the LCD screen asking if
the pictures in internal memory should be moved to the card. Select
YES to move the pictures to the card. Select NO to keep the pictures
in the camera’s internal memory.
Note: You cannot view internal memory when a CompactFlash Card
is inserted.
Veo Capture 1300 Digital Camera 13
Page 14

Camera Internal Memory vs. CompactFlash
Card - continued
If you attempt to take a picture when there is no space available in the
camera’s internal memory or the CompactFlash card, the camera will
beep 3 times to indicate that the camera’s memory is full. You need to
either delete images from the camera’s memory or transfer pictures to
your computer in order to take additional pictures.
To delete pictures from the CompactFlash card, make sure the
CompactFlash card is in the camera, otherwise, the pictures stored in
the camera’s internal memory will be deleted.
Note: It may be necessary to format your CompactFlash card if it is a
new card or has not been used before with this camera. Please see the
following page for details.
14
Page 15

Formatting CompactFlash Cards
If you have a new CompactFlash card or if you plan to use a
CompactFlash card that has been used in another camera, you may
need to format the card for use in your Veo Capture 1300 Digital
Camera.
Note: Formatting a CompactFlash card will erase any existing
information on the card, including files from other cameras or devices.
Be sure to transfer important data to your computer or other storage
device before formatting the card.
Follow these directions to format your card:
1. Turn the camera power OFF.
2. Insert the CompactFlash card.
3. Turn the camera power ON.
Instructions continued on next page.
Veo Capture 1300 Digital Camera 15
Page 16

Formatting CompactFlash Cards - Continued
4. Press the OK/MENU button to turn on the color LCD screen. The
SETUP MENU will be highlighted.
5. Press the OK/MENU button again to display the SETUP Menu.
6. Use the Scroll Down button and highlight FORMAT CF.
7. Press the OK/MENU button again. A warning message will
appear on the screen.
8. Select CONTINUE to format your CompactFlash card or select
CANCEL to decline to format the card.
Note: Never turn off the camera when formatting is in progress.
Doing so can damage your camera.
16
Page 17
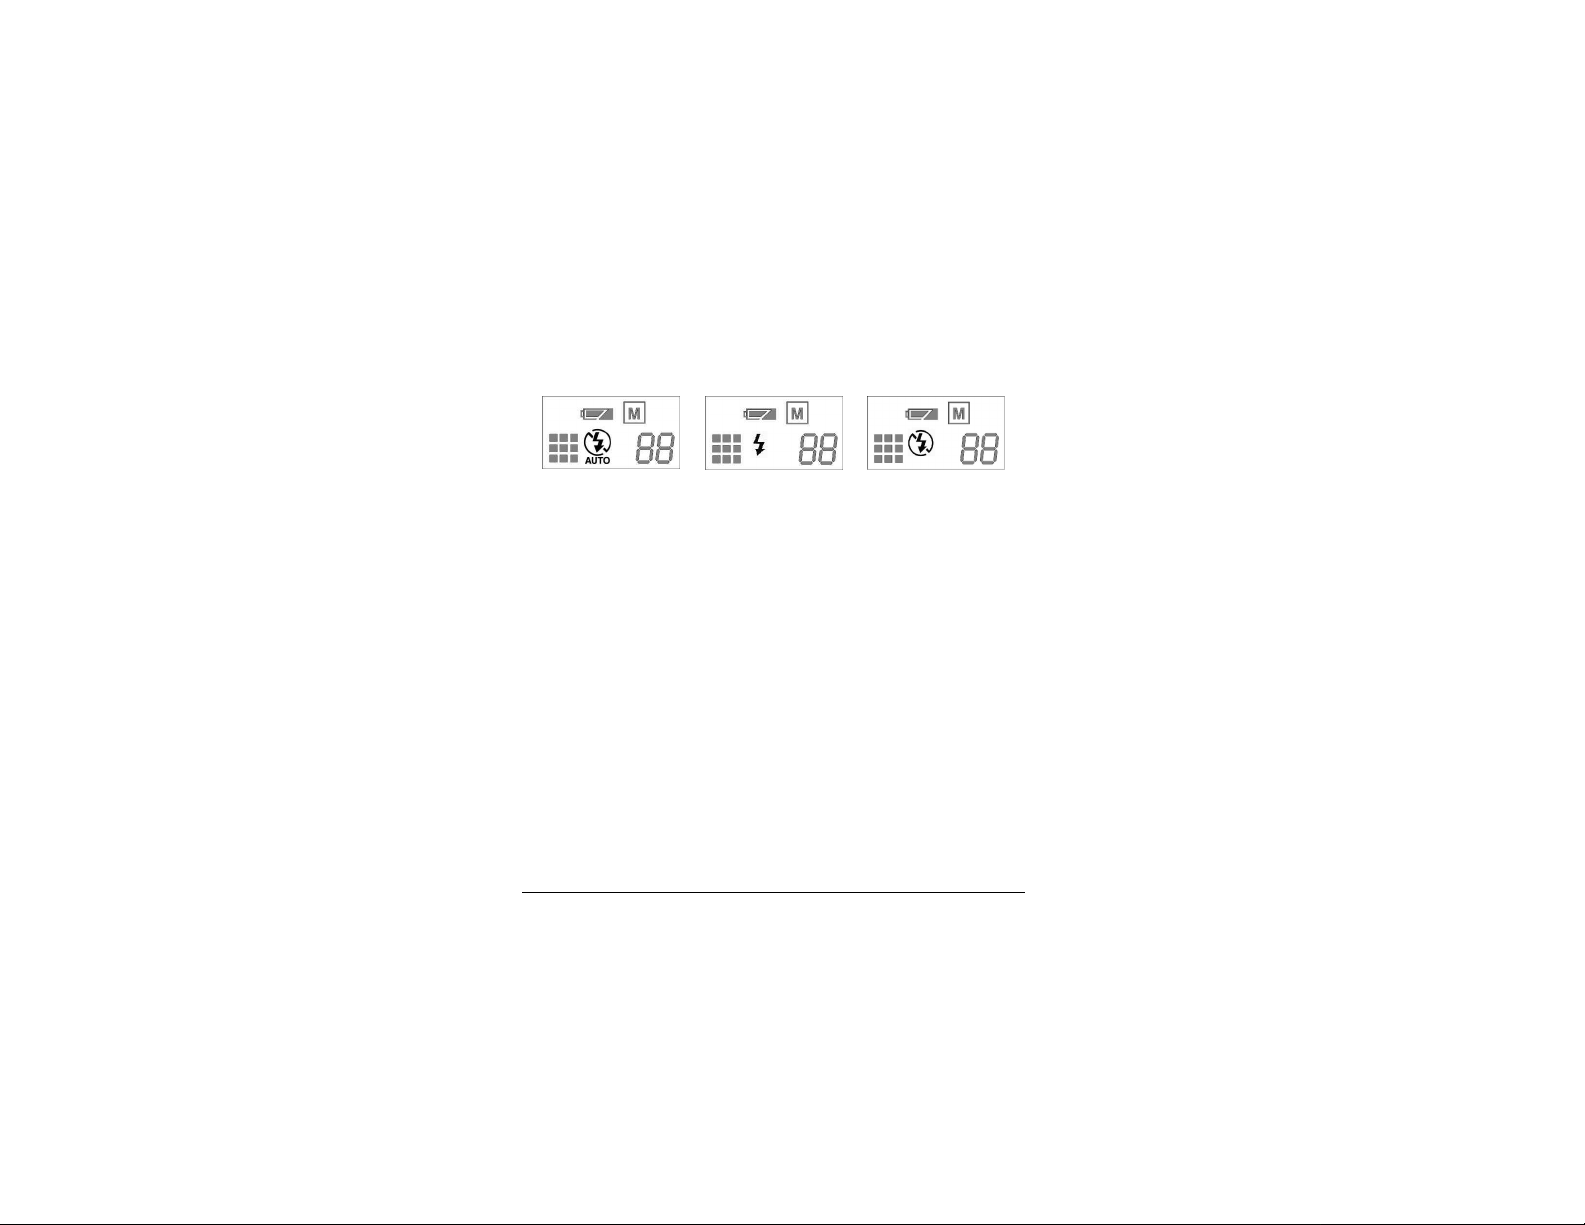
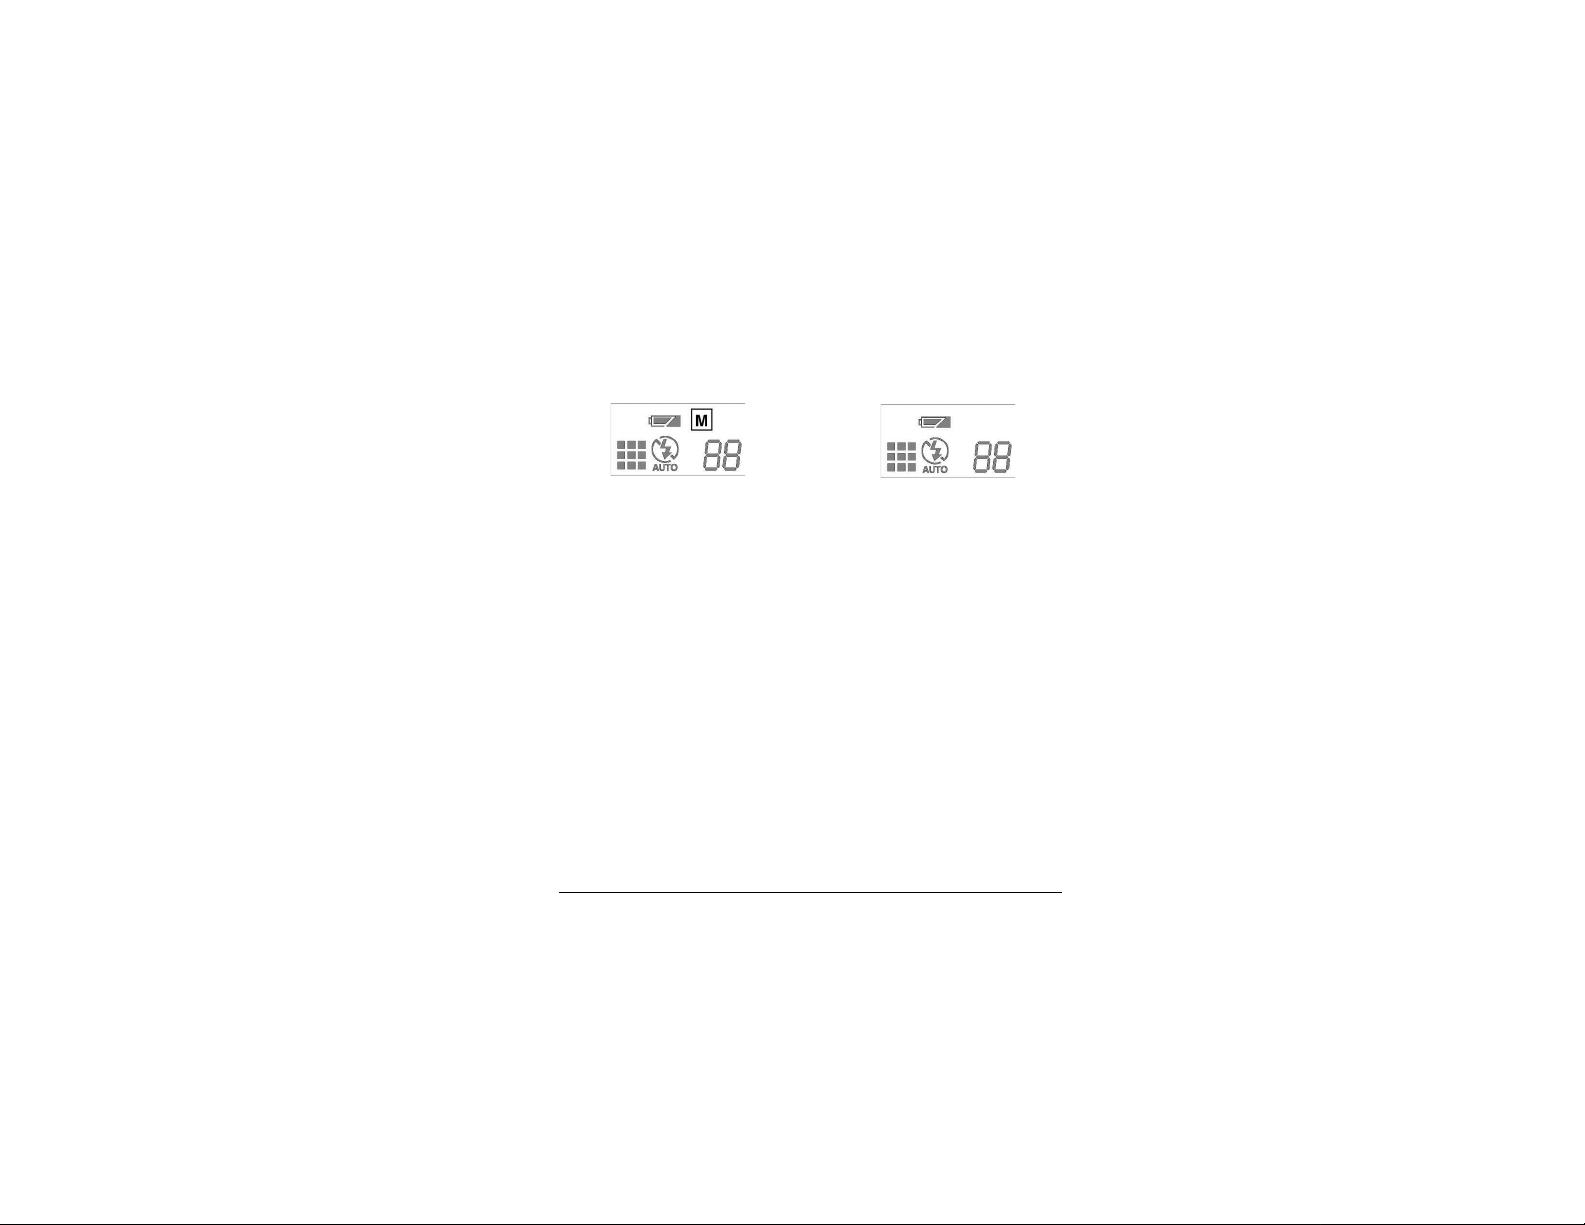
Flash Mode Settings
Auto
Use the flash mode button to select the flash mode. Use AUTO mode
to let the camera decide if the flash is needed. Use ON mode to force
the flash to always fire. ON mode can help if there are shadows on
your subject. OFF mode forces the flash to never fire and is
recommended when shooting through a window or when flash
photography is prohibited.
Veo Capture 1300 Digital Camera 17
On Off
Page 18
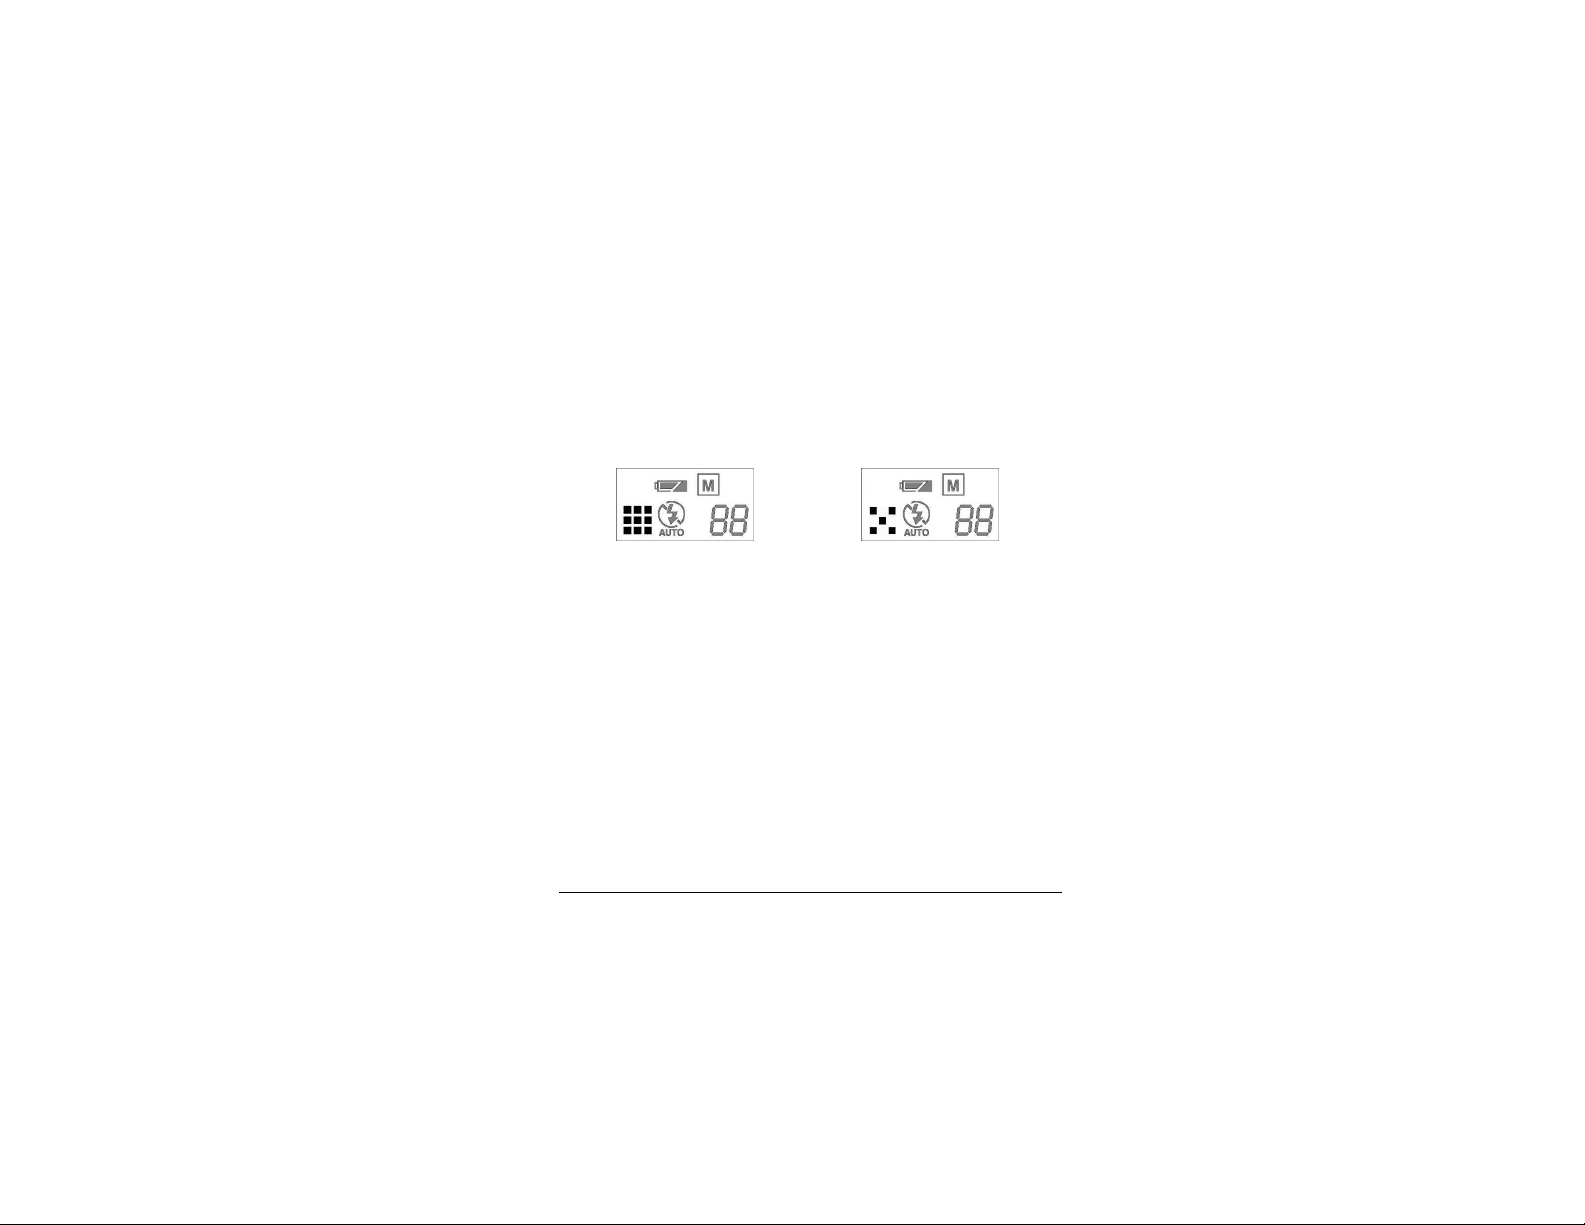
Resolution Settings
To select image resolution, press the resolution button on the top of
the camera.
1.3 Mega Pixel VGA
Use the resolution button to switch between 1.3 Mega Pixel and VGA
image mode.
Note: Resolution affects image size and file size. Use 1.3 Mega Pixel
for printing anything larger than 3” x 5”. Use VGA to get more
pictures and for email and web sites.
18
Page 19

Battery Status
Full
The battery icon on the status display indicates remaining battery
charge.
Full - the batteries have enough charge for all functions.
Low - the batteries are getting weak. Note: the color LCD will be
disabled when the batteries reach the low condition. If you press the
Display On button, you will hear three quick beeps and the display
will remain off.
Empty - the batteries are too weak to power the camera. You can no
longer take any pictures although the green power indicator and the
status LCD remain on.
Note: Use of Energizer Rechargeable NiMH AA batteries is
highly recommended.
Veo Capture 1300 Digital Camera 19
Low Empty
(Blinking)
Page 20
CompactFlash Card Status
Card Inserted
The CompactFlash card icon, on the status LCD, indicates whether a
CompactFlash card has been properly inserted into the camera. Please
check that this icon is present after inserting your card. This will let
you know that the card has been fully inserted and the camera can
read the card.
20
No Card
Page 21

Remaining Picture Counter
The remaining picture counter estimates the remaining photos based
on the remaining memory and your current settings for resolution and
quality. This number reflects the space available on your
CompactFlash card if it is inserted. Otherwise it reflects the remaining
internal memory.
The remaining picture count must be estimated because pictures take
varying amounts of memory to store based on the complexity of the
scene. The counter will show 0 when memory is full.
If you try to take another picture, the camera makes three quick beeps
and displays FUL in the counter. You must transfer some pictures to
your PC, delete some pictures, or insert another CompactFlash card to
continue taking pictures.
Veo Capture 1300 Digital Camera 21
Page 22

Color LCD Menus
To see an image in the color LCD, press the LCD Display On/Off
button on the back of the camera, or press OK/MENU to go directly
to the main menu.
Color LCD off
on/off
Color LCD on
22
Page 23

Setup - Quality
Setup
Sets the quality of the
photos. The value
selected remains the
default until the setting
is changed again.
Veo Capture 1300 Digital Camera 23
Page 24

Setup - Quality - continued
BEST: Lowest compression. Highest image quality with largest file
size. Best print quality.
BETTER: (initial default): Moderate compression.
GOOD: Highest compression. Lowest image quality with smallest
file size. Suitable for web or email.
Note: For best quality prints, set quality mode to BEST and set
resolution to 1.3 Mega Pixel mode.
24
Page 25

Setup - Quick View
Displays the photo you have just taken on the color LCD and gives
you a chance to delete the
photo.
Quick View
ON: Quick View ON
OFF: (default) to conserve
battery power.
Veo Capture 1300 Digital Camera 25
Page 26

Setup - Quick View - continued
When Quick View is ON, taking a picture will give you the option to
cancel saving a picture.
Press Menu/OK to cancel saving the picture. The picture will be
automatically saved after a short interval of time has passed without
pressing the Menu/OK.
26
Page 27

Setup - Erase All
Select ERASE ALL to erase all the pictures stored either inside the
CompactFlash Card or the internal memory.
To delete photos from the CompactFlash Card, make sure the
CompactFlash card is in the camera.
To delete photos from internal memory, remove your CompactFlash
Card.
Veo Capture 1300 Digital Camera 27
Page 28

Setup - Format CF
Formats or reformats a CompactFlash Card.
Format CF
CANCEL: (default)
Cancel formatting.
CONTINUE: Formats
the CompactFlash Card
and removes all files
from it.
28
Page 29

Playback
Select PLAYBACK to view photos that are stored in the camera.
Selecting the PLAYBACK command displays the last photo taken on
the color LCD. Press the Scroll Up button to scroll forward and press
the Scroll Down button to scroll backward through your photos.
Veo Capture 1300 Digital Camera 29
Page 30

Playback - continued
Press OK/MENU to bring up the menu bar.
Use the Scroll Up button to scroll right to left and use the Scroll Down
button to scroll left to right.
To turn off menu bar and
continue scrolling
through thumbnails
To delete the selected
picture
Note: With a CompactFlash card inserted, you can only view the
pictures on the card. To view pictures stored in internal memory,
please remove the card.
30
Back To Main Menu
Page 31

Thumbnails
Thumbnails
Thumbnails display nine
photos at a time on the
color LCD. Use the LCD
Scroll Up and Down
buttons to select a
thumbnail.
Veo Capture 1300 Digital Camera 31
Page 32

Thumbnails - continued
Press OK/MENU to bring up the menu bar.
Use the Scroll Up button to scroll right to left and use the Scroll Down
button to scroll left to right.
To turn off menu bar and
continue scrolling through
thumbnails
To erase the selected
image
To enlarge the selected image
Back To Main Menu
32
Page 33

Digital Zoom
Digital Zoom allows you
to enlarge the image 2x
the normal size.
Note: Digital zoom
applies to every photo if
enabled until you disable
the digital zoom function.
Note: Images will
automatically be captured
in VGA resolution when
the digital zoom is active.
Veo Capture 1300 Digital Camera 33
Page 34

Exiting from the Main or Setup Menu
or
Main
Exiting from either the Main or Setup Menu will return to either Live
Preview or OFF depending on how you entered menu mode.
34
Setup
Page 35

Taking Pictures
1. Turn on the camera by pressing the Power button. The green power
status light on the back of the camera will light up. If the green power
status light is not lit, check to make sure the batteries are properly
oriented. Also make sure the batteries are new or have enough power.
2. Frame your subject(s) in the viewfinder or use the color LCD. To
see an image in the color LCD, press the LCD Display On/Off button
on the back of the camera. The LCD allows more accurate framing of
the subject than the viewfinder, but utilizes more battery power.
3. Hold the camera steady. Press and hold the shutter button until the
camera beeps. The camera decreases the picture counter in the LCD
status display by one.
Note: The picture counter may not always decrease with every
picture. This is because every picture uses a different amount of
memory and the remaining pictures must be estimated.
Tips for Taking Great Pictures
Indoor pictures are best taken in an evenly lit room (no extremes of
light and dark in the picture). Use the flash when there is not enough
light. Frame your subject 3 to 7 feet away.
When taking outdoor photos, always make sure the sun or other light
source is behind the person taking the picture, and not beside or
behind your subject(s). Frame your subject at least 3 feet away.
Veo Capture 1300 Digital Camera 35
Page 36

Camera-to-Computer Connection
Caution: It is important to install your camera software before
connecting the cable. Please insert your Veo Capture 1300 Digital
Camera CD-ROM into the CD-ROM drive of your computer and
follow the instructions on the screen to complete the installation.
1. Turn on the camera.
2. Connect the USB cable to any available USB port on your
computer.
3. Connect the other end of the cable to the camera as shown below.
Note: When the USB cable is connected to the computer, all buttons on
the camera are disabled, except the power on/off button.
36
Page 37

Optional AC Power Adapter
Your camera can be used with an optional AC power adapter. Plug in
the adapter cord as shown in the illustration below.
Note: The AC power adapter is
not included in your Veo Capture
1300 Digital Camera Kit. To order
the adapter, please contact us at
the web page or phone number
below.
http://www.veoproducts.com/purchase.htm
or (408) 474-0494 Monday through Friday from 8:30 a.m. to 5:30
p.m. Pacific Time.
Important: Always turn your camera off before unplugging it.
SDRAM image loss can result from unplugging the camera without
first turning it off.
Veo Capture 1300 Digital Camera 37
Page 38

Installing the Veo Capture 1300
Software
1. Insert the Veo Capture 1300 CD-ROM into the CD-ROM drive of
your computer.
2. The following installation screen
will appear. Click Install to begin the
software installation. If the following
screen does not appear, click on
Start->Run and type in:
D:\veoautorun.exe (D:\ refers to the
letter of your CD-ROM drive,
however, you may need to change the
drive letter if your CD-ROM drive is
located as another drive letter). Click
OK to start the installation screen.
3. Click OK to begin the software
installation. All the software will be
installed unless they are unchecked.
Note: The Veo Capture 1300 Camera
Drivers must be installed and cannot be unchecked.
38
Page 39

Starting the Veo Capture 1300
Software
1. Double-click on the Veo Capture 1300 icon located on
your desktop to start the software. You may also start the
software by clicking on Start->Programs->Veo Capture
1300.
2. The Veo Capture 1300 screen will
appear with various activities you can
accomplish with your camera.
Download & Manage Pictures launch ArcSoft PhotoImpression 3.0 to download your pictures.
Make Panoramic Pictures - launch ArcSoft Panorama Maker 3.0 to
create panoramic pictures.
Broadcast Internet Video - launch SpotLife to broadcast your video.
Video Messaging - launch Microsoft NetMeeting to videoconference.
Create Videos - launch ArcSoft VideoImpression 1.6 to create videos.
Veo Capture 1300 Digital Camera 39
Page 40

Download & Manage Pictures ArcSoft PhotoImpression 3.0
Welcome to PhotoImpression 3.0
ArcSoft PhotoImpression 3.0 is an easy-to-use image-editing program
specifically designed for general consumers. The program enables
you to edit, retouch, enhance or add special effects to digital images
with point-n-click simplicity. It also offers a great variety of project
templates for creating greeting cards and calendars, plus a lot more.
Getting Started with PhotoImpression 3.0
1. Double-click on the Veo Capture 1300 icon located on your
desktop.
2. Click Download & Manage Pictures to launch ArcSoft
PhotoImpression 3.0.
40
Page 41

ArcSoft PhotoImpression 3.0 - continued
Downloading pictures from your Veo Capture 1300 Camera
PhotoImpression accepts images acquired via standard TWAIN
devices and can be used to download pictures from your Veo Capture
1300 Camera. To download pictures from your camera, follow the
steps below:
1. Click the Get Photo button on the Main Screen and select Camera/
Scanner. A list of your TWAIN devices will appear.
2. Under Select Source, select “Veo Capture 1300 Camera” from
the choices on the list.
3. Under Select Album, select [New] to create a new Album.
4. Click the Acquire button to display the “Veo Capture 1300
Camera” TWAIN window.
5. Click the Get Pictures button to download your pictures.
6. Click the Submit All button to save your pictures to the Album.
Veo Capture 1300 Digital Camera 41
Page 42

ArcSoft PhotoImpression 3.0 - continued
Emailing your pictures
If your email program is MAPI-compliant, you can use
PhotoImpression to open a new email message and automatically
attach the current image to it.
1. Click on Get Photo on the Main Screen and select Album.
2. Select the Album that your picture is currently saved in and then
double-click on the picture to select the picture.
3. The picture you selected will appear in the center of
PhotoImpression.
4. Click on Save and then select Email.
5. Select the image size that you want to send. Click the Send button
to send your email.
42
Page 43

ArcSoft PhotoImpression 3.0 - continued
Emailing your pictures - continued
6. If you are using America Online, select AOL email. If you are
using any other email program that is MAPI-compliant, select Other
MAPI compliant email. Finally, click OK to start your email
program which will send off the email with the picture attached.
Note: If your email program is not MAPI-compliant or if MAPI is not
enabled on your Computer, you will not be able to use this function.
You can use the “Insert” or “Attach” function in your email program
to manually attach the image for inclusion in an email. Contact your
email provider for further assistance with sending file attachments.
Veo Capture 1300 Digital Camera 43
Page 44

Make Panoramic Pictures ArcSoft Panorama Maker 3.0
Welcome to ArcSoft Panorama Maker 3.0
ArcSoft Panorama Maker 3.0 is an easy-to-use image entertainment
program that seamlessly combines multiple photos into a single
panoramic picture. It enables you to create eye-catching, large-format
panoramas with point-and-click simplicity. You can also view your
panoramas from different perspectives.
Getting Started with Panorama Maker 3.0
1. Double-click on the Veo Capture 1300 icon located on your
desktop.
2. Click Make Panoramic Pictures to launch ArcSoft Panorama
Maker 3.0
44
Page 45

Create Videos - ArcSoft
VideoImpression 1.6
Welcome to ArcSoft VideoImpression 1.6
ArcSoft VideoImpression 1.6 is an easy-to-use video and image
editing software program. The program enables you to create and edit
new videos using existing video and image files - making desktop
video presentations for home, business, and the web.
Getting Started with VideoImpression 1.6
1. Double-click on the Veo Capture 1300 icon located on your
desktop.
2. Click Create Videos to launch Arcsoft VideoImpression 1.6.
Veo Capture 1300 Digital Camera 45
Page 46

ArcSoft - Getting Help
ArcSoft PhotoImpression, Panorama Maker, and VideoImpression
provide extensive online help. If you need more information or
instructions on how to use a specific feature or tool, click the Help (?)
button in the upper right-hand corner within the specific program.
Technical Support:
Phone: 510-440-9901
Fax: 510-440-1270
Email: support@arcsoft.com
Websites:
www.arcsoft.com
www.photoisland.com
46
Page 47

Broadcast Internet Video SpotLife
Spotlife.com offers a showcase destination site for users with a full
suite of personal video services including live videos, recorded video,
updating webcams and digital pictures.
Getting Started with SpotLife
1. Double-click on the Veo Capture 1300 icon located on your
desktop.
2. Click Broadcast Internet Video to launch SpotLife.
Getting Help
SpotLife provides extensive online help. If you need more information
or instructions on how to use a specific feature or tool, visit Spotlife’s
websites at http://www.spotlife.com/support.
Veo Capture 1300 Digital Camera 47
Page 48

Microsoft Windows Messenger
Guide
Microsoft Windows Messenger has been included with Microsoft
Windows XP to provide the latest in point-to-point
videoconferencing. To ensure that you obtain the most from your
camera experience, we have compiled this brief instruction guide to
help you get started. Note that this guide is provided only as a
reference and is not endorsed by Microsoft.
To obtain additional assistance with Microsoft Windows Messenger
beyond what is outlined in this guide, refer to the support options on
Page 59.
48
Page 49

Microsoft Windows Messenger - continued
Starting Windows Messenger:
1. Click on Start->All Programs->Windows Messenger to start
Windows Messenger.
2. You will be prompted with the sign in screen. Enter your e-mail
address and password and then click “OK”. For example, any address
ending in @hotmail.com or @msn.com can be used.
Veo Capture 1300 Digital Camera 49
Page 50

Microsoft Windows Messenger - continued
3. Windows Messenger will sign you in.
4. The people on your contact list will appear. If you want to connect
with another user for videoconferencing, you will need to add them to
your contact list, using the “Add” button. Follow the rest of the
directions in Windows Messenger to add your friends or family to
your contact list.
50
Page 51

Microsoft Windows Messenger - continued
Using Windows Messenger For Videoconferencing:
Double-click on the person’s name that you would like to connect
with. A conversation window will appear where you can do the
following:
Start camera
Start talking
Turn on your camera for videoconferencing
Use your microphone to talk to another person
Send a file
Text messages
Transfer a file to another person
Type text messages to another person
Veo Capture 1300 Digital Camera 51
Page 52

Microsoft Windows Messenger - continued
Starting Your Camera:
Make sure that no other program is using your camera. If you have
any other PC Camera or videoconferencing software that is already in
use, make sure to close these programs first. To turn your camera on,
click the “Start Camera” button. The text message window will also
display the message, “You have asked to have a video and voice
conversation. Please wait for a response or Cancel (Alt+Q) the
pending invitation.”
The other person who sent the invitation to join the video and voice
conversation will see the screen shown on the next page, with the
message: “I would like to have a video and voice conversation with
you. Do you want to Accept (Alt+T) or Decline (Alt+D) the
invitation?”
52
Page 53

Microsoft Windows Messenger - continued
Starting Your Camera - continued
The other person has a choice of clicking “Accept” or “Decline” to
begin the video and voice conversation.
Once connected to the other person, your screen will appear similar to
the image pictured. The other person’s video will appear in the large
video window, while your own video will appear in the lower right
corner as a Picture-in-Picture window.
If you have a soundcard and microphone, the options for voice will
also be available. You have the options to adjust your speaker volume
or mute the microphone.
Veo Capture 1300 Digital Camera 53
Page 54

Video Messaging - Microsoft
NetMeeting
Microsoft NetMeeting has been included with your camera to provide
videoconferencing capabilities. As one of the most widely distributed
and versatile videoconferencing applications on the market, you will
be able to communicate with friends and family through Microsoft
NetMeeting.
To ensure that you obtain the most from your camera experience, we
have compiled this brief instruction guide to help you get started. Note
that this guide is provided only as a reference and is not endorsed by
Microsoft.
To obtain additional assistance with Microsoft NetMeeting beyond
what is outlined in this guide, refer to the support options on Page 59.
54
Page 55

Microsoft Netmeeting - continued
Starting Microsoft NetMeeting
IMPORTANT: Make sure any other video camera applications are
closed before starting Microsoft NetMeeting.
1) Look for the NetMeeting icon on your desktop or Quick Launch bar
and then double-click on it to start Microsoft NetMeeting.
2) Microsoft NetMeeting will start and you will see a window similar
to the one shown below:
Veo Capture 1300 Digital Camera 55
Page 56

Microsoft Netmeeting - continued
How to use Microsoft NetMeeting - continued
3) Turn your camera on by clicking the Play/Pause button
to initiate the video stream. Adjust the camera angle and
focus to ensure a clear picture of you for your videoconferencing partner. These are the buttons you will use with NetMeeting:
56
Page 57

Microsoft Netmeeting - continued
Connecting to another NetMeeting user
There are a few methods to connect to another user who is using
NetMeeting.
Connecting via MSN Messenger
Connecting to another NetMeeting user is easy via the MSN
Messenger service, simply download and install MSN Messenger
from Microsoft at http://messenger.msn.com. Directions for
installing and setting up MSN Messenger will be shown on the MSN
Messenger webpage or can be accessed in the MSN Messenger
program by clicking on Help->help Topics.
With MSN Messenger, you can send instant messages to your friends
and family if they are online and even invite them to start NetMeeting.
Veo Capture 1300 Digital Camera 57
Page 58

Microsoft Netmeeting - continued
Connecting using an IP address:
To have a direct connection with another user, you must first obtain an
IP address . IP addresses for most dial-up connections will change
every time you log on to the Internet. For this reason, you must get the
IP address from the person you are trying to contact each time. You
can also determine your IP address and then send it to the other person
who will use NetMeeting to call you.
To obtain your IP address, first
connect to your Internet Service
Provider. Start NetMeeting and then
click on Help->About Windows
NetMeeting. You can see your IP
address here (as shown).
You can send your IP address to the
person who you are calling or they
can send you their IP address by email or through an Instant Messaging application such as MSN
Messenger.
To connect to a person using their IP address, press the “Place a Call”
button (Telephone icon). Enter the other person’s IP address and press
Call to place the call.
58
Page 59

Microsoft Windows Messenger and NetMeeting Support and Resources
This guide has been intended to provide a brief introduction to
Windows Messenger and NetMeeting. For more in-depth questions or
to obtain technical support for Microsoft Windows Messenger or
NetMeeting, please refer to the information listed below. The
resources listed below are third-party sources and are neither endorsed
nor supported by the camera manufacturer and have been provided
only as a reference.
Phone:
* Check Microsoft’s Product Support page for more details at
http://www.microsoft.com/support.
Online
Microsoft NetMeeting:
Windows and MSN Messenger:
The Windows NetMeeting Zone:
Meeting by Wire:
(800) 936-5700
(425) 635-7123
Veo Capture 1300 Digital Camera 59
[Toll Call/No charge support*]
[Toll Free/Pay per incident*]
http://www.microsoft.com/windows/netmeeting
http://messenger.msn.com
http://www.netmeet.net
http://www.meetingbywire.com
Page 60

FAQ
1. How many Pictures can the camera store?
The number of pictures that the camera can store depends on the
complexity of the pictures and the memory card. It also depends on
your quality and resolution settings.
2. What type of memory card does the camera use?
The camera utilizes only CompactFlash cards.
We recommend CompactFlash cards that carry
the CompactFlash Association Logo.
3. What are the recommended sizes for printing pictures?
-VGA: 3” x 5”
- 1.3 Mega Pixel: 5” x 7”
4. What is the maximum MB size CompactFlash card the camera
can use?
Up to 128 MB Type I or Type II CompactFlash cards can be used with
the camera.
60
Page 61

5. Where can I obtain a replacement USB cable or Software Suite
CD-ROM for my camera?
For a nominal fee, you can purchase a replacement cable or CD-ROM
by contacting our support team via email or phone. AC power
adapters can also be purchased by contacting us at the web page or
phone number below.
http://www.veoproducts.com/purchase.htm
or (408) 474-0494 Monday through Friday from 8:30 a.m. to 5:30
p.m. Pacific Time.
6. How do I connect the camera to the computer?
The Veo Capture 1300 Digital Camera utilizes a USB connector. USB
will work with Windows 98, Me, 2000, and XP. If your computer did
not come equipped with a USB port, you may purchase a USB adapter
card at a local computer store.
Veo Capture 1300 Digital Camera 61
Page 62

7. What batteries are recommended for use with the camera?
Energizer Alkaline AA batteries are recommended for use with the
camera. For extended use of the camera, Energizer Rechargeable
NiMH AA batteries are recommended.
8. What are some suggestions to conserve the batteries?
It is recommended that the color LCD be turned off whenever
possible to significantly conserve battery life.
9. Cleaning the lens and LCD:
Make sure to use a soft, clean, damp cloth to clean the lens or LCD
display. Do not use harsh chemicals, solvents, or other cleaners to
clean the lens or LCD display, as these may damage the lens or LCD
display.
62
Page 63

Troubleshooting
Problem: The power light does not turn on.
Solution: Check to make sure the batteries are oriented properly.
Also make sure the batteries are new or have enough power.
Problem: The software states the camera is not connected.
Solution: Make sure the camera cable is plugged in. Verify that
the USB port on the computer is functioning properly. Check to
see if the camera power is on.
Problem: Cannot use the internal memory. Pictures do not save to
the internal memory.
Solution: Check to make sure the backup battery is inserted
properly and has enough power. Replace the backup battery if
needed.
Problem: The LCD display does not turn on.
Solution: Press the LCD Display On/Off button to turn the LCD
on. If the LCD display does not turn on, the batteries may be too
low. Replace the batteries with a new set.
Veo Capture 1300 Digital Camera 63
Page 64

Problem: The pictures are too dark or light.
Solution: In dark environments, make sure the flash is set to
AUTO or ON. In bright environments, the flash may be set to
OFF for better results.
Problem: The pictures will not download.
Solution #1:
A) Make sure that the software for the camera has been installed
and properly loaded on your computer.
B) Next, check the USB cable to make sure it is properly inserted
into the computer and camera.
C) Turn on the camera, making sure that the batteries are still full.
D) Click on Start->Settings->Control Panel->System->Device
Manager->Universal Serial Bus Controller (Windows 98/ME) or- Click on Start->Settings->Control Panel->System>Hardware->Device Manager->Universal Serial Bus Controller
(Windows 2000/XP). Make sure that your USB Host Controller
and USB Root Hub are working properly.
E) If either device is not working properly, indicated by a yellow
“!” or red “X” in the Device Manager, please contact your
computer manufacturer for assistance with enabling these devices.
If both devices are working properly, try reinstalling the camera
software and try downloading your pictures again.
64
Page 65

Solution #2: You may also purchase a CompactFlash reader to
download your pictures (available at most computer stores). A
CompactFlash reader is an external device used to copy files from
your CompactFlash card, similar to an external floppy drive.
Remove your CompactFlash card from your camera and insert it
into the CompactFlash reader. You can then drag and drop the
files from your CompactFlash card to your computer.
Problem: The CompactFlash card is not detected when inserted
into the camera.
Solution: Open the CompactFlash card slot and eject the card.
Reinsert the card, making sure it is properly oriented and seated
properly. Then turn the camera power on to see if the card was
detected.
Problem: How do I e-mail my pictures taken with the Veo Capture
1300 Digital Camera?
Solution:
America Online
1) Start America Online and click on the “Write” icon. Fill in the
Send To, Subject, and body of the message.
Veo Capture 1300 Digital Camera 65
Page 66

2) Next, click on the “Attachments” button in the lower left
corner of the window and an Attachments window will appear.
Click on the ATTACH button and change the folder to the
location where you saved your picture(s).
3) Double click on the picture you want to attach to your e-mail
(JPG format). The file should appear in the Attachments window.
Click OK.
4) The picture is now attached to your e-mail. If you are ready to
send your e-mail, press SEND NOW.
5) If you are not sure how to attach files with your particular email program, please refer to the program documentation or
contact America Online for further assistance.
Hotmail
1) Start Hotmail and log in to your Hotmail account.
2) Click on “Compose” and then type your e-mail message,
including the “To:” and “Subject:” fields.
3) Under “Attachments” click on the “Add/Edit Attachments”
button to attach your picture(s).
4) An Attachments screen will appear. Click the “Browse” button
to select the picture (JPG format) that you want to attach.
66
Page 67

5) Click the “Attach” button. This will transfer the file to your email. The transfer of an attached file may require 30 seconds up to
10 minutes. Note that Hotmail can only accept files that are less
than 1MB.
6) Repeat Steps 3 - 5 to attach additional files. Click the “OK”
button to return to your message.,
7) Click the “Send” button to send your e-mail.
8) For any questions related to Hotmail, please contact Hotmail
Support or click on the “Help” link on the Hotmail webpage.
Yahoo! Mail
1) Start Yahoo! Mail and log in to your Yahoo! Mail account.
2) After you are logged into your e-mail account, click on
“Compose”.
3) Type in the recipient’s e-mail address and your message.
4) Under “Attachments” at the bottom of the page, click on
“Add/Delete Attachments”.
5) A new window will appear. In Step 1, click the “Browse”
button and change the location to where your pictures are saved.
(JPG format)
Veo Capture 1300 Digital Camera 67
Page 68

6) Once you have selected the file you want to attach, doubleclick on the file.
7) In Step 2, click the “Attach” button to transfer the file from
your computer to Yahoo!
8) In Step 3, click the “Done” button to attach the file to your email. You are now ready to send.
9) If you are ready to send the e-mail, click on the “Send” button
to send your e-mail.
10) For any questions related to Yahoo!, please contact Yahoo!
support for further assistance.
Camera Precautions
• To avoid electrical shock, do not expose the camera to any fluids.
Fluids may cause damage to the camera and may cause fire and/or
electrical shock. Turn the camera OFF and remove the batteries
immediately if the camera is exposed to fluids.
• Do not attempt to open the camera or attempt your own repairs.
68
Page 69

Additional Help and Resources
For detailed Technical Support, Frequently Asked Questions, and
more information about the Veo Capture 1300 Digital Camera, please
see our website at:
http://www.veoproducts.com/technical.htm
For Technical Support by phone, please call (408) 474-0494.
Technical support hours are Monday through Friday from 8:30 a.m. to
5:30 p.m. Pacific Time.
Veo Capture 1300 Digital Camera 69
Page 70

Statement of Limited Warranty
Two Years Limited Warranty
The Veo Capture 1300 Digital Camera
The manufacturer warrants that for a period of 2 (two) years from the
date of purchase that this product 1) is free from defects in materials
and workmanship and 2) conforms to its specifications. If the product
does not function due to manufacturer defects during the warranty
period, the manufacturer, at its option , will either repair or replace
this product with one that is functionally equivalent. These are your
exclusive remedies under this warranty. Please call (408) 350-8403
for warranty service.
This warranty does not apply to damages caused by accident,
misuse, or tampering, and excludes all consequential damages
except in jurisdictions not allowing such exclusions or limitations.
Made in Taiwan.
70
 Loading...