

Venue DUAL LASER PACK User Manual
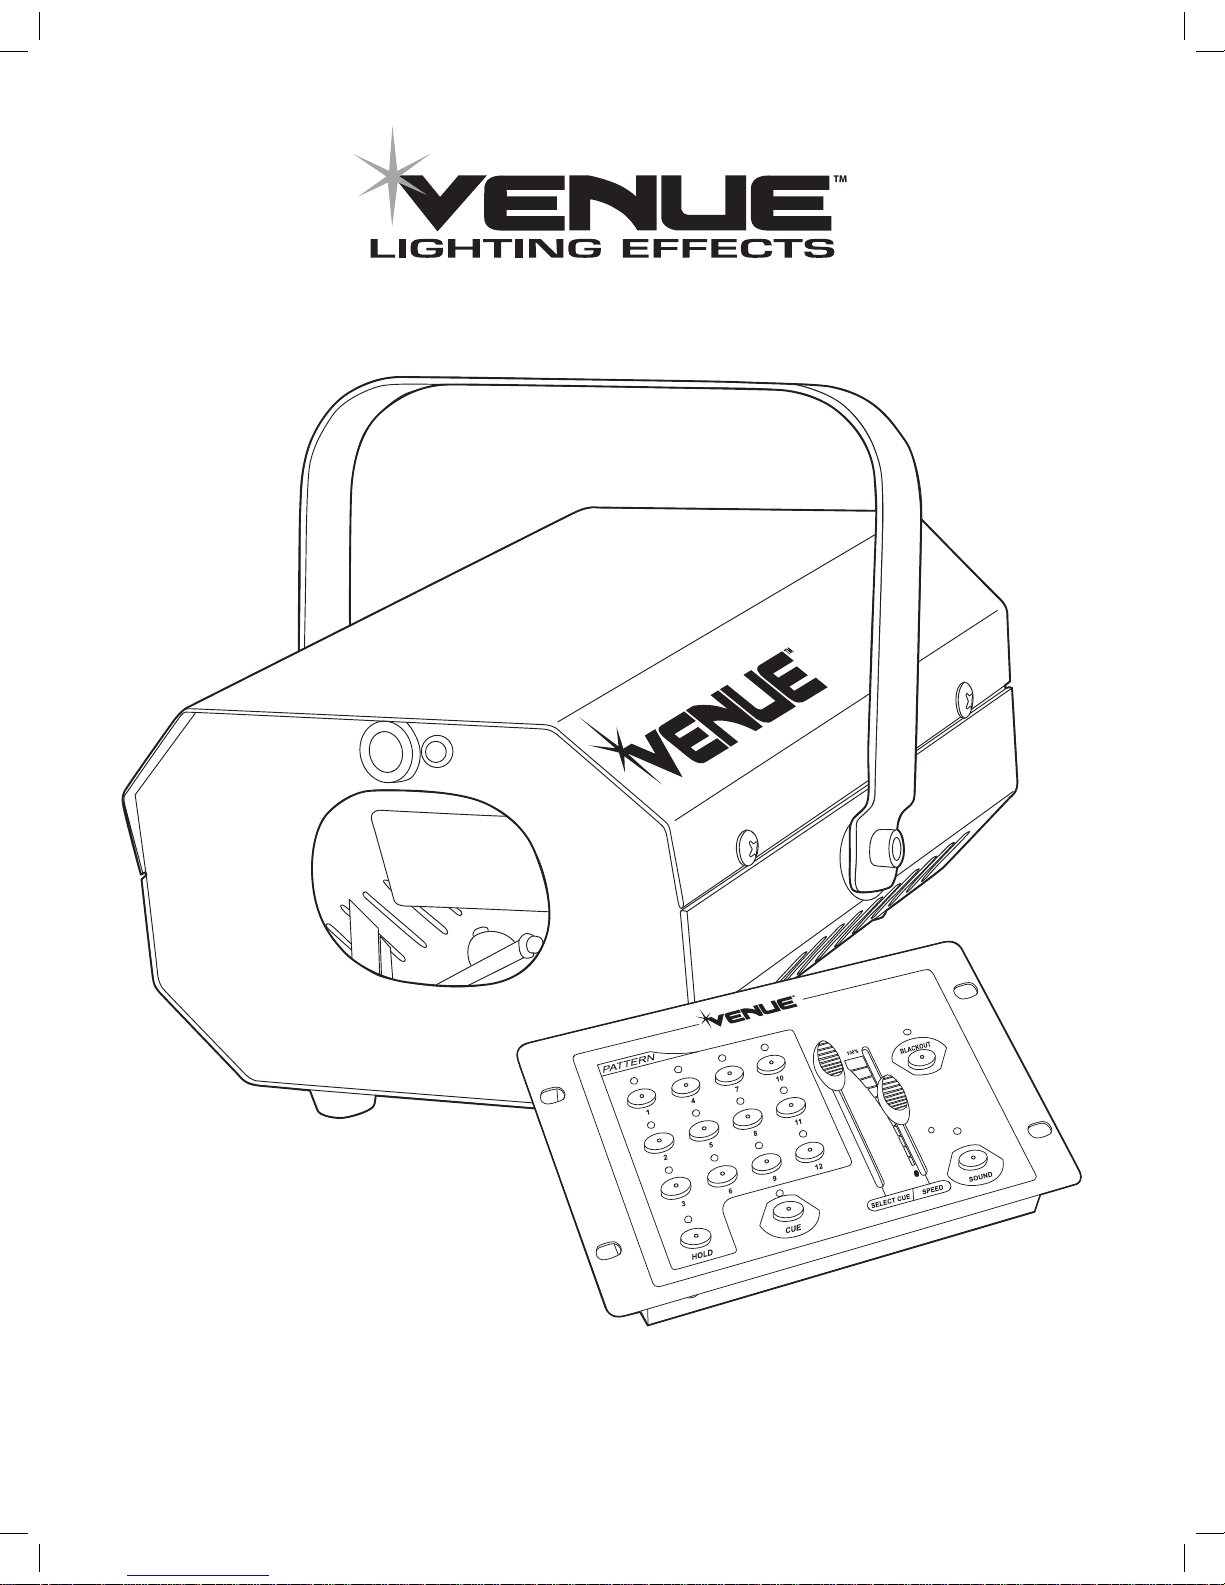
DUAL LASER PACK & CONTROLLER USERS MANUAL
www.venuelightingeffects.com
8129.01 Venue PP laser Instr.indd 1 5/2/08 6:09:25 PM
laser and controller instruction manual
SAFETY INFORMATION
• Never operate this unit if it has a damaged cord or plug.
• Keep the power cord away from heated surfaces.
• For indoor use only. Keep in a cool dry place with a temperature of not more than 95˚F.
• Continuous operation of over 4 hours will shorten the life of the laser.
• Do not shake the xture once it is secured in place.
• The lens at the aperture can collect dirt and dust that will decrease the power output. Clean regularly with a soft, dry cloth.
• Do not remove the warranty sticker.
• Do not dismantle the product. There are no user-serviceable parts.
Fuse Replacement:
Disconnect the power plug. Use a screwdriver to unscrew the fuse holder. Take out the burnt fuse and replace it with one
of the same type. Replacing the fuse with a different type will cause damage and will void the warranty.
TECHNICAL SPECIFICATIONS
AC Power: 110VAC 60Hz, Fuse (2A)
Laser: Wavelength 532nM, 10mW Green
Control System: High Capacity Micro Processor
Scanner: Stepper Motor
Working Mode: DMX, Auto, Sound Active, Master/Slave
DMX Control: 7 Channels
Connector: 3-pin XLR DMX
Size: L 9.3” x W 6.9” x H 6.4”
Weight: 6.6 lbs. / 3 kg
8129.01 Venue PP laser Instr.indd 2 5/2/08 6:09:26 PM
www.venuelightingeffects.com
FUNCTION INTRODUCTION
SOUND ACTIVE: The laser projector is activated by sound. The sound sensitivity is adjustable by the sensor knob.
If there is no sound for 7 seconds, laser output is automatically shut off.
AUTO: The laser projector runs the built-in programs automatically. When in this mode, the laser cannot
shut off automatically.
DMX CONTROL: The unit is controllable by any standard DMX 512 controller for laser on/off, static pattern size,
dynamic pattern speed, pattern position, scanning speed and more.
FUNCTION SETTINGS
SOUND ACTIVE: Triggered by sound only.
AUTO MODE: Default program, not subject to change with external controls.
SLAVE: Controlled by Master only.
DMX MODE: Controlled by DMX512 console only.
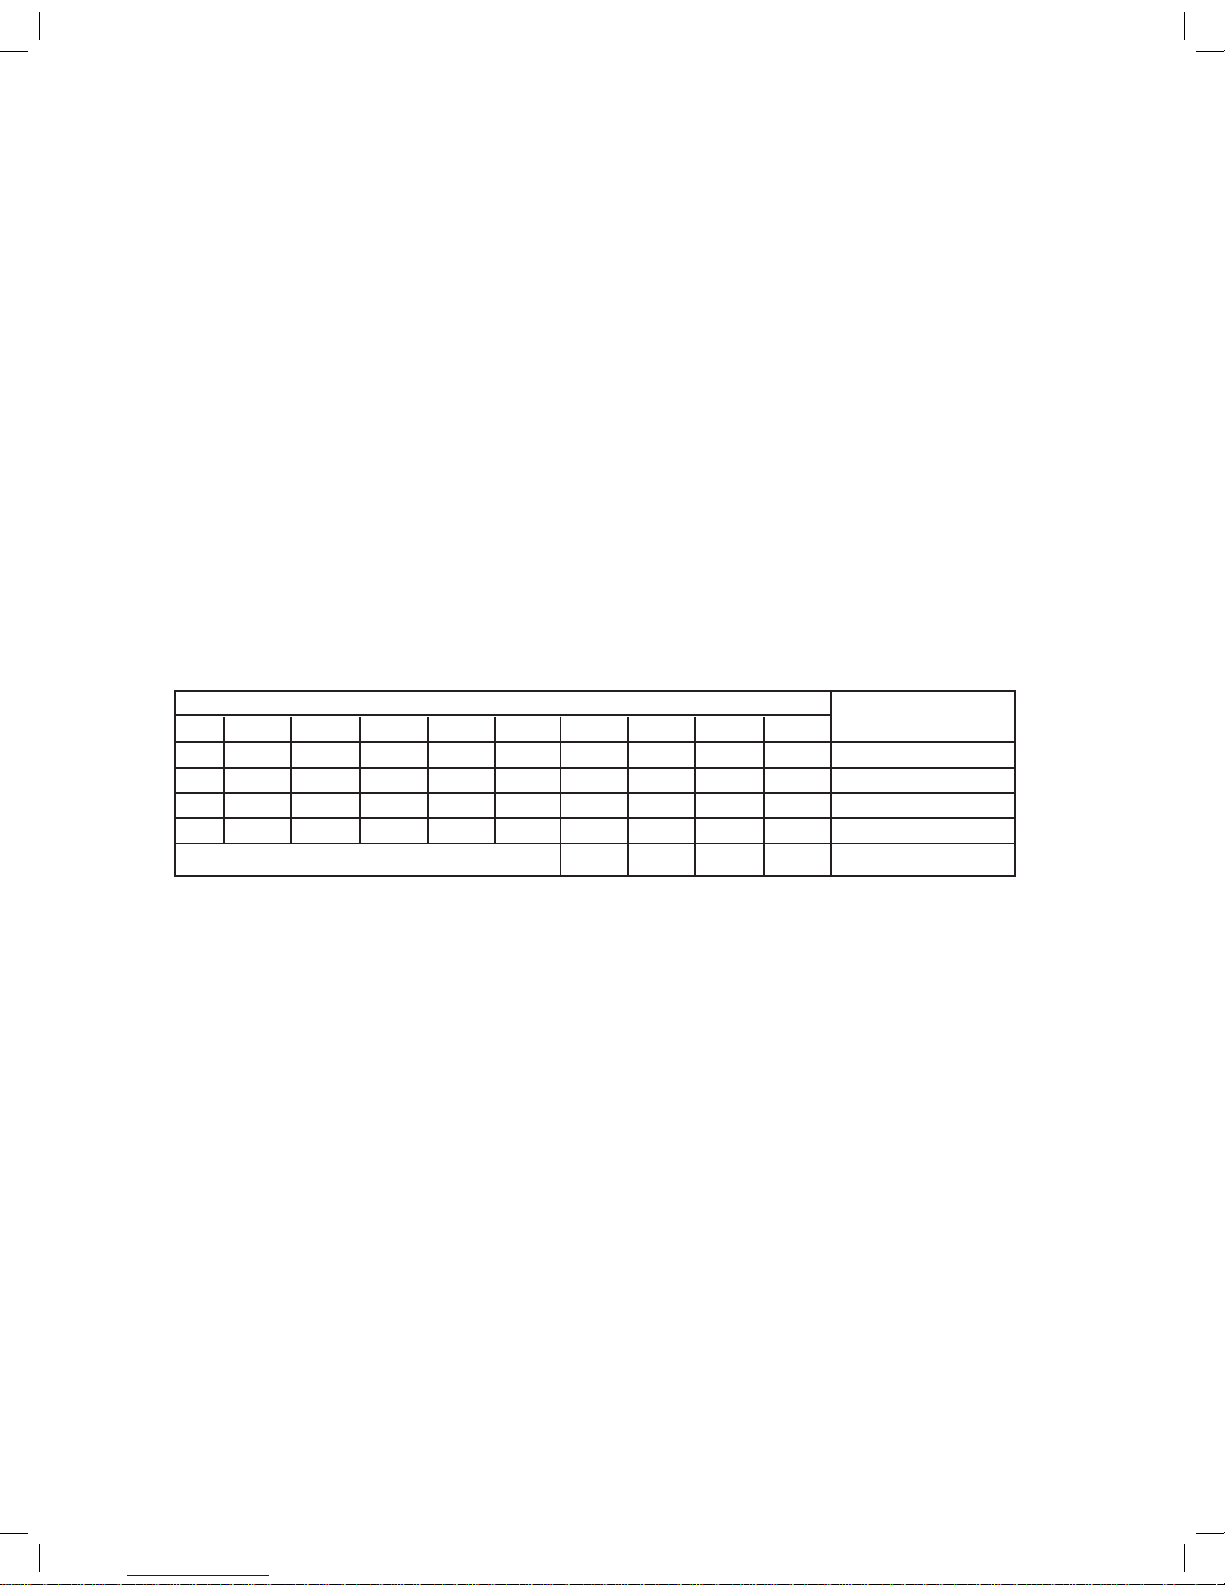
Set the system function with the DIP switch.
DIP switch 0=OFF 1=ON X=0FF or ON
DIP switch CHART FUNCTION
1 2 3 4 5 6 7 8 9 10
0 0 X X X X X X X 0 SOUND_ACTIVE
1 0 X X X X X X X 0 AUTO_MODE
0 1 X X X X X X X 0 SLAVE
1 1 X X X X X X X 0 TEST_MODE
SET DMX ADDRESS 1 DMX MODE
8129.01 Venue PP laser Instr.indd 3 5/2/08 6:09:26 PM
laser and controller instruction manual
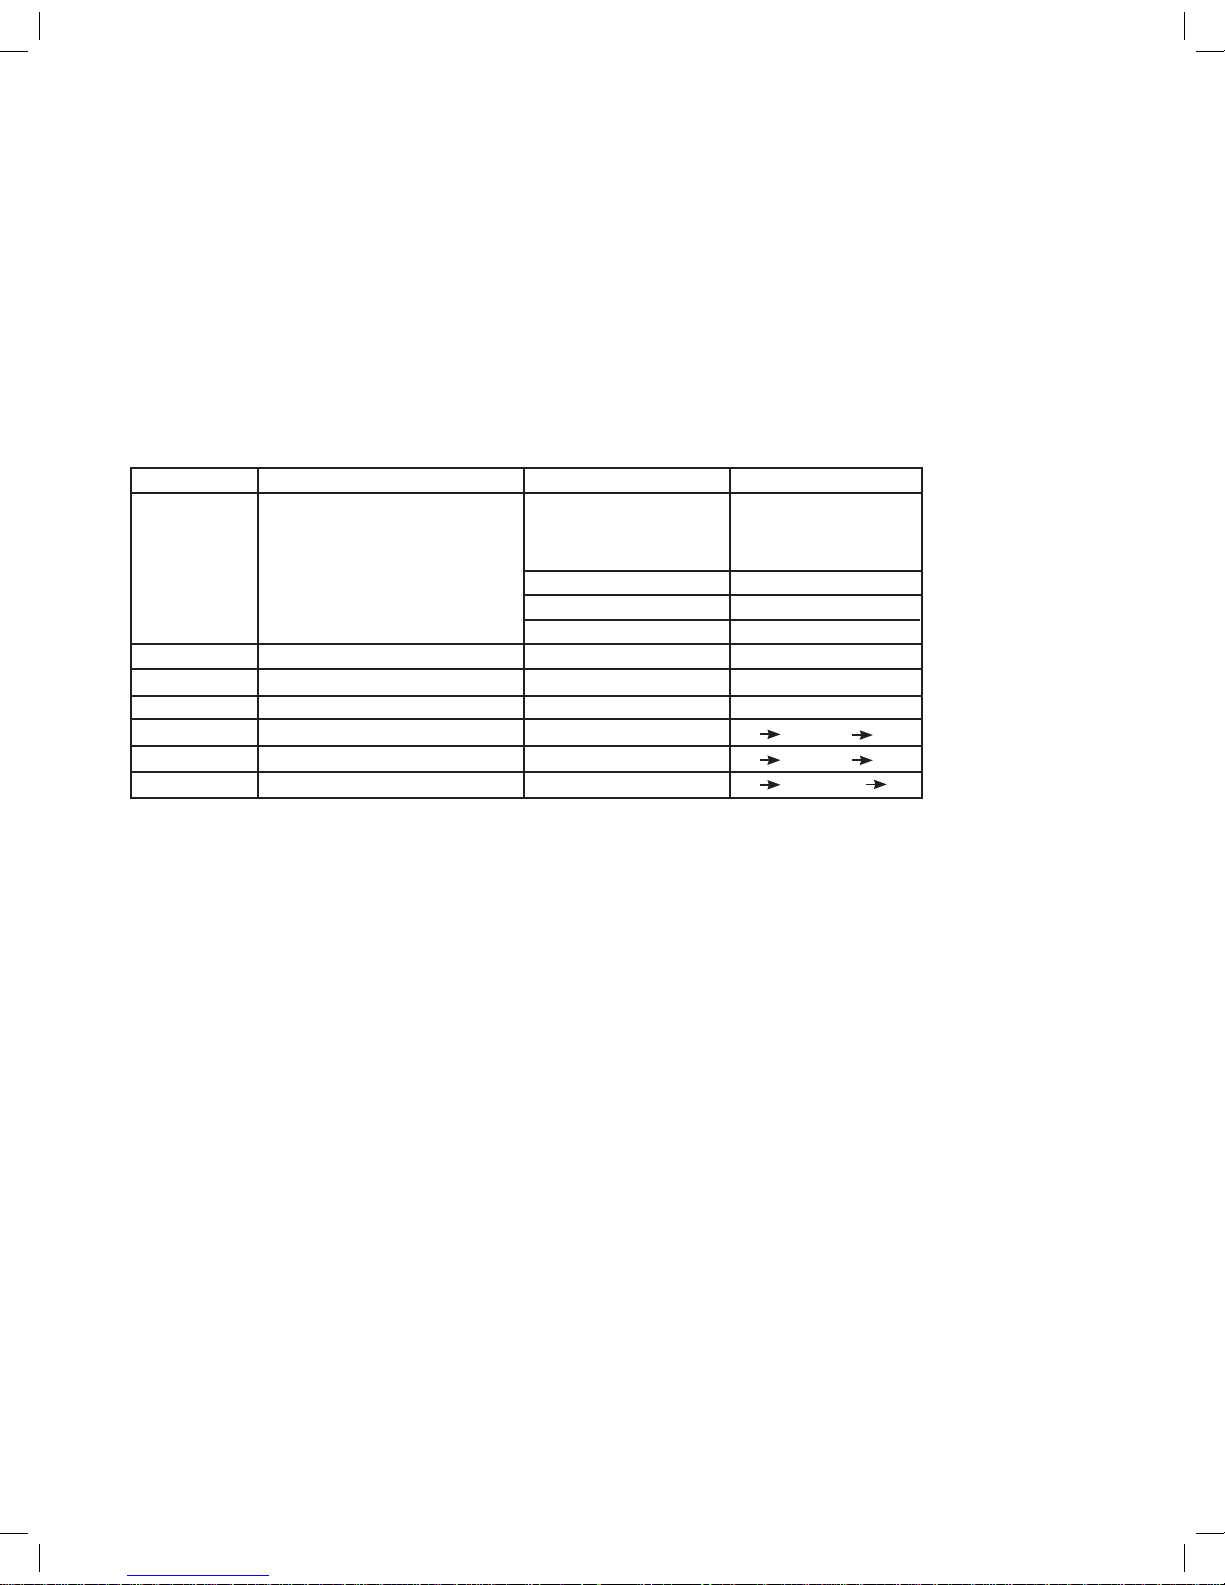
ADDRESS SETTING
In binary systems, there are only two numbers. 0 meaning “OFF” and 1 meaning “ON”. The numbers increase by
multiplying the previous value by 2. Positions from DIP switch #1 to DIP switch #9 signify binary value from a lower to
higher position.
EG LOOP ADDRESS BINARY
1 1 100000000
2 8 000100000
3 15 111100000
DMX CONTROL TABLE
GENERAL OPERATION
1. If in DMX mode, use the correct DMX address assignment.
2. Connect the projector and DMX512 console with the DMX signal cable. In Stand Alone mode, there is
no DMX input required.
3. Once powered on, the laser emits a beam in 2 seconds.
4. The laser can be controlled to play and edit programs by 1) a DMX controller in DMX mode, by 2) default program in
auto mode, and 3) in sound active mode if the sound sensitivity knob is correctly adjusted.
:
Channel Function DMX512 Value Detail
CH1 Mode 0~20 Close
Laser and scanner
head stop.
21~120 Dynamic Graphics
121~220 Static Graphics
221~255 Sound Active Mode
CH2 Pattern Selection 0~255 40 Patterns
CH3 Pan 0~255 Pan Movement
CH4 Tilt 0~255 Tilt Movement
CH5 Scan Speed 0~255 0 255 fast slow
CH6 Speed of Dynamic pattern 0~255 0 255 fast slow
CH7 Size of Static pattern 0~255 0 255 small big
8129.01 Venue PP laser Instr.indd 4 5/2/08 6:09:26 PM
 Loading...