

Page 1
User's Guide
Headphone Ampli er with USB-DAC
CONTENTS
■
Features of this Product _________________________________ 2
■ Contents of Package ___________________________________ 3
■
Compatible Models of iPod/iPhone and PC (OS)_________________3
■ How to Use this Product ________________________________ 3
1.
Checking the Remaining Battery of this Product ______________ 3
2. Charging the Built-in Battery of this Product _______________ 4
3. Charging iPod/iPhone by this Product's Built-in Battery ______ 4
4. Connecting with iPod/iPhone __________________________ 5
5. Listening to Music in iPod/iPhone in "iAMP" Mode __________ 5
6.
Synchronizing with iPod/iPhone and iTunes on PC __________ 6
7. Listening to Music on PC in "USB DAC" Mode ______________ 7
8. Playing DSD Audio Files with foobar2000 _________________8
9. Connecting to Other Audio Devices ____________
________ 18
10. Setting Other Functions ____________________________ 19
11. Setting Gain ______________________________________ 20
Troubleshooting _____________________________________21
■ Speci cations _______________________________________ 22
■ Appendix:
Input/Output Relations and Toggle Switch Pattern Diagram ___ 24
■ Cautions on Use _____________________________________ 25
■ Product Support _____________________________________ 28
Upsampling Function
DSD Playback
Page 2
2
Thank you for purchasing VentureCraft product. Please read this
user's guide thoroughly before using.
Keep this document available for your future reference.
Disclaimer
●
VentureCraft is not responsible for any damages caused by natural
disasters and fire, actions or damages caused by third parties,
criminal or accidental use by individuals, or any other damages
caused by other irregular usage.
●
VentureCraft is not responsible for any changes or losses to recorded
data, losses of commercial pro t, interruption of business operations,
or any resultant damages or losses caused by use or malfunction of
this product.
●
VentureCraft is not responsible for any damages caused by failure
to follow instructionsin this user's guide.
Dear Valued Customer
・ Before using this product, please make sure to read "Cautions
on Use" found on the page 25 of this document.
・ The appendix of input/output relations and toggle switch
pattern diagram is on the page of this document.
・ [8. Playing DSD Audio Files with foobar2000] explains how to
install software package on PC. It is recommended to print
out the procedures prior to the installation.
■
Features of this Product
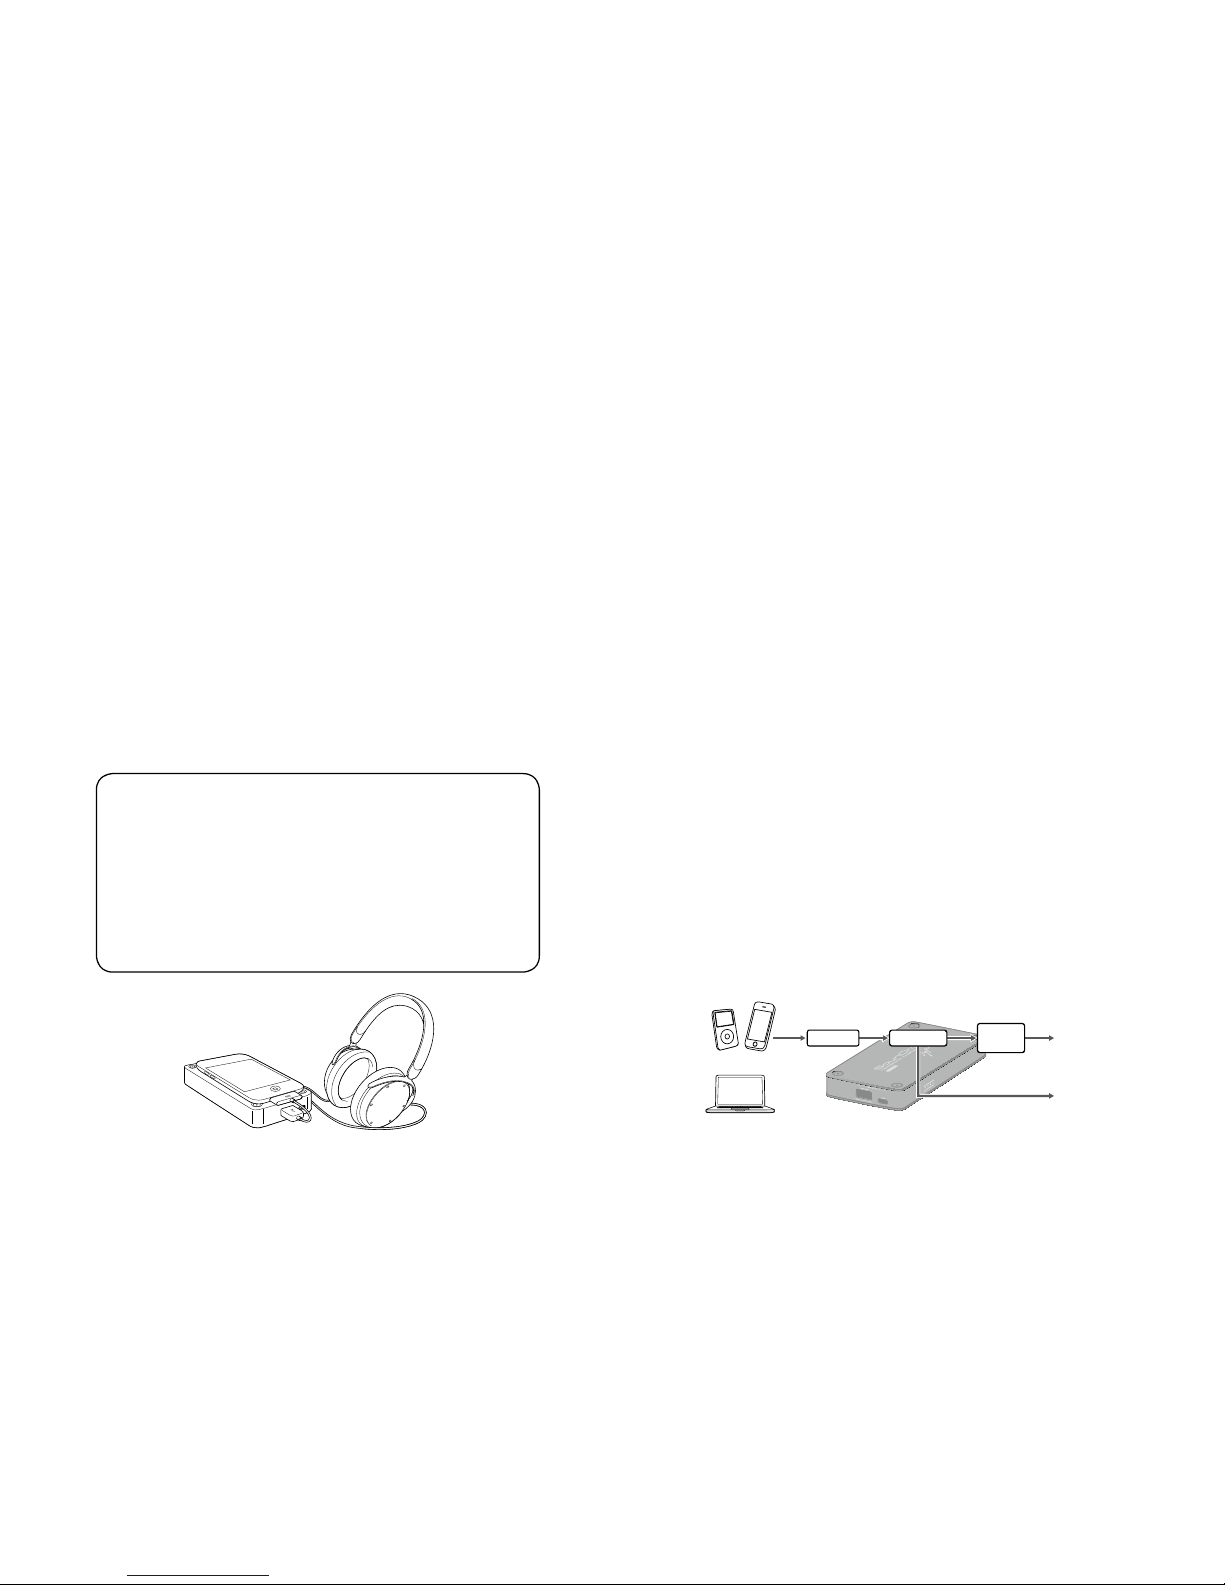
SounDroid Typhoon supports 4 inputs (iPod/iPhone, PC [USB], optical
digital, analog line) and 3 outputs (headphone, optical digital, variable
analog line).
As a portable headphone amplifier, *the world's first "iPod/iPhone
upsampling" function is mounted. The upsampled digital data is
converted to the wider dynamic-ranged and high-resoluted analog
signal by the TI's high-quality DAC, PCM5102A (32bit/192kHz/112dB).
* Upsampling (iPod/iPhone only): 48kHz, 96kHz, or 192kHz/32bit (max.)
For the analog curcuit pre-ampli er, the low-noise and low-distortion
TI's LME49860 (changeable) is mounted, and for the headphone
amplifier, the high slew-rate current feedback type high quality
amplifier, TPA6120, is mou nted. Accordingly, super quiet and
super high-quality sound become real, and it surely maximizes the
headphone potential.
●
PC-USB DAC (96kHz/32bit)
●
Asynchronous mode
The high-quality D/A conversion is operated by the sophisticated
clock that segregates well the PC jitter, and it supports 96kHz/32bit
PCM format.
By the internal DSP, DSD format (2.8224MHz) is real-timely converted
to PCM format at 88.2kHz/32bit, and it fully maximizes the potential
of such high-qua
lity sound digital contents.
* Some OS and PC are not supported.
Headphone
Output
SPDIF OUT
(OPT OUT)
Front end
PCM5102A
Final
OP-AMP
iDevice
PC
Page 3
3
■
Contents of Package
●
SounDroid Typhoon main unit
●
USB cable (USB2.0 compatible[A connec tor - micro B
connector type])
●
Customer card & Warranty (Japan only)
■
Compatible Models of iPod/iPhone and PC (OS)
●
iPod:
iPod classic (160GB, 2009)/iPod nano (6th/7th generation)/
iPod touch (4th/5th generation)
●
iPhone:
iPhone 5/4S/4
●
PC (OS)
Windows
:
8/7/Vista/XP SP3 or later (32bit/64bit)
Mac
:
OS X v10.5 or later
■
How to Use this Product
Please follow operational procedures 1 to 11 below.
1.
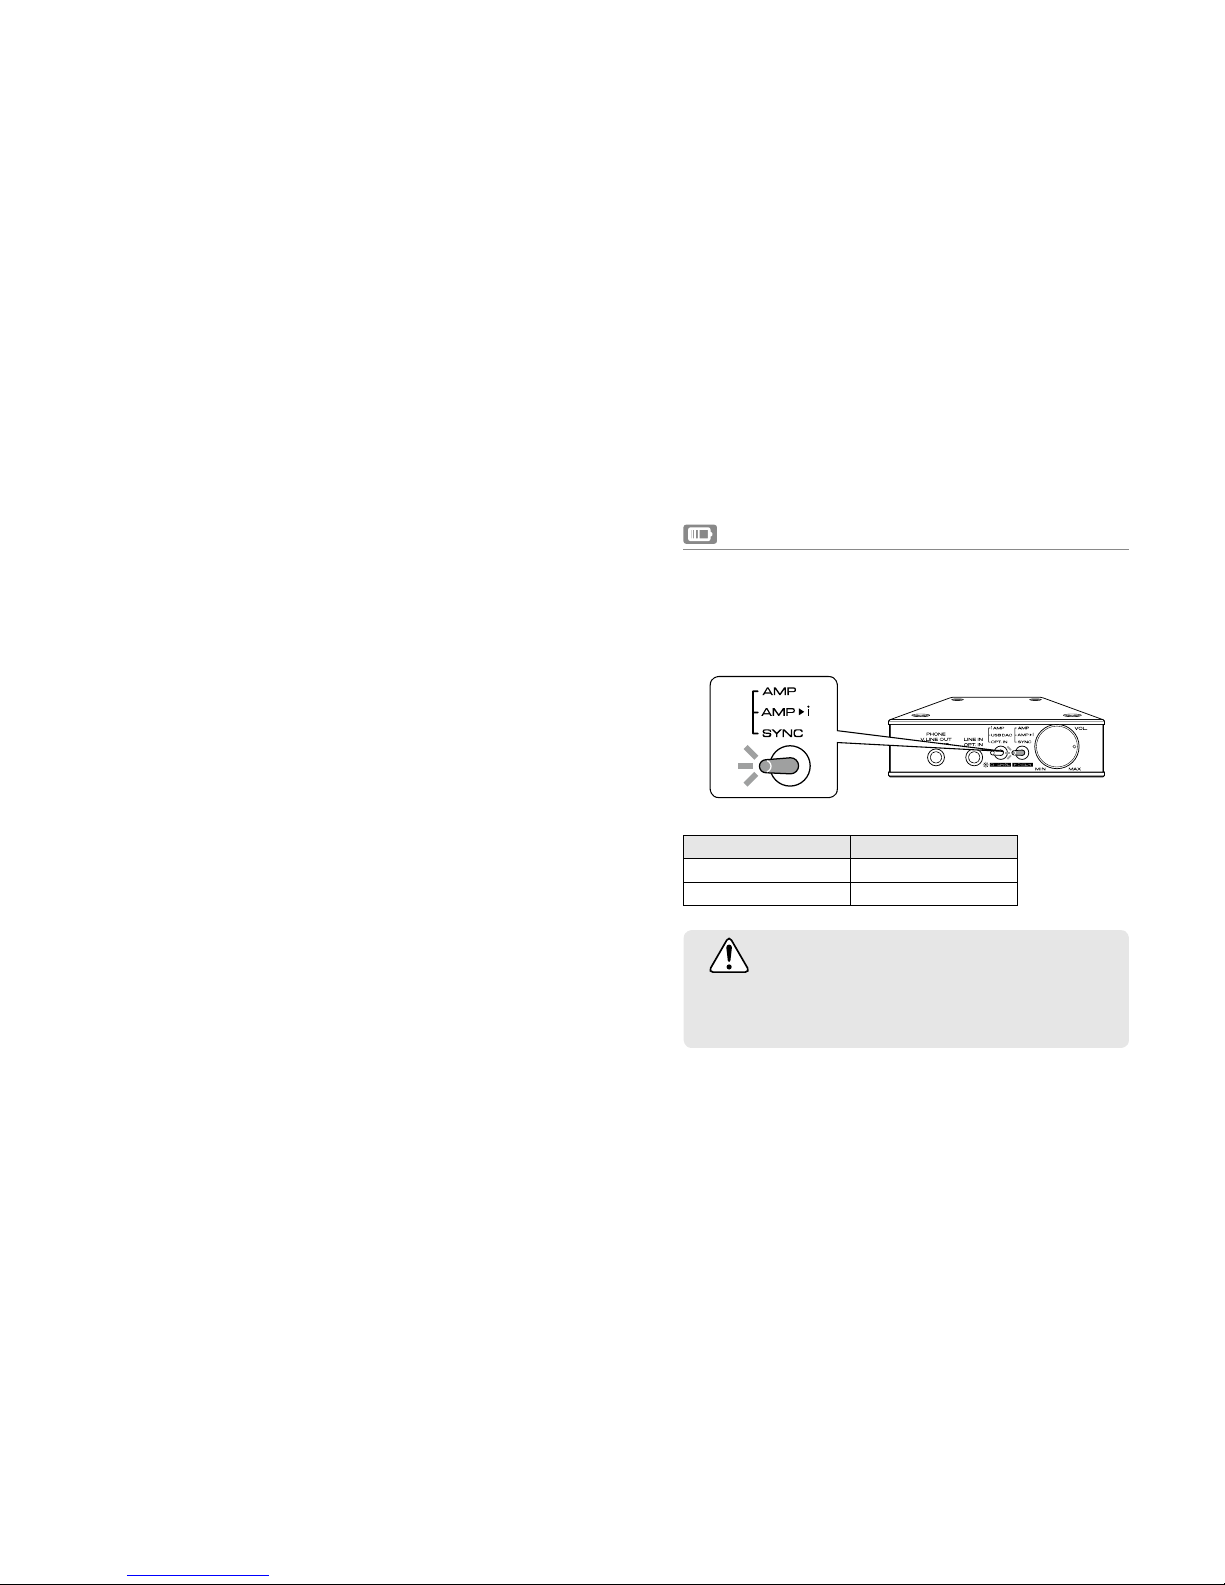
Checking the Remaining Battery of this Product
The remaining battery can be checked by the LED color of the
toggle switch (R) on the front panel. When turning the power
ON, the LED lights up based on the level of the remaining
battery.
Remaining battery LED
Full Green
Empty Red
CAUTION
The battery at the time of purchase is not fully charged.
Charge the battery before using this product.
Page 4
4
CAUTION
If both LEDs are off or become off while the USB cable is
connected, immediately disconnect the USB cable and stop
charging.
Please refer to "Troubleshooting" on page 21 of this User's
Guide and reset before reuse.
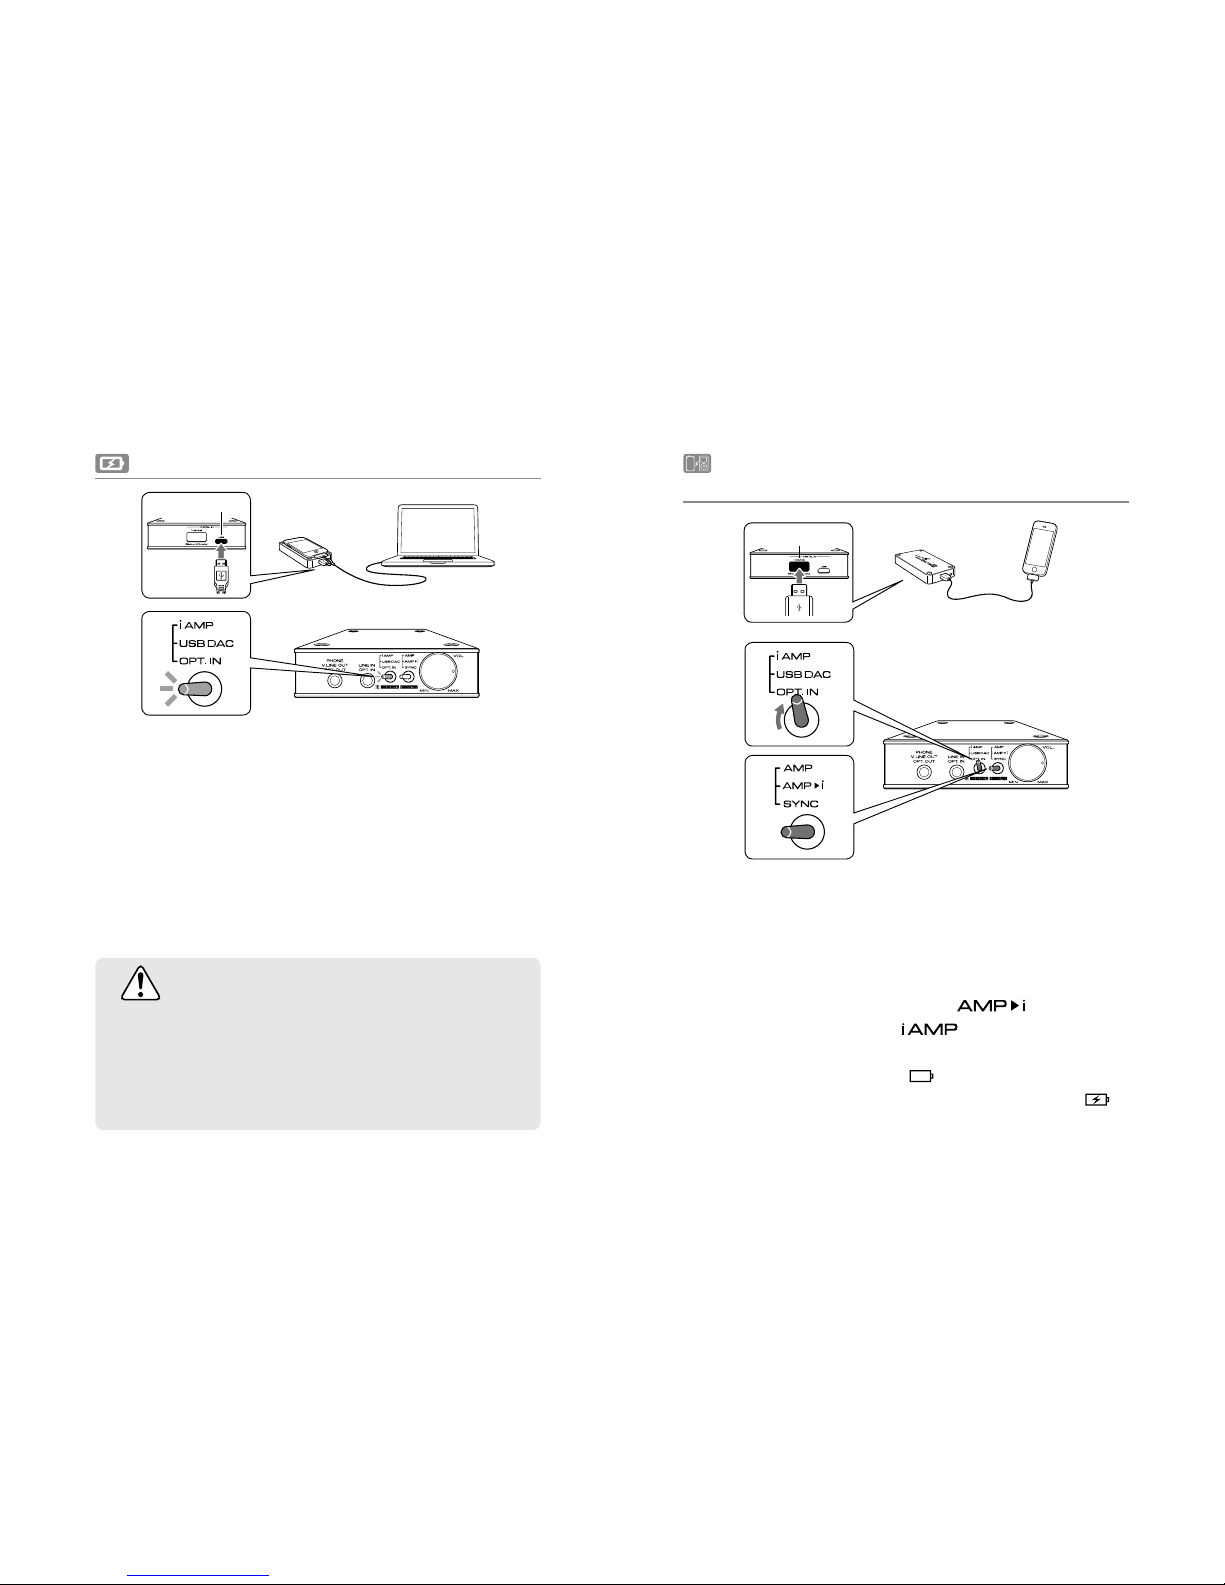
2. Charging the Built-in Battery of this Product
Connect the USB micro B connector on the rear panel of
this product and PC or the USB charging adapter supplied
with iPod/iPhone by using the supplied USB cable.
The LED color of the toggle switch (L) on the front panel
stays red while being charged and becomes green when
fully charged.
*
When the built-in battery of this product is fully charged, it will
automatically start charging iPod/iPhone. It takes approximately
6 hours to fully charge this product.
1
2
3. Charging iPod/iPhone by
this Product's Built-in Battery
i DEVICE
Connect by inserting the Apple genuine dock cable
supplied with iPod/iPhone into the iDEVICE (USB standard
A) connector of this product.
Turn the power ON by the power switch volume knob
and set the toggle switch (R) to "
" position and
the toggle switch (L) to "
" position. iPod/iPhone
will start to be charged by the built-in battery of this
product. The battery mark
located at the top right of
iPod/iPhone screen will change to a charging mark
.
1
2
USB
Page 5
5
i DEVICE
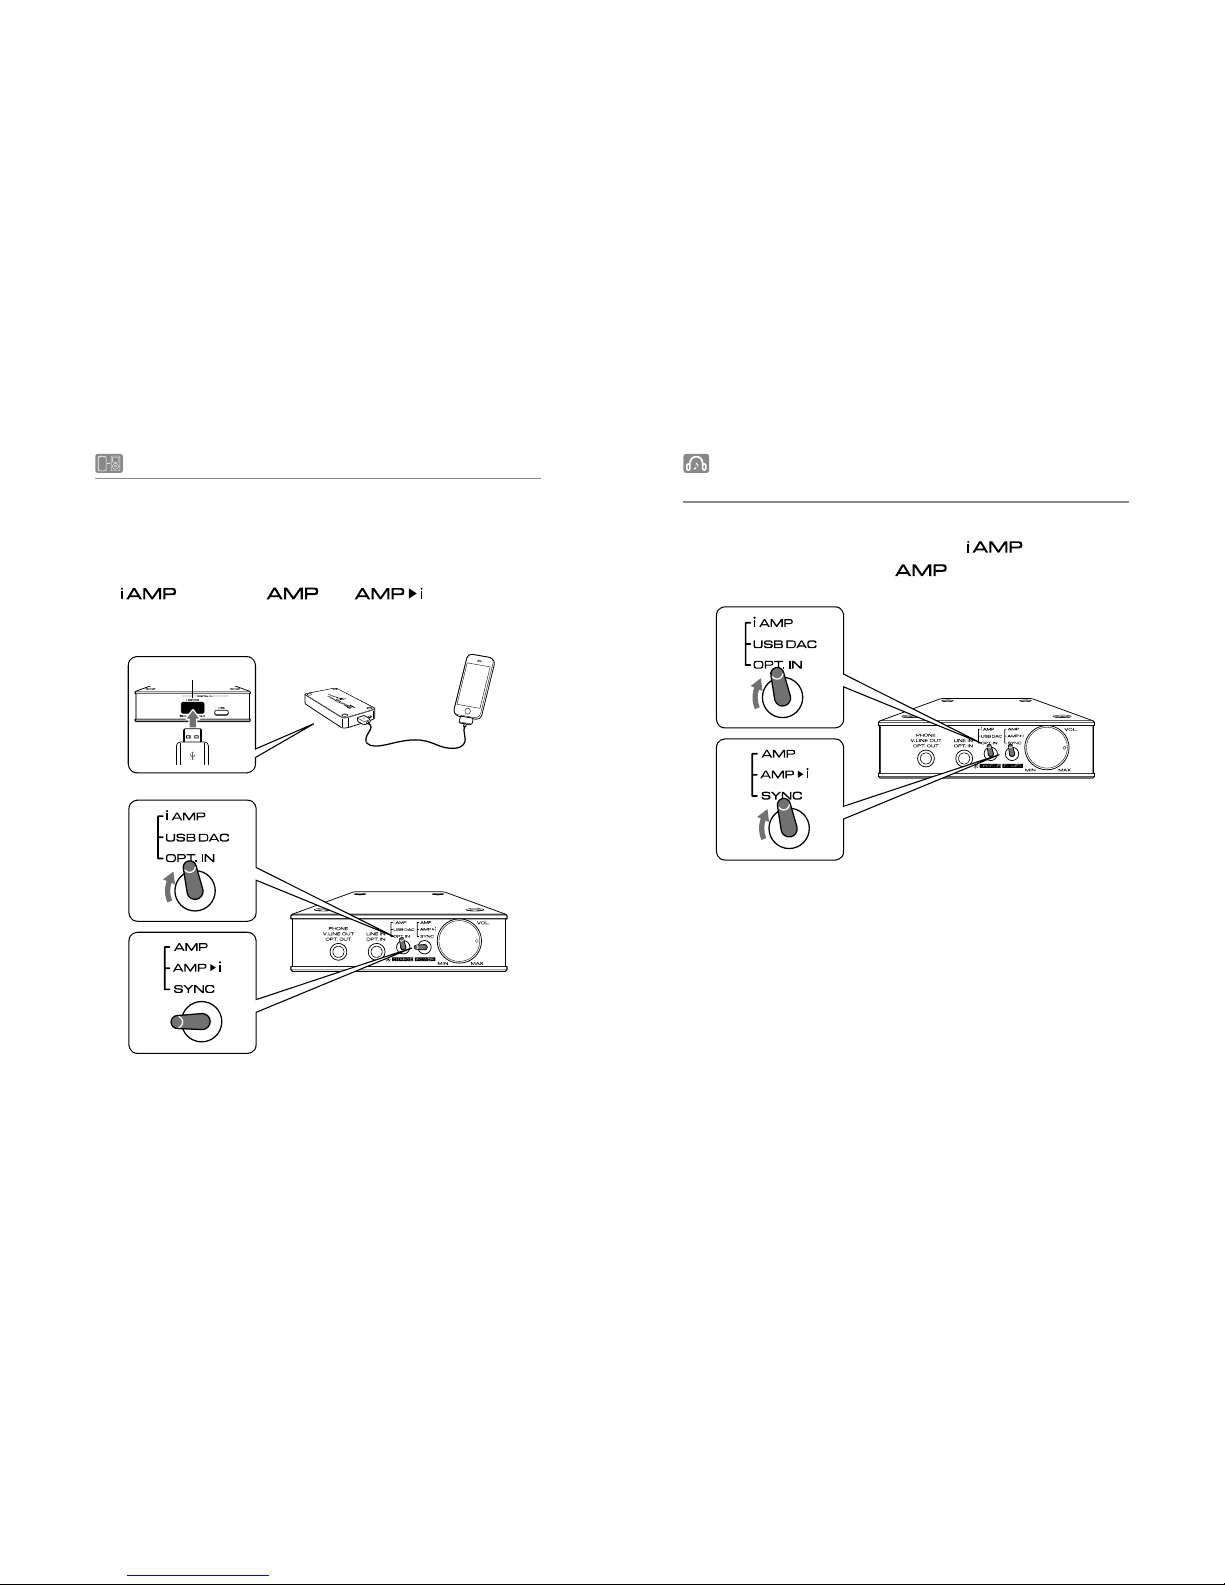
4. Connecting with iPod/iPhone
Connect by inserting the Apple genuine dock cable supplied
with iPod/iPhone into the iDEVICE (USB standard A) connector
of this product, turn the power ON by the power switch
volume knob, and set the toggle switches on the front panel (L)
to "
" and (R) to " " or " " for headphone
output/digital output.
5. Listening to Music in iPod/iPhone in
"iAMP" Mode
Turn the power ON by the power switch volume knob
and set the toggle switch (L) to "
" position and
the toggle switch (R) to "
" position.
Once this product and iPod/iPhone are correctly connected
(authenticated), music starts playing.
*
If music is not playing, iPod/iPhone may not be connected
with this product at all, or it may not be correctly connected
(authenticated).
In such case, disconnect iPod/iPhone once and recoonect,
or turn the power OFF by turning the power switch volume
knob counterclockwise all the way until
it clicks and then
turn the power ON again.
1
2
Page 6
6
6.
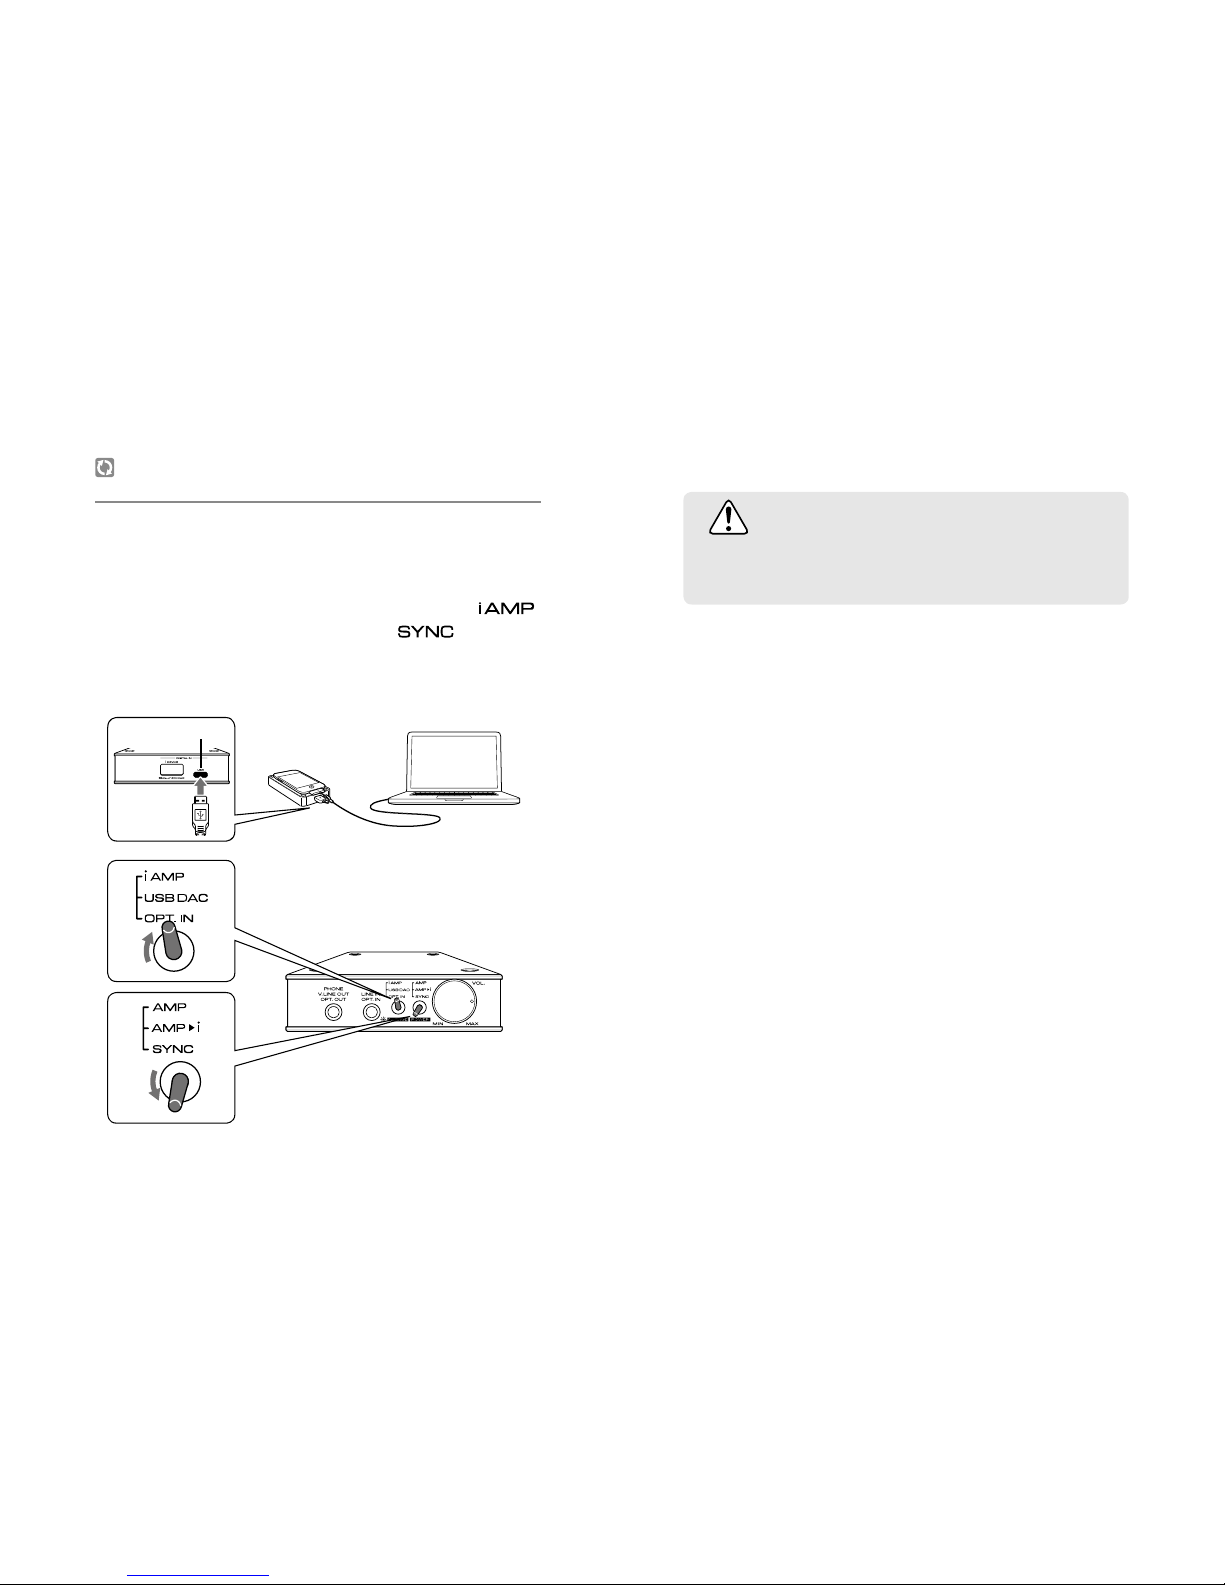
Synchronizing with iPod/iPhone and
iTunes on PC
Connect the USB micro B connector on the rear panel of
this product and your PC with the supplied USB cable.
Turn the power ON by the power switch volume knob and
set the toggle switch (L) on the front panel to "
"
position and the toggle switch (R) to "
" position to
synchronize with iTunes on PC. "SYNC" state is the same as
if iPod/iPhone was directly connected to PC.
CAUTION
Do not change the switches or disconnect the microUSB cable
during synchronization.
1
2
USB
Page 7
7
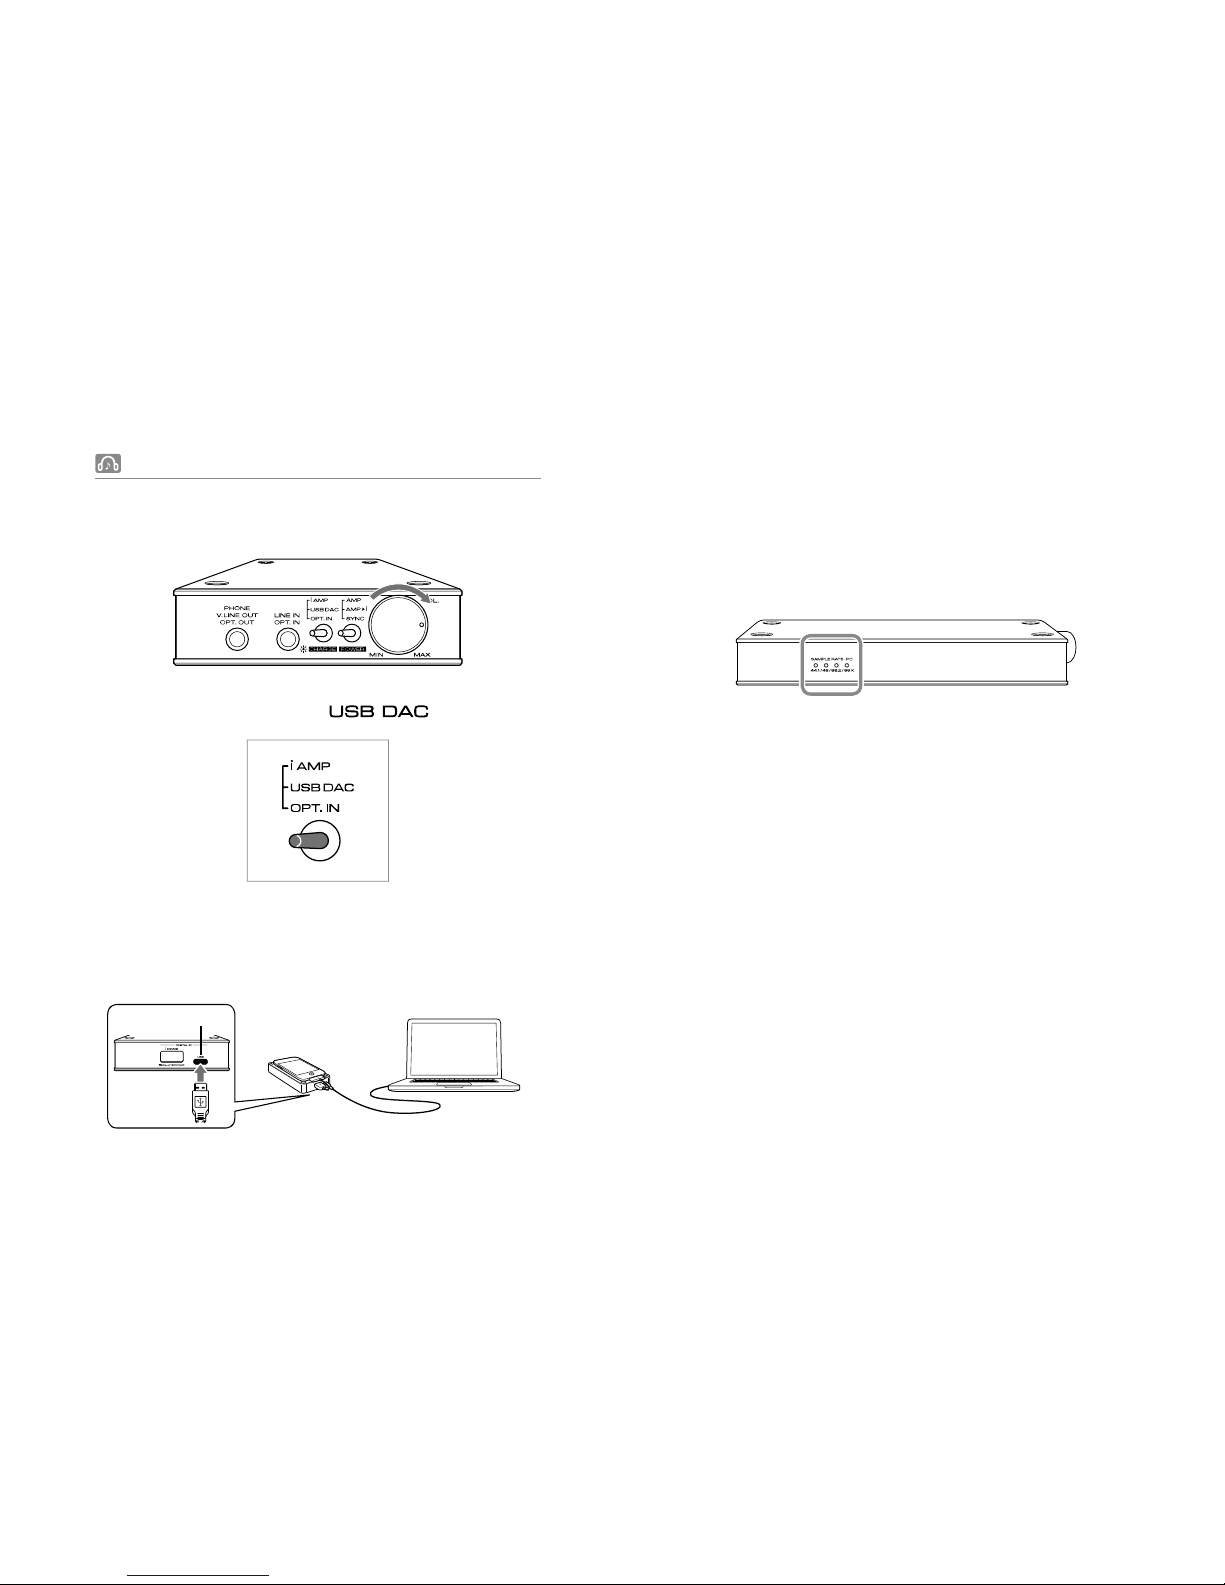
7. Listening to Music on PC in "USB DAC" Mode
Turn the power switch volume knob clockwise until it
clicks to turn the power ON.
Connect this product and PC with the supplied USB cable.
The USB audio output device driver is automatically installed
when this product is connected to PC for the rst time.
1
Check the sound setting on PC and confirm a sound is
coming. For volume control, adjust the volume on PC.
* The built-in battery is charged at the same time.
When using this product in PC-USB DAC mode, the SAMPLE
RATE-PC indicator at the side panel shows the sampling
frequency of the playing music.
Installing the foobar2000 software package enables the highresolution digital DSD playback.
Next 10 pages explain about the software package.
3
4
Set the toggle switch (L) to " " position.
2
USB
Page 8

8
8. Playing DSD Audio Files with foobar2000
■
Installation of software package
For Windows PC
SounDroid Typhoon is compatible with Windows8/7/Vista/XP.
Installing the audio driver for asynchronous connection and
ASIO driver for receiving DSD Native data to the internal DSP.
Download the software package from our ocial website.
Open the downloaded folder.
Click the set-up files and operate the installat
ion. when
the set-up is nished, PC automatically restarts, and the
installation is completed.
■
Playback settings for DSD formats
For Windows PC
●
Required software and components for DSD playback (by
foobar2000)
foobar2000 DSD playback software
foo out asio ASIO output component for foobar2000
foo input sacd Component for DSD playback
【Supported DSD audio formats】
DSF format
DSDIFF format
●
Downloading fo
obar2000
Start internet browser and access to the below URL.
http://www.foobar2000.org/
Click "Latest stable version Download foobar2000
v1.x.x" under Download tag.
Click [Save].
●
Installation of foobar2000
Start installer(Windows8/7/Vista).
Double-click "foobar2000_v1.x.x" on desktop (Windows
XP).
1
1
1
2
2
2
3
3
Page 9
9
Click [Next].
License Agreement appears, and click [I Agree] as
accepting the agreement.
Install Type appears.
Select "Standard installation" and click [Next].
Set the destination folder for installation and click
[Next].
Click [Install].
Installation of foobar2000 is now completed.
Uncheck "Run foobar2000" and click [Finish].
●
Installation of Component foo out asio
Start internet browser and access to t
he below URL.
http://www.foobar2000.org/components
Click "ASIO support 2.1.2".
* Link name may dier by updates.
Click "Download" under Links.
Open the downloaded folder (Windows8/7/Vista).
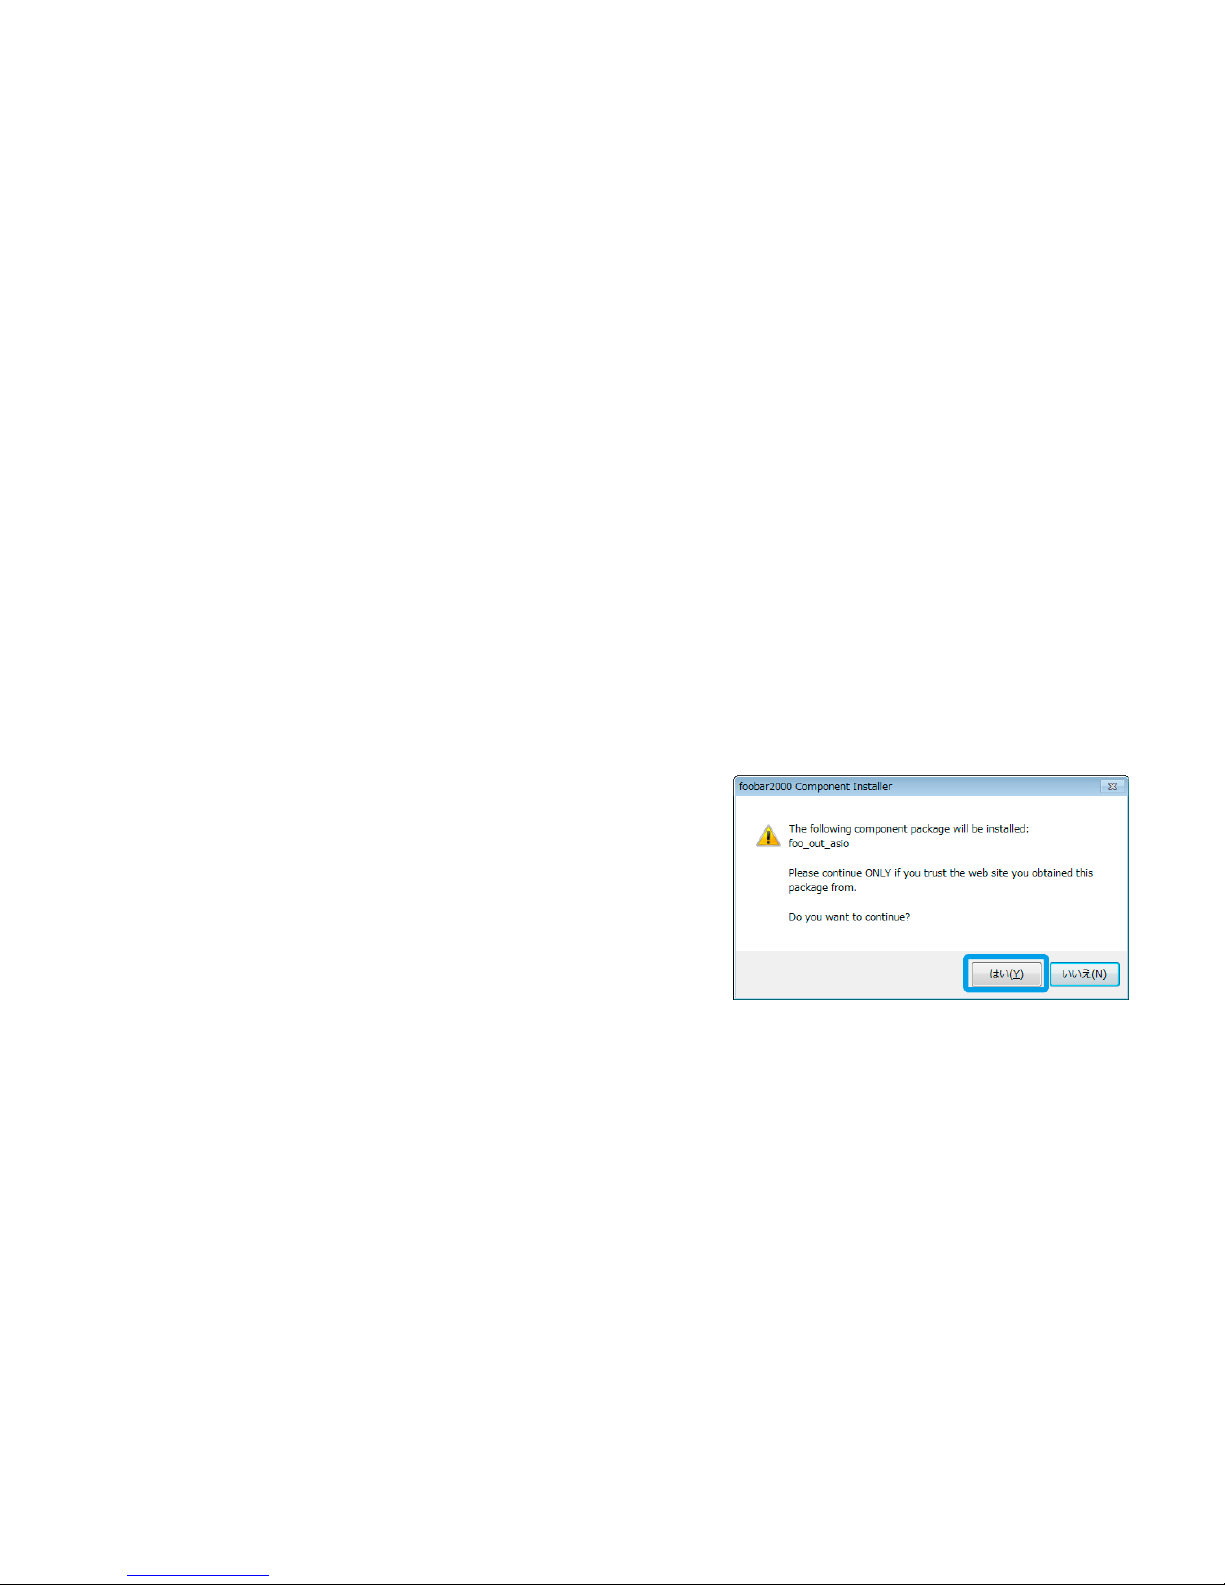
foobar2000 starts, and this screen appears.
Click [Yes].
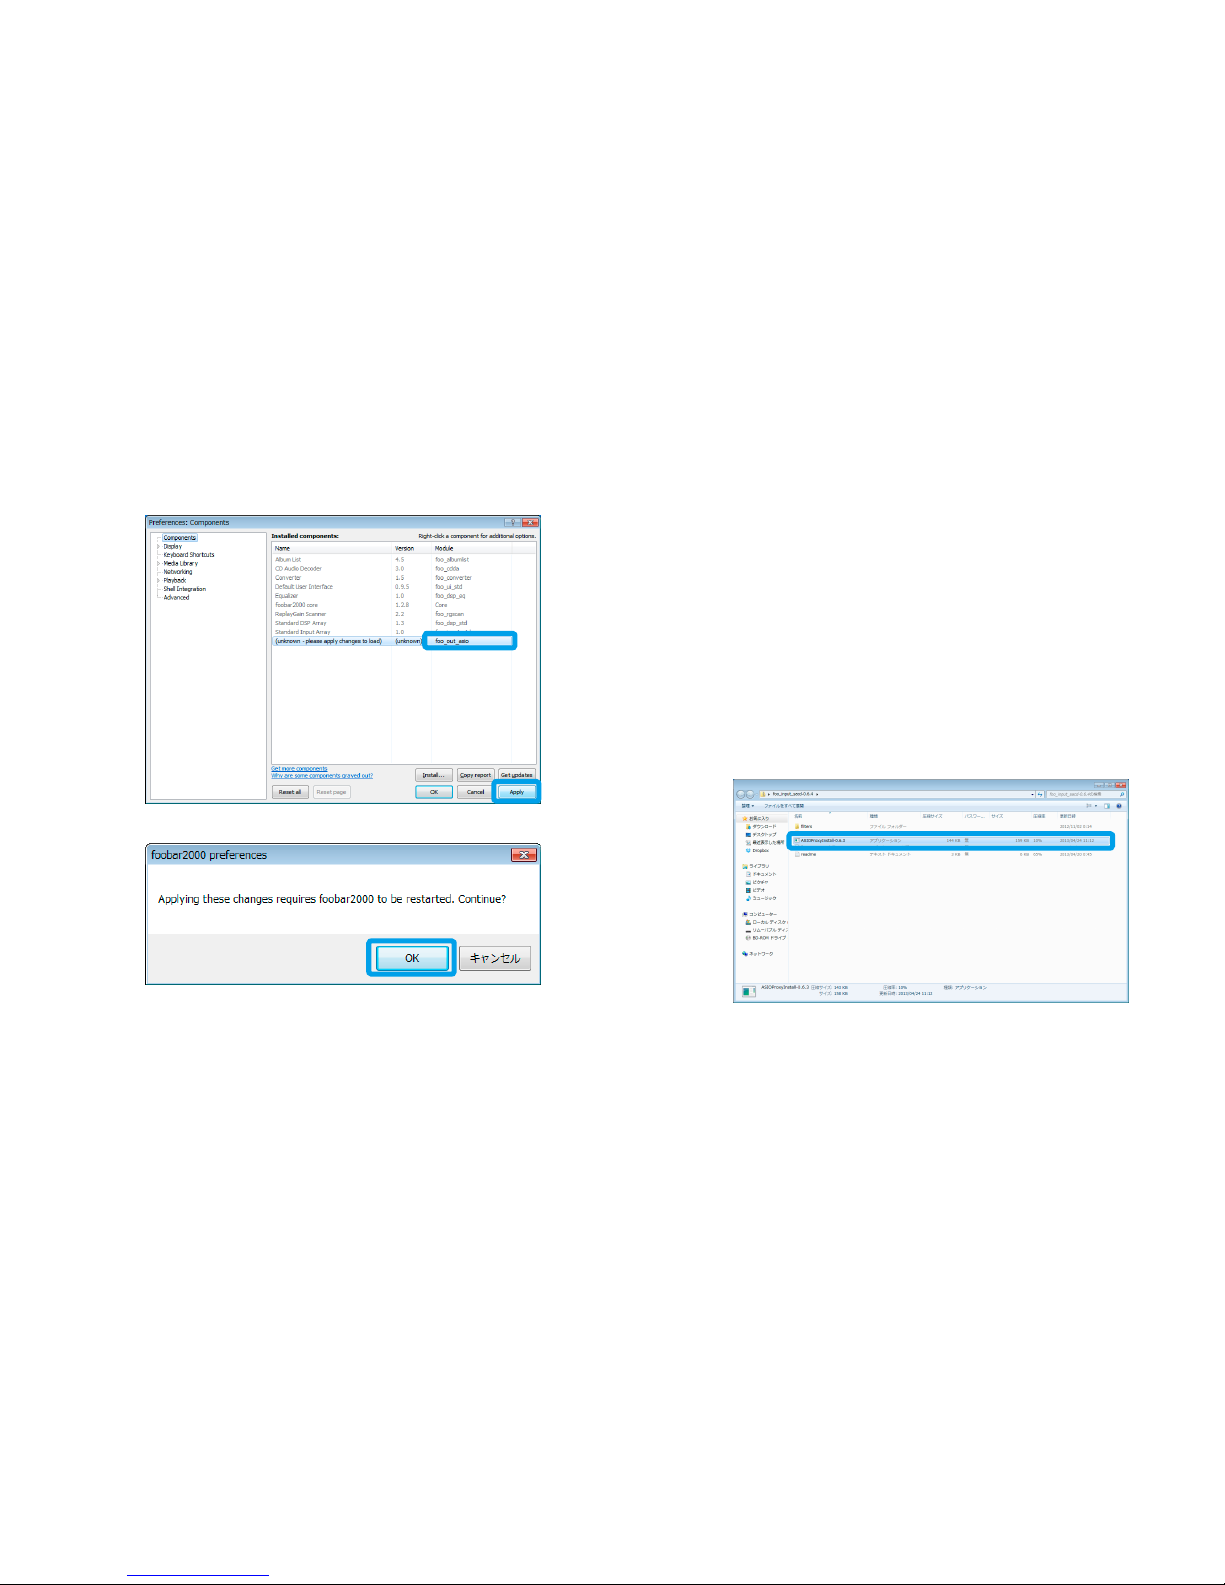
"foo_out_asio" appears on "Installed components".
3
4
5
6
7
8
1
2
3
4
Page 10
10
Select "foo out asio" and click [Apply].
This screen appears.
Click [OK].
Installation of foo out asio for foobar2000 is now
completed.
●
Installation of foo input sacd
Start internet browser and access to the below URL.
http://www.sourceforge.net/projects/sacddecoder/files/
foo_input_sacd/
Click "foo_input_sacd-0.6.x.zip".
* Link name may dier by updates.
Click [Save].
Open the downloaded folder.
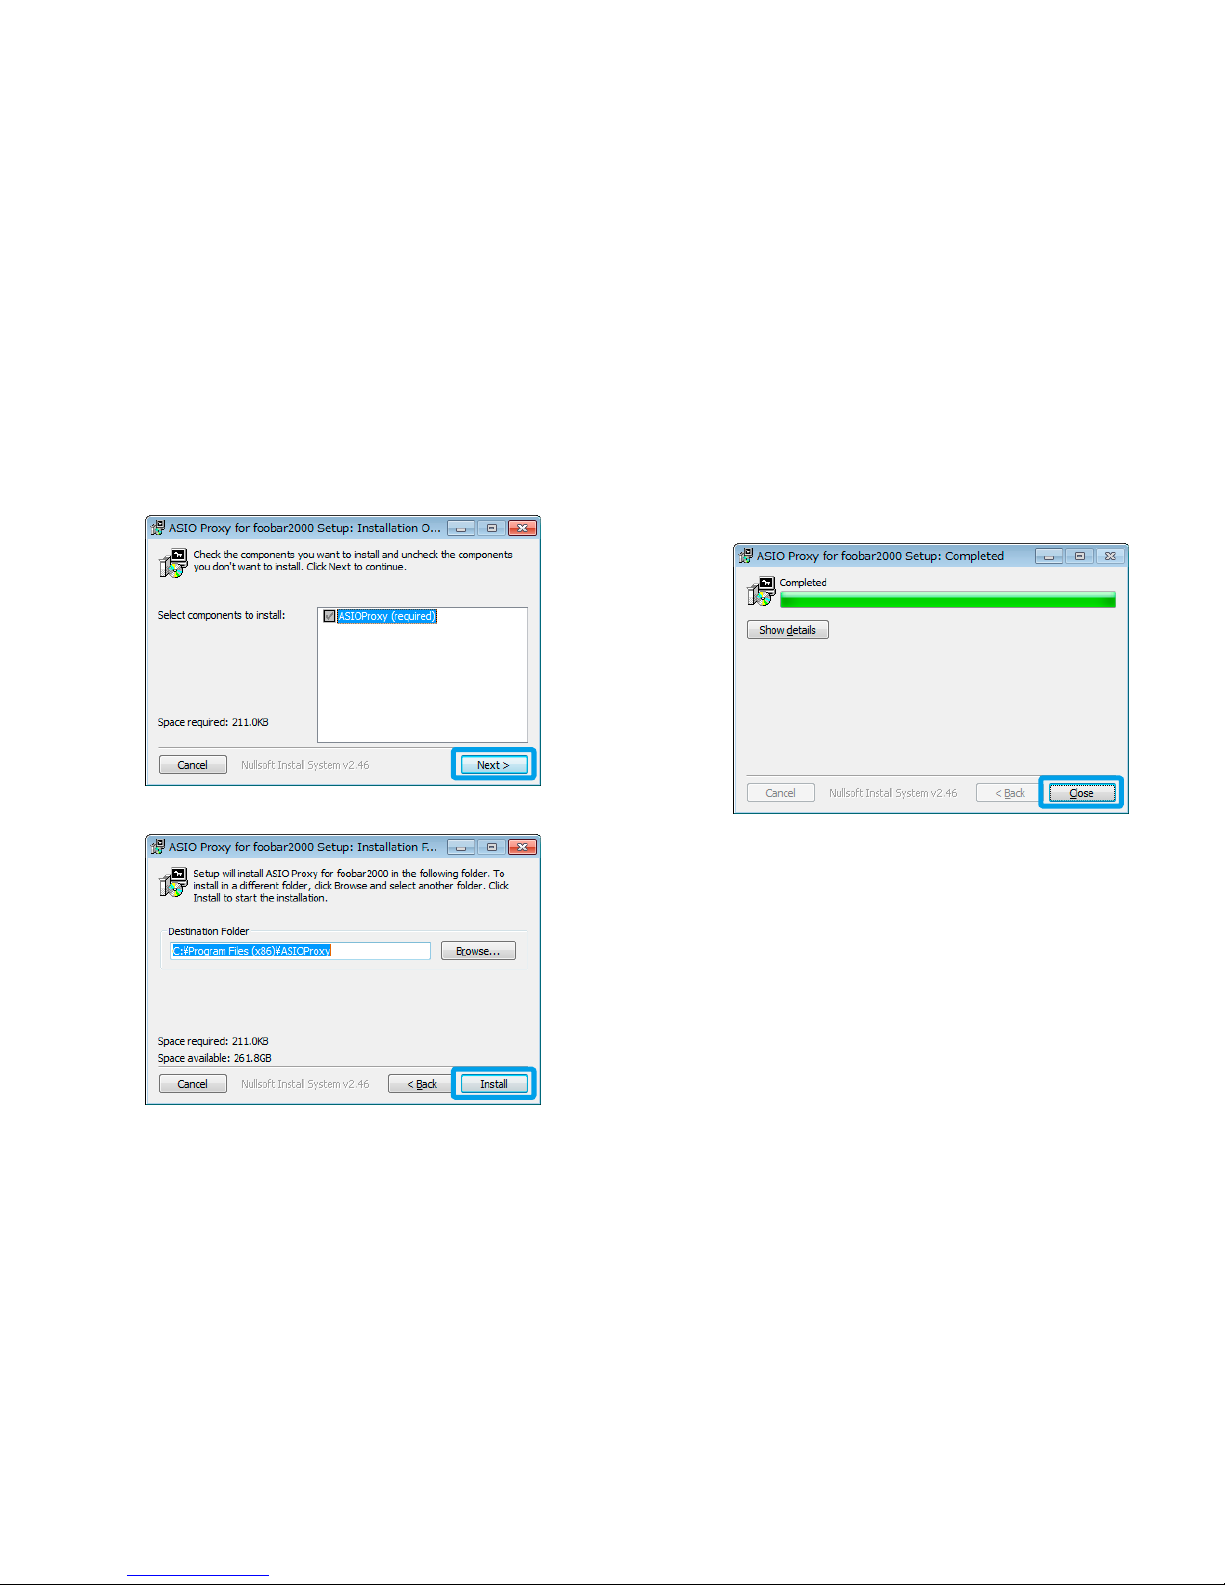
Double-click "ASIOProxyInstall".
Installer starts.
5
6
1
2
3
4
5
Page 11
11
Click [Next].
Set the destination folder for installation.
Click [Install].
Installation begins.
When installation is completed, click [Close] and nish
the operation.
6
7
8
9
Page 12
12
●
Setting up foobar2000
Associating the previously downloaded/installed components
and tools with foobar2000 and setting up to receive DSD
Native in this product.
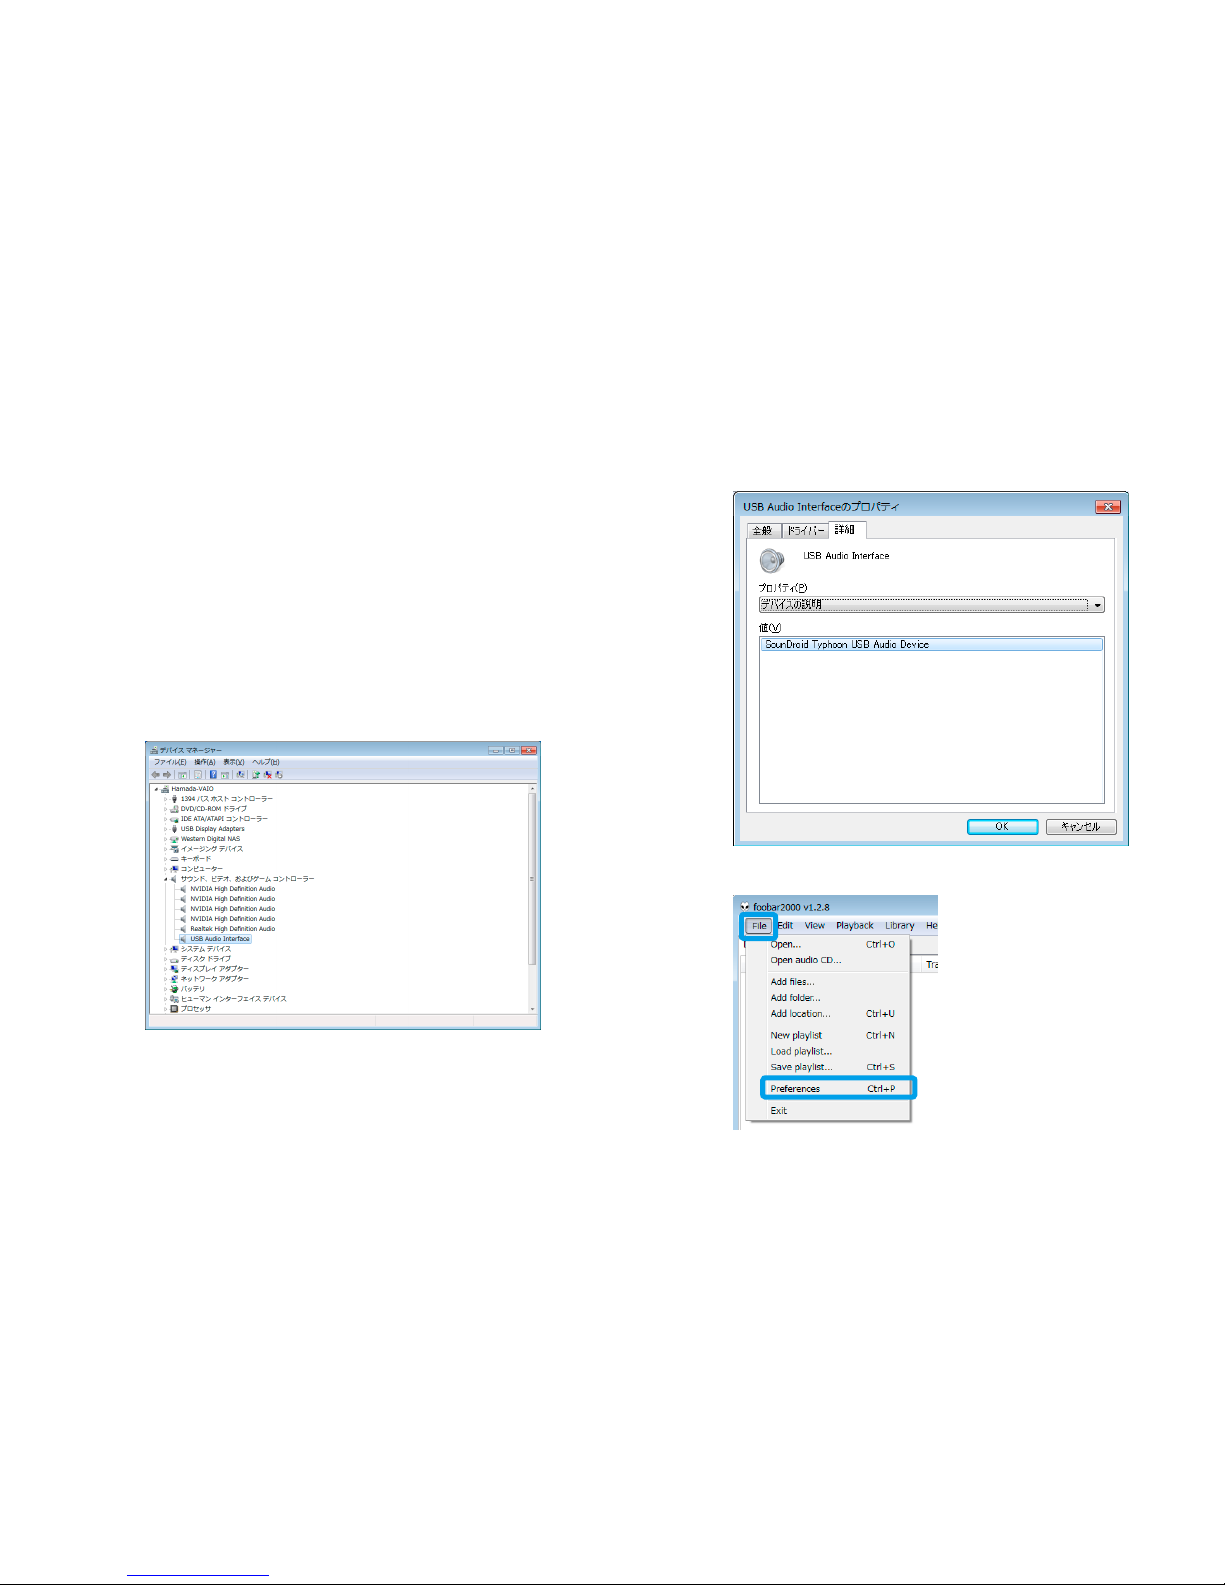
Check this product and PC are connected.
Double-click "USB Audio Interface" on PC's Device
Manager to check the Property Details.
If it does not appear, this product and PC are not properly
connected.
Click (File) → (Preferences) on foobar2000.
1
2
3
Page 13
13
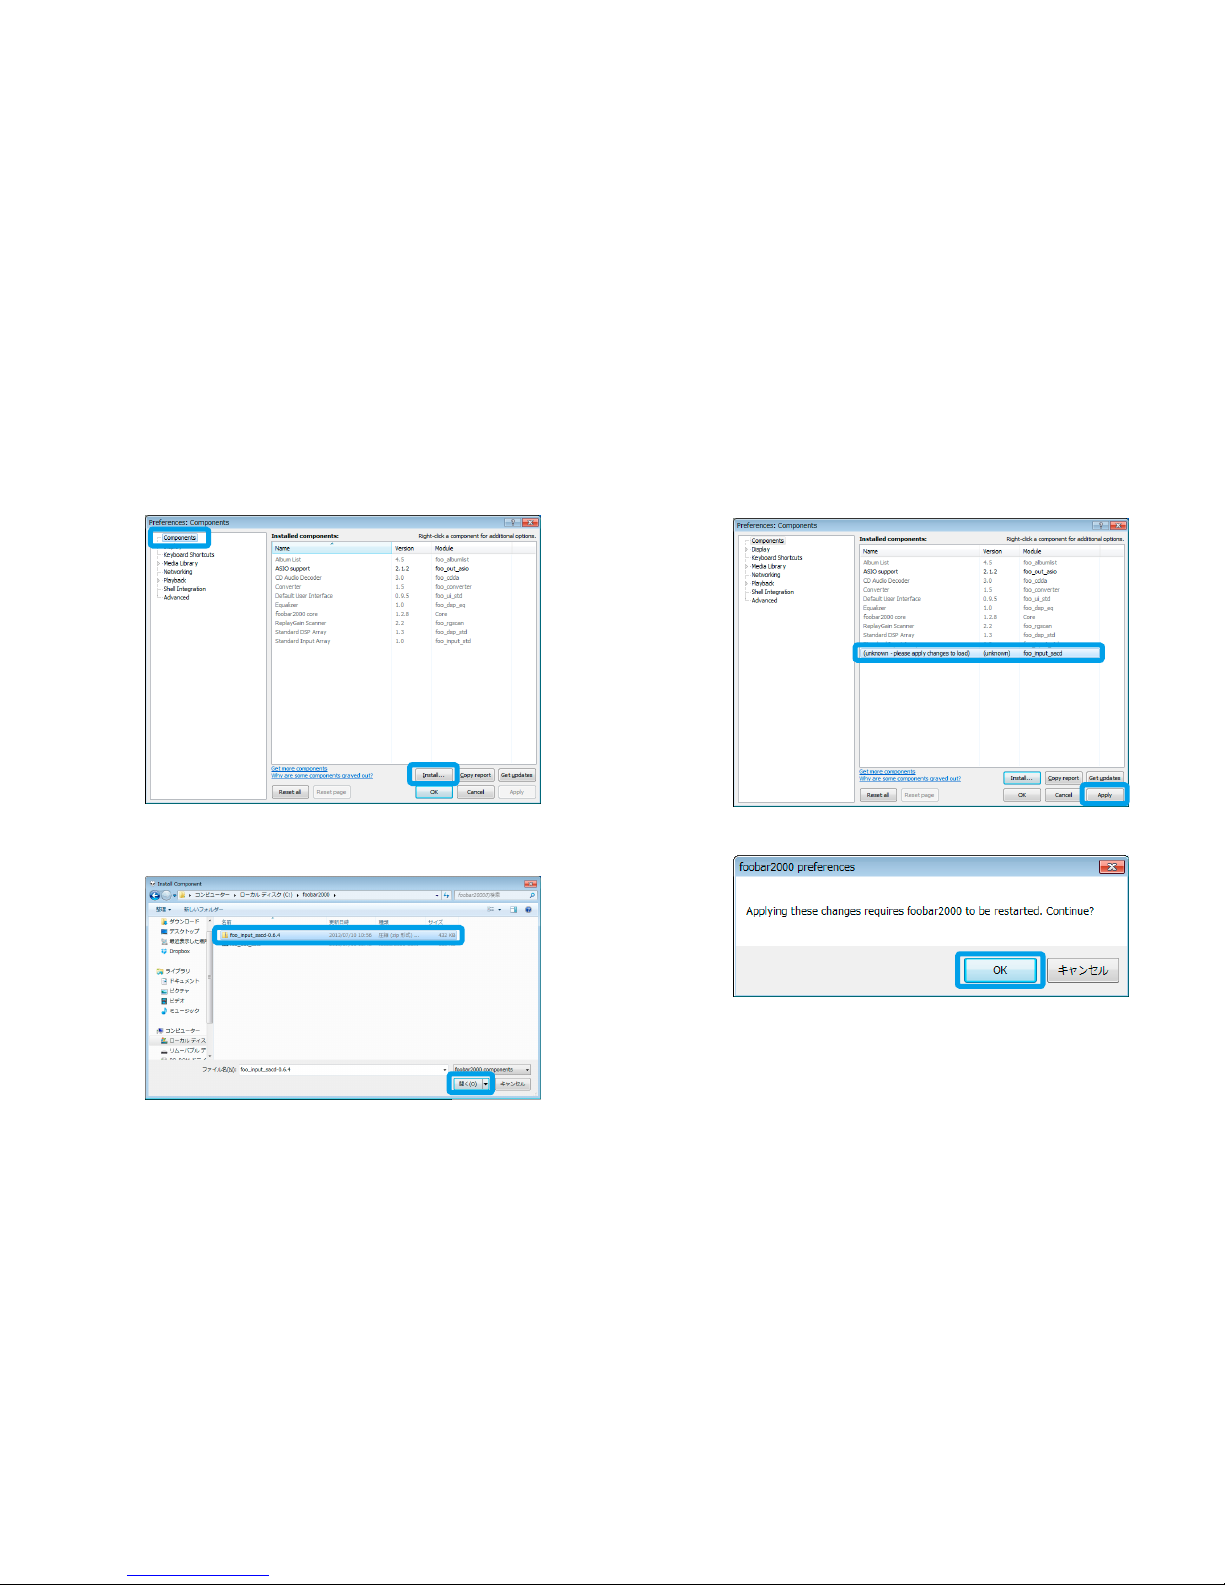
Open (Components) and click [Install].
Select "foo_input_sacd-0.6.x" compressed le and click
[Open].
Select "foo_input_sacd" and click [Apply].
This screen appears. Click [OK].
4 6
5
7
Page 14
14
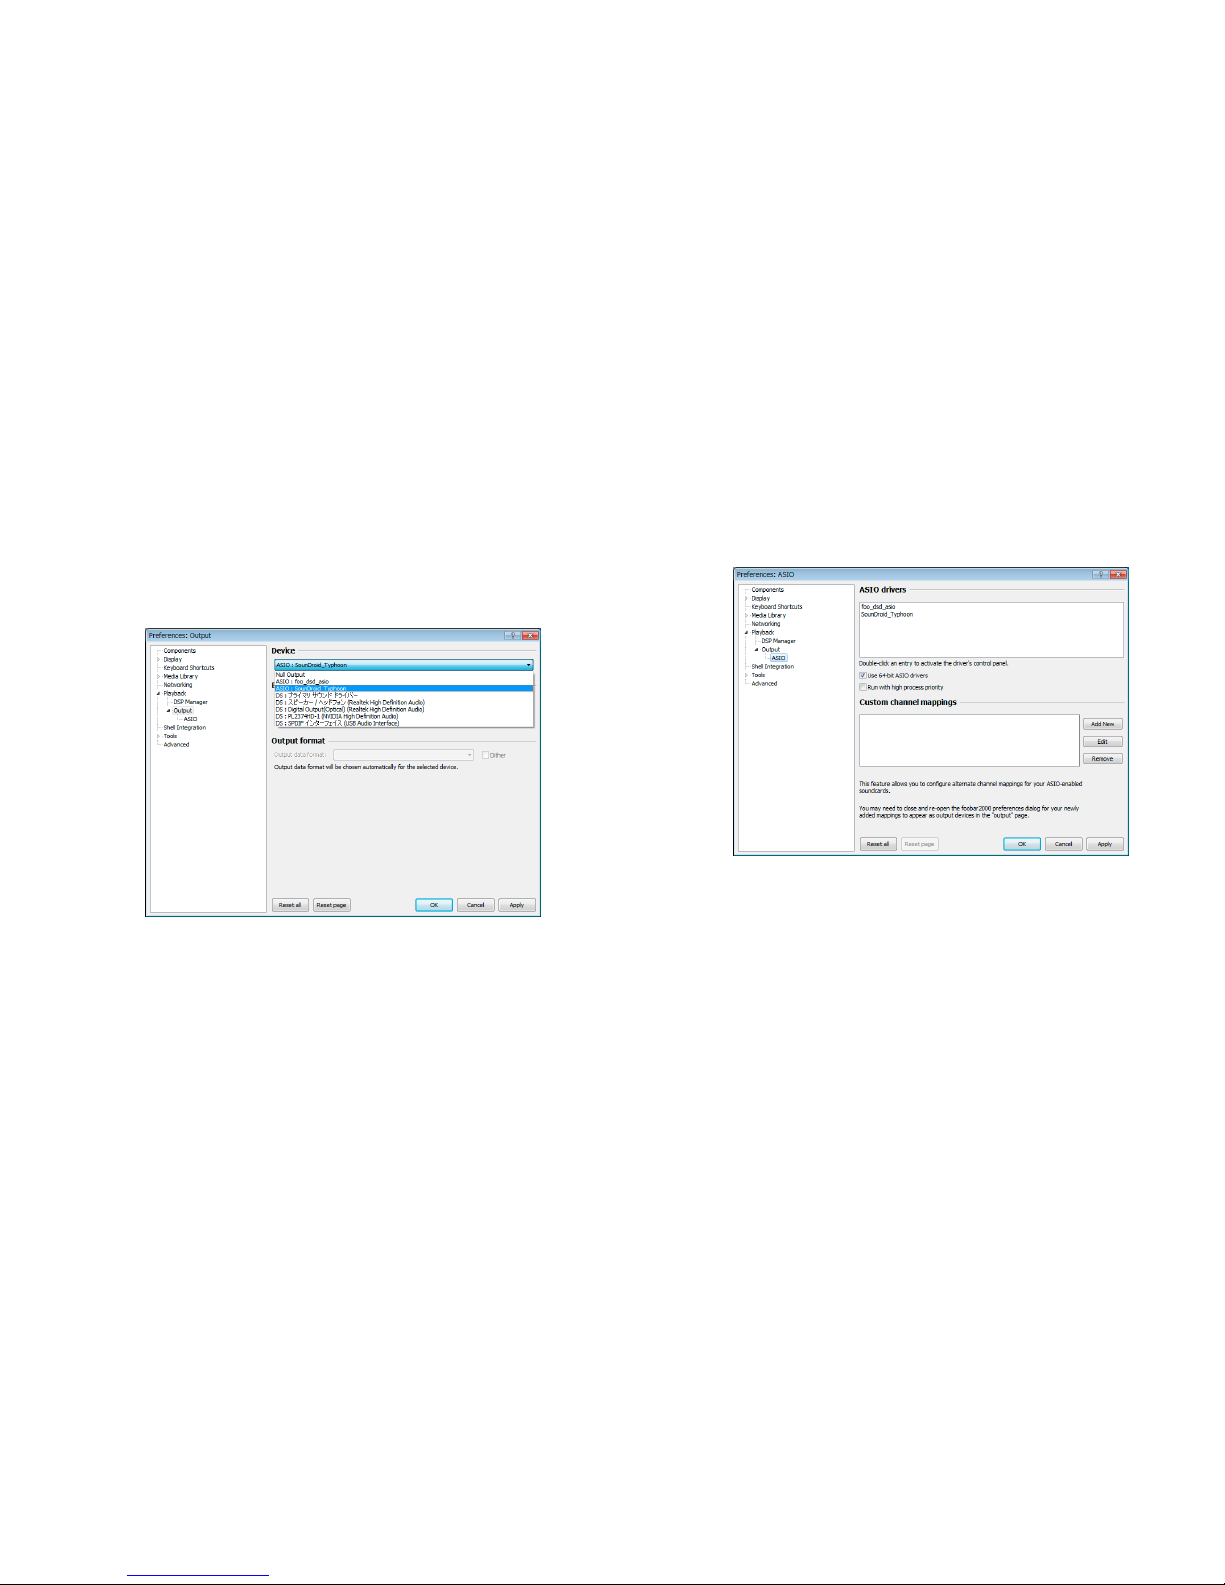
Double-click (Playback).
Click (Output).
Select "ASIO:SounDroid_Typhoon" under (Device).
Click [Apply] and [OK].
Click (Ouput).
Click (ASIO).
* If operating at 64bit OS, put a checkmark on "Use 64-
bit ASIO drivers".
Select "foo_dsd_asio" on (ASIO drivers).
Click [Add New] on (Custom channel mappings).
8
9
10
11
12
13
14
15
Page 15
15
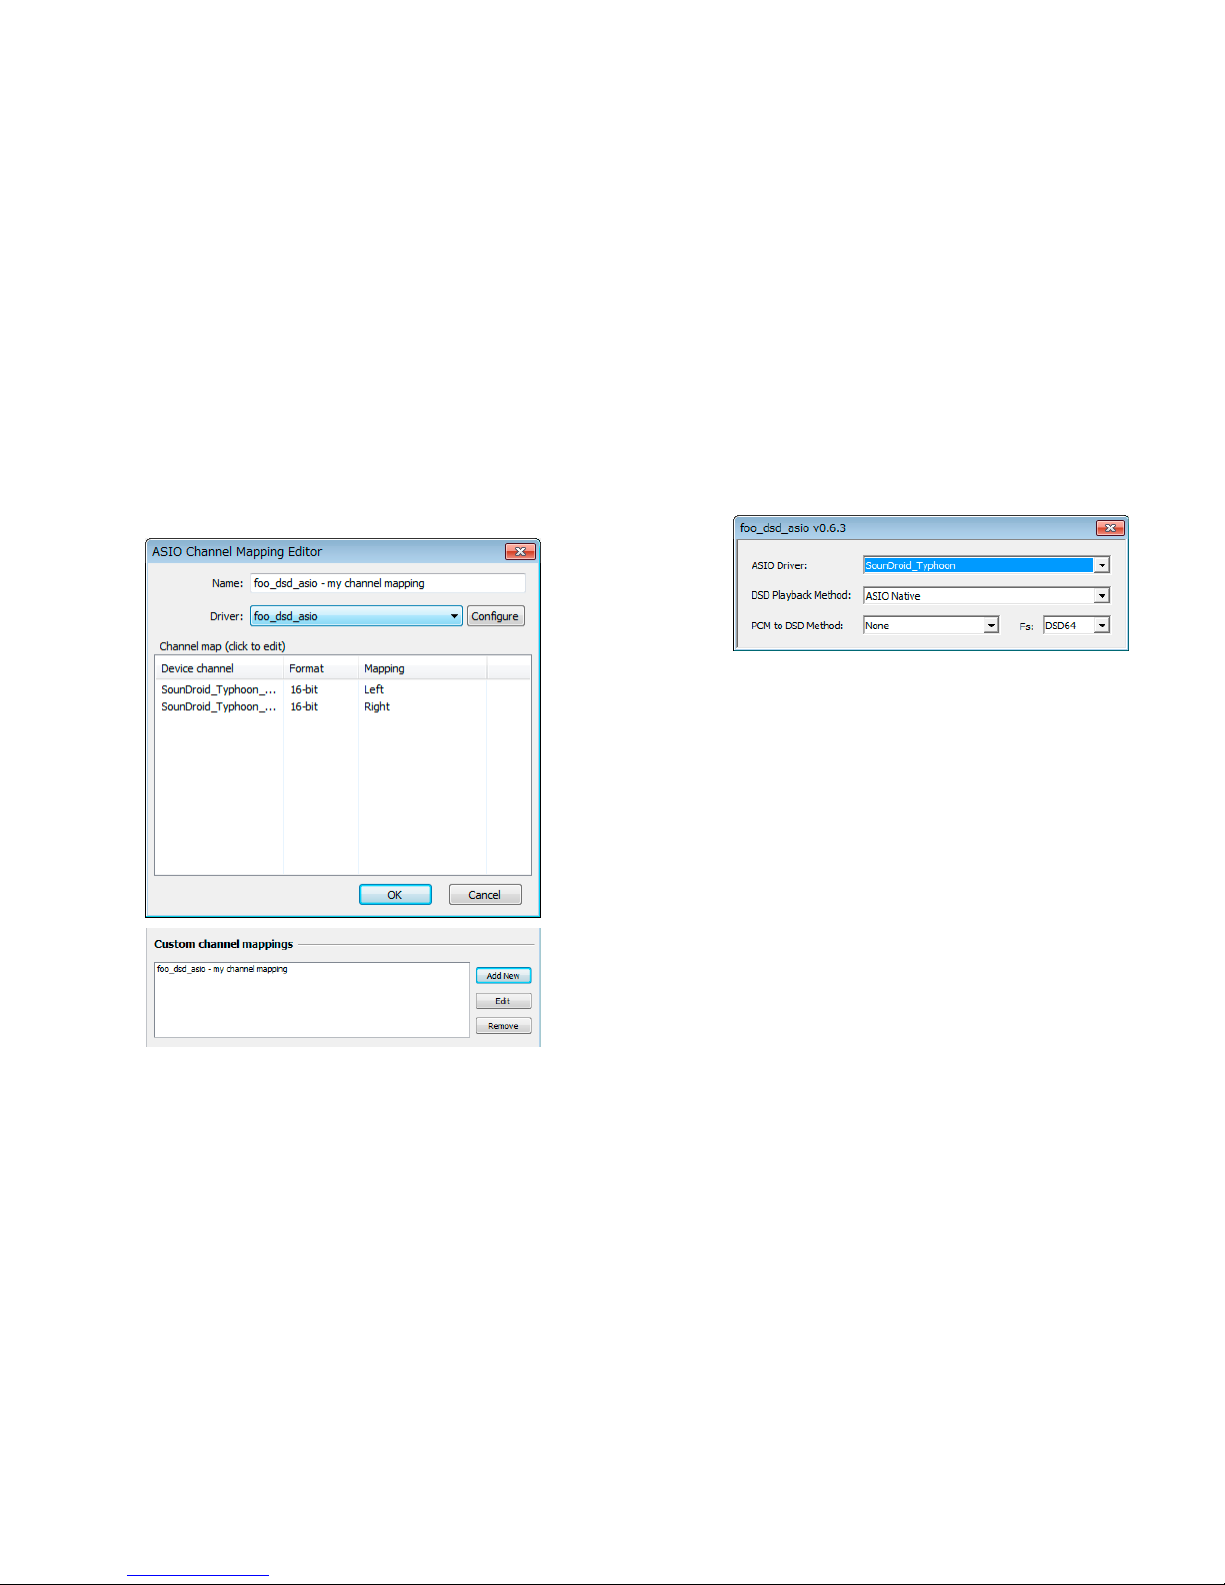
Select "foo_dsd_asio" under (Driver) on (ASIO Channel
Mapping Editor) and click [OK].
Click [Congure] and check the settings as below.
Select "SounDroid_Typhoon" on (ASIO drivers).
Click [Add New] on (Custom channel mappings).
16 17
18
19
Page 16
16
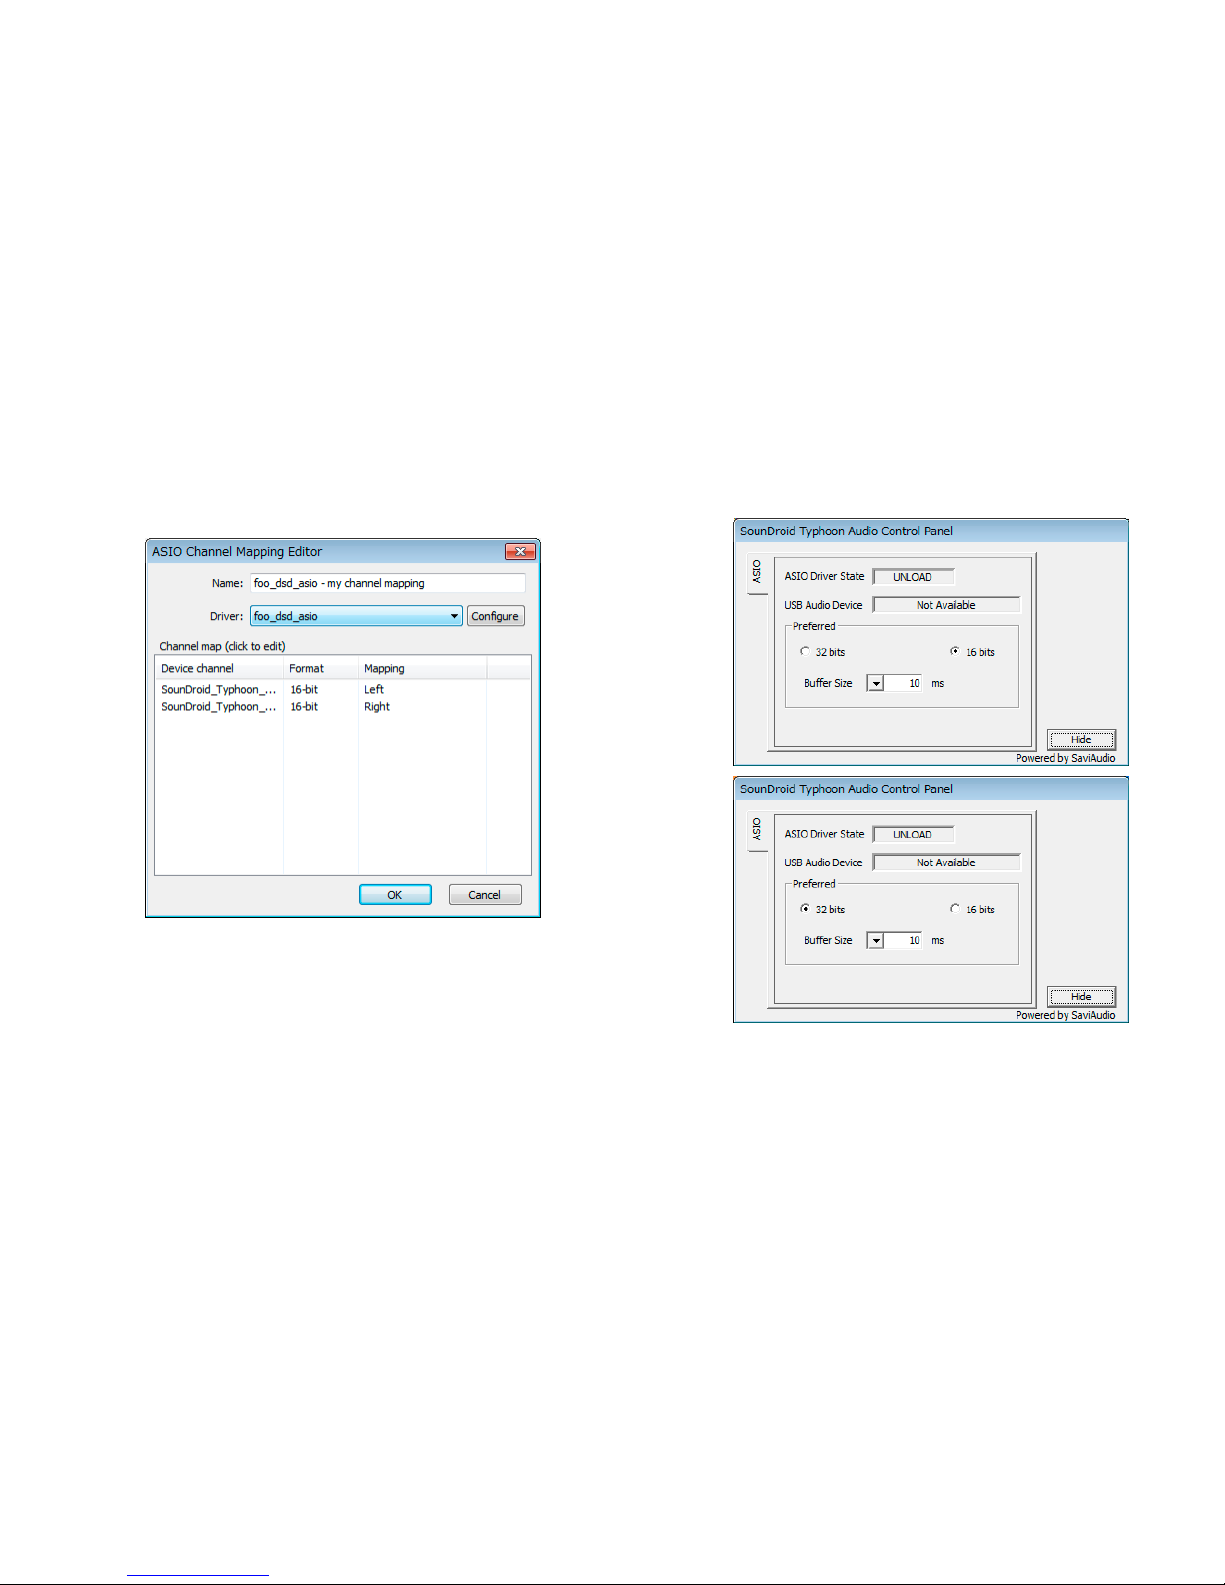
Select "SounDroid_Typhoon" under (Driver) on (ASIO
Channel Mapping Editor) and click [OK].
Click [Congure] and check the settings as below.
By optionally setting up the bit and sample rate above,
the sound data is converted DSD to PCM through this
product's internal DSP and output.
20 21
Page 17
17
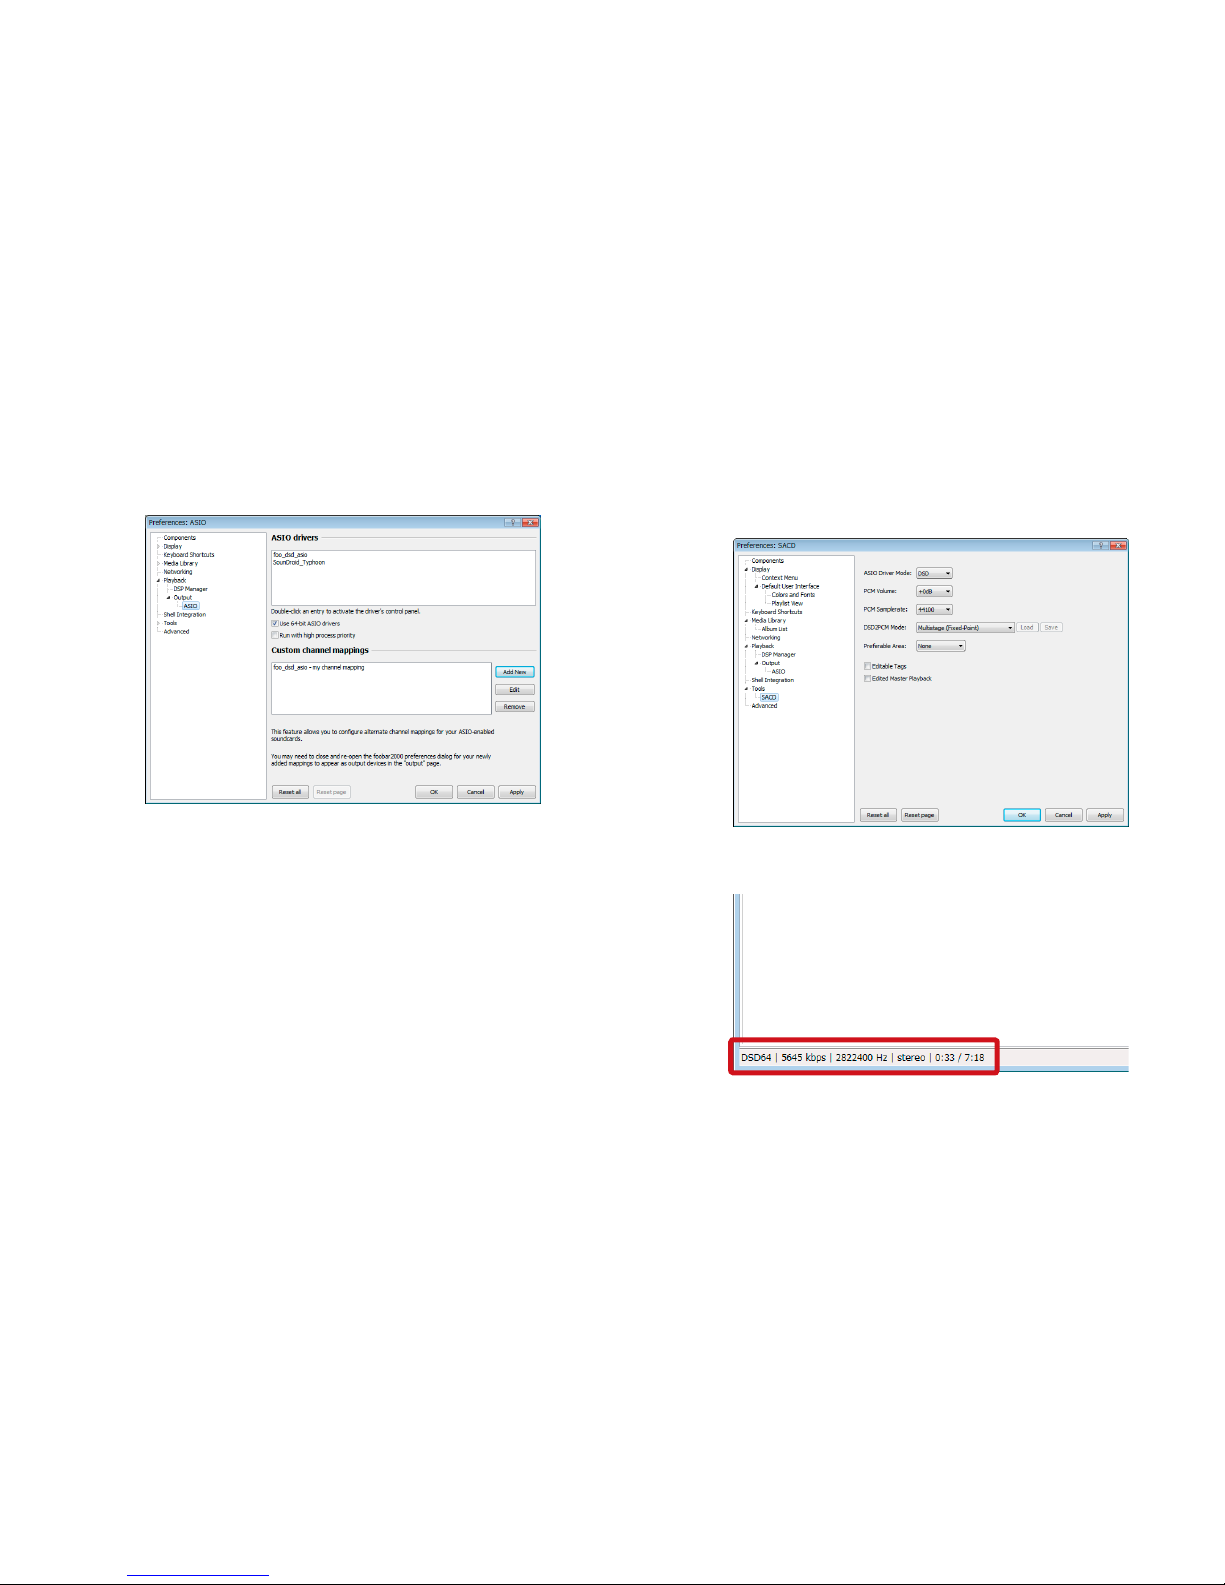
Click [Apply] and [OK].
Click (Tools) and (SACD).
Select "DSD" under (ASIO Driver Mode) and click [Apply]
and [OK].
Setting up foobar2000 is now completed.
Enjoy your favorite DSD sounds in the playlist.
* When DSD is playing, it displays like the above.
22
23
24
Page 18
18
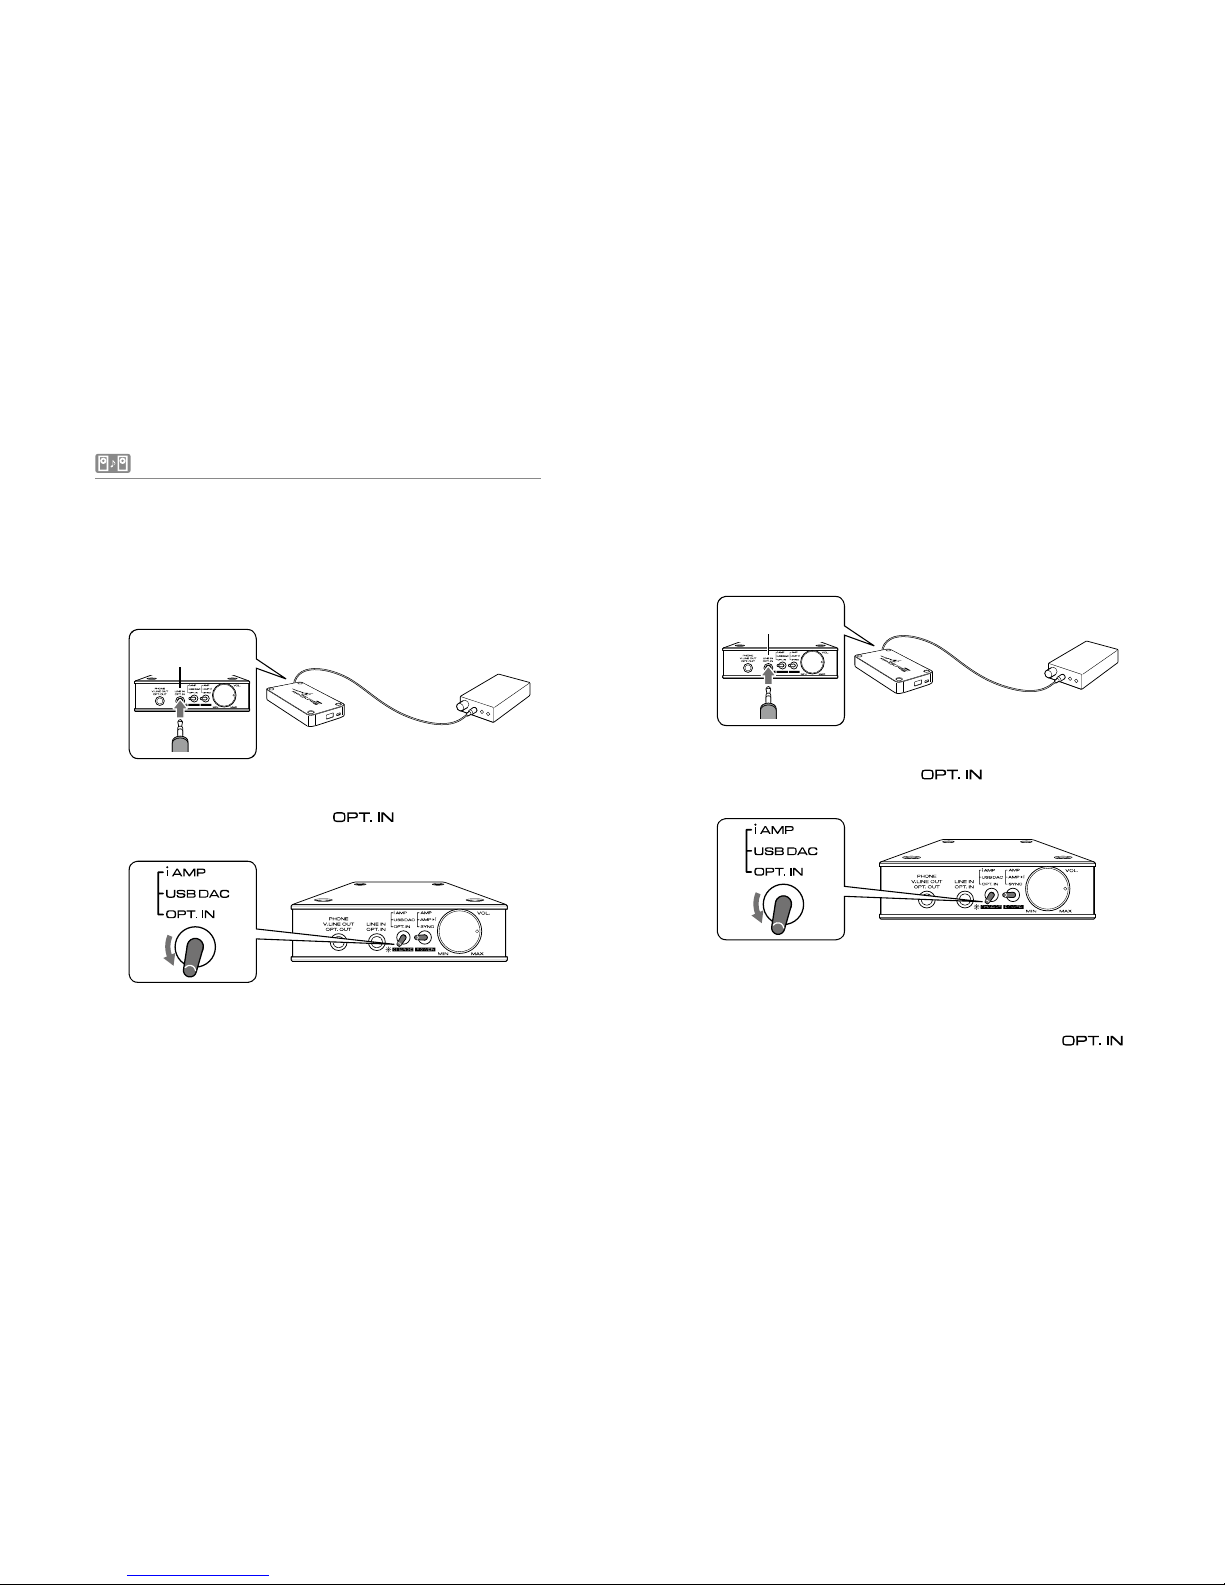
9. Connecting to Other Audio Devices
This product supports both digital and analog input/output.
■
Optical digital input
Connect to the LINE IN/OPT. IN terminal by an optical
digital cable.
LINE IN
OPT.IN
Set the toggle switch (L) to "
" position.
1
2
■
Analog line input
Connect an analog output device to the LINE IN/OPT. IN
terminal by a 3.5mm stereo mini cable.
LINE IN
OPT.IN
Set the toggle switch (L) to "
" position.
The analog line input data and digital input data can be mixingplaying.
If no mixing-playing and analog line input only, use " "
mode.
1
2
Page 19
19
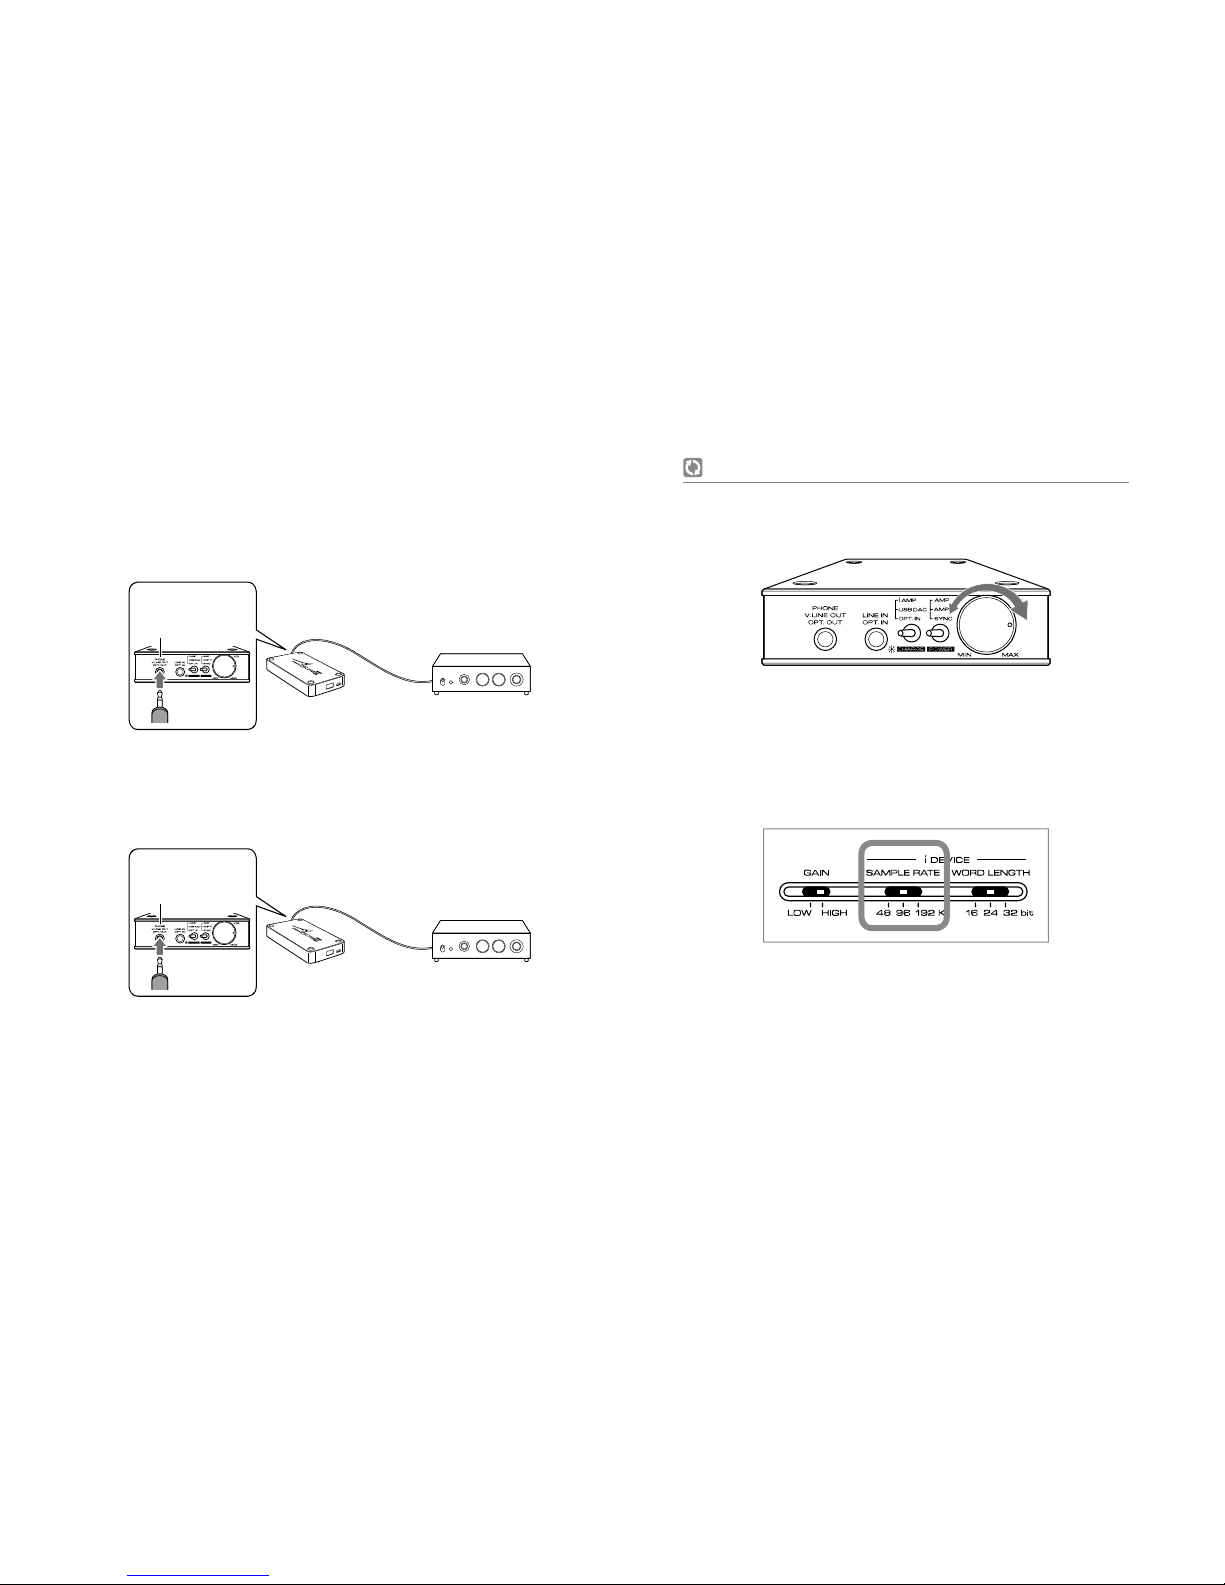
10. Setting Other Functions
■
Setting volume
Adjust the power switch volume knob.
■
Switching the sample rate and word length of
iDevice audio data
●
Sample Rate
In power OFF condition, set the SAMPLE RATE switch to
48kHz/96kHz (x2)/192kHz (x4) position.
*
Upsampling the iPod/iPhone audio data generates 20kHz+
frequency audio information that is supposedly exsisted
between the data essentially. Upsampling enables richer
tone and eld.
■
Optical digital output
Connect a digital input device to the OPT. OUT terminal
by an optical digital cable.
PHONE
V.LINE OUT
OPT. OUT
■
Variable analog line output
Connect an analog input device to the V.LINE OUT terminal
by a 3.5mm stereo mini cable.
PHONE
V.LINE OUT
OPT. OUT
Due to variable analog line output, adjust the volume
based on the input level of the connected analog input
device.
1
1
Page 20
20
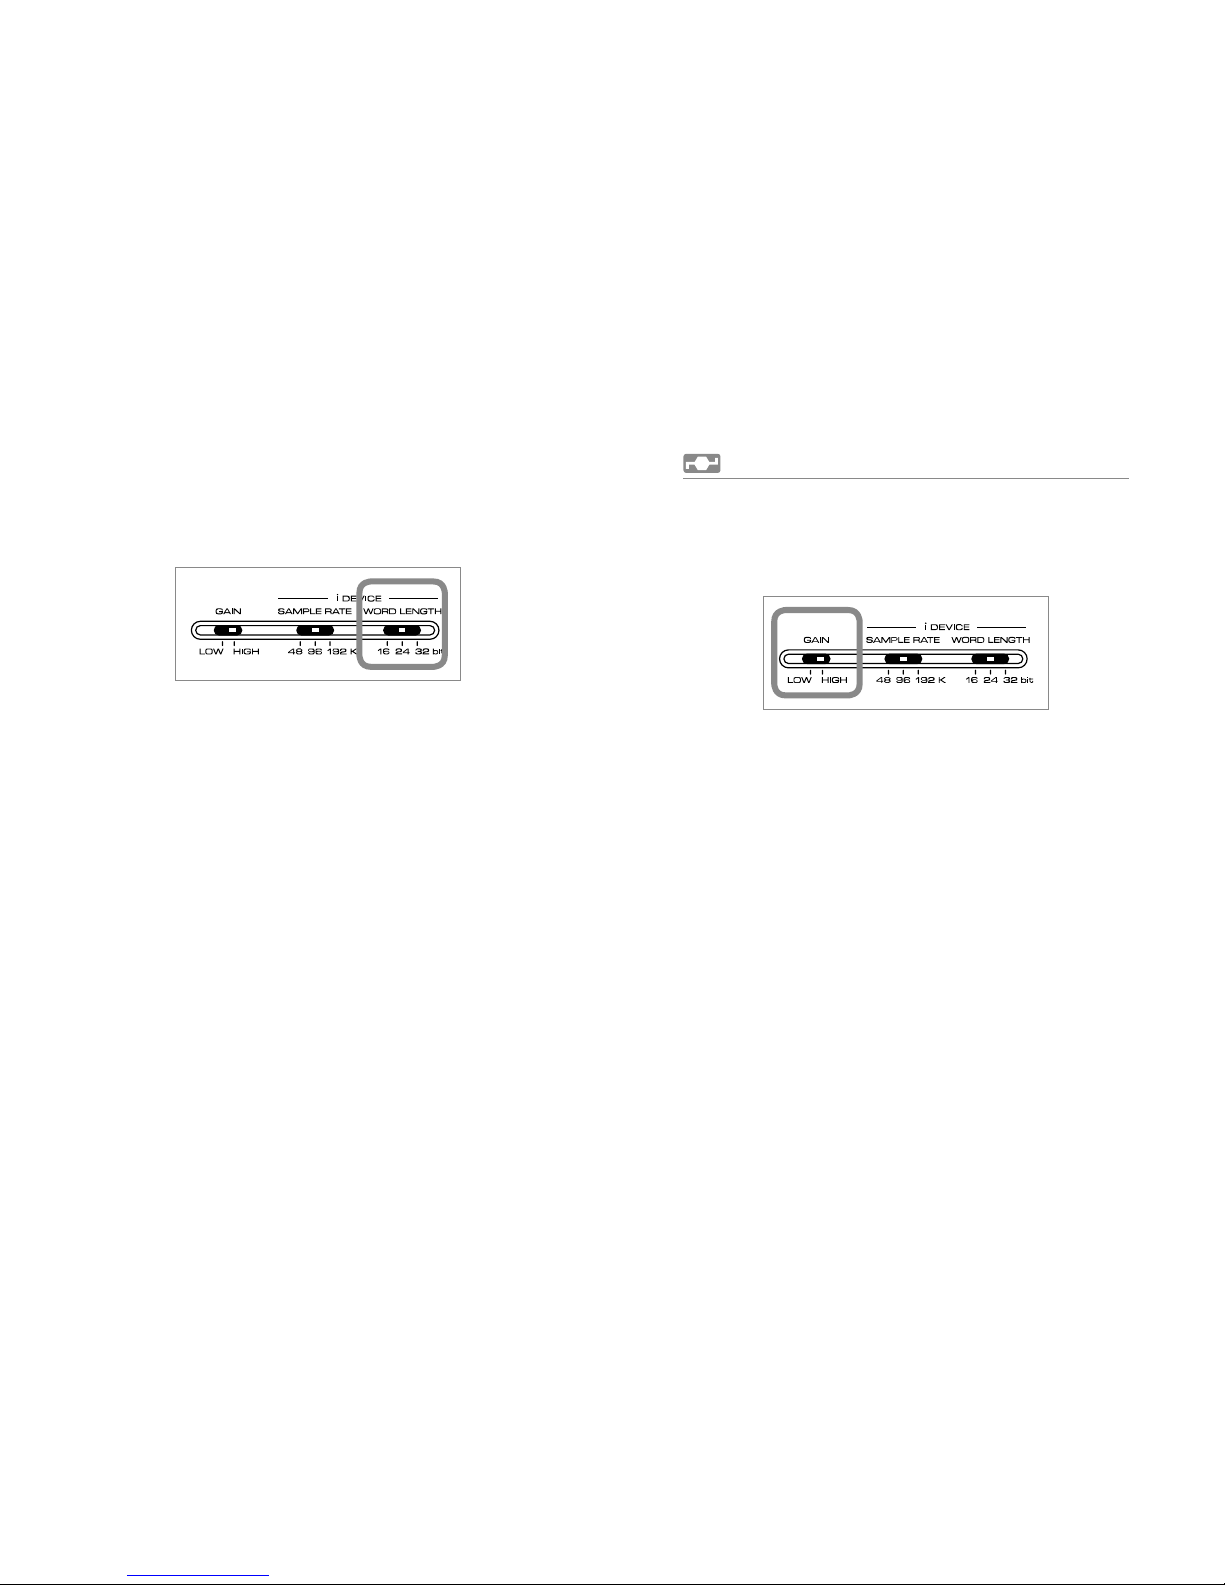
11. Setting Gain
Gain of the headphones can be set by switching the GAIN
switch to either [HIGH] or [LOW].
It enables the headphones with dierent impedance to exert
its full performance and to play in high-quality sounds.
* Do not apply force to the GAIN switch to avoid breaking the
switch.
●
Word Length
In power OFF condition, set the WORD LENGTH switch to
16/24/32bit position.
* The higher the bit rate is, the wider the dynamic range
becomes, and it provides a lively high-quality sound in a
sense of liberty.
Page 21
21
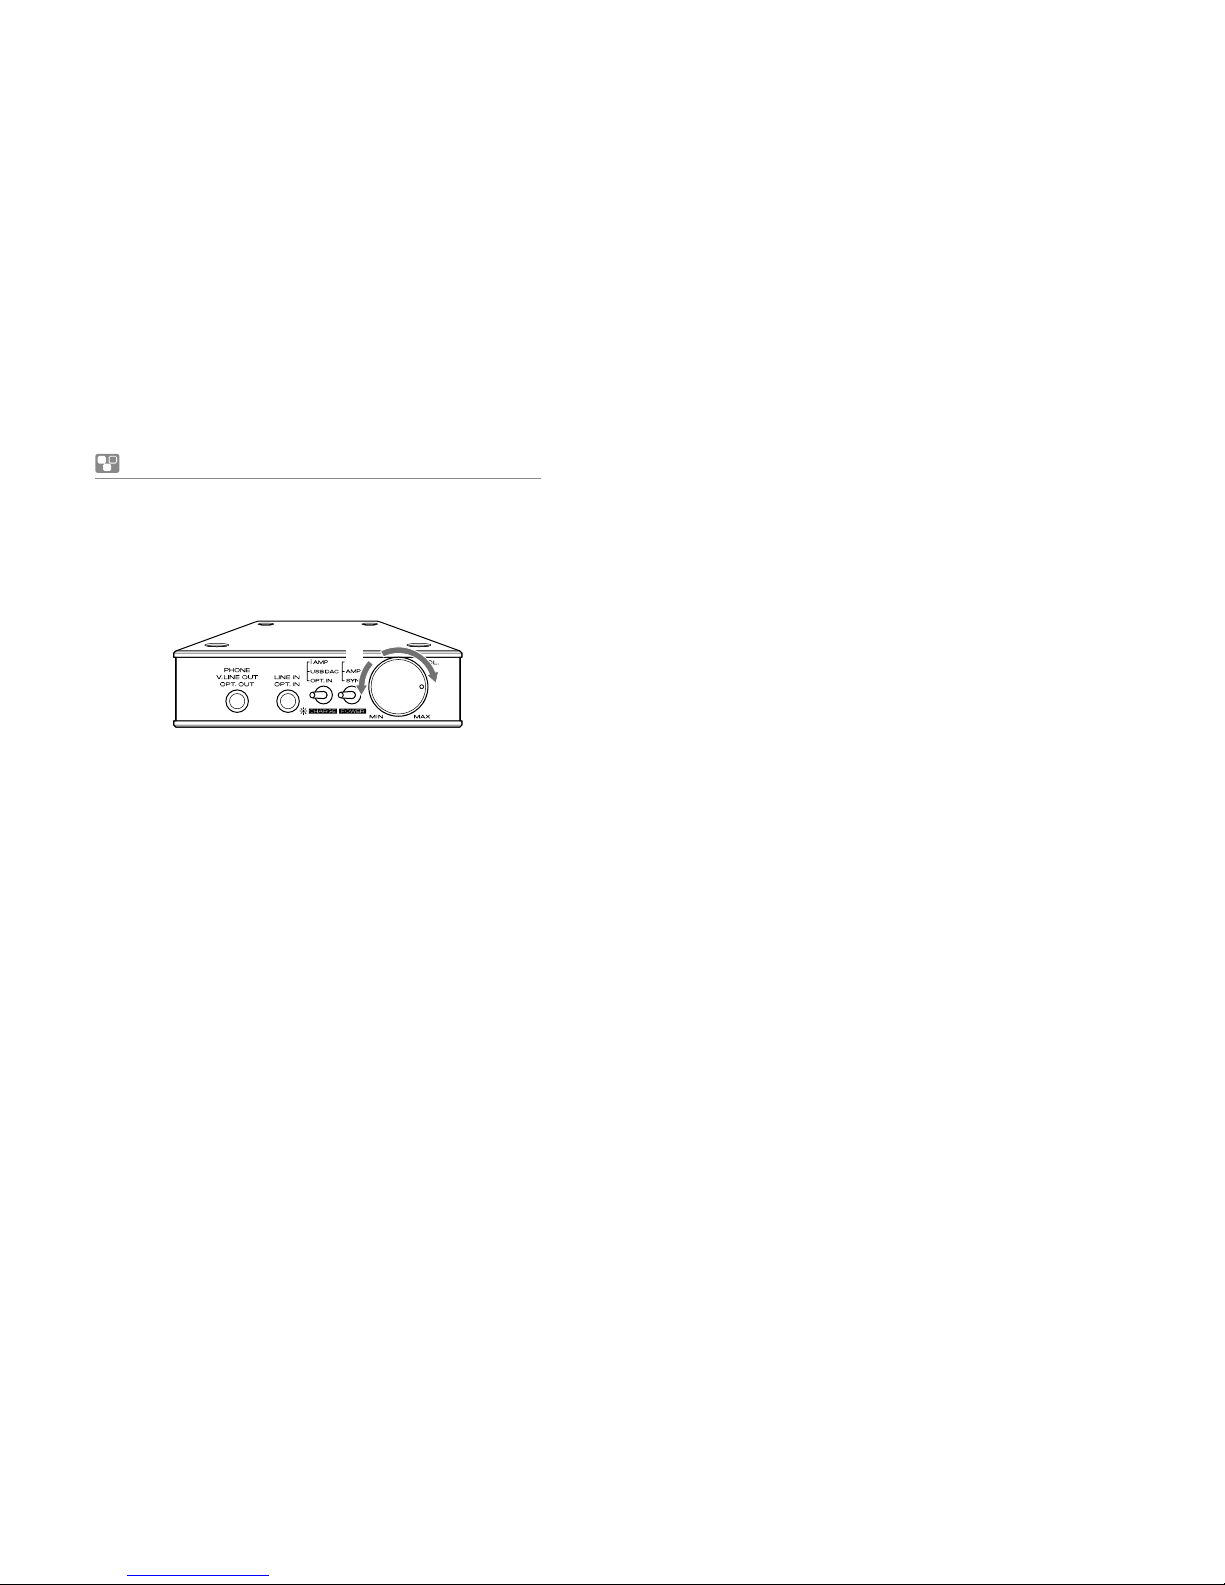
Troubleshooting
●
In case the operation of this product freezes (operation
stops), reset this product to the factory setting by turning
the volume knob all the way counterclockwise until it
clicks, turning OFF the main power, and then turning back
ON by turning the volume knob clockwise again.
●
Reconnect iPod/iPhone and this product.
●
Restart iPod/iPhone.
[OFF] [ON]
①
②
Page 22
22
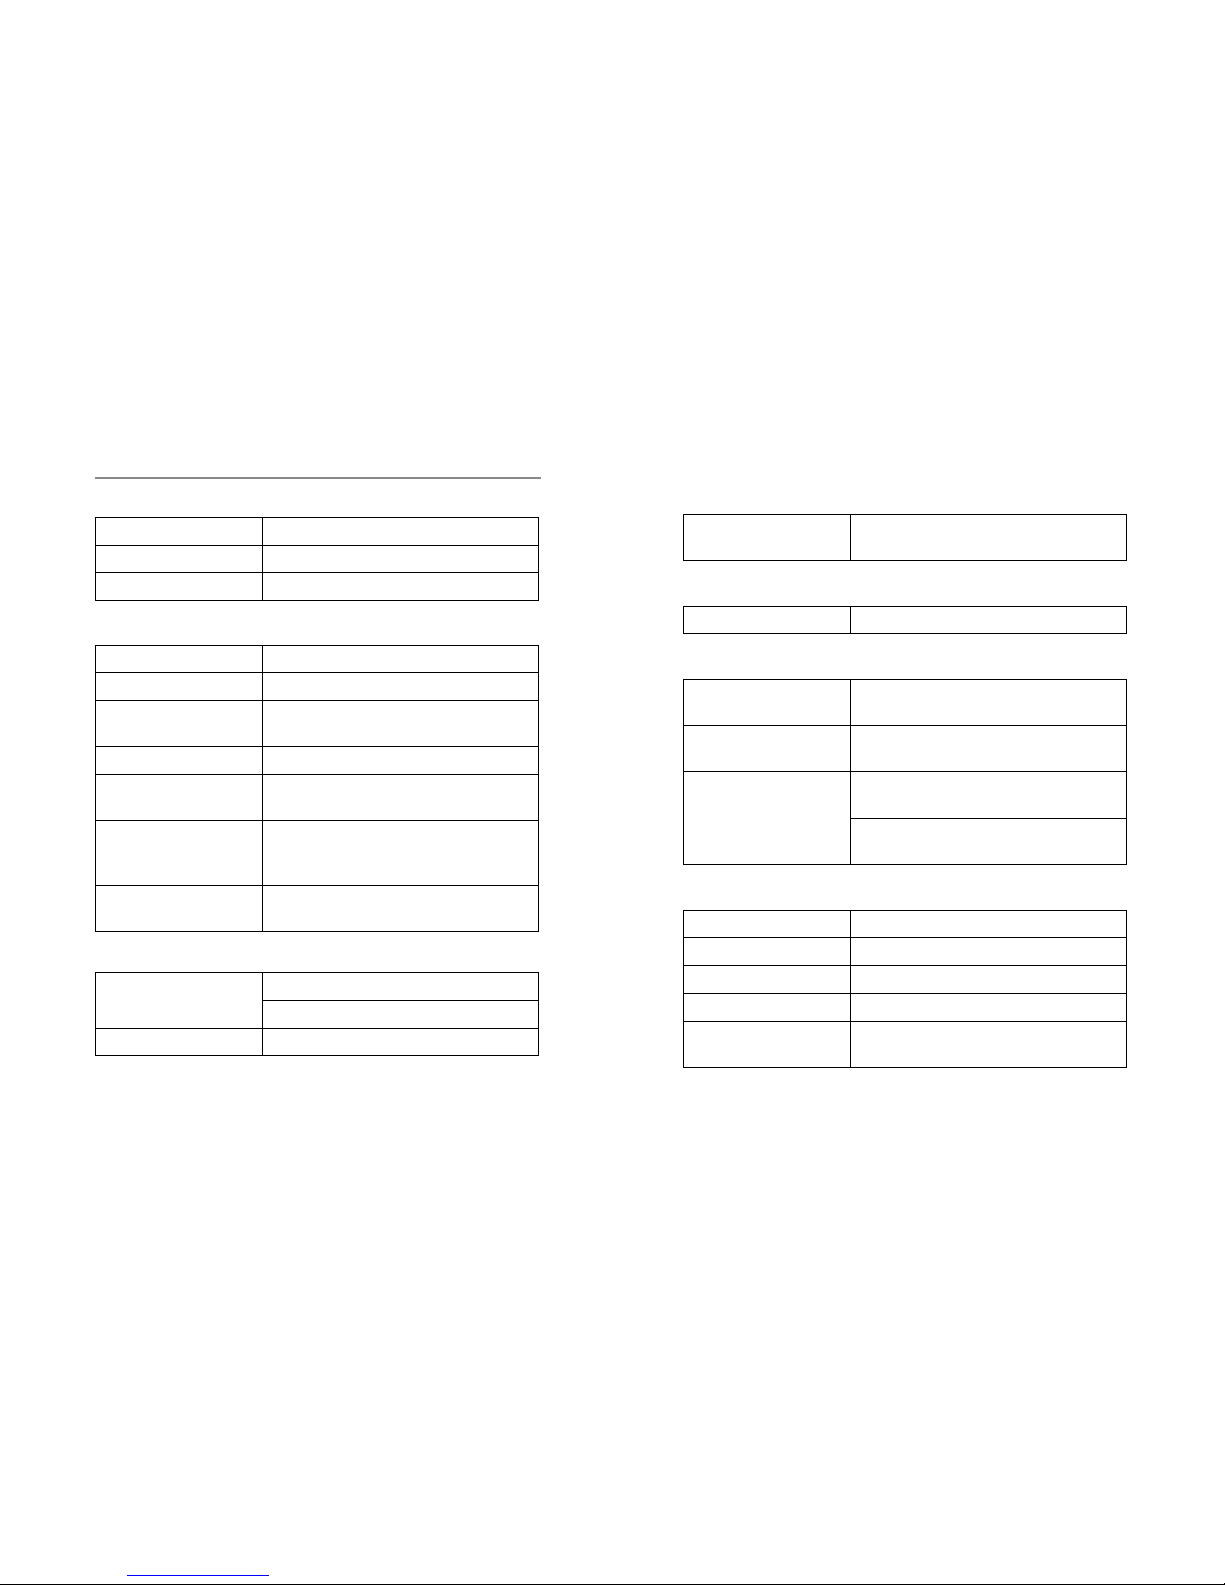
Specications
■ Main unit
Width 67.8mm
Height 139.0mm
Weight 200g
■ Main Specications
Max. output 80mW+80mW (32Ω)
S/N 95dB or greater (32
Ω)/192k, 32bit
Total harmonic
distortion
0.01% or less (80mW output)
Frequency characteristic 10Hz-100kHz (LINE IN input)
Adaptive headphone
impedance
8
Ω-600Ω
Sampling frequency/
bit rate
32/44.1/48kHz, 16bit: iPod/iPhone input
32-96kHz (PCM), 16/24/32bit: USB input,
2.8224MHz (DSD): USB input
Upsampling/bit
96/192kHz,
16/24/32bit: iPod/iPhone input only
■ Digital input
USB connector
USB standard A
USB micro B
Optical digital terminal 3.5mm optical (round)
■ Analog input
Analog line terminal
3.5mm stereo mini
47k
Ω/max input level: about 2Vrms
■ Digital output
Optical digital terminal 3.5mm optical (round)
■ Analog output
Analog headphone
terminal
3.5mm stereo mini
Analog line output
terminal (variable)
3.5mm stereo mini
Variable output range
About 1.6mVrms-1.6Vrms
Gain L volume max.
About 2.3mVrms-2.0Vrms
Gain H volume max.
■ Battery
Battery type Lithium ion polymer battery
Capacity 3500mAh
Charge method Via the supplied USB cable (USB2.0)
Time to full charge Approx. 6 hours
Sustainable charge
frequency
Approx. 500 times
Page 23
23
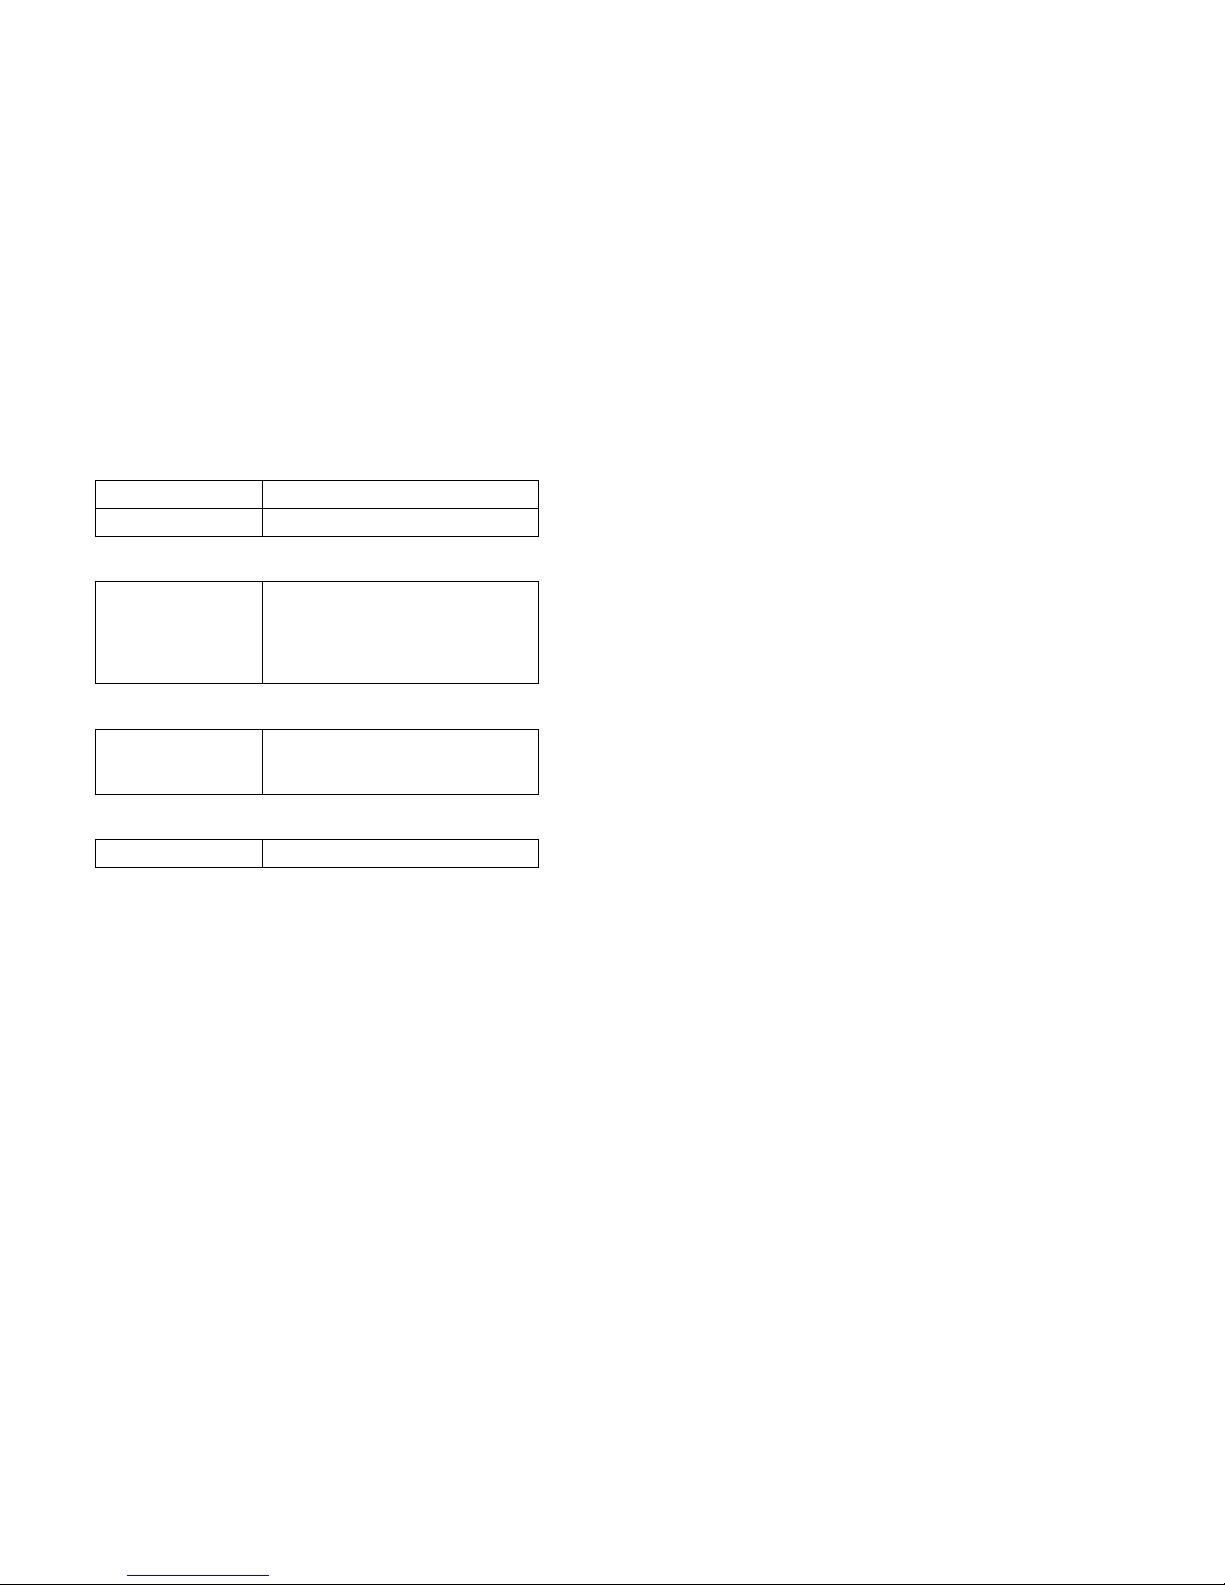
■ Power
Input DC5V/1A (AC-type USB Charger)
Output DC5V/1A
■ Compatible audio data format
AAC (16 to 320Kbps), AIFF, AAC (MP4
downloaded from iTunes Store), MP3
(16 to 320Kbps), MP3 VBR, Audible
(formats 2-4), Apple Lossless, WAV PCM,
DSD Native
■ Supported OS
Windows8, Windows7, WindowsVista,
WindowsXP, MacOS X v10.7 or later
* Supports both Windows 32bit/64bit
■ Software
Software package (download)
Page 24
24
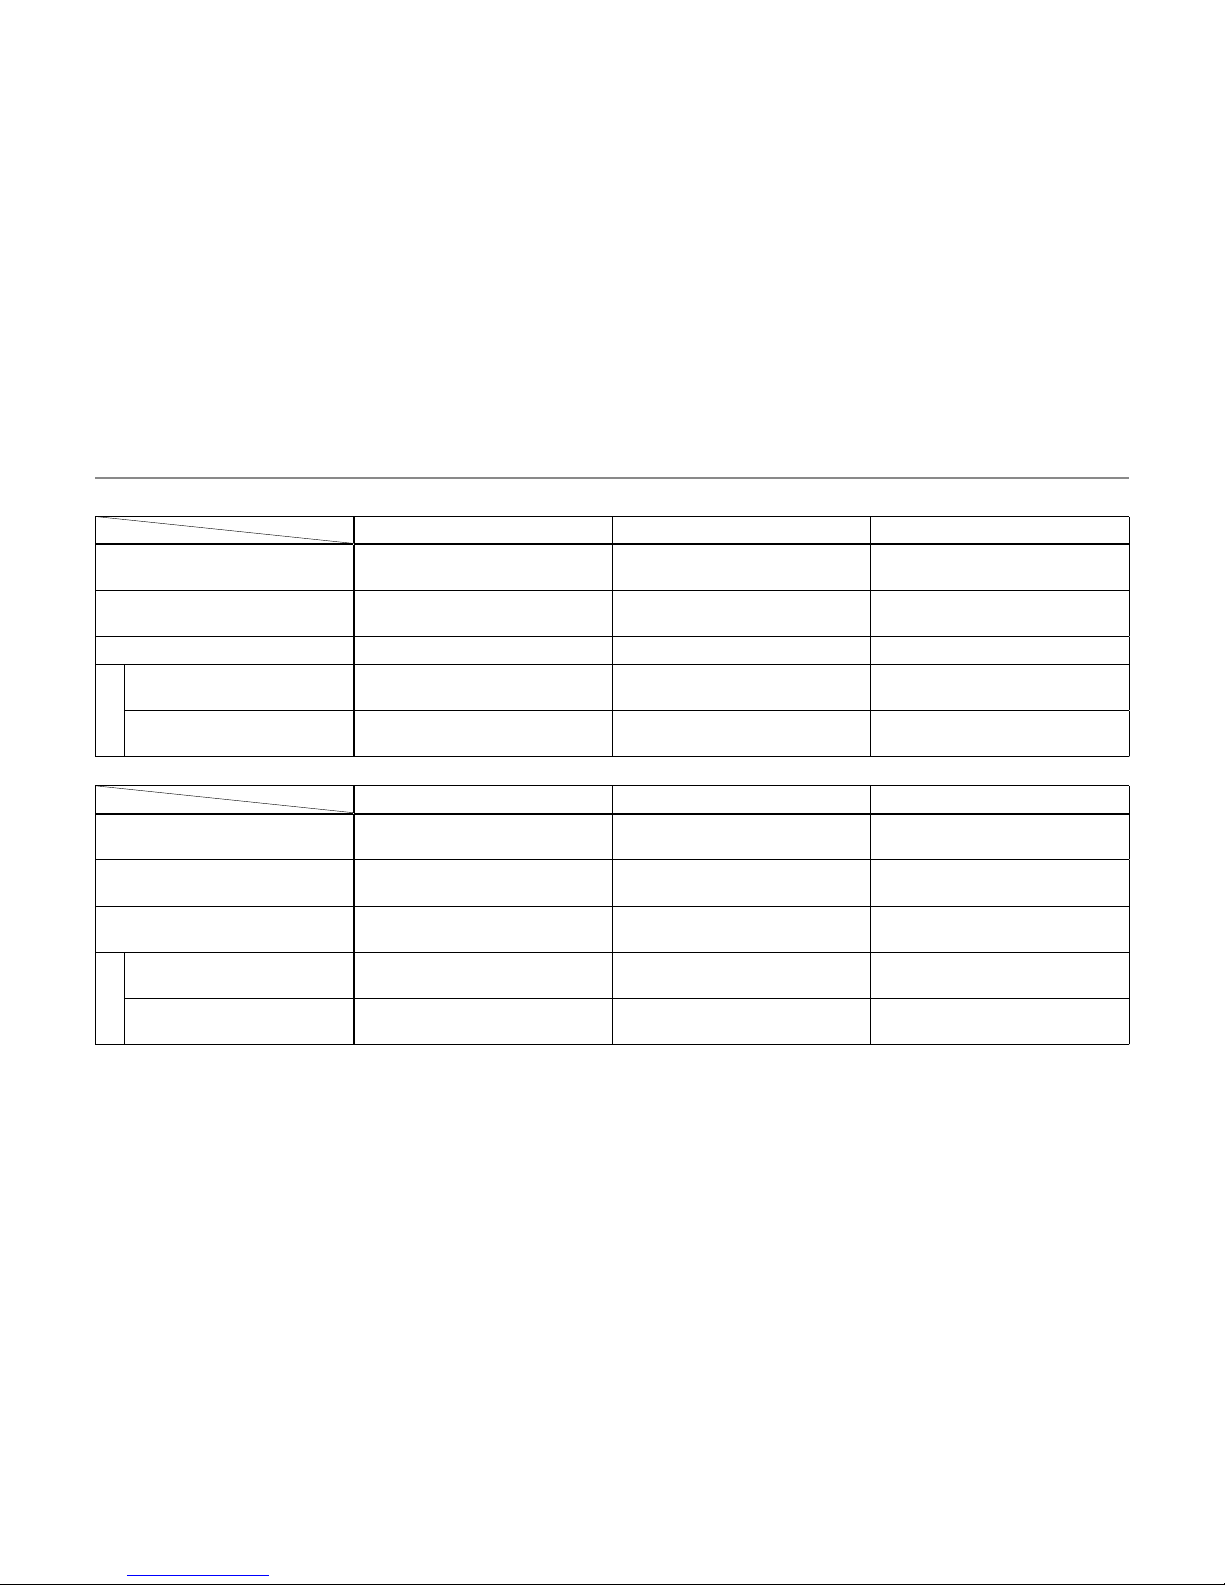
Appendix: Input/Output Relations and Toggle Switch Pattern Diagram
Input Output
Headphone Out Variable Line Out Optical S/PDIF
iDevice
44.1KHz/16bit
80mW
+80mW (32Ω)
* 48KHz/96KHz/192KHz 16bit/24bit/32bit
About 2Vrms (@47kΩ) 192KHz/24bit (Max.)
Optical S/PDIF
192KHz/24bit (Max.)
80mW
+80mW (32Ω) About 2Vrms (@47kΩ) 192KHz/24bit (Max.)
Line
80mW
+80mW (32Ω) About 2Vrms (@47kΩ) −
PC
PCM
96KHz/32bit (Max.)
80mW
+80mW (32Ω)
* 96KHz/32bit (Max.)
About 2Vrms (@47kΩ) 96KHz/32bit (Max.)
DSD
64DSD 2.8
MHz
80mW
+80mW (32Ω)
* 88.2KHz/16bit or 32bit (PCM conversion)
About 2Vrms (@47kΩ)
88.2KHz/16bit or 24bit
(PCM conversion)
Input Output
Headphone Out Variable Line Out Optical S/PDIF
iDevice
Toggle (L)
:iAMP
Toggle (R)
:AMP or AMPi
Toggle (L)
:iAMP
Toggle (R)
:AMP or AMPi
Toggle (L)
:iAMP
Toggle (R)
:AMP or AMPi
Optical S/PDIF
Toggle (L)
:OPT.IN
Toggle (R)
:SYNC or AMP or AMPi
Toggle (L)
:OPT.IN
Toggle (R)
:SYNC or AMP or AMPi
Toggle (L)
:OPT.IN
Toggle (R)
:SYNC or AMP or AMPi
Line
Toggle (L)
:USB-DAC or OPT.IN
Toggle (R)
:SYNC or AMP or AMPi
Toggle (L
):USB-DAC or OPT.IN
Toggle (R)
:SYNC or AMP or AMPi
−
PC
PCM
Toggle (L)
:USB-DAC
Toggle (R)
:SYNC or AMP or AMPi
Toggle (L)
:USB-DAC
Toggle (R)
:SYNC or AMP or AMPi
Toggle (L)
:USB-DAC
Toggle (R)
:SYNC or AMP or AMPi
DSD
Toggle (L)
:USB-DAC
Toggle (R)
:SYNC or AMP or AMPi
Toggle (L)
:USB-DAC
Toggle (R)
:SYNC or AMP or AMPi
Toggle (L)
:USB-DAC
Toggle (R)
:SYNC or AMP or AMPi
Page 25

25
Cautions on Use
In order to use this product safely and prevent accidents, please
take the following cautions.
■
In order to avoid risks such as re and electric shock, do not
use in high-humidity environments or where this product
may come in contact with water.
■
Do not use, charge, or leave this product in locations exposed
to direct sunlight such as car dashboards and window
sills. Also, do not
use, charge, or leave in high-temperature
environments such as inside vehicles parked in the sun or
near heat sources such as heaters and stoves.
■
Do not use to play music, etc. while driving a vehicle, riding
a bicycle, or walking.
■ If liquid that has been leaked from the batter y makes
contact with your skin or cloths, wash under running
water immediately. Also, if such liquid enters your eyes,
w
ash under running water immediately without rubbing
and consult a doctor.
■
Do not disassemble, modify, or repair this product by yourself.
■
If this product does not get fully charged after the specied
charging time, cease charging and arrange for inspection/
repairs to be performed.
■ Use a soft cloth to clean this product. Do not directly apply
water, dust spray, solvent, polisher, cleaning agent
, etc.
■ The battery has a life duration. The usable duration will
become shorter due to aging degradation. Do not keep
charging for a long period of time. Always disconnect the
USB cable each time when charging is completed.
Battery Disposal and Recycle
When disposing of this product, do so in accordance with
the laws and regulations applicable in the area you live.
This product has a built-in batte
ry therefore can not be
disposed of together with general household waste.
Page 26

26
For the customers in the USA INFORMATION:
This product has been tested and found to comply with the
limits for a Class B digital device, pursuant to Part 15 of the
FCC Rules.
These limits are designed to provide reasonable protection
against harmful interference in a residential installation.
This product generates, uses, and can radiate radio frequency
energy and, if not installed and used in ac
cordance with
the instructions, may cause harmful interference to radio
communications.
However, there is no guarantee that interference will not occur
in a particular installation. If this product does cause harmful
interference to radio or television reception, which can be
determined by turning the product off and on, the user is
encouraged to try to correct the interference by one or more
of t
he following measures:
– Reorient or relocate the receiving antenna.
– Increase the separation between the product and receiver.
– Connect the product into an outlet on a circuit different
from that to which the receiver is connected.
– Consult the dealer or an experienced radio/TV technician
for help.
You are cautioned that any changes or modi cations not expressly
approved in this manual could void
your authority to operate this
product.
If you have any questions about this product:
Visit: http://go-dap.com
Contact: Venture Craft Customer Information Service
+81-3-5204-1004
This device complies with Part 15 of the FCC Rules. Operation
is subject to the following two conditions: (1) This device
may not cause harmful interference, and (2) this device must
accept any interference received, includ
ing interference that
may cause undesired operation.
For the customers in the USA and Canada
RECYCLING LITHIUM-ION BATTERIES
Lithium-ion batteries are recyclable.
You can help preserve our environment by returning your
used rechargeable batteries to the collection and recycling
location nearest you.
For more information regarding recycling of rechargeable
batteries, call toll free 1-800-822-8837, or vi
sit http://www.
rbrc.org/ .
Caution: Do not handle damaged or leaking Lithium-ion
batteries.
Page 27
27
About China RoHS Compliance
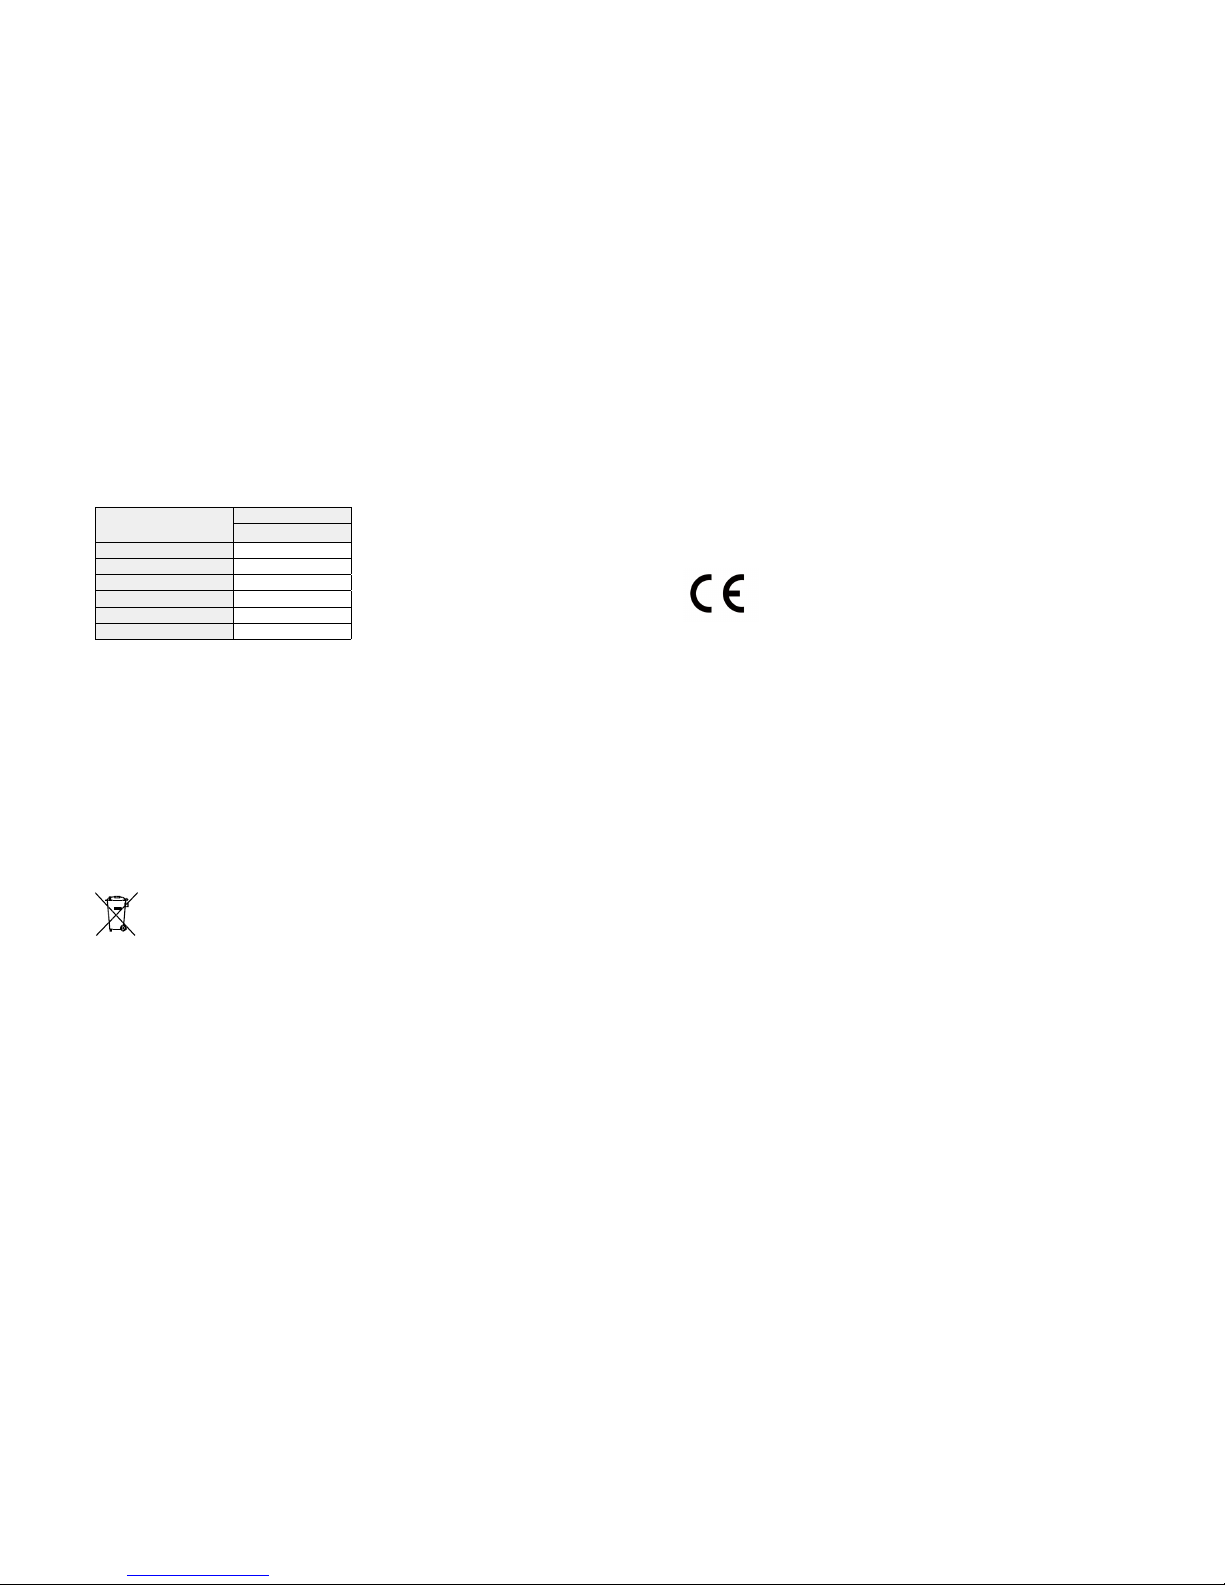
DD Limited
有毒有害物质或元素含有表
有毒或
有害物质
零部件
电路板 附件
铅 (Pb) ○ ○
汞 (Hg) ○ ○
镉 (Cd) ○ ○
六价铬 (Cr
6+
) ○ ○
多溴联苯 (PBB) ○ ○
多溴二苯醚 (PBDE) ○ ○
○ 表示该有毒有害物质在该部件所有均质材料中的含量均在 SJ/T
11363-2006 标准规定的限量要求以下。
× 表示该有毒有害物质至少在该部件的某一均质材料中的含量超出
SJ/T11363-2006 规定的限量要求。
根据中国电子行业标准 SJ/T11364-2006 和相关的中国政府法规,本
产品及其某些内部或外部组件上可能带有环保使用期限标识。取决
于组件和组件制造商,产品及其组件上的使用期限标识可能有所不
同。组件上的使用期限标识优先于产品上任何与之相冲突的或不同
的环保使用期限标识。
European Union - Electronics and Battery
Disposal Information:
Th is sy mbo l mea ns that acco rdi ng to loc al la ws and
regulations your product and its battery should be recycled
separately from household waste. When this product reaches
its end of life, take it to a collection point designated by
local authorities for the recycling of electronic product. The
improper d
isposal of waste electronic product from the
consumer may be subject to fines. The separate collection
and recycling of your product and its battery at the time of
disposal will help conserve natural resources and ensure that
it is recycled in a manner that protects human health and the
environment.
CE Notice
This product conforms to the EMC Directive 2004/108/EC
and to the Low Voltage Directive 200
6/95/EC. The complete
Declarations of Conformity can be found at http://go-dap.
com .
Page 28

28
Product Support
VentureCraft Inc. Gadget Business Division
http://www.go-dap.com/
1-3-5-2F Nihonbashihoncho, Chuo-ku, Tokyo 103-0023 JAPAN
Business Hours:
Mon-Fri 10:00 to 17:00 (Closed: Sat, Sun, Holidays)
Contact:
[email protected]
FAX:
+81-3-6893-3728
Trademarks and Registered Trademarks
iPod, iPhone, Made for iPod, Made for iPhone, iTunes, and Mac
OS are registered trademarks or trademarks of Apple Inc., in
the USA, or other countries.
"Made for iPod" and "Made for iPhone" are indications that
the product is an electronic accessory that is designed to
connect exclusively with an iPod/iPhone, and the developer
has certified that the product has f
ulfilled the performance
standard specified by Apple Inc. Apple Inc. is not liable for
performance, safety, and compliance to the standard of this
product.
Other system and product names shown in this document
are the registered trademarks or trademarks of general
developer/manufacturers. Please note that ® and
TM
are not
shown in this document.
© 2013.07 Venture Craft Inc. GST-1307E
 Loading...