

Page 1

DVR User Guide
Page 2

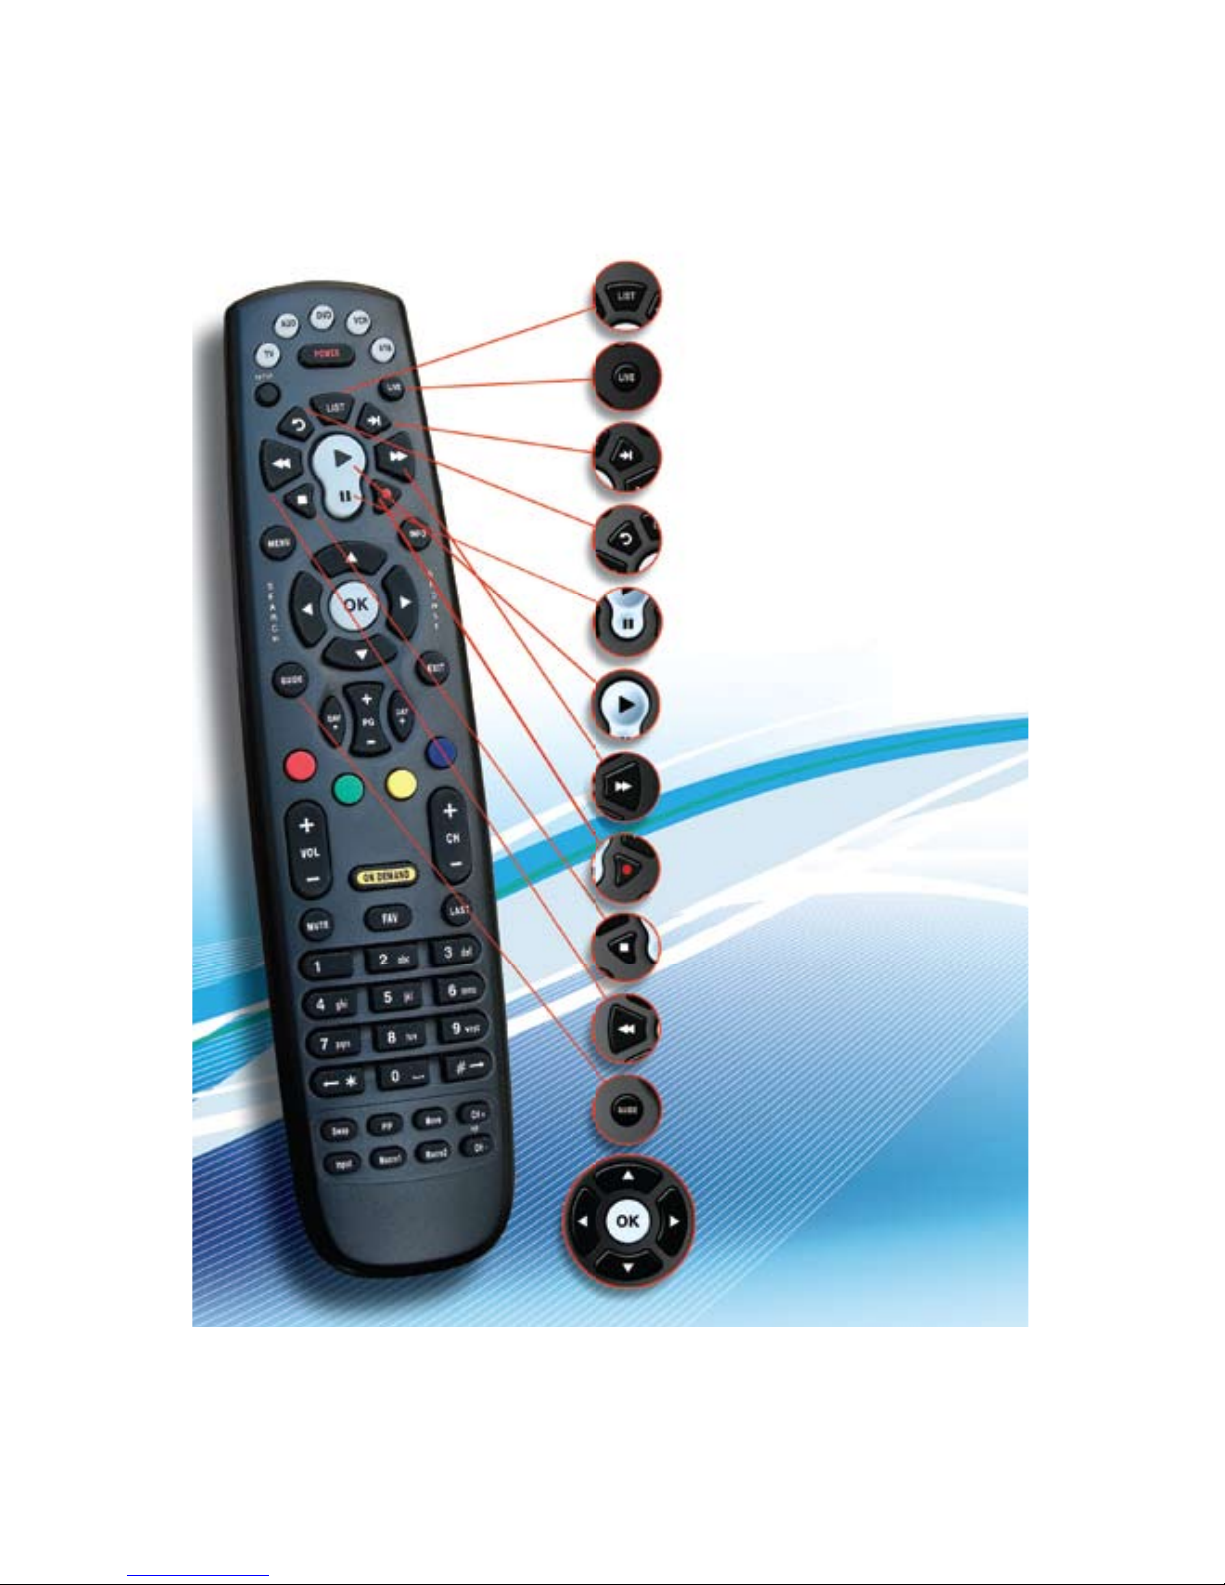
Playback Controls
These buttons function similar to VCR controls. Plus you have the new DVR
controls such as Instant Replay.
List: Press to see your list of recorded programs. Press it again to see what
is scheduled to be recorded.
Live: Press to return to the current part of a live
broadcast.
Skip Forward: Skip forward 30 seconds while
watching a recording.
Replay: Skip backwards 10 seconds while watching a recording or while
watching live TV.
Play: Begin watching a recording.
Forward: Forward through parts of a recording.
Record: Press to record a show.
Pause: Pause what you are currently watching.
Stop: Press to Stop watching a recording or to Stop recording that is in
progress.
Rewind: Rewind through parts of a recording.
1
Control Live TV
Using your DVR and your remote control, you can control live TV. Each time
you tune to a channel, the DVR begins making a temporary recording of the
program you are watching. This means you can Pause the current program
if the phone rings, rewind or instant replay a scene that you just have to see
again, or fast forward to skip what you don’t want to watch. Your DVR will
record up to two hours of live TV.
The live TV recording is not a permanent recording. The DVR is recording live
TV in temporary storage or a buffer. For live TV recordings, the temporary
recording (buffer) will be erased if any of the following occur:
•TurnoffyourDVR
•Watchthesamechannelforlongerthanthetemporaryrecordingbuffer
period. The most recent two hours of the program (less for HD) is kept in
the temporary recording.
•Switchtoanotherprogram.Whenyouchangechannels,yourDVR
begins to store the new program. It removes the previous program you
were watching from storage.
Page 3
2
List
– “Did I record my show yesterday”. This button
takes you to your list of recorded programs. Press it
again to see what is scheduled to be recorded.
Live
– “I don’t care what I missed I just want to see
it live” Return to the current part of a live broadcast.
Skip Forward
– “I have already seen this part”
Skip forward 30 seconds while watching a
recording.
Replay
– “What did they just say” Skip backwards
10 seconds while watching a recording or while
watching live TV.
Pause
– “A snack would be great right now” Pause
what you are currently watching.
Play
– “I’m back from getting a snack and I want
to get serious about this program again” Begin
watching a recording.
Forward
– “I don’t want to watch these
commercials” Quickly forward through parts of a
recording.
Record
– “Need to take that telephone call” Press to
record a show.
Stop
– “I’m done watching my show” Stop watching
a recording or to Stop a recording that is in progress.
Rewind
– “Did you see that” Rewind through parts
of a recording.
Guide
– “What time is my show on so I can get it
recorded” Access the interactive program guide.
Arrow
– Use Arrow to navigate and select on
screen choices.
Page 4
3
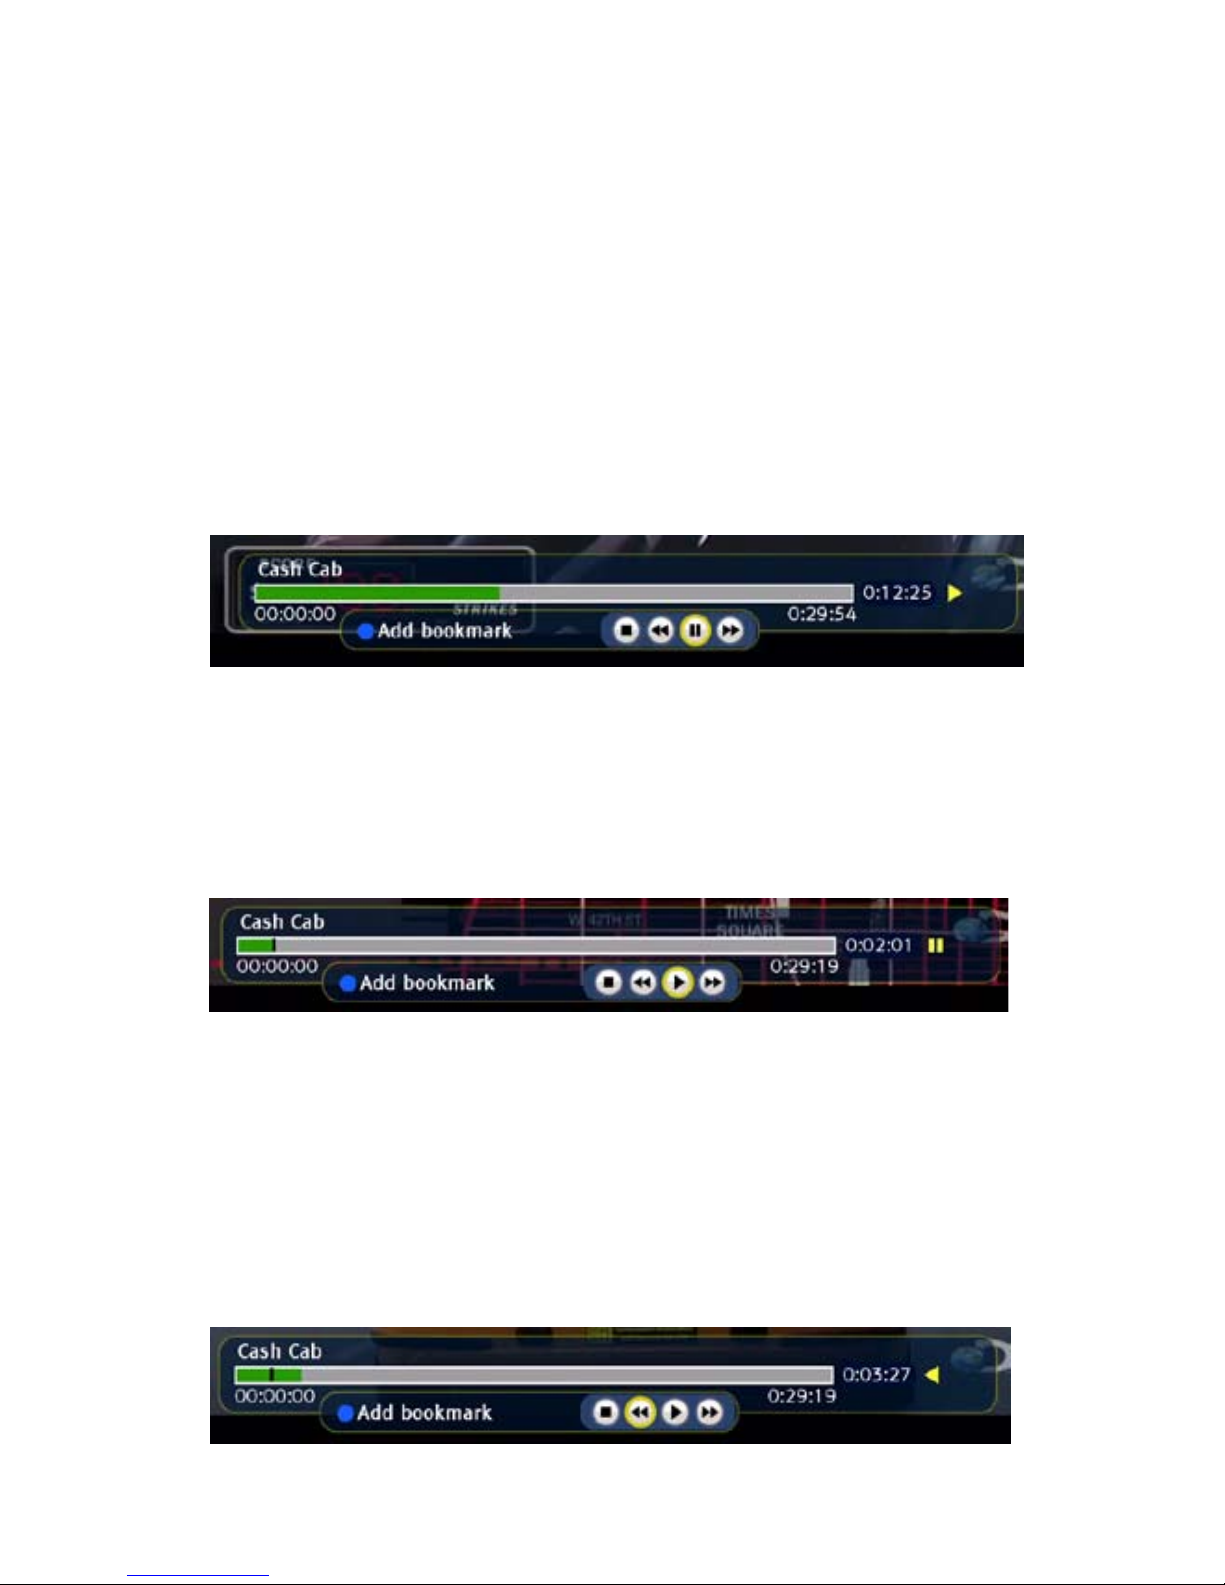
Status Bar
The status bar appears whenever you Pause, Rewind, or Fast Forward a live or
recorded program. It gives you information such as the title of the program
you are watching, the length of the program and elapsed time.
In this example, the recording of Cash Cab is 29 minutes and 54 seconds long.
You are viewing the program at 12 minutes and 25 seconds in to the program.
The single yellow arrow pointing to the right indicates the program is in play
mode. Two yellow arrows pointing right would indicate Fast Forward mode.
Yellow arrows pointing to the left would signify that you are Rewinding the
program.
Pause
As you watch live TV or recorded programs, press Pause and the programming
on the screen instantly freezes. For programs you are watching live, your DVR
will remain in Pause mode for up to 90 minutes.
Rewind
Do you need to see something again? Press Rewind. Press it again up to 3
times to increase the rewind speed. x4, x15, x30 and x300 will display next to
the status bar. x4 is the slowest setting and x300 is the fastest. Press play to
resume normal play.
Page 5
4
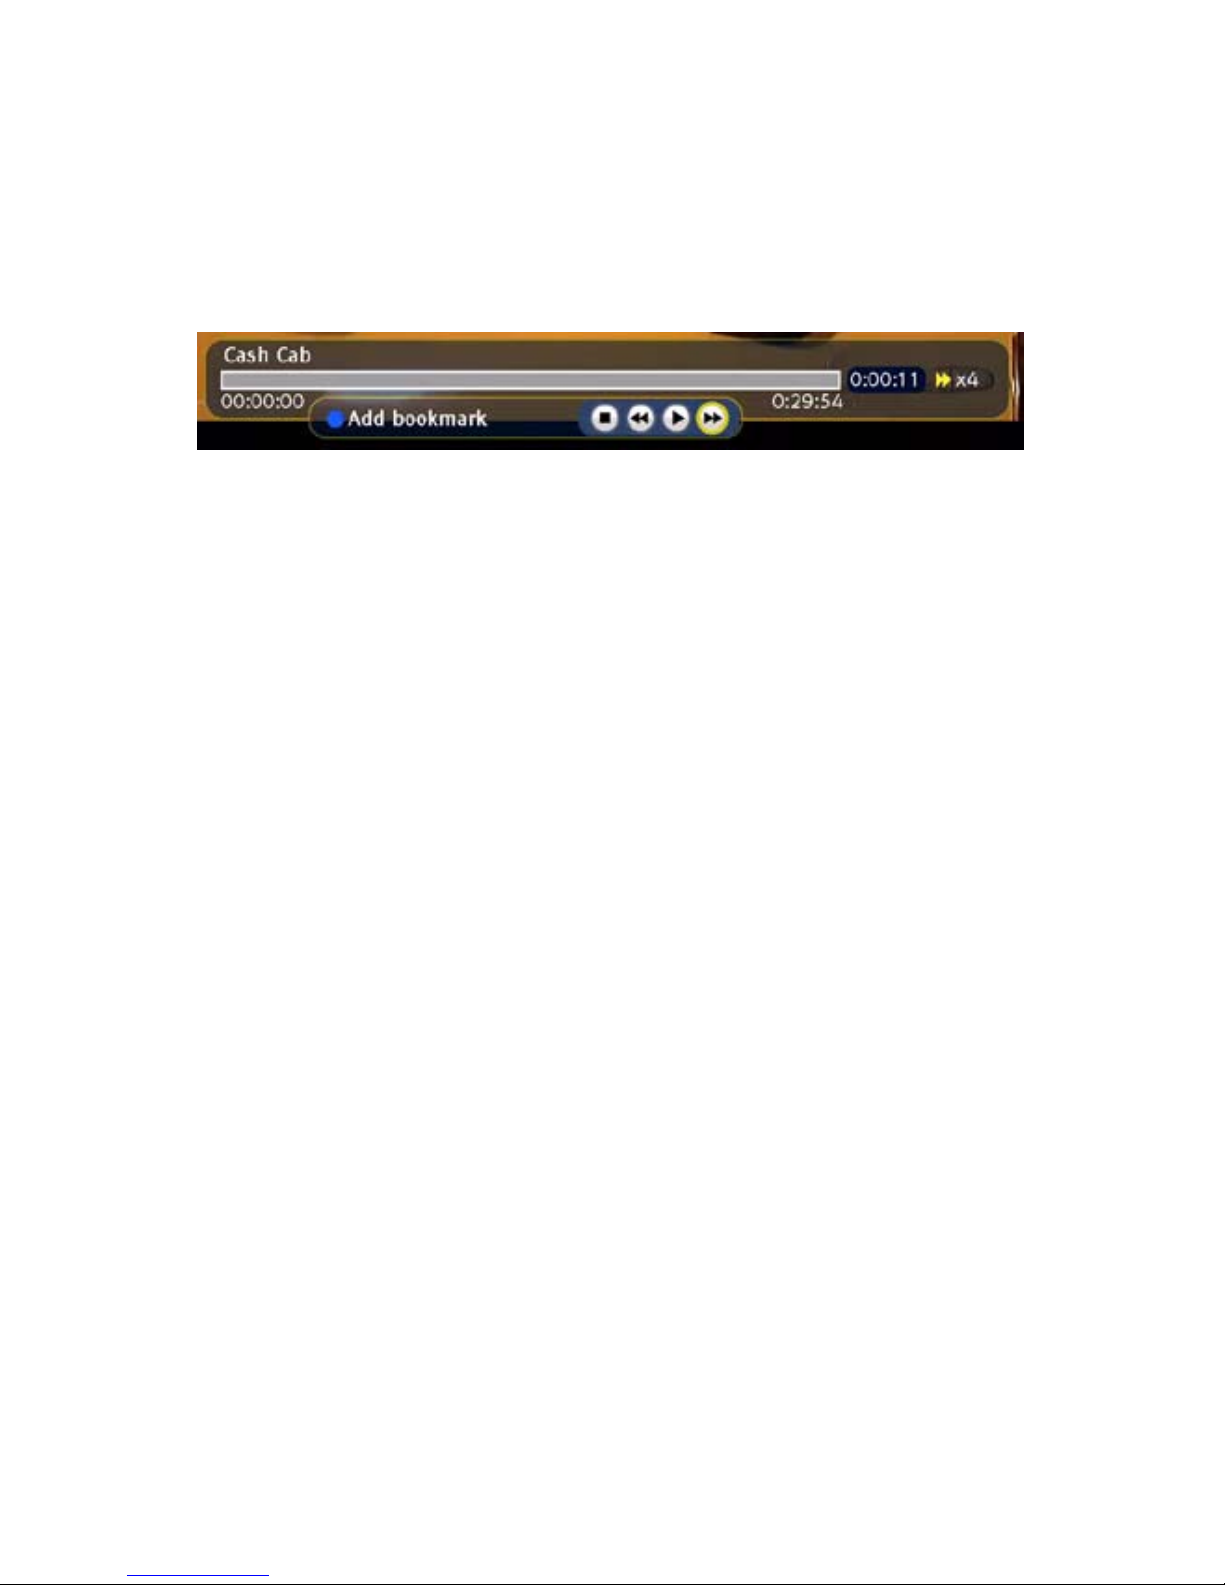
Fast Forward
Press Fast Forward to move forward in a recorded program. Press it again up
to 3 times to increase the fast forward speed. x4, x15, x60 and x300 will display
next to the status bar. x4 is the slowest setting and x300 is the fastest. Press
Play to resume normal play.
Instant Replay
WithInstantReplay,youcangobacktoseethelastplayofthegameorreplay
the last scene of your movie. Just press the Replay button on your remote
to replay the last 10 seconds. Press the replay button repeatedly to continue
skipping back in 10 second increments.
Return to Live TV
Any time that you Pause or rewind a live program, the show continues to be
broadcast in real time. To return to live programming, press the Live button.
Page 6
5
Record Programs
Using your DVR you can build your personal library of programs, movies,
sports, TV shows, etc. Follow these steps to manage your library.
Note: You can restrict viewing of recorded programs, just like any other program. If you schedule a recording for a program you have locked, the program
willberecorded.Whenattemptingtoviewit,youwillneedtoenterthePIN.
To build your program library you can set recordings in two ways.
1 – One Touch recording of the program you are currently watching
2 – Record from Program Information in the Guide.
3 – Record from the Future Recordings screen.
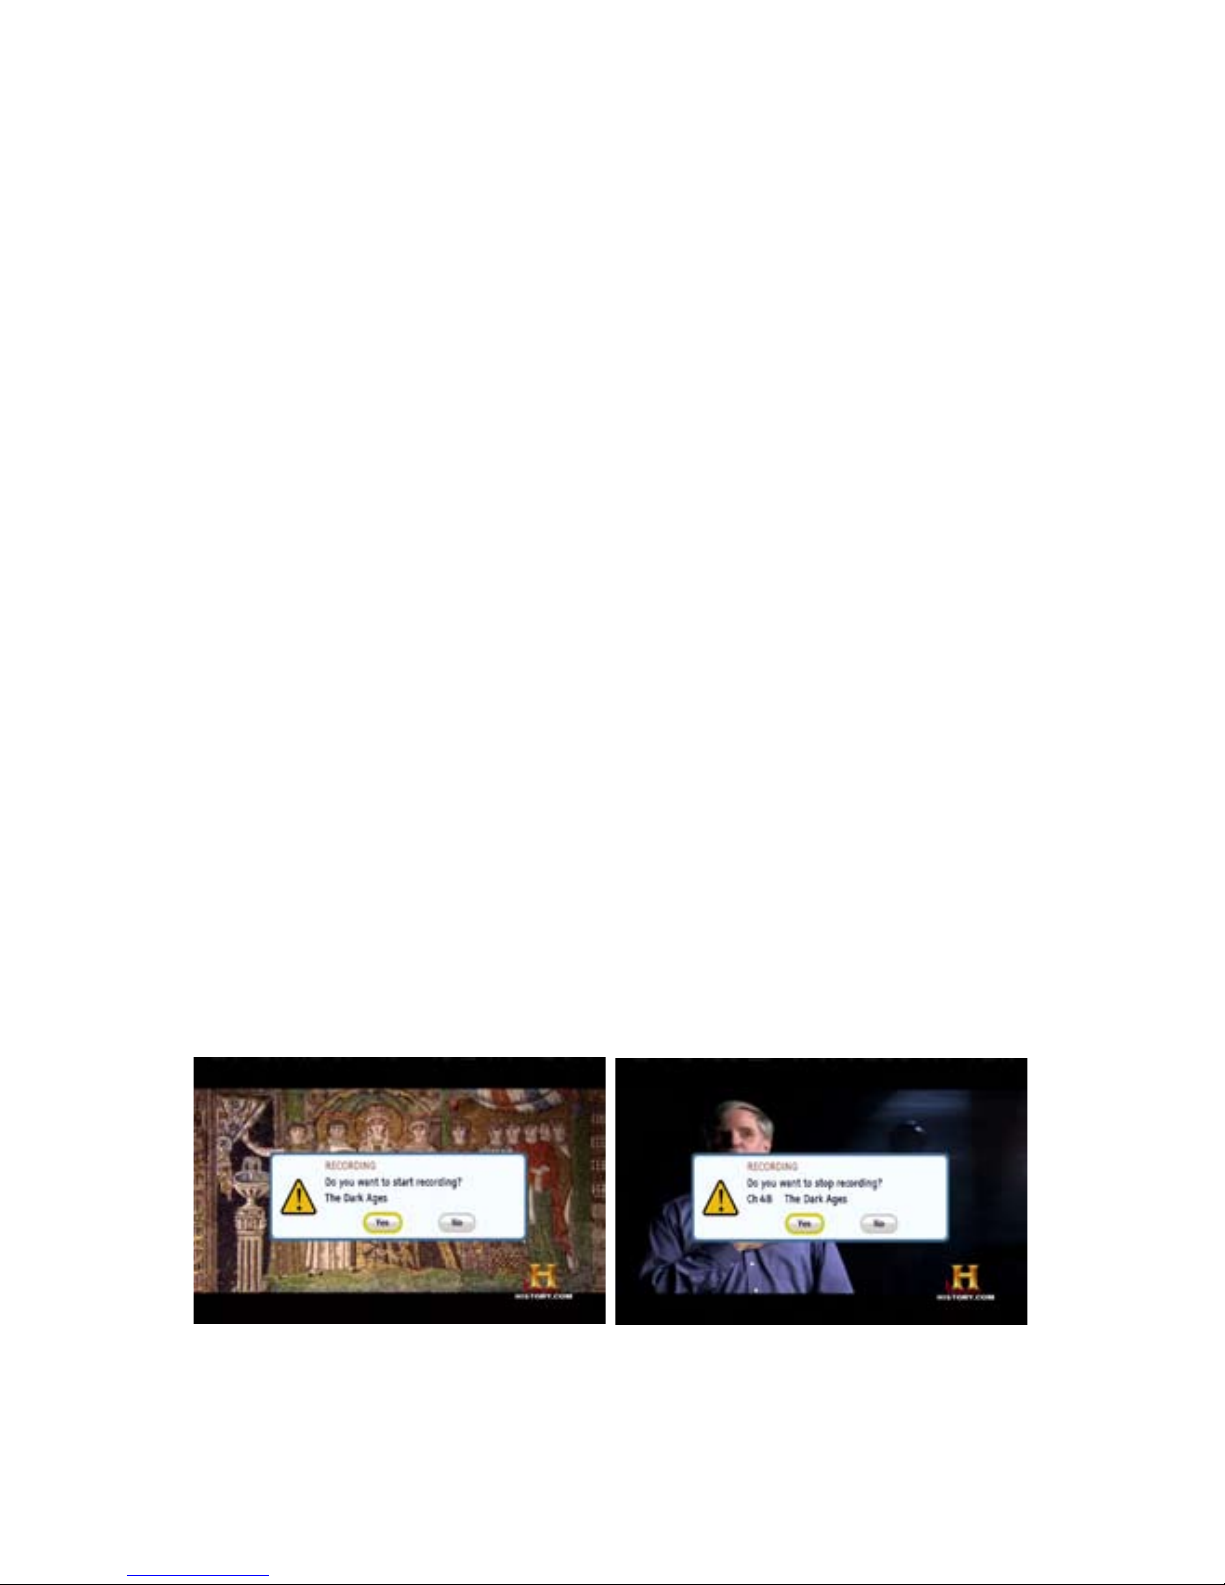
One Touch Recording of the program you are currently watching
1. To begin recording the program you are currently watching, press Record
on the remote control.
2. The DVR will confirm that you want to begin recording the program. If you
do wish to record the program, arrow to select Yes, and then press OK. If
the program is already in progress, it will begin recording from the point
you press record.
3. To Stop recording the program, press the Stop button on the remote
control.
4. The DVR will confirm that you want to stop recording the program. If you
do wish to stop recording the program, arrow to select Yes, and then
press OK.
Page 7
6
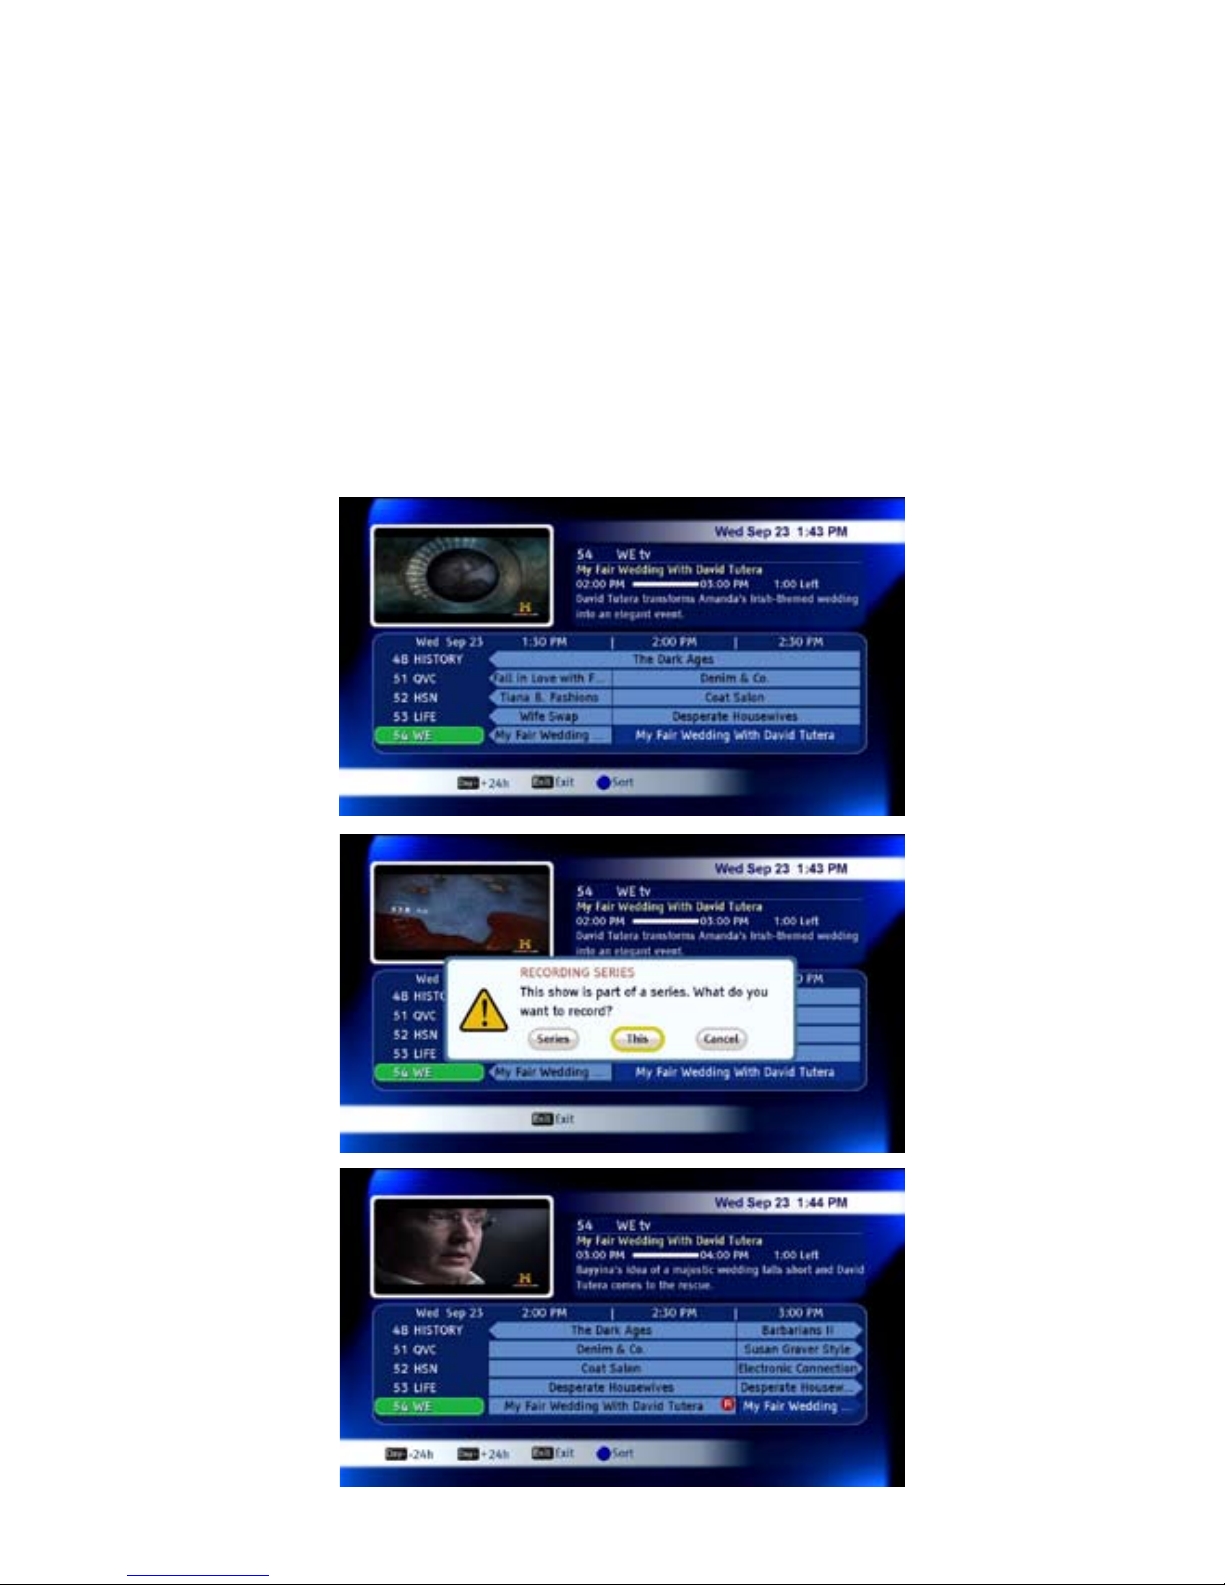
Record from the Program Guide
1. Press the Guide button to display the program guide.
2. Highlight the program that you want to schedule for recording.
3. Press the Record button on the remote control.
4. If the program is part of a series the DVR will ask if you wish to record just
This episode or the Series. Use the arrow keys to make your selection and
then press OK on the remote control.
5.Whentheprogramisscheduledtorecord,itwillshowintheguidewitha
red ‘R’.
6. Press Exit on the remote to exit the guide.
Page 8
7
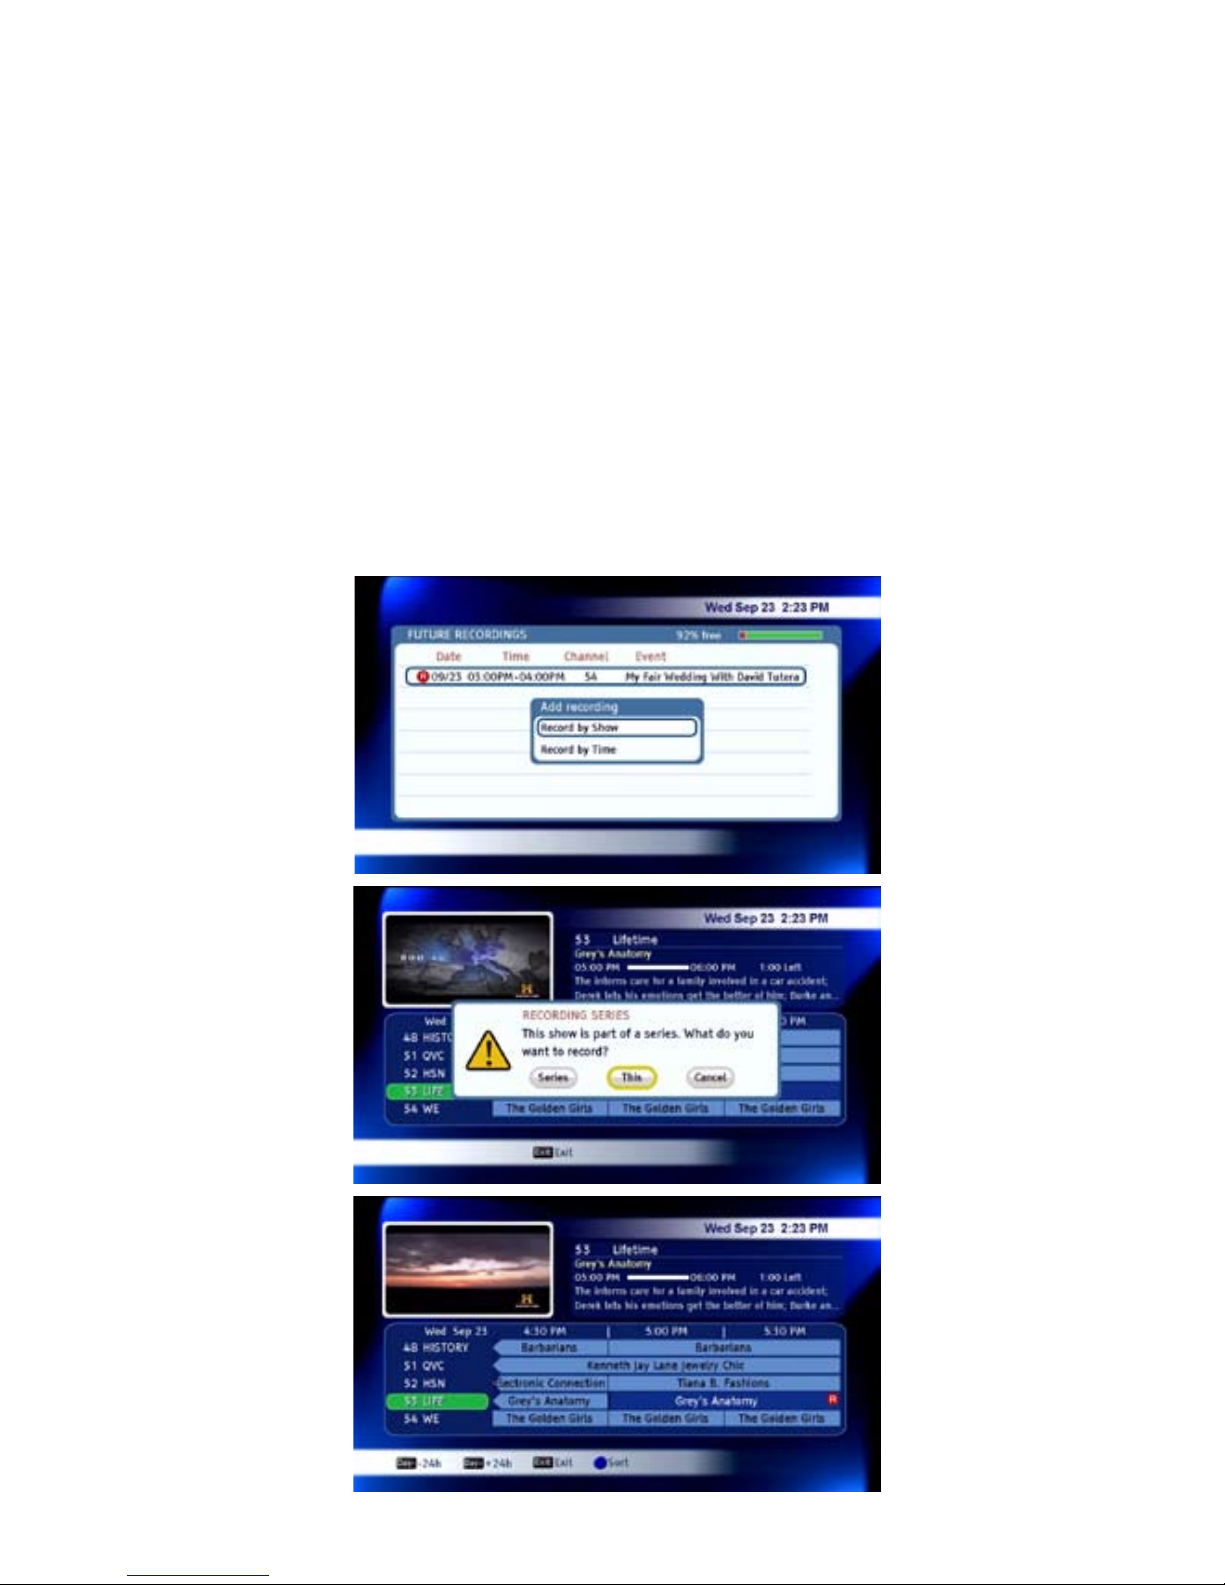
Record from the Future Recordings Screen
1. Press the List button on the remote control to view the Folder List. Press
the List button a second time to view a list of future recordings.
2. Press the Green button on the remote control to add a recording.
3. Use the arrow keys to make your selection to either Record by Show or
Record by Time. If you Record by Show, the Guide will display.
4. Arrow through the guide to find and highlight the show you wish to record.
5. Press the Record button on the remote control.
6. If the program is part of a series the DVR will ask if you wish to record just
this episode or the Series. Use the arrow keys to make your selection and
then press OK on the remote control.
7.Whentheprogramisscheduledtorecord,itwillshowintheguidewitha
red ‘R’. A series recording will display two red “R’s” in the guide.
Page 9
8
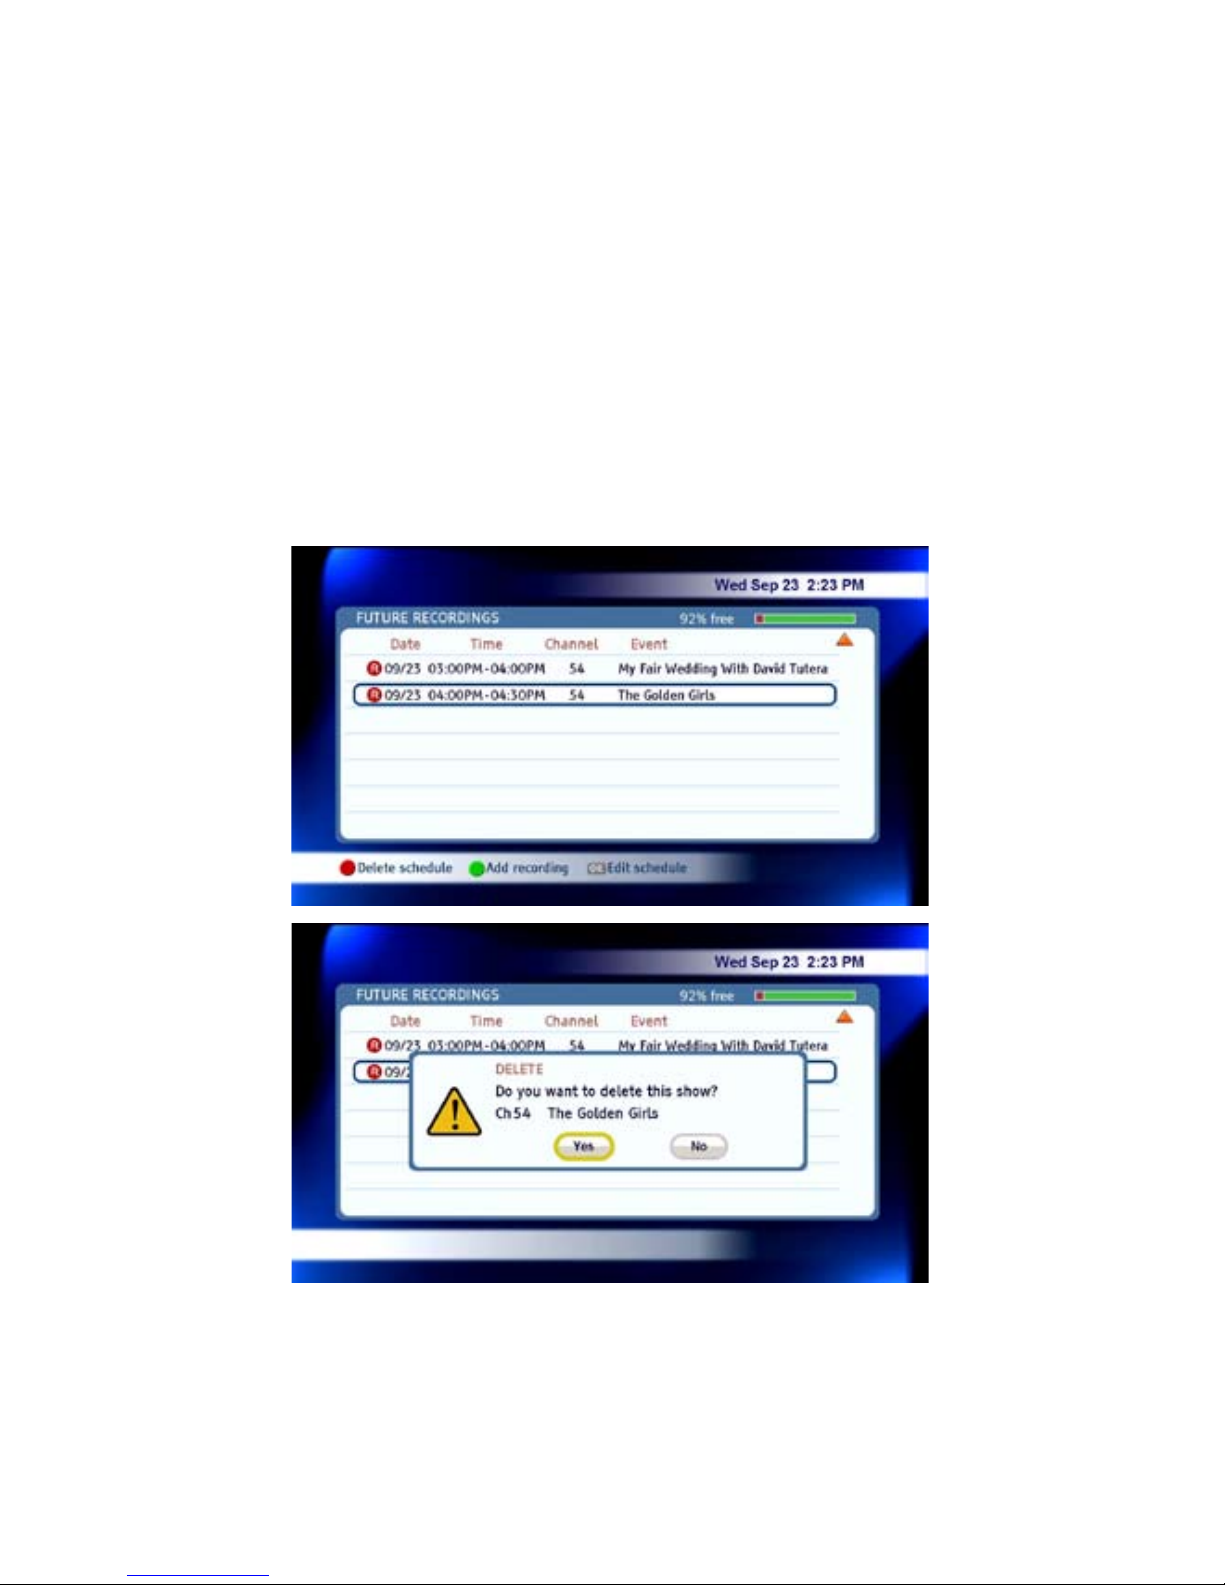
Cancel or Delete a Scheduled Recording
You can cancel or delete a scheduled recording at any time. Simply access the
list of future recordings and remove it from the list.
8. Press the List button on the remote control to view the Folder List. Press
the List button a second time to view a list of future recordings.
9. Use the arrow keys on the remote control to select the future recording you
want to delete.
10. Press the Red button on the remote control. The DVR will ask to confirm
that you want to delete the show. Use the arrow keys to make your selec-
tionYesorNoandthenpressOKontheremotecontrol.
Page 10
9
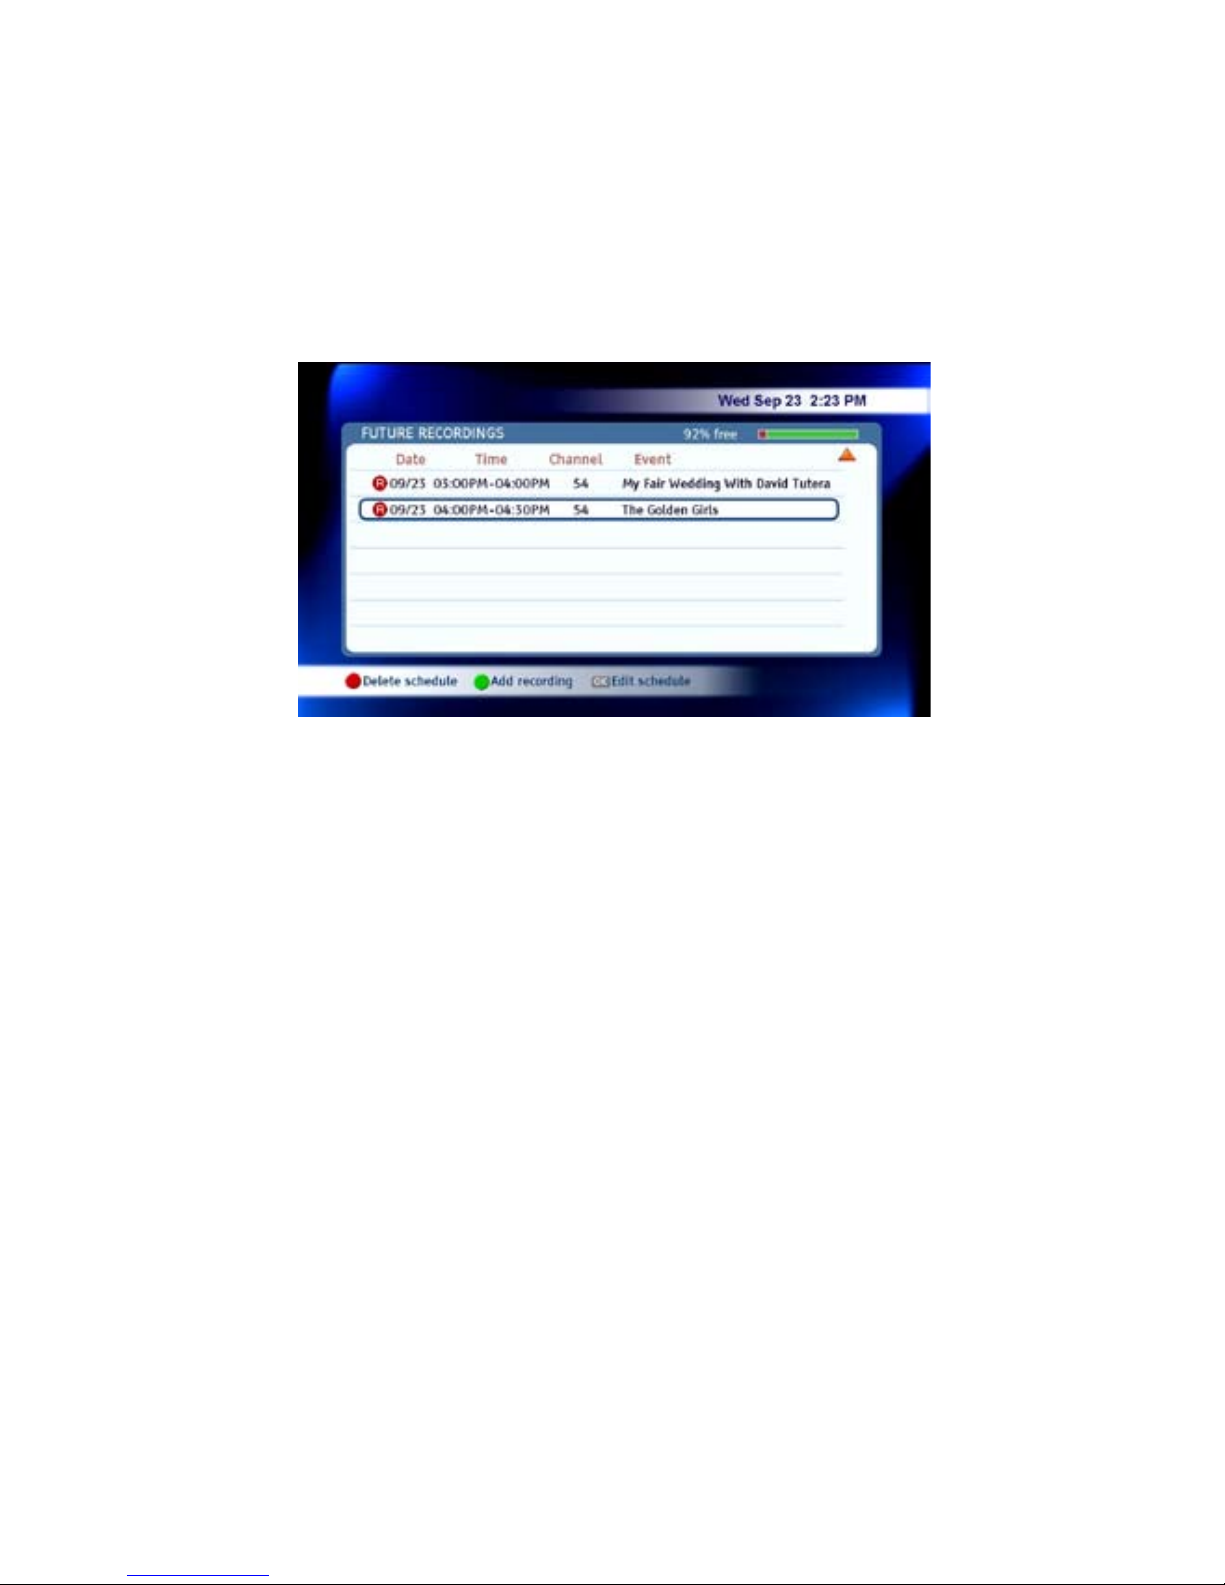
View a List of Scheduled Recordings
You can view a list of scheduled recordings any time.
1. Press the list button on the remote control to view the Folder List. Press the
list button a second time to view a list of future recordings.
2. From here you can delete scheduled recordings, edit recordings or add
recordings.
Page 11
10
Watch a Recorded Program
It’s never been so easy to watch one of your recorded programs – when you
are ready to watch it.
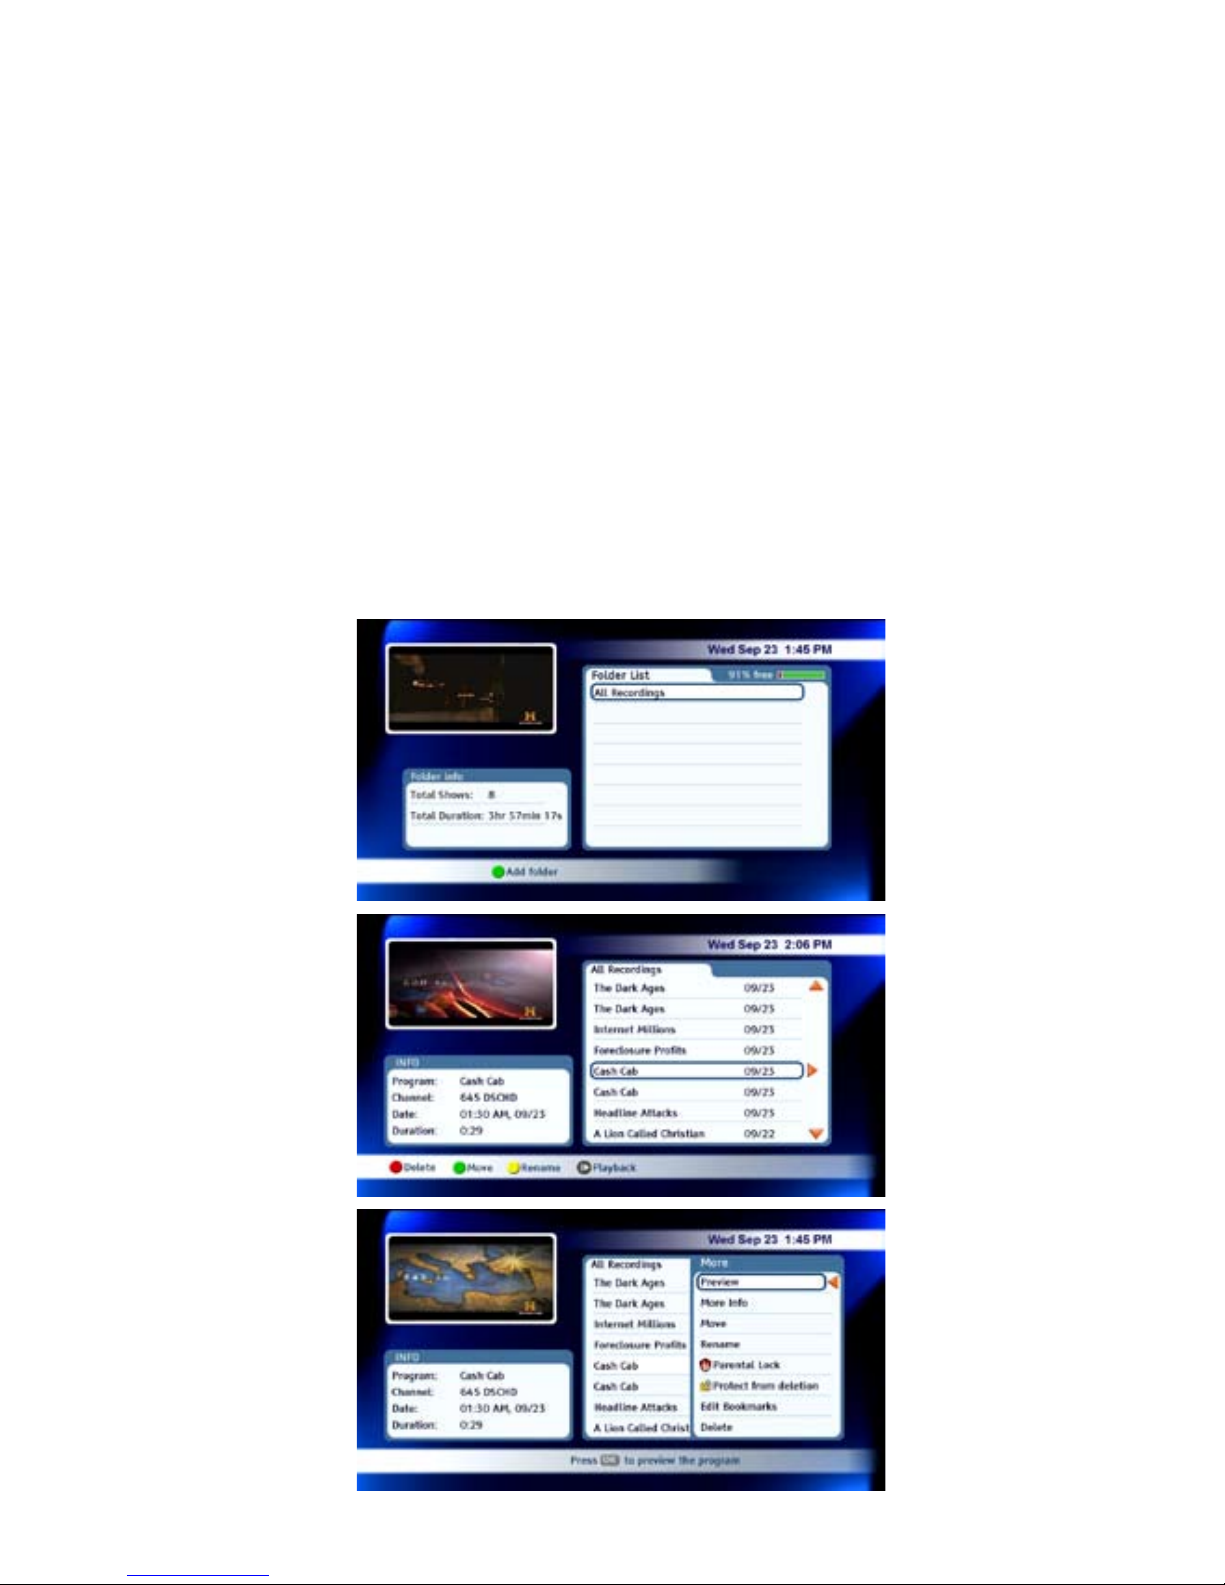
1. Press the List button on the remote control. This will display the Folder List.
2. Press OK on the remote control to view the list of recordings in the All
Recordings folder.
3. Using the up and down Arrow keys on the remote control, highlight the
program you want to watch.
4. Press Play on the remote control to begin watching the program immedi-
ately.
5. If you press the right arrow key on the remote control with the program
highlighted, you are given options to view more information about the
selected program.
Page 12

11
Manage Your Personal Video Library
Whenyouselectaprogramfromyourlistofrecordedprograms,youhavea
number of options to help you manage that recording.
The following options or information is available when you select a program:
a. Preview/Playback – If you arrow to choose Preview, the program
will play in the window in the upper left of the screen. If you
choose Playback, the program will take the screen.
b.MoreInfo–Whenyouhighlightaprogrambriefinformation
displays for your selection in the lower left of the screen. Choosing More Info from the list provides more information about the
selected recording.
c. Move – Recorded programs can be organized into folders. Use the
Move option to move a recording into a specific folder.
d. Rename – You can rename a program if desired.
e.ParentalLock–IfyouwanttorequireaPINforviewingacertain
recording, use the Parental Lock option.
f. Protect from deletion – If you record a series and keep only a cer-
tain number of episodes at any given time, you may have one that
you want to protect from deletion.
g. Edit Bookmarks – Your DVR is capable of marking specific spots in
a program. If you want to edit bookmarks for a program, use this
option.
h. Delete – To delete a recorded program, press the Delete key.
Page 13
12
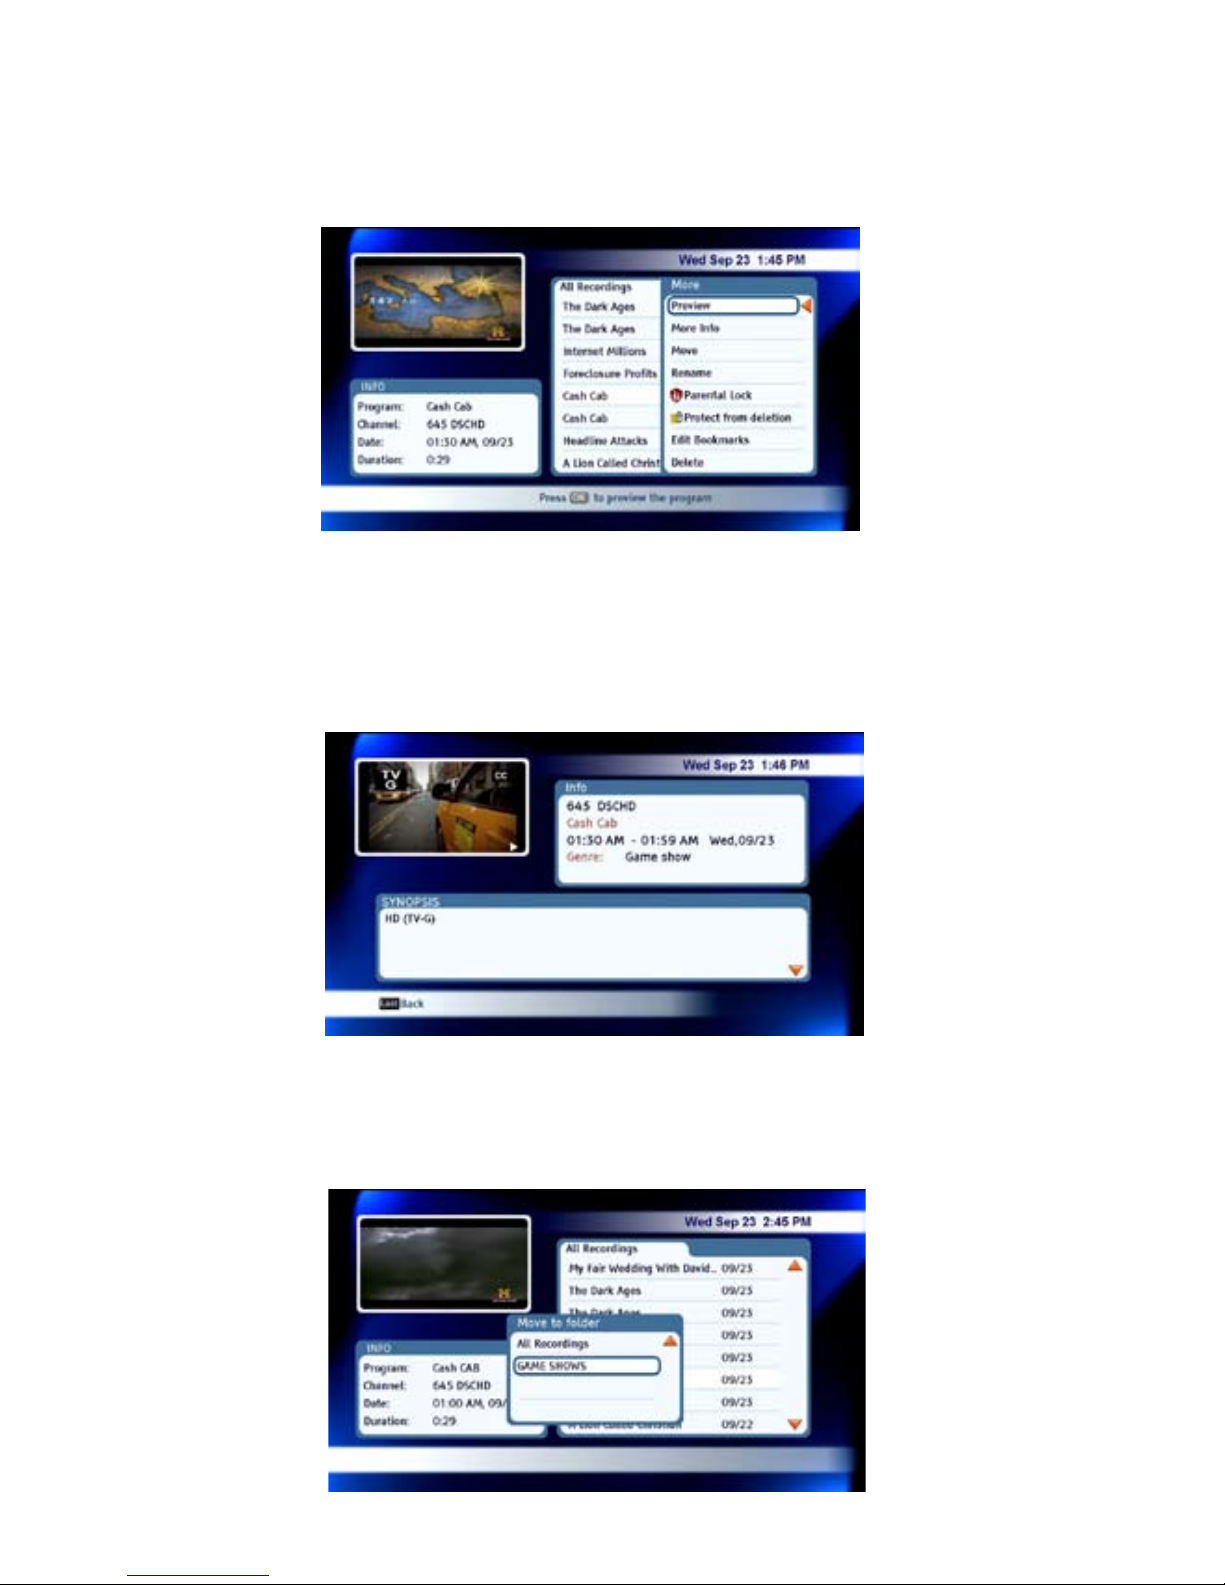
Preview/Playback
If you arrow to choose Preview, the program will play in the window in the upper left of the screen. If you choose Playback, the program will take the screen.
More Info
Whenyouhighlightaprogrambriefinformationdisplaysforyourselectionin
the lower left of the screen. Choosing More Info from the list provides more
information about the selected recording.
Move
Recorded programs can be organized into folders. Use the Move option to
move a recording into a specific folder.
Page 14
13
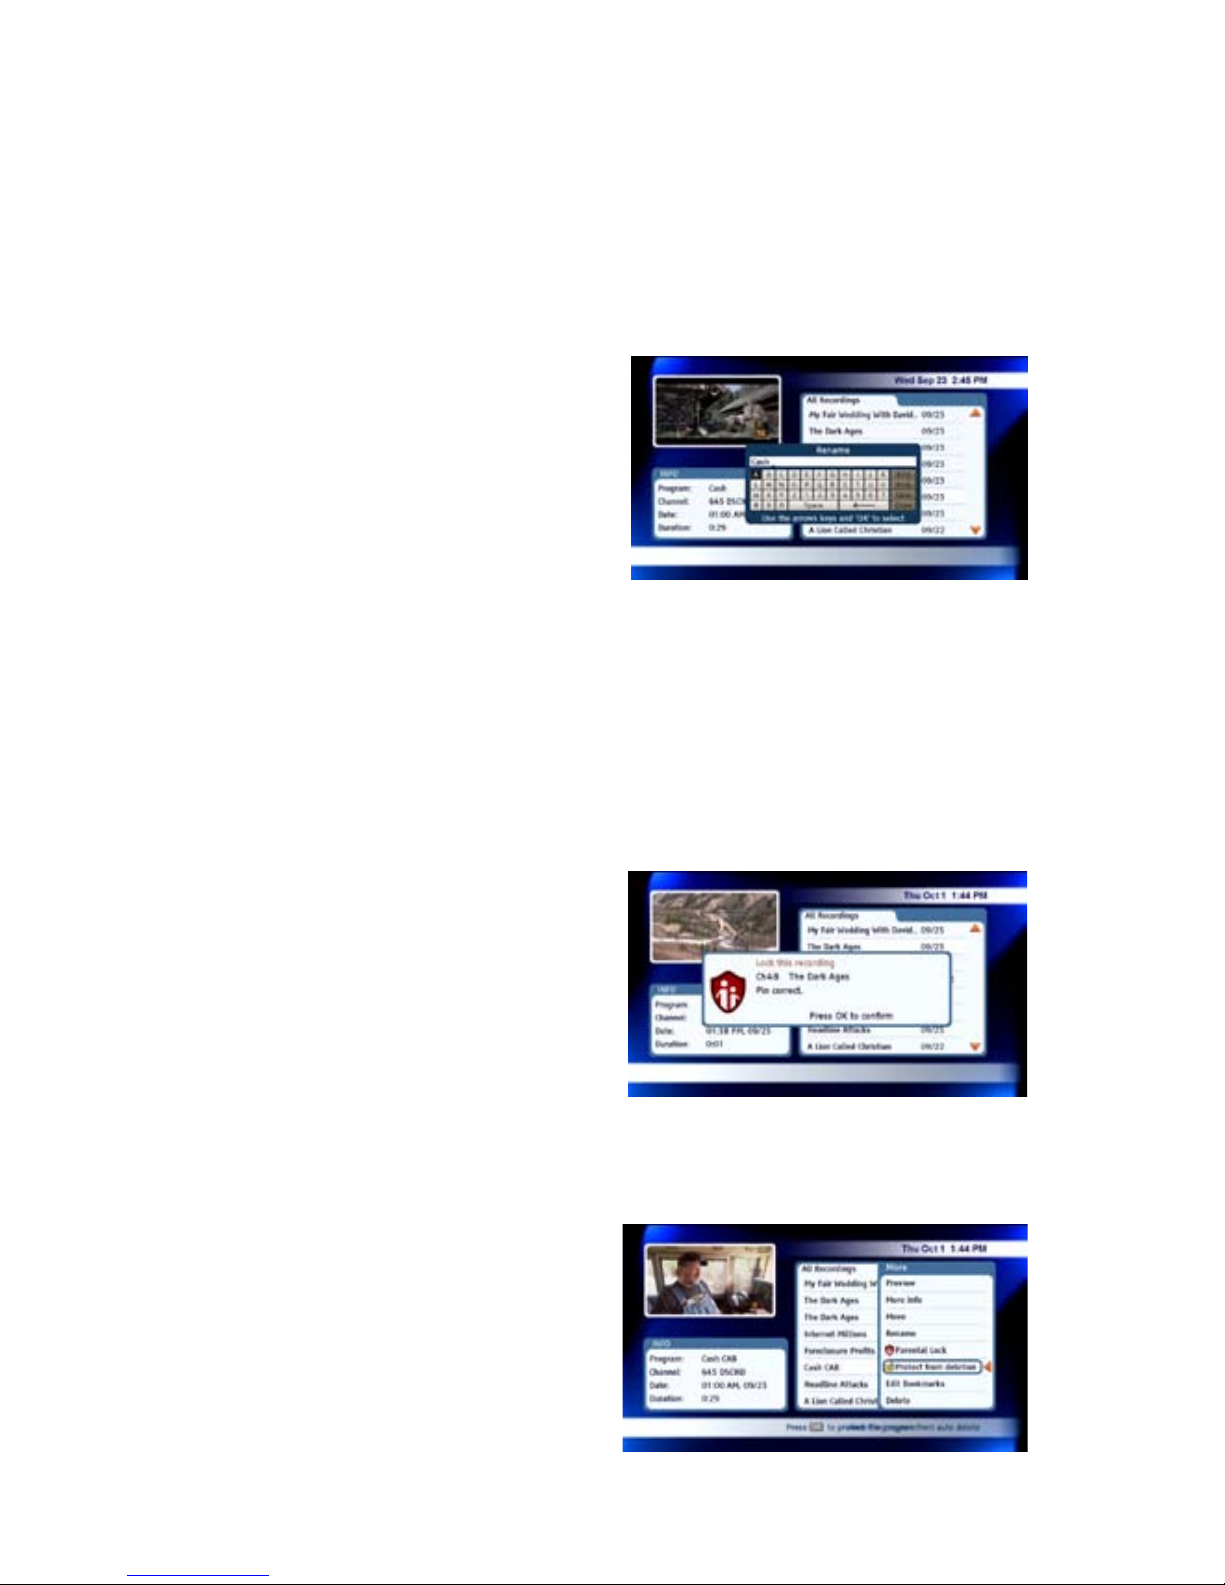
Rename
You can rename a program if desired.
1. Select Rename from the list of options.
2. Using the on screen ‘keyboard’ use the arrow keys to highlight letters and
press OK to select them.
3.Whendone,arrowtoselectSaveandpressOK.
Parental Lock
IfyouwanttorequireaPINforviewingacertainrecording,usetheParental
Lock option.
1. Select Parental Lock from the list of options.
2.Entera4-digitPINthatwillberequiredtoviewtheprogram.
3.Whenprompted,presstheOKbuttonontheremotecontroltoconrmthe
parental lock setting.
Protect from Deletion
If you have a recording that you
do not want to have automatically
deleted in order to make space on
the DVR, you should set it to protect
from deletion. Simply choose the
Protect from Deletion option from
the list and it will be protected from
deletion.
Page 15
14
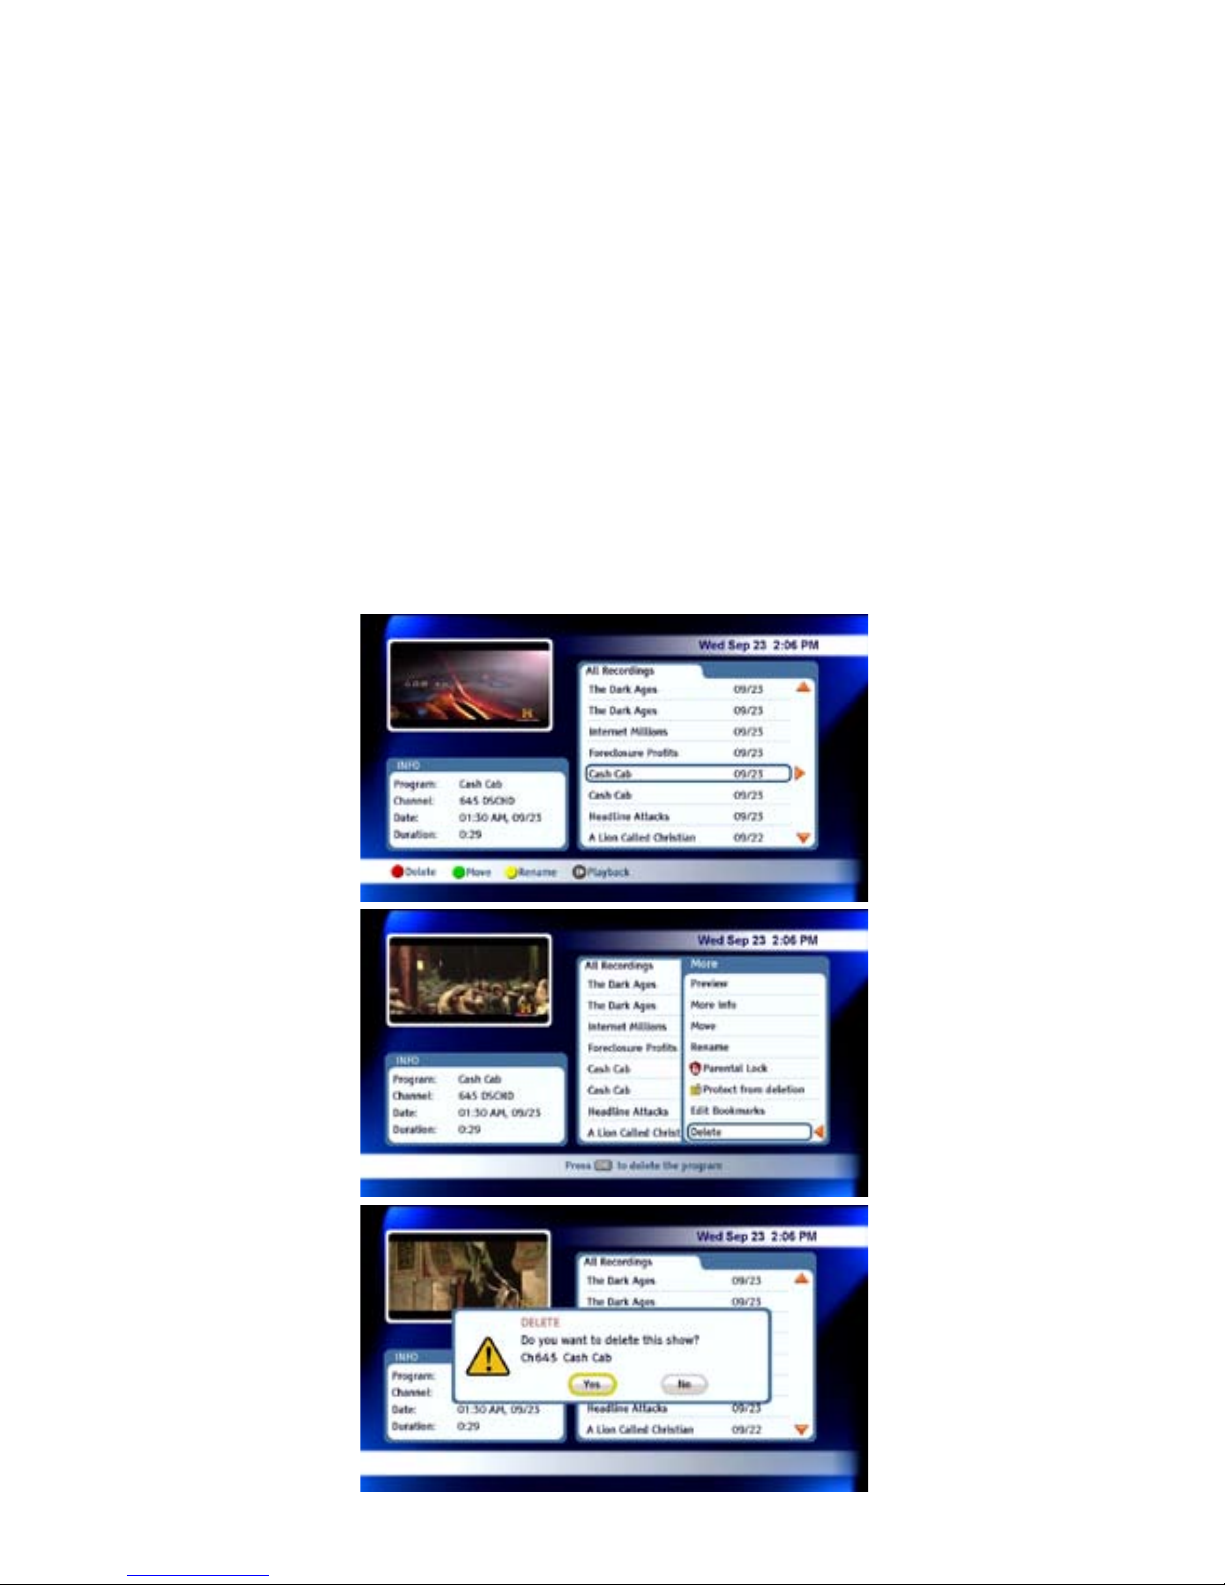
To Delete a Recording
A recorded program remains in your video library until you decide to delete it
unless you have it set to delete when space is needed.
1. Press the List button on the remote control. This will display the Folder List.
2. Press OK on the remote control to view the list of recordings in the All
Recordings folder.
3. Using the up and down Arrow keys on the remote control, highlight the
program you want to delete.
4. Press the right arrow to display the options for that recording. Arrow down
to select Delete.
5. Your DVR will confirm that you want to delete the program. Use the arrow
key to select Yes and then press OK on the remote control.
Page 16
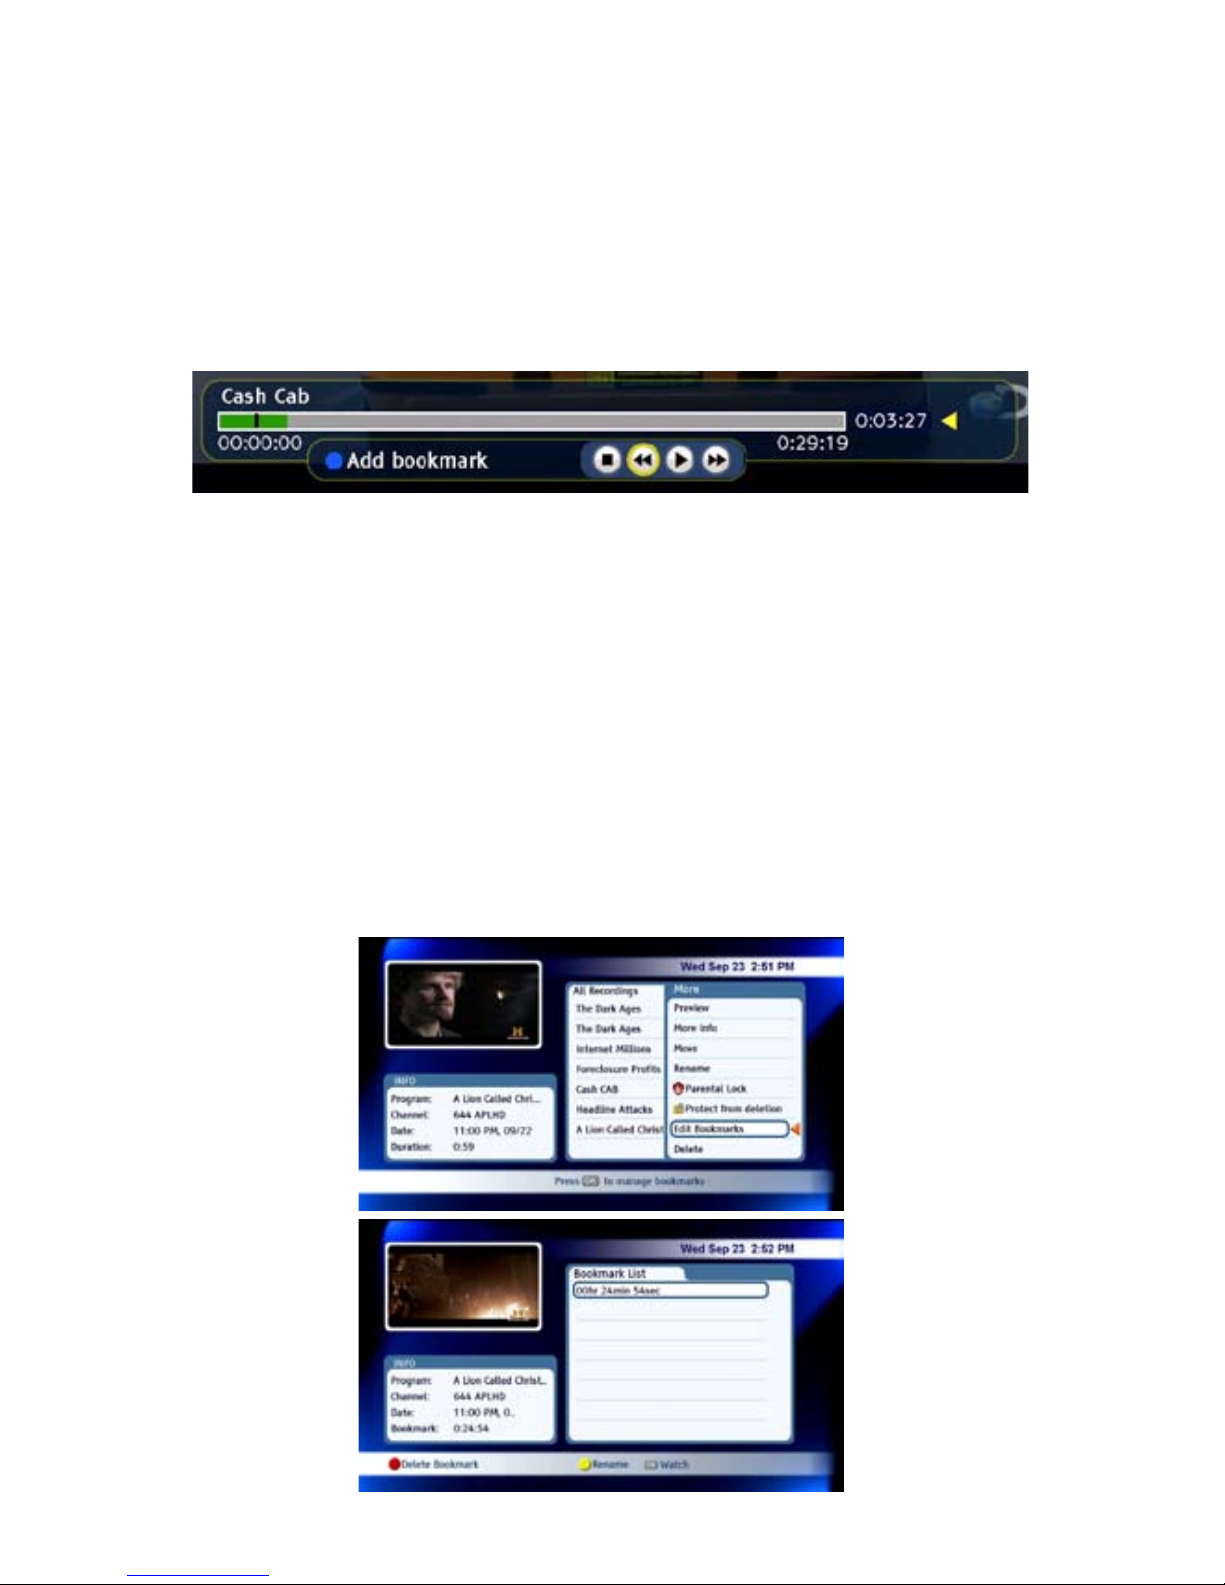
Using Bookmarks in a Recorded Program
Your DVR is capable of marking specific spots in a program, called Bookmarks.
It is an easy way for you to mark your spot in a program that you might not be
able to watch in its entirety.
As you are watching a program, press the Blue button on the remote control
to add a bookmark. You will notice a black line in the status bar.
Later when you return to finish viewing the program, begin playback of the
program. Press the up arrow key to forward to the first bookmark. If there
are multiple bookmarks, keep pressing the up arrow key until you are to your
desired place in the program.
Manage the bookmarks for a recording.
1. From the More Information menu for the recorded program, select Edit
Bookmarks.
2. Each bookmark that is stored in the recording will display. You may rename
it using the Yellow button, delete it using the red button, or begin watching
the program from that spot using the OK button.
 Loading...