

Page 1
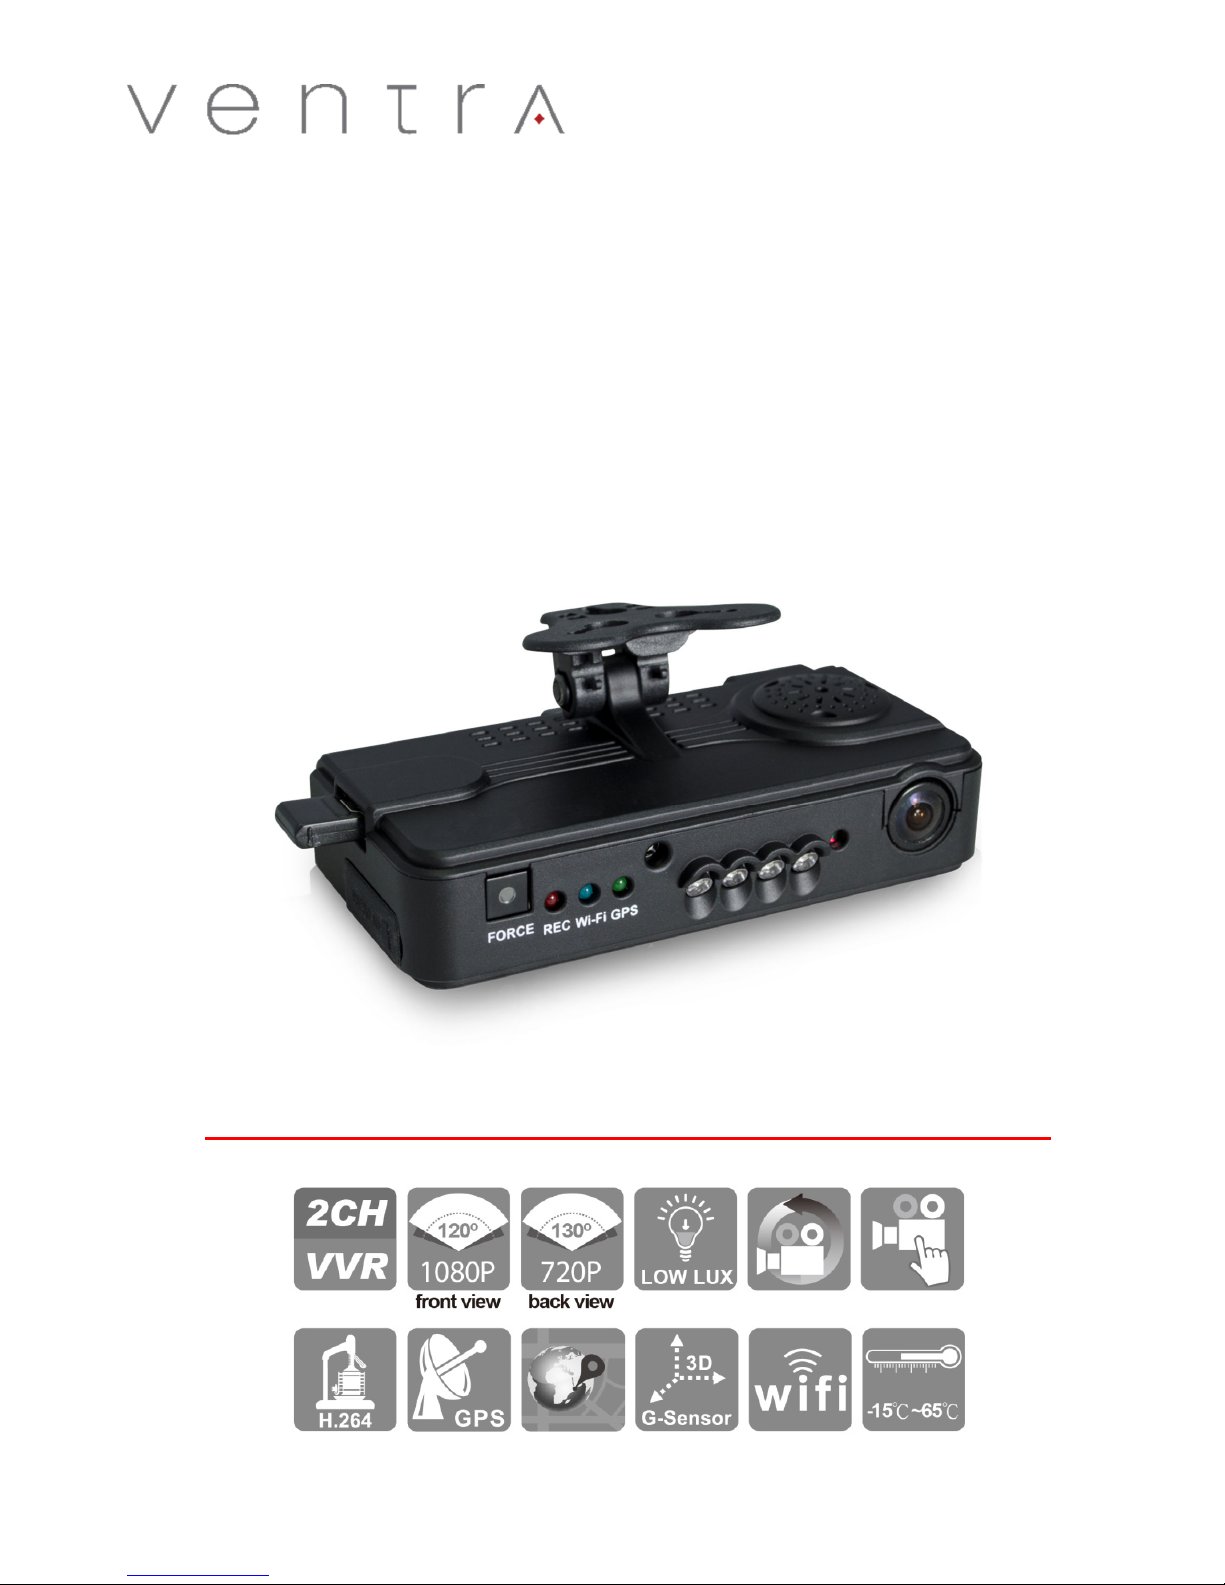
Ventra VDR-760 2 CH HD Vehicle
Video Recorder
User Manual
05 19. V1.3
Page 2

Vehicle video recorder user manual
ii
Safety Precautions
To ensure device working correctly, please test record and play video
function before use. Please note that manufacturer, subsidiaries,
affiliates, and distributors are not liable for any consequential damages
arising from any malfunction of main device accessory. Including the
losses cause by memory card that failed to record image or recorded
files unable to read on any device.
Before using the product, please ensure that you read the
safety precautions below. Always make sure the product is used
correctly.
• Please keep device away from children
• Only using the power supply as recommended or supplied by the
manufacture
• Do not attempt to disassemble, alter or modify the product
• To avoid the risk of injury, do not touch the interior of the product if
it has been dropped or otherwise damaged
• Stop using the product immediately if it emits smoke, a strange
smell, or otherwise behaves abnormally
• Do not use organic solvents such as alcohol, benzene, or thinner to
clean the product
• Do not let the product come into contact with liquid or moisture
• Do not allow liquids or foreign objects to enter the VDR
• Do not place the VDR nearby or direct contact with flame
• Do not handle the power cord with wet hands
• Do not use the equipment in a manner that exceeds the rated
capacity of the electrical outlet or wiring accessories.
• Do not use the damaged power cords or plugs
• Do not allow direct or metal objects (such as pins or keys) contact
with the terminals or plugs.
• Avoid using, placing or storing the product in humid or dusty areas
Page 3

Vehicle video recorder user manual
iii
Windshield Mounted Device Notice
1. Please check and comply with ALL local, state and federal laws and or
regulations regarding windshield mounted devices. Some state laws
prohibit drivers from using suction mounts on their windshield when
operating motor vehicles. Other state laws allow the suction mount to
be mounted to be located only in specific locations on the windshield.
Numerous states have enacted restrictions against placing objects on
the windshield in locations that obstruct the driver’s vision.
2. IT IS THE USER’S RESPONSBILITY TO MOUNT VENTRA EQUIPMENT IN
COMPLIANCE WITH ALL PPLICABLE LAWS AND ORDINCANCE.
Audio and Video Recording Notice
3. Certain local, state and federal laws may prohibit recording of audio and
or video in vehicles or public area, or without knowledge and or
consent, please check and comply with ALL local, state and federal laws
and regulations.
4. Certain local, state and federal laws may require signage or display that
indicate recording of audio and or video in vehicles or public area.
Please check and comply with ALL local, state and federal laws and
regulations.
5. IT IS THE USER’S RESPONSBILITY TO USE VENTRA EQUIPMENT IN
COMPLIANCE WITH ALL PPLICABLE LAWS AND ORDINCANCE.
6. Use of this product other than its intended purpose is strictly
prohibited.
7. Disconnect the power of the VDR if not used for an extended period of
time
8. Ventra Technologies Inc. does not assume any responsibility for any
fines, violation, penalties or damages that may be incurred as a result of
the use of the product.
9. Ventra Technologies Inc. is not responsible for any direct, indirect,
incidental or consequential damages, arising out of use, misuse or
inability to use of our products.
Page 4
Vehicle video recorder user manual
iv
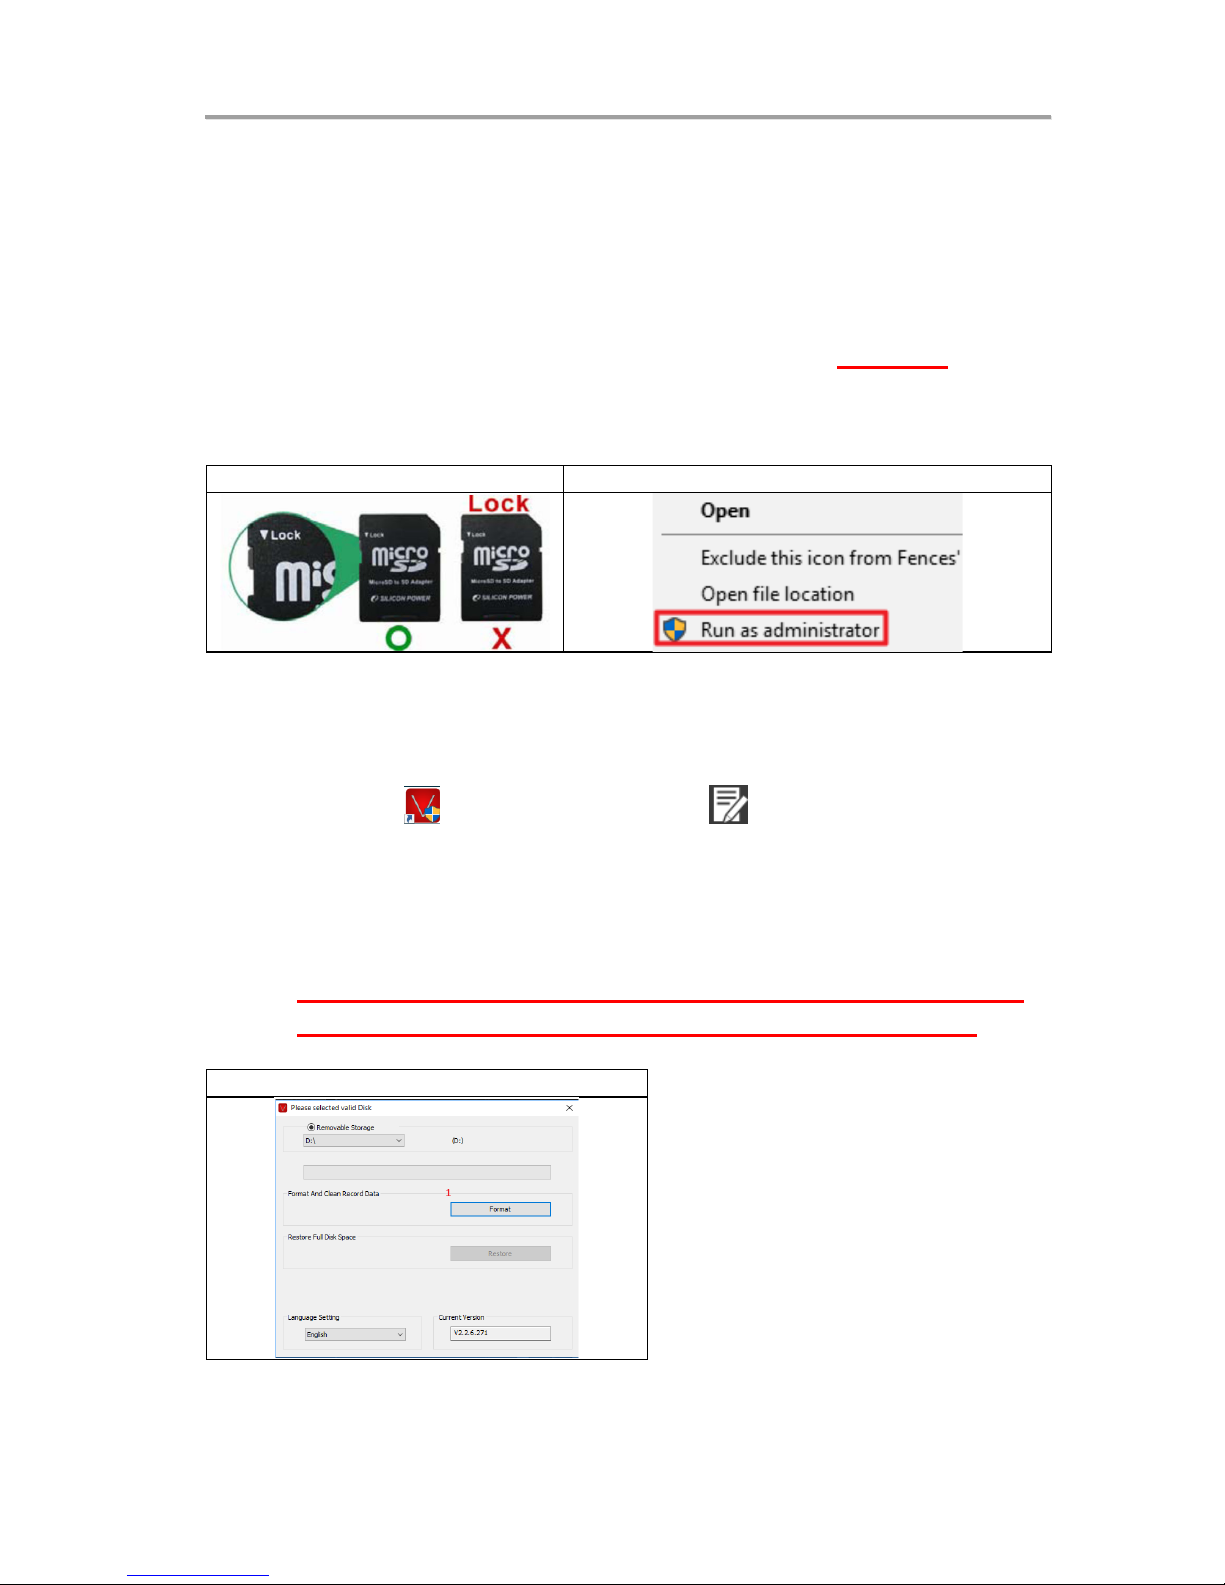
IMPORTANT: FORMAT SD CARD PRIOR TO USE
When you use the Micro SD card for the first time or use a new card,
the SD card MUST be formatted prior to use.
*Notice:
1. Before formatting Micro SD card, please ensure to UNLOCK it first.
2. If the card is unlocked but still cannot be formatted, please run the
program as Administrator to prevent from this problem.
1
2
Format steps:
i. Insert the CD in your PC and open the file
ii. Install the VDR-760 / VDR-220 PC Software
iii. Run program and click on “Format Micro SD Card”.
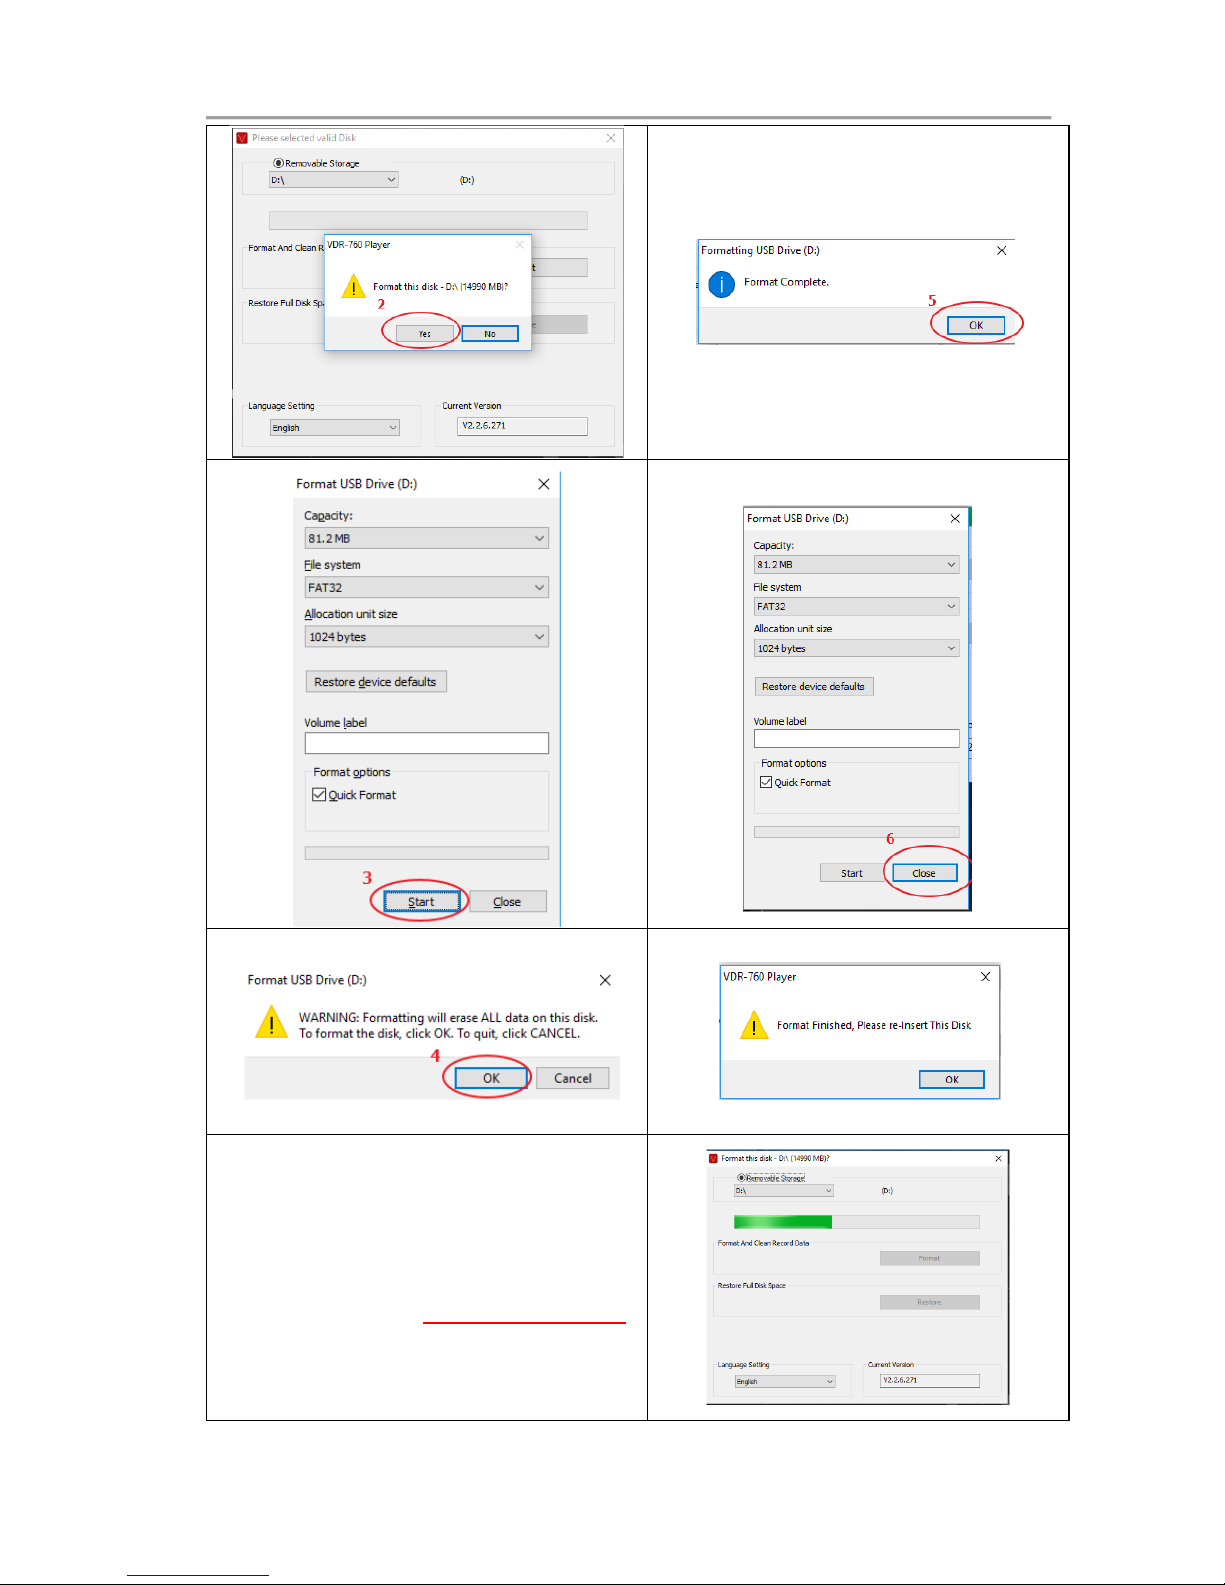
iv. Click on『Format』to start formatting the Micro SD card as
following steps:
NOTICE: The SD card capacity, regardless of size
32GB, 64GB or 128GB will show 77.5 to 80.5MB
Windows 10
Page 5
Vehicle video recorder user manual
v
Regardless of SD card capacity (i.e.
16GB, 32GB, 64GB or 128GB
Once its formatted via the Ventra PC
player or VDR760, the SD card capacity
will show between 77.5MB to 80.5MB
This is due to the system design of the
VDR760 and is completely normal
Page 6

Vehicle video recorder user manual
vi
Table of Contents
A. Feature .............................................................................................................. 1
B. Specifications / Recording Frame Rate ....................................................... 2
C. Included Components / Models / Recording Time ...................................... 3
D. Product Diagram .............................................................................................. 4
E. Product Dimension ........................................................................................... 5
F. Installation ........................................................................................................ 6
F. Installation Continued ..................................................................................... 7
Notice ................................................................................................................. 8
G. Remote controller / Video Out ....................................................................... 9
G. Remote controller / Video Out Continued .................................................. 10
H. Recording and stop recording ...................................................................... 11
I. Playback video recording .............................................................................. 12
I. Playback video recording Continued ........................................................... 13
I. Playback video recording Continued ........................................................... 14
I. Back up video recording ............................................................................... 15
I. Back up video recording Continued ............................................................ 16
I. Settings / System configuration ................................................................... 17
I. Settings / System configuration Continued ................................................ 18
I. Settings / System configuration Continued ................................................ 19
I. Snapshot Setting .......................................................................................... 20
I. Video Playback speed and volume control ............................................... 19
J. Format memory card ..................................................................................... 21
J. Format memory card continued .................................................................. 22
J. Format memory card continued .................................................................. 23
J. Format memory card continued .................................................................. 24
K. Restore memory card .................................................................................... 25
K. Restore memory card continued ................................................................. 26
L. Warranty Information .................................................................................... 27
Note: VDR-760 and VDR-220 utilizes proprietary file
format. The SD card MUST be Formatted via the
VDR 760 desktop software prior to use
https://ventrainc.com/ventra-products-all-in-one-vdr-760/
Page 7

Vehicle video recorder user manual
1
A.
Feature Highlight
1. Ultra low-light high-resolution CMOS sensor
2. Record 1080P HD Video (Front Camera) and 720P HD (Interior
Cab View) simultaneously
3. Record HD Video, Audio, G-Sensor and GPS data
4. Auto continuous loop recording
5. Normal and Event Recording Files
6. Vandal Resistant SD card slot
7. Built-in Supercapacitor for power to ensure video files are saved
when system powers off
8. Plug and Play
9. Front view angle 120 degrees. Cab view angle 130 degrees
10. Driving Route and Speed history in Ventra software playback with
Google Map Integration
11. G-sensor sensitivity adjustable according to vehicle type and road
condition
12. Event videos are saved and marked for easy identification
13. Proprietary file format
14. Password protection
15. Assign Company and Vehicle ID
16. Wi-Fi adapter for optional VentraCloud Service
Page 8

Vehicle video recorder user manual
2
B.
Specifications
Recording Resolution and Frame Rate
Front Camera In-Cab Camera
Resolution / Frames Per Second 1080P @ 25 FPS 720P @ 10 FPS
Upload to Server Storage
(Optional Fee Based Service)
720P @ 15 FPS 720P @ 10 FPS
Sensor Front 1080P CMOS Sensor
In-cab 720P CMOS Sensor
Camera view angle Front camera view angle 120°
In-cab camera view angle 130°
Voltage (a) 5VDC 800mA Hardwired connection
(b) Built-in1.5F super capacitor as backup power for file storage
Operating Temp 5F ~ 140F
Storage device Max 128GB MicroSD Card. Class U1 / U3 speed and higher
Recording Frame Front 1920 x 1080 Max. @ 25 FPS
In-cab 1280 x 720 Max. @ 15 FPS
Auto record when vehicle / system power on. Cab facing camera can be
disabled via software setting
Recording contents Video, Audio, Date, Time , G-sensor data, GPS data
Storage format (a) Specific format for software player
(b) H.264 compression
Microphone Built-in high sensitivity microphone for automatic voice adjustment
Time setting GPS auto adjustment, use built in calendar clock if no GPS signal
G-Sensor Internal 3D G-Sensor
GPS Built-in GPS
GPS position, drive route and speed history
WiFi Optional USB WIFI Adapter
Page 9

Vehicle video recorder user manual
3
C.
Included Components
(a) VDR760 Dual Channel Vehicle Camera
(b) Micro SD card* (
see model below)
(c) 4 PIN, 3.5 inch headphone jack to RCA output cable
(d) IR remote controller
(e) Window mount bracket
(f) Bracket holder
(g) Hard wired power cable
(h) Product CD
(i) User Guide
(j) USB WiFi Adapter
Models
VDR-760 VDR-760BT VDR-760ZT
SD Card Included
32GB Micro SD 64GB Micro SD 128GB Micro SD
All VDR-760 models are the same except for the SD card included
Recording Time
Models
VDR-760 VDR-760BT VDR-760ZT
SD Card
32GB Micro SD 64GB Micro SD 128GB Micro SD
Recording Time
6 - 8 Hours 12 - 15 Hours 24 –30 Hours
Recording duration is an approximate time provided as reference and may vary
Page 10
Vehicle video recorder user manual
4
D.
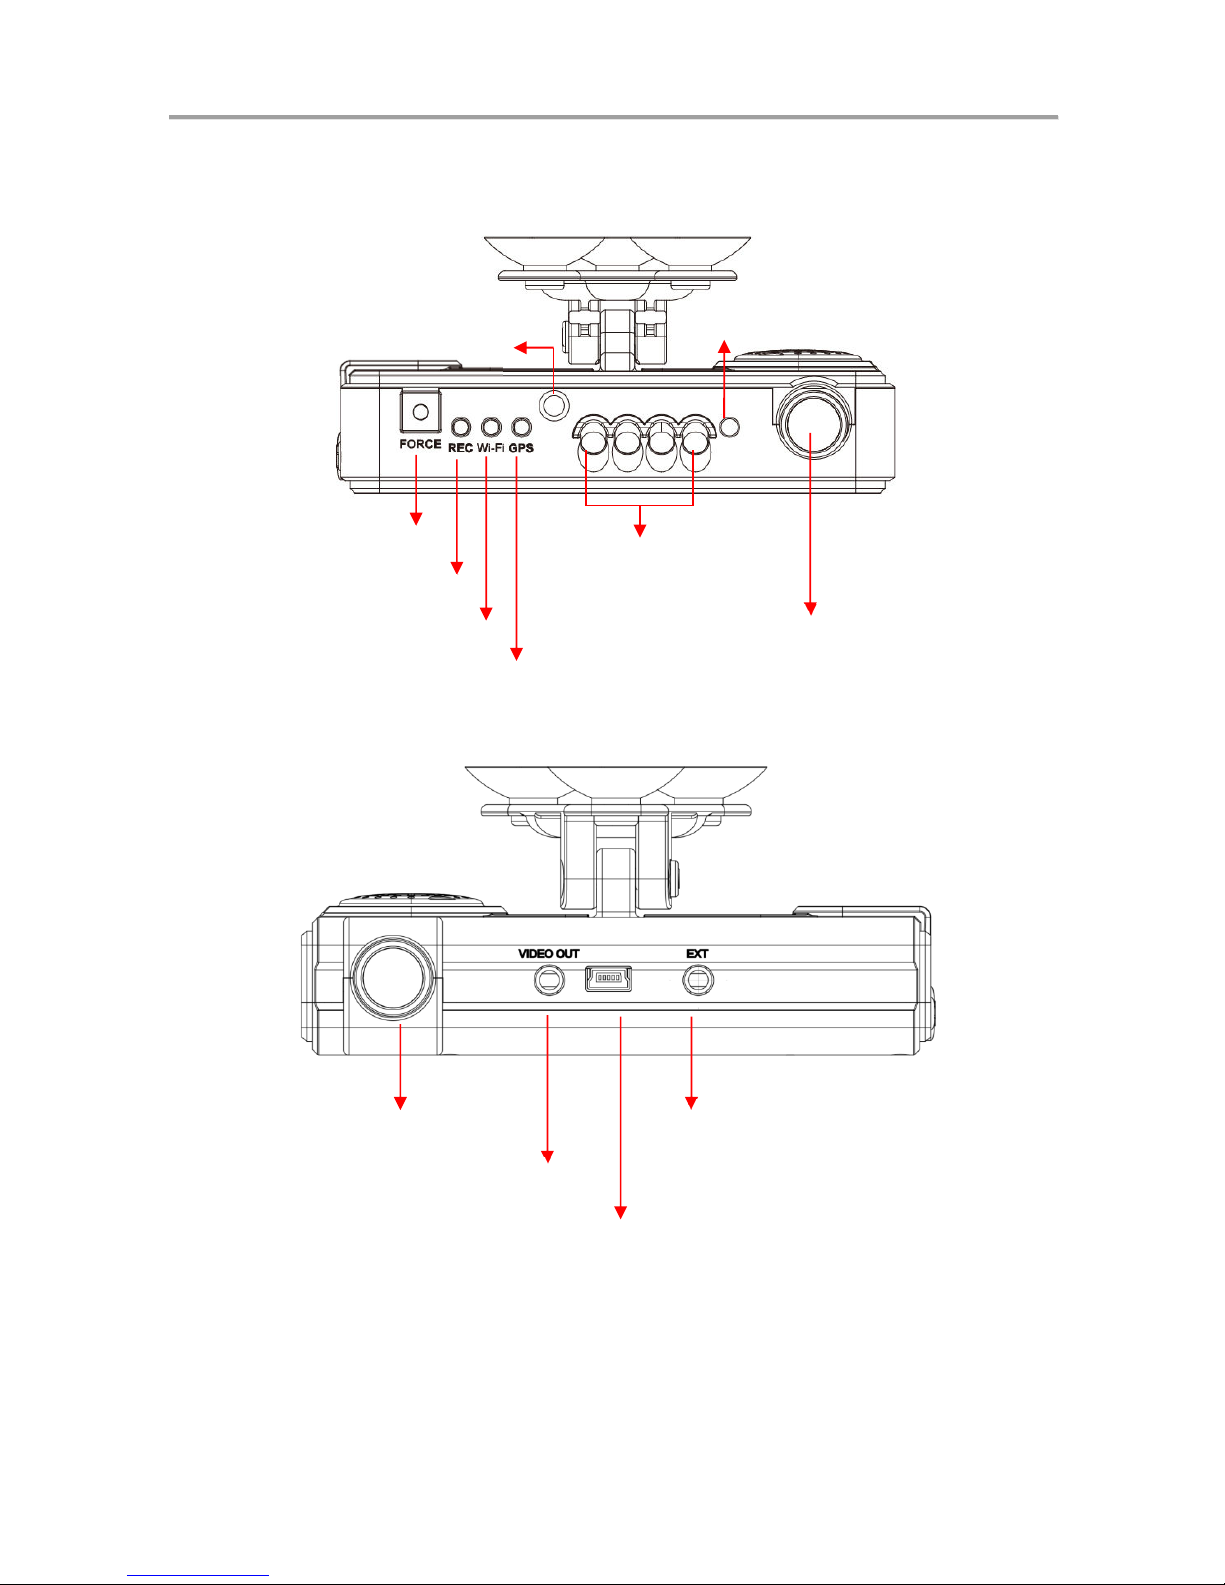
Product Diagram
Front camera
(1080P)
Power cable
Video output
External GPS
Connector (Optional)
VDR
-760 includes built-
in
passive GPS
Recording Light /Red
WiFi connection light/Blue
Force Recording Button
IR LED light
In-cab camera
(720PHD)
Light Sensor
Remote Control Receiver
GPS indicator/Green
Page 11
Vehicle video recorder user manual
5
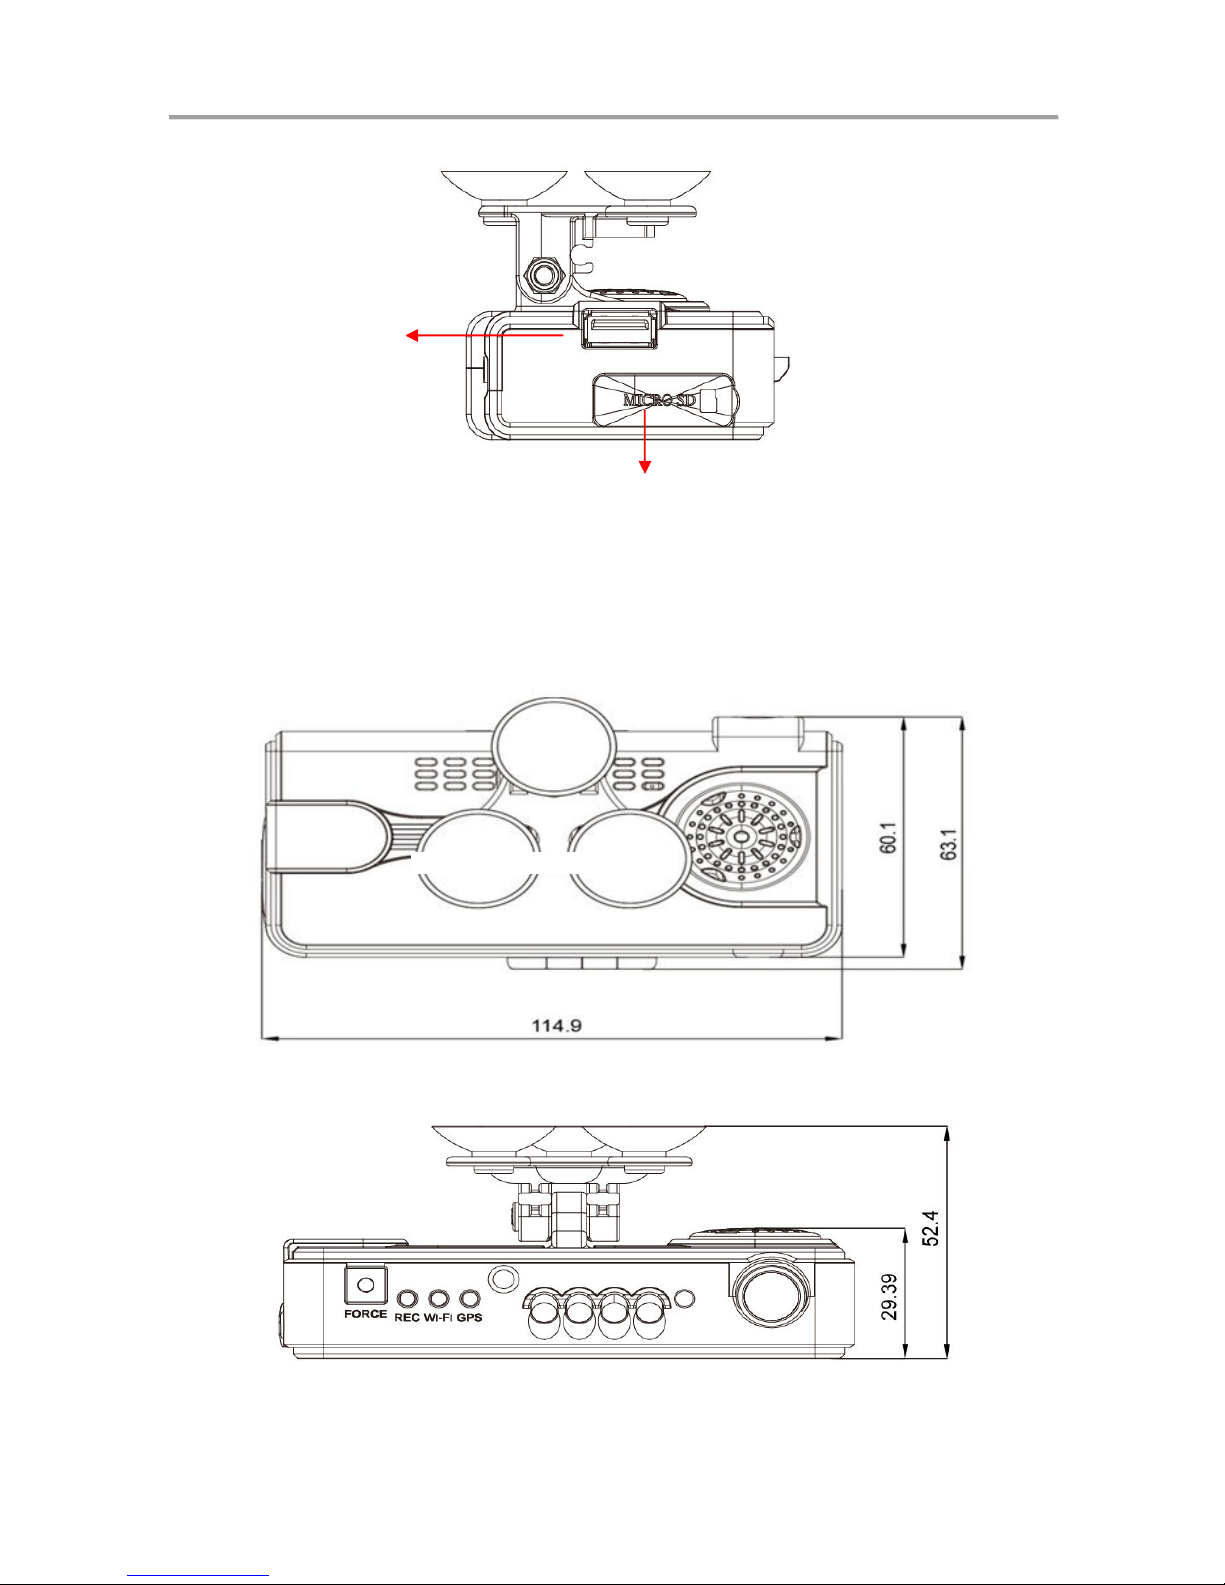
E.
Product Dimension
Unit:millimeter
USB Port / WiFi Dongle
MICRO SD Card Slot
Page 12
Vehicle video recorder user manual
6
F.
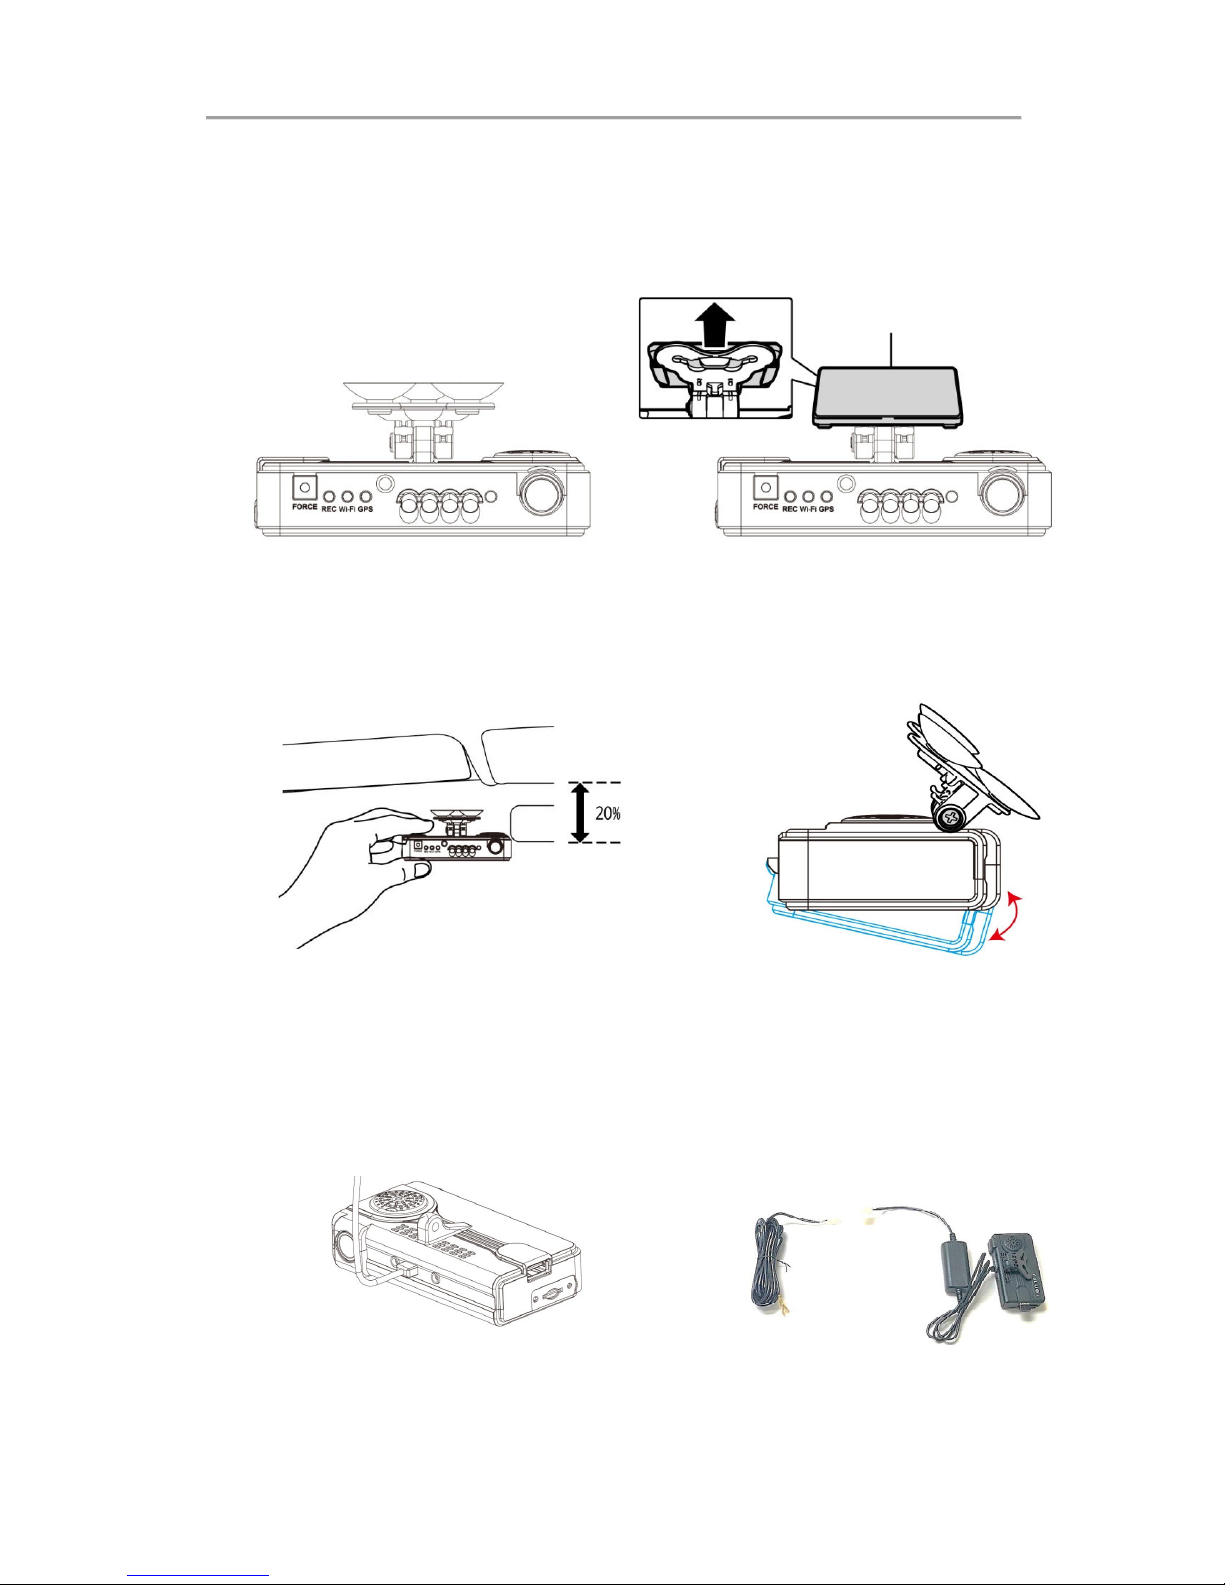
Installation
1.
Use「suction cup」or「Double-sided adhesive」install device on vehicle
front windshield.
2. Set up the system in proper
position
3.
Adjust the
camera
view
to
desired angle by loosening the
bracket screw
4. Connect the power cable from the
VDR760 to the extension cable square
plug. From the ext. cable, connect to
the wires to the vehicle fuse
Double
-
sided adhesive
Page 13
Vehicle video recorder user manual
7
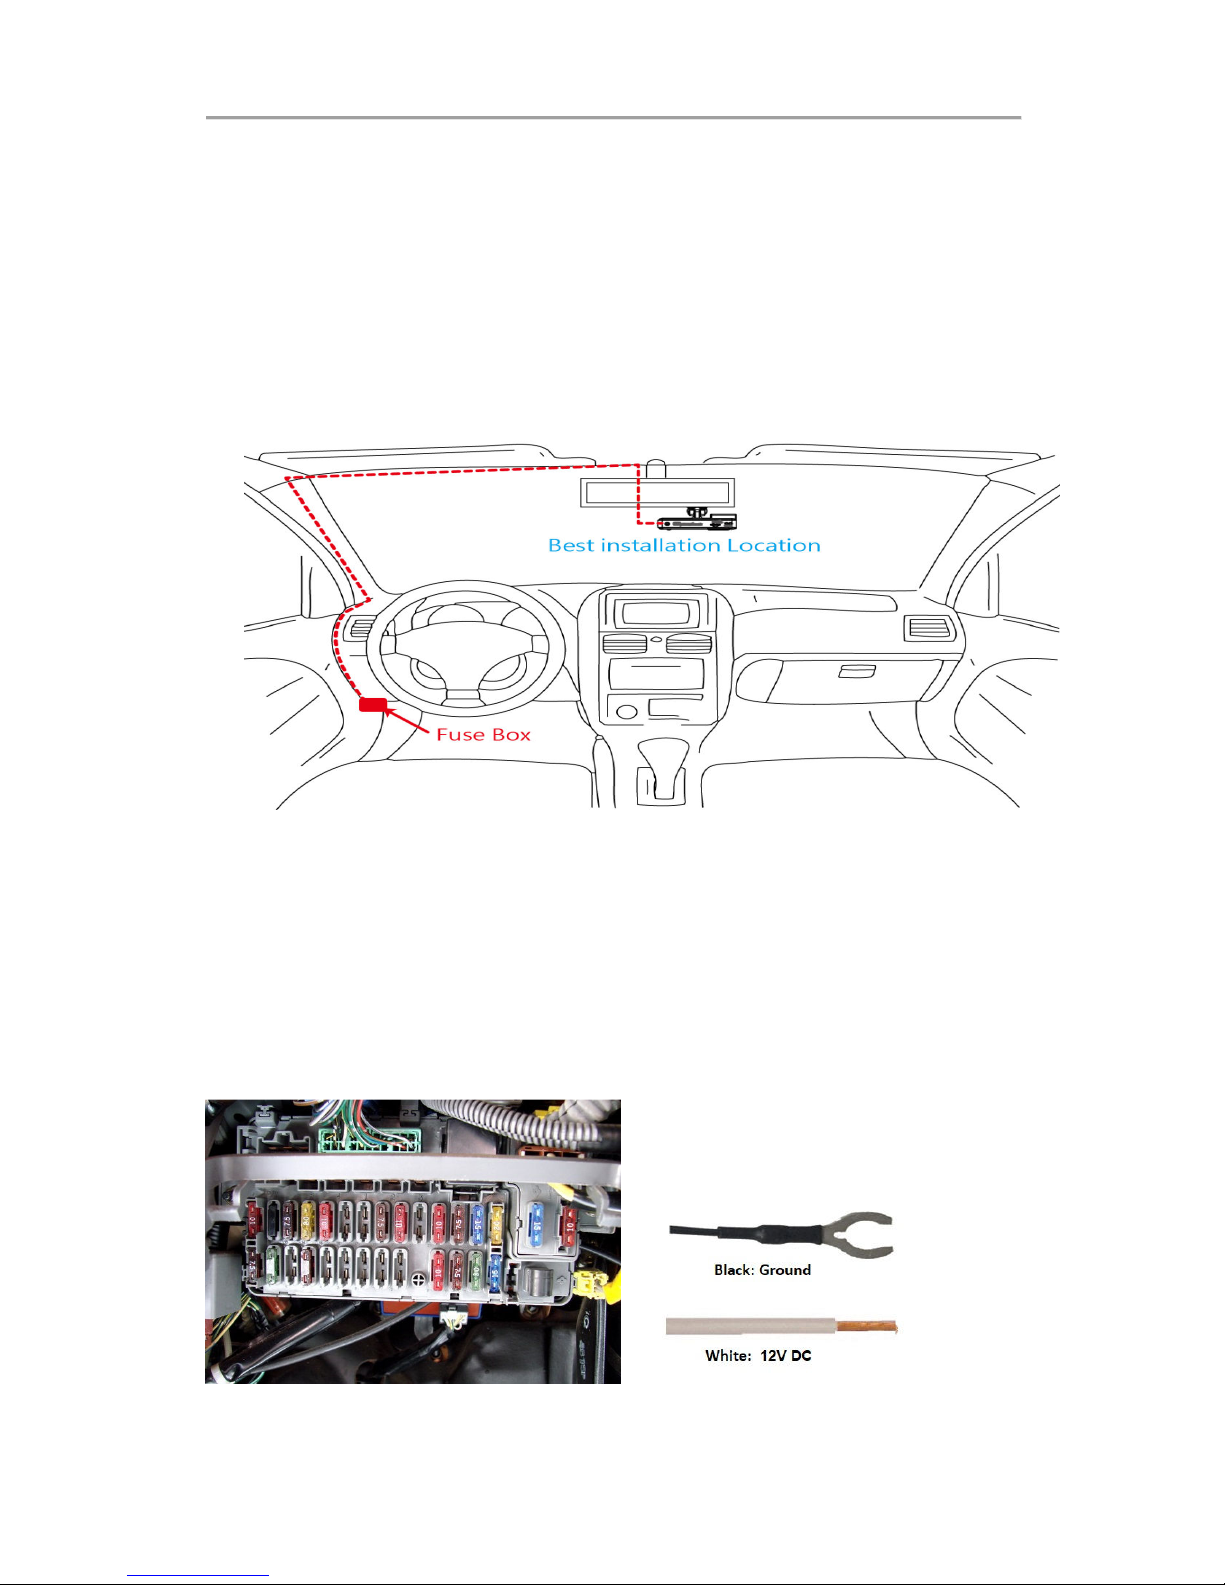
6. Device wire installation diagram. During the wire installation, avoid
set wire on left side above GPS. Set wire through device front hole to
vehicle ceiling to get better GPS signal.
VDR requires 2 wires - WHITE (12V DC) and Black (Ground) for
installation. Use the power cable included with the system.
Do not modified the power cable or remove the inline power box
included with the VDR system.
Page 14

Vehicle video recorder user manual
8
Notices
(a) GPS positioning accuracy may be affected by the installation
position, sun, environment or weather condition
(b) For video clarity, install device in the wiper washable area
(c) Tinted window film with metal components may lead to GPS
signal interference
(d) Infrared (IR) start-up time and off time depends on the light
intensity, which affected by the installation location, sun visor
and other factors
(e) The day and night mode with a delay of about 30 seconds
(f) Before using the memory disk, please format the disk first via
the VDR-760 player. If not, device will automatically erase all
data in the memory disk before recording, then recording as
default setting
(g) To ensure recording quality, please do not use adapter card with
Micro SD card. Doing so may lead to bad connection due to
shock and vibration
(h) Memory card has life span. To ensure working correctly, please
test and format the memory card on VDR-760 Player regularly
(i) Use new memory card insert device, it will format proprietary
files format which will take about 2 minutes
(j) After SD card format by device or PC player, 8G, 16G, 32G, 64G
or 128G SD card all showing 77.5 - 80.5MB storage space
under Windows system, other storage space as hidden files,
user have to play video records by VDR-760 player. The
restore SD card also have to use the VDR-760 player refer to
format/restore memory card chapter.
(k) The collision and high frequency vibration may cause physical
damage to the memory card magnetic field, resulting in video
intermittent or unable to playback. It is recommended to
perform regular inspection and backup important data.
(l) If the device power consumes more than the standard USB
output 500mA, the computer power supply may be insufficient,
and require additional DC 5V / 1A above the power supply wire.
(m)
Device video output normally divided into two systems: NTSC or
PAL. Ensure using suitable system according to different devices
and monitors.
Page 15
Vehicle video recorder user manual
9
G.
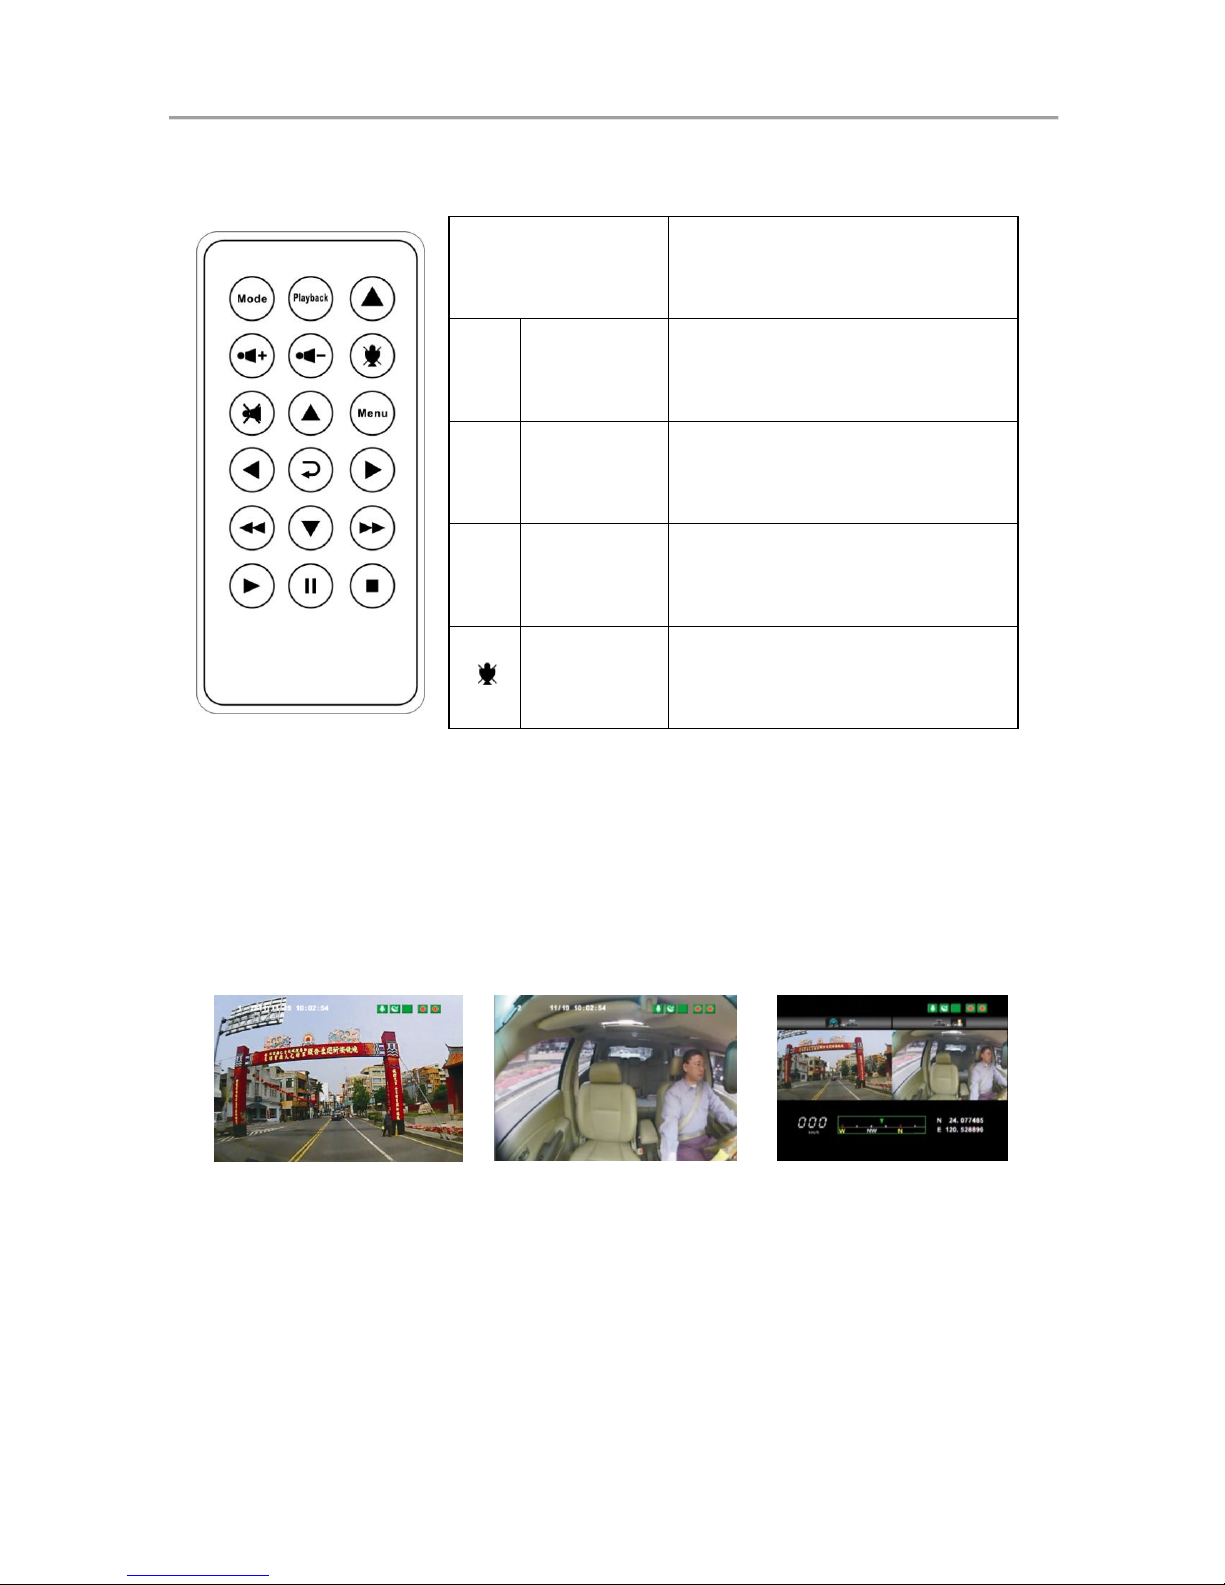
Remote controller
Buttons Functions
▲
Force
recording
button
Manually establish a
recorded file which cannot
be overwritten
Mode
Mode
button
Full screen / Half screen
spilt shift
Menu
Menu
button
show the device firmware
version & server ip
information
Mute
button
Audio recording On/Off
◆Introduction of OSD Interface: (Video output from connecting TVOUT line to the device):
( 1 ) Press Mode button in Live view interface switch CH1 front
camera, CH2 in-cab camera and dual front and in-cab camera
image as below:
Front camera
image(CH1)
In-cab
camera
image(CH2)
Front &
In-
cab
camera image
display
Page 16
Vehicle video recorder user manual
10
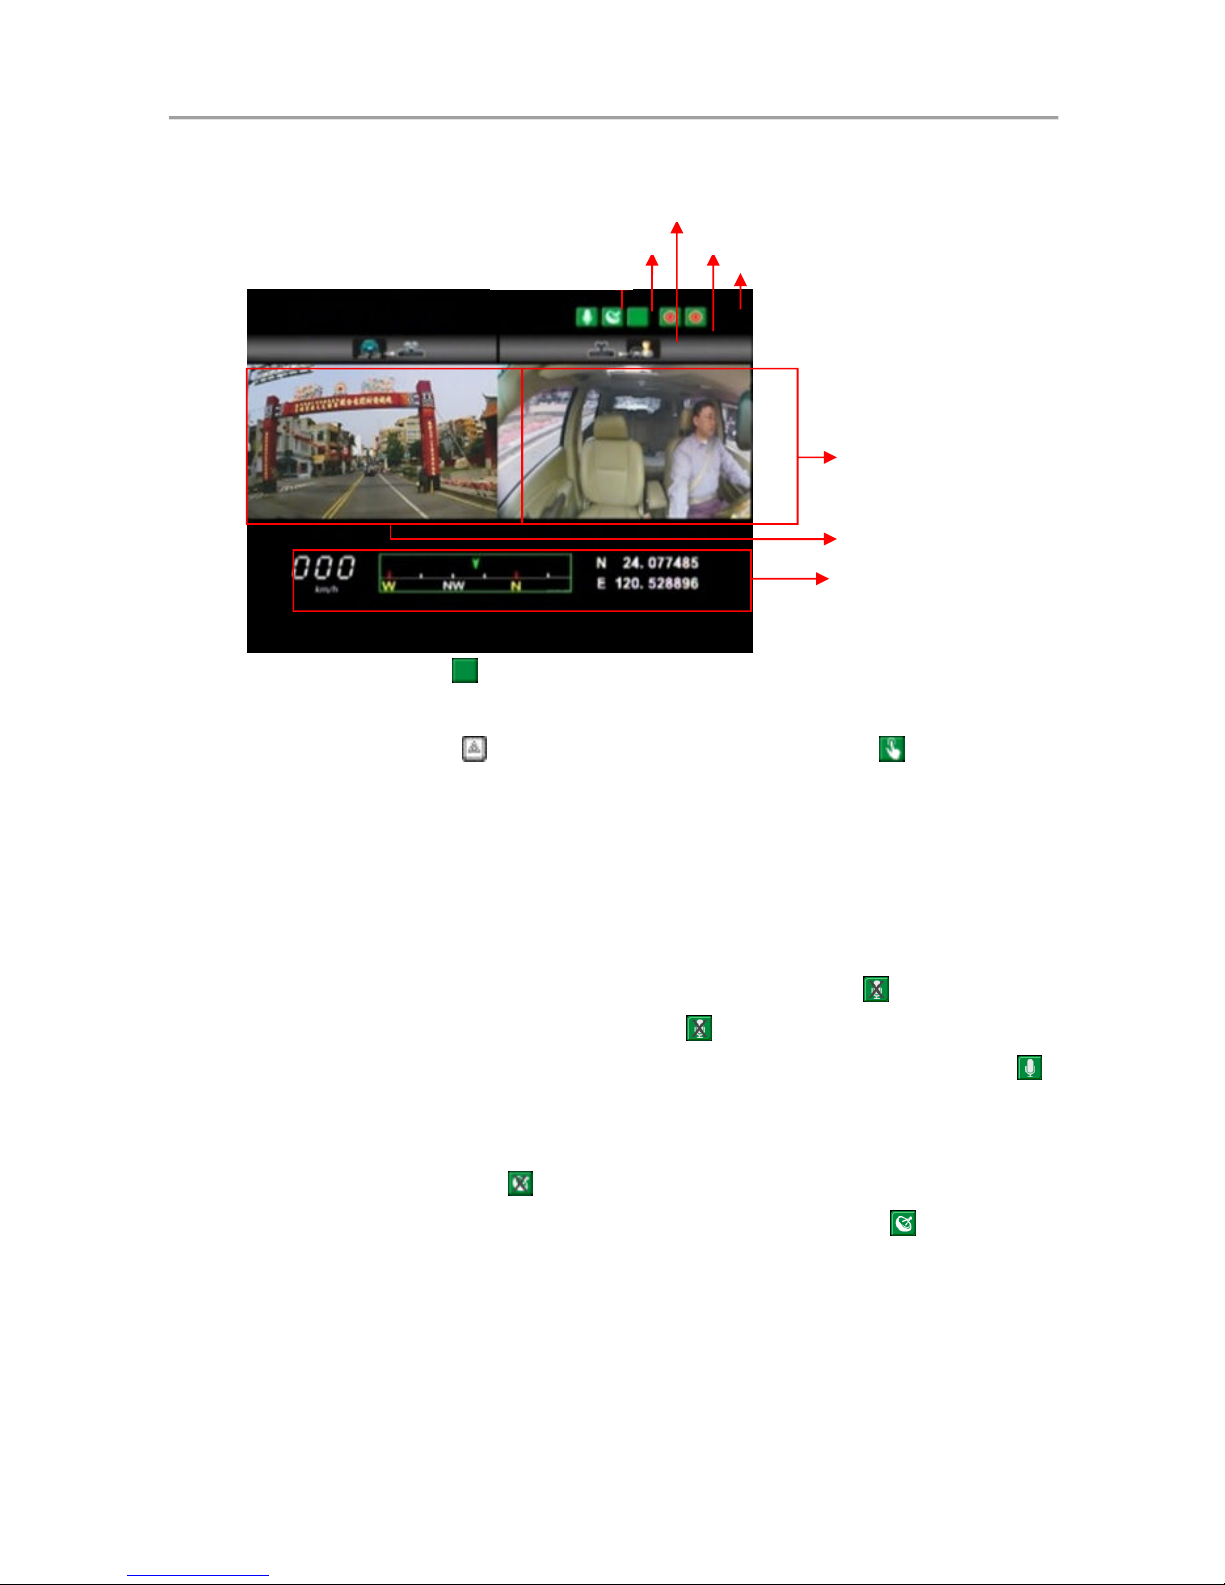
( 2 ) Illustration Description
1. Event Record: Appears in the top right side of LIVE screen, it
means that G-Sensor didn't receive abnormal signal. When you press
the record button from the remote control or click this icon at
the right top to force the machine to record manually.
2. Click Menu button on remote controller under LIVE screen to
display current software version.
3. In the LIVE screen you can choose whether open the recording or
not, click Mute button on remote controller, the icon will showing
on top right of LIVE screen, this icon stand for stop recording
audio, start and being recording the top right screen will showing
icon.
4. GPS display: When icon appears at the top right of the LIVE
screen, it means there is no GPS signal; when the icon appears in
the top right of the LIVE screen, it indicates that the GPS is working.
* The boot screen and LIVE screen image may change due to software update or
revision without any notice.
H.
Recording and stop recording
Front camera
In-cab camera
GPS connection
A
udio record On
G-Sensor event
Front camera image (CH1)
In-cab camera image (CH2)
GPS drive information
Page 17
Vehicle video recorder user manual
11
When the device powers on, the screen will show a welcome
message if connected to TV-Out. Software will display current
software version as「Firmware Version: XXXX」 before going into
LIVE screen.
a. Power on/ Start recording:
Power on, device boots up after approx. 1 minute. The red light flash
indicate device being recording.
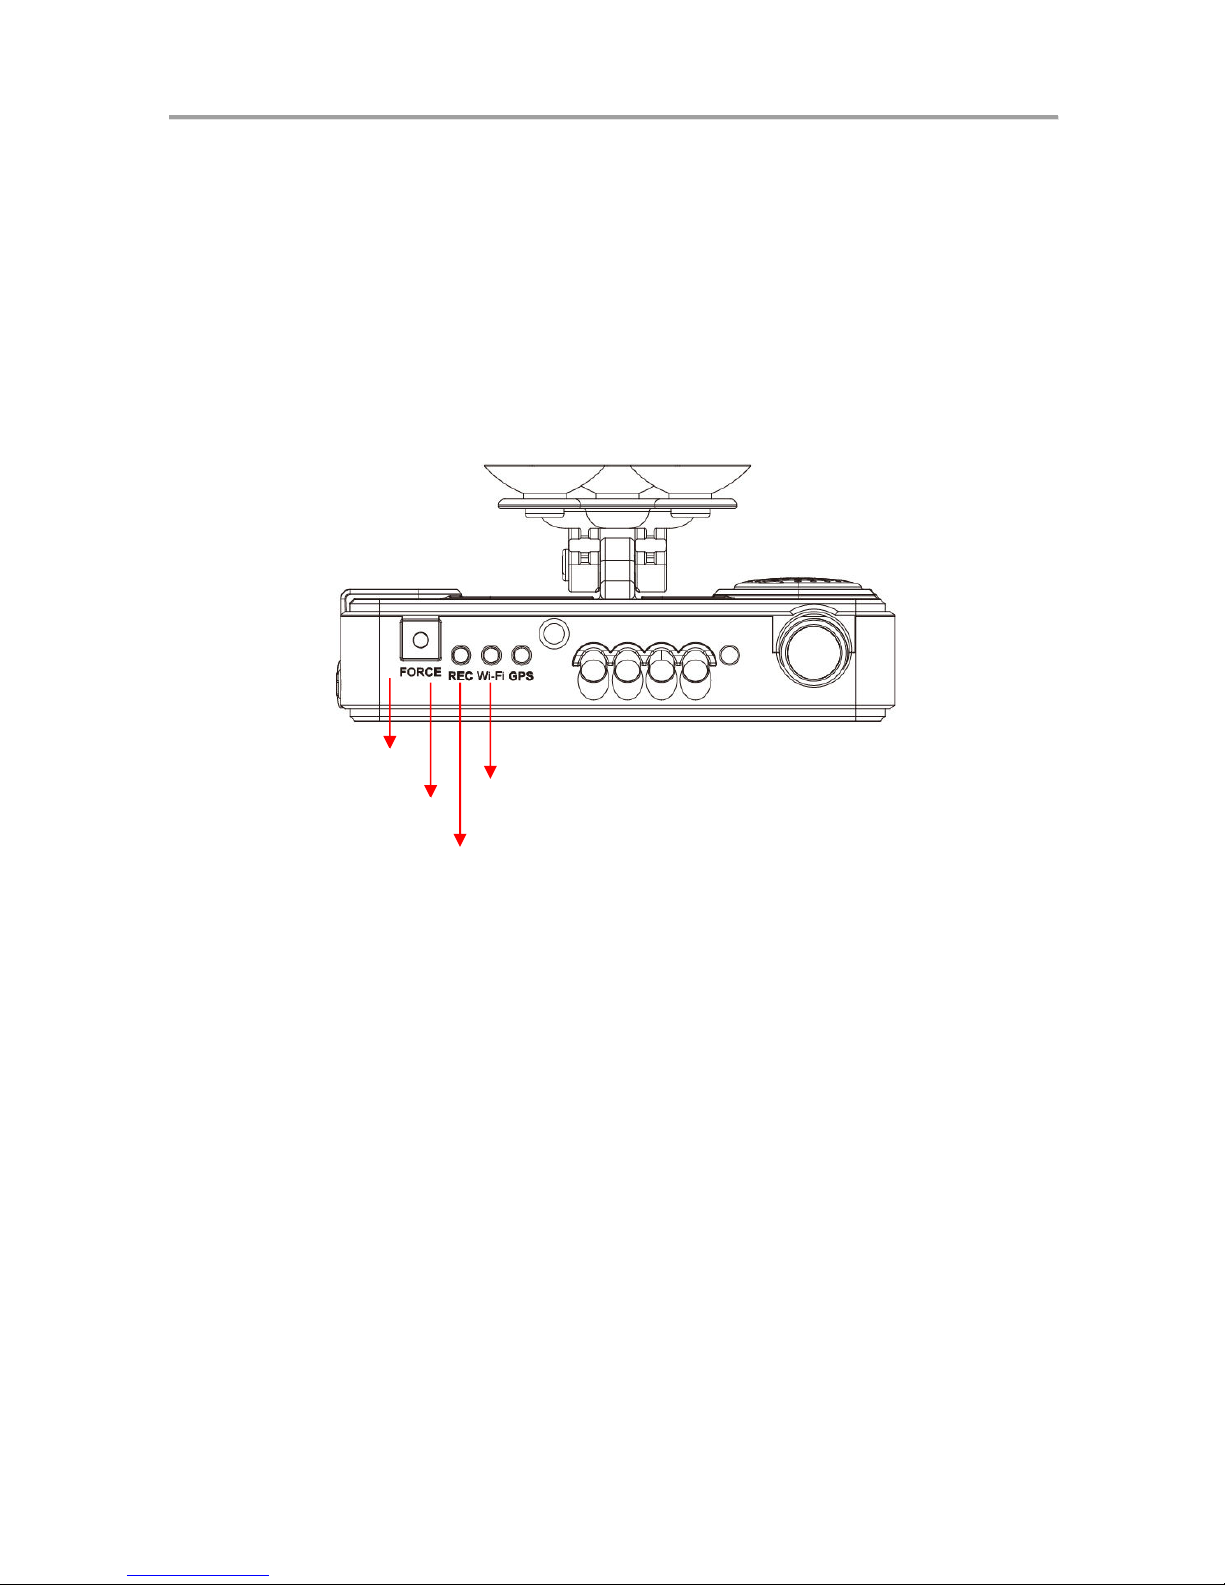
Light indicator:
●
FORCE
: Force recording button (Manual Event Bookmarking)
REC Red light: Steady ON: Recording, OFF: Not recording;
Flashing: Event recording
●
Wi-Fi Blue light: Steady ON: Connected; OFF: Not connected.
●
GPS Green light: Flashing: Searching; Steady ON: Connected.
b. Power Off/ stop recording
Power off and then remove the memory card to read the recording file in
computer.
Recording
/
Red
WiFi connection/Blue
Force recording button
GPS position/ Green
Page 18
Vehicle video recorder user manual
12
I.
Playback video records
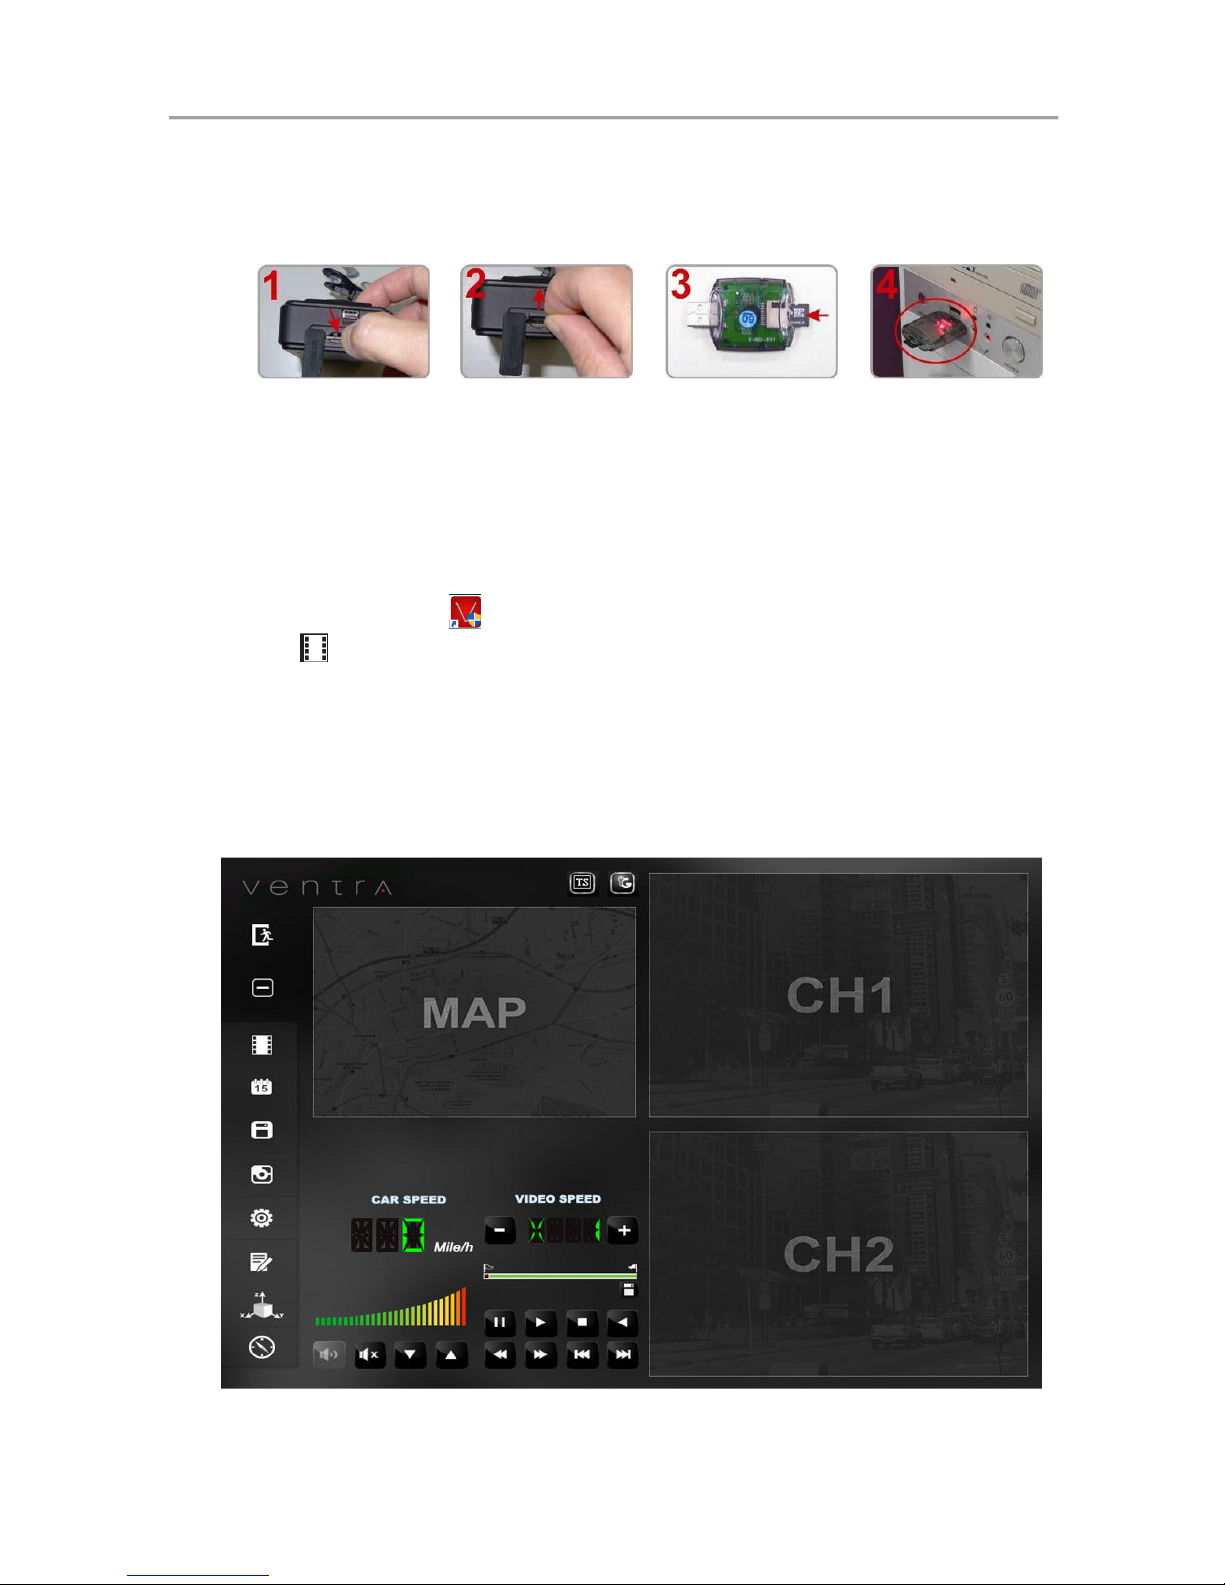
How to read the files from Micro SD card?
Remove the
vandal resistant
and gently press
the Micro SD
card with finger.
Remove the card
Insert the Micro
SD card into the
card reader
(please make
sure the
direction is
correct).
Connect the card
reader to the PC
and use the
software in CD
to play the files.
1. Video playback
Start the program (you can locate it in the disk),
Press button, and choose the memory card player list to play the
files.
Note: Direct X 9.0 above is required for this program
2. Main Screen
PC Player interface
Page 19
Vehicle video recorder user manual
13
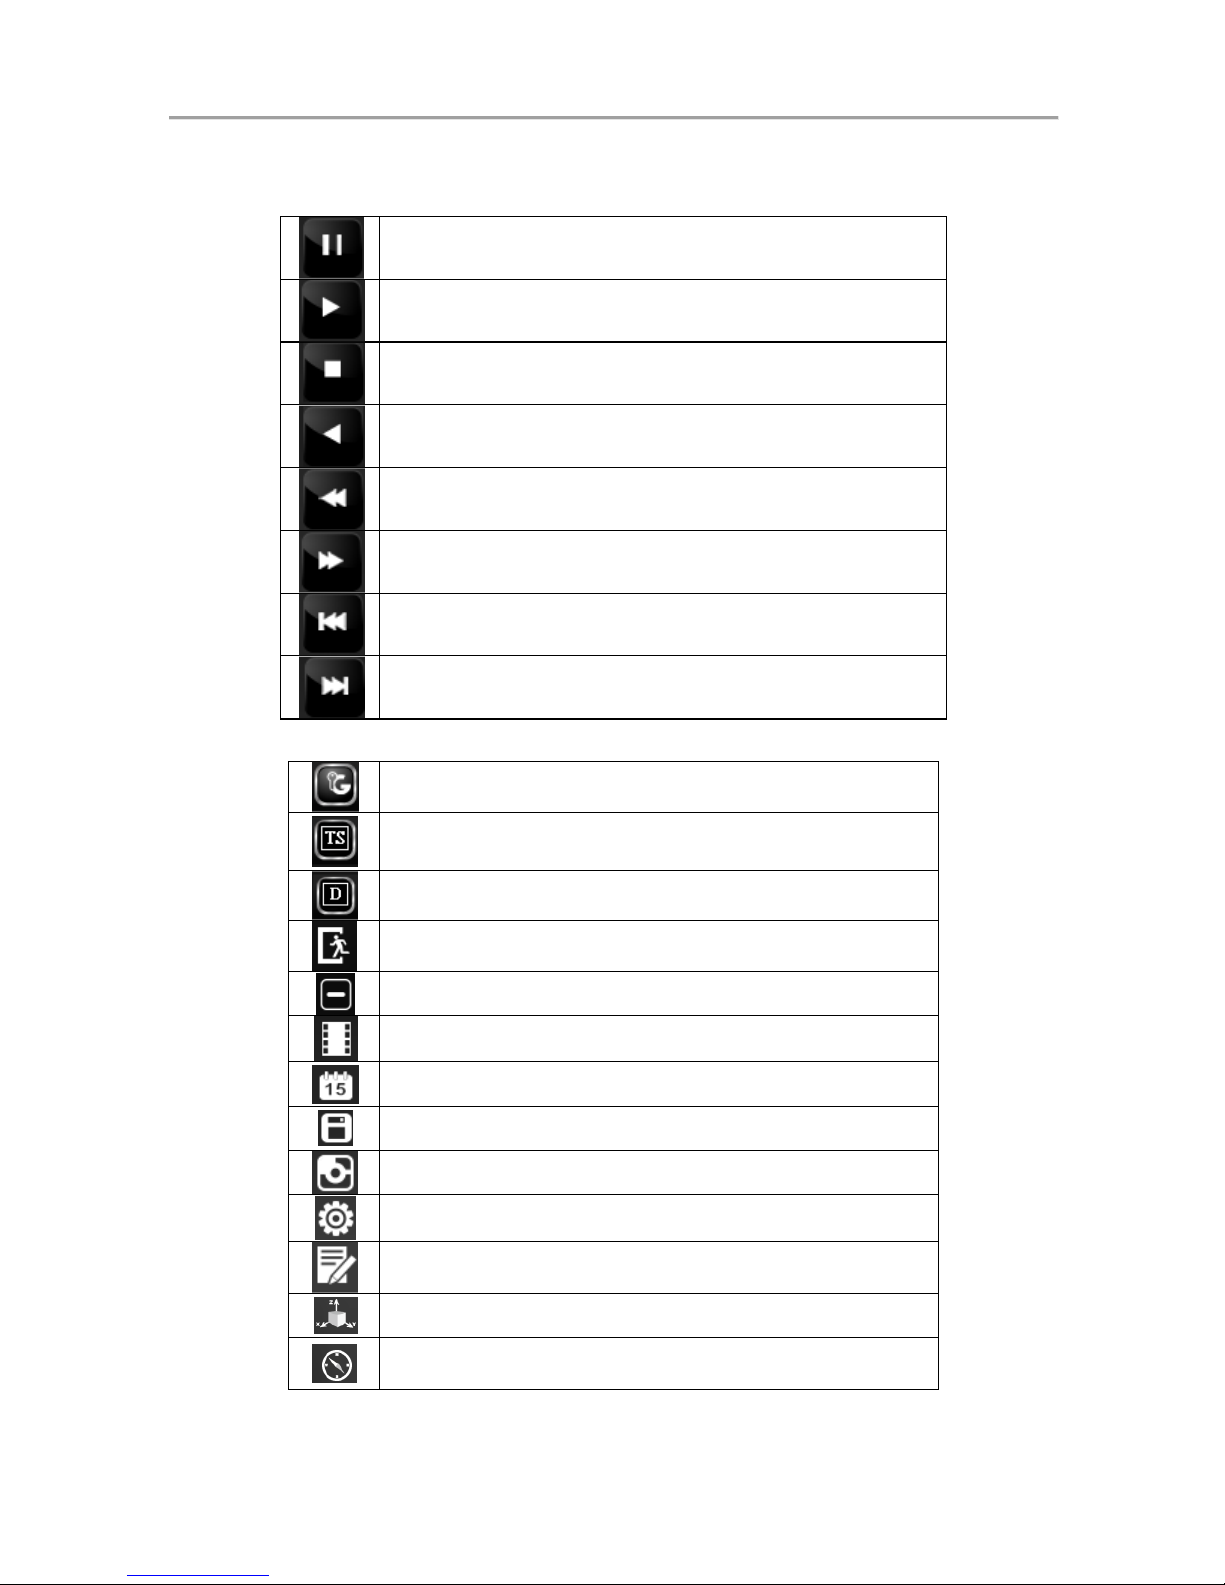
Control Interface Description:
Pause
Play
Stop
Reverse
play previous frame
Play next frame
Play previous file
Play next file
Google Map API Key
.TS
File
(uploaded event video to server, may not
be applicable to all customers)
.SD File (Native recorded file on SD card)
Close the PC Player
Minimize the PC Player
Playback
Calendar
Backup / Save Video
Snapshot
Configuration
Format
G-Sensor Graph
Compass
Page 20
Vehicle video recorder user manual
14
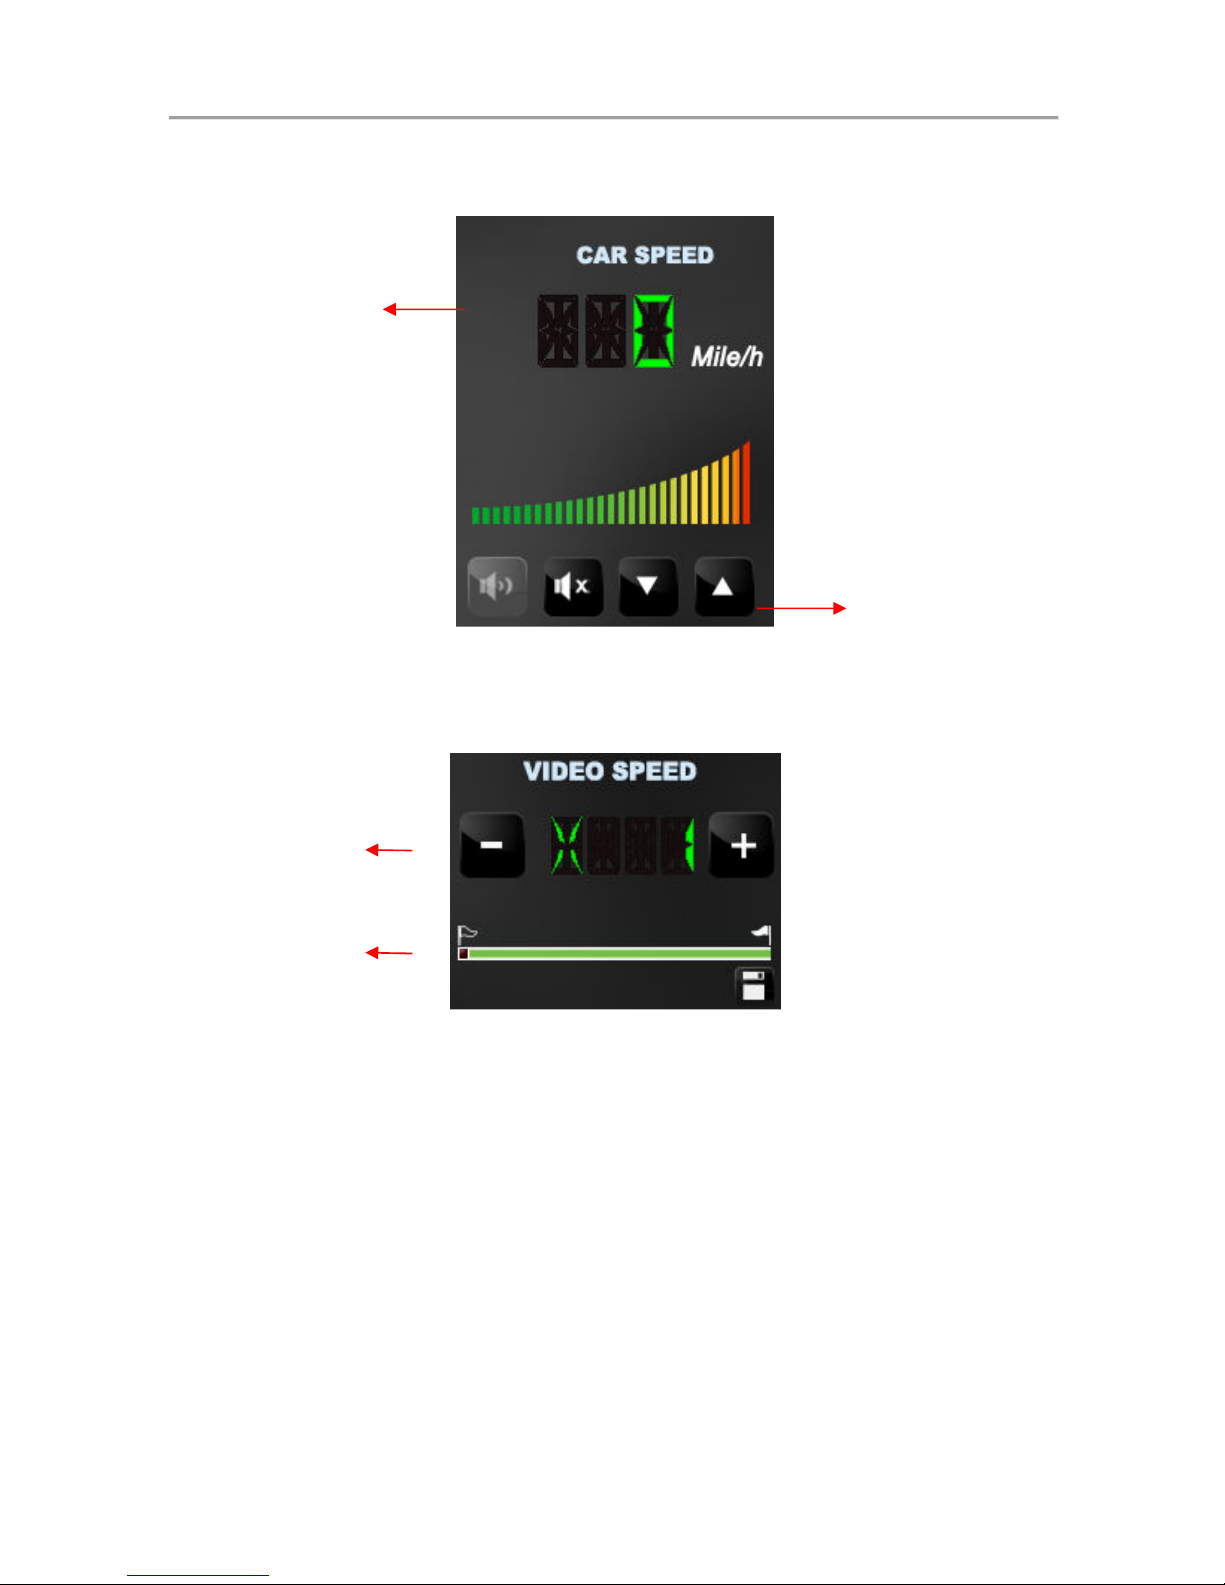
a. Speed & Volume
b. Video Playback
(1) Play BAR: Move the play BAR by mouse
The flag above BAR can be move to backup video files
(2)Video speed: Support 2x, 4x, 8x fast forwarding and -2x, -4x, -
8x slow play mode.
Status BAR
V
ideo
Speed
Speed
Volume
control
Page 21
Vehicle video recorder user manual
15
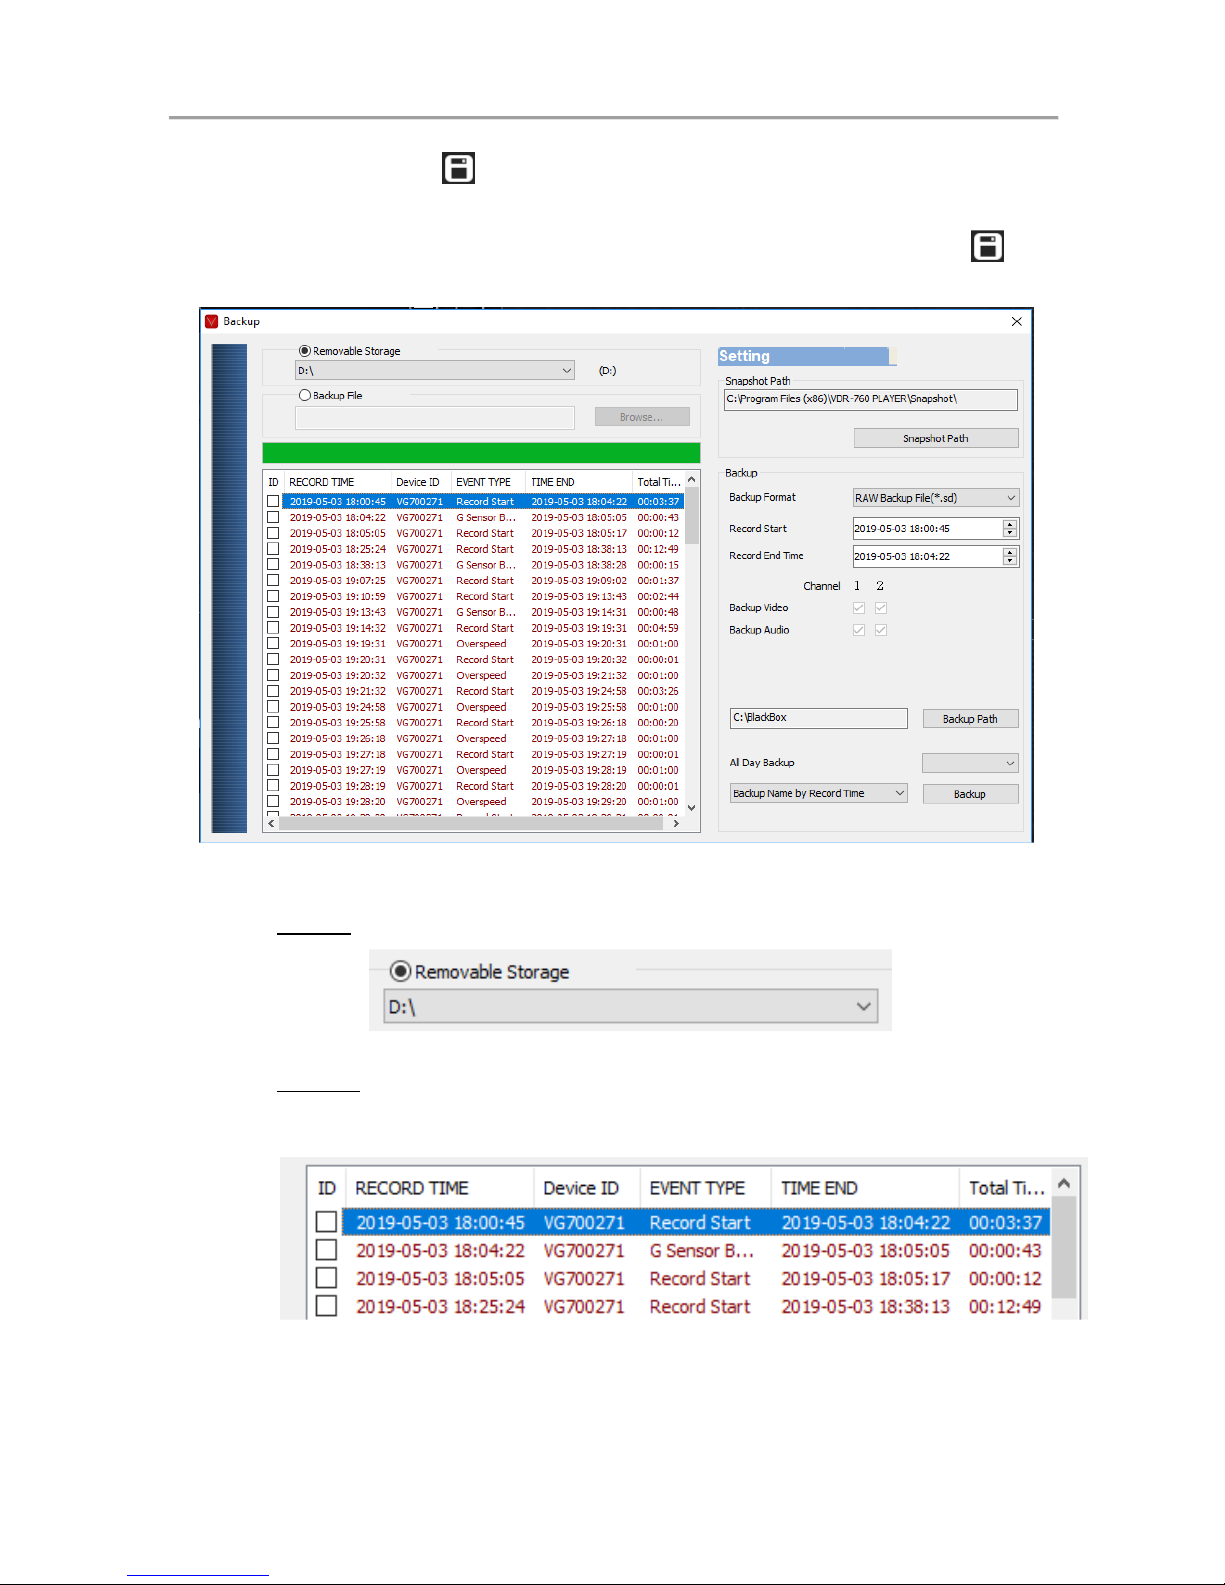
Disk Backup
Save the recorded files from memory card to PC, click the
button and it will pop up backup window as below.
Step 1: select the SD card location
Step 2: select the records to backup
Page 22
Vehicle video recorder user manual
16
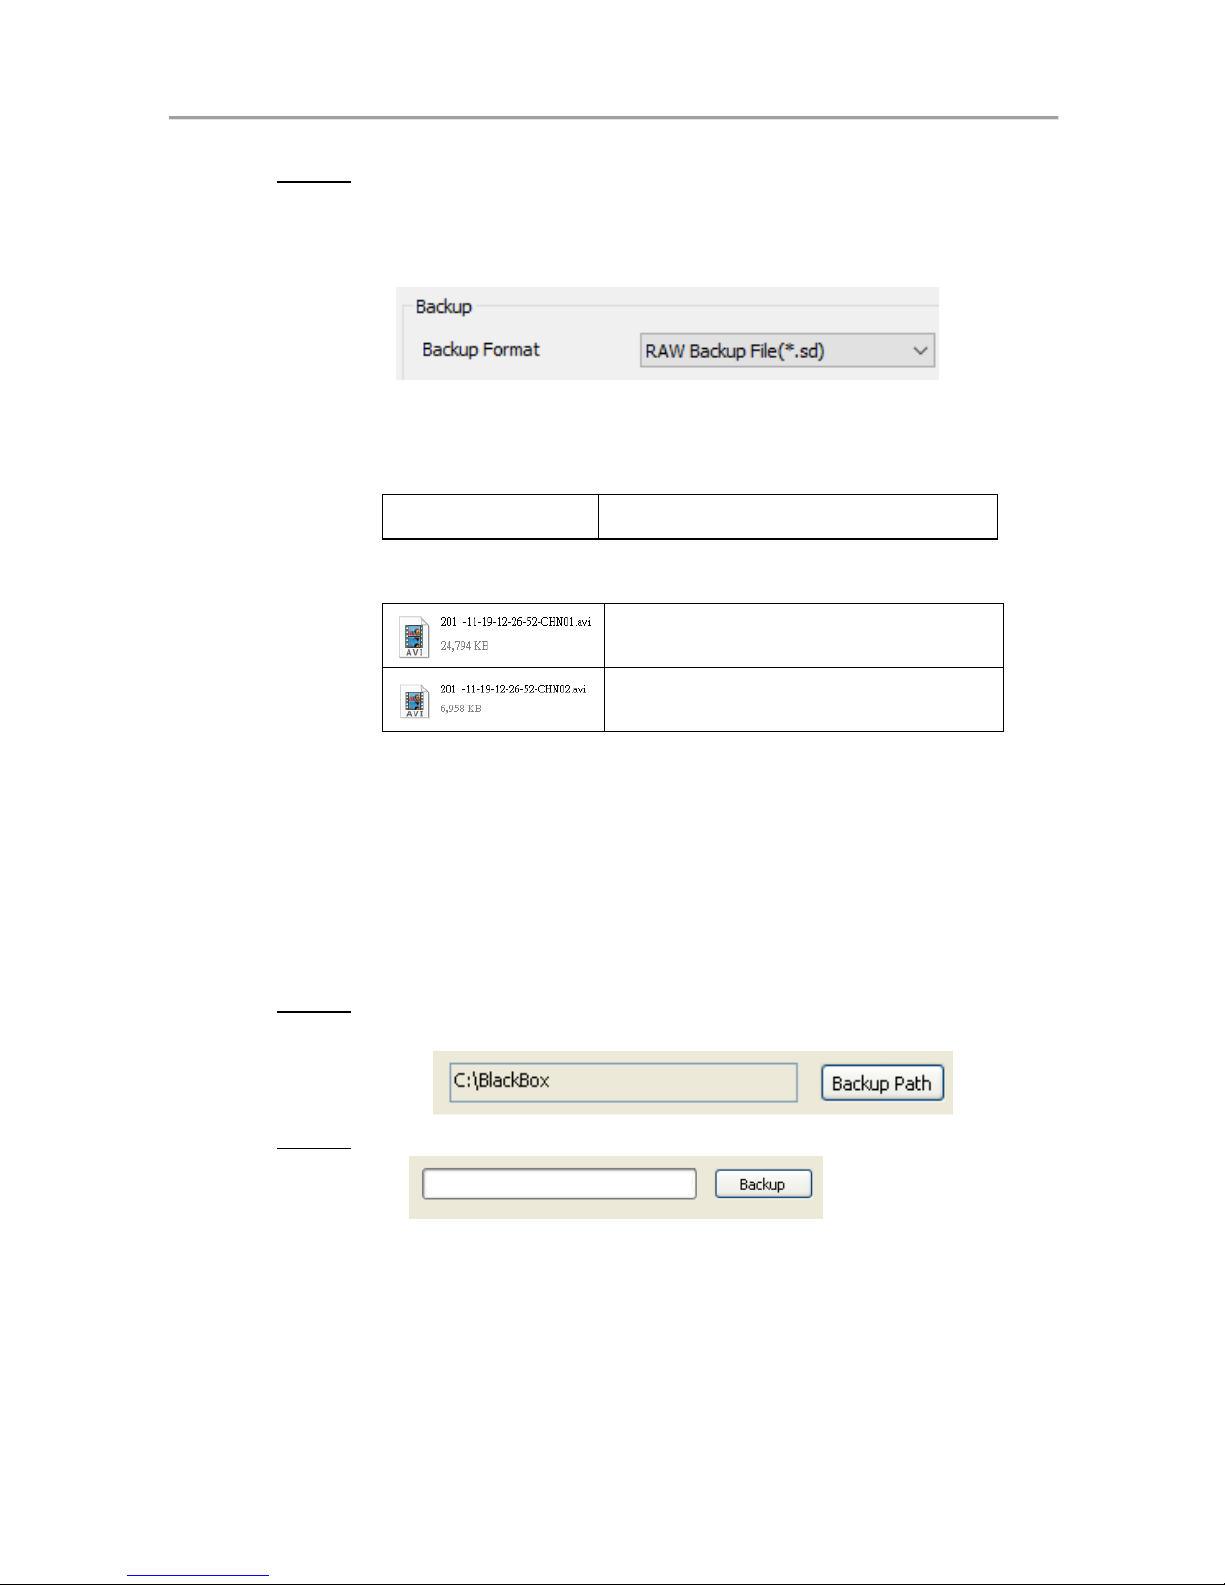
Step 3. Choose the backup file format
(1)Micro SD Card Backup (*.sd)
(2)AVI File Backup (*.avi)
Backup format:
(1) Micro SD card backup format
Micro SD Card File type (*.sd)
(2)AVI File Backup (*.avi)
CH 01 is front camera recording
The file name is *.avi.
CH 02 is in-cab camera
recording The file name is *.avi.
★Note: If backup by original format of Micro SD card, the
file recorded with location of GPS (longitude and
latitude), speed and G-SENSOR. If backup by the
format of *.avi, the file recorded date, video and
audio. We suggest to backup via original format of
Micro SD card.
Step 4. Backup Path: Select your backup destination (e.g.:
C:\blackbox)
Step 5.Start backup
Page 23
Vehicle video recorder user manual
17
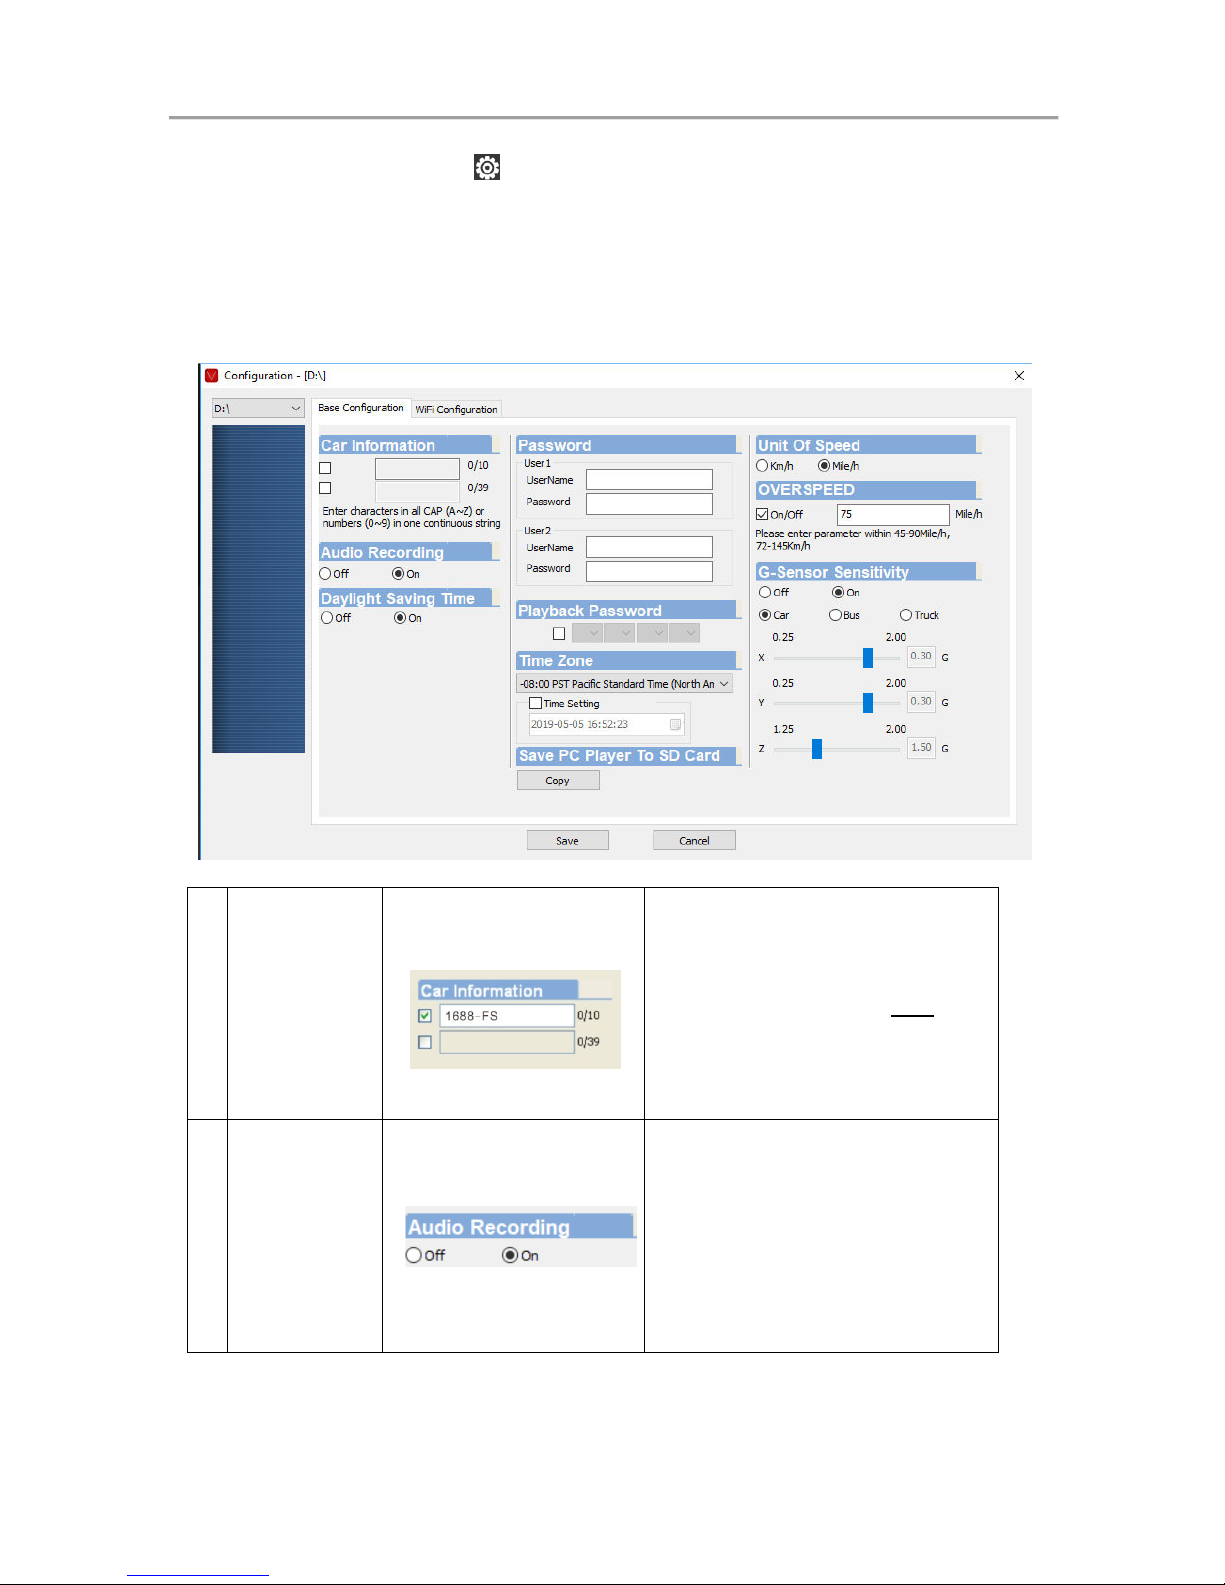
Configuration
Insert memory card into adapter card before recording, and then
plug in adapter card to PC USB slot. Click and run software to
setting recording method, after setting complete, insert the
memory card back to device and continue recording.
1.
Car
Information
The vehicle or driver ID can set
and recorded.
Enter characters in all CAP (A ~
Z) or numbers (0 ~ 9) in one
continuous string.
2.
Audio
Recording
Audio recording.
On: Enable audio recording
Off: Disable audio recording
Page 24
Vehicle video recorder user manual
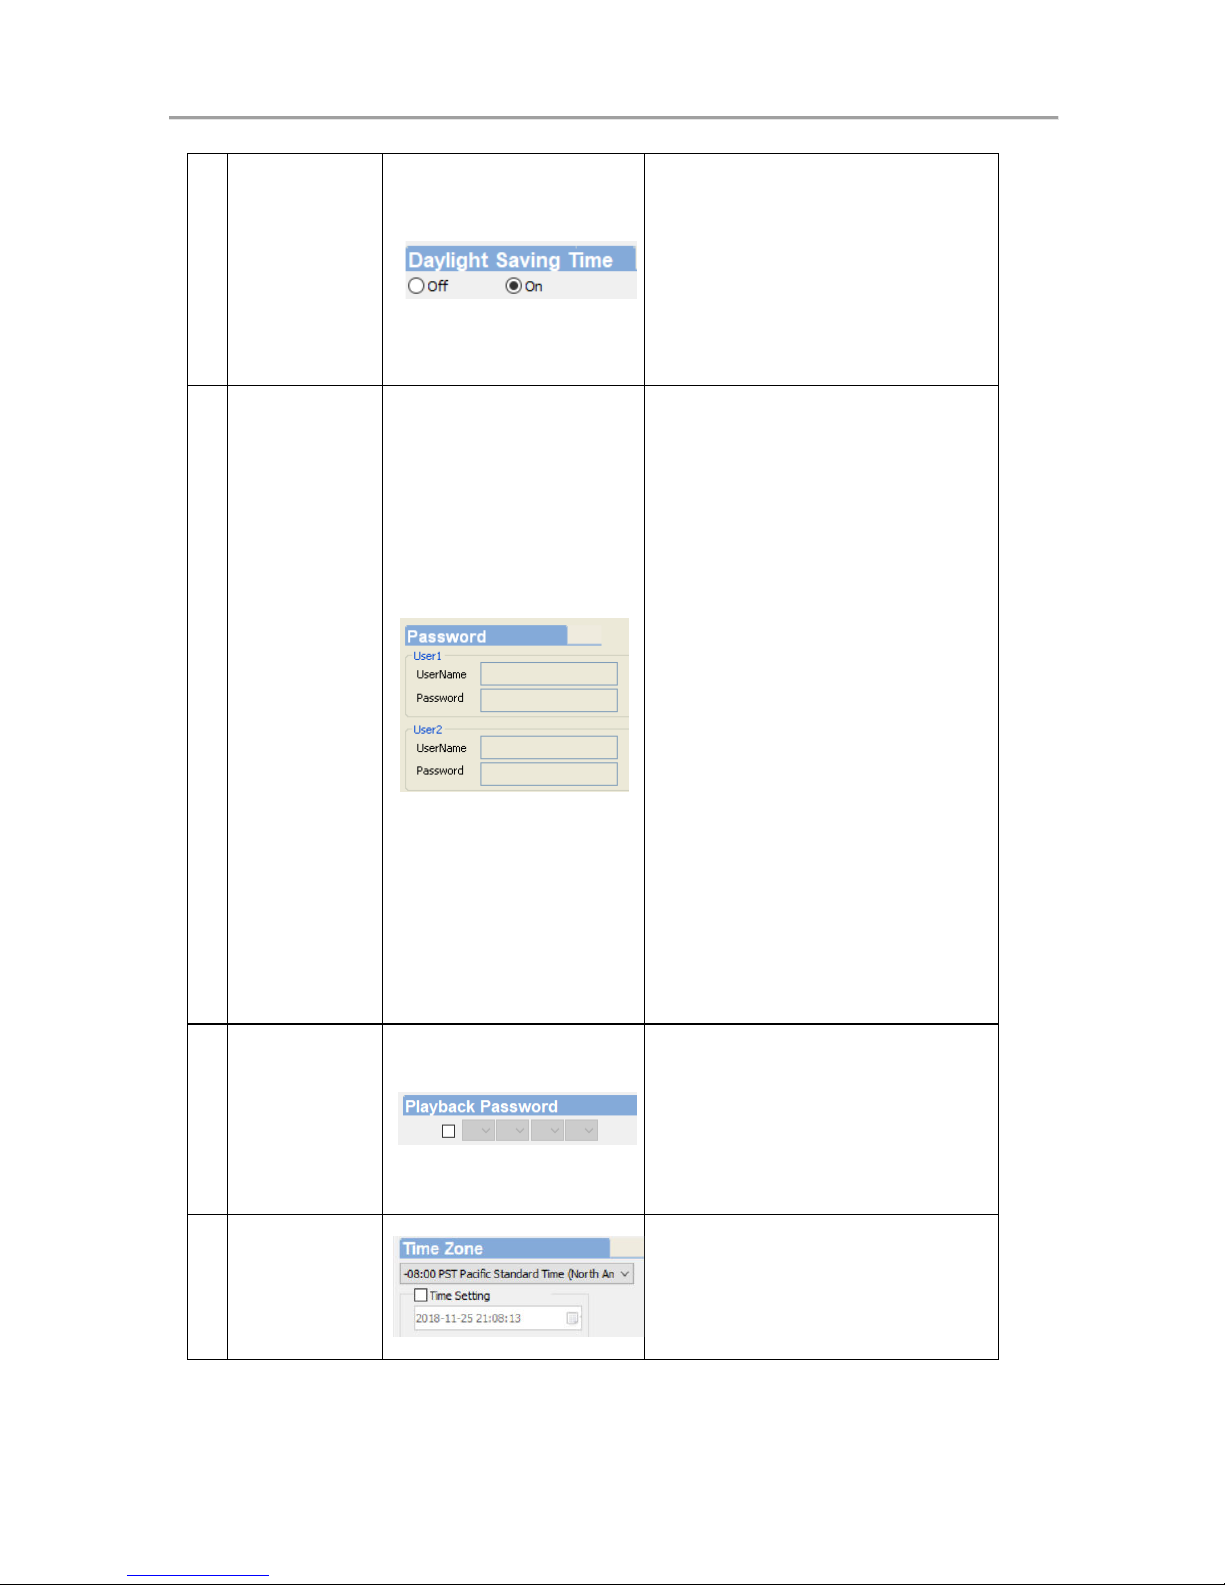
18
3.
Daylight
Saving Time
Enable or Disable Daylight
Saving Time. If enabled,
system will automatically
adjust based on calendar
4.
Password
Assign Password to SD card
to prevent unauthorized
access.
Set password to 15
characters max, for
example:
123456789123456
After setting the password,
it is required to enter
password to access the
playback file, setting,
formatting memory card.
★ Note: Please DO NOT
lose password. There is
no master password to
reset the card.
5.
Playback
Password
Encrypted memory card to
prevent unauthorized
access the vehicle video
recorder. Set password to a
four figures number from 0
to 9.
6.
Time zone
Set time zone for the VDR
system
Page 25
Vehicle video recorder user manual
19
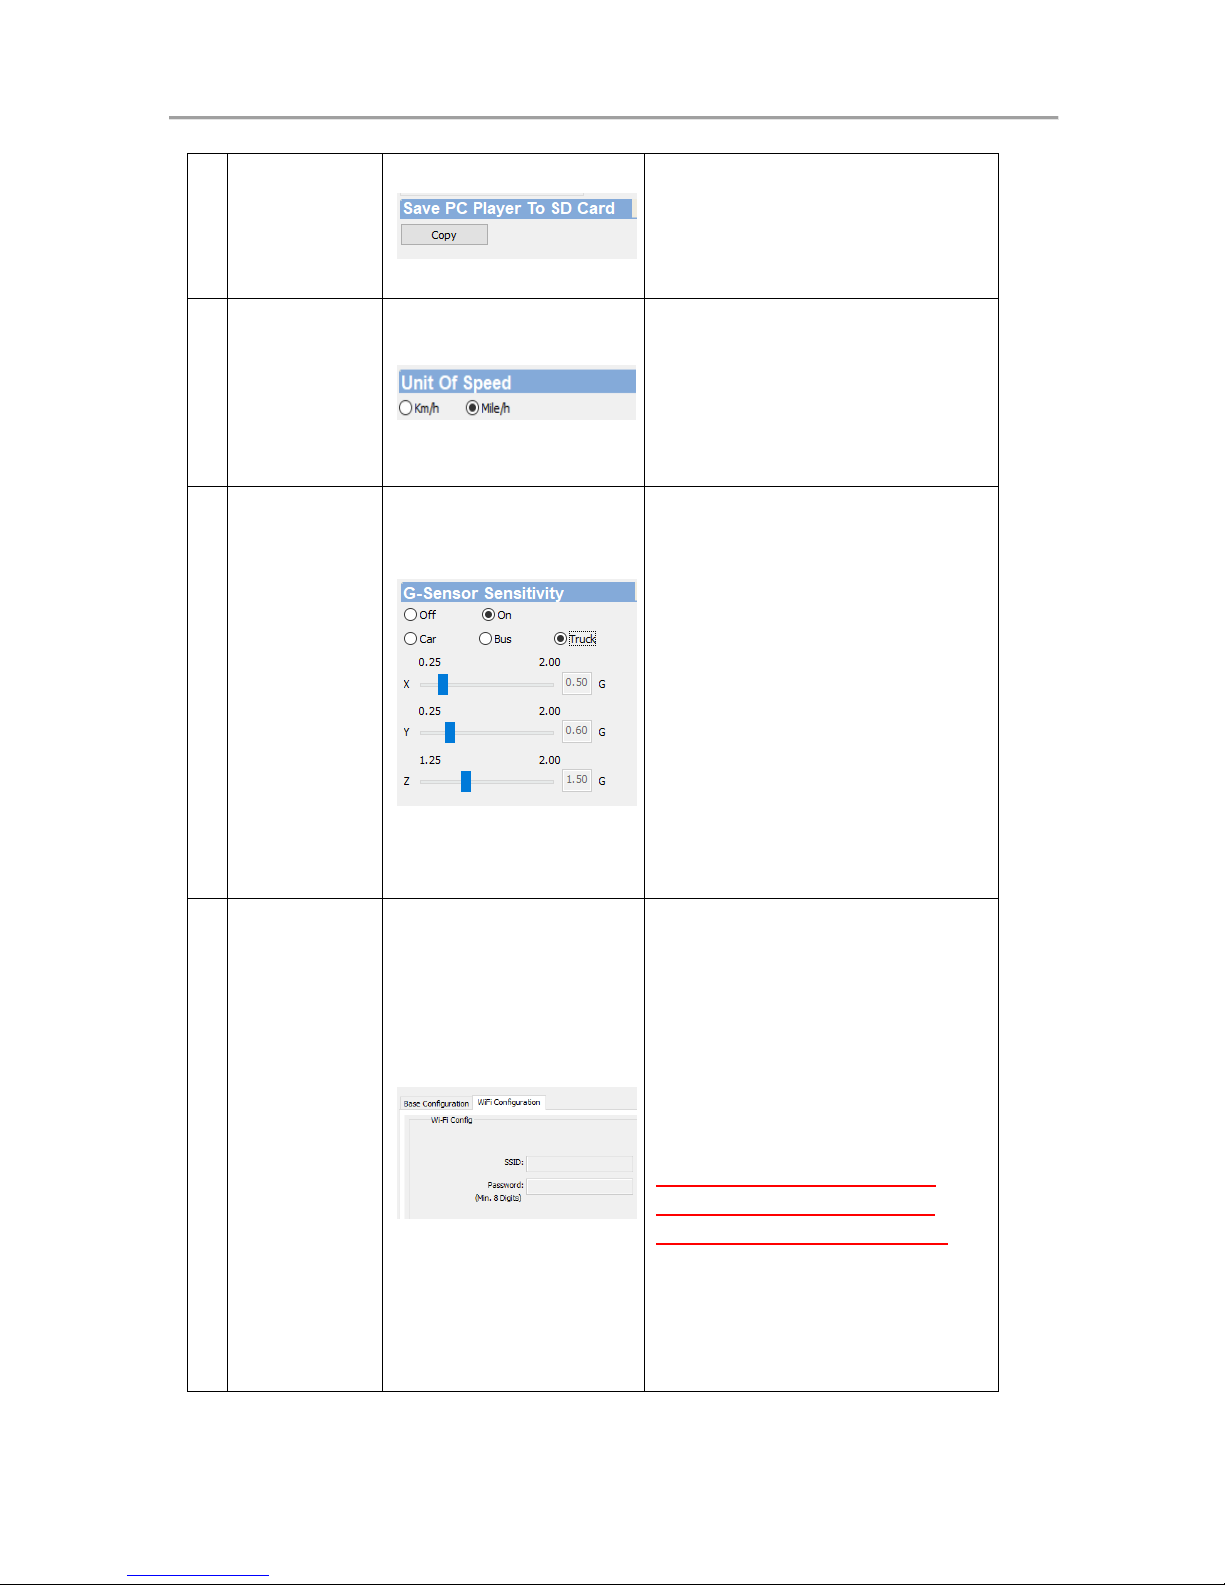
7.
Save PC
Player To SD
Card
Save a copy of PC player to
the SD card
8.
Unit of
Speed
Km/h: kilometer per hour
Mile/h: Mile per hour
★ Note: 1 KM=0.6214 mile,
1 mile=1.6093KM
9.
G-Sensor
Sensitivity
G Sensor: On /Off
Off: Disable G Sensor
Of: Enable G sensor
If disabled, VDR will not
detect impacts as Event.
Sensitivity of G-Sensor to
detect impact, collision and
condition. May need to
adjust based on vehicle
type and road conditions
10.
Wi-Fi
Setting
WiFi Setting is to program how
the VDR-760 will connect to a
an external hotspot such as
smartphone or Access Point
SSID: Enter name of Wi-Fi
SSID ID ( character and
number).
SSID should NOT contain
Hyphen (-) John-WFi or
apostrophe (‘) John’s WiFi
Password: Enter Wi-Fi
password
Page 26

Vehicle video recorder user manual
20
Snapshot Tool
While playing the recorded file, you can use this function to
snapshot the picture and save it into PC.
Default saving path for snapshot picture will be in /Snapshot
folder.
File format as *.bmp
Page 27
Vehicle video recorder user manual
21
J.
Format memory card
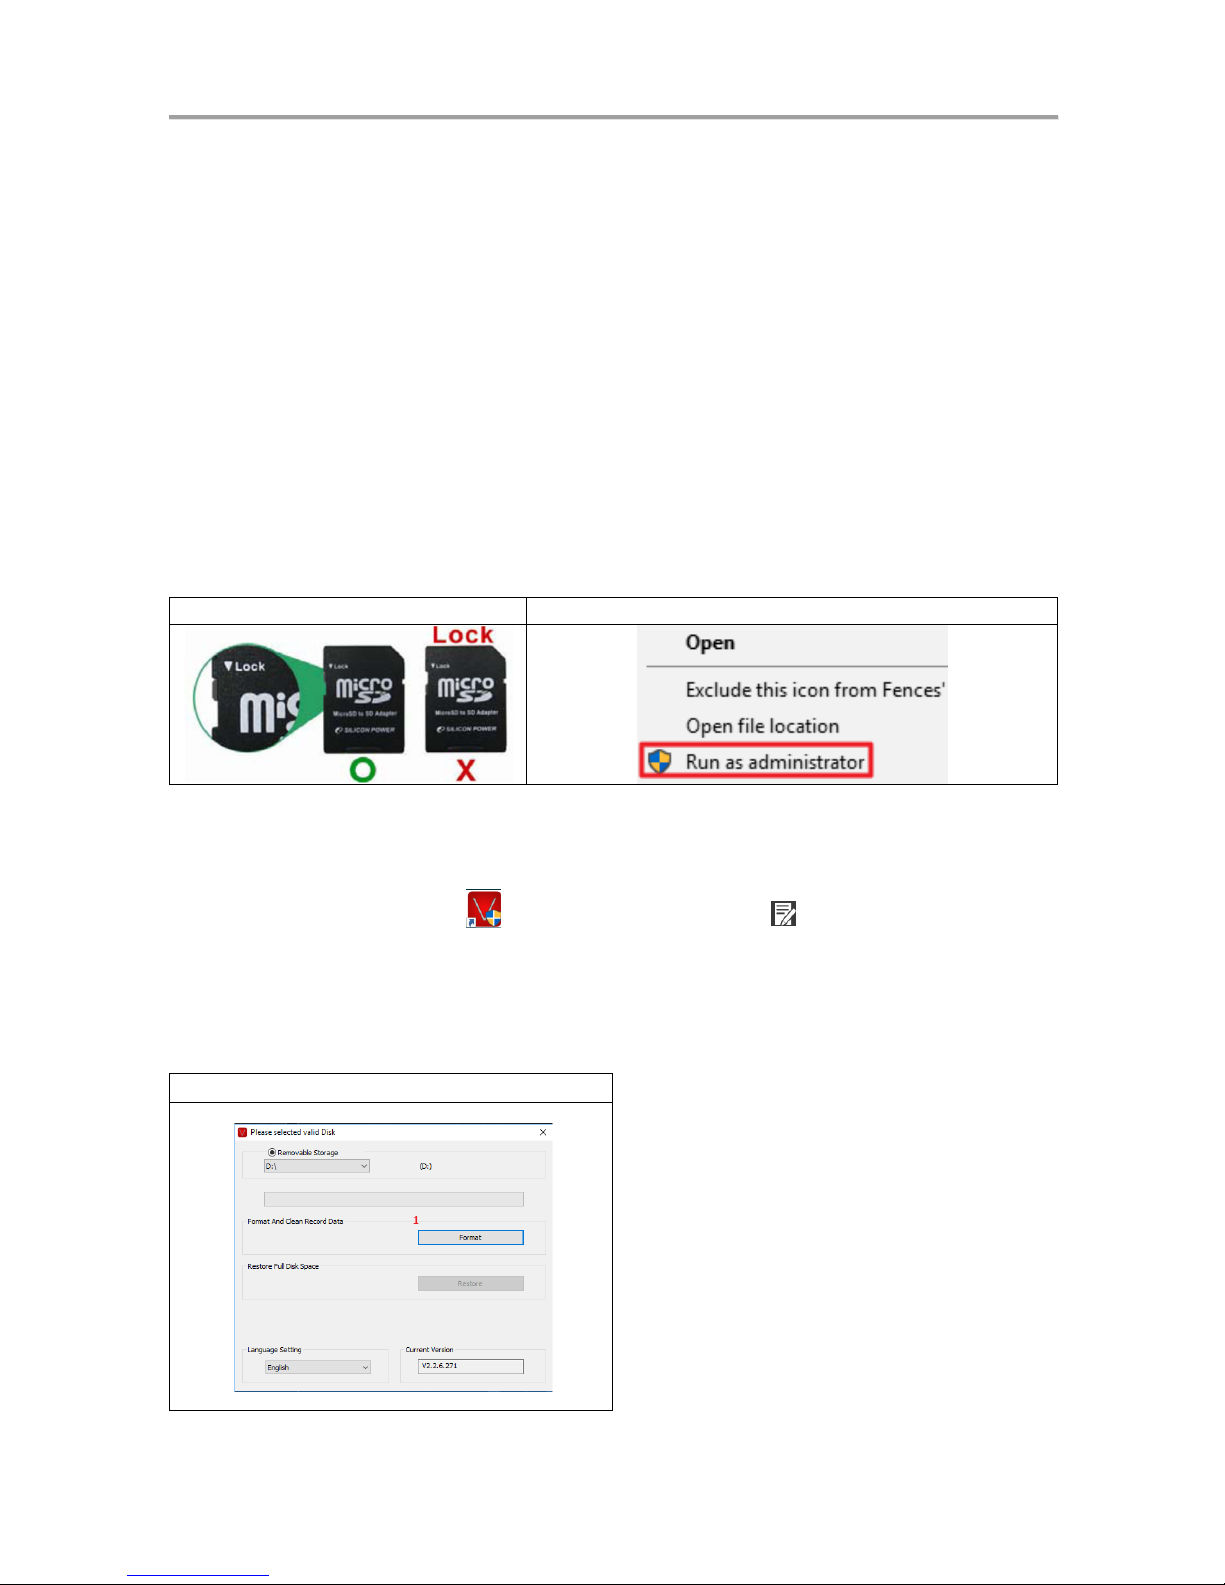
When You Should Format Micro SD CARD?
When you use the Micro SD card for the first time or use a new card, the
SD card MUST be formatted prior to use.
★Note: this record system cannot delete a particular video, backup
video before format SD card.
*Notice:
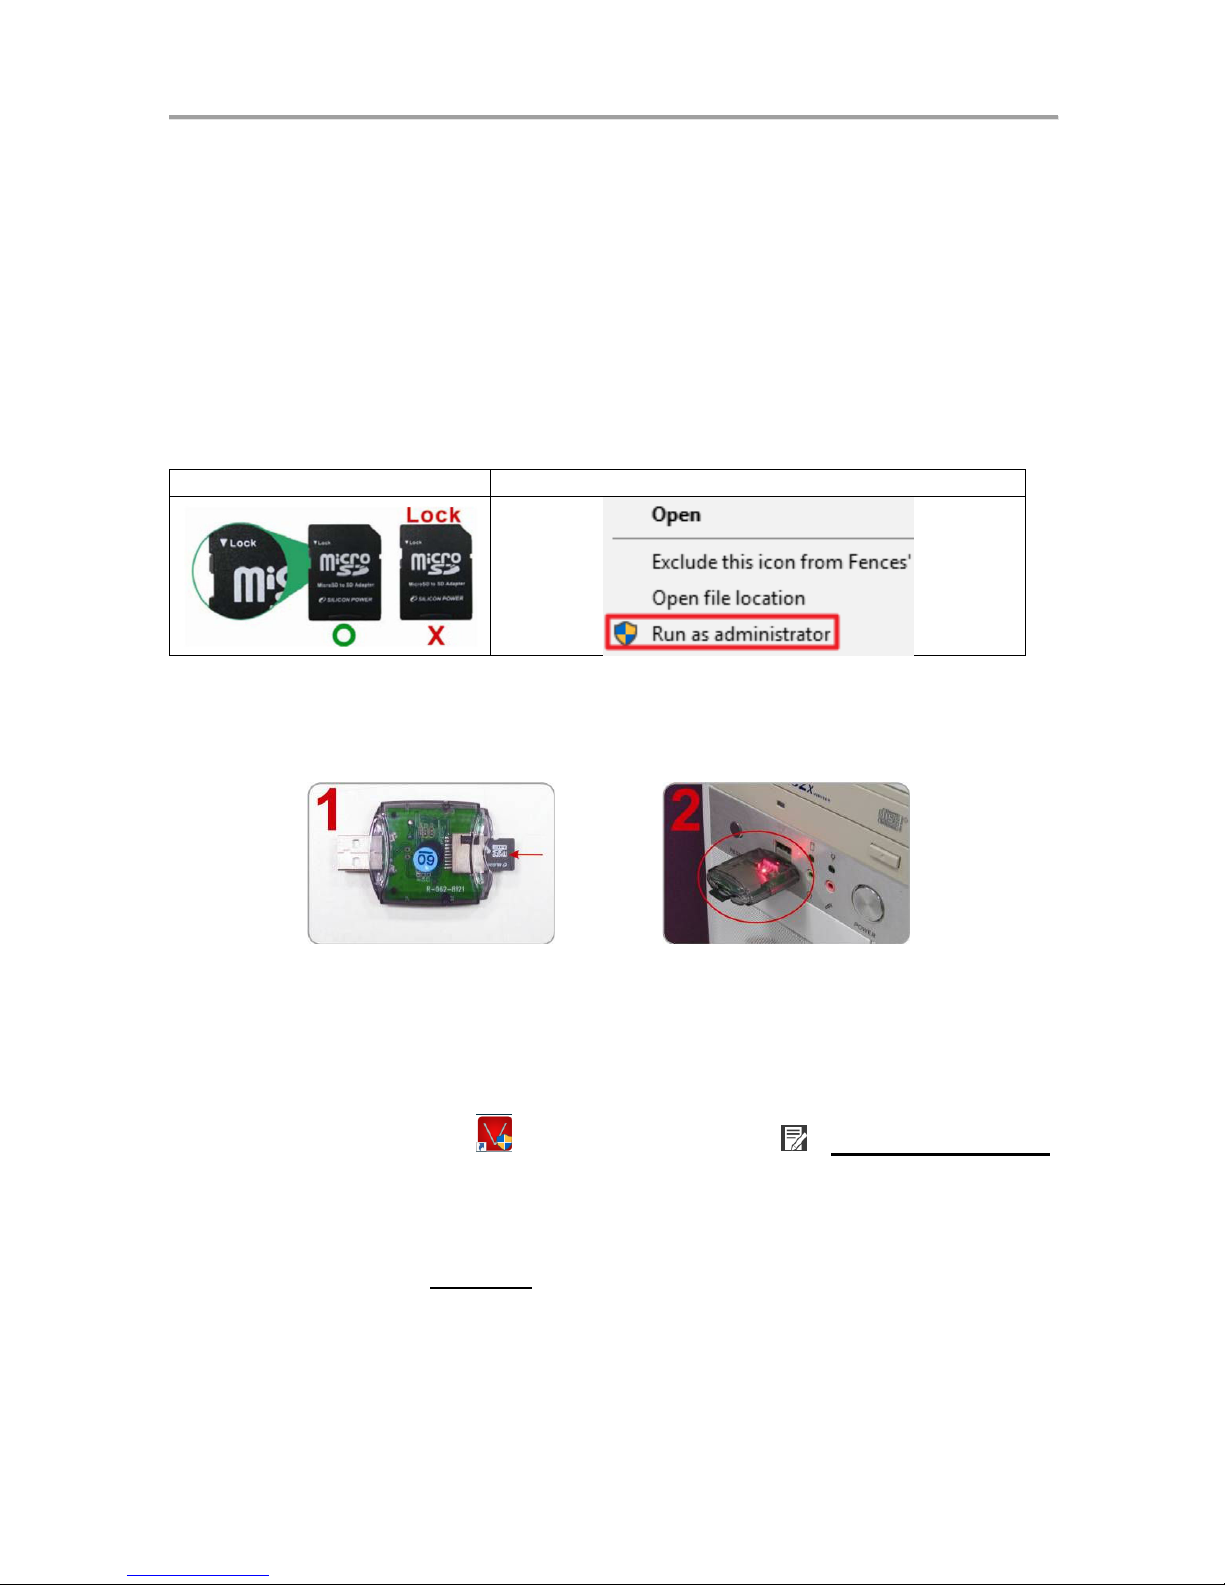
3. Before formatting Micro SD card, please ensure to unlock it first.
4. If the card is unlocked but still cannot be formatted, please run the
program as Administrator to prevent from this problem.
1
2
Format steps:
i. Insert the CD in your PC and open the file
ii. Run program and click on “Format Micro SD
Card”.
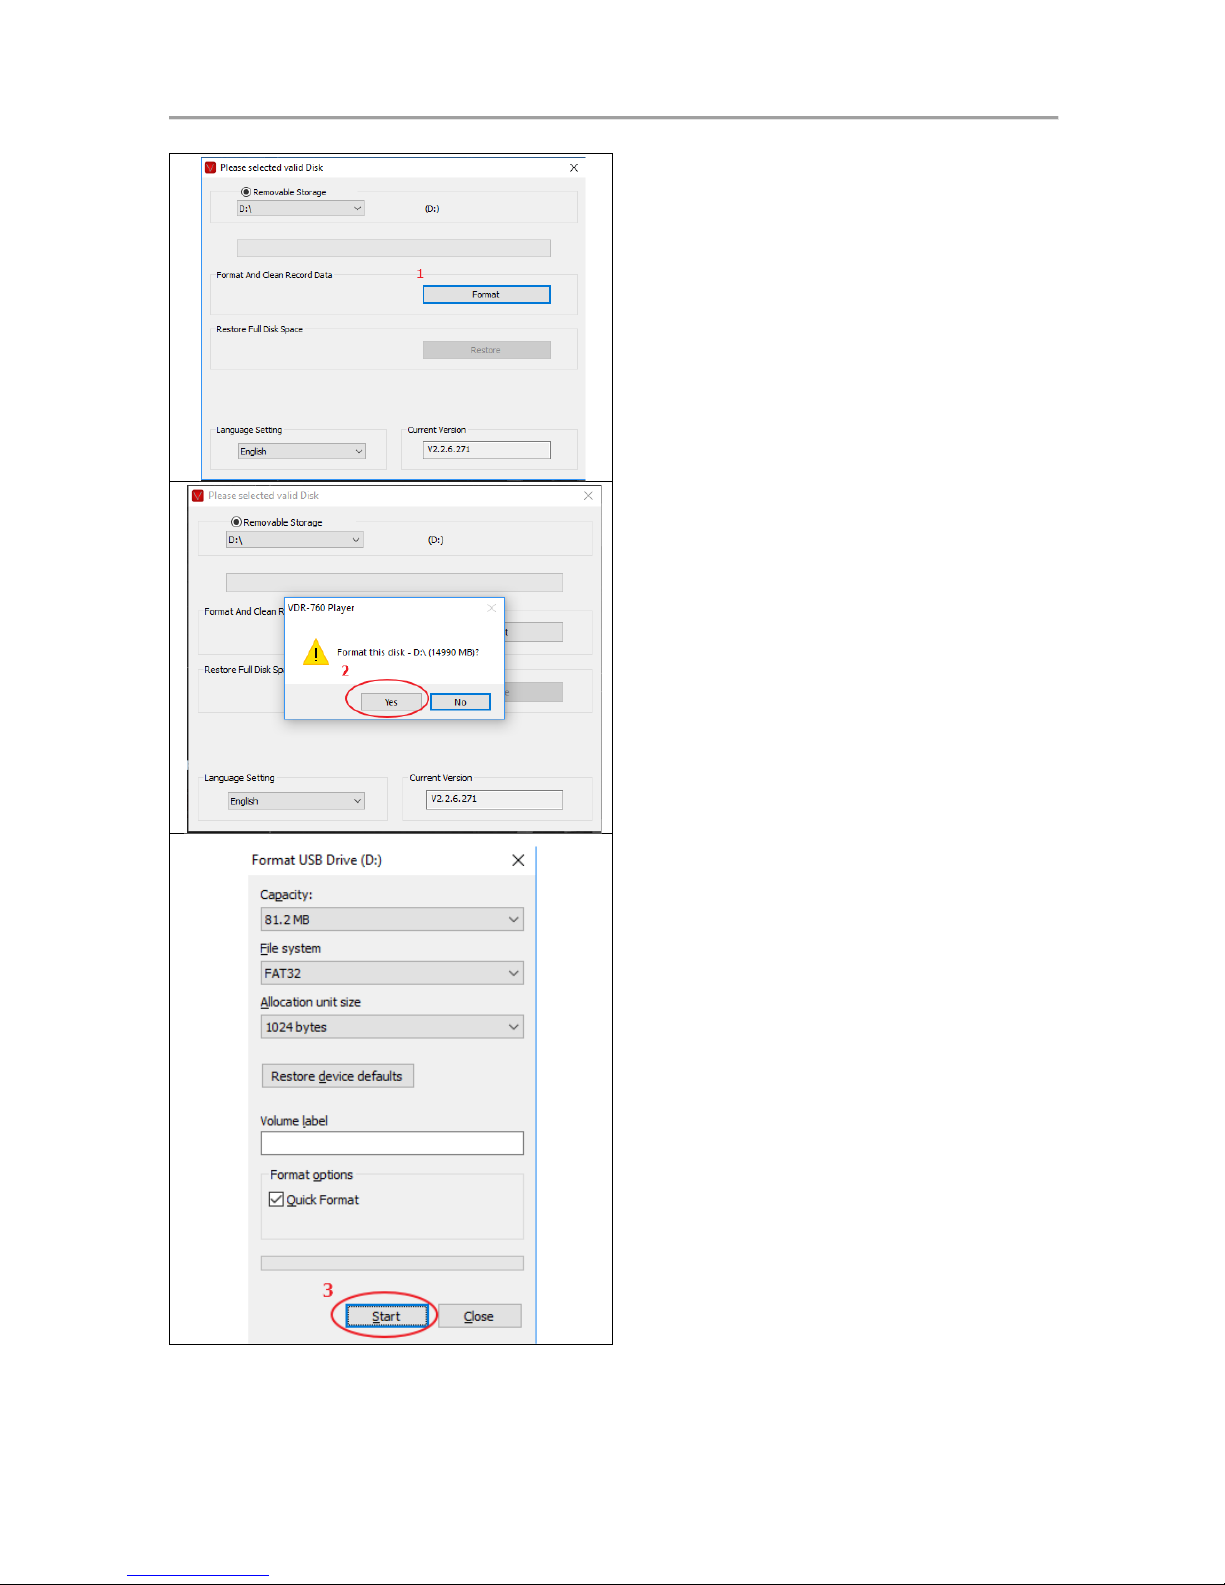
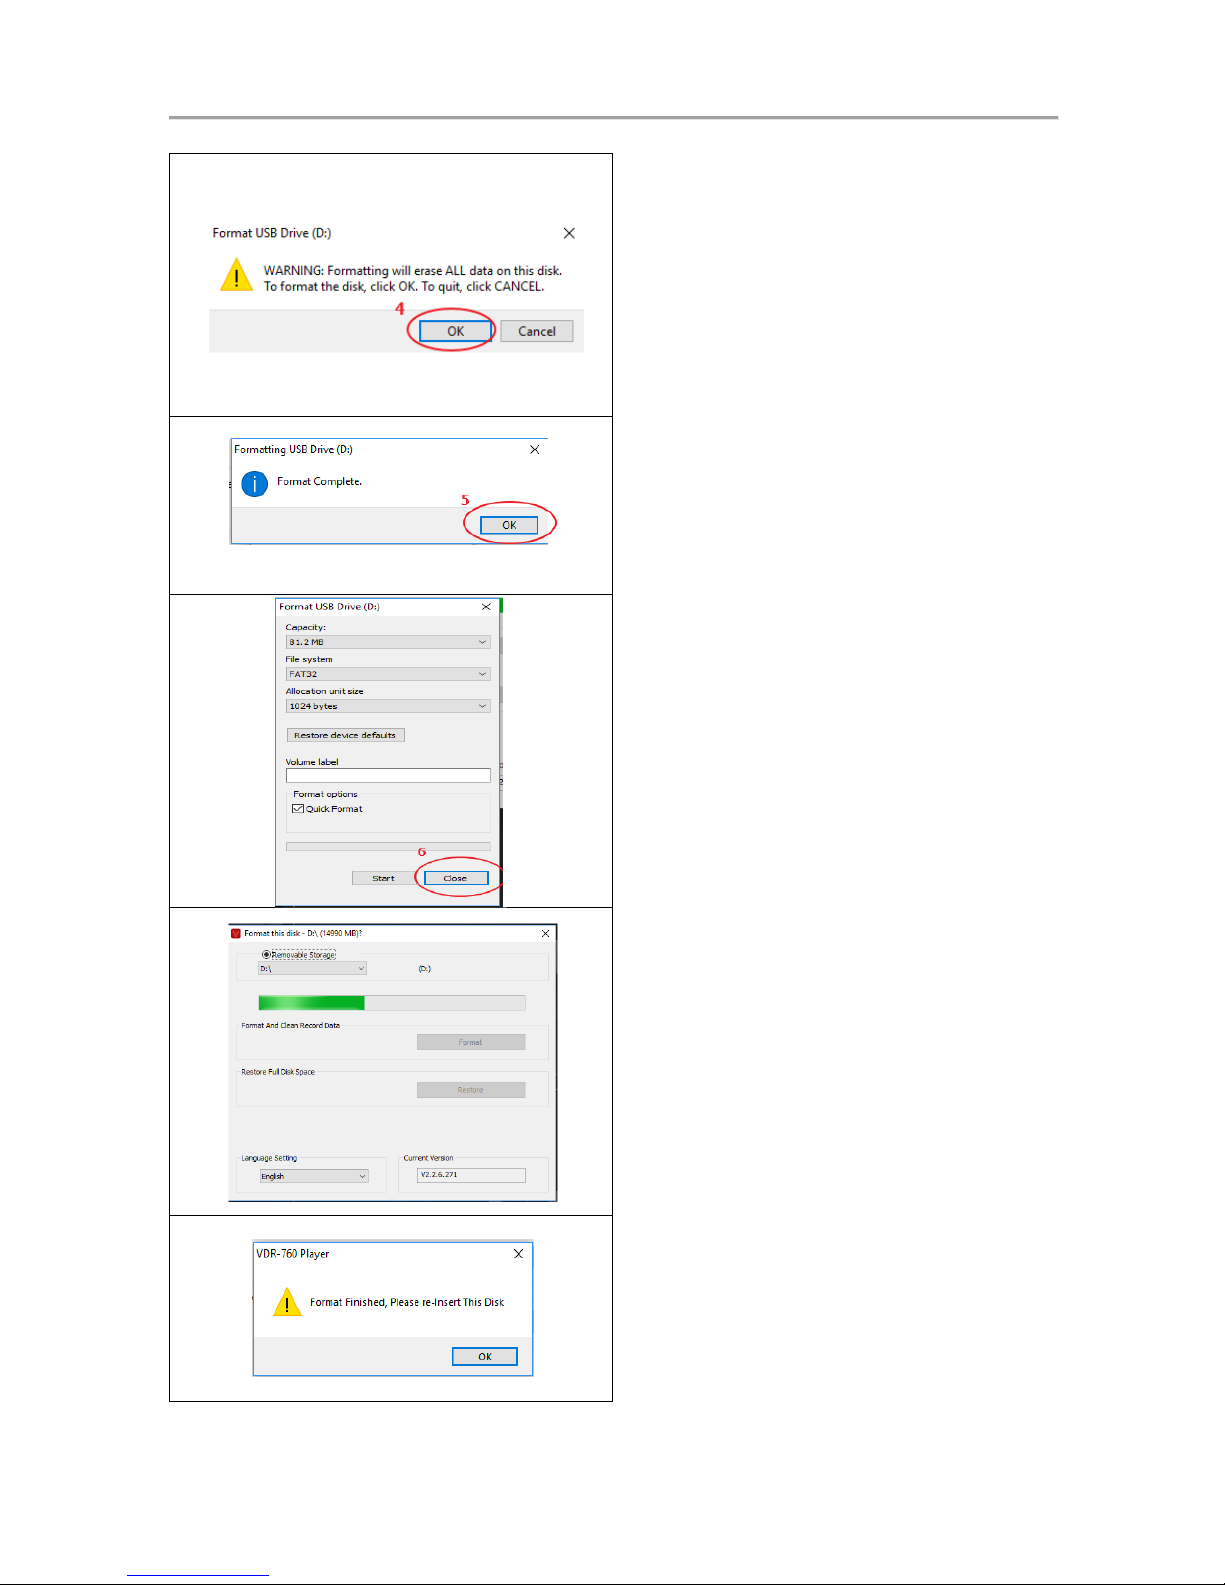
iii. Click on『Format』to start formatting the Micro SD
card as following steps:
Windows 10
Page 28
Vehicle video recorder user manual
22
Page 29
Vehicle video recorder user manual
23
Page 30
Vehicle video recorder user manual
24
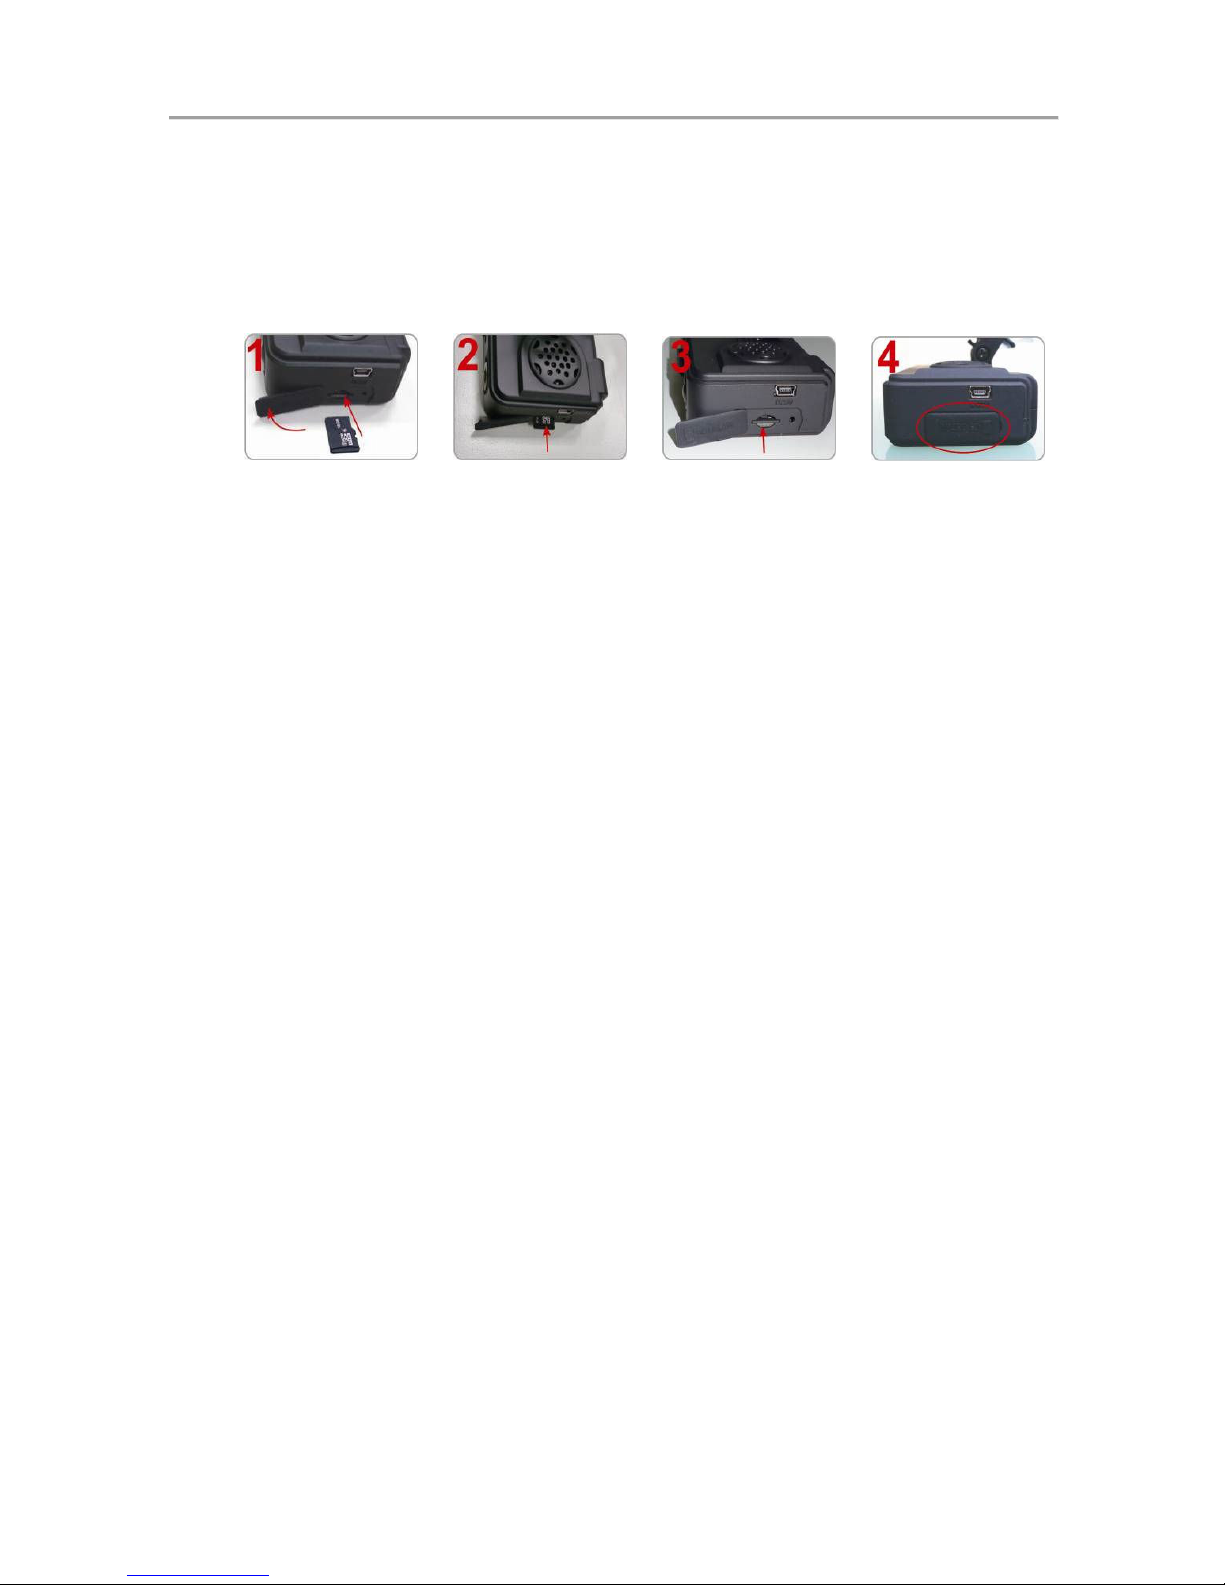
iv. When formatting is completed, please insert the card
into the VDR
Unlock the vandal
resistant SD card
slow via the included
wrench
Insert the Micro SD
card in correct
direction. Mind the
gap of the SD card
slot
Close the Micro SD
card until it is set
Secure the SD card
slot via the special
screw provided
Page 31
Vehicle video recorder user manual
25
K.
Restore memory card
When you have backed up the recorded files into PC and want to use the
Micro SD card for other purposes, you have to restore it first so it can be
used correctly.
*Notice:
1. Before formatting Micro SD card, please ensure to unlock it first.
2. If the card is unlocked but still cannot be formatted, please run the
program as Administrator to prevent from this problem.
1
2
How to restore memory card?
Steps as below:
Insert the Micro SD card into the
card reader (Please make sure
the direction is correct)
Connect the card reader with
the PC
3、Insert the CD in your PC and open file
4、Find and run program and click on “Format Micro SD
Card”
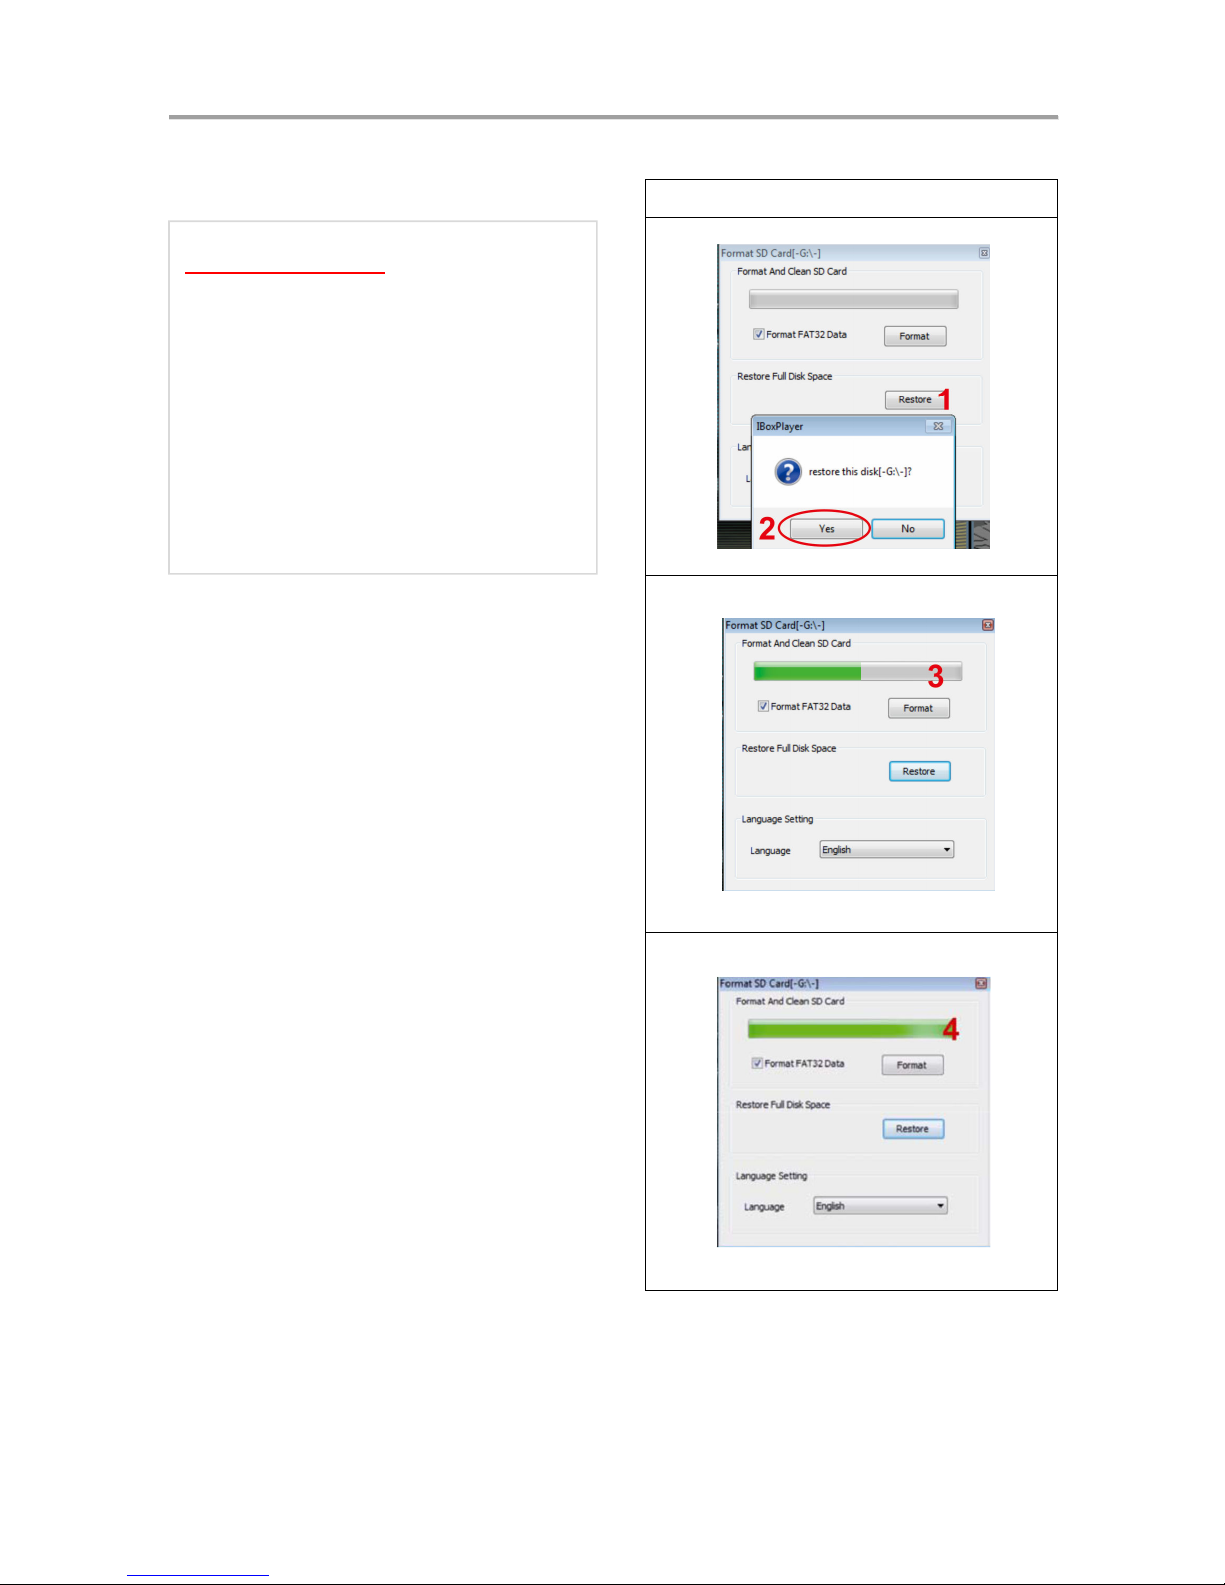
5、Click on『Restore』to restore the Micro SD card. Please see
the following steps as reference. When finished, the SD card
can be used for other purpose
Page 32
Vehicle video recorder user manual
26
Windows 10
IMPORTANT
Restoring the SD card will
permanently DELETE all data from
the SD card.
Restoring the SD card to the original
format so it can be utilized for non
Ventra system recording.
Page 33

Vehicle video recorder user manual
27
VENTRA LIMITED WARRANTY
Ventra Technology warrants the system against defects in material and workmanship for a period of one (1) year
from the date of original purchase. During this period, Ventra’s liability for any defective product, or any product
part, shall be limited to the repair or replacement of the product, at Ventra’s sole discretion.
This warranty does not apply to defects or damages resulting from mishandling, accident, abuse, negligence,
lightning, water/liquid, power surges, improper interfacing, operation outside of design limits, misapplication,
improper repair, or unauthorized modification.
The term "Ventra Product" is limited to the hardware components and required firmware. It DOES NOT include
software applications or programs, non-Ventra products or peripherals. To the extent permitted by local law, all
non-Ventra products or non-Ventra branded peripherals - such as external storage SD card are provided provide
the respective manufacturer's own warranties directly to you, and are not covered by this Limited Warranty.
To obtain service within the warranty period, please contact Ventra at [email protected] for assistance. If
product repair or replacement is necessary, a Return Merchandise Authorization (RMA) will be issued. The
Customer will be solely responsible for shipping charges, insurance and proper packaging to prevent breakage in
transit, whether or not the product is covered by this warranty. All shipments of repaired or replaced products
by Ventra will be F.O.B. California.
VENTRA MAKES NO OTHER WARRANTIES, EXPRESS OR IMPLIED, AS TO MERCHANTABILITY OR FITNESS FOR A
PARTICULAR PURPOSE OF ANY PRODUCT SOLD UNDER THIS CONTRACT. UNDER NO CIRCUMSTANCES SHALL
VENTRA BE LIABLE FOR ANY INDIRECT, INCIDENTAL, SPECIAL, PUNITIVE OR CONSEQUENTIAL DAMAGES
INCLUDING, WITHOUT LIMITATION, INFRINGEMENT OF THIRD PARTY RIGHTS, LOST GOODWILL, LOST
REVENUES OR PROFITS, WORK STOPPAGE, DATA LOSS, SYSTEM FAILURE, IMPAIRMENT OF OTHER GOODS,
COSTS OF REMOVAL AND REINSTALLATION OF THE SYSTEM, LOSS OF USE, INJURY TO PERSONS OR PROPERTY
ARISING OUT OR RELATED TO THE SYSTEM WHETHER BASED ON BREACH OF WARRANTY, BREACH OF
CONTRACT, TORT OR OTHERWISE. IN NO EVENT SHALL VENTRA’s LIABILITY EXCEED THE ACTUAL PURCHASE
PRICE OF THE SYSTEM WITH RESPECT TO WHICH ANY CLAIM IS MADE.
The information in this specification sheet reflects the current technical specifications at the time of print. Ventra
reserve the right to change the technical or physical specifications and features without prior notification.
While every effort has been made to ensure the accuracy of the information, certain specifications are based on
approximate figures
All trademarks, service marks, trade names, product names and logos are the property of their respective owners.
Copyright 2019 Ventra Technology Inc. www.ventrainc.com [email protected]
 Loading...