

Ventec Life Systems VOCSN, VOCSN-VC Clinical Quick Start Manual
Clinical Quick Start Guide
VOCSN offers mechanical Ventilation, Oxygen, Cough, Suction, and Nebulizer therapies in one compact,
portable, lightweight device.
This Quick Start Guide is intended to provide a high-level overview of VOCSN use, and does not
contain all the information required to operate VOCSN safely. For detailed instructions for use, see
the Clinicial and Technical Manual, available online at VentecLife.com.
Critical Care Ventilator
VOCSN is one of the few portable ventilators to achieve the rigorous critical care
standard1 for safety and accuracy. The ventilator provides invasive, noninvasive, and
mouthpiece ventilation and delivers a comprehensive set of modes and settings to
meet patient needs.
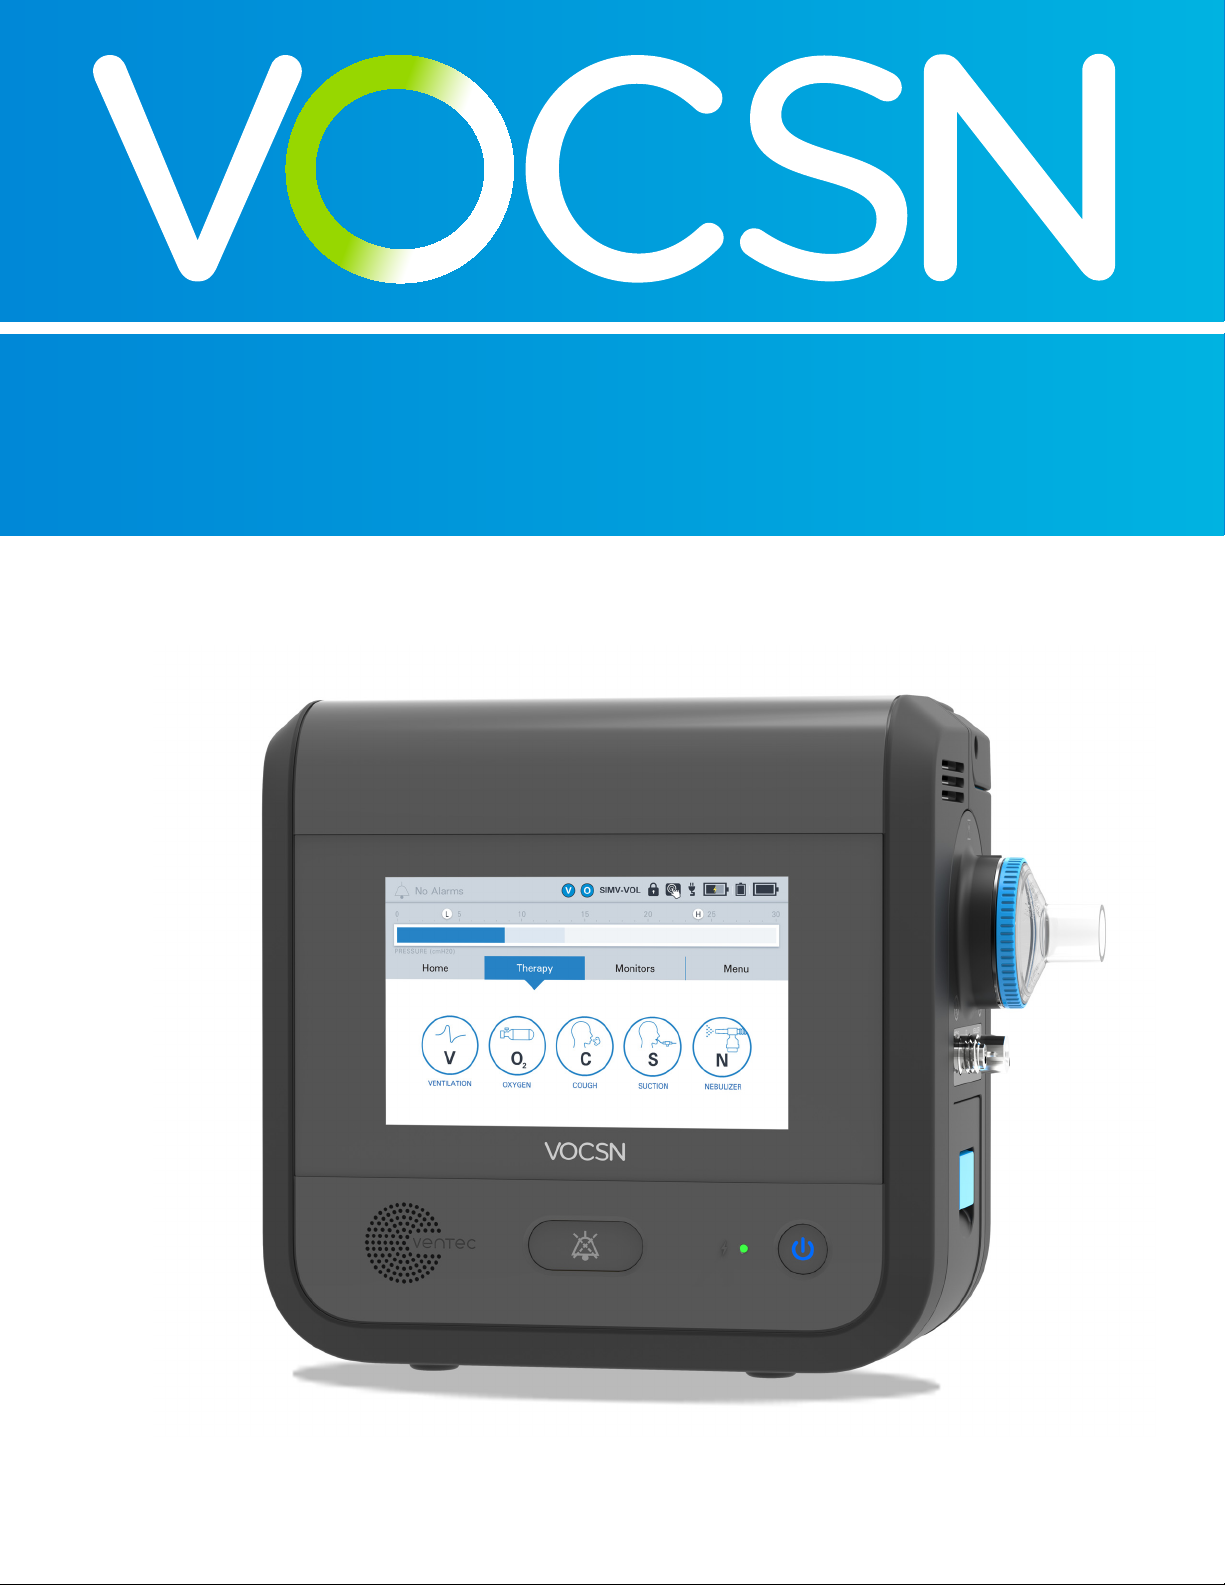
VENTILATION
6 L/min Equivalent Internal Oxygen Concentrator
The VOCSN internal oxygen concentrator and Oxygen DirectTM system deliver the
equivalent of 6 L/min of oxygen or up to 40% FiO2. External high pressure and low
2
pressure oxygen sources can be connected when needed.
OXYGEN
COUGH
SUCTION
Touch Button Cough
Touch Button CoughTM therapy is activated in seconds rather than minutes, without
changing the circuit. Breath Sync monitors patient breathing and triggers a cough at
a natural point in the breathing cycle.
Hospital Grade Suction
Hospital grade suction system provides consistent high flows throughout the entire
suction experience. VOCSN Suction therapy is up to three times quieter than
traditional portable suction machines.
High Performance Nebulizer
VOCSN automatically compensates for the airflow from the nebulizer drive to ensure
accurate ventilation and comfortable breathing. VOCSN records each medication
use and turns off the nebulizer when the therapy is complete.
NEBULIZER
1.ISO 80601-2-12

Quick Start Guide
Table of Contents
VOCSN Configurations . . . . . . . . . . . . . . . . . . . . . . . . . . . . . . . . . . . . . . . . . . . . . . . . . . . . . . . . 2
Hardware Overview. . . . . . . . . . . . . . . . . . . . . . . . . . . . . . . . . . . . . . . . . . . . . . . . . . . . . . . . . . . 2
Software Overview . . . . . . . . . . . . . . . . . . . . . . . . . . . . . . . . . . . . . . . . . . . . . . . . . . . . . . . . . . . 3
Locking and Unlocking the Touchscreen . . . . . . . . . . . . . . . . . . . . . . . . . . . . . . . . . . . . . . . . . . . . 3
Night Mode and Day Mode . . . . . . . . . . . . . . . . . . . . . . . . . . . . . . . . . . . . . . . . . . . . . . . . . . . . . . 4
Clinician Access . . . . . . . . . . . . . . . . . . . . . . . . . . . . . . . . . . . . . . . . . . . . . . . . . . . . . . . . . . . . . . . 4
Permissions. . . . . . . . . . . . . . . . . . . . . . . . . . . . . . . . . . . . . . . . . . . . . . . . . . . . . . . . . . . . . . . . . . . 5
Enable Prescribed Therapies . . . . . . . . . . . . . . . . . . . . . . . . . . . . . . . . . . . . . . . . . . . . . . . . . . . . . 5
Exit Buttons . . . . . . . . . . . . . . . . . . . . . . . . . . . . . . . . . . . . . . . . . . . . . . . . . . . . . . . . . . . . . . . . . . 5
VOCSN Placement. . . . . . . . . . . . . . . . . . . . . . . . . . . . . . . . . . . . . . . . . . . . . . . . . . . . . . . . . . . . 6
Powering VOCSN . . . . . . . . . . . . . . . . . . . . . . . . . . . . . . . . . . . . . . . . . . . . . . . . . . . . . . . . . . . . 6
The Power Supply. . . . . . . . . . . . . . . . . . . . . . . . . . . . . . . . . . . . . . . . . . . . . . . . . . . . . . . . . . . . . . 6
Batteries . . . . . . . . . . . . . . . . . . . . . . . . . . . . . . . . . . . . . . . . . . . . . . . . . . . . . . . . . . . . . . . . . . . . . 7
Connecting Patient Circuits . . . . . . . . . . . . . . . . . . . . . . . . . . . . . . . . . . . . . . . . . . . . . . . . . . . . . 8
Connecting and Removing a Bacterial Filter . . . . . . . . . . . . . . . . . . . . . . . . . . . . . . . . . . . . . . . . . 8
Mouthpiece Patient Circuits . . . . . . . . . . . . . . . . . . . . . . . . . . . . . . . . . . . . . . . . . . . . . . . . . . . . . . 8
Active, Passive, and Valveless Ventec One-Circuits . . . . . . . . . . . . . . . . . . . . . . . . . . . . . . . . . . . . 9
Connecting a Ventec One-Circuit O2 Tube . . . . . . . . . . . . . . . . . . . . . . . . . . . . . . . . . . . . . . 10
Connecting an Active Ventec One-Circuit Multilumen Tube . . . . . . . . . . . . . . . . . . . . . . . . . 10
The Pre-Use Test . . . . . . . . . . . . . . . . . . . . . . . . . . . . . . . . . . . . . . . . . . . . . . . . . . . . . . . . . . . . 10
Changing Ventilation, Oxygen, and Cough Controls . . . . . . . . . . . . . . . . . . . . . . . . . . . . . . . . . 11
Alarms . . . . . . . . . . . . . . . . . . . . . . . . . . . . . . . . . . . . . . . . . . . . . . . . . . . . . . . . . . . . . . . . . . . . 12
Setting Ventilation and Oxygen Alarms . . . . . . . . . . . . . . . . . . . . . . . . . . . . . . . . . . . . . . . . . . . . 12
Alarm Priorities . . . . . . . . . . . . . . . . . . . . . . . . . . . . . . . . . . . . . . . . . . . . . . . . . . . . . . . . . . . . . . . 13
Alarm and Event Logs . . . . . . . . . . . . . . . . . . . . . . . . . . . . . . . . . . . . . . . . . . . . . . . . . . . . . . . . . 13
Silencing Alarms . . . . . . . . . . . . . . . . . . . . . . . . . . . . . . . . . . . . . . . . . . . . . . . . . . . . . . . . . . . . . . 13
Connecting a Nurse Call System or Remote Alarm . . . . . . . . . . . . . . . . . . . . . . . . . . . . . . . . . . . 13
Ventilation Therapy . . . . . . . . . . . . . . . . . . . . . . . . . . . . . . . . . . . . . . . . . . . . . . . . . . . . . . . . . . 14
Oxygen Therapy . . . . . . . . . . . . . . . . . . . . . . . . . . . . . . . . . . . . . . . . . . . . . . . . . . . . . . . . . . . . 14
Connecting External Oxygen . . . . . . . . . . . . . . . . . . . . . . . . . . . . . . . . . . . . . . . . . . . . . . . . . . . . 14
Cough Therapy . . . . . . . . . . . . . . . . . . . . . . . . . . . . . . . . . . . . . . . . . . . . . . . . . . . . . . . . . . . . . 15
Suction Therapy. . . . . . . . . . . . . . . . . . . . . . . . . . . . . . . . . . . . . . . . . . . . . . . . . . . . . . . . . . . . . 15
Connecting a Suction Canister . . . . . . . . . . . . . . . . . . . . . . . . . . . . . . . . . . . . . . . . . . . . . . . . . . . 16
The Ventec Travel Suction Canister . . . . . . . . . . . . . . . . . . . . . . . . . . . . . . . . . . . . . . . . . . . . 16
The External Suction Canister Adapter (Sold Separately) . . . . . . . . . . . . . . . . . . . . . . . . . . . 16
Nebulizer Therapy . . . . . . . . . . . . . . . . . . . . . . . . . . . . . . . . . . . . . . . . . . . . . . . . . . . . . . . . . . . 17
External Nebulizer Compensation . . . . . . . . . . . . . . . . . . . . . . . . . . . . . . . . . . . . . . . . . . . . . . . . 17
Internal Nebulizer Therapy . . . . . . . . . . . . . . . . . . . . . . . . . . . . . . . . . . . . . . . . . . . . . . . . . . . . . . 17
VOCSN Therapy Interactions. . . . . . . . . . . . . . . . . . . . . . . . . . . . . . . . . . . . . . . . . . . . . . . . . . . 18
Maintaining Oxygenation During Nebulizer or Suction . . . . . . . . . . . . . . . . . . . . . . . . . . . . . . . . 18
Comparable Ventilation Modes. . . . . . . . . . . . . . . . . . . . . . . . . . . . . . . . . . . . . . . . . . . . . . . . . 19
Volume Ventilation Modes . . . . . . . . . . . . . . . . . . . . . . . . . . . . . . . . . . . . . . . . . . . . . . . . . . . . . . 19
Pressure Ventilation Modes (Including Volume-Targeted) . . . . . . . . . . . . . . . . . . . . . . . . . . . . . . 19
Non-Invasive Ventilation Modes. . . . . . . . . . . . . . . . . . . . . . . . . . . . . . . . . . . . . . . . . . . . . . . . . . 20
VOCSN Controls Setup . . . . . . . . . . . . . . . . . . . . . . . . . . . . . . . . . . . . . . . . . . . . . . . . . . . . . . . 21
VentecLife.com 1
Clinical Quick Start Guide
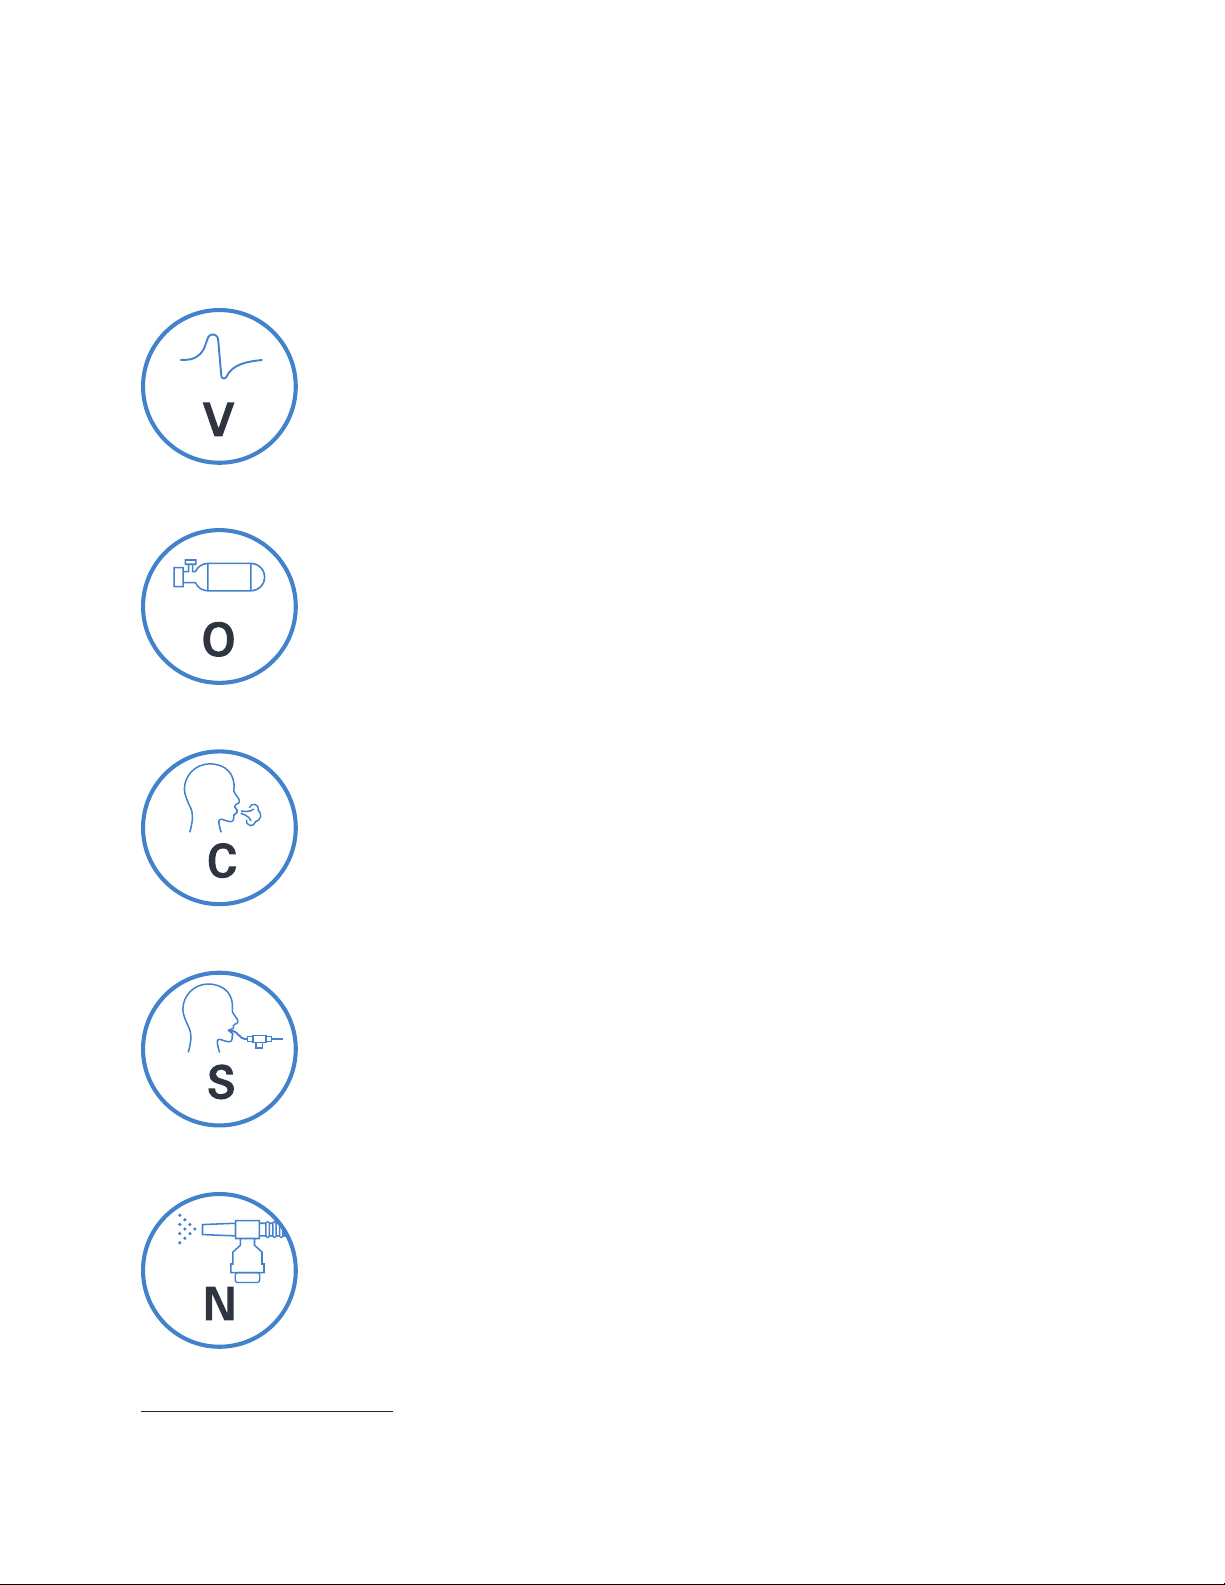
VOCSN Configurations
VOCSN may include all five therapies and all the features described in this guide, or just the set of therapies
and features purchased or prescribed by the treating physician. Depending on its configuration, VOCSN will
be able to provide Ventilation, +Oxygen Concentration, +Cough, +Suction, and/or +Nebulizer therapy. It
may also be able to provide oxygen from an external high-pressure source and FiO2 monitoring (+Pro
configurations) or low-pressure oxygen (all configurations). The configuration name is based on the therapies
VOCSN can provide. For example, the V+C configuration provides Ventilation+Cough therapies. The
configuration name is printed on the back of the device.
Configuration
(Located on Device
Rear Label)
V+O+C+S+N+Pro
(or “VOCSN”)
V+O+C+S+N
V+C+Pro
(or “VOCSN-VC”)
V+C
Ventilation
(V)
Yes Yes Yes Yes Yes Yes Yes
Yes Yes Yes Yes Yes No Yes
Yes No Yes No No Ye s Yes
Yes No Yes No No No Ye s
O2
Concentration
(+O)
Hardware Overview
12
11
10
1
9
8
2
3
4
5 6
Touchscreen
1
Speaker
2
Alarm Silence button
3
External Power / Charge Status indicator light
4
Power button and indicator light
5
Removable, rechargeable battery
6
Active exhalation valve connection port
7
Ventec One-Circuit O2 tube connection port
8
(+O configurations only)
Nebulizer drive port (+N configurations only)
9
External bacterial filter and Ventec One-Circuit
10
connection port
Handle
11
Cooling air outlet
12
7
High-Pressure
External
Oxygen and
Cough
(+C)
13
14
15
16
17
18
19
20
21
22
23
24
25
Suction
(+S)
13
14
15
16
17
Handle
T-Slot mount
Cooling air outlet and Cough therapy exhaust
High-pressure O2 input port (+Pro configurations only)
Low-pressure O2 input port
Remote alarm or Nurse Call Cable port
USB port for use by trained personnel only. See the
Clinical and Technical Manual for details.
Cooling air intake and filter
Power connection port
Patient air inlet and filter
Removable, rechargeable battery
Suction interface
Cooling air outlet
18
19
Nebulizer
+(N)
20
FiO2 Monitor
22
21
(+Pro)
23
LowPressure
External
Oxygen
25
24
VentecLife.com 2
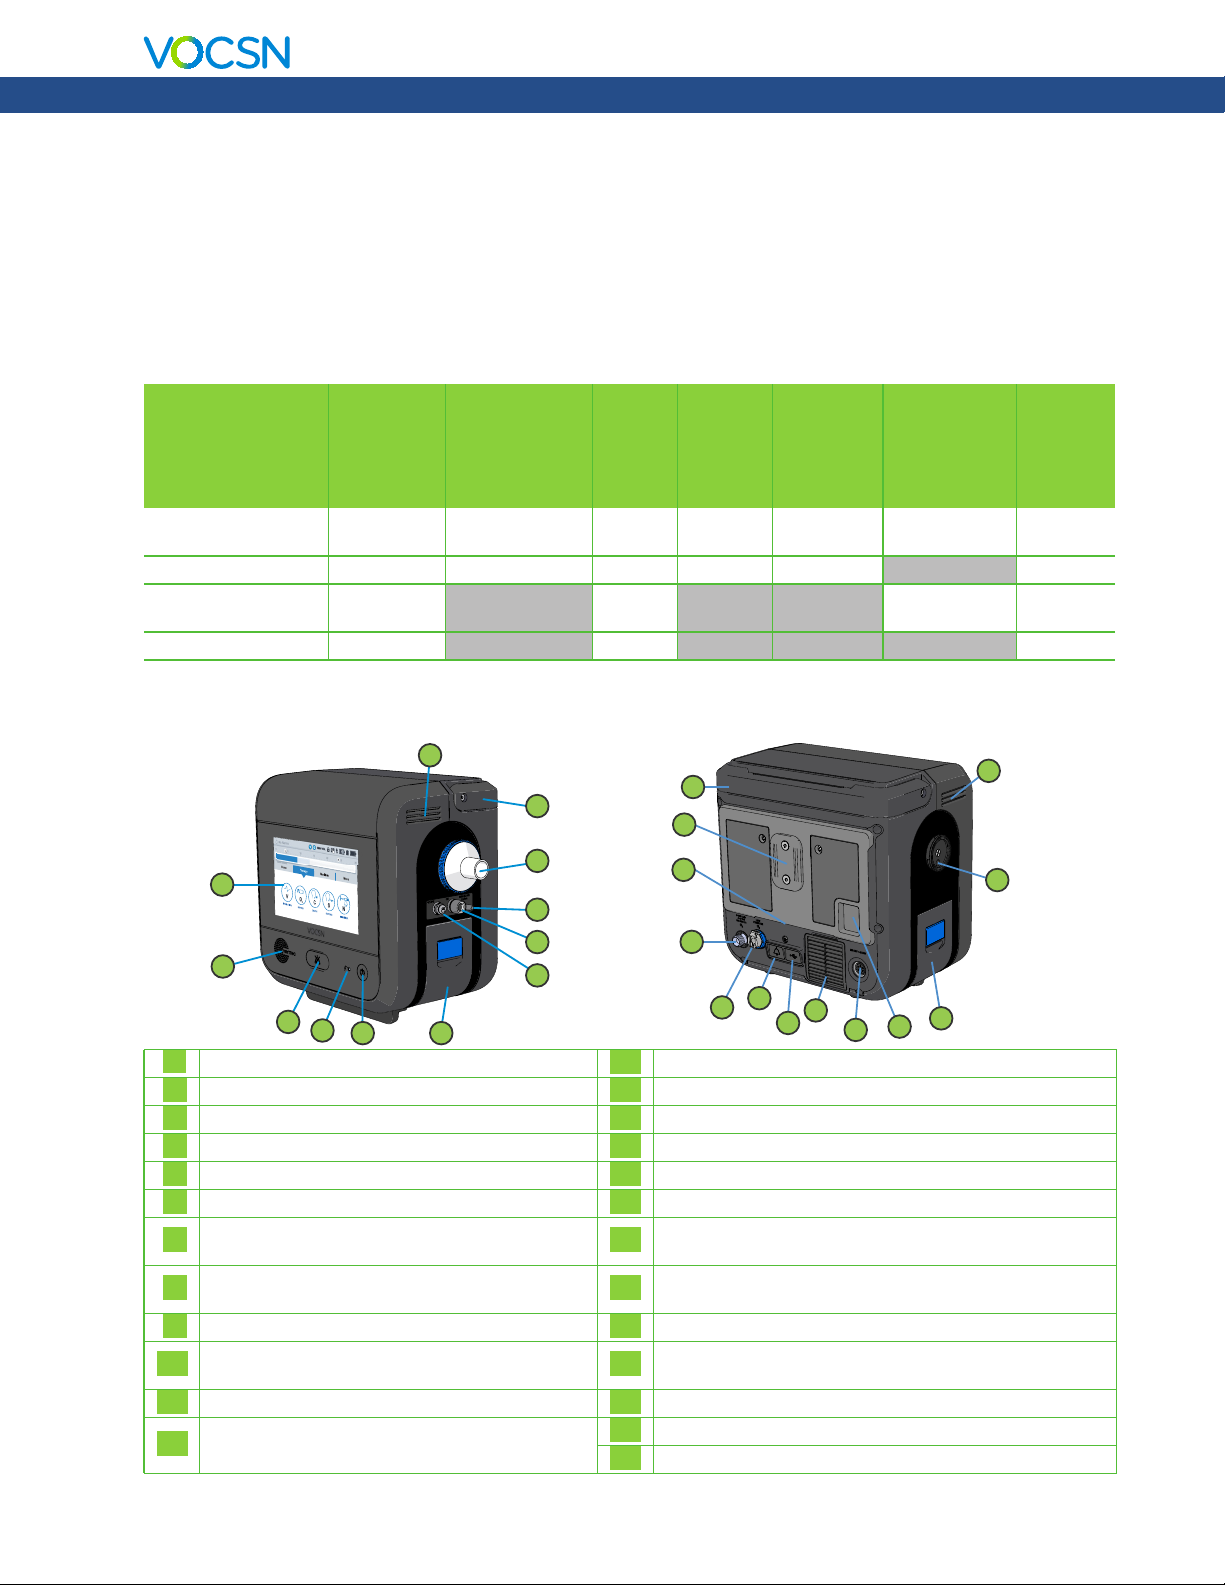
Software Overview
p
Clinical Quick Start Guide
Pressure Monitor
Navigation Links
Clinician
Link to Active and
Recent Alarms
No Alarms
0 5 10 15 20 25 30L H
PRESSURE (cmH20)
Home
VENTILATION
Therapy MenuMonitors
Active
Therapies
V O
Access
Status
SIMV-VOL
Lock
Screen
NEBULIZERSUCTIONCOUGHOXYGEN
Power
Status
Links to VOCSN Thera
y Screens
Locking and Unlocking the Touchscreen
To lock and unlock the VOCSN touchscreen, use the status bar to press and hold the lock screen button for
three seconds. A pop-up message will appear to confirm your action.
LOCKEDUNLOCKED
VentecLife.com 3
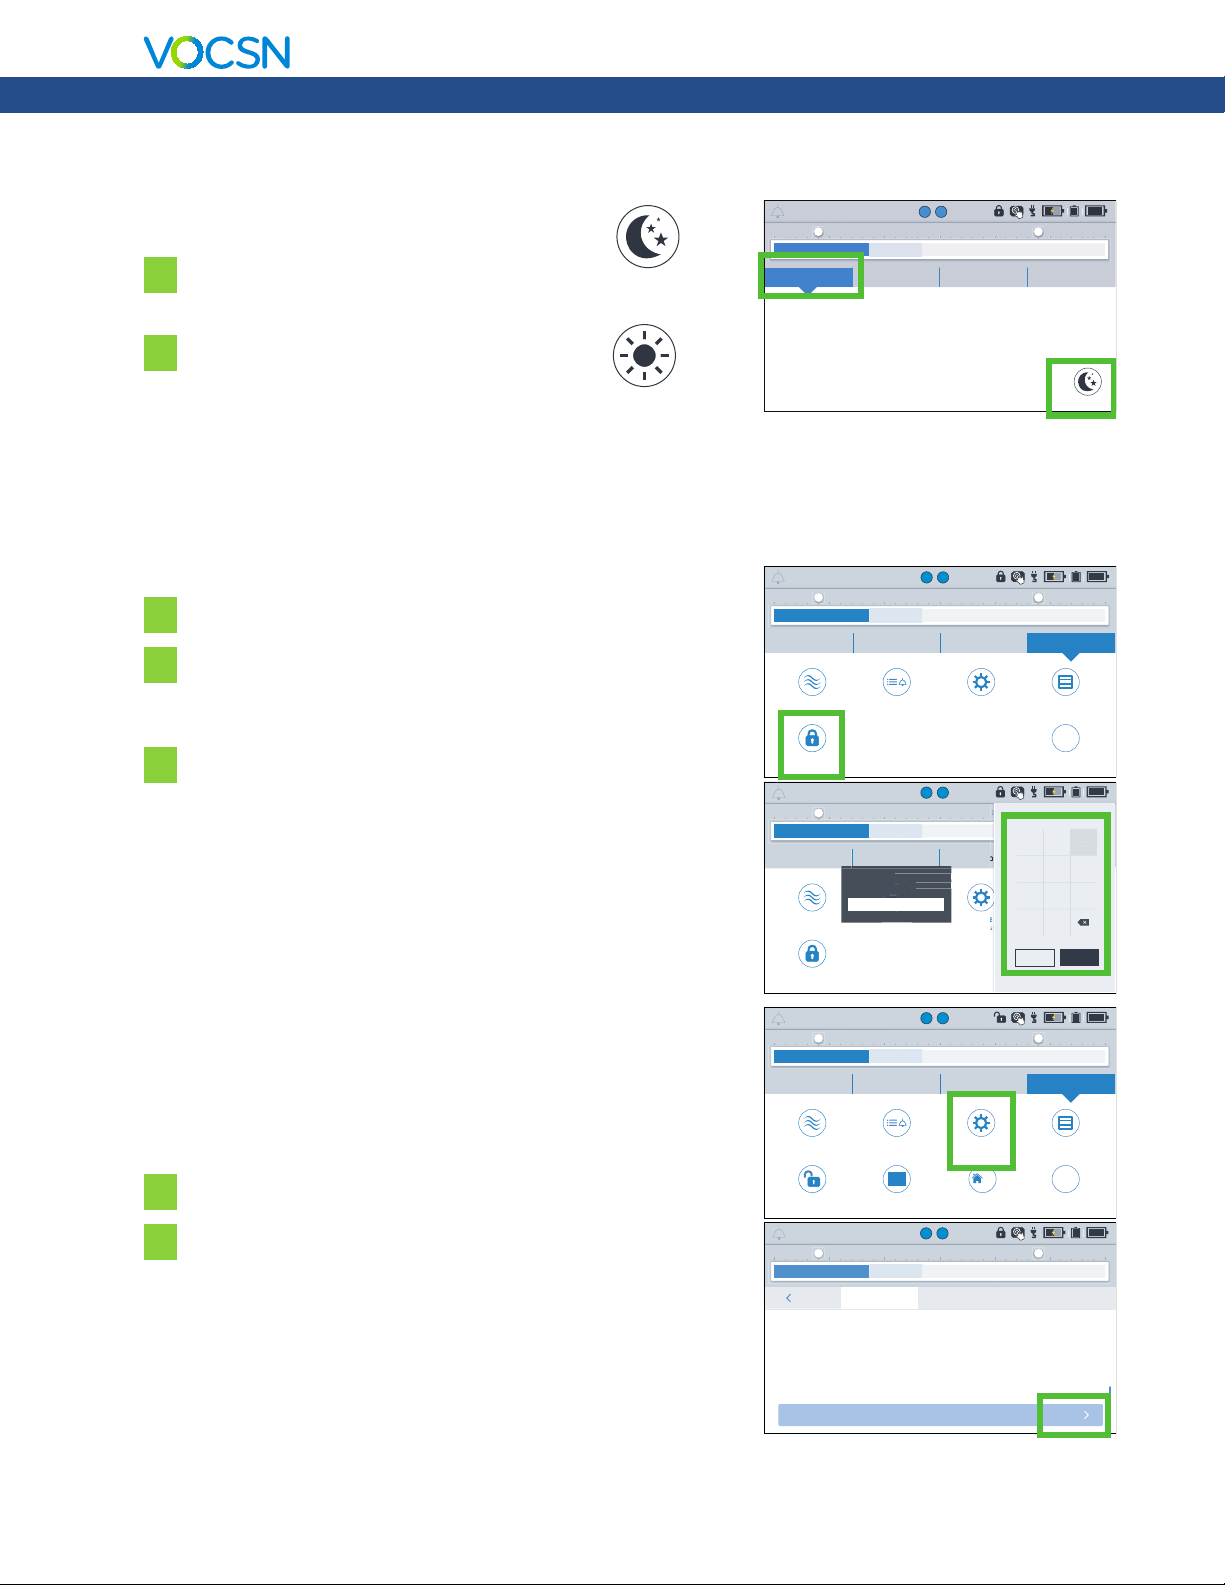
Night Mode and Day Mode
S
GS
C
e
Access
222
E
S
S
r
r
3
Clinical Quick Start Guide
Use the Home screen to change between
Night Mode and Day Mode.
1 Press NIGHT MODE to dim the LCD
NIGHT MODE
display.
2 Press DAY MODE for full screen
brightness.
DAY MODE
Clinician Access
To lock or unlock VOCSN:
1 Press CLINICIAN ACCESS in the Menu tab.
2 Locate the device serial number printed on the VOCSN
back label. It is also visible from the Service section of the
MY VOCSN screen.
3 Enter the four-digit Clinician Access passcode (the last
four digits of the device serial number), and then press
ACCEPT.
SIMV-VOL
No Alarms
0 5 10 15 20 25 30L H
PRESSURE (cmH20)
Home
15
BPM
No Alarms
0 5 10 15 20 25 30L H
PRESSURE (cmH20)
Home
CLINICIAN
ACCESS
No Alarms
0 5 10 15 20 25 30L H
PRESSURE (cmH20)
Home
Please enter passcode
CLINICIAN
ACCESS
V O
Therapy MenuMonitors
430
mL
TIDAL VOLUME
V O
Therapy MenuMonitors
SETTINGS
& ALARMS
V O
Therapy MenuMonitors
Click OK to enter Clinician
lick OK to ent
for clinician access
Access mode.
m
SETTINGS
ETTIN
& ALARMS
Preset 1
VENT PRESETBREATH RATE
SIMV-VOL
SETTINGS
SIMV-VOL
SETTINGS
NIGHT MODE
LOGSPRE-USE TEST DEVICE
i
MY VOCSN
123
Menu
456
7089
LOGSPRE-USE TEST DEVICE
ACCEPTCANCEL
i
MY VOCSN
If the UNLOCK REQUIRED? control is set to No, all VOCSN
controls will be configurable by any VOCSN user. When set to Yes ,
controls set to Clinician Only in the PERMISSIONS screen will be
No Alarms
0 5 10 15 20 25 30L H
PRESSURE (cmH20)
Home
Therapy MenuMonitors
V O
SIMV-VOL
locked.
LOGSPRE-USE TEST
i
MY VOCSN
EDIT
V O
SIMV-VOL
PRESET 2PRESET 2PRESET 1PRESET 1
DEVICE
SETTINGS
R
PERMISSIONS
X
To enable or disable the Clinician Access feature:
1 Press DEVICE SETTINGS in the Menu tab.
2 Press edit, and then change the UNLOCK REQUIRED?
control to Yes or No.
SETTINGS
& ALARMS
C
C
COUGH
COUGH
C
O
NEBULIZE
N
S
N
CLINICIAN
ACCESS
No Alarms
0 5 10 15 20 25 30L H
PRESSURE (cmH20)
PRESCRIPTIONS
EXIT
INSUFFLATION TIME
ALARM VOLUME
DATE
TIME
CALIBRATE TOUCHSCREEN
UNLOCK REQUIRED?
ENABLE PRESCRIBED
THERAPIES
DEVICE
SETTINGS
3.0 seconds
Medium
2017-09-30
02:32 PM
Yes
VentecLife.com 4
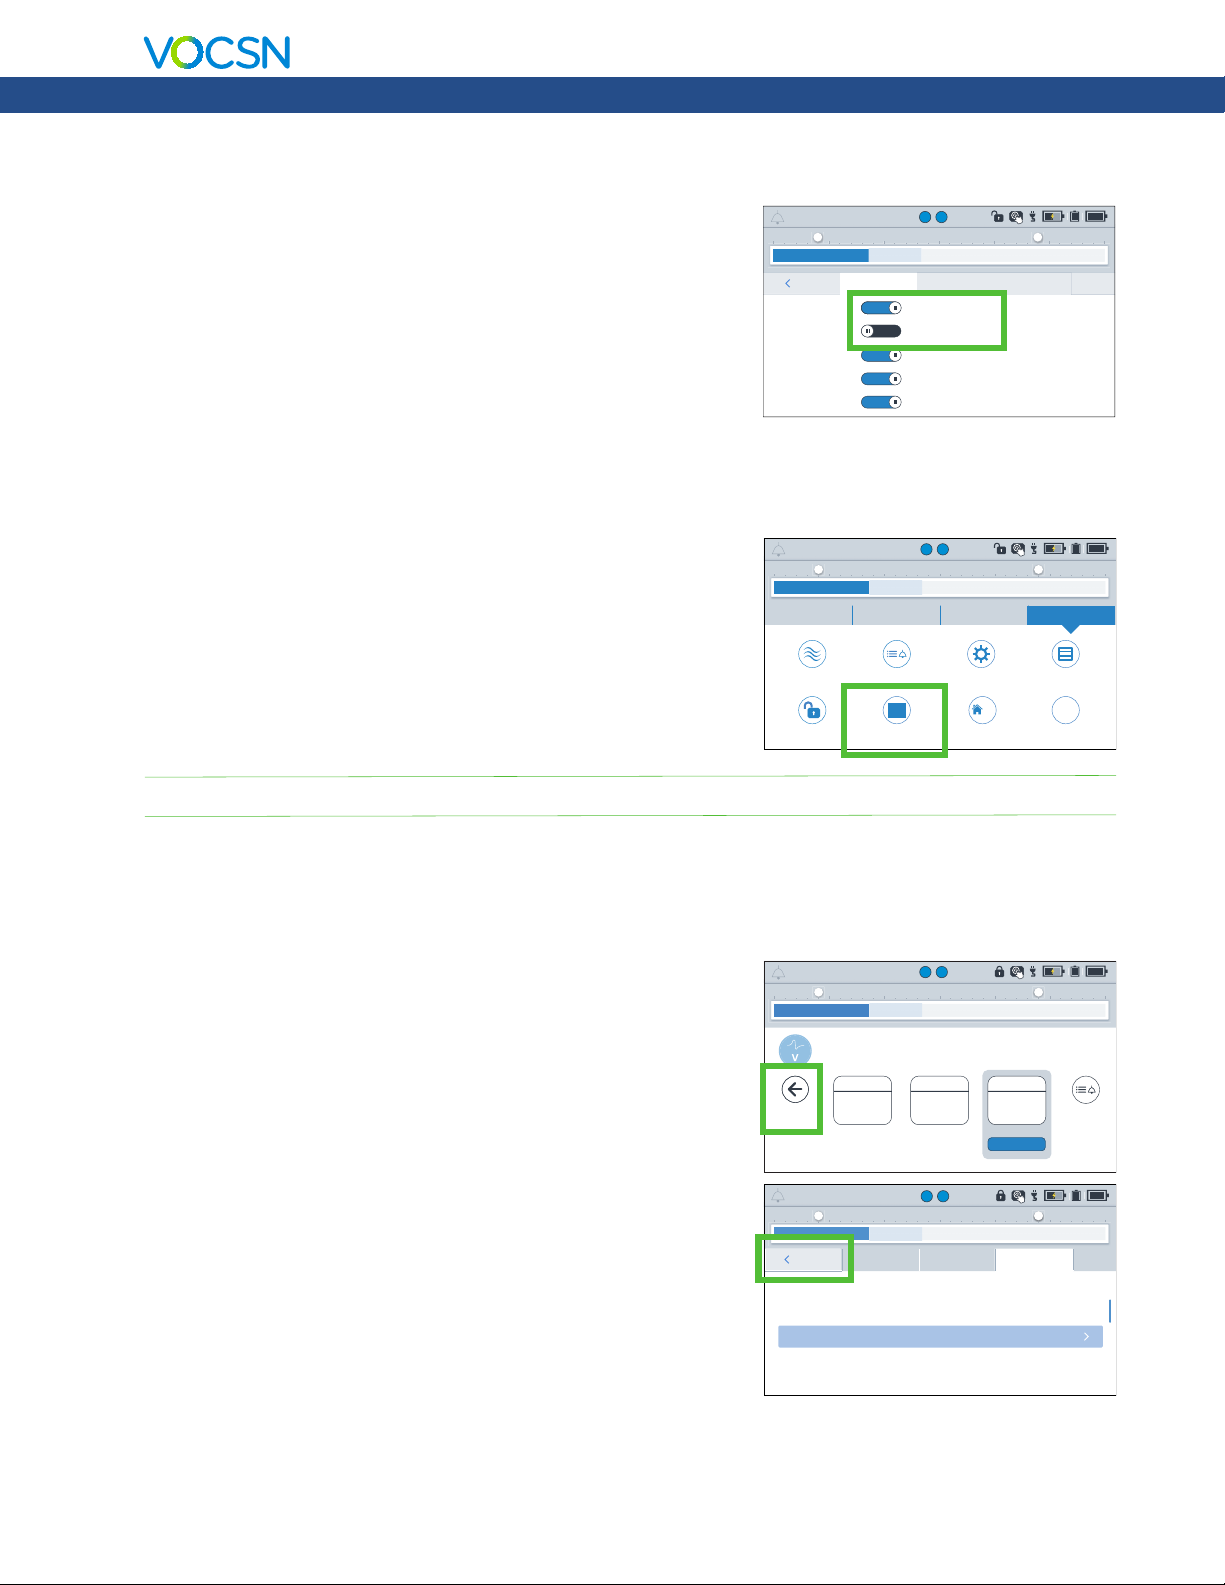
Permissions
Clinical Quick Start Guide
Using the Permissions feature, VOCSN can be locked so that a
Clinician Access passcode is required to change controls. To
configure which controls are locked, press PERMISSIONS in the
Menu tab. Then, use the toggles to set each control.
• User and Clinician - Unlocked. Accessible at all times.
• Clinician Only - Locked. Control changes require the
Clinician Access passcode.
Enable Prescribed Therapies
Press the ENABLE PRESCRIBED THERAPIES
button to enable or disable VOCSN therapies
such as the internal O2 Concentrator, Cough,
Suction, Nebulizer, and/or the FiO2 Monitor.
This feature allows clinicians to enable a suite of
therapies appropriate for the patient condition,
and disable others.
SIMV-VOL
No Alarms
0 5 10 15 20 25 30L H
PRESSURE (cmH20)
EXITEXIT
CIRCUIT TYPE
MODE
HUMIDIFICATION
BREATH RATE
INSPIRATORY TIME
No Alarms
0 5 10 15 20 25 30L H
PRESSURE (cmH20)
Home
CLINICIAN
ACCESS
VENTILATOR
VENTILATOR
VENTILATOR
PERMISSIONS
PERMISSIONS
PERMISSIONS
V O
COUGH
COUGH
COUGH
PERMISSIONS
PERMISSIONS
PERMISSIONS
User and Clinician
Clinician Only
User and Clinician
User and Clinician
User and Clinician
V O
Therapy MenuMonitors
SETTINGS
& ALARMS
C
C
COUGH
COUGH
C
O
NEBULIZE
N
S
N
ENABLE PRESCRIBED
THERAPIES
SIMV-VOL
DEVICE
SETTINGS
PERMISSIONS
R
X
NEBULIZER
NEBULIZER
NEBULIZER
PERMISSIONS
PERMISSIONS
PERMISSIONS
LOGSPRE-USE TEST
i
MY VOCSN
NOTE: The Enable Prescribed Therapies button is only visible when VOCSN is in Clinician Access mode.
Exit Buttons
VOCSN software has two types of EXIT buttons to navigate to the
previous screen:
• Inside therapy screens, the EXIT button appears as a
back arrow on the left-hand side of the screen.
• Inside configuration screens, the EXIT button will
appear as a tab in the upper left-hand corner.
No Alarms
0 5 10 15 20 25 30L H
PRESSURE (cmH20)
EXIT
No Alarms
0 5 10 15 20 25 30L H
PRESSURE (cmH20)
MODE
CIRCUIT TYPE
TIDAL VOLUME
BREATH RATE
INSPIRATORY TIME
PEEP
SIGH
Prepare patient circuit for ventilation,
select preset, and press START to begin.
SIMV-VOL
NOW ACTIVE
SIMV-VOL
Active
450 mL
20 BPM
1.0 seconds
10 cmH20
OFF
SIMV-VOL
V O
NIGHTDAY
AC-PRES
SIMV-VOL
V O
NIGHTDAYEXIT MOBILE
MOBILE
SIMV-PRES
ACTIVE NOW
STARTSTART
PRESS TO EDIT
25 30
H
PRESS TO EDIT
SETTINGS
& ALARMS
EDIT
VentecLife.com 5

Clinical Quick Start Guide
VOCSN Placement
When selecting a place to operate VOCSN, keep the following in mind:
• Do not block VOCSN air inlets and vents.
• Do not operate VOCSN on its back or on compliant bedding, which may obstruct the airflow
around it.
• Do not cover VOCSN with towels or other materials.
• VOCSN should be placed in a well-ventilated area, free of airborne pollutants, contaminants, and
fumes.
• Always have a backup means of ventilation available, as well as a backup means of any other
therapy critical to patient care.
• Do operate VOCSN near smoke, open flame, or heat sources while Oxygen therapy is in use. This
could cause fire or explosion and serious harm to the patient.
• Over time, direct sunlight may compromise the integrity of VOCSN plastic housing or the Ventec
One-Circuit. Place VOCSN in a location that is not exposed to extended periods of direct
sunlight.
• Ensure the environment is within the recommended operating range of temperature, altitude, and
relative humidity for VOCSN. (5 to 40 °C, 700 to 1060 hPA, 15% to 90% RH)
Powering VOCSN
Use the Power button on the front right side of VOCSN to turn it on
and off. Listen for two audio tones every time you power on
VOCSN. This verifies the VOCSN backup buzzer, which is used in
case of an Inop alarm condition or issue with the VOCSN speaker.
Power
The Power Supply
Whenever possible, connect VOCSN to an external source of continuous power. Verify the external power
indicator appears on the touchscreen when VOCSN in plugged in.
button
2
1
VentecLife.com 6
 Loading...