

Ventech 800 Installation Instructions Manual

9HQWHFK
9 HQWLODWLRQ7HFKQRORJ\/WG
Ventech 800 Range hood
Installation Instructions
IMPORTANT SAFETY INSTRUCTIONS
PROTECT SURFACES
Stainless steel is very easily damaged during
installation if abraded or knocked by tools.
It is recommended to protect the polished
surface of the range hood with cardboard or
polystyrene during the installation to minimise
the risk of damage occurring.
To reduce the risk of damage occurring to the
cooktop, it is recommended that the surface of
the cooktop is protected with thick cardboard
or a similar object during installation of the
range hood.
WEIGHT HAZARD
The range hood is heavy. Weight of the hood is
18kg!
Please ensure adequate care is taken when
installing the range hood to prevent personal
injury.
It is recommended that two people install this
range hood.
The range hood must be installed onto a solid
xing.
ELECTRIC SHOCK HAZARD
Always disconnect the appliance from the
mains power supply before carrying out any
maintenance or repairs. Alterations to the
domestic wiring system must be made by a
qualied electrician.
Failure to follow this advice may result in electric
shock or death.
QUALIFIED PERSON
This appliance must be installed and
connected to the mains power supply only by
a suitably qualied person according to these
installation instructions and in compliance with
any applicable local building and electricity
regulations. Failure to install the appliance
correctly could invalidate any warranty or
liability claims.
INSTALLATION
• Ensure bench top and range hood surfaces
are suitably protected before installation.
• The most common attachment method is
illustrated. Other options, including using
threaded rod, may be applied.
• The range hood supporting xtures must be
sturdy enough to safely support the range
hood.
• The joinery cut out dimensions are shown
overleaf.
• The spigot of the range hood is removable.
If necessary the ducting can be attached to
the spigot prior to tting the range hood to
joinery.
• Fit the range hood to the supports, this
requires two people.
• Take care not to over tighten the xing
screws as distortion to the rim may occur.
• If required re-attach the spigot to the range
hood.
• The hood has two glands to allow wiring to
be routed to the connection box.
• Make required electrical connections.
• Remove plastic lm from lters and t lters.
• Remove plastic lm from lower surface of
the range hood.
• Check all functions of the range hood are
operational.
Everything is possible with Ventech as your Partner
www.ventech.co.nz
Ventech 800mm Range Hood – INSTALLATION
Designed and manufactured in New Zealand
the Sound of Silence
T 0800 VENTECH
(0800 8368324)
M 027 279 6399
E enquiries@ventech.co.nz
www.ventech.co.nz
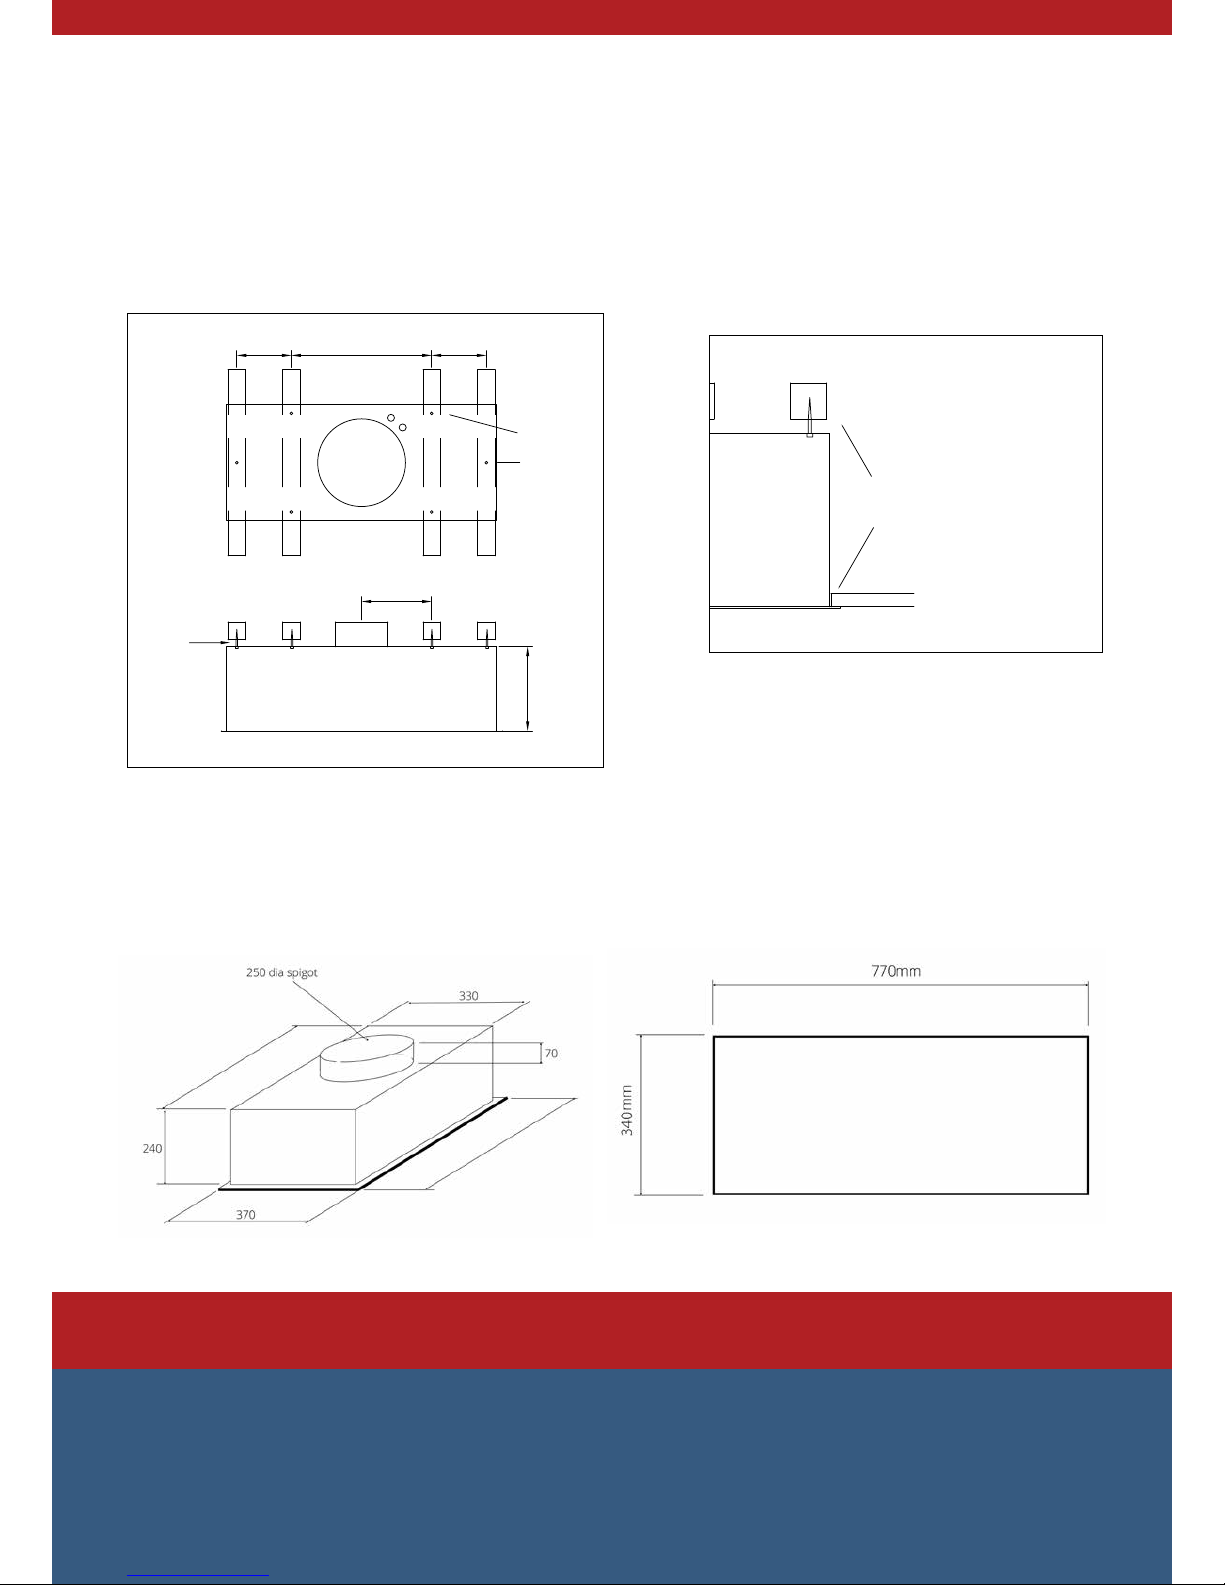
Ventech 800mm Surface Mounted Range Hood – DIMENSIONS
800
760
Exterior Joinery cut-out
6 x M8
mounting
screws
Only tighten mounting
screws so the rim just
contacts the joinery.
200
400
156
156
Warning; Do not over tighten mounting screws
Mount range hood by screwing through the mounting holes into fixings located as shown. Other mounting holes can be drilled if necessary
avoinding cables and components inside the range hood.
240
Minimum
clearance
5mm
Warning: Do not over tighten mounting screws
 Loading...