

VENTCROFT ICU freedom User Manual

Draft 3
Printed: 09/07/2003
Page 1 doc: icu_kit_user_maunul_090703.doc
ICU freedom
USER GUIDE
Wireless Intruder Alarm System
WWW.VENTCROFT.CO.UK
16 Wireless Zones
4 Wired Zones
Wireless Remote
Wireless PA’s
2 User Codes
4 Set Levels
Chime Zones
Quick Set Option
Low Battery
Warning
Security without wires
VENTCROFT LTD
GODDARD ROAD
ASTMOOR INDUSTRIAL ESTATE
CHESHIRE.
WA7 1NQ
UK
©

Draft 3
Printed: 09/07/2003
Page 2 doc: icu_kit_user_maunul_090703.doc
Table of Contents
1.0 USING THE SYSTEM................................................................................................................ 3
1.1 AN OVERVIEW ..........................................................................................................................................................3
2.0 SETTING AND UNSETTING THE SYSTEM ............................................................................. 4
2.1 SIMPLE FULL ARMING OF THE SYSTEM USING THE ONBOARD KEYPAD ..........................................................................4
2.2 DISARMING SYSTEM INTO “DAY / UNSET” .................................................................................................................... 5
2.4 QUICK SETTING THE SYSTEM. ...................................................................................................................................6
2.4.1 Reduced Exit Timer..........................................................................................................................................6
2.4.2 Instant Setting .................................................................................................................................................. 6
2.5 DISARMING AND RESETTING THE AFTER AN ALARM ACTIVATION .................................................................................. 7
2.5.1 Disarming and Resetting after an Alarm activation..........................................................................................7
2.5.2 Disarming and Resetting the system when the alarm is sounding.................................................................. 7
2.6 SETTING / UNSETTING AND RESETTING QUICK KEYS SEQUENCES ...............................................................................8
3.0 USING WIRELESS REMOTE CONTROLLERS WITH THE ICU SYSTEM .............................. 9
3.1 SETTING AND UN-SETTING THE SYSTEM .....................................................................................................................9
3.1.1 Full Setting / Arming......................................................................................................................................... 9
3.1.2 Part Set arming the system (Omitting Zones)................................................................................................ 10
3.1.3 Disarming System into “Day / unset” .............................................................................................................10
3.2 PERSONAL ATTACK .................................................................................................................................................11
3.3 QUICK KEYS SEQUENCES........................................................................................................................................ 12
4.0 USER PROGRAMMABLE FEATURES .................................................................................. 13
4.1 RECALLING ALARM EVENTS.....................................................................................................................................13
4.3 CHANGING THE SECONDARY PIN CODE.................................................................................................................... 15
4.4 ENABLING / DISABLING CHIME ZONES ......................................................................................................................16
4.5 TESTING THE EXTERNAL AND INTERNAL SIRENS AND STROBE. ..................................................................................17
4.5.1 Testing the External and Internal Sirens........................................................................................................ 17
4.5.2 Testing the Strobe.......................................................................................................................................... 17
4.6 WALK TESTING THE SYSTEM ................................................................................................................................... 18
4.7 USER QUICK KEYS SEQUENCES............................................................................................................................... 18
5.0 DISPLAY REFERENCES ........................................................................................................ 18
5.1 GENERAL DISPLAY INDICATION ................................................................................................................................18
5.1 ALARM ACTIVATION DISPLAY INDICATION ................................................................................................................. 18
6.0 QUICK KEY REFERENCES.................................................................................................... 18
7.0 SYSTEM MAINTENANCE....................................................................................................... 18
7.1 TESTING.................................................................................................................................................................18
7.1.1 Testing all Intruder detection devices. ...........................................................................................................18
7.1.2 Testing siren & strobe. ................................................................................................................................... 18
.1.3 Testing Remote PA Devices. ........................................................................................................................... 18
7.2 BATTERY REPLACEMENT..........................................................................................................................................18
7.3 BATTERY MONITORING AND LOW BATTERY WARNINGS .............................................................................................18
8.0 SYSTEM RECORDS .............................................................................................................. 18
8.1 ZONE PROGRAMMING AND ATTRIBUTE RECORDS ...................................................................................................... 18
8.2 TIMERS AND OPTIONS .............................................................................................................................................18
8.3 SYSTEM MAINTENANCE LOG....................................................................................................................................18
8.4 INSTALLATION DETAILS............................................................................................................................................ 18
8.5 NOTES ...................................................................................................................................................................18
Draft 3
Printed: 09/07/2003
Page 3 doc: icu_kit_user_maunul_090703.doc
1.0 Using the System
1.1 An Overview
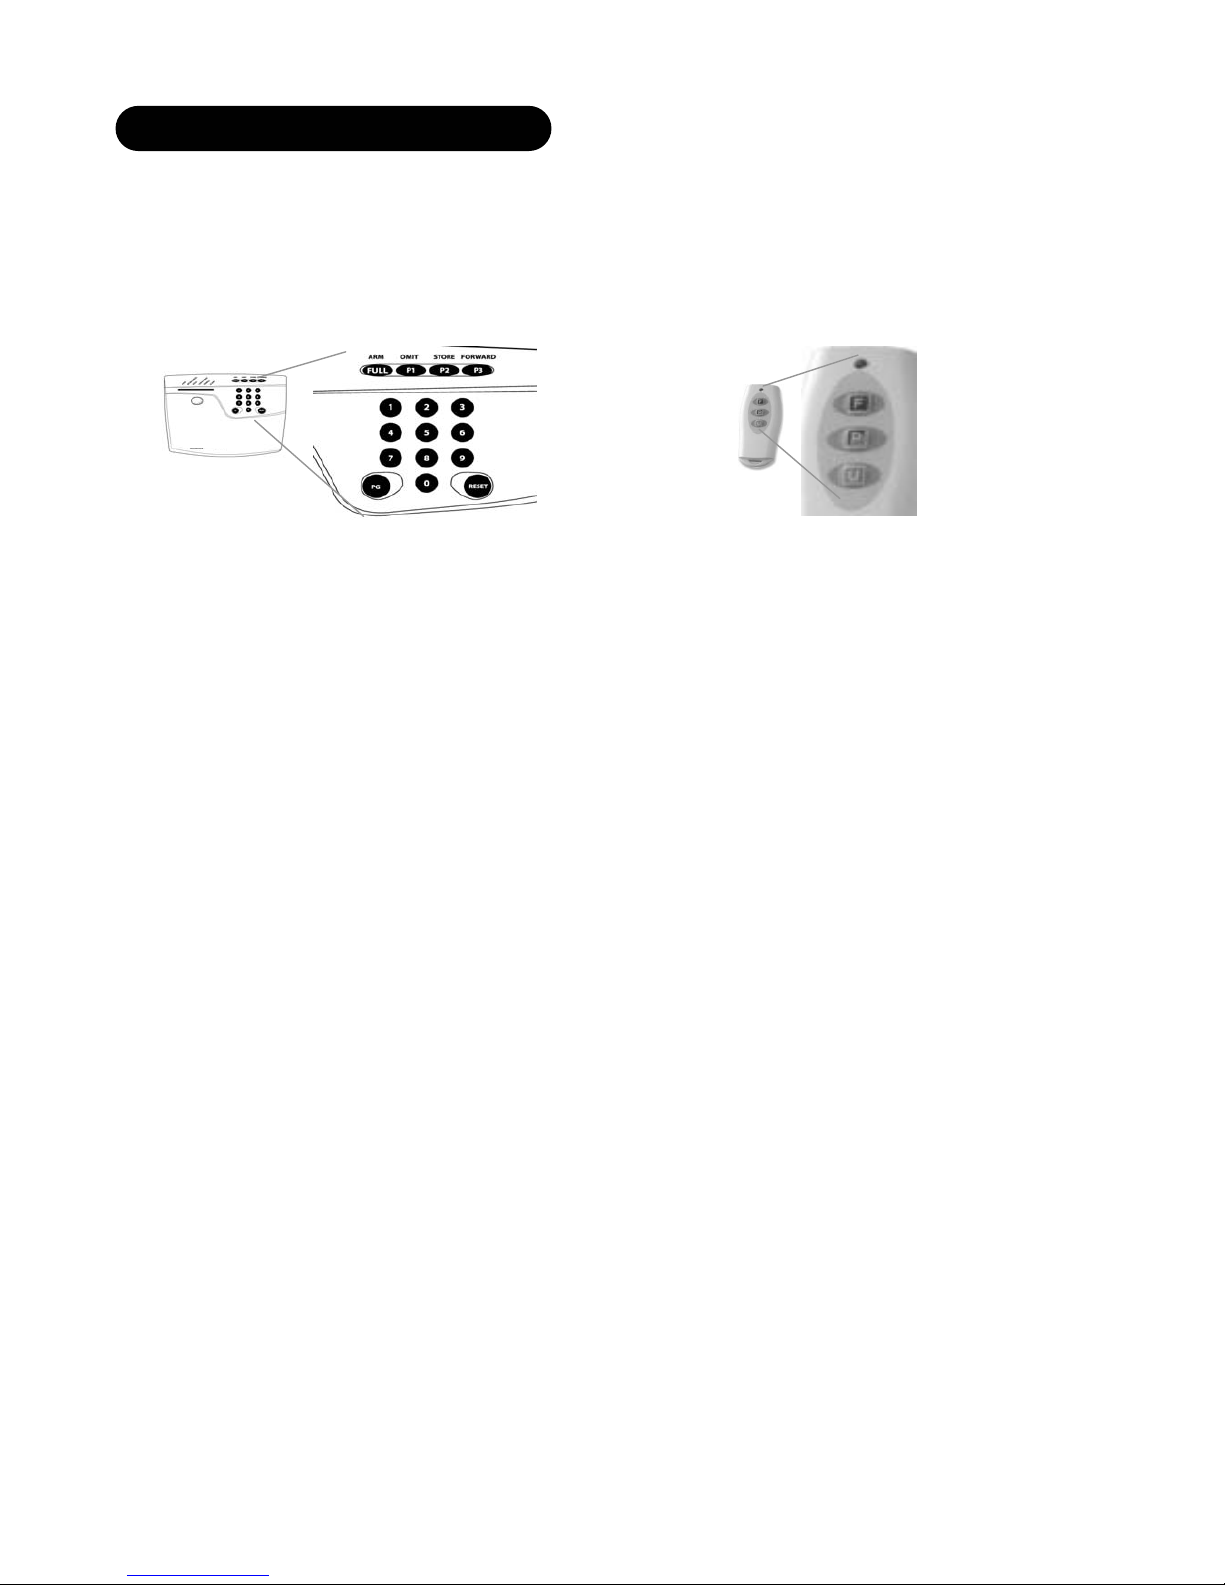
The ICU system may be set and unset by utilising either the on bored key pad on the control unit
or by utilising a wireless remote control, which can also act as a Personal Attack button. The on
board key pad is also used to program and change system features and settings.
ICU 23 key Pad ICU Wireless Remote Control
Setting and Un-setting the System
The system has four set levels “Full set”, “Part set 1” , “Part set 2” and “Part set 3”, when no
protection is required the system is “day / unset”.
The System has two user codes, the master user code which is “1234” and the standard
secondary user code which is “5678”. The Secondary user code is not enabled by factory default,
and must be enabled by the engineer before it can be used.
Both user codes can be used to set, unset and reset the system, but only the master user code
can make programming changes to the system.
Code Protection
Incorrect code entry is protected with an automatic keypad lockout, should the code be entered
incorrectly Five times the key pad will lockout for 1 minute, and will not respond to key presses. If
this occurs wait 1 minute then re-enter the correct code.
Programming and Enabling Features.
The ICU W16 has many programmable features allowing the user to personalise the system, such
as programmable user and secondary user codes, chimes zones,
Walk testing
At regular intervals the system should be fully tested by walk testing the intruder detection devices
and remote PA devices, testing the external sounder and strobe unit and testing any signalling
devices such as digital dialling devices.
Draft 3
Printed: 09/07/2003
Page 4 doc: icu_kit_user_maunul_090703.doc
2.0 Setting and Unsetting the System
Setting and Un-setting
When arming the system, check that all doors and windows (particularly those fitted with a door/window
contact) are securely closed and that all PIR detectors have an unobstructed view of the areas they cover,
If the users attempts to set the system while any zones are open the control unit will provide a bad bleep
and return to day mode, and will not set. To “set / arm” the system ensure all windows and doors are
closed and set the system.
Once armed, the display on the control unit will go blank and the external strobe will activate for 5 seconds
confirming the system has set after you have left the premises
During the exit timer if any “Entry / Exit” zones or “walkthrough” zones are triggered they will be ignored, if
any instant zones are triggered the alarm system will activate a local alarm and sound the internal
sounders, to silence the alarm the code will need to be entered to cancel the activation.
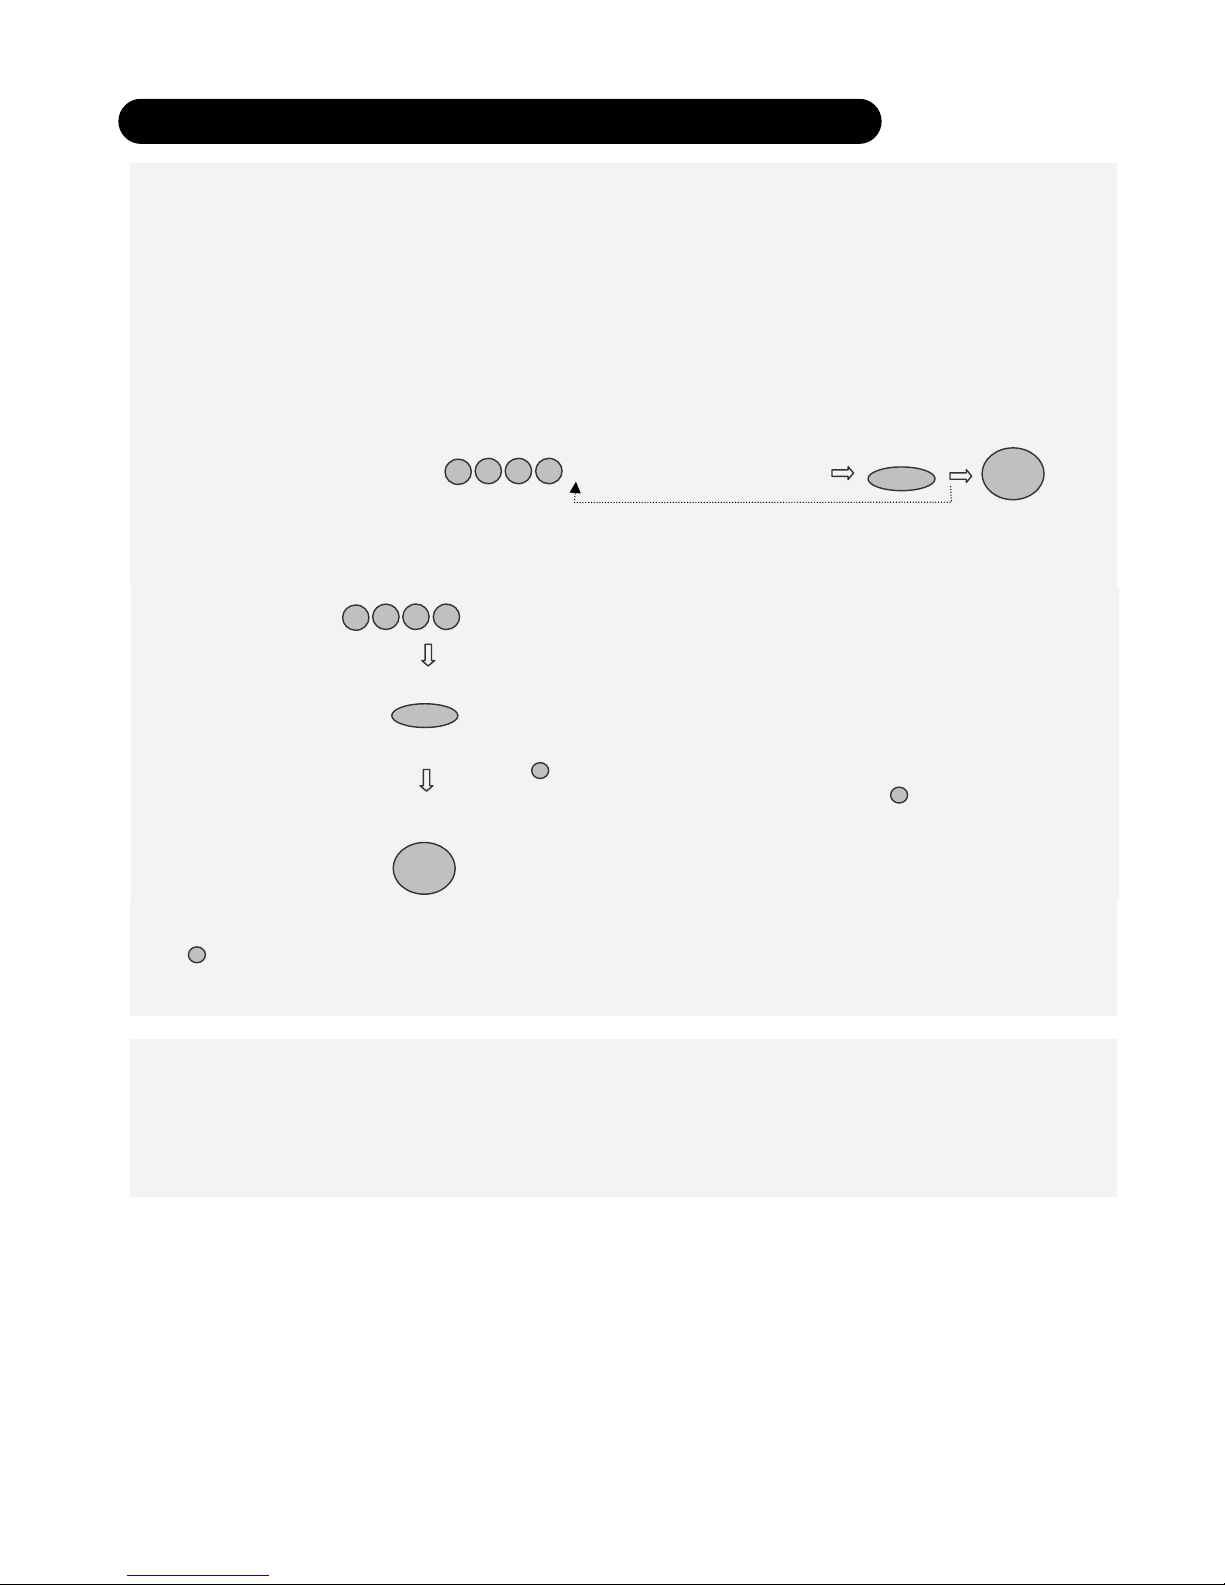
2.1 Simple Full Arming of the System using the onboard keypad
Before attempting to arm the system, check that all doors and windows (particularly those fitted with a
door/window contact) are securely closed and that all PIR detectors have an unobstructed view of the
areas they cover.
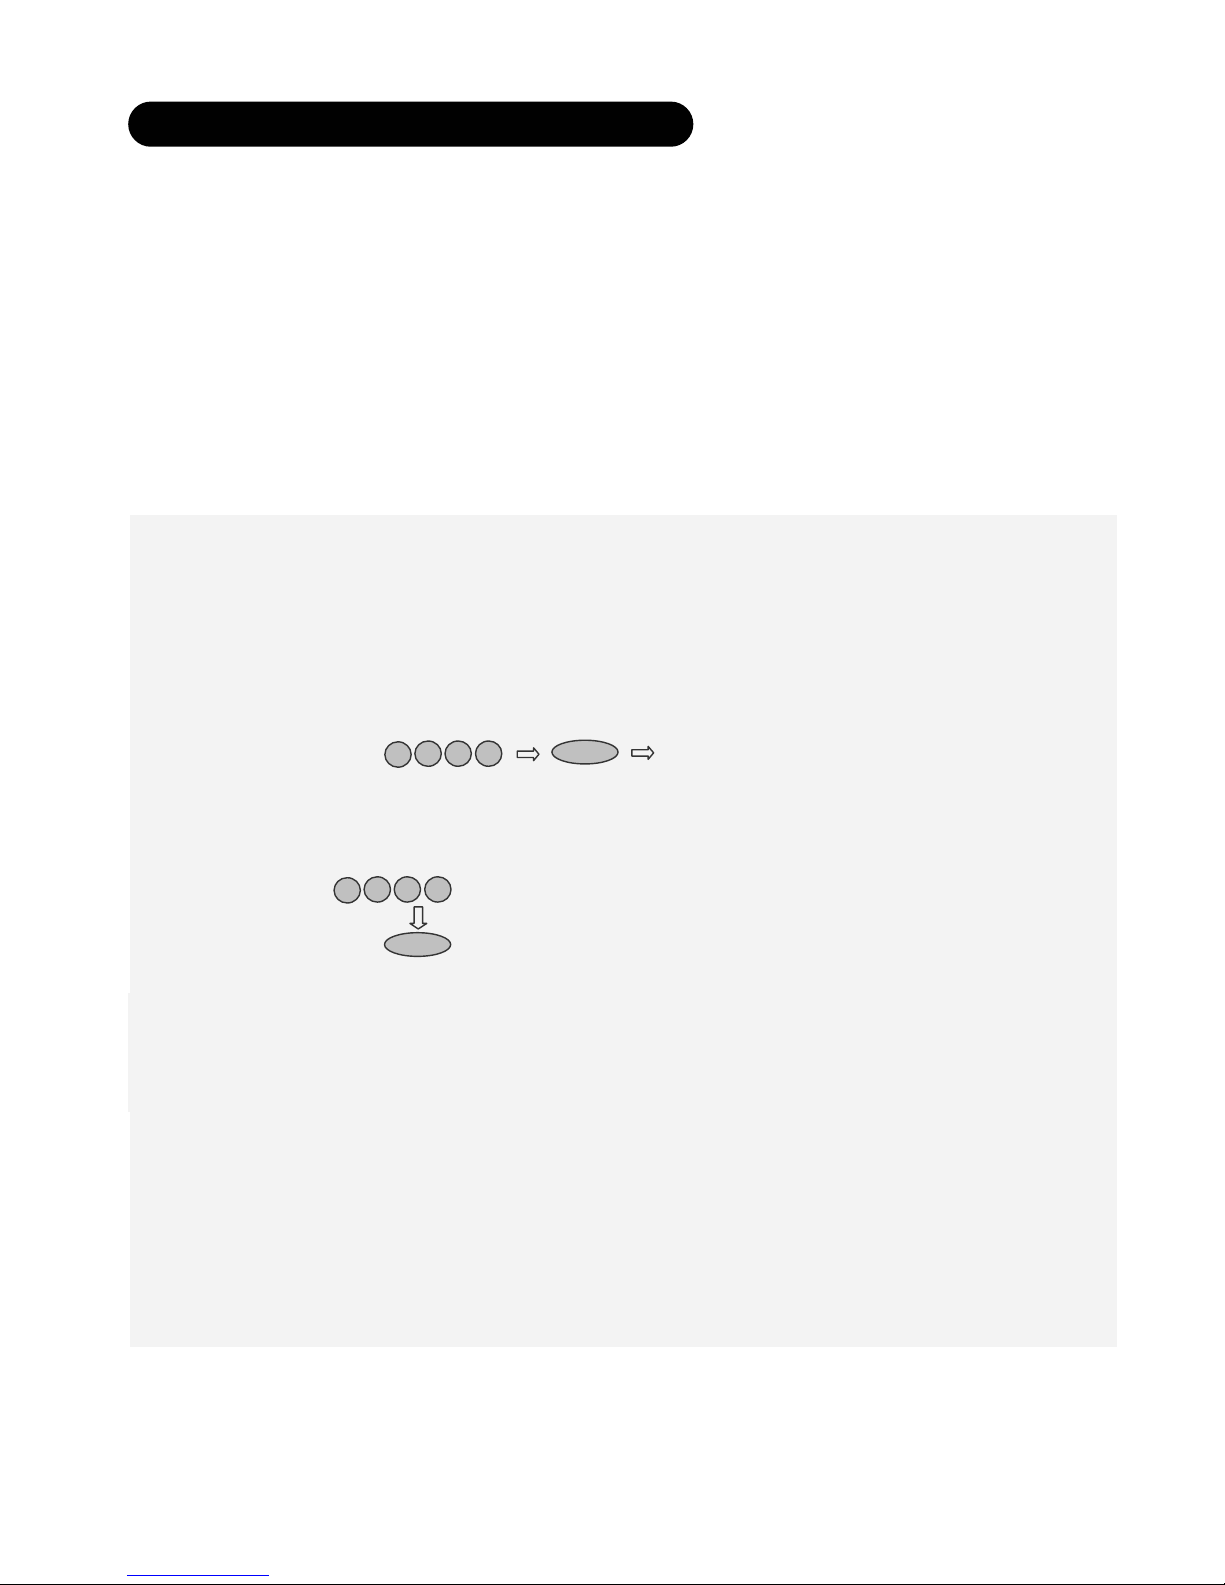
Quick key sequence
Press the following keys:
User or secondary user exit premises
Detailed Explanation
Press the following keys:
User or Secondary user OK beep, and display shows “ 0 0 ” flashing.
Exit countdown commences and the control unit beeps slowly,
displays shows “ F u ” flashing.
During the last 10 seconds of the exit countdown, the beeping gets faster as a final warning to leave the
premises.
Once armed, the display on the control unit will go blank and the external strobe will activate for 5 seconds
confirming the system has set after you have left the premises
If the users attempts to set the system while any zones are open the control unit will provide a bad bleep
and return to day mode, to set the system ensure all windows and doors closed and set the system.
During the exit timer if any “Entry / Exit” zones or “walkthrough” zones are triggered they will be ignored, if
any instant zones are triggered the alarm system will activate a local alarm and sound the internal
sounders, to silence the alarm the code will need to be entered to cancel the activation.
The Exit timer is factory set at 30 seconds.
FULL
D
C
O E
D
C
O E
FULL
Draft 3
Printed: 09/07/2003
Page 5 doc: icu_kit_user_maunul_090703.doc
2.2 Disarming System into “Day / unset”
When the system is in “Day / unset” the user is in residence and requires no intruder alarm protection. In
“Day / unset” mode the PA and all tamper are still active.
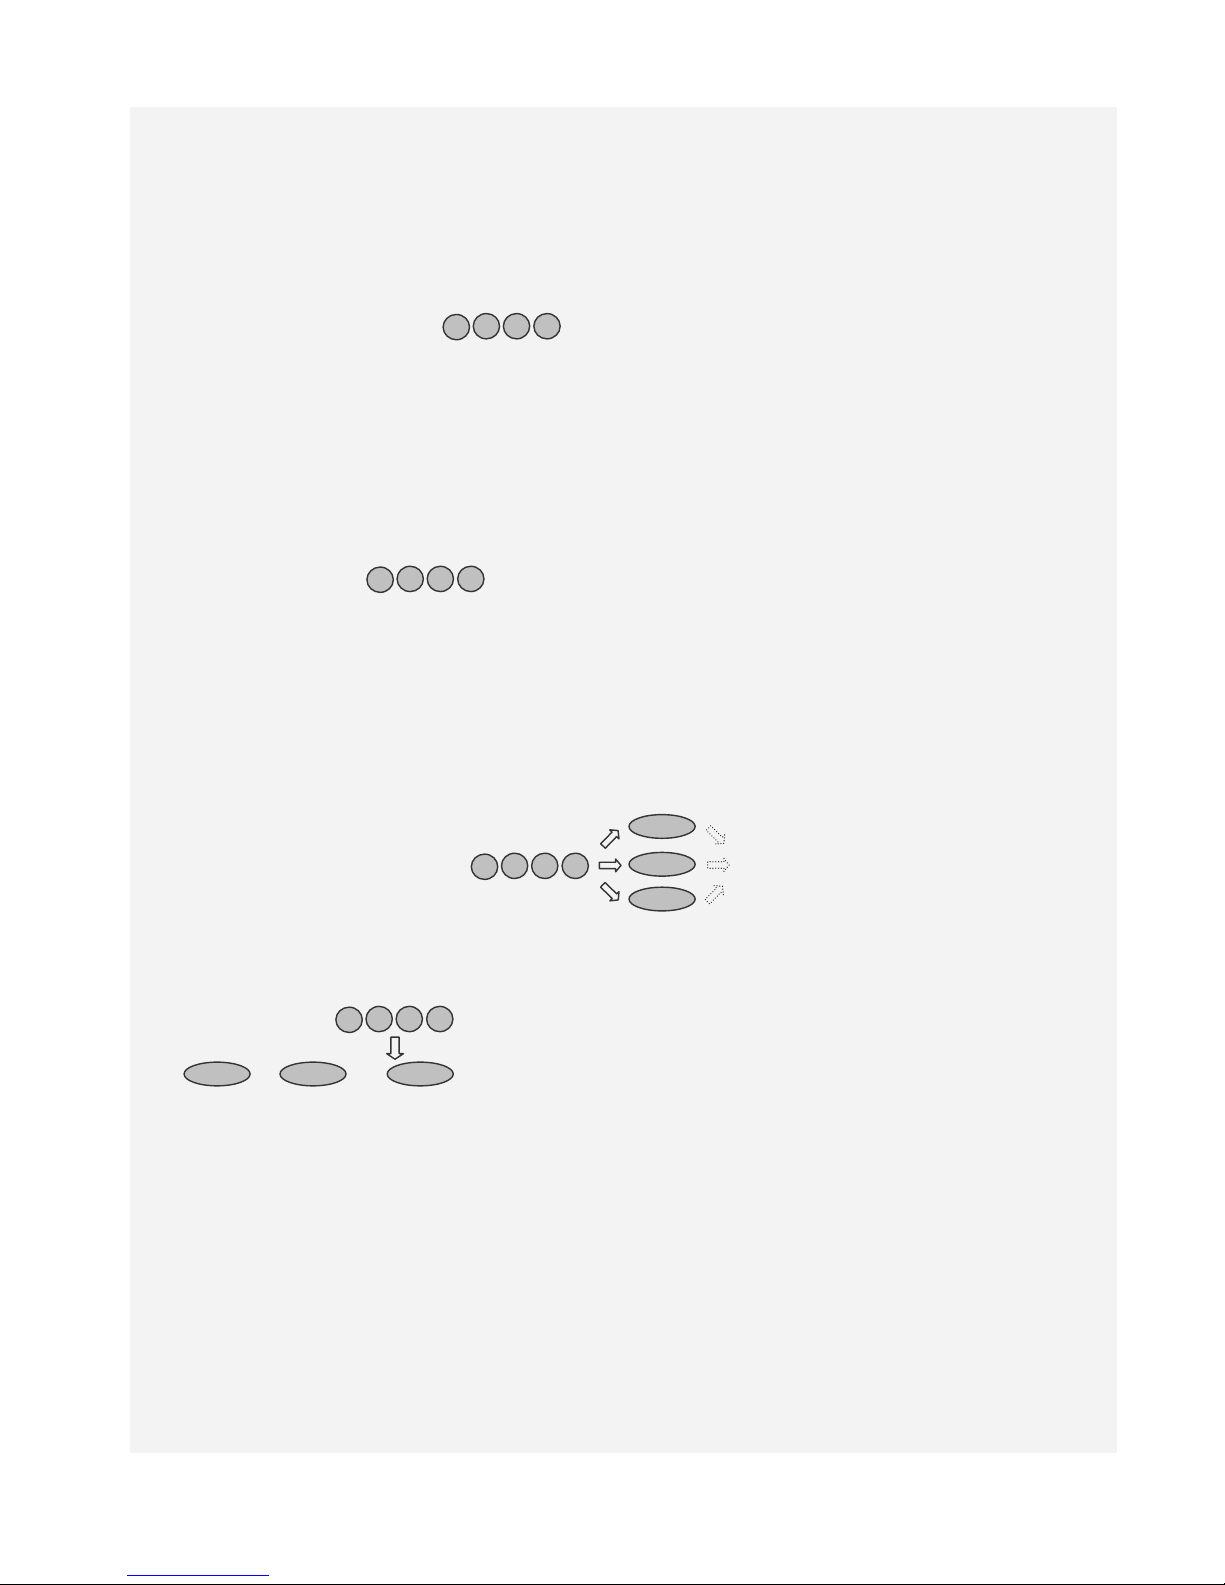
Quick key sequence
Press the following keys:
User or secondary user
Detailed Explanation
Enter the premises or protected area first passing through “Zone 1” or any entry/ exit / zones, The control
unit will begin to beep slowly indicating that you must disarm the alarm system within the entry exit time
(30 seconds default entry as with the exit timer, the beeps get faster in the last 10 seconds of the entry
time.
During the entry timer walkthrough zones will also act and entry exit zones also known as time inhibited
zones
User or Secondary user OK beep, and display shows “ 0 0 ” flashing.
This is the procedure to follow when disarming the system under normal circumstances (i.e. there has been no alarm
condition while the system was armed).
2.3 Part Set arming the system (Omitting Zones)
Quick key sequence
Press the following keys:
User or secondary user Leave protected area
Detailed Explanation
Press the following keys:
User or Secondary user OK beep, and display shows “ 0 0 ” flashing.
or or Exit countdown commences and the control unit beeps slowly, the
displays shows “ p 1 ” or “ p 2 ” or “ p 3 ” .
During the last 10 seconds of the exit countdown, the beeping gets
faster as a final warning to leave the premises.
Once armed, the display on the control unit will go blank and the external strobe will activate for 5 seconds
confirming the system has set after you have left the premises
If the users attempts to set the system while any zones are open the control unit will provide a bad bleep
and return to day mode, to set the system ensure all windows and doors closed and set the system.
During the exit timer if any “Entry / Exit” zones or “walkthrough” zones are triggered they will be ignored, if
any instant zones are triggered the alarm system will activate a local alarm, sounding the internal
sounders, to silence the alarm the code will need to be entered to cancel the activation.
Exit timer is factory set at 30 seconds.
D
C
O E
D
C
O E
D
C
O E
P2
P3
P1
P1 P2 P3
D
C
O E
Draft 3
Printed: 09/07/2003
Page 6 doc: icu_kit_user_maunul_090703.doc
2.4 Quick Setting the System.
Quick setting allows the user to arm the system more quickly by reducing exit timer. The are two options
for quick setting, either to reduce the exit time to 10 seconds (see 2.4.1) or set the system instantly with no
exit time (see 2.4.2) . Quick set is extremely useful at night when part setting the system as it reduces the
length of time the control panel will bleep before setting.
2.4.1 Reduced Exit Timer.
Setting the system with a reduced exit timer allows the user to arm the system with an exit time of 10
seconds rather than standard user programmed exit time.
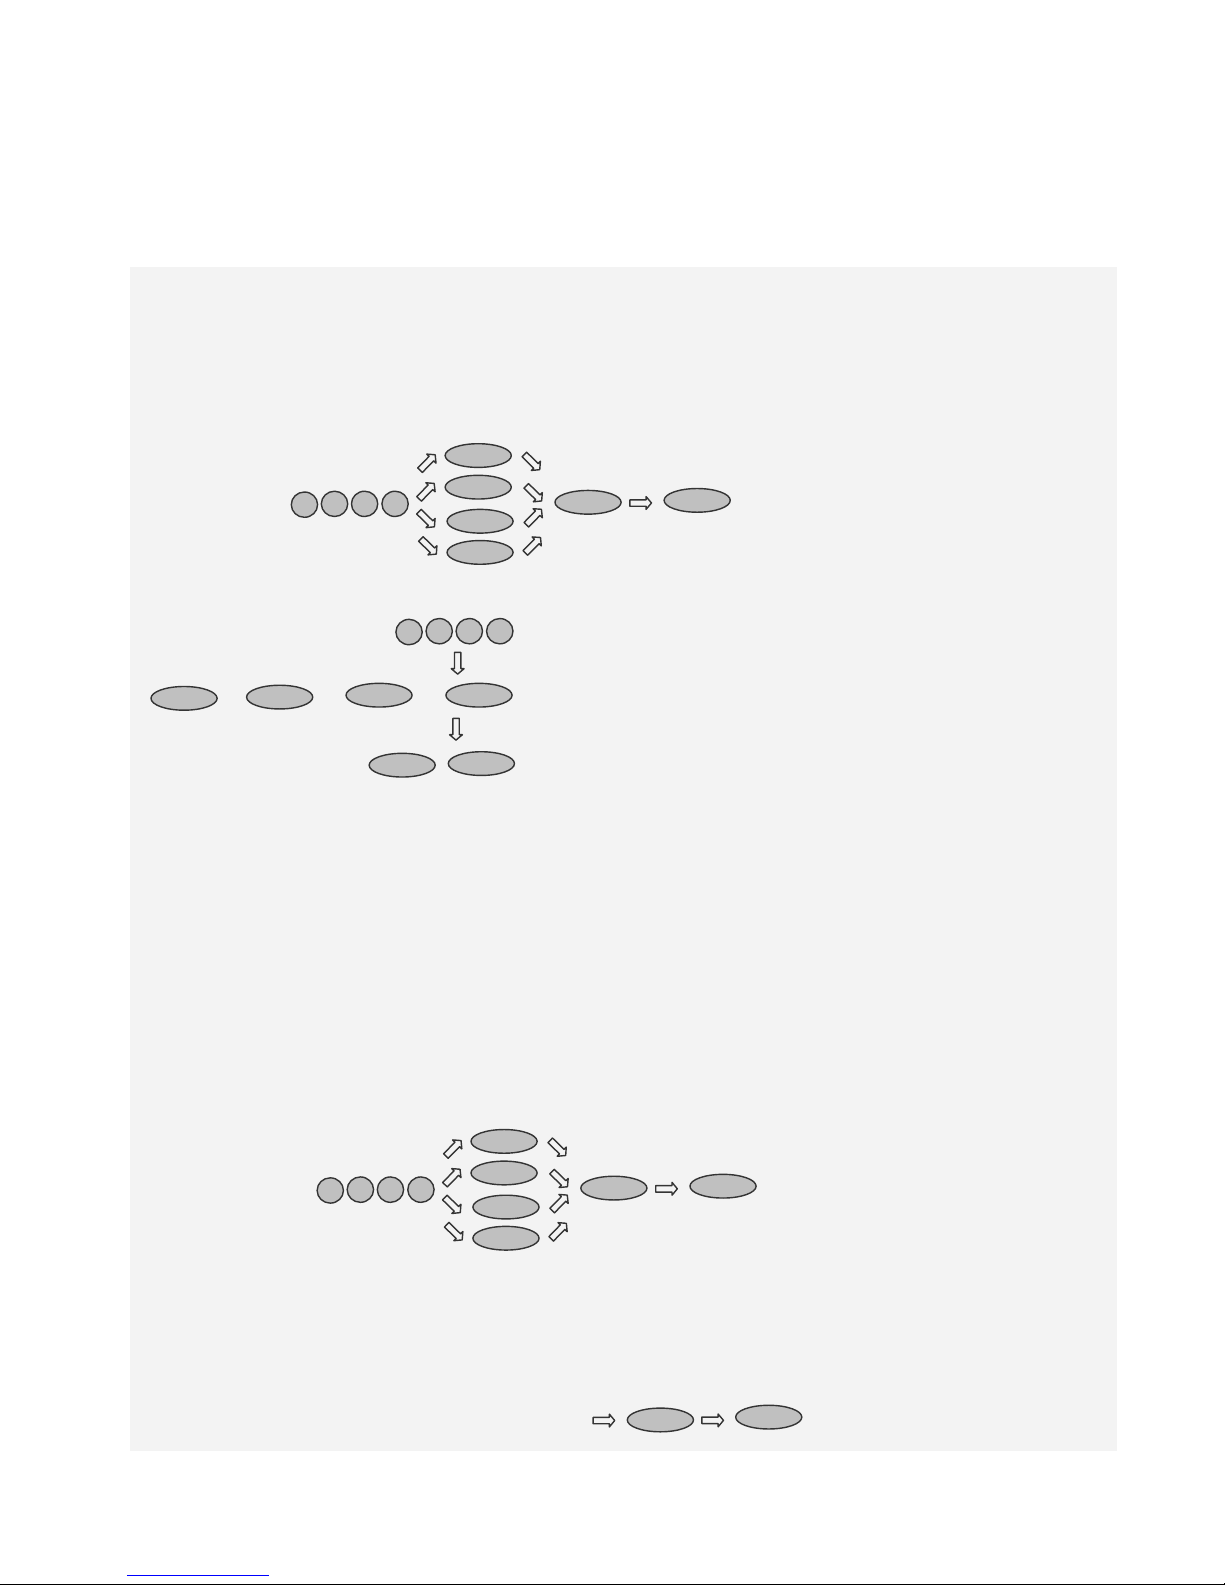
To utilise reduced exit time (quick set) simply press the following
Quick key sequence
User
Detailed Explanation
Enter the following;
User or Secondary user OK beep, and display shows “ 0 0 ” flashing.
or or or Exit countdown commences and the control unit beeps slowly
displays shows “ F u ” or the appropriate display.
The system will now set in 10 seconds, the beeping gets faster
as a final warning to leave the premises. Once armed, the
display on the control unit will go blank and the external strobe
will activate for 5 seconds confirming the system has set after
you have left the premises.
If the users attempts to set the system while any zones are open the control unit will provide a bad bleep
and return to day mode, to set the system ensure all windows and doors closed and set the system.
During the exit timer if any “Entry / Exit” zones or “walkthrough” zones are triggered they will be ignored, if
any instant zones are triggered the alarm system will activate a local alarm, sounding the internal
sounders, to silence the alarm the code will need to be entered to cancel the activation.
Quick setting options
Full setting
Part Set 1
Part Set 2
`
Part Set 3
2.4.2 Instant Setting
Instant setting the control system forces the exit timer to be to be bypassed and the system will set
instantly.
To utilises reduced exit quick set simply press the following
……begin quick setting system and press
FULL
P2 P3
FULL
D
C
O E
FULL
P1
FULL
FULL
P1
FULL
P2
P3
D
C
O E
FULL
FULL
P1
FULL
P2
P3
D
C
O E
FULL
FULL
Draft 3
Printed: 09/07/2003
Page 7 doc: icu_kit_user_maunul_090703.doc
2.5 Disarming and Resetting the after an Alarm Activation
2.5.1 Disarming and Resetting after an Alarm activation
If an alarm activation has occurred, the internal and external sounders will stop sounding after the
reprogrammed siren duration (10 minutes factory default and re-programmable).
When returning to premises with previously activated alarm system the sounder may have stopped
sounding and the external strobe as has continued to flash.
Instead of the entry timer, the control unit will beep every few seconds and the internal siren will sound
when zone 1 is triggered or any other entry zone is triggered.
Quick key sequence
Enter User or secondary user Ö activated zones displayed
Repeat as Necessary.
Detailed Explanation
Enter the following;
User or
Secondary user
OK beep, the display shows the first alarm activation event,
ie, “0 1 ,0 2 , 0 3 ….1 6 “ for wireless, and “D 1 ,D 2 , D 3, D 4” . If the
display flashes, then more than one alarm event has occurred
Display shows next alarm event flashing ie, “0 1 ,0 2 , 0 3 ….1 6 “ for
wireless, and “D 1 ,D 2 , D 3, D 4” for wired. In the unlikely event that
several alarm events have taken place since the system was armed,
press “ Forward “ again to view the further events, the last alarm
event will not flash when displayed, pressing “ Forward “ again
returns to the first alarm event.
Displays changes to “ 0 0 ” ,the control unit to returns to “day / unset”
The “ Reset“ key can be pressed at any time to cancel the above procedure and return the control unit to
“day / unset”.
2.5.2 Disarming and Resetting the system when the alarm is sounding.
If you accidentally trigger a detector when the system is armed, then the external and internal siren will
sound and the external strobe will flash. If an attempt was made to tamper with any part of the system with
the control unit in “day / unset”, then only the internal siren will sound.
To silence the system in such a case, follow the procedure in section ‘4.4.
D
C
O E
RESET
D
C
O E
P3
Forward
P3
Forward
RESET
FORWARD
FORWARD
FORWARD
Draft 3
Printed: 09/07/2003
Page 8 doc: icu_kit_user_maunul_090703.doc
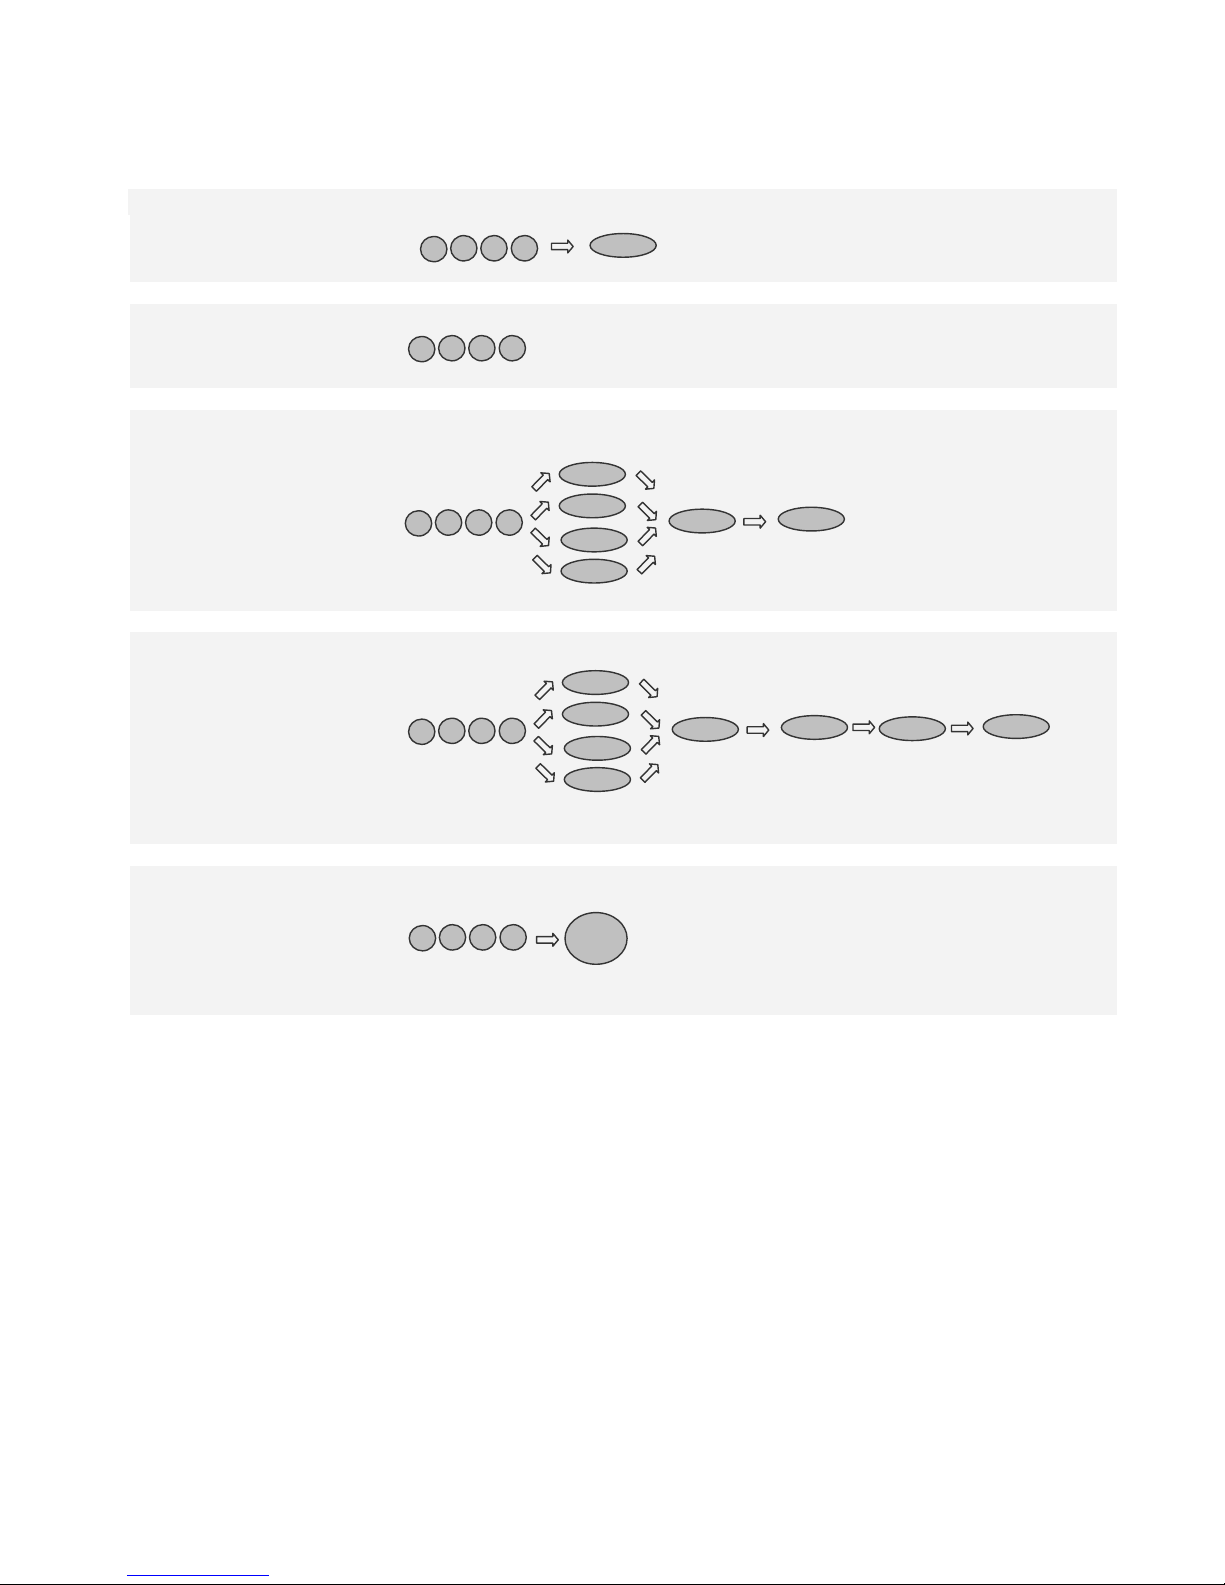
2.6 Setting / Unsetting and Resetting Quick Keys Sequences
Simple Full Arming the System using the onboard keypad
User or secondary user
Disarming the System
User or Secondary user
Arming with a reduced Exit Timer (Quick Setting)
User or secondary user
Arming with Instant Setting (No exit Timer)
User or secondary user
Disarming the System after an alarm activation
User or Secondary user
D
C
O E
FULL
D
C
O E
D
C
O E
RESET
P1
FULL
P2
P3
D
C
O E
FULL
FULL
P1
FULL
P2
P3
D
C
O E
FULL
FULL
FULL
FULL
Draft 3
Printed: 09/07/2003
Page 9 doc: icu_kit_user_maunul_090703.doc
3.0 Using Wireless Remote Controllers with the ICU system
The System can be “Full set”, “Part set 3” and “day / unset” with the wireless remote controls, they can
also act as wireless remote “PA” Buttons. Up to 3 Remote Controllers can be programmed into the ICU
Freedom Control unit. The wireless remote control unit can not reset a PA alarm that has been activated, to
reset the system it must be done via the on board keys pad.
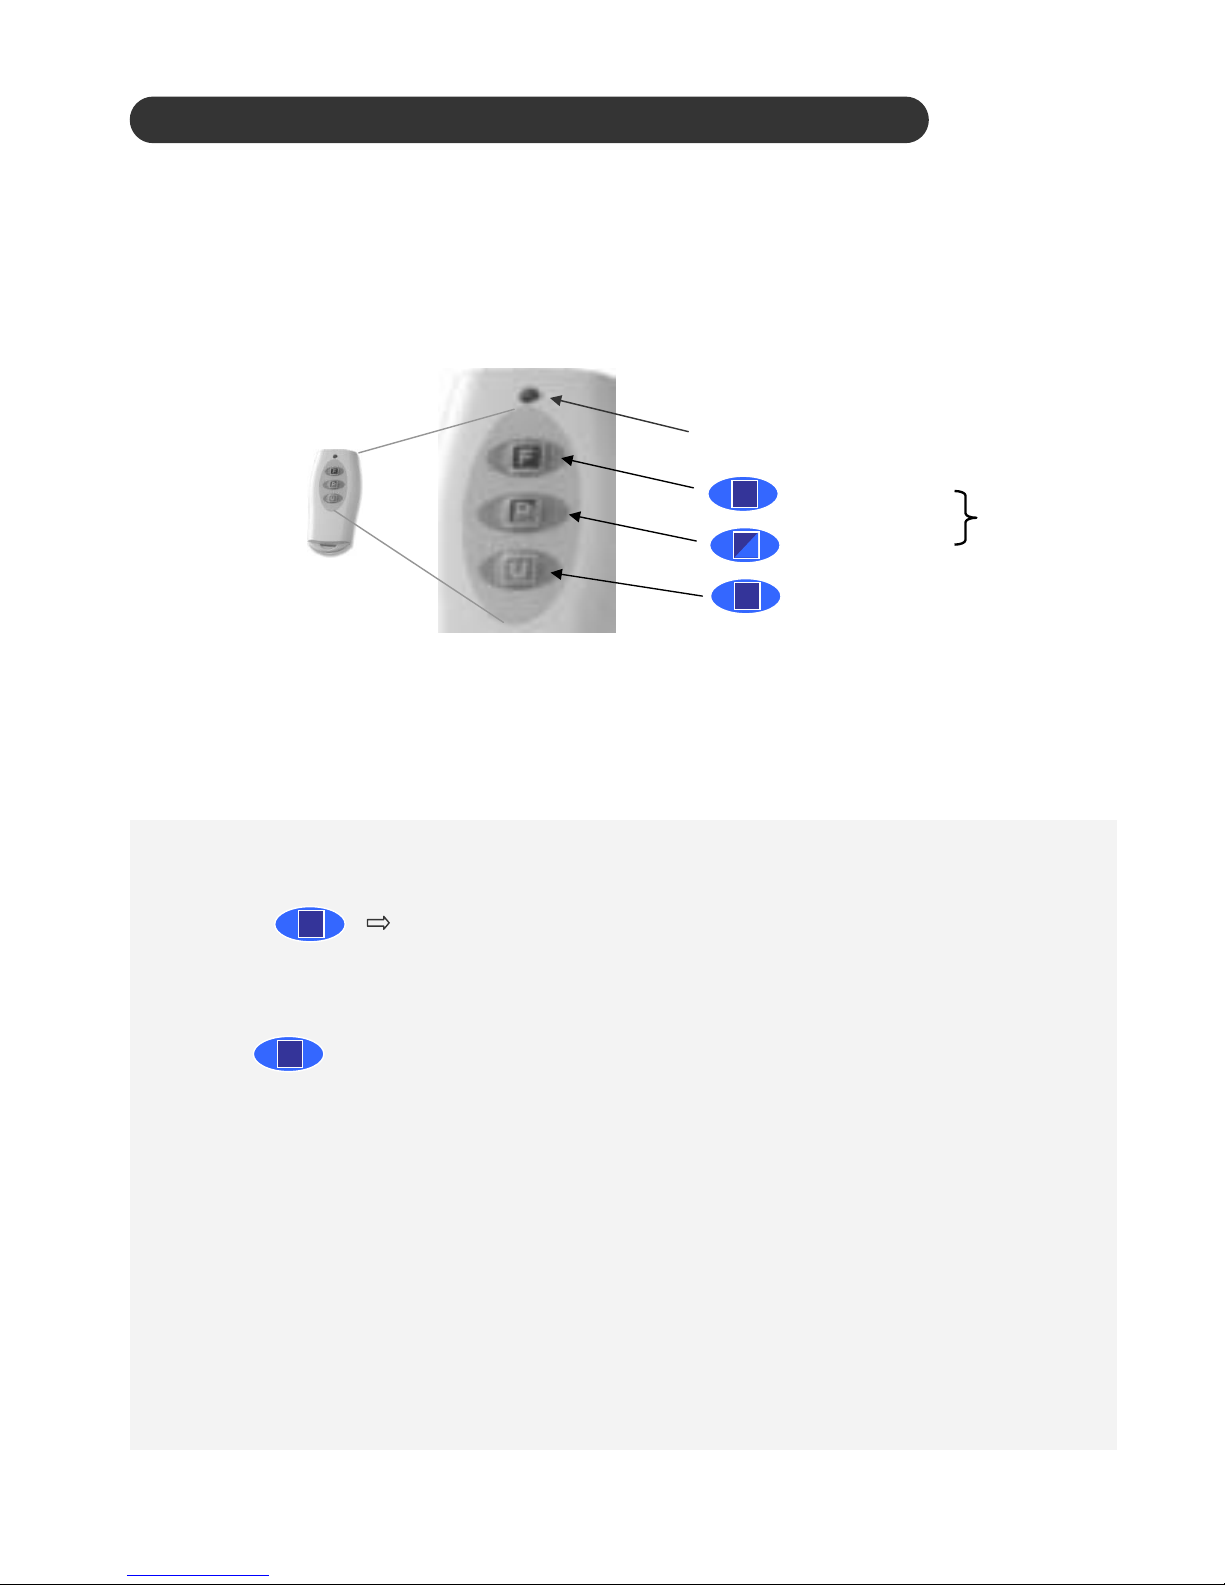
When any button is pressed on the wireless remote control the LED will flash showing a button has been
pressed.
3.1 Setting and Un-setting the System
3.1.1 Full Setting / Arming
Quick Key Sequence
Press exit premises
Detailed Explanation
Press the following keys:
Press Exit countdown commences and the control unit beeps slowly displays shows “ F u ”
flashing.
During the last 10 seconds of the exit countdown, the beeping gets faster as a final
warning to leave the premises.
Once armed, the display on the control unit will go blank and the external strobe will
activate for 5 seconds confirming the system has set after you have left the
premises.
If the user attempts to set the system while any zones are open the control unit will provide a bad bleep
and return to day mode, to set the system ensure all windows and doors closed and set the system.
During the exit timer if any “Entry / Exit” zones or “walkthrough” zones are triggered they will be ignored, if
any instant zones are triggered the alarm system will activate a local alarm and sound the internal
sounders, to silence the alarm the code will need to be entered to cancel the activation.
Exit timer is factory set at 30 seconds.
LED
Full Set Button
Part Set Button
Unset Button
ICU WIRELESS REMOTE CONTROL
F
F
F
P
U
PA Feature
 Loading...