

Page 1
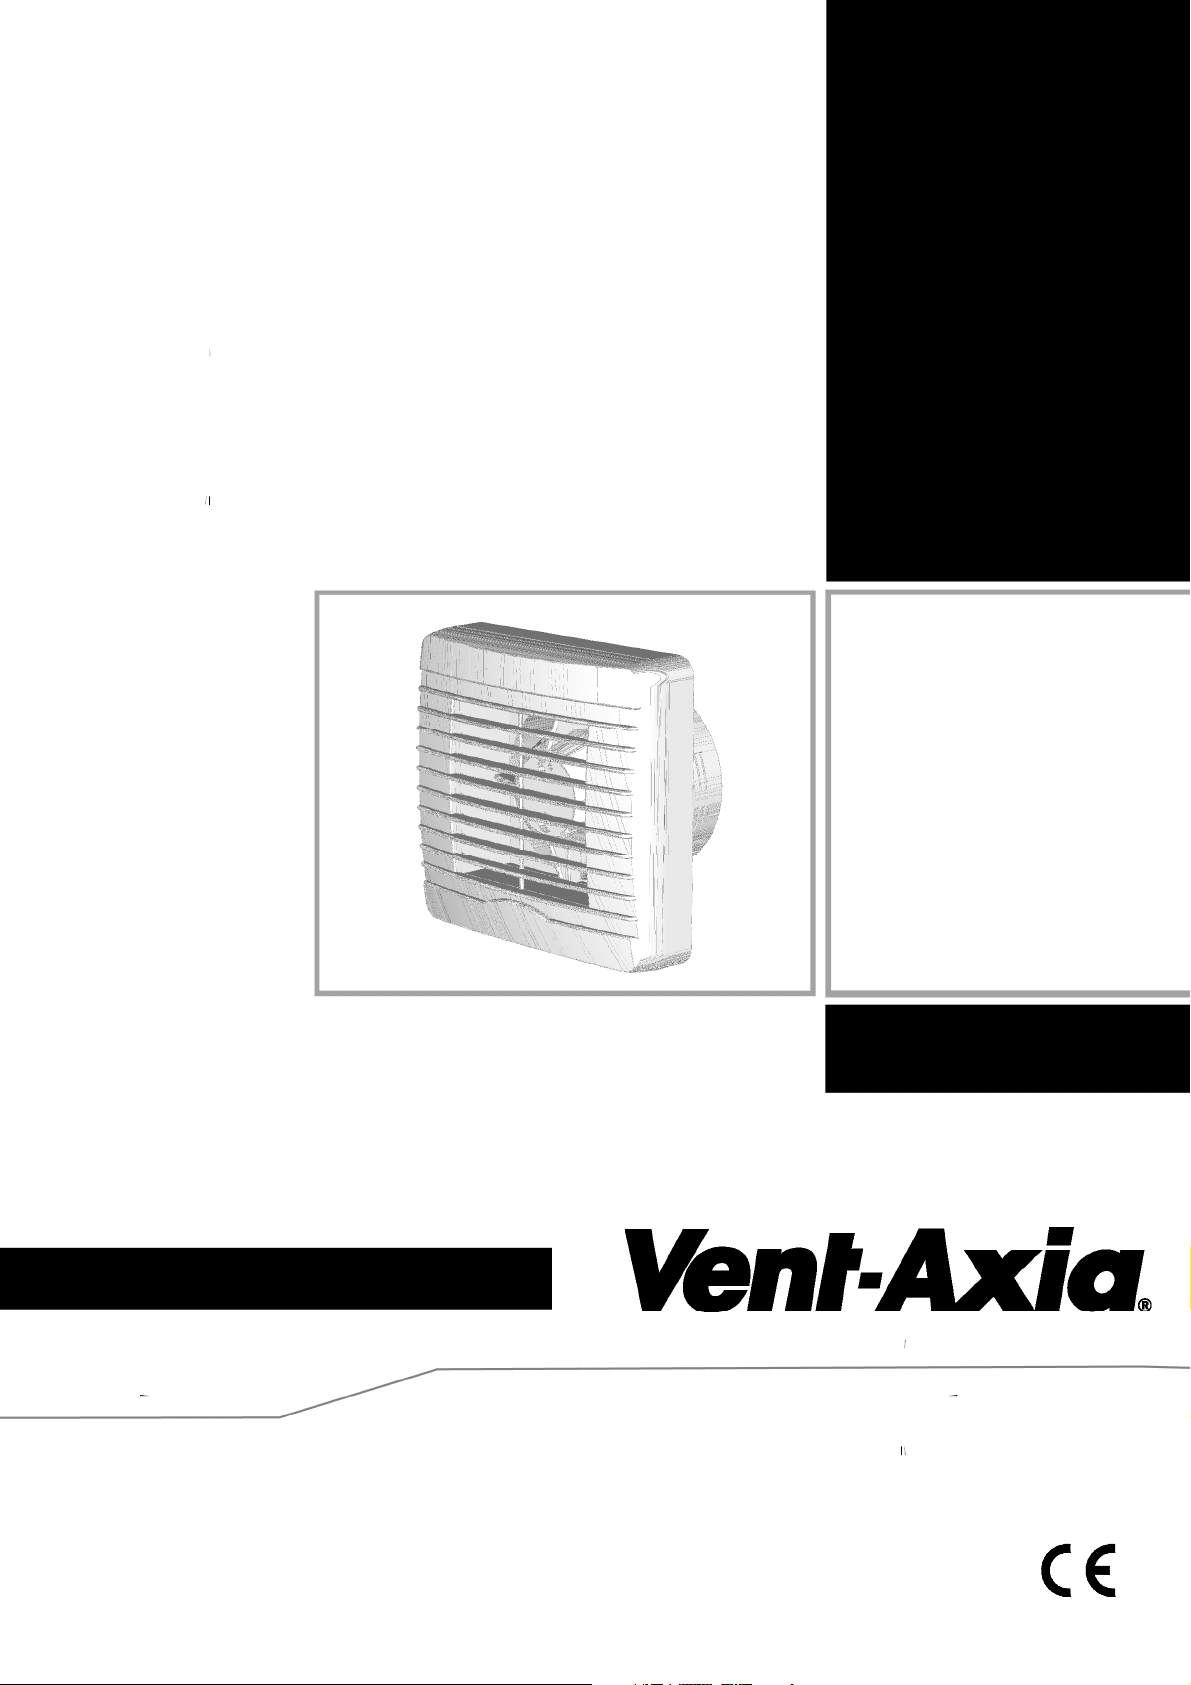
VA100
Installation and Wiring Instructions
220-240V~50Hz
PLEASE READ INSTRUCTIONS IN CONJUNCTION WITH
ILLUSTRATIONS. PLEASE SAVE THESE INSTRUCTIONS.
Stock Ref. N°
VA100LP 25 11 10B
VA100LT 25 12 10B
VA100XP 25 13 10C
VA100XT 25 14 10C
VA100LHP 25 16 10E
VA100XHP 25 17 10F
VA100XHT 25 15 10C
IP44
Page 2

Installation and Wiring Instructions for the VA100 Fan.
IMPORTANT:
READ THESE INSTRUCTIONS
BEFORE COMMENCING THE
INSTALLATION
DO NOT install this product in areas where the following may be present or occur:
• Excessive oil or a grease laden atmosphere.
• Corrosive or flammable gases, liquids or vapours.
• Ambient temperatures higher than 40°C or less than –5°C.
• Possible obstructions which would hinder the access or removal of the Fan.
SAFETY AND GUIDANCE NOTES
A. All wiring to be in accordance with the current I.E.E.
Regulations, or the appropriate standards of your country and
MUST be installed by a suitably qualified person.
B. The fan should be provided with a local isolator switch capable
of disconnecting all poles, having a contact separation of at
least 3mm.
C. Ensure that the mains supply (Voltage, Frequency, and Phase)
complies with the rating label.
D. The fan should only be used in conjunction with the
appropriate Vent-Axia products.
E. It is recommended that the connection to the fan connector
terminals is made with flexible cable.
F. When the fan is used to remove air from a room containing a
fuel-burning appliance, ensure that the air replacement is
adequate for both the fan and the fuel-burning appliance.
G. The fan should not be used where it is liable to be subject to
direct water spray for prolonged periods of time.
H. Where ducted fans are used to handle moisture-laden air, a
condensation trap should be fitted. Horizontal ducts should be
arranged to slope slightly downwards away from the fan.
I. This appliance is not intended for use by young children or
infirm persons without supervision.
J. Young children should be supervised to ensure that they do
not play with the appliance.
Page 3

DESCRIPTION
The VA100 from Vent-Axia is a 100mm extract fan for domestic bathrooms and WC’s
available as window, wall or panel mounted models. Model options with shutter, timer
and auto humidity control.
ACCESSORIES (not supplied)
A range of 100mm wall and window kits are available for
installing into most walls/windows using telescopic
Window
Wall 254102 254100
Stock Reference
White Brown
254101A
N/A
liners/spacers supplied.
A. INSTALLATION
WHERE TO FIT
A short circuit of the airflow should always be avoided by positioning the fan as far
away as possible from and opposite to the main source of air replacement. Fig. 1.
VA100LH, VA100XH and VA100XHT. These models are fitted with automatic
electronic humidity sensing. The humidity sensor needs free air circulation so do not
site close to cupboards, etc. Do not site above a radiator or other heat source.
PANEL/CEILING MOUNTING
IMPORTANT: The fan should be installed into a closed duct system or protected by an
exterior air grille.
1. Cut a 105mm diameter hole in the fixing surface.
2. Remove the grille by loosening the screw at the bottom of the grille.
3. Mark the screw centres through the holes in the fan back plate. Drill, plug and
screw into position.
4. Replace grille and tighten the screw.
WINDOW MOUNTING (Window kit not supplied – see Accessories above)
1. Cut a 105mm diameter hole in the glass.
2. Fit spacers as required behind the fan back plate, engaging the locating pips in
the corner holes.
3. Place the fan spigot through the hole in the glass from the inside, with a gasket
on each side of the glass.
4. From the outside, place on the remaining spacer, with the locating pips facing
outwards. For double-glazing and materials up to 40mm thick, one or more
spacers may be discarded.
5. Draw the assembly together with the threaded fixing ring. Do not over-tighten.
6. Fix the exterior grille in position, using the screws provided, with the louvres
pointing downwards.
Page 4
WALL MOUNTING (Wall kit not supplied – see Accessories above)
1. Cut a 115mm diameter hole through the wall and insert the wall sleeve with the
large diameter sleeve on the room side. Slope the sleeve slightly downwards
away from the fan. Cement both ends into position flush with the wall faces.
2. Remove the grille by loosening the screw at the bottom of the grille.
3. Mark the screw centres on the wall through the holes of the fan back plate. Drill
plug and screw into position.
4. Repeat for the external grille sub-frame. Fix exterior grille into position with the
louvres positioned downwards.
AFTER INSTALLATION ENSURE IMPELLER ROTATES FREELY
WARNING: THE FAN AND ANCILLARY CONTROL EQUIPMENT MUST
BE ISOLATED FROM THE POWER SUPPLY DURING THE
INSTALLATION / OR MAINTENANCE.
B. WIRING.
IMPORTANT: There are two methods of cable entry to the fan. If the side cable entry
option is used, ensure the supplied grommet is used and maintains a good
seal to prevent water ingress.
The VA100 is suitable for connection to 220-240V/1/50Hz supply. It is class
II double insulated and MUST NOT be earthed.
1. Select and follow the appropriate wiring diagram. (Fig. 2, 3 or 4)
2. Check all connections have been made correctly and ensure all terminal
connections and cable clamps are securely fastened.
3. Ensure the impeller rotates and is free from obstructions.
C. SETUP
TIMER ADJUSTMENT (VA100LT, VA100XT & VA100XHT)
BEFORE ADJUSTING THE TIMER, SWITCH OFF THE MAINS SUPPLY. TIMER
SHOULD ONLY BE ADJUSTED BEFORE OR DURING INSTALLATION.
1. Remove the fan grille. The controller is factory set at 15 minutes approx.
The overrun time period can be adjusted from 3-25 minutes by altering the
adjuster on the control PCB.
2. To REDUCE the operating time, use a small screwdriver to turn the
adjuster ANTI-CLOCKWISE.
3. To INCREASE the operating time, use a small screwdriver to turn the
adjuster CLOCKWISE.
4. Replace the fan grille.
Page 5

HUMIDITY SET-POINT ADJUSTMENT
BEFORE ADJUSTING THE CONTROLLER, SWITCH OFF THE MAINS SUPPLY.
HUMIDISTAT SHOULD ONLY BE ADJUSTED BEFORE OR DURING
INSTALLATION.
1. Remove the fan grille. The controller is factory set to switch on at about
70% RH. The humidity set point can be adjusted from 40-95%RH by
altering the adjuster on the control PCB.
2. To LOWER the set-point use a small screwdriver to turn the adjuster ANTI-
CLOCKWISE. This makes the controller MORE sensitive.
3. To RAISE the set-point use a small screwdriver to turn the adjuster
CLOCKWISE. This makes the controller LESS sensitive.
4. Replace the fan grille.
IMPORTANT: Upon installation it is possible that the humidity controller will make the
fan run continuously until it has acclimatised to the environment. As part of the
installation process it is important to set/adjust the humidity sensitivity to the desired
position. The controller is already factory set to switch on at about 70% R.H.
SHUTTER OPERATION
The shutter mechanism in all VA100‘X’ model fans will open approximately one minute
after the fan is turned on. The shutter will close about a minute after the fan is switched
off.
PULLCORD OPERATION (VA100LH, VA100XH)
The PULLCORD will activate the fan when switched. When the PULLCORD is
switched into the off position, After which the fan will return to the Auto sensing mode.
The Neon will only activate if the PULLCORD is in the ON position.
NEON OPERATION
The Neon will activate whenever the LS or PULLCORD is activated. The NEON will
switch off if the fan is running in Timer overrun or Humidity mode (if applicable).
D. SERVICING AND MAINTENANCE.
1. At intervals appropriate to the installation, the fan should be inspected and cleaned to
ensure there is no build up of dirt or other deposits.
2. Wipe the inlets and front face with a damp cloth until clean.
The fan has sealed for life bearings, which do not require lubrication.
Page 6
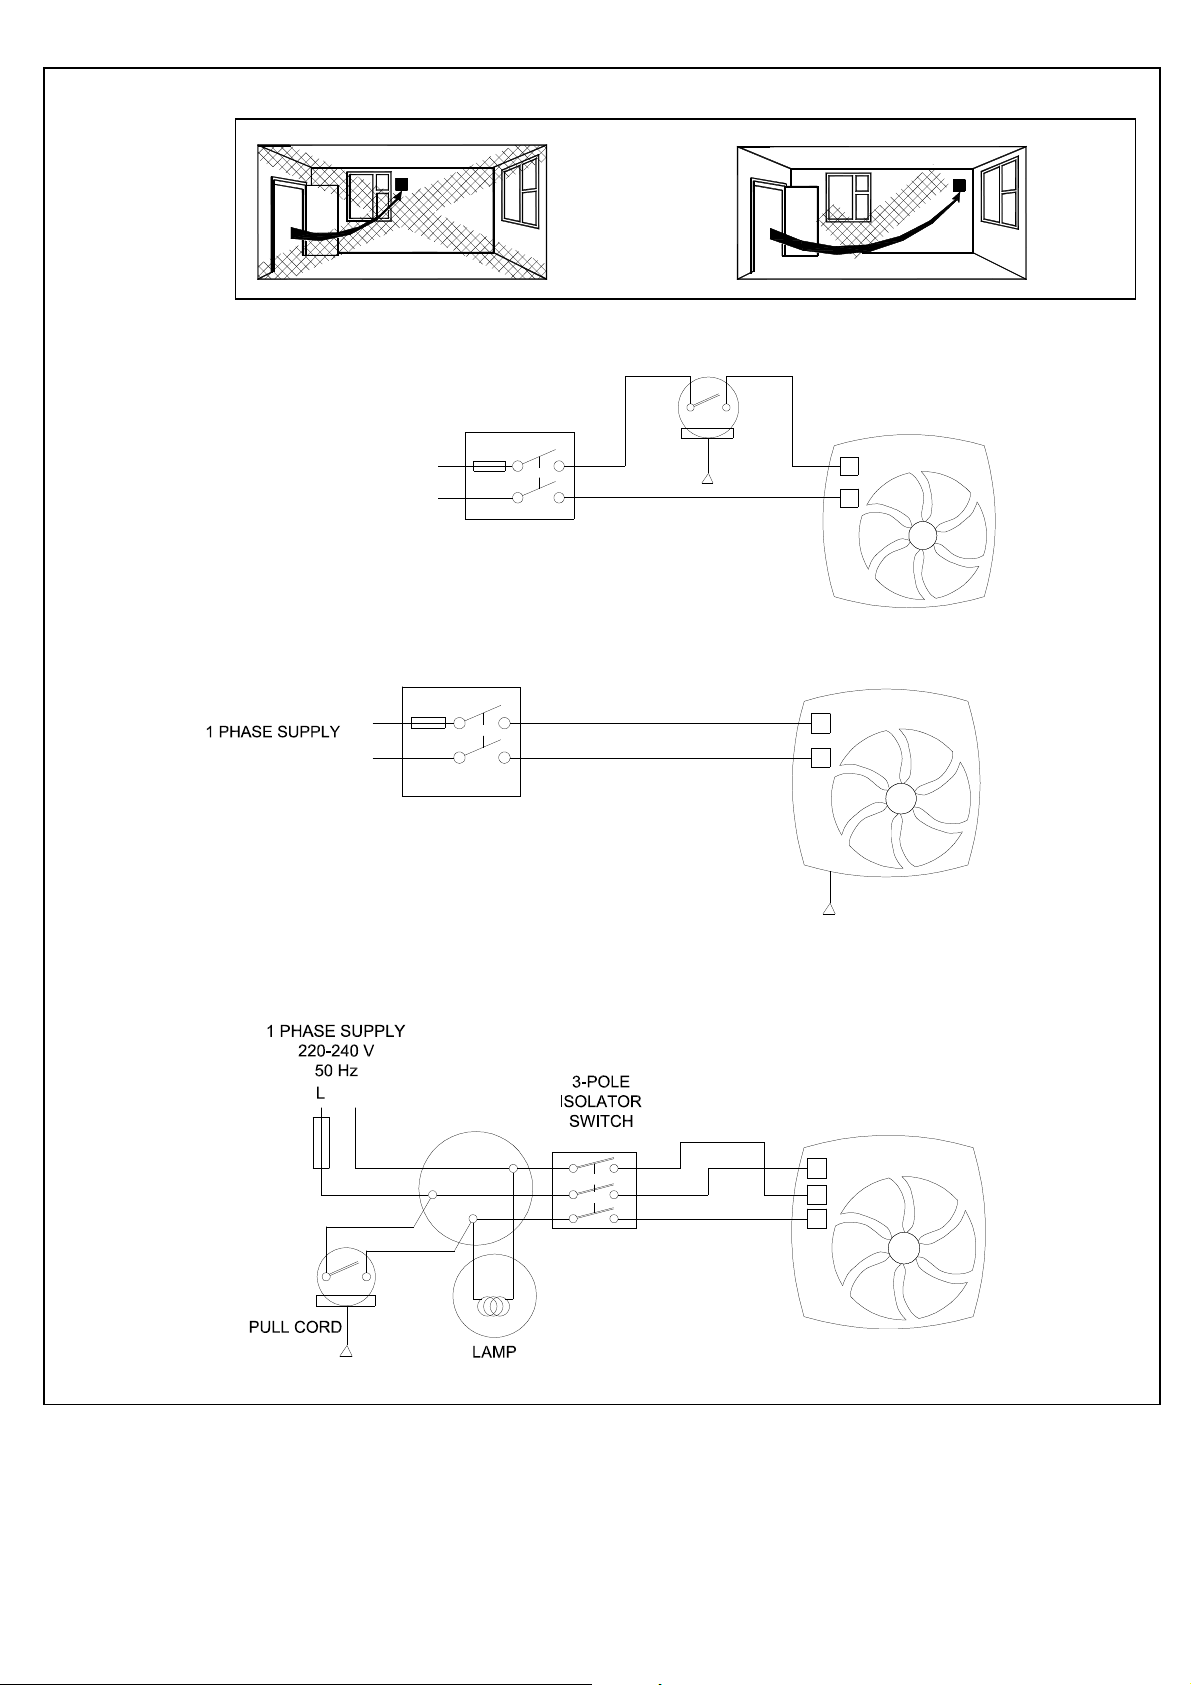
Fig. 1
Fig. 2 : VA100L
1 PHASE SUPPLY
(220-240V 50Hz).
L
~
N
FUSE
1 AMP
SWITCHED
FUSED
SPUR (1A)
Fig. 3 : VA100X/VA100LH/VA100XH
(220-240V 50Hz).
FUSE
L
1 AMP
~
N
SWITCHED FUSED
SPUR (1A)
Fig. 4 : VA100XT/VA100LT/VA100XHT
(VA100LH & VA100XH LS CAN BE USED AS OVERRIDE)
~ N
1 AMP
PULL CORD
L
N
L
N
PULL CORD
L
N
L
S
FAN
FAN
FAN
Page 7
VA100LP
-
VA100LT
-
VA100XP
-
VA100XT
-
VA100LHP
-
VA100XHP
-
VA100XHT
-
Type HRS (Recuperative, Regener
ative,
Control Facto
r & Control Typology: (CTRL/
Local
Local
Local
regenerative heat exchangers only),
Mixing Rate of Non
-
Ducted BVUs not
Position and description of visual filter
Internet Address (for Disassembly
www.vent
-
www.vent
-
www.vent
-
www.vent
-
www.vent
-
www.vent
-
www.vent
-
Sensitivity p. Variation@+20/
-
20 Pa:
(for
Air Tightness
-
ID/OD
-
(m3/h) (for Non
-
Ducted
Annual Electricity Consumption: AEC
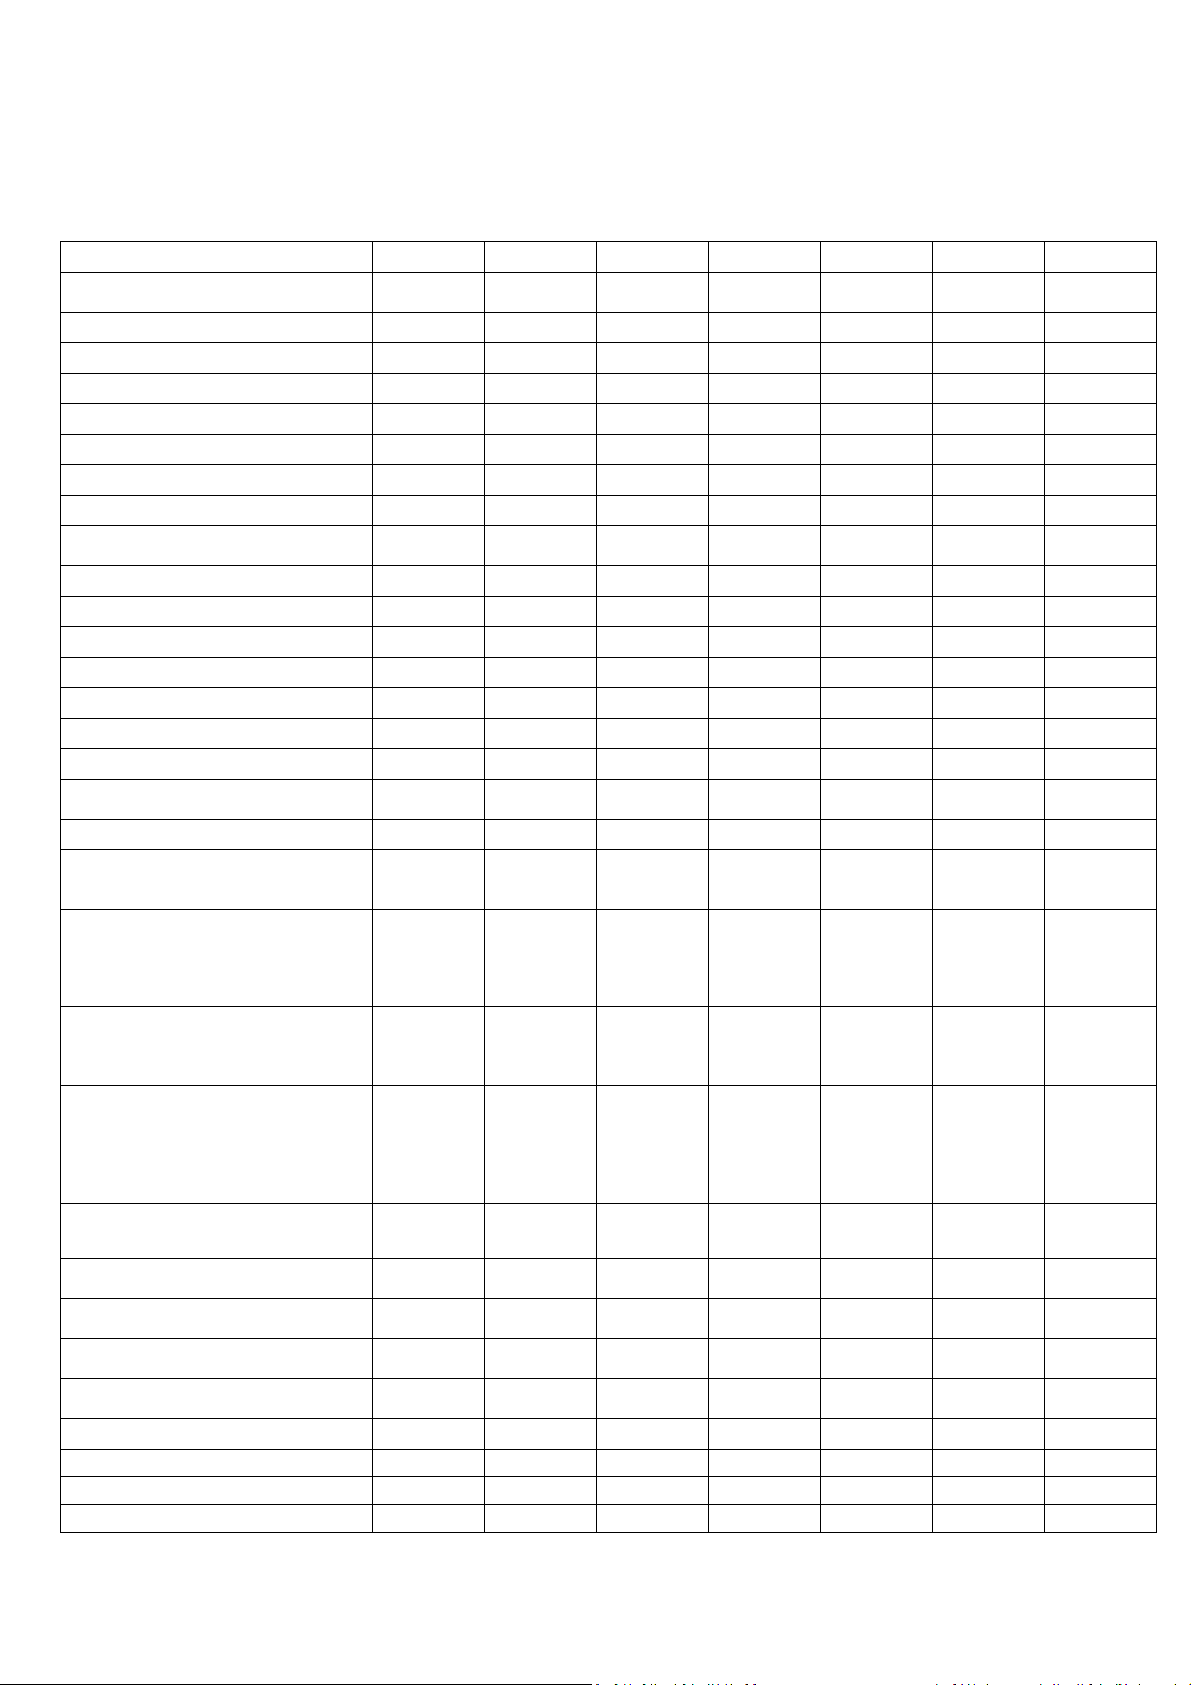
PRODUCT FICHE
For Residential Ventilation Units (Complying Commission Delegated Regulation (EU) No 1254/2014)
Name: Vent-Axia Vent-Axia Vent-Axia Vent-Axia Vent-Axia Vent-Axia Vent-Axia
Model ID (Stock Ref.) :
SEC Class F F F F D D D
SEC Value ('Average') 13.97 15.72 13.97 15.72 26.23 26.23 26.23
SEC Value ('Warm') 6.32 7.11 6.32 7.11 11.86 11.86 11.86
SEC Value ('Cold') 27.32 30.75 27.32 30.75 51.31 51.31 51.31
Label Required? (Yes/No=Out of scope) No No No No No No No
Declared as: RVU or NRVU/UVU or BVU RVU-UVU RVU-UVU RVU-UVU RVU-UVU RVU-UVU RVU-UVU RVU-UVU
Speed Drive Multi-Speed Multi-Speed Multi-Speed Multi-Speed Multi-Speed Multi-Speed Multi-Speed
None)
Thermal Eff: [ (%), NA(if none)] N/A N/A N/A N/A N/A N/A N/A
Max. Flow Rate (m3/h) 108.00 108.00 108.00 108.00 108.00 108.00 108.00
Max. Power Input (W): (@Max.Flow Rate) 20.00 20.00 20.00 20.00 20.00 20.00 20.00
LWA: Sound Power Level (dB) 53.52 53.52 53.52 53.52 53.52 53.52 53.52
Ref. Flow Rate (m3/s) 0.02 0.02 0.02 0.02 0.02 0.02 0.02
Ref. Pressure Diff. (Pa) N/A N/A N/A N/A N/A N/A N/A
SPI [W/(m3/h)] 0.26 0.26 0.26 0.26 0.26 0.26 0.26
Typology)
Control Factor; CTRL 1.00 0.95 1.00 0.95 0.65 0.65 0.65
Control Typology
Declared: -Max Internal & External Leakage
Rates(%) for BVUs or carry over (for
-&Ext. Leakage Rates (%) for Ducted UVUs;
251110
None None None None None None None
Manual
Control
N/A N/A N/A N/A N/A N/A N/A
251210
Clock Control
251310
Manual
Control
251410
Clock Control
251610
Demand
Control
251710
Demand
Control
251510
Demand
Control
intended to be equipped with one duct
connection on either supply or extract air
side;
warning for RVUs intended for use with
filters, including text pointing out the
importance of regular filter changes for
performance and energy efficiency of the
unit
For UVUs (Instructions Install Regulated
Supply/Extract Grilles Façade)
Instructions)
Non-Ducted Vus)
Vus)
(kWh/a)
Annual Heating Saved: AHS (kWh/a)
AHS: Average 13.97 15.72 13.97 15.72 26.23 26.23 26.23
AHS: Warm 6.32 7.11 6.32 7.11 11.86 11.86 11.86
AHS: Cold 27.32 30.75 27.32 30.75 51.31 51.31 51.31
N/A N/A N/A N/A N/A N/A N/A
N/A N/A N/A N/A N/A N/A N/A
In F&W In F&W In F&W In F&W In F&W In F&W In F&W
axia.com
N/A N/A N/A N/A N/A N/A N/A
N/A N/A N/A N/A N/A N/A N/A
3.65 3.38 3.65 3.38 1.91 1.91 1.91
axia.com
axia.com
axia.com
axia.com
axia.com
axia.com
Page 8
446428
D 0917
Disposal
This product should not be disposed of with household waste. Please recycle where facilities exist. Check with
your local authority for recycling advice.
Head Office: Fleming Way, Crawley, West Sussex, RH10 9YX. Tel: 01293 526062 Fax: 01293 551188
UK NATIONAL CALL CENTRE, Newton Road, Crawley, West Sussex, RH10 9JA
SALES ENQUIRIES: Tel: 0844 8560590 Fax: 01293 565169
TECHNICAL SUPPORT: Tel: 0344 8560594 Fax: 01293 539209
For details of the warranty and returns procedure please refer to www.vent-axia.com or write to Vent-Axia Ltd, Fleming Way, Crawley, RH10 9YX
 Loading...