

Page 1
Venom Ltd. Solution House, Sandon Road,
Thereld, Hertfordshire SG8 9RE.
www.venomuk.com
Venom is a trademark of Venom Ltd.
www.venomuk.com
Venom UK Gaming
@VenomGamingUK
Venom UK Gaming
Wireless Vibration Headset XT+
For use with
PS4™, PS3™, Xbox One®, Xbox 360®, PC and Mac
®
User Instructions
Please Recycle
VS2854_Wireless Vibration Headset XT+ Instructions A5 2016.indd 1-2 28/06/2016 10:33
Page 2
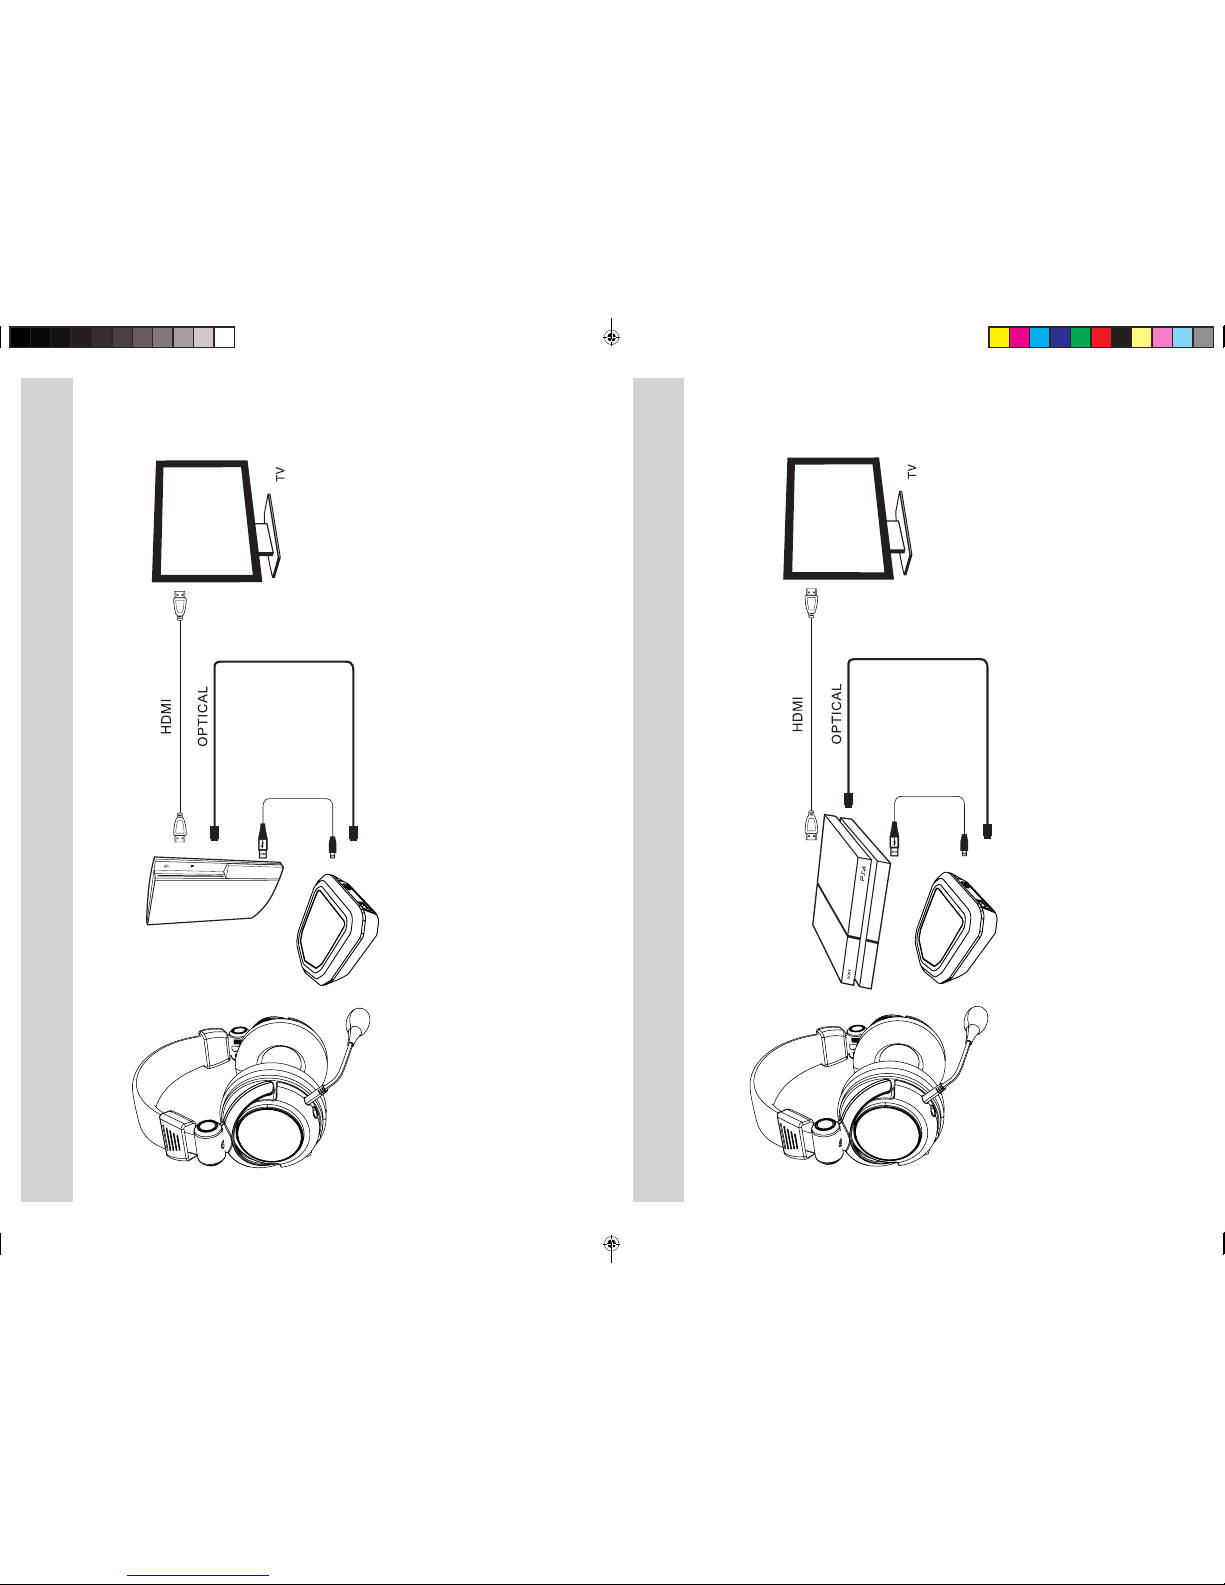
Fig.2 PS4™ via Optical
Fig.1 PS3™ via Optical
USB
USB
VS2854_Wireless Vibration Headset XT+ Instructions A5 2016.indd 3-4 28/06/2016 10:33
Page 3

Fig.4 XBOX One
®
via Optical
Fig.3 XBOX 360
®
via Optical
USB
Audio Cable
OPTICAL
Audio Cable
USB
VS2854_Wireless Vibration Headset XT+ Instructions A5 2016.indd 5-6 28/06/2016 10:33
Page 4

English
Wireless Vibration
Headset XT+
For use with PS4™, PS3™, Xbox One®,
Xbox 360®, PC & Mac
®
Model number: VS2854
User Guide
Thank you for purchasing the Wireless
Vibration Headset XT+.
Please read this user guide thoroughly
before using the Wireless Vibration
Headset XT+ and keep the guide safe
for further reference. This guide includes
the most common set ups for using the
Wireless Vibration Headset XT+ with your
PS3, PS4, Xbox 360 or Xbox One system
via optical. If you require any more help
please contact our helpline. Thank you
and enjoy!
Important:
If you have any compatibility problems
please initially visit our website to ensure
you have the most up to date drivers. If
the problem persists then please contact
our customer service team.
Contents
1 x Wireless Vibration Headset XT+
1 x Wireless Transmitter
1 x Optical Cable
2 x USB Cables
2 x Audio Cables
( 1 x Xbox 360 1 x Xbox One)
1 x User Guide
Setting up your PS3™ via Optical
Fig.1
1. First connect your Wireless
Transmitter to your PS3 system:
connect the optical cable directly
into the Wireless Transmitter and
the other end into the back of the
PS3 system (please ensure that
the connector is the correct way
around as it will only insert in one
position).
2. Then connect the USB connector
into any spare port on the PS3
system and the Micro USB
connector into the port on the
Wireless Transmitter.
3. To connect the Wireless Vibration
Headset XT+ to the PS3 system:
turn on the power on the
PS3 system and the Wireless
Transmitter will start ashing red/
blue.
4. Then turn on the power on the
Wireless Vibration Headset XT+
and the LED’s on each ear cup
will also start ashing red. To pair:
simply hold down the pairing
button until you hear a beep on
the headset or both LED’s on
the ear cups and the Wireless
Transmitter stop ashing and
become a solid red light.
NB: You will also need to change the
PS3 system settings to optical:
1. On the PS3 menu go to “Settings”
and select > “Accessory Settings”
> “Audio Device Settings” >
“Input Device” and scroll up/down
until “2.4G Wireless Headset”
is displayed then repeat this for
“Output Device Settings” and
press “OK” to conrm.
2. Go back to “Settings” and select
Fig.5 PC/Mac
USB
VS2854_Wireless Vibration Headset XT+ Instructions A5 2016.indd 7-8 28/06/2016 10:33
Page 5

> “Sound Settings” > “Audio
Output Settings” and select
“Optical Digital”. Then make sure
only “AAC” is ticked and not
“Dolby Digital” or “DTS”.
Setting up your PS4™ via Optical
Fig.2
1. First connect the Wireless
Transmitter to your PS4 system:
connect the optical cable directly
into the Wireless Transmitter and
the other end into the back of
the PS4 system (please ensure
the connector is the correct way
around as it will only insert in one
position).
2. Then connect the USB connector
into any spare port on the PS4
system and the Micro USB
connector into the port on the
Wireless Transmitter.
3. To connect the Wireless Vibration
Headset XT+ to the PS4 system:
turn on the power on the
PS4 system and the Wireless
Transmitter will start ashing red/
blue.
4. Then turn on the power on the
Wireless Vibration Headset XT+
and the LED’s on each ear cup
will also start ashing red. To pair:
simply hold down the pairing
button until you hear a beep on
the headset or both LED’s on
the ear cups and the Wireless
Transmitter stop ashing and
become a solid red light.
NB: You will need to change the PS4
system settings to optical:
1. On the PS4™ menu go to
“Settings” and select > “Sound
and Screen” > “Audio Output
Settings” > “Primary Output Port”
> “Digital Out (Optical)” then
make sure only “AAC” is ticked
and not “Dolby Digital” or “DTS”
and press “OK” to conrm.
2. On the “Audio Output Settings”
menu select “Audio Format
(Priority)” and ensure “Linear
PCM” is ticked.
3. Then go back to “Settings”
and select > “Devices”
>“Audio Devices” > “Output to
Headphones” and select “Chat
Audio”.
Setting up your Xbox 360® via Optical
Fig.3
1. First connect the Wireless
Transmitter to the Xbox 360
system: connect the optical
cable directly into the Wireless
Transmitter and the other end into
the back of the Xbox 360 system
(ensure the connector is the
correct way around as it will only
insert in one position).
2. Then connect the USB connector
into any spare port on the Xbox
360 system and the Micro USB
connector into the port on the
Wireless Transmitter.
3. To connect the Wireless Vibration
Headset XT+ to your console: turn
on the power on the console and
the Wireless Transmitter will start
ashing red/blue.
4. Then turn on the power on your
Wireless Vibration Headset XT+
and the LED’s on each ear cup
will also start ashing red. To pair:
simply hold down the pairing
button until you hear a beep on
the headset or both LED’s on
the ear cups and the Wireless
Transmitter stop ashing and
become a solid red light.
5. For chat function, connect the
3.5mm to 2.5mm cable (provided)
to your Wireless Headset and
the other end into your Xbox 360
controller.
NB: You will need to change your Xbox
360® settings to optical:
1. On the Xbox 360 menu go to
“Settings” > “System” > “Console
Settings” > “Audio” and select
“Digital Output”.
2. For chat connect the Audio Cable
(provided) from the Wireless
Vibration Headset XT+ to the
Xbox 360 controller.
Setting up your Xbox One® via Optical
Fig.4
1. First connect your Wireless
Transmitter to the Xbox One
system: connect the optical
cable directly into the Wireless
Transmitter and the other end into
the back of the Xbox One system
(ensure the connector is the
correct way around as it will only
insert in one position).
2. Then connect the USB connector
into any spare port on the Xbox
One system and the Micro USB
connector into the port on the
Wireless Transmitter.
3. To connect the Wireless Vibration
Headset XT+ to your console: turn
on the power on your console and
the Wireless Transmitter will start
ashing red/blue
4. Then turn on the power on your
Wireless Vibration Headset XT+
and the LED’s on each ear cup
will also start ashing red. To pair:
simply hold down the pairing
button until you hear a beep on
the headset or both LED’s on
the ear cups and the Wireless
Transmitter stop ashing and
become a solid red light.
5. For chat rst connect an Ofcial
Stereo Headset Adaptor (sold
separately)
6. Then connect the 3.5mm to
3.5mm cable (provided) to your
Wireless Headset and the other
end into your Xbox One controller.
For chat function using a new Xbox One
controller which has the direct port.
7. Connect the 3.5mm to 3.5mm
cable (provided) to your Wireless
Headset and the other end into
your Xbox One controller.
NB: The headset on the Xbox One system
will automatically be recognised as no
other set up is needed.
Setting up your PC
Fig.5
1. First connect the Wireless
Transmitter to the PC: connect
the USB connector into any spare
port on the PC and the Micro USB
connector into the port on the
Wireless Transmitter.
2. To connect the Wireless Vibration
Headset XT+ to the PC: turn on
the PC’s power and the Wireless
Transmitter will start ashing red/
blue.
3. Then turn on the power on the
Wireless Vibration Headset XT+
and the LED’s on each ear cup
will also start ashing red. To pair:
simply hold down the pairing
button until you hear a beep on
the headset or both LED’s on the
VS2854_Wireless Vibration Headset XT+ Instructions A5 2016.indd 9-10 28/06/2016 10:33
Page 6

ear cups and Wireless Transmitter
stop ashing and become a solid
red light.
4. No future set up is needed.
Setting up your Mac
Fig.5
1. First connect the Wireless
Transmitter to the Mac: connect
the USB connector into any spare
port on the Mac and the Micro
USB connector into the port on
the Wireless Transmitter.
2. To connect the Wireless Vibration
Headset XT+ to the Mac: turn on
the power on the Mac and the
Wireless Transmitter will start
ashing red/blue.
3. Then turn on the power on the
Wireless Vibration Headset XT+
and the LED’s on each ear cup
will also start ashing red. To pair:
simply hold down the pairing
button until you hear a beep on
the headset or both LED’s on
the ear cups and the Wireless
Transmitter stop ashing and
become a solid red light.
4. Then go to “System Preferences”
> “Sound”.
5. On the “Output” tab select “2.4G
Wireless Headset”.
6. On the “Input” tab make sure
“2.4G Wireless Headset” is also
selected.
To charge the Wireless
Vibration Headset XT+
1. Connect the Micro USB
connector into the port on the
Wireless Vibration Headset XT+
and the other end into any USB
device, either a computer or
mains adaptor.
2. When charging the indicator is
red; when fully charged the light
will go out.
3. When charging, please ensure
that the Wireless Vibration XT+
power is turned off to reserve
power.
Battery Information
Your device is powered by a rechargeable
battery. The full performance of a new
battery is achieved only after two or
three complete charge and discharge
cycles. Do not leave a fully charged
battery connected to a charger, since
overcharging may shorten its lifetime. Do
not dispose of batteries in a re as they
may explode. Please dispose of batteries
according to local regulations and recycle
where possible. Do not dispose as
household waste.
Care and Maintenance
Your device is a product of superior
design and craftsmanship and should be
treated with care. The suggestions below
will help you to protect your warranty
coverage:
• Keep your device out of the reach of
small children.
• Keep the device dry. Precipitation,
humidity and all types of liquid or
moisture can contain minerals that will
corrode electronic circuits. If your device
does get wet, allow it to dry completely.
• Do not use or store the device in
dusty, dirty areas, as moving parts and
electronic components of your device
can be damaged.
• Do not use or store the device in hot
areas. High temperatures can shorten
the life of electronic devices, damage
batteries and warp or melt certain
plastics.
• Do not use or store the device in cold
areas. When the device returns to its
normal temperature, moisture can form
inside the device and damage electronic
circuit boards.
• Do not drop, knock or shake the device.
Rough handling can break internal
circuit boards and ne mechanics.
• Do not use harsh chemicals, cleaning
solvents or strong detergents to
clean the device. All of the previous
suggestions apply equally to your
device, battery, charger or any
enhancements.
Note: parts of the headset are magnetic.
Metallic materials may be attracted to
the headset. Do not place credit cards or
other magnetic storage media near the
headset, as information stored on them
may be erased. Occasionally the headset
may pick up interference from mobile
phones.
Helpline Information:
The helpline is a one-to-one live service.
Hours: 9.00am - 5.00pm
Monday to Thursday
9.00am – 4.30pm Friday
Tel: +44 (0) 1763 284181
Email:
customerservice@venomuk.com
Website: www.venomuk.com
To ensure that your call is handled quickly
and efciently please check that you
have the model number VS2854 and any
other relevant information regarding your
product at the time of your call.
VS2854_Wireless Vibration Headset XT+ Instructions A5 2016.indd 11-12 28/06/2016 10:33
 Loading...