

Page 1

Venom Ltd. Solution House, Sandon Road,
Thereld, Hertfordshire SG8 9RE.
www.venomuk.com
Venom is a trademark of Venom Ltd.
www.venomuk.com
Venom UK Gaming
@VenomGamingUK
Venom UK Gaming
Vibration Headset XT+
For use with PS4™, PS3™, Xbox 360®,
PC and Mac®
User Instructions
Please Rec ycle
VS2849_Multi_Vibration Headset XT+_Instructions_A5_FULL.indd 1-2 15/07/2014 15:40
Page 2
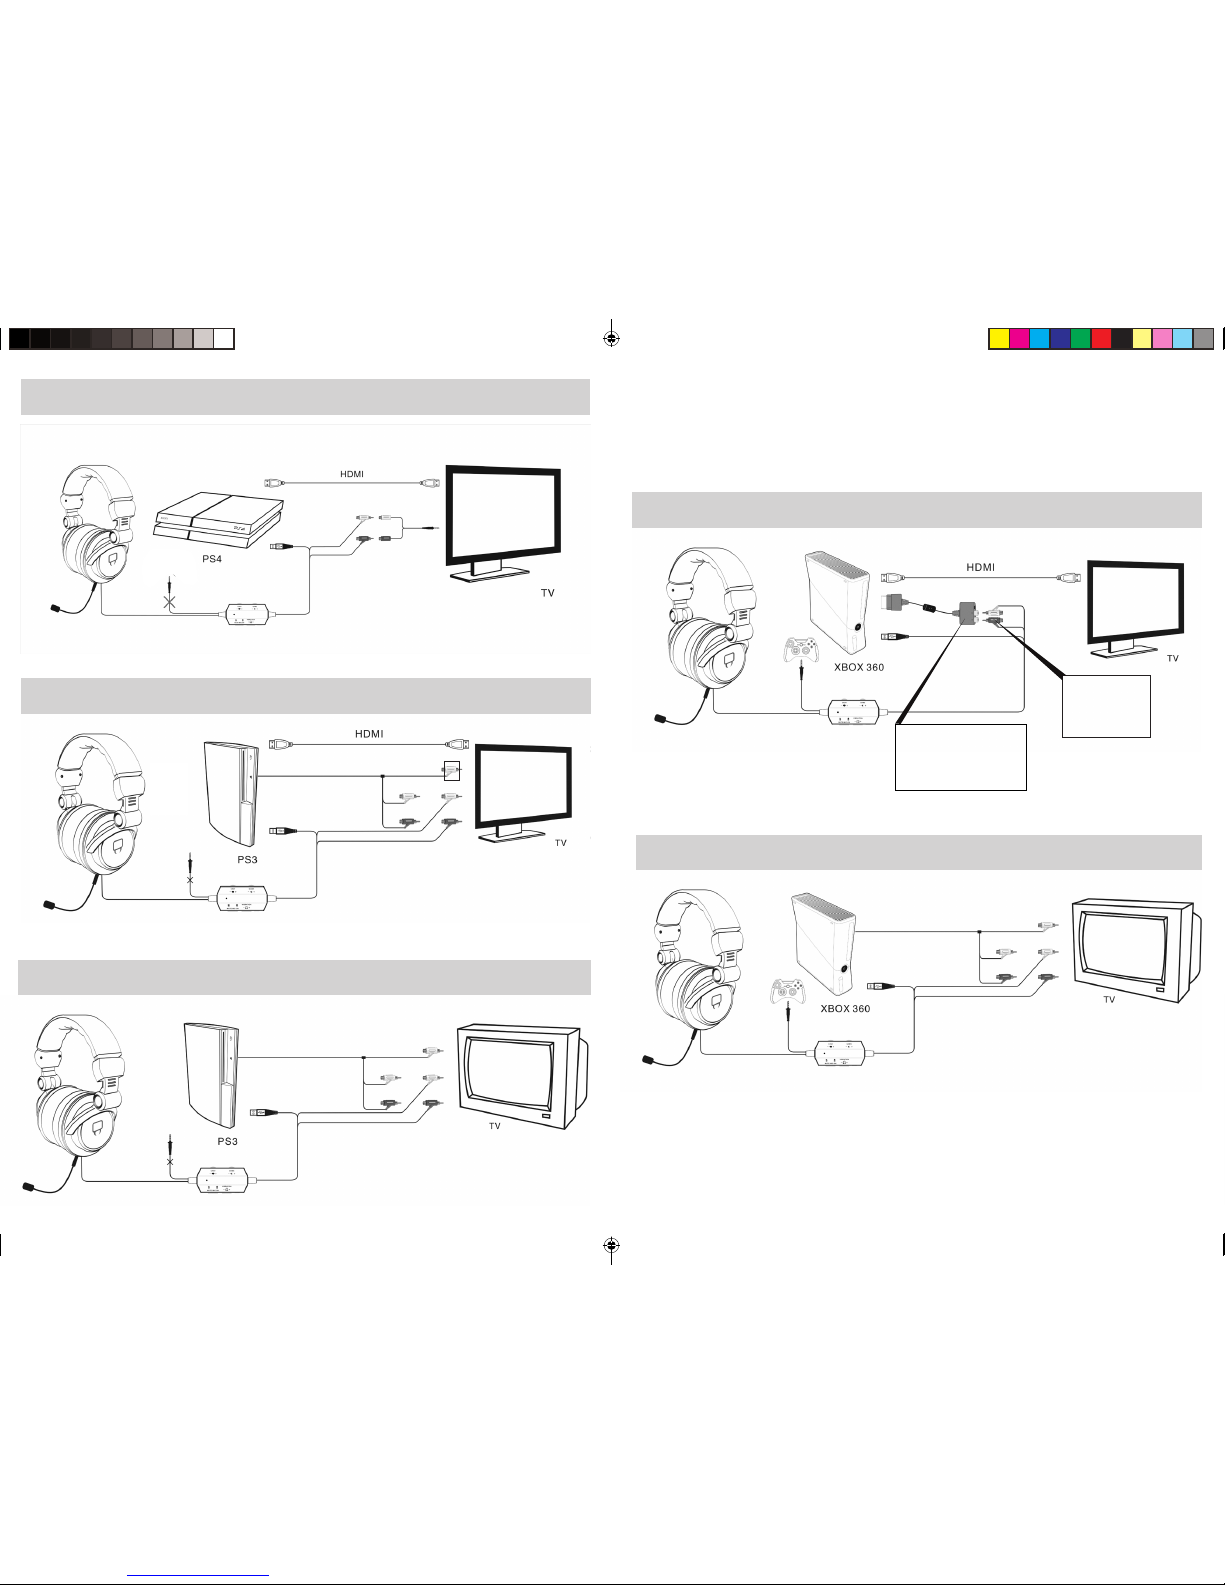
Fig.3 PS3 AV
USB
Audio
(Red/White)
Video (Yellow)
Fig.2 PS3 HDMI
USB
Audio
(Red/White)
Video (Yellow) (Not in use)
X
Fig.5 XBOX AV
USB
2.5mm
Jack
Audio
(Red/White)
Video (Yellow)
Fig.4 XBOX HDMI
USB
2.5mm
Jack
Audio
(Red/White)
Xbox 360 Audio
Adaptor Cable
(Sold separately)
Fig.1 PS4 HDMI & Audio Cable
USB
Audio
(Red/White)
Audio
(Red/White)
RCA/3.5mm
Jack Splitter
VS2849_Multi_Vibration Headset XT+_Instructions_A5_FULL.indd 3-4 15/07/2014 15:40
Page 3
English
Vibration Headset XT+
For use with PS4™, PS3™, Xbox 360®, PC &
Mac
®
User Guide
Thank you for purchasing the Vibration Headset
XT+
Please read this user guide thoroughly before using
the Vibration Headset XT+ and keep the guide safe
for further reference. This guide includes the most
common set ups for using the Vibration Headset
XT+ with either your PS4, PS3 or Xbox 360 system
via HDMI or AV. For any additional set ups for your
TV, monitor or gaming monitor please consult your
manufacturer’s instructions. Also, please note that
some additional cables may be required depending
on your home set up (sold separately).
If you require any more help please contact our
helpline. Thank you and enjoy!
Contents
1 x Vibration Headset XT+
1 x User Guide
1 x Quick Set Up Guide
Setting up your PS4™ with HDMI
Fig.1
1. Insert the USB directly into your PS4™.
2. Then connect both the red and white headset
audio connectors to the red and white audio
connectors on the RCA/3.5mm jack splitter. Then
plug this into your headphone port on your TV.
3. On the PS4 ™ menu the headset will automatically
be identied. If you are not signed in then you will
need to select a user.
4. On the main menu go to “Settings” and select >
“Sound and Screen” > “Audio Output Settings”
> “Output To Headphones” and change to “Chat
Audio”. Press “X” to conrm.
5. Finally hold down the PS button on your controller
and then select “Adjust Devices”. Turn the
“Volume Control (Headphones)” up to max.
Setting up your PS3™ with HDMI
Fig.2
1. Insert the USB directly into your PS3.
2. Connect both the red and white headset audio
connectors into the corresponding audio inputs on
your TV.
3. Then connect the PS3 red and white audio
connectors into the back of the headset audio
connectors.
4. The yellow audio connector is not needed.
NB: You will need to change your PS3 settings
to HDMI. Go to “Settings” > “Display Settings” >
“Video Output Settings” > “HDMI”.
Audio Settings HDMI or
Digital (optical)
1. On the main PS3 menu go to “Settings” and select
> “Sound Settings” > “Audio Multi-Output”.
2. Ensure that the mute is turned off on the Inline
Volume Control Unit and that the volume is turned
up on the headset.
Setting up your PS3 with AV
Fig.3
1. Insert the USB directly into your PS3.
2. Then using the AV cable supplied with your
console, connect both the red and white headset
audio connectors into the corresponding audio
inputs on your TV.
3. Then connect the PS3 red and white audio
connectors into the back of the headset audio
connectors and the yellow video connector into
the corresponding input on your TV.
Video Settings AV
1. On the main PS3 menu go to “Settings” and
select > “Display Settings” > “Video Settings”
> “AV Multi/Scart” > “YPb/Cb Pr/Cr ” select
“Change” and press “Yes” to conrm, ensure your
TV is on standard.
2. Finally select TV type which will be either 16:9 or
4:3.
3. Press “X” to save.
Please note: if changing from HDMI to AV, you will
need to change the channel from HDMI to AV.
Audio Settings AV
1. On the main PS3 menu go to “Settings” and select
> “Sound Settings” > “Audio Output Settings” >
select “Input Connector/Scart/AV Multi”.
Helpline Information:
The helpline is a one-to-one live
service.
Hours:
9.00am - 5.00pm
Monday to Thursday
9.00am – 4.30pm Friday
Tel: +44 (0) 1763 284181
Email:
customerservice@venomuk.com
Website:
www.venomuk.com
To ensure that your call is handled
quickly and efciently please check that
you have the model number VS2849
and any other relevant information
regarding your product at the time of
your call.
Venom Ltd. Solution House, Sandon
Road, Thereld, Hertfordshire SG8 9RE.
VS2849_Multi_Vibration Headset XT+_Instructions_A5_FULL.indd 5-6 15/07/2014 15:40
Page 4

2. Press “X” to save
To set up chat on your headset
1. On the main PS3 menu go to “Settings” and
select > “Accessory Settings” > “Audio Devices” >
“Input Device” and select “USB Ear Microphone”.
Then select “Output Device” and “USB Ear
Microphone”.
2. Then select “Microphone Level” and adjust as
required, ensuring the volume indicator just
reaches red when you speak loudly into the
headset microphone.
3. Press “OK” to save.
Setting up your Xbox 360® with HDMI
Fig.4
1. Insert the USB directly into your Xbox 360.
2. Connect the Xbox Audio Adaptor (sold separately,
or supplied with your Xbox) directly into your Xbox
360, then connect both the red and white headset
audio connectors into the corresponding audio
inputs on the Xbox Audio Adaptor cable.
3. Finally connect the 2.5mm jack directly into your
Xbox 360 controller for chat.
*When connecting with HDMI you will require an Xbox 360 Audio
Adaptor Cable for audio output (sold separately).
Setting up your Xbox 360 with AV
Fig.5
1. Insert the USB directly into your Xbox 360.
2. Connect both the red and white headset audio
connectors into the corresponding audio inputs on
your TV.
3. Then using the AV cable supplied with your
console, connect the Xbox 360 red and white
audio connectors into the back of the headset
audio connectors and the yellow video connector
into the corresponding input on your TV.
4. Finally connect the 2.5mm jack directly into your
Xbox 360 controller for chat.
To set up chat on your headset
1. On the main Xbox 360 menu go to “Settings” >
“Preferences” > “Voice”.
2. Then select “Voice Volume” and set volume at 10.
3. Then select “Game Volume” and also set volume
at 10.
4. Finally select “Voice Output” and set as “Play
Through Headset”.
5. Ensure that the mute is turned off on the Inline
Volume Control Unit and that the volume is turned
up on the headset.
Please note: you may still experience sound from
your TV. If you do not wish to hear the volume from
your TV whilst using your gaming headset, either
mute or turn down your TV volume.
Setting up your PC
1. Simply connect the USB to your PC.
2. Please note: when connected, the Game Volume
on the Inline Volume Control Unit is disabled; only
the Vibration, Chat and Mute On/Off are functional.
Setting up your Mac
®
1. Simply connect the USB to your Mac.
2. Go to “System Preferences” > “Sound”.
3. On the “Output” tab select “USB EarMicrophone”.
4. On the” Input” tab make sure the same “USB EarMicrophone” is also selected.
5. To control volume adjust the Chat dial.
6. Please note: when connected, the Game Volume
on the Inline Volume Control Unit is disabled; only
the Vibration, Chat and Mute On/Off are functional.
Care and Maintenance
Your device is a product of superior design and
craftsmanship and should be treated with care. The
suggestions below will help you to protect your
warranty coverage:
· Keep your device out of the reach of small
children.
· Keep the device dry. Precipitation, humidity and
all types of liquid or moisture can contain minerals
that will corrode electronic circuits. If your device
does get wet, allow it to dry completely.
· Do not use or store the device in dusty, dirty areas,
as moving parts and electronic components of
your device can be damaged.
· Do not use or store the device in hot areas. High
temperatures can shorten the life of electronic
devices, damage batteries and warp or melt
certain plastics.
· Do not use or store the device in cold areas. When
the device returns to its normal temperature,
moisture can form inside the device and damage
electronic circuit boards.
· Do not drop, knock or shake the device. Rough
handling can break internal circuit boards and ne
mechanics.
· Do not use harsh chemicals, cleaning solvents or
strong detergents to clean the device. All of the
previous suggestions apply equally to your device,
battery, charger or any enhancements.
Note: parts of the headset are magnetic. Metallic
materials may be attracted to the headset. Do not
place credit cards or other magnetic storage media
near the headset, as information stored on them may
be erased. Occasionally the headset may pick up
interference from mobile phones.
Français
Casque Vibrant XT+
Compatible avec PS4™, PS3™, Xbox 360®, PC
& Mac
®
Mode d’emploi
Merci d’avoir acheter ce casque Vibrant XT+.
Veuillez lire attentivement ce manuel d’instructions
avant d’utiliser ce produit et conservez-le en lieu
sûr à des ns de référence future. Ce guide inclut
les congurations les plus usuelles pour l’utilisation
du casque vibrant XT+ avec votre PS4, PS3 ou
votre Xbox 360 via HDMI ou AV. Pour toutes autres
congurations sur votre télévision, votre écran ou
votre écran de jeu, veuillez consulter les instructions
de leur fabricant. Veuillez également noter que
vous pourriez avoir besoin d’utiliser des câbles
supplémentaires (vendus séparément) en fonction de
la conguration de votre système.
Pour plus de renseignements, veuillez contacter
notre service d’assistance. Merci et bonne écoute !
Contenu
1 x Casque Vibrant XT+
1 x Mode d’emploi
Configuration de votre PS4™ avec HDMI
Fig.1
1. Insérez la che USB directement dans votre PS4.
2. Raccordez ensuite les connecteurs audio rouge
et blanc du casque aux connecteurs audio rouge
et blanc du RCA / répartiteur 3,5 mm. Branchez le
port de votre casque sur votre télévision.
3. Dans le menu PS4, le casque est
automatiquement identié. Si vous n’avez pas
ouvert de session, vous devrez sélectionner un
utilisateur.
4. Dans le menu principal, sous Settings,
sélectionnez Sound and Screen > Audio Output
Settings > Output To Headphones et sélectionnez
Chat Audio. Appuyez sur X pour conrmer.
5. Maintenez le bouton PS de votre télécommande
enfoncé pour sélectionner Adjust Devices.
Tournez le Volume Control (Headphones) au
maximum.
VS2849_Multi_Vibration Headset XT+_Instructions_A5_FULL.indd 7-8 15/07/2014 15:40
Page 5

Configuration de votre PS3™ avec HDMI
Fig.2
1. Insérez la che USB directement dans votre PS3.
2. Branchez les deux connecteurs audio rouge
et blanc du casque dans les entrées audio
correspondantes de votre téléviseur.
3. Puis branchez les connecteurs audio rouge et
blanc de la PS3 à l’arrière des connecteurs audio
du casque.
4. Le connecteur audio jaune n’est pas nécessaire.
Remarque : veuillez changer vos paramètres PS3
sur HDMI. Allez dans « Settings » (Paramètres) > «
Display Settings » (Paramètres afchage) > « Video
Output Settings » (Paramètres de sortie vidéo) > «
HDMI ».
Paramètres audio HDMI ou numérique (optique)
1. Sur le menu principal de la PS3, allez dans «
Settings » (Paramètres) et sélectionnez > « Sound
Settings » (Paramètres son) > « Audio Multi-Output
» (Sortie audio multiple).
2. Assurez-vous que la fonction Muet est désactivée
sur le cordon de commande de réglage du volume
et que le volume est activé sur le casque.
Configuration de votre PS3 avec AV
Fig.3
1. Insérez la che USB directement sur votre PS3.
2. Puis, utilisez le câble AV livré avec votre console
et branchez les deux connecteurs audio rouge
et blanc du casque dans les entrées audio
correspondantes de votre téléviseur.
3. Puis, branchez les connecteurs audio rouge et
blanc de la PS3 à l’arrière des connecteurs audio
du casque et le connecteur vidéo jaune dans
l’entrée correspondante de votre téléviseur.
Paramètres vidéo AV
1. Sur le menu principal de la PS3, allez dans «
Settings » (Paramètres” et sélectionnez) > «
Display Settings » (Paramètres afchage) > «
Video Settings » (Paramètres vidéo) > « AV Multi/
Scart » (AV Multi/Péritel) > « YPb/Cb Pr/Cr ». Puis,
sélectionnez « Change » (Changer) et appuyez sur
« Yes » (Oui) pour conrmer. Assurez-vous que
votre télévision est sur standard.
2. Enn, sélectionnez le type d’écran de la télévision
qui sera soit 16:9 ou 4:3.
3. Appuyez sur « X » pour enregistrer vos
modications.
Remarque : lorsque vous passez d’une connexion
HDMI à une connexion AV, vous devez changer de
chaîne et passer de HDMI à AV.
Paramètres audio AV
1. Sur le menu principal de la PS3, allez dans «
Settings » (Paramètres) » et sélectionnez > «
Sound Settings » (Paramètres son) > « Audio
Output Settings » (Paramètres de sortie audio) >
sélectionnez « Input Connector/Scart/AV Multi »
(Connecteur d’entrée/Péritel/AV Multi) ».
2. Appuyez sur « X » pour enregistrer vos
modications.
Pour configurer la discussion en ligne sur
votre casque
1. Sur le menu principal de la PS3, allez dans
« Settings » (Paramètres) et sélectionnez > «
Accessory Settings » (Paramètres accessoires) > «
Audio Devices » Paramètres périphériques audio)
> puis sélectionnez « Input Devices » (Périphérique
d’entrée) et « USB Ear Microphone » (Micro
casque USB). Puis, sélectionnez « Output Device
» (Périphérique de sortie) et « USB Ear Microphone
» (Micro casque USB).
2. Sélectionnez ensuite « Microphone Level » (Niveau
du microphone) et réglez de manière adéquate
en vériant que le voyant d’indication du volume
atteigne la couleur rouge lorsque vous parlez fort
dans le microphone du casque.
3. Appuyez sur « OK » pour enregistrer vos
modications.
Configuration de votre Xbox 360® avec HDMI
Fig.4
1. Insérez la che USB directement sur votre Xbox
360.
2. Branchez l’adaptateur audio (vendu séparément)
de la Xbox directement sur votre Xbox 360,
puis, branchez les deux connecteurs audio
rouge et blanc du casque aux entrées audio
correspondantes du câble de l’adaptateur audio
de la Xbox.
3. Enn, branchez la prise de 2,5mm directement
sur la manette de votre Xbox 360 pour pouvoir
discuter en ligne.
*En cas de branchement HDMI, vous devez disposer d’un
câble adaptateur audio Xbox 360 pour la sortie audio (vendu
séparément).
Configuration de votre Xbox 360 avec AV
Fig.5
1. Insérez la che USB directement sur votre Xbox
360.
2. Branchez les deux connecteurs audio rouge
et blanc du casque dans les entrées audio
correspondantes de votre téléviseur.
3. Puis, utilisez le câble AV livré avec votre console
et branchez les connecteurs audio rouge et blanc
de la Xbox 360 à l’arrière des connecteurs audio
du casque et le connecteur vidéo jaune dans
l’entrée correspondante de votre téléviseur.
4. Enn, branchez la prise de 2,5mm directement
sur la manette de votre Xbox 360 pour pouvoir
discuter en ligne.
Pour configurer la discussion en ligne sur
votre casque
1. Sur le menu principal de la Xbox 360, allez dans
« Settings » (Paramètres) > « Preferences »
(Préférences) > « Voice » (Voix).
2. Sélectionnez ensuite « Vice Volume » (Volume de
la voix) et réglez le volume sur 10.
3. Sélectionnez ensuite « Game Volume » (Volume du
jeu) et réglez également le volume sur 10.
4. Enn, sélectionnez « Voice Output » (Sortie voix) et
sélectionnez « Play Through Headset » (Son via le
casque).
5. Assurez-vous que la fonction Muet est désactivée
sur le cordon de commande de réglage du volume
et que le volume est activé sur le casque.
Remarque : il se peut que votre télévision émette
toujours du son. Si vous ne souhaitez pas entendre
le son émis par votre télévision pendant que vous
utilisez votre casque de jeu, coupez le son de votre
télévision ou mettez-le à zéro.
Configuration de votre PC
1. Branchez simplement la che USB sur votre PC.
2. Remarque : lors du branchement, le volume du
jeu sur le cordon de commande de volume est
désactivé. Seules les fonctions Vibration, Chat et
Muet sont opérationnelles.
Configuration de votre Mac
®
1. Branchez simplement la che USB sur votre Mac.
2. Allez dans « System Preferences » « (Préférences
Système) > « Sound » (Son).
3. Dans l’onglet « Output » (Sortie), sélectionnez «
USB Ear Microphone » (Micro casque USB).
4. Dans l’onglet « Input » (Entrée), veillez à ce que
l’option « USB Ear Microphone » (Micro casque
USB) soit également sélectionnée.
5. Pour régler le volume, utilisez le bouton de Chat.
6. Remarque : lors du branchement, le volume du
jeu sur le cordon de commande de volume est
désactivé. Seules les fonctions Vibration, Chat et
Muet sont opérationnelles.
Entretien et maintenance
Votre appareil est un produit de conception et de
fabrication de qualité supérieure et doit être traité
avec soin. Suivez les suggestions ci-dessous
pour vous aider à protéger la couverture de votre
garantie.
• Conservezvotreappareilhorsdelaportéedes
jeunes enfants.
• Conservezvotreappareilausec.Lapluieet
tous les types de liquide ou d’humidité peuvent
contenir des minéraux susceptibles d’entraîner
la corrosion des circuits électroniques. Si
votre appareil est mouillé, laissez-le sécher
complètement.
• N’utilisezetn’entreposezpasl’appareildans
des endroits poussiéreux ou sales an de ne
pas endommager les pièces mobiles et les
composants électroniques de ce dernier.
• N’utilisezetn’entreposezpasl’appareildans
des endroits chauds. Les fortes températures
peuvent raccourcir la durée de vie des appareils
électroniques, endommager les batteries et
déformer ou faire fondre certains plastiques.
• N’utilisezetn’entreposezpasl’appareildansdes
endroits froids. Lorsque l’appareil revient à une
température normale, une condensation peut se
former à l’intérieur et endommager les circuits
imprimés.
• Nefaitespastomber,necognezetnesecouez
pas l’appareil. Toute manipulation brutale peut
endommager les circuits imprimés internes et les
pièces mécaniques de précision.
• N’utilisezpasdeproduitschimiques,denettoyage
abrasifs ou de détergents puissants pour nettoyer
l’appareil. Toutes les suggestions précédentes
s’appliquent également à votre appareil, à la
batterie, au chargeur et à tout accessoire.
Remarque: certaines parties du casque sont
magnétiques et peuvent attirer des objets
métalliques. Ne placez pas de cartes bancaires ou
tout autre support d’enregistrement magnétique à
côté du casque, au risque de perdre les informations
enregistrées. Le casque peut parfois capter des
interférences causées par les téléphones portables.
VS2849_Multi_Vibration Headset XT+_Instructions_A5_FULL.indd 9-10 15/07/2014 15:40
Page 6

Deutsch
XT+ Vibration-Kopfhörer
Zur Verwendung mit PS4™, PS3™, Xbox 360®,
PC und Mac
®
Benutzerhandbuch
Wir danken Ihnen dafür, dass Sie den XT+ VibrationKopfhörer gekauft haben.
Bitte lesen Sie vor dem Gebrauch dieses Produkts
sorgfältig die Bedienungsanleitung und bewahren
Sie sie zur zukünftigen Bezugnahme auf. Dieses
Handbuch enthält die häugsten Einstellungen bei
der Verwendung des Vibration-Kopfhörers XT+ mit
entweder Ihrem PS4, PS3- oder Xbox 360-System
über HDMI oder AV. Alle zusätzlichen Einstellungen
Ihres Fernsehers, Monitors oder Gaming-Monitors
bitte in den Anleitungen des Herstellers nachlesen.
Bitte außerdem beachten, dass abhängig von Ihrer
Installation einige zusätzliche Kabel erforderlich sein
können (separat erhältlich).
Wenn Sie Hilfe benötigen, wenden Sie sich bitte an
unsere Helpline. Vielen Dank und viel Spaß!
Inhalt
1 x XT+ Vibration-Kopfhörer
1 x Benutzerhandbuch
PS4™-System auf HDMI einstellen
Fig. 1
1. Den USB-Stecker direkt in das PS4-System
einstecken.
2. Anschließend die rote und die weiße AudioSteckverbindung des Kopfhörers in die roten
und weißen Audio-Buchsen am 3,5 mm-KlinkenSplitter einstecken. Anschließend den Splitter in
den Kopfhörer-Eingang am Fernseher einstecken.
3. Der Kopfhörer wird automatisch im PS4-Menü
erkannt. Falls Sie noch nicht eingeloggt sind,
müssen Sie einen Benutzer auswählen.
4. Im Hauptmenü auf „Einstellungen“ gehen, >
„Bild und Ton“ > „Audio-Ausgabeeinstellungen“
> „Ausgabe an Kopfhörer“ wählen und zu
„Chat-Audio“ wechseln. Zum Bestätigen auf „X“
drücken.
5. Abschließend die PS-Taste auf der Steuerkonsole
gedrückt halten und „Geräte einstellen“ wählen.
Die „Lautstärkeregelung (Kopfhörer)“ auf
maximale Lautstärke einstellen.
PS3™-System auf HDMI einstellen
Fig.2
1. Den USB-Stecker direkt in das PS3-System
einstecken.
2. Den roten und den weißen Audio-Stecker in
die entsprechenden Audio-Eingänge an Ihrem
Fernseher einstecken.
3. Anschließend den roten und den weißen AudioStecker des PS3-Systems an der Rückseite der
Kopfhörer-Audio-Stecker anschließen.
4. Der gelbe Audio-Stecker wird nicht benötigt.
HINWEIS: Sie müssen die Einstellung Ihres
PS3-Systems in HDMI ändern. Zu „Settings“
(Einstellungen) > „Display Settings“ (Einstellungen
anzeigen) > „Video Output Settings“ (VideoausgabeEinstellungen) > „HDMI“ gehen.
Audio-Einstellungen HDMI oder Digital
(optisch)
1. Im Hauptmenü des PS3-Systems zu „Settings“
(Einstellungen) gehen und > „Sound Settings“
(Sound-Einstellungen) > „Audio Multi-Output“
(Audio-Multi-Ausgabe) wählen.
2. Sicherstellen, dass die Stummschaltung an der
integrierten Lautstärkeregelung ausgeschaltet ist
und die Lautstärke am Kopfhörer aufgedreht ist.
Ihr PS3-System für AV vorbereiten
Fig.3
1. Den USB-Stecker direkt in das PS3-System
einstecken.
2. Anschließend mithilfe des mit Ihrer Konsole
gelieferten AV-Kabels die roten und weißen
Kopfhörer-Audio-Buchsen an die entsprechenden
Audioeingänge an Ihrem Fernseher anschließen
3. Anschließend den roten und den weißen AudioStecker des PS3-Systems in die Rückseite der
Kopfhörer-Audio-Stecker einstecken und den
gelben Videostecker an dem entsprechenden
Eingang an Ihrem Fernseher anschließen.
Video-Einstellungen AV
1. Im Hauptmenü des PS3-Systems zu „Settings“
(Einstellungen) gehen und > „Display Settings“
(Einstellungen anzeigen) > „Video Settings“
(Video-Einstellungen) > „AV Multi/Scart“ (AVMulti/Scart) > „YPb/Cb Pr/Cr“ wählen. „Change“
(Ändern) wählen und zur Bestätigung auf „Yes“
(Ja) drücken. Sicherstellen, dass Ihr Fernseher auf
Standard steht.
2. Zum Schluss den Fernsehertyp auswählen, der
entweder 16:9 oder 4:3 ist.
3. Zum Speichern auf „X“ drücken.
Bitte beachten: Beim Wechsel von HDMI auf AV
muss der Kanal von HDMI auf AV umgestellt werden.
Audio-Einstellungen AV
1. Im Hauptmenü des PS3-Systems zu „Settings“
(Einstellungen) gehen und > „Sound Settings“
(Sound-Einstellungen) > „Audio Output Settings“
(Audioausgabe-Einstellungen) > „Input Connector/
Scart/AV Multi“ (Eingangsstecker/Scart/AV Multi)
wählen.
2. Zum Speichern auf „X“ drücken.
Chat an Ihrem Kopfhörer einstellen
1. Im Hauptmenü des PS3-Systems zu „Settings“
(Einstellungen) gehen und > „Accessory Settings“
(Zubehöreinstellungen) > „Audio Devices“
(Audiogeräte) sowie „Input Device“ (Eingabegerät)
und „USB Ear Microphone“ (USB-Ohrmikrofon)
auswählen. Anschließend „Output Device”
(Ausgabegerät) und dann „USB Ear Microphone”
(USB-Ohrmikrofon) wählen.
2. Anschließend „Microphone Level“ (Mikrofonpegel)
auswählen und nach Bedarf anpassen. Dabei
sicherstellen, dass die Lautstärkeanzeige gerade
den roten Bereich erreicht, wenn Sie laut in das
Kopfhörermikrofon sprechen.
3. Zum Speichern auf „OK“ drücken.
Ihre Xbox 360® auf HDMI einstellen
Fig.4
1. Den USB-Stecker direkt in Ihre Xbox 360
einstecken.
2. Den Xbox Audio-Adapter (separat erhältlich) direkt
in Ihre Xbox 360 einstecken. Anschließend den
roten und den weißen Kopfhörer-Audio-Stecker
in den entsprechenden Audio-Eingang am Xbox
Audio-Adapterkabel einstecken.
3. Schließlich den 2,5 mm-Buchsenstecker für
den Chat direkt in Ihre Xb0x 360-Steuerung
einstecken.
*Beim Anschließen mit HDMI benötigen Sie ein Xbox
360 Audio-Adapterkabel für die Audioausgabe (separat
erhältlich).
Ihre Xbox 360 für AV vorbereiten
Fig.4
1. Den USB-Stecker direkt in Ihre Xbox 360
einstecken.
2. Den roten und den weißen Audio-Stecker in
die entsprechenden Audio-Eingänge an Ihrem
Fernseher einstecken.
3. Anschließend mithilfe des mit Ihrer Konsole
gelieferten Kabels den roten und den weißen
Audio-Stecker der Xbox 360 in die Rückseite
der Kopfhörer-Audio-Stecker einstecken und den
gelben Videostecker an dem entsprechenden
Eingang an Ihrem Fernseher anschließen.
4. Schließlich den 2,5 mm-Buchsenstecker für
den Chat direkt in Ihre Xbox 360-Steuerung
einstecken.
Chat an Ihrem Kopfhörer einstellen
1. Im Hauptmenü des PS3-Systems zu „Settings“
(Einstellungen) „Preferences“ (Präferenzen) >
„Voice“ (Stimme) gehen.
2. Anschließend „Voice Volume“ (Stimmlautstärke)
auswählen und die Lautstärke auf 10 einstellen.
3. Zum Schluss „Voice Input“ (Stimmeingabe)
auswählen und auf „Play Through Headset“ (Über
Kopfhörer abspielen) einstellen.
4. Sicherstellen, dass die Stummschaltung an der
integrierten Lautstärkeregelung ausgeschaltet ist
und die Lautstärke am Kopfhörer aufgedreht ist.
Bitte beachten: Möglicherweise ist der Sound von
Ihrem Fernseher noch zu hören. Wenn Sie den
Sound von Ihrem Fernseher nicht hören möchten,
während Sie Ihren Gaming-Kopfhörer verwenden,
den Fernseher stumm schalten oder die Lautstärke
geringer stellen.
PC vorbereiten
1. Den USB-Stecker einfach in Ihren PC.
2. Bitte beachten: Nach dem Anschließen ist
die Spiele-Lautstärke an der integrierten
Lautstärkeregelung deaktiviert. Nur Vibration, Chat
und Stummschaltung funktionieren.
Mac vorbereiten
®
1. Den USB-Stecker einfach in Ihren Mac einstecken.
2. Zu „System Preferences“ (Systemeinstellungen) >
„Sound“ gehen.
3. Auf der Registerkarte „Output“ (Ausgabe) „USB
Ear-Microphone“ (USB-Ohrmikrofon) wählen.
4. Vergewissern Sie sich, dass auf der Registerkarte
„Input“ (Eingabe) ebenfalls „USB Ear-Microphone“
(USB-Ohrmikrofon) ausgewählt ist.
5. Zur Lautstärkeregelung Chat-Bedienknopf
verstellen.
6. Bitte beachten: Nach dem Anschließen ist
VS2849_Multi_Vibration Headset XT+_Instructions_A5_FULL.indd 11-12 15/07/2014 15:40
Page 7

Impostazione della PS3™ con HDMI
Fig.2
1. Inserire l’USB direttamente nella vostra PS3.
2. Collegare entrambi i connettori audio rosso
e bianco delle cufe agli ingressi audio
corrispondenti sul televisore.
3. Ora collegare i connettori audio rosso e bianco
della PS3 alla parte posteriore dei connettori audio
delle cufe.
4. Il connettore audio di colore giallo non è
necessario.
NB: È necessario cambiare le impostazioni della
PS3 a HDMI. Selezionare “Settings” (Impostazioni)
> “Display Settings” (Visualizza impostazioni >
“Video Output Settings” (Impostazioni uscita video)
> “HDMI”.
Impostazioni audio HDMI o Digitale (ottico)
1. Sul menu principale della PS3, selezionare
“Settings” (Impostazioni) seguito da > “Sound
Settings” (Impostazioni audio) > “Audio MultiOutput” (Multi-uscita audio).
2. Vericare che il silenziatore del suono (Mute)
sull’Unità di controllo del volume in linea sia
disattivato, e che il volume sulle cufe sia acceso.
Impostazione della PS3 con AV
Fig.3
1. Inserire l’USB direttamente nella vostra PS3.
2. Se si utilizza il cavo AV in dotazione con la
console, collegare entrambi i connettori audio
rosso e bianco delle cufe agli ingressi audio
corrispondenti sul televisore.
3. Ora collegare i connettori audio rosso e bianco
della PS3 alla parte posteriore dei connettori audio
delle cufe, e il connettore video giallo all’ingresso
corrispondente sul televisore.
Impostazioni video AV
1. Sul menu principale della PS3, selezionare
“Settings” (Impostazioni) seguito da > “Display
Settings” (Visualizza impostazioni) > “Video
Settings” (Impostazioni video) > “AV Multi/Scart”
> “YPb/Cb Pr/Cr”. Ora selezionare “Change”
(Cambia) e premere “Yes” (Sì) per confermare;
controllare che il televisore sia su standard.
2. I nne, selezionare il tipo di televisore, ossia 16:9
oppure 4:3.
3. Premere “X” per salvare.
Attenzione: se si passa da HMDI ad AV, sarà
necessario cambiare il canale da HMDI ad AV.
Impostazioni audio AV
1. Sul menu principale della PS3, selezionare
“Settings” (Impostazioni) seguito da > “Sound
Settings” (Impostazioni audio) > “Audio Output
Settings” (Impostazioni uscita audio) > e
selezionare “Input Connector/Scart/AV Multi”
(Connettore ingresso/Scart/AV Multi).
2. Premere “X” per salvare.
Per impostare la modalità Chat sulle cuffie
1. Sul menu principale della PS3, selezionare
“Settings” (Impostazioni) seguito da > “Audio
Devices” (Dispositivi audio) > “Input Device”
(Dispositivo ingresso), quindi selezionare “USB
Ear Microphone” (Microfono auricolare USB).
A questo punto, selezionare “Output Device”
(Dispositivo uscita) e poi “USB Ear Microphone”
(Microfono auricolare USB).
2. Ora selezionare “Microphone Level” (Livello
microfono) e regolare secondo le vostre
preferenze, controllando che l’indicatore del
volume raggiunga appena il rosso quando parlate
ad alta voce nel microfono delle cufe.
3. Premere “OK” per salvare.
Impostazione della Xbox 360® con HDMI
Fig.4
1. Inserire l’USB direttamente nella vostra Xbox 360.
2. Collegare l’Adattatore audio della Xbox (venduto
separatamente) direttamente alla Xbox 360, poi
inserire entrambi i connettori audio rosso e bianco
delle cufe negli ingressi audio corrispondenti sul
cavo dell’Adattatore audio della Xbox.
3. Inne, collegare il jack da 2,5 mm direttamente al
controllo della Xbox 360 per chattare.
*Per il collegamento con HDMI è necessario un cavo di
Adattatore audio per Xbox 360, per l’uscita audio (venduto
separatamente).
Impostazione della Xbox 360 con AV
Fig.5
1. Inserire l’USB direttamente nella vostra Xbox 360.
2. Collegare entrambi i connettori audio rosso
e bianco delle cufe agli ingressi audio
corrispondenti sul televisore.
3. Ora, utilizzando il cavo AV in dotazione con la
console, collegare i connettori audio rosso e
bianco della Xbox 360 alla parte posteriore dei
connettori audio delle cufe, e il connettore video
giallo all’ingresso corrispondente sul televisore.
4. Inne, collegare il jack da 2,5 mm direttamente al
controllo della Xbox 360 per chattare.
die Spiele-Lautstärke an der integrierten
Lautstärkeregelung deaktiviert. Nur Vibration, Chat
und Stummschaltung funktionieren.
Pflege und Wartung
Ihr Gerät ist ein hervorragend konstruiertes und
gefertigtes Produkt und muss mit Sorgfalt behandelt
werden. Die folgenden Empfehlungen werden Ihnen
helfen, Ihren Garantieschutz zu erhalten:
• BewahrenSiedasGerätaußerReichweitevon
kleinen Kindern auf.
• HaltenSiedasGerättrocken.Niederschlag,
Feuchtigkeit und alle Arten von Flüssigkeiten
können Mineralien enthalten, die die
elektronischen Schaltungen korrodieren. Wenn Ihr
Gerät nass werden sollte, lassen Sie es vollständig
trocknen.
• DasGerätnichtinstaubigen,schmutzigen
Bereichen benutzen oder aufbewahren, da
bewegliche Teile und Elektronikbauteile des Geräts
dadurch beschädigt werden können.
• DasGerätnichtinheißenBereichenbenutzen
oder aufbewahren. Hohe Temperaturen können
die Lebensdauer elektronischer Geräte verkürzen,
Batterien beschädigen und bestimmte Kunststoffe
verformen oder schmelzen.
• DasGerätnichtinkaltenBereichenbenutzenoder
aufbewahren. Wenn das Gerät zu seiner normalen
Temperatur zurückkehrt, kann sich Feuchtigkeit
im Innern des Geräts bilden und Platinen
beschädigen.
• DasGerätnichtfallenlassen,vorStößenschützen
und nicht schütteln. Ein grober Umgang mit
dem Gerät kann zur Beschädigung interner
Schaltungen und der Feinmechanik führen.
• KeineaggressivenChemikalien,Lösungsmittel
oder starke Reinigungsmittel zur Reinigung
des Geräts benutzen. Alle der vorhergehenden
Empfehlungen gelten gleichermaßen für das
Gerät, die Batterie, das Ladegerät und alle
Erweiterungen.
Hinweis: Teile des Headsets sind magnetisch. Das
Headset kann Metallteile anziehen. Bringen Sie
keine Kreditkarten oder anderen magnetischen
Speichermedien in der Nähe des Headsets, da
die darauf gespeicherten Informationen gelöscht
werden könnten. Im Kopfhörer können gelegentlich
Störungsgeräusche durch Mobiltelefone auftreten.
Italiano
Cuffie vibranti XT+
Per uso con PS4™, PS3™, Xbox 360®, PC &
Mac
®
Guida per l’Utente
Grazie di avere acquistato queste Cufe vibranti XT+.
Si prega di leggere attentamente queste istruzioni
prima di usare il prodotto e di conservarle al sicuro
per futuro riferimento. Questa guida contiene le
impostazioni più diffuse per l’uso delle Cufe vibranti
XT+ con il sistema della PS4, PS3 o Xbox mediante
HDMI o AV. Per eventuali impostazioni supplementari
per TV, monito o monitor per videogiochi, consultare
le istruzioni del produttore. Si ricorda che inoltre che
potrebbero essere necessari altri cavi, a seconda
dell’impostazione del sistema di casa vostra).
Per maggiore assistenza, contattare la nostra
helpline. Grazie e buon divertimento!
Contenuto della confezione
1 x Cufe vibranti XT+
1 x Guida per l’Utente
Impostazione della PS4™ con HDMI
Fig.1
1. Inserire l’USB direttamente nella vostra PS4.
2. Ora inserire entrambi i connettori audio rosso
e bianco delle cufe nei connettori audio
corrispondenti di colore rosso e bianco sullo
sdoppiatore per jack RCA/3,5 mm. Inserire
quest’ultimo nell’attacco per le cufe sul vostro
televisore.
3. Nel menu della PS4, le cufe saranno identicate
automaticamente. Se non siete già connessi,
dovrete selezionare un utente.
4. Nel menu principale, passare a “Settings”
(Impostazioni) e selezionare > “Sound and
Screen” (Suono e schermo) > “Audio Output
Settings” (Impostazioni uscita audio) > “Output To
Headphones” (Uscita a cufe) e cambiare a “Chat
Audio” (Audio chat). Premere “X” per confermare
le impostazioni.
5. Inne, tenere premuto il pulsante PS sul vostro
controller e selezionare “Adjust Devices” (Regolare
dispositivi). Alzare no al massimo “Volume
Control (Headphones)” (Controllo volume (cufe)).
VS2849_Multi_Vibration Headset XT+_Instructions_A5_FULL.indd 13-14 15/07/2014 15:40
Page 8

Impostazione della modalità Chat sulle cuffie
1. Sul menu principale della Xbox, selezionare
“Settings” (Impostazioni) seguito da >
“Preferences” (Preferenze) > “Voice” (Voce).
2. Ora selezionare “Voice Volume” (Volume voce) e
impostare il volume su 10.
3. Poi selezionare “Game Volume” (Volume gioco) e
impostare anche in questo caso il volume su 10.
4. Inne, selezionare “Voice Output” (Uscita voce)
e impostarlo su “Play Through Headset” (Gioca
tramite cufe).
5. Vericare che il silenziatore del suono (Mute)
sull’Unità di controllo del volume in linea sia
disattivato, e che il volume sulle cufe sia acceso.
Attenzione: dal televisore potrebbe comunque
esservi diffusione sonora. Se non si desidera avere
volume dal televisore durante l’uso delle cufe di
gioco, selezionare Mute oppure abbassare il volume
del televisore.
Impostazione del PC
1. È sufciente collegare l’USB al PC.
2. Si ricorda che, dopo il collegamento, il Volume di
gioco sull’Unità di controllo del volume in linea è
disattivato; solo Vibrazione, Chattare e Muro On/
Off sono operativi.
Impostazione del Mac
®
1. È sufciente collegare l’USB al vostro Mac.
2. Selezionare “System Preferences” (Preferenze
sistema) > “Sound” (Suono).
3. Sulla scheda “Output” (Uscita), selezionare “USB
Ear-Microphone” (Auricolare USB).
4. Sulla scheda “Input” (Ingresso), vericare di
selezionare anche in questo caso lo stesso “USB
Ear-Microphone” (Auricolare USB).
5. Per controllare il volume, regolare il quadrante
Chat (Chatta).
6. Si ricorda che, dopo il collegamento, il Volume di
gioco sull’Unità di controllo del volume in linea è
disattivato; solo Vibrazione, Chattare e Muto On/
Off sono operativi.
Cura e manutenzione
Manifattura e design del prodotto sono di elevato
livello, pertanto il dispositivo va maneggiato con
cura. Le indicazioni riportate di seguito consentono
di sfruttare al meglio la copertura della garanzia.
• Tenereildispositivofuoridallaportatadibambini
piccoli.
• Tenereildispositivoasciutto.Precipitazioni,
umidità e qualsiasi tipo di sostanza liquida o
umida potrebbero corrodere i circuiti elettronici
interni. Se il dispositivo si bagna, farlo asciugare
completamente.
• Nonutilizzarenéconservareildispositivo
in presenza di polvere o detriti per evitare
il danneggiamento delle parti mobili o dei
componenti elettronici.
• Nonutilizzarenéconservareildispositivoinluoghi
soggetti a temperature elevate. Le temperature
elevate possono ridurre il ciclo di vita dei
dispositivi elettronici, danneggiare le batterie,
deformare o fondere le parti in plastica.
• Nonutilizzarenéconservareildispositivoinzone
eccessivamente fredde. Quando il dispositivo
torna a una temperatura normale, potrebbe
formarsi al suo interno della condensa che rischia
di danneggiare le piastre dei circuiti elettronici.
• Nonfarcadereoscuotereildispositivoe
proteggerlo da ogni possibile urto. Un utilizzo
inadeguato del dispositivo potrebbe danneggiare i
circuiti interni e le parti meccaniche delicate.
• Nonutilizzareprodottichimici,solventiné
detergenti aggressivi per pulire il dispositivo.
Le indicazioni sopra riportate si riferiscono al
dispositivo, alla batteria, al caricatore e a eventuali
accessori.
Nota: alcune parti delle cufe sono magnetiche e
potrebbero pertanto attrarre materiali metallici. Non
collocare carte di credito o altri dispositivi magnetici
di archiviazione in prossimità delle cufe per evitare
la cancellazione delle informazioni in essi presenti.
Occasionalmente, le cufe potrebbero captare
interferenze dai telefoni cellulari.
Nederlands
Vibration hoofdtelefoon XT+
Te gebruiken met PS4™, PS3™, Xbox 360®, PC
& Mac
®
Gebruikershandleiding
Hartelijk dank voor uw aankoop van de XT+ Vibration
hoofdtelefoon.
Gelieve aandachtig het instructieboekje te lezen
voordat u dit product gebruikt en bewaar het op een
veilige plaats zodat u er later kunt naar verwijzen.
In deze gids vindt u de meest gebruikelijke
installatiemogelijkheden voor het gebruik van de
Vibration hoofdtelefoon XT+ met uw PS4, PS3
of Xbox 360 systeem via HDMI of AV. Raadpleeg
de instructies van uw fabrikant voor eventuele
aanvullende installatie-instructies voor uw tv,
monitor of spelmonitor. Merk op dat mogelijk eXT+ra
kabels nodig zijn, afhankelijk van uw installatie thuis
(afzonderlijk verkocht).
Neem contact op met onze helplijn indien u meer
hulp nodig hebt. Hartelijk dank en veel plezier ermee!
Inhoudsopgave
1 x Vibration hoofdtelefoon XT+
1 x Gebruikershandleiding
Installatie van uw PS4™ met HDMI
Fig.1
1. Steek de USB rechtstreeks in uw PS4.
2. Sluit vervolgens de rode en de witte
audioconnectors van de hoofdtelefoon aan
op de rode en witte audioconnectors op de
RCA/3,5mm splitter. Steek deze vervolgens in uw
hoofdtelefoonpoort op uw tv.
3. Op het PS4 menu wordt de hoofdtelefoon
automatisch geïdenticeerd. Indien u niet
aangemeld bent moet u een gebruiker selecteren.
4. In het hoofdmenu gaat u naar “Instellingen” en
selecteer > “Geluid en scherm” > “Instellingen
audio-output” > “Output naar hoofdtelefoon”
en verander in “Chat Audio”. Druk op “X” om te
bevestigen.
5. Druk tot slot de PS-knop op uw controller in en
selecteer vervolgens “Apparaten aanpassen”.
Draai de “Volumeregeling (hoofdtelefoon)” op max.
Installatie van uw PS3™ met HDMI
Fig.2
1. Steek de USB rechtstreeks in uw PS3.
2. Sluit zowel de rode als witte audioconnectors van
de hoofdtelefoon aan op de overeenkomstige
audio-inputs op uw tv.
3. Sluit vervolgens de PS3 rode en witte
audioconnectors aan op de achterzijde van de
audioconnectors van de hoofdtelefoon.
4. U hoeft de gele audioconnector niet te gebruiken.
NB: U moet uw PS3 instellingen veranderen in HDMI.
Ga naar “Settings” (Instellingen) > “Display Settings”
(Instellingen weergeven) > “Video Output Settings”
(Video outputinstellingen) > “HDMI”.
Audio-instellingen HDMI of Digitaal (optisch)
Fig.3
1. In het PS3 hoofdmenu gaat u naar “Settings”
(Instellingen) en selecteer > “Sound Settings”
(Geluidsinstellingen) > “Audio Multi-Output” (Audio
Multi-Output).
2. Zorg dat dempen is uitgeschakeld op de
ingebouwde volumeregeling en dat het volume
aan staat op de hoofdtelefoon.
Installatie van uw PS3 met AV
1. Steek de USB rechtstreeks in uw PS3.
2. Vervolgens gebruikt u de AV kabel die
meegeleverd werd met uw console voor het
aansluiten van de rode en witte hoofdtelefoon
audioconnectors in de overeenkomstige audioinputs op uw tv.
3. Sluit vervolgens de PS3 rode en witte
audioconnectors aan op de achterzijde van de
audioconnectors van de hoofdtelefoon en de gele
videoconnector in de overeenkomstige input op
uw tv.
Video-instellingen AV
1. Op het PS3 hoofdmenu gaat u naar “Settings”
(Instellingen) en selecteer > “Display Settings”
(Display-instellingen) > “Video Settings” (Videoinstellingen) > “AV Multi/Scart” > “YPb/Cb Pr/Cr
” selecteer “Change” (Wijzigen) en druk op “Yes”
(Ja) ter bevestiging, zorg dat uw tv op standaard
staat.
2. Selecteer tot slot het tv-type, dat ofwel 16:9 of 4:3
zal zijn.
3. Druk op “X” voor opslaan.
Merk op: bij wijziging van HDMI naar AV, moet u het
VS2849_Multi_Vibration Headset XT+_Instructions_A5_FULL.indd 15-16 15/07/2014 15:40
Page 9

kanaal veranderen van HDMI in AV.
Audio-instellingen AV
1. Op het PS3 hoofdmenu gaat u naar “Settings”
(Instellingen) en selecteer > “Sound Settings”
(Geluidsinstellingen) > “Audio Output Settings”
(Instellingen audio-output) > selecteer “Input
Connector/Scart/AV Multi”.
2. Druk op “X” voor opslaan.
Instellen van chat op uw hoofdtelefoon
1. Op het PS3 hoofdmenu gaat u naar “Settings”
(Instellingen) en selecteer > “Accessory Settings”
(Accessoire-instellingen) > “Audio Devices”
(Audiotoestellen) > selecteer “Input Device” (Input
apparaat) en selecteer “USB Ear Microphone”
(USB oormicrofoon). Selecteer vervolgens
“Output Device” (outputapparaat) en selecteer
“USB Ear Microphone” (USB oormicrofoon).
2. Selecteer vervolgens “Microphone Level”
(Microfoonniveau) en pas aan als nodig, zorg dat
de volume-indicator net in het rood gaat wanneer
u luid in de microfoon van de hoofdtelefoon praat.
3. Druk op “OK” voor opslaan.
Installatie van uw Xbox 360 met HDMI
Fig.4
1. Steek de USB rechtstreeks in uw Xbox 360.
2. Steek de Xbox Audio-adaptor (afzonderlijk
verkocht) rechtstreeks in uw Xbox 360, sluit
vervolgens zowel de rode als witte audioconnectors van de hoofdtelefoon aan op de
overeenkomstige audio-inputs op de kabel van de
Xbox audio-adapter.
3. Sluit tot slot de 2,5mm stekker rechtstreeks aan
op uw Xbox 360 controller voor chat.
*Bij aansluiting met HDMI hebt u een Xbox 360 audio adapterkabel nodig voor audio-output (afzonderlijk
verkocht).
Installatie van uw Xbox 360 met AV
Fig.5
1. Steek de USB rechtstreeks in uw Xbox 360.
2. Sluit zowel de rode als witte audioconnectors van
de hoofdtelefoon aan op de overeenkomstige
audio-inputs op uw tv.
3. Gebruik vervolgens de AV-kabel die werd
meegeleverd met uw console en sluit deXbox
360 rode en witte audioconnectors aan op de
achterzijde van de audioconnectors van de
hoofdtelefoon en de gele videoconnector in de
overeenkomstige input op uw tv.
4. Sluit tot slot de 2,5mm stekker rechtstreeks aan
op uw Xbox 360 controller voor chat.
Installatie van chat op uw hoofdtelefoon
1. In het Xbox 360 hoofdmenu gaat u naar “Settings”
(Instellingen) > “Preferences “ (Voorkeuren) >
“Voice” (Stem).
2. Selecteer vervolgens “Voice Volume”
(Stemvolume) en stel volume in op 10.
3. Selecteer vervolgens “Game Volume” (Spelvolume)
en stel volume ook in op 10.
4. Selecteer tot slot “Voice Output” (Stemoutput) en
stel in als “Play Through Headset” (Afspelen via
hoofdtelefoon).
5. Zorg dat dempen is uitgeschakeld op de
ingebouwde volumeregeling en dat het volume
aan staat op de hoofdtelefoon.
Opgelet: mogelijk hoort u nog steeds geluid van uw
tv. Indien u geen geluid wenst te horen van uw tv
terwijl u uw spelhoofdtelefoon gebruikt, dient u uw
tv-volume te dempen of uit te schakelen.
Installatie van uw PC
1. Sluit de USB gewoon aan op uw pc.
2. Opgelet: bij aansluiting is het spelvolume op
de inline volumeregeling uitgeschakeld; alleen
vibratie, chat en dempen aan/uit zijn functioneel.
Installatie op uw Mac
®
1. Sluit gewoon de USB aan op uw Mac.
2. Ga naar “System Preferences”
(Systeemvoorkeuren) > “Sound” (Geluid).
3. Op het tabblad “Output” selecteert u “USB Ear
Microphone” (USB oormicrofoon).
4. Op het tabblad ”Input” zorgt u ervoor dat dezelfde
“USB Ear Microphone” (USB oormicrofoon) ook
geselecteerd is.
5. Om het volume te regelen, draait u aan de Chatregelknop.
6. Opgelet: wanneer u aangesloten bent, is het
Game Volume op de Inline Volume regelunit
uitgeschakeld; alleen de Vibratie, Chat en Dempen
aan/uit zijn functioneel.
Onderhoud en beheer
Uw toestel heeft een superieur en vakkundig
ontwerp en dient voorzichtig behandeld te worden.
De onderstaande suggesties helpen u om uw
garantie te beschermen:
• Houduwtoestelbuitenhetbereikvankleine
kinderen.
• Houdhettoesteldroog.Neerslag,vochtenalle
soorten vloeistof kunnen mineralen bevatten die
de elektronische circuits corroderen. Indien uw
toestel nat wordt, dient u het volledig te laten
drogen.
• Umaghettoestelnietgebruikenofbewaren
in stofge of vuile gebieden, aangezien de
bewegende onderdelen en elektronische
componenten van uw toestel beschadigd kunnen
raken.
• Umaghettoestelnietgebruikenofbewarenin
warme ruimtes. Hoge temperaturen kunnen de
levensduur van elektronische toestellen verkorten,
batterijen beschadigen en bepaalde plasticsoorten
vervormen of doen smelten.
• Umaghettoestelnietgebruikenofbewarenin
koude ruimtes. Wanneer het toestel opnieuw op
normale temperatuur is, kan zich vocht binnenin
het toestel vormen en de elektronische printplaten
beschadigen.
• Umaghettoestelnietlatenvallen,omverstotenof
schudden. Een ruwe behandeling kan de interne
printplaten en jne mechaniek kapot maken.
• Gebruikgeenagressievechemicaliën,
schoonmaakmiddelen of krachtige detergenten
om het toestel schoon te maken. Alle vorige
suggesties gelden ook voor uw toestel, batterij,
oplader of eventuele verbeteringen.
Opmerking: bepaalde onderdelen van de
hoofdtelefoon zijn magnetisch. de hoofdtelefoon kan
metaalhoudende materialen aantrekken. Plaats geen
kredietkaarten of andere magnetische opslagmedia
in de buurt van de hoofdtelefoon, aangezien de
informatie die hierop staat mogelijk gewist kan
worden. Af en toe kan de hoofdtelefoon interferentie
opvangen van mobiele telefoons.
Español
Auriculares con vibración XT+
Para utilizar con PS4™, PS3™, Xbox 360®, PC
y Mac
®
Manual de usuario
Gracias por comprar los auriculares con vibración
XT+.
Lea las instrucciones antes de utilizar este producto
y consérvelas para futuras consultas. Esta guía
incluye los ajustes más comunes para el uso de
los auriculares con vibración XT+ en su sistema
PS4, PS3 o Xbox 360 por medio de HDMI o AV.
Para ajustes adicionales de su televisor, monitor
o monitor de juego, consulte las instrucciones del
fabricante. Además, tenga en cuenta que pueden ser
necesarios algunos cables adicionales en función
de la instalación que tenga en casa (se venden por
separado).
Si necesita más ayuda, póngase en contacto con
nuestro centro de asistencia. ¡Gracias y disfrute!
Contenido
1 set de auriculares con vibración XT+
1 guía de usuario
Conectar su PS4™ con HDMI
Fig. 1
1. Conecte el USB directamente a su PS4.
2. A continuación, conecte los conectores de audio
blanco y rojo de los auriculares a los conectores
de audio blanco y rojo del adaptador RCA hembra
de 3,5 mm. Después, conéctelo al puerto de
salida para auriculares de su televisor.
3. En el menú del PS4, los auriculares se
identicarán automáticamente. Si no está
registrado, necesitará seleccionar un usuario.
4. En el menú principal, vaya a “Ajustes” y
seleccione > “Sonido y pantalla” > “Ajustes de
salida de audio” > “Salida para auriculares”
y cambie a “Audio del chat”. Pulse “X” para
conrmar.
5. Para terminar, mantenga pulsado el botón PS de
su mando y seleccione “Ajustar dispositivos”.
Suba el “Control de volumen (auriculares)” al
máximo.
VS2849_Multi_Vibration Headset XT+_Instructions_A5_FULL.indd 17-18 15/07/2014 15:40
Page 10

Conectar su PS3™ con HDMI
Fig.2
1. Conecte el USB directamente a su PS3.
2. Conecte los conectores rojo y blanco de audio
en las correspondientes entradas de audio de su
televisor.
3. Después, conecte los conectores de audio rojo
y blanco de la PS3 en la parte posterior de los
conectores de audio de los auriculares.
4. El conector amarillo no es necesario.
NOTA: Necesitará cambiar la conguración de su
PS3 a HDMI. Vaya a “Settings” (Ajustes) > “Display
Settings” (Ajustes de pantalla) > “Video Output
Settings” (Ajustes de salida de video) > “HDMI”.
Ajustes de audio HDMI o digital (óptica)
1. En el menú principal de la PS3 vaya a “Settings”
(Ajustes) y seleccione > “Sound Settings” (Ajustes
de sonido) > “Audio Multi-Output” (Multisalida de
audio).
2. Asegúrese de que la función de silencio esté
desactivada en la unidad de control de volumen
en línea y de que el volumen en los auriculares sea
lo sucientemente alto.
Conectar su PS3 con AV
Fig.3
1. Conecte el USB directamente a su PS3.
2. Después, utilizando el cable AV suministrado
con la consola, conecte los conectores rojo y
blanco de los auriculares en las correspondientes
entradas de audio del televisor.
3. Después, conecte los conectores de audio
rojo y blanco de la PS3 en la parte posterior de
los conectores de audio de los auriculares y el
conector de video amarillo en la correspondiente
entrada de su televisor.
Ajustes de vídeo AV
1. En el menú principal de PS3, vaya a “Settings”
(Ajustes)y seleccione “Display Settings” (Ajustes
de pantalla) > “Video Settings” (Ajustes de vídeo)
> “AV Multi/Scart” > “YPb/Cb Pr/Cr”. Seleccione
“Change” (Cambiar) y pulse “Yes” (Sí) para
conrmar. Asegúrese de que su televisor esté en
modo estándar.
2. Por último, seleccione el tipo de televisor, que será
16:9 o bien 4:3.
3. Pulse “X” para guardar.
A tener en cuenta: si cambia de HDMI a AV, tendrá
que cambiar también el canal de HDMI a AV.
Ajustes de audio AV
1. En el menú principal de la PS3 vaya a “Settings”
(Ajustes) y seleccione > “Sound Settings”
(Ajustes de sonido) > “Audio Output Settings”
(Ajustes de salida de audio) > seleccione “Input
Connector/Scart/AV Multi” (Conector de entrada/
Euroconector/AV Mult)”.
2. Pulse “X” para guardar.
Para ajustar el chat en sus auriculares
1. En el menú principal de la PS3 vaya a “Settings”
(Ajustes)” y seleccione > “Accessory Settings”
(Ajustes de accesorios)” > “Audio Devices”
(Dispositivos de audio) > seleccione “Input
Devices” (Dispositivo de entrada) y seleccione
“USB Ear Microphone” (Micrófono y auricular
USB). Después, seleccione “Output Device”
(Dispositivo de salida) y elija “USB Ear
Microphone” (Micrófono y auricular USB).
2. Después, seleccione “Microphone Level” (Nivel de
micrófono) y ajuste el volumen asegurándose de
que el indicador de volumen alcanza la zona roja
solo cuando habla muy alto en el micrófono.
3. Pulse “OK” para guardar.
Conectar su Xbox 360® con HDMI
Fig.4
1. Conecte el USB directamente a su Xbox 360.
2. Conecte el adaptador de audio de la Xbox
(se vende por separado) directamente en su
Xbox 360, después conecte los conectores de
audio rojo y blanco de los auriculares en las
correspondientes entradas de audio del cable
adaptador de audio de la Xbox.
3. Por último, conecte el conector de 2,5 mm en el
mando de su Xbox 360 para chatear.
*Cuando lo conecte con HDMI, necesitará un cable adaptador de audio de la Xbox para la salida de audio (se vende
por separado).
Conectar su Xbox 360 con AV
Fig.5
1. Conecte el USB directamente a su Xbox 360.
2. Conecte los conectores rojo y blanco de audio de
los auriculares en las correspondientes entradas
de audio de su televisor.
3. Después, utilizando el cable AV suministrado
con la consola, conecte los conectores de audio
rojo y blanco de la Xbox 360 en la parte posterior
de los conectores de audio de los auriculares
y el conector de vídeo amarillo en la entrada
correspondiente de su televisor.
4. Por último, conecte el conector de 2,5 mm en el
mando de su Xbox 360 para chatear.
Para ajustar el chat en sus auriculares
1. En el menú principal de la Xbox 360, vaya
a “Settings” (Conguración) > “Prefereces”
(Preferencias) > “Voice” (Voz).
2. Después, seleccione “Voice Volume” (Volumen de
la voz) y ajuste el volumen a 10.
3. Después seleccione “Game Volume” (Volumen del
juego) y ajuste el volumen a 10.
4. Por último, seleccione “Voice Output” (Salida
de voz) y marque “Play Through Headset”
(Reproducir por los auriculares).
5. Asegúrese de que la función de silencio esté
desactivada en la unidad de control de volumen
en línea y de que el volumen en los auriculares sea
lo sucientemente alto.
A tener en cuenta: puede que todavía perciba el
sonido del televisor. Si no desea oír el volumen
del televisor mientras utiliza los auriculares, baje el
volumen del televisor o active la función de silencio.
Conectar su PC
1. Simplemente conecte el USB directamente a su
PC.
2. Nota: cuando esté conectado, se inhabilita
el Volumen del juego en la Unidad de control
de volumen en línea. Solo están operativos la
vibración, el chat y el silencio on/off.
Conectar su Mac
®
1. Simplemente conectar el USB a su Mac.
2. Ir a “System Preferences” (Preferencias del
sistema) > “Sound” (Sonido).
3. Seleccionar “USB Ear-Microphone” (Micrófono y
auriculares USB) en la pestaña “Output” (Salida).
4. Asegurarse de que la misma opción “USB EarMicrophone” (micrófono y auriculares USB) está
marcada en la pestaña “Input” (Entrada).
5. Para controlar el volumen, ajustar el regulador de
chat.
6. Nota: cuando esté conectado, se inhabilita
el Volumen del juego en la Unidad de control
del volumen en línea. Solo están operativos la
vibración, el chat y el silencio on/off.
Cuidado y mantenimiento
Su dispositivo es un producto de diseño y
fabricación de primera clase y debe tratarse con
cuidado. Las siguientes sugerencias le ayudarán a
proteger su cobertura de garantía:
• Mantengaeldispositivofueradelalcancedeniños
pequeños.
• Mantengaeldispositivoseco.Laprecipitación,
la humedad y todos los tipos de líquidos o
de humedades pueden contener minerales
que corroerán los circuitos electrónicos. Si
el dispositivo se moja, deje que se seque
completamente.
• Noutilicenialmaceneeldispositivoenáreas
polvorientas o sucias, ya que las piezas móviles
y los componentes electrónicos del dispositivo
pueden dañarse.
• Noutilicenialmaceneeldispositivoenáreasde
calor. Las elevadas temperaturas pueden acortar
la vida de los dispositivos electrónicos, dañar las
baterías y deformar o fundir ciertos plásticos.
• Noutilicenialmaceneeldispositivoenáreasfrías.
Cuando el dispositivo vuelve a su temperatura
normal, puede formarse humedad en el interior
del dispositivo y dañar las placas de circuitos
electrónicos.
• Nodejecaer,golpeenisacudaeldispositivo.La
manipulación brusca puede romper placas de
circuitos internos y sistemas mecánicos nos.
• Noutiliceproductosquímicosagresivos,
disolventes de limpieza ni detergentes fuertes
para limpiar el dispositivo. Todas las sugerencias
anteriores se aplican igualmente al dispositivo, a la
batería, al cargador o a cualquier mejora.
Nota: ciertas piezas de los auriculares son
magnéticas. Los materiales metálicos pueden ser
atraídos por los auriculares. No coloque tarjetas de
crédito u otros medios de almacenaje magnéticos
cerca del auricular, ya que podría borrarse la
información guardada en los mismos. En ocasiones,
los auriculares pueden captar interferencias de
teléfonos móviles.
VS2849_Multi_Vibration Headset XT+_Instructions_A5_FULL.indd 19-20 15/07/2014 15:40
 Loading...