

Page 1

venom night ranger ii
pilot’s handbook
read before flight!
venf-6221-2
Page 2
I. Introduction
The Venom Night Ranger II is an outstanding Ready to Fly Electric Mini
Helicopter for indoor flying and outdoors on calm days. At about 300
grams, the Venom Night Ranger II will fly for 8-10 minutes on the 7-Cell
Ni-MH battery. Although the Venom Night Ranger II is not difficult to
operate, we recommend that you read these instructions thoroughly
and carefully first. You can also ask for assistance from your hobby
shop staff or local model flying club.
Specifications:
Model No ............................................... VENF-6221
Model Name .......................................... Venom Night Ranger II
Main Rotor Diameter ............................. 530 mm
Fuselage Length ................................... 500 mm
Weight ................................................... 280-300g
Battery ................................................... 8.4v Ni-MH
Radio Controller .................................... 4 Channel FM
Servo ..................................................... 2PCS
Guarantee:
We guarantee that the Venom Night Ranger II to be free of
manufacturing faults and material defects. This product has been
checked and adjusted individually before leaving the manufacturer.
Please contact your local hobby shop for replacement parts and technical
support or contact Venom Air Corps Customer Service at
or customerservice@venom-aircorps.com. To help identify broken or
damaged parts we have included a detailed parts list and assembly
diagram at the end of this instruction manual.
800-705-0620
WARNING!
READ BEFORE FLIGHT
The Venom Night Ranger II is not a toy. It is a precision machine requiring
proper assembly and setup to avoid accidents and it is the responsibility of
the owner to operate this product in a safe manner as it can cause serious
personal injury and damage to property due to carelessness or misuse.
When charging the battery pack, do not overcharge! If batteries get hot during
charging, discontinue charging immediately and disconnect the battery from
the charger. Never leave battery unattended while charging. If you are unsure
of how to charge this battery, please contact Venom Air Corps or seek the
advice of your local hobby shop. Never let children charge batteries without
adult supervision.
To avoid an out of control model always turn the transmitter on first then
connect the battery to the heli. When turning off the heli, always disconnect
the battery first, then turn off the transmitter. If the orders are reversed the
heli may become uncontrollable and cause serious damage.
If you are in doubt of your ability, we strongly recommend that you seek
assistance from experienced radio controlled Helicopter modelers or join
your local model flying club to gain the required knowledge and skill. As the
manufacturer and distributor, we assume no liability for the use of this
product.
Children under the age of twelve (12) are strictly prohibited from playing with
this electric helicopter.
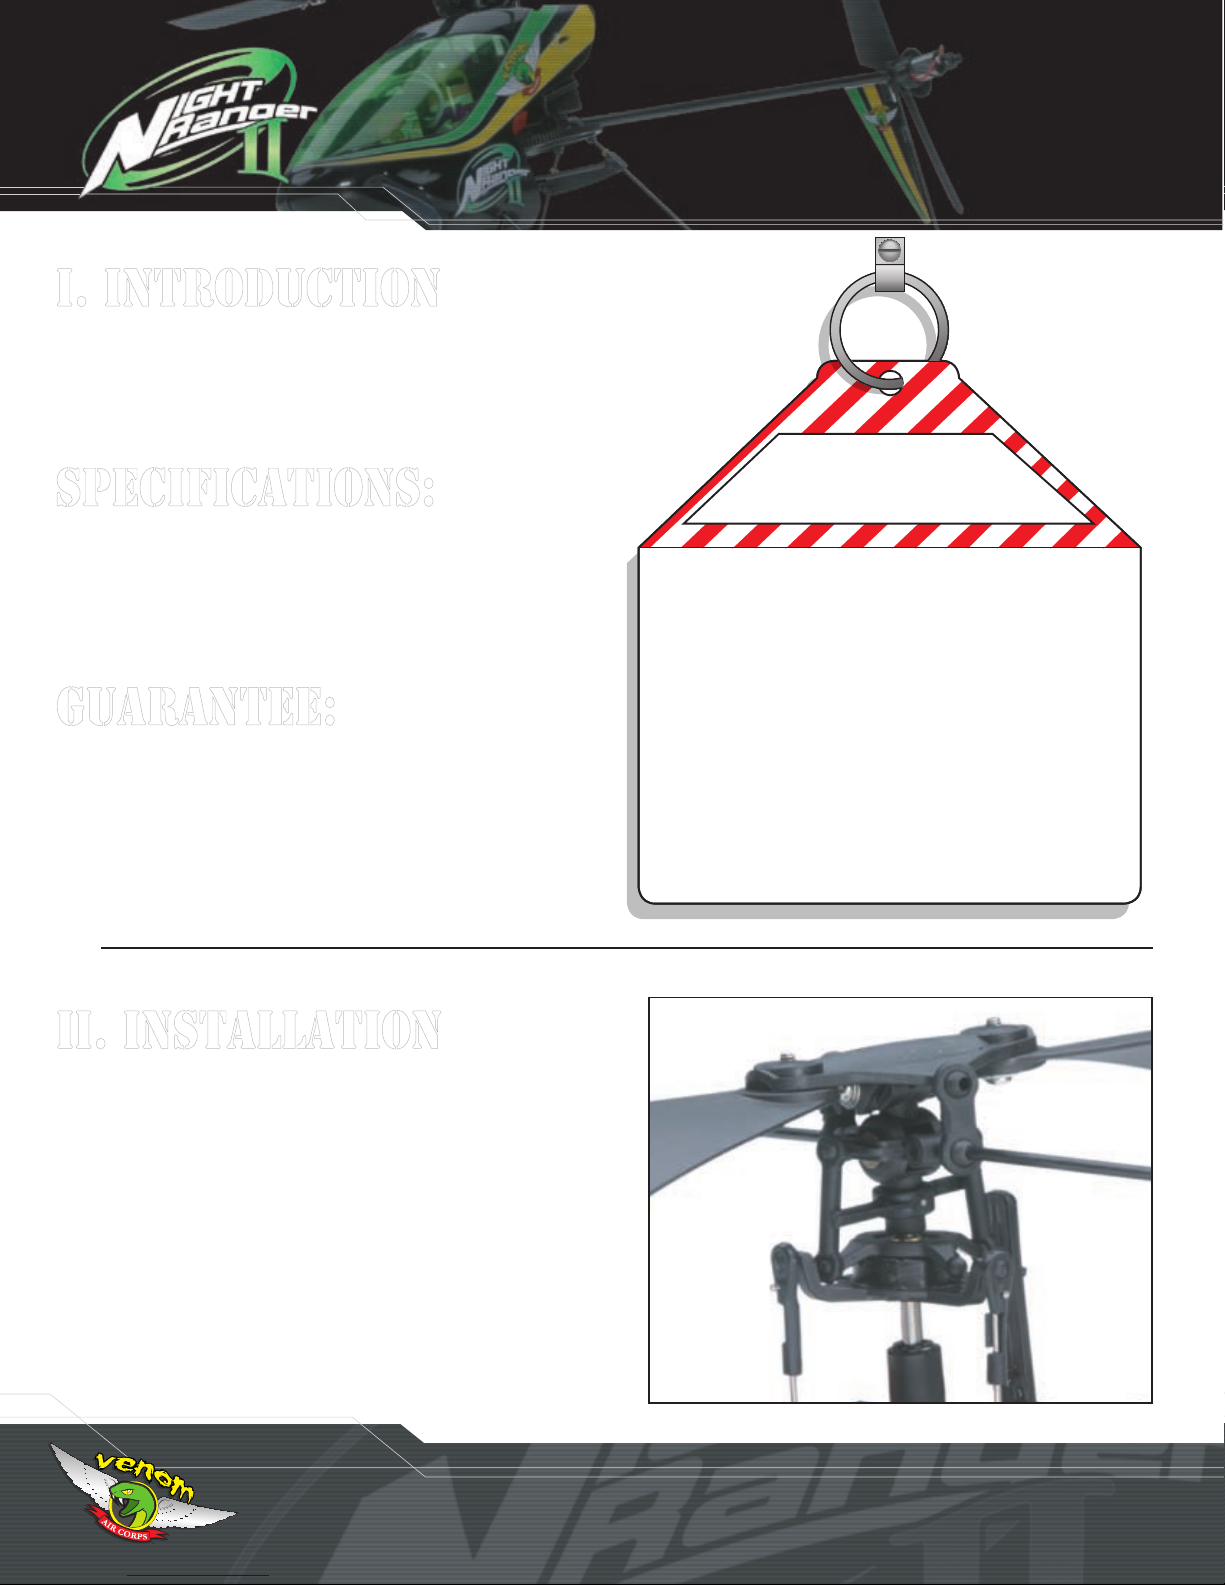
II. Installation
The Venom Night Ranger II is a Ready-to-Fly Electric Helicopter. You
only need to install the battery and assemble and attach the rotor blades.
Please make sure the battery pack has been fully charged before
you install it.
1. The main rotor blades are attached to the blade holder using M2.5mm
screws and washers. Tighten them carefully!
Caution: When attaching the Rotor blades to the blade holder
make sure the blades are tight. To avoid stripping the plastic,
gently tighten the screws until they stop. If the blades are too
loose and pivot too freely, they will be unstable at high RPMs and
will produce undesirable flight characteristics that may become
dangerous.
2. Disassemble the canopy by gradually pulling the rubber grommets off
the horizontal mount bar.
02: VAC Night Ranger II
Page 3
3. Plug in the supplied the wall charger and attach the battery pack.
Caution: The battery will be fully charged in about 2 hours, do not
overcharge! Overcharging the battery will cause serious damage or
may explode the battery! If batteries get hot during charging,
discontinue charging immediately and disconnect the battery from the
charger. Never leave battery unattended while charging. If you are
unsure of how to charge this battery, please contact Venom Air Corps
or seek the advice of your local hobby shop. Never let children charge
batteries without adult supervision.
4. Slide the battery holder apart, insert the fully charged battery (with the
wire lead facing forward) into the front half of the battery holder. Slide
the rear half of the holder back over the battery and secure with a
rubber band. Slide the entire battery assembly forward.
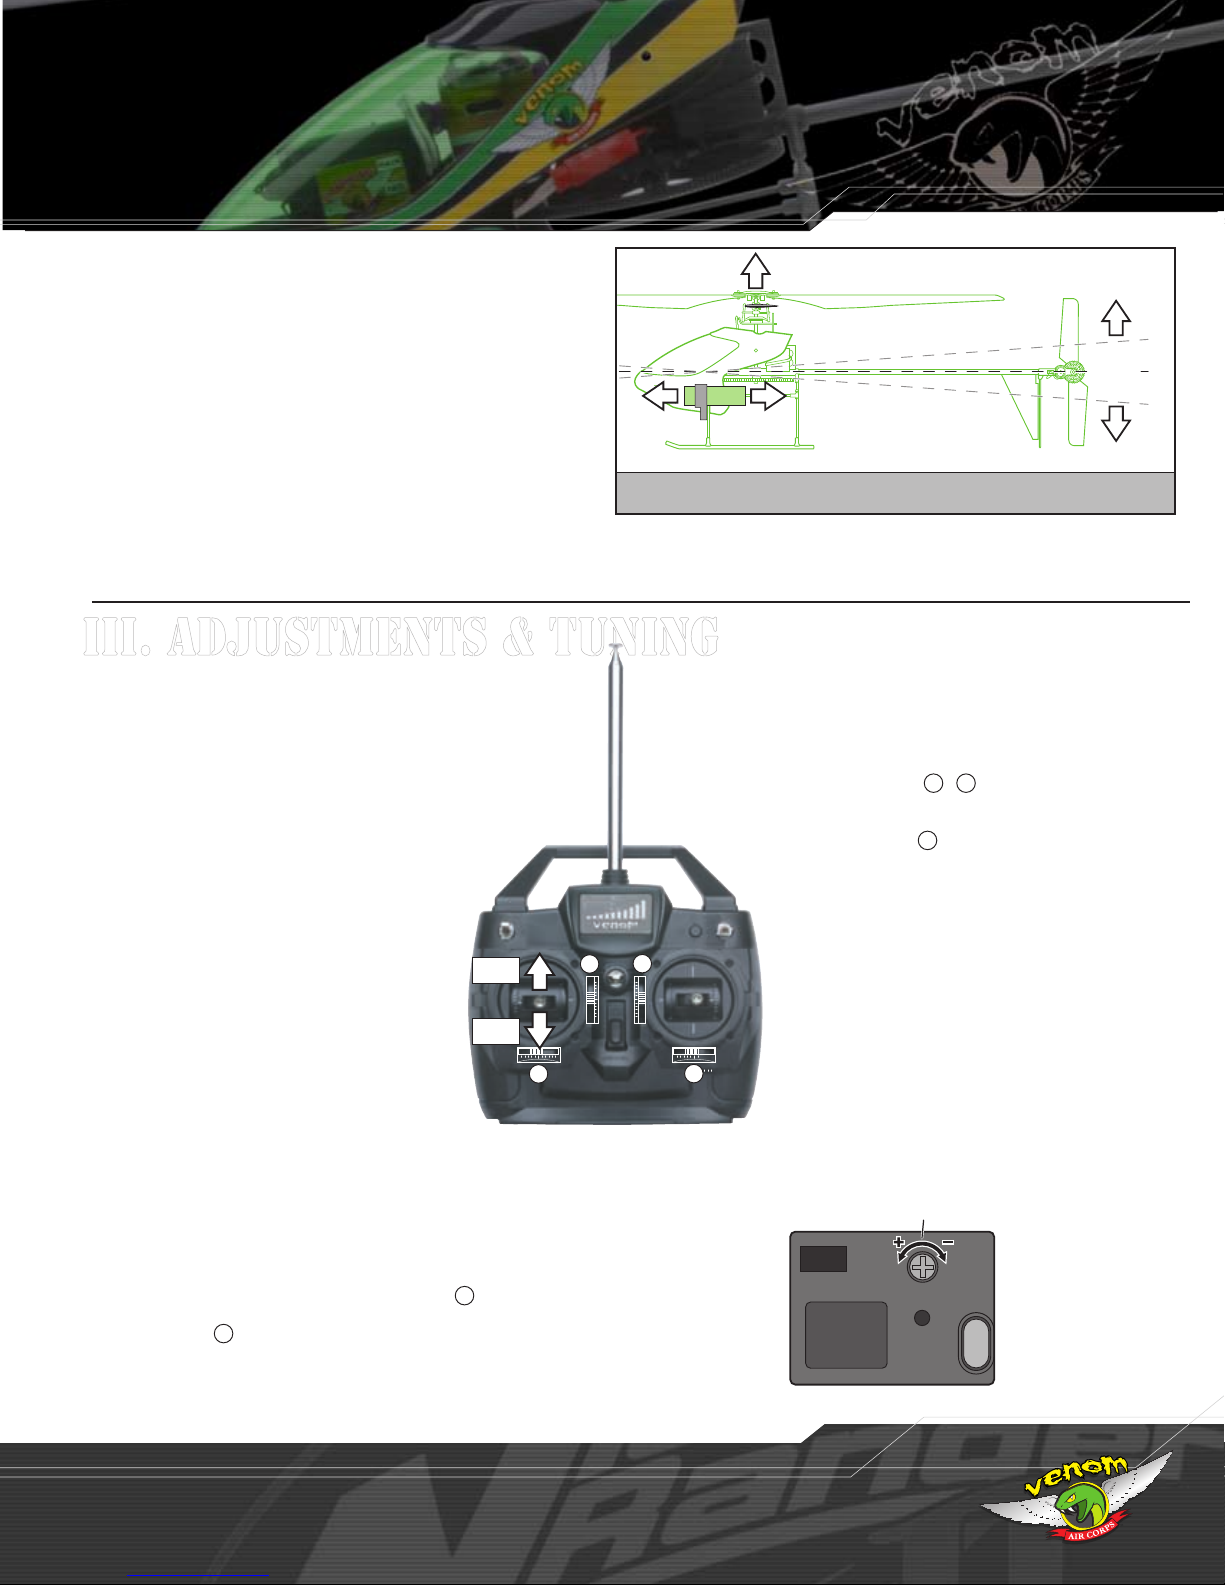
Fig. a
LIFT BY FLY BAR
The boom should be level with the
ground when the VNR II is lifted by
the flybar. If it is not, move the battery
forward or backwards to balance.
Always check the CG with the battery
and canopy installed
Balancing the Center of Gravity (CG)
NOSE HEAVY
LEVEL
TAIL HEAVY
5. To adjust the center of gravity position the flybar at a 90 degree angle
to the tail boom. Pick up the Venom Night Ranger II by the flybar and
position the battery so that the tail boom is parallel to the floor. (Fig. a)
IIi. Adjustments & Tuning
The instructions below are for Mode II -North America, please alternate
the control stick and transmitter trims for Mode I - Outside North America.
Attention:
Before connecting the battery to the control board, you must
confirm the following settings:
A. Transmitter has been turned on, antenna is screwed in and
extended and batteries are fully charged.
B. The crystals on the transmitter and receiver must match each
other.
C. The throttle stick (LEFT STICK) must be located in
the throttle down position, otherwise serious
damage to the Venom Night Ranger II and
personal injury may occur!
If all of the above settings are confirmed, connect the
battery to the control board.
1. After the battery is connected, the red indicator
light on the heli control board will start blinking
rapidly for 5-10 seconds, which indicates that the
control board and gyro are initializing. This
process is for self-adjustment of the system. DO
NOT TOUCH THE VENOM NIGHT RANGER II WHEN
THE GYRO IS INITIALIZING! Once initialized, the
indicator light will be a slowly flashing red light. If the light does not blink
after the battery is connected, please check that you have switched on
the transmitter and that the battery has been fully charged. NOTE: If the
throttle stick is not in the Throttle Down position when the battery is
connected, the gyro will still initialize but the throttle stick will not be
active until it is returned to the Throttle Down position.
Throttle
Up
Throttle
Down
1
6. Reinstall the canopy by pushing the two rubber grommets onto the horizontal
mount bar and inserting the cutouts over the front landing skid struts.
4. Push the left control stick slightly forward, keep your fingers, eyes and
other objects well away from the rotating parts. When the main rotor blades
start rotating, the tail blades should start rotating simultaneously.
5. Slowly push the left control stick forward to increase rotor speed. The
Venom Night Ranger II may not take off vertically; it may go forward or
backwards, left or right. Use trim sliders & to fine tune the Venom
3 4
Night Ranger II while hovering. You may also find the helicopter’s nose
will swing to the left or right side when you increase throttle. In this case, you
need to adjust the transmitter trim .
1
6.The Venom Night Ranger II is equipped with a gyro that
controls the RPM of the tail rotor to compensate for main
rotor torque. To adjust the sensitivity of the gyros effect,
use a micro flat blade screwdriver to rotate the gyro
2
Pot clockwise to lessen the sensitivity and counter-
adjustment pot (Fig. b). Turn the Gyro Adjustment
3
clockwise to increase the sensitivity.
7. Now you have finished all the settings and
adjustments. Pull the throttle stick to the Throttle
Down position and disconnect the battery from the
4
control board first, then turn off the power of the
transmitter. Never turn the transmitter off before
disconnecting the battery as the Venom Night Ranger II
may become uncontrollable.
Fig. b
Gyro Adjustment Pot
(Adjusts Sensitivity)
2. If the main rotor blades start rotating, and the left control stick has not
been pushed forward, slowly adjust the transmitter trim 2 (See Picture)
until they stop rotating. If the tail blades start rotating, carefully adjust
the transmitter trim 1 until they stop operating or rotate slowly.
3. Test the flight controls to make sure they are operating properly and will
move the swashplate in the direction you want to fly. Push the Right stick
forward and the swashplate will tilt forward. Push the stick to the right and
the swashplate will tilt to the right.
Front of Receiver/Gyro
www.venom-aircorps.com :03
Page 4

Iv. Controlling the VNR II
The principle of flying:
The Venom Night Ranger II generates lift using the rotor blades. The
main rotor is driven by a motor, and also generates unwanted torque.
The Venom Night Ranger II always rotates around its vertical axis, the
tail rotor counteracts this unwanted rotation by producing thrust in the
lateral directions. The tail rotor’s thrust can be varied purposely in order
to change the Venom Night Ranger II’s heading. There are two basic
functions required to control the Venom Night Ranger II: (1) climbing and
descending is controlled by altering rotor thrust, (2) rotation around the
vertical axis is controlled through the thrust of the tail rotor by varying its
rotational speed. However, you must also be able to steer the Venom
Night Ranger II forwards and backwards and to both sides. This task is
carried out by the cyclic control system. The cyclic control system
consists of servos, swashplate, stabilizer and main rotor blades. Their
pitch angle is varied cyclically by the servos via the swashplate. This
action tilts the rotational plane of the flybar paddles, and thereby the main
rotor. The main rotor remains parallel to the swashplate. If the
swashplate inclines forwards, the plane of the flybar paddles also inclines
forwards. The result is that the thrust of the rotor is directed slightly
towards the rear instead of vertically, and the Venom Night Ranger II
responds by moving in the forward direction. There are four control
functions of the control system, and we need all of them to properly fly
the Venom Night Ranger II.
Flying Environments:
What you need now is a spacious room without any obstacles. Make
sure that the air is calm. Drafts caused by open windows or doors should
be avoided. We recommend a flat, smooth floor on which the Venom
Night Ranger II can slide, soft carpet is not a good choice for flying,
because it could hook the skid of the Venom Night Ranger II and cause
damage.
Attention: Errors and carelessness in assembling and flying the
Venom Night Ranger II can result in serious personal injury and
damage to property. Never touch the spinning rotor blades or any
other exposed moving parts.
Lift the Helicopter
Push Left control stick forward.
Lower the Helicopter
Pull Left control stick backwards.
ROTATE LEFT
Operation Procedures:
1. Place the Venom Night Ranger II in the middle of the room, you
should always stand approximately 6 ft (2m) from the Venom Night
Ranger II and behind the tail. Make sure that your Venom Night
Ranger II and transmitter have been assembled properly and adjusted
completely. Switch the transmitter on, then connect the fully
charged battery to let the gyro initiate. Once the gyro initiates,
check once more that the servos are operating correctly
before proceeding.
2. Now you are ready to start learning to fly. The control diagrams on the
next two pages will help you trim and fly the helicopter.
3. Initially you do not need to worry about how to operate your Venom
Night Ranger II skillfully. Through practice, you will become more
confident operating the controls and adjusting the throttle. When your
fingers respond to the movements of the Venom Night Ranger II
spontaneously, you are ready for more advanced flying. Please note
that the directions described on this page are if you are facing the tail
of the VNR II. If you are facing the nose left and right will be reversed
as your right is now the Venom Night Ranger II’s left.
04: VAC Night Ranger II
Push Left control stick left.
ROTATE RIGHT
Push Left control stick right.
Page 5

1.
2.
4.
3.
1.
2.
4.
3.
1.
2.
4.
3.
4. Push the throttle up gradually until the Venom Night Ranger II starts to
become light. The Venom Night Ranger II may initially swing to the left
when you increase throttle. This is because of the thrust of the tail
rotor and the rotation of the main rotor (This is an unavoidable
deviation during take off). Open the throttle gradually until the Venom
Night Ranger becomes light, and then carefully move the throttle stick
further until it lifts off. Observing the Venom Night Ranger’s response,
correct any movement if necessary. Don’t fly too high, keep its
height below one meter (3 ft.) off the floor. If there is any instability
or shaking or if the Venom Night Ranger II is out of control, please
land at once. The only thing that helps at this stage is to practice and
then practice some more.
5. Try to control the Venom Night Ranger II using the smallest possible
corrective commands. The sooner you notice a movement and
respond to it, the smaller the corrective measures are required, and
the smaller the flying deviation. Be patient as it does take time to learn
all the required skills to control the Venom Night Ranger II. All
successful pilots have mastered the skill of flying through lots of
practice.
6. Once your flying time increases and you are capable of controlling
your Venom Night Ranger II in the air, you can slowly increase its
height off the ground. The Venom Night Ranger II will become more
stable as it is flown a little higher, this is because it leaves its own
down thrust turbulence. If you fly the Venom Night Ranger II in a
small room you may find that after a short time it flies unevenly and
unpredictably. This is because the Venom Night Ranger II quickly
moves the air in the room and creates a turbulent environment, if this
occurs land and take a break for a minute, the air will calm down
quickly. When you are able to control the Venom Night Ranger II
smoothly at 3 meters high and can vary the attitude, you are now
ready for advanced flying!
7. You might like to try flying the Venom Night Ranger II outdoors or set
up a flying course to test your skill (set up your flying course with
soft material such as cushions so you don’t damage the Venom Night
Ranger II if you lose control). You can also practice with the nose
of the helicopter facing you, just remember that your left and
right will now be reversed! Try these three flying box patterns to
practice your advanced flying skills:
i. With the tail towards you, fly the VNR II in a box pattern. Slide the
heli sideways, forwards and backwards instead of using the tail
rotor to turn.
ii. Repeat the box pattern facing the side of the heli.
iii. Repeat the box pattern with the front of the heli facing you.
iv.
Once you master the box patterns, try flying a figure 8 pattern
.
Tilt nose down and move forward
Lift nose and move backwards
slide LEFT when VNRII is facing you
slide Right when VNRII is facing you
Push Right control stick forward.
Push Right control stick left.
Note! Direction is reversed when the VNR II is facing you!
Note! Direction is reversed when the VNR II is facing you!
Push Right control stick right.
Pull Right control stick backwards.
i. BOX PATTERN
Pilot
iii. BOX PATTERN
Pilot
ii. BOX PATTERN
Pilot
www.venom-aircorps.com :05
Page 6

v. After A Crash
While the Venom Night Ranger II is easy to fly, crashing is a part of the
learning process. If you can’t avoid a crash, remember two important
things. Throttle down to the off position before you crash to avoid
damaging the rotor head and cyclical system and try to hit boom first to
avoid damaging the radio gear. After a crash there are several important
steps to take before reflying your Venom Night Ranger II.
1. Check for Damage:
Before your next flight always take the time to inspect the helicopter
for damage. If there are any broken parts replace them
immediately!
If there is no damage follow these preflight tips before your next flight.
1. Check the Center of Gravity (CG). The battery pack may have
shifted during the crash. Follow the instructions on page 3 to reset
the CG.
2. Check the Flybar Paddles. If the flybar paddles moved in the
crash and are not parallel to each other, your VNR II will fly very
erratically.
3. Check the Radio System. Make sure the servos move correctly
and the helicopter is receiving signals correctly.
vi. exploded View
Lift nose and Throttle down
Flybar paddles in side view.
7640
7648
7645
7648
7661
Pull both control sticks backwards.
7655
7662
7673
7654
7646
7650
7665
7661
7649
7660
7643
7651
7669
7651
7657
7645
7650
7655
7653
7665
1542
7646
7640
7641
7642
7653
7659
7662
7656
7663
7647
7644
7658
7652
7647
7644
06: VAC Night Ranger II
Page 7

vii. Parts List
VENF-7640
Rotation Holder
VENF-7641
Flybar Control Tray
VENF-7642
Anti Rotation Arm
VENF-7643
Main Rotor Gear & Shaft
VENF-7644
Tail Motor and Pinion
VENF-7645
Main Rotor Control Link (Short)
VENF-7650
Pushrod Assembly
VENF-7655
Canopy
VENF-7660
Swashplate Assembly
VENF-7646
Skid Assembly
VENF-7651
Main Shaft Bearing
VENF-7656
Tail Rotor Blade
VENF-7661
Flybar Paddles
VENF-7647
Tail Rotor Gear and Shaft
VENF-7652
Tail Shaft Bearing
VENF-7657
Flybar
VENF-7662
Battery Holder
VENF-7648
Main Blades
VENF-7653
Rotation Holder Assembly
VENF-7658
Tail Holder
VENF-7663
Tail Support Bar and Blade
VENF-7649
Flybar Control Link (Long)
VENF-7654
Main Motor and Pinion
VENF-7659
Tail Boom
VENF-7665
Servo
VENF-7666
Screw Set
VENF-7671
Tail Motor Connector
VENF-7667
Main Motor Connector
VENF-7673
Circuit Board
VENF-7668
Charger
VENF-7674
Transmitter
VENF-7669
Main Frame
VEN-1542
Battery
VENF-7670
Accessories
www.venom-aircorps.com :07
Page 8

 Loading...