

VenMill Elite 60 User Manual

Elite 60
TM
User Manual
Covers getting to know your machine,
repairing an optical disc, maintenance,
menus, displays and warranty coverage.

This unit is intended to clean/repair the
following discs: CD-ROMs, Music CDs, Data
CDs, DVDs, HD-DVDs, Computer Discs,
Game Discs, Books on disc, all recordable
CDs and DVDs, double-sided discs, & 3 Inch
Discs (only with adapter).
SAVE ALL PACKING MATERIALS. FAILURE
TO USE PACKAGING DESIGNED FOR THIS
UNIT MAY CAUSE DAMAGE TO THE UNIT
AND WILL VOID WARRANTY. FOR MORE
INFO CONTACT SUPPORT@VENMILL.COM
THANK YOU
For purchasing the Elite 60
TM
© 2009 VenMill Industries, Inc. All rights reserved. Under the copyright laws, this manual may not be copied, in
whole or in part, without the written consent of VenMill.
Every eort has been made to ensure that the information in this manual is accurate. VenMill is not responsible
for printing or clerical errors.
VenMill, Skip-Away, Elite 60 & OptoClear names and designs are trademarks of VenMill Industries, Inc. Artwork
and Design © 2008 VenMill Industries, Inc. All Rights Reserved.
The maximum amount of repairs per cartridge may vary based on cleaning cycle usage. At this time Blu-ray discs
can only be maintained, not repaired, due to the nature of the disc. A disc adapter (included) will be needed for
3 inch disc repair or cleaning. See www.venmill.com for more information.
CAUTION: Units and consumables are designed for use in specic regions. Your warranty will be voided if you
purchase the equipment and/or consumables outside of your designated region. Purchase only through Authorized
Distributors found on our website at www.venmill.com. If uncertain, please contact sales@venmill.com.
Note: Discs can be repaired an unlimited amount of times. However, never run a disc two times consecutively
without letting the disc cool to room temperature after each repair cycle.
VenMill Industries, Inc
36 Town Forest Rd
Oxford, MA
USA 800-928-0090
No. Am. 866-864-0210
Intl. 508-363-0410
Fax 508-363-0414
www.venmill.com

READ BEFORE OPERATING EQUIPMENT
SECTION 1
Unpacking and Repacking ............................................................................................1
SECTION 2
Getting to Know Your Unit ............................................................................................ 2
SECTION 3
Quick Start ..........................................................................................................................3
SECTION 4
Onscreen Displays ............................................................................................................5
SECTION 5
Operation ............................................................................................................................6
Operation Modes ..................................................................................................... 6
Using your 3 Inch Adapter ....................................................................................7
SECTION 6
Menu Screen ......................................................................................................................8
SECTION 7
Standard Maintenance ...................................................................................................9
Replacing the OptoClear
TM
Cartridge ............................................................... 9
Replacing the Bung Wheels .......................................................................... 10
Cleaning the Bung Wheels ............................................................................ 11
Cleaning the Cleaner Disc ................................................................................. 11
Cleaning the Elite 60TM ........................................................................................ 12
Cleaning the Drive Wheel .................................................................................. 12
Error Codes .............................................................................................................. 12
SECTION 8
Elite 60TM FAQs ................................................................................................................ 13
SECTION 9
Elite 60TM 1 Year Limited Warranty ........................................................................... 16
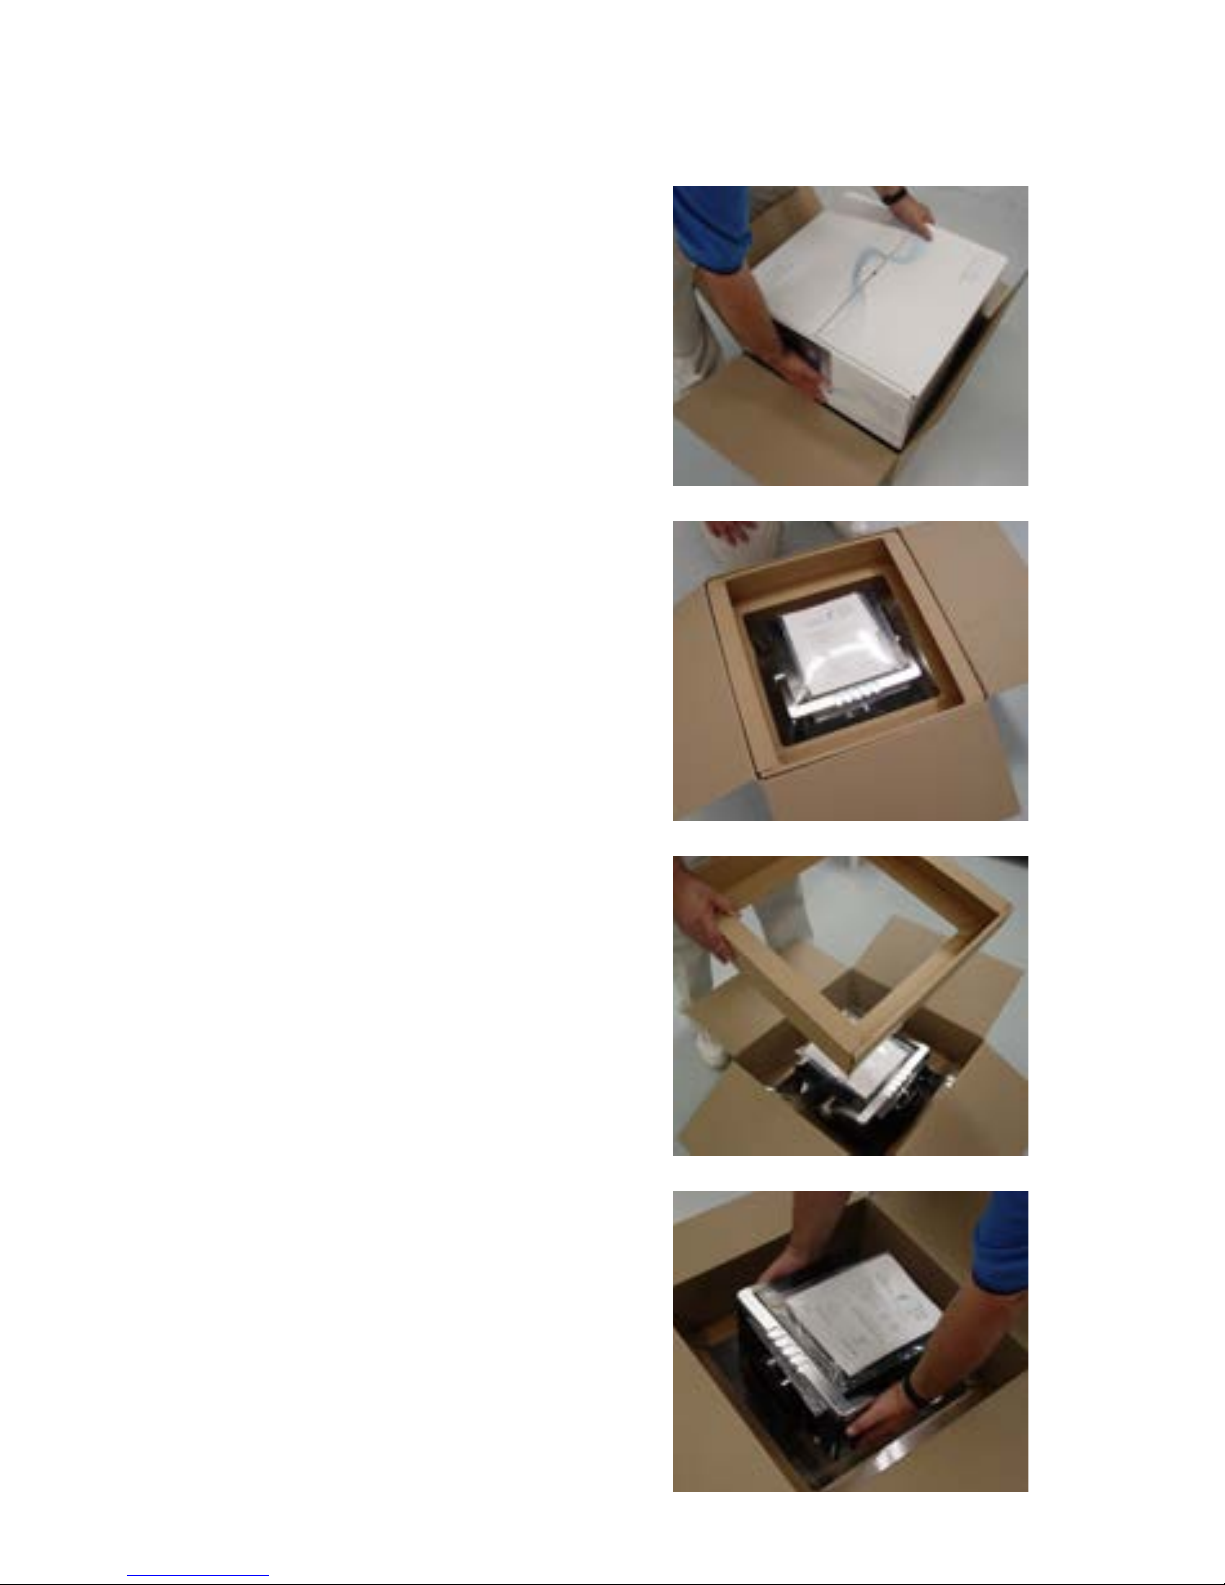
SECTION 1 Unpacking and Repacking
1
UNPACKING YOUR UNIT
Please use these instructions if you need to
repackage your unit for shipment. Reverse
the unpacking instructions for repacking the
unit back up.
SAVE ALL PACKING MATERIALS. FAILURE
TO USE PACKAGING DESIGNED FOR THIS
UNIT MAY CAUSE DAMAGE TO THE UNIT
AND WILL VOID WARRANTY.
1. Open the brown outer shipper box.
2. Remove Elite 60 retail box from outer
shipper. Carefully open up the box.
3. Pull out the KorrVu plastic. You may nd
that some tightness will occur.
4. Remove all supporting documents and
accessories including the power cord
and power adapter in the box.
5. Gently remove the Elite 60. You may
also use the handle on top of the unit
to remove it out of the box.
6. For space saving both KorrVu’s can
collapse to at pieces along with the
retail and outer ship box.
If you have any questions or difficulties
please feel free to call VenMill Industries
Customer Support toll free at 866-864-0210
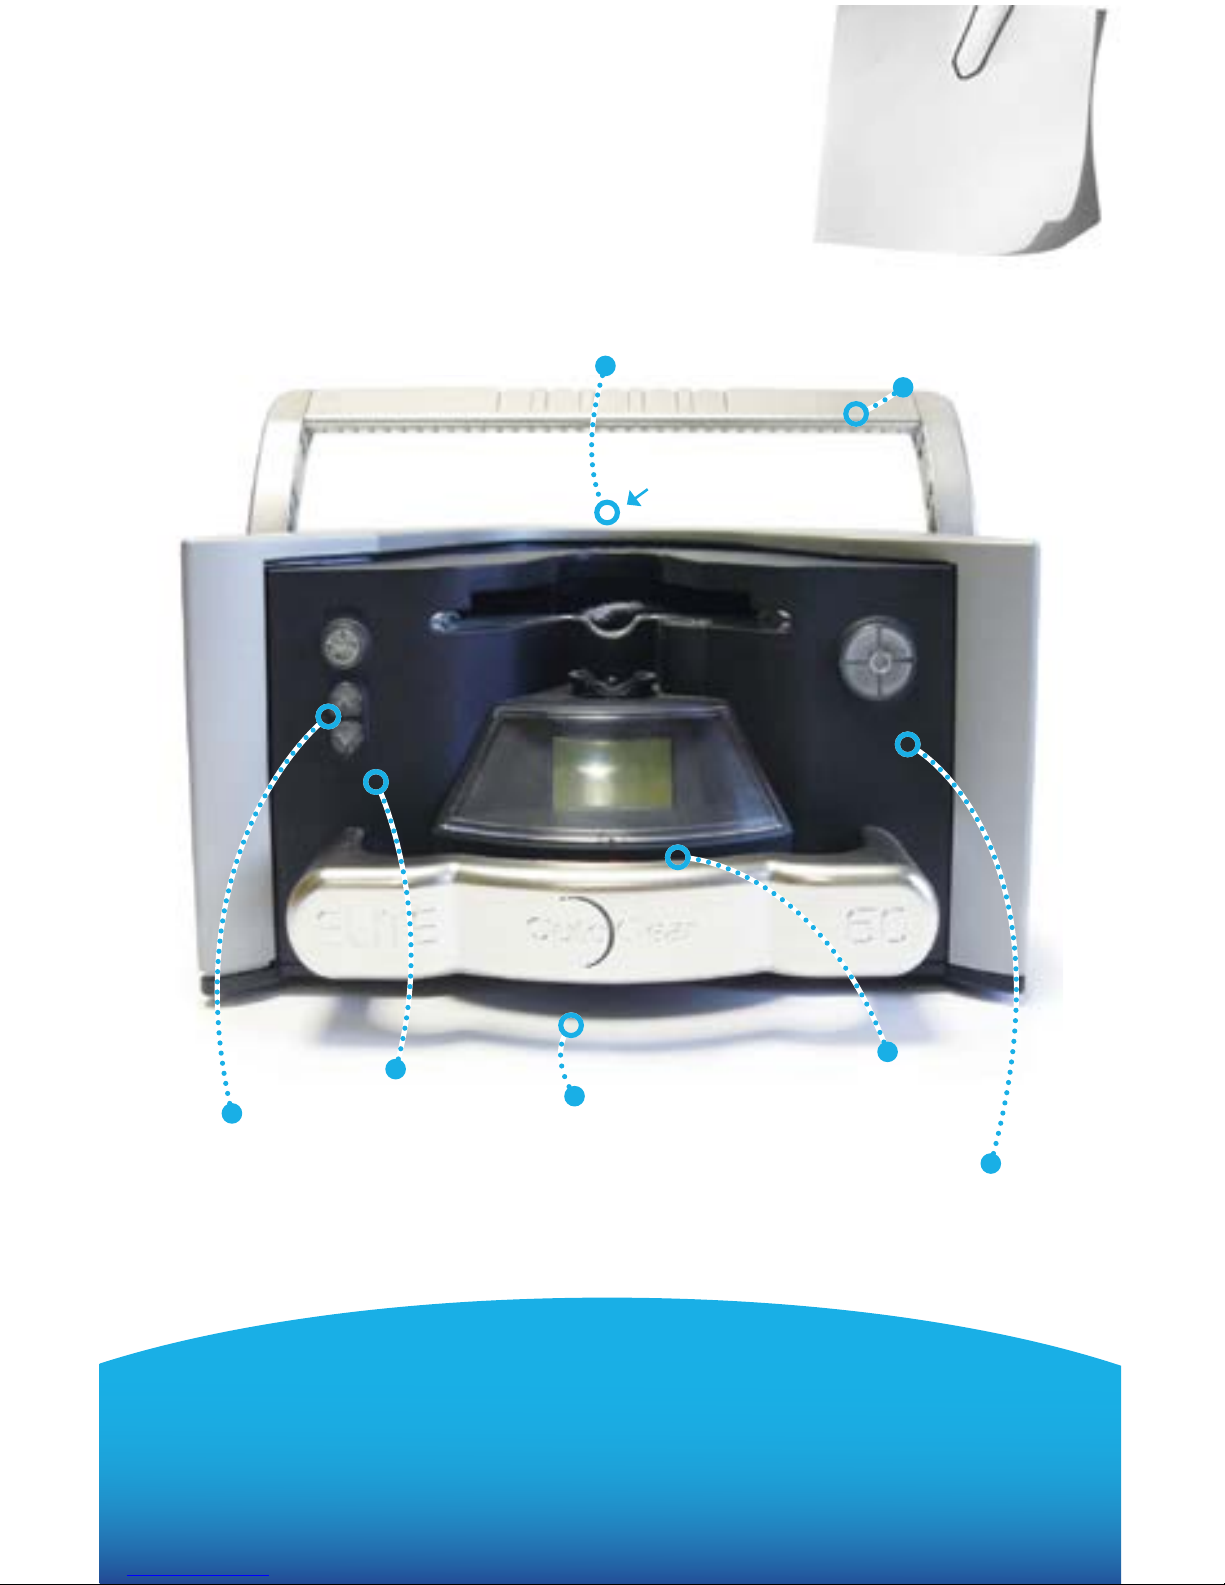
3 Inch Adapter
Holder
Repair Button
Blue = repair mode
Green = clean mode
Red Flashing = Error
Drawer Handle
Display
Menu Scroll
located in back of unit
Power Button
Green = power
Orange = standby
Carrying Handle
SECTION 2
Getting to
Know Your Unit
2
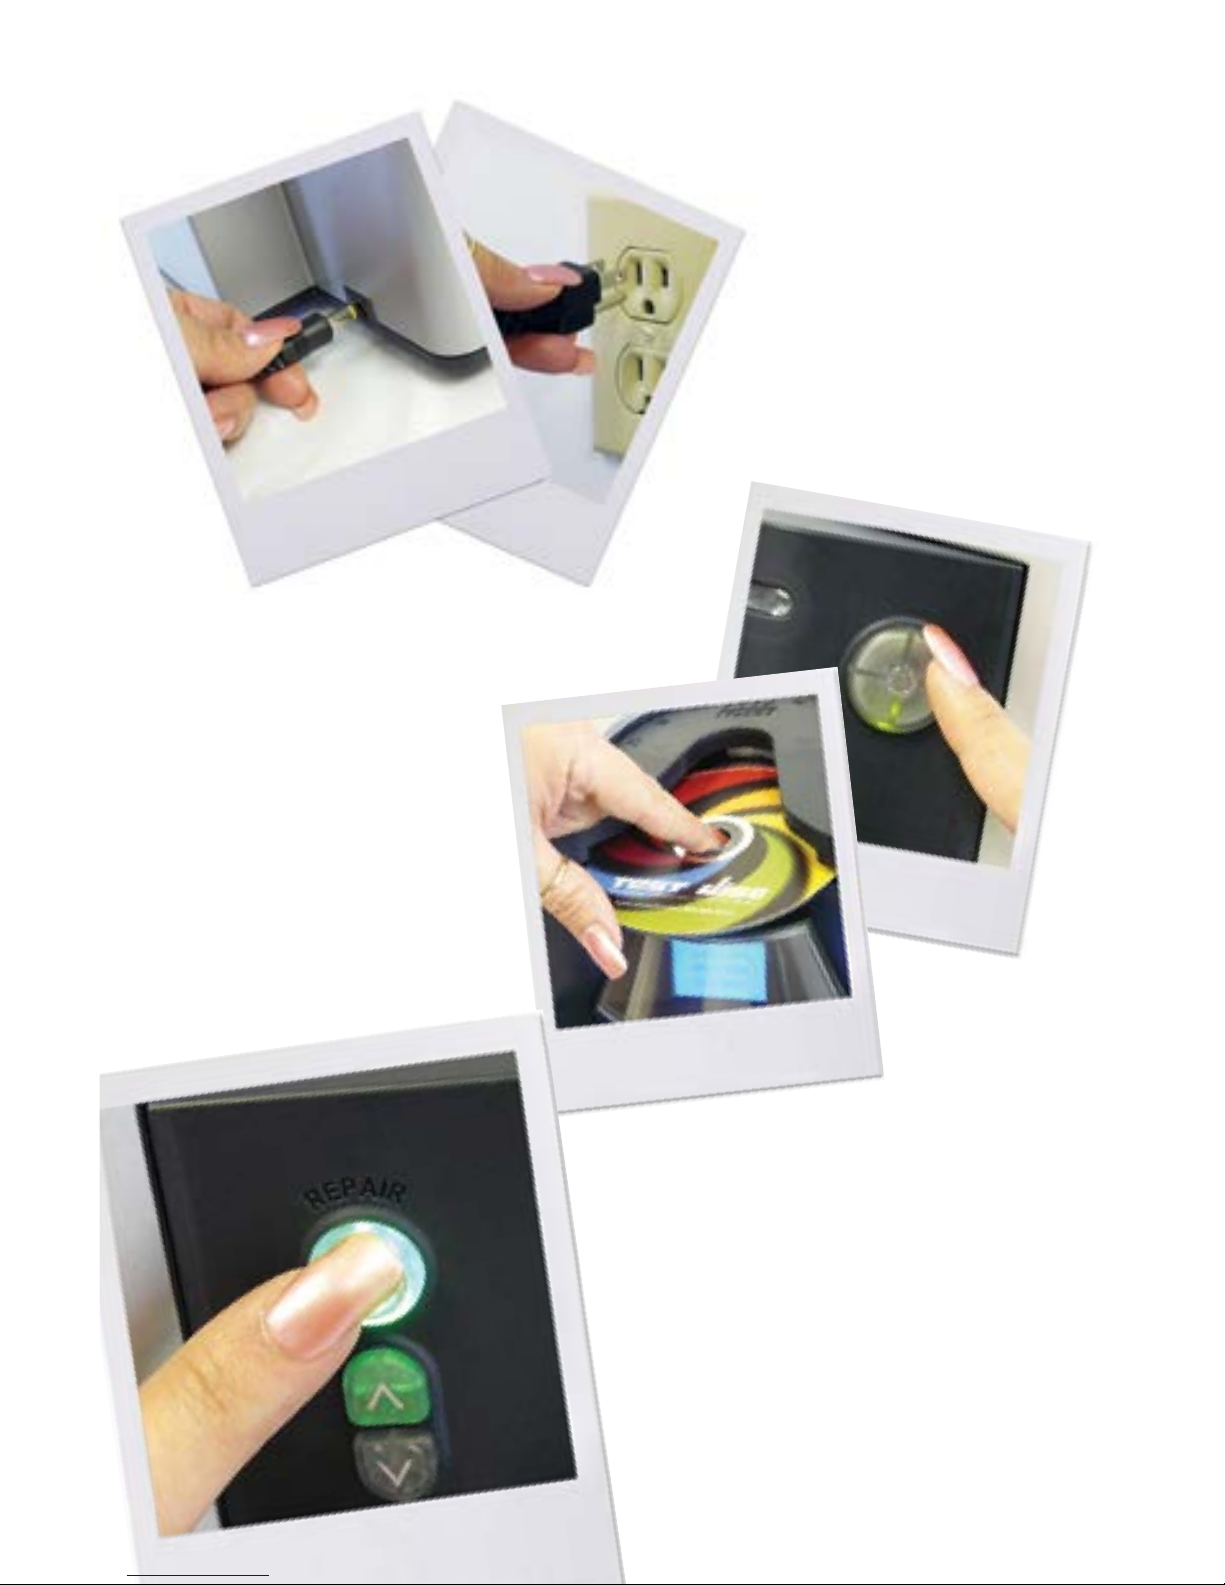
2 Press the power button.
Pic three
Pic one
Warning!
1 Plug in the Elite 60
TM
power cord.
WARNING!: Plug directly
into outlet. Do not use
Extension Cords.
SECTION 3 QUICK START
3 Remove the Disc
installed during shipping.
(1st time use only)
a Manually pull the
disc straight out of
the machine.
4 Press the Repair Button.
a By default, the Elite 60
TM
when it
is rst powered ON is in “Quick
Clean Mode”. Repair button will
be green. Inserting a disc will
result in a 15 second cleaning
cycle being performed.
For Repair Cycle see section 5.
b When the repair button is pressed,
the button will be blue, indicating
a 90 second repair is selected.
Pic four
3
Pic two
 Loading...