

Page 1
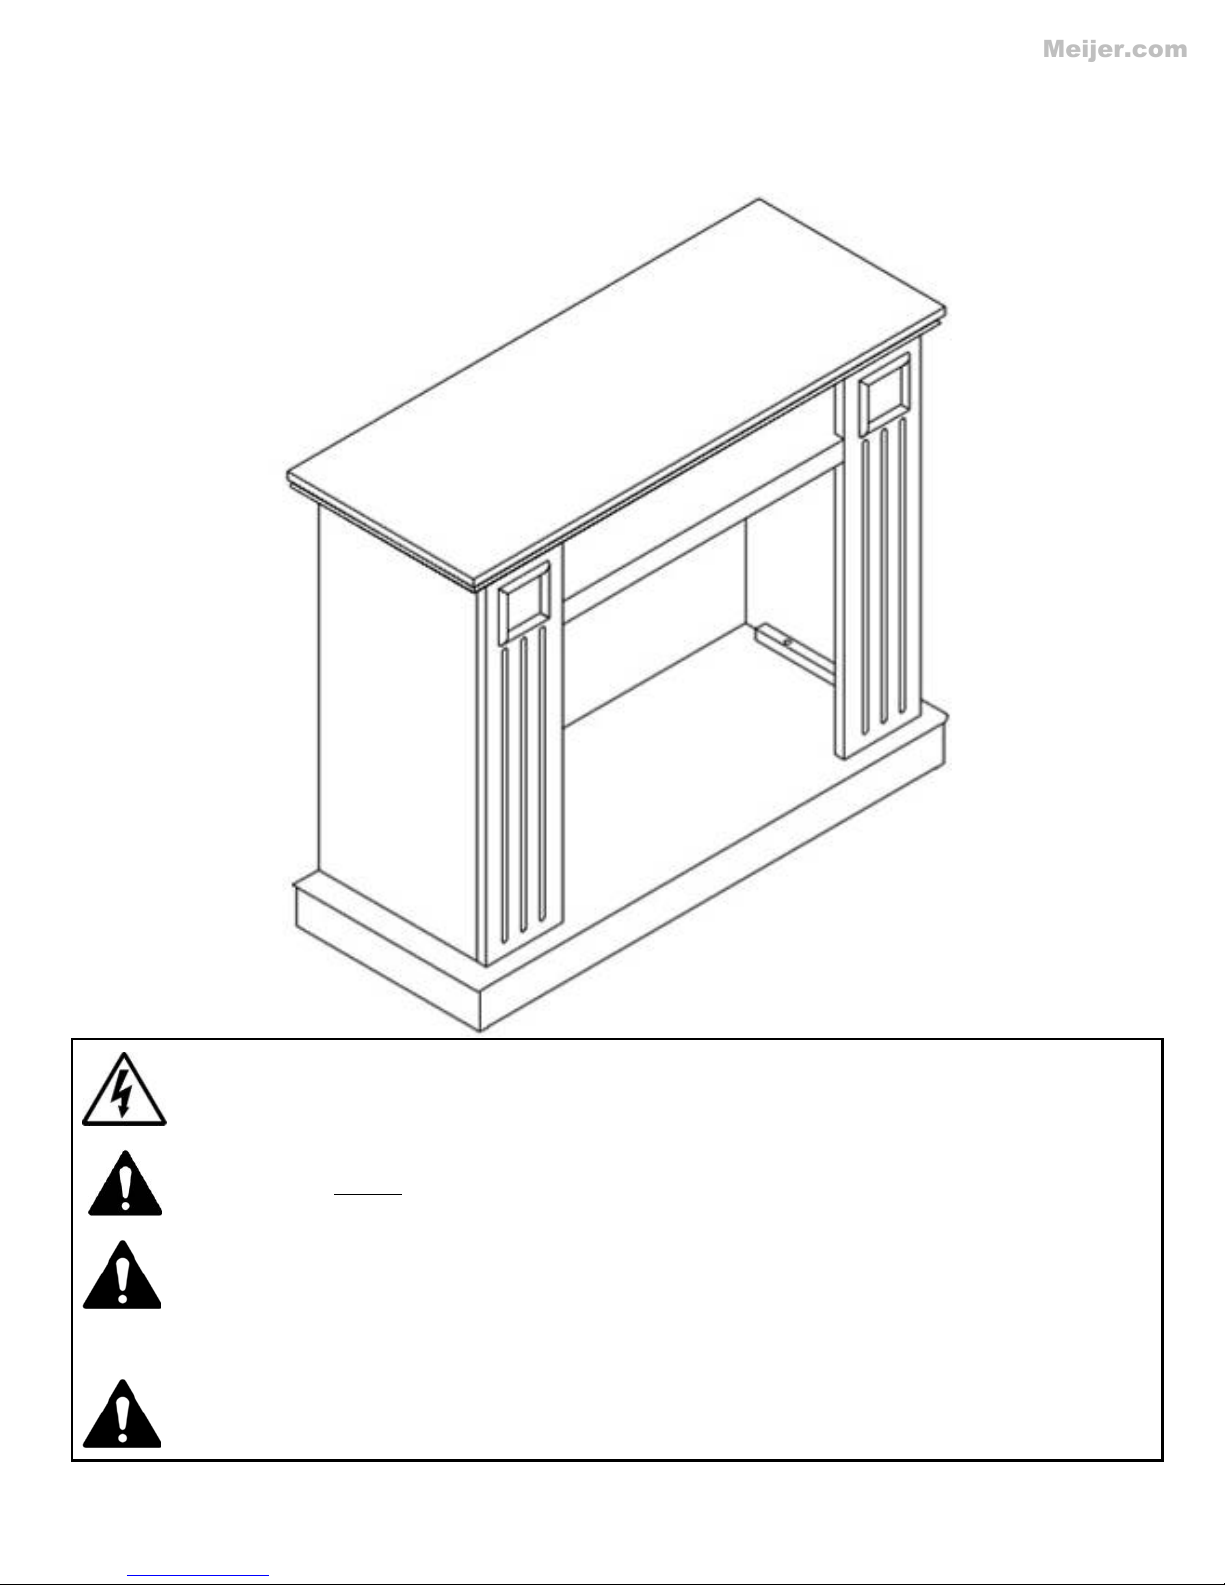
ELECTRIC FIREPLACE
all safety
SAVE THESE INSTRUCTIONS!
Meijer.com
OWNERS MANUAL
Model KAMN-23
Only use this heater as described in this manual. Any other use is not recommended
by the manufacturer, and may cause fire, electric shock, or other p ersonal injury.
WARNING! Read and understand this entire owner’s manual, including
information, before plugging in or using this product. Failure to do so could result in fire,
electric shock, seriou s personal injury, or death.
WARNING! INDOOR use only! NEVER use this heater outdoors!
CAUTION! Keep this owner’s manual for future reference. If you sell or give this product
away, make sure this manual accompanies this product.
Page 2
2
IMPORTANT SAFETY INFORMATION!
WARNING
ALWAYS keep electric cords, home furnishings, drapes, clothing, papers, or other
WARNING
Meijer.com
combustibles at least 3 feet (0.9m) away from the front of this heater, and away from the
bottom, sides, and rear of this heater.
DO NOT place the heater near a bed because objects such as pillows or blankets can fall off
the bed and be ignited by the heater.
DO NOT COVER this heater or block the air vents at all. Doing so could cause a fire.
AVOID fire or electric shock! NEVER insert or allow any foreign objects to enter the
ventilation or exhaust openings of this heater.
Prevent Fire! Keep all flammable liquids, like gasoline or paint, away from this heater. This
heater produces arcing sparks that could ignite flammable liquids.
DO NOT cover this heater in any manner. Doing so could block the air flow and cause the
unit to overheat, or could ignite the material covering the heater.
NEVER run the power cord under carpet, rugs, runners, or any other covering. Doing so
could cause the cord or materials covering the cord to overheat.
AVOID FIRE! Regularly inspect all air vents to make sure they are free from dust, lint, or other
blockage. Unplug the unit and clean with a va cuum ONLY. DO NOT rinse or get wet.
For residential use only! NOT for commercial use! NEVER use this fireplace for other than
its intended purpose.
FREE STANDING: ALWAYS ATTACH THE PEDESTAL BEFORE USE in free standing
mode. DO NOT ATTACH WALL MOUNT BRACKET WHILE IN FREE STANDING MODE.
HANGING: ALWAYS ATTACH WALL MOUNT BRACKET TO WALL AND HANG UNIT
BEFORE USE. DO NOT ATTACH PEDESTAL WHILE IN WALL HANGING MODE.
The wall mount bracket and pedestal are designed for use ONLY w ith this product. NEVER
use a wall mount bracket or pedestal from another manufacturer.
Use extreme caution if using this heater near children, or where children may be present.
NEVER leave this heater unattended. ALWAYS unplug this heater when not in use.
This heater is hot when in use. AVOID INJURY! DO NOT TOUCH hot surfaces, or attempt
to move this heater while it is hot.
ALWAYS turn this heater off before unplugging it from the outlet.
AVOID INJURY! Keep the cord from crossing traffic areas to avoid tripping.
NEVER modify this fireplace. Doing so could result in personal injury or property damage.
Modification of this fire pl ac e completely vo ids all warr ant i es .
Discontinue use if this fireplace malfunctions or is dropped or damaged in any manner.
Page 3
3
WARNING
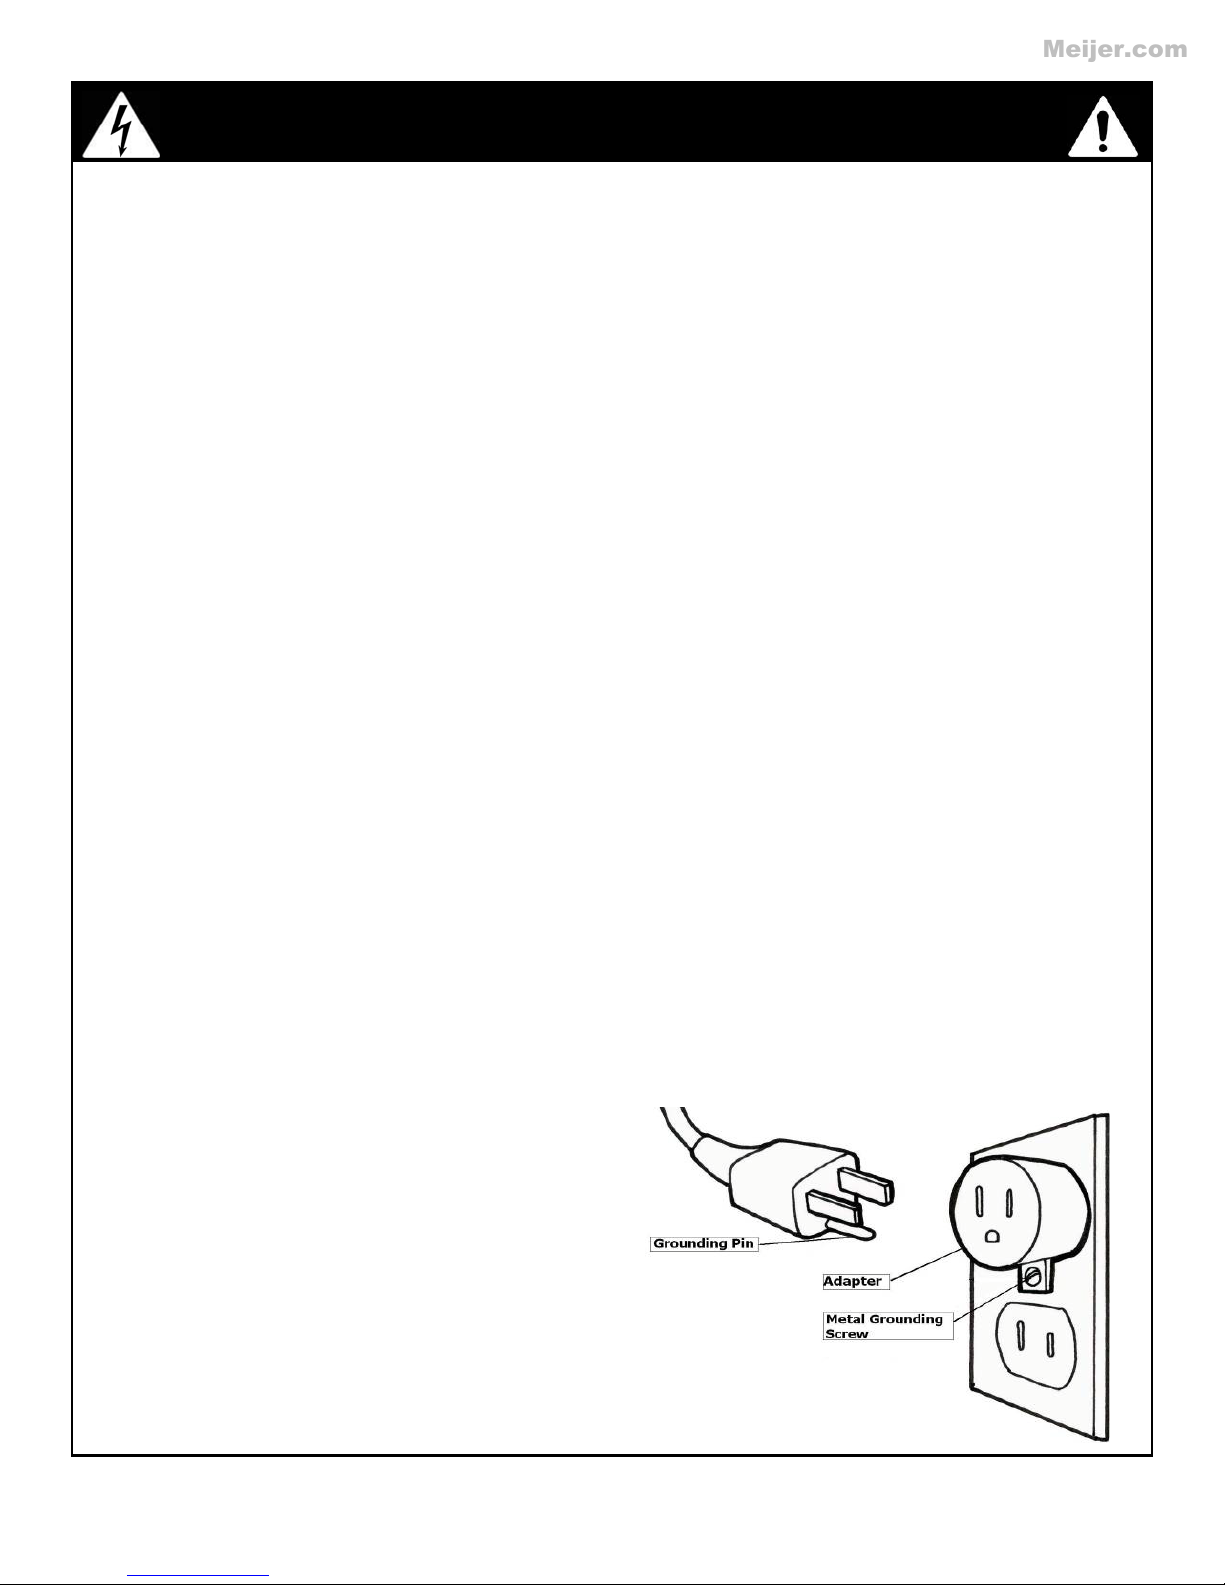
The cord supplied with the heater has a
receptacle is not available, an adapter
Meijer.com
Risk of electric shock! DO NOT OPEN! No user-serviceable parts inside!
ALWAYS disconnect this unit from the power supply before performing any assembly or
cleaning, or before relocating the electric fireplace.
ALWAYS store this heater in a dry location. NEVER use the fireplace if it has become wet.
NEVER use this heater in bathrooms, laundry rooms, or any other location where the
heater could fall into a bathtub or pool, become damp or come in contact with wate r .
NEVER hang this unit on a wall directly below an electrical outlet.
NEVER operate this heater if the power cord or plug has become damaged, or if the
grounding pin is damaged or missing.
Place the heater near a wall outlet so an extension cord is not needed. If an extension cord is
needed, the gauge of the cord must be at least 14AWG, and the rating must be at least
1875 Watts. NEVER use a smaller gauge cord with a lower rating. Doing so may result in
fire or electric shock.
ONLY use this heater on a 110~120 V olt 15 Amp grounded circuit. NEVER overload the
circuit. If this heater trips the circuit breaker, unplug all other appliances on the same circuit
before the next use. Avoid plugging other appliances into the same circuit as this heater.
NEVER plug this heater into an outlet that is old, cracked, or has any loose wires or
connections. Plugging this heater into a faulty outlet could result in electric arcing within
the outlet that could cause the outlet to overheat or catch fire.
ALWAYS check your heater cord and plug connections with each use!
i) MAKE SURE the plug fits tight in the outlet! Faulty wall outlet connections or loose plugs
can cause the outlet to overheat.
ii) Heaters draw more current than small appliances. Overheating may occur even if it
has not occurred with the use of other appliances.
iii) During use check frequently to see if the plug outlet or faceplate is HOT!
iv) If the outlet or faceplate is HOT, discontinue use immediately and have a qualified
electrician inspect and/or replace the faulty outlets.
•
plug with two blades (live and neutral) and
one round pin (ground). If a 3-slot
MUST be used. The adapter MUST be
properly grounded to the outlet box (see
figure at r ight).
Page 4
4
PREPARATION
3L
2L
2R
3R
Meijer.com
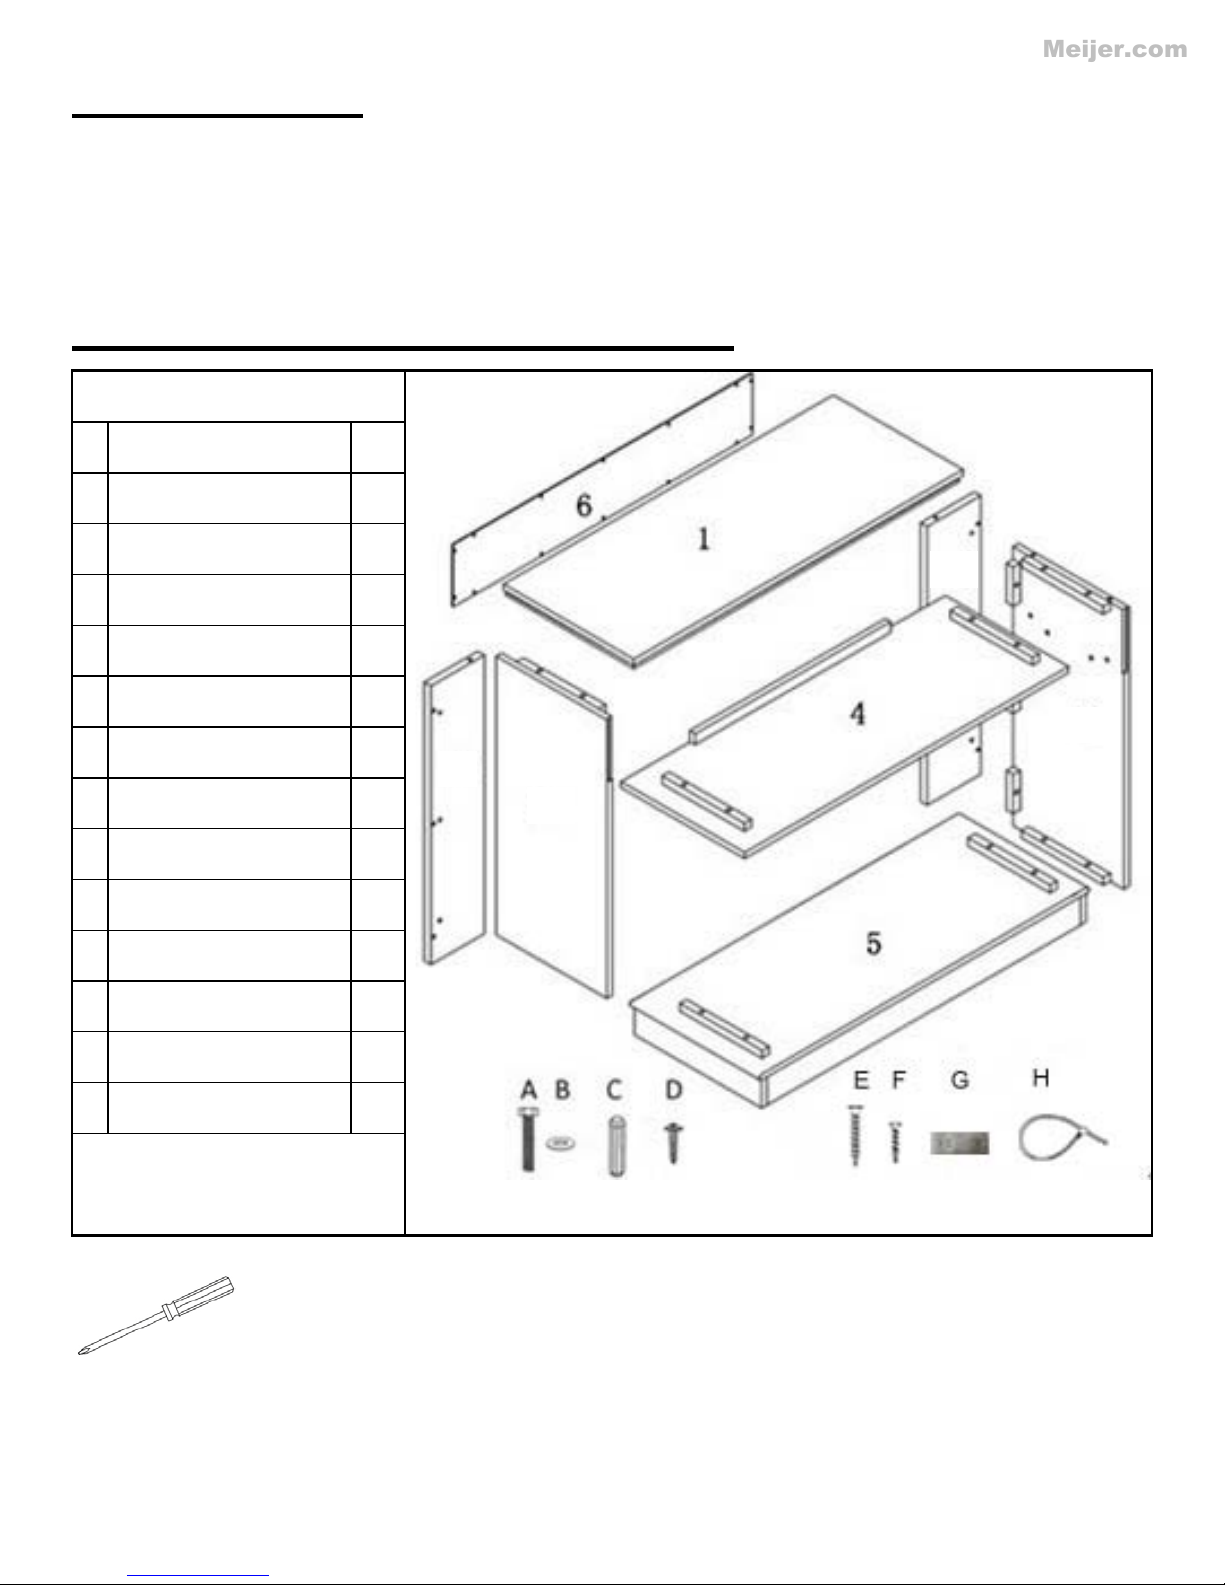
A complete electric fireplace heater should consist of two parts; the wooden mantle and the
fireplace heater. Each is packed in a separate carton. Always use the fireplace heater with the
wooden mantle.
Remove all parts from the carton and place them on a clean, soft, and dry surface. Check the parts
list to make sure nothing is missing. Dispose of all packaging materials properly. Please recycle.
FIREPLACE PARTS & HARDWARE
Fireplace Insert not shown
1 Mantel top 1
2 Side panels (2L / 2R) 2
3 Rear panels (3L / 3R) 2
4 Shelf 1
5 Hearth 1
6 Cross panel 1
A Bolts 19
B Washers 19
C Wood dowels 23
D Wood screws 15
E Long wood screws 4
F Short wood screws 4
G Bracket 4
H Strap 2
See Insert Manual for insert
installation instructions &
important safety information.
Note: A Phillips screwdriver is requi red for some assembly steps, but is not included.
Page 5
5
ASSEMBLY
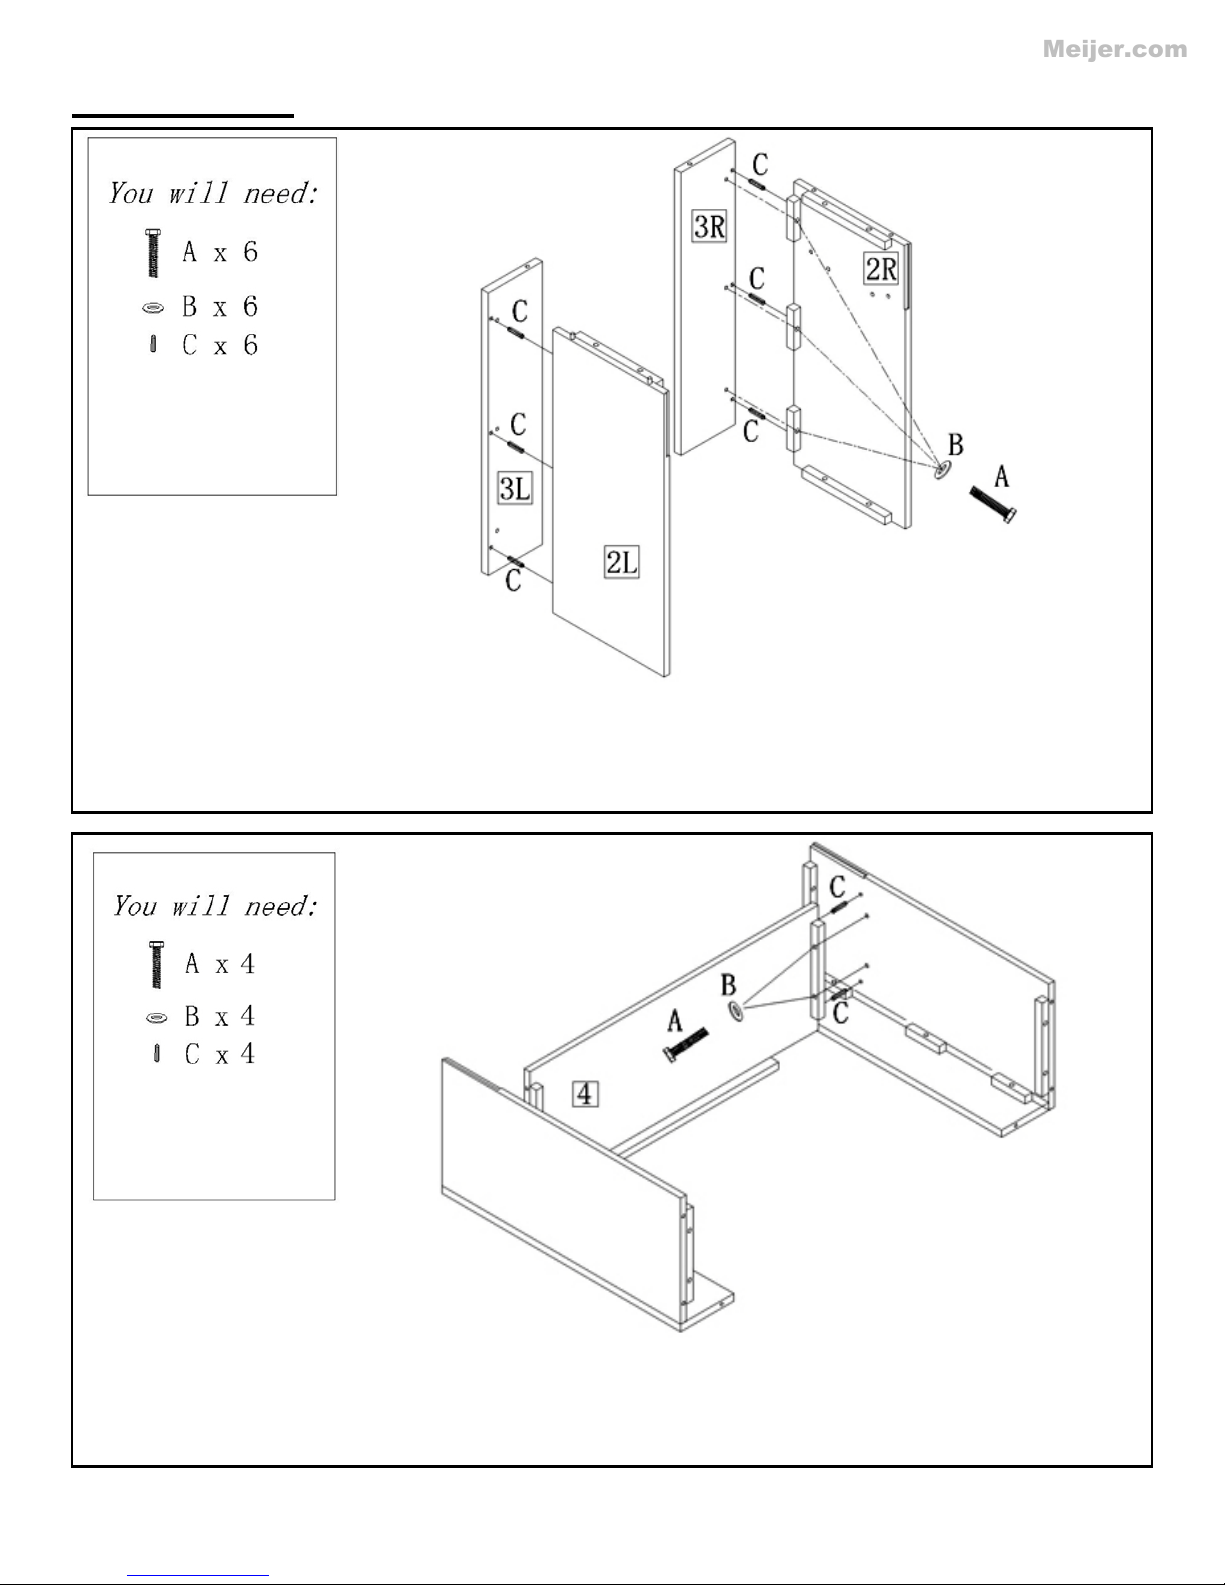
STEP 1. Insert the wood dowel (C) into the back edge of side panels (2L/2R). Press
in rear panels. Secure with Phillips screwdriver.
STEP 2. Insert wood dowel (C) into holes in each end of shelf (4). Press shelf and
her so dowels go into holes in side panels. Thread bolts (A) t hrough
washers (B) and connectors on shelf and into holes in side panels. Secure with
Phillips screwdriver. DO NOT over-tighten.
Meijer.com
rear panels (3L/3R) and side panels together so dowels go into holes in rear panels.
Thread bolts (A) through washers (B) and connectors on side panels and into holes
side panels toget
Page 6
6
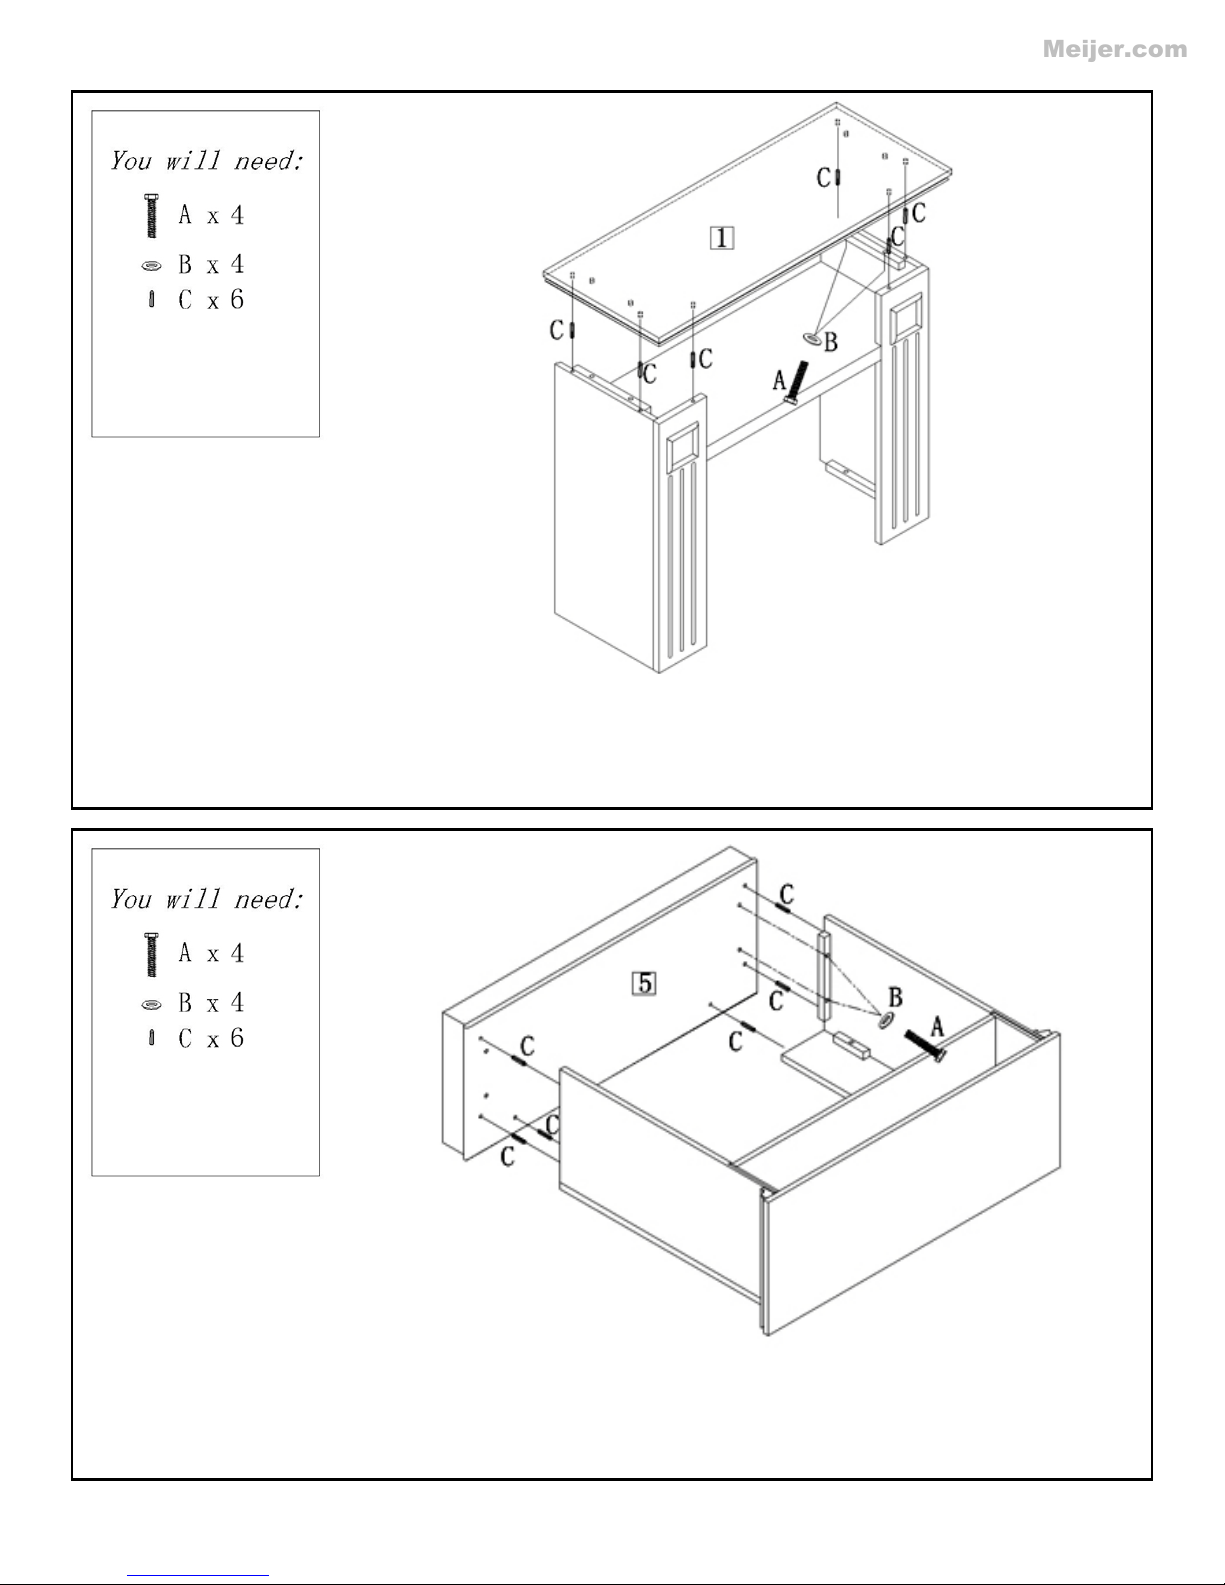
STEP 3. Insert wood dowel (C) into holes in each end of shelf (4). Press shelf and
side panels together so dowels go into holes in side panels. Thread bolts (A) through
washers (B) and connectors on shelf and into holes in side panels. Secure with
Phillips screwdriver. DO NOT over-tighten.
STEP 4. Insert wood dowel (C) into six holes on bottom edge of side panel assembly.
into hearth (5) so dowels go into holes in hearth. Thread
with Phillips screwdriver. DO NOT over-tighten.
Meijer.com
Slide side panel assembly
bolts (A) through washers (B) and connectors on side panels and into hearth. Secure
Page 7
7
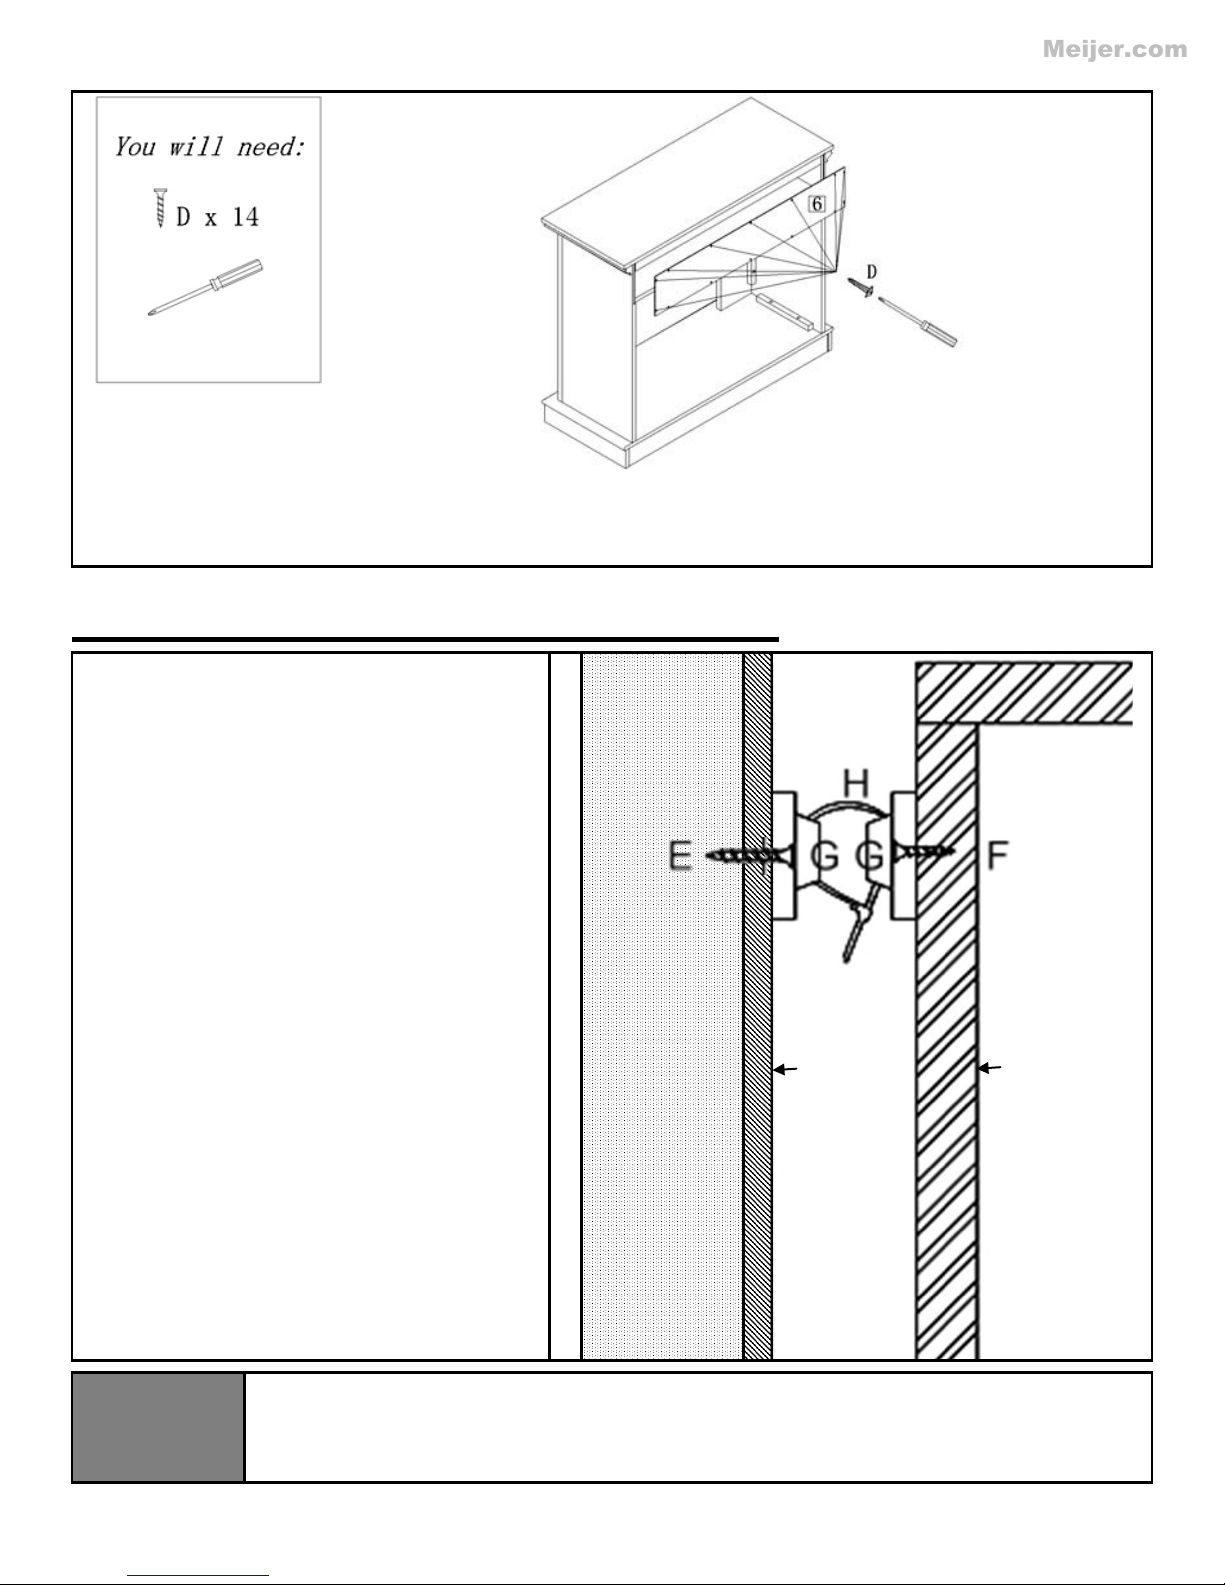
STEP 5. Thread wood screws (D) through holes in cross panel (6) and into holes in
back edge of mantel assembly. Secure with Phillips screwdriver. Tighten all bolts and
screws.
bracket (G) to the wall with
. Secure with a
NOTE: Make sure to screw directly
through the drywall and into a wall
stud. If no wall stud is available, or if
Secure with a Phillips
Move the furniture into its final position.
the bracket
Make sure the bracket is firmly
framed wall covered in drywall (sheet rock). For concrete walls, cinder
Wall stud
Drywall
Mantel
Meijer.com
ANT-TIP SAFETY KIT INSTALLATION
1. Attach one
the long screw (E)
Phillips screwdriver.
DO NOT over-tighten
you have a concrete wall, consult a
professional for proper installation.
2. Attach the second bracke t (G) near the
top of the mantel frame with the short
screw (F).
screwdriver.
DO NOT over-tighten
3.
Thread strap (H) through
and tighten strap until s nug .
DO NOT over-tighten.
4.
attached to the wall, and to the mantel,
and that the strap is snug.
The wall mount fasteners included with this anti-tip kit are for use ONLY with a
NOTICE
woodblocks, or other wall types, consult a professional for the best attachment methods.
Page 8
8
Limited Warranty
Thank you for purchasing this Electric Fireplace! If you need assistance with assembly, have
Meijer.com
This warrants to the original purchaser that this product is free from defects in material and
workmanship as of the date of purchase and that it will, under normal use and proper care, remain so
for one year from the date of purchase. Missing or initially defective parts will be replaced free of
charge during the period of this limited warranty. The original dated sales receipt is required for all
warranty claims. This warranty does not cover damage which has occurred during transport from the
point of purchase to the consumer’s home. This warranty does not cover glass, bulbs, remote
controls, or batteries.
This product is for residential use only. Any and all commercial use of this product voids all
warranties, and frees the manufacturer from all liability. The following will void this warranty: Damage
caused f rom t ampering with, modifying, or altering the fireplace insert in any manner; Dam age due to
incorrect assembly, improper care, misuse, or abuse; Damage from being used with the wrong power
source; Water dam age; Damage caused from this insert being used outdoors; Damage caused from
this insert being used for excessive periods of time; Damage caused by the insert being used in a
commercial application; Damage from use as a primary heat source; Other misuse or abuse not
specifically listed herein.
This product is not intended to be used as a primary heat source.
VENDOR DEVELOPMENT GROUP, INC.(HEREAFTER, VDG), ITS DIRECTORS, OFFICERS, OR
AGENTS, WILL NOT BE LIABLE TO THE PURCHASER OR ANY THIRD PARTY, WHETHER IN
CONTRACT, IN TORT, OR ON ANY OTHER BASI S, FOR ANY INDIRECT, SPECIAL, PUNITIVE,
EXEMPLARY, CONSEQUENTIAL, OR INCIDENTAL LOSS, COST, OR DAMAGE ARISING OUT OF
OR IN CONNECTION WITH THE SALE , MAINT ENANCE, USE, OR INABILITY TO USE THIS
PRODUCT, EVEN IF VDG, OR ITS DIRECTORS, OFFICERS, OR AGENTS HAVE BEEN ADVISED
OF THE POSSIBILITY OF SUCH LOSSES, COSTS OR DAMAGES, OR IF SUCH LOSSES, COSTS,
OR DAMAGES ARE FORESEEABLE. IN NO EVENT WILL VDG, OR ITS OFFICERS, DIRECTORS,
OR AGENTS BE LIABLE FOR ANY DIRECT LOSSES, COSTS, OR DAMAGES THAT EXCEED
THE PRODUCT PURCHASE PRICE.
Some jurisdictions do not allow the exclusion or limitation of incidental or consequential damages, so
the above limitation or exclusion may not apply to the purchaser. This limited warranty gives you
specific legal rights, and you may also have other rights which vary from jurisdiction to jurisdiction.
questions about the use of this product, or have missing or defective parts, please e-mail us at:
Or, call us toll-free (M-F 8:30AM-4:30 PM CST) at
1-866-561-0731
Vendor Development Gr oup, Inc.
Minneapolis, MN 55401
Made in China
 Loading...