

Page 1
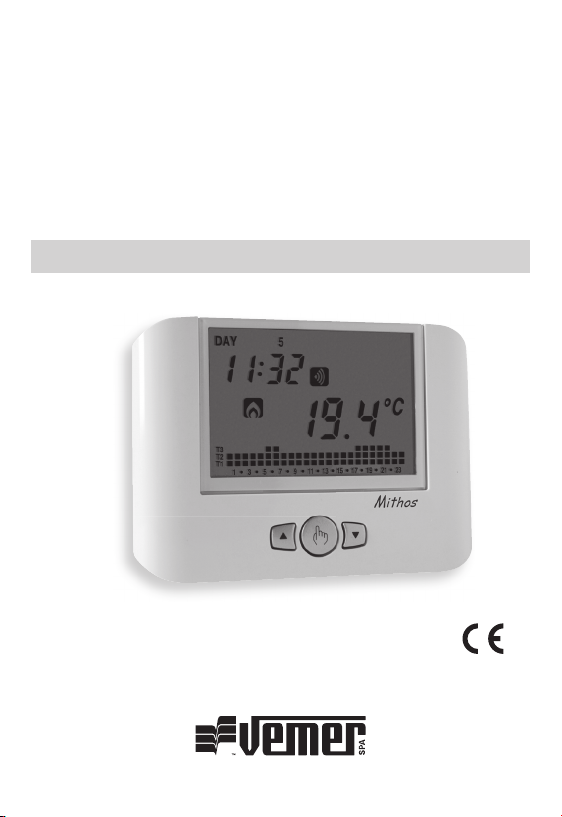
Cronotermostato
Digitale a radiofrequenza
Mithos RF
Manuale d’Uso
User Manual
RADIOFREQUENCY
DIGITAL CHRONOTHERMOSTAT
Page 2

Page 3

Indice
■ Montaggio Pagina 3
■ Dimensioni Pagina 4
■ Funzionamento Pagina 4
■ Avvertenze di sicurezza Pagina 5
■ Caratteristiche tecniche Pagina 5
■ Elementi di controllo / Indicazioni a display Pagina 7
■ Avviamento iniziale / Reset Pagina 9
■ Impostazione orologio Pagina 9
■ Impostazione programmi Pagina 11
■ Impostazione temperature Pagina 13
■ Funzionamento manuale Pagina 14
■ Funzionamento estate / inverno Pagina 15
■ Comando On-Off da tastiera Pagina 16
■ Temporizzazioni Pagina 16
■ Programmazione avanzata Pagina 18
■ Funzioni avanzate Pagina 24
■ Tipo di regolazione Pagina 26
■ Sostituzione batteria Pagina 28
■ Norme di riferimento Pagina 28
■ Programmi invernali Pagina 29
■ Programmi estivi Pagina 30
Italiano
- 1 -
Manuale d’Uso Cronotermostato Mithos
Page 4
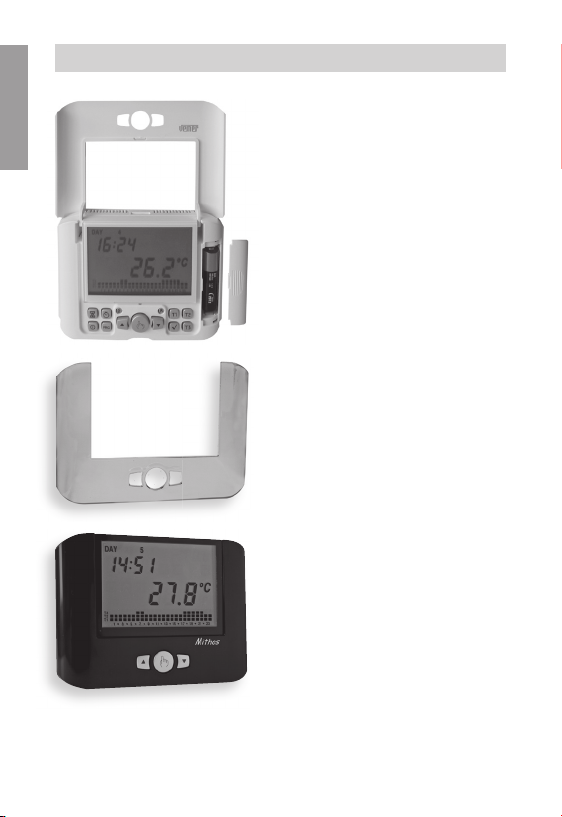
Cronotermostato digitale Mithos
Italiano
• Comfort e controllo dei consumi
garantiti sia d’inverno che d’estate
(riscaldamento/condizionamento)
• Alimentazione: 1 batteria 1,5 V tipo AA
(Alcalina)
• Frontalino intercambiabile colore
argento disponibile come accessorio
(cod. VE323200)
• Installazione a parete o a copertura
della scatola 503 (3 moduli)
• Visualizzazione dello stato di
funzionamento, dell’ora, del giorno e
della temperatura interna
• Programmazione settimanale con tre valori
di temperatura controllabili lungo l’arco della
giornata
- 2 -
Manuale d’Uso Cronotermostato Mithos
T3 : +2 ÷ +35 °C
T2 : +2 ÷ +35 °C
T1 : +2 ÷ +35 °C
Page 5
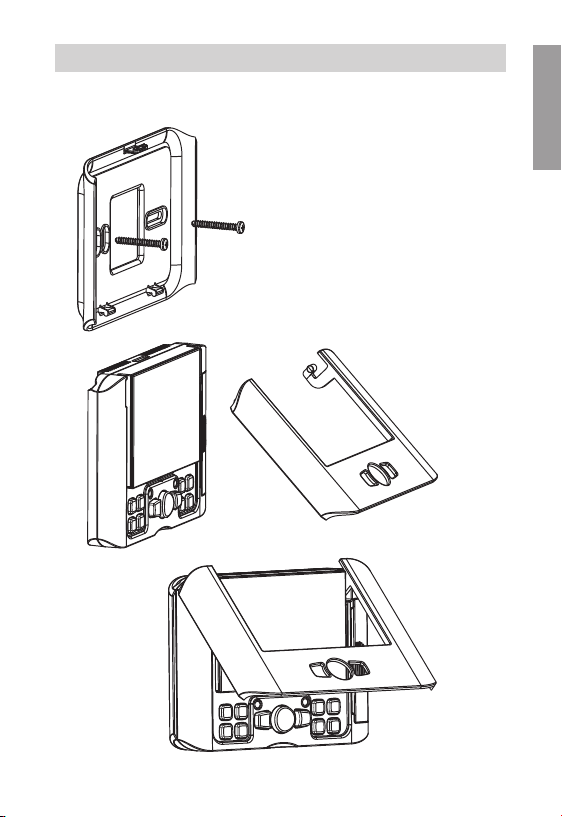
MONTAGGIO
• È consigliabile scegliere per il
cronotermostato una collocazione in
una zona che rispecchi il più possibile
le condizioni di temperatura media di
tutto l’ambiente. Va evitata l’installazione
nell’immediata vicinanza di porte, nestre,
fonti di calore, irraggiamento solare diretto,
e posizioni con eccesso o totale mancanza
di aerazione.
Si consiglia inoltre di montare il
cronotermostato ambiente a circa 150 cm
dal pavimento.
Il montaggio può essere a parete oppure a
copertura scatola 503
Italiano
- 3 -
Manuale d’Uso Cronotermostato Mithos
Page 6
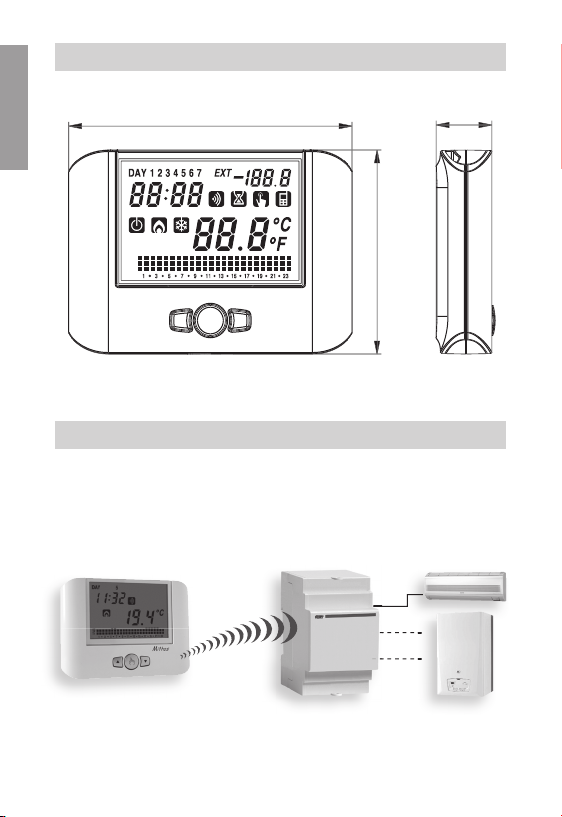
DIMENSIONI
T3
T2
T1
132
26
Italiano
FUNZIONAMENTO
L’attivazione del carico avviene tramite l’attuatore remoto comandato dal
cronotermostato per mezzo di un segnale a rediofrequenza.
Mithos RF CaricoAttuatore remoto
a 1 o più canali
Per il dettaglio di configurazione degli strumenti, vedere il capitolo
CONFIGURAZIONE E TEST ATTUATORE REMOTO
- 4 -
Manuale d’Uso Cronotermostato Mithos
Page 7

■ Mithos RF è un cronotermostato settimanale da parete elettronico, per comando a
radio frequenza, adatto ad ambienti con grado d’inquinamento 2.
Codice Modello Descrizione
VE428900 Set Mithos RF Bianco Mithos RF bianco + attuatore 1 canale
VE426300 Set Mithos RF Nero Mithos RF nero + attuatore 1 canale
VE427100 Mithos RF Bianco Cronotermostato 3 livelli di temperatura
VE425500 Mithos RF Nero Cronotermostato 3 livelli di temperatura
AVVERTENZE DI SICUREZZA
■ Durante l’installazione ed il funzionamento del prodotto (cronotermostato +
attuatore remoto) è necessario rispettare le seguenti indicazioni:
1) Il prodotto deve essere installato da persona qualificata rispettando
scrupolosamente gli schemi di collegamento.
2) Non alimentare il prodotto se qualche parte di esso risulta danneggiata.
3) Il prodotto deve essere installato e messo in funzione in conformità con la
normativa vigente in materia di impianti elettrici.
CARATTERISTICHE TECNICHE
■ Mithos RF
• Alimentazione: 1 batteria alcalina stilo 1,5V (tipo AA)
• Autonomia: 24 mesi circa
• Riserva di carica: 1 minuto (per sostituzione batteria)
• Indicazione del livello di carica della batteria
• 5 temperature impostabili:
– T3, T2, T1 per la regolazione automatica
– T0 temperatura di antigelo impostabile in programmazione avanzata
– T
temperatura in funzionamento manuale
• Regolazione della temperatura:
– ON/OFF con differenziale impostabile tra 0,1°C e 1°C
– PROPORZIONALE con banda proporzionale e periodo di regolazione impostabili
• Programmazione settimanale
• Risoluzione giornaliera: 1h
Italiano
- 5 -
Manuale d’Uso Cronotermostato Mithos
Page 8

• Ritardo di accensione impostabile tra 15, 30 o 45 minuti (indipendente per ogni ora)
• Scala temperatura misurata: 0°C ÷ +50°C
• Risoluzione temperatura misurata e visualizzata: 0,1°C
• Campo regolazione temperatura: 2,0°C ÷ +35°C
• Aggiornamento della misura: ogni 20 secondi
Italiano
• Precisione di misura: ± 0,5°C
• Funzionamento invernale o estivo o manuale
• Visualizzazione opzionale in °F
• Cambio automatico ora solare/ora legale
• Blocco tastiera con password per installazione in luoghi pubblici
• Installazione a parete (o su scatola 503)
• Attivazione carico tramite segnale a radiofrequenza 433.92 MHz
• Temperatura di funzionamento: 0°C ÷ +50°C
• Umidità di funzionamento: 20% ÷ 90% non condensante
• Temperatura di immagazzinamento: -10°C ÷ +65°C
• Grado di protezione: XXD
I valori preimpostati delle temperature (espressi in °C) sono i seguenti:
funz. invernale funz. estivo
T1 5.0 SPENTO
T2 15.0 23.0
T3 18.0 25.0
MANUALE 20.0 24.0
T
La regolazione dei livelli di temperatura soggiace alla condizione seguente: T1 ≤ T2 ≤T3.
In modalità estiva, T1 non è impostabile e corrisponde a condizionatore OFF.
■
ATTUATORE REMOTO
• Per le caratteristiche tecniche relative all’attuatore remoto si rimanda alla
documentazione specifica a corredo dello strumento.
- 6 -
Manuale d’Uso Cronotermostato Mithos
Page 9
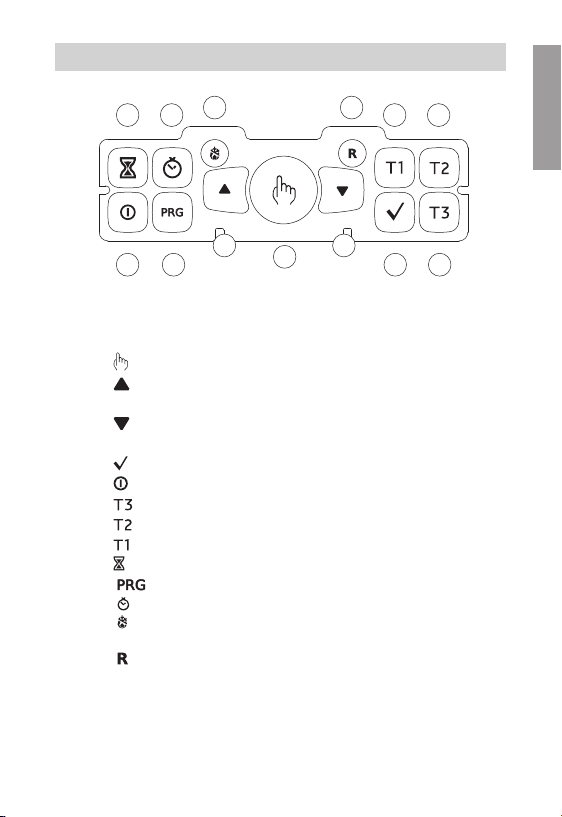
ELEMENTI DI CONTROLLO / INDICAZIONI A DISPLAY
12
➔
11
➔9➔
➔
➔5➔
■ Elementi di controllo
1) Tasto “ ”: funzionamento manuale
2) Tasto “
3) Tasto “ ”: decrementa il campo selezionato
4) Tasto “ ”: conferma il dato impostato
5) Tasto “
6) Tasto “
7) Tasto “
8) Tasto “
9) Tasto “
10) Tasto “
11) Tasto “
12) Tasto “
13) Tasto “
”: incrementa il campo selezionato
”: attivazione e spegnimento funzionamento del cronotermostato
”: seleziona la temperatura T3
”: seleziona la temperatura T2
”: seleziona la temperatura T1
”: consente di impostare una temporizzazione o un ritardo di accensione
”: impostazione programmi o programmazione avanzata
”: impostazione orologio
”: funzionamento invernale (preimpostato) oppure funzionamento estivo
”: cancella la data e l’ora ma non le programmazioni impostate (per far
2
10
massima giornaliera
minima giornaliera
(il tasto è raggiungibile solo con una punta)
questo vedere “Ripristino parametri di default” pag. 26)
(il tasto è raggiungibile solo con una punta).
➔
1
13
➔
➔
3
o visualizzazione temperatura
o visualizzazione temperatura
➔8➔
➔4➔
7
6
Italiano
- 7 -
Manuale d’Uso Cronotermostato Mithos
Page 10
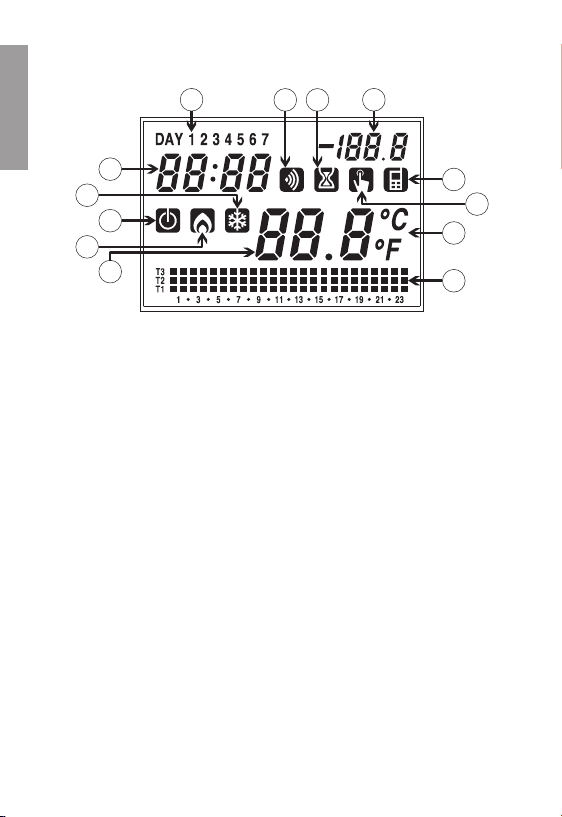
■ Indicazioni a display
Italiano
22
20
26
21
16
14)
Campo
“Giorno”
Campo utilizzato per la programmazione
15)
16)
Campo
“Temperatura ambiente”
Campo
“Programma impostato”
17)
Campo
“Attivazione funzionamento manuale”
18)
Campo
“Temporizzazioni”
19)
Campo
“Attivazione condizionamento”
20)
Campo
“Attivazione riscaldamento”
21)
Campo
“Orologio”
22)
Campo non utilizzato
23)
24)
Campo
“Trasmissione a radiofrequenza”
Campo
“Unità di misura”
25)
Campo
“Spento”
26)
14
24 19
15
23
18
25
17
- 8 -
Manuale d’Uso Cronotermostato Mithos
Page 11
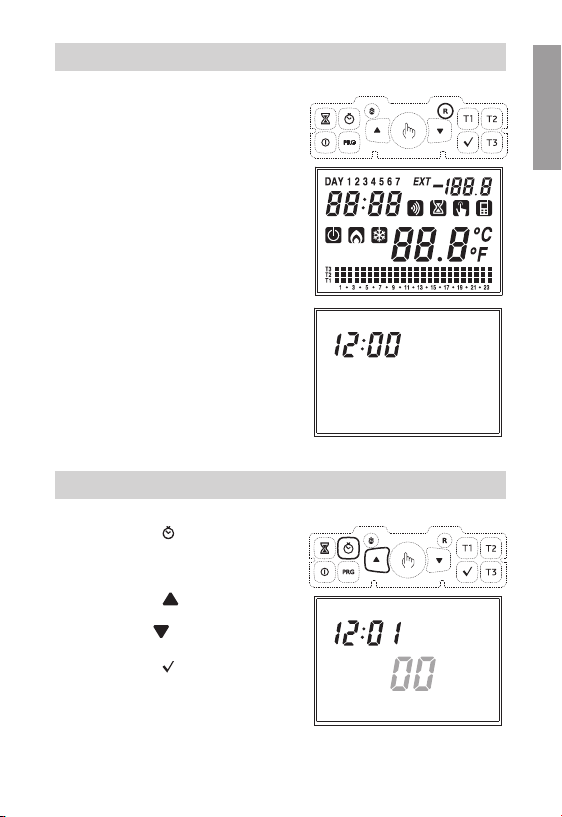
AVVIAMENTO INIZIALE / RESET
•
Inserire la batteria e premere con una
punta il tasto “R”.
Vengono accesi tutti i segmenti del display
e attivato il relè per un tempo di 3 secondi,
dopodichè il campo orologio (22) riparte
da 12:00 e rimane lampeggiante no
all’impostazione dell’orologio.
Attenzione
se l’orologio non viene impostato
il cronotermostato non regola;
comincia a regolare solo dopo
l’impostazione dell’ora.
IMPOSTAZIONE OROLOGIO
• Premere il tasto “ ”, sul campo (16)
scorrono lampeggianti i secondi, mentre
il campo (22) mostra le cifre dei minuti e
delle ore.
Premere il tasto “
secondi e incrementare di 1 il campo
minuti oppure “
campo secondi.
Premere il tasto “
(Nel caso in cui l’impostazione
dell’orologio avvenga dopo un reset,
il campo “secondi” non è impostabile.
Pertanto il primo parametro da impostare
sarà il campo “minuti”).
” per azzerare i
” per azzerare il
” per confermare.
Manuale d’Uso Cronotermostato Mithos
- 9 -
Italiano
Page 12
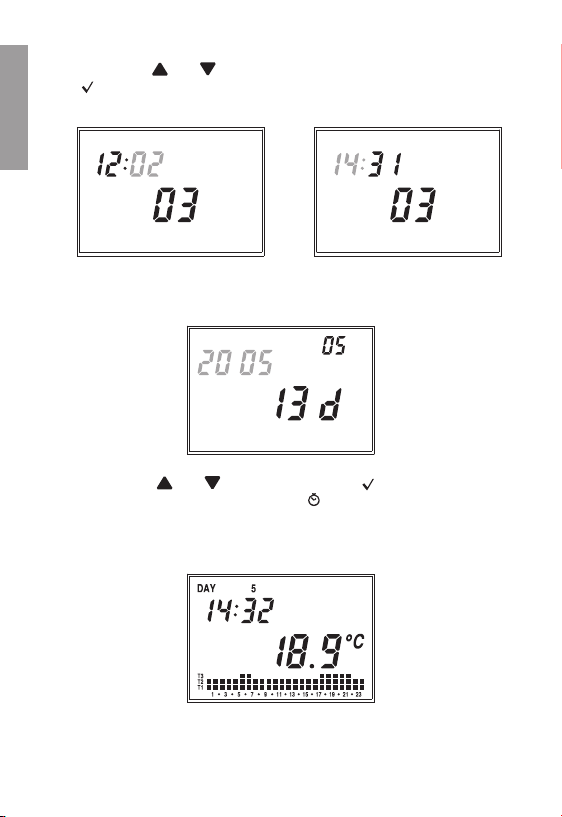
A questo punto comincia a lampeggiare la cifra dei minuti.
Agire sui tasti “
“
” per confermare.
” e “ ” per incrementare o decrementare il campo e premere
Ripetere la procedura per impostare le ore.
Italiano
Una volta impostato il valore delle ore, sul campo (22) compare lampeggiante il valore
dell’anno, sul campo (15) il valore del mese e sul campo (16) il valore del giorno.
Premere i tasti “
Una volta impostato il giorno, premere il tasto “
” e “ ” per modicare i valori e “ ” per confermare.
” per uscire dal menù.
All’uscita di tale procedura l’indicazione dell’orologio non lampeggia più, sul campo (16)
ritorna la visualizzazione della temperatura ambiente.
- 10 -
Manuale d’Uso Cronotermostato Mithos
Page 13
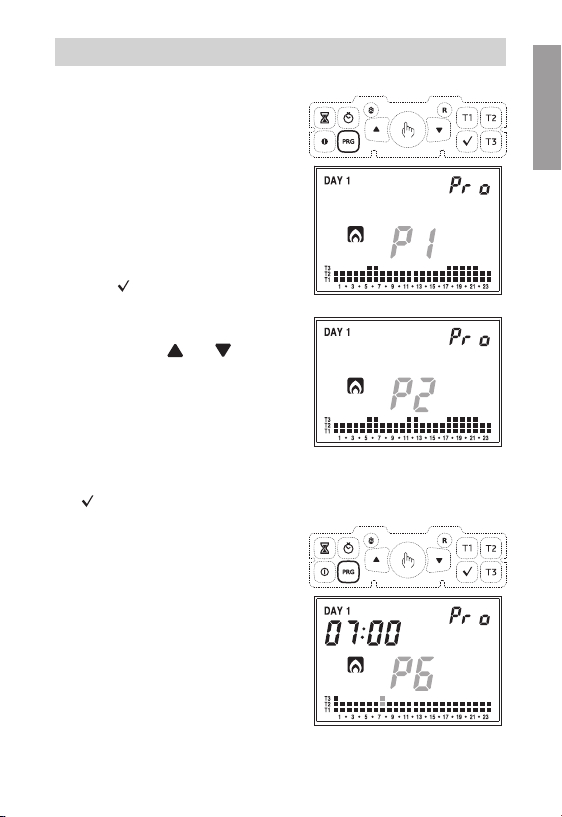
IMPOSTAZIONE PROGRAMMI
• Premendo il tasto “PRG” sul campo (14)
compare l’indicazione relativa a lunedì, sul
campo (16) compare il programma
selezionato lampeggiante (nell’esempio P1),
sul campo (15) compare “Pro”, sul campo
(17) compare l’andamento graco del
programma relativo e si attiva il simbolo
(20) o (21) a seconda del funzionamento
impostato (estivo o invernale).
Se il programma evidenziato va bene si
passa al giorno successivo premendo
il tasto “
• Se il programma evidenziato non va bene
per quel giorno, si può cercarne un altro
utilizzando i tasti “
modicano il valore “Px” contenuto nel
campo (16); al cambiare del programma
cambia anche il contenuto del campo (17)
relativo al programma scelto.
I programmi in default sono riportati alla
ne di questo manuale.
Selezionato il programma corretto si passa
al giorno successivo premendo il tasto
“
•
”.
” e “ ” che
”.
Se nessun programma soddisfa le
esigenze dell’utente, si sceglie un
qualsiasi programma e si ripreme il tasto
“PRG”
, a questo punto lampeggia il
segmento del campo
(17)
relativo
Italiano
- 11 -
Manuale d’Uso Cronotermostato Mithos
Page 14
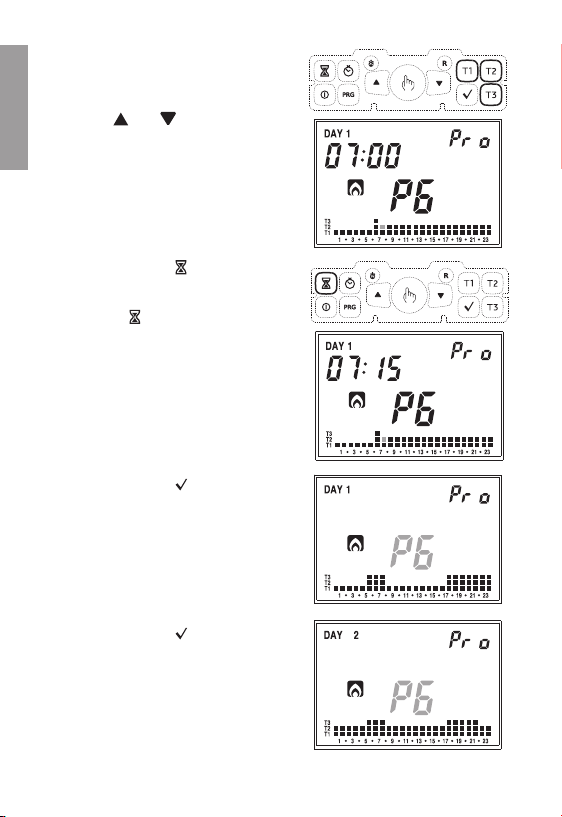
Con i tasti T1 , T2 e T3 è possibile
modicare la temperatura selezionata
per quell’ora e, allo stesso tempo,
passare all’ora successiva. Utilizzando
i tasti
Italiano
“ ” e “ ”
spostarsi di ora in ora senza modicare la
temperatura impostata.
è possibile
Premendo il tasto
“ ”
è possibile
impostare un ritardo di accensione per
quella determinata ora. Ogni pressione
del tasto
“ ”
comporta un aumento del
ritardo di 15 minuti.
Premendo il tasto
“ ”
si conferma il
programma modicato e si ritorna alla
situazione con
campo
Premendo il tasto
(16)
“Px”
.
“ ”
lampeggiante sul
si conferma il
programma per quel giorno e si passa
al giorno successivo nché si arriva
a domenica, dopo di ché si ritorna in
funzionamento normale:
Manuale d’Uso Cronotermostato Mithos
- 12 -
Page 15
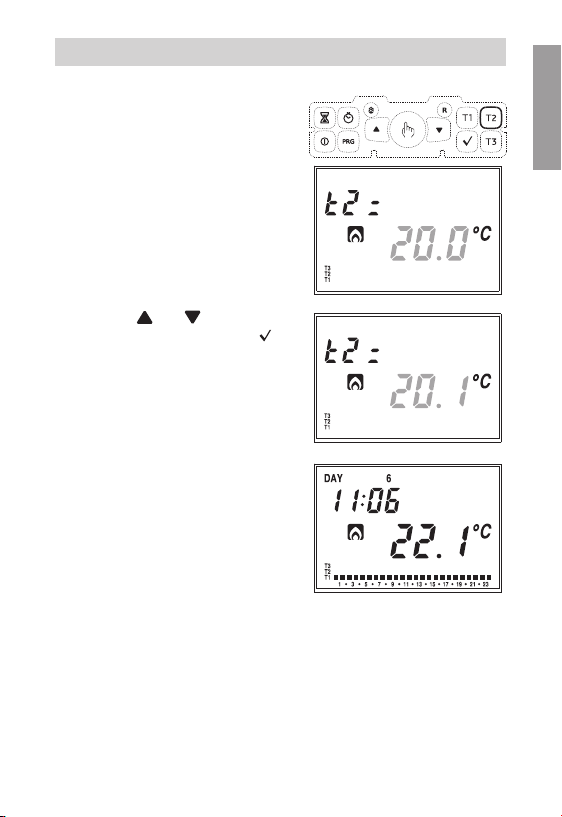
IMPOSTAZIONE TEMPERATURE
•
In uno qualsiasi dei modi di funzionamento,
alla pressione dei tasti
campo
(22)
alla temperatura che si sta modicando,
sul campo
(16)
suddetta temperatura.
T1, T2
e T3 sul
compare la scritta relativa
lampeggia il valore della
Italiano
Con i tasti
“ ” e “ ”
si può
modicarne il valore e con il tasto
si conferma il cambiamento e si ritorna al
funzionamento normale.
I limiti di impostazione per i set sono
riportati nelle caratteristiche tecniche.
Manuale d’Uso Cronotermostato Mithos
“ ”
- 13 -
Page 16
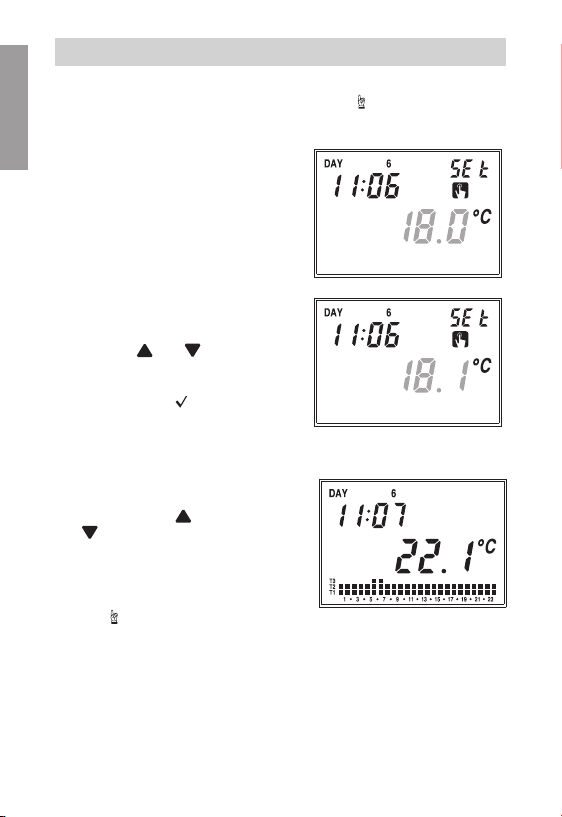
FUNZIONAMENTO MANUALE
•
In funzionamento automatico alla pressione del tasto
come un normale termostato con temperatura di funzionamento Tm.
Italiano
Sul campo
Sul campo
Sul campo
Il simbolo
Il campo
Con i tasti
Premendo il tasto
In qualsiasi momento è possibile
(22)
rimane l’ora corrente.
(14)
rimane il giorno corrente.
(15)
compare la scritta
(18)
compare.
(17)
(16)
scompare. Sul campo
lampeggia il valore di temperatura
“SEt”
manuale impostata.
“ ” e “ ”
è possibile
variarne il valore da 2.0°C a 35°C.
“ ”
o dopo 45
secondi dall’ultima operazione, sul campo
(16)
ricompare il valore della temperatura
ambiente.
vericare la temperatura impostata
premendo il tasto
“ ”
“ ”
o il tasto
, premendo ancora uno dei 2 tasti
si può modicare l’impostazione della
temperatura. Si passa dal programma
manuale al programma automatico
semplicemente premendo di nuovo il
tasto
“ ”
per almeno 3 secondi.
.
“ ”
il sistema si comporta
- 14 -
Manuale d’Uso Cronotermostato Mithos
Page 17
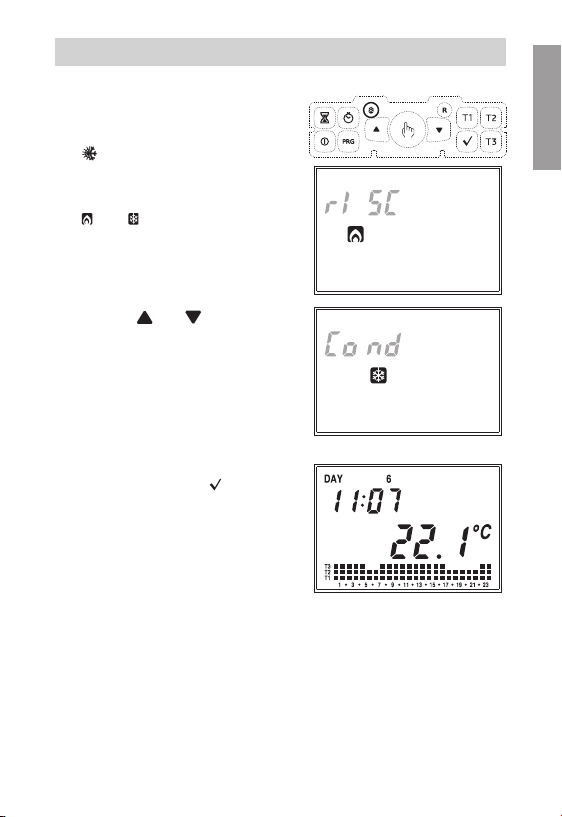
FUNZIONAMENTO ESTATE / INVERNO
Per passare dal funzionamento invernale
a funzionamento estivo (o viceversa),
premere con una punta il tasto
“
”(12).
Sul campo (22) compare la scritta “rISC”
(o “Cond”) lampeggiante e il simbolo
“ ”
(o
“ ”
).
“ ”
e
“ ”
Con i tasti
selezionare uno dei due funzionamenti.
Il programma passerà al funzionamento
voluto premendo il tasto
dopo 45 secondi dall’ultima operazione.
Le potenzialità del funzionamento estate
sono speculari a quelle del funzionamento
inverno, per cui l’impostazione di tutti i
parametri può essere fatta seguendo le
procedure riportate in questo manuale di
istruzioni.
è possibile
“ ”
oppure
Italiano
- 15 -
Manuale d’Uso Cronotermostato Mithos
Page 18
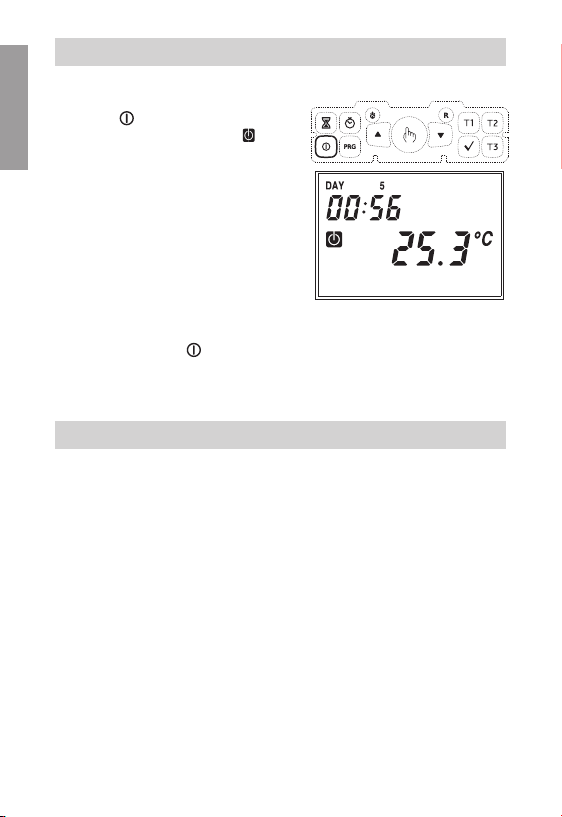
COMANDO ON-OFF DA TASTIERA
•
Per disattivare il cronotermostato premere
il tasto
“ ”
Italiano
Sul display compare il simbolo
Una volta spento, in funzionamento
invernale il cronotermostato abilita la
funzione di antigelo per far si che la
temperatura non scenda sotto una certa
soglia. Tale valore di temperatura si
imposta in programmazione avanzata
(vedere “Temperatura di antigelo”
pag. 20)
In funzionamento estivo invece la
condizione di impianto spento esclude completamente il comando di refrigerazione.
Per tornare al modo di funzionamento precedente allo spegnimento, premere
nuovamente il tasto
.
“ ”
“ ”
.
TEMPORIZZAZIONI
Il cronotermostato consente di attivare tre diversi modi di funzionamento temporizzati,
utili qualora si voglia mantenere una determinata condizione per alcune ore/giorni. I tre
funzionamenti temporizzati sono:
Funzionamento manuale
Se nello stato manuale si imposta una temporizzazione, tale stato manuale viene
mantenuto no al termine della temporizzazione, poi si passa al funzionamento
automatico. Se durante la temporizzazione si passa in funzionamento automatico o
spento, la temporizzazione termina.
Funzionamento automatico
Se nello stato automatico si imposta una temporizzazione, tale stato automatico
viene mantenuto no al termine della temporizzazione, poi si passa al funzionamento
antigelo/spento. Se durante la temporizzazione si passa in funzionamento manuale o
spento, la temporizzazione termina.
- 16 -
Manuale d’Uso Cronotermostato Mithos
Page 19
Spegnimento temporizzato
Se nello stato spento si imposta una temporizzazione, tale stato spento viene
mantenuto no al termine della temporizzazione, poi si passa al funzionamento che si
aveva prima dello spegnimento. Se durante la temporizzazione si accende l’impianto,
la temporizzazione termina.
In tutti i casi, la condizione di temporizzazione è segnalata dal simbolo “
”.
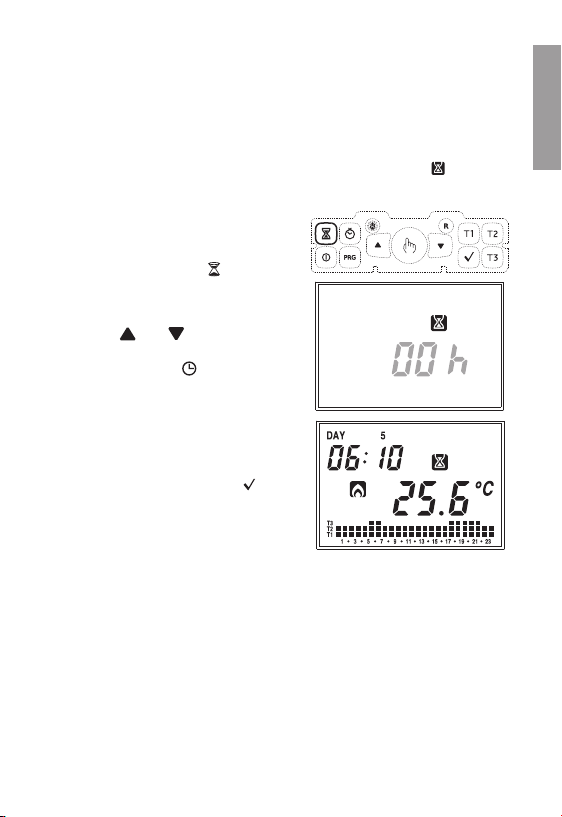
Impostare una temporizzazione
Per attivare una temporizzazione è
necessario premere il tasto
“
”
A questo punto sul display lampeggerà la
scritta
“00h”
Con i tasti
indicante la temporizzazione.
“ ”
e
“ ”
è possibile
scegliere un valore compreso tra 0 e 99.
La pressione del tasto “
” consente di
scegliere l’unità di misura tra ore e giorni.
Ogni cambio di unità di misura comporta
l’azzeramento del valore di temporizzazione
impostato.
Una volta scelto il valore, premere
“ ”
per
confermare oppure attendere 45 secondi.
Nota. Nel caso in cui si modichi l’orario durante una temporizzazione,
quest’ultima non viene aggiornata.
Nota. Nel conteggio delle ore è compresa anche quella in cui viene effettuata
la programmazione. Allo stesso modo, se l’unità di misura è in giorni,
nel conteggio è incluso anche il giorno corrente. Le temporizzazioni in
ore terminano allo scadere dell’ora, quelle in giorni alla mezzanotte.
Italiano
- 17 -
Manuale d’Uso Cronotermostato Mithos
Page 20
PROGRAMMAZIONE AVANZATA
• In programmazione avanzata è possibile accedere ai seguenti parametri di
funzionamento:
Italiano
–
tipo di regolazione
–
parametri per il tipo di regolazione
–
temperatura di antigelo
–
unità di misura della temperatura
–
congurazione/test trasmissione RF
–
password per blocco tastiera
–
ore funzionamento impianto
–
stato di carica batteria
• Si entra in programmazione avanzata,
premendo il tasto “PRG” per più di 3
secondi.
Il parametro da modicare è visualizzato
lampeggiante, con
possibile modicarne il valore e con
parametro successivo. Una volta confermato l’ultimo parametro, si esce dal menù e
il cronotermostato ritorna a funzionare con la modalità impostata in precedenza.
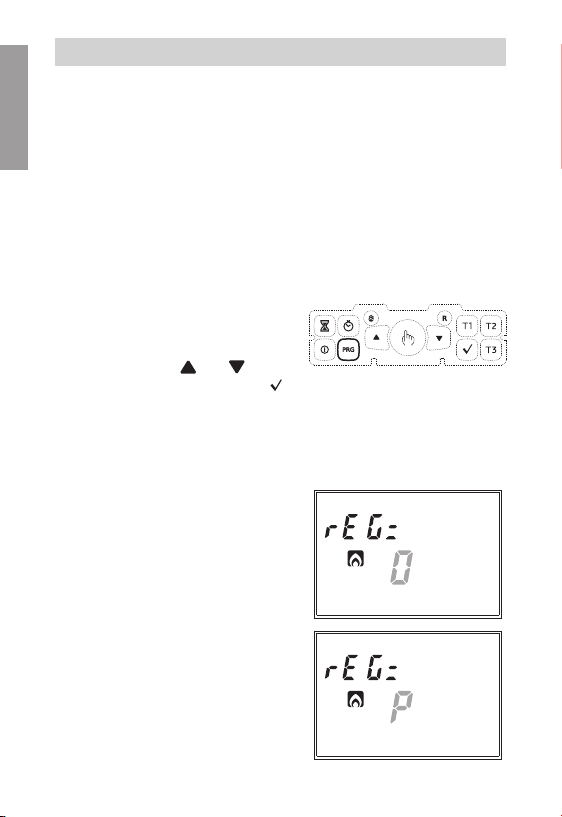
Tipo di regolazione (solo per funzionamento invernale)
• Sul campo (22) compare la scritta
“rEG=” e sul campo (16) lampeggiante
la lettera
“O” (programmazione ON-OFF),
“P” (programmazione proporzionale)
oppure
“tP” (programmazione proporzionale
da utilizzare se l’attuatore remoto è una
valvola per radiatori ThermoPro RF)
“ ”
e
“ ”
è
“ ”
confermare l’impostazione e passare al
- 18 -
Manuale d’Uso Cronotermostato Mithos
Page 21
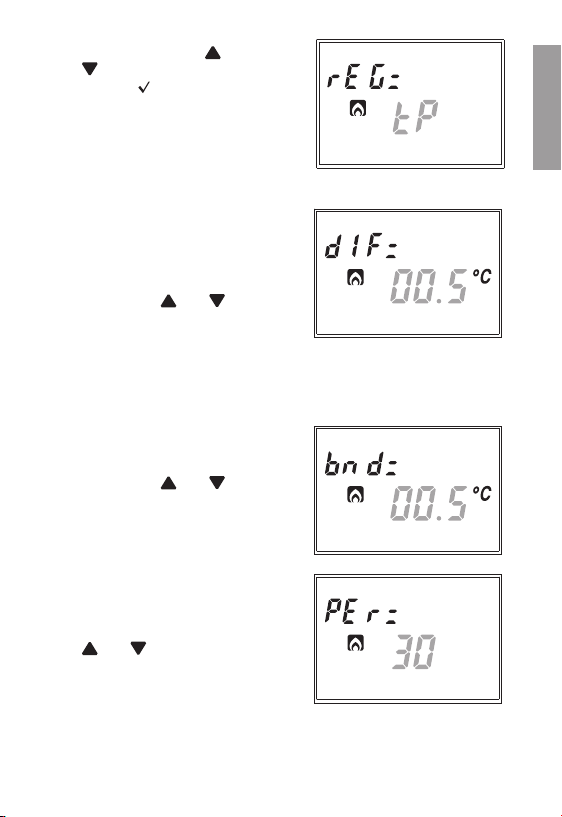
• Scegliere tramite i tasti
“ ”
il modo di regolazione voluto
e premere
“ ”
“ ”
e
per confermare e
passare all’impostazione del parametro
successivo
Parametri per il tipo di regolazione scelta (solo per funzionamento invernale)
• Nel caso di regolazione di tipo “ON/OFF”
l’unico parametro da impostare è il
differenziale. Sul campo (22) compare la
scritta “dIF=” e sul campo (16) il valore
lampeggiante attualmente impostato.
Premere i tasti
“ ”
e
“ ”
per
incrementare o decrementare il valore.
Il range varia da 0.1°C a 1°C.
• Nel caso di regolazione di tipo
–
banda di regolazione
–
periodo di regolazione
(22)
Sul campo
“bnd=”
compare la scritta
e sul campo
(16)
il valore
PROPORZIONALE
i parametri da impostare sono:
lampeggiante attualmente impostato.
Premere i tasti
“ ”
e
“ ”
per
incrementare o decrementare il valore. Il
range varia da 0.5°C a 5°C.
Confermato il valore di banda, sul
campo
(22)
e sul campo
compare la scritta
(16)
il valore lampeggiante
“PEr=”
attualmente impostato. Premere i tasti
“ ”
e
“ ”
per incrementare o
decrementare il valore. E’ possibile
scegliere tra 10, 20 o 30 minuti.
Italiano
Per una descrizione più ampia su come operare la scelta del tipo di regolazione si
rimanda al capitolo “TIPO DI REGOLAZIONE” a pag. 26.
- 19 -
Manuale d’Uso Cronotermostato Mithos
Page 22
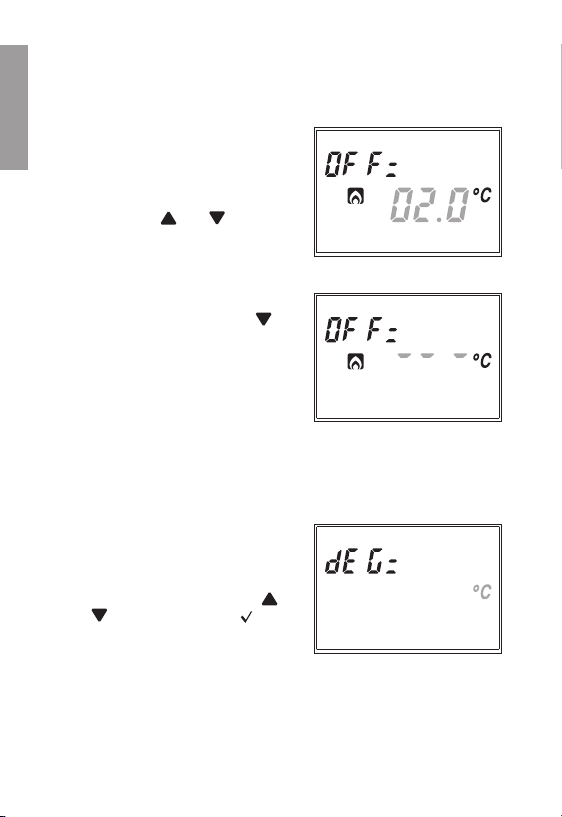
Temperatura di antigelo
(solo per funzionamento invernale)
• E’ possibile impostare un valore di temperatura di sicurezza (temperatura di
antigelo) da mantenere anche nel caso in cui il cronotermostato venga spento.
Italiano
Sul campo
“OFF=”
(22)
compare la scritta
e sul campo
(16)
lampeggia
il valore di temperatura di antigelo
attualmente impostato.
Premere i tasti
“ ”
e
“ ”
per
incrementare o decrementare il valore
di temperatura. E’ possibile scegliere un
valore compreso tra 01.0°C e 10.0°C.
E’ anche possibile disabilitare la funzione
antigelo tenendo premuto il tasto
nchè non compare sul campo
simbolo
“---”
. In questo caso, quando
“ ”
(16)
il
il cronotermostato è spento, non viene
effettuata nessuna regolazione.
Unità di misura della temperatura
E’ possibile scegliere di visualizzare la temperatura in gradi Celsius (°C) oppure in
gradi Fahrenheit (°F).
Sul campo
“dEG=”
(22)
compare la scritta
e sul campo
(25)
lampeggia
l’unità di misura attualmente impostata.
Premere indifferentemente il tasto
e
“ ”
per cambiare unità e
“ ”
“ ”
per
confermare.
- 20 -
Manuale d’Uso Cronotermostato Mithos
Page 23
CONFIGURAZIONE E TEST DELL’ATTUATORE REMOTO
L’attivazione del carico avviene tramite l’attuatore remoto comandato dal
cronotermostato per mezzo di un segnale a radiofrequenza.
Funzionamento attuatore remoto
• Per le caratteristiche funzionali relative all’attuatore remoto si rimanda alla
documentazione specica a corredo dello strumento.
Congurazione attuatore remoto
• Attivare la modalità congurazione secondo quanto descritto nella documentazione
dell’attuatore remoto
• Lo strumento rimane in modalità congurazione per il tempo pressato entro il
quale deve ricevere la stringa di congurazione
• Alla ricezione della stringa, il canale risulta congurato e l’attuatore riprende il
funzionamento normale
• Per ricongurare il canale, ripetere la procedura. Ogni nuova congurazione
cancella la congurazione precedente.
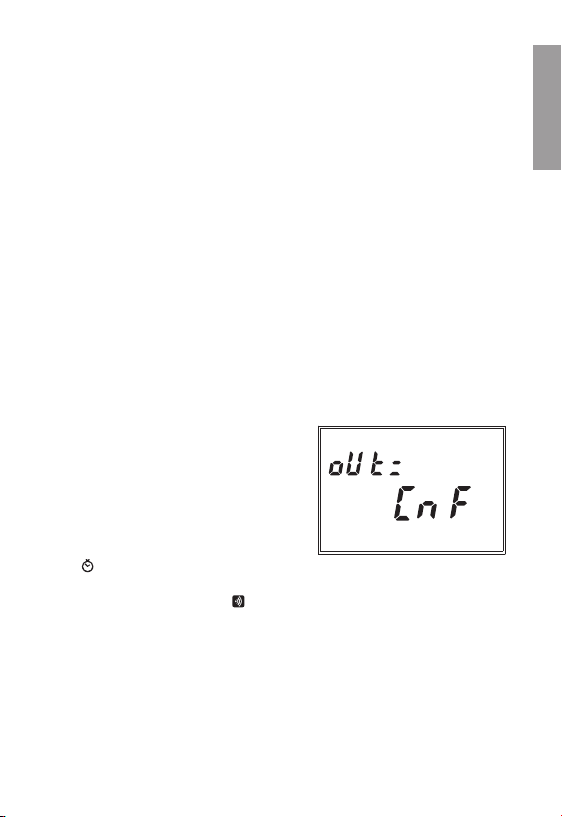
Congurazione mithos RF
• Sul campo
sul campo
compare la scritta
(16)
compare la scritta
“oUt=”
“CnF”
,
(22)
lampeggiante.
• Vericare che l’attuatore remoto sia in
modalità congurazione
• Effettuare la congurazione tenendo
premuto per almeno 3 secondi il tasto
“ ”
del cronotermostato. A congurazione
completata, sul campo
per alcuni secondi il simbolo
(24)
compare
“
” e
successivamente viene visualizzata la pagina
di test della comunicazione radio.
Test della comunicazione
• Durante la procedura di test, sul campo
compare la scritta
compare la scritta
campo
“oUt=”
“tSt”
(15)
compare la scritta
, sul campo
lampeggiante e sul
Manuale d’Uso Cronotermostato Mithos
“on”
o
(22)
(16)
“oFF”
- 21 -
Italiano
Page 24
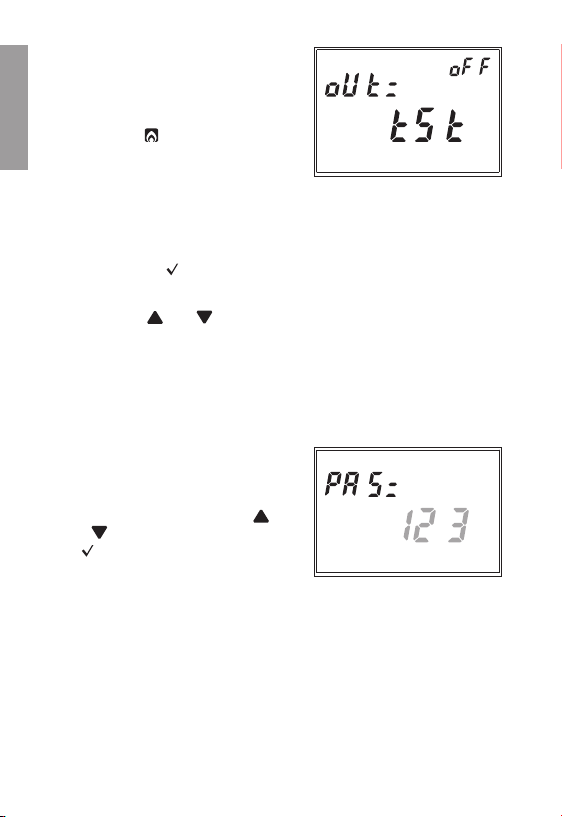
per indicare l’attivazione o meno della
modalità test
• Per attivare (on) la modalità test, premere
per alcuni secondi il tasto “PRG”
• Se la modalità test è attivata, l’accensione
Italiano
del simbolo “
” indica che il relè
dell’attuatore dovrà essere in posizione
ON, mentre l’assenza dei simboli
indica relè nello stato OFF. I comandi
di accensione e spegnimento vengono
inviati alternativamente ogni 10 secondi
per 10 minuti
• Per abbandonare la modalità test,
premere il tasto
“ ”
Nota: è possibile passare dalla modalità test alla modalità congurazione
tramite i tasti “
” e “ ”.
Password per blocco tastiera
E’ possibile scegliere un valore di tre cifre
da utilizzare per sbloccare la tastiera.
Sul campo (22) compare la scritta
“PAS=” e sul campo (16) lampeggia
il valore della password attualmente
impostata (il valore impostato di default è
“123”). Scegliere tramite i tasti
e
“ ”
un valore desiderato e premere
“ ”
per confermare.
“ ”
Per abilitare/disabilitare il blocco tastiera,
si rimanda al capitolo “FUNZIONI
AVANZATE”.
Ore funzionamento impianto
E’ possibile visualizzare le ore di
funzionamento dell’impianto (relè in stato
ON).
- 22 -
Manuale d’Uso Cronotermostato Mithos
Page 25
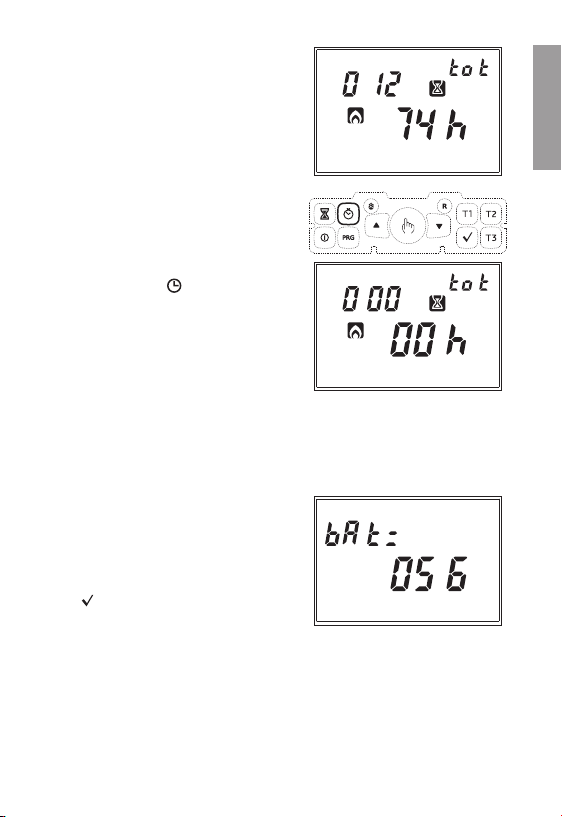
Sul campo (15) compare la scritta
“tot=” mentre sui campi (22) e (16)
compare il valore della temporizzazione
(tale valore è di 5 cifre, 3 sul campo (22)
e 2 sul campo (16) e va letto da sinistra a
destra. Nell’esempio il valore è 1274 ore).
Sono presenti due totalizzatori
indipendenti per il funzionamento
invernale e per il funzionamento estivo.
Il valore massimo memorizzabile è di
65535 ore. Per azzerare il contatore,
premere il tasto “
” per circa 3
secondi quando ci si trova nel menù
visualizzazione del contatore.
Stato di carica batteria
E’ possibile visualizzare il livello di carica
della batteria.
Sul campo (22) compare la scritta
“bAt=” e sul (16) il valore in
percentuale del livello di carica.
Dato che questo è l’ultimo parametro
della sequenza, con la pressione del tasto
“ ”
si esce dal menù e si ritorna al
funzionamento automatico.
Se nessun tasto viene premuto durante
l’impostazione di questi parametri, si
ritorna al funzionamento automatico dopo
45 secondi.
Italiano
- 23 -
Manuale d’Uso Cronotermostato Mithos
Page 26
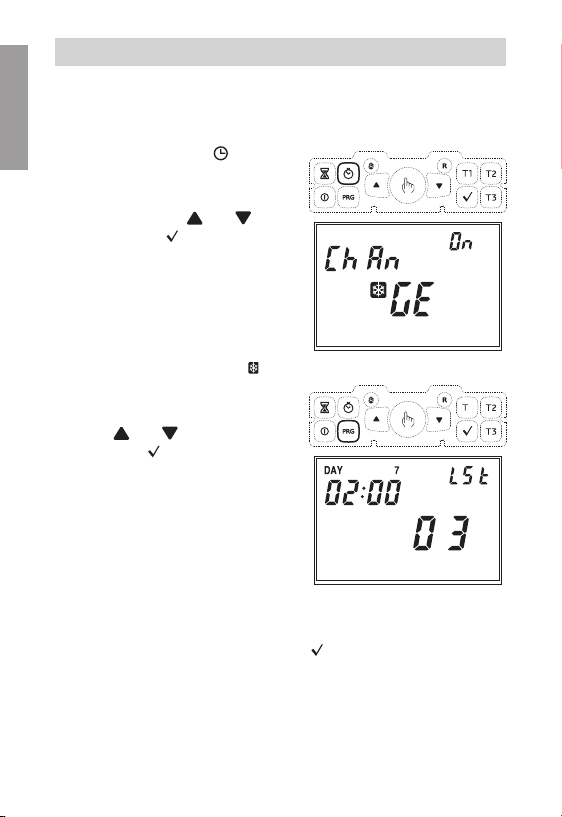
FUNZIONI AVANZATE
Cambio automatico ora solare/ora legale
Il cronotermostato consente di passare automaticamente dall’ora solare all’ora
Italiano
legale e viceversa.
Tenendo premuto il tasto “
almeno 3 secondi sul display compare
la scritta “Change” e sul campo (15) la
scritta lampeggiante “On” o “OFF” .
Scegliere con i tasti
confermare con
“ ”
Se la scelta è OFF, si esce dal menù e il
cronotermostato non effettua alcun cambio
ora. Se la scelta è ON allora vengono
visualizzati altri due menù, che deniscono
rispettivamente il cambio orario da
–
inverno estate
–
estate inverno (sul campo (20)
compare il simbolo
Per modicare i valori impostati, premere il
tasto “PRG”. Il parametro interessato dalla
modica inizierà a lampeggiare. Premere
i tasti
“ ”
e
parametro e
“ ”
“ ”
Le impostazioni da eseguire per entrambi i
menù sono nell’ordine:
–
settimana del mese
(1ST prima, 2ND seconda, 3RD terza,
4TH quarta, LST ultima)
–
giorno della settimana
–
mese
–
ora di cambiamento
Alla ne di ogni menù premere nuovamente
successivo o per uscire e tornare alla visualizzazione normale.
I valori di default impostati per il cambio orario automatico sono:
–
cambio inverno estate : ultima domenica di marzo ore 02:00
–
cambio estate inverno : ultima domenica di ottobre ore 03:00
” per
“ ”
e
“ ”
.
“ ”
per modicare il
per confermare.
e
)
“ ”
per accedere al menù
- 24 -
Manuale d’Uso Cronotermostato Mithos
Page 27
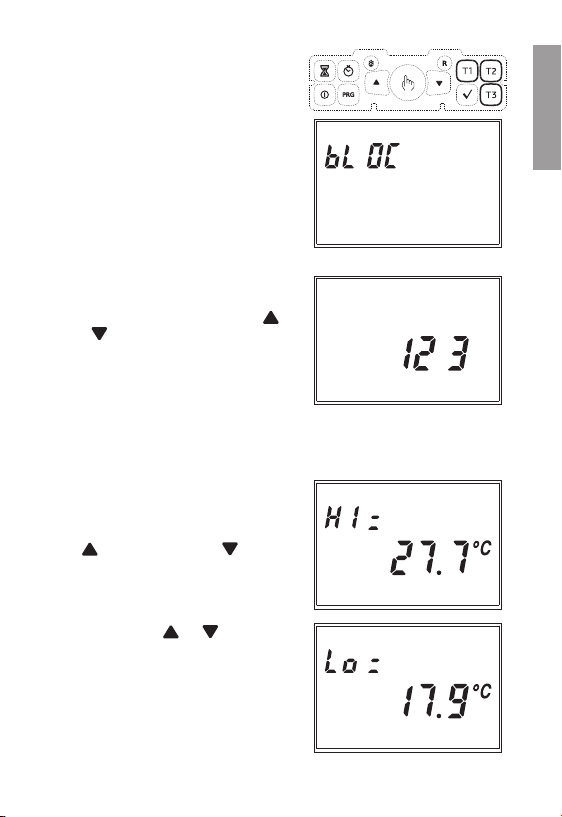
Blocco tastiera
Nel caso si voglia installare il
cronotermostato in ambienti pubblici
è possibile bloccare la tastiera
semplicemente tenendo premuto
contemporaneamente per 3 secondi i tasti
T1, T2
e T3. Sul display comparirà la scritta
“BLOC”.
Per sbloccare la tastiera, premere
nuovamente i tasti
secondi e immettere tramite i tasti
e
“ ”
T1, T2
e T3 per 3
la password di protezione.
“ ”
Visualizzazione temperatura max/min giornaliera
“Il cronotermostato memorizza
automaticamente i valori minimi e
massimi misurati nell’arco della giornata.
Per visualizzare tali valori premere il tasto
“ ”
(valore massimo) o
“ ”
(valore
minimo). Sul campo (16) compare il
valore misurato.
Per azzerare il massimo/minimo valore
memorizzato, premere per almeno 3
secondi il tasto
“ ”/“ ”
.
Italiano
- 25 -
Manuale d’Uso Cronotermostato Mithos
Page 28
Regolazione di emergenza
In funzionamento invernale, in caso di guasto al sensore, al ne di evitare problemi
di congelamento, il cronotermostato pone in ON il relè per 10 minuti ogni 4 ore e sul
campo (16) compare il simbolo “---”.
Italiano
Ripristino parametri di default
La semplice pressione del tasto “R” non provoca un reset totale dello strumento.
Per far ciò e consentire il caricamento dei valori di default, bisogna premere il tasto
“R” e successivamente entro 3 secondi il tasto
“ ”
. Sul display comparirà la
scritta “dEF”.
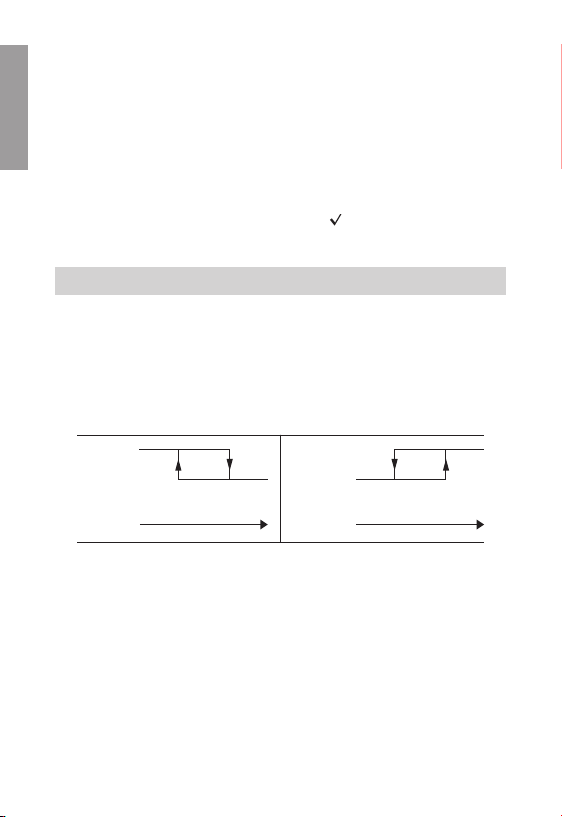
TIPO DI REGOLAZIONE
• Regolazione ON/OFF
La regolazione impostata di default è di tipo ON/OFF con spegnimento in
corrispondenza del setpoint e con differenziale impostato a 0,3°C.
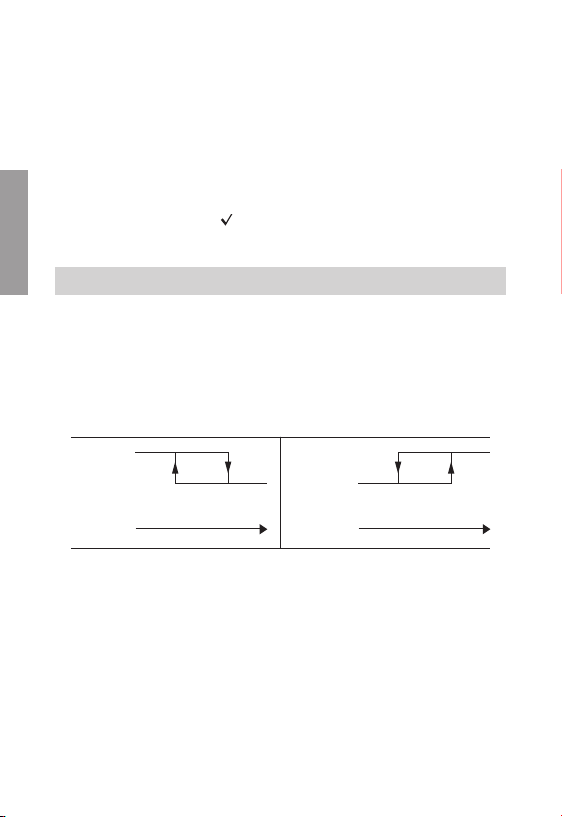
In modalità di funzionamento on/off, il relè dell’attuatore remoto segue la seguente
la logica:
modalità riscaldamento modalità raffreddamento
relè ON
relè OFF
Temperatura
crescente
SET-DIFF SET
• Regolazione proporzionale
In modalità riscaldamento può essere scelta la regolazione proporzionale che in
alcuni tipi di impianti permette di migliorare la regolazione al ne di ottenere una
temperatura costante.
Questa regolazione attua il relè ON o OFF all’interno di un ciclo di regolazione
predenito in funzione dello scostamento della temperatura misurata dal valore di
setpoint.
I parametri necessari per la denizione di questa modalità sono:
- la banda di regolazione
- il periodo di regolazione
Manuale d’Uso Cronotermostato Mithos
- 26 -
relè ON
relè OFF
Temperatura
crescente
SET+DIFFSET
Page 29

La banda di regolazione rappresenta l’intervallo di temperatura, centrato sul
setpoint, in cui si attua la regolazione proporzionale.
Nel dispositivo si imposta la metà della banda di regolazione che si desidera.
Il range per questo parametro è 0.5 ÷ 5.0°C con risoluzione 0.1°C
Il periodo di regolazione rappresenta invece la durata del ciclo di regolazione
(periodo di accensione + periodo di spegnimento)
Il valore di questo parametro è selezionabile fra 10’, 20’ e 30’
Scegliere il valore del periodo di regolazione come segue:
- 10’ per impianti a bassa inerzia termica
- 20’ per impianti a media inerzia termica
- 30’ per impianti ad alta inerzia termica
Scegliere il valore di banda di regolazione come segue:
- banda larga (5°C) per impianti con elevato gradiente termico
- banda stretta (0,5°C) per impianti con basso gradiente termico
• Regolazione tP
Nota. Questa regolazione deve essere utilizzata solo nel caso si stia
pilotando una valvola per radiatori ThermoPro RF
Questo tipo di regolazione consente di far lavorare la valvola ThermoPro RF “a
modulazione di apertura”. In questo modo la valvola si apre in modo proporzionale
a seconda della differenza tra la temperatura impostata (setpoint) e la temperatura
rilevata.
Selezionando uno degli altri tipi di regolazione la valvola non potrà lavorare in modo
proporzionale, ma sarà completamente aperta o completamente chiusa a seconda
della differenza tra temperatura impostata e temperatura rilevata.
Italiano
- 27 -
Manuale d’Uso Cronotermostato Mithos
Page 30
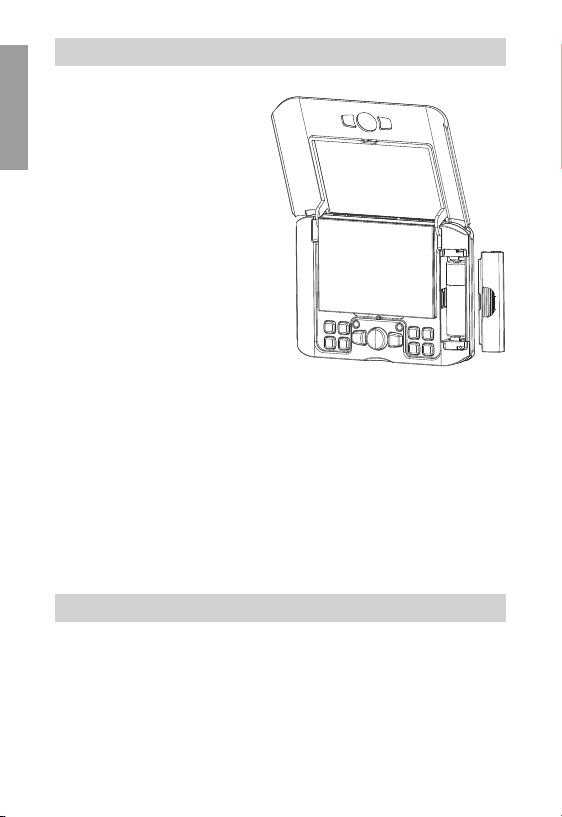
SOSTITUZIONE BATTERIA
• Quando la batteria è prossima alla
scarica, lampeggia tutto il display
Italiano
pur continuando ad eseguire tutte le
funzioni.
Per tensioni di batteria inferiori lo
strumento si porta nello stato di
batteria esaurita che comporta display
spento, consumo ridotto e tutte le
funzioni vengono sospese ad eccezione
dell’orologio. Il funzionamento in tale
stato può proseguire fino a che la
batteria mantiene una tensione tale
da permettere il funzionamento del
microcontrollore.
La sostituzione della batteria deve
avvenire nel tempo massimo di
un minuto in condizioni di display
lampeggiante.
Oltre questo tempo, data e ora vengono persi e devono essere reimpostati
all’accensione. Le programmazioni effettuate tuttavia rimangono in memoria.
Si raccomanda l’uso di sole pile alcaline.
Attenzione:
quando viene reinserita la batteria, il cronotermostato non riprende subito il
funzionamento, ma si deve aspettare un tempo variabile da 5 a 10 secondi
durante il quale la tensione interna risale ai valori di funzionamento normali.
Se si toglie e rimette la batteria scarica o quasi scarica, il tempo di attesa può
essere molto più lungo.
NORME DI RIFERIMENTO
La conformità alle Direttive Europee 5014/53/UE (RED)
2014/30/UE (EMCD)
è dichiarata in riferimento alle seguenti norme armonizzate:
ETSI EN 300 220-1
ETSI EN 300 220-2
ETSI EN 301 489-1
ETSI EN 301 489-3
- 28 -
Manuale d’Uso Cronotermostato Mithos
Page 31

PROGRAMMI INVERNALI
T3
T2
■ ■ ■ ■ ■ ■ ■ ■ ■ ■ ■ ■ ■ ■ ■ ■ ■ ■ ■ ■ ■ ■ ■ ■
P1
T1
■ ■ ■ ■ ■ ■ ■ ■ ■ ■ ■ ■ ■ ■ ■ ■ ■ ■ ■ ■ ■ ■ ■ ■
0 1 2 3 4 5 6 7 8 9 10 11 12 13 14 15 16 17 18 19 20 21 22 23
T3
T2
■ ■ ■ ■ ■ ■ ■ ■ ■ ■ ■ ■ ■ ■ ■ ■ ■ ■ ■ ■ ■ ■ ■ ■
P2
T1
■ ■ ■ ■ ■ ■ ■ ■ ■ ■ ■ ■ ■ ■ ■ ■ ■ ■ ■ ■ ■ ■ ■ ■
0 1 2 3 4 5 6 7 8 9 10 11 12 13 14 15 16 17 18 19 20 21 22 23
T3
T2
■ ■ ■ ■ ■ ■ ■ ■ ■ ■ ■ ■ ■ ■ ■ ■ ■ ■ ■ ■ ■ ■ ■ ■
P3
T1
■ ■ ■ ■ ■ ■ ■ ■ ■ ■ ■ ■ ■ ■ ■ ■ ■ ■ ■ ■ ■ ■ ■ ■
0 1 2 3 4 5 6 7 8 9 10 11 12 13 14 15 16 17 18 19 20 21 22 23
T3
T2
■ ■ ■ ■ ■ ■ ■ ■ ■ ■ ■ ■ ■ ■ ■ ■ ■ ■ ■ ■ ■ ■ ■ ■
P4
T1
■ ■ ■ ■ ■ ■ ■ ■ ■ ■ ■ ■ ■ ■ ■ ■ ■ ■ ■ ■ ■ ■ ■ ■
0 1 2 3 4 5 6 7 8 9 10 11 12 13 14 15 16 17 18 19 20 21 22 23
T3
T2
■ ■ ■ ■ ■ ■ ■ ■ ■ ■ ■ ■ ■ ■ ■ ■ ■ ■ ■ ■ ■ ■ ■ ■
P5
T1
■ ■ ■ ■ ■ ■ ■ ■ ■ ■ ■ ■ ■ ■ ■ ■ ■ ■ ■ ■ ■ ■ ■ ■
0 1 2 3 4 5 6 7 8 9 10 11 12 13 14 15 16 17 18 19 20 21 22 23
T3
T2
■ ■ ■ ■ ■ ■ ■ ■ ■ ■ ■ ■ ■ ■ ■ ■ ■ ■ ■ ■ ■ ■ ■ ■
P6
T1
■ ■ ■ ■ ■ ■ ■ ■ ■ ■ ■ ■ ■ ■ ■ ■ ■ ■ ■ ■ ■ ■ ■ ■
0 1 2 3 4 5 6 7 8 9 10 11 12 13 14 15 16 17 18 19 20 21 22 23
T3
T2
P7
T1
■ ■ ■ ■ ■ ■ ■ ■ ■ ■ ■ ■ ■ ■ ■ ■ ■ ■ ■ ■ ■ ■ ■ ■
0 1 2 3 4 5 6 7 8 9 10 11 12 13 14 15 16 17 18 19 20 21 22 23
■ ■ ■ ■ ■ ■ ■
■ ■ ■ ■ ■ ■ ■ ■ ■ ■ ■ ■ ■ ■ ■
■ ■ ■ ■ ■ ■ ■ ■ ■
■ ■ ■ ■ ■ ■ ■ ■ ■ ■ ■
■ ■ ■ ■ ■ ■ ■ ■ ■ ■
Italiano
- 29 -
Manuale d’Uso Cronotermostato Mithos
Page 32

Italiano
PROGRAMMI ESTIVI
T3
■ ■ ■ ■ ■ ■ ■ ■ ■ ■ ■ ■ ■ ■ ■ ■ ■
T2
■ ■ ■ ■ ■ ■ ■ ■ ■ ■ ■ ■ ■ ■ ■ ■ ■ ■ ■ ■ ■ ■ ■ ■
P1
T1
■ ■ ■ ■ ■ ■ ■ ■ ■ ■ ■ ■ ■ ■ ■ ■ ■ ■ ■ ■ ■ ■ ■ ■
0 1 2 3 4 5 6 7 8 9 10 11 12 13 14 15 16 17 18 19 20 21 22 23
T3
■ ■ ■ ■ ■ ■ ■ ■ ■
T2
■ ■ ■ ■ ■ ■ ■ ■ ■ ■ ■ ■ ■ ■ ■ ■ ■ ■ ■ ■ ■ ■ ■ ■
P2
T1
■ ■ ■ ■ ■ ■ ■ ■ ■ ■ ■ ■ ■ ■ ■ ■ ■ ■ ■ ■ ■ ■ ■ ■
0 1 2 3 4 5 6 7 8 9 10 11 12 13 14 15 16 17 18 19 20 21 22 23
T3
■ ■ ■ ■ ■ ■ ■ ■ ■ ■ ■ ■ ■ ■ ■
T2
■ ■ ■ ■ ■ ■ ■ ■ ■ ■ ■ ■ ■ ■ ■ ■ ■ ■ ■ ■ ■ ■ ■ ■
P3
T1
■ ■ ■ ■ ■ ■ ■ ■ ■ ■ ■ ■ ■ ■ ■ ■ ■ ■ ■ ■ ■ ■ ■ ■
0 1 2 3 4 5 6 7 8 9 10 11 12 13 14 15 16 17 18 19 20 21 22 23
T3
■ ■ ■ ■ ■ ■ ■ ■ ■ ■ ■ ■ ■
T2
■ ■ ■ ■ ■ ■ ■ ■ ■ ■ ■ ■ ■ ■ ■ ■ ■ ■ ■ ■ ■ ■ ■ ■
P4
T1
■ ■ ■ ■ ■ ■ ■ ■ ■ ■ ■ ■ ■ ■ ■ ■ ■ ■ ■ ■ ■ ■ ■ ■
0 1 2 3 4 5 6 7 8 9 10 11 12 13 14 15 16 17 18 19 20 21 22 23
T3
■ ■ ■ ■ ■ ■ ■ ■ ■ ■ ■ ■ ■ ■
T2
■ ■ ■ ■ ■ ■ ■ ■ ■ ■ ■ ■ ■ ■ ■ ■ ■ ■ ■ ■ ■ ■ ■ ■
P5
T1
■ ■ ■ ■ ■ ■ ■ ■ ■ ■ ■ ■ ■ ■ ■ ■ ■ ■ ■ ■ ■ ■ ■ ■
0 1 2 3 4 5 6 7 8 9 10 11 12 13 14 15 16 17 18 19 20 21 22 23
T3
T2
■ ■ ■ ■ ■ ■ ■ ■ ■ ■ ■ ■ ■ ■ ■ ■ ■ ■ ■ ■ ■ ■ ■ ■
P6
T1
■ ■ ■ ■ ■ ■ ■ ■ ■ ■ ■ ■ ■ ■ ■ ■ ■ ■ ■ ■ ■ ■ ■ ■
0 1 2 3 4 5 6 7 8 9 10 11 12 13 14 15 16 17 18 19 20 21 22 23
T3
T2
P7
T1
■ ■ ■ ■ ■ ■ ■ ■ ■ ■ ■ ■ ■ ■ ■ ■ ■ ■ ■ ■ ■ ■ ■ ■
0 1 2 3 4 5 6 7 8 9 10 11 12 13 14 15 16 17 18 19 20 21 22 23
- 30 -
Manuale d’Uso Cronotermostato Mithos
Page 33

Index
■ Assembly Page 33
■ Dimensions Page 34
■ Functions Page 34
■ Safety warnings Page 35
■ Technical characteristics Page 35
■ Control elements / display indications Page 37
■ Initial start-up / Reset Page 39
■ Clock setting Page 39
■ Programs setting Page 41
■ Temperatures setting Page 43
■ Manual operation Page 44
■ Summer / winter operation Page 45
■ Keypad On-Off command Page 46
■ Timing Page 46
■ Advanced programming Page 48
■ Advanced functions Page 54
■ Regulation type Page 56
■ Battery replacement Page 58
■ Reference standards Page 58
■ Winter programs Page 59
■ Summer programs Page 60
English
- 31 -
Mithos Chronothermostat User Manual
Page 34
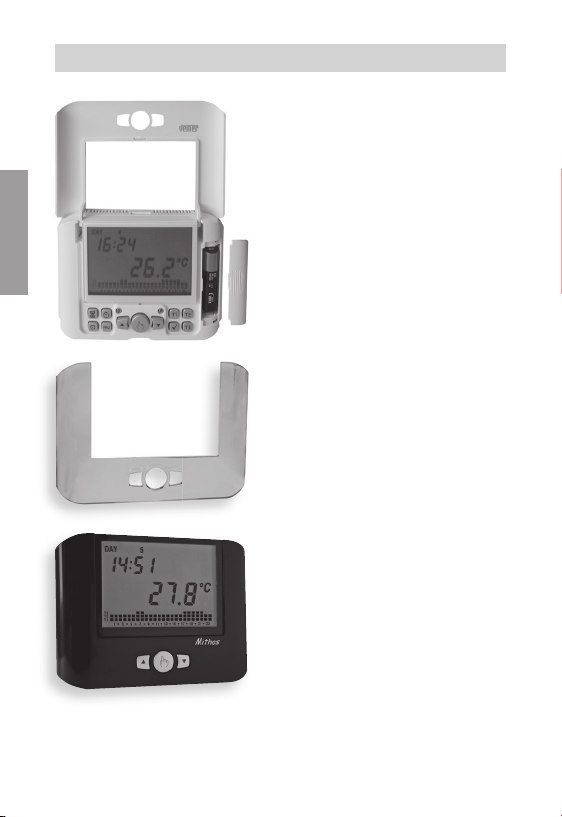
Mithos Digital Chronothermostat
• Comfort and control of
consumptions are ensured both in
winter and in summer (heating/air
conditioning)
English
• Weekly programming with three temperature
values controllable during the day
Mithos Chronothermostat User Manual
• Power supply: 1x1.5 V battery
(AA type) alkaline
• Interchangeable silver colored front
panel available as accessory
(code VE323200)
• Installation can be wall or box 503
coverage (3 modules)
• Display of the operation status, time,
day and internal temperature
T3 : +2 ÷ +35 °C
T2 : +2 ÷ +35 °C
T1 : +2 ÷ +35 °C
- 32 -
Page 35
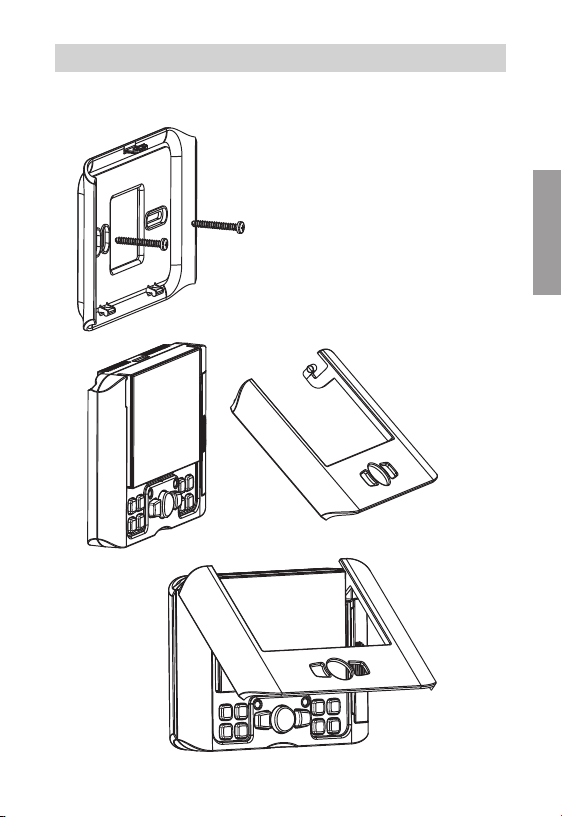
ASSEMBLY
• It is advisable to place the chronothermostat
in an area that mirrors, as much as possible,
the conditions of average temperature of
the entire environment. Avoid installing too
close to doors, windows, heat sources, direct
sunlight radiation, and positions with excess
or total lack of air inlet.
It is moreover advised to install the
environment chronothermostat at about 150
cm from the oor.
Assembly can be wall or box 503 coverage
English
- 33 -
Mithos Chronothermostat User Manual
Page 36
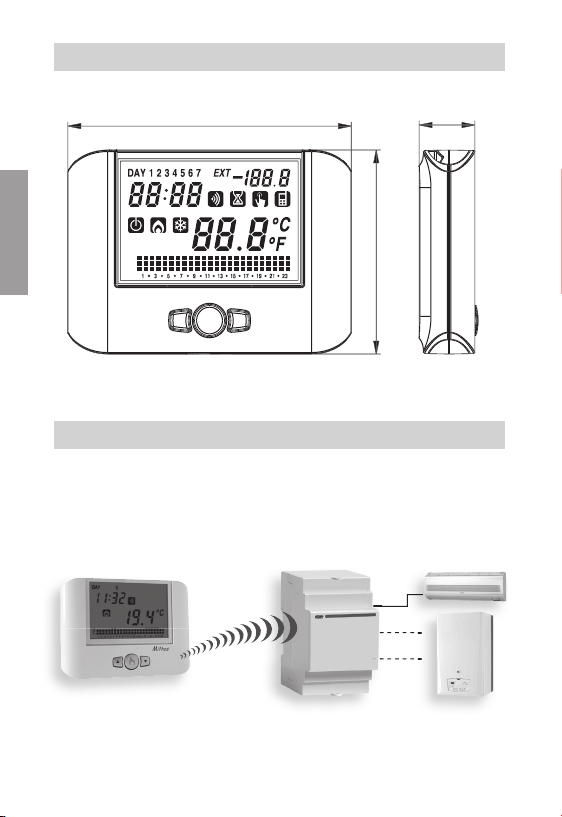
DIMENSIONS
T3
T2
T1
132
26
English
FUNCTIONS
The remote actuator activates the load after a radiofrequency signal sent by the
chronothermostat Mithos RF.
Mithos RF LoadRemote actuator
1 or more channels
For details about the configuration of the devices, see the section
CONFIGURATION AND REMOTE ACTUATOR TEST
- 34 -
Mithos Chronothermostat User Manual
Page 37

■ Mithos RF is an electronic wall-mounting weekly chronothermostat for load control via
radio frequency signal. It is suitable for environments with a pollution degree of 2.
Code Model Description
VE428900 Set Mithos RF Bianco Mithos RF white + remote actuator 1 channel
VE426300 Set Mithos RF Nero Mithos RF black + remote actuator 1 channel
VE427100 Mithos RF Bianco Digital chronothermostat RF control white
VE425500 Mithos RF Nero Digital chronothermostat RF control black
SAFETY WARNINGS
■ During installation and operation of the product, it is necessary to comply
with the following instructions:
1) The instrument must be installed by a skilled person, in strict compliance with
the connection diagrams.
2) Do not power on the instrument if any part of it is damaged.
3) The instrument must be installed and activated in compliance with current
electric systems standards.
TECHNICAL CHARACTERISTICS
■ Mithos RF
• Power supply: 1x1.5V AA stilo alkaline battery
• Battery life: about 24 months
• Charge reserve: 1 minute (for battery replacement)
• Battery charge level indication
• 5 temperature settings:
- T3, T2, T1 for automatic regulation
- T0 antifreeze temperature setting in advanced programming
- T
temperature in manual operation
• Temperature regulation:
- ON/OFF with differential setting between 0.1°C and 1°C
- PROPORTIONAL with proportional band and regulation period setting
• Weekly programming
• Daily resolution: 1h
- 35 -
Mithos Chronothermostat User Manual
English
Page 38
• Activation delay setting between 15, 30 and 45 minutes (independent for every hour)
• Measured temperature scale: 0°C ÷ +50°C
• Measured and displayed temperature resolution: 0.1°C
• Temperature regulation range: 2.0°C ÷ +35°C
• Measurement update: every 20 seconds
• Measurement precision: ± 0.5°C
• Winter or summer or manual operation
• Optional display in °F
• Automatic change CET / DST
• Password protected keypad lock for installation in public places
• Wall mounting (or on 503 type box)
• Radio Frequency remote actuator control
• Operating temperature: 0 °C ÷ +50 °C
English
• Operating humidity: 20% ÷ 90% noncondensing
• Storage temperature -10°C ÷ +65°C
• Degree of protection: XXD
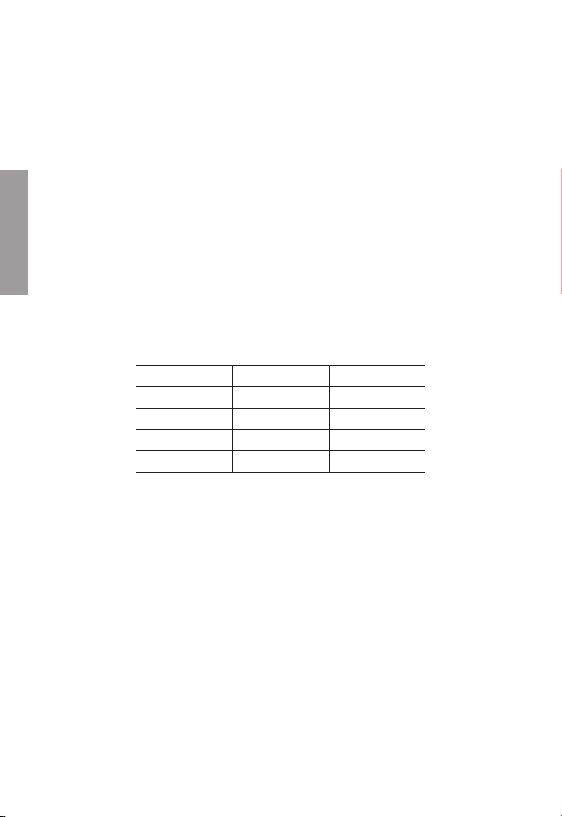
The preset temperature values (expressed in °C) are the following:
funct. winter funct. summer
T1 5.0 OFF
T2 15.0 23.0
T3 18.0 25.0
MANUAL 20.0 24.0
T
Regulation of temperature levels is subjected to the following condition: T1 ≤ T2 ≤T3.
In summer mode, T1 cannot be set and corresponds to the air conditioning OFF.
■
REMOTE ACTUATOR
• For details about technical specications refer to the remote actuator documentation
supplied with the instrument.
- 36 -
Mithos Chronothermostat User Manual
Page 39
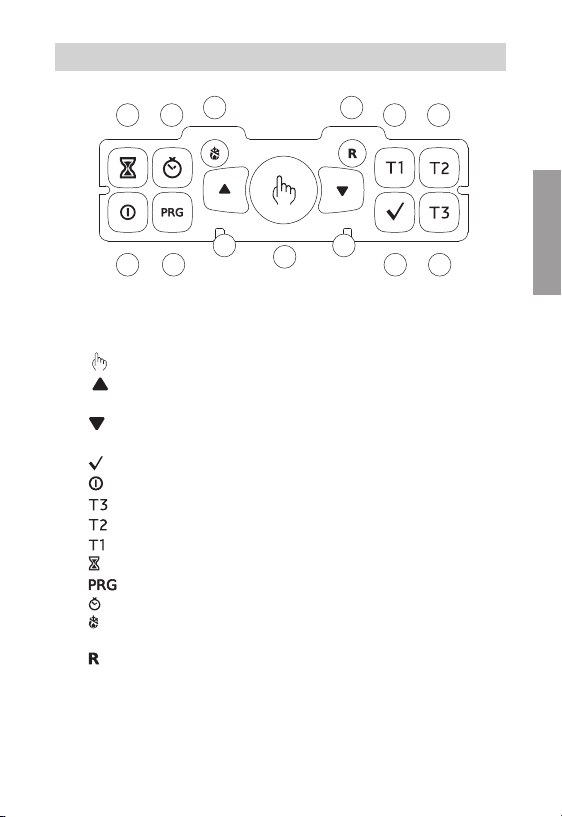
CONTROL ELEMENTS / DISPLAY INDICATIONS
12
➔
11
➔9➔
➔
➔5➔
■ Control elements
1) " " Key: manual operation
" Key: increases the selected eld or displays the daily maximum
2) "
" Key: decreases the selected eld or displays the daily minimum
3) "
" Key: conrms the set data
4) "
" Key: activation and deactivation of the chronothermostat
5) "
" Key: selects temperature T3
6) "
" Key: selects temperature T2
7) "
" Key: selects temperature T1
8) "
" Key: allows to set a timer or an activation delay
9) "
10) "
11) "
12) "
13) "
" Key: programs setting or advanced programming
" Key: clock setting
" Key: winter operation (preset) or summer operation (the button is
" Key: deletes date and time but not the set programs (to do this see
2
10
temperature
temperature
reachable only with a point)
"Restoring default parameters" page 56)
(the key is reachable only with a point).
1
13
➔
➔
➔
3
➔8➔
➔4➔
7
6
English
- 37 -
Mithos Chronothermostat User Manual
Page 40
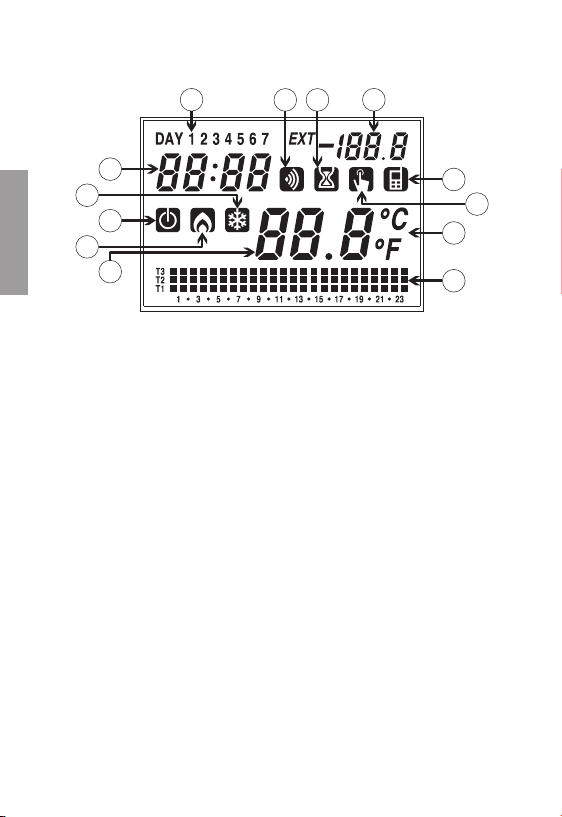
■ Display indications
14
22
20
26
21
English
14) "Day"
16
Field
15) "Programming mode"
16) "Environment temperature"
17) "Set program"
Field
18) "Manual operation activation"
19) "Timer"
Field
20) "Air conditioning activation"
21) "Heating activation"
22) "Clock"
23)
Field
Not used Field
24) "Radio frequency transmission"
25) "Unit of measurement"
26) "Off"
Field
Field
Field
Field
Field
Field
Field
Field
24 19
15
23
18
25
17
- 38 -
Mithos Chronothermostat User Manual
Page 41
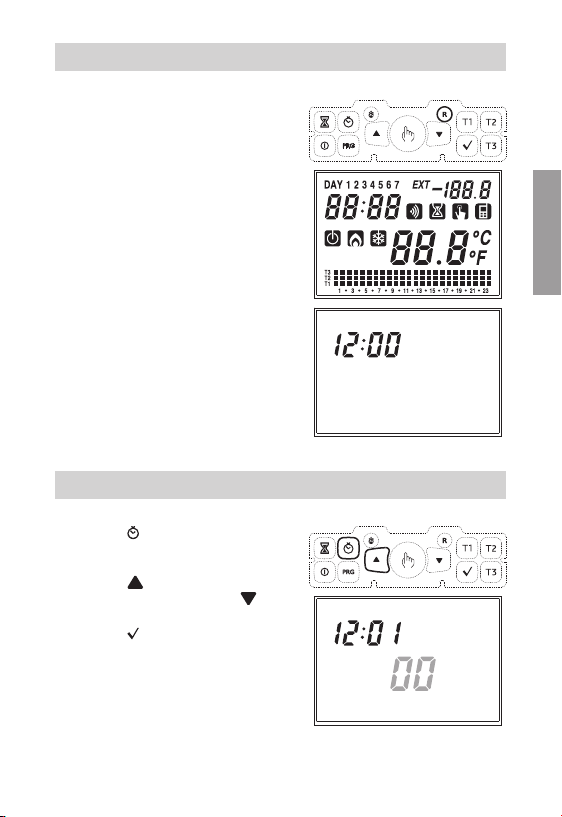
INITIAL START-UP / RESET
•
Insert the battery and press the "R" key
using a point.
All the display segments will turn on and
the relay will be activated for 3 seconds;
after this, the clock eld (22) will start at
12:00 and will ash until the clock is set.
Attention
if the clock is not set,
the chronothermostat
will not adjust; it will start doing
so only once the clock is set.
CLOCK SETTING
• Press the " " key; on eld (16) seconds
will run ashing, while eld (22) will
display digits for minutes and hours.
Press the "
increase the minute eld by 1 or "
reset the seconds eld.
Press the "
(In case the setting of the clock takes
place after a reset, the "seconds" eld
is not adjustable. Therefore, the rst
parameter to set will be the "minutes"
eld).
" key to reset seconds and
" to
" key to conrm.
English
- 39 -
Mithos Chronothermostat User Manual
Page 42
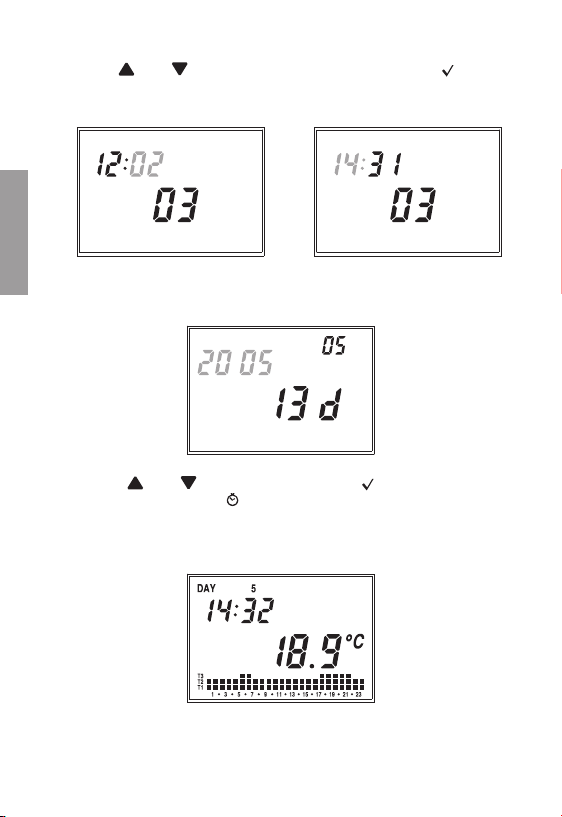
At this point, the minutes digit will start ashing.
Use the "
" and " " keys to increase or decrease the eld and press " " to
conrm.
Repeat the procedure to set the hours.
English
Once the value for the hours is set, eld (22) will display a ashing value of the year,
eld (15) the value of the month and eld (16) the value of the day.
Press the "
Once the day is set, press the "
" and " " keys to modify the values and " " to conrm.
" key to exit the menu.
Upon exiting such procedure the clock indication will not ash any more; eld (16) will
display the environment temperature again.
- 40 -
Mithos Chronothermostat User Manual
Page 43
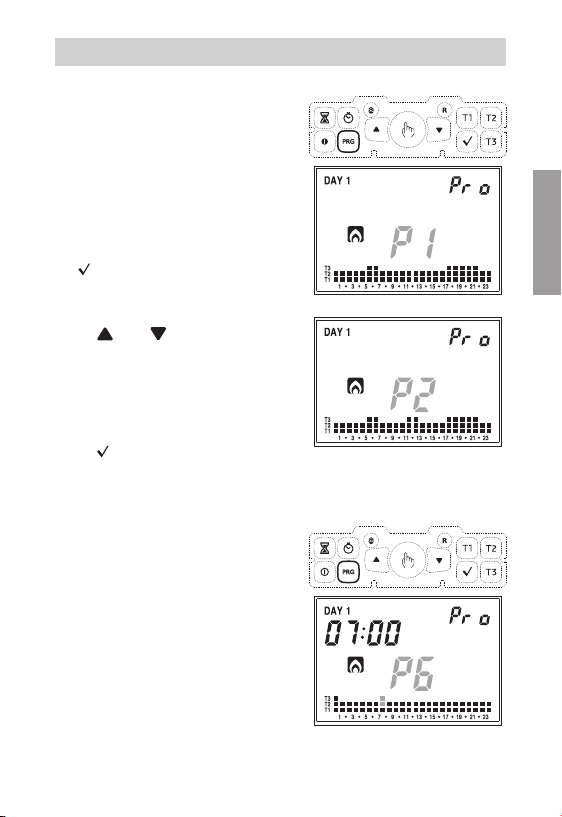
PROGRAMS SETTING
• Pressing the "PRG" key on eld (14) will
display the indication regarding Monday,
eld (16) will display the selected program
ashing (in the example: P1), eld (15) will
display "Pro", eld (17) will display the
graphic trend of the corresponding program
and will activate symbol (20) or (21)
depending on the set operation (summer or
winter).
If the selected program is correct, press the
"
” key to continue to the next day.
• If the selected program is not correct for
that day, you can create another one using
the "
" and " " keys which modify
value "Px" contained in eld (16); as the
program changes, so does the content of
eld (17) regarding the selected program.
The default programs are listed at the end
of this manual.
Once the correct program is selected, press
the "
” key to move on to the next day.
If no program satises the user's needs,
•
choose any program and press the
key again; this will bring the segment of
the corresponding eld
(17)
"PRG"
to ash.
English
- 41 -
Mithos Chronothermostat User Manual
Page 44
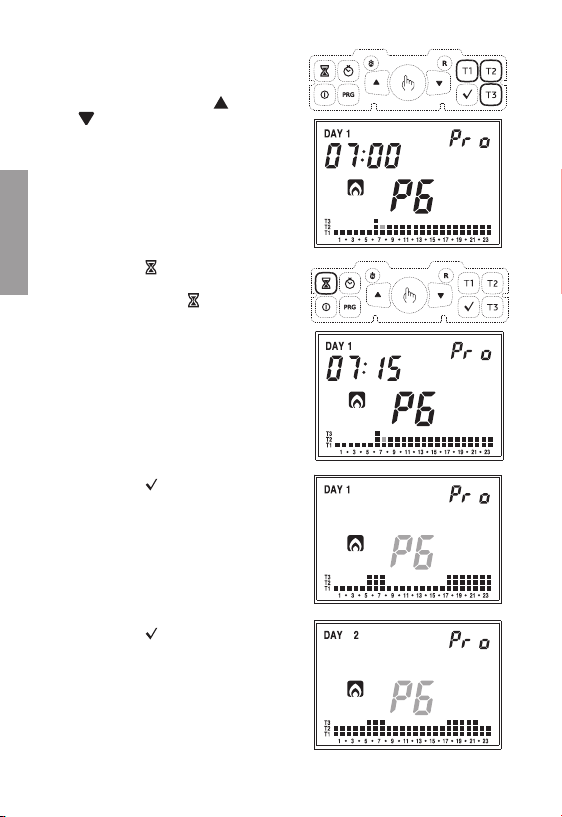
With the T1,
T2
and
to modify the temperature selected for
that hour and, at the same time, move on
to the next one. Using the
" "
keys, it is possible to move from
one hour to the next without modifying
the set temperature.
English
Pressing the
" "
key, it is possible to set
the activation delay for that specic hour.
Each pressure of the
the delay by 15 minutes.
" "
Pressing the
key conrms the
modied program and returns to the
situation with
"Px”
ashing on eld
T3
keys, it is possible
" " and
" "
key increases
(16)
.
Pressing the
" "
key conrms the
program for that day and moves on to the
next until Sunday appears, after which
operation goes back to normal mode.
Mithos Chronothermostat User Manual
- 42 -
Page 45
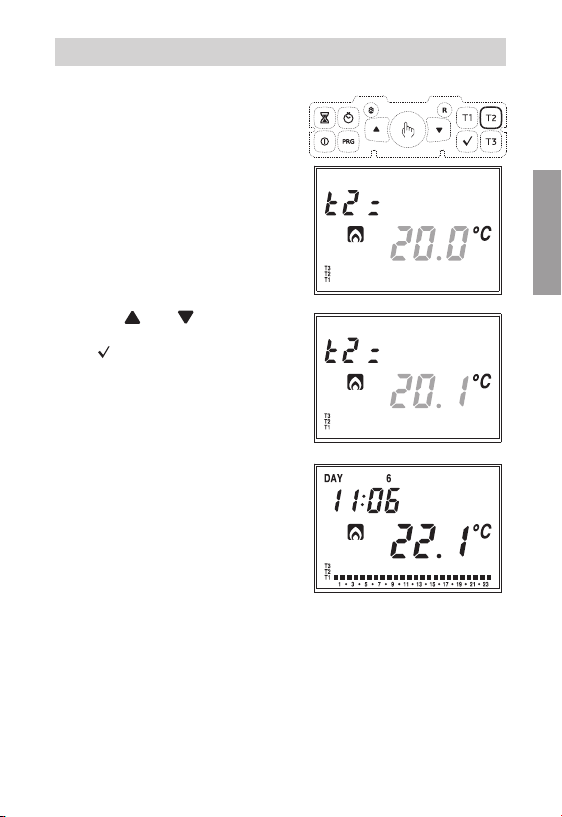
TEMPERATURES SETTING
•
In any of the operation modes, pressing
the
T1, T2
and
T3
to display the writing corresponding to the
temperature that is being modied; on
eld
(16)
temperature will ash.
keys will bring eld
the value of the aforementioned
(22)
English
With the
" " and " "
keys, it is
possible to modify the value and with
the
" ”
key it is possible to conrm the
change and return to normal operation.
The setting limits are reported in the
technical characteristics.
Mithos Chronothermostat User Manual
- 43 -
Page 46
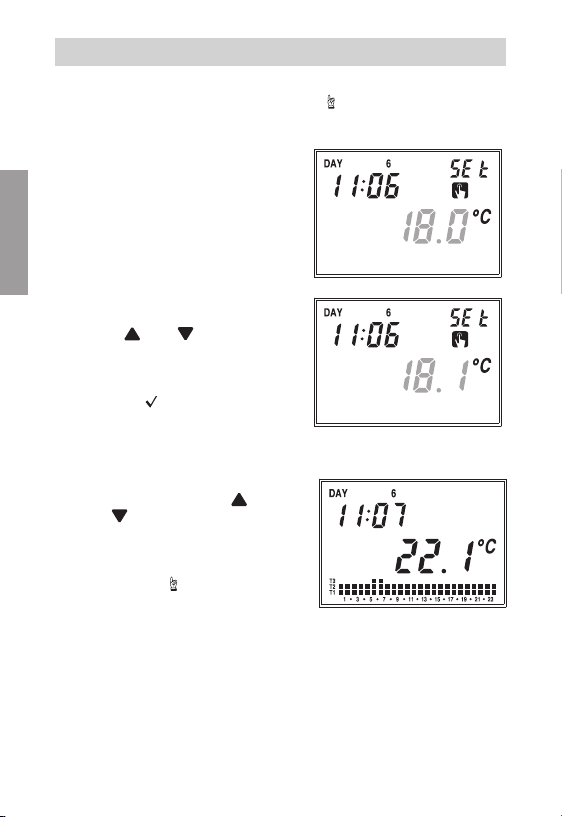
MANUAL OPERATION
•
During automatic operation, when pressing the
normal thermostat with operating temperature Tm.
Field
(22)
Field
Field
The symbol
English
Field
With the
Pressing the
At any time, it is possible to verify the
will show the current time.
(14)
will show the current date.
(15)
will display the writing
(18)
will appear.
(17)
will disappear. On eld
set manual temperature value will ash.
" " and " "
keys, it is
possible to change the value from 2.0°C
to 35°C.
" "
key or after 45 seconds
from the last operation, eld
display the value of the environment
temperature).
set temperature pressing the
or the
" "
key; pressing one of the 2
keys again will allow modication of the
temperature setting. To move from the
manual program to the automatic one,
simply press the
least 3 seconds.
"
"
key again for at
(16)
" "
"SEt"
(16)
will
key
the
" "
key, the system will act as a
.
- 44 -
Mithos Chronothermostat User Manual
Page 47
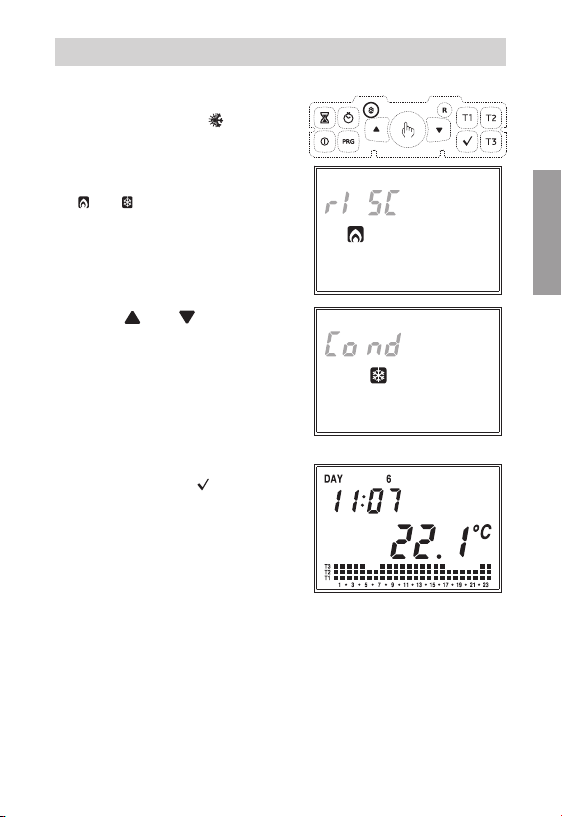
SUMMER / WINTER OPERATION
To move from winter to summer operation
(or vice versa), press the "
point (12).
On eld (22) the writing "rISC" (or
"Cond") will ash and the symbol
" "
(or
" "
) will appear.
" key with a
English
With the
" "
and
" "
keys, it
is possible to select one of the two
operations.
The program will go to the desired
operation pressing the
" "
key or after
45 seconds from the last operation.
The potential of the summer operation
is the same as the one of the winter
operation; therefore the setting of
all parameters can be carried out
following the procedures reported in this
instructions manual.
Mithos Chronothermostat User Manual
- 45 -
Page 48
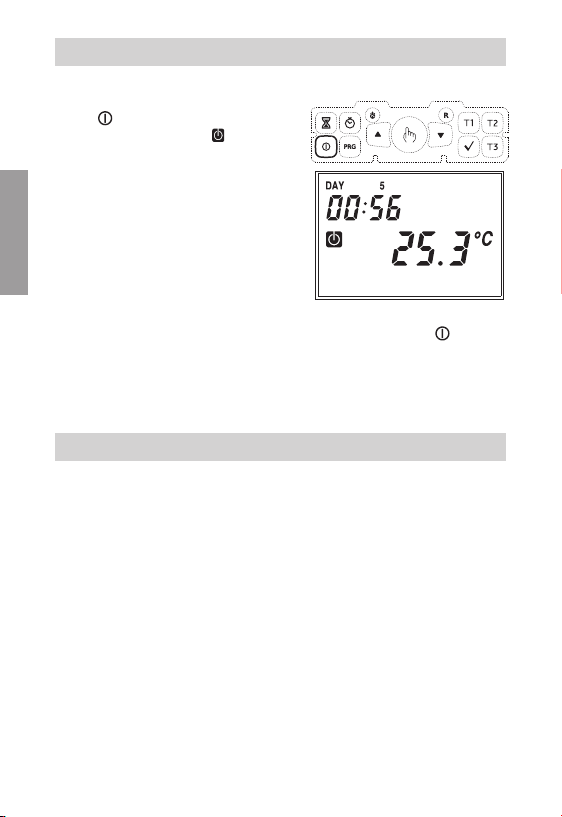
KEYPAD ON-OFF COMMAND
•
To deactivate the chronothermostat press
the
" "
The display will show the
Once deactivated, during winter operation
English
During summer operation, instead, the
To go back to the operating mode prior to the deactivation, press the
key.
the chronothermostat will activate the
antifreeze function to ensure that the
temperature does not decrease below a
certain threshold. Such temperature value
is set in advanced programming (see
"Antifreeze temperature" page 50)
deactivated system condition completely
excludes the refrigeration command.
again.
" "
symbol.
TIMING
The chronothermostat allows to activate three different timed operation modes, useful
when you want to maintain a certain condition for some hours/days.
The three timed operations are:
Manual operation
If in manual status you set a timing, such manual status will be maintained until
the end of the timing; operation will then switch to automatic. If, during the timing,
operation is switched to automatic or off, the timing ends.
Automatic operation
If in automatic status you set a timing, such automatic status will be maintained until
the end of the timing; operation will then switch to automatic. If, during the timing,
operation is switched to manual or off, the timing ends.
" "
key
- 46 -
Mithos Chronothermostat User Manual
Page 49
Timed deactivation
If in off status you set a timing, such off status will be maintained until the end of
the timing; operation will then switch to the one active before deactivation. If, during
timing, the system is activated, the timing ends.
In all cases, the timing condition is signalled by the symbol "
".
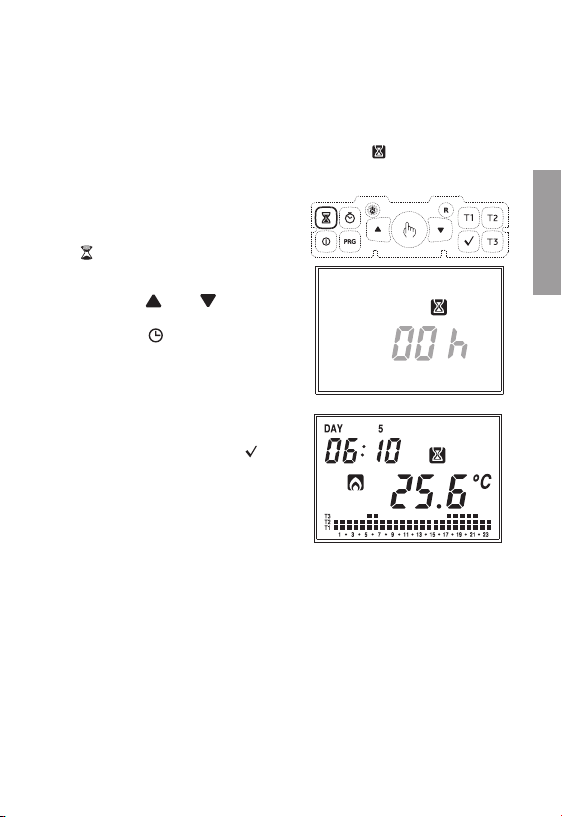
Setting a timing
To activate timing it is necessary to press
the
“ " key
The writing "00h"
timing. With the
will ash, indicating the
" "
and
" "
keys it is
possible to choose a value between 0 and
99. Pressing the "
" key will allow to
choose the measurement unit between hours
and days.
Each change in measurement unit implies a
resetting of the set timing value.
Once the value has been set, press
" "
to
conrm or wait 45 seconds.
Note. In case time is modied during timing, it will not be updated.
Note. In the hour count, the hour in which programming is carried out is
included. In the same way, if the measurement unit is in days, the count
also includes the current one. Timing in hours terminate on the hour,
the ones in days at midnight.
English
- 47 -
Mithos Chronothermostat User Manual
Page 50
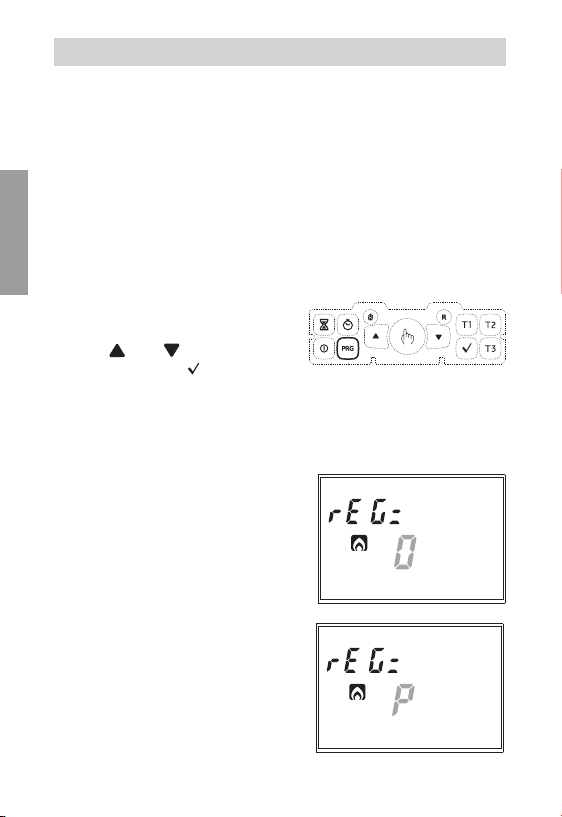
ADVANCED PROGRAMMING
• In advanced programming it is possible to access the following operation
parameters:
-
regulation type
-
parameters for regulation type
-
antifreeze temperature
-
temperature measurement unit
-
Setting/Test of the remote activator
-
keypad lock password
-
system operation hours
English
-
battery charge status
• To enter advanced programming, press
the "PRG" key for more than 3 seconds.
The parameter to be modied will ash;
using
" "
and
" "
modify its value. Use
the setting and move on to the next parameter. Once the last parameter has been
conrmed, you will exit the menu and the chronothermostat will restore operation
with the previously set operation.
Regulation type (only for winter operation)
• Field (22) will display the writing "rEG="
and on eld (16) letter
"O" (ON-OFF programming)
"P" (proportional programming)
or "tP" (proportional programming to
use if the remote actuator is a valve for
ThermoPro RF radiators) will ash.
it is possible to
" "
to conrm
- 48 -
Mithos Chronothermostat User Manual
Page 51
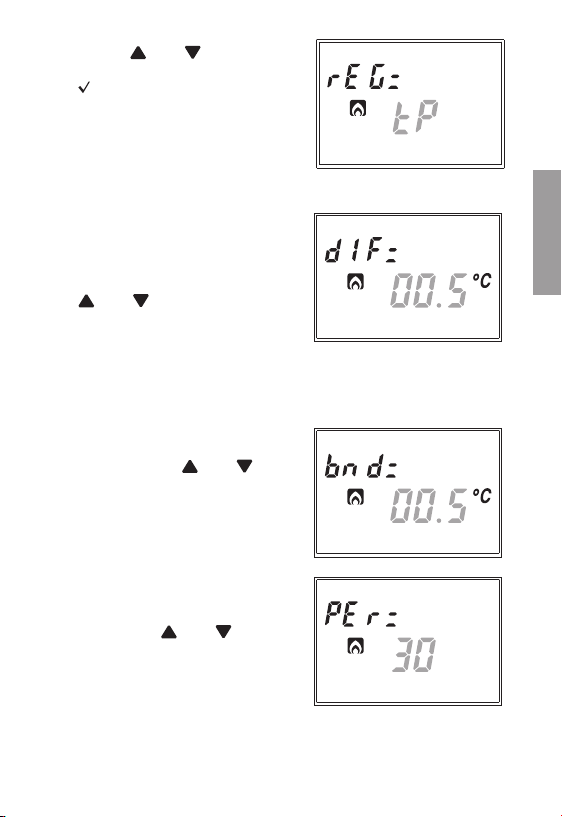
• Using the
" "
and
" "
keys, choose
the desired regulation mode and press
" "
to conrm and move to the setting
of the next parameter.
Parameters for the chosen regulation type (only for winter operation)
• In case of "ON/OFF" regulation type,
the only parameter to be set is the
differential. Field (22) will display the
writing "dIF=" and on eld (16) the
value currently set will ash. Press the
" "
and
" "
keys to increase or
decrease the value. The range varies from
0.1°C to 1°C.
• In case of
-
-
Field
PROPORTIONAL
regulation band
regulation period
(22
) will display the writing
and on eld
(16)
the value currently set
will ash. Press the
regulation type, the parameters to be set are:
"bnd="
" "
and
" "
keys
to increase or decrease the value. The
range varies from 0.5°C to 5°C.
Once the band value is conrmed, eld
(22)
will display the writing
on eld
(16)
ash. Press the
the value currently set will
" "
and
"PEr="
" "
and
keys
to increase or decrease the value. It is
possible to choose between 10, 20 or 30
minutes.
English
For a wider description on how to operate the regulation type choice, please refer to
the chapter "REGULATION TYPE" on page 56.
- 49 -
Mithos Chronothermostat User Manual
Page 52
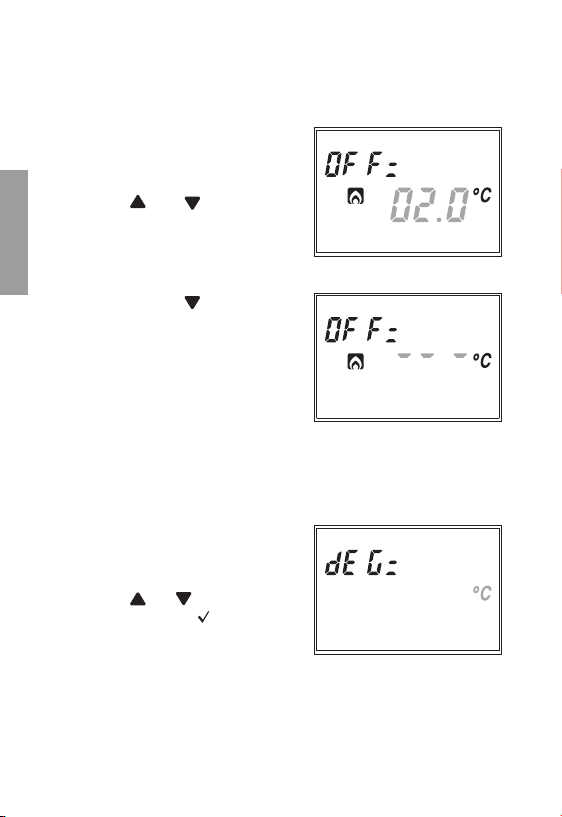
Antifreeze temperature
(only for winter operation)
• It is possible to set a safety temperature value (antifreeze temperature) to be
maintained in case the chronothermostat is deactivated.
Field
(22)
will display the writing
"OFF="
and on eld
(16)
the antifreeze
temperature value currently set will ash.
Press the
“ ”
and
“ ”
keys to
increase or decrease the temperature
value. It is possible to choose a value
between 01.0°C and 10.0°C.
English
It is also possible to disable the antifreeze
function holding the
(16)
displays the symbol
" "
key until eld
"---"
. In this
case, when the chronothermostat is off,
no regulation is executed.
Temperature measurement unit
It is possible to choose to display the temperature in degrees Celsius (°C) or
Fahrenheit (°F).
Field
(22)
and on eld
displays the writing
(25)
the measurement unit
"dEG="
currently set will ash.
Press the
" "
or
" "
to change the unit and
keys indifferently
" "
to conrm.
- 50 -
Mithos Chronothermostat User Manual
Page 53
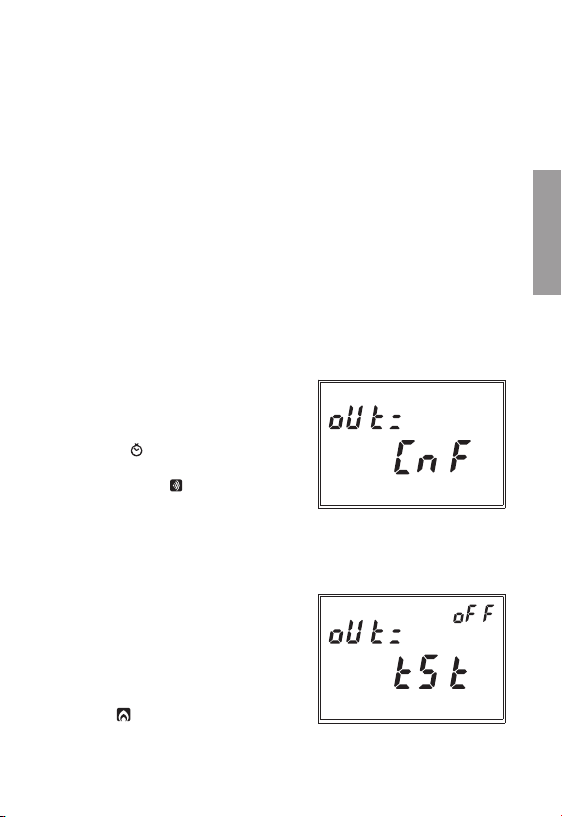
SETTING/TEST OF REMOTE ACTUATOR
The remote actuator activates the load after a radio frequency signal sent by the
chronothermostat Mithos RF.
Operation
•
For details about the functional characteristics of the remore actuator, refer to the
documentation supplied with the instrument.
Channel setting
•
Activate setting mode ad described in the documentation of the remote actuator.
•
When the setting mode is active the actuator must receive a conguration string.
•
After string reception the channel is set and the actuator starts the normal operation.
•
For re-setting the channel, repeat this procedure. Every new setting resets the previous
one.
Mithos RF setting
•
The eld
(22)
displays
“oUt=
(16)
displays
•
Verify that the remote actuator is in setting
“CnF”
”; the eld
ashing.
mode.
•
Press the “ ” key for almost 3 seconds.
When the setting is completed, on the eld
“24”
the symbol “
” appears and then
the page of radio communication test is
displayed.
TEST COMMUNICATION
•
During the test, eld
eld
(16)
(15)
displays
displays
“ON”
(22)
displays
“tSt
” ashing and eld
or
“OFF”
to indicate if
“oUt=”
,
the test is activated or not.
•
To activate the test press for some seconds
the key
“PRG”
•
If the modality-test is actived, the display
shows
.
“ ”
when the relay is in position
ON, while the absence of this symbols
indicates that the relay is OFF. The switching
- 51 -
Mithos Chronothermostat User Manual
English
Page 54
ON/OFF commands are alternatively sent
every 10 seconds for 10 minutes.
•
To exit the modality test press the key
“
”.
Note. It is possible to switch from test
mode to set mode using keys “
and “
”.
Keypad lock password
It is possible to choose a three digit value
English
to be used to unlock the keypad.
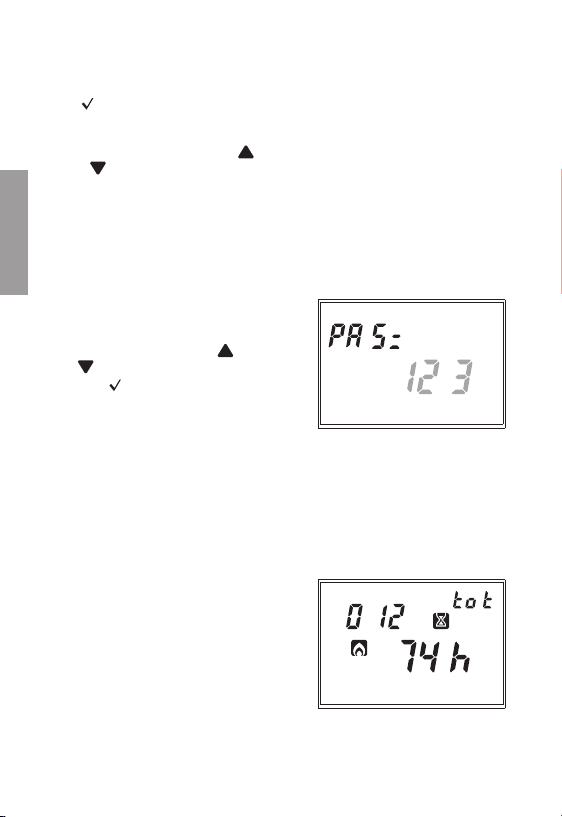
Field (22) will display the writing "PAS="
and on eld (16) the password value
currently set will ash (the default set
value is "123"). Using the
" "
keys, choose a desired value and
press
" "
to conrm.
" "
To enable/disable the keypad lock,
please refer to the chapter "ADVANCED
FUNCTIONS".
System operation hours
It is possible to display the system
operation hours (relay in ON status).
Field (15) displays the writing "tot="
while elds (22) and (16) will display
the timing value (such value is of 5 digits,
3 on eld (22) and 2 on eld (16) and
it is to be read from left to right. In the
example the value is of 1274 hours).
and
”
- 52 -
Mithos Chronothermostat User Manual
Page 55
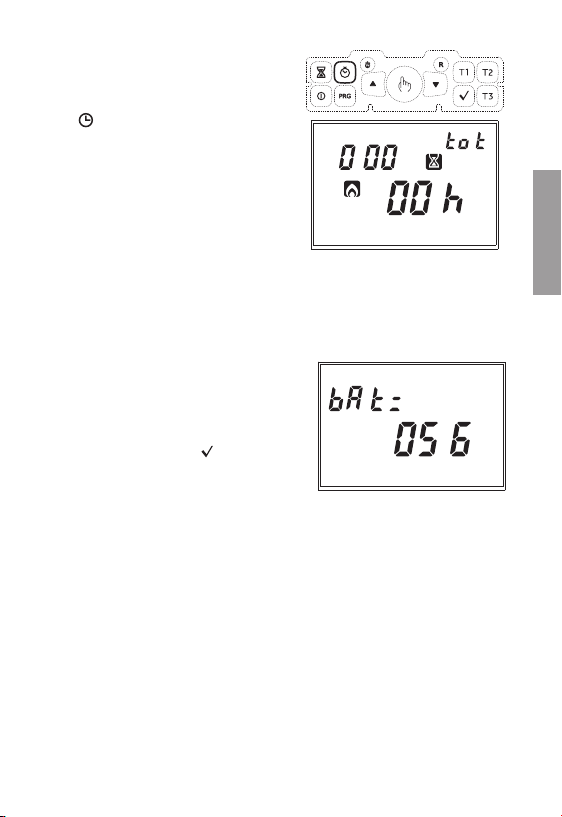
Two independent totalizers for winter
and summer operation are present. The
maximum memorizable value is of 65535
hours. To reset the counter, press the
"
" key for about 3 seconds when you
are in the counter view menu.
Battery charge status
It is possible to view the battery charge
status.
Field (22) will display the writing "bAt="
and eld (16) will show the percentage
value of the charge level.
Since this is the last parameter of the
sequence, pressing the
" "
key will
exit the menu and return to automatic
operation.
If no key is pressed during setting of
these parameters, automatic operation
will be restored after 45 seconds.
English
- 53 -
Mithos Chronothermostat User Manual
Page 56
ADVANCED FUNCTIONS
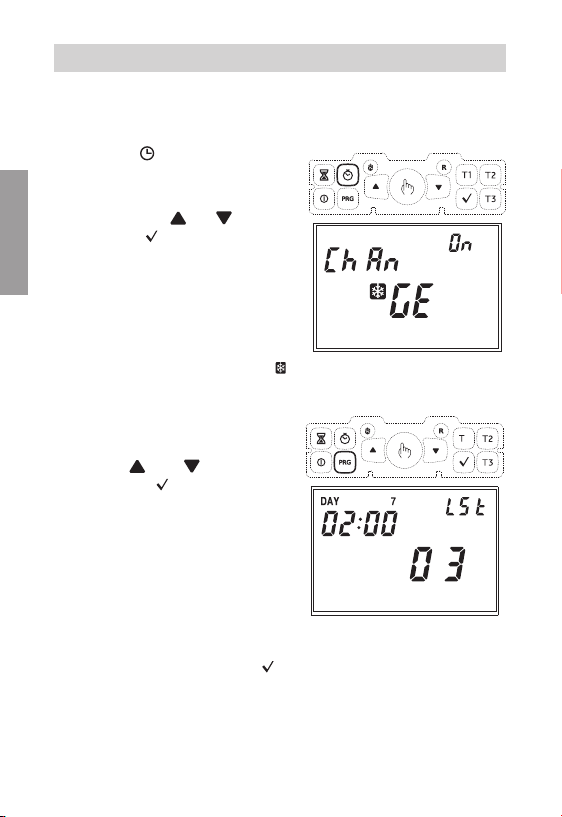
Automatic change CET / DST
The chronothermostat allows to automatically move from the CET (Central European
Time) to DST (Daylight Saving Time) and vice versa.
Holding the "
seconds, the display will show the writing
"Change" and eld (15) will ash the
writing "On" or "OFF".
Choose using the
conrm with
If the choice is OFF, you will exit the menu
English
and the chronothermostat will not execute
the hour change. If the choice is ON, then
two other menus will be displayed, which
dene respectively the hour change from
-
winter summer
-
summer winter (on eld (20) the
To modify the set values, press the
"PRG" key. The parameter corresponding
to the modication will start ashing.
Press the
the values and
The settings for both menus are, in order:
-
week of the month
(1ST rst, 2ND second, 3RD third,
4TH fourth, LST last)
-
day of the week
-
month
-
changing hour
At the end of each menu, press the
the next menu or to exit and return to the normal view.
The default values set for the automatic time change are:
-
winter summer change: last Sunday of March at 02:00
-
summer winter change: last Sunday of October at 03:00
" key for at least 3
" "
" "
.
“ ”
and
“ ”
to conrm.
or
" "
keys and
“ ”
keys to modify
Mithos Chronothermostat User Manual
" "
symbol will appear)
" "
key again to access
- 54 -
Page 57
Keypad lock
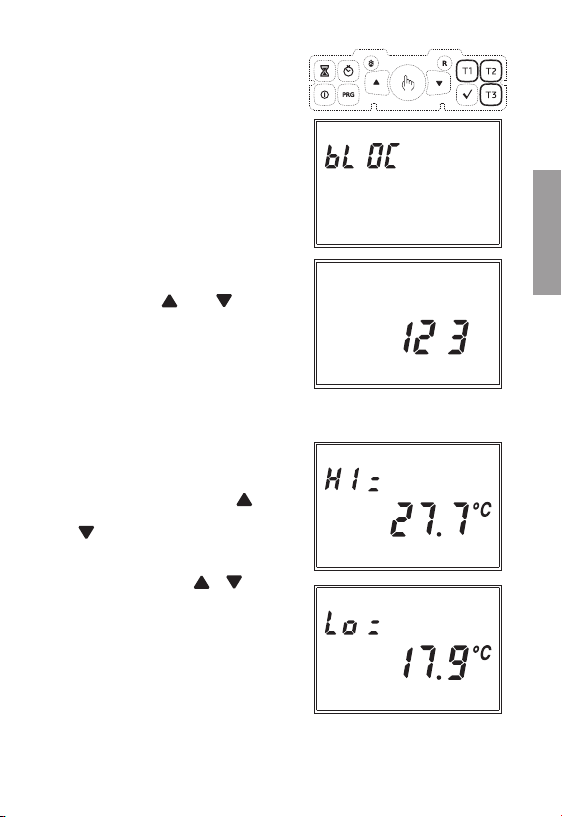
In case you want to install the
chronothermostat in public environments,
it is possible to lock the keypad simply by
simultaneously holding the
T1, T2
keys for 3 seconds. The display will show
the writing "BLOC".
and T3
To unlock the keypad, press the
and
T3
keys again for 3 seconds and
input, using the
" "
and
" "
T1, T2
keys, the
protection password.
Display of max/min daily temperature
The chronothermostat memorizes the
minimum and maximum temperature
values measured during the day.
To view such values press the
" "
(maximum value) or
" "
(minimum value). Field (16) will
display the value measured.
To reset the minimum/maximum value
memorized, press the
" "/" "
key for
at least 3 seconds.
Mithos Chronothermostat User Manual
English
key
- 55 -
Page 58
Emergency regulation
During winter operation, in case of sensor failure, in order to avoid problems
regarding freezing, the chronothermostat activates the relay for 10 minutes every 4
hours and eld (16) will display the "---" symbol.
Restoring default parameters
Simply pressing the "R" key will not cause a total reset of the instrument. To do so
and allow the loading of the default values, it is necessary to press the "R" key and
then, within 3 seconds, the
" "
key. The display will show the writing "dEF".
English
REGULATION TYPE
• ON/OFF regulation
The default regulation type is ON/OFF with deactivation in correspondence with the
setpoint and with differential set to 0.3°C.
During on/off operation mode, the relay of remote actuator follows the following
logic:
heating mode cooling mode
relay ON
relay OFF
Temperature
increasing
SET-DIFF
• Proportional regulation
During heating mode the proportional regulation can be chosen; in certain types
of systems, this allows to improve the regulation, in order to obtain a constant
temperature.
This regulation activates the ON or OFF relay within a predened regulation cycle on
the basis of the gap of the temperature measured by the setpoint value.
The necessary parameters for the denition of this mode are:
- the regulation band
- the regulation period
Mithos Chronothermostat User Manual
- 56 -
relay ON
relay OFF
Temperature
increasing
SET+DIFFSET
Page 59

The regulation band represents the temperature interval, centered on the setpoint,
in which the proportional regulation is checked.
Half the desired regulation band is set in the device.
The range for this parameter is 0.5 ÷ 5.0°C with 0.1°C resolution
The regulation period represents the duration of the regulation cycle (activation
period + deactivation period)
The value of this parameter is selectable between 10', 20' and 30'
Choose the regulation period value as follows:
- 10' for low thermal inertia systems
- 20' for medium thermal inertia systems
- 30' for high thermal inertia systems
Choose the regulation band value as follows:
- broad band (5°C) for systems with high thermal gradient
- narrow band (0.5°C) for systems with low thermal gradient
• tP regulation
Note. This regulation should be used only if you are controlling a valve for
ThermoPro RF radiators.
This type of regulation allows you to make the ThermoPro RF valve work “by the
opening modulation”. In this way, the valve opens in proportional mode according
to the difference between the set temperature (setpoint) and the detected
temperature.
Selecting one of the other regulation types, the valve will not work in proportional
mode, but it will be completely open or completely closed according to the
difference between the set temperature and the detected temperature.
English
- 57 -
Mithos Chronothermostat User Manual
Page 60
BATTERY REPLACEMENT
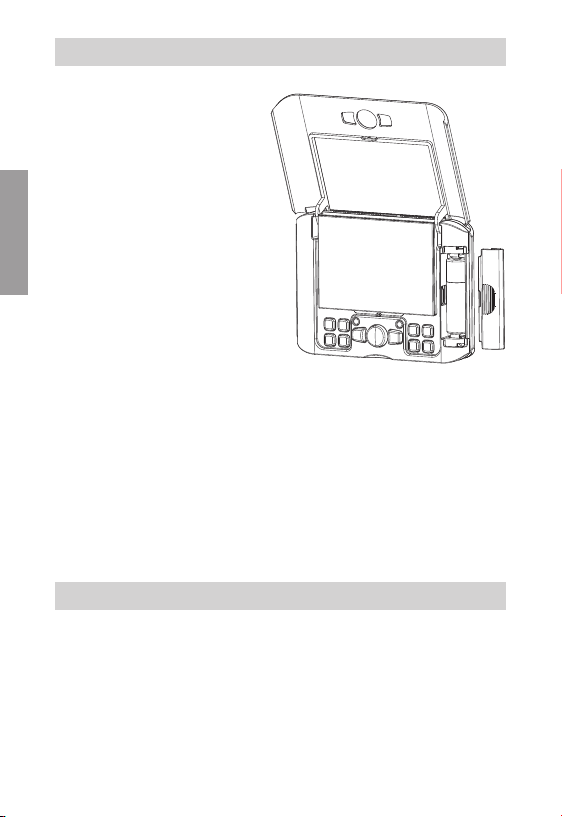
• When the battery is almost at, the
whole display ashes, although
it will continue to carry out all
functions.
For lower battery voltage, the
instrument will reach the at battery
status, which causes the display to
switch off, a reduced consumption
and the suspension of all functions
except the clock. Operation in this
English
status may continue until the battery
keeps a voltage such to allow
operation to the microcontroller.
The replacement of batteries must
take place within maximum time of
one minute in conditions of ashing
display.
Beyond this time, date and time will be lost and must be reset upon next activation.
However, the executed programs will remain memorized.
The use of strictly alkaline batteries is recommended.
Attention
when the battery is reinserted, the chronothermostat does not restart operation
immediately; a period of time varying between 5 and 10 seconds must be waited,
during which the internal voltage regains normal operation values.
If the at or nearly at battery is removed and put back again, the waiting time
could be much longer.
REFERENCE STANDARDS
Compliance with Community Directives 2014/53/EU (RED)
2014/30/EU (EMCD)
is declared with reference to the following harmonized standards:
ETSI EN 300 220-1
ETSI EN 300 220-2
ETSI EN 301 489-1
ETSI EN 301 489-3
- 58 -
Mithos Chronothermostat User Manual
Page 61

WINTER PROGRAMS
T3
T2
■ ■ ■ ■ ■ ■ ■ ■ ■ ■ ■ ■ ■ ■ ■ ■ ■ ■ ■ ■ ■ ■ ■ ■
P1
T1
■ ■ ■ ■ ■ ■ ■ ■ ■ ■ ■ ■ ■ ■ ■ ■ ■ ■ ■ ■ ■ ■ ■ ■
0 1 2 3 4 5 6 7 8 9 10 11 12 13 14 15 16 17 18 19 20 21 22 23
T3
T2
■ ■ ■ ■ ■ ■ ■ ■ ■ ■ ■ ■ ■ ■ ■ ■ ■ ■ ■ ■ ■ ■ ■ ■
P2
T1
■ ■ ■ ■ ■ ■ ■ ■ ■ ■ ■ ■ ■ ■ ■ ■ ■ ■ ■ ■ ■ ■ ■ ■
0 1 2 3 4 5 6 7 8 9 10 11 12 13 14 15 16 17 18 19 20 21 22 23
T3
T2
■ ■ ■ ■ ■ ■ ■ ■ ■ ■ ■ ■ ■ ■ ■ ■ ■ ■ ■ ■ ■ ■ ■ ■
P3
T1
■ ■ ■ ■ ■ ■ ■ ■ ■ ■ ■ ■ ■ ■ ■ ■ ■ ■ ■ ■ ■ ■ ■ ■
0 1 2 3 4 5 6 7 8 9 10 11 12 13 14 15 16 17 18 19 20 21 22 23
T3
T2
■ ■ ■ ■ ■ ■ ■ ■ ■ ■ ■ ■ ■ ■ ■ ■ ■ ■ ■ ■ ■ ■ ■ ■
P4
T1
■ ■ ■ ■ ■ ■ ■ ■ ■ ■ ■ ■ ■ ■ ■ ■ ■ ■ ■ ■ ■ ■ ■ ■
0 1 2 3 4 5 6 7 8 9 10 11 12 13 14 15 16 17 18 19 20 21 22 23
T3
T2
■ ■ ■ ■ ■ ■ ■ ■ ■ ■ ■ ■ ■ ■ ■ ■ ■ ■ ■ ■ ■ ■ ■ ■
P5
T1
■ ■ ■ ■ ■ ■ ■ ■ ■ ■ ■ ■ ■ ■ ■ ■ ■ ■ ■ ■ ■ ■ ■ ■
0 1 2 3 4 5 6 7 8 9 10 11 12 13 14 15 16 17 18 19 20 21 22 23
T3
T2
■ ■ ■ ■ ■ ■ ■ ■ ■ ■ ■ ■ ■ ■ ■ ■ ■ ■ ■ ■ ■ ■ ■ ■
P6
T1
■ ■ ■ ■ ■ ■ ■ ■ ■ ■ ■ ■ ■ ■ ■ ■ ■ ■ ■ ■ ■ ■ ■ ■
0 1 2 3 4 5 6 7 8 9 10 11 12 13 14 15 16 17 18 19 20 21 22 23
T3
T2
P7
T1
■ ■ ■ ■ ■ ■ ■ ■ ■ ■ ■ ■ ■ ■ ■ ■ ■ ■ ■ ■ ■ ■ ■ ■
0 1 2 3 4 5 6 7 8 9 10 11 12 13 14 15 16 17 18 19 20 21 22 23
■ ■ ■ ■ ■ ■ ■
■ ■ ■ ■ ■ ■ ■ ■ ■ ■ ■ ■ ■ ■ ■
■ ■ ■ ■ ■ ■ ■ ■ ■
■ ■ ■ ■ ■ ■ ■ ■ ■ ■ ■
■ ■ ■ ■ ■ ■ ■ ■ ■ ■
English
- 59 -
Mithos Chronothermostat User Manual
Page 62
English
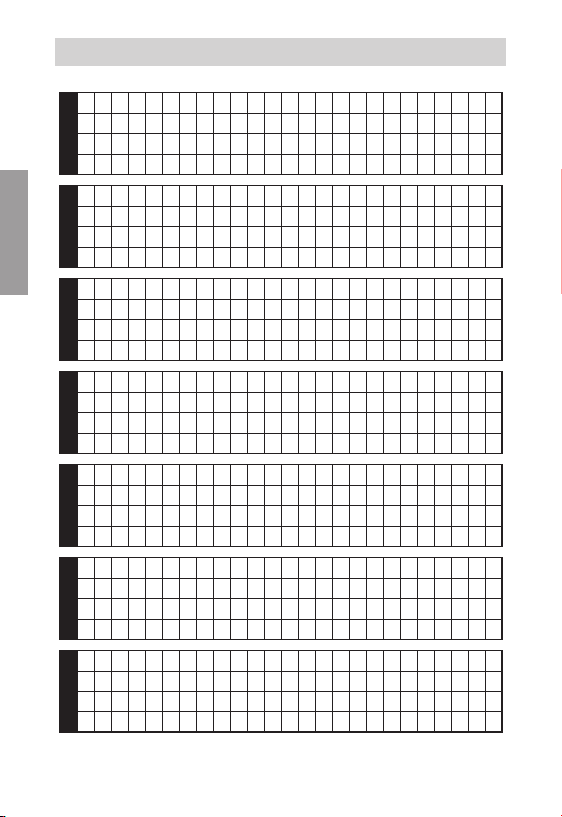
SUMMER PROGRAMS
T3
■ ■ ■ ■ ■ ■ ■ ■ ■ ■ ■ ■ ■ ■ ■ ■ ■
T2
■ ■ ■ ■ ■ ■ ■ ■ ■ ■ ■ ■ ■ ■ ■ ■ ■ ■ ■ ■ ■ ■ ■ ■
P1
T1
■ ■ ■ ■ ■ ■ ■ ■ ■ ■ ■ ■ ■ ■ ■ ■ ■ ■ ■ ■ ■ ■ ■ ■
0 1 2 3 4 5 6 7 8 9 10 11 12 13 14 15 16 17 18 19 20 21 22 23
T3
■ ■ ■ ■ ■ ■ ■ ■ ■
T2
■ ■ ■ ■ ■ ■ ■ ■ ■ ■ ■ ■ ■ ■ ■ ■ ■ ■ ■ ■ ■ ■ ■ ■
P2
T1
■ ■ ■ ■ ■ ■ ■ ■ ■ ■ ■ ■ ■ ■ ■ ■ ■ ■ ■ ■ ■ ■ ■ ■
0 1 2 3 4 5 6 7 8 9 10 11 12 13 14 15 16 17 18 19 20 21 22 23
T3
■ ■ ■ ■ ■ ■ ■ ■ ■ ■ ■ ■ ■ ■ ■
T2
■ ■ ■ ■ ■ ■ ■ ■ ■ ■ ■ ■ ■ ■ ■ ■ ■ ■ ■ ■ ■ ■ ■ ■
P3
T1
■ ■ ■ ■ ■ ■ ■ ■ ■ ■ ■ ■ ■ ■ ■ ■ ■ ■ ■ ■ ■ ■ ■ ■
0 1 2 3 4 5 6 7 8 9 10 11 12 13 14 15 16 17 18 19 20 21 22 23
T3
■ ■ ■ ■ ■ ■ ■ ■ ■ ■ ■ ■ ■
T2
■ ■ ■ ■ ■ ■ ■ ■ ■ ■ ■ ■ ■ ■ ■ ■ ■ ■ ■ ■ ■ ■ ■ ■
P4
T1
■ ■ ■ ■ ■ ■ ■ ■ ■ ■ ■ ■ ■ ■ ■ ■ ■ ■ ■ ■ ■ ■ ■ ■
0 1 2 3 4 5 6 7 8 9 10 11 12 13 14 15 16 17 18 19 20 21 22 23
T3
■ ■ ■ ■ ■ ■ ■ ■ ■ ■ ■ ■ ■ ■
T2
■ ■ ■ ■ ■ ■ ■ ■ ■ ■ ■ ■ ■ ■ ■ ■ ■ ■ ■ ■ ■ ■ ■ ■
P5
T1
■ ■ ■ ■ ■ ■ ■ ■ ■ ■ ■ ■ ■ ■ ■ ■ ■ ■ ■ ■ ■ ■ ■ ■
0 1 2 3 4 5 6 7 8 9 10 11 12 13 14 15 16 17 18 19 20 21 22 23
T3
T2
■ ■ ■ ■ ■ ■ ■ ■ ■ ■ ■ ■ ■ ■ ■ ■ ■ ■ ■ ■ ■ ■ ■ ■
P6
T1
■ ■ ■ ■ ■ ■ ■ ■ ■ ■ ■ ■ ■ ■ ■ ■ ■ ■ ■ ■ ■ ■ ■ ■
0 1 2 3 4 5 6 7 8 9 10 11 12 13 14 15 16 17 18 19 20 21 22 23
T3
T2
P7
T1
■ ■ ■ ■ ■ ■ ■ ■ ■ ■ ■ ■ ■ ■ ■ ■ ■ ■ ■ ■ ■ ■ ■ ■
0 1 2 3 4 5 6 7 8 9 10 11 12 13 14 15 16 17 18 19 20 21 22 23
- 60 -
Mithos Chronothermostat User Manual
Page 63

Page 64

Vemer S.p.A.
I - 32032 Feltre (BL)
Via Camp Lonc, 16
Tel +39 0439 80638
Fax +39 0439 80619
e-mail: [email protected] - web site: www.vemer.it
V3ISO0631-031
10-2016
 Loading...