

Page 1

English
- 1 -
User manual memo DW E
Index
■ Safety warnings page 3
■ Technical characteristics page 3
■ Dimensions page 4
■ Connection diagrams page 4
■ Display and keypad description page 5
■ Installation page 6
Setting language page 6
Setting date format page 7
Setting date page 7
Setting time page 7
■ Programmings page 8
ON/OFF Events page 8
IMPULSE Events page 8
CYCLE Events page 8
HOLIDAY Events page 9
Programming priority page 9
■ Manual operation page 10
Manual switching on/off page 10
Casual switchings on/off page 10
Lock output switchings (Lock) page 10
Battery test page 11
Menu Overview page 12
■ Automatic programming page 13
Creation of a new programme page 13
Programmes ON/OFF page 13
IMPULSE Programmes page 14
CYCLE Programmes page 16
HOLIDAY Programmes page 17
Checking a programme page 19
Displaying a programme page 19
Modifying a programme page 20
Deleting a programme page 20
Reset programmes page 21
■ Settings menu page 22
LANGUAGE menu page 22
DATE menu page 23
TIME menu page 23
CHANGE CET/DST menu page 23
CASUAL PARAMETERS menu page 26
PROGRAMME OPTIONS menu page 27
PIN menu page 27
RESET SETTINGS menu page 28
■ Meter menu page 29
■ Reset menu page 29
■ Battery replacement page 30
■ Reference Standards page 30
Page 2
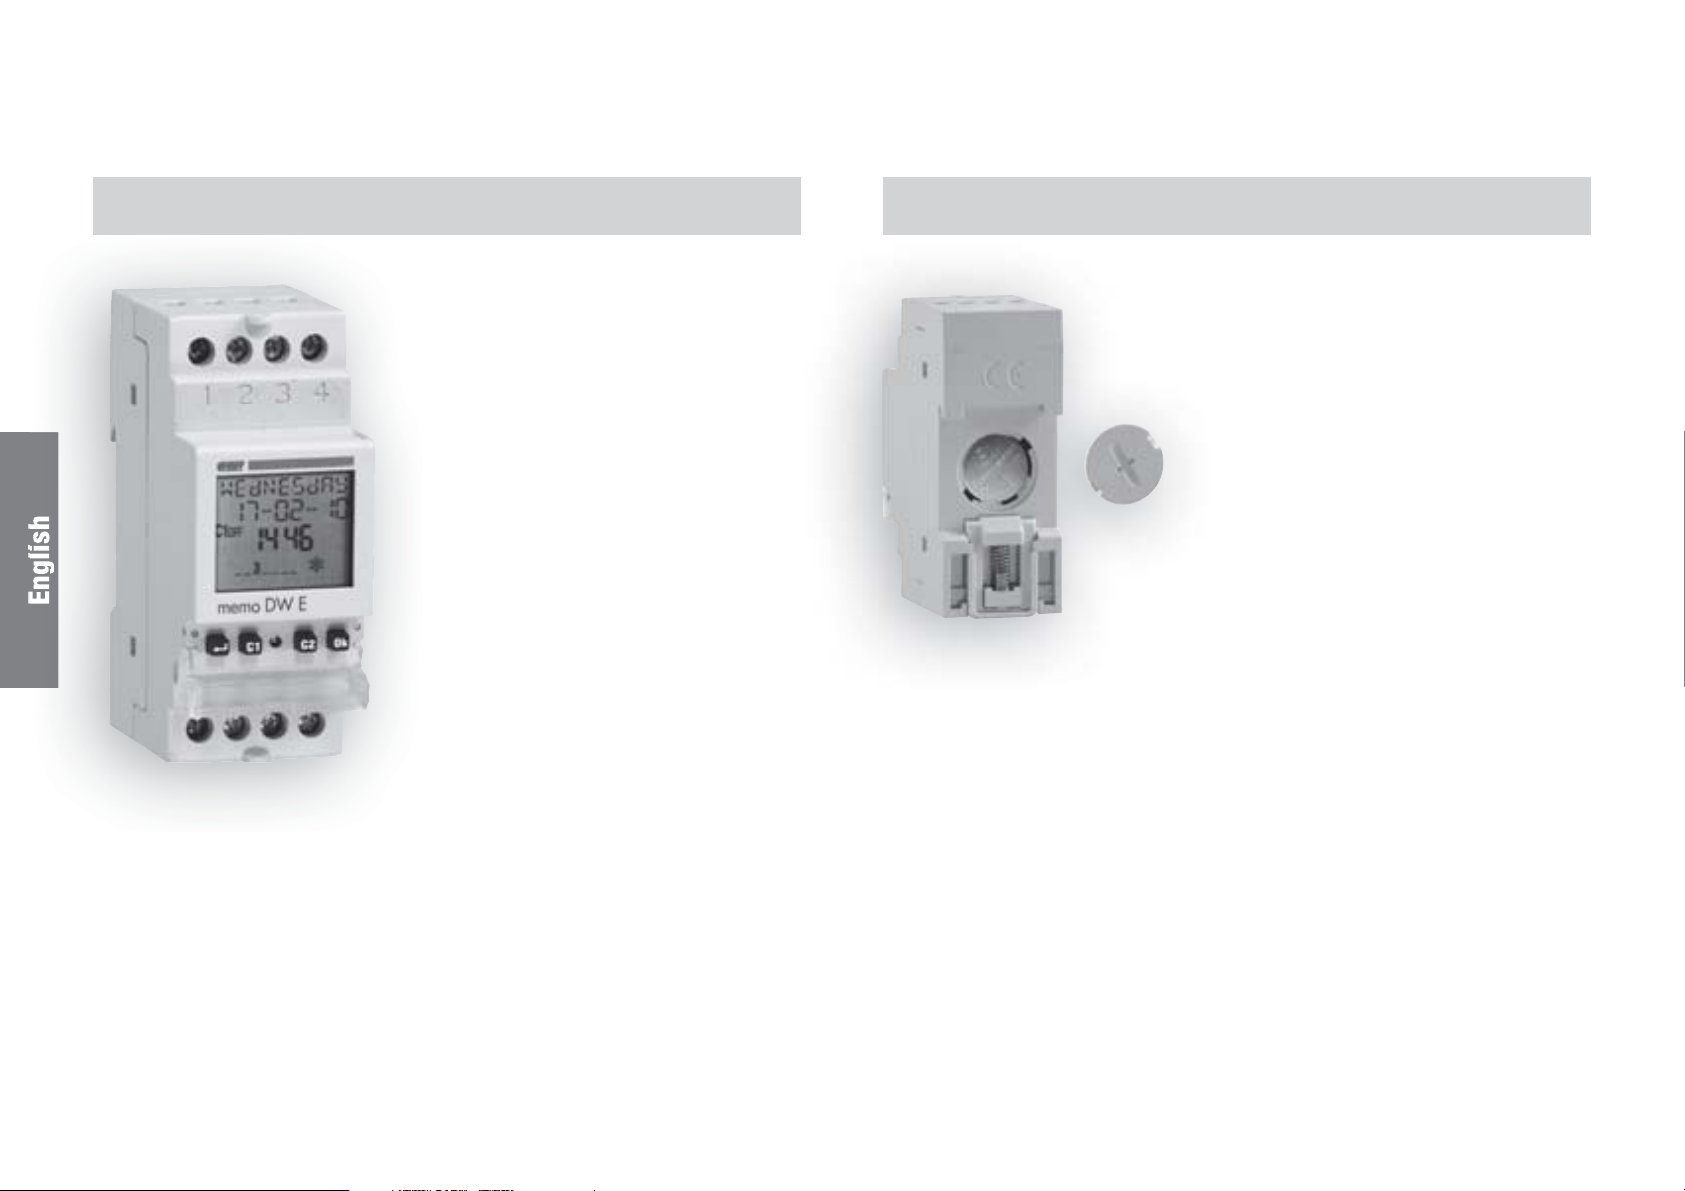
Digital programmable switchesDigital programmable switches
• Large display with text guide to
facilitate programming
• Sealable cover and possibility to
lock keypad through password
Time switch with daily/weekly programming
for the management of electric utilities
• Cover on the back of the instrument
for replacing the battery
English
- 2 -
User manual memo DW E
Page 3

English
- 3 -
User manual memo DW E
SAFETY WARNINGS TECHNICAL CHARACTERISTICS
During product installation and operation it is necessary
to observe the following instructions::
1) The instrument must be installed and started up by a qualified
person, strictly in observance of the connection diagrams shown
in this manual.
2) After installation inaccessibility to the terminals without using
dedicated tools must be guaranteed
3) Before accessing the connection terminals, make sure that the
leads are not live.
4) Do not connect or feed the instrument if any part of it is
damaged
5) The instrument must be installed and activated in compliance
with current electric systems standards.
6) Do not use the instrument for anything other than the indicated
purpose
Code Model Description
VP871800 memo DW E Daily/weekly time switch 1 relay
• Power supply: 230Vac ± 10% 50/60Hz
• Absorption: 8VA (2W)
• Replaceable battery
• Output: 1 monostable change-over contact 16(10)A / 250Vac
• Type of action: 1B
• Memorisable programmes:
- 30 events (on, off, impulse, cycle)
- 4 periods + 20 holiday days
• Backlit LCD display
• Software class: A
• Mounting: DIN rail to backplane
• Container: 2 DIN modules
• Operating temperature: 0 ÷ +50°C
• Storage temperature -10°C ÷ +70°C
• Pollution level: 2
• Rated impulse voltage: 4kV
• Degree of protection: IP20 for the terminals
• Insulation: reinforced between accessible parts (frontal) and all the
other terminals
Page 4
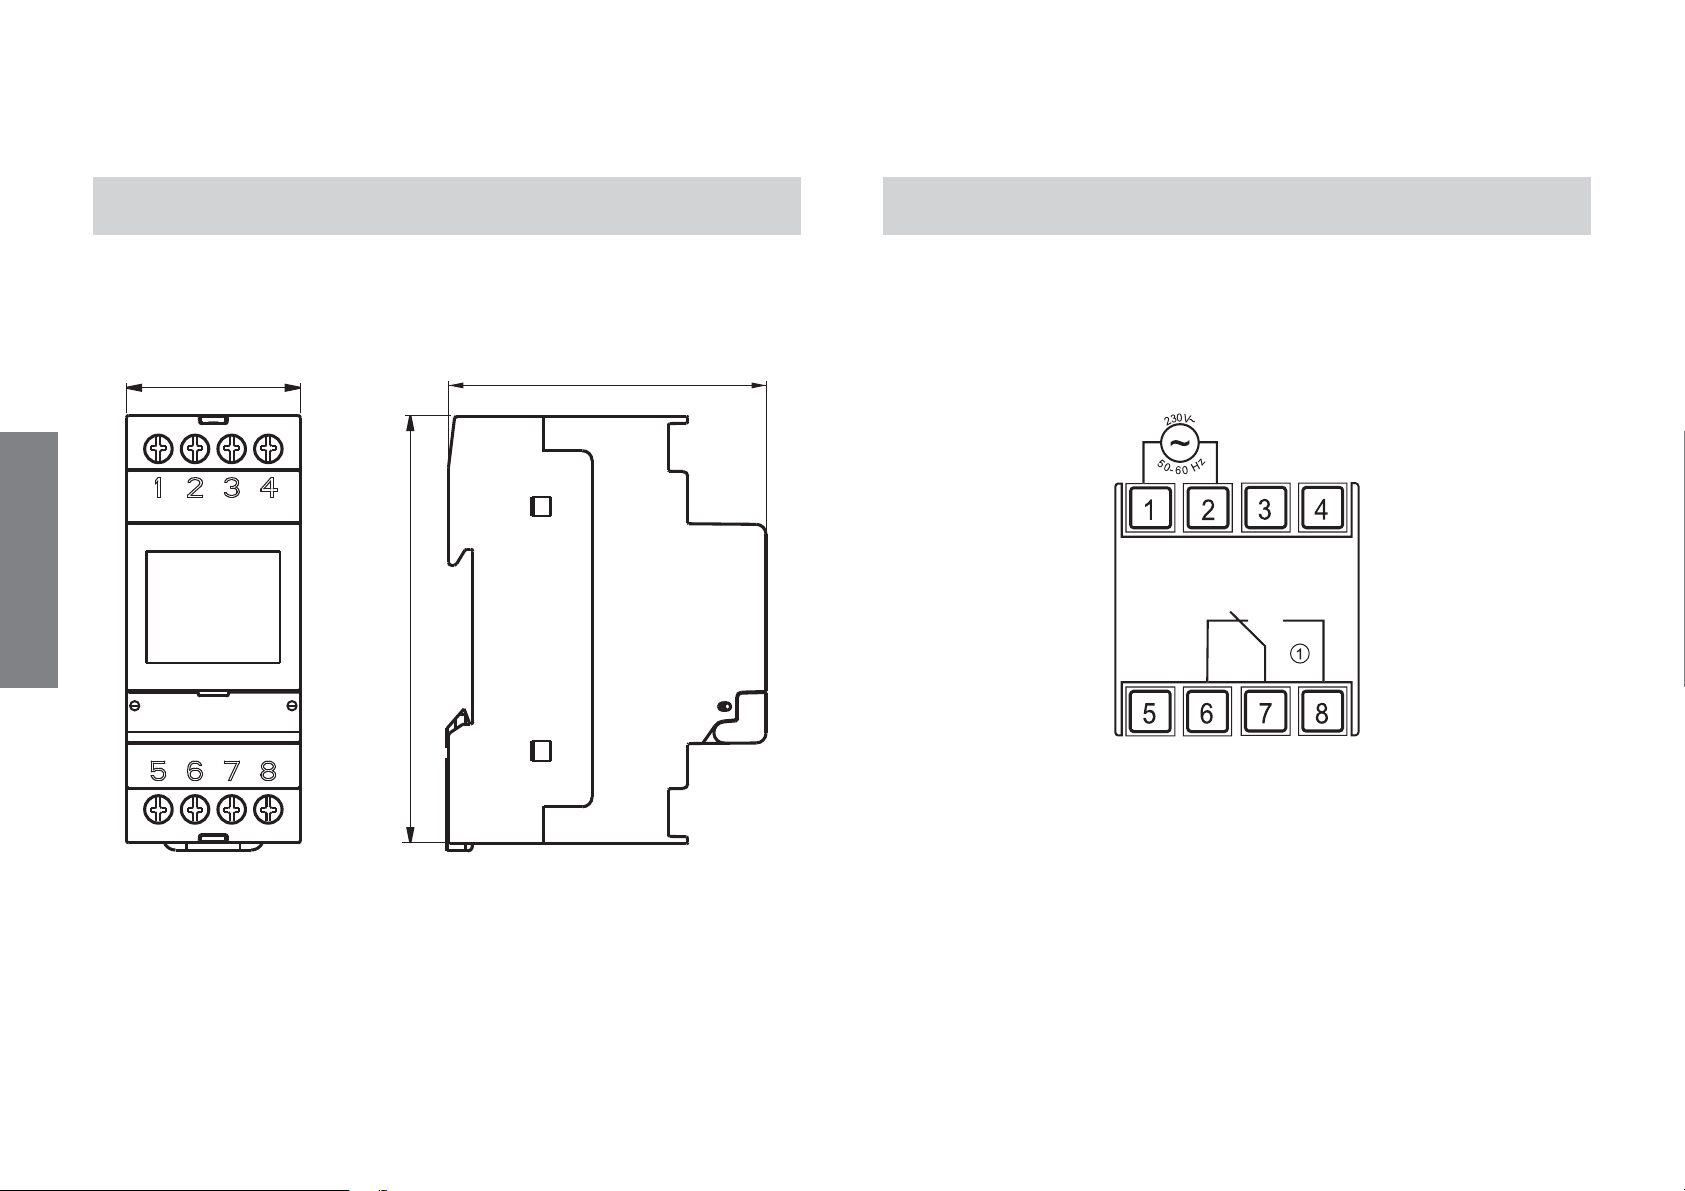
DIMENSIONS CONNECTION DIAGRAMS
English
- 4 -
User manual memo DW E
Page 5
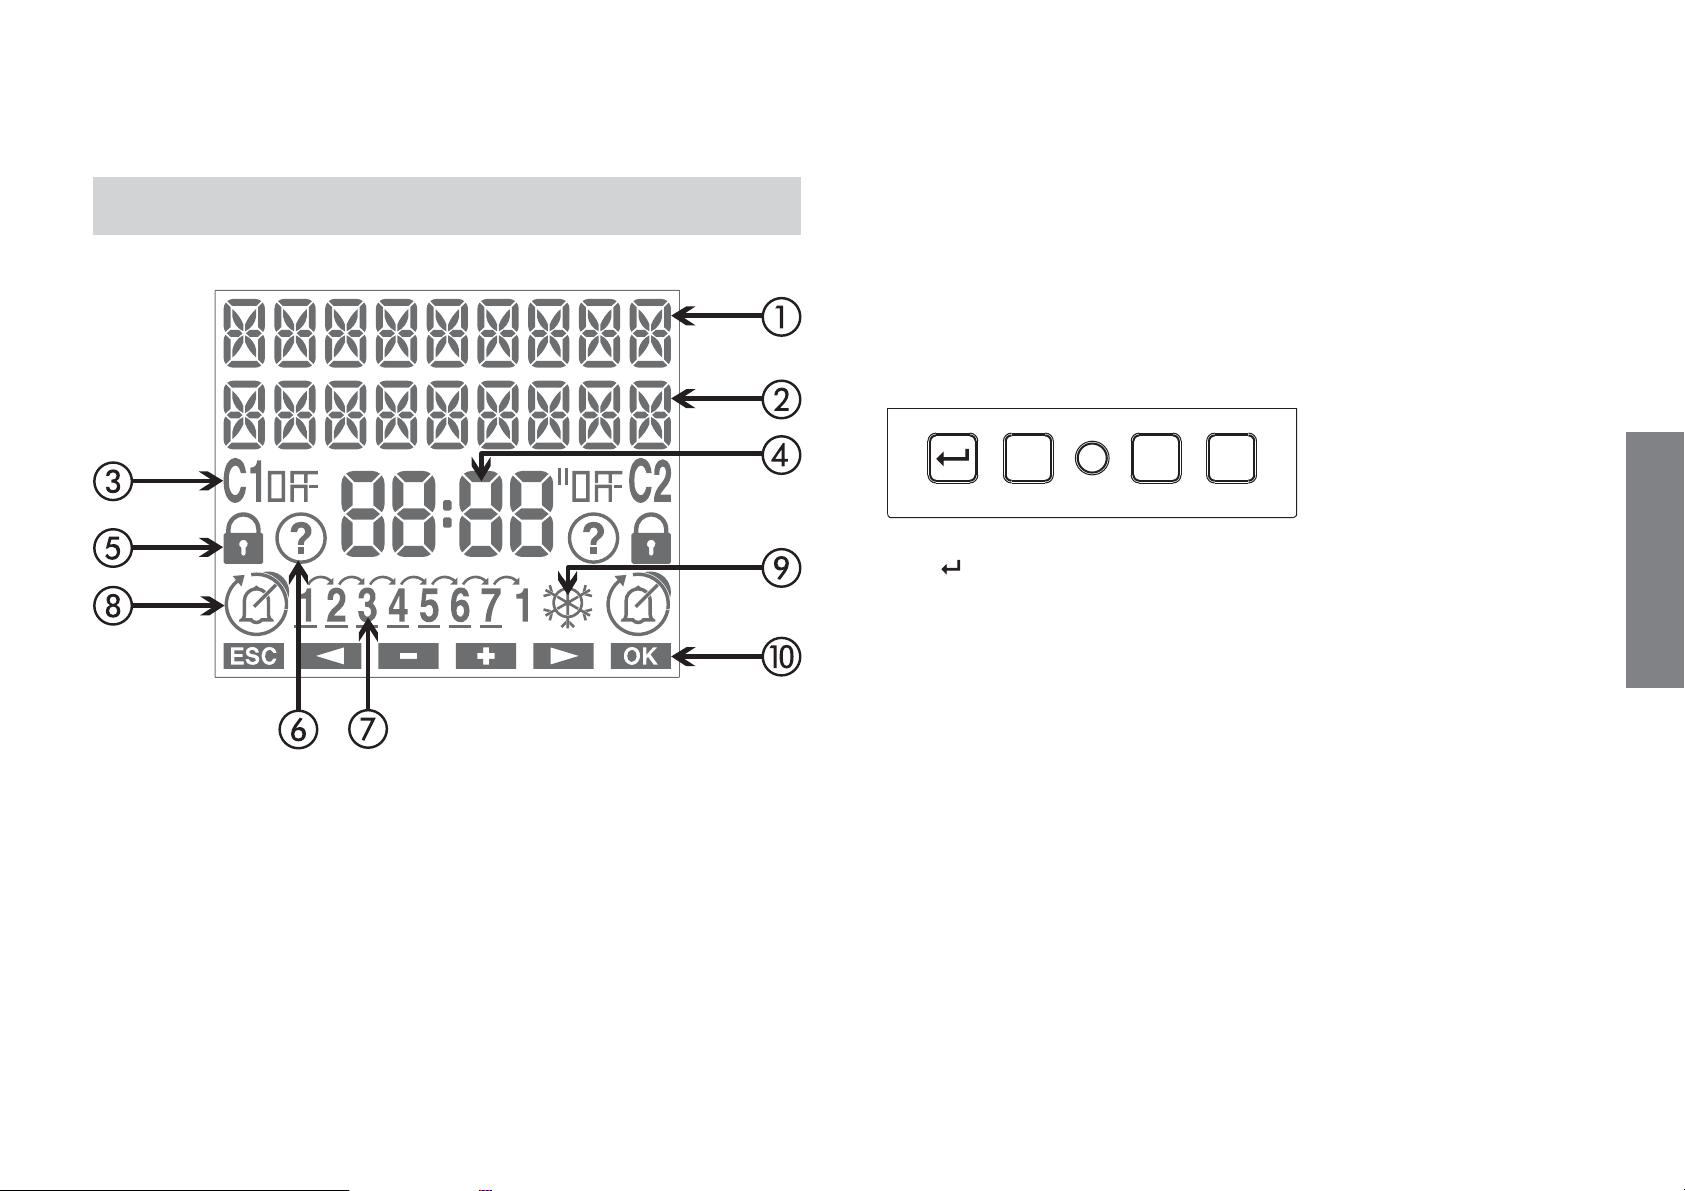
DISPLAY AND KEYPAD DESCRIPTION
g Field “day of the week”
h Field “programme running”
i Field “CET/DST”
j Field “key functions”
C1 C2ROk
a Field “text1 / day”
b Field “text 2 / date”
c Field “status relay”
d Field “time”
e Field “lock” (lock relay switchings)
f Field “random programme”
Key “
Key “Ok”: confirm datum
Key “C1”: decrease datum/previous menu/ switching channel/lock
Key “C2”: increase datum/next menu
Key “R”: reset settings
Key “Ok” + “C1” (3 sec): random on/off channel
- 5 -
User manual memo DW E
”: activation menu/esc/check battery
English
channel
Page 6
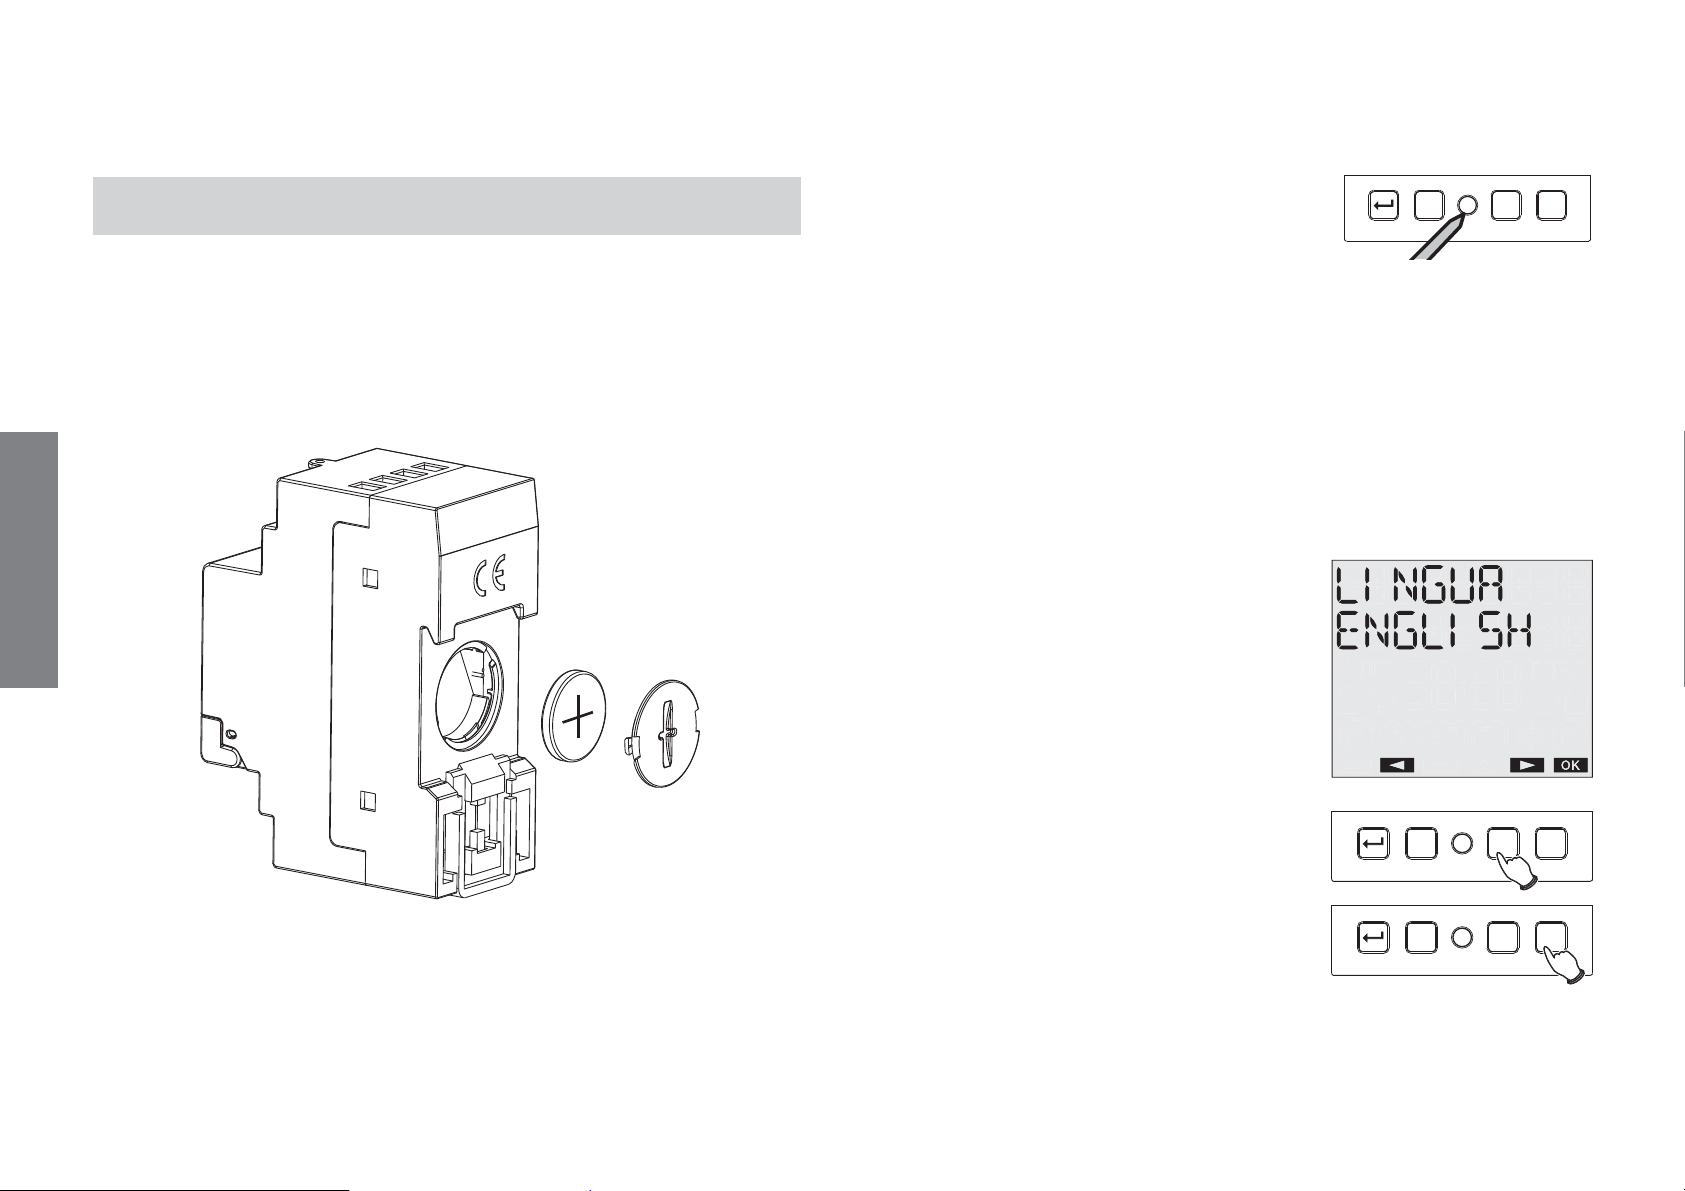
INSTALLATION
C1 C2ROk
C1 C2ROk
• The instrument is supplied with the battery not inserted to avoid
wasted consumption. Extract the battery from its packing and insert
it into the housing located behind the instrument so that pole (+)
is visible as shown in the figure. Then secure the closure cover,
turning it clockwise.
English
• Using a pointed object press key “R”
C1 C2ROk
to perform a reset. All the segments
of the display will light for a few
seconds and then the instrument shows
the version of the firmware and the type of instrument.
• At this point it is possible to insert the parameters necessary for the
instrument to work correctly:
− language
− date format
− date
− time
Setting language
It is possible to choose from 5 languages:
Italian ´ English ´ Spanish ´
French ´ German
• Connect the load and the power supply as illustrated in section
“Connection diagrams”
User manual memo DW E
Use keys “C1” and “C2” to choose
the desired language.
Press “Ok” to confirm and go on to the
“data format” menu.
- 6 -
Page 7
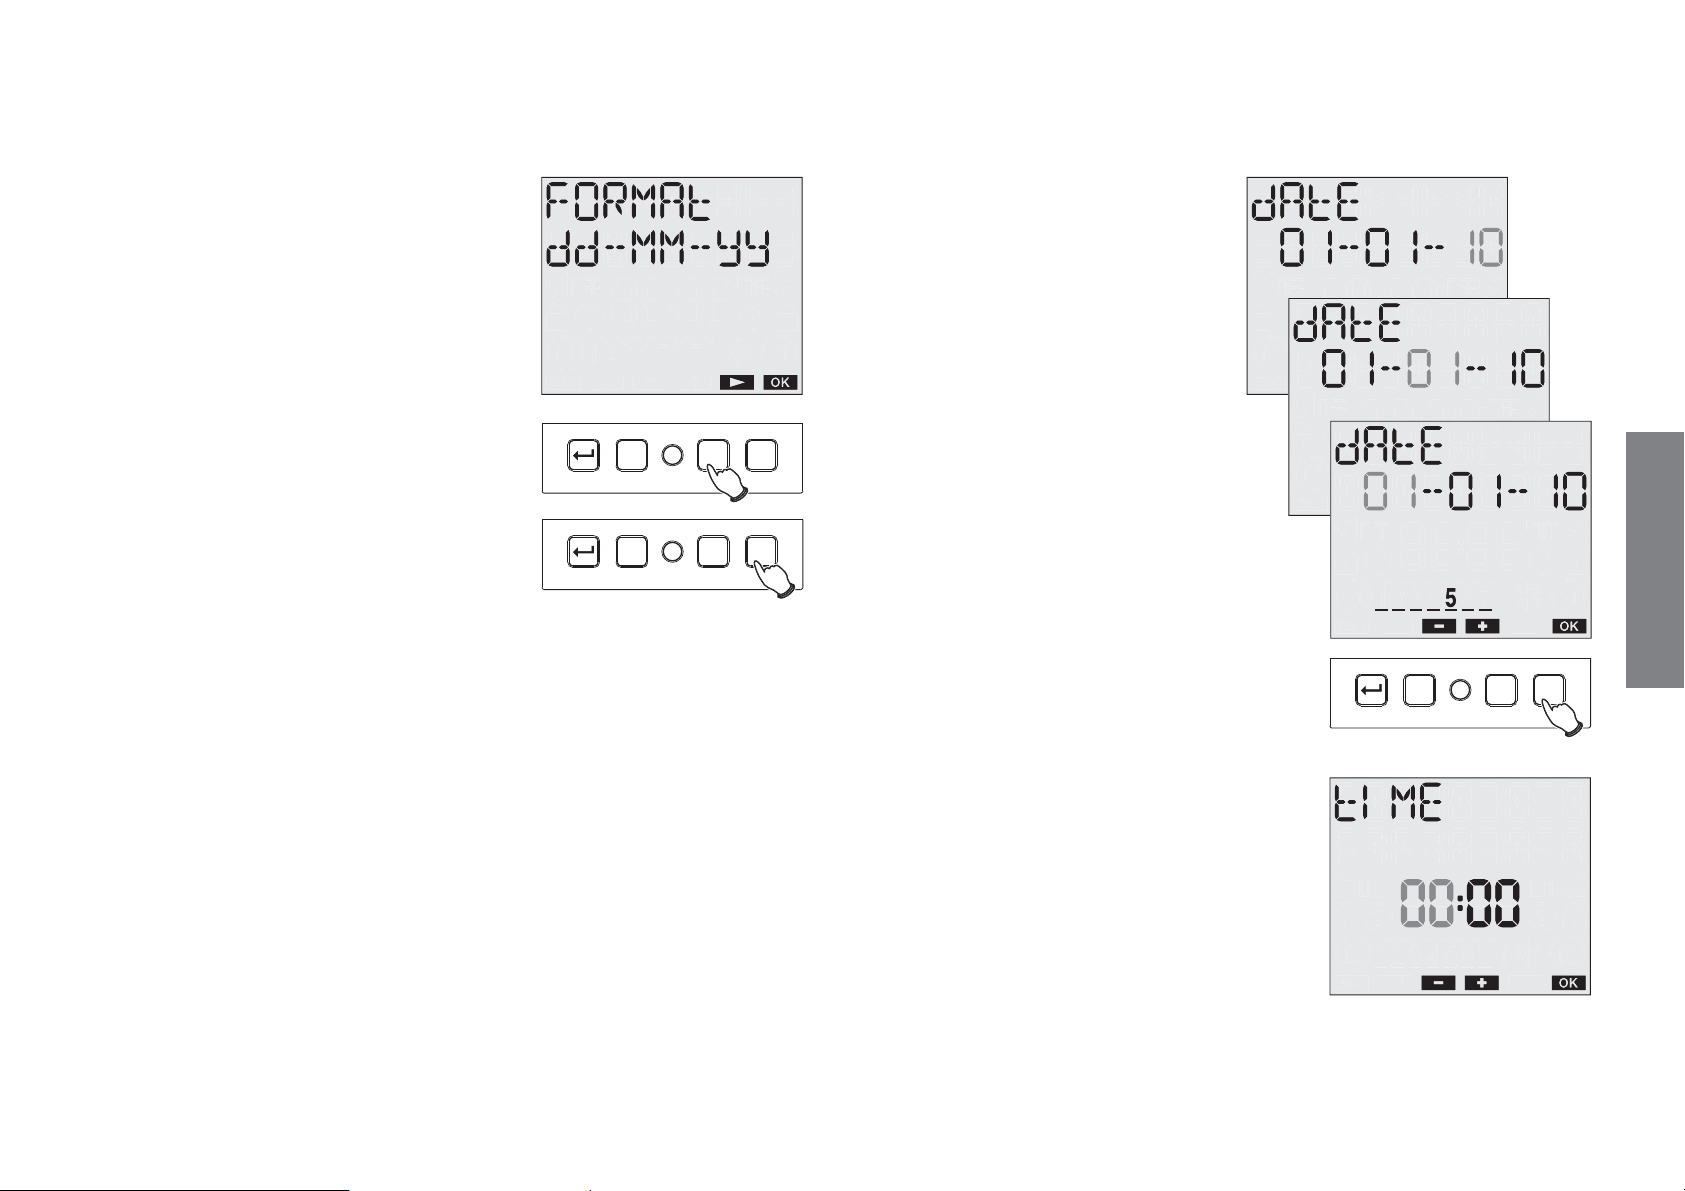
Setting date format
It is possible to choose from two
date formats:
DD-MM-YY or YY-MM-DD
When the day is inserted,
also appearing on the display
is the bar with the corresponding
day of the week
(1´ Monday, 7´ Sunday).
Use keys “C1” and “C2” to choose
the desired format.
Press “Ok” to confirm and go
on to the “data” menu.
Setting date
The parameter (year, month,
day) to be changed
flashes.
Use keys “C1” and “C2” to
choose the desired value
- and press “Ok” to confirm
and go on to the next parameter.
The sequence of parameters to be
entered is year ´ month ´ day
C1 C2ROk
C1 C2ROk
Press “Ok” to confirm and go on
to the “data” menu.
Setting time
The parameter (hours, minutes)
to be changed flashes.
Use keys “C1” and “C2” to
choose the desired value
English
C1 C2ROk
- 7 -
User manual memo DW E
Page 8
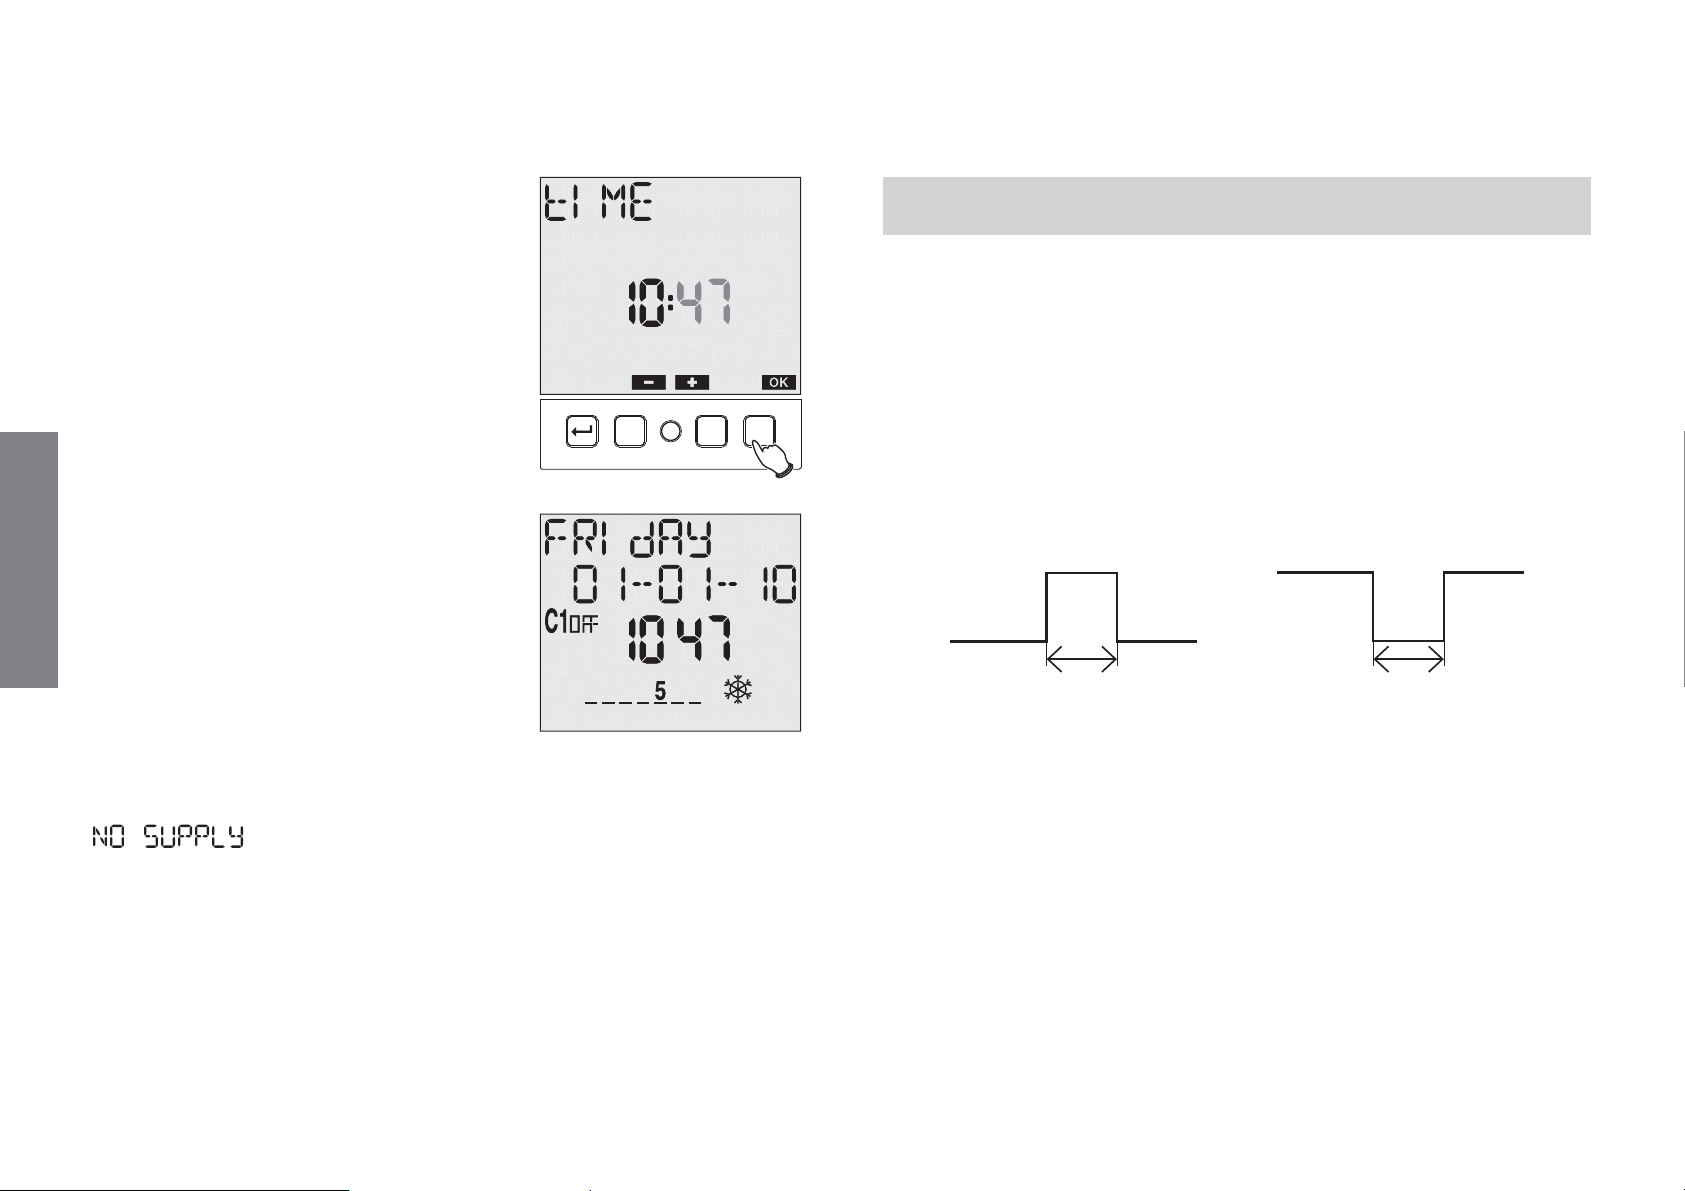
and press “Ok” to
confirm and go on to the next parameter.
The sequence of parameters
to be inserted is hours ´ minutes
Press “Ok” to confirm.
The instrument then goes into normal
operational status and is ready to work.
The display shows the values for the date,
time, status relay, day of the week (on
the first line in letters and lower down in
numbers) and the DST/CET symbol.
Note: if the instrument is not fed by
the mains, on the first line of the
display instead of the day are the words
.
In this condition backlighting is not active
and the relay not switched.
C1 C2ROk
ON/OFF Events
ON and OFF events consist of switching the relay to the on or off
position.
They may be daily (every day at the same time) or weekly (one or more
days during the week, each week).
IMPULSE events
An impulse event can be an on or off type and may last for a maximum
of 59 second:
ON OFF
At the end of the on impulse the relay will always be in the off status; at
the end of an off impulse the relay will always be in the on status.
An impulsive event can be interrupted following a manual operation.
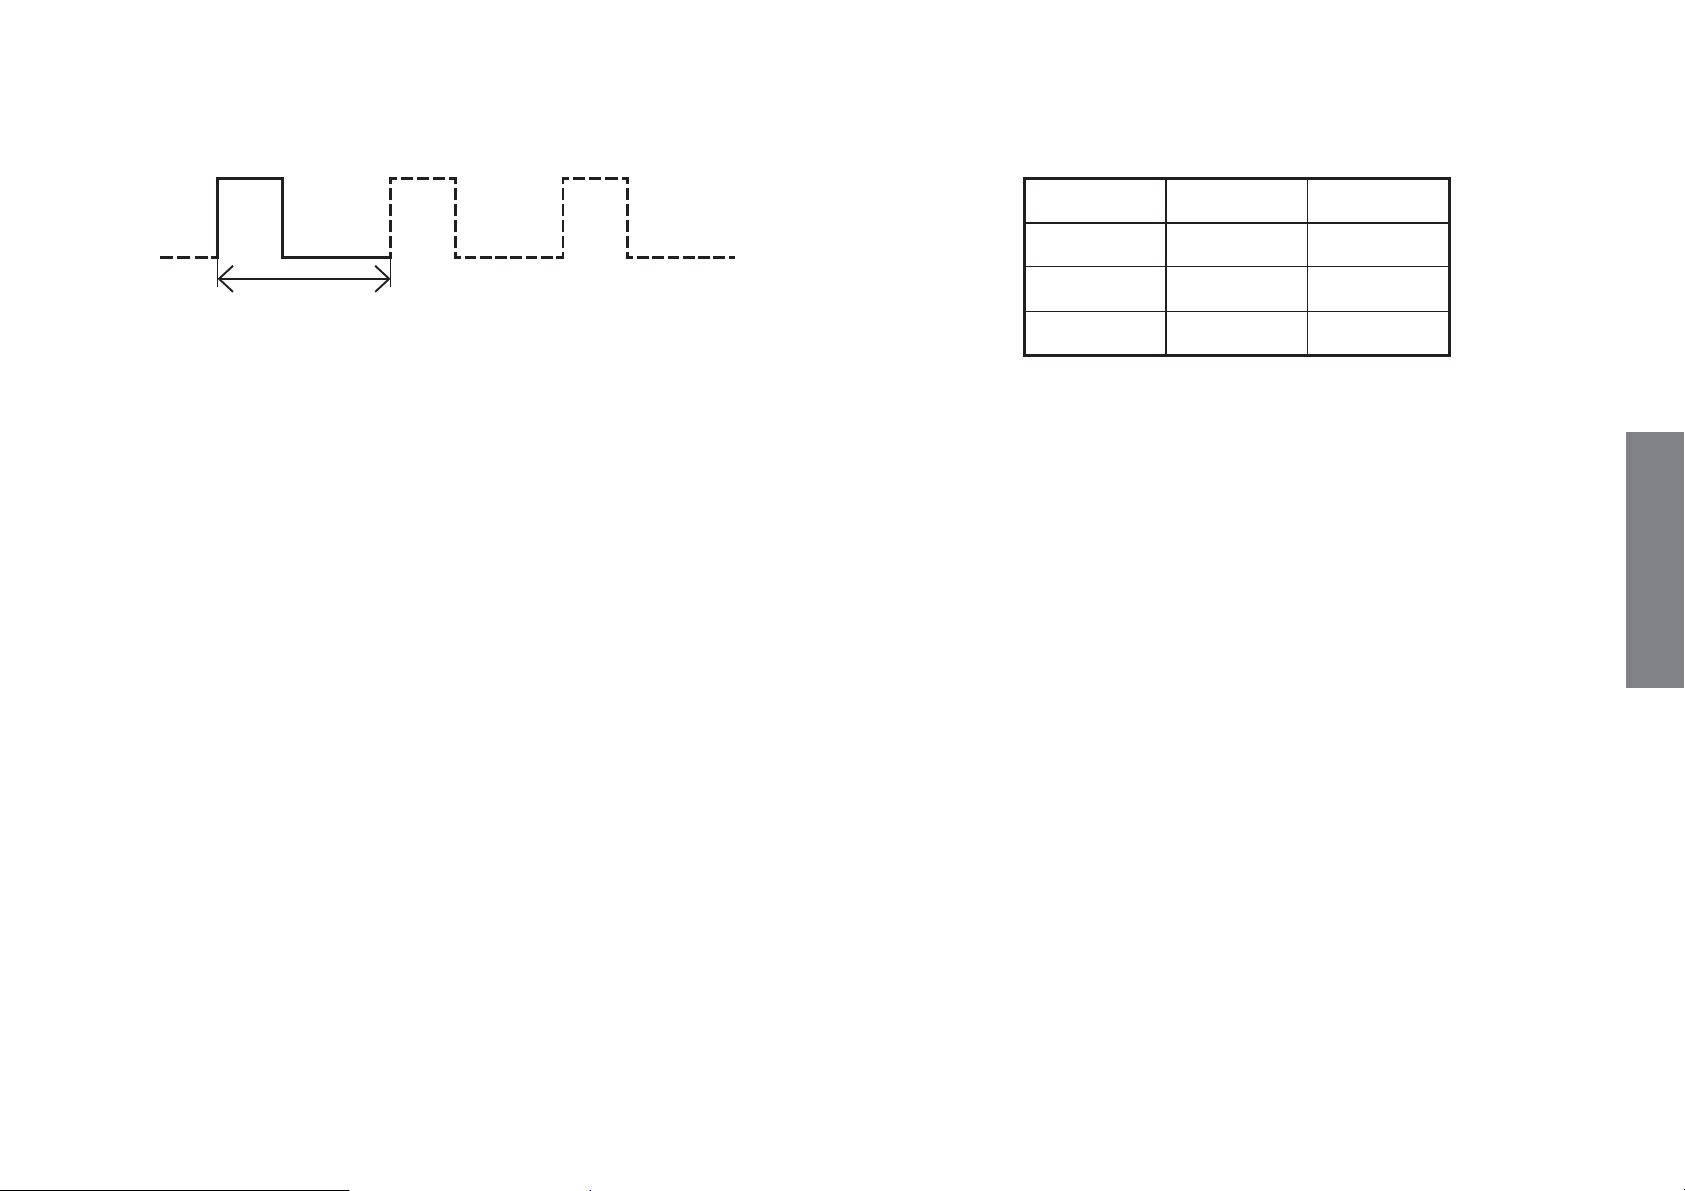
CYCLE events
A cycle event is a programme which repeats itself over a preset period
of time (maximum duration 1 week) during which there is a succession
of on and off switching.
The cycle programme always starts from the on status and always ends
in the off status. The duration of the on and off status cannot be less
PROGRAMMINGS
English
User manual memo DW E
- 8 -
Page 9
Event Weekly Daily
ON
OFF
than one minute.
The cycle event may be interrupted following a holiday event (relay
status:off), a manual operation, a date/rime change, automatic updating
of CET/DST time (we recommend disabling the automatic time change
when using the cycle programme).
HOLIDAY events
A holiday event allows you to enter individual days or holiday periods
during which all the set programmes shall not be carried out and the
relay shall be in the off position.
Holiday events always start at 00:00 on the starting day and end at
23:59 on the last day of the holiday.
Holiday events are interrupted in the case of manual operations on
output.
Programming priority
In automatic function mode the instrument behaves as foreseen by the
entered programmes. Should there be conflict between programmes
(different events starting at the same moment) the instrument will only
run the one with the highest priority, according to the following table
(1 maximum priority):
Cycle 1 -
Impulse 2 3
ON or OFF 4 5
Programmed events which starting during an event already in progress
(holiday, cycle) are ignored.
In the case of non-instantaneous (holiday, cycle, impulse) the device
always completed the started programme before managing the next.
Exceptions to this are cases in which:
- a holiday event occurs while executing a non-instantaneous
programme
- there is a change to manual operation while executing a noninstantaneous programme. In this case all the programmes running are
interrupted and if there is a lock or random on the channel, execution
of all programmes is disabled until manual procedure is deactivated
Programmes that are active when one of these exceptions occurs are
interrupted and will not be restored. When execution is interrupted, the
relays still maintain status unless entering a holiday day (or period).
English
- 9 -
User manual memo DW E
Page 10
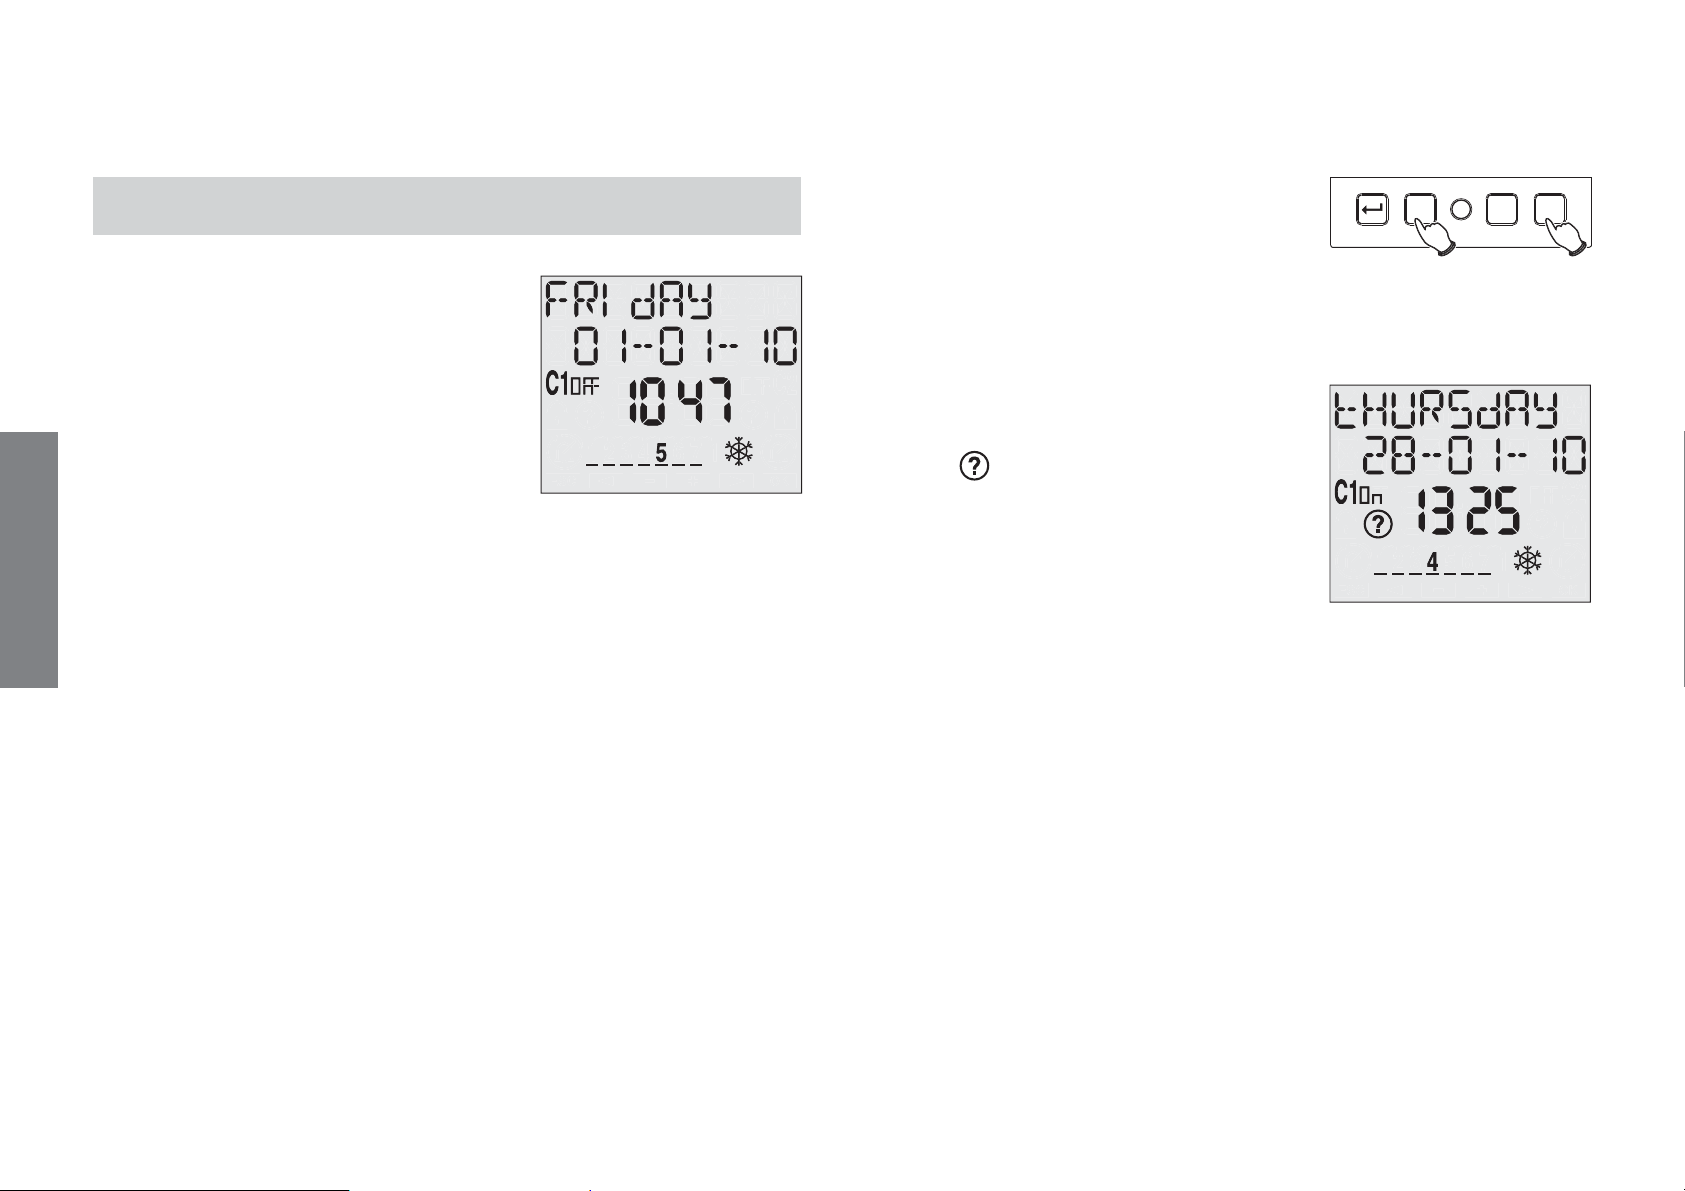
MANUAL OPERATION
Manual operations are reachable from the
normal operational status in which the
display assumes an appearance similar to
the following:
is 1 minute and the maximum 5 minutes:
such values can in any case be changed
in the settings menu)
Hold keys “C1” and “Ok” down
simultaneously for 3 seconds to activate
the function.
On confirmation of activation, under the
output status indication appears the
symbol
.
C1 C2ROk
3 seconds
Manual switching on/off
Briefly pressing keys “C1” allows
English
switching The achieved status is
maintained until the next programmed
event.
Casual on/off switchings
It is possible to activate casual output
switching.
Activation brings the output to the on
status and shall then be followed by on/
off switching with casual periods and
duty-cycles (the default minimum period
Pressing keys “C1” and “Ok” again for 3
seconds deactivates the function.
The relay is set to off status.
Lock output switching (Lock)
It is possible to activate the function
which allows all the switchings of one
output to be locked. In this way all the
programmes are locked (including the
holiday programme and the other manual
switchings) and the output is maintained
in its current status until manual
unlocking.
- 10 -
User manual memo DW E
Page 11
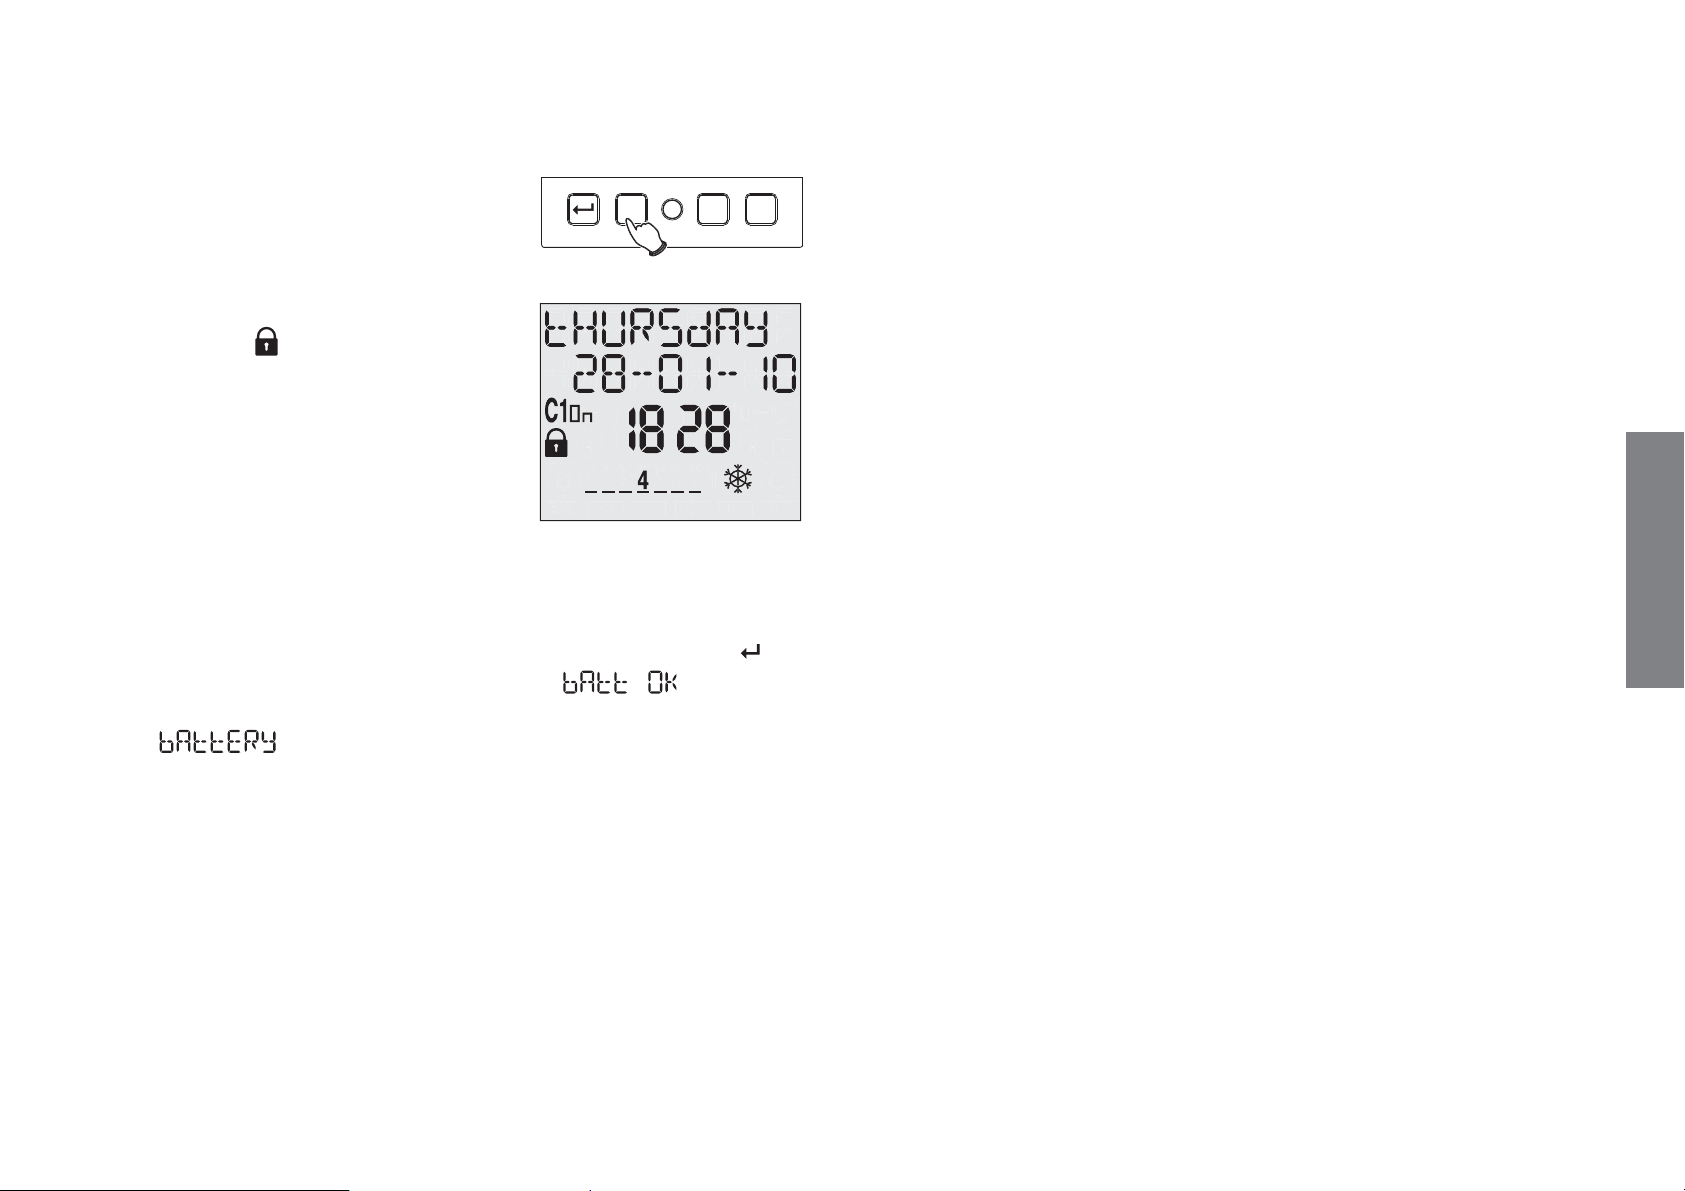
Hold key “C1” down for 3 seconds to
activate output locking.
C1 C2ROk
On confirmation of activation, on the
3 seconds
display under the channel indication
appears symbol
.
Hold key “C1” down for 3 seconds to
unlock the ouput.
Battery Test
The battery is read automatically once a week (Monday at 00:00). It is
in any case possible to read battery status by holding down key “
for 3 seconds. On the display appear the words
if the
”
battery charge level is sufficient for correct operation; otherwise the
words
appear to indicate that replacement is required as
soon as possible.
The manual functions which work on the output relays have
priority over any set programming.
The highest priority function is the lock switchings function
(LOCK).
English
- 11 -
User manual memo DW E
Page 12
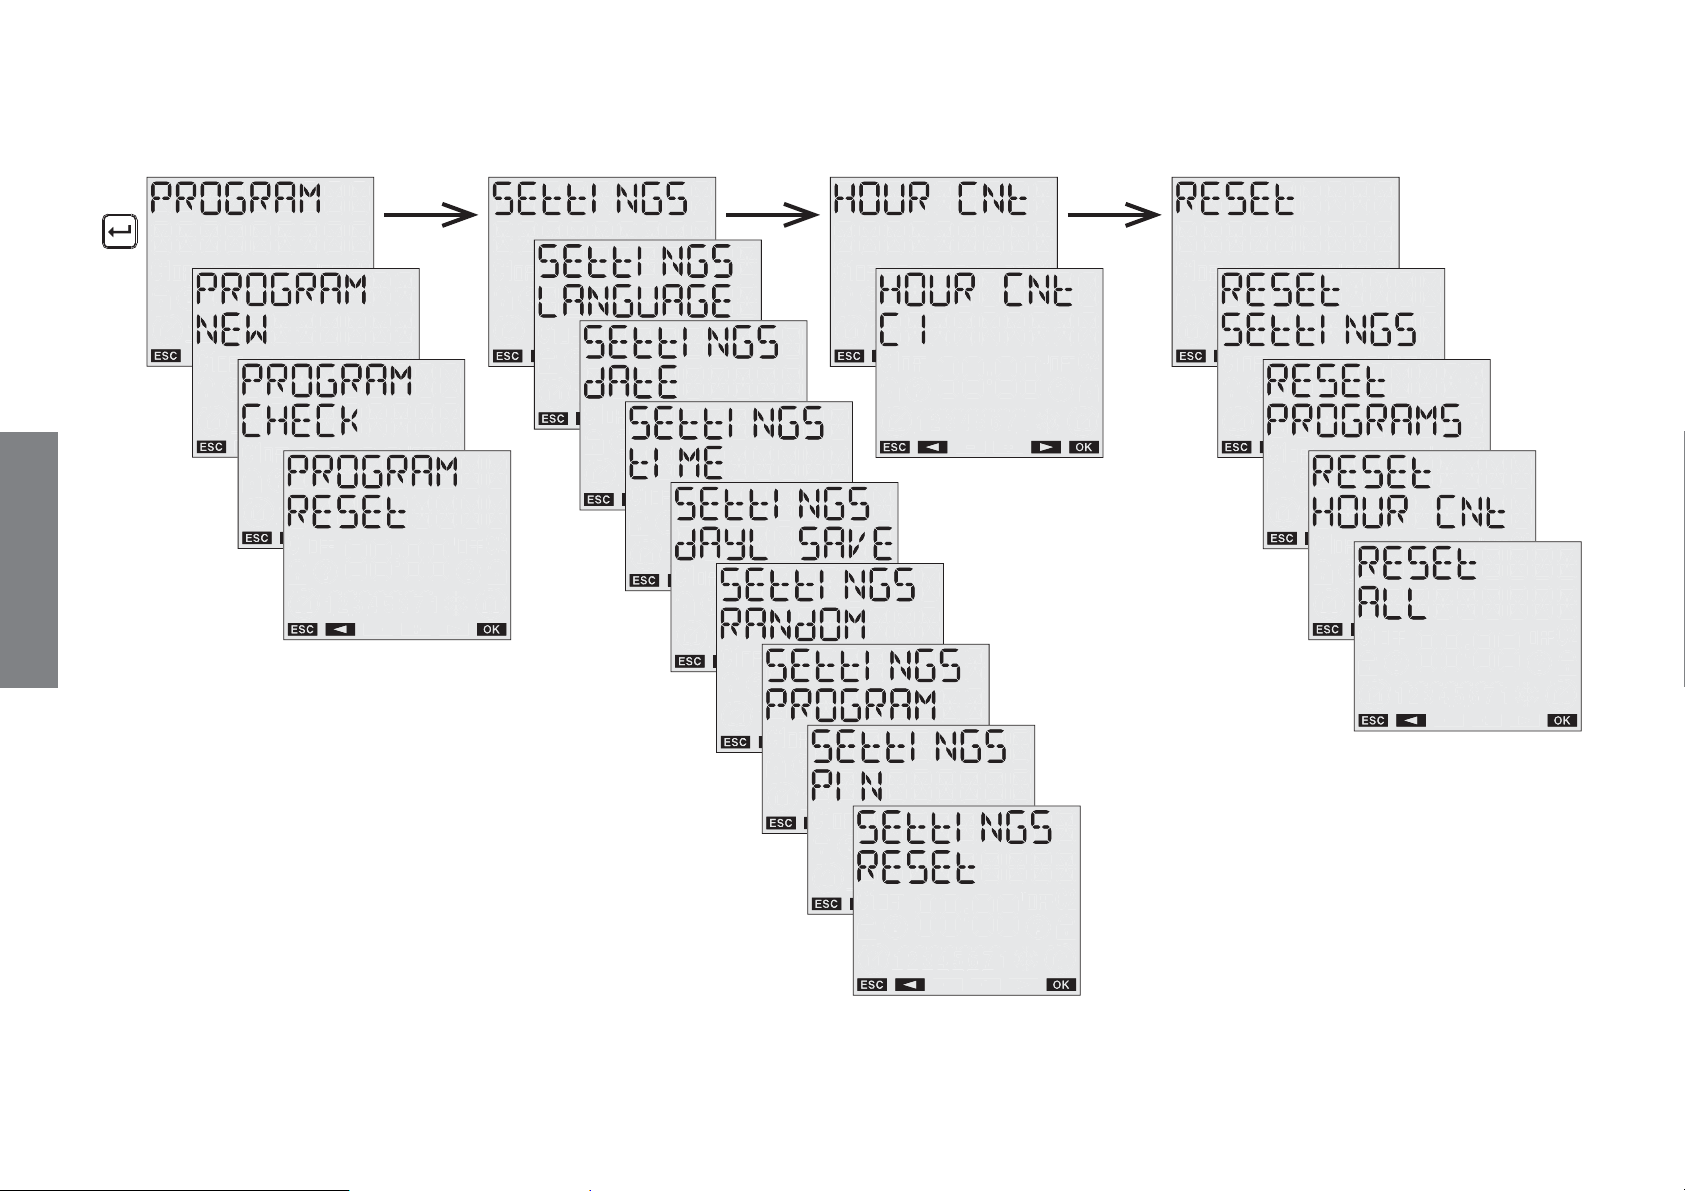
English
“Menu Overview”
- 12 -
User manual memo DW E
Page 13
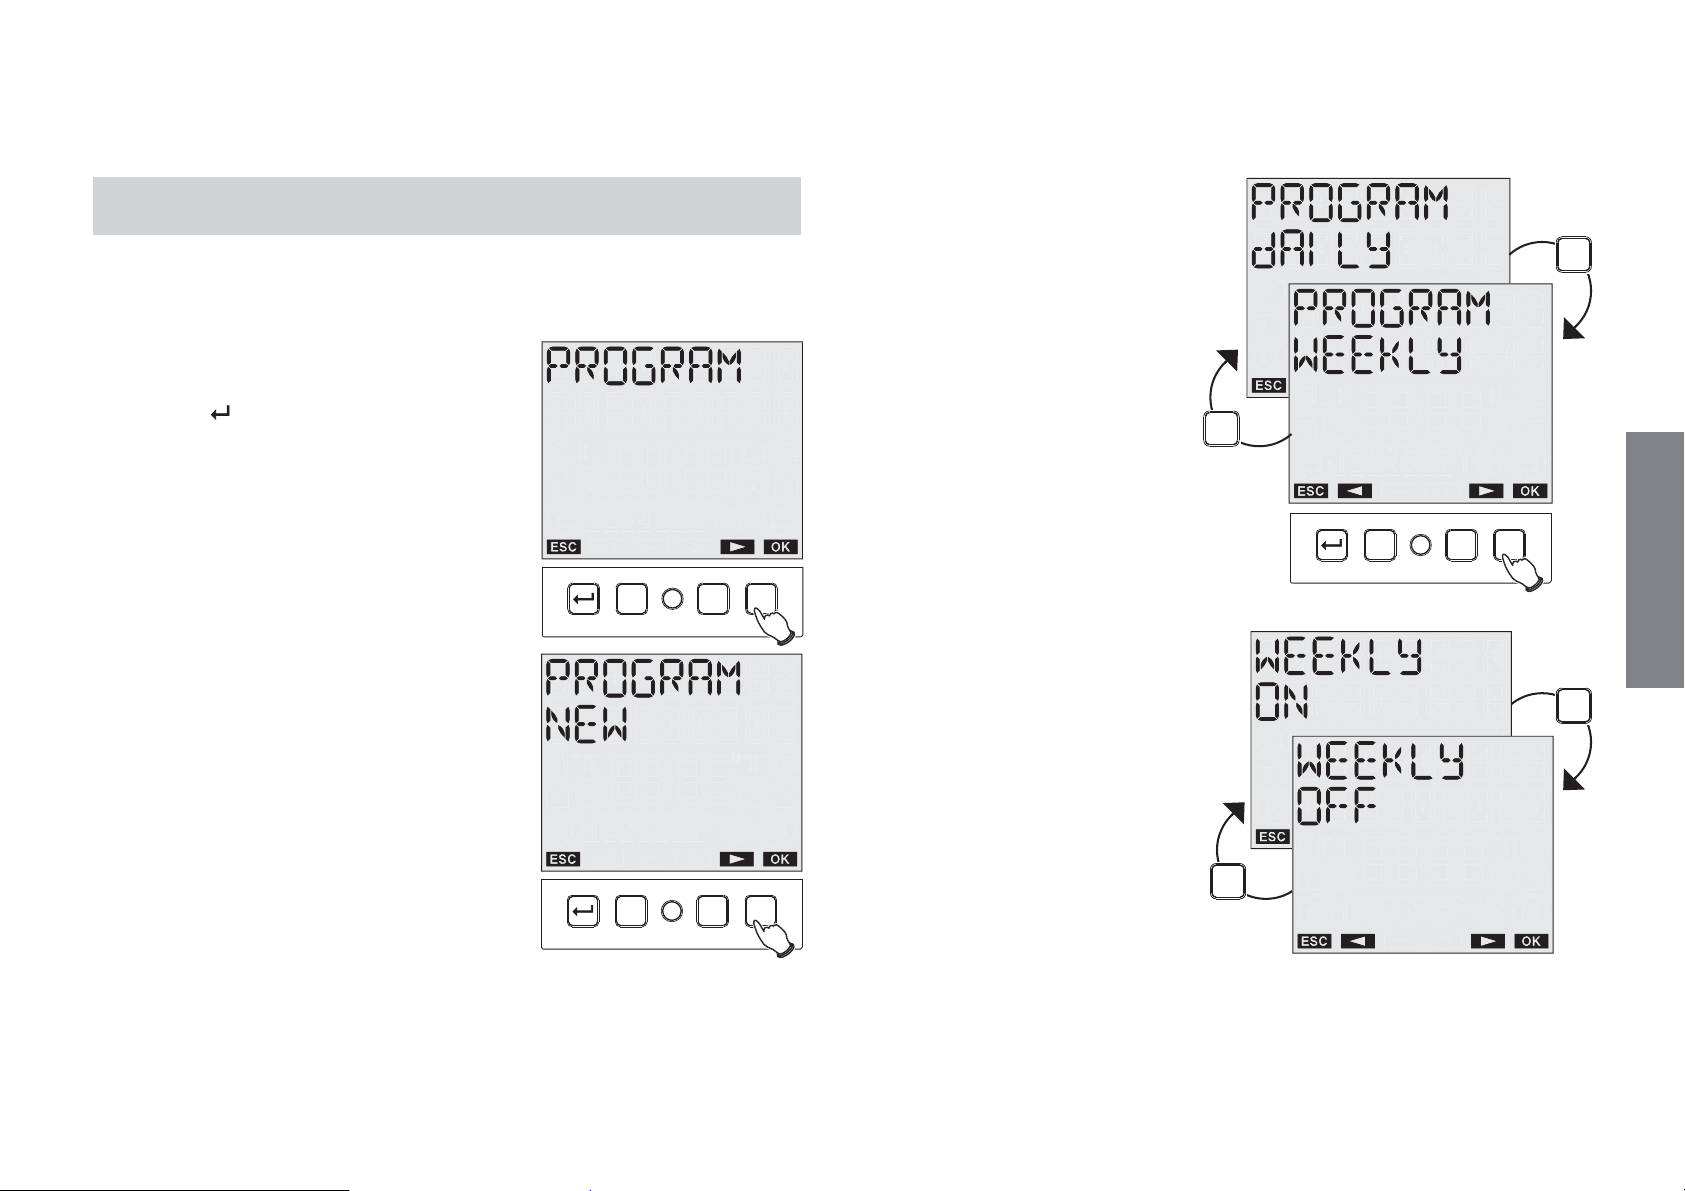
AUTOMATIC PROGRAMMING
C2
C1
C2
C1
1. Creation of a new programme
Using keys “C1” and “C2”
choose the frequency
of the event from:
DAILY, WEEKLY.
1.1 Programmes ON / OFF
Press key “
” to enter the menu, choose
the PROGRAM option using keys “C1”
and “C2” and press “Ok” to confirm.
Choose option NEW using keys
“C1” and “C2”
and press “Ok” to confirm.
C1 C2ROk
C1 C2ROk
Press “Ok”
to confirm.
Choose between an
ON or OFF event.
Press “Ok” to confirm.
C1 C2ROk
English
- 13 -
User manual memo DW E
Page 14
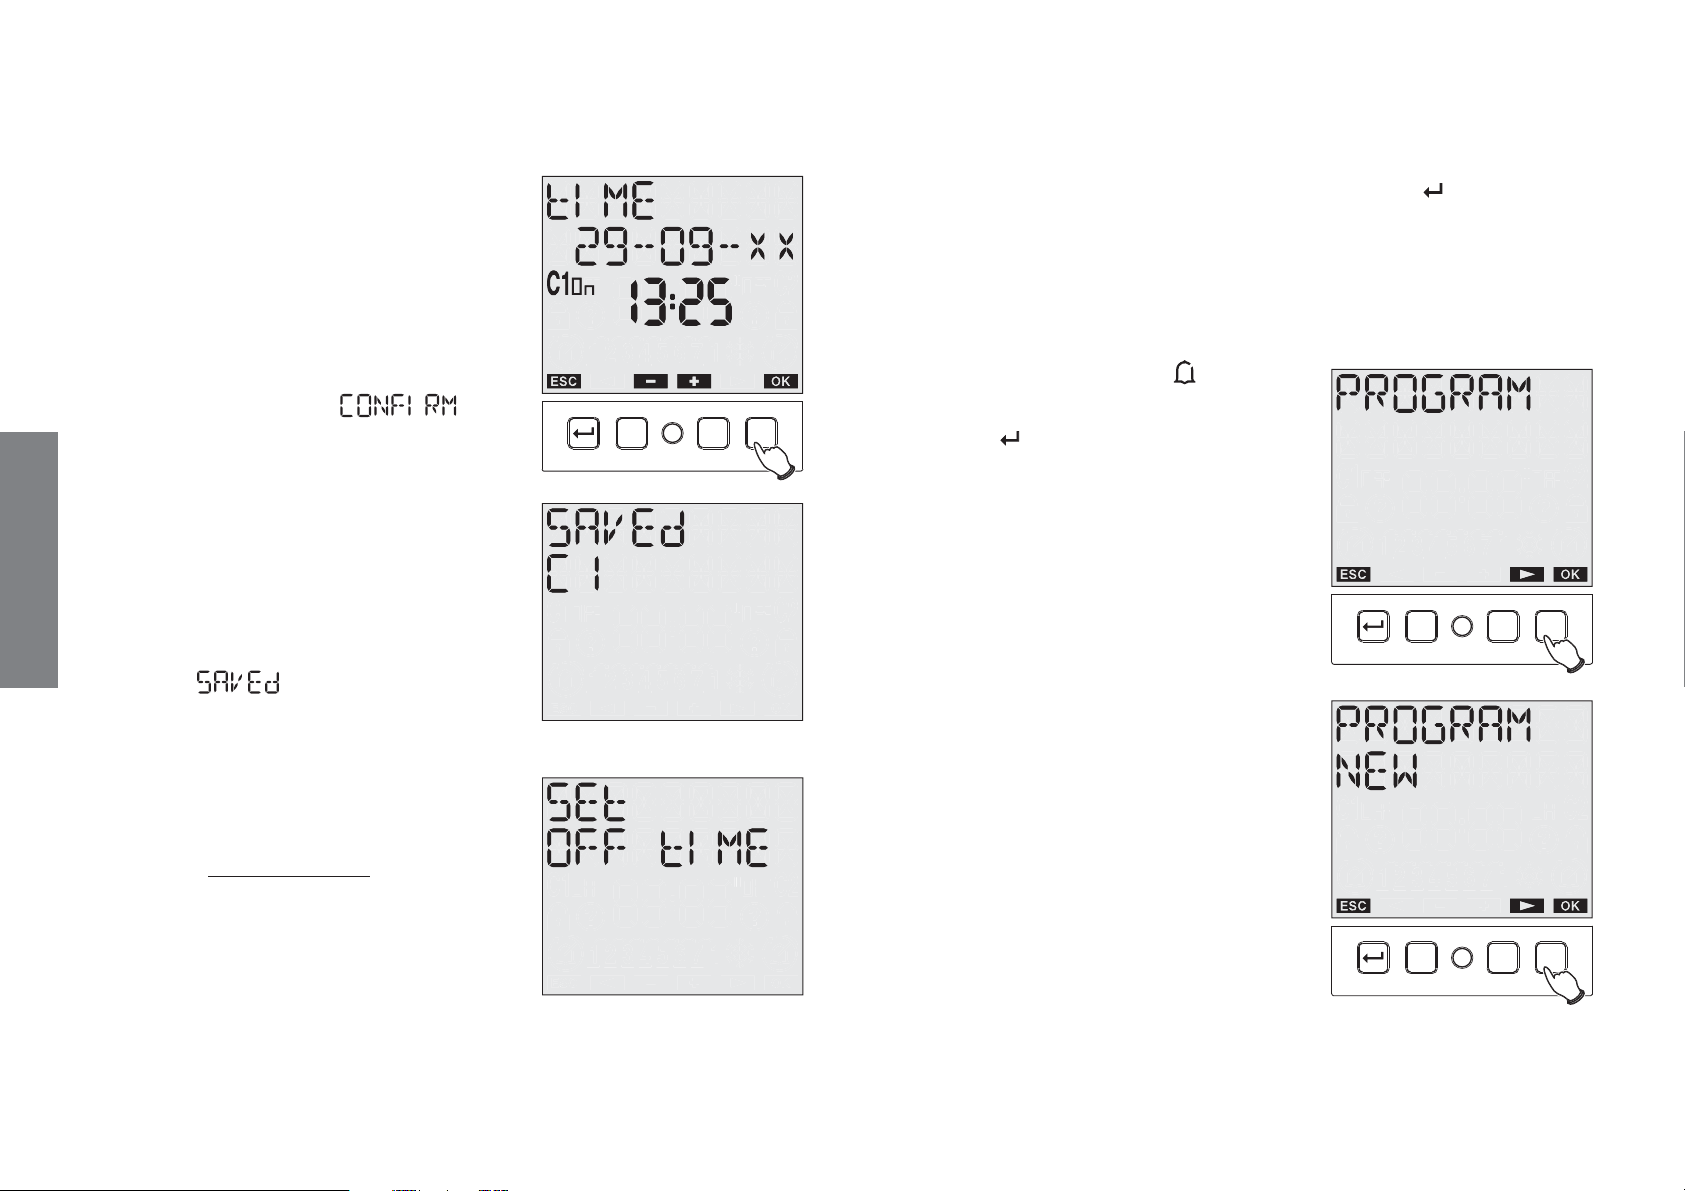
Insert the date using keys “C1” and “C2”.
(not required for daily events)
For weekly events it is possible to set
more than one day of the week. By
pressing key “Ok” you select/deselect
the day in question while using key “C2”
you scroll through the days until Sunday.
By pressing “C2” again,
appears: press “Ok” to confirm.
Enter the hours and minutes
for the switching using keys
“C1” and “C2”.
Press “Ok” to confirm.
English
Confirmation of programming is shown by
the words
on the display.
Note: recursive function
At this point the instrument activates the
recursive function which allows several
on-off events to be programmed in
succession on the same day.
Thereby once an activation (deactivation)
event has been programmed, it is possible
to enter the time of a deactivation
(activation) event for the same day.
If you do not wish to enter an off (on) time, press key
” to terminate
“
programming.
There is no control of the correlation between on/off events
programmed using the recursive function: such function is therefore to
be intended as facilitated programming.
1.2 IMPULSE programmes
C1 C2ROk
Press key “ ” to enter the menu, choose
the PROGRAM option using keys “C1”
and “C2” and press “Ok” to confirm.
C1 C2ROk
Choose option NEW using keys
“C1” and “C2” and
press “Ok” to confirm.
C1 C2ROk
- 14 -
User manual memo DW E
Page 15
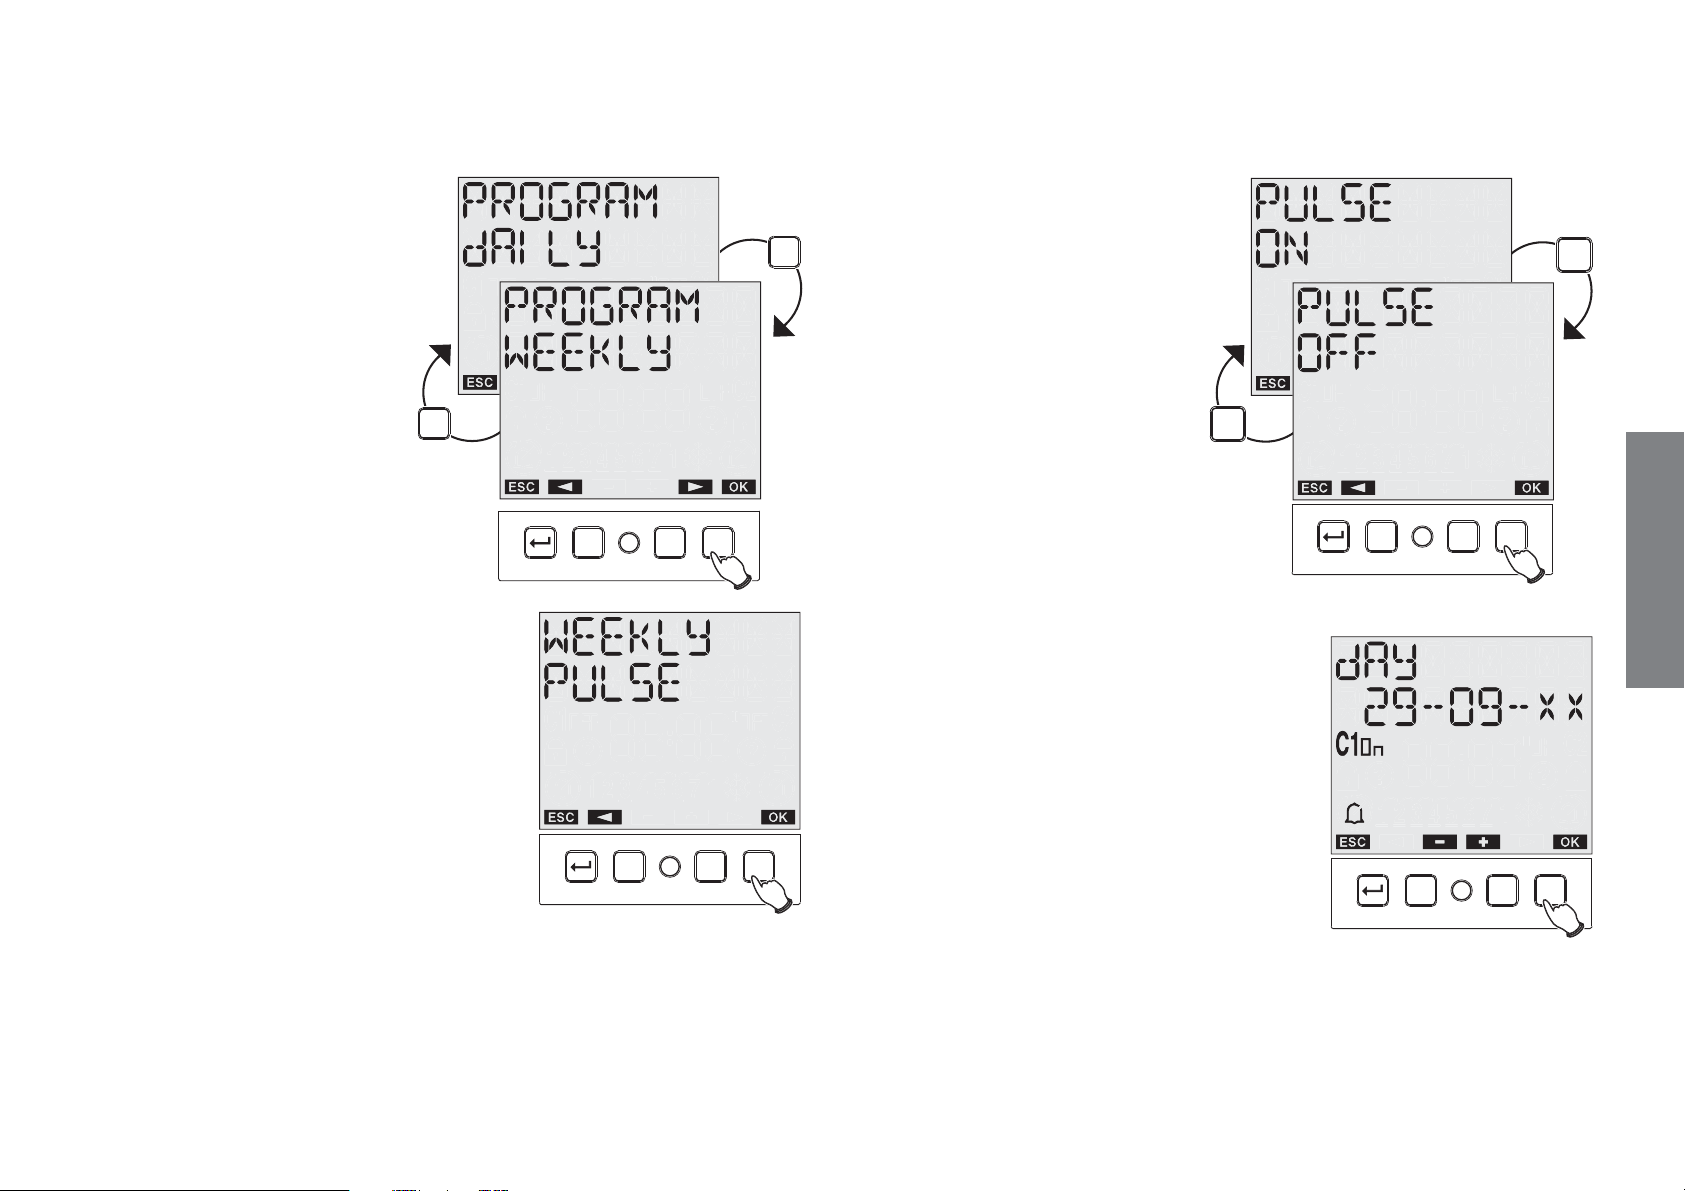
Using keys “C1” and “C2”
C2
C1
C1 C2ROk
C1 C2ROk
C2
C1
C1 C2ROk
choose the frequency
of the event from:
DAILY, WEEKLY.
Using keys “C1” and “C2”
choose whether it is an
ON impulse
or an OFF impulse.
Press “Ok”
to confirm.
Choose the impulse
using keys “C1” and “C2”
and press “Ok” to confirm.
C1 C2ROk
Press “Ok” to confirm.
Se the date using keys “C1” and “C2”
(not required for daily events).
Press “Ok” to confirm.
English
User manual memo DW E
- 15 -
Page 16
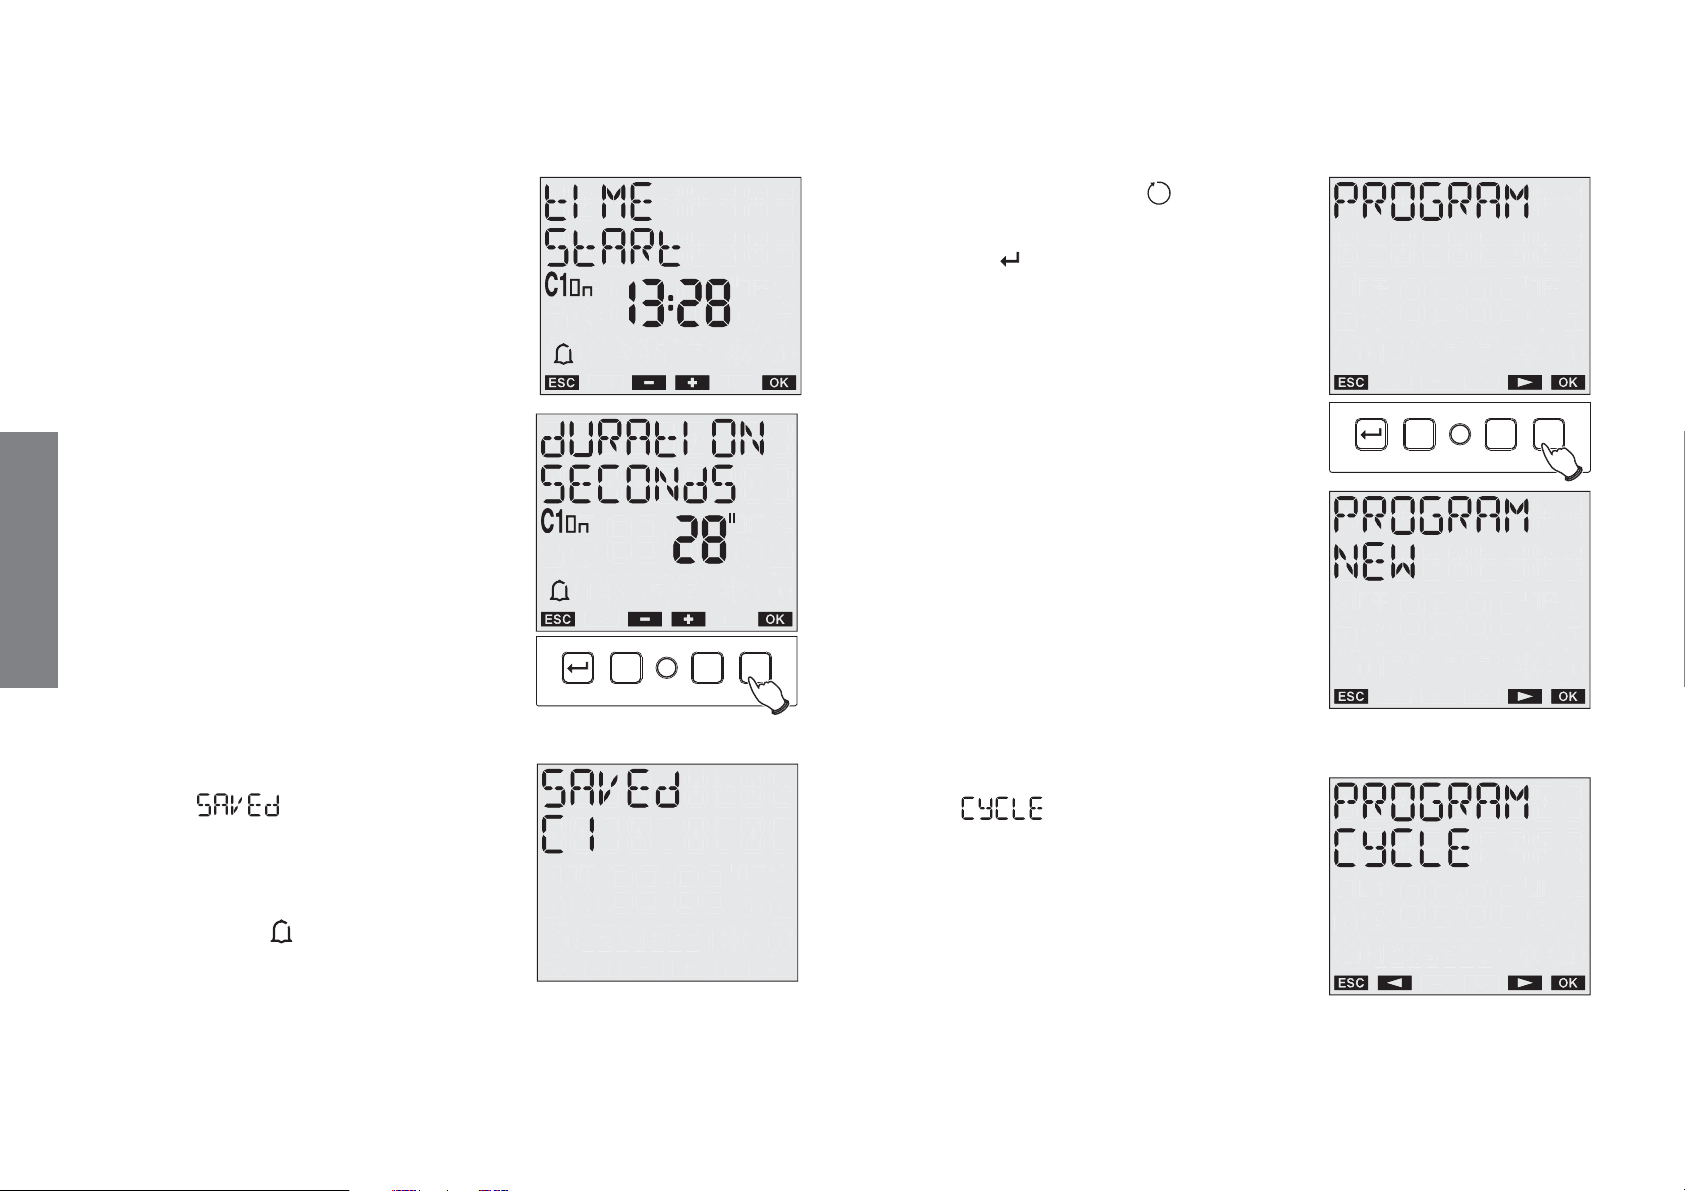
Enter the starting time
C1 C2ROk
C1 C2ROk
and duration of the impulse
(max 59 seconds).
English
Press “Ok” to confirm.
Once programming is confirmed,
on the display the are shown
the words
During normal operation, the eventual
execution of an impulse programme is
shown by symbol
display.
.
on field (8) of the
1.3 CYCLE Programmes
Press key “ ” to enter the menu,
choose the PROGRAM option
using keys “C1” and “C2”
and press “Ok” to confirm.
Choose option NEW
using keys “C1” and “C2”
and press “Ok” to confirm.
Choose
with keys “C1” and “C2”.
Press “Ok” to confirm.
- 16 -
User manual memo DW E
Page 17
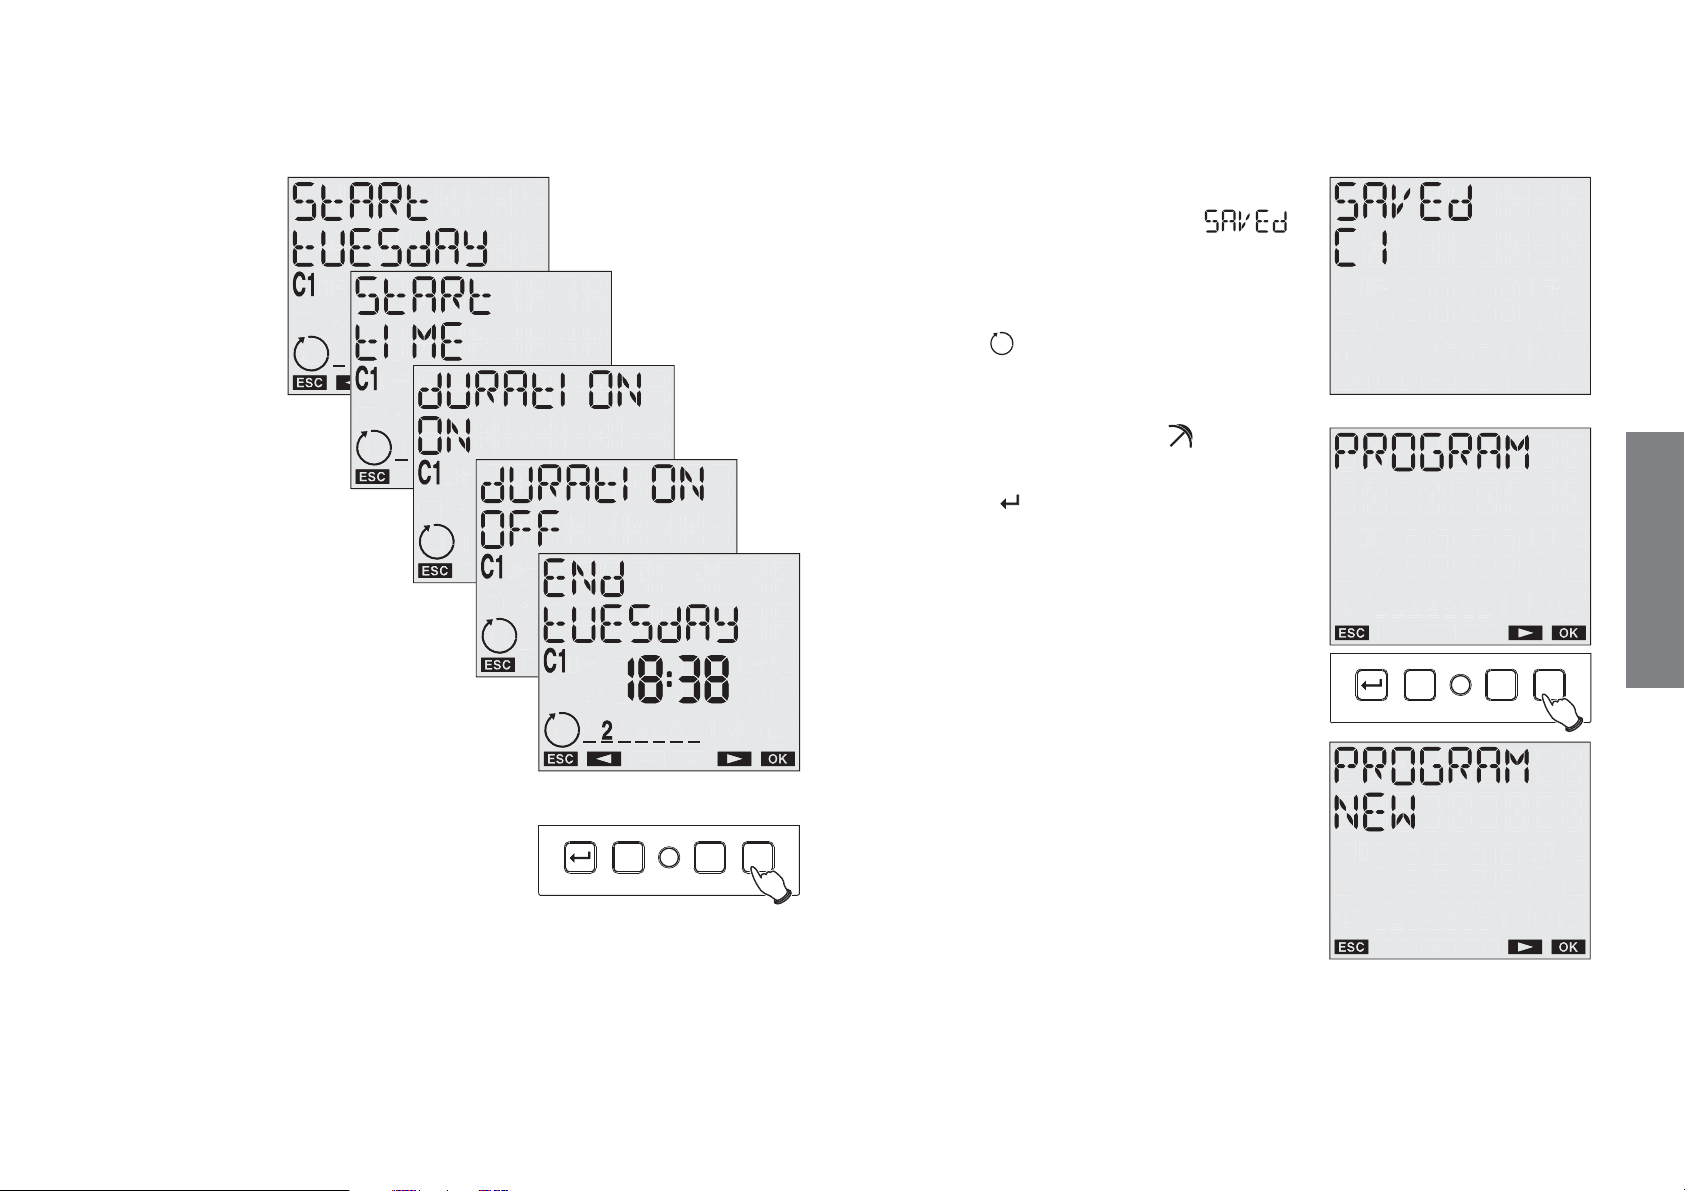
Enter the day
and time
(hours, minutes)
of cycle start,
the duration
of the
ON period
(hours, minutes),
the duration of the
OFF period
(hours,minutes),
the date and time
(hours, minutes)
of cycle end (the device
will give some possible
values for the end of the event:
such values are calculated so
that the last period is always
complete).
The maximum duration of a cycle is one
week.
Once programming is confirmed,
on the display appear the words
During normal operation, the eventual
execution of a cycle programme is shown
by symbol
on field (8) of the display.
1.4 HOLIDAY programmes
Press key “ ” to enter the menu,
choose the PROGRAM option using keys
“C1” and “C2”
and press “Ok” to confirm.
.
English
C1 C2ROk
Press “Ok” to confirm.
C1 C2ROk
User manual memo DW E
Choose option NEW using keys “C1”
and “C2”
and press “Ok” to confirm.
- 17 -
Page 18
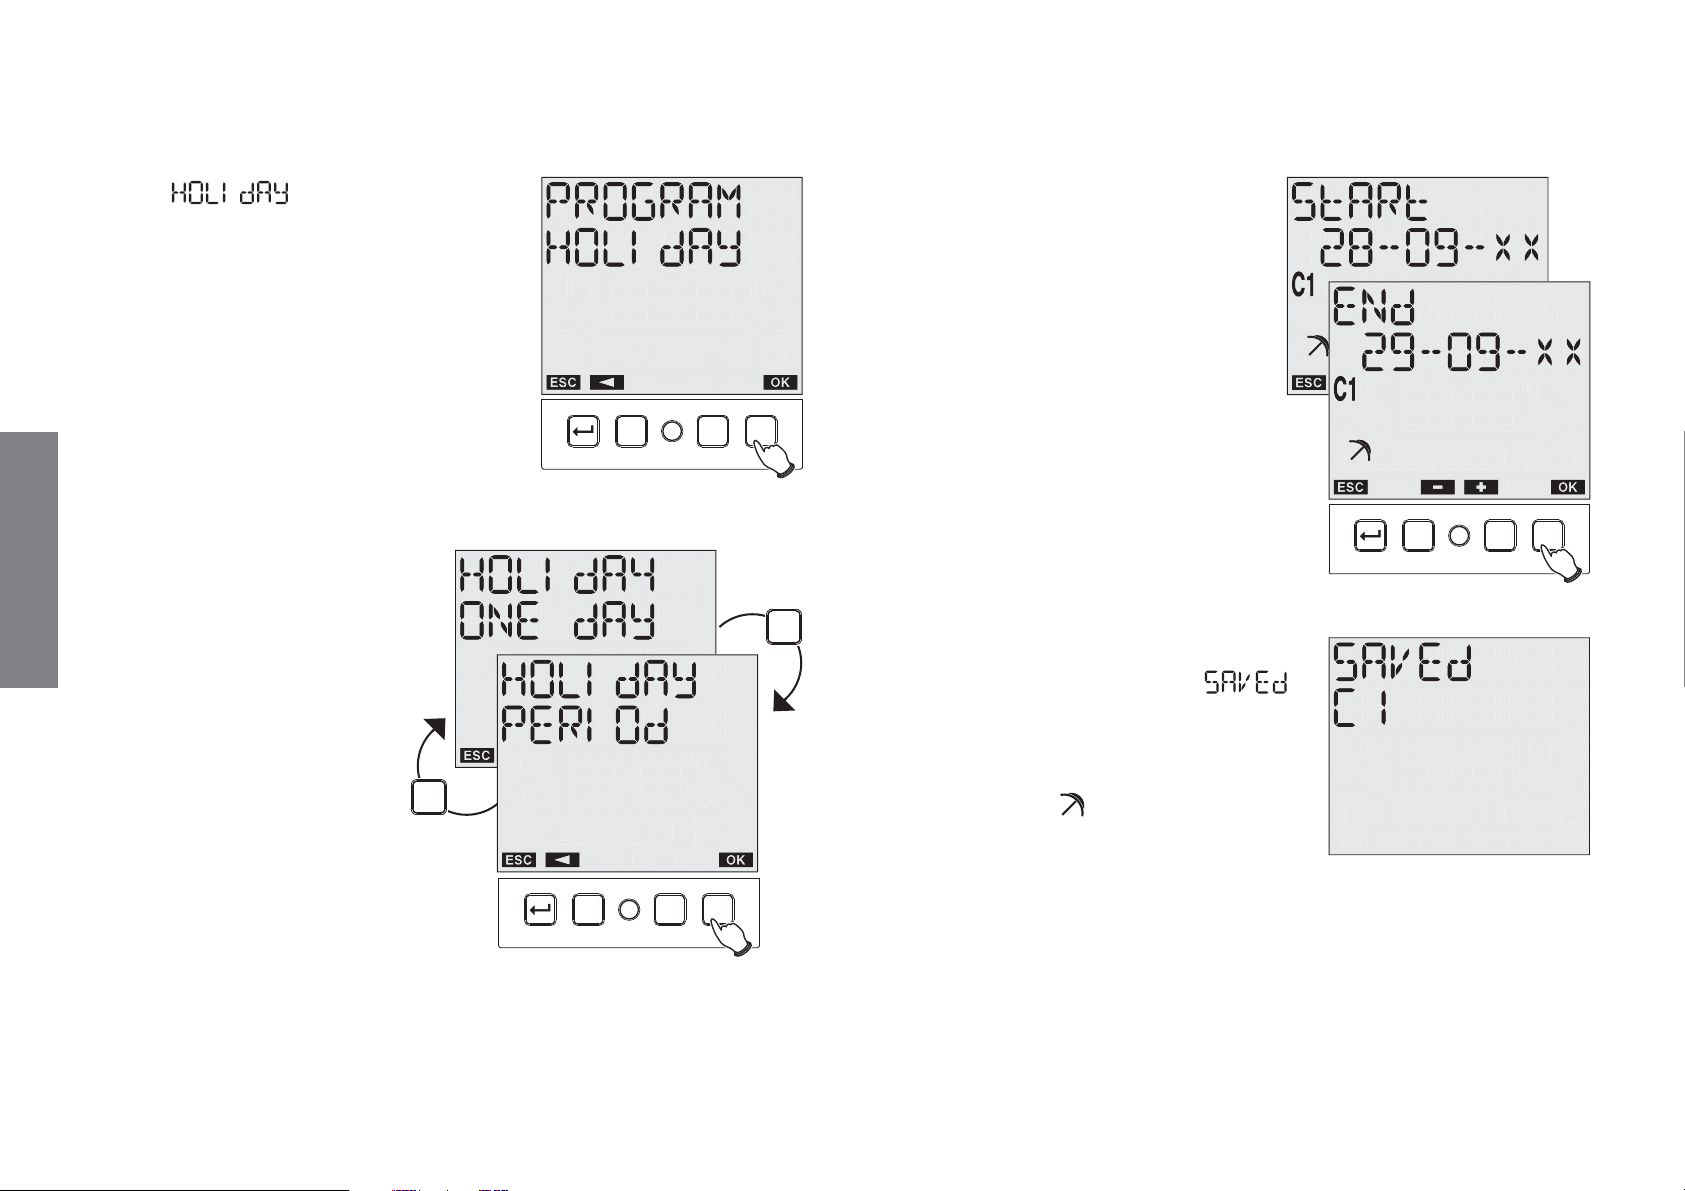
Choose
C1
C2
C1 C2ROk
with keys “C1” and “C2”.
Insert the date
(holiday day)
or
the interval of holiday days
(holiday period).
Press “Ok” to confirm.
Choose
one days’ holiday
English
or
a holiday period
using keys “C1” and “C2”
Press “Ok” to confirm.
C1 C2ROk
C1 C2ROk
Press “Ok” to confirm.
Note: the details of the interval are to be
considered as included in the period.
As confirmation of programming,
on the display appear the words
During normal operation, the eventual
execution of a holiday programme is
shown by symbol
on field (8) of the
display.
Note: recursive function
At this point the instrument activates the recursive function which
allows several holiday days (or holiday periods) to the programmed in
succession.
- 18 -
User manual memo DW E
Page 19
If you do not wish to enter another
days’ holiday (or period),
” to end programming.
press key
“
There is no control of the correlation
between holiday events programmed
using the recursive function:
such function is therefore to be intended
as facilitated programming.
2. Checking a programme
Through this menu it is possible to display, amend or delete a
programme saved in the instrument.
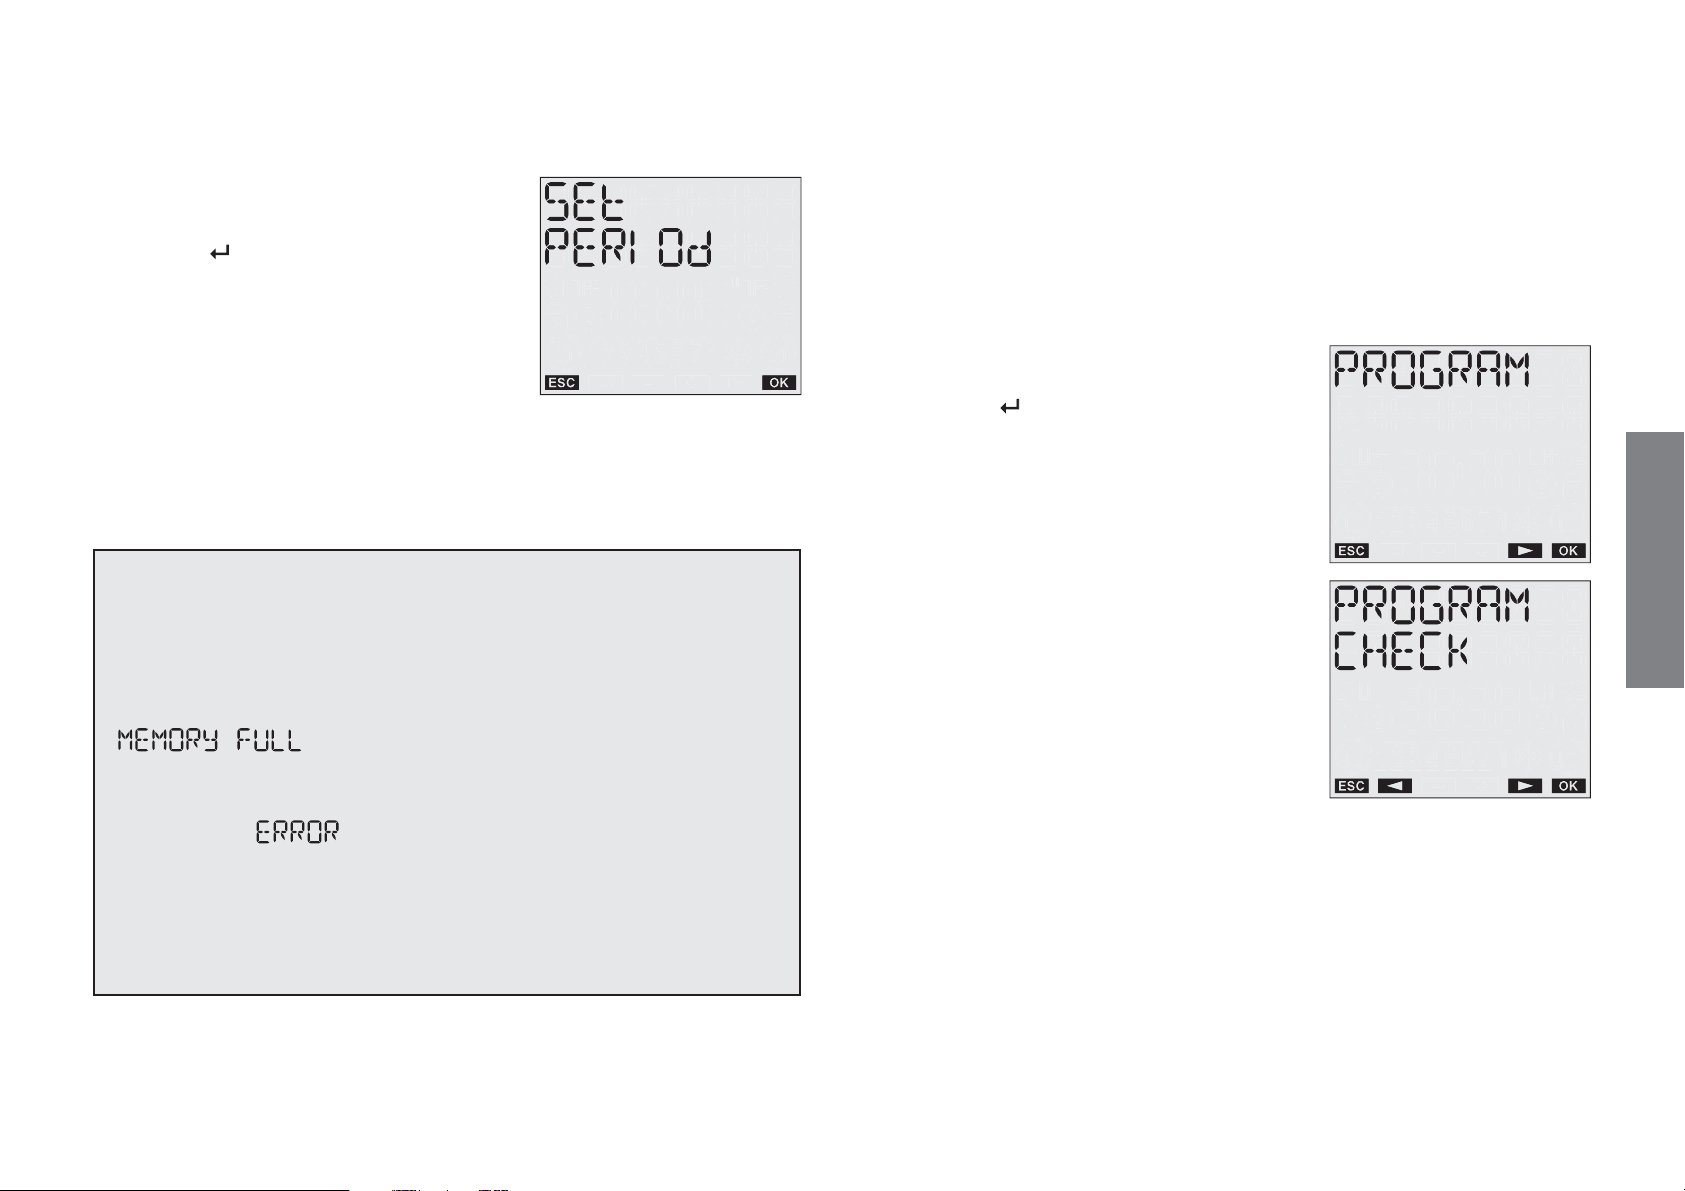
2.1 Displaying a programme
Press key “
” to enter the menu, and
using keys “C1” and “C2” choose the
PROGRAM option.
Press “Ok” to confirm.
The instrument’s internal memory allows up to 30 events + 4
holiday periods + 20 holiday days to be memorised.
Once maximum capacity is reached, attempts to memorise
another programme causes the display to show the message
. In this case it is necessary to delete a
programme in the memory in order to enter a new one.
The message
is shown on the display whenever there
is an attempt to save a programme overwriting a pre-existent
programme of the same type (for example trying to enter a daily
off event at 08:00 if there is already a daily on event at the same
time).
User manual memo DW E
English
Using keys “C1” and “C2” choose
CHECK
Press “Ok” to confirm.
Finally, choose the frequency and type of event you wish to check using
“C1” and “C2”.
At this point the first programme pertaining to the specified type is
displayed.
- 19 -
Page 20
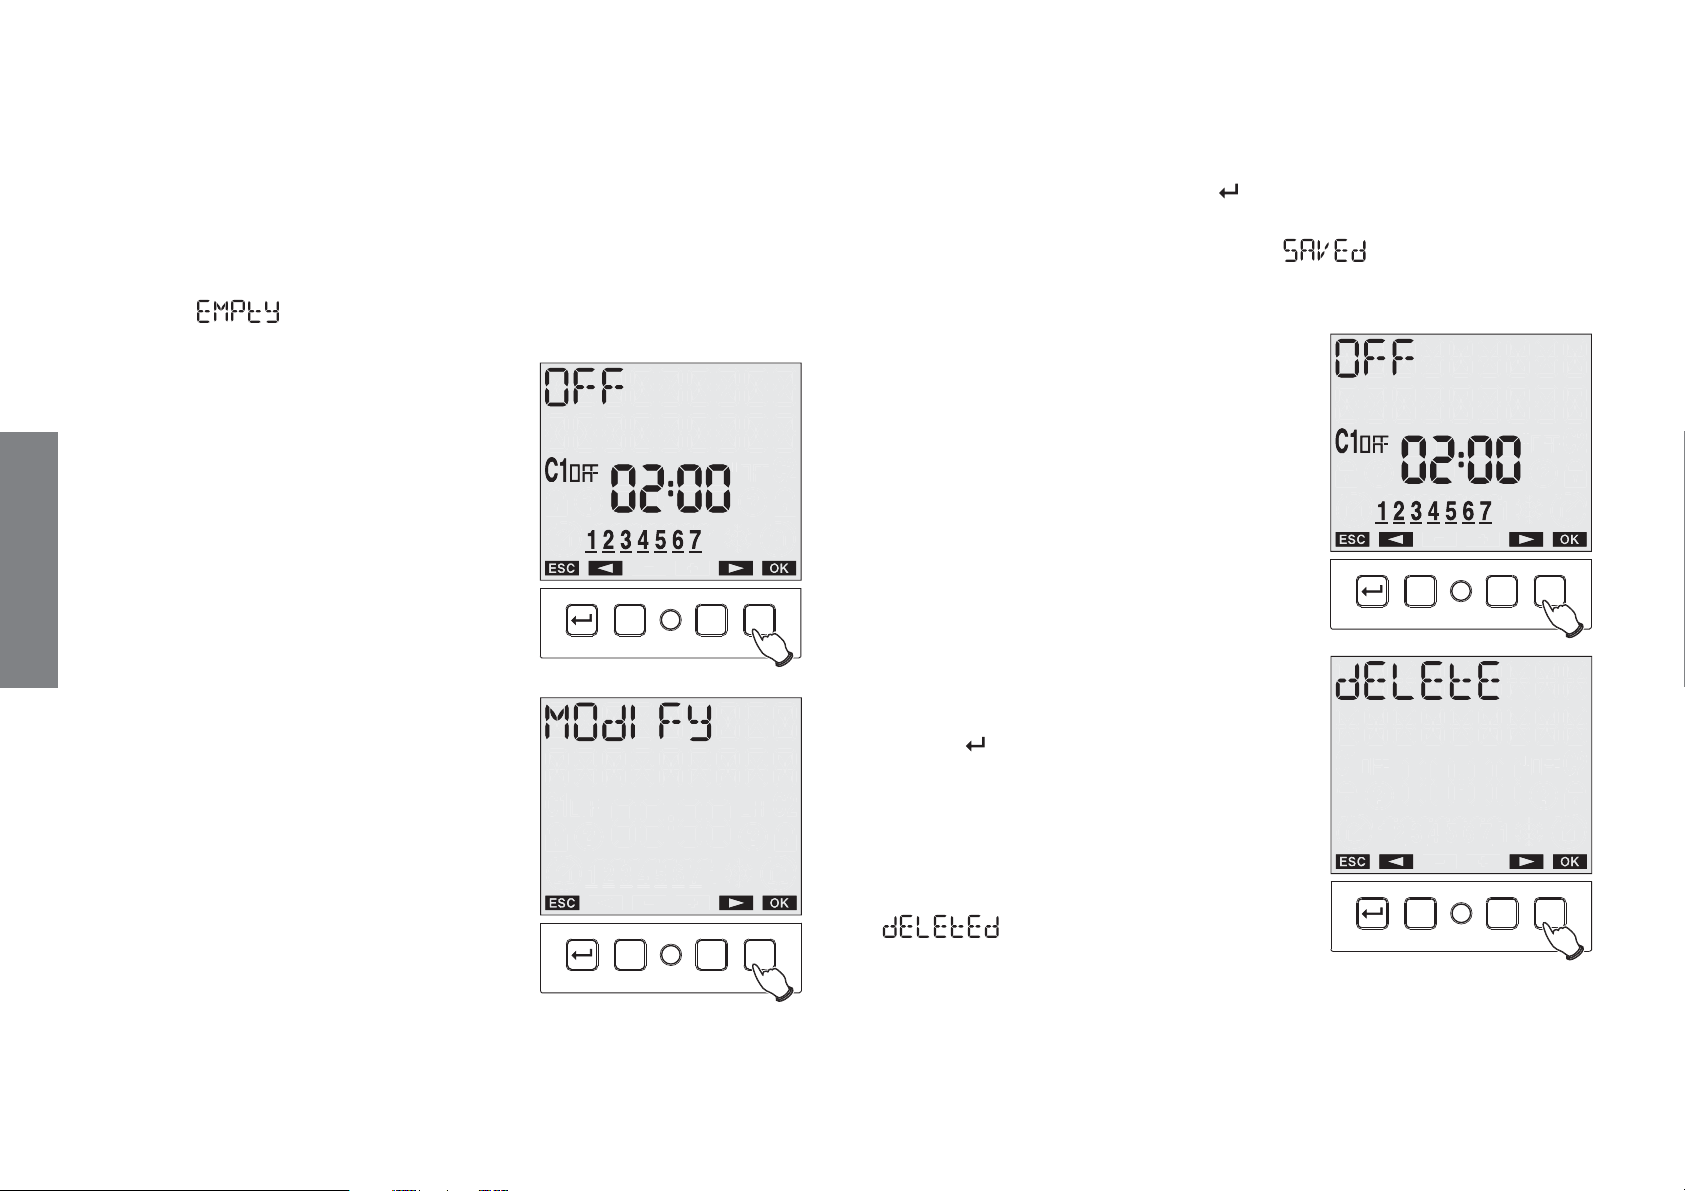
If more than one programme is present, it is possible to scroll forwards
and backwards through them by using keys “C1” and “C2”
If no programme of that particular type is present, on the display appear
the words
.
2.2 Modifying a programme
It is possible to access programme
modification from the programme display
status.
Choose the programme to be modified
English
and press key “Ok”
C1 C2ROk
Choose the MODIFY option using keys
“C1” and “C2”
and press “Ok” to confirm.
and “Ok” to confirm or the key “
At the end of the modification the words
” to exit without modifications.
are displayed and the
instrument returns to the normal operational status once again.
2.3 Deleting a programme
It is possible to access programme
deletion from the programme display
status.
Choose the programme to be deleted and
press key “Ok”
C1 C2ROk
Choose, using keys “C1” and “C2” the
DELETE option and press “Ok” to confirm
or key “
” to exit without deletion.
At this point it is possible to insert the new
programme parameters.
The parameter under modification flashes.
Use keys “C1” and “C2” to set the values
C1 C2ROk
User manual memo DW E
- 20 -
On the display appear the words
and the instrument returns to
normal operational status once again.
C1 C2ROk
Page 21
Note: in the case of CYCLE programme, the menu sequence differs
slightly. In fact in this case the first parameter of the first cycle
programme is displayed (start time). It is necessary to press key “C2”
to display all the parameters relative to that programme until the “Ok”
key is enabled which allows access to the menu containing the options
modify, delete and next (to go to the next programme cycle). At this
point using keys “C1” and “C2” choose the desired option and press
“Ok” to confirm.
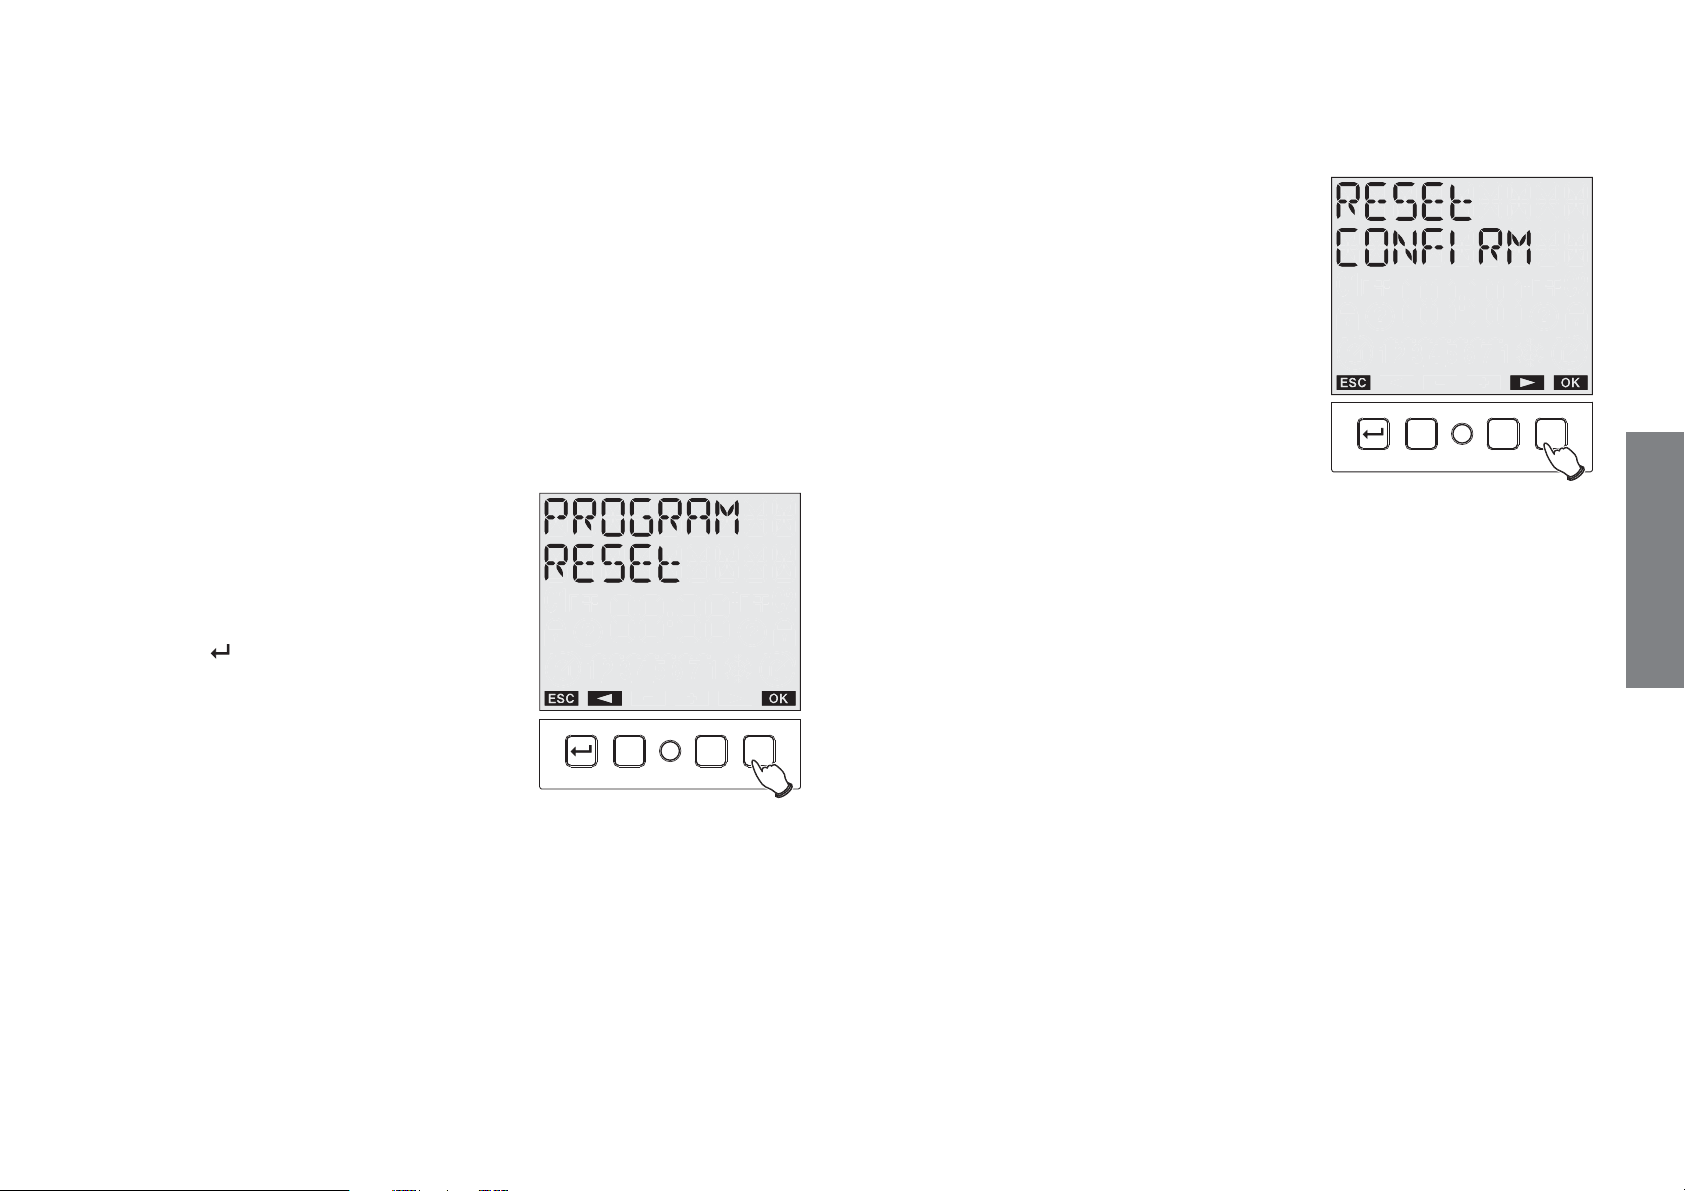
3. Reset programmes
To delete all the programmes saved on
the instrument:
Choose CONFIRM and press “Ok”. All the
programmes will be cancelled.
Alternatively it is possible to reset
programmes by accessing the reset
menu.
C1 C2ROk
English
Press key “
” to enter the menu, choose
the PROGRAM option using keys “C1”
and “C2” and press “Ok” to confirm.
Choose option RESET PROGRAM using
keys “C1” and “C2”
and press “Ok” to confirm.
C1 C2ROk
- 21 -
User manual memo DW E
Page 22
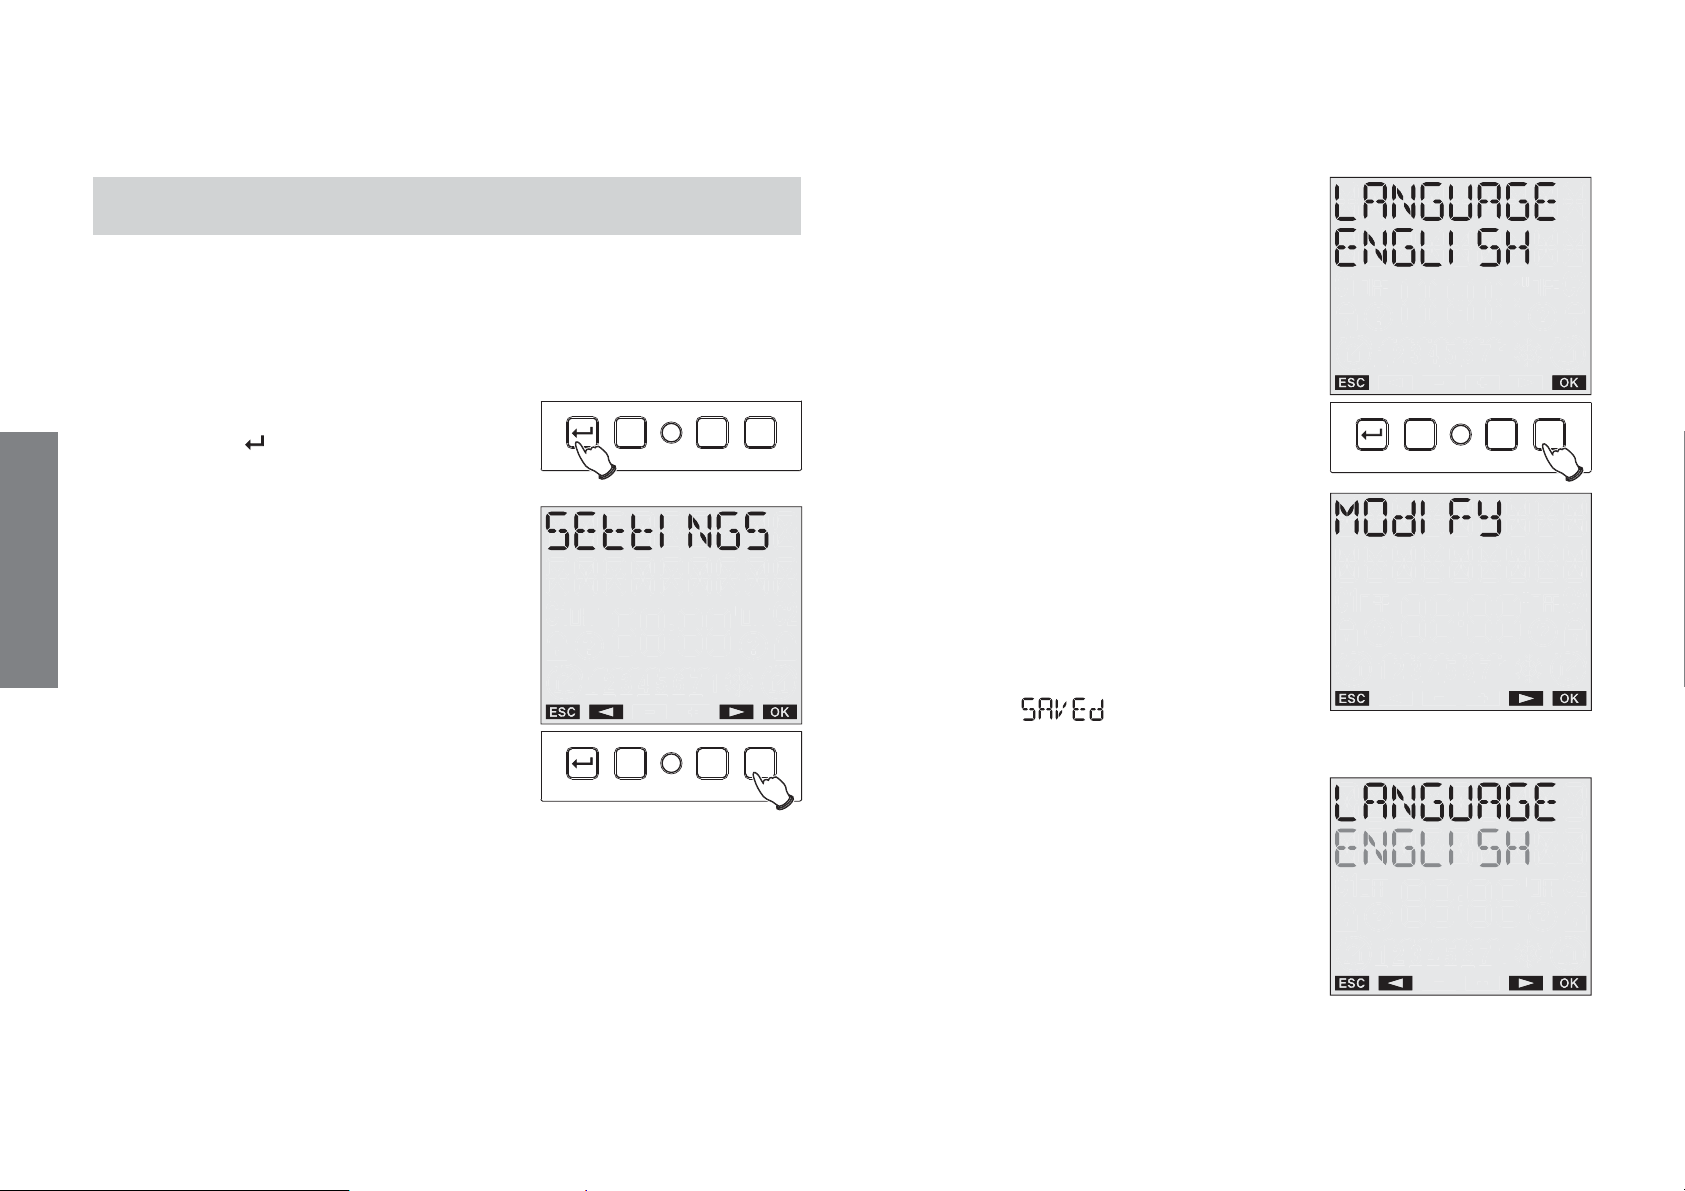
SETTINGS MENU
This menu allows the instrument’s general configuration parameters to
be displayed and eventually modified. These are:
language, date, time, DST, casual programme option and pin.
From the normal operational status
±
press key “ ”
±
choose SETTINGS
using keys “C1” and “C2”
English
±
press “Ok” to confirm.
C1 C2ROk
C1 C2ROk
LANGUAGE Menu
±
choose SETTINGS LANGUAGE using
keys “C1” and “C2”
±
confirm with “Ok”
±
the currently set language is displayed:
press “Ok”
to access the modification
±
choose the language
using keys “C1” and “C2”
±
confirm again with “Ok”
±
on the display appear
the words
The options are:
Italian, English, Spanish,
French and German.
C1 C2ROk
- 22 -
User manual memo DW E
Page 23
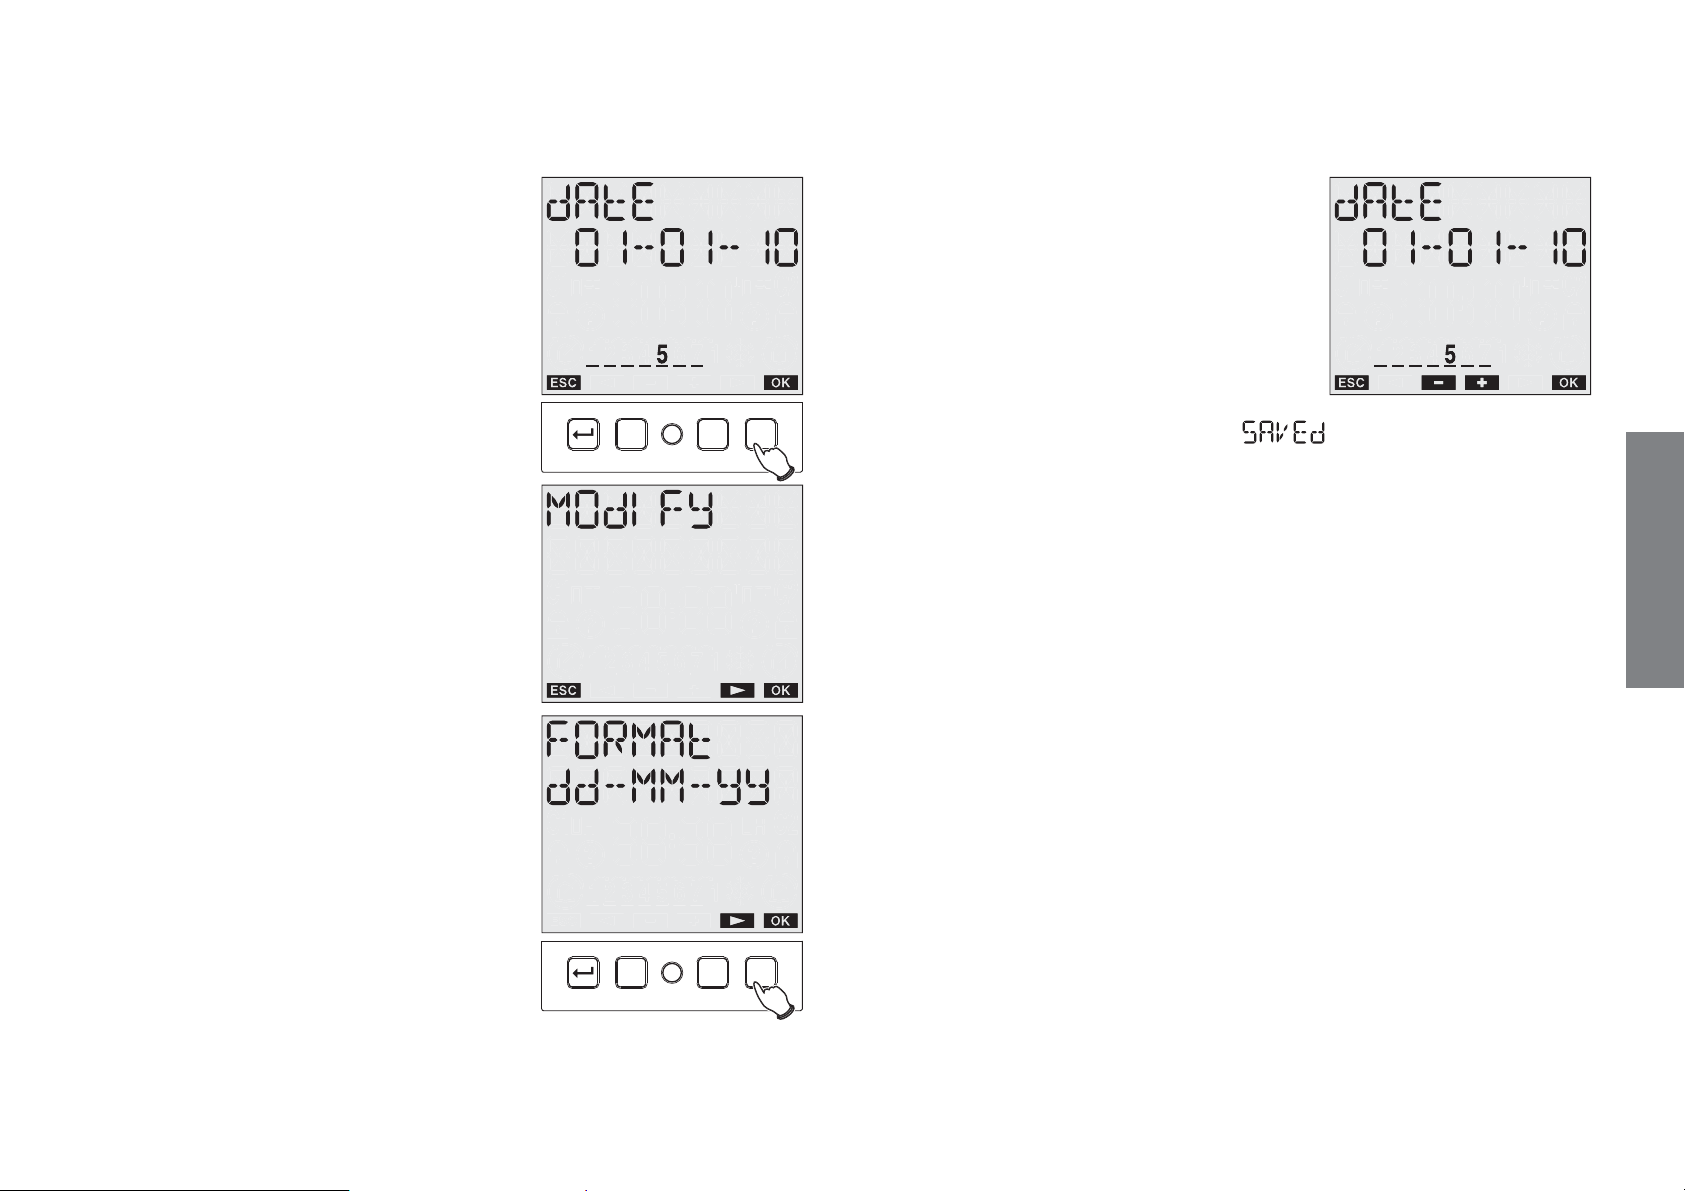
DATE Menu
±
choose SETTINGS DATE
using keys “C1” and “C2”
±
confirm with “Ok”
±
enter the year, month and date
using keys “C1” and “C2”
±
press “Ok” again
to confirm
±
the current date is displayed:
press “Ok”
to access the modification
±
choose the date format
using keys “C1” and “C2”
(dd-mm-yy or yy-mm-dd)
±
confirm with “Ok”
C1 C2ROk
C1 C2ROk
User manual memo DW E
- 23 -
±
On the display appear the words
TIME Menu
±
choose SETTINGS TIME using keys “C1” and “C2”
±
confirm with “Ok”
±
the current time displayed: press “Ok” to access the modification
±
enter hours and minutes using keys “C1” and “C2”
±
press “Ok” again to confirm
±
On the display appear the words
CHANGE CET/DST Menu
DST/CET management can be carried out automatically by the device.
In this case, the instrument:
- increases the current time by one hour when changing from CET to
DST
- decreases the current time by one hour when changing from DST to
CET
English
Page 24
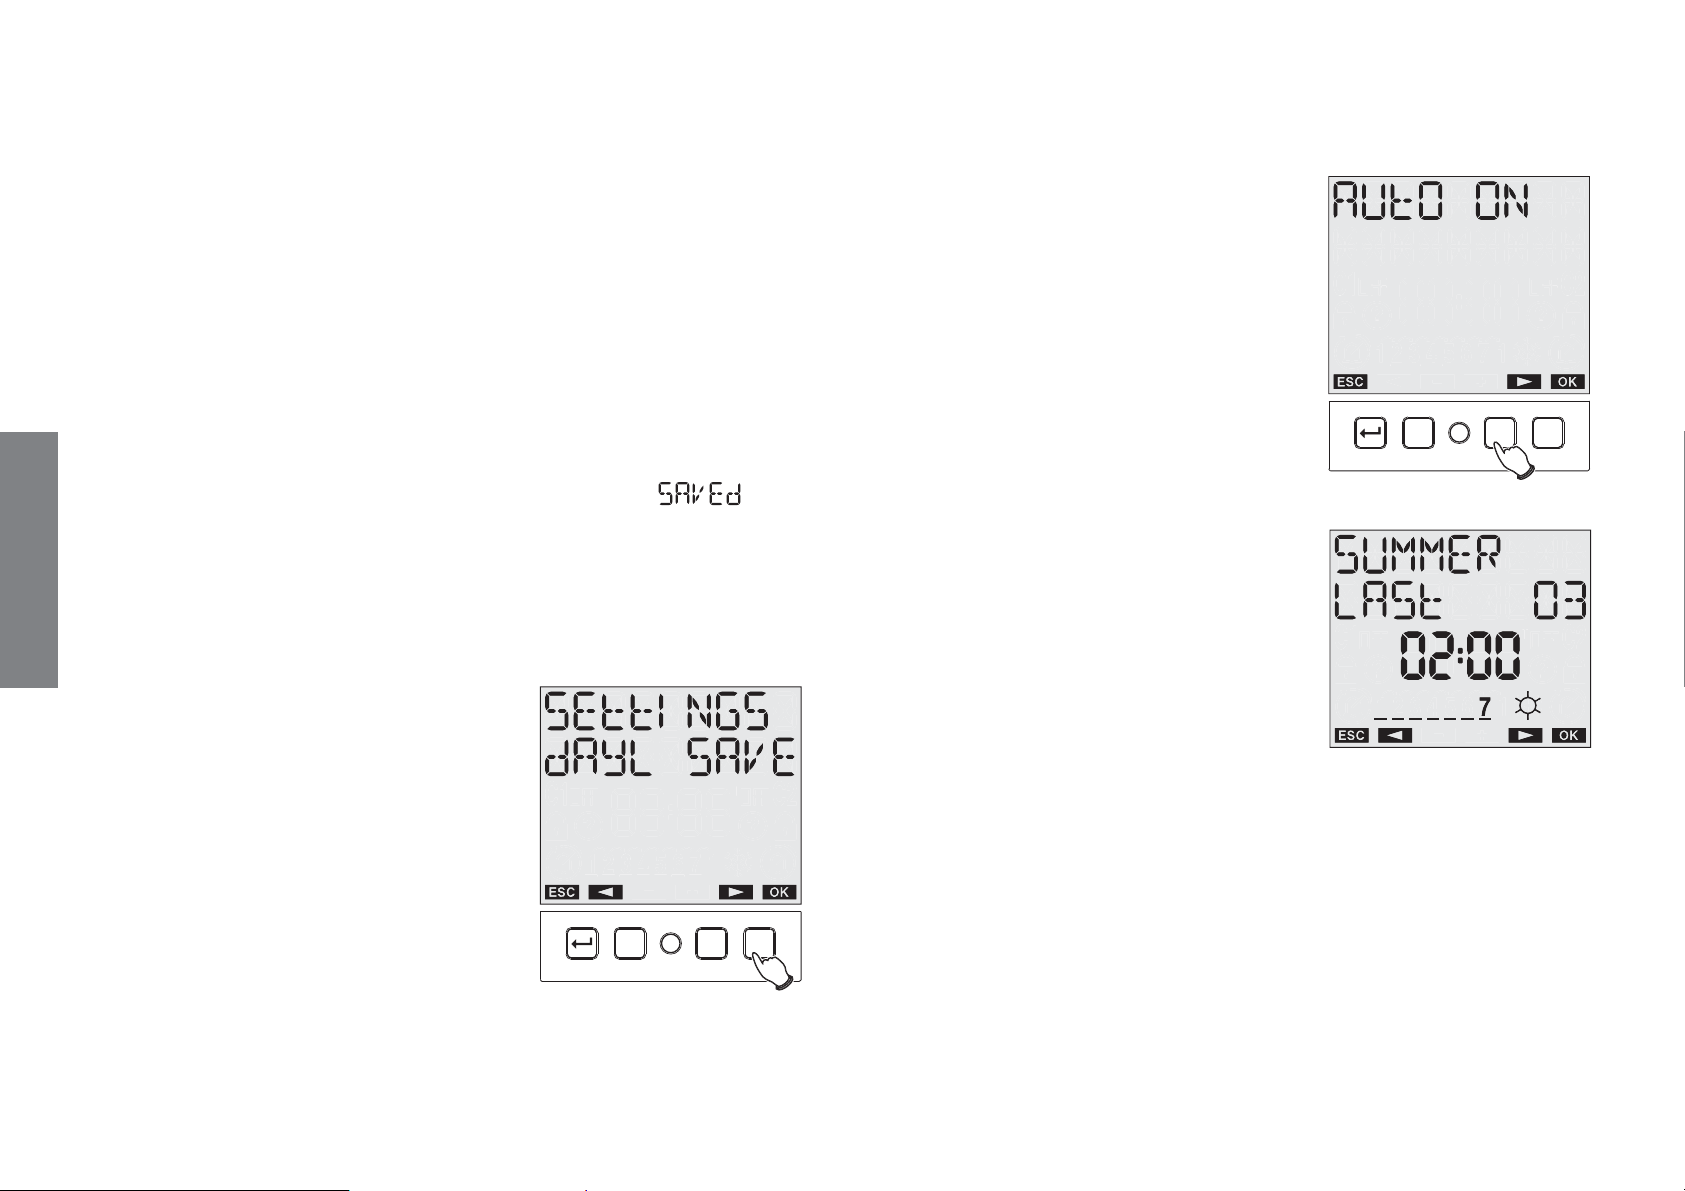
To enable/disable the automatic time change:
±
choose SETTING DAYL SAVE using keys “C1” and “C2”
±
confirm with “Ok”. The current status is displayed (AUTO ON or
AUTO OFF)
±
press “Ok” to enter modification
±
using keys “C1” and “C2” choose whether to activate or deactivate
the function
±
press “Ok” to confirm
If you choose AUTO OFF, on the display appear the words
, otherwise the instrument remains within the menu to allow the time
change days to be set.
English
To set the days and the time in which CET/DST time change occurs:
±
choose SETTINGS DAYL SAVE using
keys “C1” and “C2”
display (should this not happen, see
previous paragraph “Enable automatic
time change”)
±
press key “C2”. The time change
parameters from CET to DST appear
on the display
±
by pressing key “Ok” it is possible
to modify such values. The parameters
to be entered are sequentially:
· week
· month
· day (or date)
· time
C1 C2ROk
±
confirm with “Ok”.
The words AUTO ON appear on the
- week of the month: first 1ST, second
2ND, third 3RD, fourth 4TH, LAST
last (meant for example as the last
Sunday, Monday, ...of the month) or
DATE (to specify a precise date)
C1 C2ROk
- 24 -
User manual memo DW E
Page 25
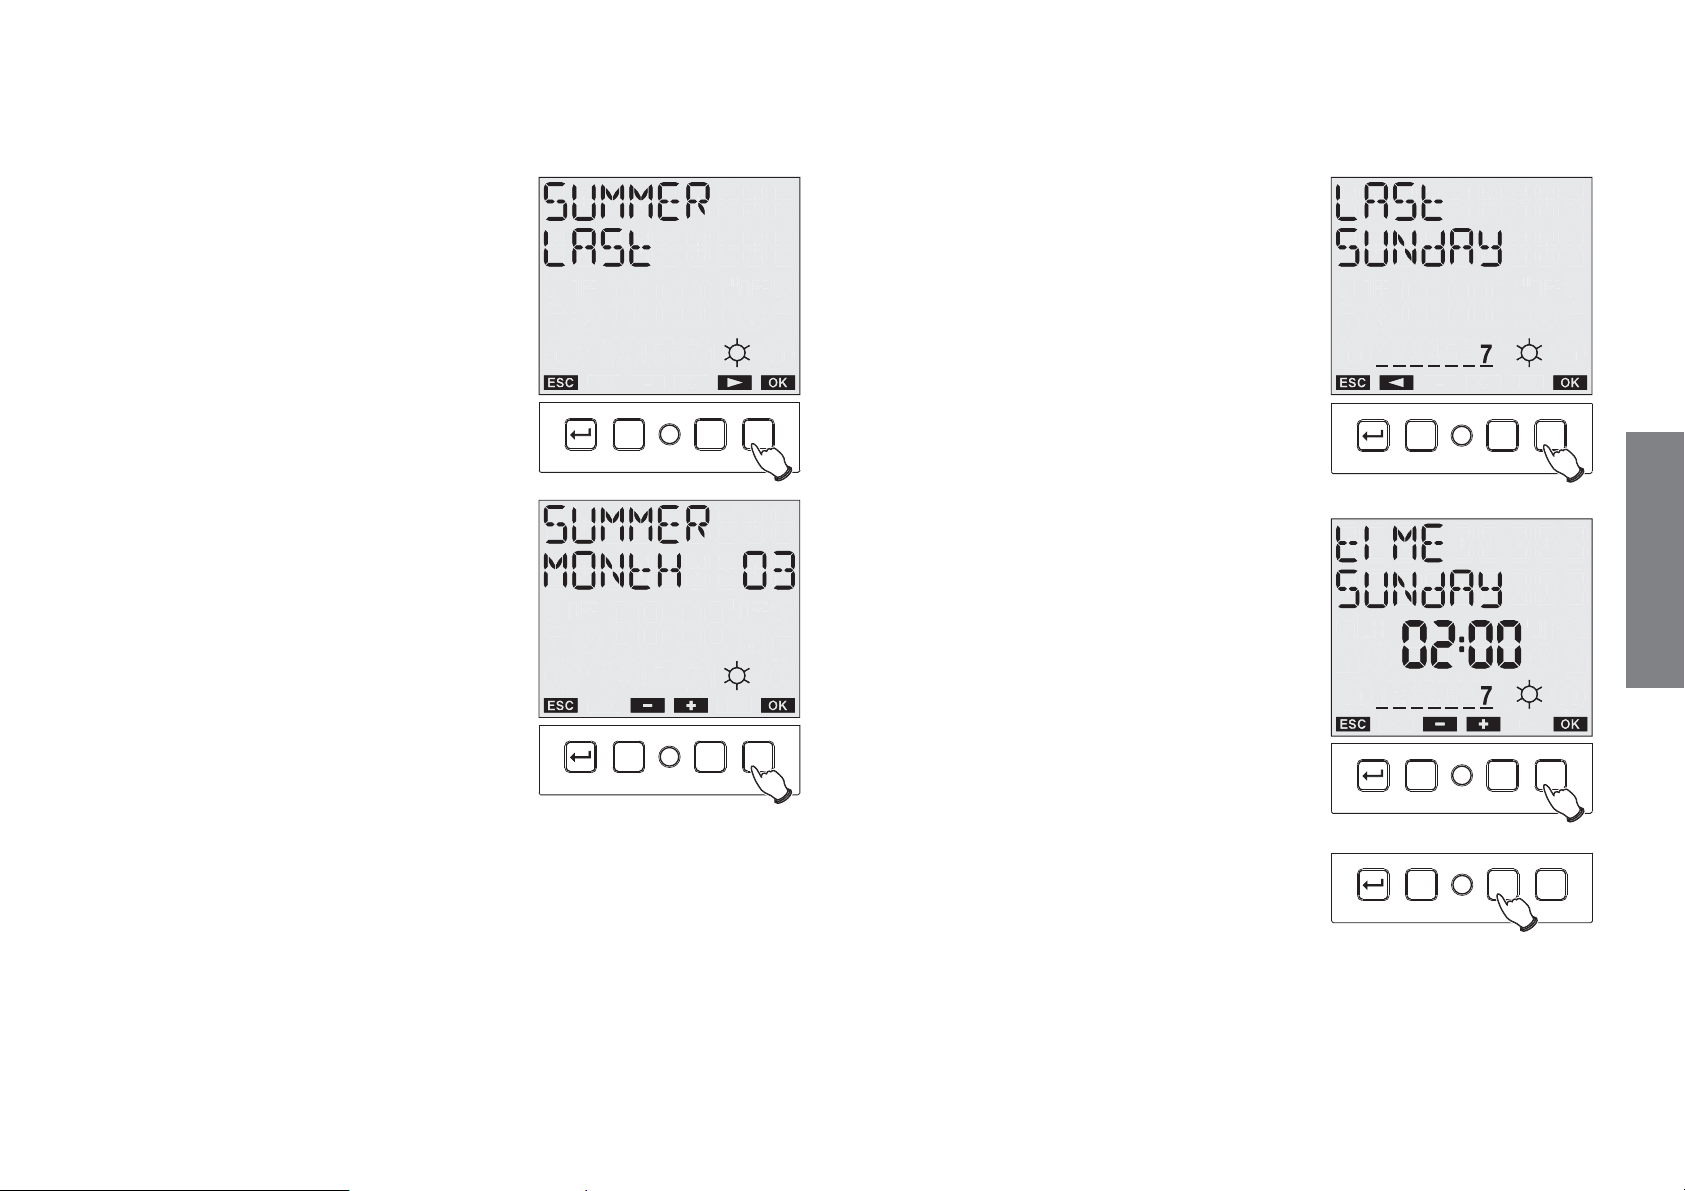
For example, the figure at the top
shows that the time change happens
on the last (LAST) Sunday (7) of
March (03) at 2 (02:00)
- if you have chosen date the day of
the month is requested; in the other
cases you are asked to enter the
day of the week on which the time
change is to happen.
Press “Ok” to confirm
- month of change
C1 C2ROk
C1 C2ROk
- enter the time of the change
Press “Ok” to confirm
- by pressing key “C2” it is possible
to set the moment in which the time
change from CET to DST occurs in
the same way
C1 C2ROk
English
C1 C2ROk
C1 C2ROk
- 25 -
User manual memo DW E
Page 26
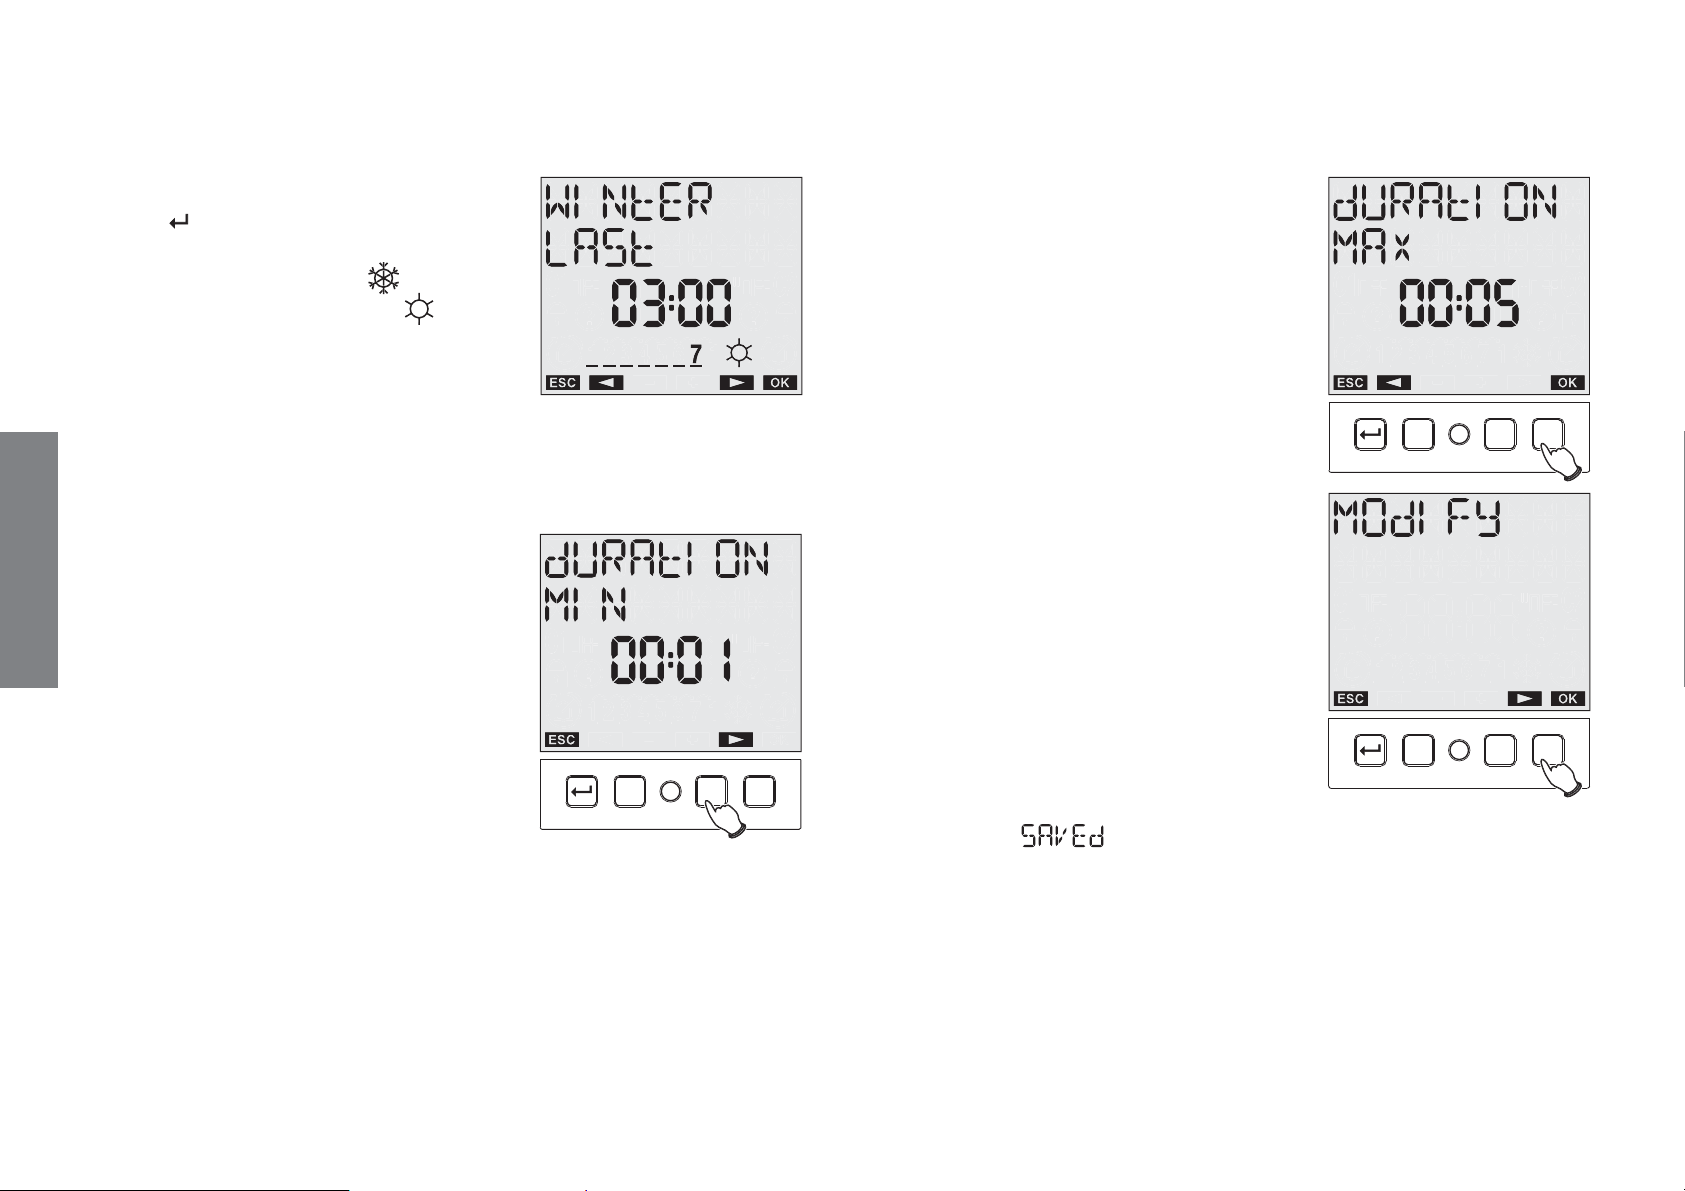
When all the parameters have been set,
press “
” to exit.
Depending on the date, on the instrument
display appears the symbol
during
the CET period (winter) and the
during the DST period (summer).
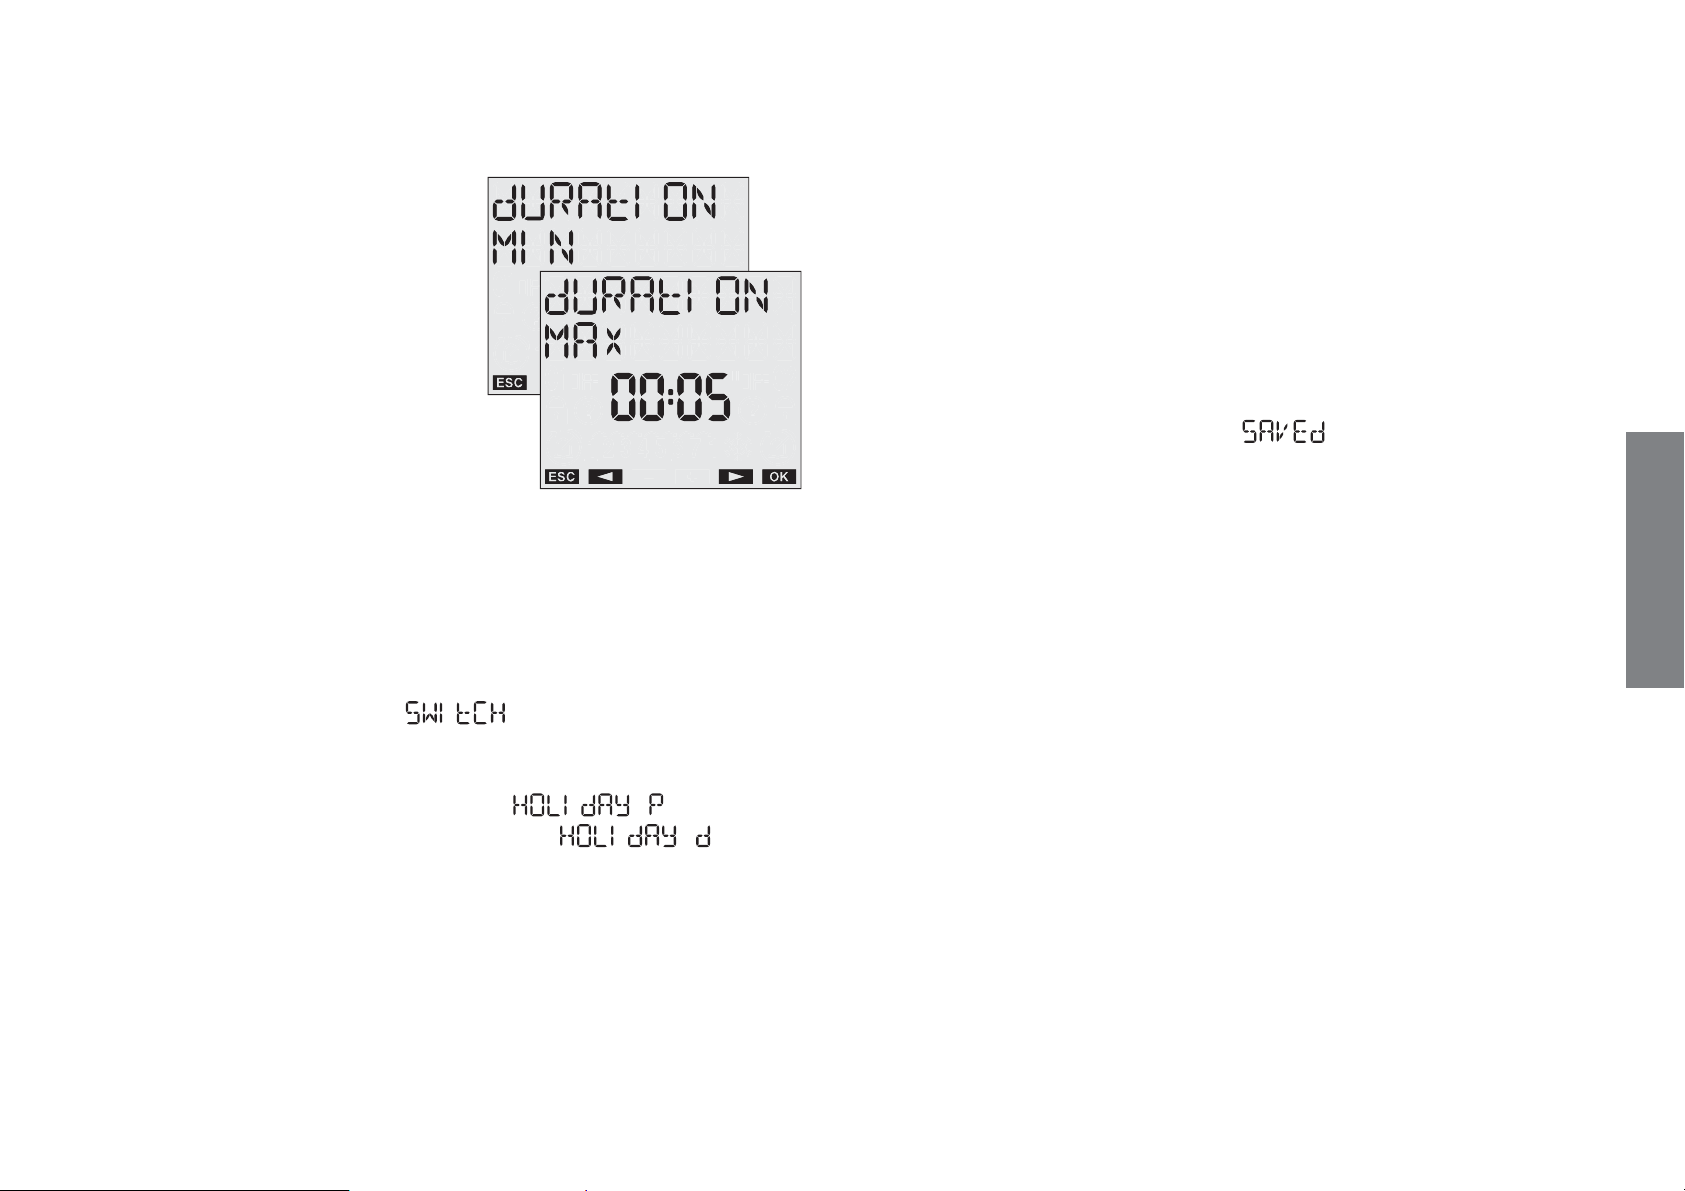
CASUAL PARAMETERS Menu
This menu allows the modification of
the minimum and maximum time which
passes between two switchings when a
casual programme is activated. As default
English
these values are set at 1 and 5 minutes.
±
choose SETTINGS RANDOM using keys
“C1” and “C2”
±
confirm with “Ok” . The minimum
duration value is displayed
±
press “C2” to display the maximum
duration
symbol
C1 C2ROk
±
press “Ok” to enter into modification
±
enter sequentially
− hour, minutes, minimum time
− hour, minutes, maximum time
±
press “Ok” to confirm
±
On the display appear
the words
C1 C2ROk
C1 C2ROk
- 26 -
User manual memo DW E
Page 27
±
the status is shown on the display for each type of switching
(enabled or not)
±
scroll the various types of programmings using keys “C1” and
“C2” and press key “Ok” to access modification of the selected
parameter
±
once in modify, choose keys “C1” and “C2” if you want to enable
or disable the switchings
±
press “Ok” to confirm
±
On the display appear the words
PROGRAMME OPTIONS Menu
This function allows programmed switchings to be impeded,
discriminating them by typology, without having to cancel them from
memory.
It is possible to:
- disable on/off programmes (
)
- disable impulse programmes
- disable cycle programmes
- disable the holiday period programme (
- disable individual day holiday programmes (
±
choose SETTINGS PROGRAM using keys “C1” and “C2”
±
confirm with “Ok” .
±
confirm with “Ok”.
)
)
User manual memo DW E
- 27 -
Note: this function allows one (or more than one) type of programme to
be excluded from automatic operation.
PIN Menu
It is possible to set a protection code to stop anyone from working on
the instrument.
The pin code is a number composed of 4 digits which may assume
values from 1 to 4.
To set the pin code:
±
choose SETTINGS PIN using keys “C1” and “C2”
±
confirm with “Ok”.
±
the four digits composing the current pin code are displayed (0000
corresponds to an inactive pin)
English
Page 28
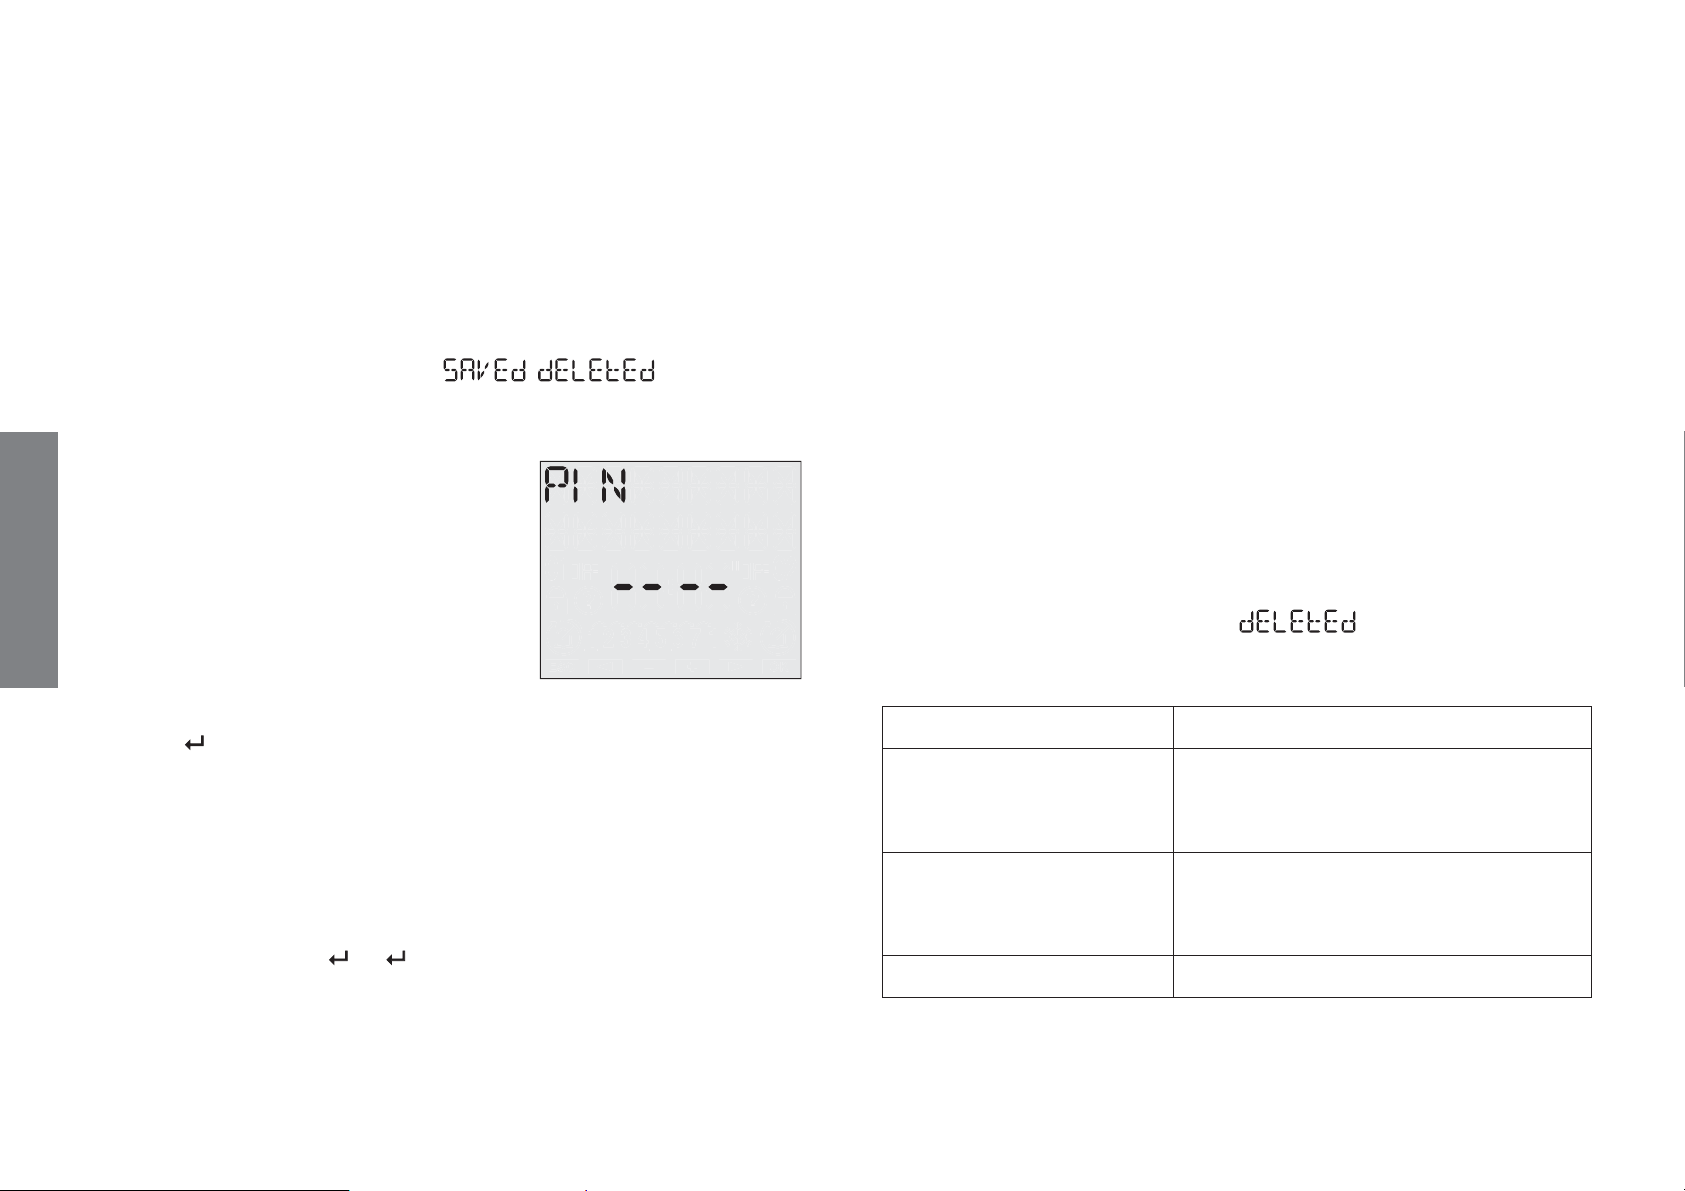
±
confirm with “Ok”.
− choose MODIFY and press “Ok” to insert the new pin code. Use
keys “C1” and “C2” to enter the digits composing the code one
by one and “Ok” to confirm them
− choose RESET should you wish to deactivate the pin code request
±
press “Ok” to confirm
±
on the display appear the words ( in the case of
reset)
RESET SETTINGS Menu
This option resets all settings relative to:
- date format
- automatic change DST/CET
- minimum and maximum time between two casual switchings
- programme options
- pin code
If the pin code request is active, about 3
minutes after the last time the keypad is
pressed, keypad lock is activated. At this
point pressing on the keypad again leads
to a request to enter the pin code.
English
To unlock the instrument simply enter the
pin code according to this rule:
- key “
”: 1
key “C1”: 2
key “C2”: 3
key “Ok”: 4
For example:
pin: 3411 “C2” “Ok” “
” “ ”
To reset the settings:
±
choose SETTINGS RESET using keys “C1” and “C2”
±
confirm with “Ok” .
±
confirm again with “Ok”
±
on the display appear the words
The factory values are reloaded thus:
Date format dd--mm--yy
Change DST/CET
- change summer time
- change winter time
Casual programme
- minimum period
- maximum period
Request PIN 0000 - disactivated
- 28 -
User manual memo DW E
automatic
Last Sunday of March at 02:00
Last Sunday of October 03:00
1 minute
5 minutes
Page 29
METER MENU
RESET MENU
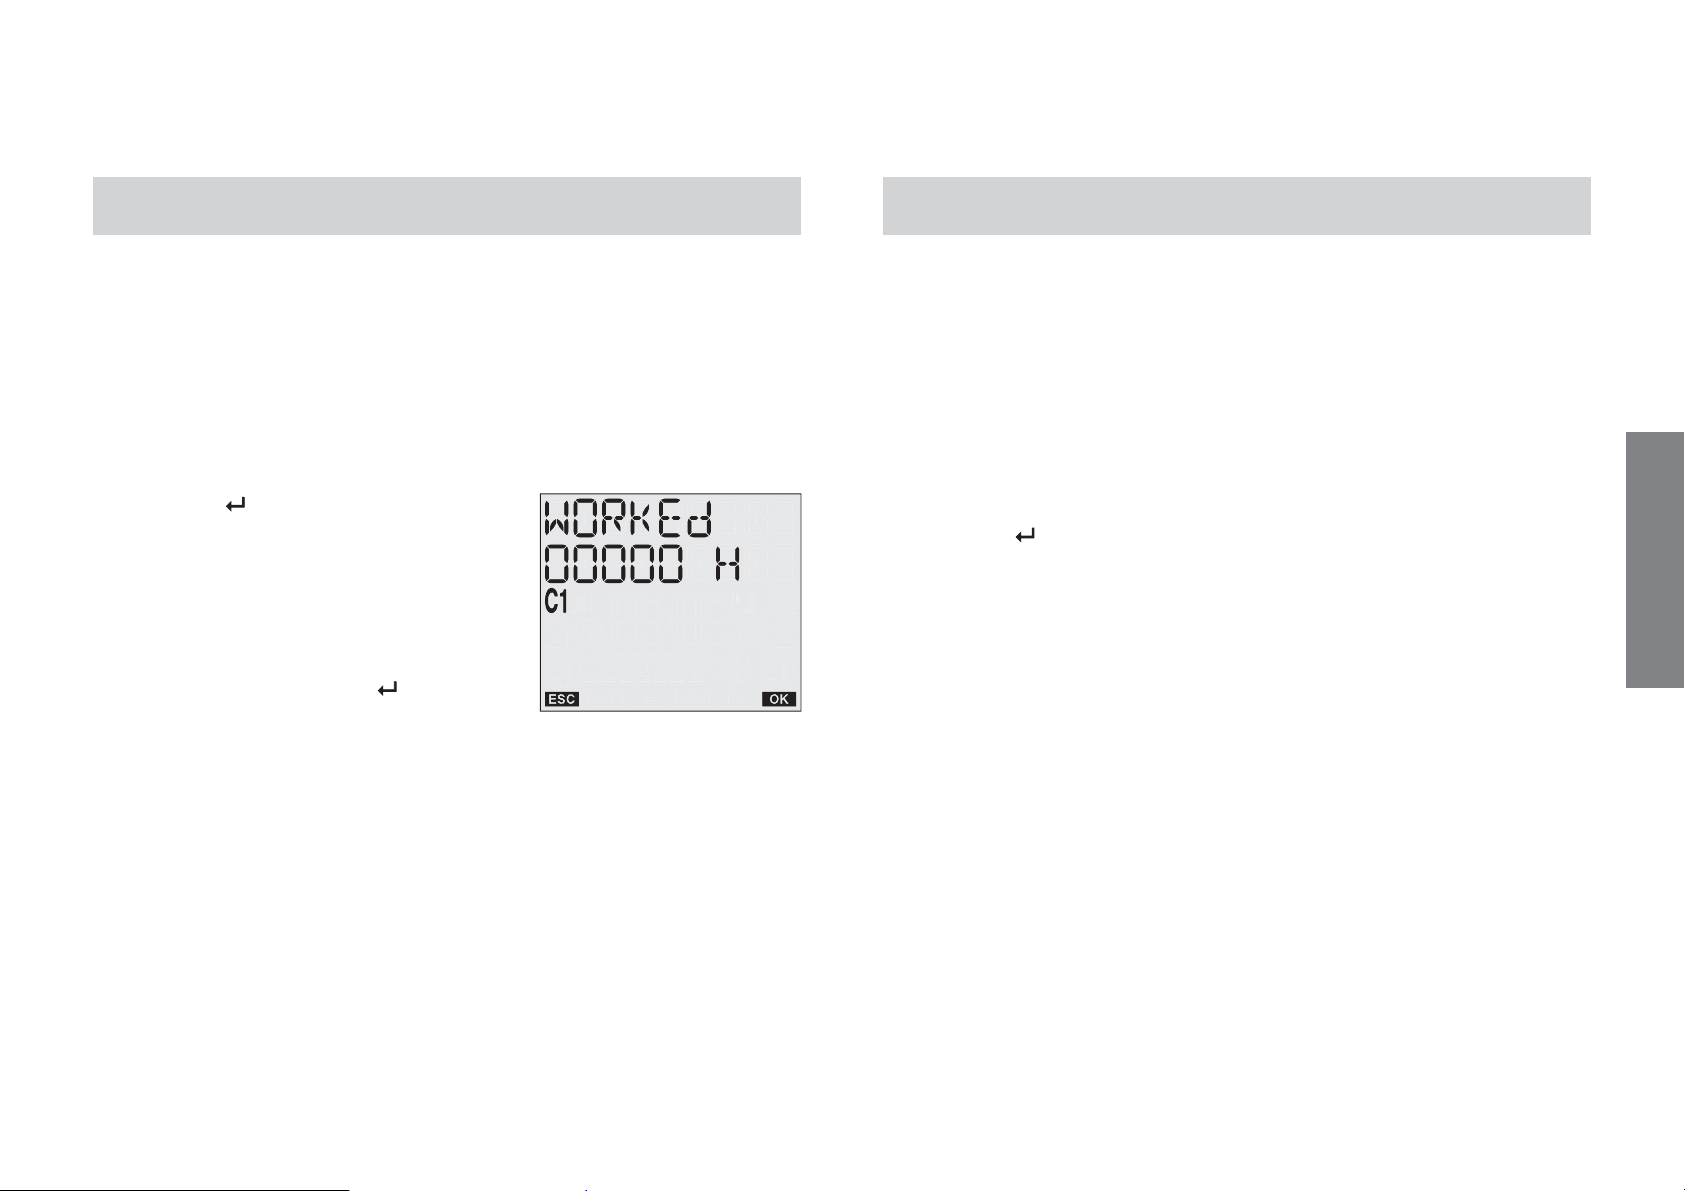
The instrument is equipped with a function which allows load use to be
calculated on a channel.
The counter has a range from 0 to 99999 hours. It resets automatically
once the maximum limit is reached.
To display the meter:
- press key “
- choose the HOUR CNT option using
keys “C1” and “C2” and press “Ok”
to confirm
- by pressing key “Ok” you access the
possibility to reset the meter: once again
press “Ok” to confirm or “
without resetting.
” to enter the menu
” to exit
It is possible to restore the initial status of the instrument using the
reset function. 4 different resets are available:
- reset settings: cancel all the entered settings
- reset programmes: cancel all the saved programmes
- reset meter: reset the working hours meter
- reset all: reset settings+ reset programmes + reset meter
To perform a reset:
- press key “
- choose RESET using keys “C1” and “C2” and press “Ok”
- using keys “C1” and “C2” choose on of the resets listed above and
press “Ok”
- press “Ok” to confirm
To perform a complete instrument reset, restoring the instrument to
factory conditions, you need to use a pointed object to press key
In this way all the settings carried out are cancelled and the initial
conditions restored.
” to enter the menu
“R”.
English
- 29 -
User manual memo DW E
Page 30
BATTERY REPLACEMENT
REFERENCE STANDARDS
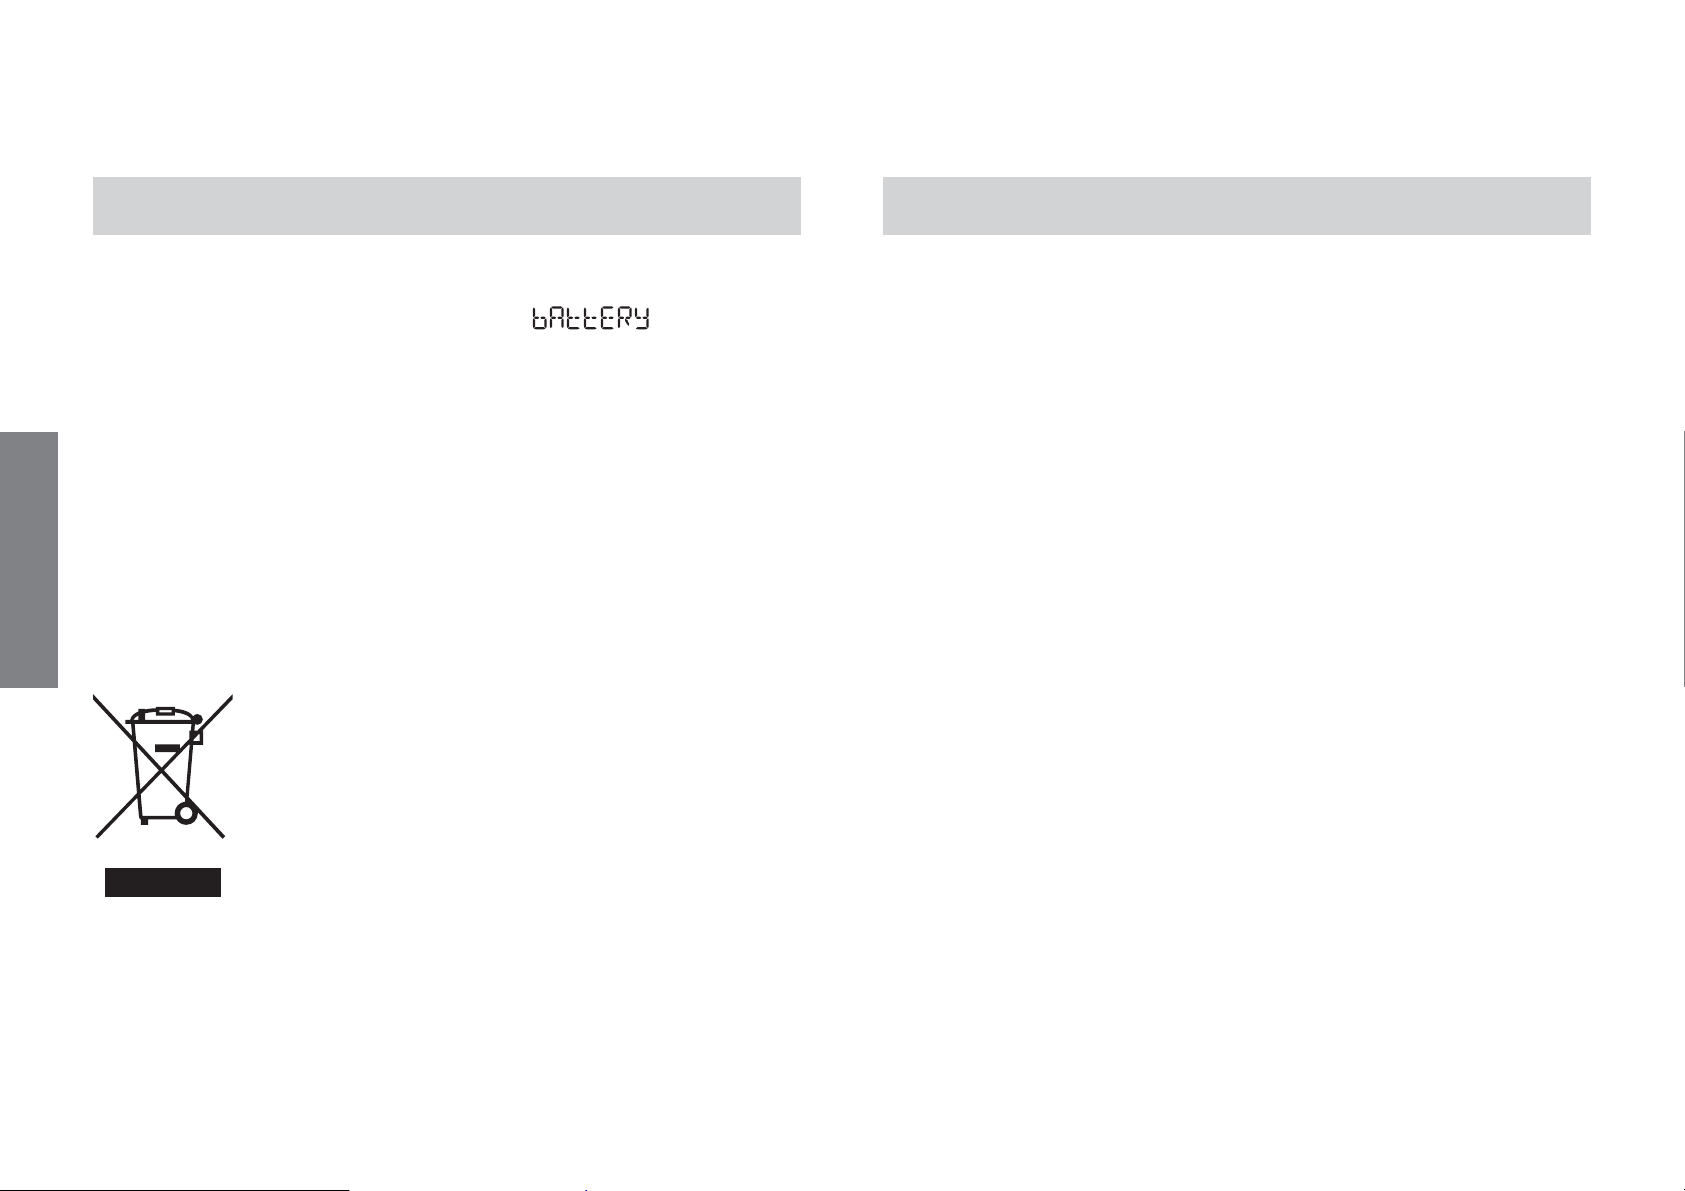
When the battery charge level drops below a certain threshold, on
the first line of the display appear the words
replace the battery as soon as possible.
To replace the battery:
- disconnect the mains
- remove the battery slot cover, turning it anti-clockwise
- replace the battery and remount the cover, turning it clockwise
- connect the power supply
In order not to lose programming and the performed settings it is
English
necessary to make sure that no more than 60 seconds pass between
extracting the flat battery and inserting the new one.
Only use CR-2032 type batteries.
Dispose of the used batteries observing the laws
in force in relation to the disposal of hazardous
waste.
. In this case
Compliance with Community Directives
2006/95/EC (Low Voltage)
2004/108/EC (E.M.C.)
is declared in reference to the harmonized Standards
• EN 60730-2-7
- 30 -
User manual memo DW E
Page 31
TIME MANAGEMENT
TIME MANAGEMENT
o
w
e
r
S
u
p
p
y
35
87
65
Power supply:
12Vac/dc 50/60Hz for model VE462800
24Vac/dc 50/60Hz for model VE463600
Time switch in 2 modules DIN container for the management of electric utilities in time
with maximum precision.
The rear cover of the instrument allows for the replacement of the deplted battery .
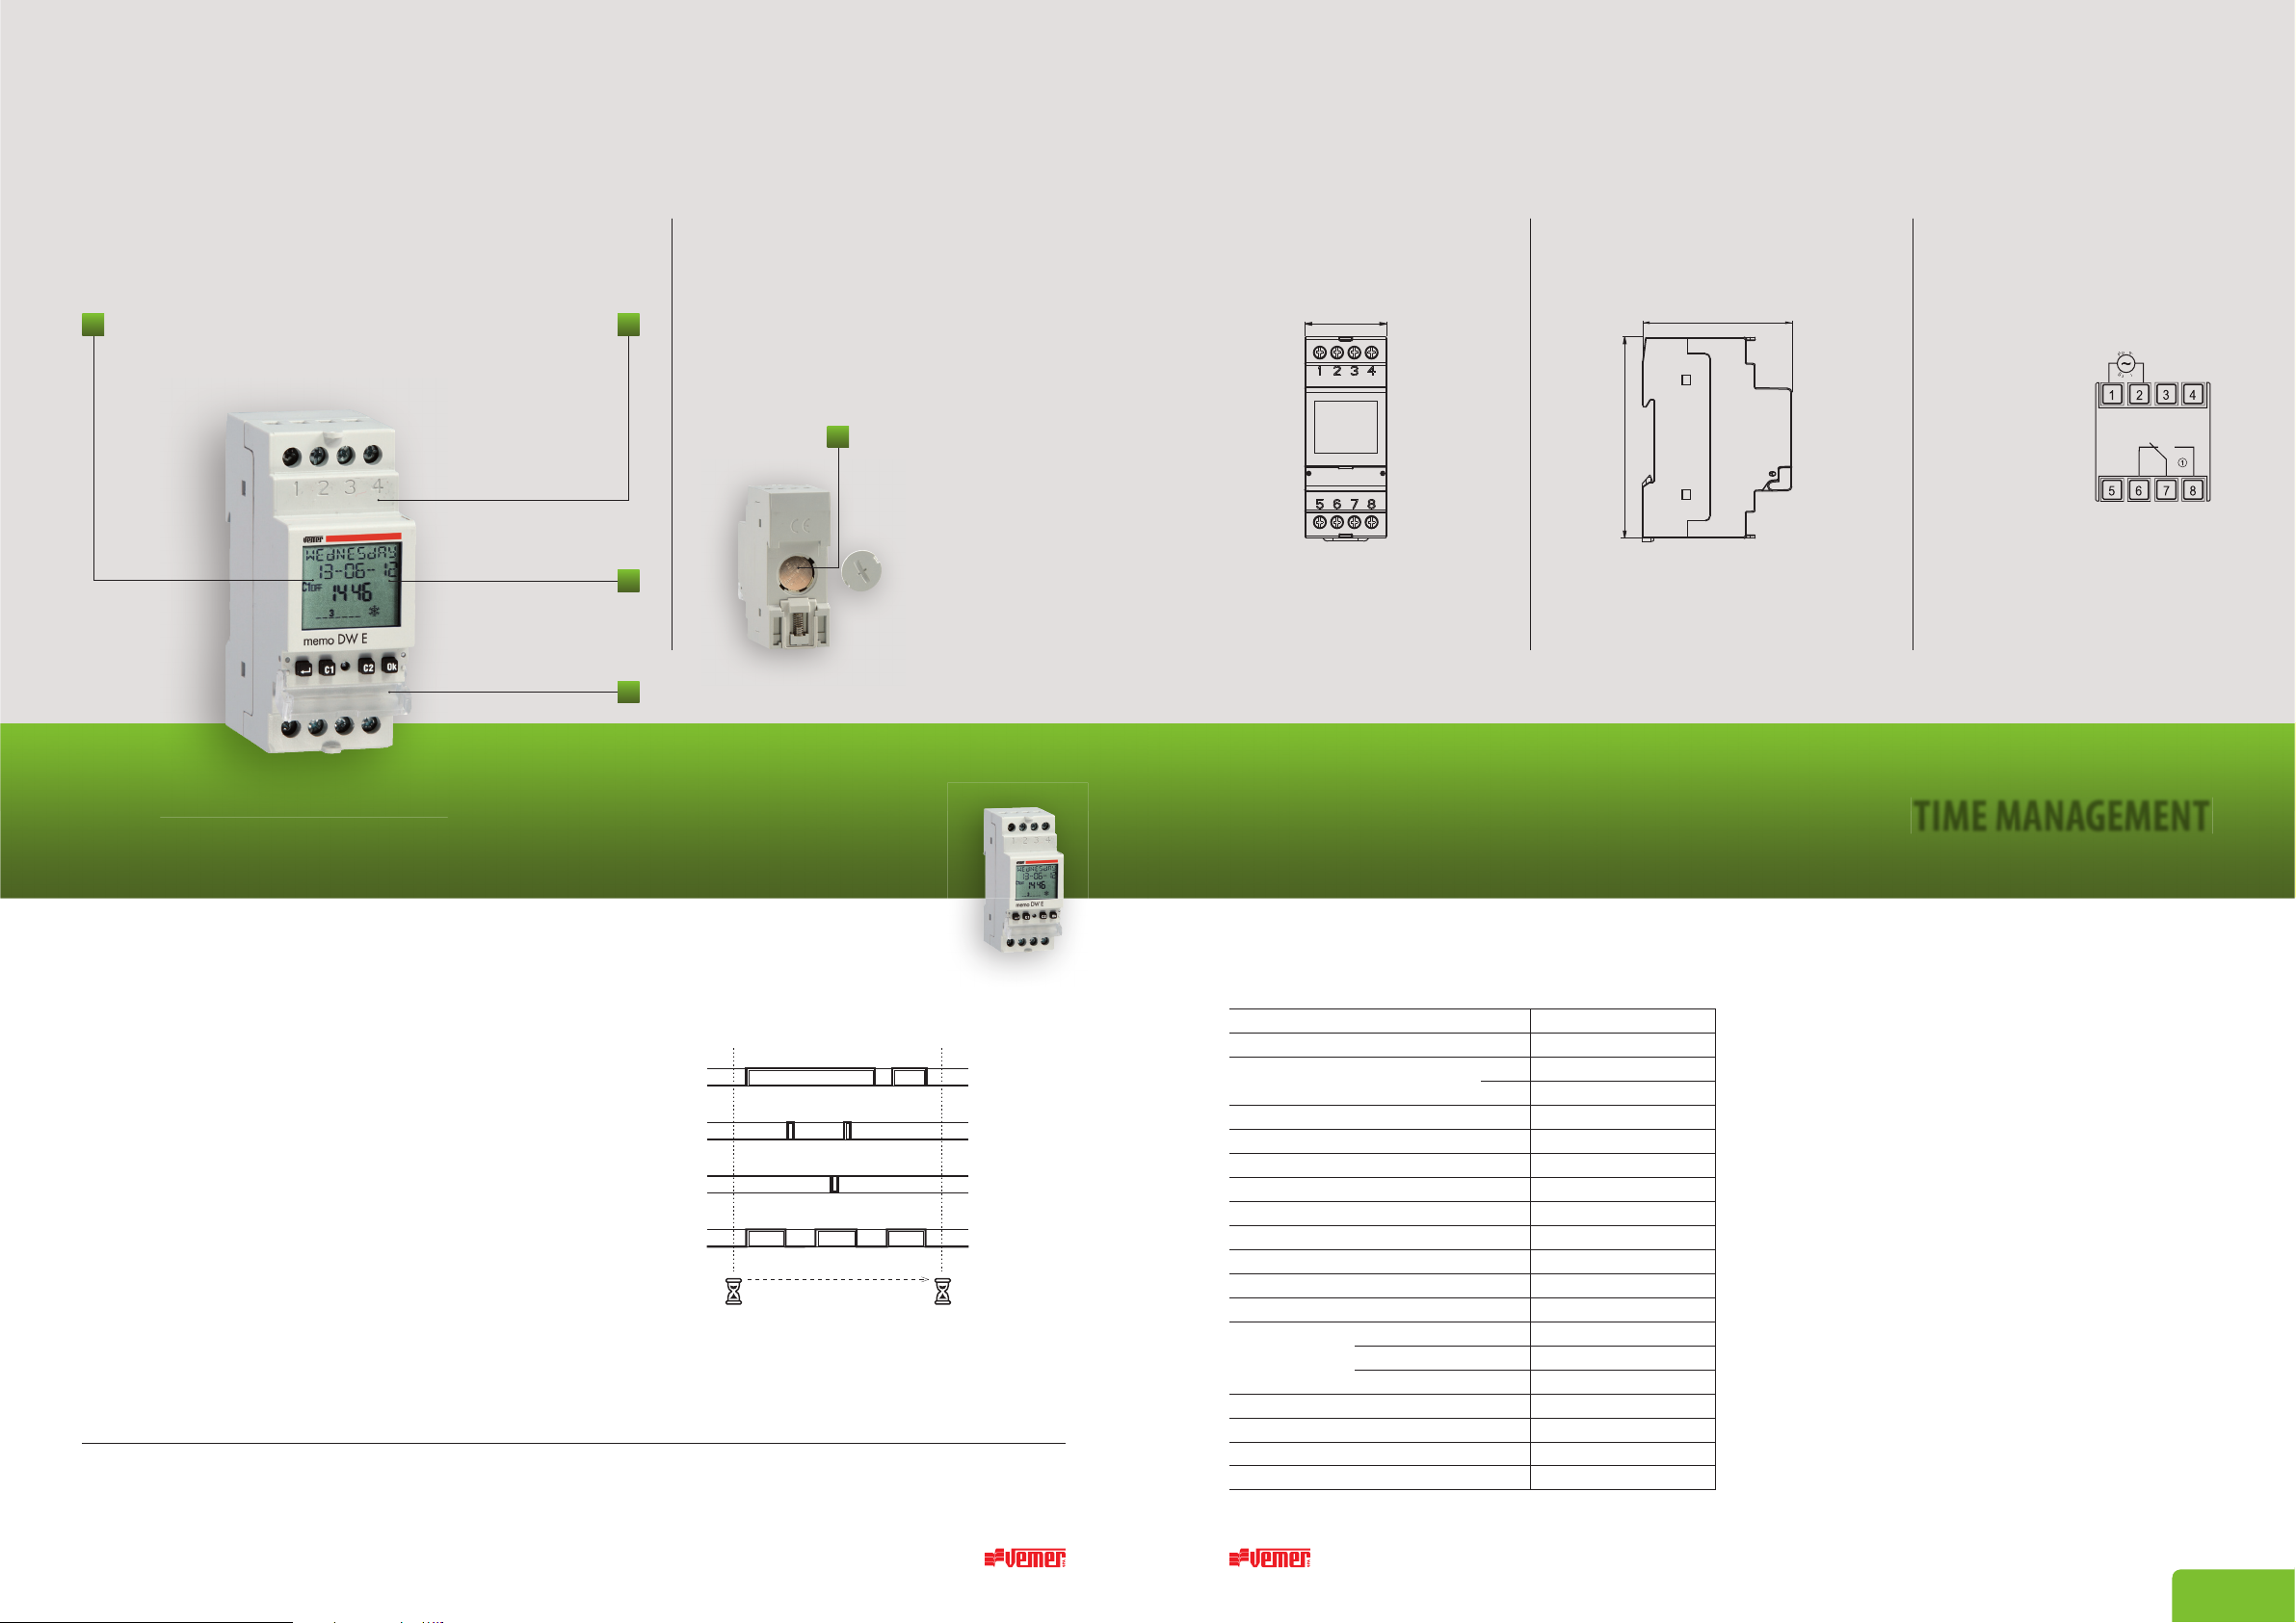
MEMO DW EDigital time switches
1 Wide backlit LCD to visualize date, time and relay
2 Container: 2 modules DIN
3 Text guide
4 Sealable cover
5 Cover on the back for replacing the battery
DAILY/WEEKLY
r
Power supply:
- 12V ac/dc 50/60Hz (±15%) (cod. VE462800)
- 24V ac/dc 50/60Hz (±15%) (cod. VE463600)
r Program ON, OFF, CYCLE, PULSE (1÷59 seconds) HOLIDAY, RANDOM
r Maximum storable programs for each channel:
- 30 events (on, o, cycle, pulse)
- 4 holiday periods (period = more consecutive days)
- 20 holiday days (single days)
r Summertime automatic update
r Manual override of the relay
r Battery life: 3 years (replaceable by opening the rear cover)
r Relays switch on-o if power supply is active
r Depleted battery signal
r Keyboard can be locked with the use of a password
r Display automaticaly shuts-o after 3 minutes of inactivity of the keyboard
Code Model Description Power supply
VE462800 Memo DW E Time switch daily/weekly 1 relay 12Vac/dc
VE463600 Memo DW E Time switch daily/weekly 1 relay 24Vac/dc
TECHNICAL INFORMATION
GENERAL CHARACTERISTICS
DiagramSide viewFront view
CONNECTION DIAGRAMDIMENSIONS (mm)
REFERENCE STANDARDS
Compliance with Community Directives:
2006/95/EC (Low voltage) and 2004/108/
EC (E.M.C.) is declared with reference to the
following standards:
r4BGFUZ&/
r&.$PNQBUJCJMJUZ&/&/
Power supply: cod. VE462800 12 Vac/dc (±15%) 50/60Hz
cod. VE463600 24 Vac/dc (±15%) 50/60Hz
Absorption
VA 8
W 2
Output 1
monostable change-over contact
Relay capacity 250 V AC A 16 (10)
uorescent lamps (a 240V) W 600
incandescent lamps (a 240V) W 1500
halogen lamps (a 240V) W 1500
Duration battery 3 years (Li-ion non-rechargable)
Charge reserve (for battery replacment) 1 minute
Switches in case of powerfail NO
Programming resolution 1 minute
N. programs:
- events 30
- periods 4
- holidays 20
Pulse time s 1 ÷ 59
Operating temperature °C 0 ÷ +50
Storage temperature °C
Degree of protection IP20 / IP41 (frontal)
Programs
ON and OFF
CYCLE
(Event consisting of sequence
of switch-on and switch-o
UIBUJTSFQFBUFEFWFSZEBZT
always in the same mode.
The maximum duration is
one week)
PULSE ON
(max 59 seconds)
PULSE OFF
(max 59 seconds)
Time step
1
5
2
3
4
 Loading...