

Page 1
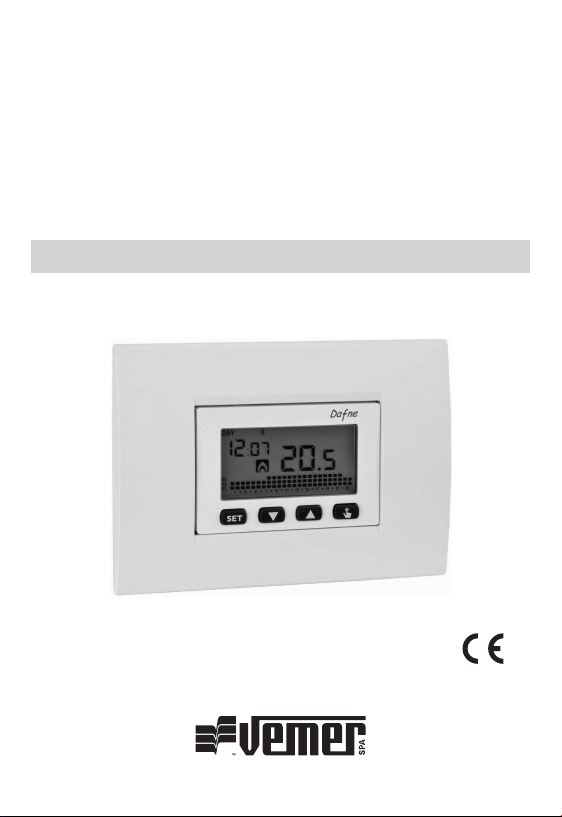
Digital
chronothermostat
Dafne
User manual
Page 2

Page 3

Index
■ Package Content Page 3
■ Connection diagrams Page 3
■ Mounting Page 4
■ Safety warnings Page 18
■ Technical characteristics Page 19
■ Display and key Page 20
■ Installation Page 21
■ Programming menu Page 22
- Time and date modification Page 24
- Programs modification Page 25
- Temperatures modification T1, T2, T3 Page 26
- Timing setting Page 28
- Advanced functions menu Page 29
■ Manual operation Page 32
■ Off Operation Page 33
■ Backlighting management Page 35
■ Minimum and maximum values Page 36
■ Summer time change Page 36
■ Regulation type Page 38
■ Timings: what they are Page 40
■ Device reset Page 42
■ Battery replacement Page 42
■ Reference Standards Page 43
■ Default values Page 44
■ Winter preset programs Page 45
■ Summer preset programs Page 46
English
- 1 -
Dafne chronothermostat, user’s manual
Page 4
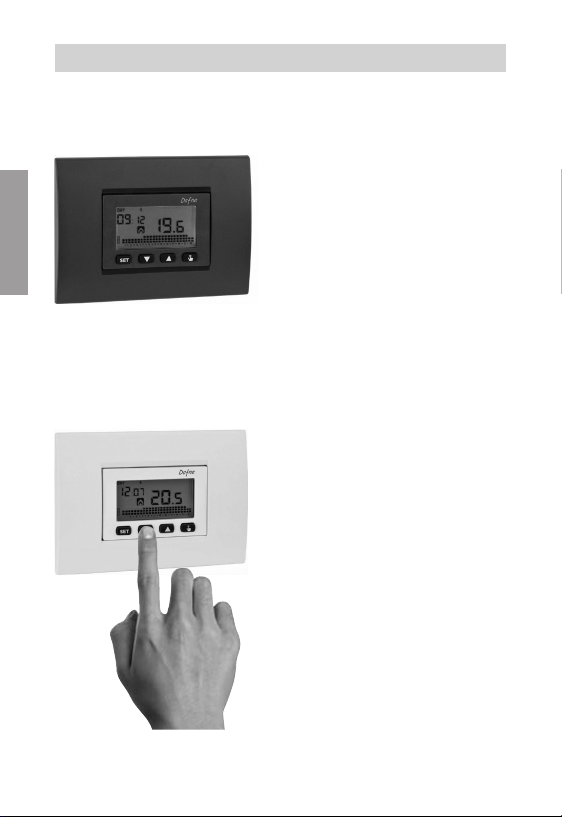
Dafne digital chronothermostat
• Summer and winter operation
modes
• Covers of white and grey anthracite
colour included in the package
(silver available on request)
English
• Battery or 230V power supply
• 7 programs available for heating
operation
7 programs available for cooling
operation
• Flush-mounting in three modules
box (503 type)
• Weekly programming with 3
settable temperature levels
- 2 -
Dafne chronothermostat, user’s manual
Page 5
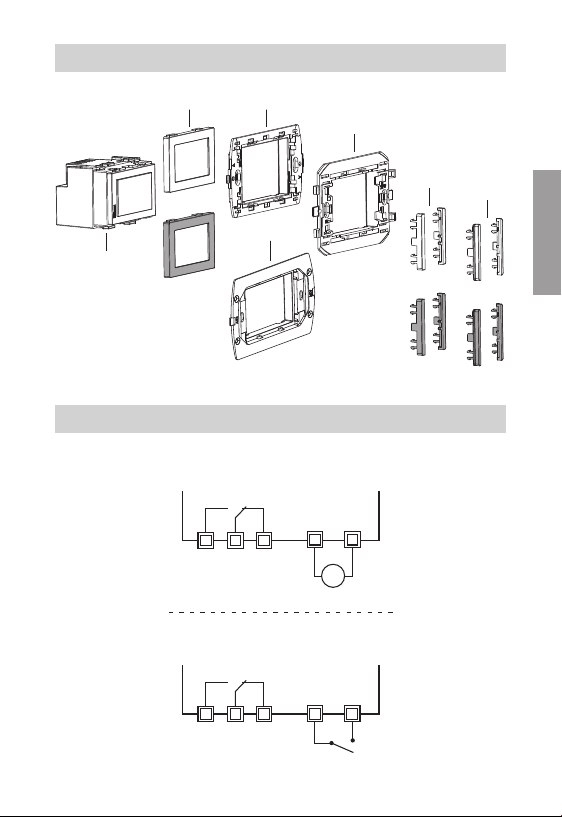
CONTENT OF THE PACKAGE
Dafne 230
Off
chronothermostat
covers
mount A
mount B
plastic
elements
VI
mount AIR
covers and plastic elements are available in white and grey anthracite colours
CONNECTION DIAGRAMS
L
N
1 2 3
NA
NO
COM
Dafne
4 5
NC
230V~
plastic
elements
BM
English
1 2 3
NO
NA
Dafne chronothermostat, user’s manual
4 5
NC
COM
- 3 -
Page 6
English
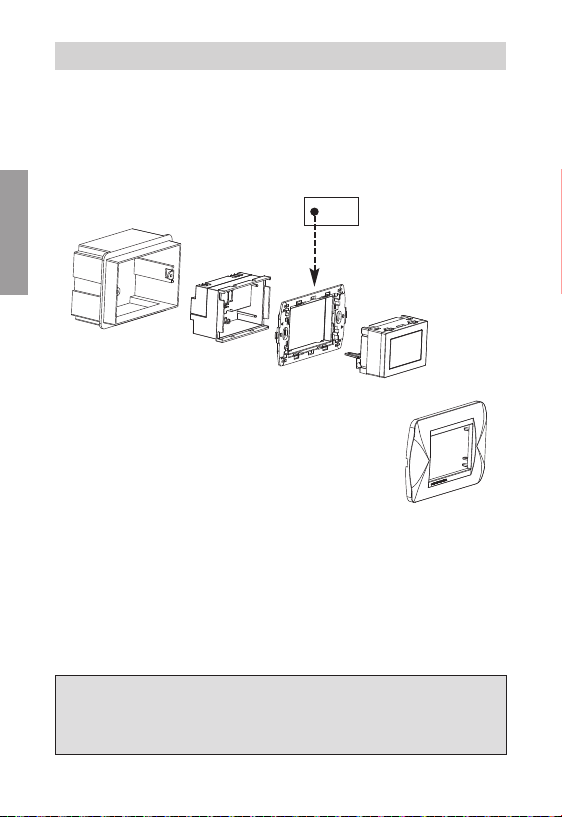
BATTERY DAFNE MOUNTING
A
Bticino Living series, Light, Light Tech, Livinglight, Axolute
Vimar Eikon series, Eikon Evo, Plana
Ave S44 series – ABB Mylos series
- 4 -
Dafne chronothermostat, user’s manual
Page 7
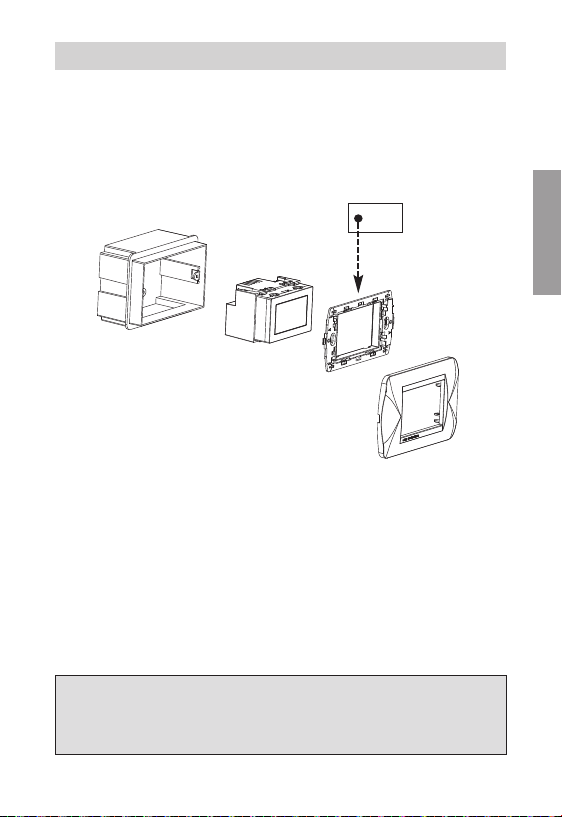
DAFNE 230 MOUNTING
A
English
Bticino Living series, Light, Light Tech, Livinglight, Axolute
Vimar Eikon series, Eikon Evo, Plana
Ave S44 series – ABB Mylos series
- 5 -
Dafne chronothermostat, user’s manual
Page 8
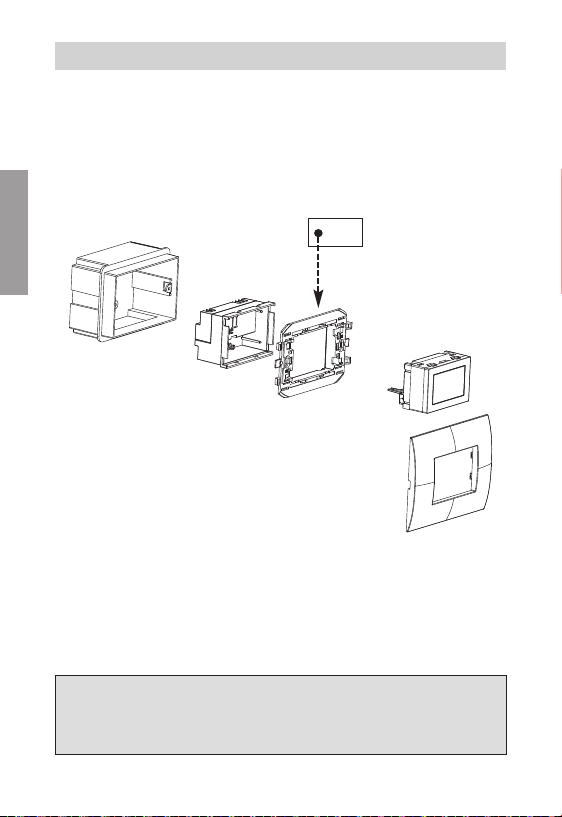
English
BATTERY DAFNE MOUNTING
B
ABB Chiara series
Vimar Arké series
- 6 -
Dafne chronothermostat, user’s manual
Page 9
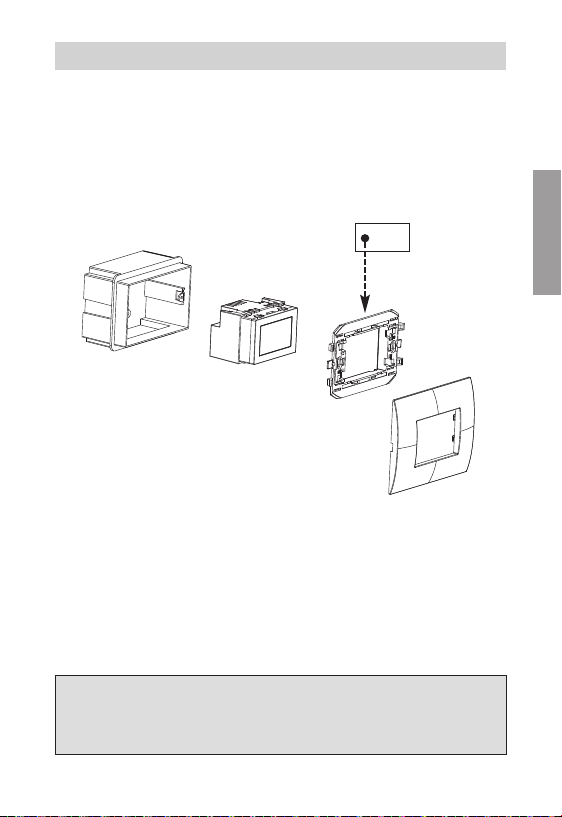
DAFNE 230 MOUNTING
ABB Chiara series
Vimar Arké series
- 7 -
Dafne chronothermostat, user’s manual
B
English
Page 10
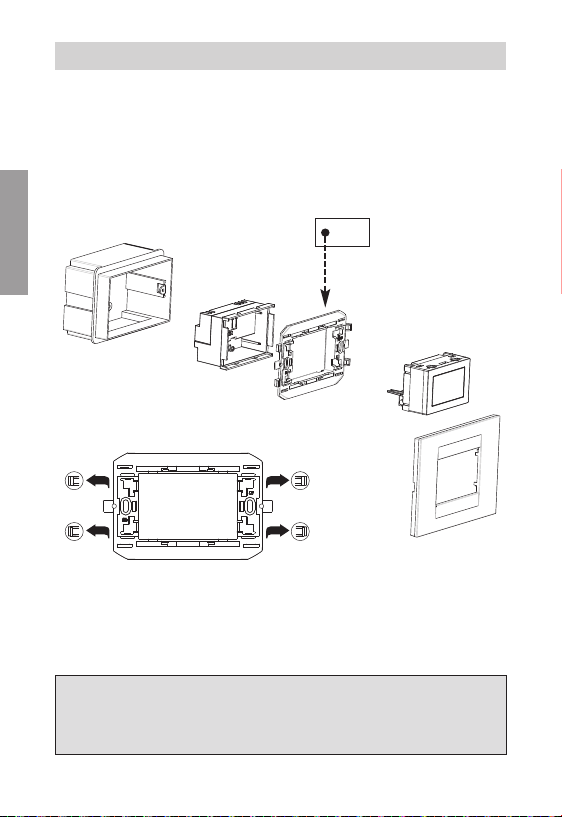
English
BATTERY DAFNE MOUNTING
B
Remove the cogs
Gewiss Chorus series
- 8 -
Dafne chronothermostat, user’s manual
Page 11
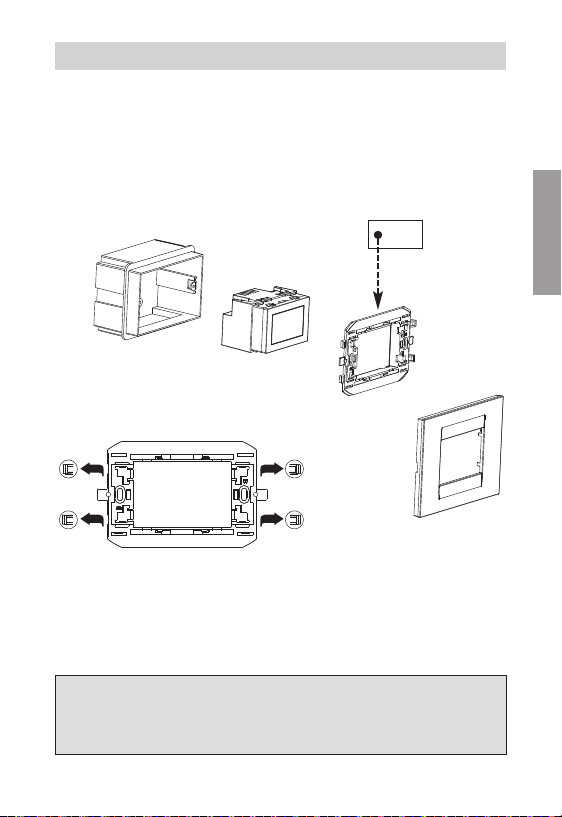
DAFNE 230 MOUNTING
Remove the cogs
Gewiss Chorus series
- 9 -
Dafne chronothermostat, user’s manual
B
English
Page 12
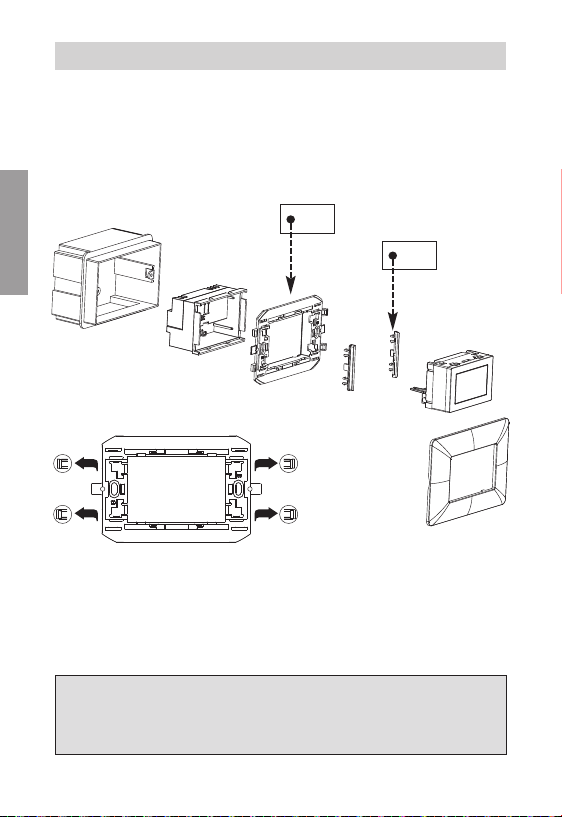
BATTERY DAFNE MOUNTING
B
English
Remove the cogs
Bticino Matix series
- 10 -
Dafne chronothermostat, user’s manual
BM
Page 13
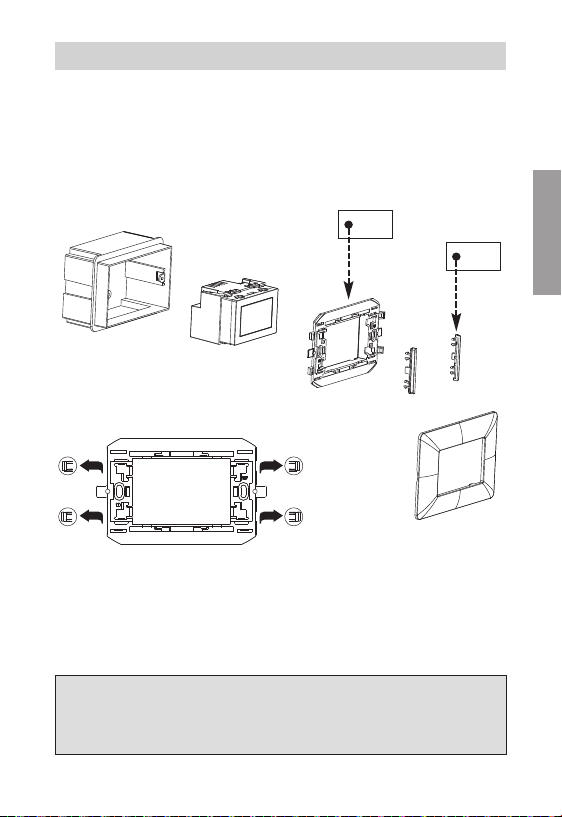
DAFNE 230 MOUNTING
Remove the cogs
B
BM
English
Bticino Matix series
- 11 -
Dafne chronothermostat, user’s manual
Page 14
English
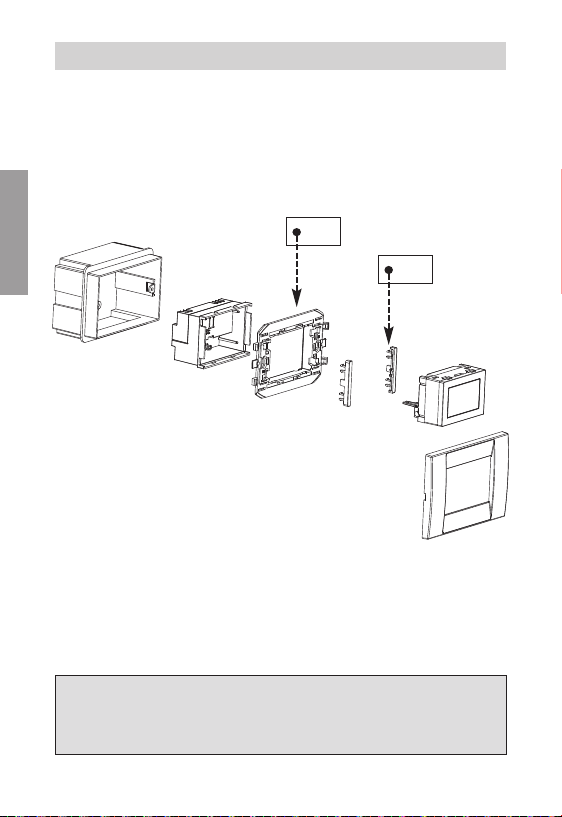
BATTERY DAFNE MOUNTING
B
VI
Vimar Idea series
- 12 -
Dafne chronothermostat, user’s manual
Page 15
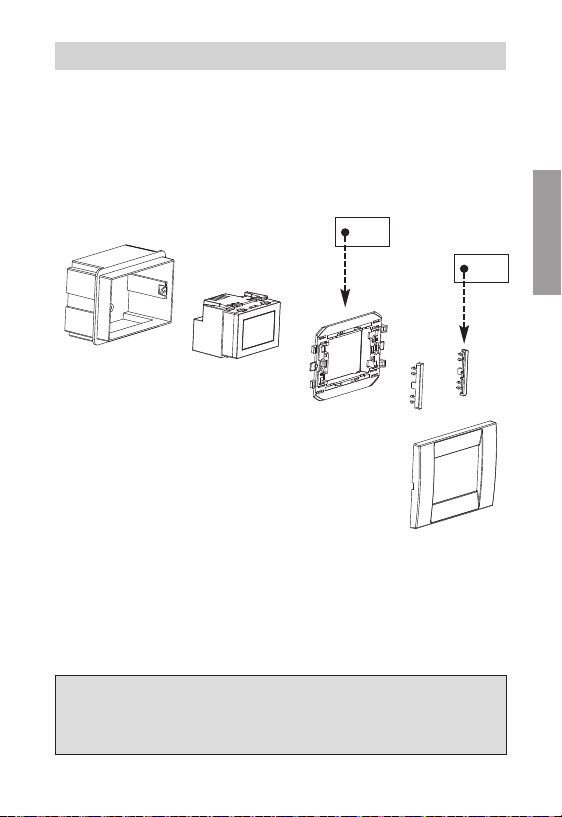
DAFNE 230 MOUNTING
B
VI
English
Vimar Idea series
- 13 -
Dafne chronothermostat, user’s manual
Page 16
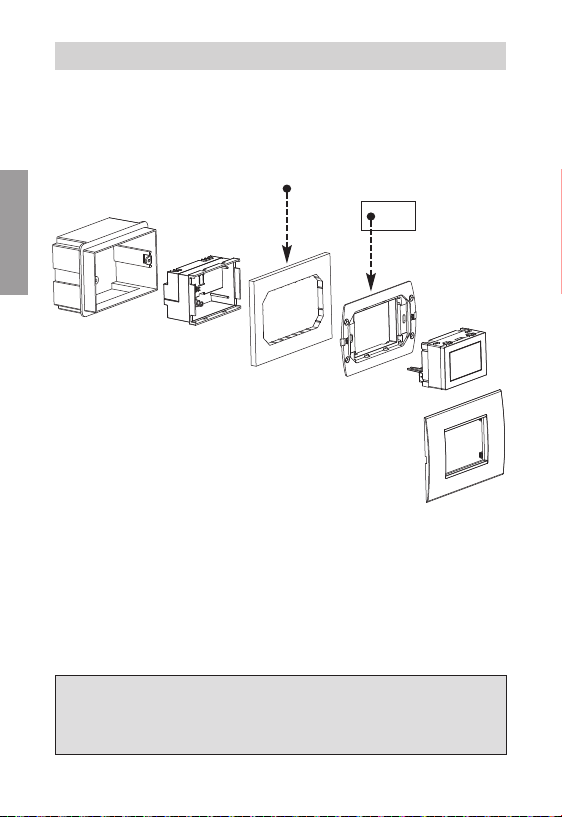
BATTERY DAFNE MOUNTING
*
English
* Note: if the box extension is not present (adapter which increases the
depth of the flush-mounting box) we recommend you using the frame
for Livinglight AIR installation
AIR
Bticino Livinglight AIR series
- 14 -
Dafne chronothermostat, user’s manual
Page 17
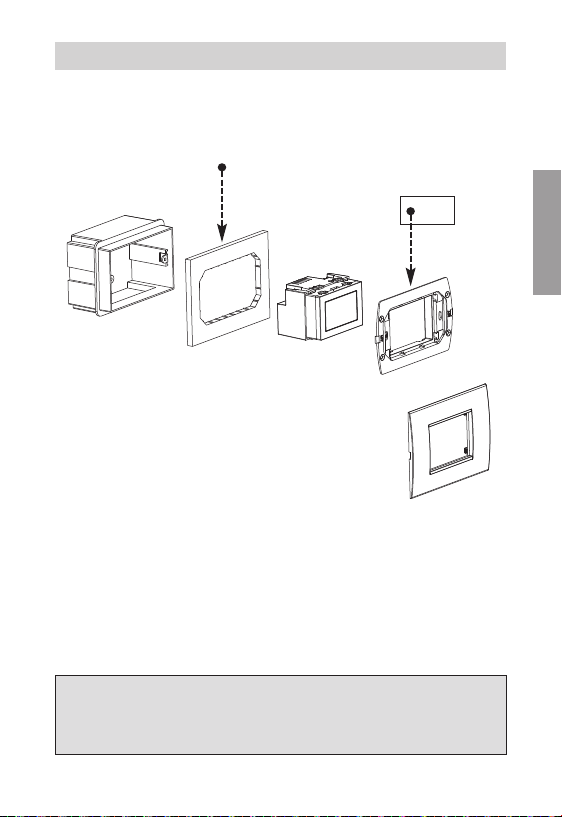
DAFNE 230 MOUNTING
*
* Note: if the box extension is not present (adapter which increases the
depth of the flush-mounting box) we recommend you using the frame
for Livinglight AIR installation
AIR
English
Bticino Livinglight AIR series
- 15 -
Dafne chronothermostat, user’s manual
Page 18
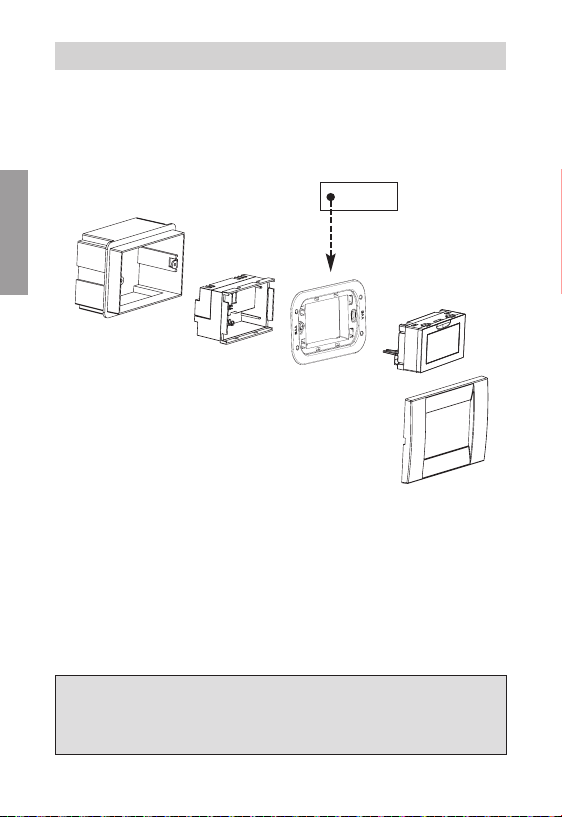
BATTERY DAFNE MOUNTING
English
AXO AIR mount not included in the package.
AXO AIR
Bticino Axolute AIR series
- 16 -
Dafne chronothermostat, user’s manual
Page 19
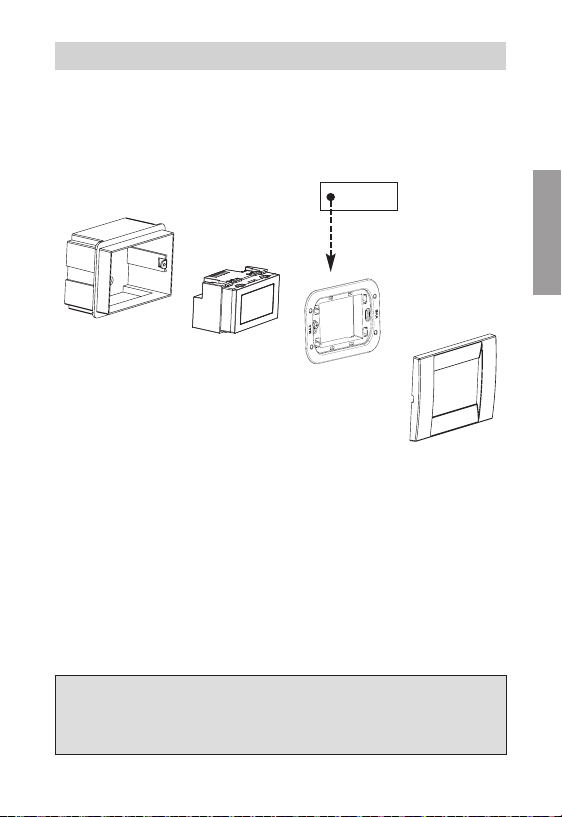
DAFNE 230 MOUNTING
AXO AIR mount not included in the package.
AXO AIR
English
Bticino Axolute AIR series
- 17 -
Dafne chronothermostat, user’s manual
Page 20

Electronic chronothermostats series with flush-mounting in
3 modules box (503 type) suitable for the temperature control in household.
Two versions are available:
■
Dafne, with battery power supply and input for external contact with whom to
switch on/to switch off the chronothermostat remotely (by telephone)
■
Dafne 230, with mains power supply
These instruments perform actions of 1B type and are intended for operating in
environments Pollution degree 2 and Overvoltage Category III (EN 60730-1).
English
SAFETY WARNINGS
■ During installation and operation product it is necessary to observe the
following instructions:
1) The device must be installed by a qualified person, in strict compliance with
the connection diagrams.
2) Do not power or connect the device if any part of it is damaged
3) After installation, inaccessibility to the connection terminals without
appropriate tools must be guaranteed.
4) The device must be installed and activated in compliance with current electric
system standards
5) Before accessing the connection terminals, verify that the leads are not live.
6) In the electrical system of the building where the device must be installed, a
protection device from the overcurrents must be present (for Dafne 230 only).
Code Model Description
VN166500
Dafne Weekly battery chronothermostat
VE431300
Dafne 230 Weekly chronothermostat 230V
- 18 -
Dafne chronothermostat, user’s manual
Page 21

TECHNICAL CHARACTERISTICS
• Power supply Dafne:
– 2 alkaline batteries 1,5 V (AAA type)
– battery life: 1 year
– depleted batteries indication
– charge reserve (for battery replacement): 1 minute
• Power supply Dafne 230:
– 230Vac (-15% ÷ +10%) 50/60Hz
– maximum consumption: 6 VA / 230Vac
– charge reserve (for blackout): 2 days about
• Flush-mounting in 3 modules box
• Terminal block Dafne:
– 3 terminals for 1.5 mm² cables for bistable output relay 5A / 250 Vac
– 2 terminals for 1.5 mm² cables for digital input (on/off with telephone dialler)
• Terminal block Dafne 230:
– 3 terminals for 1.5 mm² cables for bistable output relay 5A / 250 Vac
– 2 terminals for 1.5 mm² cables for power supply
• Temperature regulation:
– On/Off with settable differential between 0.1°C and 1°C
– Proportional with settable band and period
• Summer/winter operating mode
• Weekly programming (7 programs available for each operating mode)
• Daily resolution: 1 hour (possibility to set delays activation of 15, 30, 45 minutes
• 5 settable temperatures:
– T1, T2, T3 in automatic operation
– Tm in manual operation
– Toff in off mode (antifreeze)
• Measured temperature display: 0 ÷ 50 °C
• Measurement precision: ±0.5 °C
• Measured temperature resolution: 0.1°C
• Setpoint range: 2 ÷ 35 °C
• Clock precision: ± second/day
• Key lock by password
• Automatic summer/winter time change (you can deactivate it)
• Operating temperature: 0 ÷ +50 °C
• Storage temperature: -10 ÷ +65 °C
• Operating humidity: 20÷90% non condensing
• Mechanism for the instrument extraction of push-push type (batteries model only)
• Protection degree: IP40
• Insulation: reinforced among accessible parts (frontal) and all other terminals
independent for each hour)
- 19 -
Dafne chronothermostat, user’s manual
English
Page 22
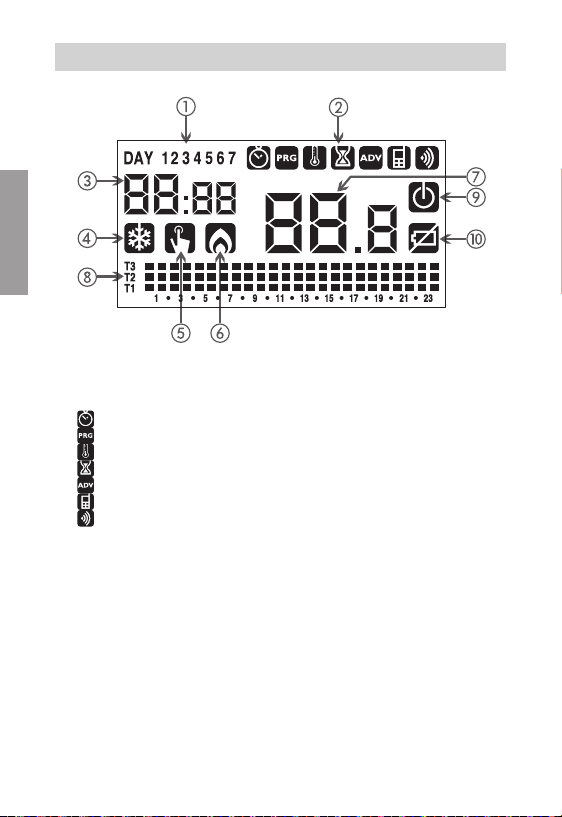
DISPLAY AND KEYBOARD
English
① Day of the week (DAY 1 = Monday)
②
Programming menu:
: date/time and summer time setting
: programs modification (for automatic operation)
: temperatures setting T1, T2, T3
: timings menu
: advanced programming menu
: not used
: not used
③
Time and minutes
④
Load activation in summer/cooling mode
⑤
Manual operation activation
⑥
Load activation in winter /heating mode
⑦
Measured environment temperature
⑧
Program on graphic for the current day (in automatic operation)
⑨
Off operation
⑩
Depleted battery indication (batteries model only)
- 20 -
Dafne chronothermostat, user’s manual
Page 23

■ Keyboard
The keys carry out different functions on the basis of the instrument status and they
will be described step by step in this user manual.
There are no multipurpose keys, that is to say contemporary pressures of 2 or more
keys.
There are two types of pressure:
- brief pressure
- long pressure, with duration higher than 3 seconds
During the pressure of a key, the display is blue.
■ Cleaning the display
To clean the display use a soft, lint-free cloth, without using excess force.
INSTALLATION
• The chronothermostats of Dafne series are designed for flush-mounting in 3
modules box (503 type).
• The programmable thermostat must be installed at a height at about 1.5 m above
the floor, away from direct sunlight, away from doors, windows, heat sources,
locations with excess or total lack of ventilation.
• Install the white or anthracite grey cover according to your preferences by hooking
it to the cogs of the device.
• Make the connections by respecting the diagrams described in this manual.
• Fix the device inside the 3 modules box in compliance with the assembly diagrams
described at the beginning of this manual. The accessories for the installation
included in the package allow the mounting of the plates described in the diagram
- 21 -
Dafne chronothermostat, user’s manual
English
Page 24
“adjustable plates” and they are:
- mount A
- mount B (according to the needs it could be necessary to remove the side cogs)
- mount AIR
- couple of BM side plastic elements (both of white colour and grey colour)
- couple of VI side plastic elements (both of white colour and grey colour)
- covers of white colour and anthracite grey colour.
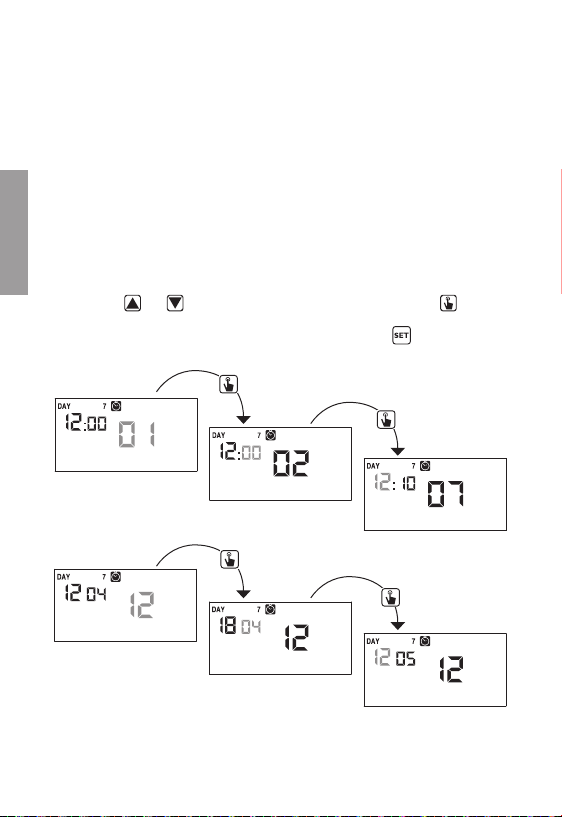
• Clock setting
Once the device is powered, set the clock (time and date insertion).
The parameters to enter are the following:
English
seconds (only synchronisation at value 00), minutes, hours, year, month, day.
Use the keys
and to increase and decrease the values and the key to
confirm and to move to the next parameter.
Once all values are set, press for a long time (3 seconds) the key
to exit the menu
of the clock synchronisation.
Seconds synchronisation
Minutes setting
Time setting
Year setting
Month setting
- 22 -
Dafne chronothermostat, user’s manual
Day setting
Page 25
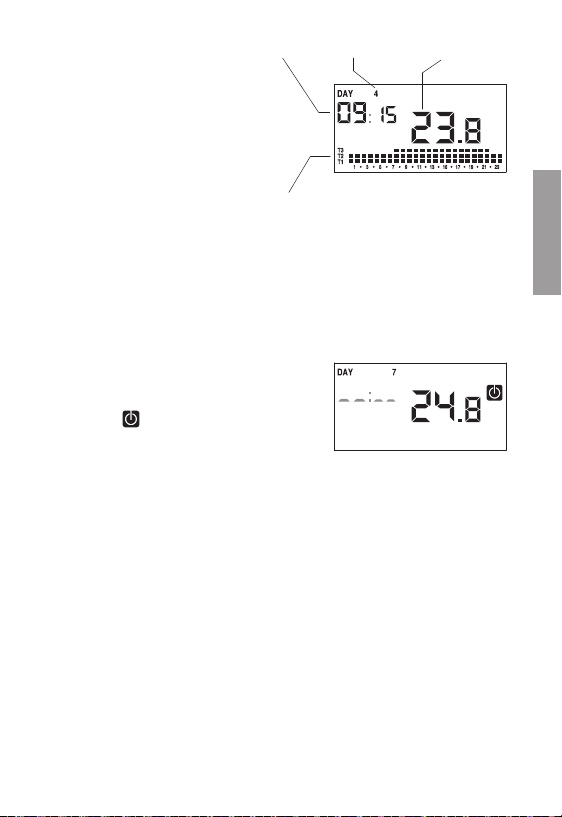
At this point the chronothermostat
will begin to operate with the set
default parameters (see page
44), displaying the day of the
week, the time, the environment
temperature and the graphic of
the program switched on.
HOUR
PROGRAM
GRAPHIC
DAY
TEMPERATURE
Attention:
to operate correctly the chronothermostat requires the time and date
insertion.
If once powered, no value is
set within about 30 seconds, the
chronothermostat begins to
operate in off mode, displayed with
the symbol
.
The time lack is displayed with
flashing dashes ( _ _:_ _ ).
The chronothermostat remains in off operation condition until when the
hour is not inserted, ensuring in this way the maintainance of the antifreeze
temperature (6°C).
In this condition, pressing any key reactivates the menu of date/time
insertion for another 30 seconds about.
- 23 -
Dafne chronothermostat, user’s manual
English
Page 26
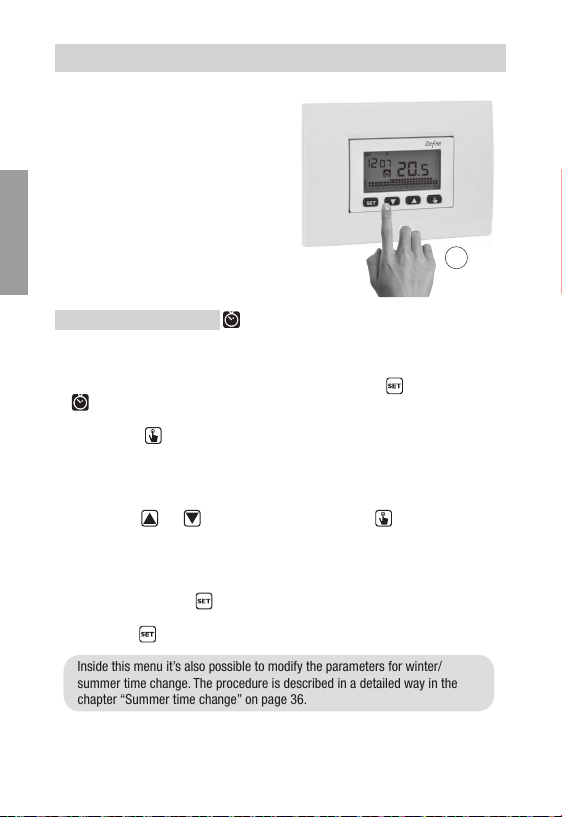
PROGRAMMING MENU
With this menu it’s possible to modify
the following operating parameters:
- Date and time
- Automatic operation programs
- Automatic operation temperatures
- Timings
- Advanced functions.
English
Time and date modification
To modify the set time and date:
1. From normal operating display, press for a long time the key
until the symbol
starts flashing on field (2)
2. Press the key
to access parameters modification. The seconds field starts
flashing. Parameters sequence to set is:
seconds* -> minutes -> hours -> year -> month -> day
3. Use the keys
and to modify the values and the key to confirm and move
to the next parameter.
(*) for seconds it’s possible only the synchronisation at value 00
4. Once all parameters are set, to exit and go back to the programming menu, press
for a short time the key
.
To exit and go back to the normal operation (automatic, manual) press for a long
time the key
or wait for the time-out expiration (30 seconds about).
Inside this menu it’s also possible to modify the parameters for winter/
summer time change. The procedure is described in a detailed way in the
chapter “Summer time change” on page 36.
- 24 -
Dafne chronothermostat, user’s manual
3s
Page 27
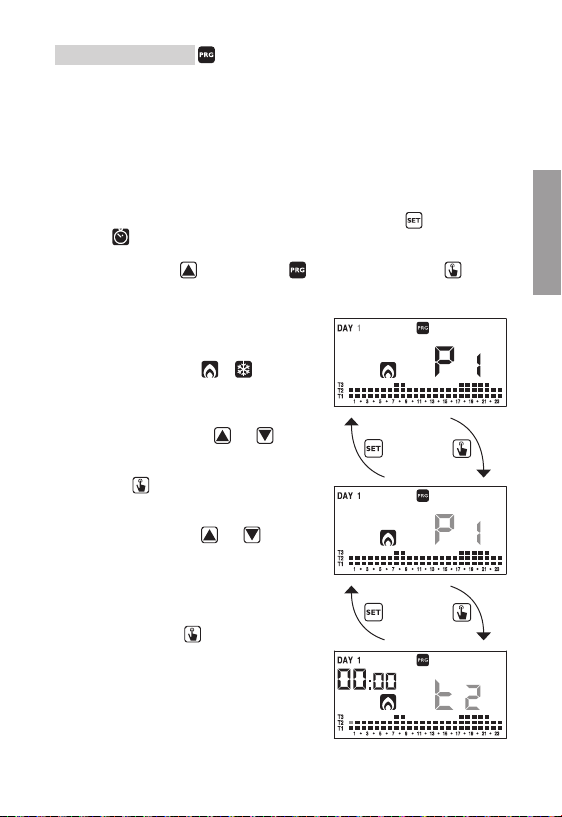
Programs modification
With this menu it’s possible to modify the programs of the automatic operation.
The device is configured to perform the program P1 from Monday to Friday and P2 on
Saturday and on Sunday (the programs profiles are described at the end of this manual
on page 45-46).
If this programming doesn’t satisfy the user needs it’s possible to change it.
To modify the programming:
1. From the normal operation display, press for a long time the key
symbol
starts flashing on field (2)
2. Press briefly the key
until the symbol flashes and press the key to
until the
access the parameters modification.
3. The programs page is displayed:
the first day of the week (DAY 1) flashing,
the current program (for example P1) of the
current operation mode (
or ) and the
profile that corresponds to the program.
3.1. If the set program is good, move to the
next day with the keys
and .
3.2. If the set program is not good, press
the key
.
The set program flashes: choose one
program different among the 7 available
by pressing the keys
and .
3.2.1. If no program exactly satisfies the
user’s needs, choose the program
which best meets them and
press the key
to access the
modification of the program profile.
On field (3) 00:00 appears while
on field (7) flashes the temperature
level (T1, T2 or T3) set for that
specific time (00:00).
- 25 -
Dafne chronothermostat, user’s manual
English
Page 28
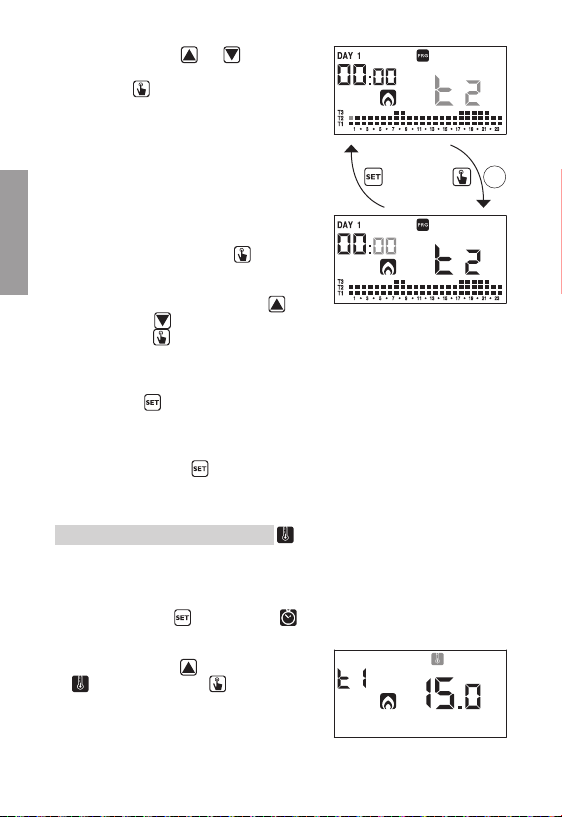
Use the keys and to change
the temperature level and the
key
to move to the next hour.
Set in this way the desired level
temperature for each hour of the
day.
3.2.1.1. For each hour it’s also possible
to delay the start of the
regulation of 15’, 30’ or 45’.
After setting the temperature
as described above, press for
English
a long time the key
a delay.
The minutes field flashes
(field 3): set with the keys
and
the delay and press the
key
to move to the next hour.
4. When the program satisfies the user’s
needs, go back to the days page pressing
twice the key
and repeat for the other
days of the week the operations just described.
When all modifications have been performed,
exit the programming menu by pressing
for a long time the key
.
Temperatures T1, T2, T3 modification
To modify the 3 temperatures of automatic operation:
1. From the normal operation display, press for
a long time the key
until the symbol
starts flashing on field (2)
2. Press briefly the key
until the symbol
flashes. Press the key to access the
parameters modification.
3s
to set
- 26 -
Dafne chronothermostat, user’s manual
Page 29
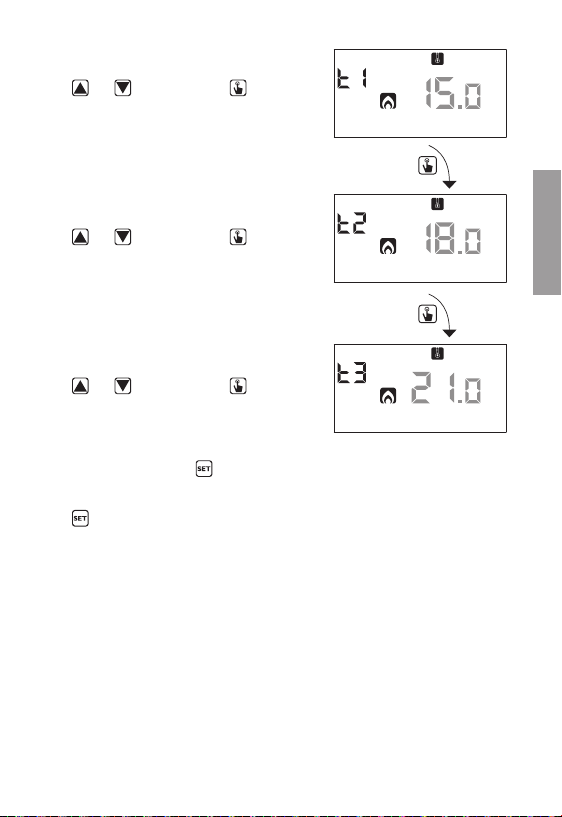
3. The value of the flashing T1 temperature is
displayed. Modify the value with the keys
and and press the key to move
to the modification of T2.
4. The value of the flashing T2 temperature is
displayed. Modify the value with the keys
and and press the key to move
to the modification of T3.
5. The value of the flashing T3 temperature is
displayed. Modify the value with the keys
and and press the key to go
back to the page of T1 temperature.
6. Once all parameters are set, to exit and to
go back to the programming menu, press
for a short time the key
.
To exit and to go back to the normal
operation press for a long time the key
or wait for the time-out expiration (30
seconds about).
Attention: the set values of temperature
must respect the condition:
T1≤T2≤T3.
In cooling mode T1 is not
settable and equals off system.
English
- 27 -
Dafne chronothermostat, user’s manual
Page 30
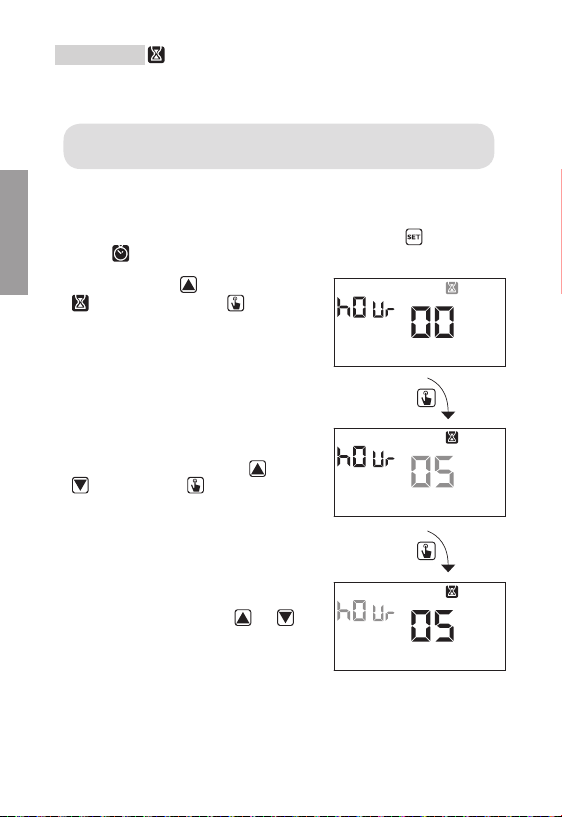
Timing setting
This menu allows the setting of a timing on the current operating mode, expressed in
hours or days.
For further information about timings, see the chapter “Timings: what they
are” on page 40.
To set a timing:
1. From the normal operation display, press for a long time the key
symbol
English
starts flashing on field (2)
2. Press briefly the key until the symbol
flashes and press the key to access
the parameters modification.
3. The value of the timing currently set
flashes (00= no timing). Enter the timing
value (from 1 to 99) with the keys
and
and press the key to move to the
measurement unit change (hours or days).
4. The measurement unit starts flashing
(h0ur or day). Press the keys
and
to choose if it is a timing in hours (h0ur)
or days (day).
until the
- 28 -
Dafne chronothermostat, user’s manual
Page 31
5. Once all parameters are set , to exit and go back to the programming menu, press
for a short time the key
.
To exit and go back to the normal operation (automatic, manual) press for a long
time the key
If a timing is active, the display shows the symbol
or wait for the time-out expiration (30 seconds about).
.
To interrupt a timing, access again the menu and set the value 00.
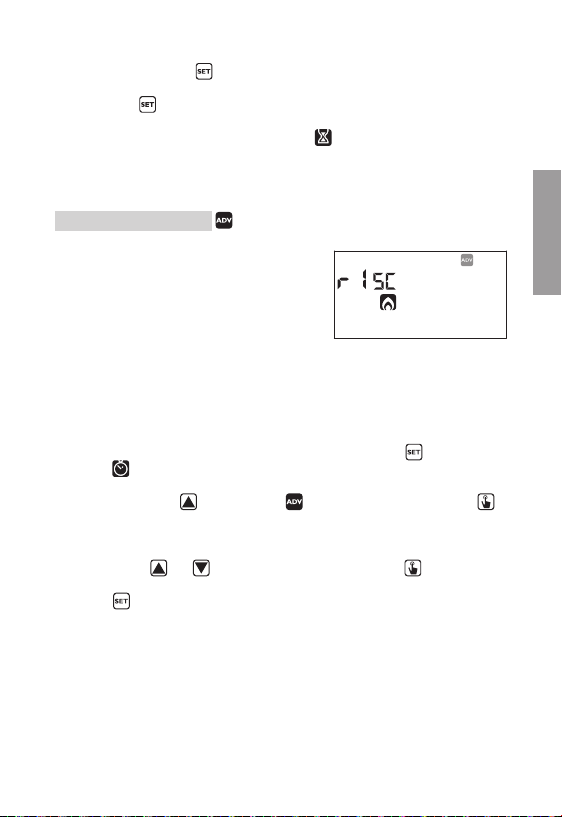
Advanced functions menu
With the ADV menu it’s possible to modify the
following operation parameters:
- operating mode (heating or cooling)
- regulation type (on-off or proportional)
- parameters relative to regulation type
- antifreeze temperature
- password for keylock
- system operation hours.
To access the menu ADV:
1. From the normal operation display, press for a long time the key
symbol
starts flashing on field (2)
2. Press briefly the key
until the symbol starts flashing and press the key
until the
to access the parameters modification
3. At this point the first parameter of the menu starts flashing:
press the keys
and to modify the parameter and the key to confirm
and to move to the next parameter. To exit the parameters modification press
the key
.
English
- 29 -
Dafne chronothermostat, user’s manual
Page 32
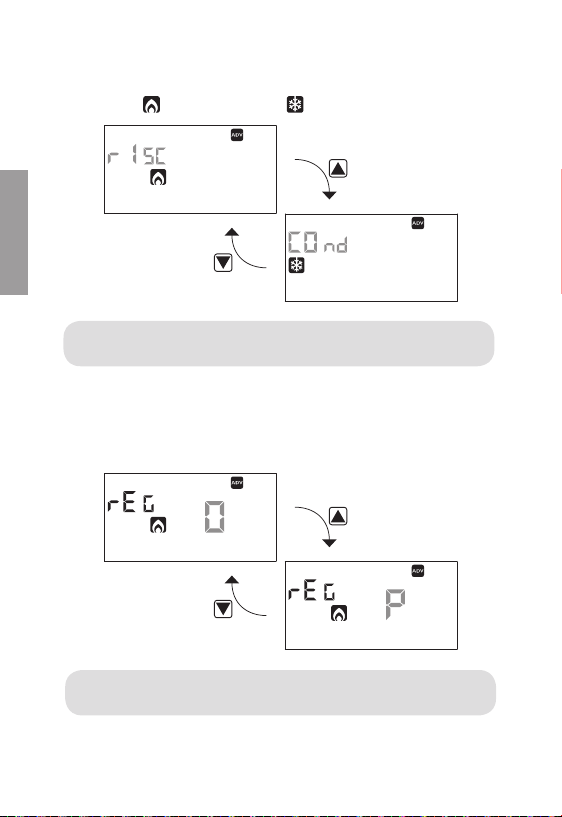
Operating mode
This parameter allows to specify the operating mode of the chronothermostat, between
winter/ heating (
) and summer-cooling ( ).
English
For further information about the operating mode see the chapter “Regulation
type” on page 38.
Regulation type (for heating mode only)
For heating mode it’s possible to choose between on/off regulation (Reg 0) or
proportional (rEg P ).
For further information about regulation type see the chapter “Regulation
type” on page 38.
- 30 -
Dafne chronothermostat, user’s manual
Page 33
Regulation parameters
In case of on/off regulation the only parameter to set is the differential (dIF), which
can have values between 0.1°C and 1°C.
In case of proportional regulation the parameters to set are the regulation band (bnd)
and the regulation period (PEr).
For further information about how to choose these values see the chapter
“Regulation type” on page 38.
But remember that the preset settings are suitable for the most part of the
situations: change these settings only if it’s really necessary.
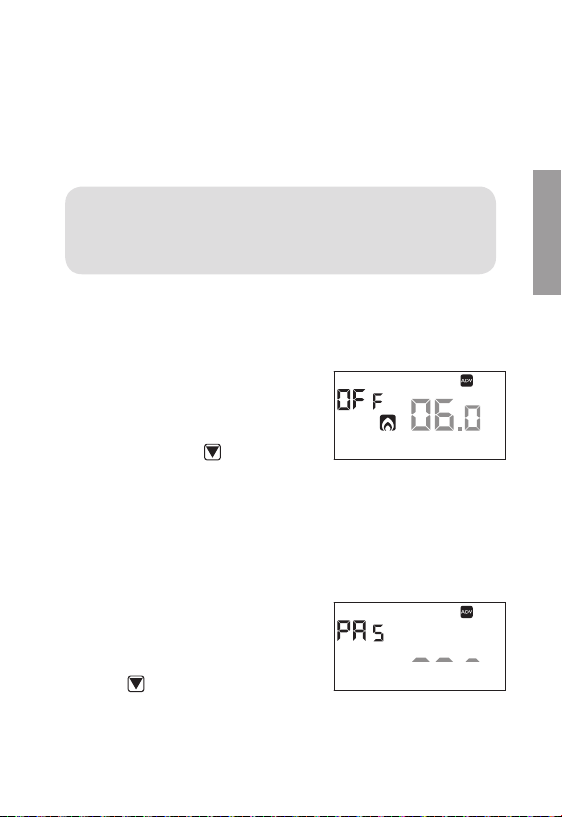
Antifreeze temperature (for heating mode only)
For the heating mode it’s possible to set a safety
temperature (antifreeze temperature – 0ff) to
maintain also if the chronothermostat is switched
off.
It’s possible to choose a value between 1°C and
10°C. It’s also possible to deactivate the antifreeze
function by pressing the key
shows “
In this case, if the chronothermostat is
_-.-
”.
until the display
switched off, no safety temperature is maintained.
Password for keylock
It’s possible to set a keylock if the chronothermostat
is installed in public places or if you want to prevent
anyone from modifying the operation parameters.
To set a password, enter on field PAs a value
between 001 and 999. To deactivate the password
press the key
until “__ ._” appears.
When the keyboard is locked, the chronothermostat
performs all its functions using the set regulation parameters.
If the keylock is active and one key is pressed, the display shows for a few seconds the
- 31 -
Dafne chronothermostat, user’s manual
English
Page 34
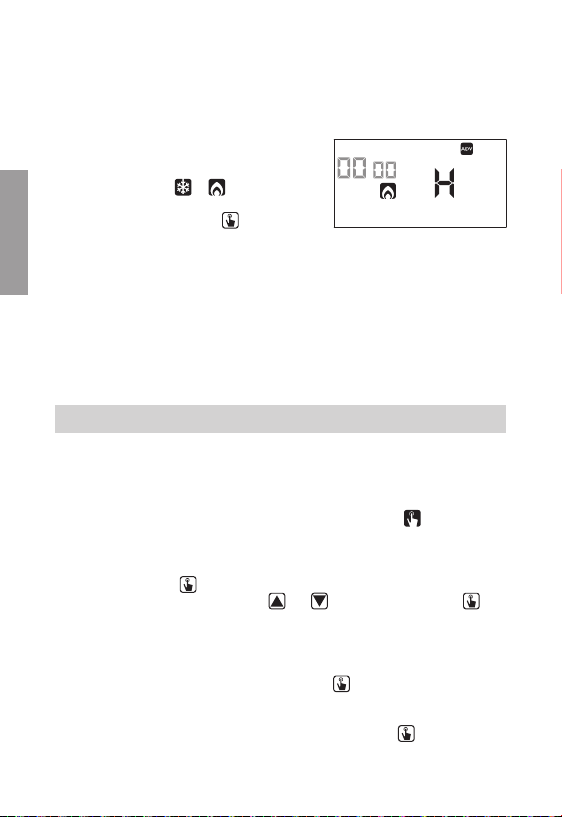
writing bL0c with flashing dashes: enter the password to unlock the keyboard, which
will be unlocked for 30 seconds from the last pressure.
System operation hours
This page shows the total number of hours of the
system operation (relay ON) for the current mode
(indicated by the icons
or ).
The hour meter has 4 digits and is resettable by
pressing for a long time the key
until 0000
appears.
English
MANUAL OPERATION
During manual operation the device performs as a normal thermostat, adjusting on the
basis of the Tm temperature (manual setpoint), independently from the day and the
time where it is.
The manual operation is signalled with the switch on of the symbol
To move from automatic operation to manual operation:
1. press briefly the key
2. set the desired setpoint with the keys
. In the field (7) the setpoint (Tm) currently set flashes
and and confirm with the key
3. at this point on field (7) the value of the environment temperature reappears and
the instrument operates in manual.
in the field (5).
If you want to change the setpoint (Tm) press the key
and repeat the points 2
and 3.
To go back to the automatic operation press for a long time the key (3 seconds
about).
- 32 -
Dafne chronothermostat, user’s manual
Page 35
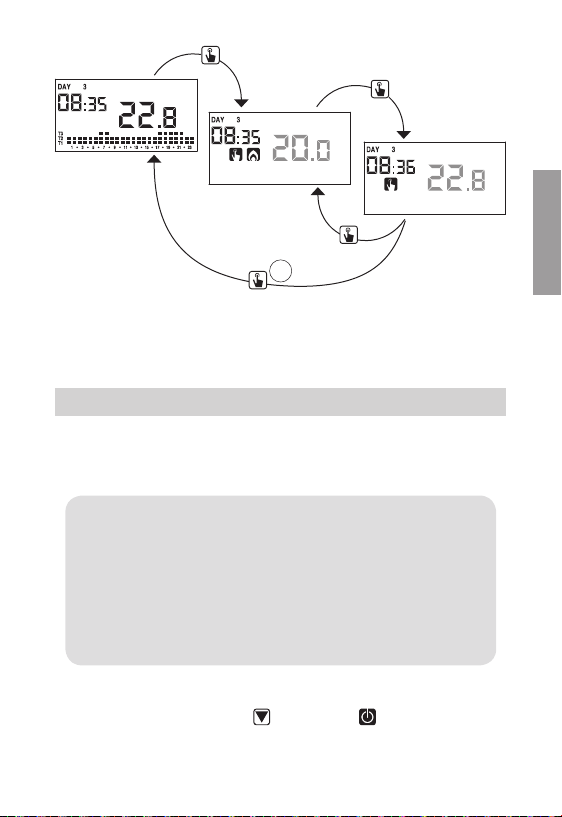
Automatic
operation
Manual setpoint
(Tm) setting
Manual operation
3s
OFF OPERATION
In off mode the device doesn’t perform any regulation (*) but it continues to display the
day, the time and the measured temperature.
(*) In the case of heating/winter operation the device still maintains
a minimum temperature - Toff antifreeze temperature - to avoid the
freezing of the system and of the environment where the device is
installed.
Toff can have values between 1°C and 10°C or it can be completely
excluded; in this last case the maintainance of minimum temperature is
not guaranteed.
The default Toff is 6°C but it’s possible to modify this value by accessing
the ADV menu (see “Antifreeze temperature” on page 31).
English
To switch the device off press the key
(field (9)).
Dafne chronothermostat, user’s manual
until the symbol is displayed
- 33 -
Page 36
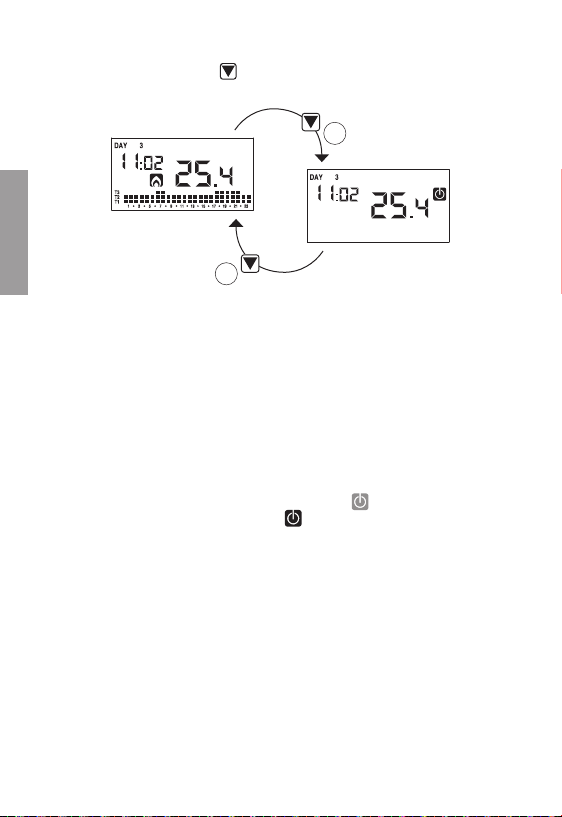
To reactivate the regulation, returning to the operating (automatic or manual) preceding
the switching off, press the key
for about 3 seconds.
3s
English
3s
Remotely switching off (battery powered model only)
Dafne has an input for the connection to a clean contact to whom to connect for
example a telephone dialler to switch on or to switch off the chronothermostat
remotely with your own telephone.
The contact can have one of these two positions:
- open à normal operation (according to the settings)
- closed à chronothermostat in off mode
Remotely off status is displayed with the flashing symbol
differentiate it from the keyboard off status (
fixed on field (9)).
on field (9) to
Attention: remotely off status (closed contact) is more important than any
other programming, so the device will be in off status until the contact
doesn’t return to the open position.
- 34 -
Dafne chronothermostat, user’s manual
Page 37
BACKLIGHTING MANAGEMENT
The chronothermostats of Dafne series have a backlit display with led.
There are some differences between battery powered models and mains powered
models.
Battery Dafne
The battery powered model has a backlighting of blue colour, which is activated only
inside any menu of programming or if any key is pressed. In normal operating status
the backlighting is off.
This behaviour is not modifiable.
Dafne ~ 230V
The 230 V powered model has a blue backlighting which is normally on.
If the installation makes it necessary (for example in bedrooms) the
backlighting can be turned off. In this condition the chronothermostat will
continue to operate normally and the backlighting activates only when you
enter setpoint modification, advanced programming, pin insertion menu.
English
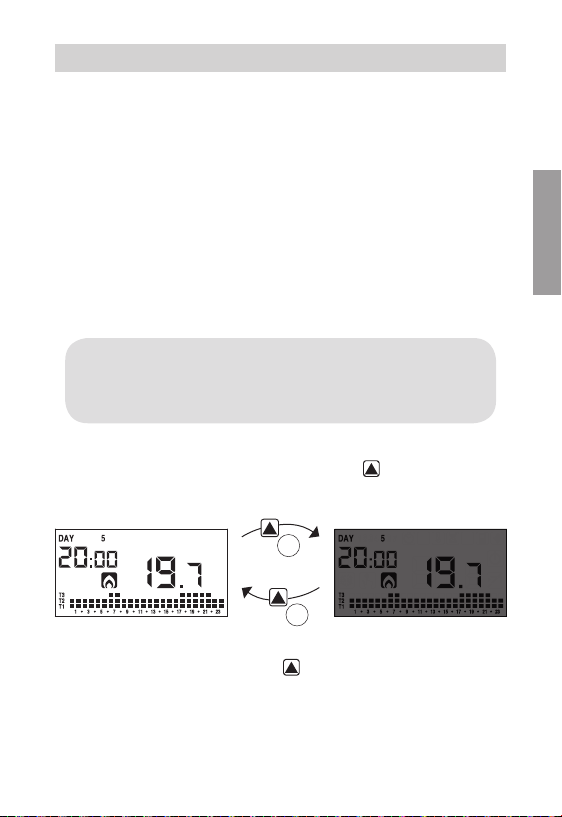
It’s possible to turn off the backlighting by pressing the key
for 3 seconds.
3s
3s
To reactivate the backlighting press the key for at least 3 seconds.
- 35 -
Dafne chronothermostat, user’s manual
Page 38
MINIMUM AND MAXIMUM VALUES
It’s possible to display the measured values of minimum and maximum temperature.
To display these values press the key
value L0) .
During the display it’s possible the resetting of these values by pressing the key
until 3 dashes appear in place of the temperature.
(maximum value Hi) or (minimum
English
Summer time is the convention to step up of one hour the dials of the clocks during the
summer period in order to prolong the lighting time in the late afternoon to the loss of the
early morning.
In European countries summer time starts the last Sunday of march and ends the last
Sunday of october.
The chronothermostat manages the summer/winter time change as follows:
- increasing of one hour to move from winter time to summer time
- decreasing of one hour to move from summer time to winter time
The device is default configured to move from summer time the last Sunday of march at 2
o’clock to go back to winter time the last Sunday of October at 3 o’clock in accordance with
Europe convention.
However it’s possible to deactivate the automatic time change or to change the date or the
hour of the time change.
SUMMER TIME CHANGE
- 36 -
Dafne chronothermostat, user’s manual
Page 39
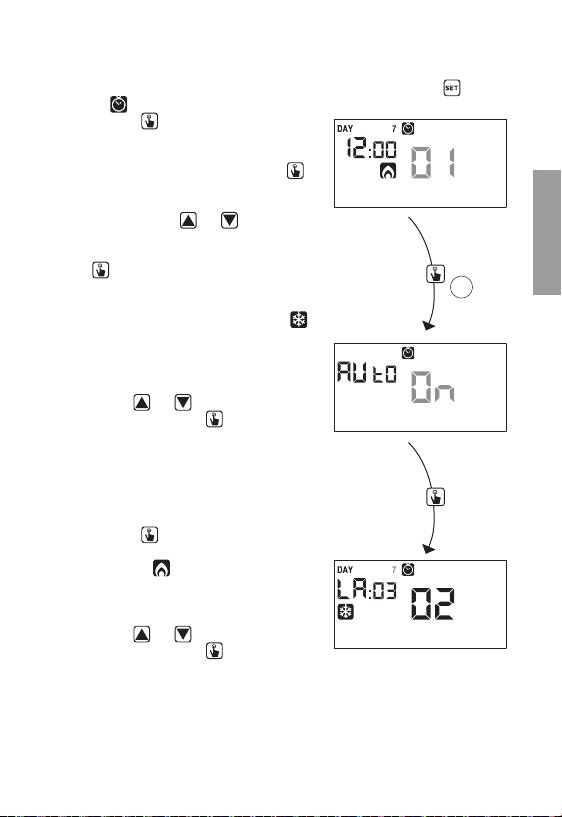
To change settings:
1. Access the menu of time and date change, pressing for a long time the key
symbol
2. Press the key
starts flashing.
to access the time and date
modification. At this point, during the modification
of any parameter (seconds, minutes, hour, year,
month or day) press for a long time the key
until the display shows the writing Aut0 on
field (3).
3. Choose with the keys
and the automatic
time change activation (Aut0 0n ) or the
deactivation (Aut0 0FF ) and confirm with the
key
4. If 0FF you go back to the date/time change; if
0n the current setting for the passage to summer
time is displayed (indicated with the symbol
).
In the example:
a. the Sunday (7) of the last week (LA ) of march
(03 ) at 2 o’clock (02)
b. if it’s necessary change the parameters with
the keys
parameter with the key
and and move to the next
. The sequence
requires the insertion of:
i. day (1…7) of the week
ii. the week of the month (first, second, third,
fourth, last – LA)
iii. the month (1…12)
iv. the hour
5. Press the key
: the current setting for the
passage to the winter time is displayed (indicated
with the symbol
). In the example:
a. the Sunday (7) of the last week (LA ) of
october (10) at 3 o’clock (03 )
b. if it’s necessary change the parameters with
the keys
parameter with the key
and and move to the next
. The sequence
requires the insertion of:
i. day (1…7) of the week
ii. the week of the month (first, second, third,
fourth, last – LA)
iii. the month (1…12)
iv. the hour
- 37 -
Dafne chronothermostat, user’s manual
until the
English
3s
Page 40
6. Once all parameters are set, to exit and go back to the programming menu, press for a
short time the key
.
To exit and go back to the normal operation press for a long time the key
the time-out expiration (30 seconds about).
REGULATION TYPE
The chronothermostats of Dafne series have two types of regulation:
On/off regulation
English
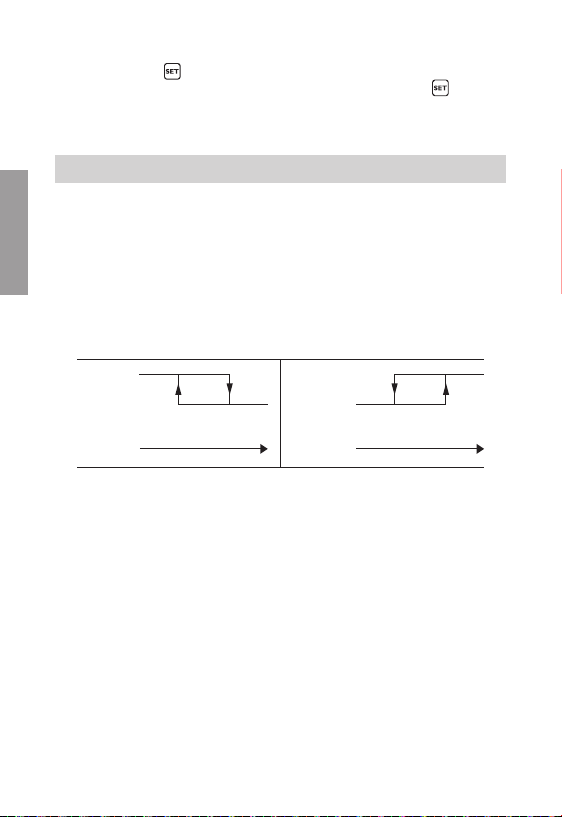
During on/off regulation the chronothermostat measures once a minute the
environment temperature and it carries out the regulation on the basis of the following
logic:
heating mode cooling mode
relay ON
relay OFF
Temperature
increasing
SET-DIFF SET
where SET represents the setpoint and DIFF the differential (useful to avoid continuous
switches on/switches off dangerous for the system in proximity to the reaching of the
setpoint).
Proportional regulation (heating only)
In heating mode, the on/off regulation is available and also the proportional regulation
which in some systems allows a more precise regulation to obtain a constant
temperature.
This regulation requires to specify two parameters:
• the band, which represents the temperature values within whom to perform the
proportional regulation. The band is centered on the setpoint and it can have values
between 0.5°C and 5°C; outside these values the heating will be
always on (if setpoint-band > environment temperature) or
always off (if setpoint + band < measured temperature).
Dafne chronothermostat, user’s manual
- 38 -
relay ON
relay OFF
Temperature
increasing
or wait for
SET+DIFFSET
Page 41

• the regulation period which represents the duration of the regulation cycle
(activation time + deactivation time of heating) and it can have values of 10, 20 or
30 minutes.
During the operating, at the beginning of the regulation period, the device measures
the environment temperature and it compares it with the programmed setpoint;
on the basis of this difference the activation time is calculated (and consequently
the deactivation time). The more the measured temperature is next to the setpoint
value – band, the more the activation time will be predominant in comparison with
the deactivation time; on the contrary, the more the measured temperature is next
to the setpoint value + band, the more the deactivation time will be predominant in
comparison with the activation time).
Once regulation period is passed, the device compares again the environment
temperature with the setpoint and it updates the activation and deactivation times for
the new period.
The result of the proportional regulation is subordinated to the correct selection of the
parameters.
Select the value of the regulation type as follows:
• 10’ for low thermal inertia systems (fan-coil)
• 20’ for medium thermal inertia systems (aluminium radiators)
• 30’ for high thermal inertia systems (cast-iron radiators)
Select the regulation band value as follows:
• broad band (5°C) for systems with high thermal gradient
• narrow band (0.5°C) for systems with low thermal gradient
Attention: the device is default configured to operate in on/off with
differential set at 0.3°C. This configuration is suitable for the most part of
the situations and for this reason it’s advisable to modify it only in particular
situations.
English
To modify the regulation type, the differential value (on/off regulation), band
and period (proportional regulation) see chapter “Regulation parameters” on
page 31.
- 39 -
Dafne chronothermostat, user’s manual
Page 42
Emergency regulation (winter mode only)
The device performs a regulation of emergency if an error occurs during the
reading of the probe or in case of time loss.
In case of probe error, if the antifreeze function is not excluded, the device activates
the load for 10 minutes every 4 hours. The display shows the writing Err on
field (7).
In case of time loss (because of depleted batteries or blackout of a duration higher
than the charge reserve) the instrument restarts from the off mode, adjusting on the
basis of the antifreeze temperature, if it hasn’t been deactivated before. Reset date/
time to go back to the normal operation (programs modifications and settings remain
English
memorized).
TIMINGS: WHAT THEY ARE
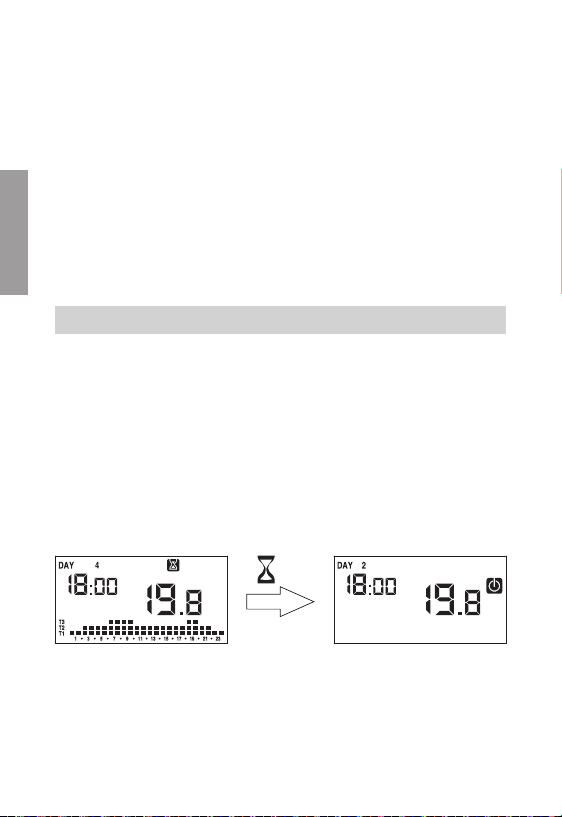
Timings allow to maintain the current operation (automatic, manual, off) for a certain
period (hours or days) and once passed the chronothermostat changes the operating
mode, as described below.
The timed operations are the following:
Timed automatic
If you set a timing in automatic status, this off status will be maintained until the end
of the timing, will then switched to off mode.
Timed manual
If you set a timing in manual status, this off status will be maintained until the end of
the timing, operation will then switched to automatic mode.
- 40 -
Dafne chronothermostat, user’s manual
Page 43
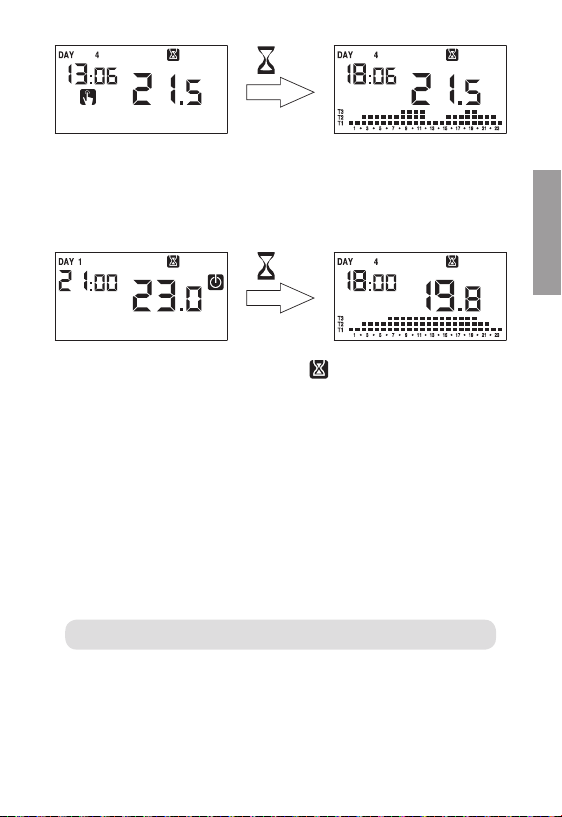
Timed off
If you set a timing in off status, this off status will be maintained until the end of the
timing, will then switched to the operation that preceded the deactivation (automatic
or manual).
If you set a timing, the display shows the symbol
.
Attention: the timing is calculated in minutes and for this reason if for
example you set a timing of 3 days at 12:15 on Tuesday it will expire at 12:15
on Friday.
Attention: the timings can end before their programmed expiration if one of these
actions occur:
- time/date modification (modification of the summer time change included)
- manual modification of the operating mode
- switching of digital input (for battery models only)
- change of the operating logic from winter to summer (or viceversa)
To set a timing, see chapter “Timing setting” on page 28.
English
- 41 -
Dafne chronothermostat, user’s manual
Page 44
DEVICE RESET
If you want to erase all performed settings and to recharge the default values, proceed
as follows:
1. to switch off and to switch on the power of the chronothermostat (230 V versions)
or to extract the chronothermostat from the wall-mounted base and reinsert it
(batteries versions)
2. during the flashing of the backlighting press the key
writing dEF.
Default values are indicated on page 44 of this manual.
English
until the display shows the
BATTERY REPLACEMENT
The model Dafne (batteries) signals the status of depleted batteries through the symbol
on (field (10)) and making the display to flash. In this status the regulation is
always guaranteed, but it’s advisable to replace the batteries as soon as possible! (*)
If the charge level of batteries further decreases, the chronothermostat enters into less
consumption mode, it switches off the display and it doesn’t perform any regulation.
(*) Remove the depleted batteries and replace them with the new ones in a maximum
time of one minute (charge reserve) to avoid to lose the settings of date and time
(the performed programmings on the contrary remain memorized even if this limit is
surpassed).
Attention: after batteries replacement, the display will switch on within 15
seconds at max.
IIn case of replacement, dispose of the used
batteries observing the laws in force in relation
to the disposal of hazardous waste.
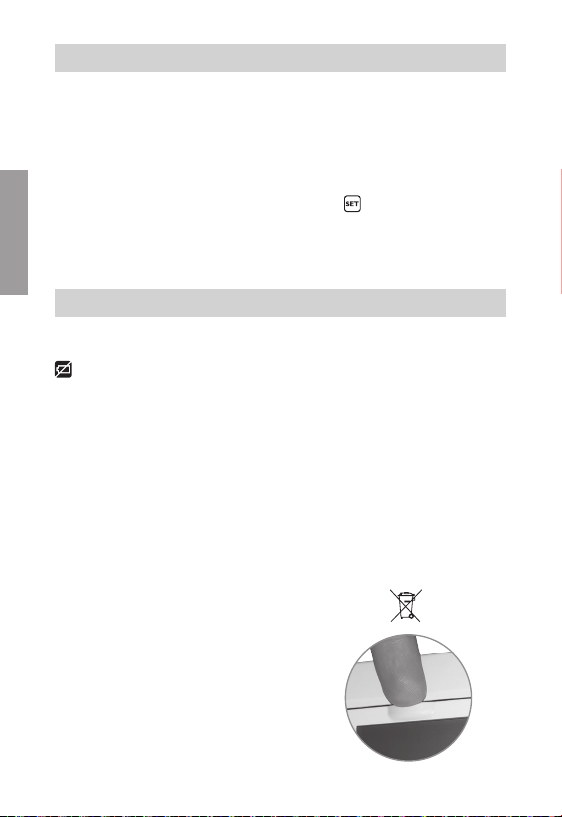
The removal of the device takes place by
pulling on the frame convexity
(see figure).
- 42 -
Dafne chronothermostat, user’s manual
Page 45

REFERENCE STANDARDS
Compliance with Community Directives
2014/35/EU (LVD)
2014/30/EU (EMCD)
is declared in reference to the harmonized standards:
EN 60730-2-7, EN 60730-2-9
English
- 43 -
Dafne chronothermostat, user’s manual
Page 46

DEFAULT VALUES
Parameter min max step default
winter manual setpoint 2.0°C 35.0°C 0.1°C 21°C
summer manual setpoint 2.0°C 35.0°C 0.1°C 25°C
T1 winter 2.0°C T2 0.1°C 15.0°C
T2 winter T1 T3 0.1°C 18.0°C
T3 winter T2 35.0°C 0.1°C 21.0°C
T2 summer 10.0°C T3 0.1°C 23.0°C
T3 summer T2 35.0°C 0.1°C 25.0°C
English
antifreeze temperature 1.0°C 10.0°C 0.1°C 6.0°C
operating mode winter summer - winter
regulation type ON/OFF PROP - ON/OFF
ON/OFF differential 0.1°C 1.0°C 0.1°C 0.3°C
proportional band 0.5°C 5.0°C 0.1°C 0.5°C
proportional period 10’ 30’ 10’ 10’
password 0 999 1
winter hour meter 0 1 0
summer hour meter 0 1 0
winter/summer time ON OFF - ON
winter/summer time
change
activation delay 0’ 45’ 15’ 0’
timed operations 0h 99d 1h 0h
000
(deactivated)
Summer:
LAST DAY7
march 02:00
Winter: LAST
DAY7 october
03:00
- 44 -
Dafne chronothermostat, user’s manual
Page 47

WINTER PRESET PROGRAMS
T3
T2
■ ■ ■ ■ ■ ■ ■ ■ ■ ■ ■ ■ ■ ■ ■ ■ ■ ■ ■ ■ ■ ■ ■ ■
P1
T1
■ ■ ■ ■ ■ ■ ■ ■ ■ ■ ■ ■ ■ ■ ■ ■ ■ ■ ■ ■ ■ ■ ■ ■
0 1 2 3 4 5 6 7 8 9 10 11 12 13 14 15 16 17 18 19 20 21 22 23
T3
T2
■ ■ ■ ■ ■ ■ ■ ■ ■ ■ ■ ■ ■ ■ ■ ■ ■ ■ ■ ■ ■ ■ ■ ■
P2
T1
■ ■ ■ ■ ■ ■ ■ ■ ■ ■ ■ ■ ■ ■ ■ ■ ■ ■ ■ ■ ■ ■ ■ ■
0 1 2 3 4 5 6 7 8 9 10 11 12 13 14 15 16 17 18 19 20 21 22 23
T3
T2
■ ■ ■ ■ ■ ■ ■ ■ ■ ■ ■ ■ ■ ■ ■ ■ ■ ■ ■ ■ ■ ■ ■ ■
P3
T1
■ ■ ■ ■ ■ ■ ■ ■ ■ ■ ■ ■ ■ ■ ■ ■ ■ ■ ■ ■ ■ ■ ■ ■
0 1 2 3 4 5 6 7 8 9 10 11 12 13 14 15 16 17 18 19 20 21 22 23
T3
T2
■ ■ ■ ■ ■ ■ ■ ■ ■ ■ ■ ■ ■ ■ ■ ■ ■ ■ ■ ■ ■ ■ ■ ■
P4
T1
■ ■ ■ ■ ■ ■ ■ ■ ■ ■ ■ ■ ■ ■ ■ ■ ■ ■ ■ ■ ■ ■ ■ ■
0 1 2 3 4 5 6 7 8 9 10 11 12 13 14 15 16 17 18 19 20 21 22 23
T3
T2
■ ■ ■ ■ ■ ■ ■ ■ ■ ■ ■ ■ ■ ■ ■ ■ ■ ■ ■ ■ ■ ■ ■ ■
P5
T1
■ ■ ■ ■ ■ ■ ■ ■ ■ ■ ■ ■ ■ ■ ■ ■ ■ ■ ■ ■ ■ ■ ■ ■
0 1 2 3 4 5 6 7 8 9 10 11 12 13 14 15 16 17 18 19 20 21 22 23
T3
T2
■ ■ ■ ■ ■ ■ ■ ■ ■ ■ ■ ■ ■ ■ ■ ■ ■ ■ ■ ■ ■ ■ ■ ■
P6
T1
■ ■ ■ ■ ■ ■ ■ ■ ■ ■ ■ ■ ■ ■ ■ ■ ■ ■ ■ ■ ■ ■ ■ ■
0 1 2 3 4 5 6 7 8 9 10 11 12 13 14 15 16 17 18 19 20 21 22 23
T3
T2
P7
T1
■ ■ ■ ■ ■ ■ ■ ■ ■ ■ ■ ■ ■ ■ ■ ■ ■ ■ ■ ■ ■ ■ ■ ■
0 1 2 3 4 5 6 7 8 9 10 11 12 13 14 15 16 17 18 19 20 21 22 23
■ ■ ■ ■ ■ ■ ■
■ ■ ■ ■ ■ ■ ■ ■ ■ ■ ■ ■ ■ ■ ■
■ ■ ■ ■ ■ ■ ■ ■ ■
■ ■ ■ ■ ■ ■ ■ ■ ■ ■ ■
■ ■ ■ ■ ■ ■ ■ ■ ■ ■
English
- 45 -
Dafne chronothermostat, user’s manual
Page 48

English
SUMMER PRESET PROGRAMS
T3
■ ■ ■ ■ ■ ■ ■ ■ ■ ■ ■ ■ ■ ■ ■ ■ ■
T2
■ ■ ■ ■ ■ ■ ■ ■ ■ ■ ■ ■ ■ ■ ■ ■ ■ ■ ■ ■ ■ ■ ■ ■
P1
T1
■ ■ ■ ■ ■ ■ ■ ■ ■ ■ ■ ■ ■ ■ ■ ■ ■ ■ ■ ■ ■ ■ ■ ■
0 1 2 3 4 5 6 7 8 9 10 11 12 13 14 15 16 17 18 19 20 21 22 23
T3
■ ■ ■ ■ ■ ■ ■ ■ ■
T2
■ ■ ■ ■ ■ ■ ■ ■ ■ ■ ■ ■ ■ ■ ■ ■ ■ ■ ■ ■ ■ ■ ■ ■
P2
T1
■ ■ ■ ■ ■ ■ ■ ■ ■ ■ ■ ■ ■ ■ ■ ■ ■ ■ ■ ■ ■ ■ ■ ■
0 1 2 3 4 5 6 7 8 9 10 11 12 13 14 15 16 17 18 19 20 21 22 23
T3
■ ■ ■ ■ ■ ■ ■ ■ ■ ■ ■ ■ ■ ■ ■
T2
■ ■ ■ ■ ■ ■ ■ ■ ■ ■ ■ ■ ■ ■ ■ ■ ■ ■ ■ ■ ■ ■ ■ ■
P3
T1
■ ■ ■ ■ ■ ■ ■ ■ ■ ■ ■ ■ ■ ■ ■ ■ ■ ■ ■ ■ ■ ■ ■ ■
0 1 2 3 4 5 6 7 8 9 10 11 12 13 14 15 16 17 18 19 20 21 22 23
T3
■ ■ ■ ■ ■ ■ ■ ■ ■ ■ ■ ■ ■
T2
■ ■ ■ ■ ■ ■ ■ ■ ■ ■ ■ ■ ■ ■ ■ ■ ■ ■ ■ ■ ■ ■ ■ ■
P4
T1
■ ■ ■ ■ ■ ■ ■ ■ ■ ■ ■ ■ ■ ■ ■ ■ ■ ■ ■ ■ ■ ■ ■ ■
0 1 2 3 4 5 6 7 8 9 10 11 12 13 14 15 16 17 18 19 20 21 22 23
T3
■ ■ ■ ■ ■ ■ ■ ■ ■ ■ ■ ■ ■ ■
T2
■ ■ ■ ■ ■ ■ ■ ■ ■ ■ ■ ■ ■ ■ ■ ■ ■ ■ ■ ■ ■ ■ ■ ■
P5
T1
■ ■ ■ ■ ■ ■ ■ ■ ■ ■ ■ ■ ■ ■ ■ ■ ■ ■ ■ ■ ■ ■ ■ ■
0 1 2 3 4 5 6 7 8 9 10 11 12 13 14 15 16 17 18 19 20 21 22 23
T3
T2
■ ■ ■ ■ ■ ■ ■ ■ ■ ■ ■ ■ ■ ■ ■ ■ ■ ■ ■ ■ ■ ■ ■ ■
P6
T1
■ ■ ■ ■ ■ ■ ■ ■ ■ ■ ■ ■ ■ ■ ■ ■ ■ ■ ■ ■ ■ ■ ■ ■
0 1 2 3 4 5 6 7 8 9 10 11 12 13 14 15 16 17 18 19 20 21 22 23
T3
T2
P7
T1
■ ■ ■ ■ ■ ■ ■ ■ ■ ■ ■ ■ ■ ■ ■ ■ ■ ■ ■ ■ ■ ■ ■ ■
0 1 2 3 4 5 6 7 8 9 10 11 12 13 14 15 16 17 18 19 20 21 22 23
- 46 -
Dafne chronothermostat, user’s manual
Page 49

Page 50

Page 51

Page 52

Vemer S.p.A.
I - 32032 Feltre (BL)
Via Camp Lonc, 16
Tel +39 0439 80638
Fax +39 0439 80619
e-mail: [email protected] - web site: www.vemer.it
MKIS00740-012-EN
06-2017
 Loading...