

Page 1
VR2AR Receiver
Quick Reference Guide
This VR2AR Quick Guide provides basic information on key
VR2AR procedures. Full details for all VR2AR procedures are
found in the VR2AR User manual. We strongly recommend you
study the full user manual before using this quick guide.
Do not bump the VR2AR hydrophone or
expose it to extreme temperature variations.
Doing so may damage the receiver and render it
unable to detect transmitters.
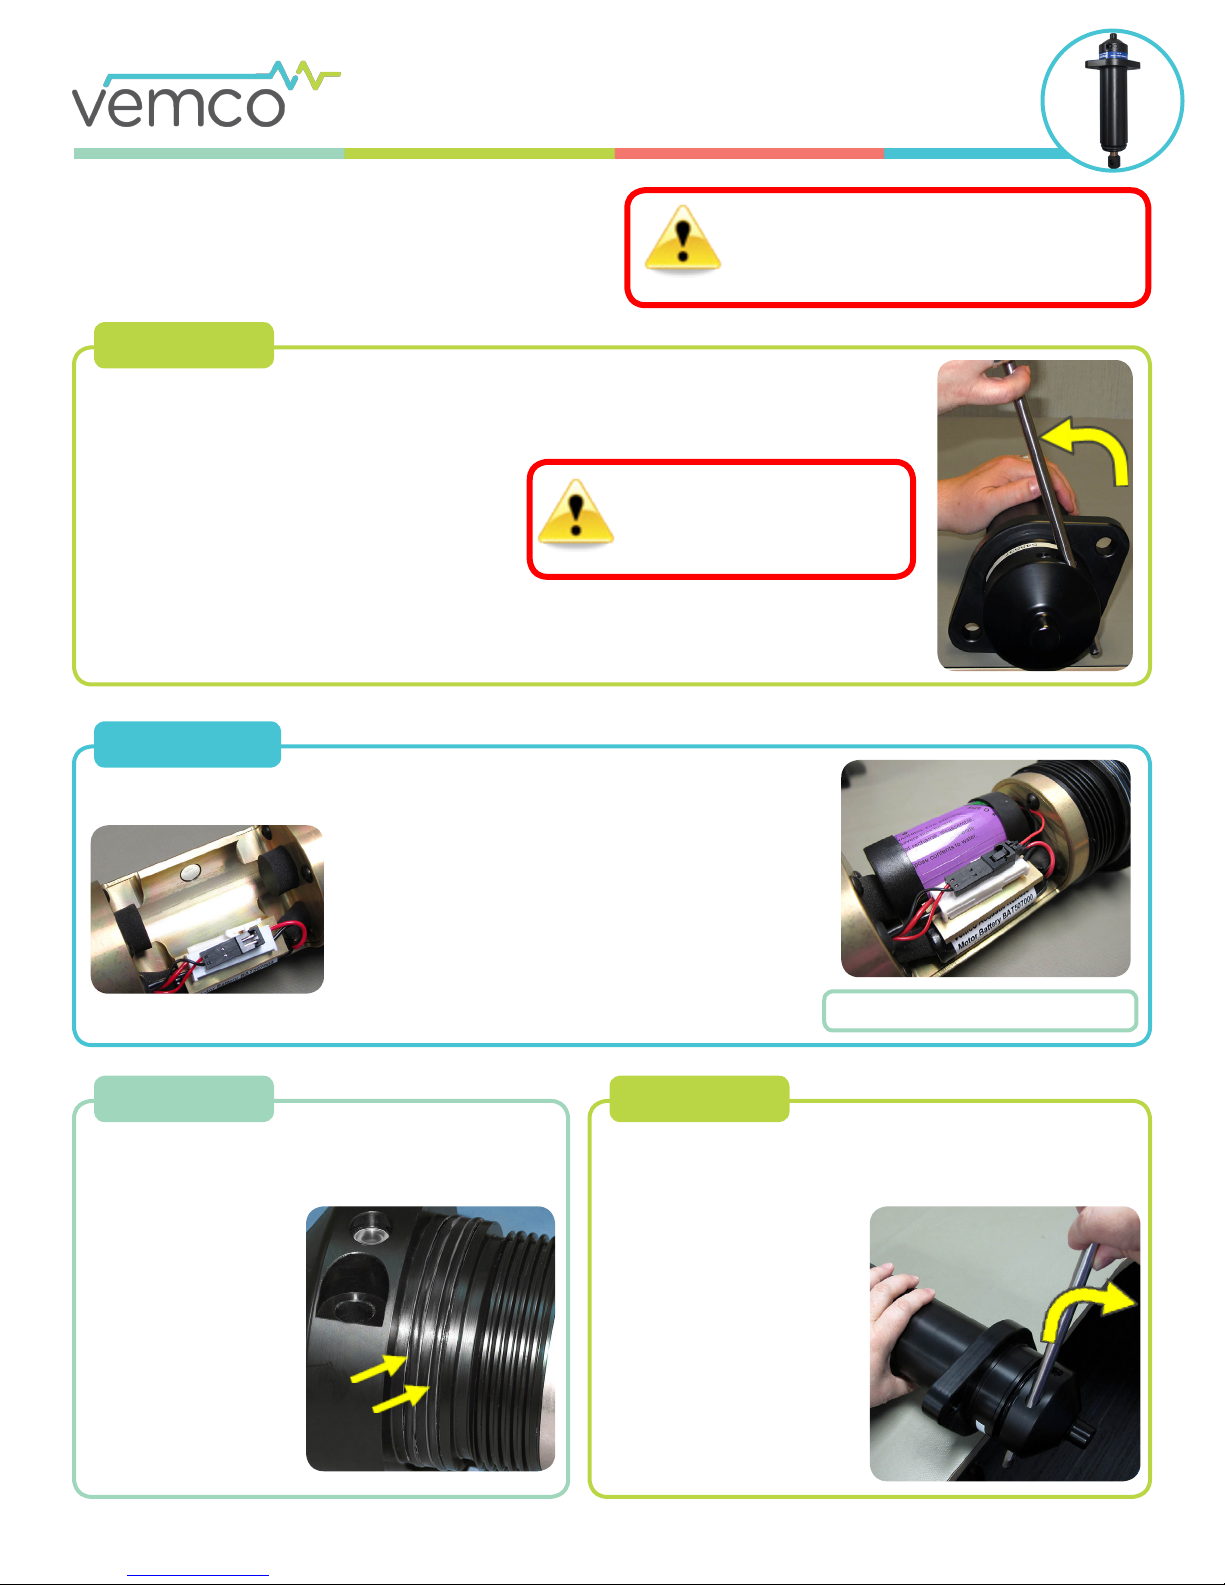
Open Case
Place VR2AR on clean, stable surface so hydrophone hangs o edge. We recommend working in a
controlled environment.
Insert the steel rod into the Bluetooth Activator hole. Hold the body of the VR2AR securely in place
(a strap wrench on the VR2AR body can help).
Apply pressure to the rod to turn end-cap counterclockwise when you are facing the hydrophone.
Remove rod when the end-cap turns easily and
continue turning by hand.
Slide the end-cap and cylinder apart until the battery compartment has cleared the cylinder. Be
very careful not to damage the threads on the end-cap or the VR2AR won’t close and seal properly.
Electronics inside the case must
NEVER come in contact with
any water or the VR2AR will be
damaged.
Main Battery
The battery used for acoustic purposes is the D-cell Lithium battery held in the battery
compartment with a magnet and the compression of two pieces of foam. The motor
battery should not need attention for many releases.
The battery connector is located next to the battery.
When installing the battery, listen for a “click” and watch
that the Status Light ashes. Be sure it ashes a long
green to indicate the VR2AR started up properly. When
disconnecting battery, press the release tab on the battery
connector and then pull connector halves apart.
O-rings
Make sure the two O-rings in the end-cap, and
the corresponding O-ring surface inside the Outer
Cylinder, are clean and debris-free. If the VR2AR
has previously been
deployed, remove the
O-rings, clean them and
inspect them for cracks
or damage. Re-grease
the O-rings (Molykote
55) and place them in
the O-ring grooves.
Close Case
Close the VR2AR case by doing the reverse of opening it, but
rst put three new desiccant packs in the bottom of the tube.
Slide the at end into the Outer Cylinder. Rotate the end-cap
clockwise, using the steel bar
when needed.
Stop turning when the gap
between the two halves is
closed. Over tightening could
damage the case.
NOTE: Dessicant packs help
reduce the occurrence of
condensation in the VR2AR.
TIP: Write the date on the battery.
Page 2
VR2AR Receiver
Quick Reference Guide
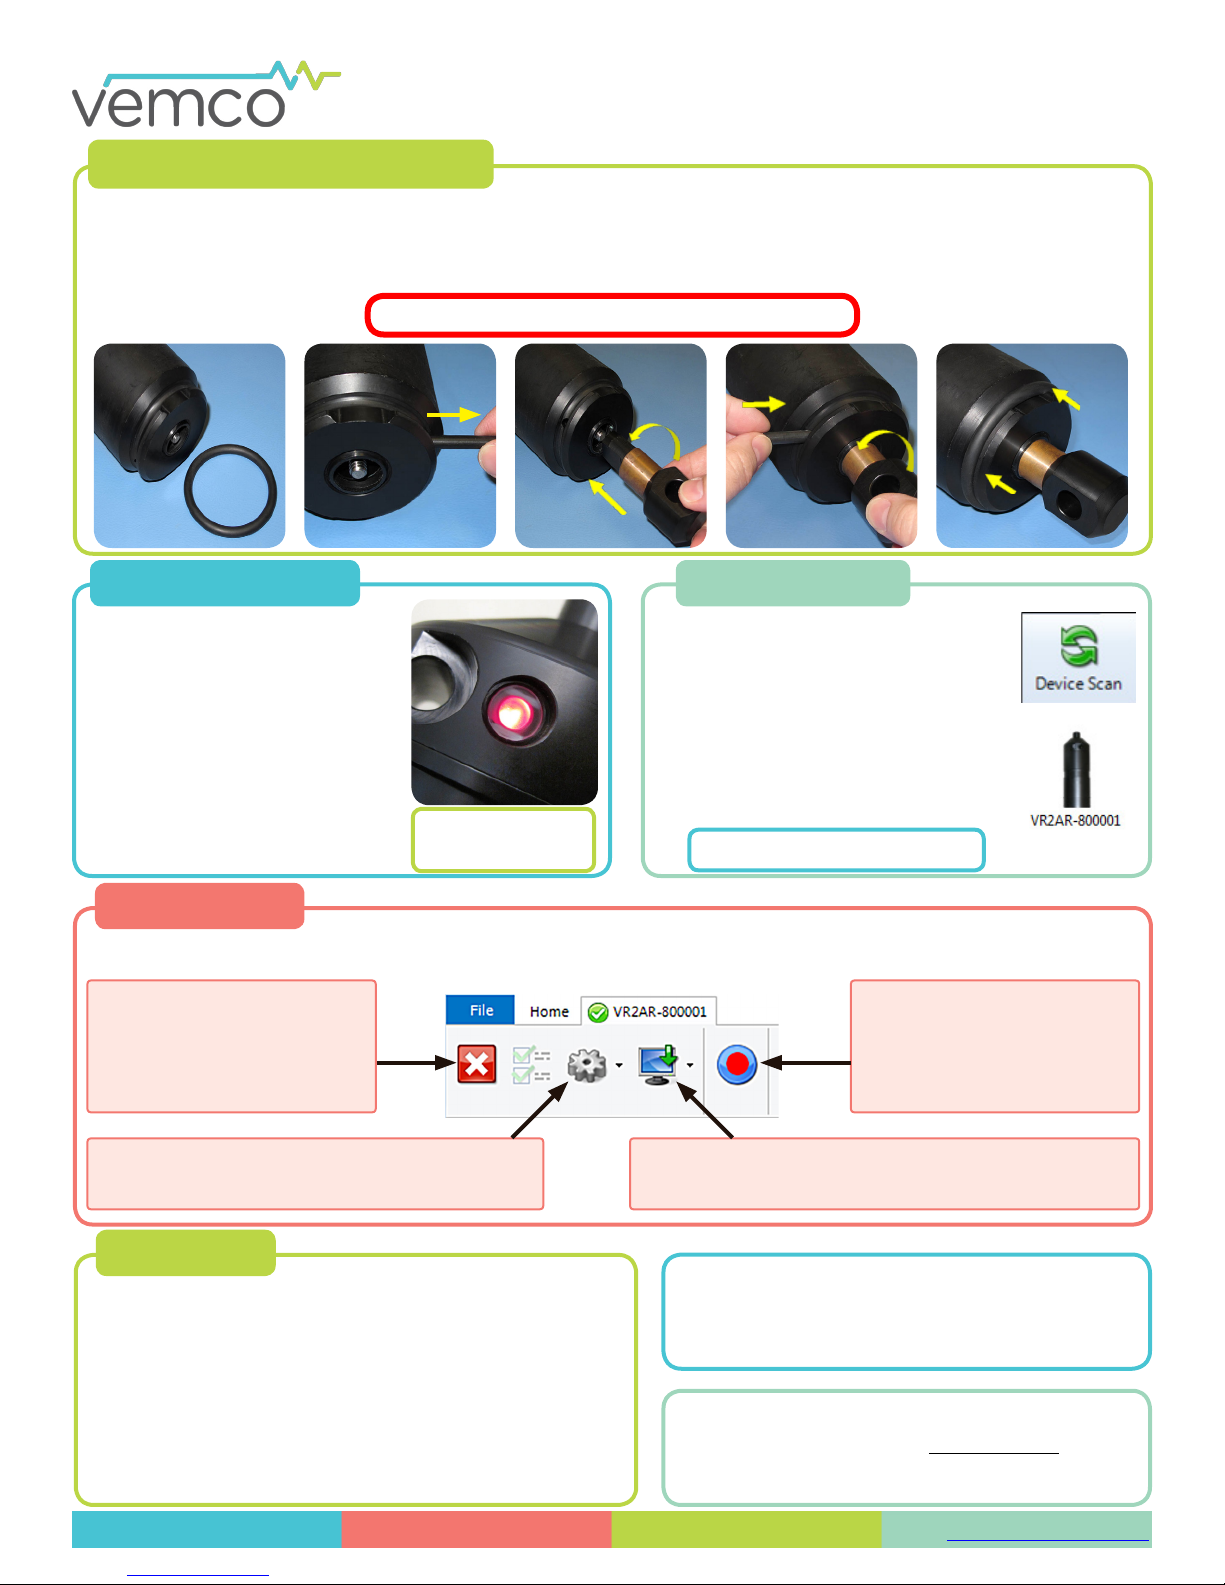
Re-arming Acoustic Release
1. Remove the Retaining O-ring.
2. Remove the Retaininig Pin.
3. Thread the new mooring lug clockwise into the
Ascent-AR until it stops.
Release will not function if pin is not properly installed.
1 2 3 4 5
4. Slide the Retaining Pin back into its hole until it stops.
Slowly turn the lug counter-clockwise until the pin
slides farther into its hole; center the pin.
5. Slide the Retaining O-ring back into its groove.
Activate Bluetooth
Slide the smaller end of the
Bluetooth Activator in the Bluetooth
Activator Hole on the VR2AR, near
the hydrophone.
Wait until the Status Light begins
ashing a bright, long, steady ash
once a second. The wait time is less
than ve seconds.
Remove the Bluetooth Activator.
One bright ash
every second.
Connect to VUE
Open VUE and wait while software scans
for the activated VR2AR. If it doesn’t scan,
then click the “Device Scan” button.
When VR2AR appears, double-click on
the receiver icon with the correct serial
number to open communication.
VR2AR Status Light is continuously on
during communication.
Bluetooth only works through air.
VUE Software
Actions such as starting a study, ooading data, and ending communication are performed from the Receiver Tab and are
started by selecting the correct icon in the tab’s ribbon. Details are found in the VR2AR user manual.
Close View – Ends
communication with VR2AR and
closes Receiver tab. Receiver
resumes recording (does not
initialize).
Device Options – Change Transmit Prole, logging
options, or setup a Watch Table.
Ooad data – Choose to ooad all data or just new data.
Start Recording –Set up and
begin a study; also erases VR2AR
memory
Status Light
No ashes = no power
2 quick red ashes every 5 sec = in Recording Mode
2 quick red ashes every 10 sec = memory is full
1 quick red ash = acoustic ping received
1 bright, long red ash = detection written to memory
1 long red ash per sec = ready for Bluetooth communication
On (solid red) = communicating with VUE
One short green ash = acoustic ping was transmitted
One long green ash = transmitted pings written to memory
DOC-5564-04
Basic instructions for communicating acoustically
with a VR2AR while deployed are found in the Field
Communication Quick Guide.
Operating temperature: -5 °C to 40 °C; Water in
which the VR2AR is deployed must not freeze.
Static depth rating: 500 meters (730 psi)
+1 902-450-1700
www.vemco.com
 Loading...