

FUSION HAND DRYER M ANUAL
V
MANUAL DEL SECADOR DE MANOS VFUSION
MANUEL DE SÉCHOIR À MAIN VFUSION
MANUEL HANDTROCKNERHANDBUCH VFUSION

SILENT & ECO FRIENDLY HAND DRYER
SAFETY
EN
WARNING: PLEASE READ THIS MANUAL CAREFULLY BEFORE INSTALLING AND SWITCHING ON
ECOLOGICALNOTE
This product is environmentally friendly. It has been designed to
operate with a very low power consumption. Plastic parts have
been marked to allow for their proper recycling. This unit has
been identified according to WEEE regulations to allow for
correct disposal.
SEGURIDAD
SÛRETÉ SICHERHEIT
SAFETY AND USE
• This unit has been designed for indoor use only, covered from
water, sun and extreme temperatures; do not use outdoors or
close to moisture and heat generators.
• Minimal distance to water source must be at least 16 inches
(40cm).
• Must be installed following the manufacturer’s instructions.
WARNING: MANUALS
This product has been designed to operate safely and reliable
for several years. However, because of its electronic nature,
manuals and technical information supplied along with the hand
dryer must be carefully read. Please keep this manual and the
rest of information for future consultation. If you transfer the unit
to a third party, please include manuals and technical
information.
• The Manufacturer is not responsible for damages caused by
misuses or defective installations.
• This hand dryer can be only revised maintained and repaired
by trained and authorized personnel.
• Always use original parts and spare parts.
•Power the hand dryer from appropriate power source
according to the acquired equipment. The unit electrical
specifications plate shows the power rating.
• Children must be supervised by an adult while using this
WARNING: ELECTRICAL CIRCUIT:
This unit must be powered by a dedicated circuit branch
protected by a circuit breaker with the appropriate rating:
Model 220/230/240V: Circuit Breaker: TURBO: 3,80Amps; ECO:
2,70Amps.
Model 110/120V: Circuit Breaker: TURBO: 8Amps; ECO: 5,65Amps.
• Circuit cable must fit current consumption for your product as
stated in this manual.
• External electrical break circuits must be used in accordance
with local regulations of installation. The device must have a
minimum distance of 3mm between contacts in all poles, for
product.
• This product is designed for an efficient and quick hand
drying experience. Never try to dry any other part of the body.
• Foreign objects must not be put on nor over the hand dryer.
• Heavy objects must not be put on the hand dryer.
•If this unit fails it must be taken out of order and technical
service (or distributor) must be called for a product check.
• Inner space of this product is protected and locked by screws,
so only authorized personnel with training should revise this
unit. There are neither serviceable nor replaceable parts inside
the unit.
disconnection.
• Minimum section of fixed wiring must be of 1.0 mm.
• In case that the hand dryer includes a HEPA filter, this one has
to be replaced for a new one every 90 days.
• In case of replacing the front cover or manipulating the
electronic PCBoard, instructions need to be carefully read to
avoid possible damage to the device.
DISPOSAL
Packaging: Packaging protects the unit in warehouse and
transportation. It is made of recyclable materials. When
packaging is no longer needed, dispose of it responsibly.
Old devices: This unit has been marked with the European
WEEE symbol. Obsolete or inoperative units must be disposed
of according to electric and electronic waste management
legislation in your country. This unit must be disposed in an
appropriate manner to avoid potential environmental damage or
re-cycling specific materials. In Europe you must dispose of this
unit in a recycling center in your area or contacting your dealer
or local government.
2

SILENT & ECO FRIENDLY HAND DRYER
SAFETY
SEGURIDAD
SÛRETÉ SICHERHEIT
MAINTENANCE
• External: Can be cleaned using a so cloth for removing dust
over external case. Do not use scouring agents, glass or
all-purpose cleaners. Never immerse the unit in water!
• Filter tray needs to be cleaned regularly. Non-cleaning of the
filter tray can damage the device.
• HEPA Filter and ZeroSmell: both the HEPA filter and
ZeroSmell need to be changed every 90 days. Not doing so
can cause damage for the unit in the long term.
INSTALLATION AND OPERATION
Revise related sections of this manual.
TABLE OF SPECIFICATIO NS
MODEL
VOLTAGE: 220/230/240V
Size 164,47*177,39*277,43
Weight 3 kg
Frequency 50/60Hz
Power Consumption 833W 828W 647W 600W
Current (when running) 3,80Amps 2,70Amps
Electrical Isolation Class I
Air Speed (km/h) 362 452 222 360
Drying Time 6-8 s 8-10 s 8-10 s 10-12 s
IP Code IP22 C
Noise dB 71 dB 68 dB 66 dB 66 dB
Number of Motors 1
Motors Speed 30.000rpm 21.000rpm
Driving System So Starting
Hands Detection
System
TURBO ECO
BLADE MULTIJET BLADE MULTIJET
Laser Sensor
MODEL
VOLTAGE: 110/120V
Size 164,47*177,39*277,43
Weight 3 kg
Frequency 50/60Hz
Power Consumption 833W 828W 647W 600W
Current (when running) 8 Amps 5,65 Amps
Electrical Isolation Class I
Air Speed (km/h) 362 452 222 360
Drying Time 6-8 s 8-10 s 8-10 s 10-12 s
IP Code IP22 C
Noise dB 71 dB 68 dB 66 dB 66 dB
Number of Motors 1
Motors Speed 30.000rpm 21.000rpm
Driving System So Starting
Hands Detection
System
TURBO ECO
BLADE MULTIJET BLADE MULTIJET
Laser Sensor
This unit complies with the recognised regulations of technology and relevant safety directives.
We hereby confirm the conformity with following European Directives: Low Voltage Directive (LVD) 2014/35/EU and Electromagnetic Compatibility Directive (EMC) 2014/30/EU.
In addition, this device complies with the following European Directives: UNE-EN 60204-1 2007+cORR:2010, UNE-EN
61000-3-2:2014, UNE-EN 61000-3-3:2013, UNE-EN 61000-6-1:2007+A1:2012 (IEC 61 000-6-1_2005) EMC, UNE-EN
61000-6-3:2007+A1:2012 (IEC 61 000-6-3:2005) EMC. Subject to modifications without notice.
3

SILENT & ECO FRIENDLY HAND DRYER
SAFETY
ES
ADVERTENCIA: LEER CUIDADOSAMENTE EL MANUAL ANTES DE INSTALAR ESTE EQUIPO Y PONERLO EN FUNCIONAMIENTO
NOTAECOLÓGICA
Este producto es amigable con el medio ambiente. Ha sido
diseñado para operar con un muy bajo consumo de potencia
eléctrica. Las piezas plásticas han sido marcadas para su
posterior reciclaje. El producto ha sido identificado para que sus
componentes eléctricos y electrónicos puedan ser
correctamente desechados.
SEGURIDAD
SÛRETÉ SICHERHEIT
SEGURIDAD Y USO
• Este producto ha sido concebido para ser usado en
ambientes interiores protegidos del agua, sol y temperaturas
extremas. No debe ser usado en exteriores o cercano a
fuentes de humedad o calor.
• Debe mantenerse una distancia mínima de 100cm de
cualquier fuente de agua como lavamanos, WC, ducha, etc.
• Debe ser instalado siguiendo las instrucciones indicadas en
ADVERTENCIA: MANUALES
Este producto ha sido diseñado para operar de forma segura y
fiable durante varios años. No obstante, debido a su naturaleza
eléctrica, los manuales y la información que se suministran
deben ser cuidadosamente leídas. Por favor guarde los
manuales para futuras consultas. Si transfiere el producto a un
tercero transfiera también los manuales y la información del
equipo.
este manual.
• El fabricante no se hace responsable de los daños que
pudieran surgir de instalaciones defectuosas o usos
incorrectos.
• Debe ser revisado, mantenido y reparado por personal
entrenado y autorizado.
• Debe funcionar con piezas y recambios originales de la marca
VELTIA .
• Debe conectarse al servicio eléctrico adecuado para el
ADVERTENCIA: CIRCUITO ELECTRICO
Debe conectarse a un circuito eléctrico dedicado de forma
exclusiva a este equipo. El circuito debe contar con una
protección magneto-térmica adecuada al consumo del equipo.
Modelo 220/230/240V: Protección Magneto-térmica: TURBO:
3,80 Amps / ECO: 2,70 Amps.
Modelo 110/120V: Protección Magneto-térmica:
TURBO:
8 Amps / ECO: 5,65 Amps.
• El cable de alimentación también debe ser apropiado para el
consumo previsto en este manual.
• Se deben incorporar medios de desconexión a la instalación
fija de acuerdo con las reglamentaciones nacionales de
instalación. El dispositivo ha de tener un mínimo de 3mm de
separación entre contactos, de todos los polos para la
modelo del producto comprado. En la placa de
especificaciones eléctricas se suministran los datos eléctricos
del equipo.
• Los niños deben ser supervisados por adultos mientras hagan
uso del producto.
• Este equipo está diseñado para el eficiente y rápido secado
de las manos. También se puede secar el pelo. No se puede
utilizar el seca manos para secar ninguna otra parte del cuerpo.
• N
o deben colocarse elementos extraños encima del producto.
• No deben colocarse objetos pesados ni aplicar fuerza sobre
el equipo.
• Si el producto sufre algún daño, debe ser puesto fuera de
funcionamiento y llamar al servicio técnico o distribuidor
autorizado para su revisión.
desconexión.
• La sección mínima del cableado fijo debe ser de 1,0 mm.
Sólo personal entrenado y autorizado debe tener acceso al
interior del producto. El interior del producto está protegido y
cerrado mediante tornillos.
En caso de que el secador incluya el filtro HEPA , deberá
cambiarse cada 90 días.
En caso de sustitución del embellecedor frontal o manipulación
de la tarjeta electrónica, deben seguirse estrictamente las
instrucciones correspondientes para evitar posibles daños en el
equipo.
ELIMINACIÓN
Embalaje: El embalaje protege al equipo durante su transporte
y almacenamiento. El embalaje está hecho de materiales
reciclables. Una vez que el embalaje no sea de más utilidad,
deséchelo en el lugar apropiado del sistema de reciclado en su
comunidad.
Equipos Viejos: Este producto tiene piezas de naturaleza
eléctrica y electrónica. Es por esta razón que ha sido marcado
con el símbolo RAEE (WEEE) según normativas europeas. Se
recomienda desechar este producto de acuerdo con las
normativas vigentes en su país. En el momento de su
eliminación, estas piezas necesitan ser gestionadas de manera
apropiada para evitar posibles daños al medio ambiente o bien
para que algunos de sus materiales sean reciclados y
re-aprovechados. En Europa, los equipos inutilizados deben ser
entregados en los centros especializados de recogida de
desechos pertenecientes a la red de su comunidad o bien
contactando al distribuidor del equipo en su región o al
organismo especializado de su gobierno local.
4
SILENT & ECO FRIENDLY HAND DRYER
SAFETY
SEGURIDAD
SÛRETÉ SICHERHEIT
MANTENIMIENTO
• Limpieza externa: Use un trapo suave para quitar el polvo en
las superficies externas del equipo. No use detergentes ni
productos químicos que puedan afectar el acabado externo.
Nunca sumerja el equipo en agua para limpiarlo.
• Se debe limpiar la caja del filtro Hepa. El descuido del
mantenimiento de dicha caja puede causar daños al equipo.
• Filtro Hepa y ZeroSmell: Debe cambiarse el filtro Hepa y el
gel ZeroSmell cada 90 días. La ausencia de cambio de los
mismos puede causar daños en el secador a largo plazo.
INSTALACIÓN Y FUNCIONAMIENTO
Consulte la sección dedicada a Instalación y Funcionamiento
de este manual
TABLAS DE CARACTERÍSTICAS TÉCNICAS / ELÉCTRICAS
MODELO
VOLTAJE: 220/230/240V
Medidas 164,47*177,39*277,43
Peso 3 kg
Frecuencia 50/60Hz
Consumo de energía 833W 828W 647W 600W
Corriente (en uso) 3,80Amps 2,70Amps
Isolación eléctrica Class I
Velocidad del aire (km/h) 362 452 222 360
Tiempo de secado 6-8 s 8-10 s 8-10 s 10-12 s
Código IP IP22 C
Ruido dB 71 dB 68 dB 66 dB 66 dB
Número de motores 1
Velocidad de motor 30.000rpm 21.000rpm
Sistema de funcionamiento Encendido lento
Sistema de detección de
manos
TURBO ECO
BLADE MULTIJET BLADE MULTIJET
Sensor láser
MODEL
VOLTAJE: 110/120V
Medidas 164,47*177,39*277,43
Peso 3 kg
Frecuencia 50/60Hz
Consumo de energía 833W 828W 647W 600W
Corriente (en uso) 8 Amps 5,65 Amps
Isolación eléctrica Class I
Velocidad del aire (km/h) 362 452 222 360
Tiempo de secado 6-8 s 8-10 s 8-10 s 10-12 s
Código IP IP22 C
Ruido dB 71 dB 68 dB 66 dB 66 dB
Número de motores 1
Velocidad de motor 30.000rpm 21.000rpm
Sistema de funcionamiento Encendido lento
Sistema de detección de
manos
TURBO ECO
BLADE MULTIJET BLADE MULTIJET
Sensor láser
Este equipo cumple con regulaciones reconocidas de tecnología y directivas de seguridad. Confirmamos la conformidad con
las directivas europeas: D 2014 / 35 / UE, D 2014 /30 / UE.
Asimismo, este equipo también cumple con las siguientes regulaciones europeas: UNE-EN 60204-1 2007+cORR:2010,
UNE-EN 61000-3-2:2014, UNE-EN 61000-3-3:2013, UNE-EN 61000-6-1:2007+A1:2012 (IEC 61 000-6-1_2005) EMC, UNE-EN
61000-6-3:2007+A1:2012 (IEC 61 000-6-3:2005) EMC. Nos reservamos el derecho a realizar modificaciones sin aviso previo.
5

SILENT & ECO FRIENDLY HAND DRYER
SAFETY
FR
ADVERTISSEMENT: VEUILLEZ LIRE ATTENTIVEMENT LE MANUAL AVANT D’INSTALLER CET ÉQUIPEMENT ET DE LE METTER EN SERVICE.
NOTEÉCOLOGIQUE
Ce produit est respectueux de l'environnement. Il a été conçu
pour fonctionner avec une très faible consommation d'énergie.
Les pièces en plastique ont été marquées pour un recyclage
ultérieur. Le produit a été identifié afin que ses composants
électriques et électroniques puissent être mis au rebut
correctement.
SEGURIDAD
SÛRETÉ SICHERHEIT
SÉCURITÉ ET UTILISATION
• Ce produit a été conçu pour être utilisé dans des
environnements intérieurs protégés de l'eau, du soleil et des
températures extrêmes. Il ne doit pas être utilisé à l'extérieur
ou à proximité de sources d'humidité ou de chaleur.
• Une distance minimale de 100cm doit être maintenue par
rapport à toute source d'eau telle qu'un lavabo, une toilette,
une douche, etc.
AVERTISSEMENT : MANUELS
Ce produit a été conçu pour fonctionner de manière sûre et
fiable pendant plusieurs années. Cependant, en raison de sa
nature électrique, les manuels et les informations fournis doivent
être lus attentivement. Veuillez conserver les manuels pour
référence future. Si vous remettez le produit à un tiers, veuillez
fournir également les manuels et les informations sur
l'équipement.
• Il doit être installé en suivant les instructions indiquées dans
ce manuel.
• Le fabricant n'est pas responsable des dommages pouvant
résulter d'installations défectueuses ou d'utilisations
incorrectes.
• Il doit être vérifié, entretenu et réparé par un personnel formé
et autorisé.
• Il doit fonctionner avec des pièces d'origine et des pièces de
rechange de la marque VELTIA.
AVERTISSEMENT : CIRCUIT ELECTRIQUE
Cet équipement doit être branché sur un circuit électrique
consacré exclusivement à cet effet. Le circuit doit comporter
une protection magnéto-thermique adaptée à la consommation
de l'équipement.
Modèle 220/230 / 240V: Protection magnéto-thermique: TURBO:
3,80 Amps / ECO: 2,70 Amps.
Modèle 110 / 120V: protection magnéto-thermique:
TURBO:
8 Amps / ECO: 5,65 Amps.
• Le cordon d'alimentation doit également être adapté à la
consommation prévue dans ce manuel.
• Les moyens de déconnexion doivent être intégrés à
l'installation fixe conformément aux réglementations nationales
en matière d'installation. Le dispositif doit avoir une séparation
minimale de 3 mm entre les contacts de tous les pôles pour la
• Il doit être branché sur le réseau électrique correspondant au
modèle du produit acheté. Les données électriques de
l'équipement sont indiquées sur la plaque signalétique.
• Les enfants doivent être surveillés par des adultes lors de
l'utilisation du produit.
• Cet équipement a été conçu pour un séchage efficace et
rapide des mains. Il peut être utilisé pour se sécher les cheveux
également. Le sèche-mains ne peut pas être utilisé pour sécher
d'autres parties du corps.
• Aucun élément étranger ne doit être placé sur le produit.
Ne placez pas d'objets lourds et n'appliquez pas de force sur
l'équipement.
• Si le produit est endommagé, il doit être mis hors service et
vous devez contacter le service technique ou un distributeur
agréé pour vérificatio
déconnexion.
• La section minimale du câblage fixe doit être de 1,0 mm.
• Seul le personnel formé et autorisé doit avoir accès à
l'intérieur du produit. L'intérieur du produit est protégé et
fermé par des vis.
• Si le sèche-linge est équipé d'un filtre HEPA, il doit être
remplacé tous les 90 jours.
• En cas de remplacement du panneau avant ou de manipulation
de la carte électronique, les instructions correspondantes
doivent être scrupuleusement respectées afin d'éviter tout
dommage éventuel du matériel.
ÉLIMINATION
Emballage : l'emballage protège l'équipement pendant le
transport et le stockage. L'emballage est fait de matériaux
recyclables. Une fois que l'emballage n'est plus utile, jetez-le à
l'endroit approprié dans le système de recyclage de votre
communauté.
Équipement anciens : ce produit contient des éléments de
nature électrique et électronique. C’est pour cette raison qu’il
porte le symbole RAEE (WEEE) conformément à la
réglementation européenne. Il est recommandé de mettre ce
produit au rebut conformément à la réglementation en vigueur
dans votre pays. Au moment de la mise au rebut, ces pièces
doivent être gérées de manière appropriée afin d'éviter tout
dommage possible pour l'environnement, et afin que certains de
leurs matériaux puissent être recyclés et réutilisés. En Europe,
les équipements non utilisés doivent être remis aux centres de
collecte des déchets spécialisés appartenant à votre réseau
communautaire ou en contactant le distributeur d'équipements
de votre région ou l'agence spécialisée de votre gouvernement
local.
6

SILENT & ECO FRIENDLY HAND DRYER
SAFETY
SEGURIDAD
SÛRETÉ SICHERHEIT
ENTRETIEN
• Nettoyage extérieur : Utilisez un chiffon doux pour enlever
la poussière sur les surfaces externes de l'appareil. N'utilisez
pas de détergents ou de produits chimiques pouvant altérer
la finition externe. Ne jamais plonger l'équipement ans l'eau
pour le nettoyer.
• Le filtre Hepa doit être nettoyé. Négliger l'entretien de ce
boîtier peut endommager l'équipement.
• Filtre Hepa et ZeroSmell : Le filtre Hepa et le gel ZeroSmell
doivent être remplacés tous les 90 jours. L'absence de
changement de ceux-ci peut endommager le sèche-mains à
long terme.
INSTALLATION ET FONCTIONNEMENT
Veuillez consultez la rubrique consacrée à l'installation et à
l'utilisation de ce manuel.
SPÉCIFICATIONS TECHNIQUES, ENVIRONNEMENTALES ET MECÁNIQUES
MODÈLE
TENSION: 220/230/240V
Taille 164,47*177,39*277,43
Poids 3 kg
Fréquence 50/60Hz
Consommation d’énergie 833W 828W 647W 600W
Courant (en marche) 3,80 Ampères 2,70Ampères
Isolation électrique Classe I
Vitesse de l’air (km/h) 362 452 222 360
Temps de séchage 6-8 secs 8-10 secs 8-10 secs 10-12 secs
Code IP IP22 C
Bruit dB 71 dB 68 dB 66 dB 66 dB
Nombre de moteurs 1
Vitesse du moteur 30.000 t/m 21.000 t/m
Système d’entraînement Démarrage progressif
Système de détection
des mains
TURBO ECO
BLADE MULTIJET BLADE MULTIJET
Capteur laser
MODÈLE
TENSION: 110/120V
Taille 164,47*177,39*277,43
Poids 3 kg
Fréquence 50/60Hz
Consommation d’énergie 833W 828W 647W 600W
Courant (en marche) 8 Ampères 5,65 Ampères
Isolation électrique Classe I
Vitesse de l’air (km/h) 362 452 222 360
Temps de séchage 6-8 secs 8-10 secs 8-10 secs 10-12 secs
Code IP IP22 C
Bruit dB 71 dB 68 dB 66 dB 66 dB
Nombre de moteurs 1
Vitesse du moteur 30.000 t/m 21.000 t/m
Système d’entraînement Démarrage progressif
Système de détection
des mains
TURBO ECO
BLADE MULTIJET BLADE MULTIJET
Capteur laser
Cet équipement est conforme aux réglementations reconnues en matière de technologie et de directives de sécurité. Nous
confirmons la conformité aux directives européennes : D 2014/35 / EU, D 2014/30 / EU.
En outre, cet équipement est également conforme aux réglementations européennes suivantes: UNE-EN 60204-1 2007 +
cORR : 2010, UNE-EN 61000-3-2:2014, UNE-EN 61000-3-3:2013, UNE-EN 61000-6-1:2007 + A1: 2012 (CEI). 61 000-6-1_2005)
CEM, UNE-EN 61000-6-3:2007 + A1:2012 (CEI 61 000-6-3:2005) CEM. Nous nous réservons le droit d'apporter des modifications sans préavis.
7

SILENT & ECO FRIENDLY HAND DRYER
SAFETY
DE
WARNUNG: BITTELESENSIEDIESEBEDIENUNGSANLEITUNGSORGFÄLTIGDURCHBEVORSIEDENTROCKNERANSCHLIEßENUNDBENUTZEN
ÖKOLOGISCHERHINWEIS
Dieses Produkt ist umweltfreundlich. Es wurde für einen sehr
geringen Stromverbrauch entwickelt. Kunststoeile wurden
gekennzeichnet, um ein ordnungsgemäßes Recycling zu
ermöglichen. Dieses Gerät wurde gemäß der WEEE-Richtlinien
identifiziert, um eine korrekte Entsorgung zu gewährleisten.
SEGURIDAD
SÛRETÉ SICHERHEIT
SICHERHEIT UND VERWENDUNG
• Das Gerät ist nur für den Gebrauch in Innenräumen konzipiert
und muss vor Wasser, Sonne und extremen Temperaturen
geschützt werden. Nicht im Freien oder in der Nähe von
Feuchtigskeits- und Wärmeerzeugern verwenden.
• Der Mindestabstand zur Wasserquelle muss 40cm Betragen.
• Gerät muss gemäß den Anweisungen des Herstellers
WARNUNG: BEDIENUNGSANLEITUNG
Dieses Produkt wurde so konzipiert, dass es mehrere Jahre
sicher und zuverlässig funktioniert. Aufgrund des
elektronischen Charakters müssen Handbücher und technische
Informationen, die zusammen mit dem Händetrockner geliefert
werden, sorgfältig gelesen werden. Bitte bewahren Sie daher
dieses Handbuch und die übrigen Informationen sorgfältig auf.
Sollten Sie das Gerät an Dritte weitergeben, so stellen Sie
sicher, dass dieses Handbuch und die technischen
Informationen weitergegeben werden.
installiert werden.
• Der Hersteller haet nicht für Schäden, die durch Missbrauch
oder fehlerhae Installation entstehen.
• Dieser Händetrockner darf nur von ausgebildetem Personal
oder authorisiertem Personal gewartet und repariert werden.
• Verwenden Sie ausschließlich originale Teile (auch
Ersatzteile).
• Verwenden Sie eine dem Trockner entsprechende
Stromquelle mit der korrekten Leistung. Das Typenschild am
Gerät zeigt die Nennleistung.
• Kinder müssen während der Verwendung des Gerätes von
WARNUNG: ELEKTRISCHE SCHALTUNG
Dieses Gerät muss von einem eigenen Stromkreis gespeist
werden, der durch einen Schutzschalter mit der
entsprechenden Leistung geschützt ist:
Modell 220/230/240V: Schutzschalter: TURBO: 3,80Amps; ECO:
2,70Amps.
Modell 110/120V: Schutzschalter: TURBO: 8Amps; ECO: 5,65Amps.
• Das Stromkabel ,uss dem in diesem Handbuch angegebenen
Stromverbrauch für Ihr Produkt entsprechen.
• Externe elektrische Trennkreise müssen gemäß der örtlichen
Installationsvorschrien verwendet werden. Das Gerät muss einen
einer Aufsichtsperson betreut werden.
• Dieses Produkt ist für eine schnelle und effiziente
Händetrocknung konzipiert. Versuchen Sie niemals andere
Körperteile oder Gegenstände zu Trocknen.
• Fremdkörper dürfen nicht in den Trockner gesteckt werden.
• Schwere Gegenstände dürfen nicht auf den Trockner gelegt
werden.
• Sollte dieses Gerät ausfallen so muss es umgehen außer
Betrieb gesetzt und vom Strom genommen werden. Der
technische Service (oder Händler) muss umgehend informiert
werden.
Mindestabstand von 3mm zwischen den Kontakten haben, um die
Verbindung zu trennen.
• Der Mindestabstand für die Direkt-Verdrahtung beträgt 1.0 mm
• Der Innenraum dieses Gerätes ist durch Schrauben gesichert
und geschützt. Das Gerät darf nur von entsprechend
geschultem und authorisiertem Personal geöffnet werden. Es
befinden sich keine zu wartenden oder auszutauschenden
Teile im Geräteinnern.
• Falls der Händetrockner einen HEPA-Filter enthält muss
dieser alle 90 Tage durch einen neuen Filter ersetzt werden.
• Wenn Sie die vordere Abdeckung wieder anbringen oder
den Geräte-Modus (Turbo Modus oder Eco-Moduks)
umstellen müssen Sie die Anleitung sorgfältig durchlesen um
Schäden am Gerät zu vermeiden.
ENTSORGUNG
Verpackung: Die Verpackung schützt das Gerät beim Lagern
und Transportieren. Sie besteht aus recyclebaren Materialien.
Sollten Sie die Verpackung nicht mehr benötigen so entsorgen
Sie diese bitte ordnungsgemäß und verantwortungsvoll.
ALT-Gerät: Dieses Gerät wurde mit einem europäischen
WEEE-Symbol gekennzeichnet. Veraltete oder nicht mehr
betriebsfähige Geräte müssen gemäß den in ihrem Land
geltenden gesetzlichen Bestimmungen für die Entsorgung von
Elektro- und Elektronik-Altgeräten entsorgt werden.
Dieses Gerät muss in geeigneter Weise entsorgt werden, um
mögliche Umweltschäden zu verhindern und das Recyclen der
entsprechenden Teile zu ermöglichen. In Europa müssen Sie
dieses Gerät in einem Recycling-Center in Ihrer Nähe
entsorgen oder sich an Ihren Händler oder an die örtlichen
Behörden wenden.
8

SILENT & ECO FRIENDLY HAND DRYER
SAFETY
SEGURIDAD
SÛRETÉ SICHERHEIT
WARTUNG
• Äußerlich: Kann mit einem weichen Tuch gereinigt werden,
um Staub vom äußeren Gehäuse zu entfernen. Verwenden Sie
keine Scheuermittel, Glas oder Allzweckreiniger. Tauchen Sie
das Gerät niemals in Wasser!
• Das Filterfach muss regelmäßig gereinigt werden. Wenn das
Filterfach nicht gereinigt wird, kann das Gerät beschädigt
werden.
• HEPA Filter und ZeroSmell: Sowohl der HEPA-Filter als auch
ZeroSmell müssen alle 90 Tage ausgetauscht werden.
Anderfalls kann das Gerät langfristig beschäigt werden
INSTALLATION UND BETRIEB
Bitte beachten Sie den entsprechenden Abschnitt der
Bedienungsanleitung.
SPEZIFIKATIONEN
MODELL
SPANNUNG: 220/230/240V
Abmessung 164,47*177,39*277,43
Gewicht 3 kg
Frequenz 50/60Hz
Stromverbrauch 833W 828W 647W 600W
Stromverbrauch (in Betrieb)
Elektrische Isolation Class I
Lugeschwindigkeit (km/h) 362 452 222 360
Trocknungszeit 6-8 s 8-10 s 8-10 s 10-12 s
IP Code IP22 C
Geräusch Pegel (dB) 71 dB 68 dB 66 dB 66 dB
Anzahl der Motoren 1
Motor-Geschwindigkeit 30.000rpm 21.000rpm
Antriebssystem So Starting
Handerkennungs
-System
TURBO ECO
BLADE MULTIJET BLADE MULTIJET
3,80Amps 2,70Amps
Laser Sensor
MODELL
VOLTAJE: 110/120V
Abmessung 164,47*177,39*277,43
Gewicht 3 kg
Frequenz 50/60Hz
Stromverbrauch 833W 828W 647W 600W
Stromverbrauch (in Betrieb) 8 Amps 5,65 Amps
Elektrische Isolation Class I
Lugeschwindigkeit (km/h) 362 452 222 360
Trocknungszeit 6-8 s 8-10 s 8-10 s 10-12 s
IP Code IP22 C
Geräusch Pegel (dB) 71 dB 68 dB 66 dB 66 dB
Anzahl der Motoren 1
Motor-Geschwindigkeit 30.000rpm 21.000rpm
Antriebssystem So Starting
Handerkennungs
-System
TURBO ECO
BLADE MULTIJET BLADE MULTIJET
Laser Sensor
Este equipo cumple con regulaciones reconocidas de tecnología y directivas de seguridad. Confirmamos la conformidad con
las directivas europeas: D 2014 / 35 / UE, D 2014 /30 / UE.
Asimismo, este equipo también cumple con las siguientes regulaciones europeas: UNE-EN 60204-1 2007+cORR:2010,
UNE-EN 61000-3-2:2014, UNE-EN 61000-3-3:2013, UNE-EN 61000-6-1:2007+A1:2012 (IEC 61 000-6-1_2005) EMC, UNE-EN
61000-6-3:2007+A1:2012 (IEC 61 000-6-3:2005) EMC. Nos reservamos el derecho a realizar modificaciones sin aviso previo.
9
INSTALLATION INSTALACIÓN INSTALLATION INSTALLATION
SILENT & ECO FRIENDLY HAND DRYER
EN
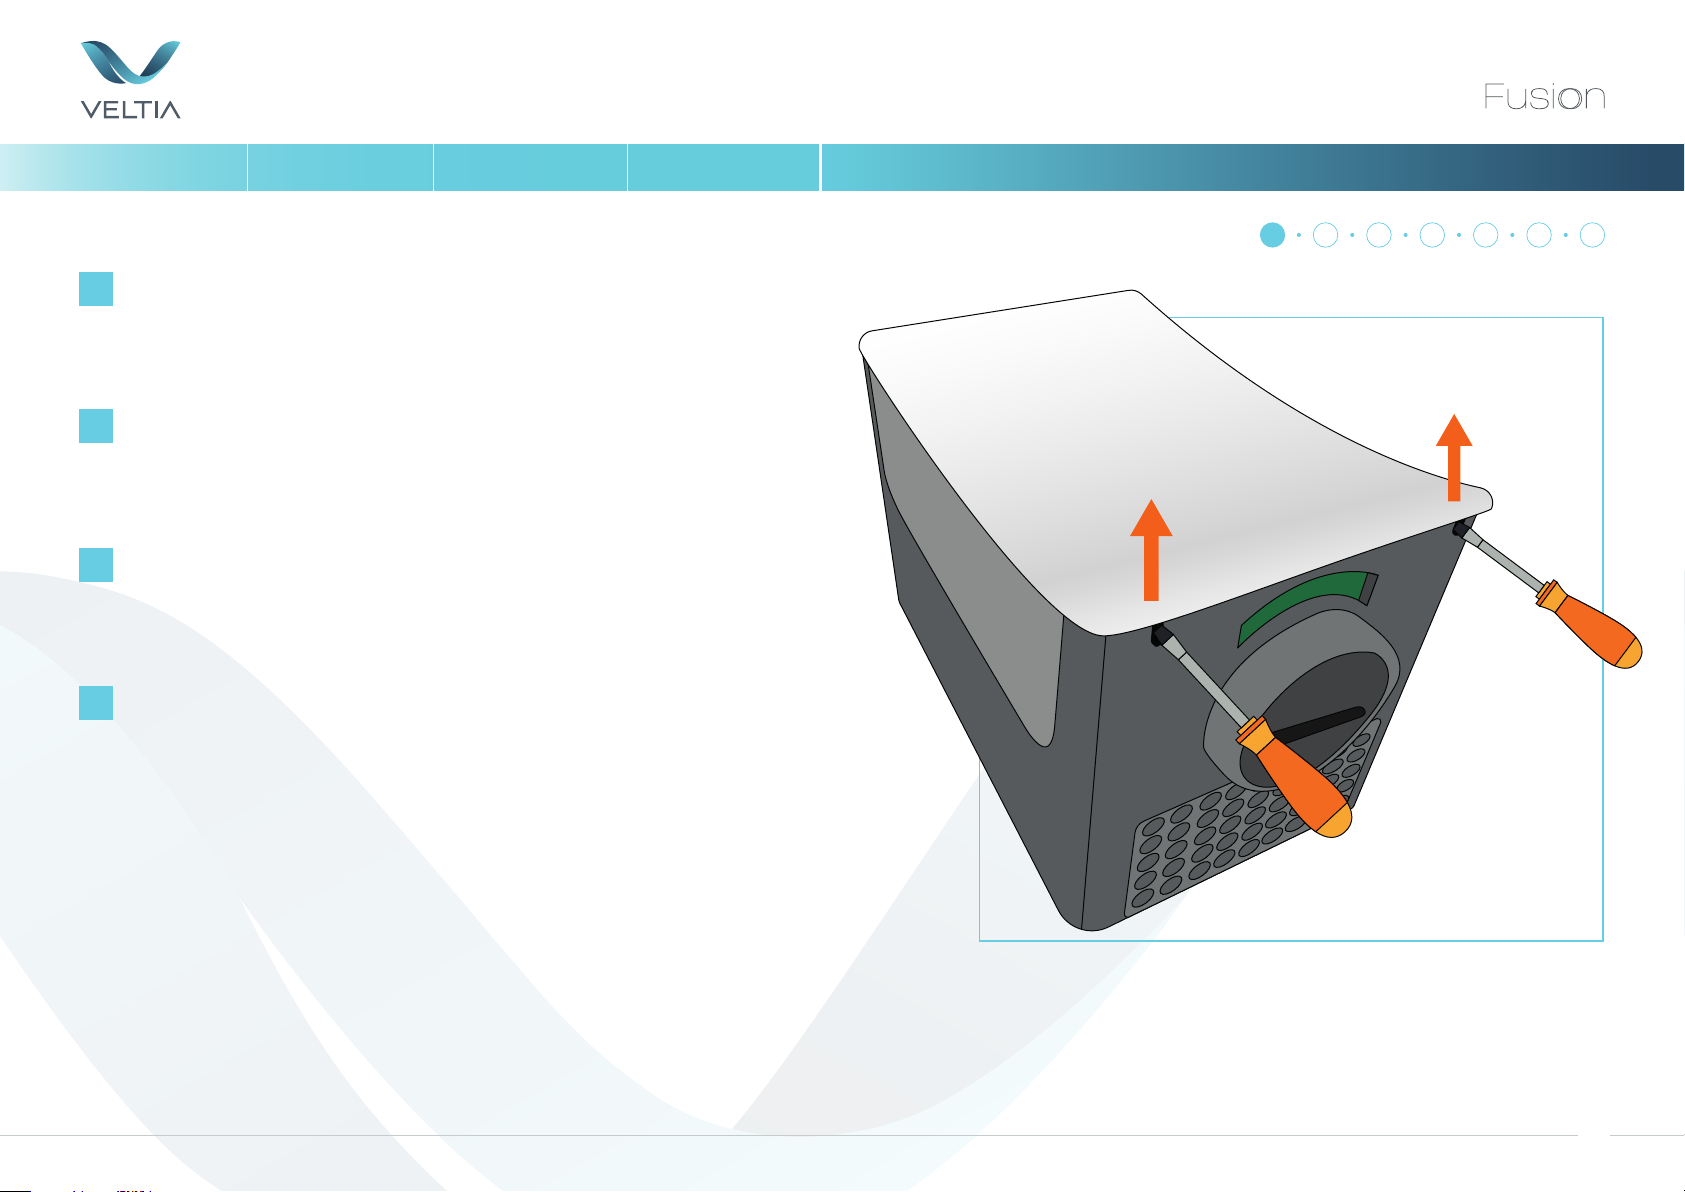
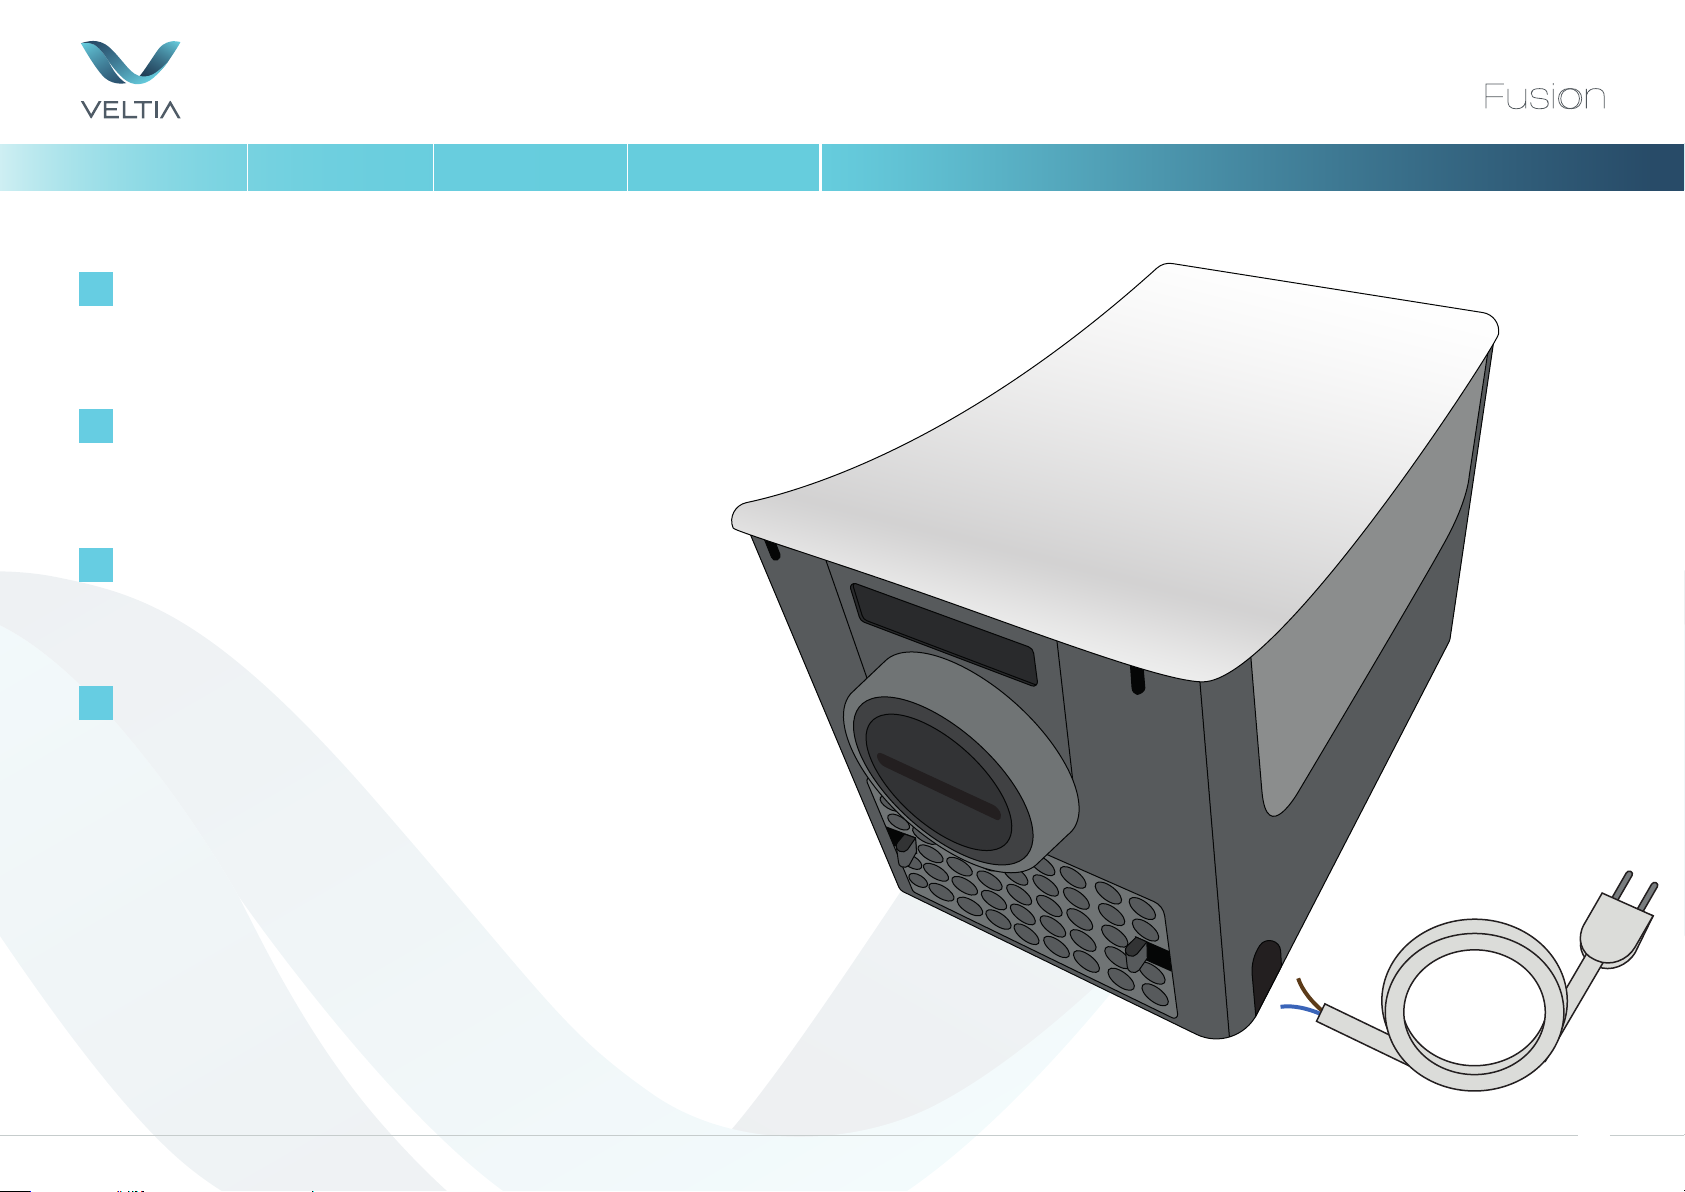
Using a terminal screwdriver, locate the holes on the
underside at the front of the hand dryer and insert the
screwdriver and push in to loosen the cover.
ES
Presionar los encajes de la parte inferior del secador con el
destornillador y levantar el embellecedor frontal por la parte
inferior del mismo.
FR
A l'aide du tournevis, appuyez sur les trous situés dans la
partie inférieure du séche-mains et soulevez le panneau
frontal du bas du séche-mains.
DE
Suchen Sie die Löcher mit einem Schraubendreher auf der
Unterseite an der Vorderseite des Händetrockners und
drücken Sie um die Abdeckung zu lösen.
1
2
4 5
3
7
6
10

INSTALLATION INSTALACIÓN INSTALLATION INSTALLATION
SILENT & ECO FRIENDLY HAND DRYER
EN
Once the low part of the front cover is separated from the
dryer, slide the front cover upwards and separate it
completely from the dryer.
ES
Una vez separada la parte inferior del embellecedor frontal,
deslizar ésta hacia arriba y liberarla completamente
del secador.
FR
Une fois que la partie inférieure du couvercle séparée, le
faire glisser vers le haut et le retirer complètement
du séche-mains.
DE
Sobald der untere Teil der vordere Abdeckung vom
Trockner getrennt ist, schieben Sie die Frontabdeckung
nach oben und trennen diese vollständig vom Trockner.
1
2
4 5
3
7
6
1
2
11
INSTALLATION INSTALACIÓN INSTALLATION INSTALLATION
SILENT & ECO FRIENDLY HAND DRYER
EN
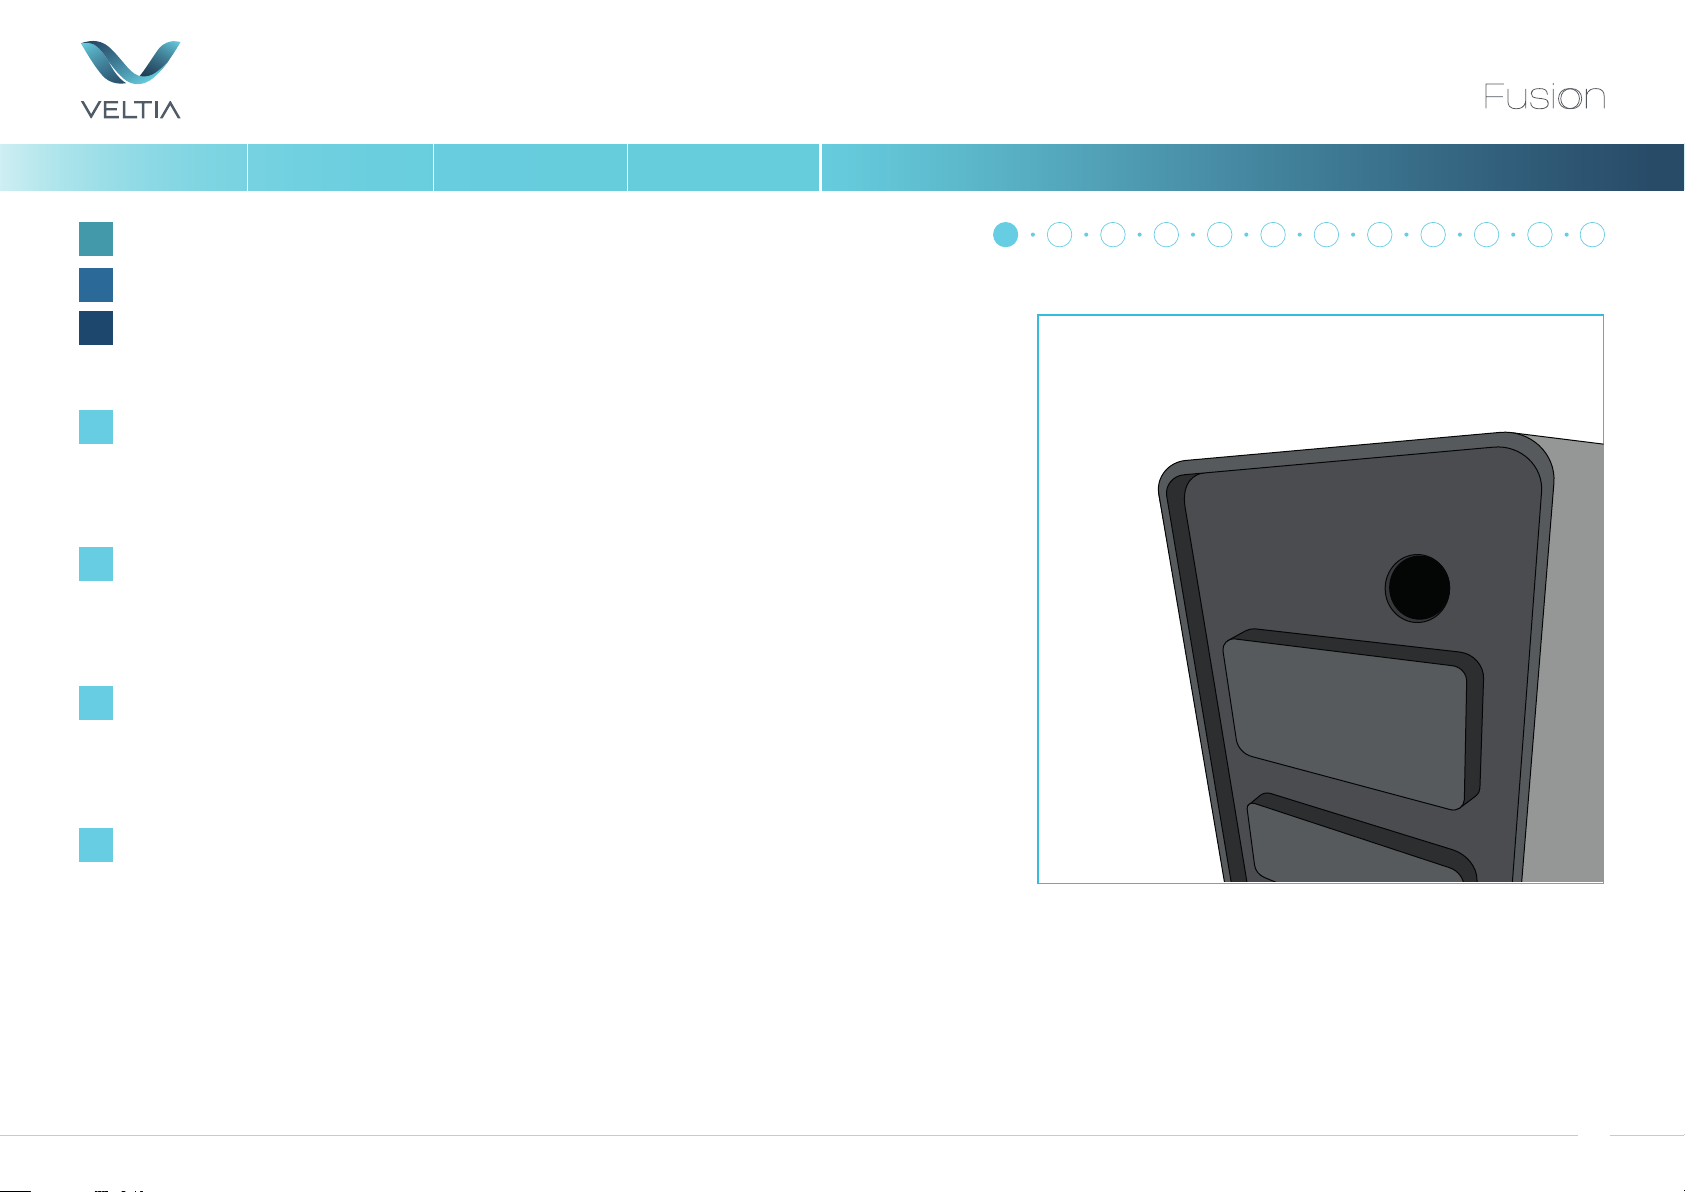
Unscrew and move the front housing away from the dryer.
ES
Desatornillar y retirar la tapa frontal.
FR
Dévisser et retirer le couvercle frontal du sèche-mains.
DE
Lösen Sie die Schrauben und entfernen Sie die
Abdeckung.
1
2
4 5
3
7
6
12
INSTALLATION INSTALACIÓN INSTALLATION INSTALLATION
SILENT & ECO FRIENDLY HAND DRYER
EN
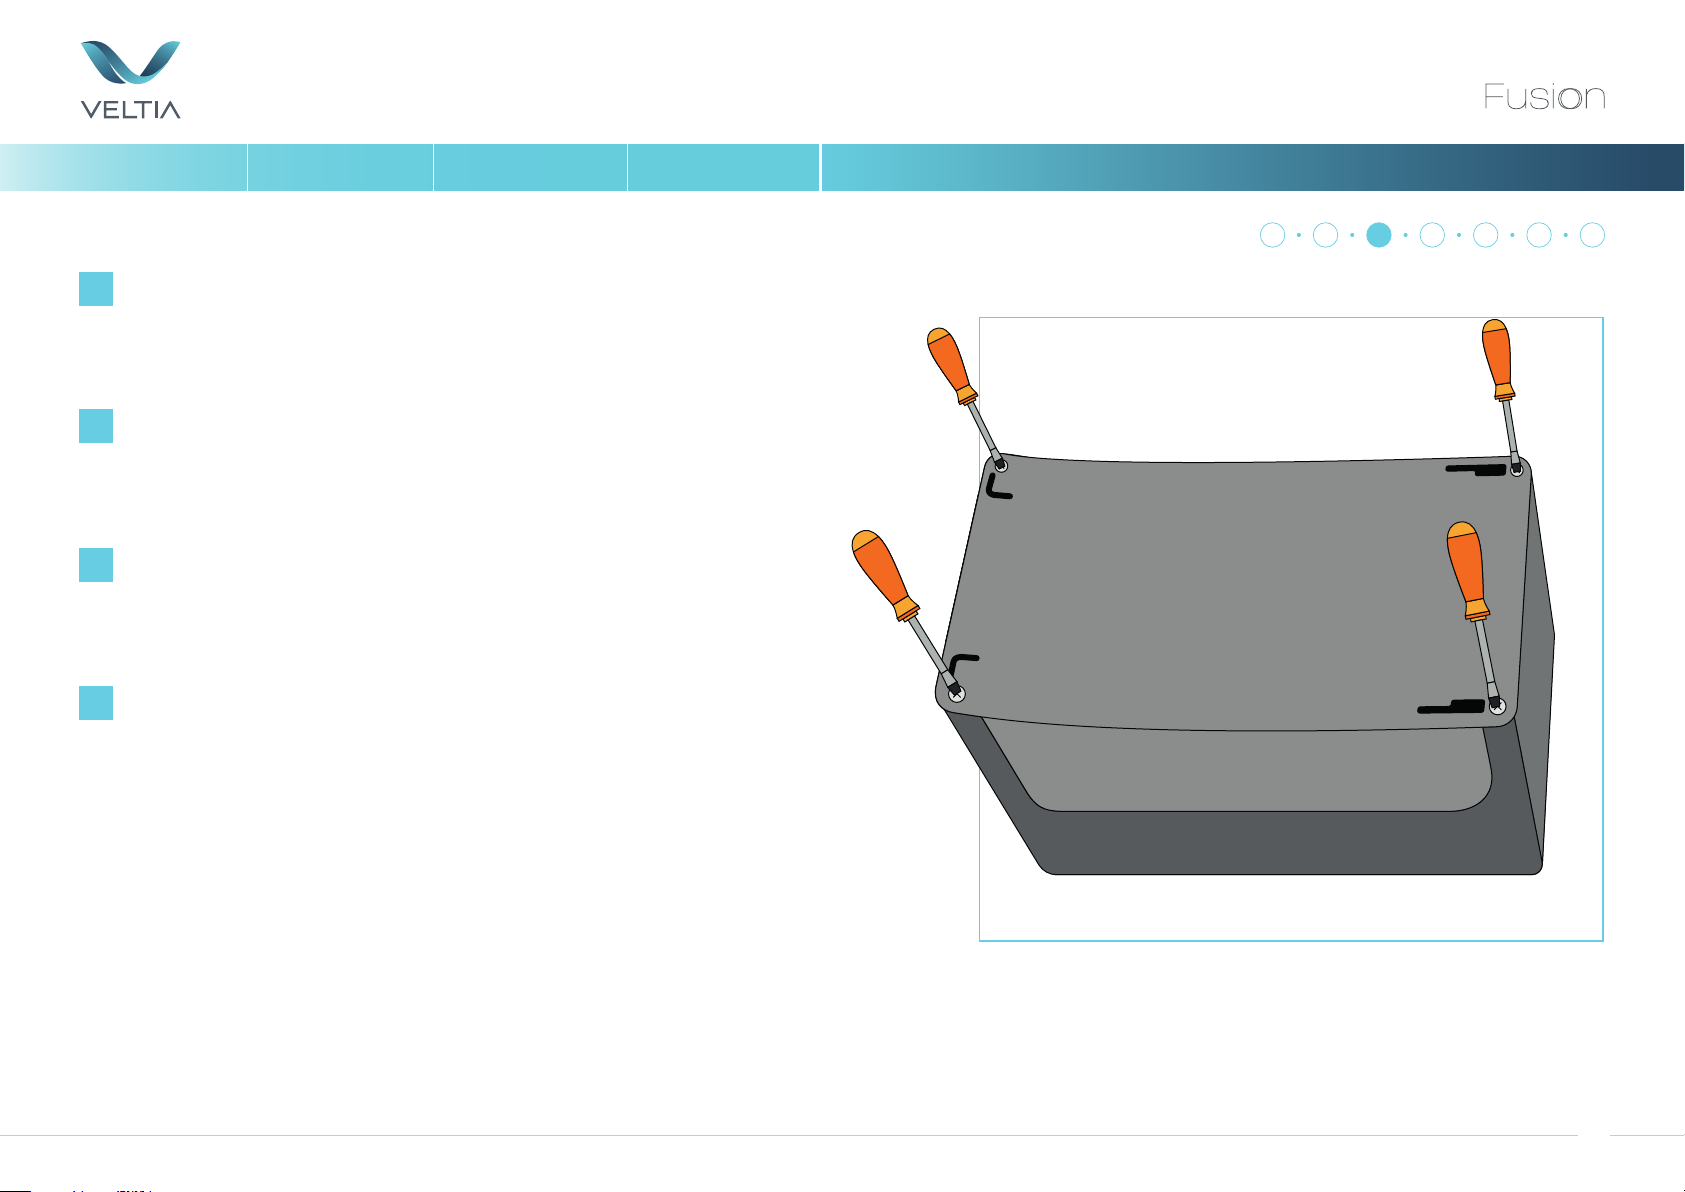
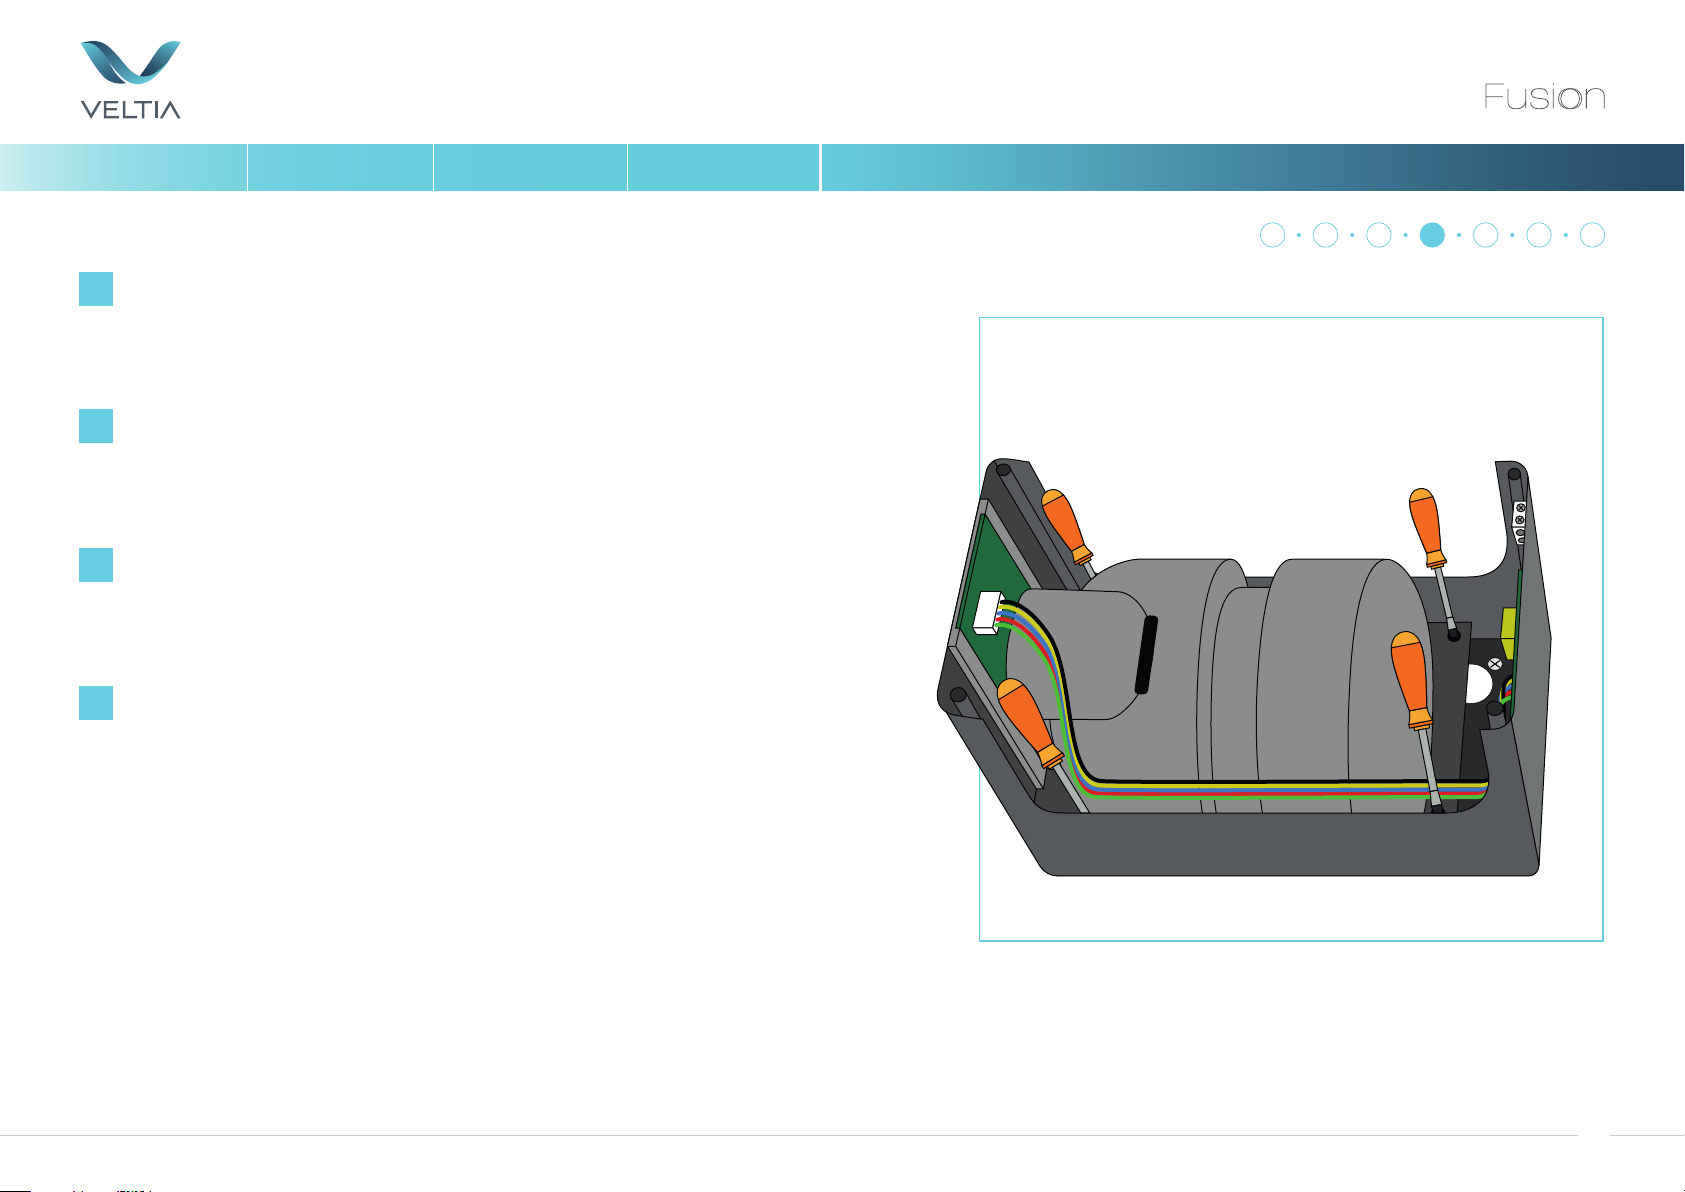
Unscrew and separate the block assembly and the rear
housing from the black plate.
ES
Desatornillar y separar el bloque motor de la placa trasera.
FR
Dévisser et séparer le bloc moteur de la plaque arrière.
DE
Lösen Sie die 4 Schrauben und lösen Sie somit die
Rückwand des Trockners. Kippen Sie den Trockner auf die
Seite um die Rückwand leichter entfernen zu können.
1
2
4 5
3
7
6
13
INSTALLATION INSTALACIÓN INSTALLATION INSTALLATION
SILENT & ECO FRIENDLY HAND DRYER
EN
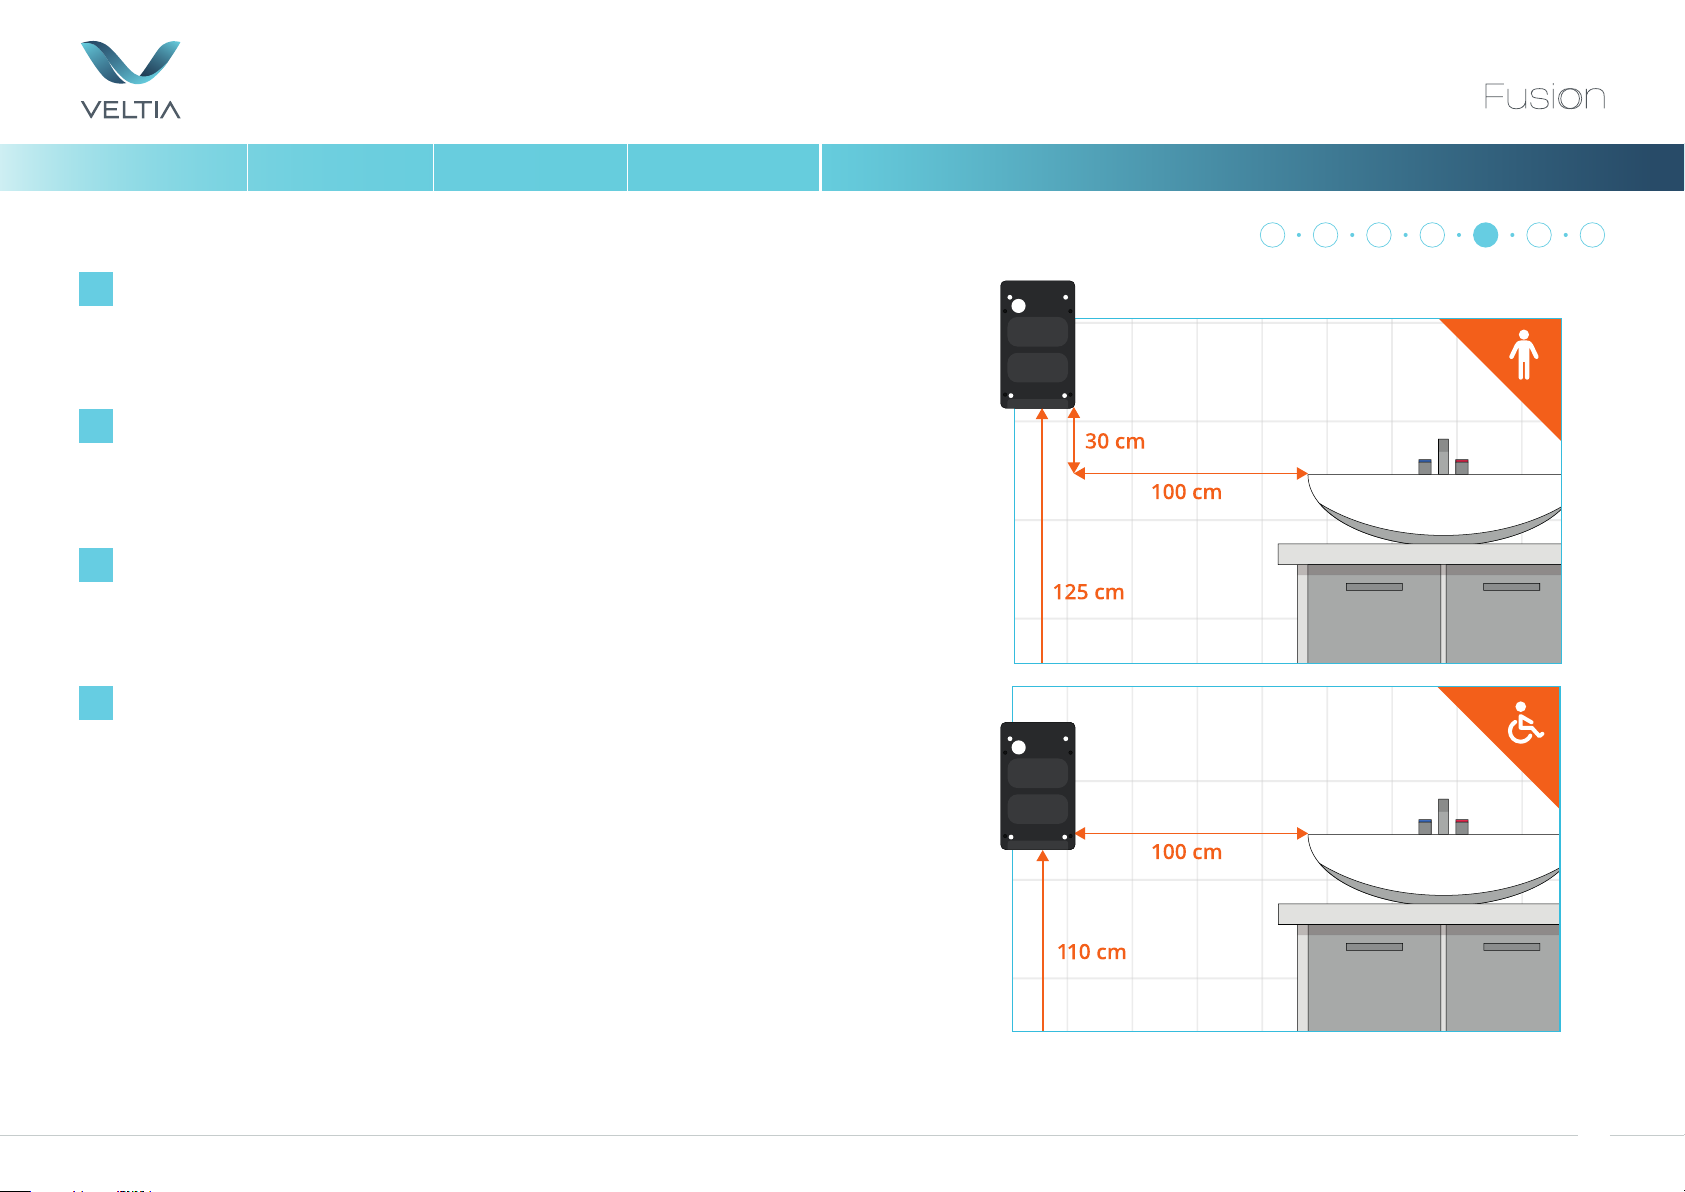
Recommended heights for the installation.
ES
Alturas recomendadas para la instalación.
FR
Hauteurs recommandées pour l'installation.
DE
Empfohlene Installationshöhe.
1
2
4 5
3
7
6
14
INSTALLATION
SICHERHEITINSTALLATION INSTALACIÓN INSTALLATION INSTALLATION
SILENT & ECO FRIENDLY HAND DRYER
EN
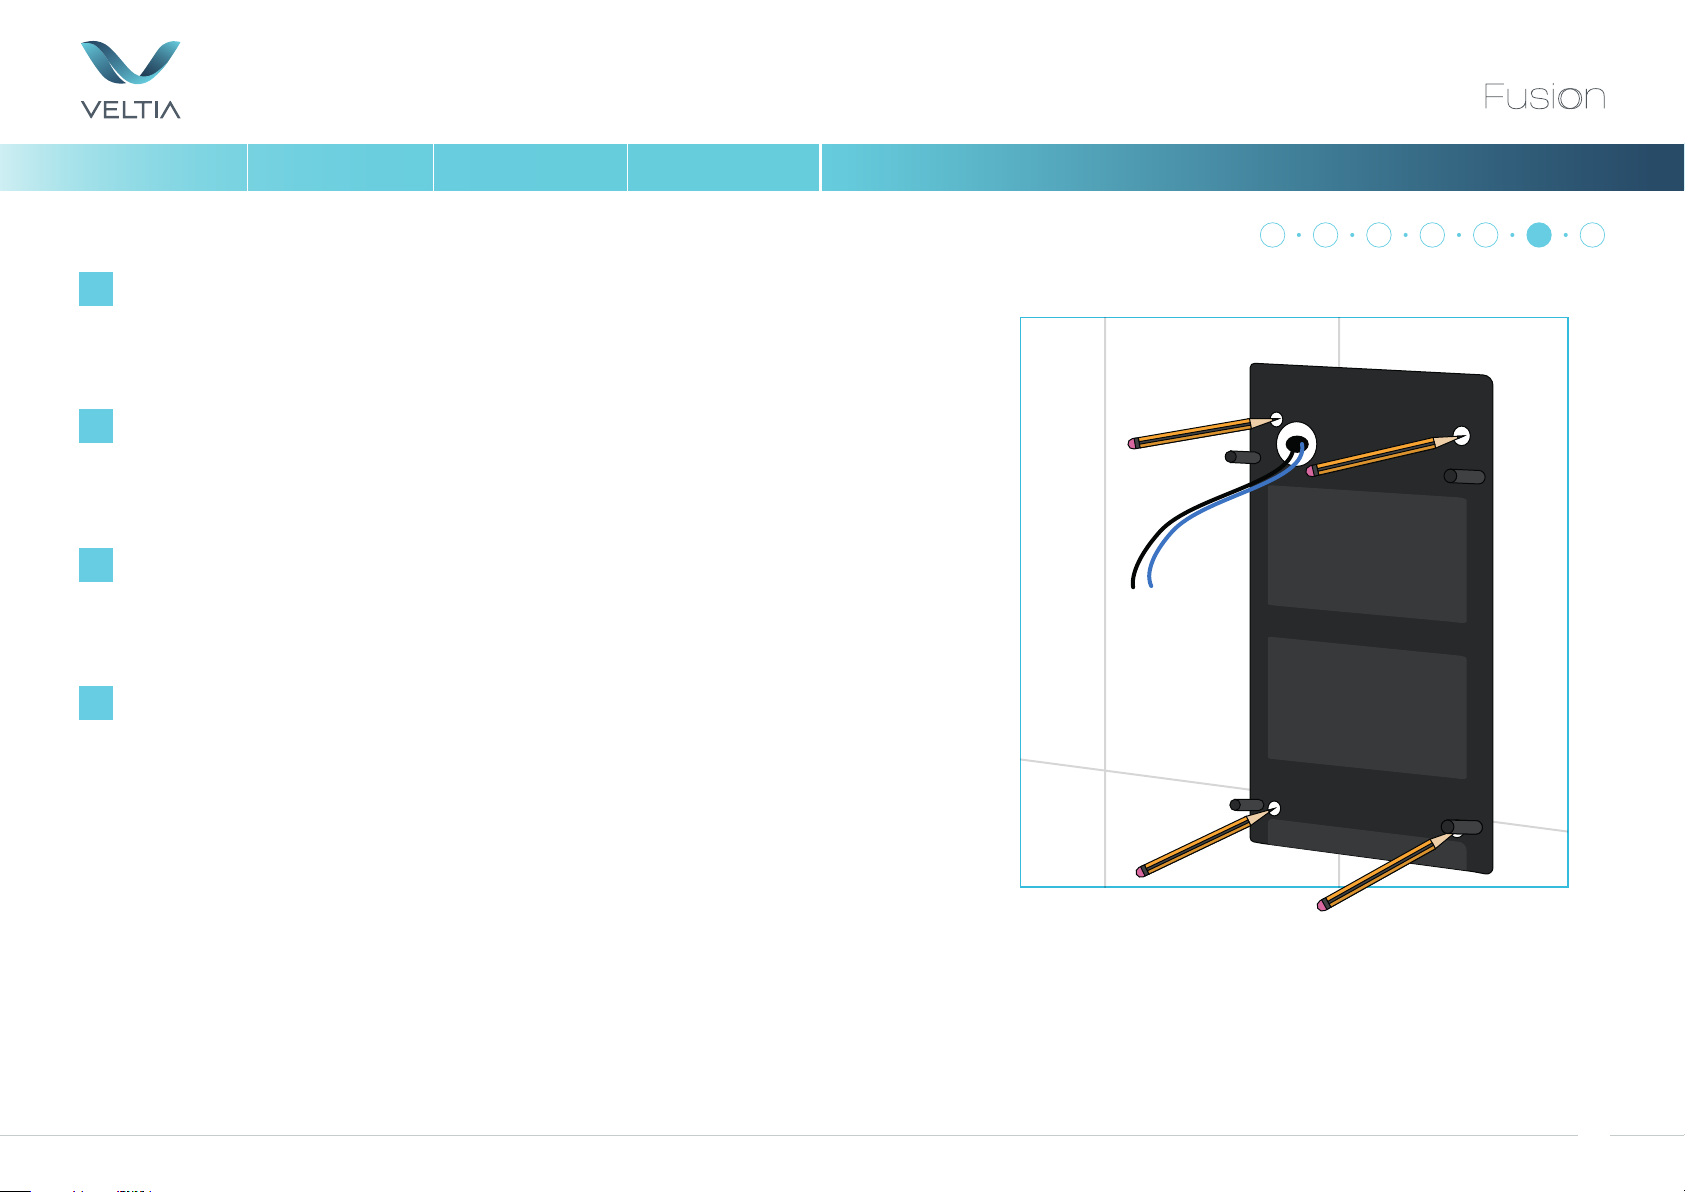
Put the back plate on the wall and mark where the
fasteners on the wall should be.
ES
Presentar la placa trasera y marcar dónde irán las
sujeciones en la pared.
FR
Présenter la plaque arrière et marquer où se trouveront
les fixations dans le mur.
DE
Legen Sie die Rückwand an die Wand und markieren Sie
an welcher Stelle die Befestigungen an der Wand sein soll.
1
2
4 5
3
7
6
15
INSTALLATION
SICHERHEITINSTALLATION INSTALACIÓN INSTALLATION INSTALLATION
SILENT & ECO FRIENDLY HAND DRYER
EN
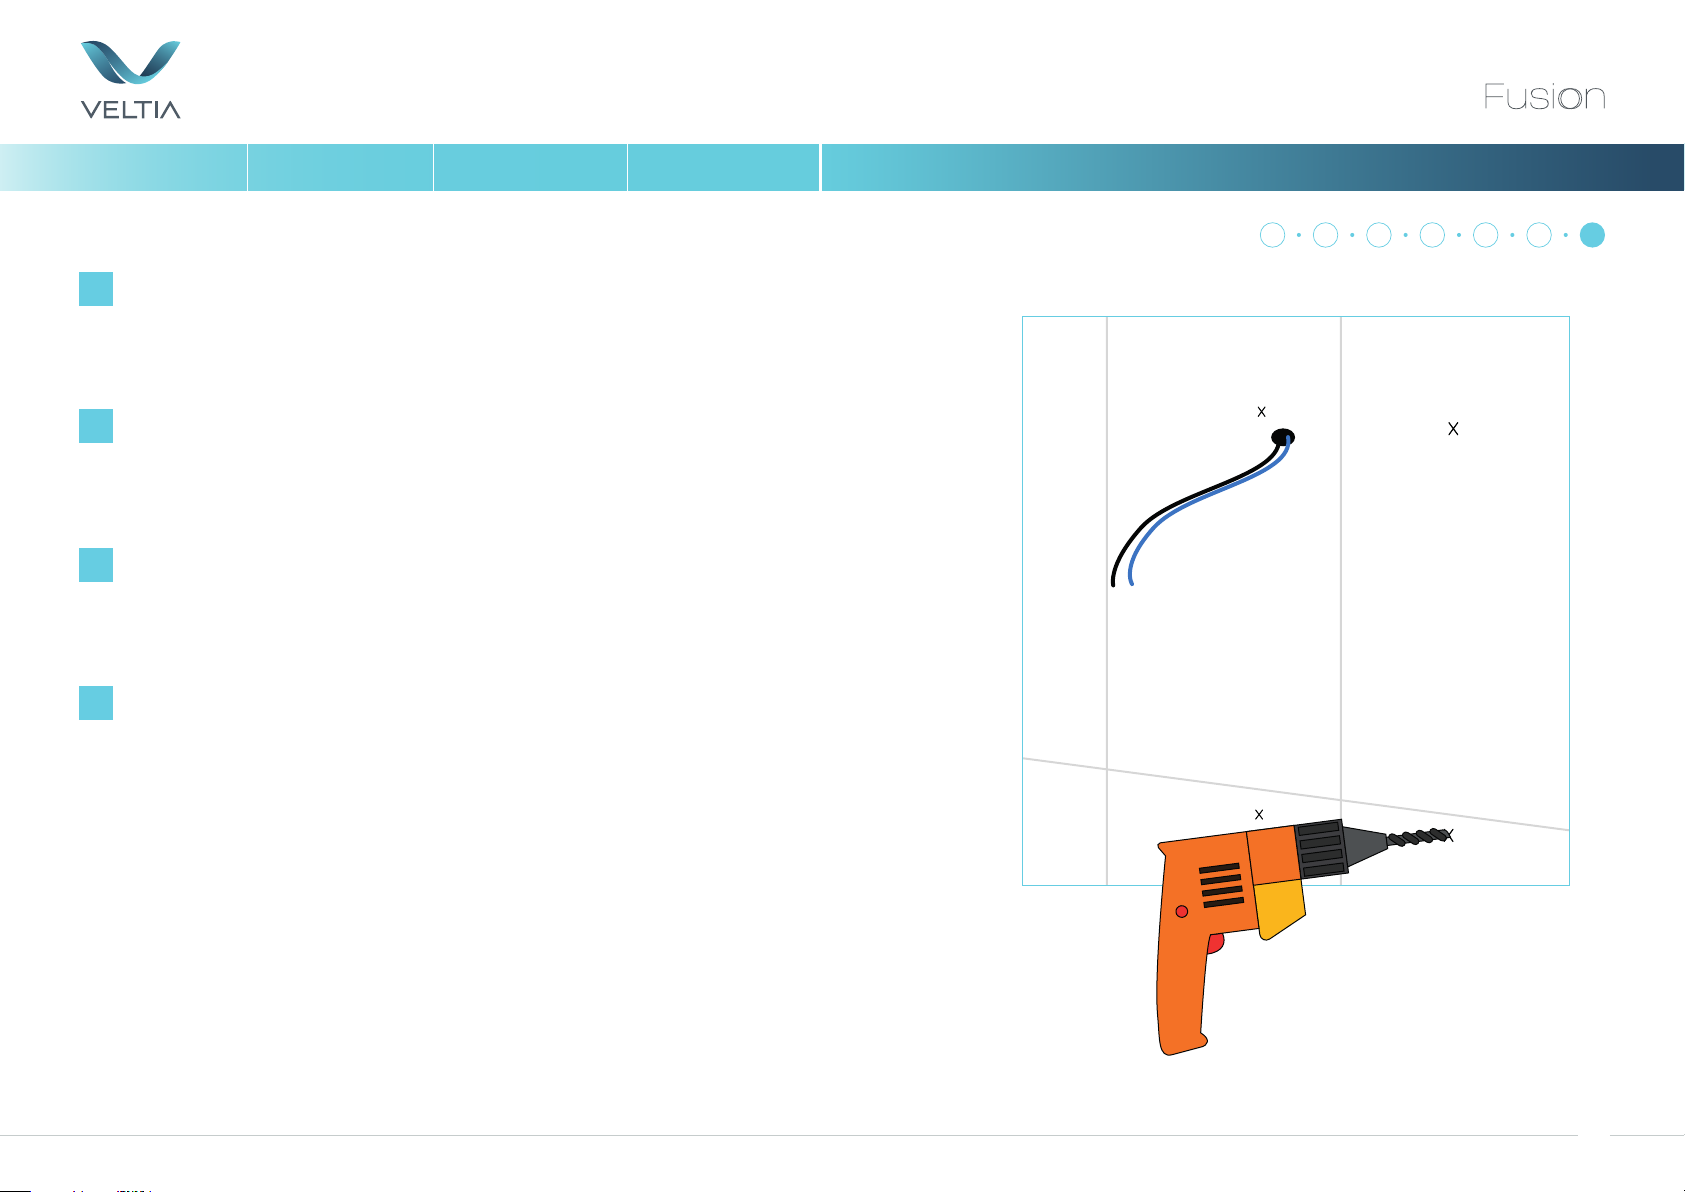
Take the back plate away and make the holes where the
marks are.
ES
Retirar la placa y hacer los agujeros en sus marcas.
FR
Retirer la plaque et faire les trous au niveau des marques.
DE
Nehmen Sie die Rückwand weg und markieren Sie die
Bohrlöcher an der Wand.
1
2
4 5
3
7
6
16
INSTALLATION INSTALACIÓN INSTALLATION INSTALLATION
EN
How to connect the hand dryer VFUSION to the power.
ES
Cómo conectar el secador VFUSION a la electricidad.
FR
Comment connecter le séchoir VFUSION à une source
d’alimentation électrique
SILENT & ECO FRIENDLY HAND DRYER
DE
Wie Sie den Händetrockner anschließen:
17
SILENT & ECO FRIENDLY HAND DRYER
INSTALLATION INSTALACIÓN INSTALLATION INSTALLATION
A
Cable coming out from the wall
Cable with right side entrance
B
Cable with le side entrance
C
EN
There are 3 options to connect the dryer.
ES
Existen 3 opciones para conectar el secador.
FR
Il y a 3 options pour connecter le séchoir de mans.
CONNECTION TO THE POWER
1
4 5
7
6
8
109
112 3
12
DE
Es gibt 3 Möglichkeiten, den Trockner anzuschließen.
18
INSTALLATION INSTALACIÓN INSTALLATION
4
5
INSTALLATION INSTALACIÓN INSTALLATION INSTALLATION
SILENT & ECO FRIENDLY HAND DRYER
CONNECTION TO THE POWER
CONNECTION TO THE POWER
Option
Opción
Option
Option
EN
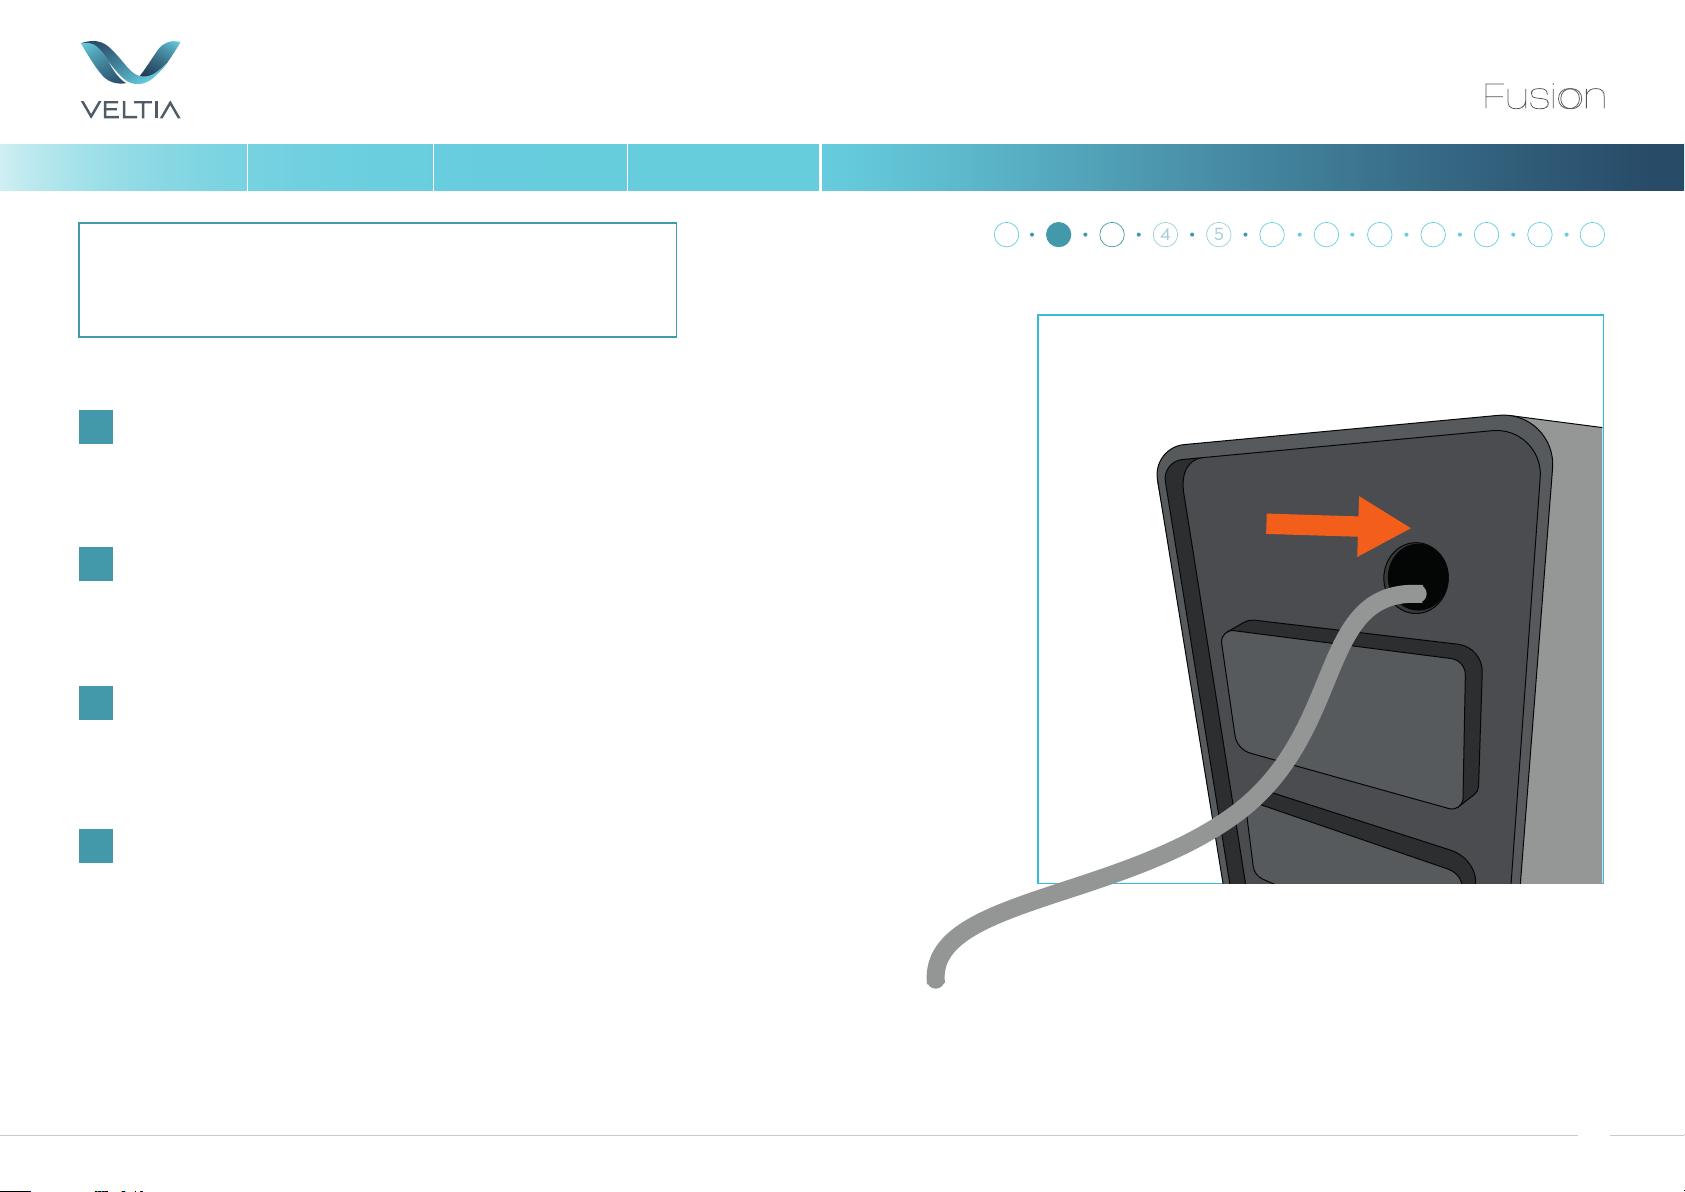
A – There is the cable coming out from the wall
A – Hay el cable que sale de la pared.
A – Le câble sort du mur.
A – Das Anschlusskabel kommt direkt aus der Wand
Introduce the cable coming from the wall in the hole located at the
back plate.
ES
Introducir el cable de la pared por el orificio proporcionado en la
parte trasera del secador.
FR
Introduire le câble mural dans l’orifice prévu à cet effet, dans la
partie postérieure du séchoir.
1
2 3
7
6
8
109
11 12
DE
Führen Sie das Anschlusskabel aus der Wand durch das Loch in der
Rückseite des Trockners.
19
SILENT & ECO FRIENDLY HAND DRYER
4
5
INSTALLATION INSTALACIÓN INSTALLATION INSTALLATION
Option
Opción
Option
Option
EN
A – There is the cable coming out from the wall
A – Hay el cable que sale de la pared.
A – Le câble sort du mur.
A – Das Anschlusskabel kommt direkt aus der Wand
Screw the back plate to the wall.
ES
Atornillar la placa trasera a la pared.
FR
Visser la plaque arrière au mur et placer le bloc-moteur.
CONNECTION TO THE POWER
1
2 3
7
6
8
109
11 12
DE
Schrauben Sie die Rückwand fest an die Wand.
20
SILENT & ECO FRIENDLY HAND DRYER
5
INSTALLATION INSTALACIÓN INSTALLATION INSTALLATION
Option
Opción
Option
Option
EN
B – Cable with right side entrance.
B – Cable con entrada lateral derecha.
B – Câble avec entrée à droite.
B – Kabel mit rechtem Seiteneingang.
Drill a hole in the marked zone of the handdryer, so the cable can go
through.
ES
Con un taladro, hacer un orificio en la zona marcada en el secador,
para poder hacer pasar el cable.
FR
Avec une perceuse, faire un trou dans la zone marquée sur le
séchoir, afin de faire passer le câble.
CONNECTION TO THE POWER
1
2 3
4
7
6
8
109
11 12
DE
Bohren Sie an der markierten Zone ein Loch in den Trockner durch
welches das Anschlusskabel passt.
21

SILENT & ECO FRIENDLY HAND DRYER
5
INSTALLATION INSTALACIÓN INSTALLATION INSTALLATION
Option
Opción
Option
Option
EN
B – Cable with right side entrance.
B – Cable con entrada lateral derecha.
B – Câble avec entrée à droite.
B – Kabel mit rechtem Seiteneingang.
Drill a hole in the marked zone of the handdryer, so the cable can go
through.
ES
Con un taladro, hacer un orificio en la zona marcada en el secador,
para poder hacer pasar el cable.
FR
Avec une perceuse, faire un trou dans la zone marquée sur le
séchoir, afin de faire passer le câble.
CONNECTION TO THE POWER
1
2 3
4
7
6
8
109
11 12
DE
Bohren Sie an der markierten Zone ein Loch in den Trockner durch
welches das Anschlusskabel passt.
22

SILENT & ECO FRIENDLY HAND DRYER
5
INSTALLATION INSTALACIÓN INSTALLATION INSTALLATION
Option
Opción
Option
Option
EN
B – Cable with right side entrance.
B – Cable con entrada lateral derecha.
B – Câble avec entrée à droite.
B – Kabel mit rechtem Seiteneingang.
Once the hole is made, insert the cable and take it towards the top
of the back part.
ES
Una vez hecho el orificio, intorducir el cable por la parte derecha y
llevarlo hacia la parte superior de la parte trasera.
FR
Une fois le trou fait, insérez le câble et dirigez-le vers le haut de la
partie arrière.
CONNECTION TO THE POWER
1
2 3
4
7
6
8
109
11 12
DE
Sobald das Loch gemacht ist, führen Sie das Kabel ein und nehmen
Sie es in Richtung der Oberseite des hinteren Teils.
23

SILENT & ECO FRIENDLY HAND DRYER
INSTALLATION INSTALACIÓN INSTALLATION INSTALLATION
Option
Opción
Option
Option
EN
C – Cable with le side entrance.
C – Cable con entrada lateral izquierda.
C – Câble avec entrée latérale gauche.
C – Kabel mit linkem Seiteneingang.
With a drill, make a hole in the area marked on the dryer to pass the
cable.
ES
Con un taladro, hacer un orificio en la zona marcada
en el secador para hacer pasar el cable.
FR
Avec une perceuse, faites un trou dans la zone marquée sur la
sécheuse pour laisser passer le câble.
CONNECTION TO THE POWER
4
1
2 3
5
7
6
8
109
11 12
DE
Bohren Sie mit einer Bohrmaschine ein Loch in den Bereich, der auf
dem Trockner markiert ist, um das Kabel zu führen.
24

SILENT & ECO FRIENDLY HAND DRYER
INSTALLATION INSTALACIÓN INSTALLATION INSTALLATION
Option
Opción
Option
Option
EN
C – Cable with le side entrance.
C – Cable con entrada lateral izquierda.
C – Câble avec entrée latérale gauche.
C – Kabel mit linkem Seiteneingang.
Drill a hole in the marked zone of the handdryer, so the cable can go
through.
ES
Con un taladro, hacer un orificio en la zona marcada en el secador,
para poder hacer pasar el cable.
FR
Avec une perceuse, faire un trou dans la zone marquée sur le
séchoir, afin de faire passer le câble.
CONNECTION TO THE POWER
4
1
2 3
5
7
6
8
109
11 12
DE
Bohren Sie an der markierten Zone ein Loch in den Trockner durch
welches das Anschlusskabel passt.
25

SILENT & ECO FRIENDLY HAND DRYER
INSTALLATION INSTALACIÓN INSTALLATION INSTALLATION
Option
Opción
Option
Option
EN
C – Cable with le side entrance.
C – Cable con entrada lateral izquierda.
C – Câble avec entrée latérale gauche.
C – Kabel mit linkem Seiteneingang.
With a drill, make a hole in the area marked on the dryer to pass the
cable.
ES
Con un taladro, hacer un orificio en la zona marcada
en el secador para hacer pasar el cable.
FR
Avec une perceuse, faites un trou dans la zone marquée sur la
sécheuse pour laisser passer le câble.
CONNECTION TO THE POWER
4
1
2 3
5
7
6
8
109
11 12
DE
Bohren Sie mit einer Bohrmaschine ein Loch in den Bereich, der auf
dem Trockner markiert ist, um das Kabel zu führen.
26

SILENT & ECO FRIENDLY HAND DRYER
INSTALLATION INSTALACIÓN INSTALLATION INSTALLATION
Option
Opción
Option
Option
EN
C – Cable with le side entrance.
C – Cable con entrada lateral izquierda.
C – Câble avec entrée latérale gauche.
C – Kabel mit linkem Seiteneingang.
Insert the cable through the hole in the upper part of the back plate.
ES
Una vez hecho el orificio, introducir el cable por la parte izquierda y
llevarlo hacia la parte superior de la parte trasera.
FR
Insérez le câble dans le trou situé dans la partie supérieure de la
plaque arrière.
CONNECTION TO THE POWER
4
1
2 3
5
INSTALLATION
7
6
8
109
11 12
DE
Führen Sie das Kabel durch das Loch im oberen Teil der Rückplatte.
27

SILENT & ECO FRIENDLY HAND DRYER
INSTALLATION INSTALACIÓN INSTALLATION INSTALLATION
EN
Using a terminal screwdriver, locate the holes on the underside at
the front of the hand dryer and insert the screwdriver and push in
to loosen the cover.
ES
Aflojar los tornillos de la parte del cable, de la regleta dentro del
secador.
FR
A l'aide du tournevis, appuyez sur les trous situés dans la partie
inférieure du séche-mains et soulevez le panneau frontal du bas du
séche-mains.
CONNECTION TO THE POWER
1
4 5
3
7
6
8
109
112
12
DE
Suchen Sie die Löcher mit einem Schraubendreher auf der
Unterseite an der Vorderseite des Händetrockners und drücken Sie
um die Abdeckung zu lösen.
28

SILENT & ECO FRIENDLY HAND DRYER
INSTALLATION INSTALACIÓN INSTALLATION INSTALLATION
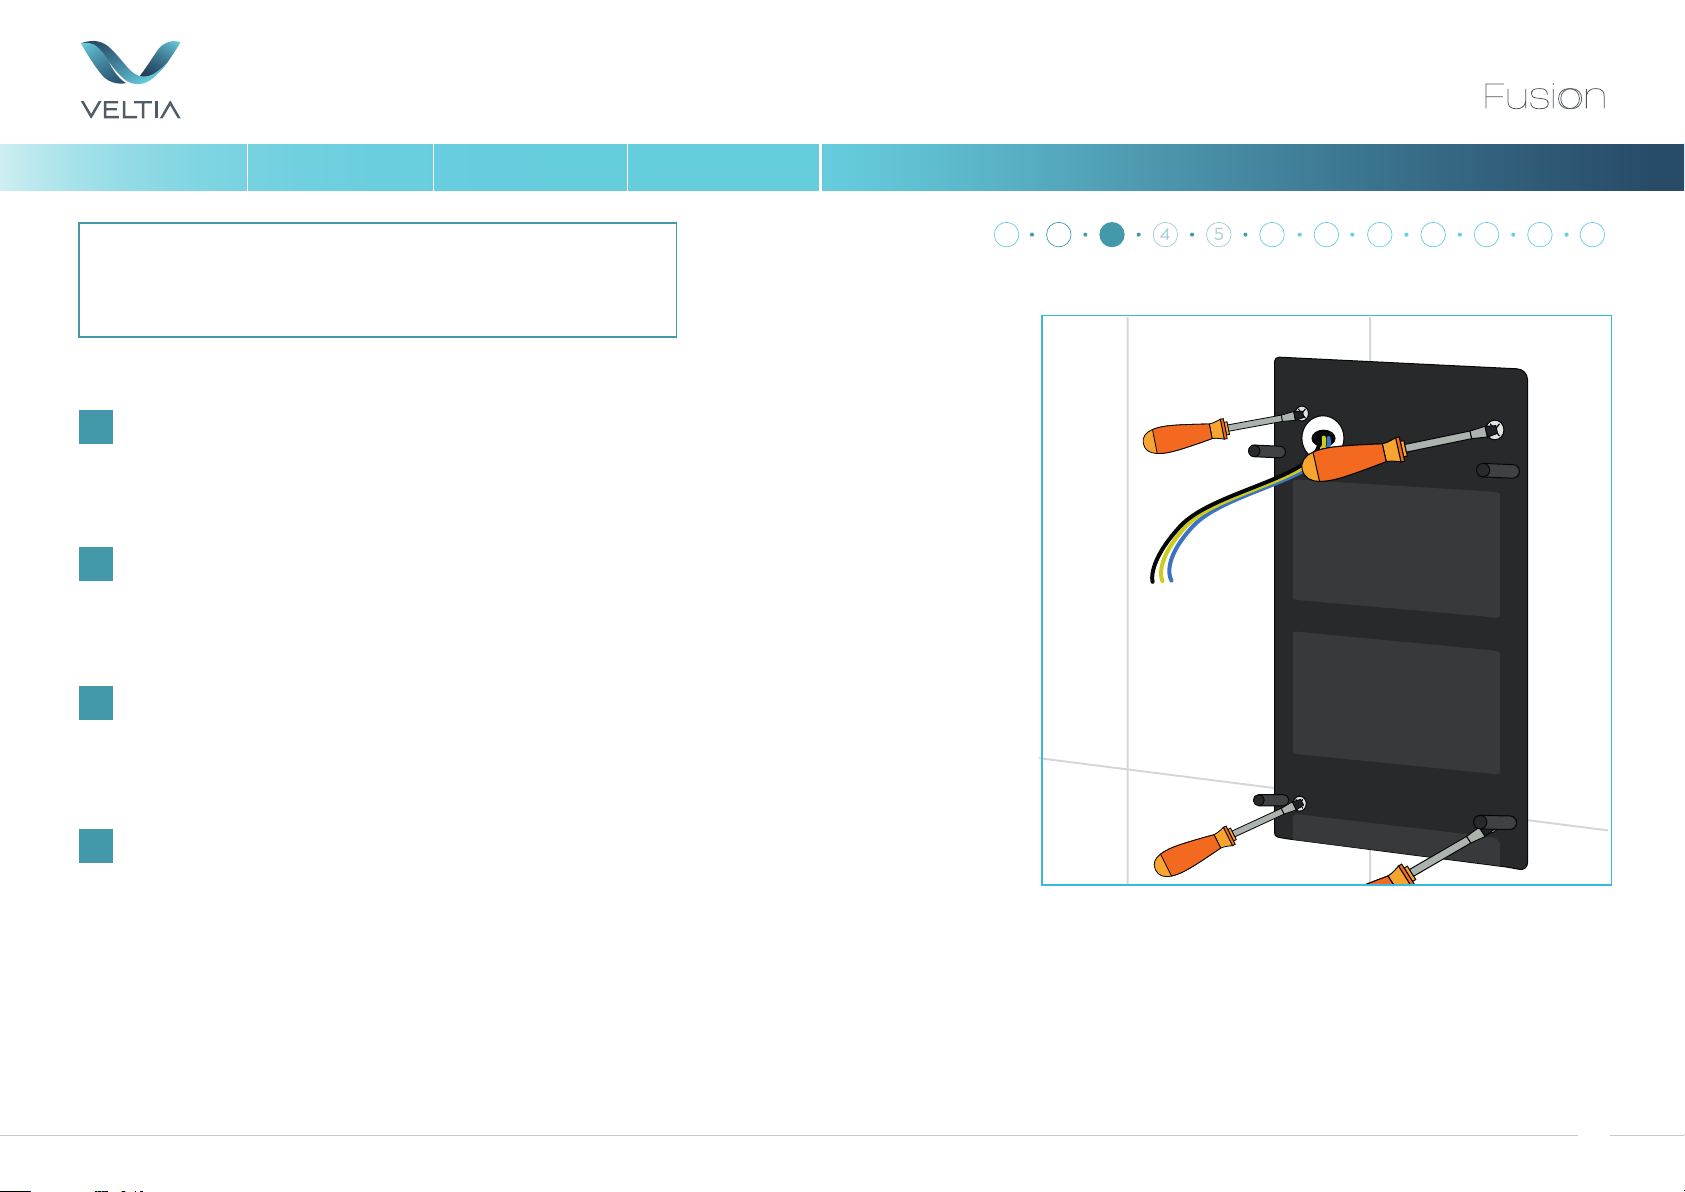
EN
Insert the corresponding cables to two inputs of the same one.
ES
Introducir los cables correspondientes a las dos entradas de la
misma.
FR
Insérez les câbles correspondants dans deux entrées du même.
CONNECTION TO THE POWER
1
4 5
3
7
6
8
109
112
12
DE
Stecken Sie die entsprechenden Kabel in zwei Eingänge desselben.
29

SILENT & ECO FRIENDLY HAND DRYER
INSTALLATION INSTALACIÓN INSTALLATION INSTALLATION
EN
Connect the power cables of the electronic board to the power
strip.
ES
Conectar los cables de corriente de la tarjeta electrónica a la
regleta.
FR
Connectez les câbles d'alimentation de la carte électronique à la
barrette d'alimentation.
CONNECTION TO THE POWER
1
4 5
3
7
6
9
8
10 11 122
DE
Schließen Sie die Stromkabel der Elektronikplatine an die
Steckdosenleiste an.
30

SILENT & ECO FRIENDLY HAND DRYER
INSTALLATION INSTALACIÓN INSTALLATION INSTALLATION
EN
Screw the motor assembly to the back plate.
ES
Atornillar el bloque motor a la placa trasera.
FR
Visser la plaque arrière au mur et placer le bloc-moteur.
DE
Schrauben Sie den Motor an der Rückwand fest.
CONNECTION TO THE POWER
1
2
4 5
3
7
6
8
109 11 12
31

SILENT & ECO FRIENDLY HAND DRYER
INSTALLATION INSTALACIÓN INSTALLATION INSTALLATION
EN
Screw on the front cover.
ES
Atornillar la tapa frontal.
FR
Visser le capot avant.
DE
Schrauben Sie die vordere Abdeckung an.
CONNECTION TO THE POWER
1
2
4 5
3
7
6
8
10 11 129
32

SILENT & ECO FRIENDLY HAND DRYER
INSTALLATION INSTALACIÓN INSTALLATION INSTALLATION
EN
Fit the cover plate into the holes in the front plate and slide
downwards.
ES
Encajar la tapa embellecedora en los orificios de la placa delantera y
deslizar hacia abajo.
FR
Insérez la plaque de recouvrement dans les trous de la plaque avant et
faites-la glisser vers le bas.
DE
Setzen Sie die Abdeckplatte in die Löcher in der Frontplatte ein und
schieben Sie sie nach unten.
CONNECTION TO THE POWER
1
2
4 5
3
7
6
8
11 12109
33

SILENT & ECO FRIENDLY HAND DRYER
INSTALLATION INSTALACIÓN INSTALLATION INSTALLATION
EN
Finally, press the bottom.
ES
Finalmente, presionar la parte inferior.
FR
Enfin, appuyez sur le bas.
DE
Drücken Sie zum Schluss auf den Boden.
CONNECTION TO THE POWER
1
4 5
3
7
6
8
109
11 122
34

MAINTENANCE MANTENIMIENTO ENTRETIEN WARTUNG
EN
Instructions to change the hepa filter and the gel zerosmell.
ES
Instrucciones para cambiar el filtro Hepa y Gel Zerosmell.
FR
Instructions pour changer les filtres hepa et le gel zerosmell.
SILENT & ECO FRIENDLY HAND DRYER
DE
Anleitung für den Wechsel des Hepa-Filters und des Zero-Smell
Gel-Tabs.
35

SILENT & ECO FRIENDLY HAND DRYER
MAINTENANCE MANTENIMIENTO ENTRETIEN WARTUNG
EN
Change the Hepa Filter: From the bottom part of the hand dryer,
press to the sides the taps from the filter tray.
ES
Cambiar el filtro Hepa: De la parte inferior del secador, presionar
las pestañas de la bandeja del filtro Hepa hacia el exterior.
FR
Changer le filtre HEPA: Dans la partie inférieure du sèche-mains,
appuyez vers l'extérieur sur les languettes du plateau du filtre Hepa.
DE
Wechsel des Hepa-Filters: Drücken Sie die beiden Stie an der
Unterseite des Trockners nach außen um das Filter-Fach zu öffnen.
HEPA-FILTER
21
36

SILENT & ECO FRIENDLY HAND DRYER
MAINTENANCE MANTENIMIENTO ENTRETIEN WARTUNG
EN
Simultaneously, pull out downwards the filter tray from the hand
dryer.
ES
Simultáneamente, extraer hacia abajo la bandeja para el filtro Hepa
de la caja del secador.
FR
En même temps, retirez le plateau pour le filtre Hepa vers le bas du
boîtier du sèche-mains.
DE
Ziehen Sie gleichzeitig das Filter-Fach aus dem Händetrockner
heraus.
HEPA-FILTER
21
37

SILENT & ECO FRIENDLY HAND DRYER
MAINTENANCE MANTENIMIENTO ENTRETIEN WARTUNG
EN
Take out the Hepa filter from the filter tray, and replace it for a new
one.
ES
Extraer el filtro Hepa de la bandeja donde se coloca dicho filtro y
cambiarlo por uno nuevo.
FR
Retirez le filtre Hepa du plateau et remplacez-le par un nouveau.
DE
Nehmen Sie den Hepa-Filter aus dem Filter-Fach heraus und
ersetzten diesen durch einen Neuen.
HEPA-FILTER
21
38

SILENT & ECO FRIENDLY HAND DRYER
MAINTENANCE MANTENIMIENTO ENTRETIEN WARTUNG
EN
Introduce the new Hepa filter in the filter tray, with the white part of
the filter touching the part of the filter tray with holes. Take into
account that the Hepa filter has a tiny curvature in one of the sides,
which fits perfectly into the slot of the filter tray.
ES
Introducir el nuevo filtro Hepa, quedando la parte del filtro (parte
blanca) en la parte inferior de la bandeja (parte con orificios). Tener
en cuenta que el filtro Hepa tiene una sutil curvatura en uno de los
lados, que encaja perfectamente con la ranura de la bandeja.
FR
Insérez le nouveau filtre Hepa en laissant la partie du filtre (partie
blanche) dans la partie inférieure du plateau (partie avec des trous).
Tenez compte du fait que le filtre Hepa présente une légère courbure
sur un côté, qui s’adapte parfaitement à la glissière du plateau.
HEPA-FILTER
21
DE
Setzen Sie den neuen Hepa-Filter in das Filter-Fach ein, wobei der
weiße Teil des Filters den löchrigen Teil des Filter-Fachs berührt.
Beachten Sie, dass der Hepa-Filter an einer der Seiten eine kleine
Krümmung aufweist, welche perfekt in den Schlitz des Filter-Fachs
passt.
39

SILENT & ECO FRIENDLY HAND DRYER
MAINTENANCE MANTENIMIENTO ENTRETIEN WARTUNG
EN
To put the filter tray back to the hand dryer, fit the tooth from the
filter tray to the hand dryer by introducing the filter tray inside the
hand dryer until the two taps from the sides fits perfectly with the
hand dryer.
ES
Para volver a introducir la bandeja con el filtro Hepa en el secador,
encajar el diente de la bandeja con el secador y apretar hacia arriba
hasta que las dos pestañas de los dos lados de la bandeja encajen
perfectamente con el secador.
FR
Pour réinsérer le plateau avec le filtre Hepa dans le sèche-mains,
insérez la dent du plateau avec le sèche-mains et appuyez vers le haut
jusqu'à ce que les deux languettes situées de part et d'autre du
plateau s'intègrent parfaitement dans le sèche-mains.
HEPA-FILTER
21
DE
Um das Filter-Fach wieder in den Händetrockner zu bringen,
bringen Sie das Filter-Fach mit der Führungsschiene in die
entsprechende Position des Trockners und drücken das Filter-Fach
langsam in den Trockner, bis dass die beiden seitlichen Stie
einrasten.
40

SILENT & ECO FRIENDLY HAND DRYER
MAINTENANCE MANTENIMIENTO ENTRETIEN WARTUNG
EN
Optionally and for more security, the filter tray can be screwed to
the hand dryer through the two small gaps located in both sides of
the filter tray.
ES
Opcionalmente y para mayor seguridad, se puede atornillar la
bandeja del filtro al secador a través de dos orificios ubicados en las
ranuras de los dos lados de la bandeja.
FR
Pour plus de sécurité, le plateau du filtre peut être vissé au
sèche-mains au travers de deux trous situés dans les fentes des deux
côtés du plateau.
HEPA-FILTER
21
DE
Aus Sicherheitsgründen kann die Filterschale optional fest mit
dem Trockner verschraubt werden.
41

SILENT & ECO FRIENDLY HAND DRYER
MAINTENANCE MANTENIMIENTO ENTRETIEN WARTUNG
EN
Simultaneously, pull out downwards the filter tray from the
hand dryer.
ES
Simultáneamente, extraer hacia abajo la bandeja para el
filtro Hepa de la caja del secador.
FR
En même temps, retirez le plateau pour le filtre Hepa vers
le bas du boîtier du sèche-mains.
DE
Ziehen Sie gleichzeitig das Filter-Fach aus dem
Händetrockner heraus.
ZEROSMELL
21
42

SILENT & ECO FRIENDLY HAND DRYER
MAINTENANCE MANTENIMIENTO ENTRETIEN WARTUNG
EN
Remove the used Zerosmell (consumed Zerosmell) from
the Hepa filter and introduce the new one inside the
provided space in the center of the Hepa filter.
ES
Sacar la cajita blanca vieja (Zerosmell gastado) del filtro
HEPA e incluir el nuevo Zerosmell dentro del espacio
facilitado en el medio del filtro HEPA.
FR
Retirez l’ancienne petite boîte blanche (Zerosmell épuisé)
du filtre HEPA et insérez le nouveau Zerosmell dans
l’espace prévu au centre du filtre HEPA.
DE
Entfernen Sie das verbrauchte Zero-Smell Gel-Tab aus
dem Hepa-Filter und setzten Sie den neuen Gel-Tab ein.
ZEROSMELL
21
43

SILENT & ECO FRIENDLY HAND DRYER
MAINTENANCE MANTENIMIENTO ENTRETIEN WARTUNG
EN
Finally, introduce again the filter tray to the hand dryer by
fitting the tooth of the filter tray to the hand dryer.
ES
Finalmente, volver a introducir la bandeja dentro del
secador, encajando el diente de la bandeja del filtro Hepa.
FR
Enfin, réintroduisez le plateau dans le sèche-mains en
insérant la dent du plateau du filtre Hepa avec le
sèche-mains.
DE
Zum Schluss setzten Sie bitte das Filter-Fach wieder in
den Händetrockner ein.
ZEROSMELL
21 21
44

SILENT & ECO FRIENDLY HAND DRYER
MAINTENANCE MANTENIMIENTO ENTRETIEN WARTUNG
EN
To put the filter tray back to the hand dryer, fit the tooth from the
filter tray to the hand dryer by introducing the filter tray inside the
hand dryer until the two taps from the sides fits perfectly with the
hand dryer.
ES
Para volver a introducir la bandeja con el filtro Hepa en el secador,
encajar el diente de la bandeja con el secador y apretar hacia arriba
hasta que las dos pestañas de los dos lados de la bandeja encajen
perfectamente con el secador.
FR
Pour réinsérer le plateau avec le filtre Hepa dans le sèche-mains,
insérez la dent du plateau avec le sèche-mains et appuyez vers le
haut jusqu'à ce que les deux languettes situées de part et d'autre du
plateau s'intègrent parfaitement dans le sèche-mains.
ZEROSMELL
21
DE
Um das Filter-Fach wieder in den Händetrockner zu bringen,
bringen Sie das Filter-Fach mit der Führungsschiene in die
entsprechende Position des Trockners und drücken das Filter-Fach
langsam in den Trockner, bis dass die beiden seitlichen Stie
einrasten.
45

SILENT & ECO FRIENDLY HAND DRYER
MAINTENANCE MANTENIMIENTO ENTRETIEN WARTUNG
EN
Optionally and for more security, the filter tray can be screwed to the
hand dryer through the two small gaps located in both sides of the
filter tray.
ES
Opcionalmente y para mayor seguridad, se puede atornillar la
bandeja del filtro al secador a través de dos orificios ubicados en las
ranuras de los dos lados de la bandeja.
FR
Pour plus de sécurité, le plateau du filtre peut être vissé au sèche-mains
au travers de deux trous situés dans les fentes des deux côtés du
plateau.
DE
Aus Sicherheitsgründen kann die Filterschale optional fest mit dem
Trockner verschraubt werden.
ZEROSMELL
21
46

SILENT & ECO FRIENDLY HAND DRYER
CHANGING INSTRUCTIONS INSTRUCCIONES DE CAMBIO INSTRUCTION DU CHANGER ANWEISUNG DER ÄNDERUNG
EN
Instructions of how to change the discs multijet and blade.
ES
Instrucciones de cómo cambiar los discos multijet y blade.
FR
Instructions pour changer les disques multijet et blade.
DE
Anleitung zum Wechsel des Luauslasses.
MULTIJET / BLADE
47

SILENT & ECO FRIENDLY HAND DRYER
CHANGING INSTRUCTIONS INSTRUCCIONES DE CAMBIO INSTRUCTION DU CHANGER ANWEISUNG DER ÄNDERUNG
EN
From the bottom part of the hand dryer, press to the sides
the taps from the filter tray.
ES
De la parte inferior del secador, presionar las pestañas de la
bandeja del filtro Hepa hacia el exterior.
FR
Dans la partie inférieure du sèche-mains, appuyez vers
l'extérieur sur les languettes du plateau du filtre Hepa.
DE
Drücken Sie die beiden Stie an der Unterseite des
Trockners nach außen um das Filter-Fach zu öffnen.
MULTIJET / BLADE
21
48

SILENT & ECO FRIENDLY HAND DRYER
CHANGING INSTRUCTIONS INSTRUCCIONES DE CAMBIO INSTRUCTION DU CHANGER ANWEISUNG DER ÄNDERUNG
EN
Simultaneously, pull out downwards the filter tray from the
hand dryer.
ES
Simultáneamente, extraer hacia abajo la bandeja para el
filtro Hepa de la caja del secador.
FR
En même temps, retirez le plateau pour le filtre Hepa vers
le bas du boîtier du sèche-mains.
DE
Ziehen Sie gleichzeitig das Filter-Fach aus dem
Händetrockner heraus.
MULTIJET / BLADE
21 21
49

SILENT & ECO FRIENDLY HAND DRYER
CHANGING INSTRUCTIONS INSTRUCCIONES DE CAMBIO INSTRUCTION DU CHANGER ANWEISUNG DER ÄNDERUNG
EN
Simultaneously, pull out downwards the filter tray from the
hand dryer.
ES
Una vez extraída la bandeja, rotar el disco hacia la derecha,
tal como se muestra en la imagen.
FR
Une fois le plateau retiré, faites pivoter le disque vers la droite,
comme indiqué sur l'image. Si le disque est vissé dans le
sèche-mains, il convient de le dévisser avant de le faire tourner.
DE
Sobald Sie das Filter-Fach entfernt haben können Sie den
Luauslass wie im Bild zu sehen nach rechts drehen.
MULTIJET / BLADE
21 21
50

SILENT & ECO FRIENDLY HAND DRYER
CHANGING INSTRUCTIONS INSTRUCCIONES DE CAMBIO INSTRUCTION DU CHANGER ANWEISUNG DER ÄNDERUNG
EN
Rotate the disc to the maximum and pull downwards to remove the
disc from the handdryer.
ES
Una vez llegado al tope (unos 10 grados), extraer hacia abajo el disco,
quedando el secador y el disco separados el uno del otro.
FR
Une fois le maximim atteint (environ 10 degrés), retirez vers le bas le
disque en laissant le sèche-mains et le disque séparés l'un de l'autre.
DE
Drehen Sie den Luauslass so weit wie möglich nach rechts und
ziehen Sie diesen nach unten aus dem Gerät.
MULTIJET / BLADE
21 21
51

SILENT & ECO FRIENDLY HAND DRYER
CHANGING INSTRUCTIONS INSTRUCCIONES DE CAMBIO INSTRUCTION DU CHANGER ANWEISUNG DER ÄNDERUNG
EN
Take the disc that needs to be installed and introduce its gaps (see
them marked in red in the picture), to the teeth which are in the
sides of the hole of the hand dryer.
ES
Coger el otro disco por el que se quiere cambiar e introducir las
ranuras que contiene dicho disco (en la imagen marcadas en rojo) a
los dientes que sobresalen de la boca del secador.
FR
Prenez le nouveau disque et insérez les fentes que ce disque
contient (dans l'image, marquées en rouge) sur les dents qui
dépassent de l'ouverture du sèche-mains.
DE
Nehmen Sie den auszutauschenden Luauslass und setzten diesen
seitlich auf die Stelle, an welcher zuvor der andere Luauslass saß
(siehe rote Markierungen im Bild).
MULTIJET / BLADE
21
52

SILENT & ECO FRIENDLY HAND DRYER
CHANGING INSTRUCTIONS INSTRUCCIONES DE CAMBIO INSTRUCTION DU CHANGER ANWEISUNG DER ÄNDERUNG
EN
Once the gaps of the disc are fitted in the teeth of the hole of the
hand dryer, turn the disc to the le until the small gap that can be
screwed is perfectly aligned with the hand dryer.
ES
Una vez las ranuras han encajado con los dientes-encaje del
secador, girar hacia la izquierda hasta que el orificio para atornillar
esté alineado con el orificio del secador y se pueda atornillar.
FR
Une fois que les fentes ont été insérées avec les dents d'insertion
du sèche-mains, tournez vers la gauche jusqu'à ce que le trou pour
visser soit aligné avec le trou du sèche-mains et que vous puissiez
le visser.
MULTIJET / BLADE
21
DE
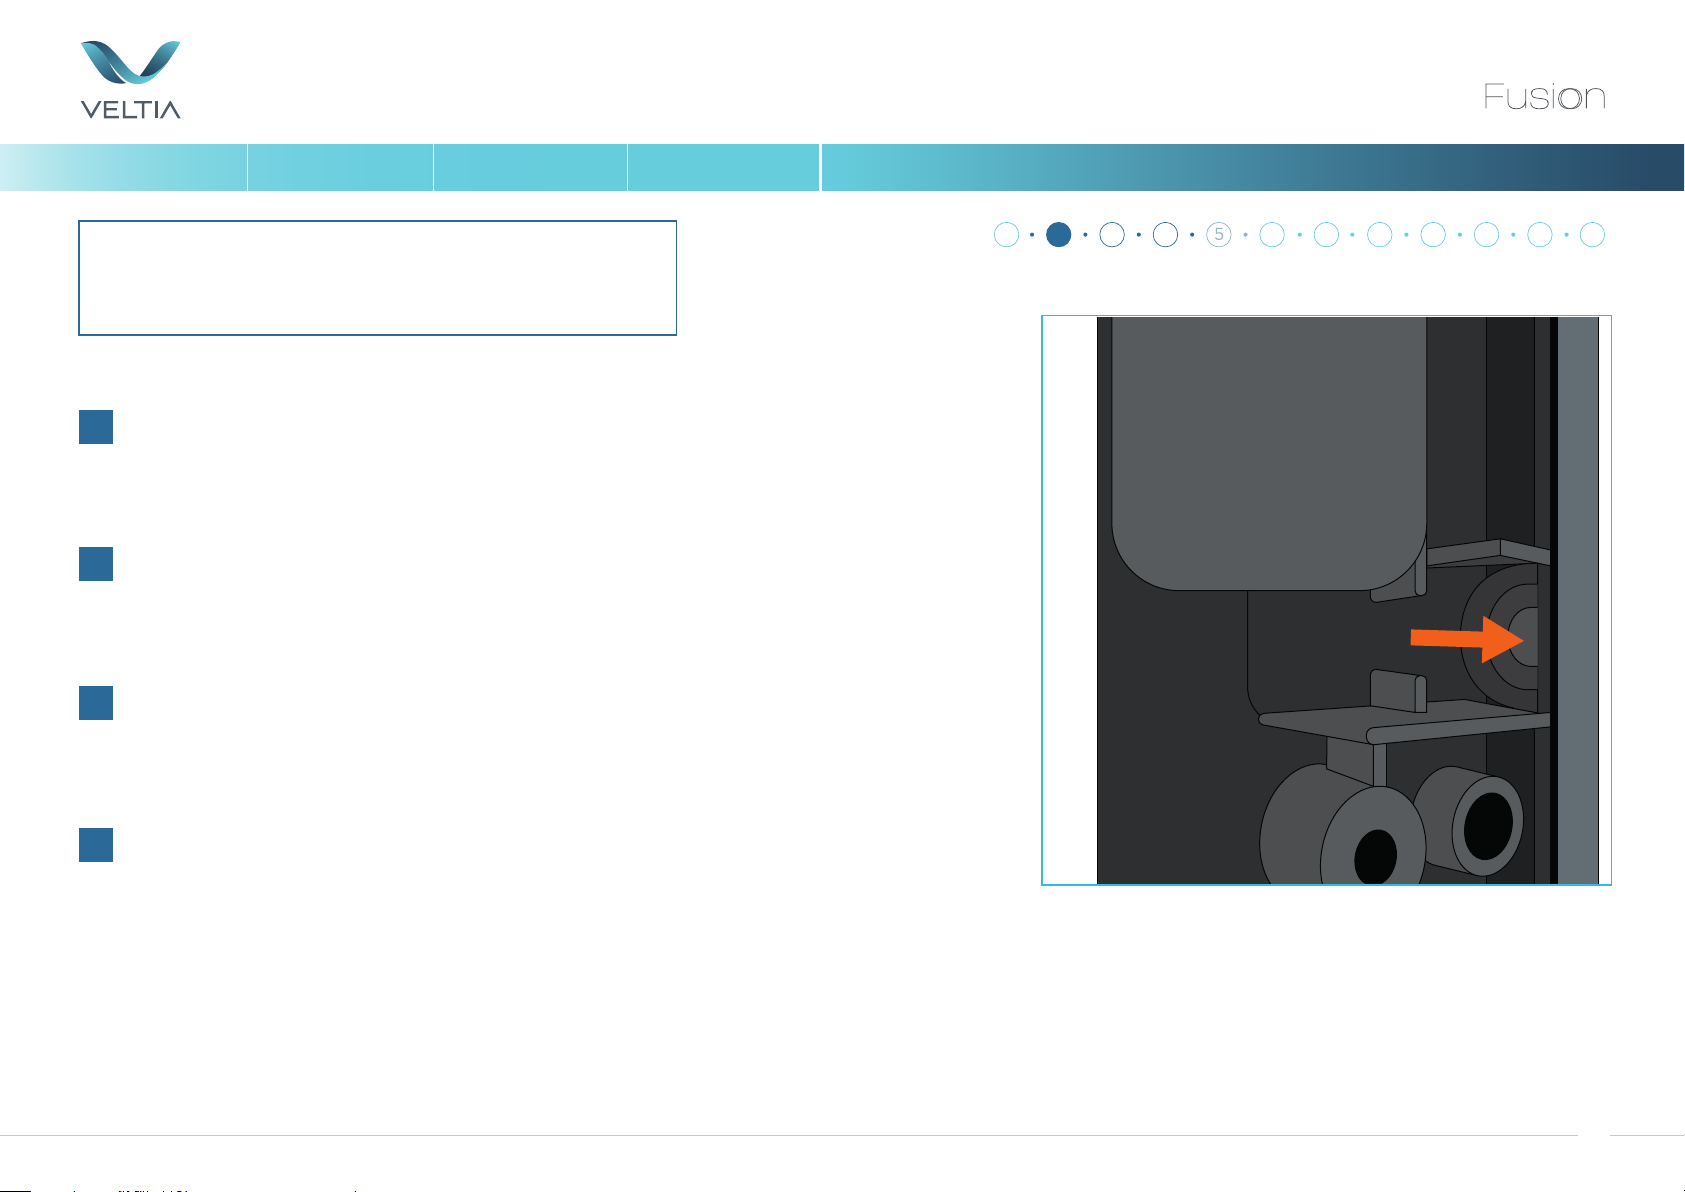
Sobald der Luauslass in Position ist lässt er sich nach links drehen,
bis dass der Luauslass wieder perfekt einrastet.
53

SILENT & ECO FRIENDLY HAND DRYER
CHANGING INSTRUCTIONS INSTRUCCIONES DE CAMBIO INSTRUCTION DU CHANGER ANWEISUNG DER ÄNDERUNG
EN
Instructions of how to change the pcboard from eco to
turbo mode and vice versa.
ES
Instrucciones de cómo cambiar la tarjeta electrónica de
modo eco a modo turbo y viceversa.
FR
Instructions pour changer la carte électronique du mode
éco au mode turbo et inversement.
DE
Anweisungen zum Wechseln der elektronischen Karte
vom Eco-Modus in den Turbo-Modus und umgekehrt.
ECO / TURBO
54

SILENT & ECO FRIENDLY HAND DRYER
CHANGING INSTRUCTIONS INSTRUCCIONES DE CAMBIO INSTRUCTION DU CHANGER ANWEISUNG DER ÄNDERUNG
EN
Using a terminal screwdriver, locate the holes on the underside at
the front of the hand dryer and insert the screwdriver and push in
to loosen the cover.
ES
Presionar los encajes de la parte inferior del secador con el
destornillador y levantar el embellecedor frontal por la parte
inferior del mismo.
FR
Appuyez sur les rainures de la partie inférieure du sèche-mains à
l'aide du tournevis et lever l'enjoliveur frontale par sa partie
inférieure.
DE
Drücken Sie den Schraubendreher in die beiden Löcher auf der
Unterzeite des Trockners um die Front-Abdeckung zu lösen.
ECO / TURBO
10811 1221
55

SILENT & ECO FRIENDLY HAND DRYER
CHANGING INSTRUCTIONS INSTRUCCIONES DE CAMBIO INSTRUCTION DU CHANGER ANWEISUNG DER ÄNDERUNG
EN
Once the low part of the front cover is separated from the dryer,
slide the front cover upwards and separate it completely from the
1
dryer.
ES
Una vez separada la parte inferior del embellecedor frontal, deslizar
ésta hacia arriba y liberarla completamente del secador.
FR
Une fois la partie inférieure de l'enjoliveur frontal séparée, faites-la
glisser vers le haut et dégagez-la complètement du sèche-mains.
DE
Sobald der untere Teil Abdeckung gelöst ist können Sie die
Front-Abdeckung nach oben schieben und vom Trockner lösen.
ECO / TURBO
10811 1221
2
56

SILENT & ECO FRIENDLY HAND DRYER
CHANGING INSTRUCTIONS INSTRUCCIONES DE CAMBIO INSTRUCTION DU CHANGER ANWEISUNG DER ÄNDERUNG
EN
Unscrew and move the front housing away from the dryer.
ES
Desatornillar y retirar la tapa frontal.
FR
Dévissez et retirez le couvercle avant.
DE
Lösen Sie die 4 Schrauben und entfernen Sie das
Gehäuse.
ECO / TURBO
10811 1221
57

SILENT & ECO FRIENDLY HAND DRYER
CHANGING INSTRUCTIONS INSTRUCCIONES DE CAMBIO INSTRUCTION DU CHANGER ANWEISUNG DER ÄNDERUNG
EN
Put pressure on the support on the upper part where the PCB is
fixed. Releasing it from that part of the hand dryer(1). Pull out the
PCB (2).
ES
1 1
Pinzar los dientes-soporte de la parte superior donde se instala la
tarjeta, para que ésta quede liberada por la parte superior del
secador(1). Extraer hacía arriba la tarjeta (2).
FR
Serrez le support de la partie supérieure où la carte est installée, afin
qu'elle soit libérée par la partie supérieure du sèche-mains (1).
Retirez la carte (2) vers le haut.
DE
Drücken Sie auf die obere Halterung des PC-Board und lösen Sie
diesen Teil vom Händetrockner (1). Ziehen Sie das PC-Board
vorsichtig heraus (2).
ECO / TURBO
10811 1221
2
58

SILENT & ECO FRIENDLY HAND DRYER
CHANGING INSTRUCTIONS INSTRUCCIONES DE CAMBIO INSTRUCTION DU CHANGER ANWEISUNG DER ÄNDERUNG
EN
The PCB has a “Jumper”, which is responsible to change modes,
ECO-TURBO, TURBO-ECO.
ES
La tarjeta contiene un Jumper que es el que deberá modificarse
para cambiar de modo ECO-TURBO, TURBO-ECO.
FR
La carte contient un cavalier lequel doit être modifié pour changer
de mode ECO-TURBO, TURBO-ECO
DE
Die Platine hat einen “Jumper”, der für die Änderung der Modi
verantwortlich ist: Eco-Mode, Turbo-Mode.
ECO / TURBO
10811 1221
59

SILENT & ECO FRIENDLY HAND DRYER
CHANGING INSTRUCTIONS INSTRUCCIONES DE CAMBIO INSTRUCTION DU CHANGER ANWEISUNG DER ÄNDERUNG
EN
The following picture shows the PCB in ECO-mode. To change to
TURBO-mode, remove the black jumper and move it to the right
(from the pictures perspective) Replacing the jumper to cover the
pin on the right.
ES
En la siguiente imagen, observamos como la tarjeta se encuentra en
modo ECO. Para cambiar a modo TURBO, debemos levantar la
parte negra del jumper y moverlo a la parte de la derecha,
cubriendo así la aguja de la derecha.
FR
Dans l'image suivante, la carte est en mode ECO. Pour passer en
mode TURBO, il convient de soulever la partie noire du cavalier et
la déplacer vers la droite, recouvrant ainsi l'aiguille de la droite.
ECO / TURBO
10811 1221
DE
Das folgende Bild zeigt die Platine im Eco-Mode. Um in den
Turbo-Mode zu wechseln entfernen Sie den schwarzen „Jumper“
und verschieben Sie Ihn nach rechts (aus der Bildperspektive).
Verschieben Sie den Jumper um den Sti rechts abzudecken.
ECO
60

SILENT & ECO FRIENDLY HAND DRYER
CHANGING INSTRUCTIONS INSTRUCCIONES DE CAMBIO INSTRUCTION DU CHANGER ANWEISUNG DER ÄNDERUNG
EN
When the Jumper is in “NORMAL” mode, it means that the PCB
and the function of the hand dryer is in TURBO mode. See the
picture below.
ES
Cuando está en modo “NORMAL” significa que el modo de la
tarjeta electrónica, y por lo tanto, el funcionamiento del secador,
será en modo TURBO. Véase la imagen siguiente.
FR
En mode "NORMAL", cela signifie que le mode de la carte
électronique, et donc le fonctionnement du sèche-mains, est en
mode TURBO. Voir l'image suivante.
ECO / TURBO
10811 1221
DE
Wenn sich der Jumper im Modus “Normal” befindet bedeutet dies,
dass sich das PC-Board un die Funktion des Händetrockners im
Turbo-Mode befinden. Siehe Bild unten.
NORMAL
61

SILENT & ECO FRIENDLY HAND DRYER
CHANGING INSTRUCTIONS INSTRUCCIONES DE CAMBIO INSTRUCTION DU CHANGER ANWEISUNG DER ÄNDERUNG
EN
Once the PCB mode is changed, the PCB needs to be refitted to
the hand dryer, first locating the lower part of the PCB to the
fittings below (1), then pushing the PCB back until it clips into place
at the top (2).
ES
Una vez cambiado el modo de la tarjeta, se introduce de nuevo la
tarjeta en el secador, encajando primero la parte inferior en los
dientes inferiores (1) y posteriormente encajando la parte superior
de la tarjeta con los dientes superiores (2).
FR
Une fois que le mode de la carte a été modifié, la carte est réinsérée
dans le sèche-mains, en introduisant d’abord la partie inférieure
dans les dents inférieures (1), puis en ajustant la partie supérieure de
la carte dans les dents supérieures (2).
ECO / TURBO
10811 1221
1
DE
Wenn der Modus geändert wurde muss das PC-Board wieder
vorsichtig in den Händetrockner eingesetzt werden. Platzieren Sie
zuerst den unteren Teil des PC-Boards in den dafür vorgesehenen
Haltern (1) und drücken Sie das PC-Board zurück, bis es oben
einrastet (2).
2
2
62

SILENT & ECO FRIENDLY HAND DRYER
CHANGING INSTRUCTIONS INSTRUCCIONES DE CAMBIO INSTRUCTION DU CHANGER ANWEISUNG DER ÄNDERUNG
EN
Screw the front housing.
ES
Atornillar la tapa frontal.
FR
Vissez le couvercle frontal.
DE
Schrauben Sie das Gehäuse wieder fest.
ECO / TURBO
8
10 11 1221
63

SILENT & ECO FRIENDLY HAND DRYER
CHANGING INSTRUCTIONS INSTRUCCIONES DE CAMBIO INSTRUCTION DU CHANGER ANWEISUNG DER ÄNDERUNG
EN
Fit in the tabs from the front cover at the top of the box of
the dryer.
ES
Encajar las pestañas del embellecedor frontal en la parte
superior de la caja del secador.
FR
Fixer les encarts du couvercle frontal à la partie supérieure
de la caisse du sèche-mains.
DE
Setzen Sie die Frontabdeckung auf der oberen Vorderseite
des Trockners ein.
ECO / TURBO
8
11 1221
64

SILENT & ECO FRIENDLY HAND DRYER
CHANGING INSTRUCTIONS INSTRUCCIONES DE CAMBIO INSTRUCTION DU CHANGER ANWEISUNG DER ÄNDERUNG
EN
Slide down the front cover.
ES
Deslizar hacia abajo el embellecedor frontal.
FR
Glisser jusqu'en bas le couvercle frontal.
DE
Drücken Sie das Frontabdeckung von oben nach unten
fest.
ECO / TURBO
8
1221
65

SILENT & ECO FRIENDLY HAND DRYER
CHANGING INSTRUCTIONS INSTRUCCIONES DE CAMBIO INSTRUCTION DU CHANGER ANWEISUNG DER ÄNDERUNG
21
EN
Press the low part of the front cover so that the tabs fit in
the box of the dryer
ES
Presionar la parte inferior del embellecedor frontal para
que las pestañas encajen en la caja del secador.
FR
Appuyer sur la partie inférieure du couvercle frontal pour
le fixer à la caisse.
DE
Drücken Sie den unteren Teil der Frontabdeckung in die
Halterungen des Trockners.
ECO / TURBO
8
66

VELTIA
Sant Adrià 95,
08030 Barcelona - SPAIN
TEL: +34 93 714 44 77
EMAIL: sales@veltia.com
www.veltia.com
 Loading...