

Veloteq Treadmill Manuals
Treadmill Manual
V.01

WARING:
If the supply cord is damaged, it must be replaced by the manufacturer, its service agent or similarly qualified
persons in order to avoid a hazard. This appliance is not intended for use by persons (including children) with
reduces physical, sensory or mental capabilities, or lack of experience and know ledge, unless they have been
given supervision or instruction concerning use of the appliance by a person responsive for their safety. Children
should be supervised to ensure that they du not play with the appliance.
Thank you
Thanks for purchasing this product. The product will help you exercise your muscles in the
correct way and to improve your fitness – and all this in a familiar environment.
Implied Warranty
The importer of this machine assures that this device was manufactured from high quality
materials.
Prerequisite for the implied warranty is the proper setup in accordance with the operating
instructions. Improper use and /or incorrect transportation can render the warranty void.
The implied warranty is for 1 year, beginning with the date of purchase. If the device you
acquired is defective, please contact our Customer Service (Inset page) within the
guarantee period of 24 months as of purchase date. The warranty applies to the following
parts (as far as included in the scope of delivery): Frame, cable, electronic devices, foam,
and wheels. The guarantee does not cover:
Damage effected by outer force
Intervention by unauthorised parties
Incorrect handling of the product
Non-compliance of the operating instructions
Wear parts and expendable items are also not covered (such as running belt).
The device is only intended for private use. The warranty does not apply to professional
usage.
Spare parts can be ordered from Customer Services (Inset page) as needed.
Please make sure you have the following information on hand when ordering spare parts.
Operating instructions
Model number (located on the cover sheet of these instructions)
Description of attachments
Attachment number
Proof of purchase with purchase date
Please do not send the device to our firm without being requested to do so by our Service
team. The costs of unsolicited shipments will be borne by the sender.
1

General safety instructions
A great deal of emphasis was placed on safety in the design and manufacture of this
fitness device. Still, it is very important that you strictly adhere to the following safety
instructions. We cannot be held liable for accidents that were caused due to disregard.
To ensure your safety and to avoid accidents, please read through the operating
instructions thoroughly and attentively before you use the sports device for the
first time.
1) Consult your GP before starting to exercise on this device. Should you want to exercise
regularly and intensively, the approval of your GP would be advisable. This is especially
true for users with health problems.
2) We recommend that handicapped people should only use the device when a qualified
carer is present.
3) When using the fitness device, wear comfortable clothing and preferably sports or aerobic
shoes. Avoid wearing loose clothing which could get caught in the moving parts of the
device.
4) Stop exercising immediately should you feel unwell or if you feel pain in your joints or
muscles. In particular, keep an eye on how your body is responding to the exercise
programme. Dizziness is a sign that you are exercising too intensively with the device. At
the first signs of dizziness, lay down on the ground until you feel better.
5) Ensure there are no children nearby when you are exercising on the device. In addition, the
device should be stowed in a place that children or house pets cannot reach.
6) Ensure that only one person at a time uses the fitness device.
7) After the sports device has been set up according to operating instructions, make sure all
screws, bolts and nuts are correctly fitted and tightened. Use only attachments
recommended and/or supplied by the importer.
8) Do not use a device that is damaged or unserviceable.
9) Always place the device on a smooth, clean and sturdy surface. Never use near water
and make sure there are no pointed objects in the direct vicinity of the fitness device. If
necessary, place a protective mat (not included in scope of delivery) to protect your floor
underneath the device and keep a free space of at least 0.5 m around the device for
safety reasons.
10)Take care not to put your arms and legs near moving parts. Do not place any material in
openings in the device.
11)Use the device only for the purposes described in these operating instructions. Use only
attachments recommended by the manufacturer
12)If the supply cord is damaged ,it must be replaced by the manufacturer,its service agent or
similarly persons in order to avoid a hazard.
2

Special Safety Precautions
Power source:
Choose a place in reach of a socket when placing the treadmill.
Always connect the appliance to a socket with a grounded circuit and no other
appliances connected to it. It is recommended not to use any extension cords.
A FAULTY GROUNDING OF THE APPLIANCE CAN CAUSE THE RISK OF
ELETRICAL SHOCKS. ASK A QUALIFIED ELECTRICIAN TO CHECK THE
SOCKET IN CASE YOU DO NOT KNOW IF THE APPLIANCE IS GROUNDED
APPROPRIATELY. DO NOT MODIFY THE PLUG PROVIDED WITH THE
APPLIANCE IF IT IS NOT COMPATIBLE WITH YOUR SOCKET. ASK A
QUALIFIED ELECTRICIAN TO INSTALL A SUITABLE SOCKET.
Sudden voltage fluctuations can seriously damage the treadmill. Weather
changes or switching on and off other appliances can cause peak voltages,
over-voltage or interference voltage. To limit the danger of damage to the
treadmill, it should be equipped with an over-voltage protective device (not
included).
This appliance is designed for use with ~220 - ~240 Volt rated voltage.
Keep power cord away from the carrying roller. Do not leave the power cord below
the striding belt. Do not use the treadmill with a damaged or worn out power cord.
Unplug before cleaning or engaging in maintenance work. Maintenance should
only be done by authorised service technicians, unless otherwise stated by the
manufacturer. Ignoring those instructions would automatically void the warranty.
Inspect the treadmill before every use to make sure that every part is operational.
Do not use the treadmill outdoors, in a garage or under any kind of canopy. Do not
expose the treadmill to high humidity or direct sunlight.
Never leave the treadmill unattended.
Make sure the striding belt is always tense. Start the striding belt before stepping on it.
Assembly
Before starting with the assembly of this fitness device, carefully read through the
set up steps as of page 6 we also recommend that you view the assembly drawing
prior to assembly (page 5).
Remove all packaging material and place the individual parts on a free surface.
This will provide you with an overview and will simplify assembly.
Please consider that there is always the risk of injury when using tools and
carrying out technical activities. Please proceed with care when assembling the
device.
3
Make sure you have a hazard-free working environment and do not, for example,
leave tools lying around. Deposit the packaging material in such a way that it does
not pose a danger. Foil/plastic bags are a potential risk of suffocation for children!
Take your time when viewing the drawings and then assemble the device according to the
series of illustrations.
The device must be carefully assembled by an adult person. If necessary, request
aid from another technically talented person.
Unpacking & Assembly
WARNING!: Use extreme caution when assembling this treadmill. Failure to do so could
result in injury.
NOTE: Each step number in the assembly instructions tells you what you will be doing.
Read and understand all instructions thoroughly before assembling the treadmill.
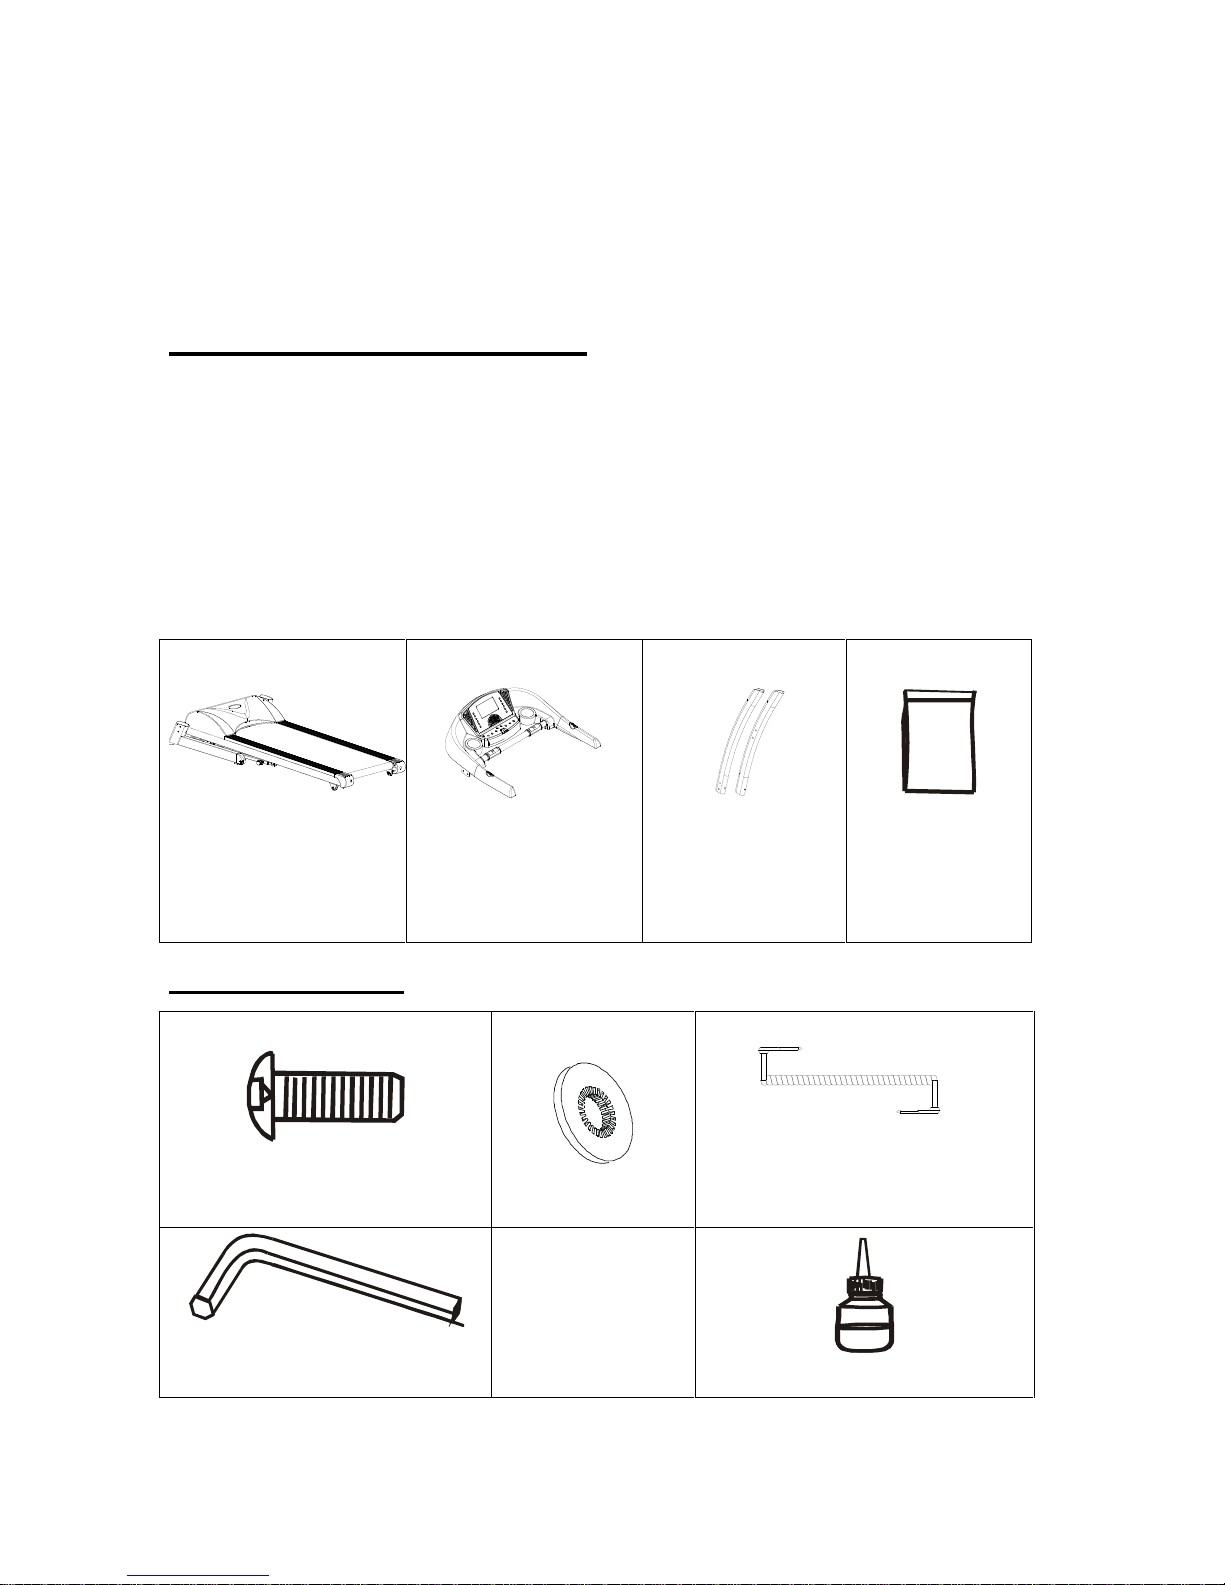
UNPACK AND VERIFY THE CONTENTS OF THE BOX:
Lift up and remove the box that surrounds the Treadmill.
Check the following items are present. If any of the parts are missing, contact with the
dealer.
MAIN BODY
CONSOLE
CONSOLE MAST
HARDWARE KIT
HARDWARE KIT
M8x15 HEX HEAD BOLT 18pcs
Washer 18 pcs
MP3 Link line
Allen wrench 1 pcs
Lubricant for running deck
4
Assembly Diagram (2)
5
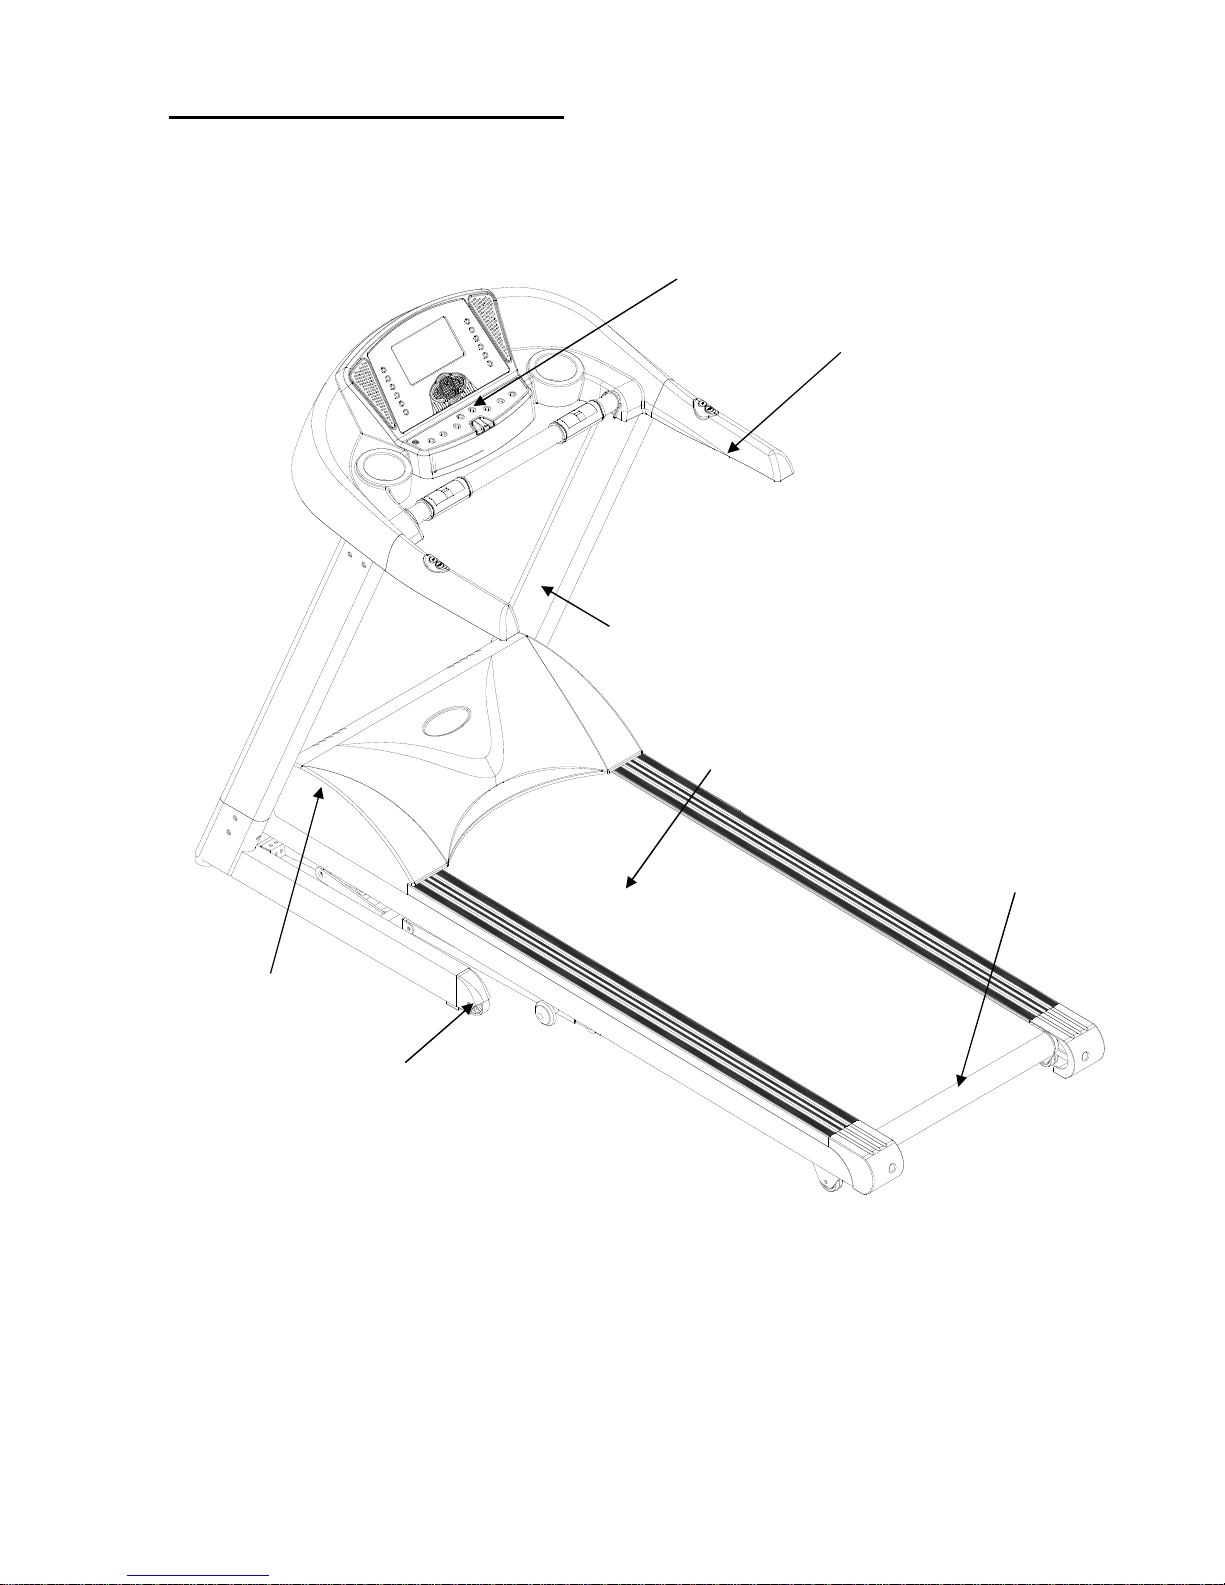
console
Handle bar
Console mast
Main body
Motor cover
Moving wheel
Rear roller
Assembly Instructions
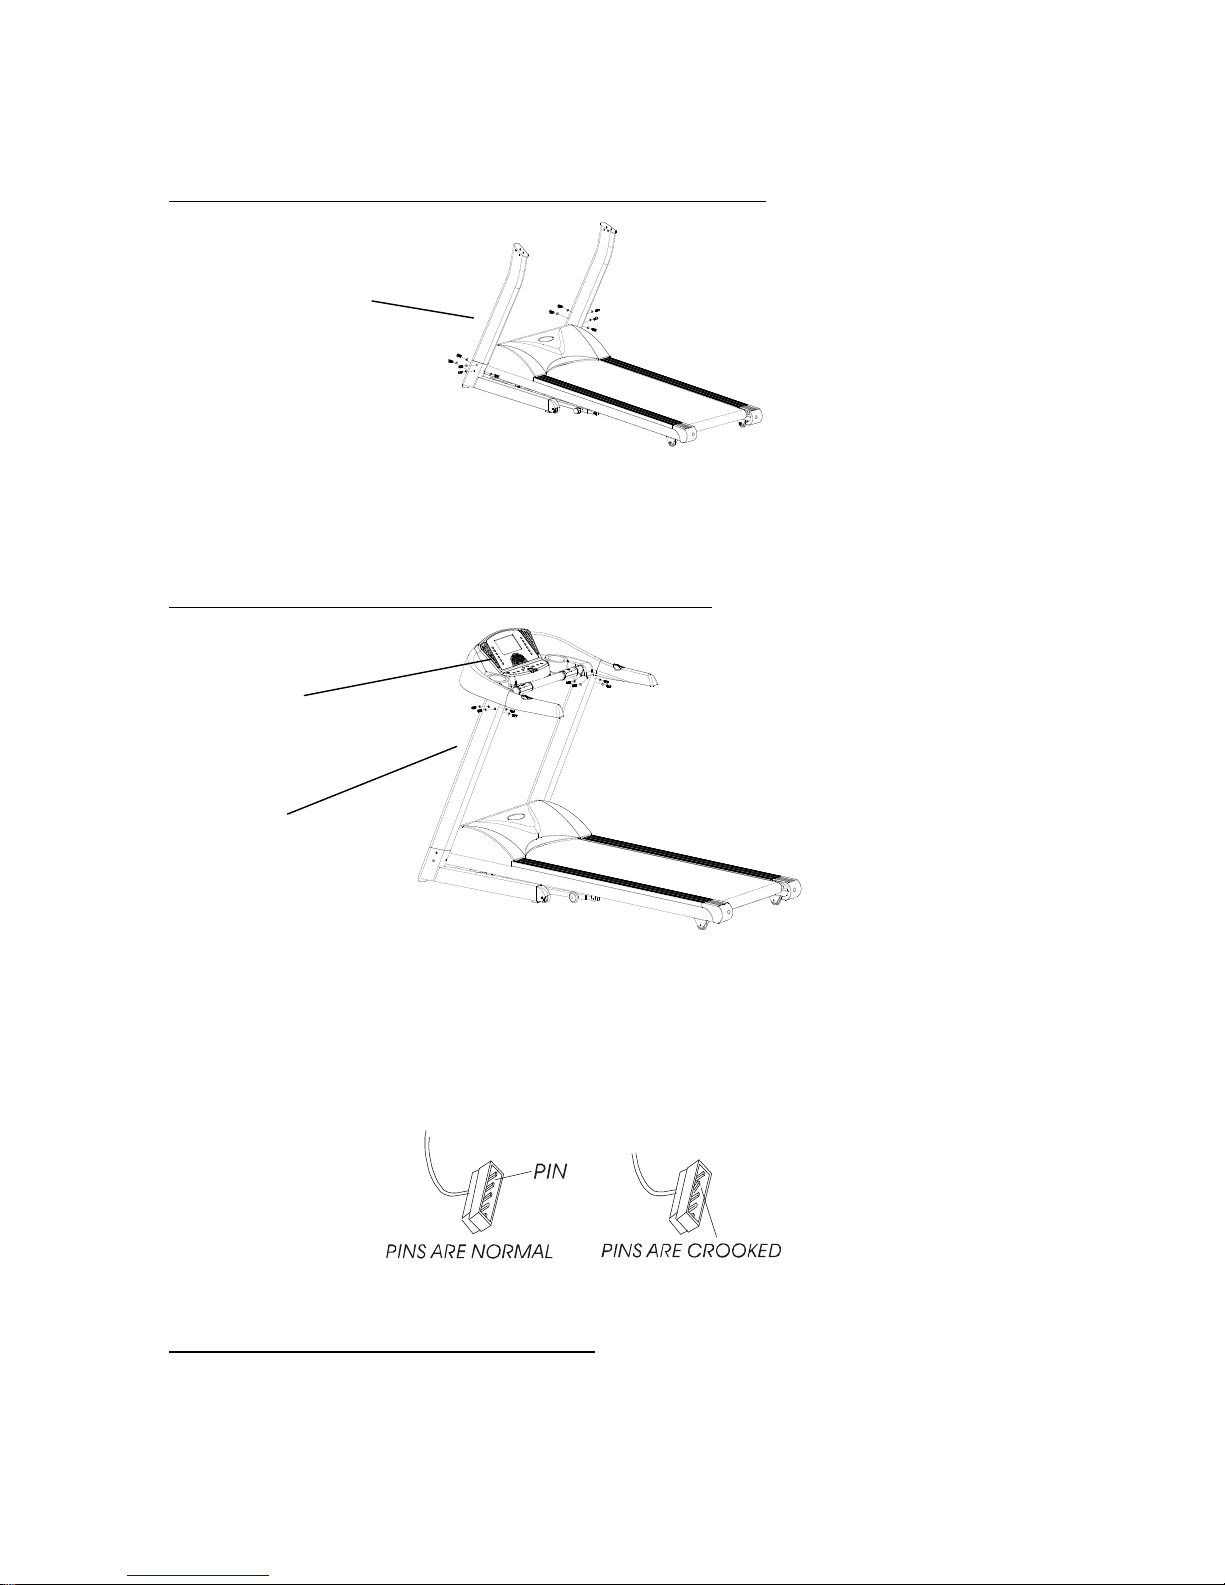
Step 1:Attach the console masts to the base frame.
A;)put the console wire through the console mast .
B:)then attach left/right console mast into main frame with six M8X15mm bolt using
washer wrench.
Step 2: Attach the console to the console mast
A) connect the wire from the console to the wire in the right console mast.
B) assemble the console to the console mast with two M4x15mm bolts and wrench.(do
not tighten the bolts)
ATTENTION: be careful when you connect the two console—controller wires, There are
pins inside connector, the pins must be straight, otherwise it will cause problems.
(Insure pins are
straight)
Step 3:Tighten step 1, step 2 bolts.
First open switch and working machine, then tighten bolts.
6
Console mast
Console
Console mast
 Loading...