

User's Manual
Misuse of this product may result in
injury read user's manual and follow all
warnings and instructions
operating this
equipment. Never allow children to play on or
Important Precautions
Warning
1. To reduce the risk of serious injury, read the following important precautions
before using the NF-6000 magnetic elliptical bike.
2. It is the responsibility of the owner to ensure that all the users of the DM 6000 are
adequately informal of all precautions. Use the DM 6000 magnetic elliptical bike
only as described in this manual.
3. Use the DM 6000 indoors on a level surface Keep the DM 6000 away from
moisture and dust. Place a mat under the DM 6000 to protect the floor or carpet.
4. Inspect and tighten all parts regularly Replace any worn parts immediately.
5. Keep children under the age of 12and pets away from the DM 6000 at all times
6. Persons weighing more than 250 pounds should not use the DM 6000.
7. Wear appropriate clothing when exercising do not wear loose clothing that could
become caught on the DM 6000 Always wear athletic shoes when using the DM
6000.
8. Always keep your back straight when using the DM 6000 Do not arch your back.
9. If you feel pair or dizziness while exercising stop immediately and cool down.
10. The pulse sensor in not a medical devise. Vendor’sfactors, including the user's
movement may affect the accuracy of heart rate readings. The pulse sensor is
intended only as an exercise aid in determining heart rate trends in general.
11. The DM 6000is intended for in-home use only. Do not use the DM 6000 in a
commercial, rental, or institutional setting.
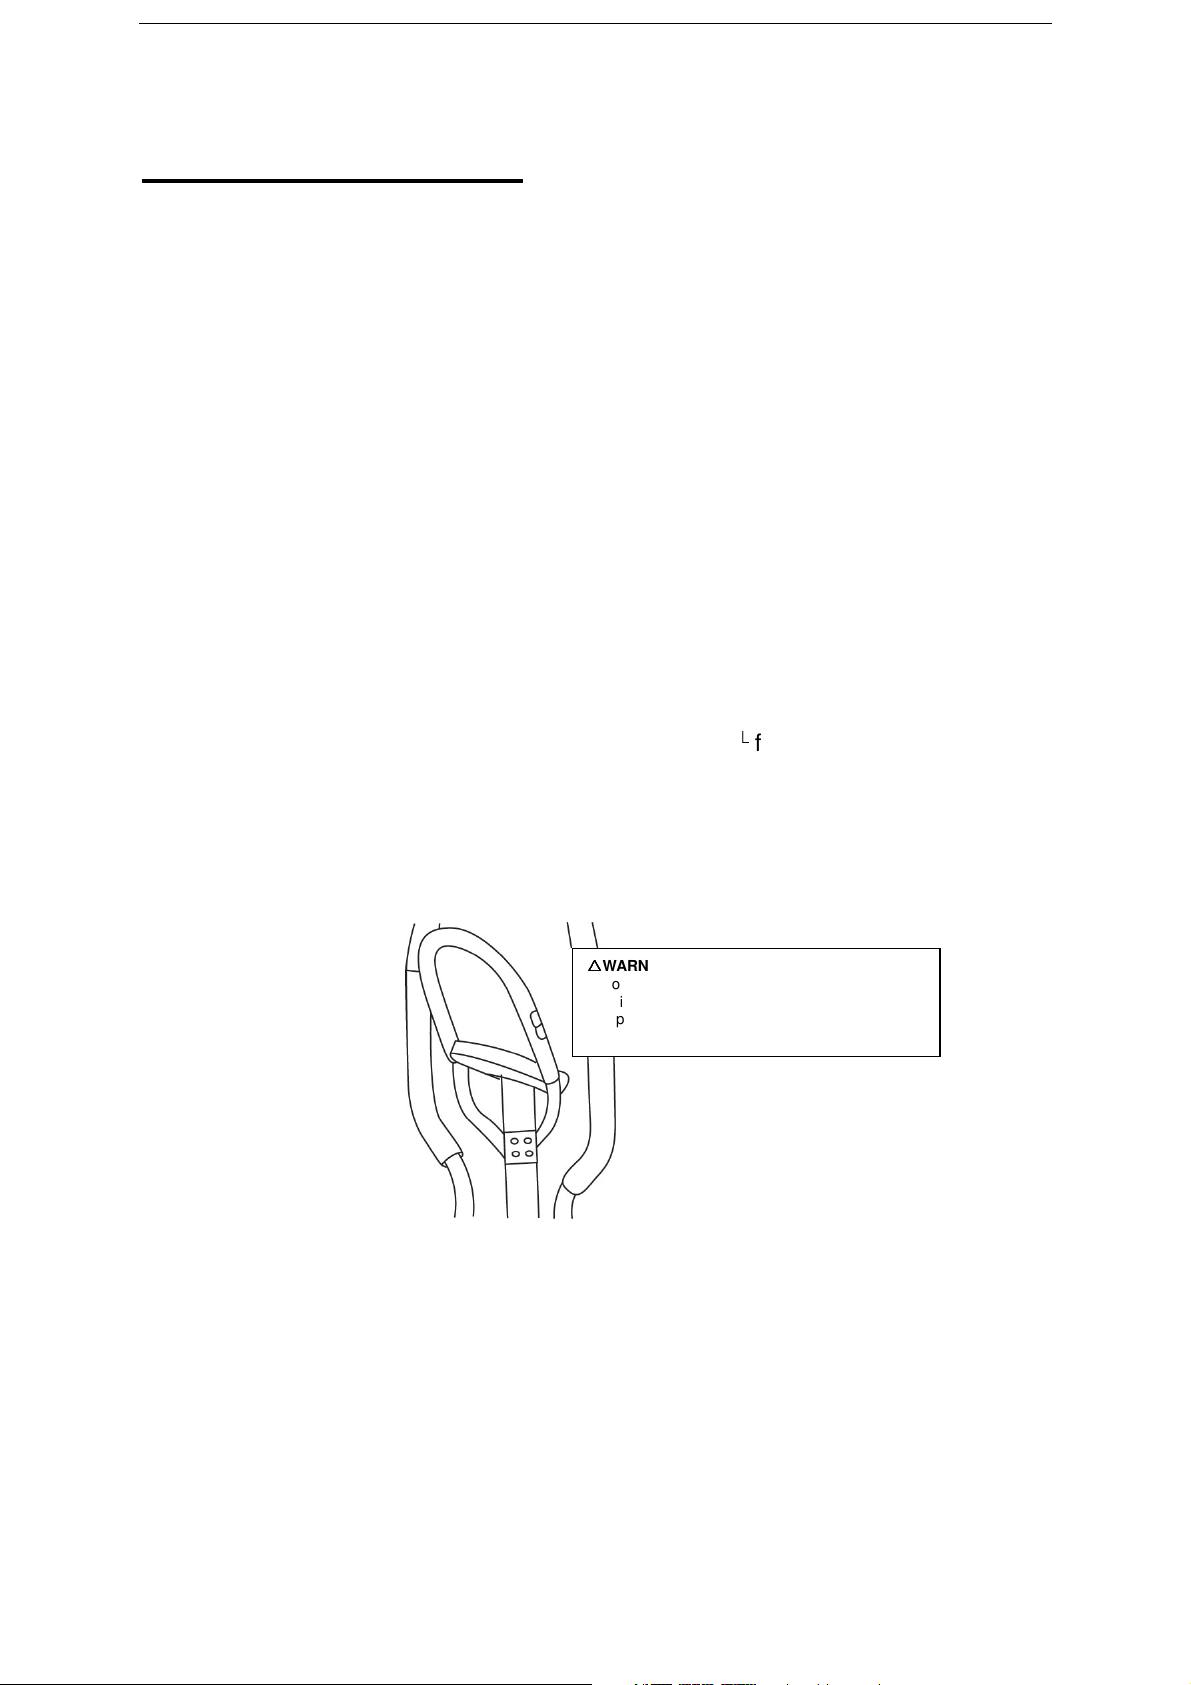
!
WARNING:
serious
around this equipment.
before
Warning
Before beginning this or any exercise programme, consult your physician. This is
especially important for persons over the age of 35 or persons with pre-existing health
problems. Read all instructions before using. We assume no responsibility for
personal injury or property damage sustained by or through the use of this product.
-1-
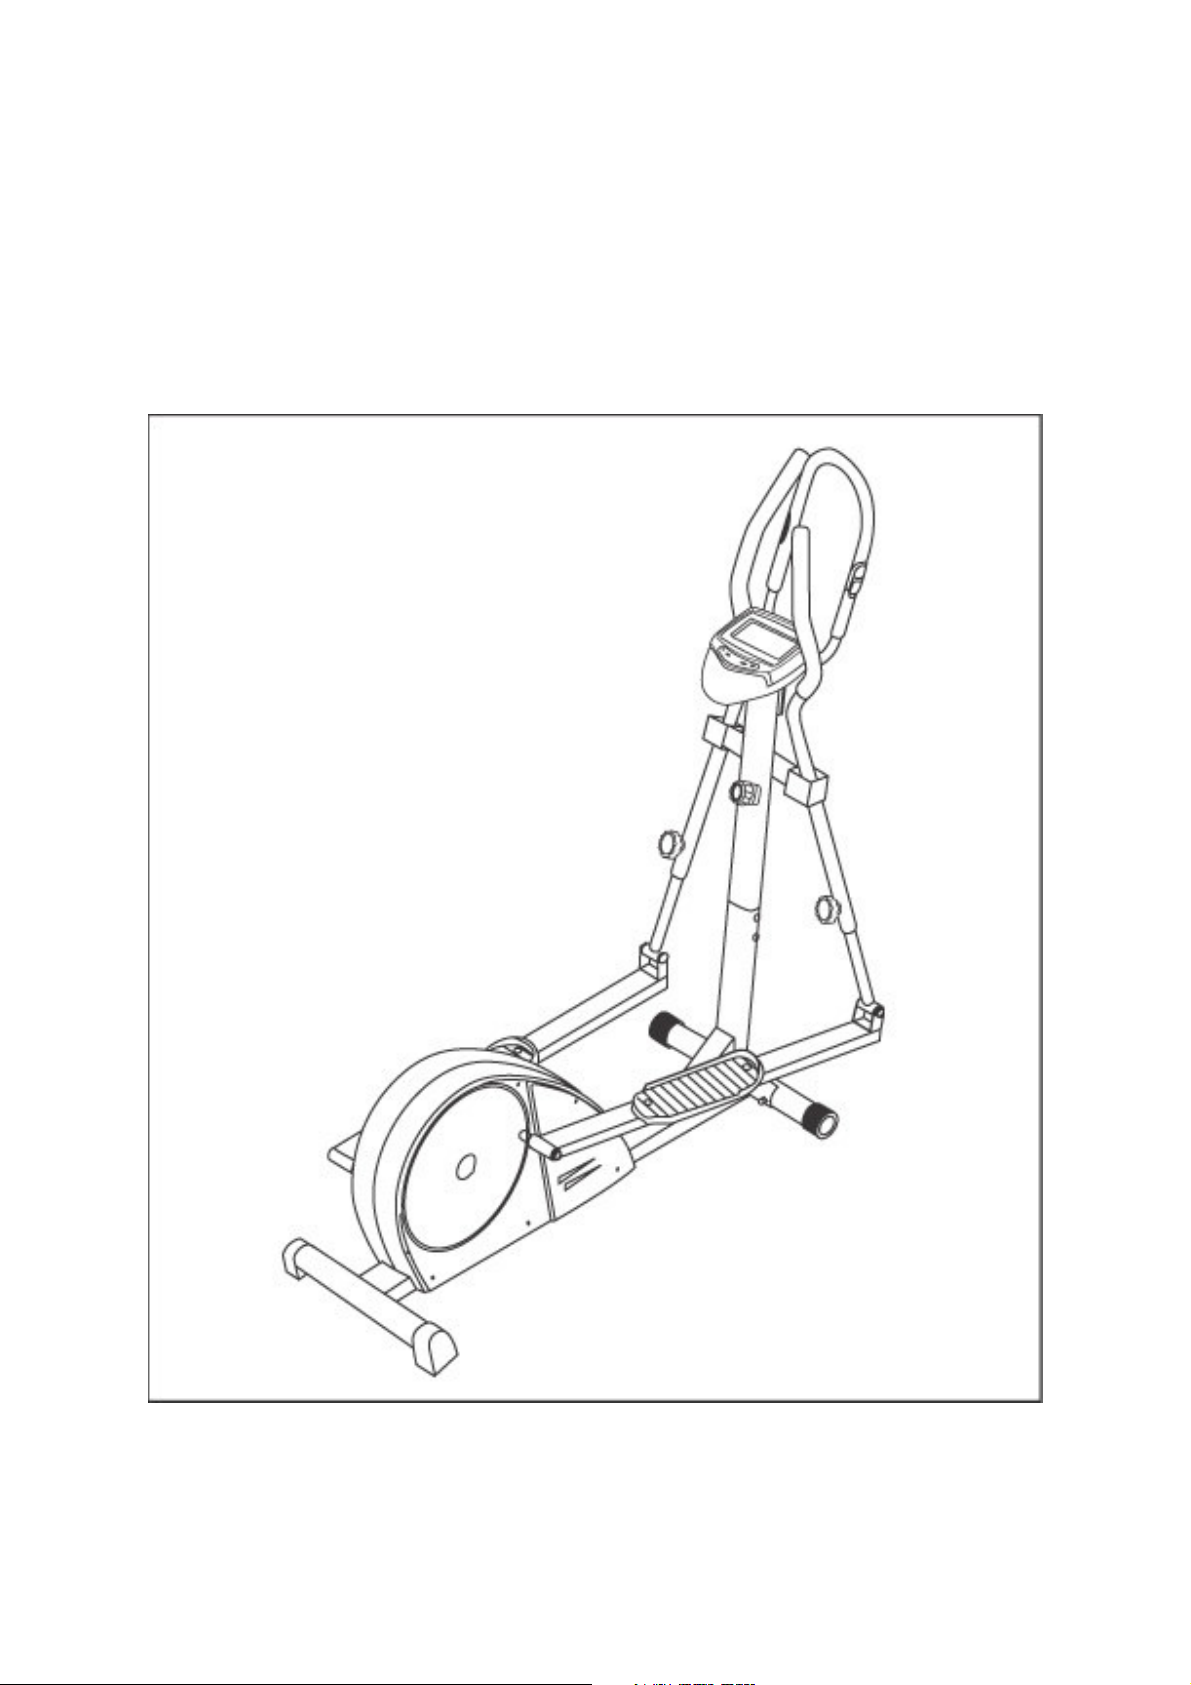
Before you begin
Congratulations for selecting DM 6000 magnetic elliptical bike. Cross
training is one of the most effective exercises for increasing
cardiovascular fitness, building endurance and toning the entire body.
The DM 6000 offers an impressive array of features designed to let you
enjoy this healthful exercise in the comfort and privacy of your own home.
For your benefit, read this manual carefully before you use the DM 6000.
-2-
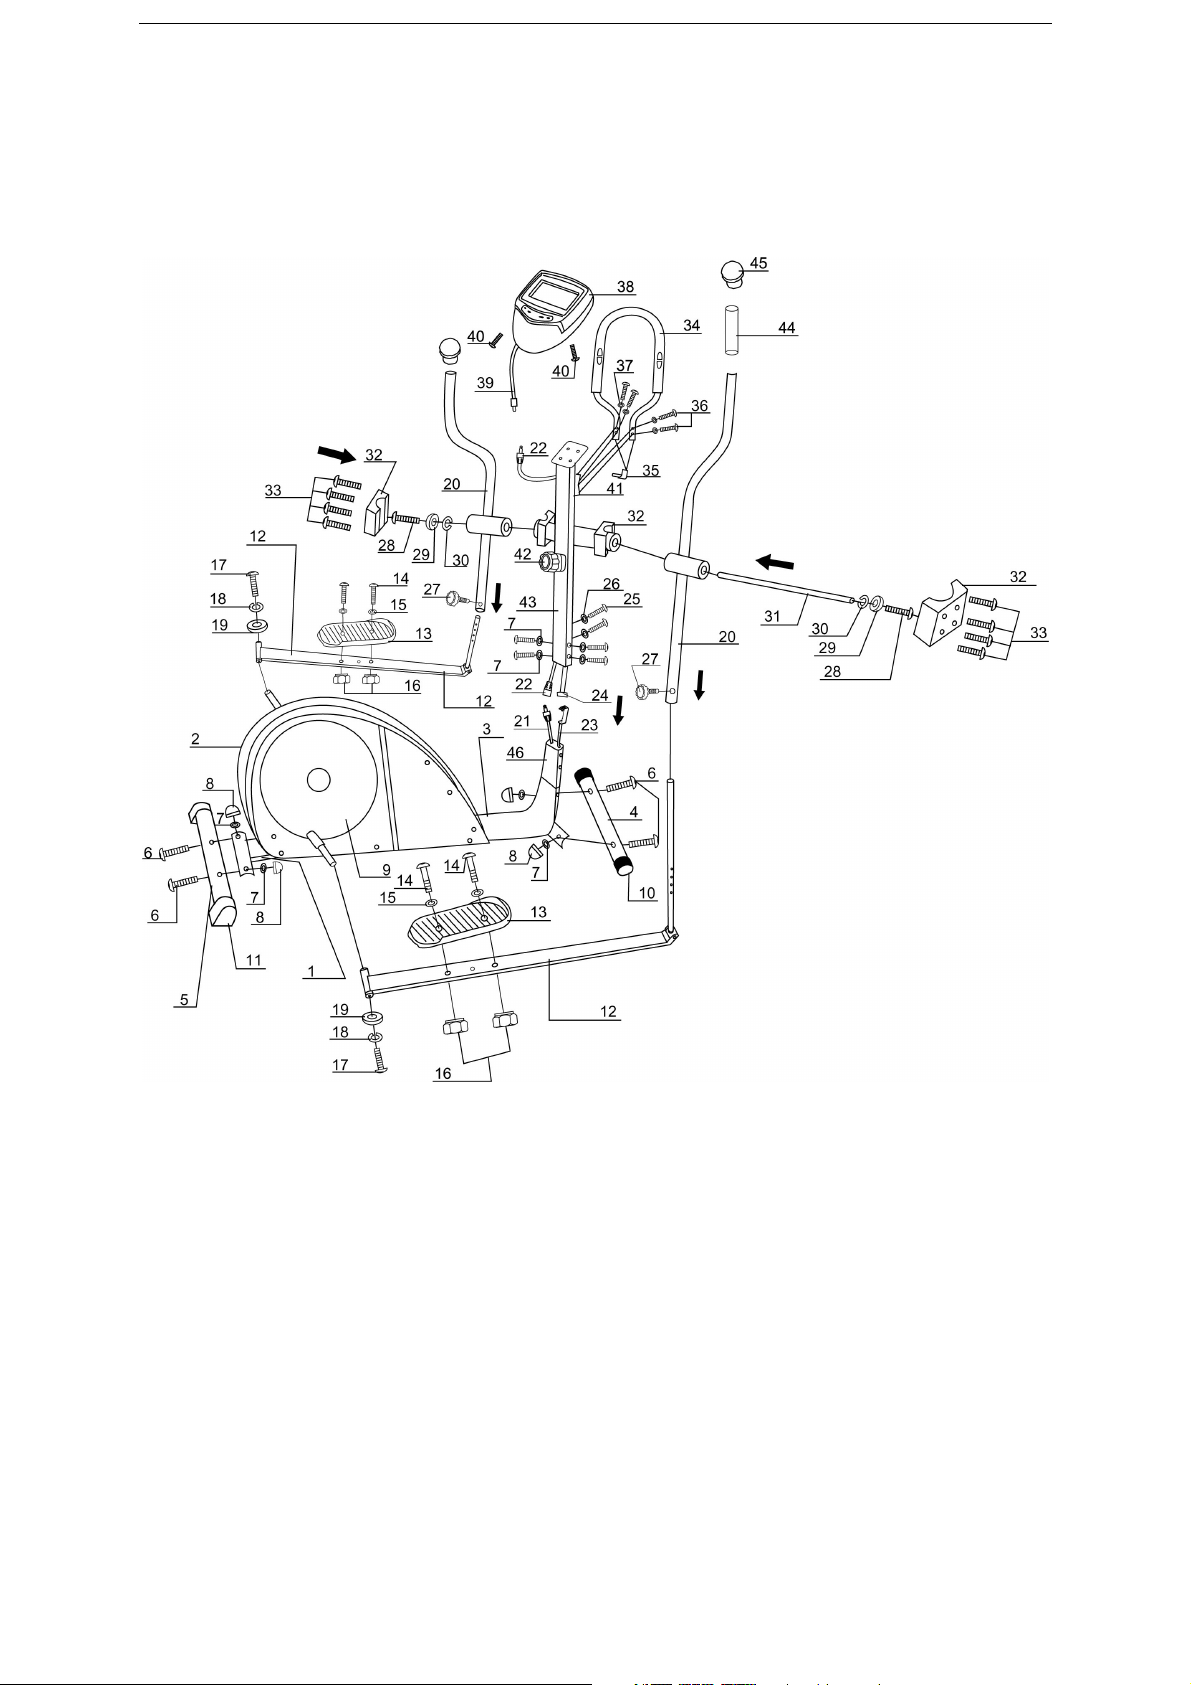
Explore Drawing
-3-
-4-

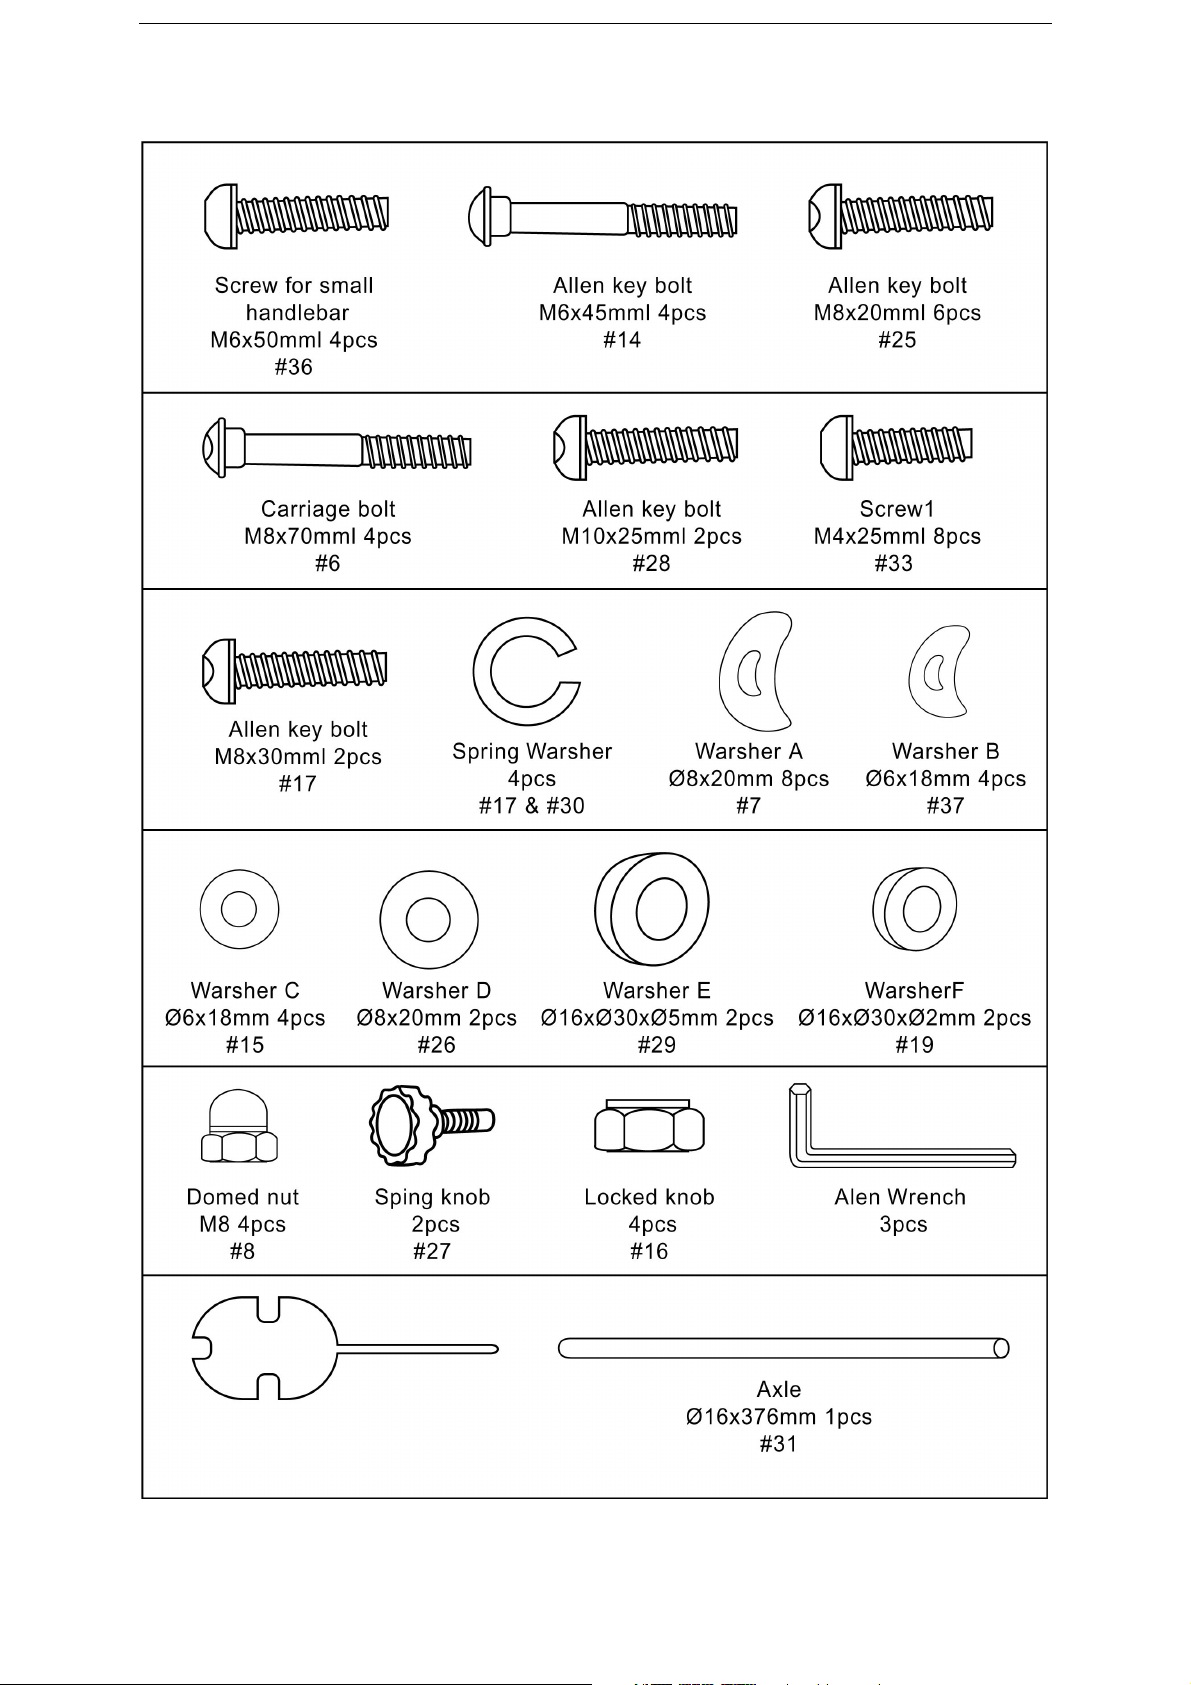
Parts List
NO. DESCRIPION Q'TY NO. DESCRIPION Q'TY
1 BASE FRAME 1 31 AXLE DIA16 x 376mm 1
2 CHAIN COVER (L & R) 1 32 PLASTIC COVER 4
3 FRONT COVER 1 33
4 FRONT STABILIZER 1 34 SMALL HANDLEBAR 1
5 REAR STABILIZER 1 35 PULSE CABLE 1
6
CARRIAGE BOLT M8 ×70mm
7 WASHER A M8 x 20mm 8 37 WASHER B M6 x 18mm 4
8 DOMED NUT M8 4 38
9 TURNING PLATE COVER
10 FRONT END CAP 2 40 SCREW 2
11 REAR END CAP 2 41 SMALL HANDLEBAR BRACKET 1
12 PEDAL ARM (L & R) 2 42 TENSION KNOB 1
13 PEDAL (L & R) 2 43 HANDLEBAR POST 1
14 ALLEN KEY BOLT M6 x 45mm 4 44
15 WASHER C M6 x 18mm 4 45 GRIP 2
16 KNOB 4 46 CENTRAL POST 1
17
ALLEN KEY BOLTS M8 x 30mm
18
SPRING WASHER
19 WASHER F M16 x 30 x 2mm 2
20
HANDLEBAR (L & R)
21 COMPUTER CABLE 1
22 COMPUTER WIRE 1
23 TENSION HOOK 1
24 TENSION CABLE 1
25 ALLEN KEY BOLT M8 x 20mm 6
26 WASHER D M8 x 20mm 2
27 SPRING KNOB 2
28
ALLEN KEY BOLT M10 x 25mm
29 WASHER E M16 x 30 x 5mm
30
SPRING WASHER
4 36 SCREW M6 x 50mm 4
2 39 COMPUTER WIRE 1
2
4
2
2
2
2
SCREW M4 x 25mm
COMPUTER
FORM
8
1
2
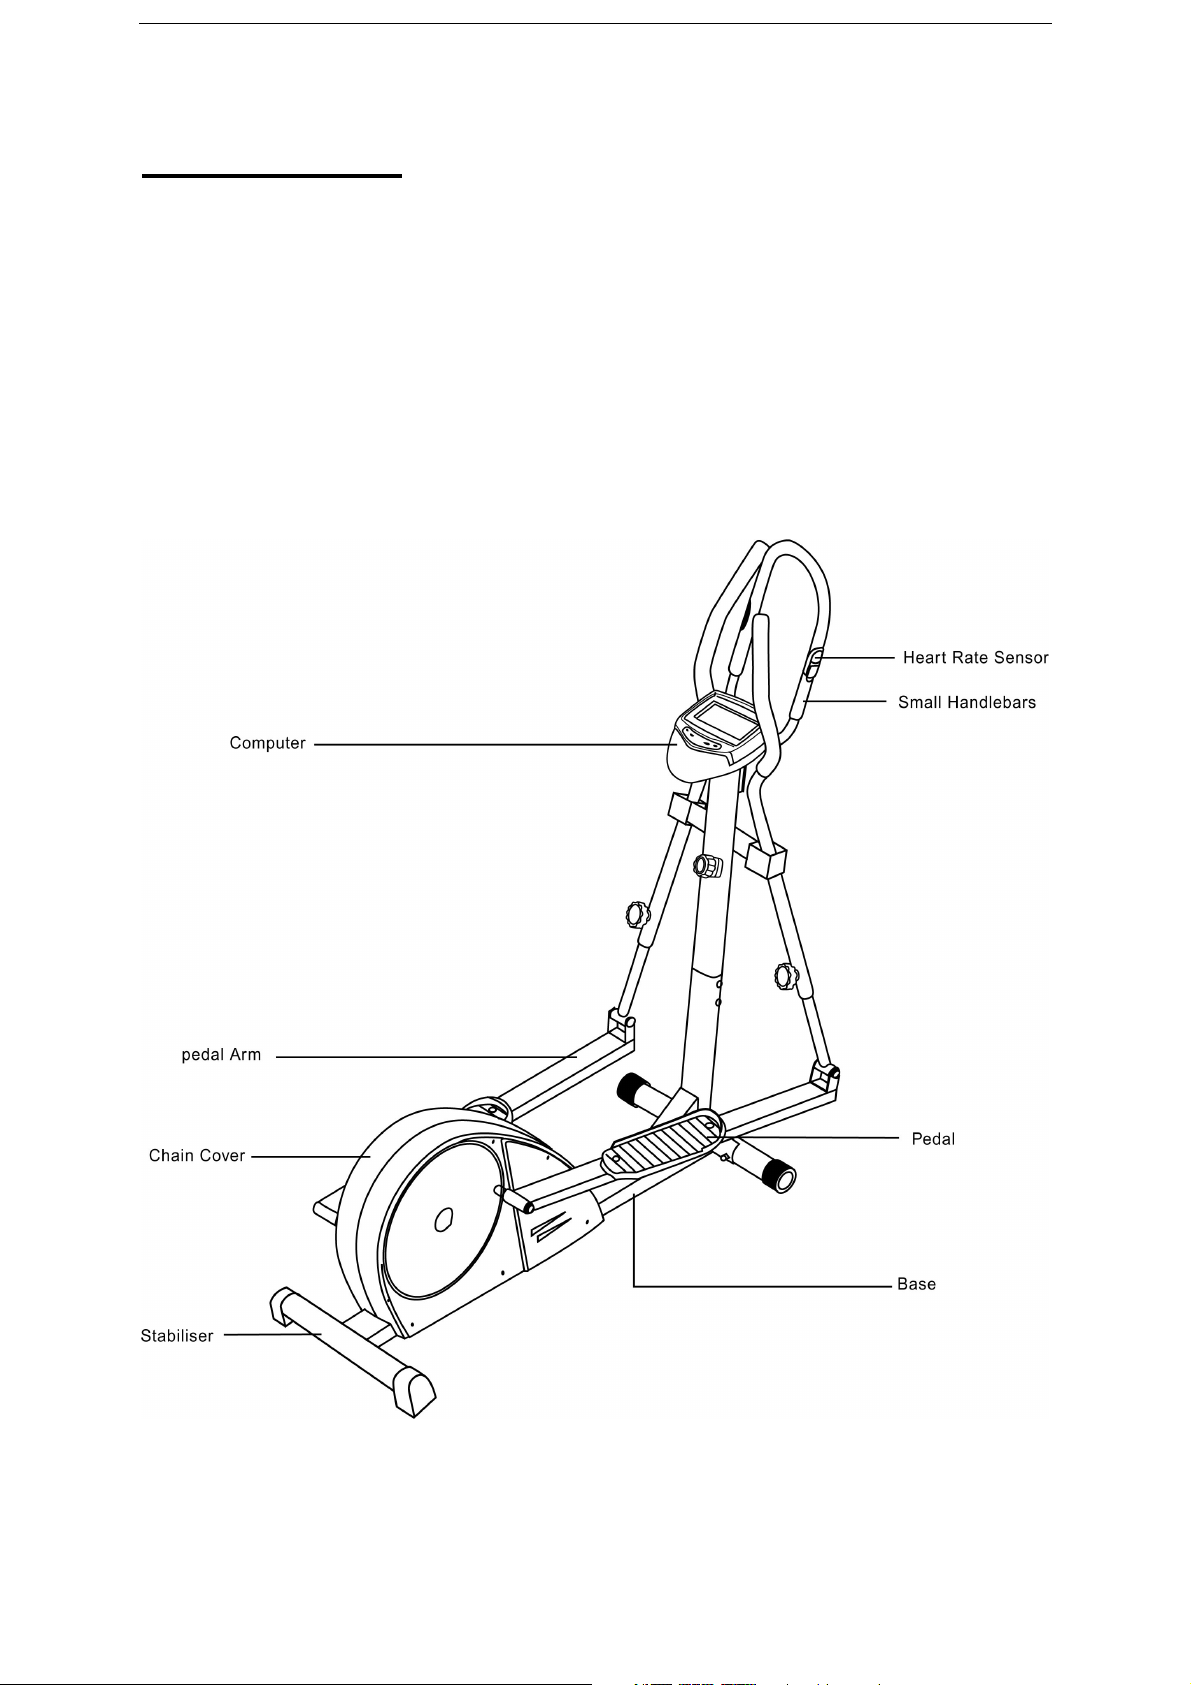
Part Identification Chart
Use the chart to help identify the parts used in assembly. Note: Some parts may have
been pre-attached for shipping purposes. If a part is not found in the parts bag, check
to see if it has been pre-attached.
Place all parts of the magnetic elliptical bike in a cleared area and remove the
packaging materials. Do not dispose of the packaging materials until assembly is
completed.
Assembly tools and batteries (2 x 1.5V - R6) are included.
-5-

Step 1,
Attach the Front Stabilizer (4) and Rear Stabilizer (5) to the Base Frame (1), using
4 sets of Carriage bolts (6), Washer A (7), Domed nuts (8).
Fix the Pedals (13) to the Pedal arm (12), using 4 sets of Allen key bolts (14),
Washer C (15), Knob (16).
NOTICE!!! Pedals (13) and Pedal arm (14) has left and
right.
Attach Pedal arm (12) to Base Frame (1), using 2 sets of Allen key bolts (17),
Spring washer (18) and Washer F (19), please fix it very tightly!
-6-

Step 2,
Connect the Computer cable (21), Computer Wire (22) and Tension Hook (23),
Tension cable (24).
Insert the Front post (43) to the Central post (46), using 6pcs Allen key bolts (25),
4pcs Washer A (7) and 2pcs Washer Washer D (26).
-7-

Step 3,
Attach the Handlebar L & R (20) to the Pedal Arm L & R (12) and tight it by pulling
the Spring knob (27) out before tightening it back in.
-8-

Step 4,
Insert Axle (31) through the Front post (43), and attach it on either side to the
handlebars L & R (20) and Plastic cover (32). Tighten it with 2 sets of Allen key bolts
(28), Washer E (29) and Spring washer (30). Then fix the Plastic cover (32) with 4pcs
Screw (33).
Attach the Small handlebar (34) to the Small handlebar bracket (41) and tighten it
with 4 sets of Screws (36) and Washer B (37).
-9-

-
Step 5
,
Attach the Computer (38) to the top of the Front post (43) with the enclosed screws
(40). And connect the cables (39-22), insert pulse cable (35) to the pulse hole which
on computer.
-10

To step onto the magnetic elliptical bike, hold
handlebars and step onto the pedal that is
lowest position. Then step onto the
begin
to move with a continuous motion. (Note: The
either direction; it is
crank in the
give
variety to your exercise, you may choose to
To dismount the magnetic elliptical bike, allow
pedals to slowly come to a stop.
CAUTION: The magnetic elliptical bike does
not have a freewheel; the pedals will continue
stops. When the
highest
and
both hands on the pulse sensors as
five to ten seconds, the heart
nd your heart rate will
grip the sensors
obtain the
pulse
appears too be to high or too low, or if your
pulse is not displayed, lift your hands off the
and allow the display to reset. Grip
sensors as described above. Try
times until you become
How to operate the DM 6000
How to exercise on the DM 6000
the
in the
other pedal. Push the pedals until they
crank can turn in
recommended that you turn the
direction shown below; however, to
turn the crank in the opposite direction.)
the
to move until the flywheel
pedals are stationary, step off the
pedal first. Then step off the lowest pedal.
How to operate the Heart Rate Sensors
To measure your pulse, stop pedaling
place
shown. Grip for
rate symbol will flash a
then be shown. Continue to
for a further fifteen seconds to
most accurate reading If the displayed
sensor
again on the
the sensors several
familiar with it.
-11-

-
ct and tighten all parts of the magnetic
trainer regularly. Replace any
worn parts immediately.
For continued smooth operation of the
bike, the Front and Rear
clean. Using a
any
residue that may build up where
. Other
IMPORTANT: Never use abrasives or
cal
damage to the computer,
and keep it out of direct
properly,
batteries should be replaced. In
that the connectors are
ged into the computer (see assembly
Maintenance
How to transport the DM 6000
Lift the NF-6000 to 45° so that the transportation wheels point downwards and to the front, and
use the fixed handlebar to move it.
Maintenance
How to maintain the DM 6000
Inspe
elliptical bike
magnetic elliptical
Stabilizers should be kept
soft cloth and mild detergent, clean
dust and
the Wheels move on the Stabilizers
components of the magnetic elliptical bike
can a so be cleaned in this manner.
solvents to clean the magnetic ellipti
bike. To prevent
keep liquids away
sunlight.
Computer trouble- shooting
If the computer does not function
the
addition, make sure
plug
step 6).
-12

-
Inspect and tighten all parts of the magnetic
Replace any worn
peration of the
bike, the Front and Rear
kept clean. Using a
soft cloth and mild detergent, clean any
. Other
liptical bike
IMPORTANT: Never use abrasives or
.
damage to the computer, keep
and keep it out of direct
Maintenance
How to maintain the DM 6000
elliptical bike regularly.
parts immediately.
For continued smooth o
magnetic elliptical
Stabilizers should be
dust and residue that may build up where
the Wheels move on the Stabilizers
components of the magnetic el
can also be cleaned in this manner.
solvents to clean the elliptical cross trainer
To prevent
liquids away
sunlight.
EXERCISE INSTRUCTIONS
Using your EXERCISE CYCLE will provide you with several benefits, it will improve
your physical fitness, tone muscle and in conjunction with calorie controlled diet help
you lose weight.
1. The Warm Up Phase
This stage helps get the blood flowing around the body and the muscles working
properly. It will also reduce the risk of cramp and muscle injury. It is advisable to do a
few stretching exercises as shown below. Each stretch should be held for
approximately 30 seconds, do not force or jerk your muscles into a stretch - if it hurts,
STOP.
-13

-
SIDE BENDS
OUTER THIGH
INNER THIGH
CALF / ACHILLES
HEART RATE
MAXIMUM
COOL DOWN
AGE
FORWARD
BENDS
2. The Exercise Phase
This is the stage where you put the effort in. After regular use , the muscles in your
legs will become more flexible. Work to your own pace but it is very important to
maintain a steady tempo throughout. The rate of work should be sufficient to raise
your heart beat into the target zone shown on the graph below.
TARGET ZONE
This stage should last for a minimum of 12 minutes though most people start at about
15-20 minutes.
3. The Cool Down Phase
This stage is to let your Cardio-vascular System and muscles wind down. This is a
repeat of the warm up exercise e.g. reduce your tempo, continue for approximately 5
minutes. The stretching exercises should now be repeated, again remembering not to
force or jerk your muscles into the stretch. As you get fitter you may need to train
longer and harder. It is advisable to train at least three times a week, and if possible
space your workouts evenly throughout the week.
4. Fault Finder
1. If you do not receive numbers appearing on your computer, please
-14

-
ensure all connections are correct.
MUSCLE TONING
To tone muscle while on your EXERCISE CYCLE you will need to have the resistance
set quite high. This will put more strain on your leg muscles and may mean you
cannot train for as long as you would like. If you are also trying to improve your fitness
you need to alter your training program. You should train as normal during the warm
up and cool down phases, but towards the end of the exercise phase you should
increase resistance making your legs work harder. You will have to reduce your speed
to keep your heart rate in the target zone.
WEIGHT LOSS
The important factor here is the amount of effort you put in. The harder and longer you
work the more calories you will burn. Effectively this is the same as if you were training
to improve your fitness, the difference is the goal.
USE
The seat height can be adjusted by removing the adjustment knob and raising or
lowering the seat. There are 7 holes in the seat post allowing for a range of heights.
Once the correct height has been chosen, refit the adjustment knob and tighten. The
tension control knob allows you to alter the resistance of the pedals. A high resistance
makes it more difficult to pedal, a low resistance makes it easier. For the best results
set the tension while the bike is in use.
-15
 Loading...