

Page 1
Automatic
X-ray Film
Processor
Installation,
Operation
And Maintenance
Manual
WARNING:
Do not plug into the electrical mains power supply before
reading this manual – or before filling the machine with
liquids
Page 2

Page 3

INTRODUCTION
---------------------------------------------------------------------------------------------------------------------------- -------------------------------------------------------------------------------------------------------------------------------------------------------------------------------- ---------------------------------------------------------------------
Thank you for purchasing a Velopex SPRINT. This model is the simplest and most
compact automatic x-ray processor we produce, and you will have no problem in
finding a convenient site for installation.
Please read this manual carefully before plugging in and using your machine for
the first time. Contained in this manual is information on the right place to position
the Sprint, how to set up the machine correctly for use, and how it should be
maintained so that you receive consistently high quality results over a long
working lifetime.
INTRODUCTION TO THE PROCESSOR
The diagrams at the front of this manual are designed to introduce you visually to
the layout of the Velopex SPRINT.
Page 4

CONTENTS
---------------------------------------------------------------------------------------------------------------------------- -------------------------------------------------------------------------------------------------------------------------------------------------------------------------------- ---------------------------------------------------------------------
Page
TABLE OF SYMBOLS 4
TECHNICAL DESCRIPTION 5
SITING THE SPRINT 6
EXTERNAL FEATURES OF THE MACHINE 8
INTERNAL FEATURES OF THE MACHINE 9
WALL MOUNTING DIAGRAM 10
WALL MOUNTING INSTRUCTIONS 11
PREPARING TO USE THE SPRINT 12
Filling the Machine with Chemicals 12
OPERATING THE SPRINT 14
To Start 14
Processing Film 15
Film Collection 15
Each Day 15
FILM STORE 16
ROUTINE MAINTENANCE 16
Cleaning the Processor 16
Caution 17
TROUBLESHOOTING 18
Symptoms and Action 18
FILM QUALITY PROBLEMS 19
Films too dark 19
Films too light 20
Films dirty or marked 20
CONTAMINATION 21
USER SERVICEABLE ITEMS 21
MODULE DIAGRAM 22
SPARE PARTS 23
CONSUMABLE ITEMS 23
NON USER SERVICEABLE ITEMS 23
Page 5

Page 6

TABLE OF SYMBOLS
---------------------------------------------------------------------------------------------------------------------------- -------------------------------------------------------------------------------------------------------------------------------------------------------------------------------- ---------------------------------------------------------------------
This processor is fitted with indicator lights illuminated RED. When lit, these indicate that
the processor is switched ON and operating correctly.
In darkroom conditions, red illumination is used to prevent film fogging and, on this
processor, it is NOT indicating a dangerous condition.
DISCONNECT MACHINE FROM THE MAINS ELECTRICAL SUPPLY WHEN IT IS
NOT IN USE, OVERNIGHT AND WEEKENDS.
POSITION THE MACHINE TO ALLOW EASY DISCONNECTION FROM
ELECTRICAL SUPPLY.
Input rating:
110-120V, 200-240V ~ 50/60 Hz – Power Input 200w
This equipment must be plugged into an earthed/grounded socket outlet.
Use only the connection lead supplied.
_______________________________________________________________________
20/08/2007 4 SPRINT MkV
Page 7

TECHNICAL DESCRIPTION
---------------------------------------------------------------------------------------------------------------------------- -------------------------------------------------------------------------------------------------------------------------------------------------------------------------------- ---------------------------------------------------------------------
The Velopex "Sprint" X-Ray Processor is a machine for developing and fixing dental
x-ray films without user contact between insertion of the exposed film and receipt
of the developed film into the wash-tank for collection at the end of the process.
The machine receives undeveloped film in a light-tight enclosed area, visible
through its protective red perspex flap, where a motor-driven “module" carries it
between two continuous belts through a tank containing Developer. The film is
passed out into an identical "module" working in a second tank, containing Fixer.
Chemical temperature is maintained at 27°C, (81°F), by two rod heaters protruding
from the rear wall of the machine, heating each chemical tank through a metal
sleeve.
The film finally passes into a water Wash Tank after processing. It is retrieved by
removing the film from the collector tank.
The overall dimensions of the processor are:- width 380mm (15 inches), with
water tank fitted; height 450mm (17¾ inches); depth 230mm (9 inches).
The weight of the processor is: empty, 6.85 kg (15 Ib); full, 10.25 kg (22½ Ib).
This machine is a CLASS I device.
ENVIRONMENTAL CONDITIONS FOR TRANSPORT AND STORAGE
This machine should be kept within the temperature range -10°C and +40°C,
(14°F and 104°F) and below 80% humidity.
INTERFERENCE BETWEEN EQUIPMENT
This X-Ray processor complies with the following E.M.C. Standards
E.E.C- EN6060I-1-2
U.L- FCCPart 15 Class A
In the event that electromagnetic or other interference is suspected between this
processor and other equipment close to it, move the two units further apart until
the problem is eliminated.
_______________________________________________________________________
20/08/2007 5 SPRINT MkV
Page 8

SITING THE SPRINT
---------------------------------------------------------------------------------------------------------------------------- -------------------------------------------------------------------------------------------------------------------------------------------------------------------------------- ---------------------------------------------------------------------
PRE-INSTALLATION INSTRUCTIONS
Although the Velopex Sprint is designed for use in daylight, care should be taken
to avoid sources of intense light. For example do not site directly under a window,
fluorescent tube or floodlight.
A well ventilated position is mandatory.
The SPRINT has been designed for use on a normal counter-top or for
wall-mounting. It is important that when the machine is filled with solution the
stand does not rock or shake, as this could cause spillage. Never move the
machine with chemicals in the tanks.
Avoid siting the machine above or near other electrical, mechanical or sensitive
apparatus - e.g. autoclave, compressor, evacuation equipment.
Place the machine against a wall to prevent it from being accidentally knocked
over.
The machine should not be placed in areas exposed to flammable gases.
When the machine is to be sited in a darkroom, it is essential to ensure that the
room is well ventilated and light-tight. There should be sufficient space for easy
chemical changes and for the machine to be serviced safely.
When choosing a site for your Velopex it may be convenient to site the machine
near a sink for ease of chemical changing.
When choosing the site, it is important to allow for the presence of liquids.
Surfaces susceptible to water (or chemical) damage should therefore be avoided.
Avoid carpeted areas.
The ambient temperature must be maintained below 27°C (81°F).
WARNING: X-ray radiation can be harmful to patient, technician and
dentist. Inadequate lead shielding of the darkroom or film storage area
will also cause fogging of films from exposure to stray x-ray radiation.
Consult your Radiation Protection Adviser, your local bye-laws, your
Department of Health and Safety or Dental Equipment Dealer for proper
construction of darkroom or placement of film processing equipment in
the vicinity of x-ray radiation sources.
CLEANING THE PROCESSOR CASING
Keep the outside of the machine clean with a mild solution of household
detergent and warm water (not boiling).
Use a damp cloth only (wring all excess water out of the cloth) and wipe the
external surfaces, exercising extreme care around the electrical components.
WARNING: Ensure that the machine is disconnected from the mains
power supply during cleaning and never allow water to seep into the
casing.
_______________________________________________________________________
20/08/2007 6 SPRINT MkV
Page 9
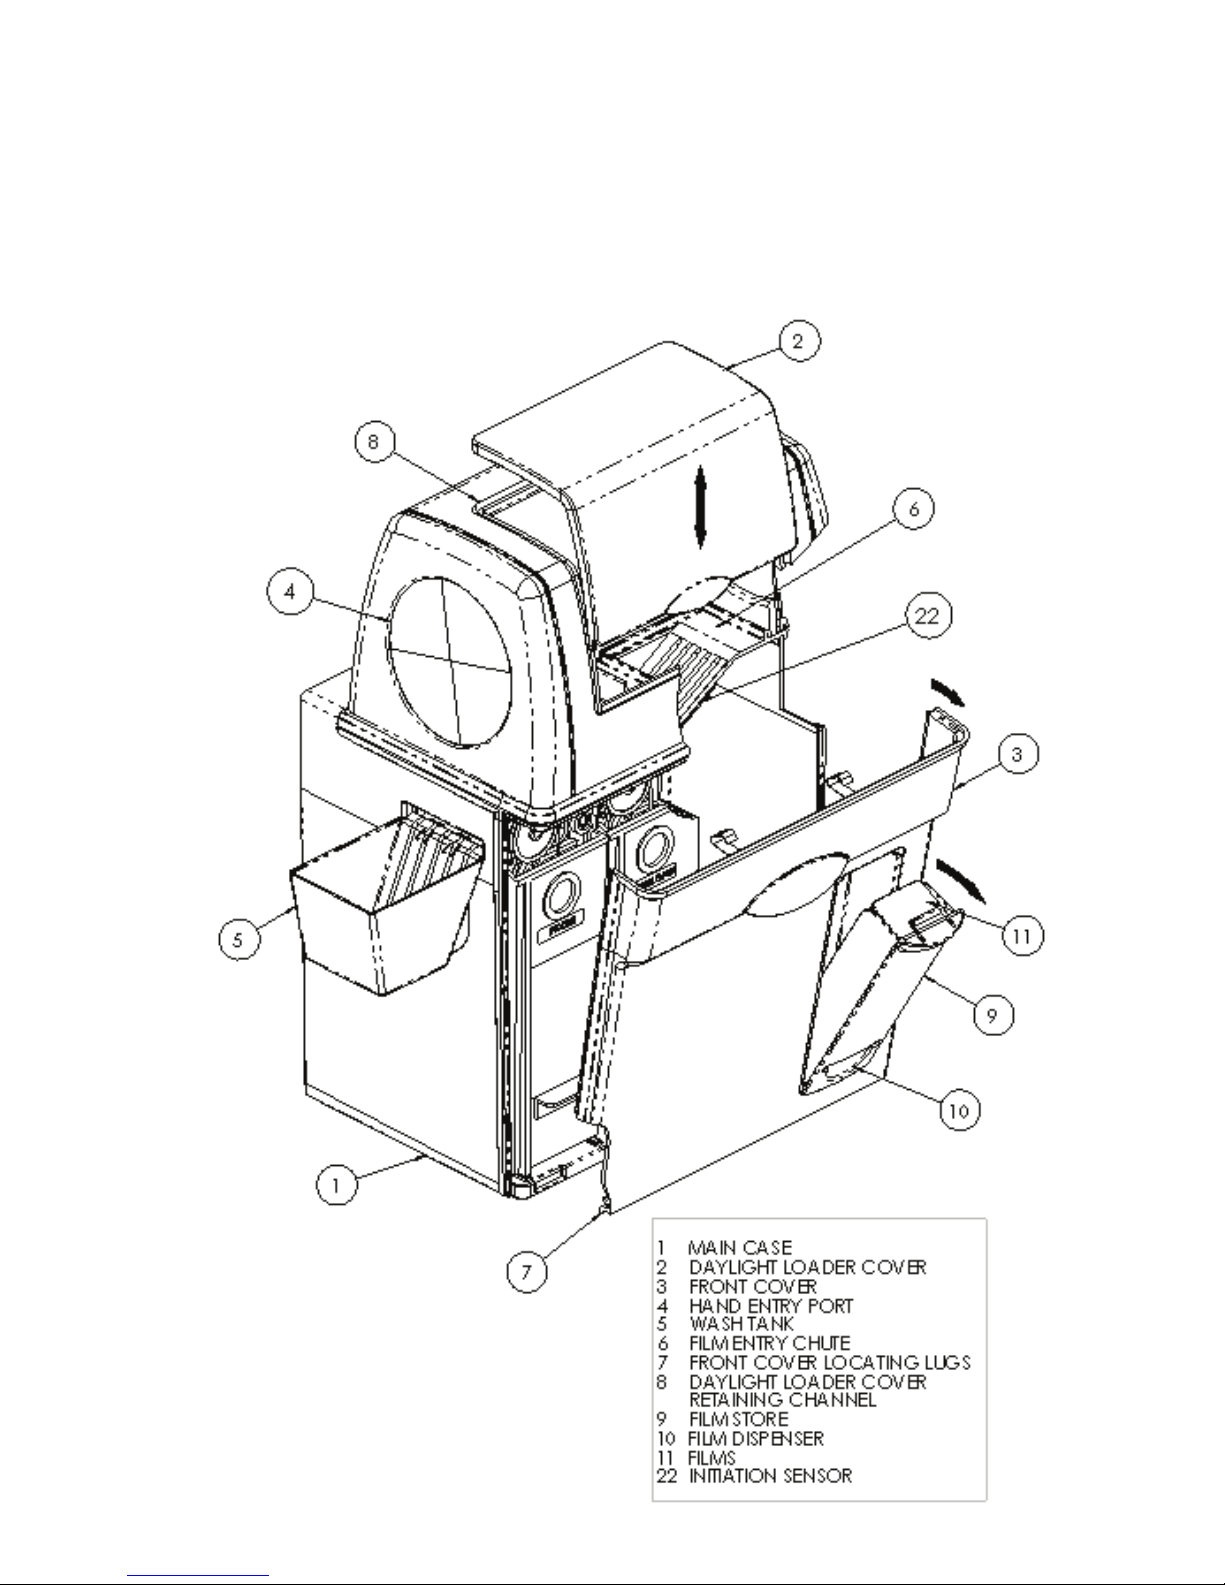
EXTERNAL FEATURES
---------------------------------------------------------------------------------------------------------------------------- -------------------------------------------------------------------------------------------------------------------------------------------------------------------------------- ---------------------------------------------------------------------
_______________________________________________________________________
20/08/2007 7 SPRINT MkV
Page 10

INTERNAL FEATURES
---------------------------------------------------------------------------------------------------------------------------- -------------------------------------------------------------------------------------------------------------------------------------------------------------------------------- ---------------------------------------------------------------------
_______________________________________________________________________
20/08/2007 8 SPRINT MkV
Page 11
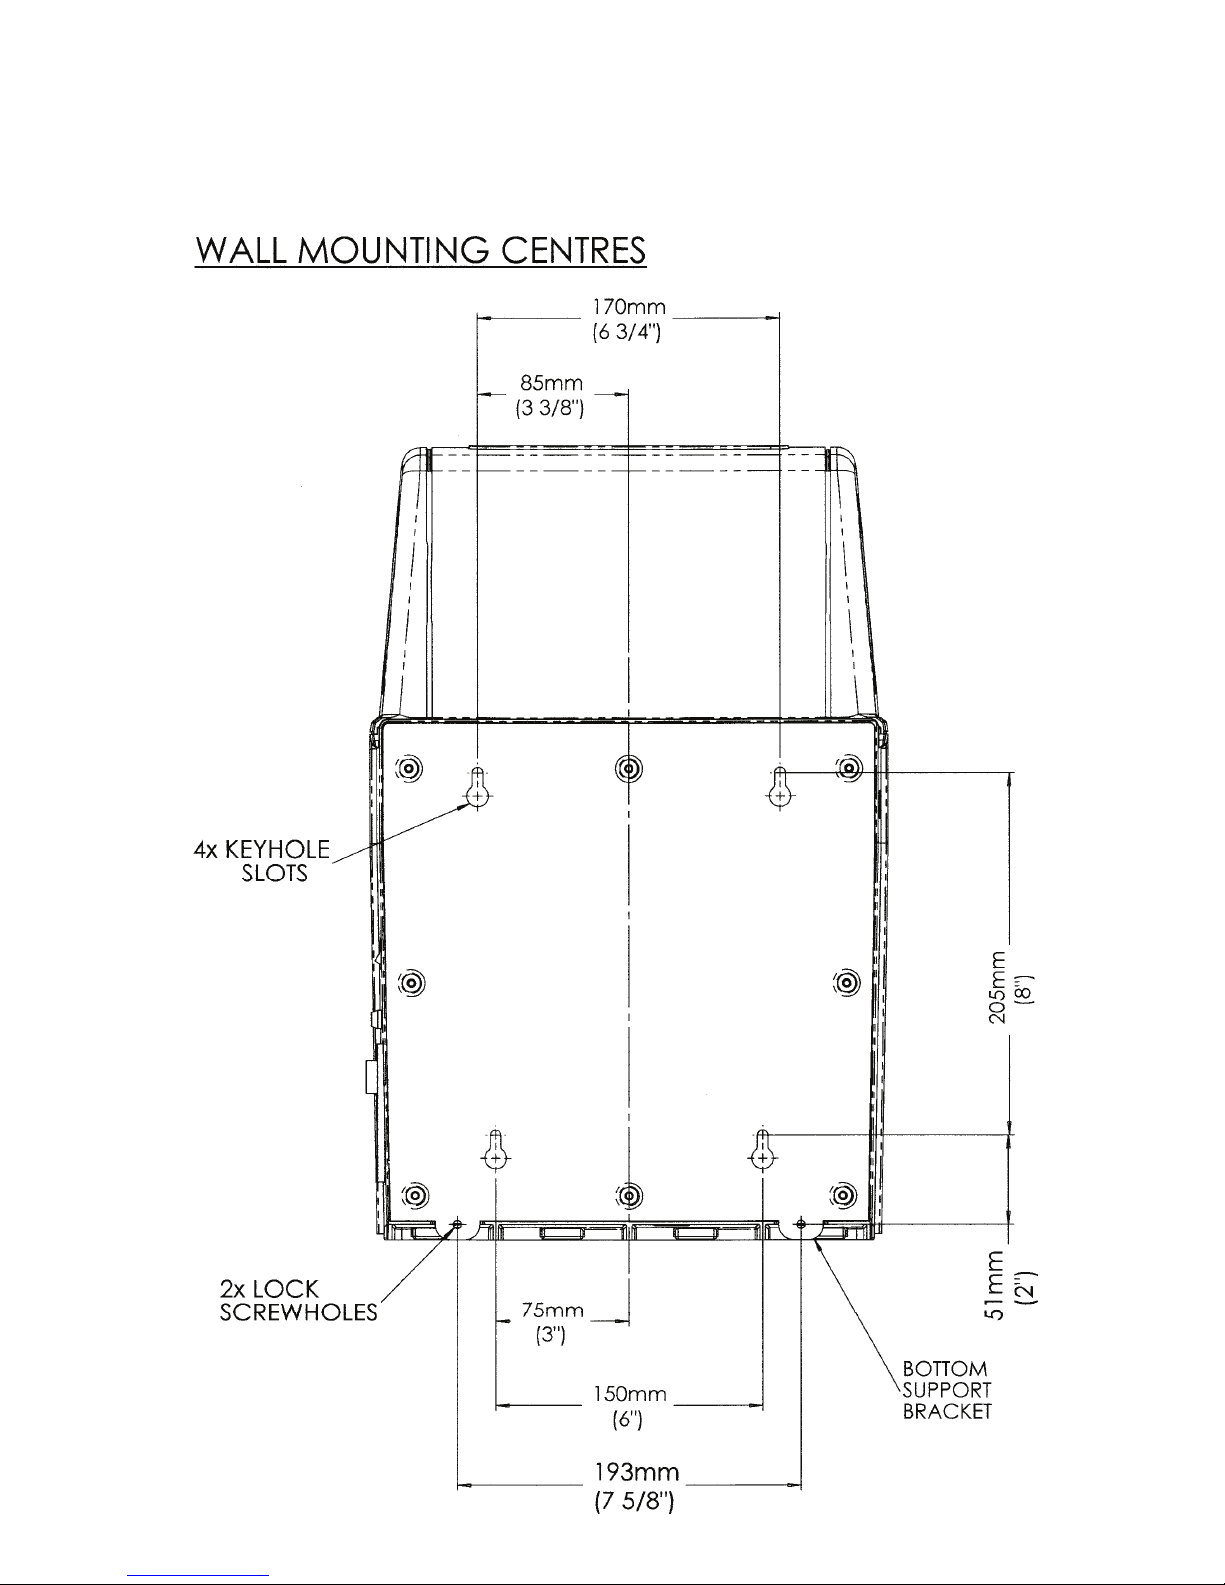
WALL MOUNTING DIAGRAM
---------------------------------------------------------------------------------------------------------------------------- -------------------------------------------------------------------------------------------------------------------------------------------------------------------------------- ---------------------------------------------------------------------
_______________________________________________________________________
20/08/2007 9 SPRINT MkV
Page 12

WALL MOUNTING INSTRUCTIONS
---------------------------------------------------------------------------------------------------------------------------- -------------------------------------------------------------------------------------------------------------------------------------------------------------------------------- ---------------------------------------------------------------------
The Sprint is ideal for wall mounting and is fitted with 4 keyhole slots on the rear
panel. A further 2 locking holes at the bottom of the rear panel prevent accidental
lifting once in place.
Choose an area of wall that is both flat and vertical. It must be able to carry a load
of 25kg, (55 lb). Use all the mounting points to ensure a secure fixing and to
spread the loading onto all the screws.
NOTE: - Please remember to position the processor within 1 metre,
(3 feet), of the electrical supply, preferably with the supply socket to the
right of the machine.
1. Use screws and wall anchors suitable for the type of wall.
2. Using the template provided, hold in the required position on the wall and
temporarily fix using suitable adhesive tape. Use a spirit level and adjust as
necessary.
3. Using suitable wall plugs for the type of wall proceed as follows:-
Drill 4 holes in the wall for the keyhole slot screws - To suit No 12 x 35mm
(1½ inch) Pan Head slotted screw.
Drill 2 holes in the wall for the lower locking screws - To suit No 8 x 25mm
(1 inch) Pan Head slotted screw.
4. Place all the wall plugs into their appropriate holes.
5. Fit the 4 keyhole screws into position leaving the screw heads 3mm, (⅜ inch),
proud of the wall surface.
6. Lift the EMPTY processor up to the wall and using the keyhole slots, hook the
machine onto the 4 screws. If necessary, adjust the screw head heights if they
appear too tight or loose.
7. IMPORTANT: - Lock the machine into position by assembling the two
remaining screws into the lower fixing holes.
8. Test that the machine is mounted correctly by checking that it cannot now be
lifted off the wall.
_______________________________________________________________________
20/08/2007 10 SPRINT MkV
Page 13

PREPARING TO USE THE SPRINT
---------------------------------------------------------------------------------------------------------------------------- -------------------------------------------------------------------------------------------------------------------------------------------------------------------------------- ---------------------------------------------------------------------
The machine is supplied in a single carton containing:-
Velopex SPRINT Processor; Operator's Manual; Water tank; Machine Accessory bag
containing: - Electric Lead; Transport Module Turning Tool; Cleaning Brush;
Chemical Change Chart and Warranty Card.
1. Familiarise yourself with the layout of the machine by referring to illustrations at
the front of this manual.
2. Remove the water tank and Film accessory bag that are stored inside the
daylight loader, (item 20). Entry into the Daylight Loader is made by vertically
lifting the daylight loader cover, (item 2).
3. When the machine has been unpacked and is in position, the inner packaging
must be removed. The transport modules inside are protected by internal
packing pieces. Open the front cover (item 3) and discard the packaging along
with the separating sheet between the output rollers of both modules (items
17 and 18).
FILLING THE MACHINE WITH CHEMICALS
WARNING: Ensure the machine is disconnected
from the mains power supply when filling with
chemicals and water. NEVER turn on the machine
with the tanks empty. Hot parts are exposed when removing the tanks.
SWITCH OFF THE MAINS SUPPLY.
Do not use chemistry or film designed for manual processing.
Note: Optimum processor performance will be achieved by using Velopex Fixer
and Developer. The machine is built, however, to work satisfactorily using most
high quality brands of chemical.
ONLY use chemicals designed for automatic processing. Chemicals used for
MANUAL PROCESSING ("hand dunking") will produce poor results.
1. The correct positions for the tanks are clearly marked.
2. Each tank with its transport module in place should be withdrawn:
NOTE: This is done by sliding FORWARDS (towards the operator) until completely
clear of its rod heater element fixed to the machine internal back wall. The
Developer tank is removed first; the Fixer tank second. Do not lift either tank until it
is clear of the front of the machine.
3. Tanks are now free to be taken to a clean working surface for filling.
4. The transport modules should now be lifted from their respective tanks and the
separating sheets removed from between the output rollers.
5. Start to fill each tank with the appropriate chemical, pouring in 1(one) litre fluid
at this stage. Pour in accordance with the marking on the tanks, i.e. Developer
always in the Developer tank and Fixer in the Fix tank.
6. The rod heating elements fixed to the internal wall of the machine must be
lightly lubricated only with the silicone grease provided. (Replacement tube Pt.
_______________________________________________________________________
20/08/2007 11 SPRINT MkV
Page 14

No. I/FIT5041P) Use at first time of operation and after every tank removal.
7. Carefully lower each transport module into its respective tank – NOTE, rapid
immersion will cause excessive displacement of chemical leading to spillage.
Should any spillage occur it should be cleaned up immediately.
8. The level of the liquids should now be adjusted: - top up to within 25mm,
(1inch), from top of the tank, (shown as half way in the tank viewing window,
item 21). This level should be checked every day and topped up as necessary.
IMPORTANT: When returning the transport modules to their tanks, ensure
that they are correctly positioned, i.e. with the drive pins inwards so that they
engage correctly with the drive dogs on the inside wall of the tank area.
9. Return tanks to their individual positions in the machine (clearly marked), N.B. Fixer first, Developer second. Push the tanks carefully home until they
touch the rear wall of the tank area, ensuring that each drive pin engages its
drive dog.
10. Load the film store (item 9) if required.
11. Replace the front cover by dropping its locating lugs (item 7) into the front
cover locating slots (item 19). Now close the front cover until it clips shut.
WARNING: If the front cover will not close fully, remove it and make sure that
both the tanks touch the rear wall of the tank area and the modules are fully
engaged in the drive dogs.
12. Gently replace the red daylight loader cover, (item 2), by lowering it
vertically until it engages fully into both front and rear retaining channels
(item 8) in the Daylight Loader (item20).
WARNING: If the red cover is not fully in position the unit will not be
light-tight, and film fogging will occur.
13. The wash tank (item 5) should now be filled with water to the "level" line
and hung in position on the left hand side of the main case, at the film exit
slot.
OPERATING THE SPRINT
---------------------------------------------------------------------------------------------------------------------------- -------------------------------------------------------------------------------------------------------------------------------------------------------------------------------- ---------------------------------------------------------------------
TO START
NOTE: - Ensure that the two tanks are correctly filled with chemicals and
fitted into position before switching on the machine.
First plug the electric power lead into the socket (item 12) on the right hand side
of the processor and plug the other end into the mains wall socket. The processor
may now be switched on by the wall socket switch.
_______________________________________________________________________
20/08/2007 12 SPRINT MkV
Page 15

Whilst the chemistry is below the correct temperature (Indicator light is flashing),
temperature will be sensed and the speed will adjust accordingly. When the
temperature of the chemistry reaches 27°C the machine will operate at Normal
Speed – this is indicated by the indicator light being permanently on - the film
spends approximately 1 minute in each chemistry tank.
PROCESSING FILM
Push hands, (with the exposed film package) through the hand entry ports (item
4) at each end of the Daylight Loader (item 20). Strip the film from its wrapper.
Hold one of your hands on the Film Entry Chute (Item 6). Slide the film carefully
down the Film Entry Chute (item 6) a single bleep will indicate the machine has
started. The film should be picked up by the transport mechanism. As soon as
each film has fully entered the transport, pause for a few seconds before
processing the next film.
IMPORTANT: Do not remove hands from the loader until the last film
has entered the transport system. To do so may cause film fogging.
FILM COLLECTION
An audible Beep will sound when all the films entered are processed.
Films will collect in the Wash Tank and may be lifted clear by hand.
Films should be separated before drying to avoid sticking together. Change the
water in the Wash Tank every five films processed.
EACH DAY
1. Before use check levels of Developer and Fixer and top up where
appropriate.
2. Before processing run through a 'clean-up' film. This may be done during
the warming up period. For clean-up films use a spare intra-oral film. After a
week discard the old film and use a fresh one. This routine helps to clean
the transport system and checks that the transport mechanism is running
properly.
3. Renew the water in the wash tank.
4. At the end of the day turn the Mains Power Switch OFF and disconnect
machine.
WARNING: Turning off electrically at the end of each workday is an
essential safety procedure.
POSITION THE MACHINE TO ALLOW EASY DISCONNECTION FROM
ELECTRICAL SUPPLY.
_______________________________________________________________________
20/08/2007 13 SPRINT MkV
Page 16
FILM STORE
---------------------------------------------------------------------------------------------------------------------------- -------------------------------------------------------------------------------------------------------------------------------------------------------------------------------- ---------------------------------------------------------------------
The SPRINT is fitted with a simple film store and dispenser drawer for standard
intra-oral film (item 9).
To load the film store, unclip the top from the front cover and remove.
Stack new film neatly into the back of the film store (item11) as illustrated,
uniformly orienting in one direction.
Return the film store back into position and clip the top into place.
Films are simply dispensed by placing the index finger through the U-shaped
dispenser hole (item 10) on the outside of the cabinet, and gently easing them
out.
NOTE: The film store must always be in position, even if empty or not being used,
otherwise light will leak into the processing area and will fog the films being
processed.
ROUTINE MAINTENANCE
---------------------------------------------------------------------------------------------------------------------------- -------------------------------------------------------------------------------------------------------------------------------------------------------------------------------- ---------------------------------------------------------------------
CLEANING THE PROCESSOR MODULES
A clean processor is the key to consistent good
results and the following cleaning routine should be
carried out at each chemical change – the frequency will
vary according to the use of the machine and the
number of x-ray films passed through it.
Regularly inspect the supply cord for any damage, at least every time
the machine is cleaned. Replace if necessary.
NOTE: It is not recommended to extend the use of chemicals beyond
three weeks.
1. Switch off the processor and disconnect it from the mains power supply.
2. Place transport modules in a sink with running water and a drain. Rinse under
the running water.
Do not allow chemicals to dry on the belts before cleaning.
NOTE: the modules will be wet with chemicals - take care to allow them to
drain a little over the tanks before moving them.
3. Clean tanks first by rinsing the insides with fresh, running water, and allow
draining. Wipe dry inside and out before re-filling.
4. Clean transport modules thoroughly one at a time with fresh water for each
module to avoid cross-contamination. Take care to return each to the tank from
which it has been removed, e.g. Developer module to Developer tank.
5. The best method of cleaning a module is to immerse totally in a sink full of hot
water (not boiling). Using the brush provided, scrub around the gears and the
roller ends. Using the special tool provided, rotate the gears and belts by hand
_______________________________________________________________________
20/08/2007 14 SPRINT MkV
Page 17

to assist in thorough cleaning. (Rinse the belts thoroughly - Do not use
detergents, just hot water.)
Never use boiling water; boiling water will damage your module.
6. After cleaning, pour 1 litre (1¼ pints) of fresh chemical into the correct tanks
and replace the modules into their respective tanks. Top up the chemicals to
within 25mm (1 inch) of the top of the tanks. Renew the silicone grease on the
heating elements. Replace the tanks in the processor, fixer first, followed by the
developer.
7. Be sure to keep a note of the date when chemicals are changed, using the
chart provided.
PLEASE NOTE: Spend time cleaning the machine, as you will be amply
rewarded by high quality results and extended chemical and machine
life.
CAUTION: Processing chemicals should be handled with care. If spilt
they may cause staining or corrosion of surfaces. They can also cause
skin or eye irritation - wipe up any drips or spillage immediately. If
chemicals are splashed onto the skin or eyes, flush immediately with
abundant amounts of plain water. Always observe the chemical
manufacturer's recommendation for this situation. Problems of this
nature can be avoided by wearing protective glasses and gloves.
_______________________________________________________________________
20/08/2007 15 SPRINT MkV
Page 18

TROUBLESHOOTING
---------------------------------------------------------------------------------------------------------------------------- -------------------------------------------------------------------------------------------------------------------------------------------------------------------------------- ---------------------------------------------------------------------
SYMPTOMS AND ACTION
Symptom: Machine does not operate.
Action: 1. Check that Mains Power is plugged in and the supply is switched
on.
2. Check that cord is fully engaged in both mains power supply and
socket on the right hand side of the machine.
3. Switch off Mains Power supply and unplug the machine and call
for Service.
Symptom: Heater Indicator Light Permanently Off and Audible Bleep
Action: Light is constantly off with an audible bleep- the machine has
detected a function out of limits. Call for Service.
Note: After 30 minutes the audible bleep will stop but the Heater
Indicator Light will remain off.
Symptom: Chemical(s) overheating.
Action: 1. Call for Service.
Symptom: Films will not enter through Film Entry Guide.
Action: 1. Open machine Daylight Loader Cover and Front Cover and check
correct engagement of transport modules.
Symptom: Film Lost in the Machine.
Action: 1. Check that the transport modules are correctly located in their
drive dogs and running correctly. If not, re-locate.
2. Check the spring tensioning of the modules and check for correct
positioning. Use the module turning tool to rotate the belts for
inspection, and run a test film through the module using this tool.
3. Check that transport modules have been put through the correct
cleaning procedure.
4. Should there be any damage to the belts, such as tearing or
twisting, order a replacement module.
_______________________________________________________________________
20/08/2007 16 SPRINT MkV
Page 19

FILM QUALITY PROBLEMS
---------------------------------------------------------------------------------------------------------------------------- -------------------------------------------------------------------------------------------------------------------------------------------------------------------------------- ---------------------------------------------------------------------
SYMPTOMS AND ACTION
Symptom: Films too dark or fogged.
Action: 1. Test for light fogging by feeding an unexposed film through the
machine. It should process as a transparent piece of film base with
no signs of shadows or blackness evident.
2. If there is light fogging, proceed as follows:a) Check that the daylight loader cover is firmly in place.
b) Check very closely for other possible light leaks: ensure that
the machine has not been sited in direct sunlight or in intense
lighting conditions (e.g. directly under strip lights or spotlights).
Do not take your hands out of the daylight loader before the
film has fed completely into the machine.
(Fog at one end only of the film indicates premature removal
of hands from daylight loader).
Check hand entry ports to ensure there is a good light seal
around the wrists -if not, call for service.
c) Check whether films have been stored too close to x-ray
source, and re-locate.
d) Check expiry date on film box to ensure films are not out of
date. (Keep films in a cool, dry place: excessive heat can cause
premature ageing of film).
3. Check that there has been no chemical mix-up, leading to cross-
contamination.
4. Check temperature of developer and fixer tanks. This is generally
set at 27°C (81 °F). A substantial difference could lead to dark film.
Switch off the machine and call for service.
_______________________________________________________________________
20/08/2007 17 SPRINT MkV
Page 20

Symptom: Films too light.
Action: 1. Check chemicals as follows:
a) Chemicals exhausted - replace with fresh.
b) Chemicals contaminated - clean machine, replace
chemicals with fresh solutions.
c) Chemical level in tanks too low - top up.
d) Temperature of chemical(s) too low, (check with a
thermometer) - below 27°C (81 °F) - call for service.
2. Check films have been exposed correctly.
Symptom:
Films dirty or marked.
Action: 1. Check water. Clean tank thoroughly and change water.
2. Check transport modules are being cleaned correctly
(see cleaning instructions).
3. Check chemical level in both tanks and top up as required.
4. Check modules for correct positioning. When found in incorrect
order, contamination will have occurred. Thoroughly wash and
replace with fresh chemicals.
5. Check for stray light entering machine - proceed as for fogging
(see above).
_______________________________________________________________________
20/08/2007 18 SPRINT MkV
Page 21

CONTAMINATION
---------------------------------------------------------------------------------------------------------------------------- -------------------------------------------------------------------------------------------------------------------------------------------------------------------------------- ---------------------------------------------------------------------
When changing chemicals, make sure that the tanks are emptied completely and
rinsed out. Fresh chemical will be spoiled by contamination, leading to poor
results.
WARNING: If the unit should emit abnormal odour, become overheated
in some parts or produce unusual noises, unplug from Main Power
Supply. Contact your Velopex supplier.
A clean, well-maintained machine will produce good clear x-rays; a dirty machine
will cause problems.
Do not struggle with film processing problems. Through experience, MEDIVANCE
INSTRUMENTS probably has the answer.
USER SERVICEABLE ITEMS
---------------------------------------------------------------------------------------------------------------------------- -------------------------------------------------------------------------------------------------------------------------------------------------------------------------------- ---------------------------------------------------------------------
CAUTION
PLEASE NOTE: THERE ARE NO USER SERVICEABLE ITEMS WITHIN THE
ELECTRICAL COMPARTMENT OF THE MACHINE
MODULE GEARS
If problems are experienced with the transport module it should be considered for
replacement.
However changing of the gears is an extremely simple operation and can be
carried out on site. To replace gears proceed as follows:-
Remove gear cover plate retaining screw, see diagram on next page, (item 22).
The gear cover plate (item 23) can now be gently eased off. Remove old gears
and replace with new gears to their correct positions. Replace gear cover plate
and retaining screw.
Module Diagram
---------------------------------------------------------------------------------------------------------------------------- -------------------------------------------------------------------------------------------------------------------------------------------------------------------------------- ---------------------------------------------------------------------
_______________________________________________________________________
20/08/2007 19 SPRINT MkV
Page 22

_______________________________________________________________________
20/08/2007 20 SPRINT MkV
Page 23

SPARE PARTS
---------------------------------------------------------------------------------------------------------------------------- -------------------------------------------------------------------------------------------------------------------------------------------------------------------------------- ---------------------------------------------------------------------
ITEM No Description Part No
2 Daylight Loader Cover I/MDG7708P
4 Hand Entry Ports (2 off) I/ASS7710A
5 Wash Tank Assembly I/ASS7713A
15 Developer Tank I/MDG2176F
16 Fixer Tank I/MDG2177F
17 Developer Module I/MOD0067F
18 Fixer Module I/MOD0068F
Page 24 Module Gear Replacement set I/MOD0100F
CONSUMABLE ITEMS
---------------------------------------------------------------------------------------------------------------------------- -------------------------------------------------------------------------------------------------------------------------------------------------------------------------------- ---------------------------------------------------------------------
Chemistry Developer Ready-To-Use (2x5 Ltr) C/DER3001F
Fixer Ready-To-Use (2x5 Ltr) C/FIR5000F
Film Intra-Oral D Speed (4x25) I/FLM7000F
Intra-Oral E Speed (4x25) I/FLM7001F
Quality Control Vischeck (20 Strips) I/FLM7002F
System Cleaner Tablets (36) I/TAB0002P
NON USER SERVICEABLE ITEMS
---------------------------------------------------------------------------------------------------------------------------- -------------------------------------------------------------------------------------------------------------------------------------------------------------------------------- ---------------------------------------------------------------------
Medivance Instruments will make available on request circuit diagrams,
component part lists, descriptions, calibration instructions, or other
information which will assist the user’s appropriately qualified technical
personnel to repair those parts of equipment which are designated by
Medivance Instruments as repairable.
Application should be made to:
Medivance Instruments Limited
Service Department
Barretts Green Road,
Harlesden
London NW10 7AP
Tel: - +44 (0)20 8965 2913
Fax: - +44 (0)20 8963 1270
_______________________________________________________________________
20/08/2007 21 SPRINT MkV
Page 24

Page 25

Medivance – Sprint MkIV Operating Manual– Issue 4 08/08/07
Velopex is a trademark of Medivance Instruments Ltd
 Loading...