

Velodyne Acoustics SPL-1520-R Owners manual
SPL-R™Series
SPL-800R
SPL-1000R
SPL-1200R
SPL-1500R
USER’S
MANUAL
DSP-Controlled Home Theater Subwoofer
Restoring Defaults
Caution
.
www.velodyne.com
SPL-R User’s Manual
i

Table of Contents
C
ongratulations . . . . . . . . . . . . . . . . . . . . . . . . . . . . . . . . . . . . . . . . . . . . . . . . . . . .1
Installation . . . . . . . . . . . . . . . . . . . . . . . . . . . . . . . . . . . . . . . . . . . . . . . . . . . . . . .2
Rear Panel Connections . . . . . . . . . . . . . . . . . . . . . . . . . . . . . . . . . . . . . . . . . . . . . .3
Rear Panel Connections - Detailed Explanation . . . . . . . . . . . . . . . . . . . . . . . . . . . . . . .4
Interconnect Cables . . . . . . . . . . . . . . . . . . . . . . . . . . . . . . . . . . . . . . . . . . . . . . . . .5
Usage . . . . . . . . . . . . . . . . . . . . . . . . . . . . . . . . . . . . . . . . . . . . . . . . . . . . . . . . . .6
Care of Your Subwoofer . . . . . . . . . . . . . . . . . . . . . . . . . . . . . . . . . . . . . . . . . . . . .10
Troubleshooting and Service . . . . . . . . . . . . . . . . . . . . . . . . . . . . . . . . . . . . . . . . . .10
Specifications . . . . . . . . . . . . . . . . . . . . . . . . . . . . . . . . . . . . . . . . . . . . . . . . . . . .11
Velodyne Products . . . . . . . . . . . . . . . . . . . . . . . . . . . . . . . . . . . . . . . . . . . . . . . . .13
.
www.velodyne.com
SPL-R User’s Manual
ii

Restoring Defaults
Congratulations
C
ongratulations on your purchase of a Velodyne Small Plays Loud-Remote (SPL-R) subwoofer.
This system represents the state-of-the-art in low frequency reproduction. Read and follow the
instructions below to insure safe and proper system operation.
Warning!
To prevent fire or shock hazard, do not expose this equipment to rain or moisture. To avoid
electrical shock, do not open speaker enclosure or amp chassis cover. Please observe all
warnings on the equipment itself. There are no user serviceable parts inside. Please refer all
service questions to your authorized Velodyne dealer.
Prior to Installation
Please unpack the system carefully. Please save the carton and all packaging materials
for future use. Record the serial number in the space provided on the warranty card for
future reference.
PRODUCT FEATURES
• DSP-Controlled
• 4 selectable preset modes for customized listening
• Automatic 6-band room equalizer with microphone included
• Night-mode setting
• Mute control
• Woofer
- 8” (6.5” piston diameter) subwoofer with 2.5” high-temp voice coil and
107 ounce magnet/204 ounce motor structure (SPL-800R)
- 10” (8” piston diameter) subwoofer with 3” voice coil and 162 ounce magnet/
346 ounce motor str
- 12” (9.7” piston diameter) subwoofer with 3” voice coil and 162 ounce magnet/
346 ounce motor structure (SPL-1200R)
- 15” (12.7” piston diameter) subwoofer with 3” voice coil and 162 ounce magnet/
346 ounce motor str
• Built-in 2000 watts Dynamic/1000 watts RMS high efficiency Class D amplifier
• Adjustable (40 to 120 Hz) low-pass crossover (defeatable)
• Line-level (RCA) inputs and outputs
• Speaker-level inputs with five way binding post connections
• Signal sensing auto turn on/off (defeatable)
• Variable volume control
• Selectable phase contr
• Frequency response of 28-120 Hz (SPL-800R), 24-120Hz (SPL-1000R),
22-120Hz (SPL-1200R), 20-120Hz (SPL-1500R),
Magnetically shielded for video use (SPL-1000R, SPL-1200R
•
and SPL-1500R)
• Multiple staggered low-pass crossovers; 12 dB/octave initial, 48 dB/octave ultimate
• Driver Displacement Control circuit to prevent over excursion and amp clipping
• Blue power indicator LED
• High-excursion EPDM rubber surround
• Oversized spider for linearity at high excursion
ucture (SPL-1000R)
ucture (SPL-1500R)
ol (0, 90, 180 or 270 degr
ees)
.
www.velodyne.com
SPL-R User’s Manual
1
Installation
WARNING: TO REDUCE THE RISK OF FIRE
OR ELECTRIC SHOCK. DO NOT EXPOSE
THIS APPLIANCE TO RAIN OR MOISTURE.
AVIS:
RISQUE DE CHOC ELECTRIQUE-NE PAS OUVRIR
RISK OF ELECTRIC SHOCK
DO NOT OPEN
CAUTION
TM
SPL-R Series
+ R - - L +
SPEAKER LEVEL INPUT
VELODYNE ACOUSTICS,INC.
SERIAL # LABEL
117V~
60Hz
8A
AUTO ON/OFF
ACTIVE
INACTIVE
OFF
POWER
ON
V
OLUME
UP
DOWN
OUTPUT
INPUT
R
L
LFE
MIC INPUT
IR INPUT
12V
TRIGGER
LOW-PASS
C
ROSSOVER
40 Hz
80 Hz
120 Hz
I
O
Y
our new Velodyne subwoofer provides for a number of installation options. Read all the
installation information below in order to determine which installation option is best for your
system. Remember to perform all installation procedures with system power turned off.
1
2
7
8
9
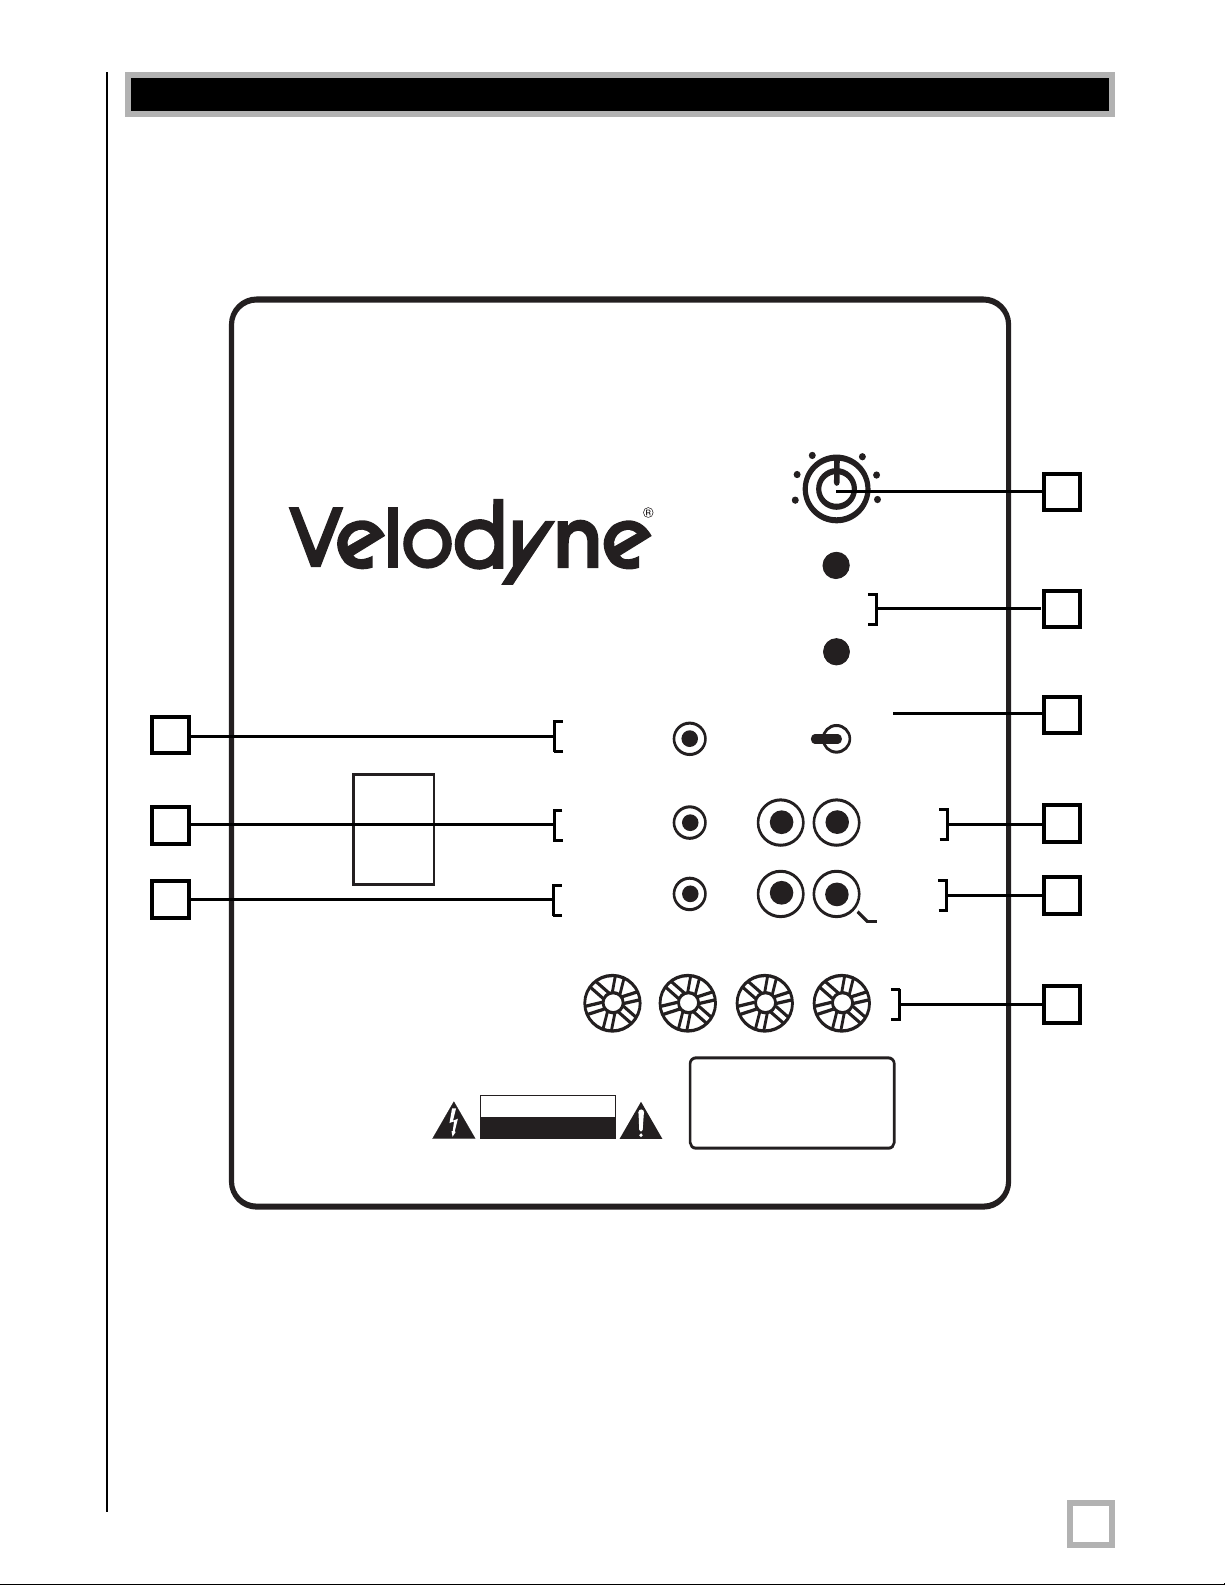
e 1. SPL-R Rear Panel Connections
Figur
RE
AR PANEL CONNECTIONS
3
5
4
6
.
www.velodyne.com
SPL-R User’s Manual
2

Rear Panel Connections
F
igure 1 shows the connections on the rear panel of the SPL-R.
Following are brief descriptions of the connections described in Figure 1. More detail on these
connections can be found in the next section.
(1) LOW-PASS CROSSOVER
Use this knob to select the high-frequency range at which you wish to cut off the signal to
the subwoofer. When the knob is turned all the way to the left, the Subwoofer Direct feature
is invoked and the subwoofer plays all frequencies up to 200 Hz.
(2) VOLUME Control
This control allows you to balance the output from the subwoofer to the main speakers in
your system. This control should be set to achieve similar volume level from between both
the main speakers and subwoofer. When pressing volume up or down, the speed at which
the power light blinks indicates subwoofer volume - the faster the blinking, the louder the
unit plays. After the volume blinking stops, the unit will blink out the actual volume number.
Slower blinks represent tens, and faster blinks represent ones. So, for example, if the
volume were set at 34, after the rapid blinking stopped you would observe three slow blinks
followed by four faster blinks, indicating a volume of 34.
Note: Volume is also controllable by using the supplied remote, when defaults are restored.
The default is 30 out of 100.
AUTO ON/OFF Switch
(3)
Use this switch to select between auto-on and constant on (auto-on bypass) operation.
(4) LINE INPUT/LFE Input
Connect these jacks to the LINE OUT pr
of your receiver/processor. If using the LFE output from your receiver or processor, plug
the single cable into the “L” - LFE input or for more signal, use a “Y” connector and feed the
signal into both “R” and “L” inputs.
LINE OUTPUT
(5)
Connect these jacks to the LINE IN amp input to use the SPL-R’s internal high pass
crossover. See below for a more detailed explanation of this crossover.
(6) SPEAKER LEVEL INPUT Terminals
Connect these input terminals to the speaker output terminals of your amplifier or receiver.
If you use this method of connection, when you go to the r
make sure you select the large speaker option.
eamp output, LFE output or subwoofer output jacks
eceiver speaker set up menu,
Mic Input
(7)
Connect the supplied microphone for the Auto EQ feature to this mini-jack.
.
www.velodyne.com
SPL-R User’s Manual
3
 Loading...