


Dear Velocity Micro customer,
Thank you for choosing Velocity Micro to build your computer system.
We appreciate that this decision represents a signifi cant investment of
your time and resources. This book will help you to make the most of
your investment with helpful tips for maximizing performance, troubleshooting, and upgrading.
Your computer has been handcrafted from the best performance components available. Before we sent you this PC, we spent hours carefully
wiring, tuning, and testing it to meet our exacting standards.
This guide, you will fi nd, contains important information on how to best
set up your new computer system, how to properly maintain it to preserve its longevity, and how to troubleshoot problems should they arise.
We look forward to hearing from you over the course of your Velocity
Micro PC ownership. Please contact us with questions, comments, suggestions, and ideas. We love hearing your feedback.
Good luck with your system. We look forward to hearing from you soon.
The team at Velocity Micro.
Note on Shipping
By the time you open this package, your computer has already been
through the most traumatic experience of its life: shipping. Velocity Micro
has developed packaging materials to protect your computer during shipping. Retain all boxes and packaging materials. If you should ever need
to send your PC back to Velocity Micro for upgrades or repairs, you will
need to use these materials.
Carefully inspect your system for any shipping damage. Report any shipping damages to Velocity Micro within 5 days of receiving your system.
Reports of shipping damage received after 5 days will not be honored.

2
Velocity Micro, Inc.
7 5 1 0 W h i t e p i n e R d .
R i c h m o n d , V A 2 3 2 3 7
( 8 0 0 ) 3 0 3 - 7 8 6 6
w w w.v e l o c i t y m i c r o . c o m
© 2 0 0 6 V e l o c i t y M i c r o

Contents
Contacting Velocity Micro . . . . . . . . . . . . . . . . . . . . . . . .4
Chapter 1 Setting Up Your System . . . . . . . . . . . . . . . . .5
Planning Your Workspace . . . . . . . . . . . . . . . . . . . . . . . . . . . .5
Minimizing Physical Strain . . . . . . . . . . . . . . . . . . . . . . . . . . . .5
Protecting Against Power Surges . . . . . . . . . . . . . . . . . . . . . .6
Connecting Devices . . . . . . . . . . . . . . . . . . . . . . . . . . . . . . . . .7
Turning On Your PC . . . . . . . . . . . . . . . . . . . . . . . . . . . . . . .10
Setting Up Your Operating System . . . . . . . . . . . . . . . . . . . .10
Chapter 2 Maintaining Your System . . . . . . . . . . . . . . .13
Protecting Against Viruses . . . . . . . . . . . . . . . . . . . . . . . . . . .13
Freeing Up Hard Drive Space . . . . . . . . . . . . . . . . . . . . . . . .15
Loading Programs and Files Faster . . . . . . . . . . . . . . . . . . . .16
Uninstalling Unused Programs . . . . . . . . . . . . . . . . . . . . . . .17
Working with Drivers . . . . . . . . . . . . . . . . . . . . . . . . . . . . . . .18
Troubleshooting Drivers . . . . . . . . . . . . . . . . . . . . . . . . . . . . .18
Updating Drivers . . . . . . . . . . . . . . . . . . . . . . . . . . . . . . . . . .20
Preventing Electrostatic Discharge . . . . . . . . . . . . . . . . . . . .21
Upgrading Hardware . . . . . . . . . . . . . . . . . . . . . . . . . . . . . . .22
Cleaning Your System . . . . . . . . . . . . . . . . . . . . . . . . . . . . . .23
Taking Care of Your Notebook Battery . . . . . . . . . . . . . . . . .25
Chapter 3 Restoring Your System . . . . . . . . . . . . . . . . .26
Chapter 4 Troubleshooting . . . . . . . . . . . . . . . . . . . . . . .27
Chapter 5 Finding Help . . . . . . . . . . . . . . . . . . . . . . . . . .32
Velocity Care . . . . . . . . . . . . . . . . . . . . . . . . . . . . . . . . . . . . .32
Windows Help . . . . . . . . . . . . . . . . . . . . . . . . . . . . . . . . . . . .32
Online Help . . . . . . . . . . . . . . . . . . . . . . . . . . . . . . . . . . . . . .32
Hardware Trouble . . . . . . . . . . . . . . . . . . . . . . . . . . . . . . . . .32
Contacting Vendors . . . . . . . . . . . . . . . . . . . . . . . . . . . . . . . .33
Chapter 6 Warranty . . . . . . . . . . . . . . . . . . . . . . . . . . . . .34
Glossary . . . . . . . . . . . . . . . . . . . . . . . . . . . . . . . . . . . . . .38
3

4
www.velocitymicro.com
Contacting Velocity Micro
Velocity Micro offers the following contact options:
VelocityCare
To receive Velocity Micro’s superior US-based technical
support, please refer to the warranty sticker located on the
back or bottom of your PC, or attached to your invoice for your
warranty number, which the support technician will need in
order to assist you.
To fi nd the exact model and manufacturer of hardware
components you have, check your system’s invoice. If you
cannot fi nd this information send a request to
vmsupport@velocitymicro.com and include your invoice
number.
Support hub: http://www.velocitymicro.com/resources
Phone: (800) 303-7866, option 5
Email: vmsupport@velocitymicro.com
Live Chat
Velocity Micro Live Chat is available at our website and
provides you with an easy way to communicate with Velocity
Micro sales and support.
General Contact Information:
Phone (800)303-7866
Fax (804)897-4777
http://www.velocitymicro.com

www.velocitymicro.com
5
Chapter 1
Setting Up Your System
As you prepare to set up your Velocity Micro computer, you
will need to take into account several factors: where to place
your system, how to connect it, the safest way to work on your
system, and how to set up your system for a lifetime of easy
use.
Planning Your Workspace
Carefully planning your system’s workspace can save headaches
in the future. Below are a few tips for optimal placement:
Leave at least six inches of space in between the back and
sides of your system and any walls or enclosures. Doing this
will give hot air room to circulate and cool down. Avoid placing
your computer inside a desk’s built-in enclosure. These spaces
trap heat and increase noise. If you purchased a subwoofer,
place it on the floor and have one side touching a wall. This
this will minimize desktop vibrations and give greater bass
response.
Minimizing Physical Strain
Set up properly, your work area should help minimize the
physical stress that may occur from prolonged computer use.
Try out the tips below to create an ergonomic work area.
• Place your monitor level with your eyes. You shouldn’t
have to bend your neck to view the screen. Adjust the
contrast and brightness of your monitor to be easier on
your eyes. Your monitor’s manual can help you with this
task.

6
www.velocitymicro.com
• Sit up straight in your desk chair. When you type, your
wrists should be level with the keyboard. You should be
able to type comfortably without bending your wrists.
• Look away from the monitor every few minutes. This will
reduce the eyestrain and tension headaches that can
result from prolonged system use.
Protecting Against Power Surges
For additional power protection, you may purchase an
Uninterruptible Power Supply (UPS). A UPS works like a surge
protector but can keep your system powered during a power
outage, giving you with enough time to save your work and
safely shut down your system. You may purchase a surge
protector or UPS from Velocity Micro.
Storing Manuals and CDs
Your system ships with all the manuals for its software and
hardware products, as well as a number of important disks.
Place all manuals and disks (including the System Restore
disk, if included with your system) in a safe, easily accessible
location. Should you require technical support in the future,
these manuals and disks will greatly assist the technician
working with you and make it much easier to fi x your system.
Your Velocity Micro system warranty does
not cover damage due to lightning strikes
or power surges. For this reason, connect all
your power cords (monitor, system, speakers),
telephone cables (modem, phone line, DSL) and
cable modem lines to a surge protector. The
minimal cost of a surge protector will be well worth
it when your system lives through a power surge.
www.velocitymicro.com
7
Chapter 1
Setting Up Your System
Getting Started
Connecting Devices
This guide covers the basics in connecting devices to your PC.
For more advanced set up of items like digital video or digital
audio hardware, please consult the included manuals for
assistance.
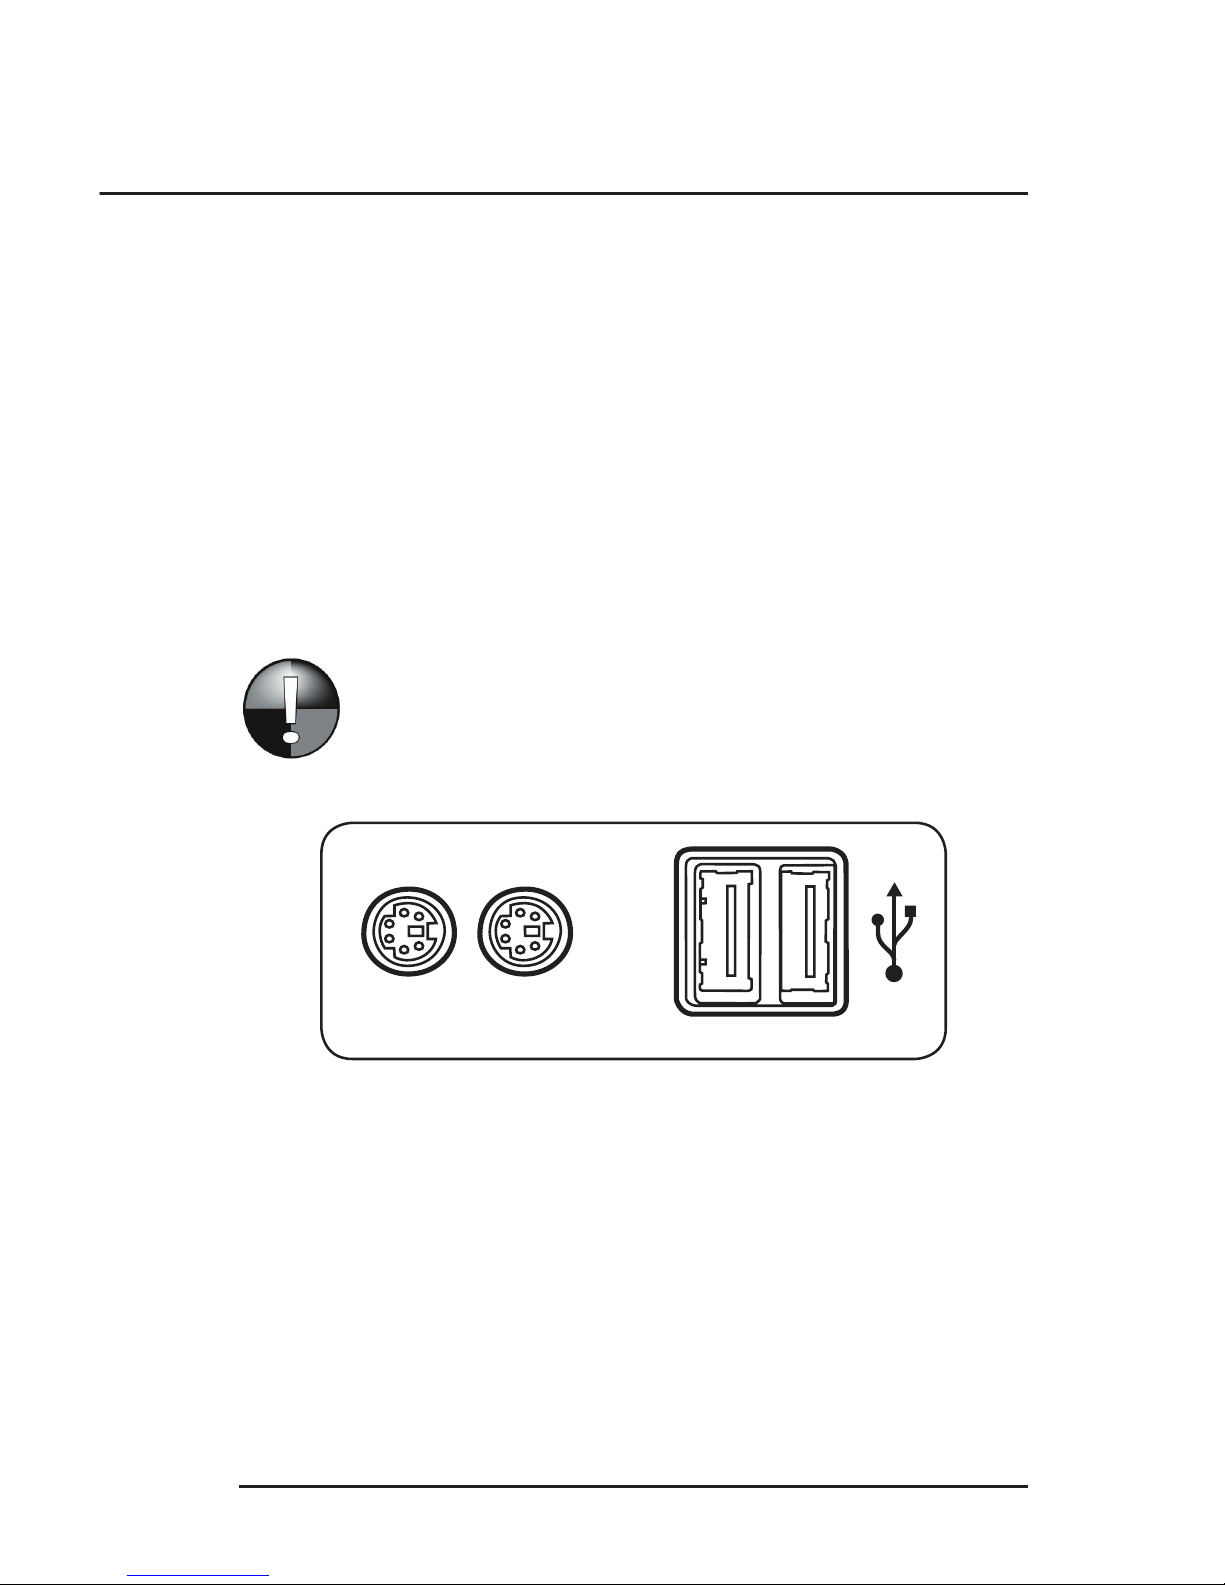
1. Connect your keyboard and mouse to their intended ports
(USB or PS/2) as demonstrated in this illustration.
Never insert or remove a PS/2 connection when
your system is powered on.
Input Connections
PS/2 Ports USB Ports
Keyboard
(purple)
Mouse
(green)

8
www.velocitymicro.com
Ethernet Port & Cable
Modem Ports &
Phone Cable
Internet Connections
2. Connect your monitor to its appropriate port. CRT monitors
use the analog VGA port; LCD displays may use the digital
DVI port. To connect an analog VGA monitor to a digital DVI
port, use the included adapter.
3. Connect your monitor’s power cable to a surge protector or
UPS.
4. For broadband Internet access (cable or DSL) or connection
to a T1 or Ethernet network, connect an Ethernet cable
to the Ethernet port on your system. For dial-up Internet
access, connect phone and modem cables to their
appropriate ports.
Video Connections
Analog VGA Port Digital DVI Port
(Blue) (White)
www.velocitymicro.com
9
Chapter 1
Setting Up Your System
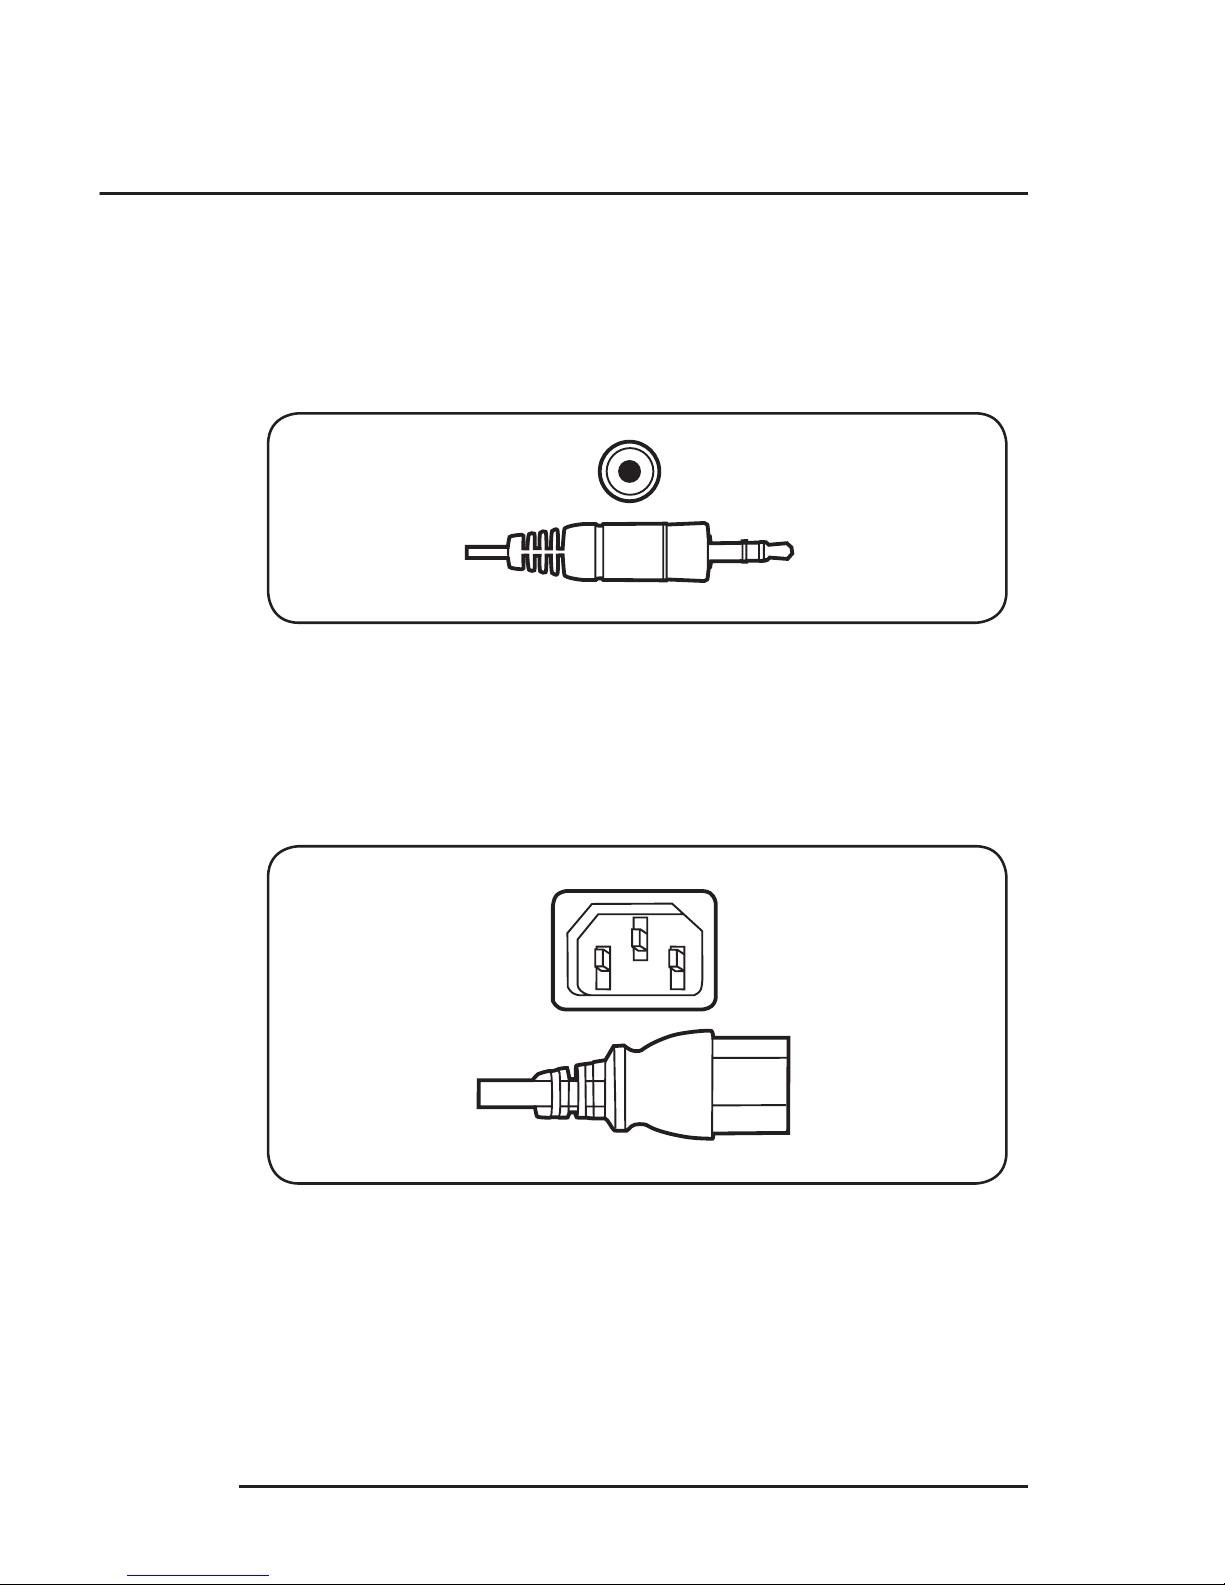
5. Connect speakers by connecting the cables to the
appropriate ports. Pay attention to the color-coding scheme
(on the back of your PC and on each of the accessories’
cords) to match them up properly.
6. Connect your power cable to the computer’s power supply.
Connect the other end to the surge protector or UPS.
7. Set the switch on the surge protector or UPS to “|” or the
number 1 position.
Speaker Port & Cable
Power Supply Port & Cable
10
www.velocitymicro.com
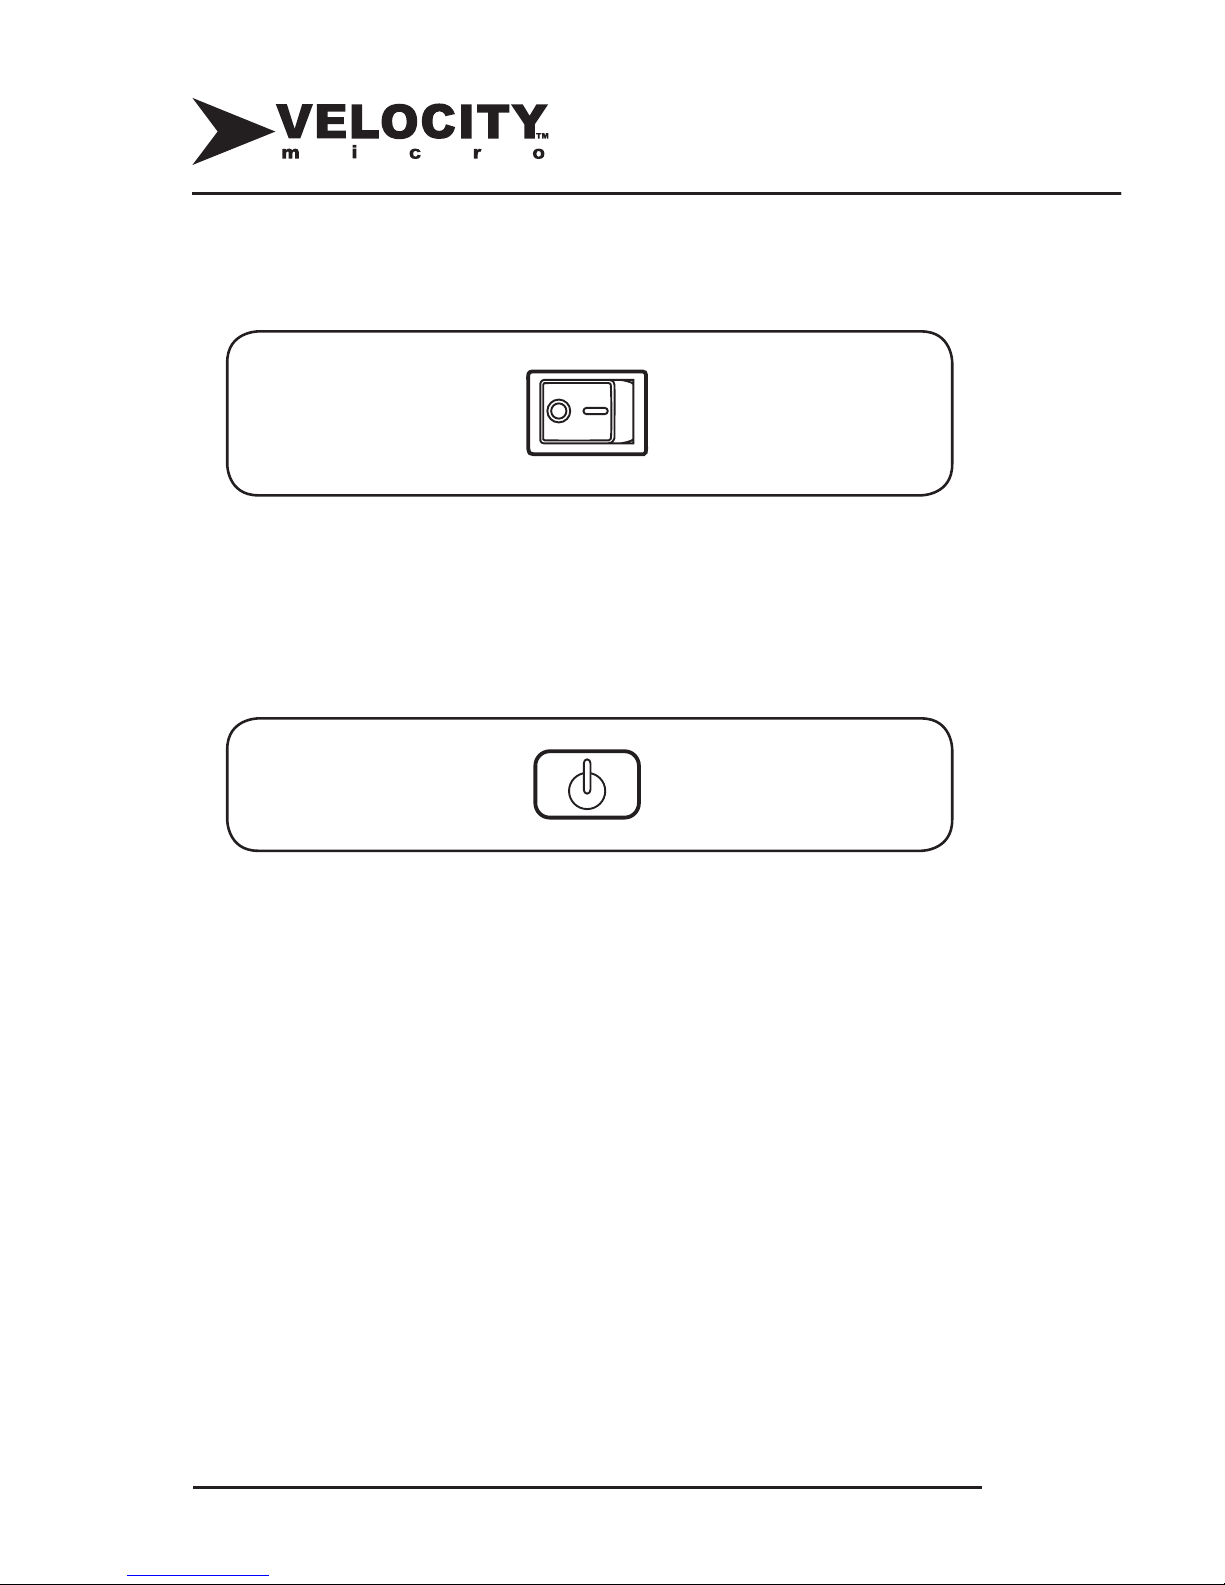
8. Set the power supply switch (located on the rear of the
chassis) to “|” or the number 1 position.
Turning On Your PC
9. Press the power button on the front of your monitor.
10. Press the power button on the front of your computer’s
case. On LX cases, this button will be located behind the
door.
11. Your computer should boot up. If it does not, double-check
that all cables are properly connected and that all surge
protectors and power supplies have been turned on.
Setting Up Your Operating System
12. Upon startup, Microsoft® Windows® may present you with
the license agreement. After accepting, you will be directed
to enter the product key.
Power Supply Switch
Monitor Power Button

www.velocitymicro.com
11
13. The product key is located either on the inside door
covering your drive bays (on LX cases) or on the rear
of your case. On notebooks, the key is located on the
underside of the system. Once you have entered the
product key, Windows will begin its setup routine. Follow all
prompts and dialog boxes to complete the setup process.
Note that the product key does not contain the numerals 0, 1, or 5.
When you login to Windows for the fi rst time, you will see the
Windows activation screen.
14. Activate Windows. You will have thirty (30) days to activate
Windows. The easiest activation method is over the
Internet.
To activate over a broadband (cable or DSL) connection:
1. Bypass the activation screen.
Chapter 1
Setting Up Your System
An active Internet connection will make the
next step easier.

12
www.velocitymicro.com
2. Setup your Internet connection and connect
to the Internet.
3. Reboot the PC.
To activate over a dial-up (modem) connection:
1. Bypass the activation screen.
2. Setup your Internet connection.
3. Connect to the Internet.
4. Double-click the
key icon located in the
bottom-right-hand corner of the screen.
You can also activate Windows over the phone. You may
bypass the activation screen for 30 days before Windows will
require you to activate it.
If you purchased Microsoft Offi ce, you’ll need to activate
it separately. The process is similar to activating
Windows. Consult the accompanying manual for further
instructions.
Windows must be activated in 30 days or the
system will not work.

www.velocitymicro.com
13
Chapter 2
Maintaining Your System
This chapter contains tips on maintenance you should perform
regularly to keep your system running optimally.
Maintaining Optimal Performance
Protecting Against Viruses
Computer viruses are malicious programs that cause system
damage and reproduce themselves to spread from one
computer to another. Viruses, worms, and Trojans are threats
to any stable computing environment. There are thousands
of computer viruses in circulation. These simple tips can help
your system stay clear of most viruses.
• Make sure you have antivirus protection and anti-spyware
software. These can be purchased from Velocity Micro.
Reliable versions may also be found online.
The information in this document has been
reviewed and is believed to be accurate. However,
neither Velocity Micro nor its affi liates assume any
responsibility for inaccuracies, errors, or omissions
that may be contained herein. In no event will
Velocity Micro or its affi liates be liable for direct,
indirect, special, incidental, or consequential
damages resulting from any defect or omissions in
this document, even if advised of the possibility of
such damages.

14
www.velocitymicro.com
• Backup your data regularly to external media such as a
writeable CD or DVD. Velocity Micro is not responsible
for lost data.
• Never download an attached fi le you receive in e-mail
from someone you don’t know.
• If you do know the sender but are not expecting an
attachment, do not open it. Many worms spread by
sending email to every listing in an address book.
• Avoid downloading fi les with .exe, .pif, .scr, .vbs, .js, .cpl,
.com, or .bat at the end of the name. Files with these
endings are meant to execute programs; they could
potentially contain viruses.
• Be especially aware of downloading fi les with a
combination of .gif, .bmp, or .jpg in combination with the
above extensions.
• Run antivirus and anti-spyware software scans regularly
(at least once a week).
• Update your antivirus program with the current defi nition
so it can clean the latest viruses. New viruses appear
almost every day, so staying up to date is important.
Your warranty does not cover data loss due to
equipment failure or software errors. Regularly
back up any fi les to a removable storage device
to keep data safe.

www.velocitymicro.com
15
Freeing Up Hard Drive Space
Disk Cleanup is a utility that erases files from certain folders
where you are sure to have some wasted space. Freeing up
hard drive space will improve your system’s performance by
allowing the hard drive to access your data and program files
more quickly.
1. To begin Disk Cleanup, select: Start > All Programs
> Accessories > System Tools > Disk Cleanup The
program will prompt you to specify a drive on which to
operate (usually C:) The Disk Cleanup window will appear.
2. Place a check mark next to the location(s) that you want
to clean up. All of these locations contain temporary files
that are not vital to your system; thus, they are usually
safe to erase. To see which files are in the location(s)
you’ve checked, select View Files.
3. After you are sure of the files to delete, select
OK. Disk
Cleanup will erase the files in the locations you selected.
The Disk Cleanup window.
Chapter 2
Maintaining Your System
16
www.velocitymicro.com
Loading Programs and Files Faster
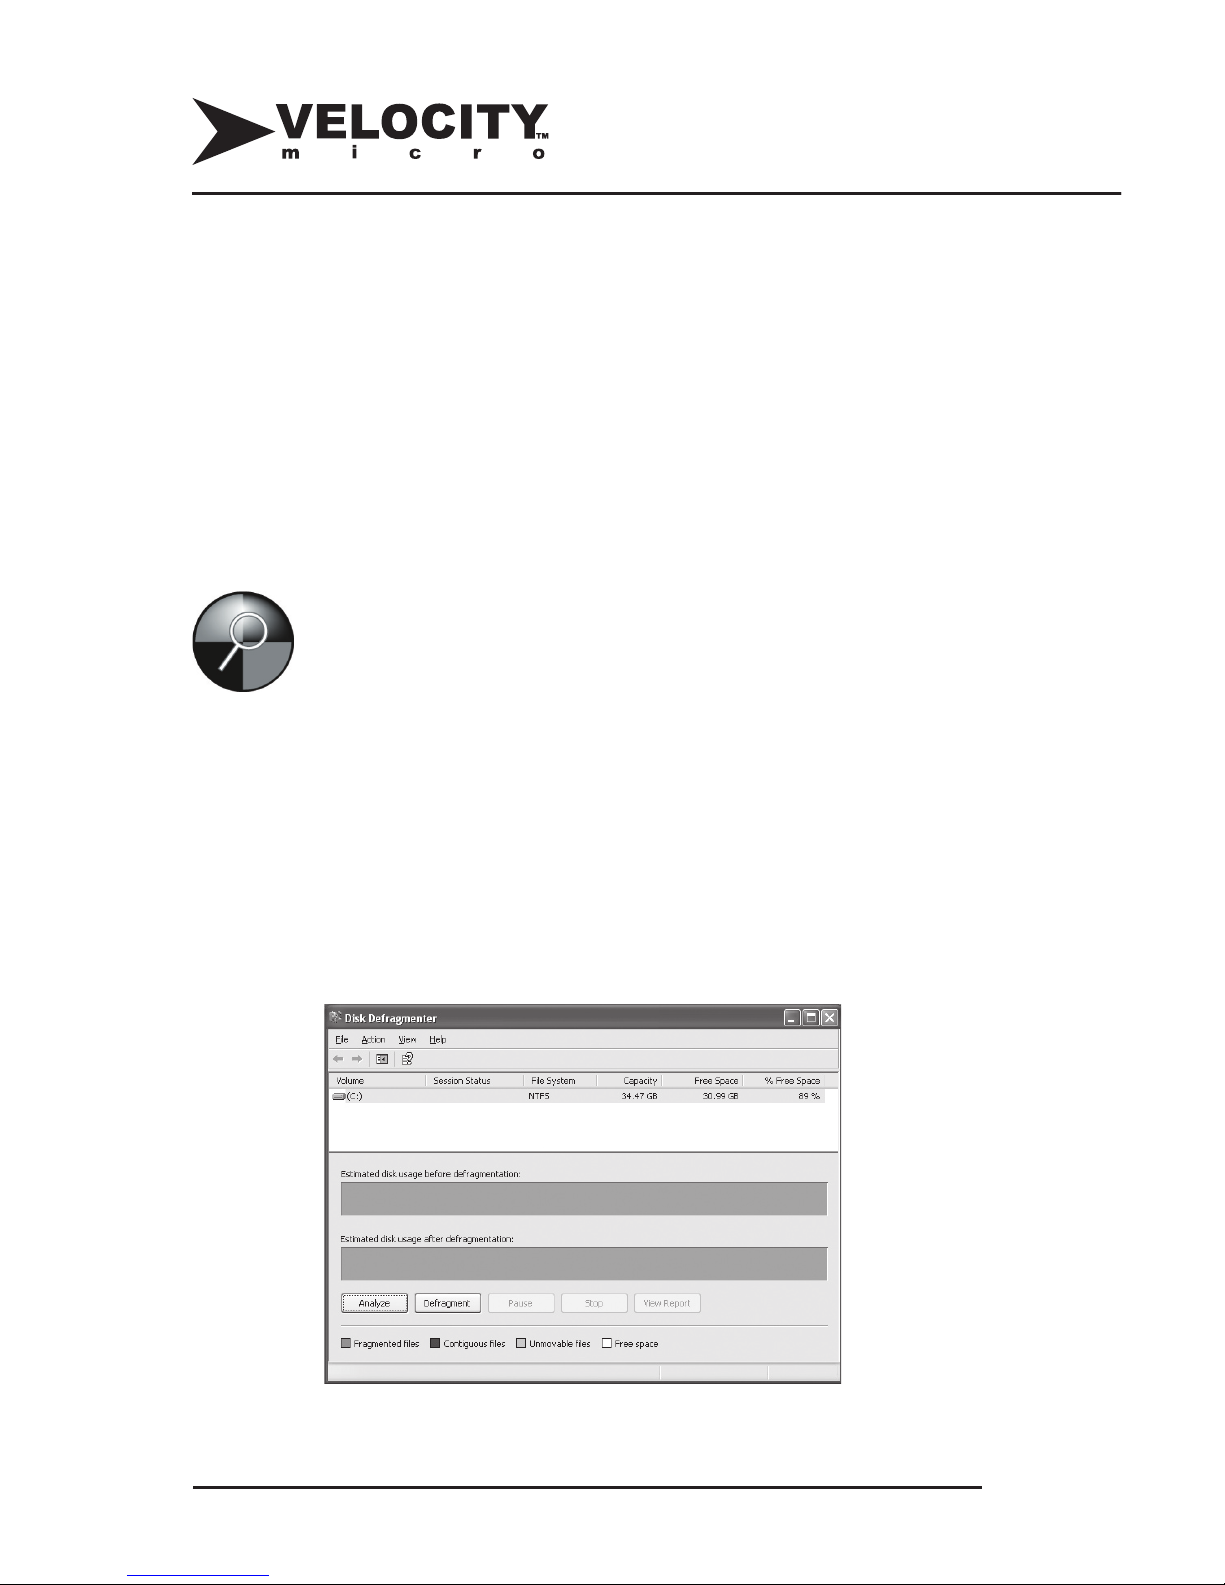
As you use your system, Windows will scatter (“fragment”) bits
of fi les over different locations in the hard drive. Using Disk
Defragmenter will rearrange the hard drive so that each fi le
resides next to its other pieces, making it easier and faster
to access fi les. This process can take from a few minutes to
a few hours, depending on how cluttered your system is with
scattered bits of fi les. Velocity Micro recommends running Disk
Defragmenter once a week for optimal system performance.
Use Disk Defragmenter in the following manner:
1. Select Start > All Programs > Accessories > System
Tools > Disk Defragmenter. The Disk Defragmenter
window will appear.
2. Select the drive you wish to defragment (usually C:).
3. Select the
Defragment button to begin defragmentation.
Before using Disk Defragmenter, shut down
all running programs. Disk Defragmenter
cannot complete if programs are accessing
the hard drive.
The Disk Defragmenter window.

www.velocitymicro.com
17
Uninstalling Unused Programs
During the life of your system, your hard drive will fill up with
programs, games, and other large files. In addition to causing
possible system instability, these unused files make it more
difficult for your hard drive to access the programs you want to
use. To maintain the health of your system, you should remove
old or unwanted programs and files on a regular basis.
The Control Panel contains a record of all the programs
installed on your hard drive. To remove an application,
uninstall it using the Control Panel:
1. Select Start > Control Panel > Add or Remove Programs
.
3. Select the program you wish to uninstall.
4. Select the program’s Change/Remove button.
5. Follow any prompts given by the program to remove it
from the hard drive.
Chapter 2
Maintaining Your System
The Add/Remove Programs dialog box.

18
www.velocitymicro.com
Working with Drivers
A driver is a piece of software that enables your computer to
communicate with a peripheral device.
When you purchase a peripheral (such as a printer or
scanner), Windows generally already has the proper drivers.
At the very least, Windows will recognize that it needs a
driver and will prompt you to put in the disk that came with the
product.
Troubleshooting Drivers
Velocity Micro loads your system with the most recent drivers
for all components, as well including them on a disk that comes
with your PC.
There are times, especially when a device is malfunctioning,
that it becomes necessary to reinstall a driver. The Device
Manager provides a central location where you can check
the status of drivers, update, replace, or reinstall them, and
even return to a previous driver version. To access the Device
Manager, follow this procedure:

www.velocitymicro.com
19
1. Start>My Computer>Properties>Hardware>Device
Manager.
2. A yellow exclamation point (or question mark) next to
any hardware device indicates a missing or problematic
driver. To update a driver, find the device that needs
troubleshooting, right-click on its entry in the list, and
select Update Driver. Follow the on screen instructions
to complete driver installation.
Chapter 2
Maintaining Your System
The Device Manager window.

20
www.velocitymicro.com
Updating Drivers
Hardware manufacturers update product drivers over time. New
drivers may add features or improve compatibility. Updating
drivers can also improve performance.
Obtain driver updates by visiting the manufacturer’s website
and looking for the “Drivers,” “Downloads,” or “Support”
section. Follow the posted guidelines for installing the new
drivers.
Flashing the BIOS
Flashing your motherboard’s BIOS is not recommended and
can have serious consequences. Flashing the BIOS may void
your warranty.
Find more guides, advice, and support
online at: www.velocitymicro.com/resources
Velocity Micro does not support users fl ashing
the motherboard’s BIOS

www.velocitymicro.com
21
Maintaining Hardware
Preventing Electrostatic Discharge (ESD)
Velocity Micro desktop computer cases are built to be serviced
and opened by the user. Before opening your system’s
case, however, you must take care to prevent ESD. Since
computer systems operate on precisely controlled electrical
currents, even a small jolt of static electricity may damage your
computer’s components.
Follow these guidelines to reduce the chances of ESD when
working with your computer:
• Before you begin working on your system, discharge
static electricity from your body by touching a grounded,
unpainted metal surface. The metal chassis of your
system case works fine for this procedure.
• Avoid placing your open system on thick carpet. If you
must place the system on a carpet, use an anti-static
floor pad (available at office supply stores) between the
system and the carpet.
• Wear an anti-static bracelet (sold at office supply stores)
when working on the inside of your system. An anti-static
bracelet connects you to a grounding source and ensures
that your body does not build up static charge.
• Minimize the time a system component is out of its static-
sensitive bag by preparing the system beforehand for the
component’s installation.
Chapter 2
Maintaining Your System

22
www.velocitymicro.com
Upgrading Hardware
Since Velocity Micro systems do not include proprietary
components, they can be customized and eventually upgraded
with a variety of off-the-shelf parts. Velocity Micro offers a
lifetime upgrade policy on your system. For the wholesale
cost of parts plus a reasonable labor charge and the cost of
shipping, Velocity Micro technicians will upgrade your system
to your exact specifi cations. Examples of upgrades include:
• Adding an additional hard drive for increased storage
capacity
• Adding a sound card for audio connections and sound
quality
• Installing a faster video card for increased performance in
3D games
• Installing more memory to improve multitasking
performance and system reliability
Opening your computer case will not void your warranty.
Upgrading or adding components will not void your warranty,
but Velocity Micro will not support components it does
not install. Damage caused to your system or any of its
components by the installation and subsequent usage of parts
after purchase will not be covered under your system warranty.
If you would like to be sure an upgrade is
performed correctly and maintain your support
options, Velocity Micro offers a comprehensive
upgrade policy. Contact a customer care
representative at (800)303-7866 for details.

www.velocitymicro.com
23
Cleaning Your System
As with everything, your computer will accumulate dust and
dirt over time. Dust and dirt can impair functionality and
shorten your system’s lifespan.
Avoid eating, drinking, and smoking around your computer.
These activities will increase the amount of dirt your system
collects and may have more serious consequences, including
damage to your system and its components.
Follow these tips regularly to keep your system clean:
The Outside
Use a damp cloth to gently wipe the computer case, monitor
case, printer case, keyboard, mouse, and speakers. Never
use soap or a spray product. Never allow liquid to drip or spill
inside computer parts or case openings.
The Inside
Remove your system’s side panel and use a can of
compressed air (sold at most offi ce supply stores) to blow
out dust and debris. Do this away from your work area so the
dust and dirt will not collect there. Out of doors is best, but in a
garage or other large space would also work well. Be careful
to avoid using excessive air pressure, which can damage your
system.
Chapter 2
Maintaining Your System
Before cleaning or performing maintenance,
turn off your system and all its peripheral
components.

24
www.velocitymicro.com
Monitor Screen
Apply a small amount of ammonia-free window cleaner to a
clean, lint-free cloth. Wipe the screen completely and repeat
until streaks and dust have been removed.
Keyboard
Wipe dust off gently with a dry, lint free cloth. Use your can
of compressed air to remove dirt and debris that may have
accumulated underneath your keys.
Mouse & Mousepad
Turn the mouse upside down. Use a clean, lint-free cloth to
wipe off any debris from the eye/ lens. Remove dust and dirt
from the mouse pad with a damp (but not wet) cloth.
Disk Drives
The floppy and CD-ROM drives should be cleaned periodically
with a cleaning kit, available where software is sold.
Printer
Follow the manufacturer’s instructions for cleaning the printer.

www.velocitymicro.com
25
Taking Care of Your Notebook Battery
Your Velocity Micro NoteMagix™ notebook comes with a
standard high-performance Lithium Ion (Li-Ion) batter. Taking
care of your battery will maintain your system’s stability,
performance, and longevity. Use the following tips to preserve
battery life:
• Only recharge your battery when its capacity is fully
drained. This is called “cycling” the battery. Cycling the
battery will ensure full use of its capacity and extend its
lifespan. Velocity Micro recommends cycling the battery
at least three times in the first month of use.
• Use the power management features of your notebook.
Navigate to Start>Control Panel>Power Options.
Customizing these options for your system can greatly
extend battery life. In particular, the display and the hard
drive are the biggest drains on charge.
• Dim your notebook’s brightness to a comfortable viewing
level. Doing this reduces a large drain on the battery’s
charge.
• Disable your wireless connection when not in use.
Searching for a wireless connection drains battery
power. Likewise, remove PCMCIA cards and external
peripherals when not in use.
• Do not leave your laptop in areas where it will be
subjected to extreme temperatures, such as in direct
sunlight.
Chapter 2
Maintaining Your System

26
www.velocitymicro.com
Chapter 3
Restoring Your System
If you experience a complete lack of function in your PC,
you may need to perform a complete system restore. Call
VelocityCare for further instruction.

www.velocitymicro.com
27
Chapter 4
Troubleshooting
This chapter contains basic troubleshooting tips for your
Velocity Micro system.
Problem: The computer, monitor, printer, and speakers are not
making any noise or light.
First, try:
• making sure the power switch on the front of the
monitor is on. Check that the power switch on back
of the monitor is switched on.
Then:
• Make sure the monitor is plugged into a functioning
surge protector or outlet.
• Adjust the brightness and contrast controls on
the front of the monitor to make sure they are not
darkened.
• Make sure the video cable is plugged into both the
system and the monitor. Tighten the thumbscrews on
the cable’s connection to the system. Your system
may have more than one video connection. If your
system has onboard video as well as a video card,
make sure your monitor is plugged into the video
cord’s input.
• Unplug the video cable and make sure the pins on
both ends are straight and not bent. Correct any
bent pins with the tip of a pen or screwdriver, then
reconnect the cable.

28
www.velocitymicro.com
• Remove your system’s case and make sure the
video card is securely fastened in its slot. Be sure to
take the proper precautions against static electricity
as outlined in Chapter 2 “Preventing Electrostatic
Discharge.”
Problem: “Invalid System Disk” or “No Operating System
found” or “NTLDR is missing” message appears at
start up.
Try:
• making sure that all floppy disk and CD/DVD drives
are empty. Remove any USB storage devices and
flash media.
• If the message persists, contact Velocity Micro
Customer Care.
Problem: The monitor displays an image, but it is distorted or
“hour-glass” shaped.
First, try:
• making sure the video cable is plugged into both the
computer and the monitor. Tighten the screws on
the cable’s connection to the computer.
Then:
• Unplug the video cable and make sure the pins on
both ends are straight and not bent. Correct any
bent pins with the tip of a pen or screwdriver, then
replace the cable.
• Check your system’s resolution and refresh rate.

www.velocitymicro.com
29
Right-click on your Desktop, select Properties, then
select the Settings tab to fi nd the resolution. To fi nd
the refresh rate, select the Advanced button, and
then select the Monitor tab. Check your monitor’s
manual for optimal resolutions and refresh rates.
Problem: The computer seems loud.
First:
• wait for your system to fully boot up. Fans
sometimes spin at higher RPMs when the system
starts up; they will settle down to normal rotational
speed within a minute or two.
• Using all the precautions detailed in Chapter 2
“Preventing Electrostatic Discharge,” carefully open
your case and use a can of compressed air to
gently blow dust off any fans. Dust buildup creates
turbulence and noise around the fans.
• Consider upgrading your CPU’s heatsink/fan
combination. The stock fans that come with the
CPU are suffi cient, but several companies make
heatsink/fan combinations that lower noise as well
as improve cooling.
Velocity Micro carries such products – should you
wish to upgrade, call toll-free at (800)303-7866.
Chapter 4
Troubleshooting
If you would like to be sure an upgrade is
performed correctly and maintain your support
options, Velocity Micro offers a comprehensive
upgrade policy. Contact a customer care
representative at (800)303-7866 for details.

30
www.velocitymicro.com
Problem: The system’s time keeps losing accuracy.
Solution:
• The time is stored on your motherboard inside a
chip that is refreshed by a battery. Certain software
programs or hardware devices can interfere with
the battery’s normal operation. If you recently
installed a piece of hardware or a software program,
try uninstalling or removing it and see if that fi xes
the problem. If that doesn’t work, try replacing the
battery, which is just a regular watch battery you
can get from any hardware or electronics store.
• Check your motherboard’s manual to fi nd out the
type of battery you need.
Problem: The computer has a virus.
Solution:
• If you haven’t already done so, purchase a copy
of a virus scanner such as McAfee™ VirusScan.
Update the virus defi nitions and then thoroughly
scan your system, cleaning what you can. If you
have a specifi c Trojan or worm, visit McAfee’s
Replacing your motherboard’s battery will erase
vital system settings. Contact VelocityCare
before attempting such an operation or else your
warranty may be voided.

www.velocitymicro.com
31
website (http://www.mcafee.com) to see if there is a
removal tool you can download.
Problem: The mouse seems jumpy or erratic on screen.
First, try:
• wiping off the bottom of your mouse so that the lens
becomes clean.
• If that doesn’t work, clean and dry your mouse pad
or mousing surface. Make sure your surface is
smooth for your mouse.
• Make sure Windows has the correct drivers for your
mouse. Right-click on the My Computer icon, then,
Properties>Hardware>Device Manager>Mice
and other pointing devices.
• If there are yellow exclamation points (or yellow
question marks) next to any of the devices in this
menu, refer to your mouse’s manual for reinstalling
drivers.
Chapter 4
Troubleshooting

32
www.velocitymicro.com
Chapter 5
Finding Help
You have several options for supporting your Velocity Micro
system:
VelocityCare
Contact Velocity Micro Customer Care at (800)303-7866,
option 5, or via email at vmsupport@velocitymicro.com.
VelocityCare is available for the life of your system and
includes technical support and customer care. Live chat is also
available from www.velocitymicro.com.
Windows Help
Select Help and Support from the Start Menu. Use the index
to find information about your question.
Online Help
Visit Microsoft Help and Support at
http://www.microsoft.com/support
Visit vendors’ websites at:
http://www.velocitymicro.com/vendors
Hardware Trouble
If you are having problems with an individual piece of hardware,
refer to the manual for that product included with your system.
Alternatively, you may contact the technical support offered by
that product’s manufacturer. Velocity Micro may not support
certain pieces of hardware as noted on your invoice.

www.velocitymicro.com
33
Contacting Vendors
If you are having problems with an individual software
program, contact the vendor of that software. You can use
the phone number found in the software manual or visit the
vendor’s website.
Find a list of vendors at: www.velocitymicro.com/vendors

34
www.velocitymicro.com
Chapter 6
Warranty
Velocity Micro provides 1 to 3 years of technical support for all systems shipped within
the United States, depending on the warranty package purchased. During this time, the
customer may call Velocity Micro’s Warranty Help Desk to speak with a certified technician from Velocity Micro’s build team to assess any issues only with:
• The original, unmodified operating system and device drivers
• The original, unmodified computer hardware and components
The toll-free telephone number and Warranty number are on the Warranty Sticker,
which is affixed to the computer case.
Support:
Support service begins upon the customer’s receipt of the system. Support service
covers only those products purchased from and installed by Velocity Micro that are
shipped and used within the United States. The Help Desk technician will provide
hardware and basic Operating System software support to resolve operational conflicts
only. Neither telephone technical support nor on-site service includes software training
or support (beyond initial installation) or hardware upgrades.
Repairs:
Depot Repair service consists of the following: the customer shall ship the system to
be repaired to Velocity Micro and Velocity Micro will ship it back to the customer. If the
customer’s warranty includes on-site service and it is deemed necessary and feasible by
Velocity Micro’s Help Desk, Velocity Micro will ship the customer the part(s) needed to
repair the system and arrange for a Velocity Micro’s field service engineer to correct the
problem. It is the customer’s responsibility to notify the Warranty Department once the
part(s) has been received by the customer. The original part(s) which were repaired or
replaced must be received back at Velocity Micro’s designated location within 14 days or
the customer will be charged for the part(s). Failure to return said part(s) within this time
frame grants Velocity Micro permission to charge the customer the prevailing retail price
of the part(s). In any area where on-site service is not available or if it is not included in
the terms of the warranty purchased, an RMA number will be given to the customer and
the system will be recalled for repair. The RMA number expires 14 days after it is issued
and must be written on two or more sides of the outside of the shipping packaging.
Once receipt of repair part(s) has been confirmed, a field service engineer will arrive on
the customer site within 12 working hours if the customer’s site is within 50 miles of a
designated service location.
Due to the complex nature of some computer problems, some system failures
cannot be diagnosed by telephone and require the product be returned to Velocity
Micro’s facility for further diagnosis and repairs. Under no circumstance can
Velocity Micro dispatch a field technician for on-site diagnosis prior to a repair.

www.velocitymicro.com
35
If a problem cannot be repaired on site for any reason, including when the problem
requires additional diagnosis before component failure can be determined,
arrangements will be made to ship the system back to Velocity Micro for repair. Prior
written authorization is required or the package will be refused and shipped back
at the customer’s expense. Velocity Micro will pay normal ground shipping fees for
RMAs (returned merchandise authorization) issued during the first 90 days from
the customer’s receipt of the system. Velocity Micro will pay for ground shipping
to Velocity Micro’s designated repair center and for return back to the customer
at the original shipping address only. For RMAs issued after the first 90 days, the
customer is responsible for shipping charges and shipping insurance to Velocity Micro
facilities. Velocity Micro will pay for ground shipping charges to the customer. If the
customer requests faster service, the customer will be charged for the difference in
the shipping costs at the time the return authorization is originated. When shipping
an entire computer system to Velocity Micro, the customer must use the original box
and packing materials to ensure its safety. If the customer does not have the original
shipping container, new packing must be purchased from Velocity Micro prior to the
return of the computer. Velocity Micro is not responsible for damage to systems in
transit.
If a system is recalled for repair and it is discovered that the problem is not covered
under this warranty, Velocity Micro will notify the customer and inform them of service
alternatives that are available to them on a fee basis. In this case the customer is
responsible for paying all RMA shipping costs.
STANDARD TERMS OF SALE AND LIMITED WARRANTY AGREEMENT
Velocity Micro warrants Velocity Micro’s products are free from defects in materials
and workmanship for a period of one (1) year to three (3) years from the date of
invoice to the original customer, based on the warranty duration period selected
at the time of purchase. Any implied warranties are limited to one year from the
date of purchase and Velocity Micro is not liable for any subsequent damages. The
customer will retain the invoice as evidence of the purchase date and the length of
warranty the particular system carries, in addition to proof of purchase of optional
extended warranty (when applicable). Velocity Micro will repair or replace any part
of Velocity Micro’s standard system (including the case, power supply, motherboard,
processor, RAM, floppy drive, optical drive, hard drive, video card, sound card,
modem, network card, mouse, and keyboard) found to be defective under normal use,
unless the system has been misused, neglected, or abused as determined by Velocity
Micro support staff. Monitors, speakers, printers, and all other accessory items not
assembled or built by Velocity Micro are covered by their respective manufacturers’
warranties.
If no proof of purchase of an extended warranty beyond one (1) year from date of
purchase can be provided by the customer, Velocity Micro will only honor one (1)
year of warranty coverage. If the computer is purchased from a third party retail store,
the warranty coverage period will be one (1) year from the date of purchase unless
the Velocity Micro product documentation included in the package has an extended
warranty certificate. Customers who purchase systems from a third party retailer must
register the computer within 14 days of purchase by telephone or online by following
the written instructions included with the computer documentation.

36
www.velocitymicro.com
Velocity Micro’s responsibility is limited to repair or replacement, either of which
may be selected by Velocity Micro at Velocity Micro’s sole discretion. Velocity Micro
makes no claim of suitability for a particular purpose. Additionally, the video card,
sound card, modem, and some other components may be covered by the original
source manufacturer’s warranty of more than three years for part replacement only,
but Velocity Micro’s responsibility shall cease at the end of the warranty period
of the particular component, and the customer must seek replacement from the
manufacturer directly. Extended service plans may include a deductible payment, the
term of which is stated on the original invoice, if applicable to the customer’s system.
Velocity Micro may decline warranty coverage without the customer’s original invoice
as evidence of coverage and system number. Removal or addition of hardware inside
a Velocity Micro system DOES NOT void the customer’s warranty for the remainder
of the unchanged and unmodified computer components, unless the changes or parts
damage other components that are covered. This warranty cannot be extended or
transferred after the time of sale.
In keeping with standard industry practice, Velocity Micro reserves the right to
substitute functionally equivalent new or serviceable reconditioned parts and systems,
which are warranted for the remainder of same period as the original defective part.
Velocity Micro reserves the right to change the brand or model of a component to one
of equal performance or specification when the equivalent is no longer produced or
available from Velocity Micro’s normal suppliers.
Velocity Micro is not responsible for any fees, duties, or tariffs applied as a result of
shipment.
Velocity Micro’s Limited Warranty covers only defects arising under normal use and
does not include malfunctions or failures resulting from damage:
• Caused by failure to provide a suitable installation or operating
environment for the product and/or accessories.
• During shipment, other than original shipment to the client if Velocity
Micro’s carrier is used.
• Caused by impact with other objects, dropping, falls, spilled liquids, or
immersion in liquids.
• Caused by a power surge or a disaster such as fire, flood, wind,
earthquake, or lightning.
• Caused by unauthorized attachments, alterations, repairs, modifications,
or foreign objects.
• Caused by accessories.
• Caused by the use of the product or accessories for purposes other
than those for which they are customarily used.
• From improper installation or maintenance.
• From failure to clean filters and/or fans.
• Caused by any other abuse, misuse, mishandling, or misapplication of
consumer products.
• Caused by accessories or other products or services of companies
other than Velocity Micro.

www.velocitymicro.com
37
• Caused by programs, data, viruses, or other files.
• Or loss resulting from a failure to back-up data or other files.
The warranty does not cover systems shipped outside of the United States of
America.
Velocity Micro’s Limited Warranty does not cover defects, malfunctions or failures
with the following items:
• Case lighting
• Batteries
If Velocity Micro replaces or re-formats a hard disk during repairs or upgrades,
Velocity Micro’s responsibility is limited to re-installing the original operating system
and original device drivers only.
Data File Backup:
Velocity Micro claims no responsibility for any lost or missing data on a customer’s
computer. The customer is solely responsible to back-up all data files to an external
medium prior to service. Service does not include data back-up, data restoration, or
data transfer.
Revision Notice:
Velocity Micro reserves the right to change, modify or remove in whole or part any
term, section or wording of this document without prior written or verbal notification.
The customer may at any time request an updated version of this document from
Velocity Micro by emailing vmsupport@velocitymicro.com.
Chapter 6
Warranty

38
www.velocitymicro.com
Glossary
+/-RW: Specifies the formula to which a DVD burner can
write. Four formats exist: +R, -R, +RW, -RW. Check the
specifications of the drive you have selected to match with the
kind of blank DVD disks you buy.
5.1 vs. 6.1 vs. 7.1: Refers to the amount of speakers in a
surround-sound system The “.1” refers to the presence of
a sub-woofer, so a 6.1 system contains 6 speakers placed
around the room and a subwoofer to reproduce bass
frequencies. The entire Audigy 2 ZS line supports a 7.1 setup
for your system.
10/100/1000Mbps Ethernet: Mbps refers to the amount of
megabits per second that a card is capable of transmitting;
either 10, 100, or 1000 megabits per second, allowing for
maximum compatibility with all networks. 1000 Mbps is 1Gbps
(gigabits per second), which is why the technology is referred
to as “Gigabit Ethernet.”
ATA (Advanced Technology Attachment): An interface that
allows hard drives to connect to the motherboard. Revisions
of ATA include ATA/66, ATA/100, and ATA/133, all offering
increased speeds. Also known as Parallel ATA or IDE, this
interface is beginning to be phased out with the introduction of
SATA hard drives (described below). Optical drives still require
an IDE attachment.
Ax/Bx/Cx: Refers to the write/ rewrite/ read speeds of a
CD-RW drive. For example: A measurement of 52x/32x/52x

www.velocitymicro.com
39
means that drive can write to CD-R disks at 52x, re-write to
CD-R/W disks at 32x, and read data from CDs at 52x. For
reference, 1x is equivalent to 150 kilobytes per second, which
places 52x speeds at around 7,800kilobytes per second, or 7.8
megabytes per second. High-grade CD-R media, a fast drive,
and a great software package are your keys to burning CDs
quickly. The same “x” numbers hold true for DVD +/-RW drives
(that burn DVDs). A 4x DVD +/-RW drive burns DVDs at a
maximum speed of 5.54 megabytes per second.
CL2 (CAS Level 2): A measurement of latency, or the time
it takes for your memory to respond when given instructions.
Lower numbers are better; CL2 is faster memory than CL2.5,
which is in turn faster than memory rated CL3.
DDR (Double Data Rate): Motherboards that are marked
“DDR” support Double Data Rate memory (RAM). This type of
RAM used in nearly all systems and video cards today.
DDR2: the next generation of DDR SDRAM memory. They
are mounted on 240-pin DIMM modules, can operate at higher
bus speeds (up to 667 or 800)and have a capacity to hold
256 Mb to 2 GB of memory. DDR2 has twice the latency of
DDR but delivers data at twice the speed of DDR, theoretically
performing at the same level.
Dual core: (also called multi-core) A CPU to which two
or more processors have been attached for enhanced
performance and more efficient simultaneous processing of
multiple tasks. A dual core set-up is somewhat comparable
to having multiple, separate processors installed in the same

40
www.velocitymicro.com
computer. In practice, performance gains are said to be about
fifty percent: a dual core processor is likely to be about oneand-a-half times as powerful as a single core processor.
Dual Heads: Technology that allows video output to be split
among two monitors. Each monitor can display the same
image, or the image can be split across both monitors. You
can also have different programs open on each monitor.
Extreme Edition: A Pentium cpu which runs at 800MHz FSB,
includes 2MB of L3 Cache, and supports HyperThreading.
Extreme Edition processor are designed for high-end gamers
and power users.
FSB (Front-Side Bus): The speed at which the motherboard can
communicate with its RAM and chipset. FSB speed is measured in
megahertz (MHz).
GB (Gigabyte): A measure of a hard drive’s capacity to store data.
1GB equals roughly 1,000 Megabytes.
GHz (Gigahertz): The standard measurement of processor speed.
1GHZ equals roughly 1,000 Megahertz (MHz). AMD’s processors
do not use this rating; instead they go by a numbering scheme that
roughly corresponds with certain GHz speeds and cache levels.
Heat Spreader: A piece of hardware that attaches to a memory
module, helping to dissipate heat.
HT (HyperThreading): Technology released by Intel for its
Pentium processors. HyperThreading enables the processor

www.velocitymicro.com
41
to multitask between two software programs at the same time,
providing a performance boost of 25-30%.
IEEE 1394 FireWire: An extremely fast way to connect peripherals
to your system, offering speeds of 400 or 800 megabits per
second. FireWire ports are traditionally used in transferring digital
video from your camcorder to your system.
L2 Cache (Level 2 Cache (pronounced “cash”): A collection of
chips on the processor that speeds up commonly-used functions.
The more cache your processor has, the quicker it can perform
certain functions.
L3 Cache (Level 3 Cache (pronounced “cash”): An extra
level of chips on the processor that speed up commonly-used
functions. The more cache your processor has, the quicker it
can perform certain functions.
PCI Express (Peripheral Component Interconnect
Express): Interface standard developed by Intel. PCI Express
ports connect peripherals (such as a video card or sound card)
to the rest of the system. PCI Express improves upon PCI and
AGP by offering increased bandwidth for data transfer.
PCxxxx: PCxxxx refers to the internal speed of your RAM
(memory). PC4200 memory runs at 533MHz, PC4000 memory
runs at 500MHz, PC3700 memory runs at 466MHz, PC3500
runs at 433MHz, and PC3200 runs at 400MHz. These MHz
speeds correspond with a certain DDR number. For example,
400MHz memory is listed as “PC3200 DDR400.”
Glossary

42
www.velocitymicro.com
RAID (Redundant Array of Independent Disks): Technology
that allows two hard drives to be connected together, providing
a variety of benefits. The most common setup is RAID 0 which
offers increased hard disk performance since two hard drives are
working to process that same data. Most motherboards today
support RAID0 and RAID 1, eliminating the need for a separate
controller.
ROM (Read Only Memory): Drives with a “-ROM” suffix can only
read data from disks. These drives cannot burn CDs or DVDs.
RPM (Revolutions Per Minute): The speed at which a hard drive
rotates its magnetic platters. Traditional speeds include 5400RPM
and 7200RPM. Serial ATA offers speeds of 10,000RPM.
SATA/ 150 or Serial ATA (Serial Advanced Technology
Attachment): High-speed interface for connecting hard drives
to the motherboard. SATA replaces ATA by offering increased
data transfer speeds (up to 150 Mbps), and cables that are easier
to manage inside a system’s case. Today’s motherboards can
support 2 Serial ATA drives in a RAID configuration.
USB/ USB 2.0 (Universal Serial Bus): A technology that allows
all kinds of peripherals, from printers and scanners to mice and
sound cards, to connect to your system. USB 2.0 ports improve
data transfer rate over the original USB. USB devices can be
connected and diskonnected while the system is on.

www.velocitymicro.com
43
Customer Notes

44
www.velocitymicro.com
Customer Notes
 Loading...