

Vello RW-C1, RW-N2, RW-SM2K, RW-S1, RW-O2K User manual
...
FREEWAVE
USER MANUAL
1

INTRODUCTION
Thank you for choosing the Vello
FreeWave Wireless Remote Shutter
Release. This device triggers your
camera wired or wirelessly, allowing
you to trip the shutter without
disturbing the camera. It’s ideal for
taking pictures of subjects that are
dicult to approach, such as wildlife. It
also eliminates vibrations caused by
pressing your camera’s shutter release
button during macro, close-up, or
long-exposure photography. The
two-second delay function is great for
self-portraits.
Unlike infrared remotes, which
won’t work if the receiver is not
in direct line-of-sight of the
transmitter, the FreeWave uses
radio frequencies. Radio waves
can pass through and around
objects such as walls, windows,
and floors. You can even trigger your
camera around corners.
The FreeWave can transmit over
16,000,000 possible channels, and there
are no dip switches to set. The device
configures with the press of a button.
2
Your Vello FreeWave
Wireless Remote Shutter Release
kit contains:
Wireless RF Receiver,
Wireless RF Transmitter,
Camera Release cable,
Battery, Lanyard, and Clip.

KEY FEATURES
Smar t Code: 16,000,000 possible
radio channels. No dip switches to
set. One transmitter can trigger
multiple receivers.
Extended Range: up to 100m
(320 ft.)
Multi-function: Trigger your camera
wirelessly or wired. Wired
triggering works even if the battery
in the receiver is dead or missing.
Versatile: One receiver works with
dozens of camera models. Just swap
out the camera release cable.
Dual-Function Release: Press
halfway to focus; press full to trigger
shutter.
Delayed Release: Two-second delay
function gives you extra time to get
into position.
Multi-exposure: Take multiple shots
with one press of the trigger.
Long Exposure: Control the length of
the exposure remotely.
LED indicator s: Confirm pre-focus
and exposure during wireless mode.
3

SAFETY WARNINGS CAMERA RELEASE CABLES
• There are no user-serviceable parts
inside the devices. Do not at tempt to
disassemble or perform any
unauthorized modification.
• Do not operate the FreeWave in the
presence of flammable gas or vapors.
• Do not handle with wet hands or
immerse in or expose to water or
rain. Failure to observe this
precaution could result in fire or
electric shock.
• Keep out of the reach of children.
This device contains small parts which
may pose a choking hazard.
• Observe caution when handling
batteries. Batteries may leak or
explode if improperly handled. Use
only the batteries listed in this
manual. Make certain to align
batteries with correct polarity.
• Batteries are prone to leakage when
fully discharged. To avoid damage to
the product, be sure to remove the
batteries when leaving the product
unattended for prolonged periods or
when no charge remains.
4
• Do not use or leave the devices in
conditions of extreme heat, severe
cold, or high humidity.
• Turn o the camera’s power before
inserting or removing the remote
cord.
• Dispose used batteries, packaging, and
old devices in accordance with
appropriate local environmental
regulations.
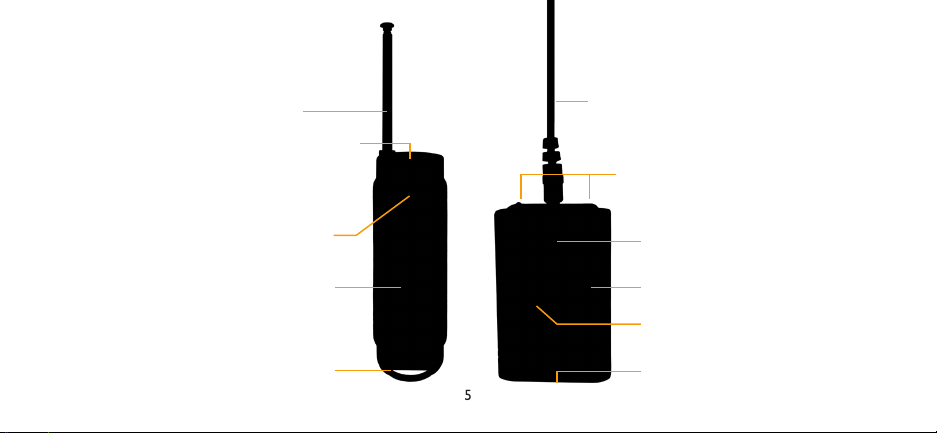
FEATURES DIAGRAM
antenna
confirmation LED
Transmitter
shutter release button
interchangeable
shutter release cable
confirmation LEDs
Receiver
shutter release button
shot selector
lanyard loop
hold/ready button
power/set button
battery bay
5

POWERING UP
Turning ON the Receiver: Press and
hold the Set/Power button until the
red LED comes on. The Receiver turns
o the same way. Press and hold the
Set/Power button until the red LED
turns o.
Turning ON the Transmitter: There
is no need for a power button on the
Transmitter. The Transmitter is always
ready to fire and uses power
only when you press the shutter
release button.
Press and hold the Set/Power
button for ~3 seconds to power up
the Receiver.
6
 Loading...